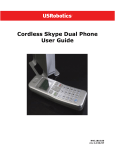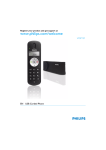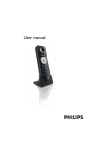
1
User manual
Charge the handset(s) for 24 hours before use !
EN
Contents
3
4
6
7
9
10
12
13
14
21
24
25
27
35
37
38
39
41
Contents
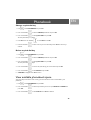
Important information
What’s in the box
Your VOIP 321
Icons on the handset display
Install
Connect
Main menu
Call
Phonebook
Call log
Redial list
Other features
Using the intercom
Default settings
Troubleshooting
Informations
Index
3
EN
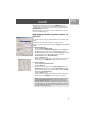
Important information
Instructions for use for the VOIP 321
The VOIP321 is a Skype ready USB / PSTN phone, capable of voice communication through Internet protocol
as well as on a normal telephone line.
For your safety
Safety information
This telephone is not designed for making emergency telephone calls when the power fails. An alternative
should be made available for access to emergency calls.
Power requirements
The product requires an electrical supply of 220 - 240 volts, single phase alternating current, excluding IT
installations defined in standard EN 60950.
Battery requirements
The handset requires power source of two rechargeable NiMH batteries, size AAA 1.2V 650mAh. IF THE
INCORRECT TYPE OF BATTERIES ARE USED, A WARNING MESSAGE WILL BE DISPLAYED.
WARNING : The electrical network is classified as dangerous according to criteria in the standard
IEC 60950. The only way to power down this product is by unplugging the power supply from the
electrical outlet. Ensure the electrical outlet is located close to the apparatus and is always easily
accessible.
CAUTION : RISK OF EXPLOSION IF BATTERY IS REPLACED BY AN INCORRECT TYPE. Never
use non-rechargeable batteries; use recommended type supplied with this telephone. NiMH batteries
must be disposed of in accordance with the applicable waste disposal regulations.
Safety precautions
>
>
>
>
>
>
>
>
>
4
Do not allow the handset to come into contact with liquids or moisture.
Do not open the handset or base station. This could expose you to high voltages.
Do not allow the charging contacts of the charger or the battery to come into contact with extraneous
conductive materials.
There is a slight chance that the telephone could be damaged by an electrical storm. It is recommended
that users unplug the phone from the USB socket and the phone line from the phone wall socket during
a storm.
Do not use the handset in an explosive hazard area such as where there is gas leaking.
Young children should be supervised to ensure that they do not play with the telephone.
Because the phone works by sending radio signals between the base unit and the handset, wearers of
hearing aids may experience interference in the form of a humming noise.
We advise that this phone should not be used near intensive care medical equipment or by persons with
pacemakers.
Your phone can interfere with electrical equipment such as answering machines, TV and radio sets if placed
too close. It is recommended that you position the base unit at least one meter from such appliances.
EN
Important information
Install requirements
In order to use the phone, your computer should meet the following requirements :
• PC running Windows 2000 or XP
•
400 MHz processor
•
128 MB RAM
•
Free USB slot on the PC
•
Internet Connection (boardband recommended)
Need help
For more information on troubleshooting and FAQ’s:
Online help : www.p4c.philips.com
Troubleshooting : see page 38
DFU update on : www.p4c.philips.com
5
EN
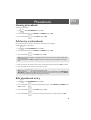
What’s in the box
2 AAA Battery
Handset VOIP 321
Battery door
Base station VOIP 321
Charger
Welcome
Quick start guide
1
Installation CDROM
Connect
2
Install
3
Enjoy
Quick Start Guide
1 power supply for base station
and 1 power supply for charger
Line Cord and line adaptor (if relevant) to plug the
RJ11/RJ11 Line Cord (see below) in your wall plug
What else you need :
• Internet connection
(broadband recommended)
A desktop or a laptop
with free USB port
6
• Only the Skype version
printed on the CD ROM
is granted for a full
compatibility. New
feature may not work
with VOIP 321 when
upgrading Skype.
A telephone line
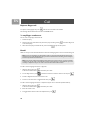
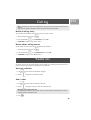
Your VOIP 321
EN
Overview handset
1
2
3
1
4
2
3
5
6
4
5
6
7
7
8
8
9
9
10
10
11
11
12
12
13
15
14
13
14
15
Earpiece
Display, icons see page 9
Menu key & Softkey OK
Use to enter menus.
Use to select menu.
Use to confirm an operation.
Redial, Mute & Softkey Back
Use to switch between call details.
Use to enter dial list.
Use to redial last dialled number.
Use to mute/unmute a call
Use to delete text and digits.
CID & Scroll up Key
Use to enter call list.
Use to scroll up items
Use to increase ringer and receiver volume.
Phonebook & Scroll down Key
Use to access phonebook.
Use to scroll down items.
Use to reduce ringer and receiver volume.
Off & Exit Key
Use to end a call.
Use to exit menus.
Use to turn the hanset ON/OFF.
Talk & Recall Key
Use to make and receive calls.
Use to send flash signal.
Use to pick up or make second incoming calls on Skype.
0 and + key
Use to enter 0 when making a call.
Press and hold to enter + while making SkypeOut calls.
Pound, Ringer off & Pause Key
Use to enter a pause.
Use to turn the ringer on/off.
Star & Key lock Key
Use to lock the keypad.
Intercom and Conference Key
Use to make intercom calls.
Use to set up 3-way conference.
Microphone
Loudspeaker Key*
Use to turn the speaker on/off.
Skype key
Use to make SkypeOut calls.
Use to launch Skype contact list.
*Warning ! Handsfree activation could suddenly increase
the volume in the loudspeaker to a very high level. Make
sure the handset is not too close to your ear.
7
Your VOIP 321
EN
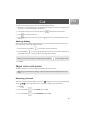
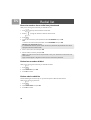
Overview base station
1
1
LED on base station
- On when the base is powered up.
- Blinks normally when there is an incoming telephone call or
during a telephone call.
- Blinks slowly while paging the handset.
- Blinks quickly during registration mode.
2
- Steady ON when the USB is plugged in and the base is powered
up.
- Flash when there is data communication with USB.
2
Paging key
Use to page the handset.
Use to register a handset.
Main features
•
•
•
•
Contact list display on handset.
Connection and Skype status display.
Skype status display for each contact on the contact list.
Change your online status on the handset.
Dual line phone
•
•
•
8
Able to receive calls from Skype as well as from regular telephone line.
User selectable melodies for each line for easy recognition.
Call waiting alert when there is another incoming call from another line.
EN
Icons on the handset display
When being used for the first time, it is sometimes necessary to wait until the battery is
sufficiently charged before the icons appear on the display.
The display gives information about the operation of your telephone. Following icons can be
shown in the headline of the display.
Base/Handset link.
Telephone call in progress.
Battery full; 2/3 full; 1/3 full; Empty, please charge.
Loudspeaker is turned on.
The alarm clock is turned on.
The ringer is turned off.
There is a new Caller ID record or Caller ID records are being reviewed.
Message Waiting Indicator.
Skype call in progress.
Digits/characters on the right.
More menu options are available upward.
More menu options are available downward.
OK/Confirmation of selection.
Press to return to the previous screen.
Press to erase text or digits.
9
EN
Install
How to install the software
Before using your phone, please install the VOIP321 driver provided in the
enclosed CD.
To install the VOIP321 driver :
1. Insert the installation CD into the PC's CD ROM (or DVDROM)
drive.
2.
The installation program will start automatically.
3.
Follow the instructions on the screen.
4.
Click on Quit.
5.
Remove the installation CD from the PC's CD ROM (or DVDROM)
drive.
TIP : If for some reason the installation does not start automatically :
- Click on Windows START and then Run.
- Type explorer and navigate to the CD ROM (or DVDROM) drive.
- Double-click on Setupwizard.exe.
>
>
If your operating system is Windows 2000, you need to restart your PC to
complete the setup.
The VOIP 321 driver should autostart if this option is checked during
installation.
Getting Ready
To start making Skype call
1.
Power up your base and connect your USB base on a free USB port of
your PC if you have not already done so.
2.
Start the VOIP 321driver by double clicking on the shortcut icon
created on your desktop if it is not already started.
3.
If this is the first time you use the VOIP 321 driver, you will see the
message ANOTHER PROGRAM WANTS TO USE SKYPE.
Simply select ALLOW THIS PROGRAM TO USE SKYPE and
press OK.
4.
Start Skype if the VOIP 321driver has not started Skype for you; login
to your Skype account.
5.
From Skype, click on Tools. Select Options. Select Sound Devices
from the left.
6.
For XP user, select Philips VOIP321 from Audio IN, Audio OUT
and Ringing pull down box. Press SAVE.
For Windows 2000 user, select USB Audio Device from Audio IN,
Audio OUT and Ringing pull down box. Press SAVE.
7.
Now your phone is ready for use. The status icon should be shown on
the handset to indicate your current status.
About the VOIP321 Driver
Once VOIP 321driver is installed and started on your PC, a tray icon will
be shown when the VOIP321 driver is loaded.
10
EN
Install
Double click on the tray icon will return the ABOUT page of the
VOIP 321driver, where the current status will be shown. If there are
problems with the connection, the problem will be displayed; otherwise
CONNECTED will be shown.
Right click on the tray icon either to stop the VOIP 321 driver or to see
the status of VOIP 321 driver.
Adjusting the handset speaker volume on
your PC
The earpiece volume setting on your PC affects the sound quality of your
phone.
Please follow the steps below to adjust your earpiece volume.
On the PC, click on the Start button and select Settings. Select Control
Panel.
For Windows 2000 users,
• Click on Sound and Multimedia.
• Under Sounds and Multimedia Properties, select the Audio tab.
• To adjust the earpiece volume, select USB audio Device from the
Preferred device pulldown menu under Sound Playback; to adjust
the microphone volume, select USB audio Device from the
Preferred device under Sound Recording.
• Click the Volume button.
• Adjust the volume using the slider. Close the window when finished.
• When finished, click CANCEL to retain audio driver selection.
For Windows XP users,
• Click on Sound and Audio Devices.
• Select the Audio tab.
• To adjust the earpiece volume, select Philips VOIP321 from the
Default device pulldown menu under Sound Playback; to adjust
the microphone volume, select USB audio Device from the Default
device under Sound Recording.
• Click the Volume button.
• Adjust the volume using the slider. Close the window when finished.
• When finished, click CANCEL to retain audio driver selection.
Note : Before exiting sound and audio properties, please make sure
that Use only Preferred Devices (for Windows 2000 user) or
Use only Default Devices (for Windows XP user) checkbox is
checked. Once this checkbox is checked, you will be able to separate
the audio path of your PC, such that audio from Skype will come out
from the handset and audio from other PC applications will come out
from the preferred audio device.
11
EN
Connect
Note : Install the drivers and software first (see page 10) and
connect the USB phone only once it is done.
1.
Connect the output plug of the base adapter to the adapter socket on
the back of the base unit and the base adapter to the wall main supply.
A click should be heard when the cord is properly connected to the
base.
2.
Connect the USB plug directly to your PC's USB slot.
3.
Connect the telephone line cord to the phone socket on the back of
the base unit and to the plug (optional and country dependent) then
wall phone socket.
Note : You may find in the box the line adaptor delivered separately
from the line cord. In this case, please, first plug this line adaptor onto
the line cord before connecting it to the line socket.
4.
If you have bought a multi-pack product, each extra handset comes
with a charger and adapter. Connect the adapter to the wall main
supply.
5.
Place the 2 rechargeable NiMH AAA batteries (included), observing
their polarities, into the battery compartment on the handset.
6.
Slide the battery door firmly into place.
7.
Place the handset on the charger and let the batteries continuously
charge for 24 hours before using. The handset may get warm during
the initial charge. This is normal.
Please note that handset may not turn ON for up to 15 minutes if the
batteries are too low.
To set the language of your handset, press any key when you see
WELCOME. Select your country and press OK.
8.
9.
Note : Before first use, put the product on the charger and charge
batteries for 24 hours minimum.
12
EN
Main menu
Your phone offers a variety of functions and features that are grouped in the menus.
To access the main menu, press
Press
and press UP / DOWN
to browse the menu.
to exit the menus.
Main menu
SKYPE
PHONEBOOK
Private
Contacts
User Status
Voicemail
Credits
View
Add
Edit
Quick Dial
To Shared
Delete
Delete All
Status
Shared
View
Add
Edit
To Private
Delete
Delete All
Status
CLOCK / ALARM
PERSONAL SET
ADVANCED SET
Set Clock
Set Alarm
Alarm Tone
Handset Tone
Handset Name
Contrast
Auto Answer
Backlit
Language
Recall Time
Dial Mode
Pause
PABX
Baby Call
Registration
Base Select
Delete HS
Change PIN
Reset
Call records menu
Missed
Received
Dialled
To Private
To Shared
Delete
Delete All
To Private
To Shared
Delete
Delete All
To Private
To Shared
Delete
Delete All
13
EN
Call
General Information
Before any call is made, please note the following.
Emergency Calls
Skype does not support emergency call; all emergency calls will be routed to the telephone line.
Low battery warning
If your phone is almost out of battery during a call, it will sound an alert tone. Place your phone on the charger
for charging as soon as possible or it would turn off when it is out of battery. Placing the phone on the charger
for charging will end the current call.
Call timer
The call timer shows the duration of your current call on display. It is shown in minutes and seconds (MM-SS)
in the first hour. After that, it will be shown in hours and minutes (HH-MM).
Make a Skype call
1.
Press
to access Skype contact list.
2.
Press UP / DOWN
3.
Press
called.
or
to select the Skype user you would like to call.
to call the selected contact. The selected contact's name will be displayed and
Note : The contact list shows the Skype contact list of the user who is currently logged in to Skype on
the PC. The icon on the left of each entry shows the online status of that entry. See page 34 for user
status display icon.
TIP : Search by letter - Using the keypad, enter the first letter of the name you wish to find.
E.g. If you want to find the contact name "Peter", press
with the letter P.
E.g. If you want to find "Sam", press
selected.
once should return the first contact begins
four times, the first contact begins with the letter S will be
Note : You can also change your online status on the handset. Refer to the menu - Skype section for
instruction on how to change online status, see page 34.
Note : The full name of the contacts on the contact list will be shown. If you want to view the contact's
Skype ID, press
entry will be shown.
when the contact is selected. If a SkypeOut entry is selected, the number of the
Making a Skype call while the Telephone line is in used
If you have two handsets, you can make a Skype call while another handset is on a Telephone call.
To make a Skype call while the telephone line is in used, follow the instruction in “Make a Skype call”,
page 14. If the Skype line is in used, UNAVAILABLE will be shown when you attempt to launch the
contact list, or busy tone will be returned.
14
EN
Call
Make a SkypeOut call
1.
Press
to access Skype contact list.
2.
Press UP / DOWN
3.
Press
or
to select the SkypeOut number to call.
to call the selected contact. The selected number will be displayed and called.
OR
Enter the SkypeOut number and press
to make a SkypeOut call.
Note : In order to make SkypeOut calls, you need to purchase SkypeOut credits; please go to
http://www.skype.com/store/buy/skypeout.html for further details.
When making SkypeOut calls, it is necessary to dial the country prefix of the phone number you are
calling, i.e. 00, 011 or + .
For example, when making calls to North America: 00-1-905-5251258 or 011-1-905-3456622
when making international calls: 00-852-25447555 or +852-90446577
To enter + : In idle mode, long press
Note : Press
mode.
.
to delete an incorrect digit. Long press
or press
to return to idle
Answer a Skype call
When you receive a call,
If the incoming call is from the Skype line, the Skype melody will ring and
Skype ID will display on the phone.
Press
will flash in the display and the
to answer the call.
Note : You will be able to receive second incoming call from the other line (i.e. receive a telephone call
while on a Skype call). A special call waiting tone will be heard and the caller ID will be shown on the
display.To pick up the call on the other line, end the current call and press
again.
End a Skype call
Press
or place the phone on the charger will end the call and return the phone to idle mode.
15
EN
Call
Reject a Skype call
To reject an incoming Skype call, press
when the call is received on the handset.
The incoming call information will be stored in the MISSED call list.
3- way Skype conference
You can start a 3-way Skype conference call.
1.
Call the first party.
2.
After the first party answered the call, put the first party on hold by pressing
to the second party.
3.
When the second party answered the call, press and hold
and make a Skype call
to join the two parties.
Recall
While on a call, you can use the recall function to make a second outgoing call or receive a second incoming call.
Note : If you are using Skype, you will be able to make or receive second calls without extra charges.
However if you are using the telephone line, you have to subscribe to the call waiting service from your
local service provider to use this feature.
Note : You can only make second outgoing call via the line your current call is on. If you are currently
on Skype call, you can make a second call to a contact on your Skype list or a SkypeOut call; if you are
currently on telephone call, you can make a second call to another landline number.
To make a second outgoing call while on a Skype call,
1.
While on the first call, press
.
A dial tone should be heard; the first call will be put on hold.
2.
To call a Skype contact, press
3.
To make a SkypeOut call, enter the number to call.
4.
To return to the first call or to toggle between calls, press
to obtain the contact list; select the contact to call and press
.
To make a second outgoing call while on a telephone call (note: this is a network dependent feature),
1.
While on the first call, press
.
A dial tone should be heard; the first call will be put on hold.
2.
Enter the number to call.
3.
To toggle between the two calls on the telephone line, press
16
.
.
EN
Call
To receive a second incoming call (note: this is a network dependent feature),
1.
When there is a second incoming call, a call-waiting alert will be heard; if the second incoming call is from
the other line, a special call-waiting alert will be heard.
2.
If the second incoming call is from the other line, press
3.
Press
to pick up the second call.
4.
Press
same line.
again to return to the first call, and to toggle between the two calls if both calls are on the
to terminate the current call first.
Chaining Dialling
You can dial out numbers from the phonebook even after you have seized the phone line. And there is no
limit to the number of times chain dialling is accessed.
1.
During off hook, press DOWN
for 2 seconds to access the phonebook.
2.
Press UP / DOWN
to scroll through the phonebook records or you can use the number keys to
jump directly to the record starting with the corresponding letters of that key.
Note : If you decide to quit using chain dialling, simply press DOWN
3.
for 2 seconds again to exit.
Press OK.
Skype voice mail access
Your phone allows you to access your Skype voicemail box with just a few presses.
Note : To get a voicemail account, please go to http://www.skype.com/products/skypevoicemail/ for further
details.
Retrieving voicemail
When there are new voicemails waiting for you, the icon
standby. The
will appear on the top line of the display during
icon will be gone when there is no more new message in your voicemail box.
1.
Press
.
2.
Press UP / DOWN
to select SKYPE and press OK.
3.
Press UP / DOWN
to select VOICEMAIL and press OK.
17
EN
Call
4.
Press UP / DOWN
to select the voicemail to listen to and press
.
Note : While you are browsing the voicemail list, an asterisk (* ) is used on the second line to indicate
that the voicemail is new.
5.
Press UP / DOWN
to select PLAY to play the message.
Deleting a voicemail
1.
Press
.
2.
Press UP / DOWN
to select SKYPE and press OK.
3.
Press UP / DOWN
to select VOICEMAIL and press OK.
4.
Press UP / DOWN
to select the voicemail to delete and press
5.
Press UP / DOWN
to select DELETE and press OK to confirm.
Deleting all voicemails
1.
Press
2.
Press UP / DOWN
to select SKYPE and press OK.
3.
Press UP / DOWN
to select VOICEMAIL and press OK.
4.
Press
5.
Press UP / DOWN
6.
A confirmation prompt should be shown; press OK to confirm.
18
.
to enter the voicemail menu.
to select DELETE ALL and press OK.
.
EN
Call
Make a telephone call
Call from telephone line
1.
Press
to obtain the line; a dial tone should be heard.
2.
Enter the number to dial.
Pre-dial
1.
Enter the number you want to call. The number will appear on the display.
You can enter up to 20 digits.
2.
Press
to dial the number.
Note : Long press
where you want to enter a pause.
Making a Telephone call while the Skype line is in used
If you have two handsets, you can make a Telephone call while another handset is on a Skype call.
To make a telephone call while the Skype line is in used, follow the steps in “Make a telephone call”,
page 19. If the telephone line is in used, busy tone will be returned.
Answer a call
If the incoming call is from the landline, the landline melody will ring and
will flash in the display.
The caller ID will display if you have subscribed caller ID service from your local telephone service provider.
Press
to to answer the call.
End a call
Press
or place the phone on the charger will end the call and return the phone to standby.
Quick dialling
You can assign frequently dialled number from the phonebook to keys on the handset. Once assigned, press
and hold the key on the handset during standby will dial the stored number. The number will be dialled using
your landline.
19
EN
Call
Call in progress
Set the earpiece volume during a call
You can increase or decrease the volume of a caller's voice during a call. There are 5 volume levels for
selection.
To adjust the volume, during a call :
1.
Press UP or DOWN
2.
Press UP or DOWN again
. The display shows the current volume level.
to adjust the volume.
Note : Besides adjusting the volume on the handset, you might also need to adjust the volume on your
PC in order to set the speaker to the most comfortable volume.
Please refer to “Adjusting the handset speaker volume on your PC”, page 11 for information on how to
adjust the volume on the PC.
Microphone mute
During a call, if you wish to speak to someone privately without having the caller hear your conversation,
1.
Press
; the caller cannot hear you, but you can hear the caller.
2.
Press
again to communicate with your caller again.
Handsfree call (Speaker)
Handsfree provides the convenience of talking to the caller without holding onto the phone. You can
communicate by using the speaker/microphone of the phone. Handsfree also allows others in the room to be
involved in the conversation if you are not using the headset.
If you want to use the phone's speaker, during a call,
1.
Press
.
You can hear the caller over the loudspeaker and you can speak via the microphone.
the display.
2.
Press
will appear on
again to deactivate the handsfree mode.
Setting the loudspeaker volume during a handsfree call
1.
While the phone is off hook, press UP or DOWN
2.
Press UP or DOWN again
20
to adjust the volume.
. The display shows the current volume level.
EN
Phonebook
Viewing phonebook
To view your phonebook,
, select PHONEBOOK and press OK.
1.
Press
2.
Select the phonebook to open, PRIVATE or SHARED and press OK.
3.
Press UP / DOWN
to select VIEW and press OK.
Add entry in phonebook
Each record can store a name up to 10 characters and a number up to 20 digits.
To add an entry to your phonebook,
, select PHONEBOOK and press OK.
1.
Press
2.
Select the phonebook to open, PRIVATE or SHARED and press OK.
3.
Press UP / DOWN
to select ADD and press OK.
Note : Please note that contacts on the Skype contact list cannot be stored to the phonebook (both
shared and private).
If your phonebook is full, FULL is displayed. You have to delete some records before entering new
ones.
4.
Enter the name for the record. A name must be entered and it must be unique. Press OK to continue.
5.
Enter the number for the record. You must enter a number
Note : Long press
where you want to enter a pause.
You cannot enter an identical name for two different records in your phonebook. If so, DUPLICATE
REPLACE? is displayed. Press OK to replace the existing record with the new entry or press BACK
to return to the previous display and make changes to the name.
Edit phonebook entry
1.
Press
, select PHONEBOOK and press OK.
2.
Press UP / DOWN
OK to continue.
to select the phonebook you want to open, PRIVATE or SHARED; press
3.
Press UP / DOWN
to select EDIT and press OK.
4.
Press UP / DOWN
to scroll to the entries you wish to edit or search by letter, press OK.
21
EN
Phonebook
5.
Edit the name and number using the keypad. Press
6.
Press OK to save your changes.
to erase a character or digit.
Delete phonebook entry
1.
Press
, select PHONEBOOK and press OK.
2.
Press UP / DOWN
OK to continue.
to select the phonebook you want to open, PRIVATE or SHARED; press
3.
Press UP / DOWN
to select DELETE and press OK.
4.
Press UP / DOWN
to select the record to delete and press OK.
5.
Press OK to confirm.
Phonebook record search by letter
1.
Press DOWN
to directly access the phonebook.
2.
Press the key with the first letter of the record you want to find, i.e.
one time to find Peter.
Quick dial to entries in your private phonebook
This feature allows you to dial to the entries in your private phonebook by pressing and holding a quick dial
key that you have assigned. You can assign 9 quick dial keys (keys 1-9).
Note : Contacts on the contact list cannot be assigned to quick dial keys.
Assign a quick dial key
1.
Press
2.
Press UP / DOWN
to select the PRIVATE phonebook and press OK.
3.
Press UP / DOWN
to select QUICK DIAL and press OK.
4.
Press UP / DOWN
to select the key to assign a number to; press OK.
5.
Press UP / DOWN
OK to save.
to select the record to assign to the key selected in the previous step; press
22
, select PHONEBOOK and press OK.
EN
Phonebook
Change a quick dial key
1.
Press
, select PHONEBOOK and press OK.
2.
Press UP / DOWN
3.
Press UP / DOWN
to select QUICK DIAL and press OK.
The first quick dial key is displayed.
4.
Press OK. Press UP / DOWN
5.
Press UP / DOWN
selected.
to select the PRIVATE phonebook and press OK.
to select EDIT. Press OK.
to select a new entry for the selected key. Press OK when the entry is
Delete a quick dial key
1.
Press
, select PHONEBOOK and press OK.
2.
Press UP / DOWN
3.
Press UP / DOWN
to select QUICK DIAL and press OK.
The first quick dial key is displayed.
4.
Press UP / DOWN
to scroll to the quick dial key you wish to delete and press OK.
5.
Press UP / DOWN
to select DELETE and press OK.
6.
CONFIRM? is displayed. Press OK to confirm.
to select the PRIVATE phonebook and press OK.
View available phonebook space
Your phone keeps track of how much memory you have used and how much is still available in your
phonebook.
1.
Press
, select PHONEBOOK and press OK.
2.
Press UP / DOWN
press OK.
to select the phonebook you want to open, PRIVATE or SHARED and
3.
Press UP / DOWN
to select STATUS. Press OK when finished.
23
EN
Call log
Your phone keeps a record each time you make, receive or miss a call. You can access a list of the last 15 calls
that you have missed, the last 5 calls you have received, and the last 10 dialled numbers you have dialled. Each
record stores a name up to 12 characters and a 20 digits number and up to 32 alphanumeric characters for
contact.
For missed and received calls, the call records will automatically be stored only if you have subscribed to caller
ID service from your local Telephone line service provider, otherwise only Skype calls will be stored.
If you have more than one handset, each handset has its own call list.
View caller ID
1.
Press UP
to directly access the call log. Press UP / DOWN
RECEIVED call list and press OK.
2.
Browse
3.
Press
to select MISSED or
in the call records.
to view the number.
To call / redial
1.
Press UP
to directly reach the call log in idle mode. Press UP / DOWN
or RECEIVED call list and press OK.
2.
Browse
3.
Press
to select MISSED
in the call records to select an entry.
.
Note : To be able to call back a correspondent in the case of an incoming call, you need to subscribe
to the Caller Line Identification service.
Copy call log entry in the phonebook
To save the phone number of your family, friends, and colleagues, you can save the call records to your
phonebook if you do not already have their contact information.
While you are viewing the call record that you would like to save,
1.
Press
2.
To save the call log record to your private phonebook, select TO PRIVATE and press OK.
OR
to save it to your shared phonebook, select TO SHARED and press OK.
3.
Enter a name for this entry and press OK.
4.
Edit the number if necessary and press OK.
The record will be saved in the selected phonebook.
24
.
EN
Call log
Note : The call record saved into the phonebook is still in your call list but it will show the new name
entered.
Skype contacts, SkypeIn or SkypeOut numbers cannot be saved to the phonebook.
Delete a call log entry
You can delete each individual call record one at a time. To delete a record :
1.
While viewing the call record, press
.
2.
3.
Press UP / DOWN
to select DELETE and press OK.
CONFIRM? is displayed. Press OK to confirm.
Delete all the call log entries
You can delete all the call records at once. To delete all call records list :
1.
While viewing the call record, press
.
2.
3.
Press UP / DOWN
to select DELETE ALL and press OK.
CONFIRM? is displayed. Press OK to confirm.
Redial list
You phone stores the last 10 numbers/contacts you have dialled, up to 32 alphanumeric characters each. If
you have more than one handset, each handset has its own redial list.
View the redial list
1.
Press
2.
Browse
, the last number/contact dialled is displayed.
through the last 10 dialled numbers.
Call / redial
1.
Press
2.
Browse
to directly reach the redial list in idle mode.
through the redial list to select the wanted number.
Matching your phonebook record
If a dialled number matches a phone number stored in the phonebook, that phonebook name will be
displayed instead of the dialled number.
3.
Press
25
EN
Redial list
Record a number from redial into phonebook
While you are viewing a dial record that you would like to save :
1.
Press
to directly reach the redial list in idle mode.
2.
Browse
3.
Press
4.
To save the record to the private phonebook, select TO PRIVATE and press OK
OR
to save the record to the shared phonebook, select TO SHARED and press OK.
through the redial list to select the wanted record.
.
Matching your phonebook record
If a dialled number matches a phone number stored in the phonebook, that phonebook name will be
displayed instead of the dialled number.
5.
Enter a name for this record and press OK.
6.
Edit the number if necessary and press OK.
Note : The redial record saved into the phonebook is still in your redial list but it will show the new
name entered.
Skype contacts, SkypeIn or SkypeOut numbers cannot be saved to the phonebook.
Delete last numbers dialled
While you are viewing a dial record that you would like to delete,
1.
Press
.
2.
Select DELETE and press OK.
3.
Press OK to confirm.
Delete whole redial list
Instead of deleting the records one by one, you have this option to delete the entire dial list.
While you are viewing any dial record,
1.
Press
2.
Select DELETE ALL and press OK.
3.
Press OK to confirm.
26
.
EN
Other features
Lock keypad
Keypad can be locked to prevent accidental key press.
When the keypad is locked, you can still answer an incoming call by pressing
.
During the call, the keypad is active. When the call is ended, the keypad will be locked again.
1.
In idle mode, long press
2.
Long press
. When locked, LOCKED appears on the display.
again to unlock the keypad.
Paging
You can locate the handsets by using this feature.
Press
on the base.
All handsets registered to the base will produce the paging tone for 30 seconds and the screen displays
PAGING.
To stop paging :
Press
on one of the handsets or press
on the base again.
Note : If an external call comes in, all the handsets will stop paging, and play the external call melody.
A handset will not play the paging melody if it is powered off or not in idle mode. However, all the other
handsets will still ring.
CallerID first ring suppression
If you have subscribed for CallerID service, your phone will suppress the first ring before the CID. After
resetting, first ring suppression will be deactivated. After the first call, your phone will automatically detect if
CID service is subscribed. If CID service is detected, your phone will start suppressing the first ring after the
first call.
Note : Once first ring suppression is activated, the first ring before CID will be suppressed even after
you have unsubscribed the CID service. If you have unsubscribed the CID service and do not wish to
have the first ring suppressed, please power recycle the base.
Switch on/off the handset
To switch off the your phone, long press
To switch on the power of your phone, press
while in idle mode.
or return the handset to the charger.
The handset should be automatically turned on.
27
EN
Other features
Personalizing your sounds
You can assign different ringing melodies for each handset at different volume levels.
You can select a different ringtone for Skype, Telephone and intercom calls.
Selecting your handset's ringing melody
1.
In idle mode, press
.
2.
Select PERSONAL SET and press OK.
3.
Select HANDSET TONE and press OK.
4.
Select the line to select ringtone for and press OK.
5.
Select the desired ringtone and press OK to confirm.
Selecting your handset's ringing volume
1.
In idle mode, press
.
2.
Select PERSONAL SET and press OK.
3.
Select HANDSET TONE and press OK.
4.
Select VOLUME and press OK.
5.
Press UP / DOWN
to select the volume level and press OK to confirm.
Shortcut for turning handset ringer on/off
In idle mode, long press
to turn on/off the handset ringer.
appears to indicate the ringer is turned off. The handset will not emit any sound for any incoming call.
Set key tones on/off
1.
In idle mode, press
2.
Select PERSONAL SET and press OK.
3.
Select HANDSET TONE and press OK.
4.
Select KEYBEEP and press OK. The current setting is displayed.
5.
Select ON or OFF and press OK to confirm.
28
.
EN
Other features
Rename handset
You can give your phone a different name. If you have more than one handset, you can give each handset its
own name.
The handset name can be up to 10 characters long and it can be composed of A-Z, 0-9, and space.
1.
In idle mode, press
.
2.
Select PERSONAL SET and press OK.
3.
Select HANDSET NAME and press OK. The current handset name is displayed.
4.
Edit the handset name and press OK to confirm.
Set time
Once the base is powered up and connected to the PC and the USB driver is running, your handset will obtain
the current time from the PC.
However, you can still adjust the clock manually. To adjust your clock :
1.
In idle mode, press
.
2.
Press UP / DOWN
3.
4.
Press UP / DOWN
to select SET CLOCK and press OK.
Use numeric keys to enter the time for the clock in 24 hours format and press OK.
to select CLOCK/ALARM and press OK.
Setting the alarm clock
You can set the alarm time and personalize the alarm tone.
Setting the alarm time
1.
In idle mode, press
.
2.
Select CLOCK/ALARM and press OK.
3.
Select SET ALARM and press OK. The current setting is displayed.
4.
Select ON or OFF and press OK. If you selected ON, continue to step 5.
5.
Enter the alarm time using the digit keys and press OK.
The alarm tone rings for at most 1 minute. Press
to turn off the alarm clock.
29
EN
Other features
Selecting the alarm clock's ringing melody
1.
In idle mode, press
.
2.
Select CLOCK/ALARM and press OK.
3.
Select ALARM TONE and press OK.
4.
Select MELODY and press OK. The current setting is displayed.
5.
Select the desired melody and press OK to confirm.
Setting the alarm volume
1.
In idle mode, press
.
2.
Select CLOCK/ALARM and press OK.
3.
Select ALARM TONE and press OK.
4.
Select VOLUME and press OK. The current setting is displayed.
5.
Select the desired volume level and press OK to confirm.
Auto-answer on/off
Auto answer gives you the convenience of answering a call by just picking up the phone from the cradle or
charger. You don't need to press
.
1.
In idle mode, press
.
2.
Select PERSONAL SET and press OK.
3.
Select AUTO ANSWER and press OK. The current setting is displayed.
4.
Select ON or OFF and press OK to confirm.
Language setting
Your phone comes with several languages. When you change your phone's language, the menus will be
displayed in the chosen language.
1.
In idle mode, press
2.
Select PERSONAL SET and press OK.
3.
Select LANGUAGE and press OK. The current language is displayed.
4.
Select the desired language and press OK to confirm.
30
.
EN
Other features
Set dialling mode (Tone/Pulse)
Dialling mode applies only when you are making a telephone call. Your phone is by default set to tone dialling.
You can switch to pulse dialling if necessary.
1.
In idle mode, press
.
2.
Select ADVANCED SET and press OK.
3.
Select DIAL MODE and press OK. The current setting is displayed.
4.
Select TONE or PULSE and press OK to confirm.
Temporary tone dialling in pulse dial mode
If the dialling mode is set to pulse, you can long press
to set temporary tone dialling. d will be
displayed on the screen. All the following digits will be dialed as tones until you hang up.
Set display contrast
1.
In idle mode, press
.
2.
Select PERSONAL SET and press OK.
3.
Select CONTRAST and press OK. The current setting is displayed.
4.
Press UP / DOWN
to adjust the contrast and press OK to confirm.
Turning the backlit on/off
The LCD and keypad will be lit when the phone is being used.
1.
In idle mode, press
.
2.
Select PERSONAL SET and press OK.
3.
Select BACKLIT and press OK. The current backlit is displayed.
4.
Select ON or OFF and press OK to confirm.
31
EN
Other features
Pin code setting
A PIN (personal identification number) code is required to access the registration, delete handset, and reset
mode.
The factory-preset code is "0000". You can change it to a unique code of your own. A PIN code can be up to
8 digits long.
1.
In idle mode, press
.
2.
Select ADVANCED SET and press OK.
3.
Select CHANGE PIN and press OK.
4.
Enter the current PIN and press OK.
5.
Enter the new PIN and press OK.
6.
Repeat the new PIN and press OK to confirm.
Note : You will hear a reject tone if the new PIN is not repeated correctly. Follow steps 3 to 7 and try
again.
Restore handset default settings
You can reset the display, sounds, and other settings of your phone. Refer to the chapter “Default settings”,
page 37.
1.
In idle mode, press
.
2.
Select ADVANCED SET and press OK.
3.
Select RESET and press OK.
4.
Enter the PIN and press OK to confirm.
Set Baby call on/off
Baby call allows you to dial out a programmed number via the telephone line by pressing any key on the handset
(except the OFF key).
1.
In idle mode, press
.
2.
Select ADVANCED SET and press OK.
3.
Select BABY CALL and press OK. The current setting is displayed.
4.
Select ON and press OK.
5.
Enter or edit the number and press OK to confirm.
BABY CALL is displayed when you return to standby mode.
To turn off baby call,
1.
Press
2.
Select OFF and press OK.
32
.
EN
Other features
Registering
Register a new handset to base station
Each base can register up to 4 handsets.
1.
In idle mode, press
.
2.
Select ADVANCED SET and press OK.
3.
Select REGISTRATION and press OK.
4.
Before you enter the PIN, long press
on the base for 4 seconds.
Note : If the base is full, the base would not go into registration mode. See the section “Unregister a
handset”, page 33 to unregister a currently registered handset.
Note : The range of this handset is 250 m outdoor and 50 m indoor. An out of range warning will be
emitted and the range icon will be flashing on the display if you move too far away from the base unit
during a call. You will need to move closer to the base unit or your call will be disconnected.
Unregister a handset
A handset can un-register another handset registered to the same base. It can also un-register itself.
1.
In idle mode, press
.
2.
Select ADVANCED SET and press OK.
3.
Select DELETE HS and press OK.
4.
Select the handset you would like to un-register and press OK.
5.
Enter the PIN (by default PIN is "0000") and press OK to confirm.
Select the base station
If your handset is registered to more than 1 base, you can select which base the handset will use.
1.
In idle mode, press
.
2.
Select ADVANCED SET and press OK.
3.
Select BASE SELECT and press OK.
4.
Select the base to use and press OK.
Note : Bases your handset is registered to which is not Philips VOIP 321 base will be labelled as GAP
BASE; your Philips VOIP 321 base will be labelled as BASE in Base Select.
33
EN
Other features
User status
User status display
Skype status icons are used on the handset to represent different online status as well as each contact's online
status on the Skype contact list. Please refer to the following table for the description of each status.
Online / SKYPE ME
Offline
Away
Not Available
Not Disturb
Invisible
SkypeOut entry
User status settings
You can change you current Skype status on the handset. To change your online status :
1.
In idle mode, press
.
2.
Select SKYPE and press OK.
3.
Select USER STATUS and press OK.
4.
Select the status to change into and press OK to save the status.
Check your Skype credits
You can also check your SkypeOut account credits before you make a SkypeOut call.
To check your SkypeOut credits,
1.
In idle mode, press
.
2. Press UP / DOWN
to select SKYPE and press OK.
3. Press UP / DOWN
to select CREDITS and press OK when finish.
34
EN
Using the intercom
Note : You need at least 2 handsets to carry out the functions mentioned in this chapter.
Make an internal call
You can call someone in the house by using the intercom function on your phone.
To make an intercom call :
1.
Press
.
2.
Select the handset you want to call and press OK
OR
enter the number of the handset that you want to call.
Note : You will hear a busy tone if the other handset is not available.
Make an internal call during an external call
While you are on an outside call, you can put the outside call on hold and make a call (inquiry call) to someone
in the house.
To make an inquiry call, during an outside call :
1.
Press
.
2.
Select the handset you want to call and press OK
OR
enter the number of the handset that you want to call.
3.
Wait for the other handset to answer your call.
Note : If the other handset does not answer, press
external call.
again to cancel the attempt and return to the
Transfer an external call to another handset
During an external call,
1.
Press
.
2.
Select the handset you want to call and press OK
OR
enter the number of the handset that you want to call.
3.
When the other handset has answered your call, press
The external call is transferred.
or place the handset on cradle.
35
EN
Using the intercom
Make a conference call
You can invite another handset to join a call with the external line.
During an outside call,
1.
Press
.
2.
Select the handset you want to call and press OK
OR
enter the number of the handset that you want to call.
3.
When the other handset has answered your call, long press
You are then in a conference call.
.
Note : Any handset hangs up during a conference call will leave the other handset still connecting with
the external call.
Answer a call from the telephone line while
on Skype call (Multi-handset)
The other handsets will ring the telephone melody.
Press
on the other handset to pick up the call.
Answer a Skype call while on a call on the
telephone line (multi-handset case)
The other handsets will ring the Skype melody.
Press
36
on the other handset to pick up the call.
EN
Default settings
Handset name :
PHILIPS
Time :
00:00
Ringer melody (fixed lines) :
Party
Ringer melody (Skype) :
Dring
Ringer melody (Internal call) :
Party
Ringer volume :
Level 3
Alarm :
Off
Alarm ringer melody :
Party
Alarm ringer volume :
Level 3
Key tone :
ON
Backlit :
ON
Recall duration :
100 ms
Dial mode :
Tone
Contrast :
Level 2
Auto answer :
OFF
Menu language :
English
Pause duration :
Pause 1
Baby call :
Off
Baby call number :
Empty
Base select :
Auto
CID first ring suppression :
OFF
Message waiting indicator :
OFF
System PIN :
0000
Keypad lock :
OFF
Earpiece volume :
Medium
37
EN
Troubleshooting
Problems
No dial tone when pressing
Signal icon
Solutions
.
is flashing.
• Make sure that the adapter and the phone cord is connected
properly.
• Check that the batteries are fully charged and installed
properly.
• This phone does not work during power failure.
• Register your handset to a base.
• Move closer to the base unit.
The phone does not ring.
• Make sure the adapter and the phone cord are connected
properly.
• Move the handset closer to the base unit.
• Turn on the ringer.
When the handset is placed on the
charger, no beep is heard.
•
•
•
•
The call waiting call cannot be
answered.
• Check with your local phone company and select the correct
recall duration.
• End the current call, and press TALK again to pick up the
second call.
Battery icon remains empty although
the handset has charged for 24
hours.
• Please contact your dealer to purchase new rechargeable
battery.
• Check to make sure the battery icon is scrolling while being
charged.
No symbol on the display.
• Charge battery.
• Make sure the batteries are in the compartment and your
handset is ON.
Bad audio quality (crackles, echo,
etc.).
• Install the base unit in a different room or higher location or
away from other electronic appliances.
• Move closer to the base unit.
Cannot hear the other party clearly/
speaker too loud/quiet.
• Refer to “Adjusting the handset speaker volume on your PC”,
page 11.
Contact list/ User status returns
UNAVAILABLE.
• Check if your base is connected to the PC.
• Check if Skype is running on the PC. Start Skype if the
VOIP 321 driver has not started Skype for you.
• Check if the VOIP 321 driver is running on the PC.
• Move the handset closer to the base if it is out of range.
Cannot make SkypeOut calls.
• Enter 00, + (press and hold 0) or 011 before the number to
dial.
• Check your account to see if you have enough credit.
• Check to see if a link is established between then handset and
the base.
• Refer to “Make a SkypeOut call”, page 15 for more detail.
Busy tone is returned while making
Skype call.
• Make sure both Skype and the PC application is/are started on
the PC and running properly.
• Make sure the phone is setup correctly.
• Wait for the remote party to be online.
Take the handset off the charger and put it back again.
Clean charging contacts with a clean and dry cloth.
Turn on the handset tone from the PERSONAL SET Menu.
There will be no beep if the handset's power is turned off
previously.
If the above solutions do not help, remove the power from the handset and the base and restart Skype as well
as the PC software. Wait for 15 minutes and try again.
38
EN
Informations
Safety information
This equipment is not designed to make emergency calls when the power fails. An alternative has to be made
available to allow emergency calls.
Warranty
The warranty informations are available on www.p4c.philips.com.
Conformity
The Declaration of conformity is available on www.p4c.philips.com.
Safety precautions
Do not allow the handset to come into contact with water. Do not open the handset or the base station. You
could be exposed to high voltages. Do not allow the charging contacts or the batteries to come into contact
with conductive materials. Never use any battery type other than the one supplied : risk of explosion.
WARNING ! Never use non-rechargeable batteries; use only the recommanded type supplied with
this telephone. IF RECHARGEABLE BATTERIES ARE NOT USED, A WARNING MESSAGE WILL BE
DISPLAYED.
Replace handset batteries
Electric, Magnetic and Electromagnetic Fields
("EMF")
1.
2.
3.
4.
5.
Philips Royal Electronics manufactures and sells many consumers oriented products, which usually, as with
any electronic apparatus, have the ability to emit and receive electro magnetic signals.
One of Philips' leading Business Principles is to take all necessary health and safety precautions for our
products, to comply with all applicable legal requirements and to stay well within the EMF standards
applicable at the time of producing the products.
Philips is committed to develop, produce and market products that cause no adverse health effects.
Philips confirms that if its products are handled properly for their intended use, they are safe to use
according to scientific evidence available today.
Philips plays an active role in the development of international EMF and safety standards, enabling Philips
to anticipate further developments in standardization for early integration in its products.
39
EN
Informations
Environmental care
Please remember to observe the local regulations regarding the disposal of your packaging materials, exhausted
batteries and old phone and, where possible, promote their recycling.
Recycling & disposal
Disposal instructions for old products :
The purpose of the WEEE directive (Waste Electrical and Electronic Equipment; 2002/96/EC) is to ensure that
products are recycled using best available treatment, recovery and recycling techniques to ensure human health
and high environmental protection.
Your product is designed and manufactured with high quality materials and components, which can be recycled
and reused.
Do not dispose of your old product in your general household waste bin.
Inform yourself about the local separate collection system for electrical and electronic products
marked by this symbol .
Use one of the following disposal options :
1. Dispose of the complete product (including its cables, plugs and accessories) in the designated WEEE
collection facilities.
2. If you purchase a replacement product, hand your complete old product back to the retailer. He should
accept it as required by the WEEE directive.
Philips has marked the packaging with standard symbols designed to promote the recycling and
appropriate disposal of your eventual waste.
A financial contribution has been paid to the associated national recovery & recycling system.
The labelled packaging material is recyclable.
40
EN
Index
Numerics
3- way Skype conference 16
A
Add entry in phonebook 21
Alarm clock,set 29
Alarm melody 30
Alarm volume 30
Answer a call 19
Answer a call from the telephone line while on
Skype call 36
Answer a Skype call 15
Answer a Skype call while on a call on the
telephone line 36
Assign a quick dial key 22
Auto-answer on/off 30
B
Baby call on/off 32
Backlit on/off 31
Base station 8
Base station, select 33
Batteries, insert 12
Battery 4
C
Call 20
Call / redial from call log 24
Call / redial from redial list 25
Call from telephone line 19
Call in progress 20
Call log 24
Call timer 14
CallerID first ring suppression 27
Chaining Dialling 17
Change a quick dial key 23
Conference call 36
Conformity 39
Connect 12
Contents 3
Contrast 31
Copy call list entry in the phonebook 24
D
Default settings 37
Delete a call log entry 25
Delete a quick dial key 23
Delete last numbers dialled 26
Delete phonebook entry 22
Delete whole redial list 26
Deleting a voicemail 18
Dialling mode 31
Display contrast 31
Driver 10
E
Earpiece volume,set 20
Edit phonebook entry 21
Electric, Magnetic and Electromagnetic Fields
("EMF") 39
End a call 19
End a Skype call 15
Environmental care 40
H
Handset 7
Handsfree call 20
Help 5
I
Icons on the handset display 9
Install 10
Install requirements 5
Install the software 10
Installation CD 10
Instructions for use for the VOIP 321 4
Intercom 35
Internal call 35
Internal call during an external call 35
K
Key tones on/off 28
Keys handset 7
L
Language setting 30
LED on base station 8
Lock keypad 27
Loudspeaker volume, adjust 20
Low battery warning 14
M
Main menu 13
Mute 20
P
Paging 27
Paging key 8
Phonebook 21
Pin code 32
Power requirements 4
Pre-dial 19
Q
Quick dial 22
Quick dialling 19
R
Range 33
Recall 16
Receive a second incoming call 17
Record a number from redial into phonebook 26
Recycling & disposal 40
41
EN
Index
Redial list 25
Registering 33
Reject a Skype call 16
Rename handset 29
Replace handset batteries 39
Restore handset default settings 32
Retrieving voicemail 17
Ringing melody 28
Ringing volume 28
S
Safety 4, 39
Search by letter 14
Search by letter in phonebook 22
Second outgoing call 16
Shortcut for turning handset ringer on/off 28
Skype call 14
Skype contacts list 8
Skype credits, check 34
Skype status icons 34
Skype voice mail access 17
SkypeOut call 15
Sounds 28
42
Speaker 20
Speaker volume, adjust on PC 11
Status, phonebook 23
Switch on/off the handset 27
T
Telephone call 19
Time, set 29
Transfer an external call to another handset 35
Troubleshooting 38
U
Unregister 33
User status 34
User status settings 34
V
View available phonebook space 23
View caller ID 24
View the redial list 25
Viewing phonebook 21
W
What else you need 6
What’s in the box 6
Specifications are subject to change without notice.
Trademarks are the property of Koninklijke Philips Electronics N.V. or their respective owners.
2006 © Koninklijke Philips Electronics N.V. All rights reserved.
www.philips.com
3111 285 29702