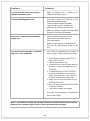
1
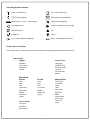
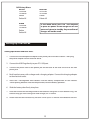
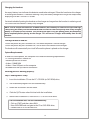
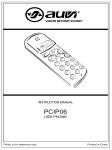
®
VISION BEYOND
BEYOND SOUND
SOUND®®
INSTRUCTION MANUAL
MANUAL
INSTRUCTION
PHIP65
PHIP65
Skype™ Cordless phone
Dual Mode Cordless Phone
Designed For Skype™
Product and
subject
to to
change.
Photo
is forisreference
only. only.
Product
andInstruction
InstructionManual
Manual
subject
change.
Photo
for reference
Table Of Contents
Table Of Contents
Caution / Warnings
About PHIP65
PHIP65 keys and functions
Icons displayed on handset
PHIP65 menu structures
Main Menu
Phone Book Menu
Call History Menu
Setting Up PHIP65
Setting up handsets and base units
Charging the handset
Turning handset on and off
System requirements
Ensuring phone is working properly
Step 1: Getting PC ready
Step 2: Adjusting the audio setup
For Windows® 2000
For Windows® XP
Step 3: Connecting PHIP65 to the PC
Step 4: Reauthorizing PHIP65 to use Skype
Adjusting the PC’s speaker volume
For Windows® XP
For Windows® 2000
Configuring the phone
Selecting a language
Registering a handset
Setting the PHIP65 clock function
Basic Operations
Calling a Skype™ user from contacts list
Calling a landline with SkypeOut
Calling a number with the landline
Redialing
Redialing when phone is off hook
Dialing using a phone book
Quick dialing
Making 3-way Skype conference calls
Ending calls
Answering calls
2
2
5
6
7
7
7
8
8
9
9
9
9
10
10
10
10
11
11
11
12
12
12
12
13
14
14
15
15
15
15
16
16
16
Using the flash feature
Making second outgoing calls while on Skype™
Making second outgoing calls while on land line
Receiving a second incoming call
Chain dialing
Hands free calling
Using the headset
Using speakerphone
Adjusting the caller’s voice volume
Using the mute function
Using the phone book
Viewing contacts in a phone book
Storing names in a phone book
Managing contacts in a phone book
Copying entries in a phone book
Assigning contacts quick dial numbers
Changing quick dial numbers
Deleting quick dial numbers
Deleting an entry in a phone book
Deleting all entries in a phone book
Viewing available space in phone book
Using quick dial for Skype™
Assigning speed dial numbers for Skype™
Calling contacts using speed dial
Call History
Viewing call history
Calling a number from the history list
Saving recorded numbers from the history list
Deleting a number in the history list
Deleting an entire history list
Stripping an area code
Viewing the dialed call list
Saving a dialed call to a phone book
Deleting a dialed number in the call list
Deleting an entire dialed call list
Skype Features
Changing online user status
Checking voicemail messages
Retrieving voicemail messages
3
16
17
17
17
18
18
18
18
18
19
19
19
19
20
21
21
21
22
22
22
23
23
23
23
24
25
25
25
25
26
26
26
27
27
27
28
28
Deleting voicemail messages
Checking SkypeOut credits
Personalizing The PHIP65
Personalizing the phone’s display
Adjusting the phone’s contrast
Using the auto answer feature
Turning the backlight on and off
Personalizing the handset sounds
Turning the key beep on and off
Adjusting handset volume
Setting the handset’s time
Setting the handset’s alarm
Selecting an alarm clock ring melody
Setting alarm volume
Advanced Features
Transferring Skype calls from the PC to the handset
Using advanced flash features
Using PABX
Changing dial mode
Setting a pause
Setting an area code
Using baby call
Setting the voicemail waiting indicator (VMWI)
Registering a handset
Unregistering another base unit
Selecting a base unit
Resetting handset’s personal settings
Additional Features
Locking the keypad
Turning handset’s ringer on and off
Viewing message waiting indicator (VMWI)
Finding a handset
Using CID first suppression
Using Multi-Handsets
Calling someone within the same building
Transferring calls to other handsets
Making 3-way calls
Default Settings
Trouble Shooting
Compliance Support
Warranty
4
28
28
29
29
29
30
30
30
30
31
31
31
32
32
32
32
33
33
33
33
34
34
34
35
35
35
36
36
36
36
37
37
38
38
39
41
44
C A U T IO N
R IS K OF E L E C TR IC S HOC K
DO NOT OP E N
The
flash and
The Lightning
lightning flash
arrow
head
within
the
and arrow head
triangle
is
a
warning
sign
within the triangle is a
alerting you of ”dangerous
warning sign alerting
voltage” inside the product.
you of "dangerous
voltage" inside the
product.
WARNING:
WARNING: To
To r reduce
educe t the
he
risk of
of eelectric
lectric shock,
o not
risk
shock, ddo
not
remove
cover
(
or
back).
N
o
remove cover (or back). No
user-serviceable
parts
inside.
user-serviceable parts inside.
Refer servicing t o qualified
Refer
servicing to qualified
service personnel.
personnel.
The
point within
Theexclamation
exclamation
the
triangle
is
a
warning
sign
point within the
alerting
you
of
important
triangle is a warning
instructions accompanying
sign alerting you of
the product
important instructions
accompanying the
product.
WARNING:
TO REDUCE THE RISK OF FIRE OR ELECTRIC SHOCK, DO NOT
EXPOSE THIS APPLIANCE TO DRIPPING OR SPLASHING LIQUIDS.
CAUTION
DO NOT EXPOSE TO DRIPPING OR SPLASHING LIQUIDS!
CAUTION: GROUNDING OR POLARIZATION. THE PRECAUTIONS
SHOULD BE TAKEN SO THAT THE WIDER BLADE OF THE AC PLUG
MUST MATCH THE SLOT IN RECEPTACLE "WALL SOCKET".
C A UT IO N: I NV IS IB L E L A S E R R A DIATI O N W HE N O P E N A ND
IN T E R L O C K S DE F E AT E D. AV O ID E X P O S UR E TO B E A M.
V O R S IC HT: U NS IC HT B A R E L A S E R S T R A HL UNG T R IT T A US ,
W E NN DE C K E L G E ÖF F NE T UND W E NN S IC HE R HE IT S V E R R IE G E L UNG
ÜB E R B R ÜC K T IS T. N IC HT DE M S T R A HL A US S E T ZE NI.
VA R NIN G : O S Y NL IG L A S E R S T R ÁL NIN G NÄR DE NNA D E L ÄR ÖP P NA D O C H
S P ÄR R ÄR UR K O P P L A ND. S T R ÁL E N ÄR FAR L IG .
A DVA R S E L : US Y NL IG L A S E R S T R ÁL IN G V E D ÁB NIN G . N ÁR
S IK K E R HE DS A F B RY DE R E E R UDE A F F UNK T IO N. U NDG Á UDS /E T T E L S E F O R
S T R ÁL IN G .
AT T NE NZIO NE : R A DIO NS L A S E R IN V IS ID IL E . N O N G UA R DA R E
DIR E T TA ME NT E NE L L A S O R G E NT E DE L L A S E R .
A C HT UNG : L A S E R L IN S E NIC HT B E R ÜHR E N UNS IC HT B A R E R L A S E R S T R A HL .
AV IS O : A L E NT E NUNC A D E V E S E R TO C A DA .
5
C L A S S 1 L A S E R P R O DU C T
K L A S S E 1 L A S E R P R O DU K T
L A S E R DE C L A S S E
L A S E R DI P R IMA C L A S S E
K LAS S E 1 LAS E R
L A S E R P R IME R A C L A S E
LAS E R CLAS S E 1
K L A S S E 1 L A S E R P R O DU K T
About The PHIP65
PHIP65 keys and functions:
MENU
MUTE
REDIAL
Menu & OK key functions:
Enter menus.
Select menu.
Keypad Backlight functions:
On while paging the handset.
On during an incoming call.
Redial, Mute & Back key functions:
Switch between call details.
Enter dial list.
Redial last dialed number.
Mute / unmute a call.
Delete text and digits.
Paging key functions:
Page the handset.
Register the handset.
IN USE
Talk & Flash key functions:
Make and receive calls.
Send flash signal.
Pick up or make second incoming
call on Skype.
FLASH
EXIT
USB
Off & Exit key functions:
End a call.
Exit menus.
Turn off the handset.
CID & Scroll Up key functions:
Enter call list.
Scroll up items.
Increase ringer and receiver volume.
Phone book & Scroll Down key functions:
Access phone book.
Scroll down items.
Reduce ringer and receiver volume.
Star & Key Lock key functions:
#
Pound and Pause key Functions:
Enter a pause.
Turn the ringer on / off.
Speaker key functions:
Turn speaker phone on / off.
INT
CONF
S
Intercom & Conference key functions:
Make intercom calls.
Set up 3-way calling.
Skype™ key functions:
Launch Skype™.
Make SkypeOut calls.
6
LED 1 functions:
Blinks slowly while paging the handset.
Blinks quickly during registration mode.
LED 2 functions:
On when the USB cable is connected to the
PC and the base is powered.
Flashes when there is data communication
with USB.
Icons displayed on handset:
Base / Handset link
CID / New missed call
PSTN call in progress
Message waiting indicator
S
Battery full; 2/3 full; 1/3 full; Empty
Skype call in progress
Loudspeaker on
Digits / Characters on the right
Alarm clock on
Up
Ringer off
Down
OK / Confirmation of speakers
Back / Erase digits on the left
PHIP65 menu structures:
The PHIP65 offers a variety of functions and features that are grouped within these menus.
Main Menu:
Skype™
Contacts
User Status
Voicemail
Credits
Phonebook
Private
View
Add
Edit
Quick Dial
To Shared
Delete
Delete All
Status
Personal Set
Language
Handset Tone
Handset Name
Contrast
Auto Answer
Backlit
Shared
View
Add
Edit
To Private
Delete
Delete All
Status
Clock / Alarm
Set Clock
Set Alarm
Alarm Tone
7
Advanced Set
Flash Time
Dial Mode
Pause
PABX
Area Code
Baby Call
VMWI
Registration
Base Select
Delete HS
Reset
Call History Menu:
Missed
To Private
To Shared
Delete
Delete All
Dialed
To Private
To Shared
Delete
Delete All
Received
To Private
To Shared
Delete
Delete All
In the menu mode, press Off / Exit anytime
or place the phone on the charger to exit the
menu and return to standby. Any unconfirmed
changes will not be saved.
Setting Up The PHIP65
Setting up handsets and base units:
1. Connect the included power adapter to the power port of the base station. Then plug
the power adapter into an electrical outlet.
2. Connect the USB Plug directly to your PC’s USB port.
3. Connect the phone cord to the phone jack on the back of the base unit and to the wall
phone jack.
4. Each handset comes with a charger and a charging adapter. Connect the charging adapter
to the electrical outlet.
5. Insert the 2 rechargeable AAA batteries into the battery compartment on the handset.
*When placing batteries into the compartment, note the battery polarities.
6. Slide the battery door firmly into place.
7. Place the handset on the charger and let the batteries charge for 14 hours before using. The
handset may get warm during the initial charge; this is normal.
8. Please note that the handset may not turn ON for up to 15 minutes if the batteries are low.
8
Charging the handset:
An empty battery icon indicates the batteries need to be recharged. Place the handset on the charger
to recharge the batteries. A handset reaching a very low battery voltage level will go into sleep mode,
displaying LOW BATT on the LCD screen.
Get into the habit of putting the handset on the charger to charge when the handset is not being used.
This will ensure the handset is always fully charged.
NOTE: Due to unique characteristics of NiMH batteries, most notably its extensive life cycle and high
safety rating, the battery icon on the handset tends to show less than full capacity when a fully charged
battery is inserted into the handset. Also, the first few times using the phone, please let the battery
drain completely before placing on the charger. This will ensure a longer talk/standby time for the
handset.
Turning handset on and off:
To turn the phone on, press and hold Off / Exit when the phone is off the charger.
To turn the phone off, press and hold Off / Exit or return the handset to the charger.
The handset will automatically turn itself off once the phone is placed on the charger.
System Requirements:
In order to use the phone, the computer must meet the following requirements:
• PC running Windows® 2000 or XP
• 400 MHz processor or faster
• At least 128MB RAM
• At least 1 free USB port on the computer
• Broadband or dial-up Internet connection
Ensuring phone is working properly:
Step 1: Getting the PC ready
1. Insert the installation CD into the PC’s CD ROM (or DVD ROM) drive.
2. The installation program will start automatically.
3. Follow the instructions on the screen.
4. Click the QUIT button when finished with the installation.
5. Remove the installation CD from the PC’s CD or DVD ROM drive.
If the installation does not start automatically:
- Click on START and then select RUN.
- Enter EXPLORER and navigate to the CD or DVD ROM drive.
- Double-click on SETUPWIZARD.EXE.
9
Step 2: Adjusting the audio setup
In order to make sure the original audio settings have not been affected, please follow the steps below.
For Windows® 2000:
1. With the base turned on and the USB plug inserted into a USB port, click START and select
CONTROL PANEL.
2. Click on SOUND AND MULTIMEDIA.
3. Select the AUDIO tab from Sound and Multimedia Properties.
4. Check to see if the current PC speakers are selected in both the SOUND PLAYBACK and the
SOUND RECORDING pull down boxes.
5. Check the USE ONLY PREFERRED DEVICES checkbox.
6. Press APPLY or OK to save the settings.
For Windows® XP:
1. With the base turned on and the USB plug inserted into a USB port, click START and select
CONTROL PANEL.
2. Click on SOUND AND MULTIMEDIA.
3.
Select the AUDIO tab from the Sound and Multimedia Properties.
Check to see if the current PC speakers are selected in both the SOUND PLAYBACK and the
4. SOUND RECORDING pull down boxes.
Check the USE ONLY PREFERRED DEVICES checkbox.
5. Press APPLY or OK to save the settings.
Step 3: Connecting PHIP65 to the PC
1. Make sure the USB base plug is inserted into the computer’s USB port.
2. Start Skype™ and login with a user name.
3. Start the USB driver by double clicking on the shortcut icon on your desktop.
4. If this is the first time using the USB driver, it will ask for authorization to allow the USB driver
to access Skype. Simply select ALLOW THIS PROGRAM TO USE SKYPE and press OK.
5. Once both Skype and the base are detected, the phone will be ready for use. The Skype ID
currently in use will be displayed on the phone’s LCD screen.
10
Step 4: Reauthorizing PHIP65 to use Skype
If you need to reauthorize the driver to access Skype, or if you accidentally blocked access
to Skype, follow these steps:
1. In the Skype program, select TOOLS, then click on OPTIONS.
2. Click on the PRIVACY tab.
3. In the RELATED TASKS section, click on MANAGE OTHER PROGRAMS’ ACCESS TO SKYPE.
4. The MANAGE API ACCESS CONTROL window will popup. In the window, select
AUVIDUAL.EXE. Then click the CHANGE button on the right side.
5. Select ALLOW THIS PROGRAM TO USE SKYPE and press OK.
6. Press OK again to close the API ACCESS CONTROL window.
7. Click SAVE to apply the change.
Now your PHIP65 phone is authorized for use with Skype.
About the USB Driver
Once the driver is installed on the PC, it should auto start when the PC is turned on. A tray icon
will be shown when the USB driver is loaded. The tray icon will return to the ABOUT page of the
USB driver, where the current status will be shown. If there are problems with the connection, an
error message regarding the problem will be displayed; otherwise CONNECTED will be shown.
Restarting the USB driver is not necessary unless it was exited. To exit the USB driver, right-click on
the tray icon and select EXIT.
Adjusting the PC’s speaker volume:
The speaker volume might affect the sound quality of the phone.
Please follow the steps below to adjust the speaker volume.
For Windows XP:
1. Click on START and then select CONTROL PANEL.
2. Click on SOUNDS, SPEECH and AUDIO DEVICES.
3. Click on the AUDIO tab. From Sound Playback pull down box, select USB AUDIO DEVICE.
4. Click on the APPLY key at the bottom; then click on the VOLUME key.
5. Adjust the volume using the slider. Close the slider window when finished.
6. Return to the Sound Playback pull down box, select the original sound device and click OK
to save and exit.
11
For Windows 2000:
1. Click on START and then select SETTINGS > CONTROL PANEL.
2. Double click on SOUNDS AND MULTIMEDIA and click on the Audio tab.
3. From Sound Playback pull down box, select USB AUDIO DRIVE and click the APPLY key at the
bottom; then click on the VOLUME key.
4. Adjust the volume using the slider; close the window when finished. Return to Sound Playback
pull down box; select the original sound device and click OK to save and exit.
Configuring the phone:
For phones with single country and language settings, skip this section.
For phones with multiple country support:
Power on the phone. The phone shows an animated welcome message on the LCD display in
different languages.
1. When the handset has established a link with the base, press any key on the handset.
2. Select the desired country and press the OK key.
If the phone was purchased outside of the user’s current country, the phone’s power adapter
and cord may need to be changed / updated to meet the country’s local connection
standards.
Selecting a language:
1. Press the MENU key and select PERSONAL SET. Press the OK key.
2. Select LANGUAGE and press the OK key. The current language is displayed.
3. Select the desired language and press the OK key to confirm.
Registering a handset:
To register the handset follow the steps below.
1. Press the MENU key and select ADVANCED SET. Press the OK key and select REGISTRATION.
2. Before entering the PIN, press and hold the PAGING key on the base for 4 seconds. The base
is now in the registration mode and both LED’s on the base will be blinking.
3. Enter the PIN on the handset and press the OK key.
12
During the registration period, SEARCH BASE will appear on the handset.
A confirmation tone will be heard if the registration is successful. The handset label, the handset
number and the clock will be displayed. The status icon will be shown as well if the PC is setup
properly with the base. If the registration is not successful, the previously unregistered handset
will continue to say UNREGISTERED. If the phone will not register, please repeat the steps and try
again.
Setting the PHIP65 clock function:
Once the base is powered up and connected to the PC, the handset will obtain the current time
from the PC.
To adjust the clock manually follow the steps below:
1. Press the MENU key during standby.
2. Press the UP or DOWN keys to select CLOCK / ALARM, and then press the OK key.
3. Press the UP or DOWN keys to select SET CLOCK, and then press the OK key.
4. Use numeric keys to enter the clock’s time; in 24-hour format.
5. Press the OK key to confirm.
Basic Operations
Before making a call, please note the following:
Emergency calls:
Skype does not support emergency calls. All emergency calls will be routed to the landline.
Out of range warning:
If you move too far away from the base unit during a call, the phone will sound an alert. The
user must move closer to the base; otherwise, the call could disconnect.
Low battery warning:
If the phone is low on battery, an alert tone will sound. Place the phone back on the
charger for charging as soon as possible otherwise, the phone will lose power and end the
call. Placing the phone on the charger while a call is still in place will indirectly end the call.
Call timer:
The call timer shows the duration of any given call. The timer works on outgoing and
incoming calls.
13
Calling a Skype™ user from contact list:
1. Press
S key.
2. Press the UP or DOWN keys to select the SKYPE user to call.
3. Press the TALK key or S key to call the selected contact.
The contact’s name will be displayed and the contact will be called.
Contact list:
The contact list shows the SKYPE contact list of the user who is currently logged into Skype.
Changing user status:
Skype status can be changed through the PHIP65. To reference this, see CHANGE ONLINE STATUS.
Search by letter:
Using the keypad, enter the first letter of the name designated to call.
For example, to find “SAM” press 7 four times; the first contact beginning with the letter “S” will be
displayed. Press the UP or DOWN keys to find the desired contact.
Calling a landline with SkypeOut:
1. Press
S key.
2. Press the UP and DOWN keys to select the SkypeOut number to be called.
3. Press TALK or S key to call the selected contact.
The contact’s name will be displayed and called.
Or
1. Enter the number to call and press
S key to dial the number.
SkypeOut:
In order to make SkypeOut calls, credits must be purchased through www.skype.com.
Entering a +:
Simply press and hold the 0 key for 1 second during standby.
Deleting digits:
Press BACK to delete an incorrect digit.
Press and hold BACK for 2 seconds or EXIT to return to standby mode.
14
Entering a pause:
Press and hold the # where you want to enter a pause.
Calling a number with the landline:
1. Enter the digits to dial and press the TALK key.
OR
2. Press the TALK key and then enter the digits to dial.
Redial:
The PHIP65 records the last 10 dialed numbers stored in the redial memory. The first 32
digits / characters of each number / contact are stored.
To redial one of the last 10 dialed numbers / contacts:
1. Press the REDIAL key. The most recently dialed number will appear.
2. Press the UP and DOWN keys to choose the number you want to dial.
3. Press the TALK key.
Redialing when phone is off-hook:
With off-hook redialing, you can redial the last number dialed.
1. Press the TALK key.
2. Press the REDIAL key. The most recently dialed number will appear and dial.
Dialing using a phone book:
You can dial a number stored in the phone book.
1. Press the PHONEBOOK key.
2. Press UP and DOWN keys to search through contacts. When you find your contact, press
the TALK key.
15
Quick dialing:
Specified numbers can be set to quick dial by simply assigning a designated contact from the
phone book to any number on the PHIP65 keypad. To do this, simply find a contact in the phone
book and during standby mode, press and hold a specified number on the keypad.
Making 3-way Skype™ conference calls:
Start a 3-way conference call.
1. Call the first Skype contact.
2. After the first party answers, press the TALK key to seize the line and make a Skype call to
the second party.
3. When the second party answers, press and hold CONFERENCE key to join the two parties.
Ending calls:
1. Press the EXIT key or place the phone on the charger.
Answering calls:
When receiving a call:
If the incoming call is from the Skype line, the Skype melody will ring and the Skype symbol
will flash on the LCD display.
If the incoming call is from the landline, the landline melody will ring and the landline symbol
will flash on the LCD display.
1. Press the TTALK key to answer the call.
Caller ID:
When the caller’s name or Skype ID shows up on the LCD display.
Turning off the ringer:
Press and hold the # when the phone is in standby to turn off the ringer for all calls. To turn it on
again, press and hold the # a 2nd time.
Using the flash feature:
While on a call, use the FLASH key to make a second outgoing call or receive a second
incoming call.
16
Second calls:
If using Skype, users can make or receive calls without extra charges. If using a landline, the call
waiting feature must be purchased through the local phone company.
Second outgoing calls:
Users can only make second outgoing calls via the line your current call is on. If on a Skype call,
users can call other Skype users or make SkypeOut calls. If on a landline, users may only call
other landline contacts.
Second incoming call from other line:
Users may receive a second call from the other line (i.e. receive a landline call while using the
Skype service.) A special call waiting tone will be heard when this happens to notify the user
that another call is coming in. Different alerts for different services can be heard.
Making second outgoing calls while on Skype™
1. Press the FLASH key. A dial tone should be heard and the first caller will be placed on hold.
2. To call Skype contact, press
press the FLASH key.
S key to obtain contact list. Select contact to be called and
3. To call SkypeOut contact, call regular number.
4. To return to the first call or to toggle between calls, press the FLASH key.
Making second outgoing calls while on the landline:
1. Press the FLASH key. A dial tone should be heard and the first caller will go on hold.
2. Enter the number to be dialed.
3. To toggle between calls, press the FLASH key.
Receiving a second incoming call:
1. When there is a second incoming call, a call waiting alert will be heard. Both services have
different call waiting alert tones.
2. If the second incoming call is from the other line, press the OFF key to terminate the first
call.
3. Press the FLASH key to pick up the second call.
4. Press the FLASH key again to return to the first caller or to toggle between the two calls.
17
Chain dialing:
Call contacts from the phone book even after the user has seized the phone line. There is no
limit to the number of times chain dialing is accessed.
1. Press and hold the PHONEBOOK key for 2 seconds.
2. Press the UP or DOWN keys to scroll through the phone book records. Use the number keys
to jump directly to the record starting with the corresponding letters of that key.
3. Press the OK key.
NOTE: To exit the Chain Dialing mode, simply press the EXIT key.
Hands-free calling:
Hands-free calling provides the convenience of talking to the caller without holding onto the
phone. Communicate by using a headset or speakerphone option on the phone.
Using the headset:
1. Plug in a headset to the headset jack on the phone.
2. Unplug the headset to end hands-free communication.
Using speakerphone
1. Press the SPEAKER key.
2. Exit speakerphone function by pressing the SPEAKER key again.
Adjusting the caller’s voice volume:
Increase or decrease the caller’s voice by using the following steps:
1. While the phone is off the hook, press the UP or DOWN key. The display will show the current
volume level. Press the UP or DOWN keys to adjust accordingly.
Still can’t find the most comfortable level?
Besides adjusting the volume on the handset, adjusting the volume on the PC might be in
order to set the speaker to the most comfortable volume.
Please refer back to “Adjusting the speaker volume on the PC” .
18
Using the mute function:
During a call, if the user wishes to speak to someone privately without having the caller hear
the conversation, follow the steps provided below:
1. Press the MUTE key;this turns off the microphone and will not allow sound to come through
the caller’s earpiece.
2. Press the MUTE key again to cancel the muting feature. This will allow voice and noise
transmissions back into the earpiece of the caller.
Using The Phone Book
Use the phone book to manage entries stored in the phone. The phone has a private phone
book, and a shared phone book. The information in the private phone book is stored in the
users handset. Therefore, if there is more than one handset, each handset has its own phone
book.
The information stored in the shared phone book is located within the base unit. Therefore,
the information can be shared by all the handsets. The phone must have a link with the base
unit before it has access to the shared phone book.
The private phone book can store up to 50 contact numbers while the shared phone book can
store up to 10 contacts. Each contact can store a name with up to 10 characters and a phone
number with up to 20 digits.
Viewing contacts in a phone book:
1. Press the PHONEBOOK key.
2
Press the UP or DOWN keys to select which phone book to open; PRIVATE or SHARED.
Press the OK key to confirm.
3. Press the UP or DOWN keys to view the previous or next record.
Storing names in a phone book:
Each contact can store a name up to 10 characters and a number up to 20 digits.
1. Press the MENU key, select PHONEBOOK and press the OK key.
2. Select the phone book to open; PRIVATE or SHARED. Press the OK key to confirm.
3. Press the UP or DOWN keys to select ADD, and then press the OK key.
19
Storing entries:
Please note that contacts on the Skype contact list cannot be stored to either of the phone books.
Memory full:
If the phone book is full, FULL will be displayed on the phone’s LCD screen.
4. Enter the name of the contact. A name must be entered and it must be unique. Press the OK key.
5. Enter the contact’s number to store into the phone book. Press the OK key.
Entering a Pause:
Press and hold the “#” key where you want to enter a pause.
Duplicate name:
If you entered an identical name for two different contacts in the phone book,
DUPLICATE REPLACE? will show up on the phone’s LCD screen. Press the OK key to replace the
existing contact with the new contact. Press the BACK key to return to the previous screen to make
changes to the name so a replacement will not occur.
Managing contacts in a phone book:
Users can edit, copy, assign quick dialing, delete contacts and check memory status while
browsing in their phone book.
1. Press the MENU key; select PHONEBOOK and press the OK key.
2. Press the UP or DOWN keys to select the phone book to open; PRIVATE or SHARED and
press the OK key .
3. Press the UP or DOWN keys to select EDIT and then press the OK key.
4. Press the UP or DOWN keys to scroll through and select a desired contact to edit,
press the OK key.
5. Edit names and numbers by using the keypad. If a mistake is made, press the BACK key to erase.
6. Press the OK key to save your changes.
20
Copying entries in a phone book:
Information from the entries can be shared by copying the entries from the private phone
book to the shared phone book and vice-versa.
1. Press the MENU key and select PHONEBOOK and press the OK key.
2. Press the UP or DOWN keys to select phone book to open; PRIVATE or SHARED. Press the OK key.
3. Press the UP or DOWN keys to select TO SHARED or TO PRIVATE, and then press the OK key.
4. Press the UP or DOWN keys to scroll to or search by letter the entries desired to copy to the other
phone book, and then press the OK key.
5. Press the OK key to save all changes.
NOTE: Contacts on the contact list cannot be assigned to quick dial keys.
Assigning contacts quick dial numbers:
1. Press the MENU key and select PHONEBOOK and press the OK key.
2. Press the UP or DOWN keys to select PRIVATE phone book, and press the OK key.
3. Press the UP or DOWN keys to select QUICK DIAL, and then press the OK key.
4. Press the UP or DOWN keys to select a contact to assign a number, and press the OK key.
5. Press the UP or DOWN keys to select the assigned number, and then press the OK key.
Changing quick dial numbers:
1. Press the MENU key; select PHONEBOOK and press the OK key.
2. Press the UP or DOWN keys to select PRIVATE phone book, press the OK key.
3. Press the UP or DOWN keys to select QUICK DIAL, and then press the OK key.
The first quick dial key is displayed. Press the OK key to confirm.
4. Press the UP or DOWN keys to select EDIT. Press the OK key.
5. Press the UP or DOWN keys to select a new entry for the selected key. Press the OK key
when entry is selected.
21
Deleting quick dial numbers:
1. Press the MENU key and select PHONEBOOK and press the OK key.
2. Press the UP or DOWN keys to select PRIVATE phone book, and then press the OK key.
3. Press the UP or DOWN keys to select QUICK DIAL, andpress the OK key.
The first quick dial key is displayed.
4. Press the UP or DOWN keys to scroll to the quick dial key desired to delete, and press the OK key.
5. Press the UP or DOWN keys to select DELETE. press the OK key.
6. CONFIRM? is displayed on the LCD screen. Press the OK key.
Deleting an entry in a phone book:
1. Press the MENU key and select PHONEBOOK and press the OK key.
2. Press the UP or DOWN keys to select the phone book to open; PRIVATE or SHARED, and press the
OK key.
3. Press the UP or DOWN keys to select DELETE, and then press the OK key.
4. Press the UP or DOWN keys to scroll to desired contact to delete, and press the OK key.
5. Press the OK key again to confirm changes.
Deleting all entries in a phone book:
1. Press the MENU key and select PHONEBOOK and press the OK key.
2. Press the UP or DOWN keys to select the phone book to open; PRIVATE or SHARED, and press the
OK key.
3. Press the UP or DOWN keys to select DELETE ALL, and then press OK.
4. CONFIRM? is displayed. Press the OK key to confirm.
22
Viewing available space in phone book:
The phone keeps track of how many memory slots have been used and how many are still
available. To view this information, follow the steps below.
1. Press the MENU key and select PHONEBOOK and press the OK key.
2. Press the UP or DOWN keys to select which phone book to open; PRIV
PRIVATE or SHARED, press
the OK key.
3. Press the UP or DOWN keys to select STATUS. Press the OK key to view the new status. Press
the OK key again when finished.
Using quick dial with Skype™:
The Skype speed dial feature allows the user to call a contact on the contact list by entering the
speed dial number assigned to the contact on Skype.
Assigning speed dial numbers for Skype™:
1. From the PC Skype contact list, select the contact desired to assign a speed dial number
and right-click to pull up the menu. Select SET SPEED-DIAL.
2. A message box will be shown to allow the user to enter a speed dial number. Choose a
number between 1 and 99 and press the OK key.
Calling contacts using speed dial:
1. From the handset, enter # and then the speed dial number to call.
2. Press the
S key. The contact assigned to the speed-dial number entered will be called.
NOTE: You can omit # key when entering the speed-dial number and a Skype call will
still be made. However, for certain countries, if the speed-dial number matches an
emergency number, an emergency call will be made instead of a Skype call.
23
Call History
The phone keeps a record of each time a call comes in or goes out. Users can access a list of up
to 15 missed calls and 5 received calls.
If the user has subscribed to a caller ID service from the local phone company, both landline
and Skype calls will be automatically stored. Otherwise only Skype calls will be stored.
If you have more than one handset, each handset has its own call list.
Order of display:
If the caller’s name is available, the first 12 characters will be displayed with the date and time the
call came through.
Matching the phone book record:
If the caller’s number matches a phone number stored in the phone book, that phone book name
will be displayed instead of the Caller ID name.
Viewing call history:
1. Press the CID key. Press the UP or DOWN keys to select the MISSED or RECEIVED call list. Press
the OK key.
2. Press the UP or DOWN keys to browse the call history.
3. Press
key to view the number.
While viewing the call history:
If the record is a SKYPE call (i.e. it is a missed / received SKYPE / SKYPEOUT call), an S
be shown. If the record is a new record, a “*” will be shown.
will
Note: The caller ID will be formatted according to the local area code entered in the AREA
CODE menu. If the number is not formatted correctly, Flash / Format button lets you change
the format of the displayed number. Long distance code “1” will be added to out of area
numbers so that a call can be returned to the number correctly.
The following table describes the available number display formats.
Number of digits
Type
Example
11 digits
Long Distance
1-123-456-7890
10 digits
Area Code First
123-456-7890
7 digits
Local Number
123-4567
24
Calling a number from the history list:
When users view the call history, they can return a missed or received call by selecting the
contact and pressing the TALK key. The call will be returned using the same service the original
call was placed through.
Saving recorded numbers from the history list:
If a call comes in and the contact is not stored in the phone book, an option to save directly
from the call history log is available on the PHIP65. To do so, follow the steps below.
1. Press the MENU key.
2. To save it to the phone book, select which phone book to save the contact in.
3. Enter a name for this entry and press the OK key.
4. Edit the number if necessary; press the OK key.
5. The contact will be saved in the selected phone book.
NOTE: Skype contacts or SkypeOut numbers cannot be saved to the phone book.
NOTE: The call history is now saved into the phone book. The call history is still in the
call list, but it will show the new name entered.
Deleting a number in the history list:
1. While viewing the call history, press MENU.
2. Press the UP or DOWN keys to select DELETE and press the OK key.
3. CONFIRM? is displayed. Press the OK key to confirm.
Deleting an entire history list:
1. While viewing the call history, press the MENU key.
2. Press the UP or DOWN keys to select DELETE ALL. Press the OK key.
3. CONFIRM? is displayed. Press the OK key to confirm.
25
Stripping an area code:
Users can strip the area code from the incoming caller’s number. A return call can be made
directly using the number in the call history.
The area code can be up to 5 digits long. The area code will be removed from the incoming
caller’s number that corresponds to the entered area code.
To strip the area code, follow the steps provided below.
1. Press the MENU key.
2. Select ADVANCED SET and press the OK key.
3. Select AREA CODE and press the OK key.
4. Enter the area code and press the OK key to confirm.
Viewing the dialed call list:
1. Press the REDIAL key. The last dialed number will show on the display.
2. Use the UP and DOWN keys to scroll through the call list.
Saving a dialed call to a phone book:
Save numbers to the phone book while scrolling through the dialed call list.
1. Press the MENU key.
2. To save a number, select the desired phone book to save the entry to.
3. Enter a name for this contact and press the OK key.
4. Edit the number if necessary. Press the OK key.
Matching a phone book record:
If a dialed number matches a phone number stored in the phone book, that phone book
name will be displayed instead of the dialed number.
NOTE: The record is now saved into the phone book. The dialed record is still in your
dialed list, but it will show the new name entered.
26
Deleting a dialed number in the call list:
While scrolling through the history of outgoing calls, the user can delete any number from the
list using the following:
1. Press the MENU key.
2. Select DELETE and press the OK key.
3. Press the OK key again to confirm deletion.
Deleting an entire dialed call list:
While the user is scrolling through the history of outgoing calls, he / she can delete all the
numbers from the list using the following:
1. Press the MENU key.
2. Select DELETE ALL and press the OK key.
3. Press the OK key again to confirm deletion.
Skype™ Features
Changing online user status:
Users can set their current Skype status using the PHIP65.
1. Press the MENU key.
2. Select SKYPE and press the OK key.
3. Select USER STATUS and press the OK key.
4. Select the status to be displayed and press the OK key to save.
Skype status icons:
Skype status icons are used to represent different status options as well as to indicate each
contact’s current online status. Please refer to the following table for a description of each.
X
Online / Skype Me
Not Available
Offline
Do Not Disturb
Away
Invisible
27
Checking voicemail messages:
The PHIP65 allows the user to access their Skype Voicemail box with just a few key presses.
Skype Voicemail:
To get a voicemail account, please go to www.skype.com/products/skypevoicemail for
further details.
New Voicemail:
When there is a new voicemail, the
icon appears on the top line of the display during
standby. The
icon will be gone when all voicemails have been deleted.
Retrieving voicemail messages:
1. Press the MENU key.
2. Press the UP or DOWN keys to select SKYPE. Press the OK key.
3. Press the UP or DOWN keys to select VOICEMAIL. Press the OK key.
4. Press the UP or DOWN keys to select the voicemail to listen to. Press the MENU key.
5. Press the UP or DOWN keys to select PLAY to play the message.
A new voicemail has an * on the 2nd line.
Deleting voicemail messages:
1. Press the MENU key.
2. Press the UP or DOWN keys to select SKYPE. Press the OK key.
3. Press the UP or DOWN keys to select VOICEMAIL. Press the OK key.
4. Press the UP or DOWN keys to select the voicemail to delete. Press the MENU key.
5. Press the UP or DOWN keys to select DELETE or DELETE ALL to purge the message(s).
6. Press the OK key to confirm deletion.
Checking SkypeOut credits:
1. Press the MENU key and scroll to SKYPE. Press the OK key.
2
Scroll UP or DOWN to select CREDITS. Press the OK key and the current amount available
for SkypeOut will be shown.
3. Press the OK key to finish.
28
Personalizing The PHIP65
The PHIP65 comes with a selection of settings that the user can change to personalize the
phone.
Personalizing the phone will be done using the individual menu options. At any time the user
can press BACK to exit the current menu or cancel the confirmation. If EXIT is pressed, the
phone will simply abort all programming and return to standby.
Personalizing the phone’s display:
Give the phone a name. Users can personally change the name of the phone by choosing a
name up to 10 characters in length. The name can be composed of any characters from A-Z or
0-9. Spaces can also be used.
1. Press the MENU key.
2. Select PERSONAL SET and press the OK key.
3. Select HANDSET NAME and press the OK key. The current handset name is displayed.
4. End the handset name.
5. Press the OK key to confirm.
Adjusting the phone’s contrast:
The display contrast can be adjusted for better viewing.
1. Press the MENU key.
2. Select PERSONAL SET and press the OK key.
3. Select CONTRAST and press the OK key. The current CONTRAST LEVEL is displayed.
4. Press UP or DOWN to select desired contrast level. Press the OK key to confirm.
Using the auto answer feature:
Auto answer gives the user the convenience of answering a call just by picking up the handset
from the charger. No need to press TALK during this feature.
1. Press the MENU key.
2. Select PERSONAL SET and press the OK key.
3. Select AUTO ANSWER and press the OK key. Then select whether to turn it ON or OFF and
press the OK key.
29
Turning the backlight on and off:
The display and keypad will be lit when the phone is being used.
1. Press the MENU key and select PERSONAL SET. Press the OK key.
2. Select BACKLIT and press the OK key. The current BACKLIT is displayed.
3. Select ON or OFF and then press the OK key to confirm.
Personalize the handset’s sounds:
Users can assign different ring tones for each handset at different volume levels.
Users can also select a different ring tone for Skype, landline, and intercom calls.
1. Press the MENU key and select PERSONAL SET. Press the OK key.
2. Select HANDSET TONE and press the OK key.
3. Select a line in which to select a ring tone and press the OK key.
4. Select the desired ring tone and press the OK key.
Adjusting the handset volume:
1. Press the MENU key and select PERSONAL SET. Press the OK key.
2. Select HANDSET TONE and press the OK key.
3. Select VOLUME and press the OK key.
4. Use the UP or DOWN keys to determine the desired volume and press the OK key.
Turning off the ringer:
Press and hold the
key to turn off the ringer.
appears to indicate that the ringer is
turned off. Ringer does not emit sound to indicate an incoming call.
Turning the key beep on and off:
1. Press the MENU key and select PERSONAL SET. Press the OK key.
2. Select HANDSET TONE and press the OK key.
3. Select KEYBEEP and press the OK key. The current setting is displayed.
4. Select ON or OFF. Press the OK key to confirm.
30
Setting the handset’s time:
The time is displayed during standby mode.
1. Press the MENU key.
2. Select CLOCK / ALARM and press the OK key.
3. Select SET CLOCK and press the OK key . The current time is displayed.
4. Edit the time by using the digit keys.
5. Press the OK key to confirm.
Setting the handset’s alarm:
Users can set the alarm time and personalize the alarm tone.
1. Press the MENU key.
2. Select CLOCK / ALARM and press the OK key.
3. Select SET ALARM and press the OK key.
4. Select ON / OFF and press the OK key. If ON is selected, continue to step 5.
5. Enter the alarm time using the key pad digits.
6. Press the OK key to confirm.
Selecting an alarm clock ring melody:
1. Press the MENU key.
2. Select CLOCK / ALARM and press the OK key.
3. Select ALARM TONE and press the OK key.
4. Select
elect MELODY and press the OK key.
5. Select desired melody.
6. Press the OK key to confirm.
31
Setting alarm volume:
1. Press the MENU key.
2. Select CLOCK / ALARM and press the OK key.
3. Select ALARM TONE and press the OK key.
4. Select VOLUME and press the OK key.
5. Select desired volume and press the OK key.
Advanced Features
Transferring Skype calls from the PC to the handset:
1. In the system tray on the PC, right-click the Auvi icon and select USE PC.
2. Initiate a Skype call through the Skype application on the PC.
3. To transfer to the handset, right-click the Auvi icon and select USE HANDSET
4. Handset will ring and press TALK button to begin using the handset.
Using advanced flash features:
The PHIP65 comes with different flash durations. Check with the local service provider if unaware
which duration to use.
1. Press the MENU key and select ADV
ADVANCED SET and press the OK key.
2. Select FLASH TIME and press the OK key.
3. Select desired flash durations.
4. Press the OK key.
Using PABX:
1. Press the MENU key and select ADVANCED SET and press the OK key.
2. Select PABX and press the OK key.. The current PABX number (if avail.) will display.
3. Enter the PABX number to enable this feature. To disable PABX, clear the number.
4. Press the OK key to confirm.
32
Changing dial mode:
1. Press the Menu key and select ADVANCED SET. Press the OK key.
2. Select DIAL MODE and press the ok key. The current setting will be displayed.
3. Select TONE or PULSE and press the OK key to confirm.
Temporary tone dialing in pulse mode:
If the dialing mode is set to pulse, the user can press and hold the STAR key to set temporary
tone dialing. D will be displayed on the screen. Tone dialing will continue until the user hangs
up the handset.
Setting a pause:
1. Press the MENU key and select ADVANCED SET. Press the OK key.
2. Select PAUSE and press the OK key. The selected pause duration is displayed.
3. Press the UP and Down key to select the Pause duration. Press the OK key to confirm.
Setting an area code:
1. Press the MENU key and select ADVANCED SET. Press the OK key.
2. Select AREA CODE and press the OK key. The current area code (if available) is displayed.
3. Enter or edit the number. Press the OK key to confirm.
Using baby call:
Baby call allows the user to dial out a programmed number by pressing any key on the phone.
1. Press the MENU key and select ADVANCED SET. Press the OK key.
2. Select BABY CALL and press the OK key.
3. Select ON and press the OK key. Enter or edit the number and press the OK key again.
To turn BABY CALL off:
Press the OFF key.
Select Off and press the OK key.
33
Setting the voicemail waiting indicator (VMWI):
1. Press the MENU key and select ADVANCED SET. Press the OK key.
2. Select VMWI and press the OK key.
3. DELETE? will show on the screen. Press the OK key again to confirm.
Registering a handset:
Each base can register up to 4 handsets. Each handset can register up to 4 bases.
1. Press the MENU key.
2. Select ADV
ADVANCED SET and press the OK key.
3. Select REGISTRATION and press the OK key.
4. Before entering the PIN, press and hold the PAGING key on the base for 4 seconds.
The base is full:
Users can register up to 4 handsets to the same base. After registering 4 handsets to the
same base, the base unit becomes full. If the user wants to register an additional handset,
the user has to unregister one of the handsets. See unregistering a handset for more
information.
5. Enter the PIN (Personal Identification Number Default is 0000) and press the OK key.
Successful registration:
Users will hear a confirmation tone if the registration is successful. The handset label, the
handset number, and the clock will be displayed.
Unsuccessful registration:
If the registration is not successful, the handset registers back to its original base unit.
SEARCHING will be displayed if it has lost a link to the base unit. Follow the procedure and
try again. If you see UNREGISTER displayed, this means the phone is registering for the first
time.
Unregistering another handset:
A handset can unregister another handset registered to the same base. It cannot unregister itself.
1. Press the MENU key
2. Select ADVANCED SET and press the OK key.
3. Select DELETE HS and press the OK key.
34
4. Select the handset desired to unregister and press the OK key.
5. Enter the default PIN (0000) and press the OK key.
Selecting a base unit:
If the handset is registered to more than 1 base, users can select which base the handset will use.
1. Press the MENU key.
2. Select ADVANCED SET and press the OK key.
3. Select BASE SELECT and press the OK key.
4. Select the base to use and press the OK key.
Resetting handset’s personal settings:
Users can reset their personalized phone settings by following the steps below.
1. Press the MENU key.
2. Select ADVANCED SET and press the OK key.
3. Select RESET and press the OK key.
4. Enter the PIN (Default PIN - 0000).
5. Press the OK key to confirm.
Extra Features
Additional
Features
Locking the keypad:
Users can lock the phone’s keypad to prevent unwanted dialed calls. To set the keypad lock, follow
the given steps below.
1. Press and hold the KEY LOCK key during standby. When locked, LOCKED appears on the
display.
2. Press and hold the KEY LOCK key again to unlock the keypad.
NOTE: When a call comes in, the keypad becomes active. As soon as the call is ended,
the keypad is locked again.
35
Turning handset’s ringer on and off:
Users can use this shortcut to turn on and off the handset ringer.
1. Press and hold the RINGER OFF key.
Note:
appears to indicate the ringer is turned off. The handset will not emit any
sound for any incoming call.
View message waiting indicator (VMWI)
If you have subscribed to the voicemail service from the local phone company and / or Skype,
turns on when you have a new message in either of the voicemail-mailboxes. After the messages
have been listened to,
will turn off.
Finding a handset:
Locate the handset by using this feature:
Note: All handsets registered to the base unit will produce the paging tone for 30
seconds and their screens display PAGING. If an external call comes in, all the handsets
will stop paging and start playing the external ring tone.
Stop the paging:
Users can stop the paging by pressing any key on each handset or pressing the PAGING key
on the base again.
Not ringing:
A handset will not emit the paging tone if it is powered off or in a mode other than standby
mode. However, the rest of the handsets will alert the paging tone when PAGING has been
pressed.
Using CID first suppression
If the user has subscribed for a Caller ID service through his or her local phone company, his or
her phone will suppress the first ring before the CID. After resetting, first ring suppression will
be deactivated. The phone will automatically detect if CID service is subscribed after the first
call. If CID service is detected, the phone will start suppressing the first ring after the first call.
Note: Once first ring suppression is activated, the first ring before CID will be
suppressed even after the user has unsubscribed to the CID service. If the user has
unsubscribed to the CID service and does not wish to have the first ring suppressed,
please power recycle the base.
36
ExtraMulti-Handsets
Features
Using
NOTE: The user will need at least 2 handsets to carry out the functions mentioned in
this section.
Call someone within the same building:
Users can call someone in the building by using the intercom feature on the phone.
1. Press the INTERCOM key.
2. Select the handset desired to call and press the OK key OR press the number of the
handset desired to call.
3. Wait for the other handset to answer the call.
NOTE: After the other handset has answered, press the INTERCOM key repeatedly to
switch between the external call and the intercom call.
NOTE: If the other handset does not answer, pressing the INTERCOM key again to
cancel the attempted call and return to the external call.
Transfering calls to other handsets:
Users can transfer during an external call.
1. Press the INTERCOM key.
2. Select the handset desired to call and press the OK key or the number of the handset
desired to call.
3. Wait for the other handset to answer the call.
4. When the other handset has answered the call, press the OFF key or place the handset
back on the charger. The external call has now been transferred.
37
M
aking
3-way
calls:
Extra
Features
Using
multi-handsets
Invite another handset to join in on a phone call.
1. Press the INTERCOM key.
2. Select the handset desired to call and press the OK key or the number of the handset
desired to call.
3. Wait for the other handset to answer the call.
4. When the other handset has answered the call, press the CONFERENCE key or place the
handset back on the charger. The external call has now been transferred.
NOTE: If any handset hangs up during a conference call, the other handset will still
be connected to the external call.
Default Settings
Handset name*
Clock
Ringer melody (Telephone)
Ringer melody (Skype)
Ringer melody (Internal)
Ringer volume
Alarm
Alarm ringer melody
Alarm ringer volume
Key tone
Confirm tone
Backlit
Recall duration
Dial mode
PHIP65
00:00
Melody 8
Melody 5
Melody 1
Level 3
Off
Melody 1
Level 3
On
On
On
Duration 1
Tone
Contrast
Auto answer
Menu language
Pause duration
Area code
Baby call
Baby call number
Base select
MWI indication
Keylock
Earpiece
* This feature / function will not be set back to default after reset.
38
Level 2
Off
English
Pause 1
Empty
Off
Empty
Auto
On
Off
Medium
Extra Features
Trouble
Shooting
Problem(s)
Solution(s)
No dial tone when pressing TALK.
- Make sure that the adapter and the phone
cord are connected properly.
- Check to ensure that the batteries are fully
charged and installed properly.
- This phone does not work during power
failure.
Signal icon is flashing.
- Register your handset to a base.
- Move closer to the base unit.
The phone does not ring.
- Make sure the adapter and the phone
cord are connected properly.
- Move the handset closer to the base unit.
- Turn on the ringer.
When the handset is placed on the
charger, no beep is heard.
- Take the handset off the charger and put
it back again.
- Clean charging contacts with a clean, dry
cloth.
- Turn on the handset tone from the
PERSONAL SET menu.
- There will be no beep if the handset’s
power is turned off.
The call waiting call cannot be
answered.
- Check with the local phone company and
select the correct recall duration.
- End the current call, and press TALK again
to pick up the second call.
Battery icon remains empty although
the handset has charged for 24-hours.
- Please contact your dealer to purchase
new rechargeable battery.
- Check to make sure the battery icon is
scrolling while being charged.
No symbol on the display.
- Charge battery.
- Make sure the batteries are in the
compartment and your handset is ON.
Bad audio quality (crackles, echo, etc.)
- Move the PC to a different location.
- Install the base unit in a diff
different room
or higher location or away from other
electronic devices.
- Move closer to the base unit.
39
Problem(s)
Solution(s)
Cannot hear the other party clearly /
speaker too loud / quiet.
- Refer to making calls - Adjusting the
speaker volume on your PC.
Cannot make SkypeOut calls.
- Enter 00, + (press and hold 0) or 011
before the number to dial.
- Check available SkypeOut credits.
- Check to see if a link is established
between the handset and the base.
- Refer to “Calling A Landline Number With
SkypeOut” for more information.
Busy tone is returned while making
Skype call.
- Make sure both Skype and the PC
applications are started and are
running properly.
- Make sure the phone is setup correctly.
- Wait for the remote party to be on the
line.
The error “Access to Skype is rejected”
appears on the computer.
You need to reauthorize the driver to
access Skype. Simply follow these steps:
1. In the Skype program, select TOOLS,
then click OPTIONS.
2. Click on the PRIVACY tab.
3. In the RELATED TASKS section, click on
MANAGE OTHER PROGRAMS’ ACCESS
TO SKYPE.
4. The MANAGE API ACCESS CONTROL
window will popup. In the window,
select AUVIDUAL.EXE. Then, click the
CHANGE button on the right side.
5. Select ALLOW THIS PROGRAM TO USE
SKYPE and click OK.
6. Press OK again to close the API ACCESS
CONTROL window.
7. Click SAVE to apply the change.
Now your PHIP65 phone is reauthorized
for use with Skype.
NOTE: If the above solutions do not help, remove the power from both the handset
and the base. Restart Skype in the PC. Wait 15 minutes and try again.
40
Extra Features
Compliance
Statement
Equipment approval information:
Your telephone equipment is approved for connection to the Public Switched Telephone Network
and is in compliance with parts 15 and 68, FCC Rules and Regulations and the Technical Requirements
for Telephone Terminal Equipment Published by ACTA.
Notification to the local telephone company:
On the bottom of this equipment is a label indicating, among other information, the US number and
Ringer Equivalence Number (REN) for the equipment. You must, upon request, provide this
information to your telephone company.
The REN is useful in determining the number of devices you may connect to your telephone line
and still have all of these devices ring when your telephone number is called. In most (but not all)
areas, the sum of the RENs of all devices connected to one line should not exceed 5. To be certain of
the number of devices you may connect to your line as determined by the REN, you should contact
your local telephone company.
A plug and jack used to connect this equipment to the premises wiring and telephone network
must comply with the applicable FCC Part 68 rules and requirements adopted by the ACTA. A
compliant telephone cord and modular plug is provided with this product. It is designed to be
connected to a compatible modular jack that is also compliant. See installation instructions for
details.
Notes:
• This equipment may not be used on coin service provided by the telephone company.
• Party lines are subject to state tariffs, and therefore, you may not be able to use your own
telephone equipment if you are on a party line. Check with your local telephone company.
• Notice must be given to the telephone company upon permanent disconnection of your
telephone from your line.
• If your home has specially wired alarm equipment connected to the telephone line, ensure
the installation of this product does not disable your alarm equipment. If you have questions
about what will disable alarm equipment, consult your telephone company or a qualified
installer.
Rights of the phone company:
Should your equipment cause trouble on your line which may harm the telephone network, the
telephone company shall, where practicable, notify you that temporary discontinuance of service
may be required. Where prior notice is not practicable and the circumstances warrant such action,
the telephone company may temporarily discontinue service immediately. In case of such
temporary discontinuance, the telephone company must:
i. Promptly notify you of such temporary discontinuance;
ii. Afford you the opportunity to correct the situation; and
iii. Inform you of your right to bring a complaint to the Commission
pursuant to procedures set forth in Subpart E of Part 68, FCC Rules and Regulations.
41
The telephone company may make changes in its communications facilities, equipment, operations
or procedures where such action is required in the operation of its business and not inconsistent with
FCC Rules and Regulations. If these changes are expected to affect the use or performance of your
telephone equipment, the telephone company must give you adequate notice, in writing, to allow
you to maintain uninterrupted service.
Interference Information:
This device complies with Part 15 of the FCC Rules. Operation is subject to the following two
conditions : (1) This device may not cause harmful interference; and (2) This device must accept any
interference received, including interference that may cause undesired operation.
This equipment has been tested and found to comply with the limits for a Class B digital device,
pursuant to Part 15 of the FCC Rules. These limits are designed to provide reasonable protection
against harmful interference in a residential installation.
This equipment generates, uses, and can radiate radio frequency energy. If not installed and used in
accordance with the instructions, may cause harmful interference to radio communications.
However, there is no guarantee that interference will not occur in a particular installation.
If this equipment does cause harmful interference to radio or television reception, which can be
determined by turning the equipment off and on, the user is encouraged to try to correct the
interference by one or more of the following measures:
• Reorient or relocate the receiving antenna (that is, the antenna for radio or
television receiving the interference).
• Reorient or relocate and increase the separation between the telecommunications
equipment and receiving antenna.
• Connect the telecommunications equipment into an outlet on a circuit different
from that to which the receiving antenna is currently connected.
If these measures do not eliminate the interference, please consult your dealer or an experienced radio / television technician for additional suggestions. Also, the Federal Communications
Commission has prepared a helpful booklet, How To Identify and Resolve Radio / TV Interference
Problems. This booklet is available from the U.S. Government Printing Office, Washington, D.C. 20402.
Please specify stock number 004-000-00345-4 when ordering copies.
Noise:
Electrical pulse noise is present at one time or another. This is most intense during electrical storms.
Certain kinds of electrical equipment, such as light dimmers, fluorescent bulbs, motors, fans, etc.,
also generate pulse noise. Because radio frequencies are susceptible to this, you may on occasion
hear pulse noise through the receiver. This is usually only a minor annoyance and should not be
interpreted as a defect of the unit.
42
FCC RF radiation exposure statement:
This equipment complies with FCC RF radiation exposure limits set forth for an uncontrolled
environment. This equipment should be installed and operated with a minimum distance of 20
centimeters between the radiator and your body. This transmitter must not be co-located or
operated in conjunction with any other antenna or transmitter. For hand-held operation, this
phone has been tested and meets the FCC RF exposure guidelines. Use of other accessories may
not ensure compliance with FCC RF exposure guidelines.
Hearing aid compatibility (HAC):
This telephone system meets FCC and Industry Canada standards for Hearing Aid Compatibility.
Privacy:
Privacy of communications may not be ensured when using this telephone.
Additional information:
I.C. Notice:
Terminal equipment:
NOTICE: This equipment meets the applicable Industry Canada Terminal Equipment
Technical Specifications. This is confirmed by the registration number: the abbreviation, IC,
before the registration number signifies that registration was performed based on a Declaration of Conformity indicating that Industry Canada technical specifications were met. It
does not imply that Industry Canada approved the equipment.
NOTICE: The Ringer Equivalence Number (REN) for this terminal equipment is marked on the
equipment itself. The REN assigned to each terminal equipment provides an indication of
the maximum number of terminals allowed to be connected to a telephone interface. The
termination on an interface may consist of any combination of devices subject only to the
requirement that the sum of the Ringer Equivalence Numbers of all the devices does not
exceed five.
Radio equipment:
The term IC before the radio certification number only signifies that Industry Canada technical
specifications were met. Operation is subject to the following two conditions: (1) this device may
not cause interference, and (2) this device must accept any interference, including interference
that may cause undesired operation of the device.
Do not attempt to repair or modify this equipment:
Repairs to certified equipment should be made by an authorized maintenance facility designated
by the supplier. Any repairs or alterations made by the user to the equipment may render the
equipment void in product warranty and compliance. This could also void the user’s authority to
operate the equipment.
43
Auvi Electronics N.A. warrants this product to the original purchaser to be free from defects in material and
workmanship, under normal conditions, for a period of 90 days for parts and labor and 1 year for parts only from
the date of original purchase.
Auvi Electronics N.A. agrees at our option during the warranty period to repair any defect in material or
workmanship or to furnish an equal product in exchange without repair charges during the first 90 days. After
90 days, a flat labor rate* will be charged and needs to be sent along with the product. All warranty services are
to be performed strictly by Auvi’s technical support staff.
To obtain service, return the unit in a PREPAID envelope to:
Auvi Electronics N.A.
5988 Mid Rivers Mall Drive, Unit 131
St. Charles, MO 63304
Attention: Warranty Services
To ensure proper service, follow these steps:
1. Pack the unit in a well-padded sturdy carton.
2. Enclose a copy of your sales receipt to validate the date of purchase.
3. Auvi Technologies will elect to repair or replace the product, free of repair charges during
the first 90 days. After 90 days, a flat labor rate* will be charged and needs to be sent along
with the product.
* Call Warranty Services at 636-447-4005
Note: This warranty does not cover any product which has been subject to damage due to an act of
God, misuse, neglect, accident, abuse, commercial use, mishandling, misapplication,
maladjustments of consumer controls, power surges, lightning damage, any presence of sand,
humidity or liquids, rental use of product, faulty installation, set-up adjustments, or modification
of, or to, any part of the product, including the antenna. Normal wear and tear is also not
covered. Damage to external media such as DVD, CD, LP, and/or tape is not covered nor is the
cost incurred in shipping the unit for warranty repair. Under no circumstances shall Auvi
Technologies be liable for any loss (direct, indirect, incidental, foreseen, unforeseen, special, or
consequential) or for any damage arising out of, or in connection with, the use of this product.
Failure to include all necessary paperwork will result in the customer being charged for the
repair.
This warranty does not cover damage due to improper operation or maintenance, connection to improper
voltage supply, or attempted repair by anyone other than Auvi Electronics N.A., St. Charles, MO.
This warranty does not cover products sold AS IS or re-manufactured units. This warranty is valid only in the
United States.
This warranty gives you specific legal rights and you may also have other rights which vary from state to state.
IMPORTANT NOTICE: DO NOT RETURN THIS UNIT TO THE RETAIL STORE FOR SERVICE. REFER TO THE ABOVE
WARRANTY SERVICE INSTRUCTIONS.
PHONE: 636-447-4005 � www.auviworld.com � FAX: 636-447-4010
44
®
VISION BEYOND SOUND ®
Auvi Electronics N.A. & Auvi Electronics L.A.
Retail Divisions of Auvi Technologies
5988 Mid Rivers Mall Drive
St. Charles, MO 63304
www.auviworld.com
For customer service inquiries in the U.S. and Canada, please email [email protected]
For customer service inquiries in Latin and South America, please email [email protected]
© 2006 Auvi Technologies, LLC. All Rights Reserved. Auvi Electronics N.A., LLC and Auvi Electronics L.A., LLC are separate subsidiaries of Auvi
Technologies, LLC. All the mentioned trademarks or trade names are the property of their respective owners. Specifications of product
features are subject to change without notice, which might alter the functionality described within this instruction manual.