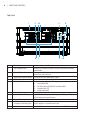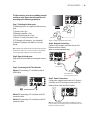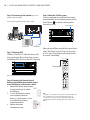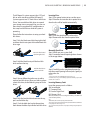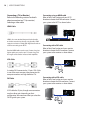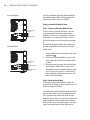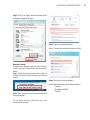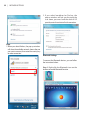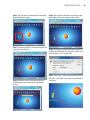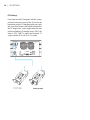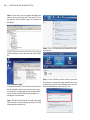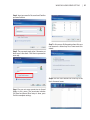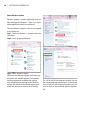
1
HD Multimedia Home Server
HDHome S4
User Manual
version HEIUBE02
2
|
INDEX
Table of contents
WARNING . . . . . . . . . . . . . . . . . . . . . . . . . . . . . .
Important Safety Instructions. . . . . . . . . . . . . . . . . . . . . .
Precautions . . . . . . . . . . . . . . . . . . . . . . . . . . . . . .
Notes on Disc Handling. . . . . . . . . . . . . . . . . . . . . . . . .
Notes about This Server . . . . . . . . . . . . . . . . . . . . . . . .
Home Server Overview . . . . . . . . . . . . . . . . . . . . . . .
Introduction . . . . . . . . . . . . . . . . . . . . . . . . . . . . .
Main Features . . . . . . . . . . . . . . . . . . . . . . . . . . . . .
Parts and Controls. . . . . . . . . . . . . . . . . . . . . . . . . .
Top Panel . . . . . . . . . . . . . . . . . . . . . . . . . . . . . . .
Rear Panel . . . . . . . . . . . . . . . . . . . . . . . . . . . . . .
Remote Controller . . . . . . . . . . . . . . . . . . . . . . . . . . .
Getting Started . . . . . . . . . . . . . . . . . . . . . . . . . . .
Step1. Checking the Accessories . . . . . . . . . . . . . . . . . . . . .
Step2. Open the back cover . . . . . . . . . . . . . . . . . . . . . . .
Step3. Connecting to the TV or Monitor . . . . . . . . . . . . . . . . .
Step4. Connecting to the Network. . . . . . . . . . . . . . . . . . . .
Step5. Connecting to the Power Cord . . . . . . . . . . . . . . . . . .
Step6. Connecting to the Speaker (If your TV or Monitor is without Speaker) .
Step7. Checking HDD . . . . . . . . . . . . . . . . . . . . . . . . .
Step8. Preparing the Remote Controller . . . . . . . . . . . . . . . . .
Step9. Power On/Off the system. . . . . . . . . . . . . . . . . . . . .
Inserting HDDs . . . . . . . . . . . . . . . . . . . . . . . . . . .
Inserting/Removing Discs . . . . . . . . . . . . . . . . . . . . . . .
Inserting Discs . . . . . . . . . . . . . . . . . . . . . . . . . . . .
Eject Discs . . . . . . . . . . . . . . . . . . . . . . . . . . . . . .
Manually Eject Discs . . . . . . . . . . . . . . . . . . . . . . . . . .
Inserting Memory Cards . . . . . . . . . . . . . . . . . . . . . . .
Vedio Connections. . . . . . . . . . . . . . . . . . . . . . . . . .
Connecting a TV (or Monitor) . . . . . . . . . . . . . . . . . . . .
Selecting a video cable . . . . . . . . . . . . . . . . . . . . . . .
Connecting with an HDMI cable . . . . . . . . . . . . . . . . . . .
Connecting with an DVI cable . . . . . . . . . . . . . . . . . . . .
. 5
. 5
. 6
. 6
. 6
. 7
. 7
. 7
. 8
. 8
. 9
. 10
. 13
. 13
. 13
. 13
. 13
. 13
. 14
. 14
. 14
. 14
. 15
. 15
. 15
. 15
. 15
. 15
. 16
. 16
. 16
. 16
. 16
INDEX
|
Table of contents
Connecting with an HDMI cable . . . . . . . . . . . . . . . . . . . . . . 16
Connecting an AV Amplifier. . . . . . . . . . . . . . . . . . . . . . . . 17
Selecting an audio cable . . . . . . . . . . . . . . . . . . . . . . . . . 17
Connecting with a Coaxial Audio Cable. . . . . . . . . . . . . . . . . . . 17
Connecting with a Toslink Optical Digital Audio Cable . . . . . . . . . . . . 17
Connecting with an HAMI Cable . . . . . . . . . . . . . . . . . . . . . . 17
Connecting Multi-Channel Audio . . . . . . . . . . . . . . . . . . . . . 17
Enjoying Videos, Photos, and Music . . . . . . . . . . . . . . . . . . . . 18
Getting started with Widows Media Center . . . . . . . . . . . . . . 18
Step1. Setting up Windows Media Center . . . . . . . . . . . . . . . . . 18
Step2. Optimize how Windows Media Center looks on your display. . . . . . . 18
Step3. Set up your speakers. . . . . . . . . . . . . . . . . . . . . . . . 19
Step4. Set up your media libraries. . . . . . . . . . . . . . . . . . . . . 19
Step5. Configure tuners, TV signal, and Guide. . . . . . . . . . . . . . . . 20
Watching TV . . . . . . . . . . . . . . . . . . . . . . . . . . . . . . 20
To watch live TV . . . . . . . . . . . . . . . . . . . . . . . . . . . . . 21
To watch live TV using a Media Center remote controller . . . . . . . . . . . 21
To find movies that are schedule to be broadcast . . . . . . . . . . . . . . 21
To watch Internet TV in Media Center . . . . . . . . . . . . . . . . . . . 22
Record TV . . . . . . . . . . . . . . . . . . . . . . . . . . . . . . . 22
To record a live TV show or movie . . . . . . . . . . . . . . . . . . . . . 22
To schedule recordings using the Guide . . . . . . . . . . . . . . . . . . 22
To schedule recordings using Search . . . . . . . . . . . . . . . . . . . . 22
To record a TV series . . . . . . . . . . . . . . . . . . . . . . . . . . . 23
To play a recorded TV program . . . . . . . . . . . . . . . . . . . . . . 23
To schedule recordings based on channel and time . . . . . . . . . . . . . 23
To schedule recordings based on keywords . . . . . . . . . . . . . . . . . 23
To add or remove folders that Windows Media Center searches when it looks for
recorded TV . . . . . . . . . . . . . . . . . . . . . . . . . . . . . . . 24
Play video and watch pictures. . . . . . . . . . . . . . . . . . . . . 24
To find and view a picture . . . . . . . . . . . . . . . . . . . . . . . . 24
To view or import pictures or videos from a removable device . . . . . . . . 24
To create a slide show . . . . . . . . . . . . . . . . . . . . . . . . . . 25
To play a slide show . . . . . . . . . . . . . . . . . . . . . . . . . . . 25
To customize setting for slide shows . . . . . . . . . . . . . . . . . . . . 25
3
4
|
INDEX
Table of contents
To rate and play your favorite pictures . . . . . . . . . . . . . . .
To find and play a video file . . . . . . . . . . . . . . . . . . . .
To slow down, speed up, or rewind a video file . . . . . . . . . . .
To change the video background color . . . . . . . . . . . . . . .
Play a CD or DVD or BD . . . . . . . . . . . . . . . . . . . . .
To play a DVD . . . . . . . . . . . . . . . . . . . . . . . . . .
To change the setting for DVD playback . . . . . . . . . . . . . .
To play an audio CD . . . . . . . . . . . . . . . . . . . . . . .
To play media files from a data CD, data DVD, or removable device . .
Supporting File Types . . . . . . . . . . . . . . . . . . . . .
Music file types . . . . . . . . . . . . . . . . . . . . . . . . .
Video file types . . . . . . . . . . . . . . . . . . . . . . . . .
Picture file types . . . . . . . . . . . . . . . . . . . . . . . .
Changing the Server Settings . . . . . . . . . . . . . . . . .
Display Settings . . . . . . . . . . . . . . . . . . . . . . . .
Change your screen resolution . . . . . . . . . . . . . . . .
Make the text on your screen larger or smaller . . . . . . . .
Audio Settings . . . . . . . . . . . . . . . . . . . . . . . .
Network Settings . . . . . . . . . . . . . . . . . . . . . . .
Bluetooth Settings . . . . . . . . . . . . . . . . . . . . . .
DTV Settings . . . . . . . . . . . . . . . . . . . . . . . . .
Windows Home Server Setting . . . . . . . . . . . . . . . .
Sharing Folders . . . . . . . . . . . . . . . . . . . . . . . .
User Accounts Setup . . . . . . . . . . . . . . . . . . . . . .
Additional Information . . . . . . . . . . . . . . . . . . . .
About Windows update . . . . . . . . . . . . . . . . . . . .
The new Windows Update is easier to use compared to its predecessor.
Finding Windows Updates . . . . . . . . . . . . . . . . . . . .
Specification . . . . . . . . . . . . . . . . . . . . . . . . . .
.
.
.
.
.
.
.
.
.
.
.
.
.
.
.
.
.
.
.
.
.
.
.
.
.
.
.
.
.
.
.
.
.
.
.
.
.
.
.
.
.
.
.
.
.
.
.
.
.
.
.
.
.
.
.
.
.
.
.
.
.
.
.
.
.
.
.
.
.
.
.
.
.
.
.
.
.
.
.
.
.
.
.
.
.
.
.
. 25
. 26
. 26
. 26
. 27
. 27
. 27
. 28
. 28
. 28
. 28
. 28
. 28
. 30
. 33
. 33
. 33
. 34
. 35
. 32
. 34
. 38
. 35
. 35
. 36
. 38
. 38
. 38
. 40
WARNING
To reduce the risk of fire or electric shock, do not
expose this device to rain or moisture.
To avoid electric shock, do not open the chassis.
Refer servicing to qualified personnel only.
Batteries or batteries installed device shall not be
exposed to excessive heat such as sunshine, fire or
the like.
Note: This equipment has been tested and found
to comply with the limits for a Class B digital
device, pursuant to Part 15 of the FCC Rules. These
limits are designed to provide reasonable protection against harmful interference in a residential
installation. This equipment generates, uses, and
can radiate radio frequency energy and, if not
installed and used in accordance with the instructions, may cause harmful interface to radio
communications. However, there is no guarantee
that interference will not occur in a particular
installation. If this equipment does cause harmful
interference to radio or television reception, which
can be determined by turning the equipment off
and on, the user is encouraged to try to correct
the interference by one or more of the following
measures:
•
Reorient of relocate the receiving antenna,
•
Increase the separation between equipment
and receiver.
•
Connect the equipment into an outlet on circuit different from that to which the receiver
is connected.
•
Consult the dealer or an experienced radio/TV
technician for help.
Shielded network cable must be used between
network hub and client in order to comply with
the limits for a digital device pursuant to Subpart
B of Part 15 of FCC Rules.
Important Safety Instructions
1. Always read the safety instructions carefully.
2. Keep this user’s manual for future reference.
3. Keep this equipment away from humidity.
4. Lay this equipment on a reliable flat surface
before setting it up.
5. The ventilator on the enclosure is used for air
convection and to prevent the equip¬ment
from overheating. Do not cover the ventilator.
6. Make sure that the power voltage is within its
safety range and has been adjusted properly
to the value of 100~240V before connecting
the equipment to the power inlet.
7. Place the power cord in a way that people are
unlikely to step on it. Do not place anything
on the power cord.
CAUTION:
Dangerous explosion if battery is incorrectly replaced. Replace only
with the same or equivalent type recommended by the manufacturer.
This symbol indicates that the product should not be placed in city / municipal waste.
Check local regulations for disposal of electronic products.
| 5
6
|
PRECAUTIONS
For Safety
Internal part is hazardous moving parts; please keep fingers and
other body parts away.
For Power Sources
•
For every change in power cord’s usage, please use an approved power cord with condition greater or equal to H05VV-F,
3G, and 0.75mm.
•
Do not disable the protective earth pin from the plug; the
equipment must be con¬nected to an earthed mains socketoutlet.
For Placement
•
For pluggable equipment, the socket-outlet shall be installed
near the equipment and shall be easily accessible.
•
Adjustment of the volume control as well as the equalizer to
other settings than the center position may increase the ear-/
headphones output voltage and therefore the sound pressure
level.
Notes on Disc Handling
•
To keep the disc clean, handle the disc by its edge. Do not
touch the surface.
•
Do not expose the disc to direct sunlight or heat sources such
as hot air ducts, or leave it in a car parked in direct sunlight as
the temperature may rise considerable inside the car.
•
After ejection a disc from the server, store the disc in its case.
•
Clean the disc with a cleaning cloth. Wipe the disc from the
center out.
•
Do not use solvents such as benzene, thinner, commercially
available disc/lens cleaners, or anti-static spray intended for
viny1 LPs.
•
If you have printed the disc’s label, dry the label before playing.
•
Do not attach a sticker type label on the disc. The disc changer
may be damaged.
•
Do not insert the following unsupported discs; doing so will
damage the unit or discs.
•
•
•
•
Discs whose shapes are nonstandard- sized or nonstandardshaped. (Card, heart, star, etc.
Discs with a paper sticker or seals.
Discs with a cellophane tape, or an adhesive residue of a
removed label.
Discs of non-standard thickness (thinner than 1.0mm, or
thicker than 1.5mm)
Copyrights
This product and manual are produced by Mvix(USA), Inc. and is
under copyright protection. Any reproduction, transfer, copy or other
illegal usages is not permitted, except for backup purpose by the
purchaser of the product.
We have put in our best effort to maintain accuracy in this manual,
but we may not guarantee the contents are absolutely accurate, for
the specification of this product may upgrade or change over time.
We reserve the right to make changes without notice.
.
Notice
If you want to know more about instruction and guidance for
Windows 7, please refer to http://windows.microsoft.com/en-US/
windows7/help/getting-started
HOME SERVER OVERVIEW
|
Introduction
Thank you for purchasing MVIX Multimedia Mini-Theater System, which will bring you full enjoyment
and high performance. We have especially designed this system to become the multimedia center of
your living room. With Dolby surround 5.1 channel and wireless transmission; you can get more through
easier way.
Main Features
•
Designed for High-speed, full HD enjoyment and style pursing.
•
The central server of Home IT system.
•
Audio/Video files sharing
•
Compatible with most of audio and video formats.
•
Built-in TV tuner with Antenna (optional)
•
Blu-Ray Drive
•
Support Wireless transmission
•
Multi-tasking advanced solution
•
Support 2/4/5.1 channel HD audio
•
Compatible with versatile file formats including MP3, WMA, WAV, JPEG, MPEG-1/2/4 and DIVX with
video solution for NTSC, PAL and HD up to 1080P full HD.
•
Multi-tasking performance to get more done.
•
Easy installation with unique thermal heat pipe valve and good noise control under 20dB.
•
Chic color lighting creates atmosphere & achieve ambience within home.
7
8
|
PARTS AND CONTROLS
Top Panel
1
No.
1
Part Name
Slot-in Optical Drive
2
Manual-Eject Hole
3
4
5
Optical Drive Active Indicator
Optical Driver Eject Button
Card Reader
6
7
Power Button
Hot-Swap Serial ATA bays
8
9
System Disk
MIC-IN Jack (pink)
Headphone-out Jack (green)
USB2.0 Ports
10
2
34
5
8
7
9
6
10
Description
Insert the CD or DVD disk into this slot, and it will load the contents
automatically.
When system is off, push a straightened paper clip into the manual
eject hole to release the disk.
It will be lit when the optical drive is active.
Press this button to eject the CD or DVD.
This Card Reader supports the following memory card:
(1)
Smart Media (SM)
(2)
SD/ SDHC/ MicroSD/ MiniSD/ TransFlash/ MMC
(3)
Compact Flash (CF)
(4)
Memory Stick (MS)
Press this button to power on the system
4x2.5” SATA I/II Hot-Swap Bays (Each support 500GB, up to 2TB);
Push the blue part to eject the drive.
HDD_0 is the internal system disk
Plug a microphone into this jack.
Plug an earphone or speaker into this jack.
Connect USB devices such as keyboard, mouse or USB Flash.
PARTS AND CONTROLS
|
Rear Panel
2
1
3
4
e-SATA
5
6
7
8
9
10
11
No.
Part Name
Description
1
TV Antenna Port
Connect antenna to this port to receive TV contents (Optional)
2
System Thermal Fans
This System Thermal Fan could lower down the temperature of the System
efficiently
3
Gigabit LAN port
The Gigabit LAN port can provide 10/100/1000Mbps transmission speed
4
Audio ports
Line-in/Optical S/PDIF-out (light-blue): Connect to an analog audio source
like CD/.DVD player / Connect to a Digital Decorder.
Line-out (green): Plug an earphone or speaker into this jack
Mic-in (pink): Plug a microphone into this jack Support High Definition
Audio 5.1 channels output.
5
Power Jack
Connect Power Cord to provide power to the system.
6
Power Thermal Fan
This Power Thermal Fan could lower down the temperature of the Power
7
DVI output
8
HDMI output
efficiently.
DVI port can output digital signal to the monitor
HDMI port can output digital video and audio signal to the monitor and the
audio system at the same time.
9
VGA output
VGA port can output analog signal to the monitor
10
eSATA ports
eSATA port can provide 3Gbps transmission speed to the connected
11
USB2.0 Ports
devices
Connect USB devices such as keyboard, mouse or USB Flash.
9
10
|
PARTS AND CONTROLS
The remote control has five types
of buttons:
1
29
24
23
The remote control has five types of buttons:
•
Playback Buttons: To control your media.
•
Navigation Buttons: To move between
items on the screen.
•
Audio-visual (AV) Buttons: To change
channels and adjust volume.
•
Numeric Keypad Buttons: To enter alphanumeric characters or TV channels.
•
Teletext and Fastext Buttons: To access
teletext functionality (if available).
21
20
3
A
7
8
5
9
4
2
6
B
12
16
13
14
17
31
30
18
C
11
15
19
22
10
22
19
28
26
27
25
D
1
3
ABC
DEF
4
5
GHI
JKL
6
MNO
7
8
9
PQRS
TUV
WXYZ
0
#
*
CLEAR
E
2
ENTER
PARTS AND CONTROLS
No.
Part Name
Description
1
Power button
Press to put the computer in standby mode; press again to bring the computer out of
standby mode and return to the desktop.
A. Playback Buttons
2
PAUSE
Pause the currently playing media; press again to resume.
3
STOP
Stop the currently playing media. (Press PLAY to start the track again from the beginning.)
4
FWD
Speed up the currently playing media; if pressed repeatedly, cycles through three fast
forward speeds from slowest to fastest.
5
PLAY
Play the selected song, Album, or Playlist.
6
SKIP
For Album or Playlist, skip to the next song. For Recorded TV, skip ahead 29 seconds.
7
RECORD
Record the TV show to disk. If pressed while live TV is on, record the current show.(If pressed
twice, record the series). If pressed from the Electronic Programming Guide, record a TV
show or TV series to disk.
8
REW
Rewind the currently playing media; if pressed repeatedly, cycles through three rewind
speeds from slowest to fastest.
9
REPLAY
For TV, go back five seconds. For Album or Playlist, play the previous song. For DVD, play the
previous chapter.
B. Navigation Buttons: Use the navigation buttons on the remote control to move between items on the screen in
Media Center.
10
START
Start Media Center, or go to the Start menu if Media Center is already running.
11
MORE
Show information about the selected item.
12
UP
Move to the item above.
13
RIGHT
Move to the item on the right, or move from the menu to the folder items. If a slide show is
playing, skip to the next picture.
14
OK/ Mouse Pad
Select the active item & mouse function touch pad(as the mouse button lightened)
15
BACK
Go to the previous screen
16
LEFT
Move to the item on the left, or move to the menu. IF a slide show is playing, return to the
previous picture.
17
DOWN
Move to the item below.
|
11
12 |
INDEX TO PARTS AND CONTROLS
C. AV Buttons: Use the AV buttons to change channels, adjust volume, access a DVD menu, or to put Media Center in
standby mode. Some buttons, such as GUIDE, act as shortcuts.
No.
Part Name
Description
18
MUTE
Mute the sound. Press MUTE again to turn the sound back on.
19
CH/PG+ / CH/PG-
Change the channel
20
GUIDE
Go to the Electronic Programming Guide.
21
LIVE TV
Switch to live TV if TV is not currently playing. If TV is paused, skip to live programming.
22
VOL+ / VOL-
Adjust the volume
23
RECORDED TV
Go to the Recorded TV page
24
DVD MENU
Display the DVD menu
25
VIDEO
Go to the Video Page
26
RAIDO
Go to the Radio Page
27
PICTURE
Go to the Picture Page
28
MUSIC
Go to the Music Page
29
MOUSE
30
MOUSE RIGHT KEY
31
MOUSE LEFT KEY
D. Numeric Keypad
The numeric keypad consists of numbers from 0 through 9 and two other keys: ENTER and CLEAR. You can use the
numeric keypad to type alphanumeric characters anywhere in Media Center that you can enter text. If you want to
delete characters you have typed, press CLEAR; press ENTER to submit the characters you have typed. You can also use
the numeric keypad to enter TV channels.
E. Teletext Buttons
Media Center supports teletext when it is available. The colored Fastext buttons on the remote control for Media Center PC work much like the teletext buttons on a standard teletext-enabled TV.
GETTING STARTED
| 13
The box contains accessories, padding material
and Server unit. Please must operate this unit
according to the following procedures.
Step 1. Checking the Accessories
The following items are supplied in the accessory
pack:
(1) Power Cord x 1pcs
(2) Remote Controller x 1pcs
(3) Size AA/AAA batteries x 2pcs
(4) Driver CD with user manual x 1pcs
(5) TV Dongle with antenna x 1pcs (optional)
(6) Wireless Keyboard with Mouse x 1pcs (optional)
Note: The packing contents may vary from different area, and if you have any question
about the above list, please feel free to contact your local dealers for the details. Mvix
reserves the right to change or upgrade the contents for better performance.
DVI cable
VGA cable
*Please see Page 16 for Various Connections.
Step 4. Network Connections
Connect a DSL modem and Media Server with
Ethernet cable (as below).
(Please see Section on Network setup)
Wi-Fi
Step2. Open the back cover
Open the back cover before inserting the connectors
Step3. Connecting to the TV or Monitor
Method 1. Connecting a TV or Monitor with an
HDMI cable;
Ethernet cable
LAN/ WLAN Router
or Boardband wireless Router
HDMI
HDMI
Step 5. Power Connections
Connect the supplied power cord to AC-IN terminal of the server. Then plug the server and TV or
Monitor Power Cord into the AC outlet.
Method 2. Connecting a TV or Monitor with DVI
connector cable;
Method 3. Connecting a TV or Monitor with VGA
connector cable.
Note: The power cord type will be different as different country,
please check the power cord type with your local dealer if the supplied power cord is not correct.
14 |
INSTALLING HARD DRIVES/ INSERTING / REMOVING DRIVES
Step 6. Connecting to the Speaker (If your TV or
Monitor is without Speaker)
Connecting the Speaker with audio cable as below:
Step 9. Power On / Off the system
Once you complete to assemble the basic equipment with Media Server together, please press the
Power Button
on the front of the panel to
turn on the system.
Power button
5.1 Channels
2.1 Channels
Microphone
Step 7. Checking HDD
HDHome S4 has four 2.5” hard disk drivers with
hot swap function. Please check if the system is
installed one HDD at least on the HDD_0 position.
When you would like to turn off the system, please
select “Shut Down” from the “Start” on the screen
of OS; or press “Power Button” of Remote Controller to enter “Sleep Mode”.
Power button
(Please see detail instruction of Hot Swap HDD Cage)
1
Step 8. Preparing the Remote Control
Before using the Remote Controller, please
insert the batteries at the back as shown
1. Remove the battery compartment
cover by pushing on its release
and lifting up.
2. 2. Insert the batteries, making
sure to properly orient the
positive (+) and negative (-) ends
as specified by the battery
compartment labels.
3. Replace the battery
compartment cover.
2
ABC
4
5
GHI
JKL
3
DEF
6
MNO
7
8
9
PQRS
TUV
WXYZ
*
CLEAR
0
#
ENTER
Note:
1. If you have selected S3 (BIOS) to shutdown the system and the light on the
device is ON about 15~20 seconds, please WAIT until the light is off.
2. In order for the audio system to perform optimally, the S/PDIF cable
length should be less than 2m. We suggest a cable with length no more
than 1m.
INSTALLING/ INSERTING / REMOVING HARD DRIVES
| 15
The HDHome S4 system supports four 2.5” hard
disk or solid state drives and the HDHome S2
System supports two 2.5” hard disk or Solid State
Drives. You can add hard disk drives to expand
your storage size as you need. Also, you can use
these drives to organize RAID configuration or
hot-swap hard disk drives while the system is
operating.
Inserting Discs
Step1. Press power button to turn on the server.
Step2. Place the disc into the slot-in optical drive,
then the disc will be loaded automatically.
Please follow the instructions to setup your hard
disk drives:
Eject Discs
Step1. Press the eject button to release disc.
Step2. Remove the disc from the optical drive.
Step1. Push the black round clip from right to left
to release the drive to eject the installed hard disk
drive cage.
Move the black round
clip from right to left.
Manually Eject Discs
Step1. Make sure your system if off.
Step2. Locate the manual ejecting hole as shown
in the images below.
Step2. Hold the black bar to pull the hard disk
drive out from the tray.
Hold the black bar to
pull the hard disk
Step3. You can follow the similar way to add or
remove hard disk drives. When you add or replace
a hard disk drive, do the following steps to fix the
drives.
Step3. Carefully push a straightened paper clip
into the manual ejecting hole and press gently to
release the disc.
Caution:
1. Never remove the disc manually while your system is on.
2. If the disc does not eject immediately, repeat the manual eject procedure
until the disc is released.
Inserting Memory Cards
Insert the memory cards as follows.
SM: Smart Media
CF: Compact Flash
SD: Secure Digital Card
MS: Memory Stick
SM
CF
Step4. Push the hard disk drive back into the ray,
press and hold the clip.
Step5. Push the black bar back to the position,
then release the blue clip to fix the hard disk drive.
SD
MS
(Once the Media Center is reading the memory card, LED indicator will turn yellow.)
Note::
* With a Memory Stick or an SD memory Card, push the card until clicks.
* Do not remove or insert memory cards while the Memory Stick/CF/SD/xD-Picture Card LED indicators are lighting as the cards are being accessed.
* Be sure to insert the memory card into the corresponding slot. Inserting a wrong card may cause a
malfunction.
16 | VIDEO CONNECTIONS
Connecting a TV (or Monitor)
Refer to the following sections for details
about connection to a TV (or monitor).
Selecting a video cable
Connecting using an HDMI cable
Refer to Rear Panel Section and your HDTV
direction to locate the HDMI connector. Connect
your system to the HDTV as shown below.
HDMI Cable
Standard HDMI cables can be up to 5 meters long, but
higher quality ones can be up to 15 meters long, and
the length can be further increased with amplifiers.
HDMI
HDMI is the new standard that provides both audio
and video transmission through a single cable. HDMI
supports resolution of 1080p with digital audio and are
used for connecting to an HDTV.
HDMI
e-SATA
Connecting with a DVI cable
Refer to Rear Panel section and your monitor
direction to locate the DVI connector. Connect
your system to the monitor as shown below.
VGA Cable
e-SATA
A standard VGA connector has 15-pins. VGA Cable
is one of the most common video connectors for
computer monitors and high-definition TVs.
DVI Cable
A DVI cable has 29 pins, though some connectors
may have fewer pins depending on their
configuration. We recommend that you select the
DVI-D type for your system.
Connecting with a VGA cable
Refer to Rear Panel section and your monitor
direction to locate the VGA connector. Connect
your system to the monitor as shown below.
e-SATA
CONNECTING AN AV AMPLIFIER
Connecting an AV Amplifier
Refer to the following sections for details about
connection to an AV Amplifier (or speakers).
Selecting an audio cable
Coaxial Audio Cable: For Coaxial S/PDIF
| 17
Connecting with an HDMI Cable
Refer to Rear Panel section (page 9) and your AV
Amplifier direction to locate the HDMI connector.
Connect your system to the AV Amplifier as shown
below.
HDMI
HDMI
3.5mm Stereo Audio Cable: A 3.5mm stereo audio
cable lets you connect to a 2 channel speakers.
Toslink Optical Digital Audio Cable: For Optical S/
PDIF Optical S/PDIF
Connecting Multi-Channel Audio
Use 3.5mm stereo audio cable may need to plus a
2-RCA converter to connect to your AV Amplifier
or Multi-Channel speakers.
Connecting using a Coaxial Audio Cable
Refer to Rear Panel section (page 9) and your AV
Amplifier direction to locate the Coaxial S/PDIF
connector. Connect your system to the AV Amplifier as shown below.
Refer to the following diagrams for the function of
each audio jack on the rear panel.
2-Channel Mode
Sterero Speaker
Connecting using a Toslink Optical Cable
Refer to Rear Panel section (page 9) and your AV
Amplifier direction to locate the Optical S/PDIF
connector. Connect your system to the AV Amplifier as shown below.
18
|
ENJOYING VIDEOS, PHOTOS, AND MUSIC
4-Channel Mode
Your Mvix HDHome comes pre-loaded with Windows Media Center. Which is fully-equipped for
you to enjoy Videos, Photos, and Music
Getting started with Media Center
Side-Surround
Channels
Front channels
5-channel Mode
Step 1. Setting up Windows Media Center
The first time you start Media Center, you'll see
a setup page with information about various
features, as well as two setup options. The quickest method is, not surprisingly, Express. You can
choose this option now if you want to jump right
in.
Let’s walk through the Custom setup options to
give you a better idea of what you can do with
Media Center.
1.
2.
Side-Surround
Channels
Front channels
Center/ Subwoofer
Channels
3.
Using a Media Center remote, press the green
Start button .
The first time you start Media Center, on the
setup page, select Continue, and then select
Custom.
When you reach the page titled Get the Most
from Windows Media Center, select Yes to
allow Media Center to download album cover
art, DVD cover art, current TV guide listings,
information from online media services, and
other useful information.
Step 2. Optimize the display.
The Display Configuration wizard is helpful for
getting the best image quality possible on your TV
screen or computer monitor.
The wizard takes you through the main part of the
process with a series of easy-to-understand questions. If you’re unsure about the details of your
hardware setup, such as the name of a cable or the
type of display you have, look at the illustrations
in the wizard—they can help you figure out what
type of connection you’re using. When you’ve
ENJOYING VIDEOS, PHOTOS, AND MUSIC
finished answering the questions, and you’re happy with the way your display looks, exit the wizard.
If you’re not satisfied, you can find additional
display options under Adjust display controls.
| 19
Each time you start Media Center, it automatically
scans the Music, Pictures, and Videos libraries on
your computer. But what if your music files are
on an external hard drive or your pictures are on
a different computer in your home group? Don’t
worry—Media Center has solutions.
1.
You can return to the Display Configuration wizard
any time:
1. Using a Media Center remote, press the green
Start button
.
2. On the Windows Media Center start screen,
scroll to Tasks, select Settings, select General, select Windows Media Center Setup, and
then select Configure Your TV or Monitor.
In the Media Library wizard, select the type
of media you want to add (for example, Music), and then select Next.
2. Select Add folders to the library, and then
select Next.
3. Select On this computer (includes mapped
network drives), and then select Next.
4. Browse to find the folder where your files are
stored, select the check box next to the folder,
and then select Next.
Media Center will search the folder for digital media. It will also save your folder selections for the
next time you start the program.
Step 3. Set up your speakers
If your Media Center is connected to a surround
sound system, you can use the Speaker Setup wizard. Choose your speaker configuration, and then
use the test feature to play a chime sound. Listen
closely to each individual speaker to make sure it’s
receiving a signal.
You can return to the Speaker Setup wizard any
time:
1. Using a Media Center remote, press the green
Start button
.
2. On the Windows Media Center start screen,
scroll to Tasks, select Settings, select General, select Windows Media Center Setup, and
then select Set Up Your Speakers.
Step 4. Set up your media libraries
If you want to import files from a shared folder
on another computer, the process is similar: Just
select On another computer and Media Center
will search for shared folders rather than local
ones. For more information, see Add media files to
Windows Media Center.
You can return to the Media Library wizard any
time:
1. Using a Media Center remote, press the green
Start button .
2. On the Windows Media Center start screen,
20 | WATCHING TV
scroll to Tasks, select Settings, and then select
Media Libraries.
Step5. Configure Tuners, TV signal, and Guide
This option only appears in the Optional Setup
menu if Media Center detects a TV tuner. A TV
tuner is a hardware device that you can connect
to your computer through an internal expansion
slot or an external expansion port, such as a USB
port. With a compatible TV tuner, you can connect
a TV signal to your computer to use one of Media
Center's best features: watching and recording TV.
The TV Setup wizard will guide you through the
process of setting up a TV signal to watch and
record in Media Center. When you reach the TV
Signal Detection Result page, select Yes, configure TV with these results, and then Media Center
will do most of the work for you.
When you reach the Guide wizard, you'll need to
enter your ZIP Code and then select your TV service provider from a list. If you're not sure, choose
the one that's closest to your area. Media Center
will use this information to set up the Guide, an
essential tool for watching and recording TV.
You can return to the TV Setup wizard any time:
1. Using a Media Center remote, press the green
Start button
.
2. On the Windows Media Center start screen,
scroll to Tasks, select Settings, select General,
select Windows Media Center Setup, and then
select Set Up TV Signal.
For more information about setting up TV tuners, see TV on your computer: Understanding TV
signals and TV tuners.
If your computer has the necessary hardware, you
can use Windows Media Center to watch, pause,
and rewind live and recorded TV programs on
your PC.
There are two primary ways to control Media Center: with a mouse and keyboard, or with a Media
Center remote control. Most of the procedures
in this topic refer to the mouse and keyboard
method, but the remote control method is often a
more satisfactory experience.
There are many types of Media Center remote
controls available to buy—make sure that the one
you want is compatible with your computer.
WATCHING TV
1.
2.
•
•
3.
•
•
•
•
•
•
•
4.
Click the Start button , click All Programs,
and then click Windows Media Center.
To begin watching live TV, do one of the following:
On the Windows Media Center start screen,
scroll to TV, and then click Live TV.
On the Windows Media Center start screen,
scroll to TV, click Guide, locate the TV show
that you want to watch, and then click a show
that's currently airing.
To control playback of live TV, move the
mouse so that the playback controls appear,
and then do any of the following:
Click the Pause button to temporarily
pause the program. You can keep a program
paused for about 30 minutes. When you're
ready to resume the program where you left
off, click the Play button .
Move the slider that appears above the
playback controls to a different point to start
watching from that point in the TV show.
Click the Skip Backward button or the
Rewind button
to watch something
again, and click the Skip Forward button or
the Fast Forward button to move ahead in the
program.
Click the Volume Increase button
or the
Volume Decrease button
to increase or
decrease the volume, and click the Mute button to turn the sound on or off.
Click the Channel Decrease button or the
Channel Increase button
to go down one
channel or up one channel, respectively.
Click the Pause button
, and then click the
Skip Forward button
repeatedly to move
forward frame-by-frame.
Click the Pause button , and then click the
Fast Forward button one, two, three, or four
times to move forward at different speeds.
When you're finished watching live TV, move
the mouse, and then click the Stop button .
| 21
Watch live TV using the Remote Control
1. To use a Media Center remote to begin watching TV, do one of the following:
•
On the remote, press the LIVE TV button.
•
Press the GUIDE button, locate the TV show
that you want to watch, and then press the
OK button.
2. To control playback of live TV, do any of the
following:
•
Press the CH + button or the CH - button to
go up one channel or down one channel,
respectively.
•
Press the ENTER button to quickly go back to
the last channel you were watching.
•
Press the FWD button or the SKIP button to
move ahead in the program.
•
Press the REW button or the REPLAY button to
watch something again.
3. When you're finished watching live TV, press
the STOP button.
Find Schedules and Program Guide
1. Click the Start button
, click All Programs,
and then click Windows Media Center.
2. To find movies that are airing on TV, do one of
the following:
•
On the Windows Media Center start screen,
scroll to Movies, and then click Movie guide.
•
On the Windows Media Center start screen,
scroll to Movies, click Search, choose a search
category (such as Movie Director), and then
enter your search criteria.
Watch Internet TV
With Internet TV in Media Center, you choose
from many TV shows, movies, and music videos
to watch directly from the web. All you need to
watch Internet TV is an Internet connection—no
TV tuner is required.
While much of the available content is free, some
programs might require a subscription to a
22
|
RECORD TV
specific service.
To watch Internet TV:
1. Click the Start button , click All Programs,
and then click Windows Media Center.
2. On the Windows Media Center start screen,
scroll to Extras, click Internet TV, and then
browse the available content.
You can record live TV shows and movies directly
onto your computer. You can even schedule a
recording in advance or automatically record new
episode of your favorite TV series.
Record a live TV show or movie
You can record a TV show or movie that's currently
airing. When you do this, the show is recorded
from the moment you start recording. For
example, if you're halfway through watching a
show before you start recording it, the recording
won't include the first half.
1. Click the Start button , click All Programs,
and then click Windows Media Center.
2. On the Windows Media Center start screen,
scroll to TV, and then click Live TV.
3. While a program is airing, move the mouse so
that the playback controls appear, and then
click Record .
Schedule Recordings using the Guide
To change the options for recordings, such as the
recording quality or the location where recorded
TV shows are stored, see Set recording options
in Windows Media Center.
There are two primary ways to control Media
Center: with a mouse and keyboard, or with a
Media Center remote control. The following
procedures explain the mouse and keyboard
method using the playback controls that appear
when you move your mouse.
You can quickly schedule recordings while
browsing the Guide for upcoming TV shows and
movies. To learn how to set up the Guide, see the
section in Getting started with Windows Media
Center entitled "Configure tuners, TV signal, and
Guide."
1.
2.
On the Windows Media Center start screen,
scroll to TV, and then click Guide.
Right-click the program that you want to
record, and then click Record to schedule a
recording of the program.
Schedule Recordings using Search
You can search in Media Center to find a TV show
or movie that you want to record.
1.
2.
3.
On the Windows Media Center start screen,
scroll to TV, and then click Search.
Click the category that you want to search by
(such as Title), and then follow the instructions
to start a search.
On the search results page, click the TV show
or movie that you want to record, and then
RECORD TV
click Record to schedule a recording of the
program.
Record a TV series
Rather than schedule the recording of your
favorite TV show every week, you can automate
the process by scheduling the recording of an
entire series.
1.
2.
On the Windows Media Center start screen,
scroll to TV, and then click Guide.
Locate the TV series that you want to record,
click it, and then click Record Series.
Play a Recorded TV program
1.
2.
•
•
•
•
3.
On the Windows Media Center start screen,
scroll to TV, click Recorded TV, and click the
show you want to watch and then click Play
or Resume.
To control the playback of a recorded TV
program, move the mouse to display the
playback controls, and then do any of the
following:
Click Pause
to temporarily pause the
program. You'll see a time span bar that shows
how much time has passed in the recording.
When you're ready to resume the program
where you left off, click Play .
Move the slider that appears above the
playback controls to a different point to start
watching from that point in the recorded
program.
Click Skip Backward
or Rewind to watch
something again, and click Fast Forward
or Skip Forward
to move ahead in the
program.
Click the Volume Increase button or the
Volume Decrease button to increase
or decrease the volume, and click the Mute
button to turn the sound on or off
.
When you're finished watching the recorded
| 23
program, move the mouse, and then click Stop
.
Schedule Recordings on channel and time
You can set up Media Center to automatically
record a specific channel at a specific time.
1. On the Windows Media Center start screen,
scroll to TV, and then click Recorded TV.
2. Click Add recording, and then click Channel
and Time.
3. In Channel, enter the channel that you want
to record.
4. In Frequency, click the Plus or Minus
button to specify how often you want to
record the channel.
5. If you selected Record Once for Frequency,
in Date, click the Plus
or Minus button
to specify the recording date.
6. In Start time, enter the time you want the
recording to start.
7. In Stop time, enter the time you want the
recording to stop.
8. Under Keep, click the Plus or Minus
button to specify how long you want to keep
the recorded show.
9. Click Record.
Schedule Recordings based on keywords
You can set up Media Center to automatically
record TV shows and movies based on keywords
that are associated with a program. These include
an actor's name, director's name, or even a word
that appears in the title.
In the future, when a TV show or movie airs that
matches keywords you specified, the program will
automatically record.
1. On the Windows Media Center start screen,
scroll to TV, and then click Recorded TV.
2. Click Add recording, click Wish List
or Keyword, and then click a category
depending on the keyword that you want to
use for recording (such as Actor name).
24 |
PLAY VIDEO AND WATCH PICTURES
3. Type the keyword for your recording, and then
do one of the following:
•
•
•
Click the matching keyword you're looking for
in the search results to record programs based
on that keyword.
Under Add to wish list, click the Record All
Shows with button to record based on the
exact word you typed. This can be useful
if you didn't see the keyword you were
looking for in the search results, but you want
to record future programs based on that
keyword.
If you clicked the Generic Keyword category
in step 2, click Save to record programs based
on that keyword.
Play video and Watch pictures
To find and view a picture
If you can't find a particular picture, try changing
the way Media Center groups your pictures.
1.
4. Click the Plus or Minus
button in the
different categories to modify the settings
that will be used for your custom recording,
click Record, and then click OK.
2.
3.
Add or Remove Folders that Media Center
searches when it looks for Recorded TV
You can add folders for Media Center to monitor
for recorded TV files. To be recognized by this
version of Media Center, the files must be either
Windows TV files (.wtv) or Microsoft Recorded TV
files (.dvr-ms).
1.
2.
On the Windows Media Center start screen,
scroll to Tasks, click Settings, click TV, click
Recorder, and then click Media Libraries.
Follow the steps to add or remove locations
that Media Center will search when it looks for
recorded TV.
4.
Click the Start button , click All Programs,
and then click Windows Media Center.
On the Windows Media Center start screen,
scroll to Pictures + Videos, and then click
Picture library.
Click Folders to sort your folders and files
alphabetically, click Date taken to sort folders
and files by date, or click Tags to sort files by
tags that have been applied. (To learn more
about tags and how to use them, see Tag
pictures so they're easier to find.)
Click the picture that you want to view.
View / Import Pictures or Videos from a Removable Device
If you have pictures on a removable device, such
as a USB flash drive or a digital camera, you can
view the pictures in Media Center or import them
directly to your computer.
1.
2.
Click the Start button , click All Programs,
and then click Windows Media Center.
If Media Center is not in full-screen mode,
click the Maximize button
.
PLAY VIDEO AND WATCH PICTURES
3.
4.
•
•
Connect your removable device to your
computer. (Cameras and most other
removable devices are usually connected to
a USB port.)
In the dialog that appears, do one of the
following:
Click Import pictures and videos, and then
follow the instructions to copy all the pictures
and videos on your device to the My Pictures
folder on your computer. (To see imported
videos in Media Center, you'll need to manually move them to the My Videos or Public
Videos folder in Windows Explorer. For more
information, see Managing your videos.)
Click View pictures or View videos to access
the pictures or videos on the device without
copying them to your computer.
Create a Slide Show
A slide show is a way to view a group of photos
one-by-one at full screen. You can create your own
slide show complete with pictures and music of
your choice, and then save it for easy access later.
1.
Click the Start button , click All Programs,
and then click Windows Media Center.
2. On the Windows Media Center start screen,
scroll to Pictures + Videos, and then click
Picture library.
3. Click Slide shows, click Create Slide Show,
and then follow the instructions to add pictures and music to your slide show.
4. On the Review & Edit Slide Show page, click
Add More to add additional pictures and music, and when you're finished, click Create.
5. On the Picture library page, click the slide
show you want to play, and then click Play
slide show.
To play a slide show
1. On the Windows Media Center start screen,
scroll to Pictures + Videos, and then click
Picture library.
| 25
2.
On the Picture library page, click Slide shows,
click the slide show you want to play, and then
click Play slide show.
3. While your slide show is playing, move the
mouse to make the playback controls appear,
and then do any of the following:
•
Click the Left arrow button or the Right
arrow button to go back or forward one
picture in the slide show.
•
Click the Pause button to pause the music
and the slide show.
•
Click the Skip Forward button or the Skip
Backward button
to go ahead to the next
song or go back to the previous song.
•
Click the Mute button to mute the sound.
•
Click the Volume Increase button or the
Volume Decrease button
to change the
volume.
•
Click the Stop button
to stop the slide
show. (The music will continue playing, but
the pictures won't appear.)
Customize Setting for Slide Shows
There are many options for customizing the presentation of your slide shows. You can specify the
order in which pictures are shown, the duration of
the transitions, and other aspects of a slide show
presentation.
1. Click the Start button , click All Programs,
and then click Windows Media Center.
2. On the Windows Media Center start screen,
scroll to Tasks, click Settings, click Pictures,
and then click Slide Shows. You can customize your slide show using the options on this
screen.
3. Click Save to save the new settings.
Rate and play your favorite pictures
You can rate individual pictures so you can keep
track of your favorites, and then play a special
presentation of only your favorite pictures.
26 |
1.
2.
3.
4.
PLAY VIDEO AND WATCH PICTURES
Click the Start button , click All Programs,
and then click Windows Media Center.
On the Windows Media Center start screen,
scroll to Pictures + Videos, and then click
Pictures library.
Right-click a picture that you want to rate, and
then click the Rating button (five stars in a
row) multiple times until it displays the desired rating.
Click the green Start button
to return
to the Windows Media Center start screen,
scroll to Pictures + Videos, and then click
Play favorites.
By default, Media Center uses ratings to determine
which pictures are your favorites. To change the
Favorite Picture settings, from the Media Center
start screen, scroll to Tasks, click Settings, click
Pictures, click Favorite Pictures, make any adjustments you like, and then click Save.
To find and play a video file
If you're having trouble finding a particular video
file, try changing the way that Media Center
groups your videos.
1. Click the Start button , click All Programs,
and then click Windows Media Center.
2. On the Windows Media Center start screen,
scroll to Pictures + Videos, and then click
Video library.
3. Click Folders to sort your folders and files
alphabetically, or click Date taken to sort
them by date.
4. Find the video that you want to watch, and
then click the video file to play it.
FF / FR, Frame-Advance a video file
1. Click the Start button , click All Programs,
and then click Windows Media Center.
2. On the Windows Media Center start screen,
scroll to Pictures + Videos, and then click
3.
4.
•
•
•
•
Video library.
Find the video that you want to watch, and
then click the video file to play it.
Click the Pause button , and then do one
of the following:
Click the Fast Forward button once to play
the video in slow motion.
Click the Fast Forward button four times to
speed up playback of the video.
Click the Rewind button one, two, three, or
four times to play the video backwards at
different speeds.
Click the Play button
to resume playback
at normal speed.
Change the Background Color on a Video
If an unchanging image stays on the screen for
too long, sometimes a faint remnant of the image
will stay on the screen even after a new image
has replaced it. This is called screen burn. To
avoid screen burn during video playback in Media
Center, you can change the shade of black that
might appear on the left and right or on the top
and bottom of your video.
1. Click the Start button , click All Programs,
and then click Windows Media Center.
2. On the Windows Media Center start screen,
scroll to Tasks, click Settings, click General,
and then click Visual and Sound Effects.
3. Under Video background color, click the
Plus
or Minus button
to change the
color. The default color is black—you can
change it to different shades of gray, or to
solid white.
4. Click Save.
PLAY A CD OR DVD OR BLU-RAY
2.
3.
4.
| 27
and then click Windows Media Center.
If Media Center is not in full-screen mode,
click the Maximize button
.
Insert the Blu-Ray into a BD drive on your
computer.
On the Media Center start screen, scroll to
CyberLink PowerDVD, and then click OK.
Play a DVD
1.
Click the Start button , click All Programs,
and then click Windows Media Center.
2. If Media Center is not in full-screen mode,
click the Maximize button
.
3. Insert the DVD into a DVD drive on your
computer.
4. If the main DVD title menu doesn't appear
automatically, on the Media Center start
screen, scroll to Movies, and then click Play
DVD.
5. Click the appropriate button (this will usually
be a Play button) on the DVD menu to play
the DVD.
6. While your DVD is playing, you can move the
mouse to make the playback controls appear.
Here are some of the things you can do with
these controls:
•
Click the Skip Forward button
to skip to
the next chapter on the DVD.
•
Click the Skip Backward button
to go
back to the previous chapter on the DVD.
•
Click the Pause button , and then click the
Fast Forward button once to watch the DVD
in slow motion. (Click the Fast Forward button again to watch the DVD in fast motion.)
•
Click the Stop button to stop playing the
DVD.
Play a Blu-Ray
1.
Click the Start button
, click All Programs,
5.
6.
•
•
•
•
Click the appropriate button (this will usually
be a Play button) on the Blu-Ray menu to play
the Blu-Ray.
While your Blu-Ray is playing, you can move
the mouse to make the playback controls
appear. Here are some of the things you can
do with these controls:
Click the Skip Forward button
to skip to
the next chapter on the Blu-Ray.
Click the Skip Backward button
to go
back to the previous chapter on the Blu-Ray.
Click the Pause button , and then click the
Fast Forward button once to watch the BluRay in slow motion. (Click the Fast Forward
button again to watch the Blu-Ray in fast motion.)
Click the Stop button to stop playing the
Blu-Ray.
Change DVD playback Settings
1. On the Windows Media Center start screen,
scroll to Tasks, click Settings, and then click
DVD.
2. Do one of the following:
28 |
•
•
•
•
PLAY A CD OR DVD OR BLU-RAY
To change the default language settings, click
Language.
To change the basic audio settings, click
Audio.
To change when subtitles appear, click
Subtitle.
To change how some buttons on a Media
Center remote control behave, click Remote
Control Options.
Change Blu-Ray playback Settings
1. On the Windows Media Center start screen,
scroll to CyberLink PowerDVD, and then click
OK.
2. Press the Remote Controller MORE button i ,
.
then press the BACK button
3.
•
•
Do one of the following:
To change the default language settings, click
Audio Language.
To change the basic settings, click Settings.
•
To change when subtitles appear, click
Subtitle.
•
To change how some buttons on a Media
Center remote control behave, click Remote
Control Options.
Play an audio CD
1. Click the Start button
, click All Programs,
and then click Windows Media Center.
2. If Media Center is not in full-screen mode,
click the Maximize button
.
3. Insert an audio CD into the CD drive on your
computer.
4. If the CD doesn't start playing automatically,
on the Windows Media Center start screen,
scroll to Music, click Music library, click
Albums, click the CD you inserted, and then
click Play album.
5. Here are some of the things you can do while
your CD is playing:
• Move the mouse to make the playback
controls appear, and then click the Skip
Forward button
to play the next track on
the CD.
• Move the mouse to make the playback
controls appear, and then click the Skip
Backward button
to go to the beginning
of the track that's currently playing.
• Click View Song List to view all the tracks on
the CD.
• Click Visualize to watch visualization while
the music plays.
• Click Play Pictures to start a slide show of
your pictures along with the music.
• Click Shuffle to play the tracks on the CD in a
random order.
• Click Repeat to play the CD over and over
again.
• Move the mouse to make the playback
controls appear, and then click the Stop
button
to stop playing the CD.
PLAY A CD OR DVD OR BLU-RAY
Play media files from a data CD, data DVD, or a
removable device
1.
2.
3.
4.
Click the Start button
, click All Programs,
and then click Windows Media Center.
If Media Center is not in full-screen mode,
click the Maximize button
.
Do one of the following:
•
Insert the CD or DVD containing media
files (such as MP3 files) into the CD or DVD
drive on your computer.
•
Plug the removable device (such as a
USB flash drive) into the USB port on your
computer.
Under What do you want to do?, click Play
music.
Supporting File Types
Music file types
Format
File Name Extensions
Windows Media Audio File
.asx, .wm, .wma, .wmx
Windows audio file
.wav
MP3 audio file
.mp3, .m3u
Advanced Audio Coding
.aac
Video file types
Format
File Name Extensions
Windows Media file
.wm, .asf
Windows Media Video file
.wmv
Windows video file
.avi
Windows TV file
.wtv
Microsoft Recorded T V
Show file
.dvr-ms
Movie file
. m p e g, . m p g, . m p e,
.m1v, mp2, .mpv2, .vob
Picture file types
Format
File Name Extensions
JPEG
.jpg, .jpeg
JPEG XR
.hdp, .wdp
TIFF
.tif, .tiff
RAW file Format
.raw
GIF
.gif
Bitmap
.bmp
Portable Network Graphics
.png
| 29
30
|
CHANGING THE SERVER SETTINGS
Display Settings
Change your screen resolution
1. Open Screen Resolution by clicking the Start
button
, clicking Control Panel, and then,
under Appearance and Personalization,
clicking Adjust screen resolution.
2. Click the drop-down list next to Resolution,
move the slider to the resolution you want,
and then click Apply.
3. Click Keep to use the new resolution, or click
Revert to go back to the previous resolution.
2.
Choose one of the following:
•
Smaller - 100% (default). This keeps text
and other items at normal size.
•
Medium - 125%. This sets text and other
items to 125% of normal size.
•
Larger - 150%. This sets text and other
items to 150% of normal size. This option
appears only if your monitor supports a
resolution of at least 1200 x 900 pixels.
3. Click Apply.
To see the change, close all of your programs and
then log off of Windows. This change will take effect the next time you log on.
Audio Settings
Hardware Setup
This system owns 3 audio jacks on the rear side
which can support up to 5.1 channel audio output.
Select Output Devices
After the speaker is connected to your system, you
can setup the audio output as follows:
Enlarge Screen Text
1.
Open Screen Resolution by clicking the Start
button
, clicking Control Panel, and then,
under Appearance and Personalization,
clicking Adjust screen resolution.
Step1. Right-click the volume icon on the OS taskbar and select Playback Devices.
Step2. On the pop-up Sound menu, select the
output device you want and click Set Default.
CHANGING THE SERVER SETTINGS
Step3. Click OK or Apply and the selected device
will appear a green check sign.
Step3. Choose a connection option:
Select "Connect to the Internet" and press"Next"
Network Settings
To connect the network, you can select wired or
wireless network. Please follow the instructions
below:
Step1. Right-click the network icon on the OS
taskbar and select Open Network and Sharing
Center.
Step4. How do you want to connect?
Select from the following three network option:
• Wireless,
• Broadband (PPPoE),
`
• Dial-Up.
Step2. View your basic network information and
set up connectors:
On the pop -up menu, selec t Set up a new
connection or network.
|
31
32 |
NETWORK SETTINGS
2. If you selec t broadband or Dial- up, the
pop-up windows will ask you the input the
user name, password and the data of ISP
provider, enter these data to finish connection.
Step5.
1. When you select Wireless, the pop-up windows
will show the available network, choose the one
you want to connect, then enter the security key
to make connection.
Bluetooth Settings
To connect the Bluetooth devices, you can follow
the instructions below:
Step 1. Right-click the Bluetooth icon on the
desktop to enable Bluetooth function
BLUETOOTH SETTINGS
Step 2. Click on the sun in the center to search the
Bluetooth devices nearby.
Step3. Click on the devices you want to connect to
show the name of them.
Step4. Select the services you want to communicate between the system and the Bluetooth
devices.
| 33
Step5. Right-click on the device you want to connect, select Connect to connect to this device
Step6. The pop-up windows will prompt you to enter the pair code of the device and the system, you
can both input “1234“ to pair them.
Step7. Once pair is done, the connected device
will show a red check sign means the connection
is working.
34 |
DTV SETTINGS
DTV Settings
If you want to watch TV programs with this system,
you have to loose the screw of the TV port on the
back panel, plug the TV dongle into the port, tight
the screw, then connect the included antenna to
the TV dongle. Your system might come with one
of the two following TV dongles, one is DVB-T, the
other is ATSC. DVB-T is mainly for European TV
system, and the ATSC is for U.S.A. TV system.
WINDOWS HOME SERVER SETTING
Sharing Folders
Microsoft Windows Home Server provides rich entertainment for home users. You can share your
music, photos, software and videos with your family. Just enable the Shared Folders function, and all
the PCs on the network will be able to access the
content on the server.
| 35
Step 3. Double-click on the item you want to share
on the network like Music, and then you can setup
the following options like Name, Description, and
Location and Enable Folder Duplication.
Step 1. Click Start to show the menu, and then click
Windows Home Server Console to pop-up the setup option.
Step 2. In the Windows Home Server Console menu,
move your mouse to Shared Folders and click it to
show its options. Its options include Music, Photos,
Public, Software and Videos.
Step 4. If you want to setup the location of the
shared folders, you can double-click on the original
one to show the menu.
36 | WINDOWS HOME SERVER SETTING
Step 5. In this menu, you can specify the folder you
want to share on the network. Thus, other PCs on
the network will be able to access the content in
this folder.
St
Y can click
li k Shared
Sh
h d Folders
F ld on Server
S
i
Step 6
6. You
icon
on the desktop to view the status of shared folders.
User Accounts Setup
In order to let other PCs on the network can access
the sharing files on the server; you have to setup
user accounts and their permission to log into the
server. Please read the following description to
create your user accounts.
Step 1. Windows Home Server Console menu, click
User Accounts to show the pop-up menu. Click OK
to proceed to the next step.
Step 2. Click + Add to create user accounts for sharing purpose.
Step 3. In the Add User Account menu, Input the
First name, Last name and Logon name. If you want
to allow this account to do remote access, you can
check Enable Remote Access for this user.
WINDOWS HOME SERVER SETTING
| 37
Step 4. Input password in Password and Confirm
password column.
Step7. In this menu, all information about this new
user account is showed up. Press Done to exit this
wizard.
Step 5. The password needs to be 5 characters at
least to pass the check. Click Next to proceed to
next step.
Step8. The new user account will show up in the
User’s Accounts’ menu.
Step 6. You can set access permission to shared
folders in this menu. The permission includes
Full, Read and None. When setup is done, press
Finish to complete settings.
38 | ADDITIONAL INFORMATION
About Windows Update
Windows Update is another application that has
been redesigned in Windows 7. Now it is a standalone application instead of a web based.
The new Windows Update is easier to use copared
to its predecessor.
Step1. Open the Windows 7 control panel from
Start Menu.
Step2. Select "System and Security"
Step3. Select "Windows Update"
When you start Windows Update it will show you
if there are any available updates. If no updates
are being reported as available, then you can
do a manual check by clicking on the Check for
updates link. Windows Update will make a quick
check and show you a summary of its findings.
This will install all the important updates but not
the recommended or optional ones. To also install
some (if not all) of the optional updates you will
need to click on the available optional updates
link.
ADDITIONAL INFORMATION
|
After you have selected all the updates that you
want to install, click on the Install button.
A s yo u c a n s e e i n t h e s c r e e n s h o t b e l ow,
Windows Update will split all available updates
by categories. You can also see the size of
each update and the information when it was
published.
When choosing the updates you want to install,
you should always select the important and
recommended ones as they usually solve critical
problems/vulnerabilities.
IIf you don't want to install an update and you
don't want it to be reported by future checks, right
click on it and select Hide update. That update
will disappear from the list and it will never be
installed on your PC.
Windows Update will download and then install
the updates. At the end, you might be prompted to
restart your computer. Close all the important applications or documents you have open and then
restart your computer. At the next log-in, Windows
Update will inform you that all updates were installed successfully.
39
40 | SPECIFICATION
Specifications
Processor
HDHomeS4: AMD 4200
Chipset
N: AMD 780G; S: AMD SB700
Video Graphics
ATI Radeon HD 4200
Memory Slot(s)
2 x 240pin DIMMs slots, support DDR2 667/800
Memory Capacity
HDHomeS4: 2 x 2GB DDR2 800 installed
(up to 8GB)
Graphic Chipset
ATI 3200
HDD Cage Capacity
Hotswap 4 x 2.5” HDD Cage
Default Install HDD
1 x 500GB SATAII HDD, 5400r.p.m.
Optical Drive(s)
Slot-in Blu-ray Drive
Card Reader
4-in-1 (SM/ SD/ MMC/ MS/ MS Pro/ xD/ CF type I &
type II/ MD)
Audio Chipset
Realtek ALC 662, support 5.1 channels HD audio
codec
Communication
(1) 802.11 b/g/n
(2)
Bluetooth v2.0
High-Spped USB 2.0 x 6
Headphone Jack (mini stereo)
Microphone Input (mini stereo)
Display: VGA, DVI, HDMI
Card reader: All in one
AC-INx 1
D-Sub x 1
S/PDIF optical output x 1 (with Line-in)
Stereo L-R Line-out Jack (mini stereo) x 1
eSATA 3Gb/s x 1
RJ-45 x 2
Stereo L-R Line Out
Microphone Input x 1
Power Requirements
AC Input: 100~240V, 50~60Hz, 1.5~3.5A
Power Consumption: 100V/240V, 250W
Dimensions (approx.)
280 mm(L) x 200mm (W) x 130mm (H)
Weight (approx.)
5.8kgs (total package/one box)
Operating Temperature: 0~38oC
Operating Humidity: 60~80%
* Specifications add designs are subject to change without notice.
WARRANTY
This Mvix Product comes with a full 1-yr manufacturer’s warranty on parts and labor. The Warranty coverage on this player begins the day you
buy your product. This warranty covers defects
in manufacturing only, and expressly excludes
coverage for excessive wear and tear, physical or
accidental abuse, loss and theft. Kindly contact
your local distributor for the warranty and service
procedures. Warranty service is available in all
countries where the product is officially distributed. The warranty covers any service or exchange
required for a defective unit during the coverage
period. The service / exchange opportunity ends
one year after the date of purchase. The replacement product is covered only for the warranty
period of the original product. When the warranty
on the original product expires, the warranty on
all replaced products also expires. When it is necessary for you to ship the product to distributor /
service center for service / exchange, you will pay
the shipping costs for shipment to the distributor.
The distributor will pay the shipping costs when
returning the product to you.
To receive warranty service, please be sure to have
your proof of purchase and a barcode from the
product's packaging. Warranty requests cannot be
processed without proof of purchase. In no event
shall MvixUSA’s (or its distributors’) liability exceed
the price paid for the product from direct, indirect,
special, incidental, or consequential damages
resulting from the use of the product, its software,
or its documentation.
MvixUSA does not offer refunds for any product.
As a part of our warranty service, we offer to repair
or replace the product. We offer cross shipments,
a faster process for processing and receiving your
replacement. MvixUSA and its distributor pay for
ground shipping only. Please contact MvixUSA’s
Distributor in your country for more details.
Specifically, your warranty does not cover the following:
| 41
• Shipping charges to return defective product.
• Labor charges for installation or setup of the
product, adjustment of customer controls on the
product, and installation or repair of systems outside of the product.
• Product repair and/or part replacement because
of improper installation, connections to improper
voltage supply, abuse, neglect, misuse, accident,
unauthorized repair or other cause not within our
control.
• Damage occurring to product during shipping
when improperly packaged or cost associated
with packaging.
• Incidental or consequential damages resulting
from the product.
Some states do not allow the exclusion of incidental or consequential damages, so the above
exclusion may not apply to you. This includes, but
is not limited to, prerecorded material, whether
copyrighted or not.) Mvix(USA), Inc. and its other
partners and distributors DO NOT assume any
responsibility in any way for how you choose to
use this product, associated firmware and this
manual. By purchasing or receiving this product,
you automatically agree to this disclaimer, and
eliminate this company and any affiliates of any
responsibility in this matter.
MvixUSA or ITS DISTRIBUTORS ARE NOT LIABLE UNDER
ANY CIRCUMSTANCES FOR ANY DIRECT, INDIRECT, SPECIAL,
INCIDENTAL, OR CONSEQUENTIAL DAMAGES, HOWSOEVER
INCURRED, EVEN IF NOTIFIED OF THE POSSIBILITY OF SUCH
DAMAGES. TO THE EXTENT PERMITTED BY LOCAL LAW, THE
REMEDIES PROVIDED IN THIS WARRANTY STATEMENT ARE
YOUR SOLE AND EXCLUSIVE REMEDY. THIS LIMITED WARRANTY
GIVES YOU SPECIFIC LEGAL RIGHTS AND YOU MAY ALSO HAVE
OTHER RIGHTS WHICH VARY FROM STATE/PROVINCE TO STATE/
PROVINCE.
Please record below the model and serial numbers found on
the product.
MODEL # Mvix HDHomeS4
SERIAL # AS-HE1301B00020P010
42
|
TRADEMARKS AND LEGAL ATTRIBUTIONS
The trademarks of Mvix® and MvixUSA® are used
in connection with products and services to signify the quality and excellence for which MvixUSA®
is known.
•
•
Mvix® and MvixUSA® are trademarks or registered
trademarks of Mvix(USA), Inc. in the United States.
You may use a Mvix® trademark or product name
to refer specifically to such Mvix® product in
marketing and promotional materials, books,
conferences, applications, demonstrations, and so
on. You are permitted to use a Mvix® trademark
referentially provided that:
•
You adhere to these Mvix™ Trademark Usage
Guidelines.
•
You do not disparage Mvix(USA), Inc. or its
products and services.
•
You display your name or logo more prominently than any Mvix™ trademark.
•
You include a disclaimer that Mvix™ does not
sponsor, affiliate, or endorse your product,
and/or services.
All other textual references, brands, logos or
product names are the copyrights, trademarks or
registered trademarks of their respective owners /
holders. Use of these trademarks on our website,
products, literature, communications, manuals,
advertising material, press releases, etc. do not
represent endorsements by the respective companies for Mvix(USA), Inc.'s products, services or
brand, but merely reflect their possible compatibility with our products.
•
•
•
•
•
Google is a trademark of Google Technology,
Inc.
HDMI is a trademark of HDMI Licensing LLC.
iPod® is a registered trademark of Apple Computer, Inc.
PSP™ (PlayStation Portable) is a trademark of
Sony Computer Entertainment Inc.
Java and all Java-based trademarks are
•
trademarks of Sun Microsystems, Inc. in the
United States, other countries, or both.
Microsoft, Windows, Vista are trademarks of
Microsoft Corporation.
UNIX is a registered trademark of The Open
Group in the United States and other countries.
WI-FI, WPA, WPA2 and WMM are registered
trademarks of Wi-Fi Alliance.
REFERENCES TO CORPORATIONS, THEIR SERVICES,
PRODUCTS and BRANDS WITHOUT WARRANTY OF
ANY KIND, EITHER EXPRESSED OR IMPLIED. IN NO
EVENT SHALL MVIX(USA), INC. BE LIABLE FOR ANY
SPECIAL, INCIDENTAL, INDIRECT OR CONSEQUENTIAL DAMAGES OF ANY KIND, OR ANY DAMAGES
WHATSOEVER, INCLUDING, WITHOUT LIMITATION,
THOSE RESULTING FROM LOSS OF USE, DATA OR
PROFITS, WHETHER OR NOT ADVISED OF THE
POSSIBILITY OF DAMAGE, AND ON ANY THEORY
OF LIABILITY, ARISING OUT OF OR IN CONNECTION
WITH THE USE OR PERFORMANCE OF THIS INFORMATION.
MVIX Products are not officially licensed or certified by DivX® Networks or Wifi Alliance.
Any MvixUSA, Inc. publication may include
technical inaccuracies or typographical errors.
The information presented here is intended for
general information only and is subject to change
without notice. ALL INFORMATION IS PROVIDED
"AS IS" WITHOUT WARRANTY OF ANY KIND, EITHER
EXPRESSED OR IMPLIED, INCLUDING BUT NOT
LIMITED TO THE IMPLIED WARRANTIES OR CONDITIONS OF MERCHANTABILITY OR FITNESS FOR A
PARTICULAR PURPOSE, OR NON-INFRINGEMENT.
SOME JURISDICTIONS DO NOT ALLOW THE EXCLUSION OF IMPLIED WARRANTIES, SO THE ABOVE
EXCLUSION MAY NOT APPLY TO YOU.
USE OF COPYRIGHT MEDIA
Federal law provides severe civil and criminal penalties for the unauthorized reproduction, distribution, rental or digital transmission of copyrighted
video and audio files. (Title 17, United States Code,
Sections 501 and 506). Mvix players are designed
to assist you in backing up, storing and reproducing material which you own the copyright for or
for which you have obtained permission from the
copyright owner. UNLESS YOU OWN THE COPYRIGHT OR HOLD PERMISSION TO COPY FROM
THE COPYRIGHT OWNER, YOU MAY BE VIOLATING
COPYRIGHT LAW AND BE SUBJECT TO PAYMENT
OF DAMAGES AND OTHER REMEDIES.
Mvix Ultio Pro or any of its accessories must not be
used for unauthorized duplication of DVDs/CDs
or any other works protected by copyright. No
license to infringe copyright is granted by the sale
of this equipment. Recording and playback of material may require permission of the media owner.
IF YOU ARE UNCERTAIN ABOUT YOUR RIGHTS, YOU
SHOULD CONTACT YOUR LEGAL AHDMISOR. YOU
ASSUME FULL RESPONSIBILITY FOR THE LEGAL
AND RESPONSIBLE USE OF THE MVIX MULTIMEDIA
PLAYER.
Use of Mvix Players, its accessories and software/
firmware for illegal purposes is strictly prohibited.
| 43
Mvix(USA), Inc.
www.mvixusa.com
TEL: 866 . 310 . 4923
Fax: 866 . 614 . 3880
[email protected]
Technical Support: http://support.mvixusa.com
© Mvix(USA), Inc.
Copyright 2010 Mvix(USA), Inc. All rights reserved.
No part of this publication may be reproduced in any form or by any means or used to make any derivative (such as translation, transformation or
adaptation) without the express written consent of Mvix(USA), Inc. as stipulated by the United States Copyright Act of 1976.