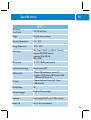
1
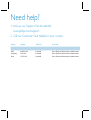
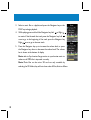
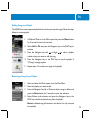
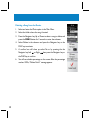
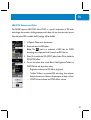
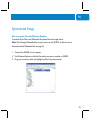
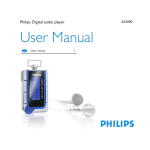
Philips Digital audio player
SA5000
User manual
EN
User manual
1
Need help?
1. Look up our Support Centre website
www.philips.com/support
2. Call our Customer Care helpline in your country
Country
Helpdesk
Tariff / min
Keep ready
China
4008 800 008
Local tariff
Date of Purchase, Model number and Serial number
Hong Kong
2619 9663
Local tariff
Date of Purchase, Model number and Serial number
Korea
02 709 1200
Local tariff
Date of Purchase, Model number and Serial number
Contents
4
5
6
7
7
9
9
10
11
11
12
13
14
14
15
16
16
16
17
17
17
19
19
20
EN
How to Use This Manual
Introduction
Accessories
Getting Started
Overview
LCD Display
Main Menu
Normal Playback Mode
Recharging the Li-Polymer Battery
Battery Status
Lock Switch
CD
Connecting and Disconnecting
Connecting to a Computer
Safely Removing from a Computer
Basic Usage
Power On
Power Off
Select and Enter a Function
Music
Music Playback
Adding Songs to a Playlist
Removing a Song from a Playlist
Deleting a Song from the Device
21
22
22
23
23
24
24
25
26
26
27
27
28
28
29
29
30
31
32
33
34
34
35
35
SRS WOW Enhancement Effect
Set EQ
Set Repeat Mode
Photo
View Photo
Slideshow
Rotate Photo
Puzzle
Multimedia
Play multimedia
Notes
Read *.txt File
Browser
Browse Contents
Setting
SRS
Set EQ
Set Repeat Mode
Record Quality / Source
Slide Interval / Slide Repeat / Transitions
Power Off
Backlight Off
Brightness
Language
EN
36
37
38
38
38
39
40
41
43
44
44
45
46
46
47
47
48
48
49
Date and Time
Master Reset
Info
Record
Line-In Recording
Microphone Recording
Language Learning Function
Synchronize Songs
Specifications
Update / Recovery Firmware
Update Firmware
Recover Firmware
Important Safety Information
General Maintance
Hearing Safety
Traf�c Safety
Copyright Information
Disposal of your old product
Modi�cations
How to Use This Manual
This User�s Manual provides instructions and illustrations on how to install and operate your
SA5000. This manual assumes that your computer�s operating system is at least Windows
ME / 2000 / XP, and that you are capable to follow the step-by-step instructions to install the
utility program used with the SA5000. For users who are not able to manage the operating
system properly, it is suggested that you first learn more about Microsoft Windows by referring to your Microsoft Windows� manual before installing the provided utility.
�
�
�
�
�
�
Introduction, tells you about the main features of the SA5000 and lists the
accessories that included in the package.
Getting Started, introduces the function keys on the SA5000, and shows the
LCD Display�s status in different modes. Connect and Disconnect, describes how to safely connect and disconnect
the SA5000 to and from your PC using the USB cable provided.
Basic Usage, describes how to use each of the SA5000�s functions. It is
recommended that you read this chapter carefully before using your SA5000.
Specification, provides the speci�cations and accessories for the SA5000.
Update / Recover Firmware, describes how to recover and upgrade firmware
on the SA5000.
Introduction
EN
Congratulations on becoming a new owner of the SA5000. The new SA5000 improves the
convenience of listening to music, viewing photos/ Multimedia �les, and sharing data.
The SA5000 is a high-performance, portable, digital audio player that enables users to play
MP3/ WMA audio, view M-JPEG and JPEG graphics, record voice/ Line-in, and to store personal data. The SA5000�s main features are:
�
�
�
�
�
�
�
�
�
�
Digital Audio Player � supports MP3 and WMA.
Multimedia Player � supports M-JPEG format.
Photo Browser � supports JPEG graphics and provides a slideshow function.
TXT File Reader � supports TXT �les.
Voice Recorder � provides a synchronous voice recording function. Recorded
�les will be stored in WAV format.
Recorded �les will be stored in WAV format.
A-B Section Repeat � enables users to repeat a particular section during
normal playback. Using this function, users can focus on repeated playback to
learn a language.
EQ and SRS effect � you are able to select SRS effect or one of the EQ modes
to enhance your music listening experience.
USB Storage Device � allows users to store data in the SA5000. (The memory
capacity depends on the model you bought.)
Micro SD Card Slot � The SA5000 supports Micro-SD cards. Plug the card
into the card slot to manage �les in the card.
�
Hold Switch � The SA5000 has a Hold Switch, located on the side of the player,
for preventing any accidental operation while recording or playing. Once the
Hold Switch is switched to lock position, all function keys are disabled.
Accessories
Please check that all the following accessories are included when you open the packing box.
If any of the items are damaged or missing, please immediately contact the vendor where
you purchased the SA5000.
�
In-ear headphones
�
USB Cable
�
Line-In Cable
�
CD-Rom with software and
user manual
Getting Started
EN
Overview
1
Display Screen
Status and information is shown in this window.
2
MIC
Built-in microphone.
3
Record
Press to start/ stop recording (not available in Playback
Mode).
Press to activate A-B repeat function during Playback Mode.
Repeat A->B
4
Lock switch
Switch to the hold position to lock all buttons, preventing
any accidental operation. Switch back to unlock the buttons.
5
Exit/
Submenu
Press to exit to the previous menu level.
Hold for two seconds to display the available options.
6
Play/Pause
Press to play a selected track. While playing, press to pause
playback and press again to resume.
When turned off, press once to power on; when turned on,
hold for 2 seconds to power off.
Power
7
Up
Volume Up
Press to select items.
During playback, press to increase volume level.
8
Down
Volume Down
Press to select items.
During playback, press to decrease volume level.
9
Left
Previous/ Rewind
Press to select options.
During playback, press to go to the previous track, or press
and hold to rewind a track.
10
Right
Next/Forward
Press to select options.
During playback, press to go to the next track. Press and
hold to fast-forward a track.
11
PLAY/ Enter
Press to con�rm item selection.
12
Strap Hole
You can tie a strap here.
13
USB Connecter
Connect one end of the supplied USB extension cable here
to connect to a PC, or to be USB Host.
14
In-ear headphones Jack
Plug the supplied in-ear headphones in here.
15
Micro SD Slot
Insert a Micro SD card to open the �les on the card.
EN
LCD Display
Main Menu
4 3
2
1
Function Icon
Shows the icon of the function selected.
2
Function Name
Shows the name of the
function selected.
3
Scroll
Press the up/ down key to
select other functions.
4
Function Icon
Shows the icons of the
other functions.
5
Clock
Shows the time (adjustment required).
6
Battery Status
Shows the status of the
battery�s capacity.
1
5
6
Normal Playback Mode
10
A
Function
Displays the current function.
B
Play/Pause
Displays the music or recording file�s
playback status.
C
Track Name
Displays the name of the selected track.
D
Artist Name
Displays the name of the singer or the
band (edited info required).
E
Album Name
Displays the album name of the track
(edited info required).
F
Equalizer
Shows the music performance.
G
Playback Time
Bar
Shows the playback�s progress.
H
Track Timer
Displays an on-going timer for the current playback �le.
I
Track Number
Display the current track number and
the total number of tracks.
J
Clock
Displays the current time (adjustment
required).
K
Repeat/
Indicates the Repeat Mode selected.
L
EQ/SRS
Indicates the SRS status or EQ mode
setting. EQ modes include: Normal,
Classical, Pop, Rock, and Jazz.
M
Battery
Indicates the Battery�s Status.
EN
Recharging the Li-Polymer Battery
The SA5000 comes with a Li-Polymer rechargeable battery. To charge the Li-Polymer battery, follow the instructions below:
1. On the bottom of the SA5000 you see a mini USB (B type, female) port.
2. Turn on the SA5000. Plug the mini USB (B type, male) end of the supplied USB cable to
the SA5000, and the USB (A type, male) end to your computer.
3. While the player is recharging, you will see the icon in the display. When the battery
is fully charged, you will see the icon. The built-in battery takes about three hours to
charge 80-percent, and �ve hours to fully charge.
4. Safely disconnect the USB cable when you are �nished recharging.
Battery Status
Critically Low
Full
Charge the battery when necessary. Refer to the �gure above to know the battery�s status.
11
Lock Switch
The SA5000 has a Lock Switch to prevent any accidental operation. When you switch it
to the lock position while the power is on, all function keys are disabled. Switch it to unlock
and the buttons function as normal.
Card Slot
The SA5000 has a memory card slot you can insert a Micro-SD memory card into. The
player will read and execute the �les inside. After inserting a card, a Memory Card folder appears in the functions. Select and open the folder to choose a �le inside to execute. If there
is no card inserted, you will not see the Memory Card folder.
12
EN
CD
The SA5000 package includes a CD. Insert the CD into your CD-ROM drive, and the installation program will start automatically. Follow the on screen instruction to install the
software. The CD contains the following:
�
�
�
Philips Firmware Manager
The Firmware Manager allows you to update or recover �rmware for the
SA5000.
User Manual and Frequently Asked Questions
Adobe Acrobat Reader
Adobe Acrobat Reader is a free software program that allows you to view and
print Portable Document Format (PDF) �les. To read the SA5000 User Manual,
you have to install Adobe Acrobat Reader.
13
Connecting and Disconnecting
Connecting to a Computer
1. On the bottom of the SA5000 you see a mini
USB (B type, female) port.
2. Plug the mini USB (B type, male) end of the
supplied USB cable to the SA5000, and plug the
USB (A type, male) end to your computer.
3. Then turn on the SA5000.
4. Once the SA5000 is connected to computer
and powered on, it should be detected by the
computer�s operating system and you will be
able to manage files in the player or copy files
using the computer.
5. You will see the images below during connection. The left image is displayed when
the SA5000 is connecting to the computer, and the right image is displayed when the
SA5000 is in the reading and writing processes.
14
EN
Safely Removing from a Computer
After updating �rmware or managing �les using a PC, follow these steps to safely remove the
SA5000 and prevent system or device corruption:
1. When a USB device is connected to a computer, an icon
appears in the task bar. Double click the icon to display
the Safely Remove Hardware dialog box. You can �nd all
USB devices connected to the computer in the display.
To remove the SA5000, close all the related programs.
Select USB Mass Storage Device and click the Stop
button.
2. When you see the window shown on the left side, select
USB Mass Storage Device and click OK.
3. When following message appears you can remove the
device safely.
15
Basic Usage
This chapter introduces the basic usages of the SA5000. Please read the following instructions carefully so that you know how to operate your device.
Power On
Before any operations can be performed, you have to �rst turn on the device. Follow the
steps below to turn on the SA5000.
1. Press the Play/ Pause button once.
2. The screen will display the Start Logo.
3. When you see the Main Menu on the screen, the device is ready to
use.
Power Off
Once the device is turned on, you can turn it off in any mode. Follow the steps below to
turn off your SA5000.
1.
2.
3.
16
In any modes, press the Play / Pause button for about 2 seconds.
The screen will display �Bye�.
When the screen turns dark, the device is turned off.
Note: If the SA5000 does not respond for several minutes, press and hold for 10 seconds to force shut down.
EN
Select and Enter a Function
The SA5000 supports multiple functions. Follow the steps below to operate these functions.
1. In the Main Menu, press the Navigator key Up or Down to select a
function. The function�s icon appears on the left side.
2. Stop at the function needed, and press the Navigator key or the
PLAY key to select the function.
3. The submenu for the selected function appears.
Music
Music Playback
The SA5000 supports MP3 and WAV.
Follow the steps below to play music / voice recording.
1. Select and enter the Music option in the Main Menu.
2. Press the Navigator key Up or Down to select how you want the
music �les sorted.
- Select All List to play all the music �les stored.
- Select Artist to select all the songs by an artist.
- Select Album to select an album to play.
- Select Record to play �les recorded by the device.
- Select Playlist to play songs from a created playlist.
17
3. Select a music �le or a playlist, and press the Navigator key or the
PLAY key to begin playback.
or Right
4. While playing, press and hold the Navigator key Left
to rewind / fast-forward the track; press the Navigator key Left
once to go to the beginning of the track; press the Navigator key
Right
once to go to the next track.
5. Press the Navigator key up to increase the volume level, or press
18
the Navigator key down to decrease the volume level. The volume
bar is shown at the bottom of display.
Note: refer to Synchronize Songs section to synchronize music to
make sure all MP3 info is imported correctly.
Note: Music �les on the micro SD card are only accesible by
selecting the SD folder, they will not show under All list, Artist or Album
EN
Adding Songs to a Playlist
The SA5000 can create a personal playlist that includes your favorite songs. Follow the steps
below to create a playlist.
1. In Playback Mode or in the Music option list, press the Menu button
for 2 seconds to enter the submenu.
2. Select Add to PL and press the Navigator key or the PLAY key to
activate.
3. Press the Navigator key Left
or Right
to select a playlist
number where you want to add the song.
4. Press the Navigator key or the PLAY key to save the playlist. A
�Writing� message appears.
5. Repeat steps 1-4 to add more songs to the playlist.
Removing a Song from a Playlist
1. Select and enter the Music option from the Main Menu.
2. Select the playlist you want to edit.
3. Press the Navigator key Up or Down to select a song to delete, and
press the Menu button for 2 seconds to enter the submenu.
4. Select Delete in the submenu and press the Navigator key or the
PLAY key to delete a selected song from the playlist.
Note: the deleted song still remains in the device. It is only removed
from playlist.
19
Deleting a Song from the Device
1. Select and enter the Music option in the Main Menu.
2. Select the folder where the song is located.
3. Press the Navigator key Up or Down to select a song to delete, and
press the MENU button for 2 seconds to enter the submenu.
4. Select Delete in the submenu and press the Navigator key or the
PLAY key to activate.
5. A con�rm box will show up, select Yes or by pressing the the
or Right , then press the Navigator key or
Navigator key Left
the PLAY key to con�rm.
6. You will see a delete percentage on the screen. After the percentage
reaches 100%, a �Delete Finish!� message appears.
20
EN
SRS WOW Enhancement Effect
The SA5000 supports SRS WOW effect. WOW is a special combination of SRS audio
technologies that creates a thrilling experience with deep rich bass from the sound source.
Note that when SRS is enabled, the EQ settings will be disabled.
1. In Playback Mode, enter the submenu.
2. Select and enter the SRS option.
Note: The
mark is a trademark of SRS Labs, Inc. WOW
technology is incorporated under license from SRS Labs, Inc.
3. Select On to enable the SRS (WOW) effect. Select Off to disable the
SRS (WOW) effect.
4. You can also select other sound effects, Field Brightness, TruBass, or
WOW Volume, and adjust their values.
- Brightness: indicates the SRS effect�s brightness.
- TruBass: TruBass is a patented SRS technology that enhances
bass performance and delivers the perception of deep, rich bass.
- WOW Volume: indicates the WOW effect�s volume.
21
Set EQ
The SA5000 provides various EQ modes, such as Pop, Rock, Jazz, and
Classical. Follow these steps to increase your music enjoyment by choosing
your preferred EQ mode.
1. In Playback Mode, enter the submenu.
2. Select and enter the EQ option.
3. Use the Up or Down key to select Normal, Pop, Rock, Jazz or
Classical, then press the Navigator key or the PLAY key to con�rm.
Note: Once EQ is enabled, the SRS(WOW) settings will be disabled.
Set Repeat Mode
1. In Playback Mode, enter the submenu.
2. Select the Repeat option.
3. Select one of the options in the Repeat mode submenu.
a. Normal: Play the selected tracks in sequence.
b. Repeat one: Repeat the current track.
c. Repeat All: Repeat all selected tracks.
d. Shuf�e: Play all selected tracks in random order, once.
e. Shuf�e REP: Plays and repeats all selected tracks in random order.
22
EN
Photo
The SA5000 supports JPEG graphics (up to 8 mega pixels) and provides a
slideshow function.
View Photos
1. To view photos stored on the SA5000, select the Photo option in the
Main Menu and press the Navigator key or the PLAY key to enter the
photo function.
2. Select and press the Navigator key or the PLAY key on a �le to view.
Thumbnails of the �rst 12 photos stored will show in the display.
Select and enter a folder where the photo belongs to �rst, if necessary.
3. Use the Up or Down key to select a thumbnail.
4. Press the Navigator key or the PLAY key to view the full screen photo.
5. After one photo is selected to view in full screen, you can view it on
the display. There are left and right arrows at the bottom of the photo.
to view the previous photo, or press
Press the Navigator key Left
the Navigator key Right
arrow to view the next one.
Note: If you want to delete photos from the �le list, please refer to the �Music - Delete a Song from Device� section.
23
Slideshow
You can view JPEG �les in a slideshow on the SA5000.
1. While viewing a photo, press the button to start the slideshow.
There will be an icon at the bottom right corner of the display.
2. To stop the slideshow, press the button again. And there will be
an icon at the bottom right corner of the display.
Note: To set how long each image is displayed, refer to the �Setting
- Slide Interval� section.
Note: You can also have photos appear in a slideshow after
performing a rotation when necessary. Simply press the Navigator
key or the PLAY key.
Rotate Photo
You can rotate photos to suit the display for better viewing when
necessary.
1. To rotate one photo, enter the submenu while viewing the photo.
Select either the 90cw or 90ccw option and press the Navigator
key or the PLAY key to rotate the photo 90 degrees clockwise or
counter-clockwise. The photo will rotate and appear on the display.
2. Select 90cw or 90ccw again to rotate again, or to restore the
photo.
24
EN
Puzzle
You can play puzzle with a stored photo.
1. While viewing a photo, enter the submenu. Select the Puzzle option
and press the Navigator key or the PLAY key. The photo will be cut
into pieces, one piece will be cut-out as a black box, and the others
will be shuf�ed and placed out of order.
2. Use the Navigator keys to move the pieces surrounding the black
box and try to restore the photo. Ex: press the Navigator key Up
to bring the piece below the box upwards; press the Navigator key Right
to move the piece at the left of the box to the right. (Quit
by press the Menu button once. Hold the Menu button to undo
the previous steps.)
3. You have 500 steps to complete the puzzle. After all the pieces are
replaced in order, the black box will disappear and you will see a
�Finish!� message appear in the display. If you cannot restore the
photo in 500 steps, you will see a �Game Over!� message in the
display.
25
Multimedia
Play Multimedia
The SA5000 supports the following movie formats:
- File type: .mov and M-JPEG .avi �les
Resolution: QVGA (320x240 pixels), Format: Motion-JPEG B,
Frame rate: 10 fps, Maximum length: 10 minutes
1. To play Multimedia �les stored on the SA5000, select the Multimedia
option in the Main Menu and press the Navigator key or the PLAY
key to enter the Multimedia function.
2. Select a Multimedia �le from the �le list and press the Navigator key
or the PLAY key to play the selected �le. (Select and enter a folder
where the �le is located �rst if necessary.)
3. Press the button to pause or resume the Multimedia playback.
Note: The Multimedia will be played broad-wise to �t the screen and
to create a better view.
Note: If you want to delete a Multimedia �le in the �le list, please
refer to the �Music - Delete a Song from Device� section.
Note: If your Multimedia �le is not .mov or .avi (M-JPEG) format, you have to transfer
it into playable format before viewing. You can �nd a Multimedia converter program
such as Quick Time Pro on the Internet.
26
EN
Notes
Read *.txt File
The SA5000 supports the reading of .txt Unicode �les.
1. To read text �les stored on the SA5000, select the Notes option
in the Main Menu and press the Navigator key or the PLAY key to
enter the Notes function.
2. Select a text �le from the �le list and press the Navigator key or
the PLAY key to read it. (Select and enter a folder where the video
belongs �rst if necessary)
3. Press the Navigator key Up or Down to read the complete text.
Note: If you want to delete text �les from the �le list, please refer
to the �Music - Delete a Song from Device� section.
Note: Unicode text �les can be read on the SA5000 correctly. To
open the text �les on a computer, select �Save as�� and choose the
Code to be Unicode, and then press Save button. You can then copy
the �le to and read it from the SA5000.
27
Browser
The SA5000 provides an easy access to �le management. The �le browser can open and
arrange �les stored in the built-in memory.
Browse Contents
In the Browser, you can open Multimedia, music, photo, and note �les which are readable by
each function page.
1. Select the Browser option in the Main Menu and press the Navigator
key or the PLAY key to enter.
2. Select the �le you want to browse and press the Navigator key or
the PLAY key to open a selected �le. (Select and enter a folder where
the �le is located �rst if necessary.)
3. Then you can watch a Multimedia �le, view a photo, listen to music, or
read a note depending on what sort of �le it is. You can also operate
functions, such as rewind the Multimedia �le, pause the music, puzzle
the photo, and etc.
28
EN
Setting
From the Setting Menu you can adjust all the options and allow the SA5000 to meet your
needs.
1. Select the Setting option in the Main Menu and press the Navigator
key or the PLAY key to enter.
SRS
The SA5000 supports SRS WOW effect. WOW is a special combination of SRS audio
technologies that creates a thrilling experience with deep rich bass from the sound source.
Note: when SRS is enabled, the EQ settings will be disabled.
1. Select the Setting option in the Main Menu and press the Navigator
key or the PLAY key to enter.
2. Select SRS from the sub menu and press the Navigator key or the
PLAY key to enter.
3. Select On and press the Navigator key or the PLAY key to con�rm.
4. To turn off the effect, choose the Off option.
5. Also you can select other sound effects Field Brightness, TruBass, or
29
WOW Volume, and adjust their values. Select and enter these three
options and a status bar appears. Adjust the value by pressing the
or Right , then press the Navigator key
the Navigator key Left
or the PLAY key to con�rm.
- Brightness: indicates the SRS effect�s brightness.
- TruBass: TruBass is a patented SRS technology that enhances
bass performance and delivers the perception of deep rich bass.
- WOW Volume: indicates the WOW effect�s volume.
Set EQ
The SA5000 provides Pop, Rock, Jazz, and Classical EQ modes. Note:
Once EQ is enabled, SRS settings will be disabled.
1. Select the Setting option in the Main Menu and press the Navigator
key or the PLAY key to enter.
2. Select and open the EQ option.
3. Press the Navigator key Up or Down to select Normal, Pop, Rock, Jazz
or Classical, then press the Navigator key or the PLAY key to con�rm.
30
EN
Set Repeat Mode
1. Select the Setting option in the Main Menu and press the Navigator
key or the PLAY key to enter.
2. Select the Repeat option.
3. Select one option from the Repeat mode submenu, then press the
Navigator key or the PLAY key to con�rm.
a. Normal: Play the selected tracks in sequence.
b. Repeat one: Repeat the current track.
c. Repeat All: Repeat all the selected tracks.
d. Shuf�e: Play all the selected tracks in a random order, once.
e. Shuf�e REP:Plays and repeats all the selected tracks in random order.
31
Record Quality/ Source
1. Select the Setting option in the Main Menu and press the Navigator key
or the PLAY key to enter.
2. Select and enter the Record option.
3. Select and enter the Quality option.
4. Select and enter Source.
5. You can set the record source to Mic or Line-in by selecting the options
in Source.
- Select Mic to record using the built-in microphone
- Select Line-in to record audio from an external device connected
to the Line-in (In-ear headphones) Jack.
32
EN
Slide Interval/ Slide Repeat/ Transitions
You can set how long each image is displayed.
1.
2.
3.
4.
Select and enter the Setting option in the Main Menu.
Select and open the Slide Interval option.
Select an option that meets your needs.
Press the Menu button once to go back to the upper level menu.
Select and open the Slide Repeat item.
5. Select On or Off and press the Navigator key or the PLAY key to set
the slideshow repeat option.
6. Press the Menu button once to go back to upper level menu. Select
and open the Transitions option. Select an option, and then press the
Navigator key or the PLAY key to con�rm.
- Off: shows no transition effect.
- Random: shows Push Alpha Blend/ Horizontal / Vertical effect
randomly.
- Push Alpha Blend: change to another photo with a fade in and
fade out effect.
- Horizontal:change to another photo with a horizontal curtain effect.
- Vertical: change to another photo with a vertical curtain effect.
33
Power Off
You can set the timer under the Power Off setting to turn off the SA5000
automatically after it is idled for a certain amount of time.
1. Select the Setting option in the Main Menu.
2. Select the Power Off option.
3. Select an option that meets your needs, then press the Navigator
key or the PLAY key to con�rm.
Backlight Off
The backlight timer program can help save power. After having been idle
for a selected amount of time, the device will turn the backlight off. Press
any button to turn the backlight on.
1. Select the Setting option in the Main Menu.
2. Select the Backlight Off option.
3. Select an option that meets your needs, then press the Navigator
key or the PLAY key to con�rm.
34
EN
Brightness
1. Select the Setting option in the Main Menu.
2. Select the Brightness option.
3. Adjust the brightness setting, then press the Navigator key or the
PLAY key to con�rm.
Language
1. Select the Setting option in the Main Menu.
2. Select the Language option.
3. Select a language you want to use, then press the Navigator key or
the PLAY key to con�rm.
35
Date and Time
1. Select the Setting option in the Main Menu.
2. Select the Date/Time option.
3. Select the Time Format item, and then select 12 hour or 24 hour
format to adjust how you want the time to be displayed.
4. Select Set Time or Set date to change the time or date settings.
5. The current set time or date is displayed.
6. Set the time or date, then press the Navigator key or the PLAY key
to con�rm.
36
EN
Master Reset
If you want to restore the settings back to the factory default settings,
you can use the Master reset Function.
1. Select the Setting option in the Main Menu.
2. Select the Master Reset option.
3. Select the Yes option, and then press the Navigator key or the PLAY
key to con�rm.
Note: All the adjustments that you made will be recovered.
Info
1. Select the Setting option in the Main Menu.
2. Select the Info option.
3. You can read the device�s information on the screen.
37
Record
Line-In Recording
The SA5000 has a built-in encoder. With
this encoder, you can record external audio
via the Line-In Jack. Plug one end of Line-In
cable into the Audio-out jack of a Walkman,
Computer, Radio, TV, or other Audio
Equipment, and plug the other end into the
Line-In jack of the SA5000.
To record:
1. Connect the player with the external source using the Line-in cable.
2. Press the Menu button and press the Navigator key Up or Down to
scroll to "Settings". Press the Navigator key to select "Settings".
3. Press the Navigator key Up or Down to scroll to "Record". Press
the Navigator key to select "Record".
4. Press the Navigator key Up or Down to scroll to "Source". Press the
Navigator key to select "Source".
5. Press the Navigator key Up or Down to scroll to "Line-in".
Press the Navigator key to select "Line-in" source.
6. Play music from the audio source, and then press the REC/A-B[�]
button to start recording.
38
EN
7. A recording �le is generated and placed under a [RECORD] folder
on the display. The �le name sequence is Line-In-yearmonthday-001,
ex: LineIn-20060314-001, and so forth. (File extensions depend on
the format you selected.)
8. Press the REC/A-B[�] button again to stop recording. A message
telling you the �le name appears and you will see the �le list in the
[RECORD] folder.
Microphone Recording
The SA5000 has a built-in Microphone, which can also work as a synchronizing recorder. You
can use it to record your voice in either an interview or a speech. To create a Microphone
Recording follow step 1, 2 and 3 from page 38 (Line-in) and the following steps below.
1.
2.
3.
Press the Navigator key Up or Down to scroll to "Mic".
Press the Navigator key to select "Mic" source.
Press the REC/A-B[�] button to start recording.
On the display, a recording �le should be generated and placed
under the [RECORD] folder. The �le name sequence is Voiceyearmonthday-001, ex: Voice-20060314-001, and so forth. (File
extensions depend on the format you selected.)
4. Press the REC/A-B[�] button again to stop recording. It will be
encoded to a WAV format �le and saved in the [RECORD] folder in
the SA5000 automatically. You will see the status jump to the �le list
in the [RECORD] folder.
39
Language Learning Function
The SA5000 enables users to listen to a particular section repeatedly
during music or voice playback. Using this function, users will be able to
pay attention to a repeated section and achieve the effect of language
learning.
1. Press the REC/A-B[�] button to set the starting point of the playback.
The A-B icon will appear on the middle bottom of the screen.
2. Press the REC/A-B[�] button again to set the �nishing point. The A-B
icon will appear on the screen. You will hear the repeating playback
that you had set previously, over and over again.
3. Press the REC/A-B[�] button again to return to normal playback. The
A-B icon disappears from the screen.
40
EN
Synchronize Songs
How to transfer �les with Windows Explorer
To transfer Music Photo and Multimedia �les please follow the steps below.
Note: The following Multimedia �les are suported: .mov and M-JPEG .avi �les. For more
infromation about Multimedia �les see page 26.
1. Connect the SA5000 to the computer.
2. Use Windows Explorer to �nd the �les which you want to transfer to SA5000.
3. Drag your mouse to select and highlight the �les. See pictures below:
41
4. Drag the �les to the directory of SA5000.
5. You will see below images during connection. The left one means SA5000 is connected
to the computer, and the right one indicates that the SA5000 is under reading and
writing processes.
6. After managing the �les by computer, follow the "Safely Remove from Computer"
section to safely remove SA5000 to prevent system or device corrupt.
7. After disconnecting and restarting, SA5000 database will be refreshed. After the
progress bar is �lled, your SA5000 is ready for media enjoyment.
42
Speci�cations
EN
SA5000
Dimensions
(W x D x H)
90 x 40.5 x 8.5 mm
Weight
45g (with built-in battery)
Operating Temperature
0∫C ~ 35∫C
Storage Temperature
-20∫C ~ 60∫C
Audio Specs
Max Output : 40mW rms (20mW / channel),
Supports SRS WOW function.
Frequency: 20 to 20K Hz
SNR: >90dB
LCD module
1.8� TFT 128x160 pixels module
Line-In/Voice Reording
Record format: WAV
USB Flash Disk
1. Meets USB speci�cation revision 2.0
2. Supports OS: Windows ME, Windows 2000, Windows XP Home/ Pro
1. Stereo Audio-out/ Line-in jack, 3.5mm
2. USB interface
I/O Input
EMI and Safety
CB
Interface Language
Simpli�ed Chinese, English
Earphones
Stereo output: 32mW rms ( 16Mw/ channel)
Battery Life
Up to 12hrs audio playback.
43
Update / Recovery Firmware
Update Firmware
Your player is controlled by an internal program called Firmware. We recommend to
regularly check www.philips.com (enter your product number SA5000 to �nd the relevant
information) for new upgrades.
To upgrade your player, please follow instructions below:
1. If you installed the Philips Firmware Manager from the CD-ROM before then remove it
from your computer by deleting the "Philips Firmware Manager" �le from the desktop.
2. Download the new Philips Firmware Manager from the website.
3. Connect the SA5000 to your computer using the USB cable.
4. Double click the "Philips Firmware Manager" icon on the desktop
to start the program. You will see the window shown as in the image.
5. Click "Update" to update your Firmware.
6. Disconnect the SA5000 safely from your computer.
44
EN
Recover Firmware
To recover �rmware to the version you bought it with, follow the steps below.
1. Connect the SA5000 to your computer using the USB cable.
2. Insert the supplied CD.
3. The Philips Firmware Manager will automatically be installed on the desktop of your
computer.
4. Double click the "Philips Firmware Manager" icon on the desktop
to start the program.
If your device needs to be recovered the program will detect this. You will see the
window shown as in the image.
5. Click the "Recover" button to recover your Firmware.
6. Disconnect the SA5000 safely from your computer.
Note: If you update the Firmware, all data saved in the memory will be erased.
45
Important safety information
General maintenance
To avoid damage or malfunction:
� Do not expose the player to excessive heat caused by heating equipment or
direct sunlight.
� Do not drop your player or allow objects to fall on your player.
� Do not allow your player to be submersed in water. Do not expose headphone
socket or battery compartment to water, as water entering the set may cause
major damage.
� Do not use any cleaning agents containing alcohol, ammonia, benzene, or
abrasives as these may harm the set.
� Active mobile phones in the vicinity may cause interference.
� Backup your �les. Please ensure that you retain the original �les you have
downloaded to your device. Philips is not responsible for any loss of data if the
product becomes damaged or not readable / legible.
About operating and storage temperatures
� Operate in a place where temperature is always between 0 and 35∫C (32 to 95F)
� Store in a place where temperature is always between -20 and 60∫C (-4 to 113F)
� Battery life may be shortened in low temperature conditions.
46
EN
Hearing safety
Listen at a moderate volume. Using the headphones at high volume can impair your hearing.
We recommend headphone no. AY3809 for this product.
Important (for models supplied with headphones):
Philips guarantees compliance with the maximum sound power of its audio players as determined by relevant regulatory bodies only with the original model of provided headphones.
In case this one needs replacement, we recommend that you contact your retailer to order
a model identical to that of the original, provided by Philips.
Traf�c safety
Do not use the headphones while driving or cycling as you may cause an accident.
47
Copyright information
All other brands and product names are trademarks of their respective companies or
organizations.
Unauthorized duplication of any recordings whether downloaded from the Internet or
made from audio CDs is a violation of copyright laws and international treaties.
The making of unauthorized copies of copy-protected material, including computer programmes, �les, broadcasts and sound recordings, may be an infringement of copyrights and
constitute a criminal offence. This equipment should not be used for such purposes.
Disposal of your old product
Your product is designed and manufactured with high quality materials and components,
which can be recycled and reused.
48
EN
Please act according to your local rules and do not dispose of your old product with your
normal household waste. The correct disposal of your old product will help prevent potential negative consequences to the environment and human health.
Modi�cations
Modi�cations not authorized by the manufacturer may void user authority to operate this
49
Specifications are subject to change without notice.
Trademarks are the property of Koninkijke Philips Electronics N.V.
Or their respective owners
2006 © Koninkijke Philips Electronics N.V. All right reserved.
www.philips.com
wk6085
Printed in China