1
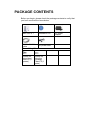
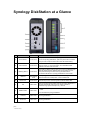
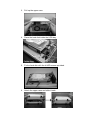
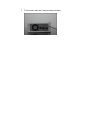
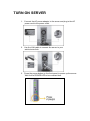
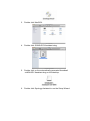
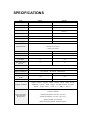
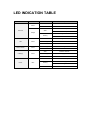
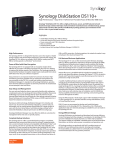
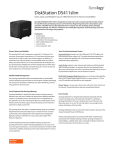
DiskStation
DS110j, DS110+
Quick Installation Guide
Document ID: Synology_QIG_1bayCL_20111017
SAFETY INSTRUCTIONS
Please read these safety instructions carefully before use, and keep
this manual in a safe place for your future reference.
Keep away from
direct sunlight and
away from
chemicals. Make
sure the
environment does
not experience
abrupt changes in
temperature or
humidity.
Do keep Synology
product upright. Do
not lay it down
horizontally.
Do not place the
Synology product
close to any liquid.
Before cleaning,
unplug the power
cord first. Wipe
Synology product
with damp paper
towels. Do not use
chemical or aerosol
cleaners to clean it.
Do not place the
Synology product
on a cart, table, or
desk, which is not
stable to avoid the
product from falling
over.
The power cord
must plug in to the
right supply voltage.
Make sure that the
supplied AC voltage
is correct and
stable.
PACKAGE CONTENTS
Before you begin, please check the package contents to verify that
you have received the items below.
Main Unit X 1
Installation CD
2M RJ-45 LAN
cable
Assembling Kit
Screws for
fixing Hard
Disk X 6 (2
spares)
AC power cord
Screws for
fixing the
Synology
Case X 3 (1
spare)
AC power
adapter
Synology DiskStation at a Glance
No.
Article Name
Location
Description
1)
Power Button
Front Panel
2)
LED Indicators
Front Panel
The LED indicator is used to display the status of the internal disk
and the system. For more information, see "LED INDICATION
TABLE" at the end of this document.
The power button is used to turn Synology DiskStation on or off.
To turn off Synology DiskStation, press the power button and hold it
until you hear a beep sound and the Power LED starts blinking.
3)
USBCopy Button
Front Panel
The USBCopy Button lights up when you connect a USB Device (for
example: digital camera, USB flash disk) to the USB port on the
front panel. Pressing the button will copy the data from the
connected USB device to Synology DiskStation’s internal HDD.
4)
USB Port
Front & Back
Panel
The Synology DiskStation offers USB ports for adding additional
external hard drives, USB printers, or other USB devices.
5)
eSATA Port1
Front Panel
The eSATA port is for connecting with an external SATA HDD.
6)
Fan
Back Panel
The fan is built to exhaust waste heat out of Synology DiskStation. It
will start automatically when the server starts. If the fan is
malfunctioning, system will beep every 1 second.
7)
RESET Button
Back Panel
1. To restore IP, DNS, passwords for the admin account to default
value.
2. To reinstall the Synology DiskStation.
8)
LAN Port
Back Panel
The LAN port is where you connect RJ-45 cable to
Synology DiskStation.
9)
Power Port
Back Panel
The power port is where you connect the AC adapter to
Synology DiskStation.
--------1
DS110+ only.
INSTALL HARD DISK
Disk Station requires one 3.5” SATA hard disk for installation. Refer
to the following steps for details:
Warning! If you use a hard disk with data on it to install, system will format the
hard disk and erase all data in some cases. Please back up the data if you
need it in the future.
1. Place the server horizontally on a desk. The rear panel should
be facing you.
2. Push to slide away the upper case.
3. Pull up the upper case.
4. Place the hard disk inside the HDD bay.
5. Fix the hard disk with the 4 HDD screws provided.
6. Attach the upper case and slide it back.
7. Fix the case with the 2 case screws provided.
TURN ON SERVER
1. Connect the AC power adapter to the server and plug in the AC
power cord to the power outlet.
2. Use the LAN cable to connect the server to your
switch/router/hub.
3. Press the power button on the front panel to power up the server.
Wait for the POWER LED to be constant blue.
INSTALL SYSTEM SOFTWARE
Windows User
1. Insert the installation CD to your computer.
2. Choose “Start” on the autorun menu.
3. Follow the on-screen instructions to complete the setup process.
Note: If you choose One-Click Setup, the admin password will be blank.
Mac User
1. Insert the installation CD to your computer.
2. Double click on the CD-Rom Drive thumbnail.
3. Double click MacOSX.
4. Double click SYNOLOGY-Assistant.dmg.
5. Double click on the automatically generated thumbnail
SYNOLOGY-Assistant.dmg on the desktop.
6. Double click Synology Assistant to run the Setup Wizard.
7. Click Browse to select the “.pat” installation file in the installation
CD.
8. Follow the on-screen instructions to complete the setup process.
Note: If you choose One-Click Setup, the admin password will be blank.
CONGRATULATIONS!
Server has been set up. Refer to the User’s Guide in the installation
CD for advanced settings and management. For more information or
online resources, please visit http://www.synology.com.
SPECIFICATIONS
Item
DS110j
DS110+
Internal HDD
3.5 SATA (II) x 1
3.5 SATA (II) x 1
Max. Capacity
3TB
3TB
Hot Swappable HDD
No
No
External HDD Interface
USB x 3
USB x 3
eSATA x 1
LAN Port
Gigabit x 1
Gigabit x 1
USBCopy
Yes
Yes
Size (HxWxD) (mm)
160 x 63 x 218
160 x 63 x 218
Weight (Kg)
0.81
0.81
‧Windows 2000 onward
‧Mac OS X 10.3 onward
Supported Clients
‧Ubuntu 9.04 onward
Max. User Accounts
512
2048
Max. Group Accounts
128
256
Max. Shared Folder
256
256
Max. Concurrent
Connections
64
256
Max. Supported IP
Cameras
5
12
File System
‧EXT4‧EXT3‧FAT (External Disk, Read/Write) ‧NTFS (External Disk, Read/Write)
Volume Type
‧Basic
Agency Certifications
‧FCC Class B ‧CE Class B ‧BSMI Class B
HDD Hibernation
Yes
Yes
Scheduled Power
On/Off
Yes
Yes
Wake on LAN
No
Yes
‧English ‧Deutsch ‧Français ‧Italiano ‧Español ‧Dansk ‧Norsk ‧Svensk
Language Localization
‧Nederlands ‧Русский ‧Polski ‧Magyar ‧Português do Brasil ‧Português
Europeu ‧Türkçe ‧Český ‧日本語‧한국어‧繁體中文‧简体中文
‧Line voltage: 100V to 240V AC
‧Frequency: 50/60Hz
Power Consumption
And Environment
Requirements
‧Operating Temperature: 40 to 95˚F (5 to 35˚C)
‧Storage Temperature: 15 to 155˚F (-10 to 70˚C)
‧Relative Humidity: 5% to 95% RH
‧Maximum Operating Altitude: 10000 feet (3048m)
LED INDICATION TABLE
LED Indication
Color
Status
Description
Static
Volume normal
Off
HDD Hibernation
Green
Available volume space < 1GB
STATUS
Static
Available volume space < 1 %
Orange
Volume degraded or crashed
Blinking
No volume
LAN
DISK / eSATA
USBCopy
Green
Static
Gigabit Link
Blinking
Network is active
Off
Network is down
Blinking
Disk is being accessed
Off
Disk is normal
Static
USB disk detected
Blinking
Copying data
Off
No USB disk attached
Static
Power ready
Green
Green
Booting up
Power
Blue
Blinking
Shutting down
Off
Power off