1
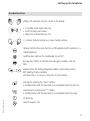
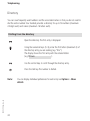
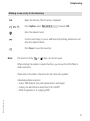
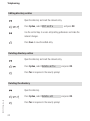
Eurit 435
Cordless ISDN telephone DECT
User Manual
Important:
This user manual contains
safety precautions!
Please read carefully before
putting the telephone into
operation, and store
in a safe place.
Safety precautions
Safety precautions
Please note the following tips for positioning, connecting and operating the phone.
➭ Position the base station or charging station on a non-slip underlay.
➭ Store the connection cable carefully to avoid accidents!
➭ Important notes on using the battery are given in the Appendix.
➭ Do not place the handset or base station/charging station
– near a heat source,
– in direct sunlight,
– near other electrical equipment.
➭ Protect your telephone against dust and avoid getting it wet or exposing it to aggressive
liquids and steam.
➭ Do not plug the connection cable into sockets other than the one for which it is intended.
➭ Connect only authorised accessories.
➭ Use only the supplied Type SNG 05-ea mains unit for the base station.
➭ Research has shown that under certain circumstances medical devices can be affected by
activated cordless telephones (DECT). Please therefore observe the rules of the medical
institution in question when using cordless telephones in medical facilities.
➭ Never
– open the telephone yourself!
– touch contacts with sharp, metallic objects!
– carry the base station by the connector cables!
➭ Use only a slightly damp cloth or antistatic cloth to clean your telephone.
➭ Do not use your telephone in damp rooms (e.g. bathroom) or in areas at risk from explosion.
Contents
Contents
Safety precautions
Eurit 435 . . . . . . . . . . . . . . . . . . . . . . . . . . . . . . . . . . . . . . . . . . . . . . . . . . . 7
Welcome . . . . . . . . . . . . . . . . . . . . . . . . . . . . . . . . . . . . . . . . . . . . . . . . . . . . . . . . . . . . . 7
20402804en_ba_a0
Setting up the telephone . . . . . . . . . . . . . . . . . . . . . . . . . . . . . . . . . . . . . . 8
Unpacking and positioning the telephone . . . . . . . . . . . . . . . . . . . . . . . . . . . . . . . . . . . . . 8
Package contents . . . . . . . . . . . . . . . . . . . . . . . . . . . . . . . . . . . . . . . . . . . . . 8
Location . . . . . . . . . . . . . . . . . . . . . . . . . . . . . . . . . . . . . . . . . . . . . . . . . . . . 8
Setting up the base station . . . . . . . . . . . . . . . . . . . . . . . . . . . . . . . . . . . . . . 9
Wall mounting . . . . . . . . . . . . . . . . . . . . . . . . . . . . . . . . . . . . . . . . . . . . . . . . . . . . . . . . 10
Connecting the telephone. . . . . . . . . . . . . . . . . . . . . . . . . . . . . . . . . . . . . . . . . . . . . . . . 11
Connecting the charging station . . . . . . . . . . . . . . . . . . . . . . . . . . . . . . . . . 11
Disconnecting the cable (base station) . . . . . . . . . . . . . . . . . . . . . . . . . . . . . 12
Putting the handset into operation . . . . . . . . . . . . . . . . . . . . . . . . . . . . . . . . . . . . . . . . . 13
Inserting the rechargeable batteries . . . . . . . . . . . . . . . . . . . . . . . . . . . . . . 13
Charging the batteries . . . . . . . . . . . . . . . . . . . . . . . . . . . . . . . . . . . . . . . . 14
Registering the handset . . . . . . . . . . . . . . . . . . . . . . . . . . . . . . . . . . . . . . . 15
Assigning Multiple Subscriber Numbers (MSN) . . . . . . . . . . . . . . . . . . . . . . 15
Displays, keys, symbols . . . . . . . . . . . . . . . . . . . . . . . . . . . . . . . . . . . . . . . . . . . . . . . . . . 16
Displays . . . . . . . . . . . . . . . . . . . . . . . . . . . . . . . . . . . . . . . . . . . . . . . . . . . 16
Handset buttons . . . . . . . . . . . . . . . . . . . . . . . . . . . . . . . . . . . . . . . . . . . . . 17
Base station keys . . . . . . . . . . . . . . . . . . . . . . . . . . . . . . . . . . . . . . . . . . . . 19
Switching the handset on/off . . . . . . . . . . . . . . . . . . . . . . . . . . . . . . . . . . . . . . . . . . . . . 20
Switching the handset off . . . . . . . . . . . . . . . . . . . . . . . . . . . . . . . . . . . . . . 20
Switching the handset on . . . . . . . . . . . . . . . . . . . . . . . . . . . . . . . . . . . . . . 20
1
Contents
Activating/deactivating the key lock . . . . . . . . . . . . . . . . . . . . . . . . . . . . . . . . . . . . . . . . 20
Activating the key lock . . . . . . . . . . . . . . . . . . . . . . . . . . . . . . . . . . . . . . . . 21
Deactivating the key lock . . . . . . . . . . . . . . . . . . . . . . . . . . . . . . . . . . . . . . 21
Paging: Locating a mislaid handset . . . . . . . . . . . . . . . . . . . . . . . . . . . . . . . . . . . . . . . . . 21
Paging call (group call) from the base station . . . . . . . . . . . . . . . . . . . . . . . 21
End call . . . . . . . . . . . . . . . . . . . . . . . . . . . . . . . . . . . . . . . . . . . . . . . . . . . 21
20402804en_ba_a0
Telephoning . . . . . . . . . . . . . . . . . . . . . . . . . . . . . . . . . . . . . . . . . . . . . . . 22
Change user . . . . . . . . . . . . . . . . . . . . . . . . . . . . . . . . . . . . . . . . . . . . . . . . . . . . . . . . . 22
Selecting a user . . . . . . . . . . . . . . . . . . . . . . . . . . . . . . . . . . . . . . . . . . . . . 22
Selecting internal and external numbers . . . . . . . . . . . . . . . . . . . . . . . . . . . . . . . . . . . . . 23
Selecting internal numbers . . . . . . . . . . . . . . . . . . . . . . . . . . . . . . . . . . . . . 23
Selecting external numbers . . . . . . . . . . . . . . . . . . . . . . . . . . . . . . . . . . . . . 23
Accepting a call . . . . . . . . . . . . . . . . . . . . . . . . . . . . . . . . . . . . . . . . . . . . . . . . . . . . . . . 24
Handset in base station/charging station . . . . . . . . . . . . . . . . . . . . . . . . . . . 24
Handset off base station/charging station (off-hook) . . . . . . . . . . . . . . . . . . 24
Ending a call . . . . . . . . . . . . . . . . . . . . . . . . . . . . . . . . . . . . . . . . . . . . . . . 24
Dialling from the VIP directory. . . . . . . . . . . . . . . . . . . . . . . . . . . . . . . . . . . . . . . . . . . . . 25
Park/unpark . . . . . . . . . . . . . . . . . . . . . . . . . . . . . . . . . . . . . . . . . . . . . . . . . . . . . . . . . . 25
Completion of Call to Busy Subscriber (CCBS)/on No Reply (automatic call-back) . . . . . . 26
Activating automatic call-back . . . . . . . . . . . . . . . . . . . . . . . . . . . . . . . . . . 26
Adjusting the handset/loudspeaker volume . . . . . . . . . . . . . . . . . . . . . . . . . . . . . . . . . . . 27
Handset microphone off (Mute) . . . . . . . . . . . . . . . . . . . . . . . . . . . . . . . . . . . . . . . . . . . 27
Redial . . . . . . . . . . . . . . . . . . . . . . . . . . . . . . . . . . . . . . . . . . . . . . . . . . . . . . . . . . . . . . 28
Dialling a number from the redial list (on-hook dialling) . . . . . . . . . . . . . . . . 28
Saving entries in the directory . . . . . . . . . . . . . . . . . . . . . . . . . . . . . . . . . . . 29
Deleting an entry . . . . . . . . . . . . . . . . . . . . . . . . . . . . . . . . . . . . . . . . . . . . 29
Deleting all entries . . . . . . . . . . . . . . . . . . . . . . . . . . . . . . . . . . . . . . . . . . . 29
Directory . . . . . . . . . . . . . . . . . . . . . . . . . . . . . . . . . . . . . . . . . . . . . . . . . . . . . . . . . . . . 30
Dialling from the directory . . . . . . . . . . . . . . . . . . . . . . . . . . . . . . . . . . . . . . 30
Making a new entry in the directory . . . . . . . . . . . . . . . . . . . . . . . . . . . . . . 31
2
Contents
Editing directory entries . . . . . . . . . . . . . . . . . . . . . . . . . . . . . . . . . . . . . . . 32
Deleting directory entries . . . . . . . . . . . . . . . . . . . . . . . . . . . . . . . . . . . . . . 32
Deleting the directory . . . . . . . . . . . . . . . . . . . . . . . . . . . . . . . . . . . . . . . . . 32
Incoming messages . . . . . . . . . . . . . . . . . . . . . . . . . . . . . . . . . . . . . . . . . . 33
General . . . . . . . . . . . . . . . . . . . . . . . . . . . . . . . . . . . . . . . . . . . . . . . . . . . . . . . . . . . . . 33
Calls list . . . . . . . . . . . . . . . . . . . . . . . . . . . . . . . . . . . . . . . . . . . . . . . . . . . . . . . . . . . . . 34
Opening a calls list (message key) . . . . . . . . . . . . . . . . . . . . . . . . . . . . . . . . 35
Opening a calls list (menu) . . . . . . . . . . . . . . . . . . . . . . . . . . . . . . . . . . . . . 35
Selecting a number from the calls list . . . . . . . . . . . . . . . . . . . . . . . . . . . . . 35
Saving entries in the directory . . . . . . . . . . . . . . . . . . . . . . . . . . . . . . . . . . . 36
Deleting an entry . . . . . . . . . . . . . . . . . . . . . . . . . . . . . . . . . . . . . . . . . . . . 36
Deleting lists . . . . . . . . . . . . . . . . . . . . . . . . . . . . . . . . . . . . . . . . . . . . . . . . 36
Voicebox . . . . . . . . . . . . . . . . . . . . . . . . . . . . . . . . . . . . . . . . . . . . . . . . . . . . . . . . . . . . 37
Playing back recorded messages . . . . . . . . . . . . . . . . . . . . . . . . . . . . . . . . . 37
20402804en_ba_a0
SMS . . . . . . . . . . . . . . . . . . . . . . . . . . . . . . . . . . . . . . . . . . . . . . . . . . . . . . 38
Requirements . . . . . . . . . . . . . . . . . . . . . . . . . . . . . . . . . . . . . . . . . . . . . . . . . . . . . . . . 38
SMS Service Centre . . . . . . . . . . . . . . . . . . . . . . . . . . . . . . . . . . . . . . . . . . . . . . . . . . . . 39
Sending SMS messages . . . . . . . . . . . . . . . . . . . . . . . . . . . . . . . . . . . . . . . . 40
Receiving of SMS . . . . . . . . . . . . . . . . . . . . . . . . . . . . . . . . . . . . . . . . . . . . 40
Entering and changing the number of the SMS service centre . . . . . . . . . . . 41
Writing, sending and saving SMS messages . . . . . . . . . . . . . . . . . . . . . . . . . . . . . . . . . . 42
Entering and sending SMS texts . . . . . . . . . . . . . . . . . . . . . . . . . . . . . . . . . 42
Saving SMS text as a draft . . . . . . . . . . . . . . . . . . . . . . . . . . . . . . . . . . . . . . 43
Inbox . . . . . . . . . . . . . . . . . . . . . . . . . . . . . . . . . . . . . . . . . . . . . . . . . . . . . . . . . . . . . . 44
Reading incoming SMS messages . . . . . . . . . . . . . . . . . . . . . . . . . . . . . . . . 44
Outbox . . . . . . . . . . . . . . . . . . . . . . . . . . . . . . . . . . . . . . . . . . . . . . . . . . . . . . . . . . . . . 46
Opening the outbox . . . . . . . . . . . . . . . . . . . . . . . . . . . . . . . . . . . . . . . . . . 46
3
Contents
Error in sending and receiving an SMS message . . . . . . . . . . . . . . . . . . . . . . . . . . . . . . . 48
Error in sending an SMS message . . . . . . . . . . . . . . . . . . . . . . . . . . . . . . . . 48
Error receiving an SMS message . . . . . . . . . . . . . . . . . . . . . . . . . . . . . . . . . 48
SMS messages to PBX . . . . . . . . . . . . . . . . . . . . . . . . . . . . . . . . . . . . . . . . . . . . . . . . . . 48
Telephoning with several call partners . . . . . . . . . . . . . . . . . . . . . . . . . . . 49
Calling another person during an external call . . . . . . . . . . . . . . . . . . . . . . . . . . . . . . . . 49
Calling an external call partner (external enquiry call) . . . . . . . . . . . . . . . . . 49
Forwarding an external call internally . . . . . . . . . . . . . . . . . . . . . . . . . . . . . . . . . . . . . . . 50
Calling an internal call partner (internal enquiry call) . . . . . . . . . . . . . . . . . . 50
Switching between two call partners (brokering) . . . . . . . . . . . . . . . . . . . . . . . . . . . . . . 51
Talking to two call partners simultaneously (3-way conference) . . . . . . . . . . . . . . . . . . . 52
Initiating a 3-way conference . . . . . . . . . . . . . . . . . . . . . . . . . . . . . . . . . . . 52
Ending a three-party call . . . . . . . . . . . . . . . . . . . . . . . . . . . . . . . . . . . . . . . 52
Accepting/rejecting call waiting . . . . . . . . . . . . . . . . . . . . . . . . . . . . . . . . . . . . . . . . . . . 53
Accepting/rejecting a second external call . . . . . . . . . . . . . . . . . . . . . . . . . 53
Staying in touch . . . . . . . . . . . . . . . . . . . . . . . . . . . . . . . . . . . . . . . . . . . . 54
Call forwarding . . . . . . . . . . . . . . . . . . . . . . . . . . . . . . . . . . . . . . . . . . . . . . . . . . . . . . . 54
Setting up and activating call forwarding . . . . . . . . . . . . . . . . . . . . . . . . . . . 55
Deactivating call forwarding . . . . . . . . . . . . . . . . . . . . . . . . . . . . . . . . . . . . 55
Checking the call forwarding status . . . . . . . . . . . . . . . . . . . . . . . . . . . . . . . 56
20402804en_ba_a0
Safety . . . . . . . . . . . . . . . . . . . . . . . . . . . . . . . . . . . . . . . . . . . . . . . . . . . . 57
Built-in security . . . . . . . . . . . . . . . . . . . . . . . . . . . . . . . . . . . . . . . . . . . . . . 57
Key lock . . . . . . . . . . . . . . . . . . . . . . . . . . . . . . . . . . . . . . . . . . . . . . . . . . . 57
Changing the system PIN . . . . . . . . . . . . . . . . . . . . . . . . . . . . . . . . . . . . . . . . . . . . . . . . 58
Changing the PIN . . . . . . . . . . . . . . . . . . . . . . . . . . . . . . . . . . . . . . . . . . . . 58
4
Contents
PBX access . . . . . . . . . . . . . . . . . . . . . . . . . . . . . . . . . . . . . . . . . . . . . . . . . 59
Entering/deleting the Exchange Access Code (EAC) . . . . . . . . . . . . . . . . . . . . . . . . . . . . 59
Saving the Exchange Access Code (EAC) . . . . . . . . . . . . . . . . . . . . . . . . . . . 59
Functions . . . . . . . . . . . . . . . . . . . . . . . . . . . . . . . . . . . . . . . . . . . . . . . . . . . . . . . . . . . 60
Telephone settings . . . . . . . . . . . . . . . . . . . . . . . . . . . . . . . . . . . . . . . . . . 61
20402804en_ba_a0
Assinging numbers/MSNs . . . . . . . . . . . . . . . . . . . . . . . . . . . . . . . . . . . . . . . . . . . . . . . 61
Assigning an MSN . . . . . . . . . . . . . . . . . . . . . . . . . . . . . . . . . . . . . . . . . . . 61
Allocating an MSN . . . . . . . . . . . . . . . . . . . . . . . . . . . . . . . . . . . . . . . . . . . 62
Language . . . . . . . . . . . . . . . . . . . . . . . . . . . . . . . . . . . . . . . . . . . . . . . . . . . . . . . . . . . 63
Ringer . . . . . . . . . . . . . . . . . . . . . . . . . . . . . . . . . . . . . . . . . . . . . . . . . . . . . . . . . . . . . . 63
Setting the handset ringer . . . . . . . . . . . . . . . . . . . . . . . . . . . . . . . . . . . . . . 64
Setting the base station ringer . . . . . . . . . . . . . . . . . . . . . . . . . . . . . . . . . . 65
Settings . . . . . . . . . . . . . . . . . . . . . . . . . . . . . . . . . . . . . . . . . . . . . . . . . . . . . . . . . . . . 66
Registering/deregistering a handset . . . . . . . . . . . . . . . . . . . . . . . . . . . . . . . . . . . . . . . . 67
Registering the handset . . . . . . . . . . . . . . . . . . . . . . . . . . . . . . . . . . . . . . . 67
Deregistering a handset . . . . . . . . . . . . . . . . . . . . . . . . . . . . . . . . . . . . . . . 68
Auto talk . . . . . . . . . . . . . . . . . . . . . . . . . . . . . . . . . . . . . . . . . . . . . . . . . . . . . . . . . . . . 68
Station selection/switching to another base station . . . . . . . . . . . . . . . . . . . . . . . . . . . . 69
Changing the handset user name . . . . . . . . . . . . . . . . . . . . . . . . . . . . . . . . . . . . . . . . . . 69
Direct call . . . . . . . . . . . . . . . . . . . . . . . . . . . . . . . . . . . . . . . . . . . . . . . . . . . . . . . . . . . 70
Setting the contrast . . . . . . . . . . . . . . . . . . . . . . . . . . . . . . . . . . . . . . . . . . . . . . . . . . . . 71
Setting the time and date . . . . . . . . . . . . . . . . . . . . . . . . . . . . . . . . . . . . . . . . . . . . . . . 71
Restoring default settings . . . . . . . . . . . . . . . . . . . . . . . . . . . . . . . . . . . . . . . . . . . . . . . 72
Resetting the handset . . . . . . . . . . . . . . . . . . . . . . . . . . . . . . . . . . . . . . . . . 72
Resetting the base station . . . . . . . . . . . . . . . . . . . . . . . . . . . . . . . . . . . . . . 72
5
Contents
Charges . . . . . . . . . . . . . . . . . . . . . . . . . . . . . . . . . . . . . . . . . . . . . . . . . . . 73
Setting the factor . . . . . . . . . . . . . . . . . . . . . . . . . . . . . . . . . . . . . . . . . . . . . . . . . . . . . . 73
Setting the display type . . . . . . . . . . . . . . . . . . . . . . . . . . . . . . . . . . . . . . . . . . . . . . . . . 73
Setting the currency . . . . . . . . . . . . . . . . . . . . . . . . . . . . . . . . . . . . . . . . . . . . . . . . . . . . 74
Displaying charges . . . . . . . . . . . . . . . . . . . . . . . . . . . . . . . . . . . . . . . . . . . . . . . . . . . . . 74
Attachment . . . . . . . . . . . . . . . . . . . . . . . . . . . . . . . . . . . . . . . . . . . . . . . . 75
Important notes on using the battery . . . . . . . . . . . . . . . . . . . . . . . . . . . . . . . . . . . . . . . 75
The editor (creating or changing entries) . . . . . . . . . . . . . . . . . . . . . . . . . . . . . . . . . . . . 77
Table of available characters (directory entries/SMS) . . . . . . . . . . . . . . . . . . . . . . . . . . . . 78
Approval and conformity . . . . . . . . . . . . . . . . . . . . . . . . . . . . . . . . . . . . . . . 79
Warranty conditions . . . . . . . . . . . . . . . . . . . . . . . . . . . . . . . . . . . . . . . . . . 79
Warranty Certificate . . . . . . . . . . . . . . . . . . . . . . . . . . . . . . . . . . . . . . . . . 81
20402804en_ba_a0
Declaration of Conformity . . . . . . . . . . . . . . . . . . . . . . . . . . . . . . . . . . . . 83
6
Eurit 435
Eurit 435
Welcome
The Eurit 435 is a cordless telephone for connection to the public ISDN network. International
DECT (GAP)-standard digital technology offers excellent voice quality combined with a very
high level of listening protection.
You can operate up to 6 handsets from one base station, giving you the possibility to conduct
free internal calls from one handset to another. A handset can be registered with up to
4 base stations. This increases your radius of action and, at the same time, your reachability.
Handsets supplied with the package are already registered with the base station.
Your Eurit 435 supports CLIP (Calling Line Identification Presentation) provided the information is available on your connection and the caller’s number has not been suppressed.
Used in conjunction with the calls list, this provides you with information about calls even
during your absence.
You can use your Eurit 435 to send or receive SMS messages to and from SMS-enabled
devices e.g. mobiles, PCs or other telephones in the fixed network.*
Set aside some time to read this user manual carefully and get to know and use the wide
range of functions offered by your Eurit 435.
20402804en_ba_a0
We hope you enjoy using your Eurit 435.
* Only in networks with SMS service and protocol 1 (standard ETSI ES 201 912).
Contact your network operator to find out whether this service is supported.
7
Setting up the telephone
Setting up the telephone
Unpacking and positioning the telephone
Package contents
The package contains the following items:
Additional package contents for the Eurit 435 Duo
1 handset
1 base station
1 SNG 05-ea mains unit
1 charging station including
mains connector
➭ 1 connector cable
➭ 2 rechargeable batteries
➭ 1 user manual
➭ Second handset
➭ 2 rechargeable batteries
➭ Charging station (for second handset)
➭
➭
➭
➭
with mains unit
Location
20402804en_ba_a0
To obtain the best possible range, we recommend positioning the base station in a location
central to your radius of action. Avoid positioning the telephone in niches, recesses and
behind steel doors.
The range between the base station and handset is up to 300 meters outdoors and up to
50 meters indoors, but may be less depending on environmental conditions as well as structural and spatial factors. Silent zones can occur due to the digital transmission in the frequency
range used – even within the range, depending on the structural environment. Call quality
may be reduced through the increased incidence of short breaks in transmission. Normal call
quality can be restored if you move slightly out of the silent zone. If the range is exceeded,
the call will be disconnected unless you move back into range within five seconds.
8
Setting up the telephone
To avoid radio signal interference from other electronic equipment, we recommend that the
base station and handset are situated at the greatest possible distance (min. 1 meter) from
other equipment.
Note:
Before using the handset, wearers of hearing aids should note that radio signals can
be picked up by the hearing aid and, if sufficiently strong, cause an unpleasant buzzing
noise.
Setting up the base station
Your telephone is designed for use under normal operating conditions. Modern furniture is
treated with a wide variety of lacquer and plastic coatings and wide range of different
polishes. Some of these substances may contain agents that corrode and soften the plastic
feet of the base station/charging station. If this happens, the feet may leave unsightly marks
on the surface of the furniture.
20402804en_ba_a0
Understandably, the manufacturer cannot accept any liability for such damage. We theref
ore recommend that you position your telephone on a non-slip underlay, especially on new
furniture or furniture treated with lacquer-based preservatives.
9
Setting up the telephone
Wall mounting
Your Eurit 435 base station is suitable for wall-mounting.
Insert two wall plugs vertically at a distance of 90 mm from each
other and affix suitable screws. Check beforehand to ensure that
the screw heads fit the slots on the back of the base station.
Leave approximately 3 mm airflow space between the screw head
and the wall.
Hang the base station on the screws and connect it to the power
supply and telephone connection.
Note:
• Please remember:
20402804en_ba_a0
The 230 V and telephone connection should be within range of the cable
provided.
• Please also note that the base station must not be mounted in the opening
area of doors and windows: Danger of damage!
• Caution: Take care not to damage any cabling which may be installed
in the wall!
10
3 mm
Setting up the telephone
Connecting the telephone
Before you can start using your telephone you must plug in the telephone connection cables
and the mains cable.
Use only the SNG 05-ea mains unit
provided for the base station!
➀ Telephone connection cable
Connect the base station to the telephone socket
using the telephone connection cable (2 ✕ RJ45).
➁ Mains cable
First, insert the mains cable in the socket marked
with the mains connector symbol on the base of the
base station, and fit the cable in the moulded cable
duct. Then insert the mains unit in the 230 V socket.
Socket for telephone connection
cable ➀
Socket for
mains cable ➁
20402804en_ba_a0
Note:
Your telephone will not function if the mains connector is not plugged in or during
a power failure.
To ensure correct functioning, set up the connection to the telephone network
only after the battery is fully charged.
11
Setting up the telephone
Connecting the charging station
Plug the mains unit into a 230 V socket.
Disconnecting the cable (base station)
First unplug the mains unit from the 230 V socket and the RJ45 plug from the telephone
connection socket.
20402804en_ba_a0
To release the connection cable, use a ballpoint pen or similar object to press the holding
hook towards the plug and simultaneously pull the plug out along with the cable.
12
Setting up the telephone
Putting the handset into operation
Your handset is ready to use only when the battery has been fully charged up. You can then
accept or make calls on this handset.
Inserting the rechargeable batteries
The bottom part of the handset contains a battery compartment for housing two type AAA
batteries (microcells).
Important notes on using the batteries are given in the Appendix.
Removing the battery compartment cover:
Slide the battery compartment cover downwards (approx.3 mm) and lift.
20402804en_ba_a0
Inserting the two rechargeable batteries (note the polarity!):
Insert the batteries in the battery
compartment. Make sure the polarity
is correct. The polarity (+/–) in the
battery compartment must match the
polarity on the batteries. The handset
will not function if the batteries are
incorrectly inserted. This may result in
damage. Replace the compartment
cover by placing it approximately
3 mm offset and slide it upwards
until it clicks into place.
13
Setting up the telephone
Charging the batteries
The batteries are not yet charged when you first unpack the telephone. To charge them, place
the handset in the base station or a charging station. The animated battery indicator on the
handset signals the charging procedure. The batteries will take around 14 hours to fully charge.
The following indicators indicate the charging status on the handset display:
Charging status “empty”
Charging status “1/4 ”
Charging status “1/2 ”
Charging status “3/4 ”
Charging status “full”
Once you have inserted the new batteries, the display (1/4, 1/2, 3/4, full) on the handset
indicates the actual charging status only after a complete charging cycle.
Insert the RJ45 plug into your telephone connection socket once the battery indicator has
stopped flashing. Your telephone is now ready to use.
Use only NiMH rechargeable batteries. Never use disposable batteries/primary
cells.
20402804en_ba_a0
Note:
14
Please note: after you have inserted the batteries for the first time, the battery
display will indicate the correct information on the charging status only after a
complete charging cycle.
Setting up the telephone
Note:
You can replace the handset in the charging/base station after every call. Charging
is electronically controlled to ensure optimal charging of batteries in different
charge states. Avoid removing the batteries from the handset for no good reason,
since this affects the optimum charging cycle.
You can improve the capacity of the installed batteries if the handset batteries are
fully discharged after lengthy use and then fully recharged.
You can telephone for up to 15 hours with fully charged batteries.
If the battery charge status has reached its lower limit, the battery indicator
(
) flashes in the display and a warning signal is heard. You have 10 minutes
of talk time left.
Registering the handset
Handsets supplied with the package are already registered on the base station. Every additional handset must first be registered on the base station. You can operate up to 6 handsets on
the base station.
For instructions on registering additional handsets, see “Registering/deregistering handsets”.
Assigning Multiple Subscriber Numbers (MSN)
20402804en_ba_a0
Your telephone is delivered with no preprogrammed Multiple Subscriber Numbers (MSN).
All incoming calls are signalled.
Note:
For instructions on how assign and allocate Multiple Subscriber Numbers (MSN),
see ”Assigning Multiple Subscriber Numbers/MSNs”.
15
Setting up the telephone
Displays, keys, symbols
Displays
The display informs you about the current status of your telephone and provides clear, easyto-follow operating guidance: The “standby indicator” tells you that your handset is ready
for use.
The meaning of the displayed symbols is as follows:
The symbol stays permanently lit if there is an active connection to the base
station. A flashing symbol indicates that the handset is reaching the limit of
the base station range.
You have two new entries in the calls list.
You have new messages in your voicebox.
Indicates an incoming SMS (text message).
You have activated the key lock.
You have deactivated the ringer (brief tone to signal calls).
You have pressed the “mute” key: the microphone is off.
Shows the battery charge status. If you can only see an empty outline or if
the indicator is flashing, you must replace your handset in the base station
for recharging.
20402804en_ba_a0
MSN A
16
Your first handset is registered under this user name.
You can operate up to 6 handsets on the base station.
Since this turns your telephone into a virtual private branch exchange,
you can make internal calls free of charge!
Setting up the telephone
Handset buttons
Softkeys, left and right, function shown in the display.
➭ In standby mode: opens directory.
➭ Scrolls through open menus.
➭ Adjusts the volume during a call.
➭ In menus: Adjusts settings e.g. ringer melody, volume.
Talk key. Performs the same function as lifting/replacing the handset on a
corded telephone.
Handsfree key: switches the loudspeaker on and off.
Message key: flashes to indicate new messages (voicebox, calls list,
SMS).
Numerical keys for dialling telephone numbers and entering names.
ABC labelling (Vanity numbers).
Hold down Key 1 to set up a connection to the voicebox.
Hash key for entering the “hash” symbol.
In standby mode, hold this key down to activate/deactivate the key lock.
20402804en_ba_a0
Asterisk key for entering the “*” symbol.
In standby mode, hold this key down to activate/deactivate the ringer.
!
VIP directory.
R-key for enquiry calls.
17
Setting up the telephone
Earpiece
Display
Control keys up/down
Directory
Left softkey
Right softkey
Left control key
Right control key
Message key
Talk key
Handsfree key
Numerical keys
20402804en_ba_a0
R-key
Microphone
18
!
VIP directory
Setting up the telephone
Base station keys
Call key on base station to activate a paging call (group call) and register additional handsets.
Paging key
20402804en_ba_a0
Charging cradle
for the handset
19
Setting up the telephone
Switching the handset on/off
Your handset is automatically switched on and ready for use only after the battery has been charged up for the first time. You can switch the handset off to keep the battery charged for longer.
Switching the handset off
Press Menu, select HS settings
and press OK to confirm.
Confirm
Handset off?
/
Handset off
by pressing OK.
Switching the handset on
Press the talk key.
Note:
When switched off, your handset cannot respond to the paging call from the base
station or to an incoming call!
20402804en_ba_a0
Activating /deactivating the key lock
If you want to carry the handset around in your pocket, activate the key lock. This prevents
you inadvertently dialling a number. During incoming calls the key lock is deactivated for the
duration of the call.
20
Setting up the telephone
Activating the key lock
Hold down the hash key for about 2 seconds.
The display shows the lock symbol
.
Deactivating the key lock
Press
Unlock
followed by the hash key.
Paging: Locating a mislaid handset
If you have mislaid your handset, you can call it from the base station. All handsets that are
registered and reachable will ring for approximately 30 seconds.
Paging call (group call) from the base station
Press the call key on the base station.
20402804en_ba_a0
End call
Press one of the softkeys on the handset or press the call key on the
base station again.
21
Telephoning
Telephoning
Change user
If you have set up and assigned the Multiple Subscriber Numbers (MSN) provided by your
network operator, you can use this feature to define the MSN to use for outgoing calls.
To find out how to program or assign MSNs and allocate user names, refer to “Programming
numbers/MSNs” or “Changing handset user names”.
Selecting a user
Press Menu, select
Change user
and press OK.
Select the preferred user name and press OK.
20402804en_ba_a0
Note:
22
This menu item is only available if several MSNs have been set up.
Telephoning
Selecting internal and external numbers
You can register up to six Eurit 345 handsets with your base station and call them over
internal numbers.
Selecting internal numbers
Enter a one-digit number and press Internal.
Selecting external numbers
Enter the number.
Press the talk key.
The number is dialled.
Ending a call:
Press the talk key or replace the handset in the base station.
You can select numbers from the directory, redial list or calls list.
Mark the relevant number and press the talk key.
20402804en_ba_a0
Note:
23
Telephoning
Accepting a call
Calls are signalled acoustically by the base station as well as visually and acoustically by the
handset.
➭ The caller’s number is shown on the display if the Calling Line Identification Presentation
(CLIP) function is activated.
➭ The caller’s number is not displayed either if the caller has withheld his number i.e. if he
has suppressed transmission of his number (CLIR), or if this is not technically possible.
In this case the display shows “Withheld number”.
Handset in base station/charging station
Remove the handset from the base/charging station and conduct your call.
Handset off base station/charging station (off-hook)
Press the talk key and conduct your call.
Ending a call
20402804en_ba_a0
Press the talk key or replace the handset in the base/charging station.
24
Telephoning
Dialling from the VIP directory
You can store 10 frequently-used numbers (per handset) in the VIP directory under key
The telephone is supplied with the VIP directory empty.
!
.
To enter a number in the VIP directory, press the VIP key ! , Option, NEW ENTRY
,
enter the name and number, and save. Numbers in the VIP directory can be deleted and/or
edited at any time.
To dial from the VIP directory:
Press the VIP key
!
!
and select the relevant entry.
Press the talk key. The number is dialled.
Note:
If your telephone is connected to a private branch exchange, the exchange access
code must be entered (see “Saving the Exchange Access Code”).
Park/unpark
You can park an external call in the network for approximately 3 minutes and retrieve it
during this time, e.g. on another telephone (unpark).
You are conducting an external call.
20402804en_ba_a0
Press Option, select
Park
and press OK to confirm.
The default park code (1) is displayed.
If necessary, you can change this code. Press OK to park the call.
Note:
To unpark the call, press Menu, “Net functions” , “Unpark”, and OK.
Enter the same park code you have used for parking the call, and press OK.
25
Telephoning
Completion of Call to Busy Subscriber (CCBS) /
on No Reply (automatic call-back)
This function must be supported by the telephone exchange.
The person you are calling is already on the telephone or not available. When the person
you have tried to call ends his call or has ended the first outgoing call from his number,
your connection is automatically set up.
Activating automatic call-back
The person you are calling is engaged or does not pick up.
Press CCBS (if the line busy) or CCNR (if there is no reply).
Note:
Only one automatic call-back per MSN can be activated. If you activate another
automatic call-back, the previous one is deactivated.
20402804en_ba_a0
You can deactivate an automatic call-back before the function is carried out by
accessing menu item Net functions > Deact. callback > OK.
26
Telephoning
Adjusting the handset / loudspeaker volume
You can adjust the handset or loudspeaker volume during a call (five levels).
H
You are conducting a call.
Set the preferred volume using the control keys.
Handset microphone off (Mute)
If you do not want your call partner to hear what you are saying e.g. to another person in the
room, you can temporarily mute your handset.
H
You are conducting a call.
Press
.
Secrecy on
flashes in the display.
Your call partner cannot hear you. Talk to the person in the room.
. Your call partner can hear you again.
20402804en_ba_a0
Press
27
Telephoning
Redial
The 10 last-dialled numbers are saved in the redial list. The oldest entry in the list is overwritten every time an additional number is dialled.
You can view, edit and delete the numbers.
Dialling a number from the redial list (on-hook dialling)
Press
¤
.
Use the control keys to select the number you wish to call.
20402804en_ba_a0
Press the talk key. The number is dialled.
28
Telephoning
Saving entries in the directory
Press
¤
.
Use the control keys to select the number you wish to call.
Press Option, select
Save number
and press OK to confirm.
Enter the name and specific preferences and press Save.
Deleting an entry
Press
¤
.
Use the control keys to select the number you wish to call.
Press Option, select
Delete Call
and press OK to confirm.
Deleting all entries
Press
¤
.
20402804en_ba_a0
Press Option, select Delete all calls and press OK to confirm.
Press Yes in response to the security prompt.
29
Telephoning
Directory
You can save frequently used numbers and the associated names so that you do not need to
dial the entire number. Your handset provides a directory for up to 50 numbers (maximum
24 digits each) and names (maximum 16 letters each).
Dialling from the directory
Open the directory. The first entry is displayed.
Using the numerical keys (0–9), enter the first letters (maximum 5) of
the directory entry you are seeking (e.g. “Bro”).
The display shows the first entry with the entered letters
(e.g. Brown
).
Use the control keys to scroll through the directory entry.
Press the talk key. The number is dialled.
20402804en_ba_a0
Note:
30
You can display individual preferences for each entry via Options > Show
details.
Telephoning
Making a new entry in the directory
Open the directory. The first entry is displayed.
Press Option, select
New entry
and press OK.
Enter the relevant name.
Use the control keys to access additional entry/setting preferences and
enter the relevant details.
Press Save to save the new entry.
Note:
The functions of the
or
keys can also be saved.
When entering the number or special function, you can use the left softkey to
make corrections.
Please refer to the table in the Annex for the name entry symbols.
20402804en_ba_a0
Individual preference options:
– Status: PBX/external (only with private branch exchanges)
– Calling Line Identification Restriction (CLIR): On/Off
– MSN: Assignment of an outgoing MSN
31
Telephoning
Editing directory entries
Open the directory and mark the relevant entry.
Press Option, select
Edit entry
and press OK.
Use the control keys to access entry/setting preferences and make the
relevant changes.
Press Save to save the edited entry.
Deleting directory entries
Open the directory and mark the relevant entry.
Press Option, select
Delete entry
and press OK.
Press Yes in response to the security prompt.
Deleting the directory
Open the directory.
20402804en_ba_a0
Press Option, select
Delete all
Press Yes in response to the security prompt.
32
and press OK.
Incoming messages
Incoming messages
General
Your Eurit 435 has three message memories:
• Calls list
• Voicebox
• SMS
.
New messages are signalled in the display by the associated symbol and by the flashing
message key. Press the message key to access the new messages.
The lists can be accessed via the menu.
20402804en_ba_a0
Note:
33
Incoming messages
Calls list
There are two types of calls list:
• Missed calls
All calls which have gone unanswered.
• Answered calls
All calls which have been answered by the handset.
These lists show calls to a receiving MSN assigned to the handset. The last 20 calls are
saved along with the date and time of each call. If a calls list is full and a new entry is
made, the oldest entry is deleted. The newest entry is displayed first, the oldest last.
20402804en_ba_a0
A caller is entered in the relevant calls list once the call has ended. If his number is transferred (CLIP), it is shown on the display. If the number is stored in the directory, the name is
automatically displayed. If there are several identical entries, both lists show only the most
recent. If an incoming call is accepted from a caller already in the missed calls list, this
entry is transferred to the redial list and deleted from the missed calls list.
34
Incoming messages
Opening a calls list (message key)
If there are new missed calls and the message key is flashing, you can access the latest entry
directly.
Press the message key, select Missed calls
if necessary,
and press OK (if there are several messages e.g. SMS, calls). The latest
entry is displayed.
Opening a calls list (menu)
Press Menu, select the calls list and press OK.
Select the relevant calls list and press OK.
Selecting a number from the calls list
Open the relevant calls list.
Select the entry you are seeking and press the talk key to dial
immediately.
20402804en_ba_a0
Note:
For PBX operation:
Depending on the external line selection, the exchange access code (EAC) may
need to be automatically inserted before the transmitted number in order to dial
directly from the calls list.
35
Incoming messages
Saving entries in the directory
Open the relevant calls list and mark the entry.
Press Option, select
Save number
and press OK to confirm.
Enter the name and specific preferences and press Save.
Deleting an entry
Open the relevant calls list and mark the entry.
Press Option, select
Delete call
and press OK to confirm.
Deleting lists
Open the relevant calls list.
20402804en_ba_a0
Press Option, select Delete all calls and press OK to confirm.
Press Yes in response to the security prompt.
36
Incoming messages
Voicebox
You can also forward calls directly to a voicebox. This function must be set up by your network operator.
You have three options for call forwarding:
➭ “Unconditional” – All calls are forwarded to the voicebox.
➭ “Busy” – Calls are forwarded to the voicebox if you are busy conducting another call,
➭ “No reply” – If you do not accept a call within 20 seconds (depending on your exchange
setting), it is forwarded to the voicebox.
For details on call forwarding, refer to “Call forwarding”.
New voicebox messages are signalled on the display by
.
Playing back recorded messages
20402804en_ba_a0
Press the message key, select Voicebox
if necessary, and
press OK (if there are several messages e.g. SMS, calls).
The connection to the voicebox is set up. Follow the voice instructions
on the voicebox.
You can call the voicebox at any time by pressing and holding down
key
.
37
SMS
SMS
You can send and receive SMS messages on your Eurit 435.
You can use your network operator’s SMS service to send an SMS to any fixed network connection or to a mobile connection. Your SMS will be received as a text message on all SMSenabled devices (mobile, PC, other telephone). If the recipient of your SMS does not have an
SMS-enabled telephone, the SMS is read out in the form of a voice message.
Incoming SMS messages are saved in the base station. You can therefore use any handset to
read, write or forward your SMS messages. If several handsets are in use, only one handset at
a time can access SMS messages.
Up to 15 incoming SMS messages can be saved. When the incoming memory is full, the pictogram
flashes. To free up memory, you need to delete some messages (see below).
You can also save 5 sent SMS messages and 5 drafts. When the memory for sent and draft
messages is full, a new entry deletes the oldest entry.
Requirements
➭ To send and receive SMS messages, your telephone line must have active Calling Line Iden-
tification Presentation (CLIP) and Connected Line Identification Presentation (COLP).
Make sure these functions are activated on your line.
20402804en_ba_a0
➭ To send an SMS, the number of the SMS service centre must be saved in your Eurit 435 as
the SMS service centre and selected as the sending centre.
38
SMS
Your service provider will advise you on
➭ the costs for sending and receiving SMS messages,
➭ the mobile providers you can use to send and receive SMS messages,
➭ and the functions your SMS service offers.
SMS Service Centre
SMS messages are exchanged in the SMS service centre. To send and receive an SMS message,
you need the number of your network operator’s SMS service centre.
Four entries are reserved in your telephone for SMS service centre numbers:
➭ SMS Service Centre 1 to 4
20402804en_ba_a0
Under Send Service, select from the list of SMS service centres, entries the one you wish to
use for sending your SMS messages.
39
SMS
Sending SMS messages
The number of the SMS service centre you wish to use to send SMS messages must be selected in your Eurit 435 as the sending SMS service centre.
This number is automatically used to send SMS messages i.e. you can only send SMS messages
via this SMS service centre.
Receiving of SMS
To receive SMS messages via an SMS service centre, you must register with the relevant SMS
service centre.
You can register with three additional SMS service centres operated by different network
operators for receiving SMS messages. You only need to register with one SMS service centre
to be able to receive SMS messages from this SMS service centre.
You must enter the number of this SMS centre under SMS Service Centre.
To register and deregister with an additional SMS service centre via an SMS message, you
first need to select the relevant SMS service centre as the Send Service.
The relevant network operator will provide information on the register/deregister details you
need to send to the SMS service centre.
20402804en_ba_a0
Note:
40
After sending an SMS message over Send Service 2 to 4, the telephone automatically switches back to Send Service 1.
SMS
Entering and changing the number of the SMS service centre
You can change the numbers for SMS Service Centre 1 to 4.
Press Menu, select
SMS
and press OK.
Select
SMS settings
Select
Services Centres
and press OK.
and press OK.
Select an SMS service centre from 1 to 4 and press OK to confirm.
Enter the number of change the existing number and save the setting
with Save.
If your Eurit 435 is connected to a PBX: If a prefix (exchange access code) is
entered (see “PBX operation”), this is automatically inserted before the number.
20402804en_ba_a0
Note:
41
SMS
Writing, sending and saving SMS messages
An SMS message must be no more than 160 characters long.
SMS messages are automatically saved only if the transmission is interrupted. If you have written
an important SMS message and want to save it, you must do this yourself before sending.
Entering and sending SMS texts
Press Menu, select
Select
SMS
Write SMS
and press OK.
and press OK.
Enter the text and press OK.
Press OK to confirm
Send to
.
Enter the recipient’s number and press Send.
You can enter the recipient’s number directly from the directory (press Search and select a
number from the directory).
20402804en_ba_a0
Sent SMS messages are automatically saved in the outbox. After five SMS messages, the
oldest entry is overwritten.
42
SMS
Saving SMS text as a draft
You can save the text of up to five SMS messages as drafts. Press Option / Save / OK.
After five SMS messages, the oldest entry is overwritten.
You can edit the saved texts and have the following options under Option:
Send to
Enter the recipient’s number and press OK.
Save
The edited text is saved with the changes you have made.
Delete
The selected entry is deleted.
Delete all
To delete all drafts, press Yes in response to the security prompt.
Note:
If you receive a call while creating an SMS message, the SMS is automatically
saved locally in the handset. You can accept the call and continue creating or
sending the SMS message later by selecting “Write SMS”.
SMS messages which could not be sent, for example if the connection was
interrupted during transmission, are assigned an error status and are saved in
the outbox.
Note that some network operators charge for connection setup to the SMS service
centre.
20402804en_ba_a0
All settings as well as the saved SMS messages remain in memory after a power
failure.
43
SMS
Inbox
Incoming SMS messages are saved in the inbox.
Reading incoming SMS messages
New SMS messages are signalled on the handsets assigned to the MSN by the symbol
in the display as well as by the flashing message key.
Each SMS message is indicated along with the associated date and time (as transmitted by
the SMS service centre). The SMS messages are sorted once they have been received. New
SMS messages are displayed before old ones.
The display shows
.
Press the message key, select SMS
if necessary, and
press OK.
The incoming SMS messages are shown in the inbox.
You can use the control key to scroll down to other SMS messages.
Press on Read to display the text of the SMS message. Use the control
key to scroll through the SMS message.
20402804en_ba_a0
Note:
44
Once you have opened a new SMS message, it is marked as “read”.
SMS
Once you have read the SMS message, you have the following options:
Press Option, select the relevant menu item and press OK.
I
Delete
Reply
To delete the SMS messages, press Yes in response to the security
prompt.
Once you have selected whether to include the received text or not,
you are in write mode. The sender’s number is automatically applied
and can be changed, if required.
Select this menu item to enter a forwarding number.
Call number
Select this menu item to set up a telephone connection to the
sender.
Save number
The sender’s number is saved in the directory; enter the associated
name.
Delete all
To delete all received SMS messages, press Yes in response to the
security prompt.
20402804en_ba_a0
Forward
45
SMS
Outbox
Outgoing SMS messages are saved in the outbox. You can access the outbox via Menu >
SMS > Outbox /OK. The saved messages are displayed. Mark the relevant message in the
list. Press Read to open the message, edit it and use the Options as necessary.
Note:
Up to five outgoing SMS messages are saved in the outbox. After five SMS
messages, the oldest entry is overwritten.
Opening the outbox
Press Menu, select
Select
Outbox
SMS
and press OK.
and press OK.
The last outgoing SMS messages are displayed.
You can use the control key to scroll down the SMS messages.
Press on Read to display the text of the SMS message. Use the
control key to scroll through the SMS message.
Press Option, select the relevant menu item and press OK.
20402804en_ba_a0
I
46
SMS
Send to
Sends the selected SMS message. If a number has already been
entered and saved, it is displayed. You can change the number at
this stage, if required.
You can edit the text and recipient’s number and send or save
the message.
Call number
After selecting this menu item, a telephone connection is set up
to the recipient.
Delete
To delete the SMS messages, press Yes in response to the security
prompt.
Delete all
To delete all outgoing SMS messages, press Yes in response to the
security prompt.
20402804en_ba_a0
Save
47
SMS
Error in sending and receiving an SMS message
Error in sending an SMS message
You will be charged the cost of sending an SMS message only if it has been correctly transmitted to your network operator’s SMS service centre.
If the SMS centre number is missing or an incorrect number has been saved, you cannot
send and receive SMS messages. The SMS service centre number appears in your calls list.
Please delete the number.
Check the number of the SMS service centre to ensure it was correctly saved.
Note:
SMS messages with special content such as images and sound are not supported.
Error receiving an SMS message
If you receive an SMS message as a voice message on your Eurit 435, this means it was sent
to you via a network operator which cannot transmit it as an SMS message.
If your telephone is unable to save any more SMS messages, an alert is displayed.
20402804en_ba_a0
SMS messages to PBX
The availability of SMS functions is dependent on your PBX.
For further information, refer to your PBX operating instructions.
48
Telephoning with several call partners
Telephoning with several call partners
Your telephone offers the option of calling a second person during a call (enquiry call),
switching between call partners (brokering) or simultaneously conversing (3-way conference
call).
Calling another person during an external call
While conducting an external call, you want to make an internal call (if several handsets are
registered) or another external call.
Calling an external call partner (external enquiry call)
H
You are conducting an external call:
Press the R-key. The first call is put on hold. Enter the relevant number
and press the talk key. You can now conduct a call with a second call
partner.
Press Option,
partner.
End
and OK to end the call with the second call
or…
20402804en_ba_a0
Your second call partner does not answer or is busy.
You can end the call attempt by pressing End.
Note:
Instead of manually entering the number of the second external call partner, you
can also call a number saved in the directory.
49
Telephoning with several call partners
Calling an internal call partner (internal enquiry call)
H
You are conducting an external call:
Press Option, Internal Inquiry and OK to make an internal
enquiry call. If necessary, use the control keys to select the internal
partner you are seeking (if more than two handsets are registered) and
press OK.
The internal partner is called.
Press Option,
End
and OK to return to the external call.
Forwarding an external call internally
You have accepted an external call and want to forward it internally to another handset.
H
You are conducting an external call:
Press Option, Internal Inquiry and OK to make an internal
enquiry call. If necessary, use the control keys to select the internal
partner you are seeking (if more than two handsets are registered) and
press OK.
20402804en_ba_a0
The internal partner is called.
Press the talk key. The external call is transferred to the internal partner.
50
Telephoning with several call partners
Switching between two call partners (brokering)
While conducting an external call, you have accepted a second call or called a second call
partner.
You can now switch between the two.
H
You are conducting an external call and have a second call on hold.
Press the R-key
or
Press Option, select Brokering
and press OK to confirm.
You are connected with the other call partner.
Ending the active call
You are switching between calls with two separate external partners
and want to end the “active” call.
Press Option,
and OK to end the active call.
If you are connected with two call partners and are switching between them,
you can include the call partner on hold in a 3-way conference call.
20402804en_ba_a0
Note:
End
51
Telephoning with several call partners
Talking to two call partners simultaneously (3-way conference)
Initiating a 3-way conference
H
You are conducting an external call and have a second call on hold.
Press Option,
Join
and OK to start the 3-way conference call.
Ending a three-party call
H
You are conducting a 3-way conference call.
Press Option, End conference
and OK to end the conference
call. You are now once more in brokering mode.
or
20402804en_ba_a0
Press the talk key to connect the two other call partners to each other.
52
Telephoning with several call partners
Accepting / rejecting call waiting
Accepting / rejecting a second external call
H
You are conducting a call:
A second external partner calls you. You will hear the call waiting tone.
Accept
Press Option, select Accept / End
and press OK.
The active call is ended. You are connected to the waiting call partner.
or
Press Option, select Accept / Hold
and press OK.
The first call is put on hold. You are connected to the waiting call partner.
You can then switch between the two call partners (brokering) or talk to
them simultaneously (3-way conference).
or…
Reject
Press Reject. You can continue the active call without hearing the call
waiting tone.
20402804en_ba_a0
Note:
If you want to end the first call and then accept the waiting call, you have a few
seconds within which to do this (depending on the exchange). Press the talk
key
. Your telephone will ring and you can accept the waiting call.
The waiting caller will hear the ringing signal for up to 30 seconds (depending on
the exchange). If you do not accept the call, he will hear the busy signal.
53
Staying in touch
Staying in touch
The call forwarding function allows you to remain in touch even if you are not near the
telephone.
You can do this by automatically forwarding calls to any other number.
Separate call forwarding settings can be made for each MSN.
Call forwarding
There are three options for call forwarding:
➭ Call forwarding unconditional – All calls are immediately forwarded to the programmed
number.
➭ Call forwarding on busy – Calls are forwarded only if your telephone is engaged.
➭ Call forwarding no reply – If you do not accept a call within 20 seconds (depending on
your exchange setting), it is forwarded to the programmed number.
20402804en_ba_a0
“Call forwarding no reply” and “Call forwarding on busy” can be activated simultaneously
but to different forwarding numbers.
54
Staying in touch
Setting up and activating call forwarding
Press Menu, select
Select
Net functions
Call forwarding
and press OK.
and press OK.
Select the relevant call forwarding option and press OK.
–
Unconditional
–
No reply
–
On busy
.
Enter or change the forwarding number and press OK.
Deactivating call forwarding
Press Menu, select
Net functions
and press OK.
Select
Status
and press OK.
Select
Deactivate
and press OK.
All
and press OK.
20402804en_ba_a0
Select the relevant call forwarding option or
55
Staying in touch
Checking the call forwarding status
Press Menu, select
Net functions
and press OK.
Select
Status
and press OK.
Select
Show number
and press OK.
20402804en_ba_a0
Select the relevant call forwarding option and press OK.
56
Safety
Safety
Built-in security
When you are on the telephone, the base station and handset are connected to each other
over a radio link. The base station handles switching between the telephone network and the
handset. To ensure that no-one can eavesdrop or telephone at your cost, the base station and
handset exchange codes. If the codes do not match, the connection with third-party handsets
cannot be set up.
The devices use digital transmission and encryption between base station and handset to
ensure a high level of listening protection
To protect important settings in your telephone, you must use a PIN (Personal Identification
Number) code.
Key lock
20402804en_ba_a0
If the key lock is activated, you can carry your handset around without inadvertently dialling
a number.
57
Safety
Changing the system PIN
The PIN is a four-digit password to protect the system and handsets against unauthorised
access. You need the system PIN to make system settings on the base station.
Changing the PIN
The telephone is delivered with the system PIN set to “0000”.
Your handset is in standby mode.
Press Menu, select
Select
Base settings
System PIN
and press OK.
and press OK.
Enter the current 4-digit PIN and press OK (only if the current PIN is
different from the default “0000”). The prompt Enter new PIN
is displayed, asking you to enter a new PIN.
Enter the new 4-digit PIN and press Save.
Enter the new PIN again (security measure) and press Save. The new
system PIN is saved.
20402804en_ba_a0
Note:
58
If you enter the PIN incorrectly, the error signal is heard and the display shows the
message: “INCORRECT PIN”. After a few seconds you can enter the PIN again.
PBX access
PBX access
Entering/deleting the Exchange Access Code (EAC)
If your base station is connected to a PBX, you may need to enter an EAC (Exchange Access
Code) for external calls when setting the telephone up. This procedure must be repeated on
every registered handset.
Please refer to the user manual of your PBX.
Saving the Exchange Access Code (EAC)
Press Menu, select
Base settings
Select
PBX
Select
Access code
and press OK.
and press OK.
and press OK.
Enter the exchange access code (one-digit). To delete a saved exchange
access number, press softkey
.
20402804en_ba_a0
Press Save. The exchange access code (EAC) is saved/deleted.
59
PBX access
Functions
This menu is used to set the following functions:
– Incoming code: If the exchange access code is automatically inserted during number
transmission, switch the function “On”. If the function is switched “Off”, the Eurit 435
inserts the exchange access code for incoming calls. This is necessary in order to call numbers directly from the calls list.
– Automatic ECT: If the function is switched on, this is transmitted via the ECT (Explicit Call
Transfer) ISDN service. Otherwise, “Disconnect” is shown on both connections.
– Automatic keypad: The “Keypad” function allows certain services to be managed by
entering characters and number sequences (e.g. also on PBXs). The “Keypad” function must
be set when connecting your Eurit 435 to an ISDN PBX or an exchange which is controlled
via “Keypad” protocol. The numbers/characters 0–9, *, # are sent as keypad information
elements.
Press Menu, select Base
and press OK to confirm.
Select
Functions
settings
/
PBX
and press OK to confirm.
Use the control keys to scroll through the list of functions. The current
setting is displayed for each function.
Use the left/right control keys to change this setting.
20402804en_ba_a0
Press Save to confirm your changes.
60
Telephone settings
Telephone settings
Assinging numbers/MSNs
Your network operator has provided you with several ISDN numbers (MSNs). These can be
used for specific applications e.g. to record separate statistics on private and business call
costs. Each programmed MSN (max. 5) can be allocated to one or more handsets and given
a corresponding user name.
If no MSN has been programmed, all incoming calls are signalled on all handsets.
Assigning an MSN
Press Menu, select
to confirm.
Base settings
and press OK
Select
MSN settings
and press OK to confirm.
Select
Assign MSN
and press OK to confirm.
Select a letter from the list
MSN A…E
and press OK to confirm.
20402804en_ba_a0
Enter the number/MSN and, if necessary, the setting for Calling Line
Identification Restriction (CLIR) and call waiting (on/off), and confirm
by pressing Save.
61
Telephone settings
Allocating an MSN
Press Menu, select
to confirm.
Base settings
and press OK
Select
MSN settings
and press OK to confirm.
Select
Allocate MSN
and press OK to confirm.
Select a letter from the list
MSN A…E
and press OK to confirm.
20402804en_ba_a0
From the list of registered handsets, select “On” for those to be assigned
to the relevant MSN and confirm by pressing Save.
62
Telephone settings
Language
You can select various languages for the display texts.
Press Menu, select HS settings
and press OK to confirm.
/
Language
Select your preferred language and press OK to confirm.
Ringer
You can adjust the ringer volume on the handset and base station in 5 steps or switch it off
(silent).
key (for approximately
20402804en_ba_a0
You can activate and deactivate the ringer by holding down the
2 seconds).
If the ringer is off, the display shows
.
63
Telephone settings
Setting the handset ringer
Your handset is in standby mode.
Press Menu, select HS settings
and press OK to confirm.
/
Ringer
This menu is used to set the following functions:
– External: define a melody for signalling incoming external calls (1 to 10).
– Internal: define a melody for signalling incoming internal calls (1 to 10).
– Volume: set the volume for signalling incoming calls. This setting is the same for internal
and external calls.
Use the control keys to scroll through the list of settings. The current
setting is displayed for each function. Use the left/right control keys to
change this setting.
Press Save to confirm your changes.
Note:
You can switch the handset ringer on and off by pressing and holding down
the
key.
20402804en_ba_a0
The display shows
64
when the ringer is off.
Telephone settings
Setting the base station ringer
Press Menu, select Base
and press OK to confirm.
settings
/
Ringer
This menu is used to set the following functions:
– Melody: define a melody for signalling incoming external calls (1 to 10).
– Volume: set the volume for signalling incoming calls.
Use the control keys to scroll through the list of settings. The current
setting is displayed for each function. Use the left/right control keys to
change this setting.
20402804en_ba_a0
Press Save to confirm your changes.
65
Telephone settings
Settings
Press Menu, select HS settings
and press OK to confirm.
/
Settings
This menu is used to set the following functions:
– Key beep: acoustic acknowledgement whenever you press a key.
– Range beep: A warning signal that tells you that you are reaching the limit of the base
station range and risk disconnection.
– Charging beep: Acknowledgement signal when establishing the charging contact.
– Automatic DTMF: Digits post-dialled in connection mode are transferred as DTMF signals
(e.g. for remote control of the answerphone etc.). When this function is deactivated, the
keypad signals are transmitted. The non-active function can be accessed under Options in
connection mode.
Use the control keys to scroll through the list of settings. The current setting is displayed for each function. Use the left/right control keys to
change this setting.
20402804en_ba_a0
Press Save to confirm your changes.
66
Telephone settings
Registering /deregistering a handset
Your Eurit 435 is delivered with the handset already registered. You can operate up
to 6 handsets on up to 4 different base stations.
Registering the handset
Press Menu, select
Select
Registration
Register handset
and press OK.
and press OK.
Select the base station with which the handset is to be registered,
and press OK.
Base stations with which your handset is already registered show
“(Active)” e.g. Base 1 (in use) .
The base station delivered with your Eurit 435 bears the name “1”.
Enter the base station system PIN (default: “0 0 0 0”) and confirm
by pressing OK.
Select the internal number for the handset or select “automatic” to
assign a free number, and confirm by pressing OK.
Hold down the key on the base station until the registration signal is
heard (approx. 10 seconds).
20402804en_ba_a0
The display shows
Registration in progress
.
If your registration is successful, you will see the name of the user
and the internal number of your handset in the display.
67
Telephone settings
Deregistering a handset
Press Menu, select
Select
Registration
Deregister handset
and press OK.
and press OK.
Select the internal number of the handset and press OK to confirm.
Press Yes in response to the security prompt on the handset.
If deregistration was successful, the display will show a confirmation.
Auto talk
The auto talk facility allows you to answer an incoming call directly, simply by picking up the
handset from the base station/charging unit.
Press Menu, select HS settings
and press OK to confirm.
/
Auto talk
20402804en_ba_a0
Use the left/right control keys to select the setting and press Save
to confirm.
68
Telephone settings
Station selection / switching to another base station
Every handset can be registered with up to 4 base stations.
If you go out of the range of the base station with the handset and enter the range of another base station, you can manually switch to the second base station.
Press Menu, select HS settings
and press OK to confirm.
/
Select base
Select one of the listed base stations and press OK to confirm.
Note:
The handset only lists the base stations with which the handset has previously
been registered.
Changing the handset user name
You can assign an individual user name e.g. “Private” or “Business” to each MSN assigned
to a handset.
Press Menu, select HS settings
and press OK to confirm.
/
User name
Select one of the listed entries and press OK to confirm.
20402804en_ba_a0
You can now change the name (max. 12 letters).
Enter the change and press Save to confirm.
69
Telephone settings
Direct call
When activated, direct call enables a preprogrammed number to be dialled directly by pressing any key (except the right softkey).
Press Menu, select HS settings
and press OK to confirm.
/
Direct call
Enter or change the number and press OK to confirm.
The display shows
20402804en_ba_a0
Note:
70
Direct call
.
To deactivate direct call, press the OFF softkey and press Yes in response to the
security prompt.
Telephone settings
Setting the contrast
Press Menu, select HS settings
and press OK to confirm.
/
Contrast
The contrast can be adjusted in 8 steps using the left/right control
keys. Press Save to confirm your changes.
Setting the time and date
Press Menu, select
to confirm.
Calendar / Clock
and press OK
This menu is used to make the following settings:
– Clock: use the numerical keys to enter the current time.
– Calendar: use the numerical keys to enter the current date.
20402804en_ba_a0
Press Save to confirm the settings. The date and time are now saved
and appear on the display in standby mode.
71
Telephone settings
Restoring default settings
This procedure is used to reset all individual preferences and to restore the handset and base
station to default mode.
Resetting the handset
Press Menu, select
to confirm.
Select
HS settings
Reset handset
and press OK
and press OK to confirm.
Press OK in response to the security prompt.
Resetting the base station
Press Menu, select
to confirm.
Select
Base settings
Reset base
and press OK to confirm.
20402804en_ba_a0
Press OK in response to the security prompt.
72
and press OK
Charges
Charges
Irrespective of your network operator, your call costs are transmitted after or during an active
connection. For technical reasons, the information on your telephone bill may differ from the
figures displayed on your telephone. The amount billed by your network provider is always
binding.
Setting the factor
You can define a factor for transmitted call data. Define this factor for each MSN as well as
for the total charges of all calls.
Press Menu, select
to confirm.
Charges
/
Factor
and press OK
Select the preferred item from the list and press OK to confirm.
Enter or change the factor and press Save to confirm.
Setting the display type
20402804en_ba_a0
You can choose whether to have the call costs and/or duration displayed during calls.
Press Menu, select Charges
press OK to confirm.
/
Type of display
and
Activate or deactivate the preferred display and press Save to confirm the setting.
73
Charges
Setting the currency
Press Menu, select
to confirm.
Charges
/
Currency
and press OK
Enter a currency (text) and press Save to confirm.
Displaying charges
Press Menu, select
to confirm.
Charges
/
All calls
and press OK
20402804en_ba_a0
Select the preferred item from the list and press OK to display the
costs. You can delete the meter or return to the list.
74
Attachment
Important notes on using the battery
1. Use only nickel-metal-hydrid (NiMH) batteries! The handset operating times (standby/active)
are valid only if the battery is charged to the defined minimum capacity (750 mAh).
The handset is delivered with two rechargeable AAA (Micro) NiMH batteries.
Using other rechargeable batteries or non-rechargeable batteries/primary cells can be
dangerous and cause the telephone to malfunction or be damaged. Understandably, the
manufacturer cannot accept any liability in such cases.
2. Rechargeable batteries can become warm while recharging. This is a normal occurrence
and is not dangerous.
3. Do not use any other type of charging units since this may damage the batteries.
4. Make sure the batteries are fitted correctly (polarities)!
5. Do not immerse batteries in water or throw in the fire.
6. Do not dismantle batteries, as this may release corrosive electrolytes.
7. Once you have inserted the new batteries, the display (1/4, 1/2, 3/4, full) on the handset
indicates the actual charging status only after a complete charging cycle.
8. New batteries reach their full capacity only after several charge/discharge procedures.
20402804en_ba_a0
9. You can replace the handset in the charging/base station after every call. Charging is
electronically controlled to ensure optimal charging of batteries in different charge states.
Avoid removing the batteries from the handset for no good reason, since this affects the
optimum charging cycle.
You can improve the capacity of the installed batteries if the handset batteries are fully
discharged after lengthy use and then fully recharged.
75
Attachment
10.
Do not short-circuit the batteries (danger). In particular, avoid inadvertent shortcircuits during storage and transport e.g. bunch of keys, metal panels or similar
objects, and make sure the batteries do not come into contact with greasy materials. For this reason, store the batteries only in an insulating package when they
are not in the handset. Avoid also touching the contacts with greasy objects.
11. By law, all used batteries and accumulators must be recycled and must not disposed of
in domestic waste.
20402804en_ba_a0
The batteries and accumulators are labelled with symbols and information on their
contents e.g.:
76
Attachment
The editor (creating or changing entries)
Switching between upper/lower case:
The left of the upper line displays an upper case “ABC”, a lower case “abc” or “Abc” (first
letter of a sentence is upper case).
Move the cursor:
left:
right:
up:
down:
Delete
Left softkey:
(press once: letter to the left of the cursor is deleted)
Left softkey:
(press and hold down: all letters are deleted)
Adding letters:
Position the cursor where you wish to add a letter and enter the letter.
20402804en_ba_a0
Note:
The characters available under each key are displayed in the lower line after you
first press the relevant key.
When writing an SMS, the number on the right of the upper line indicates the
number of remaining characters permitted.
77
Attachment
Table of available characters (directory entries/SMS)
Character (upper case)
Character (lower case)
1
. , ‘ ? ! \ “ 1- ( ) @ / : ;
. , ‘ ? ! \ “ 1- ( ) @ / : ;
2
ABC2ÄÀÁÂÃÅÆÇ
abc2äàáâãåæç
3
DEF3ÈÉËÊ
def3èéëê
4
GHI4∏ÌÍÎÏ∑
ghi4πìíîïı
5
JKL5
jkl5
6
MNO6ÖÒÓÔÕØÑ
mno6öòóôõøñ
7
PQRS7ßΩ
pqrs7ßµ
8
TUV8ÜÙÚÛ
tuv8üùúû
9
WXYZ9
wxyz9
0
[space] 0 + & _ $ £ € ¥ < > = # *
[space] 0 + & _ $ £ € ¥ < > = # *
XXX
[Switching between upper/lower case]
[Switching between upper/lower case]
#
[no function]
[no function]
20402804en_ba_a0
Key
78
Attachment
Approval and conformity
This DECT cordless ISDN telephone complies with the basic requirements contained in the
R&TTE Directive 1999/5/EC on radio equipment and telecommunications terminal equipment
and is suitable for connection and operation in the member states indicated on the base
station and/or packaging.
The declaration of conformity may be viewed at: www.swissvoice.net.
The CE symbol confirms the conformity of the telephone with the above
directive.
Warranty conditions
Your telephone is subject to a guarantee from the date of purchase in accordance with
the legal provisions of the country in which the telephone was purchased. As evidence of
the date of purchase, please keep the receipt or the warranty card completed by the
retailer. All defects attributable to material and manufacturing faults will be corrected
free of charge within the warranty period, either by repairing or replacing the defective
equipment.
The warranty does not cover expendable materials (battery cells), defects which affect
the value or use of the equipment only insignificantly, and damage caused by incorrect
use, ordinary wear and tear, or manipulation by third parties.
20402804en_ba_a0
This warranty does not cover consequential damage caused by the use, failure or defectiveness of the product. In particular, no liability whatsoever is accepted for damage to
property and pecuniary loss.
To claim under this warranty, please contact the retailer where you purchased your telephone.
79
80
20402804en_ba_a0
Attachment
Warranty Certificate
Garantieschein, Bon de garantie, Certificato di garanzia, Garantiebewijs,
Takuutodistus, Garantibevis, Garantisedel, Garantibevis, Certificado de Garantía,
Talão de garantia
device type:
(Gerätetyp, type d’appareil, tipo di apparecchio, toesteltype, laitetyyppi, maskintype, apparattyp,
apparattype, modelo del aparato, modelo do aparelho):
serial number:
(Seriennummer, numéro de série, numero di serie, serienummer, sarjanumero, serienummer,
serienummer, serienummer, número de serie, número de série):
dealer’s stamp:
(Händlerstempel, sceau du vendeur, timbro del rivenditore, stempel van de dealer, kauppiaan leima,
forhandlerens stempel, försäljarens stämpel, forhandlerstempel, sello del comerciante. carimbo do
vendedor):
dealer’s signature: (Unterschrift des Händlers, signature du vendeur, firma del rivenditore, handtekening van de dealer,
kauppiaan allekirjoitus, forhandlerens underskrift, försäljarens underskrift, forhandlers underskrift,
firma del comerciante, assinatura do vendedor):
date of purchase: (Kaufdatum, date d’achat, data d’acquisto, datum van aankoop, ostopäiväys, kjøpsdato, datum
för köpet, salgsdato, fecha de adquisición, data de compra):
81
✄
82
20402804en_ba_a0
Konformitätserklärung
Declaration of Conformity
Déclaration de Conformité
Wir:
We:
Nous:
Swissvoice AG
Adresse:
Address:
Adresse:
Fabrikstrasse 8
CH-4614 Hägendorf
Switzerland
erklären, dass das Produkt / declare that the product / déclarons que le produit:
Type:
DECT Cordless Telephone for the ISDN Interface
(Basisstation, Ladestation und Handgeräte / Base station, charging bay and handsets /
Station de base, station de recharge et combinés)
Model:
Eurit 435
Eurit 435 DUO
die grundlegenden Anforderungen gemäss Artikel 3 der nachstehenden EU-Richtlinie erfüllt:
meets the essential requirements according to article 3 of the following EC-Directive:
est conforme aux exigences essentielles de l’article 3 de la Directive CE:
Richtlinie 1999/5/EG des Europäischen Parlaments und des Rates vom 9. März 1999 über Funkanlagen und Telekommunikationsendeinrichtungen und die gegenseitige Anerkennung ihrer Konformität
Directive 1999/5/EC of the European Parliament and of the Council of 9 March 1999 on radio
equipment and telecommunications terminal equipment and the mutual recognition of their conformity
Directive 1999/5/CE du Parlement Européen et du Conseil du 9 mars 1999 concernant les équipements hertziens et les équipements terminaux de télécommunications et la reconnaissance mutuelle de
leur conformité
und dass die folgenden harmonisierten Normen angewandt wurden:
and that the following harmonised standards have been applied:
et que les standards harmonisés suivants ont été appliqués:
20402804en_ba_a0
EN 60950, EN 301489-6, EN 301406
Hägendorf, 7. 2. 2005
A. Zipp
i.V. B. Gfeller
83
84
20402804en_ba_a0
85
20402804en_ba_a0
86
20402804en_ba_a0
87
20402804en_ba_a0
88
20402804en_ba_a0
Internet:
www.swissvoice.net
© Swissvoice AG 2005
All rights as well as delivery possibilities and technical changes reserved.
20402804en_ba_000_a0
SV 20402804