1
L)
~+.+sun®
•
microsystems
SunTM Systelll Diagnostics Manual
Part Number: 800-1738-10
Revision A, of 9 May 1988
Sun is a trademark of Sun Microsystems, Incorporated.
Sun Microsystems , SunStation and Sun Workstation are registered trademarks
of Sun Microsystems, Incorporated.
SunIPC and PC-NFS are trademarks of Sun Microsystems, lncmporated.
Sun-2, Sun-3 and Sun-4 are trademarks of Sun Microsystems, Incorporated.
SunLink and Sun View are trademarks of Sun Microsystems, Inc.
The Sun logo
porated.
•
is a registered trademark of Sun Microsystems, Incor-
Sun OS is a trademark of Sun Microsystems, Inc.
ALM and ALM2 are trademarks of Sun Microsystems, Inc.
UNIX is a registered trademark of AT&T.
Multibus is a trademark of Intel Corporation.
All other products or seIVices mentioned in this document are identified by the
trademarks or seIVice marks of their respective companies or organizations.
Copyright© 1987, 1988 by Sun Microsystems, Inc.
This publication is protected by Federal Copyright Law, with all rights reseIVed.
No part of this publication may be reproduced, stored in a retrieval system,
translated, transcribed, or transmitted, in any fonn, or by any means manual,
electric, electronic, electro-magnetic, mechanical, chemical, optical, or otherwise, without prior explicit written pennission from Sun Microsystems.
Contents
I
Chapter 1 Introduction ..........................................................................................................
3
Conventions .....................................................................................................................
Coverage............................................................................................................................
3
4
1.1. Environment ............................. ..........................................................................................
5
Setting tlle Display .......................................................................................................
Testing Multiple Disks ..............................................................................................
5
Caveats ................................................................................................................................
6
QIC-24 ...........................................................................................................................
6
Renamed files ............................................................................................................
System Security........................................................................................................
6
7
sysdiag Organization..........................................................................................
8
sysdiag Witll SunView ......................................................................................
9
sysdiag witll a Terrn.inal ...................................................................................
9
Log Files ............................................................................................................................
10
Chapter 2 Using Sun System Diagnostics.............................................................
13
2.1. Editing tlle pass wd File ··································································t·h;~w:··········
2.2. Logging In .........................................................................................'.A~~+ji.@;..%fo~. ~~···
13
13
:
\.._,,/
6
2.3. Main Menu ................................................................................. .-i~2 \.\,t,<;,:_:.\.fa......Ot:.'... :.«>=" 14
Menu Selections .......................................................... ,,~2.:.:..!~( ~ u.O.:.'.•>;»,.-.L.i.:.!.........t.:~., ,; ;:;: /-\i: 14
.
2.4. Options Menu .......................................................................@\.......t.\.\.:..:..... L~··~~( .....'. :.:u.~....'.um:>;~;&\\
m;:n~:::~~~o:fi.~=~::. : : : : : : : : : : : : : ·.: '.:j):; ~:;:.~:~ ~i~ i~i:~ i ~;i: );~~
1
Serial Port Options ......................................................................~:.rn.;.;.....fa.·...=........
u
-iii-
21
Contents -
Continued
r)
SunLink Test Options ...........................................................................................
23
Printer Port Test Options ....................................................................................
24
IPC Test Options ................................................................................................... ..
25
Manufacturing Test Options ...................................................................................
27
Option Help Menu ...................................................................................................... ..
31
2.5. Exiting sysdiag ....................................................................................................... ..
32
Chapter 3 Tests and Messages ........................................................................................
37
3.1. Tests ........................................................................................................................................
37
3.2. Messages ............................................................................................................................. ..
39
Sysdiag Messages .........................................................................................................
39
SunOS Messages ...........................................................................................................
39
Appendix A Tape Drive Hardware ..............................................................................
43
A.1. Parameters ........................................................................................................................ ..
A.2. Identifying Your Tape Drive and Controller ................................................ ..
43
43
Number of Tracks .........................................................................................................
44
Tape Fonnats ................................................................................................................. ..
44
Controller Board ............................................................................................................
45
Appendix B Multiple Disk Drive Testing ...............................................................
49
ir)
J
rt)
-iv-
u
Figures
Figure A-1 Front Load and Side Load V4-inch Tape Drives ..................................
u
-v-
44
i~
1
Introduction
I
,
\...._...;)
Introduction .......................................................................................................................................
3
1.1. Environment .......................................................................................................................
5
u
1
Introduction
The Sun System Diagnostic test system, which we shall call sysdiag, is a
high-level diagnostic designed to exercise system hardware. It runs under the
SunOS operating system and is divided into two sections; the tests themselves,
and the sysdiag menus used to select and configure the tests. The tests cover
three major hardware resources; memory, secondary memory (disk and tape), and
peripherals. By placing a heavy load on the system, sysdiag tests these
resources under less-than-ideal conditions. Heavy loading uncovers problems
that do not show up when the tests are run under a light or normal load.
Conventions
(
:
\_)
To make things a little clearer, this manual uses different fonts to identify text
used in special ways. The fonts are Roman, typewriter, typewriter
bo1d, Roman bold, Roman italic and typewriter italic. They are used
as follows:
Roman
Roman font is the standard for normal text, just as it appears here.
Typewriter
Typewriter font has two meanings, depending on where it appears. It
may represent something that appears in the manual exactly as the computer
displays it on the screen, or it may represent a program path/name.
Typewriter bold
Typewriter bo1d also has two meanings; when it is used in a section of
dialogue in a display, for example, it represents something that you must
type verbatim into the computer. It sometimes appears together with regular
typewriter font: the computer output appears in typewriter, and what you
must type appears in typewriter bold.
If Typewriter bo1d appears in a menu, it is used to highlight the
aspect of the menu under discussion.
Bold
Bold Roman font indicates that something deseives more attention than the
surrounding text.
(
'
\_)
~\sun
~~
microsystems
3
Revision A of 9 May 1988
4
Sun System Diagnostics
()
Italic
Romanitali cfontisused foremphasi s; typewrit er italic font
appears in display examples to represent variables for which you or the computer must provide the exact details. For example:
Coverage
sysdiag can test the following hardware components (if they are installed
correct!y):
Sun-2 or Sun-3 Systems:
o
Xylogics disks -
o
SCSI disks- sdO, sdl, and sd2
o
SCSI 1/.i in. tape drive -
o
Archive 1/.i in. tape drive -
o
1/2
o
SKY FPP (Floating Point Processor) board (Sun-2 Only)
o
Serial ports- a and b (all CPUs); 0 through 3 (Multibus SCSI) ;ttyOO
through tty3F (ALM); and hO through kf (ALM2) - use the s option from
the Interven tion menu.
o
Data Communica tions ports -
o
Color board -
o
Ethernet boards-Mu ltibus: ieO, iel, ecO, eel; VME: iel for second Ethernet controller, first is on the CPU board
o
SunIPC boards -
o
GP, GP+, GP2 and GB (Graphics Processor and Buffer) boards turing test only
o
Physical memory
o
Virtual memory
xy or xd 0, 1, 2 and 3
stO
arO (Sun- lOOU and 150U only)
in. Magnetic tapes-mtO , mtl (1600 and/or 6250 BPI)
AO - D3, BO - B3 (SCP) and 0 - 15 (MCP)
CG2 for Sun-2 or single-buffered CG3
pcO - pc3, dO - d3 and ppO - pp3 (for parallel ports)
manufac-
Sun-3 Systems Only - in addition to components listed above:
o
FPA (Floating Point Accelerator) board
o
MC68881 (Floating Point Coprocessor)
o
Data Ciphering Processor (DCP) -
not available outside the United States
Sun-4 Systems Only - in addition to components listed above:
o
SF9010FPC (Floating Point Coprocessor)
n
4}\su
n
~
microsystems
Revision A of 9 May 1988
Chapter 1 - Introduction
(
5
\
\._,) 1.1. Environment
The sysdiag system is run as a separate user under the SunOS operating system from the /usr I diag I sysdiag directory. The environment is set by the
.login, .cshrc, and .sunview files in that directory. You can change the test
environment by altering these files, or by altering the sys di ag shell script file.
Because of the heavy demand sysdiag places on system resources, the system
may sometimes appear to be stopped, when it is only running very slowly. This
effect is most pronounced on systems with less than 4 Mbytes of memory.
Setting the Display
To use sysdiag, the SunOS environment variable TERM must reflect the tenninal type used as the sysdiag console. If the variable isn't set correctly sysdiag will not work properly. To fix this, change TERM, using the set term
command or the c command from the sysdiag main menu (refer to the Main
Menu section of Chapter 2).
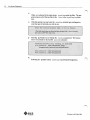
Before changing anything, see what display type is set now. To do this, log in to
the device (console or terminal) you plan to run sysdiag from (do not log in
as sysdiag!) and enterthe following commands:
(
\
\_)
The terminal_ type variable shows what type of terminal the operating system thinks you are working from. The default setting for a user working from the
bitmapped display is sun. A common setting for a user on a terminal is tvi925 (a
Televideo terminal), vtlOO or ansi (a generic ansi terminal). If the
terminal_ type accurately describes the device you are using, don't change
anything.
If you need to change the terminal type, log into the system on the device where
you plan to run sysdiag, become root (super-user), and use set term to
change terminal_ type to the device type you are using.
~\sun
~~
microsystems
Revision A of 9 May 1988
6
Sun System Diagnostics
The /etc/termc ap file contains a list of all valid tenninal types and their
characteristics. In order to see the list of valid tenninals, change directories to
/etc and view the termcap file. A typical output line would look like this:
Vertical bars ( I·) divide the tenncap fields. The last field contains a description of
the tenninal. The second field is the name used to set sysdiag to look for that
tenninal (terminal_type). The terminal_type is usually sun, which is the bitmapped display on the workstation monitor.
If you are using a tenninal connected to the Sun workstation through its RS-232
ports, use the setting that most closely corresponds to the tenninal you are using.
If you can't find the setting for your tenninal in the termcap file, try using
ansi.
Testing Multiple Disks
sysdiag automatically tests the first disk drive it finds in the system. If you
want it to test multiple disk drives, you must make sure that the device special
files are created in the I dev directory. Refer to Appendix A, Multiple Disk
Drive Testing for more infonnation.
Caveats
This section describes some side effects of sysdiag that can cause problems.
All of them can be avoided if you take proper precautions.
QIC-24
The ~" tape test has a number of configuration options. One of the options
selects the QIC-24 tape fonnat to write and read the tape with. Exercise extreme
caution when testing a tape drive using the QIC-24 fonnat. If you test a drive
with the QIC-24 option and the drive does not support it, the SCSI bus may lock
up. ·Tue only way to free up the system is to cycle the power and reboot. To avoid
this, only test the drive using QIC-24 when you are certain the drive supports it.
Read the Tape Test section in Chapter 2 and Appendix A for details.
Renamed files
Under certain circumstances, sysdiag
rename the files I dev/ sky
(when a Sky board is tested) and I etc/ttys to /dev I sky-sd and
/etc/ttys-s d respectively. Before it exits, sysdiag changes the files back
to their proper names. If sysdiag tenninates abnonnally, however, one or
both of the files may stilLhave the wrong name. To check, change directories to
I dev and I etc and look for either a sky-sd or ttys-sd file. If you find
either of these files, you may do one of the following:
will
1.
Log in, then log out as sysdiag. When sysdiag exits nonnally, it changes
the files to their proper names.
~\sun
~
microsystems
Revision A of 9 May 1988
Chapter 1 - Introduction
(
7
i
\..._.)
2.
(
) System Security
Rename the files yourself. Become root (super~user) and use the mv command to rename the files.
Because sysdiag has its own user ID with root permissions, it should have a
password installed. You will not be able to log in and run sysdiag unless you
edit the pass wd file. To do so, you may use the vi pw command, or the following:
~
You will now see a line in the passwd file that looks like this:
sysdiag:*:O: l:System Diagnostic:pa thname
Take the asterisk out of that line; it keeps anyone from logging in as "sysdiag".
When you are done, the line should look like this:
sysdiag::O:l: System Diagnostic:pa thname
Now, log in as sysdiag:
u
'
Now, by selecting the p option from the main menu, you can create a sysdiag
•\sun
•
mlcrosystems
Revision A of 9 May 1988
8
Sun System Diagnostics
(~
password. sysdiag will place the password where the asterisk was in the
/ etc/pas swd file, and whenever anyone logs in as sysdiag, the program will
ask for that password:
I
)
1,
)
Another way to change the password is to log in as root and enter
example# passwd sysdiag
You will then receive the usual password prompts:
sysdiag Organiza tion
When you login as sysdiag, its . login file starts up the sysdiag program,
which in tum displays the main menu. If you select menu items 1,2 or 3, sysdiag starts devtop, memtop, disktop , tapetop and, when anIPC
board is present, ipctop. These programs determine how the system is
configured, then start one or more of the following tests:
devtop
devtest
color
fpatest
sunlink
gpmtest
gp2test
enet
mc68881
softfp
sptest
ffpusr
fputest
dcp
softdcp
sysdiaq Tests
disktop
memtop
tape top
disk
pmem
devtest
vmem
ipctop
ipctest
The sysdiag program uses the contents of the I dev directory to help determine the system hardware configuration. The files in I dev should accurately
reflect the actual hardware on the system. The list of tests sysdiag runs is
determined by the I dev directory, commands entered in the options menu, and
use of the Select Mode option in the main menu.
•~su
n
~
microsystems
'~..
Revision A of 9 May 1988
~
(
)
Chapter 1 - Introduction
(
9
\.
\._)
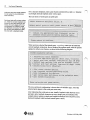
You may run sys di ag from a workstation or an ASCII tenninal. The menus
appear the same regardless of the type of display you use. When sysdiag is
running tests, the display varies, depending on whether you use a workstation or
a tenninal.
sysdiag With SunView
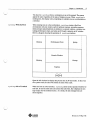
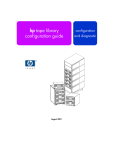
When running tests on a Sun workstation, sysdiag creates a SunView
environment with one window each for primary memory, secondary memory
(disk and tape) and peripherals, in addition to a console window, a window containing perfonnance charts, and when an IPC board is present, an IPC window .
Here is a diagram showing the positions of sysdiag windows:
..:
:
Disktop
Perfonnance Chart
.:
Ipctop
••
•
Console Window
(
Memtop
)
Devtop
"'---/
Tapetop
~
Open the left clocktool to display the precise time in 24-hour mode. In the event
of a system crash, the clock will reflect the time of the crash.
sy sdiag with a Terminal
When run from an ASCII tenninal, sys di ag cannot create separate windows for
each test. It runs the same tests and creates the same files, but it displays its message output onto the tenninal screen. As a result, the test message lines are
mixed together.
u
•\sun
~
microsystems
Revision A of 9 May 1988
10
Sun System Diagnostics
Log Files
The sysdiag program stores messages in log files. Log files are regular SunOS
text files that live in the directory /usr I ad.ml sysdiaglog. sysdiag generates several types of log files:
o
Logtimes - A text file containing the starting and ending messages for
sysdiag.
o
Core files- Certain error conditions cause core dumps; sysdiag changes
the name of the core file to core. n, where n starts at 1 and increments
for each new core dump.
o
log script files - Scripts place messages in text files with the name
log. script. n, where script is the name of the script, and n is a number
that starts at 1 and increments each time you run sysdiag without resetting log files.
o
log test files - Test routines place messages in text files with the name
log. test .pid, where test is the name of the test routine, and pi dis
the SunOS process number of the test. Every time it runs, sysdiag creates
new test files.
o
log.sky-The Sky board test (Sun-2 only) puts messages into files with the
name log. sky. n, where n is a number that starts at 1 and increments
each time you run sysdiag without resetting log files.
I~
'
J
~
(
)
Revision A of 9 May 1988
(_)
2
Using Sun System Diagnostics
Using Sun System Diagnostics ..........................................................................................
13
2.1. Editing the passwd File ..........................................................................................
2.2. Logging In ...........................................................................................................................
13
2.3. Main Menu ..........................................................................................................................
2.4. Options Menu ....................................................................................................................
2.5. Exiting sysdiag .........................................................................................................
/
I
'
I
\._)
u
13
14
17
32
(~
I~
.
)
,~
I
)
u
(
2
Using Sun System Diagnostics
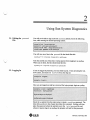
2.1. Editing the pas swd
File
You will not be able to log in and run sysdiag unless you do the following,
first, while running the SunOS operating system:
You will now see a line in the passwd file that looks like this:
sysdiag:*:O:l:Sys tem Diagnostic:pathna me·
(_)
Take the asterisk out of that line; it keeps anyone from logging in as sysdiag.
When you are done, the line should look like this:
sysdiag::O:l:Syst em Diagnostic:pathna me
2.2. Logging In
If you are logged in presently, you must fully log out. If you are using the window system, you must exit SunView first, then log out:
Once you are logged out and have received the login prompt, login as sysdiag:
Select the p option from the main menu to create a sysdiag password. The
Main Menu section in this chapter describes this command. Sysdiag will then
place the password where the asterisk was in the /etc/passwd file, and
whenever anyone logs in as sysdiag, the program will ask for that password.
13
Revision A of 9 May 1988
14
Sun System Diagnostics
You can run sysdia g as long as you like. However, to obtain accurate test
results, you should run the tests until they all have finished at least one complete
pass.
If a test finds a hardware error, it displays a message, places an entry in the
appropriate log file, and quits.
When you stop the tests, sysdia g displays the log files, using the SunOS
more command, then asks if you want to reset them. If you answer y it erases
all of the log files; if you answer n, they remain, and the next time you run
sysdia g it generates a new set of log files with a higher number appended to
the file names. After taking care of the log files, sysdia g returns to the main
menu.
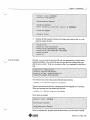
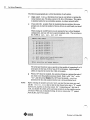
2.3. Main Menu
The sysdia g main menu will look something like this:
:::::>:::/::::·::·:·
:·:·:·::::::<::::
:::·::
:::
:::::
:::::
::::::::
::::;
:::::::::::::;:::::::::::
·:<: ::·::
::::::::::::::: ·::
: :::
::::::
·.·.·.·.·
;::
(:
::::
?
:::::
::::·
\}
:.·.·.·
::::: :::::
-.:·::ft :;·~:
:::;::::::
.·.·
:::::::
..J
cc
. : ::::.BM~~
·.·.·.
::::
::::
::::::
·::
:J
::
::
I:
:~~~:
·.·.:.:.:
·.·.
·:::·:·
·:·
::
:::
:)
::::::
:::::
::::
:·:·
:::
u:mn:
::::
::::
·.::
.:.::
:·:
.·.·.·::::::::
·::
·:::·:
:·:::
·.·.::::·:::
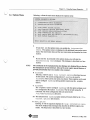
Menu Selections
::::::
:::::::::.
·::::::·
·::·:·
.·.· :::::
::::
1
Selecting 1 from the main menu starts sysdia g's Autom atic mode.
This is the simplest way to test the system, and the method most users
choose. If you choose Autom atic mode, sysdia g immediately enters
its SunView environ..111ent (if you' re on a workstation), and begins probing
for devices to test. It starts all appropriate tests for the devices it finds.
sysdia g runs each test continuously until you halt it, it finds a hardware
error, or there is a problem with sysdia g itself.
2
Selecting 2 from the main menu starts sysdia g's Ver if
verify mode, sys di ag probes I de v for the devices instar
tern. It lists the devices it found, then asks you if the list is c
answer n, it asks you to correct the problem and returns tr
•~sun
•
microsystems
:f]
/
Chapter 2 - Using Sun System Diagnostics
(
v
15
'
If you answer y it continues and performs all of the operations described in
Automatic mode.
If you have any doubt about the system configuration, or of the accuracy of
the ldev directory, you should run Verify mode.
3
Selecting 3 from the main menu starts sysdiag 's Select Mode .
This mode starts the same way automatic mode does; sysdiag immediately enters its SunView environment (if you 're on a workstation), and starts
probing for devices to test. But instead of running a test for every device it
finds, the program first prompts you for the individual hardware tests you
want to run.
4
Selecting 4 from the main menu starts sysdiag 's single test
mode. This mode brings up a new menu, from which you may select one of
these tests:
o
disktop tests
o
memtop tests
o
tapetop tests
o
devtop tests
, In this mode, the message display is similar to that when running sysdiag
on an ASCII terminal.
After you have selected the tests, sysdiag performs according to a limited sub-set of parameters for the operations described in Automa tic
mode, using only the tests chosen. Note that sysdiag stresses the system
more when many tests are run simultaneously, thus providing more accurate
test results.
o [filenam e]
Selecting o with no argument displays the options menu. It is
described in the next section. If the o option is entered followed by a
filename, sysdiag will immediately execute the restore options
command (from the options menu). This method can be used as a shortcut,
to configure sysdiag from the configuration information that has been
previously stored in the file. See the Options Menu section for information on storing and saving s y sdiag configurations. Tests for options such
as the Integrated Personal Computer (SunIPC) and data communications
boards reside in this menu.
s
Selecting sallows you to set date and time. You are shown the
current system time, and asked to enter a new time. If the time is correct,
press return. Otherwise, enter the new time and date, then press return.
d
u
When you select d, sysdiag displays log files. The program uses the
SunOS more command to display all of the log files in the
/usr I adm/ sysdiag log directory.
•~su
n
~
microsysterns
Revision A of 9 May 1988
16
Sun System Diagnostics
r
When r is selected in the main menu, sysdiag resets log files. The program removes all of the log files in the /usr I ad.ml sysdiaglog directory.
c
With this option you may leave the sysdiag console type unchanged or
enter the type of terminal you wish to use:
p
Entering p prompts you to change the sysdiag password. The interaction is very similar to the SunOS passwd command:
q
Selecting the q option causes sysdiag to quit System Diagnostics.
t)
Revision A of 9 May 1988
Chapter 2 -
(
Using Sun System Diagnostics
17
'
0
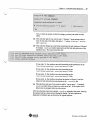
2.4. Options Menu
Selecting o from the main menu displays the options menu:
• · . YU: . . >
;.:•:•:•:•:>•::•:• ::
\:::'.::::
•:•:::
:: :•:
·•·
::1:.::
:§,:·:::¥
::
:•:
•:•:
:::::::
?
Wil
•:•:•:::::::::;::::::::::::::
··~
........... .,....
:::::
·:
:·:
·:·:
•:•.::
::
:r········
...............
r
:
::·
i
If you enter i in the options menu, you enable the interv ention
tests. The options menu is redisplay ed with additional intervention menu
items. The interven tion tests and the new menu items are described in a later
section.
m
If you enter the m comman d in the options menu, you will start the
manuf acturin g tests dialogue. This dialogue is describe d in a later
section.
(\...._,,,)
NOTE
The commands in the manufac turing test dialogue are designed for use during
the manufac ture of Sun hardware. Most of the tests require special fixtures or
provide functionality that is not useful to the customer.
f filenam e
Entering fallows you to file curren t option s that have been set
in this session. The current configuration of sysdia g is saved in
filenam e, which can be any name you choose. These options can be used
later to configure sysdia g during another session (see the o option,
below).
o filenam e
The o option is used to configure sysdia g with the option settings saved
in a configuration file named filenam e. The file is built using the f
command. All of the configuration files are stored in the
/usr I adm/ sysdia glog directory.
1o This selection lists sysdia g option names previous ly filed by the file
curren t option s (£)selec tion.
h menu_ option
Entering h with no argumen t displays the help inform ation menu.
This menu displays help message s that describe the different option commands. The help menu is described in a later section.
(
\_,.;I
4}~sun
•
microsystems
Revision A of 9 May 1988
18
Sun System Diagnostics
()
Entering h with a menu_ option argument displays the help message for
the specified selection directly, without leaving the options menu.
menu_optio n can be any of the selections listed in the options menu,
including the help selection.
q
Entering q from the options menu causes you to return to the
main menu. This command is used to exit the options menu.
Q
Selecting the Q option causes sysdiag to quit System Diagnostics. If you logged in as "sysdiag", this command logs you out. If you
logged in as super-user (root) and invoked sysdiag from the SunOS command prompt, the Q command returns the SunOS prompt.
Intervention Test
Configuration
The serial port, tape, printer port, SunLink, SunIPC, and ALM2 tests are
interventio n tests; they require you to perform some actions before running
them.
If you choose interventio n tests in the options menu, sysdiag
displays the 'prompt shown below.
Choose y to enable the intervention tests, or choose n to disable.them. If you
answer n, the options menu is redisplayed.
If you answer y, the tape drive message (shown above) is displayed: when you
press (Return I, sysdiag displays the options menu, showing additional
interventio n test selections.
The options menu now has four new entries; t (tape), s (serial port), pp
(printer port) and s 1 (SunLink) and, when an SunICP board is present, p (SunICP). These lines appear between the i and m options. The following menu
shows the options menu with the intervention tests enabled. The new options are
shown here in boldface type.
CAUTION
Any tape in the 1/4 inch tape drive will have its data destroyed when the
tape test runs. Make sure you insert a scratch tape in the drive if you enable
the tape test.
The tape drive test is enabled and set to its default configuration when the intervention tests are enabled. To prevent errors, you must load a scratch tape in the
tape drive (see the Tape Test section for details). The data communications processor and serial port tests remain inactive until you select ports for them to test.
+~!U!
Revision A of 9 May 1988
/~;
Chapter 2 - Using Sun System Diagnostics
19
t
tape drive options allows you to describe the type of tape drive you
have on your system. The system prompts you for specific tape drive information. Details concerning this command are in the Tape Drive Options section of this manual.
u
s
The serial port options selection allows you to select the serial
ports you want to test on your system. The serial port test is disabled until
you select which ports you want to test. Details for selecting the serial ports
to test are in the Serial Port Options section of this manual and in on-line
help.
s1
SunLink test options provide a selection of data communication
ports to test. The data communications processor test is disabled until you
actually select which ports to test. Details for selecting the data communication ports to test are in the Data Communications Port Options section of
this manual and in on-line help.
pp printer port test options provide a selection ofMCP-based
printer ports to test. The printer port test is disabled until you select which
ports to test. Details for selecting the printer ports are in the Printer Port
Test Options section of this manual and in on-line help.
p
rPc test options provide a selection of floppy disk drives and SunIPC
board printer ports to test. This option only appears on the menu when a
SunIPC board is present in the system. Details for selecting drives and
printer ports are found in !PC Test Options and in on-line help.
~\sun
~
microsystems
Revision A of 9 May 1988
20
Sun System Diagnostics
Tape Drive Options
To change the configuration of the tape drive test, enter t from the
options menu. This option is only visible after enabling the interve ntion
tests option (see the Options Menu section for details). After entering t, you
answer a series of questions. Your answers configure the tape drive and select
which test to run (long or short test). Appendix A will help you determine the
answers required for your specific configuration. The example that follows
shows every question sysdiag can ask. You may not be asked all of the questions in this example if you answer differently.
After describing the tape drive to sys di ag, load a ''scratch' ' tape (tape that
can be oveiwritten) into the drive. It is a good idea to clean the tape read/write
heads, so the tape test returns accurate results.
NOTE
Use a good quality tape. If you are running the long test, use a tape that is 450
feet long. The test may write past the end of a tape that is too short, producing
incorrect test results, or it may not test all of the tape drive tracks on a tape that
is too long.
()
.
/
CAUTION: lf the QIC-24 option is
selected, and the tape drive does
not support it, the SunOS operating
system will display an error message on the console. To avoid this
problem, read Appendix A to determine what options your tape drive
supports before configuring this
test.
When you answer all of the questions, sysdiag re-displays the options menu,
with the new tape options (shown on the following page in bold type) updated to
reflect your choices. The example on the following page is what the menu looks
like after entering the choices shown above.
n
.
•\su n
•
microsystems
Revision A of 9 May 1988
J
Chapter 2 -
Using Sun System Diagnostics
21
u
The new text in parentheses (shown in bold in this menu) displays what options
are currently selected. In this case the example reflects the answers given in the
example on the previous page. The display line
u
t
- 1/4 inch tape drive options (long test, g tracks, QIC-24, Emulex otlr)
can be interpreted from these descriptions:
long test - the long tape test is enabled.
short test - the short tape test is enabled.
9 tracks - the workstation has a 9 track tape drive.
o
4 tracks - the workstation has a 4 track tape drive.
o
QIC-24 -the workstation's tape drive supports the QIC-24 tape format.
o
Emulex ctlr - the workstation uses an Emulex tape controller board.
o
o
o
Appendix A contains more information on tape drives and controller boards.
After you have configured the tape options, you can make other configuration
changes, or enter q if you are finished. To turn off intervention tests, enter i,
then answer n (o) to the prompt.
Serial Port Options
To enable or reconfigure the serial port test, enter sin the options
menu. This option is only visible after enabling the interven tions test
option (see the options menu section for details). After entering s, you are
prompted for the names of the ports you want to test. Type in the ports you want
to test after the prompt, using the format described below. To disable the test,
enter none or simply press ( Return ) without entering any ports.
There are two types of serial port tests: single port loopback and dual port loopback. To select a single port loopback, enter the ports you want to test (a or b
for internal ports, 0 through 3 for SCSI ports, and 0 0 to 3F for ALM ports)
individually.
Revision A of 9 May 1988
22
Sun System Diagnostics
ALM ports are more easily selected
for test under the manufacturing
tests sub-menu.
For a dual port loopback, enter a pair of ports connected by a dash (-). Separate
each single and dual loopback entry with a space.
The test refers to ALM2 ports as ttyhO-ttykf.
Serial port tests will not pass unless
you install the correct loopback connectors on the serial ports you are
testing. On every single port in the
configuration line, attach a single
port loopback connector. For every
pair of ports connected by a dash,
link them with a loopback cable.
When you have selected the desired ports, sysdiag warns you to install the
correct loopback connectors, then re-displays the options menu, with the options
updated to reflect your choices, as shown in the following diagram.
( \)
'
The new serial port configuration is shown above in boldface type. All of the
selected ports' appear in the serial port menu entry.
After indicating the serial ports to test, install a loopback cable between every
port pair, and a loopback connector on every single port you indicated. The
example above requires a single port loopback connector for SCSI port 0, and a
dual port loopback cable between internal ports a and b.
4)\su
n
~~
microsystems
Revision A of 9 May 1988
Chapter 2 -
U
Using Sun System Diagnostics
23
SunLink Test Options
To enable or reconfigure the data communications processor test, enter s1 in the
options menu. This option is only visible after enabling the interven tions
test option (see the options menu section for details). After entering s1,
you are prompted for the the ports you want to test. Type in the ports you want
tested as shown below. To disable the test, enter none or simply press (Return I
without entering any ports.
The data communication processor
test will not pass unless you install
the correct loopback connectors on
the ports you are testing. On every
port you enter in the configuration
line, attach a loopback connector.
To select which ports to test, enter the port names, separated by spaces. The dcp
port names consist of a letter (a,b,c,or d) followed by a number (0 - 3). The mcp
port names are a number from 0- 15. The letter indicates the data communications processor board, and the number shows which port on that board to check.
For the SCP board, the RS-232 ports are 0 and 3 while the RS-449 ports are
numbers 1 and 2.
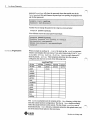
The MCP controller board port numbers are assigned as follows:
Board#
1
2
3
4
RS-2321423
Port#'s
0,3
6,7
10,11
14,15
RS-449
Port#'s
1,2
4,5
8,9
12,13
If you only have one board on your system, it will be board a. Additional boards
are lettered in increasing order. In this example, the first three ports on the first
data communications processor board are being tested.
This message now appears on the screen:
After you install the loopback connectors on the ports to be tested, press (Return I,
and the program infonns you:
After you have entered the data communication ports to test, and installed loopback connectors (in this example, on ports 0, 1 and 2 on board a),
Revision A of9 May 1988
24
Sun System Diagnostics
s y sdiag displays the loopback connector warning, then redisplays the options
menu, with the options updated to reflect your choices. To begin testing, enter q
to bring up the main menu and select a test mode from that menu.
Printer Port Test Options
After you enter the printer port selection:
sysdiag will prompt you to select the printer ports to test:
The entry in the example above would test all Multiple Communication Processor (MCP) printer ports. If none are to be tested, just press [ Return I. You may
enter any number of printer ports as long as they are separated by spaces. Here
are example entries:
Port entry
0
02
0123
What is Tested
test single port mcppO
test ports mcppO and mcpp2
test all mcp printer ports(mcpp0-mcpp3)
The program now prompts you to install loopback connectors for every port you
intend to test:
Revision A of 9 May 1988
It)
Chapter 2 -
Using Sun System Diagnostics
25
Install a parallel printer loopback connector on each port to be tested and then
press ( Return I. Sysdiag now displays your choices and lets you know that it has
initialized the multiple communications processor board:
IPC Test Options
/
\
\
~
)
NOTE
This option will appear on the options menu ONLY when Sun/PC hardware is
present in the system. In that case, a special ipctop window appears in the
upper right corner of the screen, and a ''pc'' icon is at the bottom of the screen
during a test cycle.
CAUTION
ONLY DRIVE "B" ON A SunIPC WILL BE TESTED. DRIVE "A"
MUST NOT HAVE A DISKETTE INSERTED OR THE IPC TEST WILL
FAIL.
After you select the IPC test option, sysdiag prompts you to enter which SunIPC
disk drives to test, and then which SunIPC parallel ports to test. When prompted,
enter the disk drives and/or parallel ports that you wish to test. If none are to be
tested, enter none or press I Return I.
At the prompt, you may enter any number of disk drives or parallel ports, in any
order, separated by a space. Sysdiag only tests the B disk drives.
The SunIPC disk drives are entered as dO through d3. The SunIPC parallel
ports are entered as ppO through pp3. The suffix number signifies to which
SunIPC board the disk or parallel port is attached.
In the examples that follow, you have selected p from the options menu, and are
asking sysdiag to test the B disk drives on IPC boards 2, 0 and 3, and the parallel
ports on IPCs 1 and 3:
u
Revision A of 9 May 1988
26
Sun System Diagnostics
n
This message now appears on the screen:
This message now appears on the screen:
Here are descriptions of entries that may be made after the appropriate prompt:
Port entry
dO
d2 dO d3
ppO
ppl pp3
What is tested
test the B disk drive on IPC 0
test the B disk drives on IPCs 2, 0, and 3
test the parallel port on IPC 0
test the parallel ports on IPCs 1 and 3
All B disk drives to be tested must have a formatted double density floppy
diskette installed. All parallel ports to be tested must have a loopback connector
installed.
After you have entered the drives and/or ports that you want to test, the options
menu is displayed again, echoing your choices:
~~)
I
Revision A of 9 May 1988
Chapter 2 -
Using Sun System Diagnostics
27
To run the test, enter q to return to the main menu, and select a test mode. A
''personal computer'' icon will appear at the bottom of the screen. If you
''click'' the left mouse button on the icon, a window that contains PC-NFS
messages will be displayed.
Manufactu ring Test Options
CAUTION
Manufactu ring tests are for use by manufactu ring only. They require custom test jigs, and may interfere with other tests if you select conflicting
options.
When you select manufact uring tests, interactive dialog takes place (if
manufacturing tests are formerly enabled), as shown below.
Revision A of 9 May 1988
28
Sun System Diagnostics
(~
The following paragraphs give a brief description of each option.
v
vmem wait =delay determines how long to wait before· re-running the
virtual memory test. The delay can be 0, 30, 60, or 90 minutes. This option
is intended solely for use on diskless systems, to reduce network traffic.
s
If you select the s option from the manufacturing test options, this menu
prompts you to enter the number of device drivers on each board you intend
to test.
'
:'
When testing the ALM2 board, you are assumed to have a fixed loopback
configuration, and you will need a special loopback cable. The test refers to
the ALM2 as sph, spi, spj and spk.
:t)
/
The serial port board test uses a special test jig capable of connecting 8 or 14
serial ports for the Sun-2/120 or Sun-2/170 ALM option. Eight loopback
cables are required to test the Sun VME ALM option.
q
NOTE
When a GPl board is installed, this selection brings up a prompt that asks if
you want to test the graphics processor board. Enter y for ''yes'', n for
''no'', and then press ( Return. J If a GP2 board is present, sys di ag
announces the fact and assumes that the test is to be performed on it.
Before running the graphics processor tests, you must become super-user and
edit the I etc I re. local file so that the line shown below has a "#" symbol
in front of it, and then re-boot the system. By ''commenting-out'' this line of
code, you disable the ability of the operating system to use the graphics processor board. When you are finished testing, be sure to remove the ''#'' symbol
from the file, and re-boot again.
Revision A of 9 May 1988
Chapter 2 I
u
Using Sun System Diagnostics
29
,
Now, re-boot the system so that the change you have just made can take
effect.
sb This selection asks if you want to test a ''shoebox'' (mass storage subsystem). It only tests SCSI disks, and tapes 1 - 7, using disktop, devtop
and tapetop.
mw This selection brings up a menu that customizes the test windows, if desired.
It changes sysdiag window placement and the font and point size of the
displayed text. The menu looks like this:
u
If you select l, the windows are sized according to the parameters in the
/usr/dia g/sysdia g/. sunview/ manuf-1 file.
If you select 2, the windows are sized according to the
/usr/dia g/sysdia g/. sunview/ manuf-2 file.
If you select 3, the windows are sized according to the
/usr/dia g/sysdia g/. sunview/ manuf-3 file.
If you select 4, the windows are placed as shown in Chapter 1 and use
whatever font and point size are present in the . sun view file.
re This selection asks you if you want to enable ''run on error''. If enabled,
sysdiag either retries or starts over when tests fail. If this option is disabled, tests are stopped when an error occurs.
After the selections have been entered, sysdiag redisplays the menu, showing
the options that have been entr.red during the dialog. The new options are
displayed in boldface type as shown for the regular options:
u
+~.!!
Revision A of 9 May 1988
30
Sun System Diagnostics
I~
)
\
The new text in parentheses, displayed in the manufacturing test selection, shows
what options are currently selected. The line can be interpreted as follows:
o
enab1ed - manufacturing test is enabled.
o
gp&b -
o
gp (in place of gp&b)- only the graphics processor is selected.
o
spboard# - #ofports -one or more of the serial port board tests are
selected. One entry per board. The number of ports can be 8 for the Sun2/120; 8 or 14 for the Sun-2/170; and 0-16, 1-16, or 2-16 for Sun VME ALM
boards.
o
both the graphics processor and graphic buffer are selected.
('
:,
)
vmem wait =delay- how long to wait before re-running the vmem
test. The delay can be 0, 30, 60, or 90 minutes.
,r\
\
Revision A of 9 May 1988
)
Chapter 2 -
Option Help Menu
Using Sun System Diagnostics
31
When you select h from the options menu, sysdiag displays the the help
menu. This menu has an entry for each of the major commands in the option
menu. Each help menu entry has the same name as the option command it
describes. The on-line menu represents the latest version of this software and
supercedes the examples shown here. A special Manufacturing Option menu follows the one shown below:
u
u
This menu contains an entry for every selection in the options menu. For information about a sysdiag option, enterthe corresponding letter at the prompt.
The menu will display a screen full of text about the option. Press ( Return l to
go back to the help menu. From the help menu, use q to return to the options
menu, or Q·to exit sysdiag .
Revision A of 9 May 1988
32
Sun System Diagnostics
You can display a help message directly from the options menu. From the
options menu, enter h followed by the help option letter. The corresponding
help message is displayed immediately, without goingthrough the help menu.
After displaying the help message, the program redisplays the options menu.
2.5. Exiting sysdiag
The procedure for stopping sysdiag involves two steps; stopping the tests that
are running (if any) and exiting from sys.diag itself.
The procedure for stopping the tests in progress varies, depending on whether
sysdiag is running from a terminal or a workstation.
To halt sysdiag from a workstation:
CAUTION
1.
First end any tests in progress. Enter "'C (while holding down the I Control l
key, press C) in each window that has a test running. Use the mouse to
move from window to window.
2.
Next, use the mouse to move to the gray background area and press the right
hand mouse button to activate the SunView menu. Select Exit SunView, and press the left button to confirm. Ifno gray area is visible, use
"'D (while holding down the (Control l key, press D) to remove one of the
test windows (but NOT the console window!).
3.
Before returning to the main menu, sysdiag displays the log files, using
the SunOS more command. Use the space bar to look at all the files, and if
you want to stop viewing them, simply enter q. Sysdiag then asks if
()
you want to reset the log files. Answer y if you want to throw away the
data in all of the log files, and n if you want to save it. When you have
dealt with the log files, the main menu is displayed.
All log files are removed when you answer y. To save log files for future
viewing, cd to /usr I adm and move sysdiaglog to
sysdiaglog. old. A /usr I adm/ sysdiaglog directory is automatically created when sysdiag is started.
4.
When the main menu appears, enter your next selection (enter q to exit
sysdiag).
n
Revision A of 9 May 1988
Chapter 2 -
Using Sun System Diagnostics
33
(
\_.)
Stopping sysdia g from a terminal:
1.
Enter the command endt. When the message:
appears, enter exit.
NOTE
Expect the endt command to take some time to halt all of the tests. /fit
appears that the command didn't kill all of the tests, run endt again.
2.
Before returning to the main menu, sysdia g displays the log files, using
the SunOS more command, then asks if you want to reset them. Answer
y if you want to throw away the data in all the log files, and n if you want
to save it. You will then be returned to the main menu, from which you may
enter q to exit.
If sysdia g tenninates unexpectedly, before attempting to run sysdia g
again, log in as root and, if testing a Sky board, check to see if I dev I sky. sd
exists. If so, rename it I dev I sky. Also check for ttys. sd, which should
be I etc It t y s. (Refer to the Caveats sub-section.)
(
!
~;
Revision A of 9 May 1988
()
/
()
3
Tests and Messages
(
\
\_)
Tests and Messages .....................................................................................................................
37
3.1. Tests ........................................................................................................................................
3.2. Messages...............................................................................................................................
37
39
()
u
3
Tests and Messages
This section briefly describes the tests run by sysdiag. It contains descriptions
of the the tests themselves, and some of the more common messages that these
tests might produce.
3.1. Tests
To check out the hardware, sysdiag uses one or more of the following tests:
o
(
..
~)
o
The test disk exercises the disk controller and drive. It writes two .5 MB files
with random data in /tmp, then reads and compares them. If the system
has no /tmp directory, sysdiag creates a /tmp-diskt op-sd directory to fill with random data, and removes it when you exit. sysdiag
selects the drive by issuing the SunOS command df and uses each local
drive listed.
sysdiag tests physical memory withpmem and virtual memory with
vmem.
pmem
locates parity errors, hard and soft ECC errors, memory read errors, and
addressing problems. It maps, then reads a page repeatedly throughout
memory.
vmem
tests virtual memory by allocating, writing, and reading as much virtual
memory as feasible. It leaves only the memory necessary for the operating system to function and for device tests to load and execute.
If vmem decides it does not have enough virtual memory to run properly, it exits without testing, generates a proper ending message on the
screen and in its log file, with a pass count of 0.
o
sysdiag provides these device tests; devtest,ffpusr, gpmtest, color, SunLink, enet,fpatest, mc68881, dcp, softdcp, softfp,fputest,sptest, ipctest and
printer.
(
v
I
It decides whether to run devtest by scanning !dev for devices that may be tested
and it runsffpusr if it can find the SKY board by directly probing for it. If a data
ciphering processor is present, sysdiag runs the dcp test; otherwise it runs
tests the DCP software with softdcp. The dcp tests are only offered in the United
States.
37
Revision A of 9 May 1988
38
Sun System Diagnostics
sysdiag runs gpmtest, sptest, SunLink, ipctest and printer if they were enabled
in the options menu, through the intervention selection. ipctest automatically runs if a SunIPC board is present in the system, but requires user input concerning the printer port.
The 1/2-inch tape drive should have
a scratch tape installed. Since it is
an optional test, the tape is not
tested unless you select intervention tests in the options menu (see
the intervention tests section in this
manual for details).
color
This test checks the system's color board (if it is installed).
dcp
This test automatically runs on domestic systems when a Data Ciphering Processor is present on the CPU board.
devtest
tests local disks and 1/2-inch tape drives using generic SunOS routines.
It only reads disks but it writes and reads tape drives. For 1/2-inch tape
drives, it starts by using the largest block size available (64 Kbytes), and
when it gets near the end, where 64K is too big, it uses 512 byte blocks
for the remainder.
fpatest
This test checks the floating point accelerator board (on Sun-3 systems
only).
ffpusr
tests the Sky FPP board on Sun-2s by using it to perform calculations,
then repeating the calculations in software and comparing the results.
1~
fputest
This test checks the floating point unit on Sun-4 systems.
gpmtest
gpmtest only runs if it is enabled from the options menu and requires
that you edit the I etc/ re. local file and re-boot the system
before starting sysdiag. The menu selection for gpmtest can only be
chosen after enabling the manufacturing tests (see the manufacturing
test section for details). gpmtest tests the graphics processor and graphics buffer, if they are installed.
gp2test
This test only runs if a GP2 board is present in the system, and the g
option.is selected from the manufacturing tests menu.
ipctest
This test checks SunIPc floppy ''B'' drives, and the SunIPC printer
ports. These tests are only available from the intervention test menu.
MC68881
This test checks the floating point coprocessor (on Sun-3 systems only).
printer
This test checks the printer ports on the MCP board.
reply
This test sends test packets to other systems in the I etc/host s file
Revision A of 9 May 1988
~)
/
Chapter 3 -:----- Tests and Messages
39
and requests acknowledgement that they have received them. In this
way, the Ethernet board is tested.
softdcp
On domestic systems, this test checks data encryption software when a
data ciphering chip is not present on the CPU board.
softfp
This test checks the software floating point routines (on Sun-3 systems
only).
Loopback connectors must be
installed on the serial ports and
data communication ports to be
tested. Since they are optional
tests, the Sunlink and sptest tests
do not run unless you enable them
from the intervention tests in the
options menu (see the intervention
test section in this manual for
details).
sptest
The sptest only runs if it is enabled from the options menu. The menu
selection for sptest, s, can only be chosen after enabling the intervention tests (see the intervention test section for details) or manufacturing tests (see the manufacturing test section). sptest tests the serial
ports not located on the CPU board , such as those found on the ALM2
board.
SunLink
This test checks the SCP and MCP data communications processor ports
installed on the system. It only runs if it is enabled from the options
menu. The menu selection for SunLink can only be chosen after enabling the intervention tests (see the intervention test section for details).
U
3.2. Messages
Most sysdiag messages fall into one of three categories: routine messages
from tests, messages from the SunOS .operating system and error messages from
tests.
Sysdiag Messages
The tests generate routine messages in their windows (or on the tenninal screen)
each time they start and stop, and they generate error messages when they
encounter an error. They place copies of all these messages in their log files.
When sysdiag generates a message, it identifies the test that is responsible for
the message by appending the test name to the message. Messages that appear on
the screen without a test name prefix are probably not from sysdiag. Sometimes sysdiag generates a message and appends a SunOS error message to it.
sysdiag generates routine messages when it starts and stops a test and when it
finds or fails to find a device. It generates an error message when it encounters
an error. It displays messages in the appropriate window, and it places copies of
them in the appropriate log file.
SunOS Messages
(
SunOS messages normally appear in the console window if the windows
environment is active, and they appear mixed with the other messages if you are
using a terminal. The most common SunOS messages are:
:
~
Revision A of 9 May 1988
40
Sun System Diagnostics
1.
The first message occurs when the system is overloaded (a condition that
sysdiag creates on pmpose!).
2.
The second occurs when the disk server is busy responding to requests from
other systems on its local area network.
3.
The third only occurs when sysdiag tries to retension a tape, ifthe system doesn't support the retension command.
{~
\
Revision A of 9 May 1988
/
u
'\
A
Tape Drive Hardware
(
v\
u
Tape Drive Hardware ................................................................................................................
43
A.1. Parameters ..........................................................................................................................
A.2. Identifying Your Tape Drive and Controller..................................................
43
43
()
(\\
1
/
A
Tape Drive Hardware
Use this appendix to identify the type of tape drive hardware on your Sun workstation. You need this information to correctly configure the tape test (see the
Tape Test section in chapter 2 for details).
If the tape test is not configured properly, the SCSI bus can hang, freezing up the
system. If this happens, you may have to cycle the system's power and reboot to
start it up again.
A.1. Paramet ers
f
(
I
\.._,,;!
In order to test your tape drive correctly, you must know this about the drive:
o
Number of Tape Tracks -
o
Tape Formats Supporte d - does your tape drive support the QIC-24 tape
format?
o
Tape Controlle r Board - does your tape drive use the Emulex tape controller board?
does your tape drive have 4 or 9 tape tracks?
If you know the answers to these questions, go no further. You have the information you need to configure the tape test. You also are finished if you do not plan
to test the tape drive at all, or are using the the default (short test, 4 tracks)
configuration. Otherwise, proceed to the next section.
A.2. Identifyi ng Your Tape
Drive and Controll er
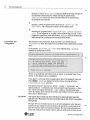
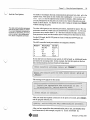
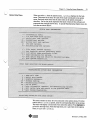
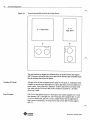
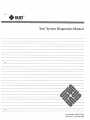
There are two types of 1A-inch tape drives on Sun systems; the 1/4-inch frontload (8 1/4 inch) drive and the 1/4-inch side load (5 1/4 inch) drive (the numbers
in parentheses refer to the width of the drive). Tape cartridges are inserted in
these drives differently. The front-load drive cartridge is inserted by its wide end;
the side-load drive cartridge is inserted by its narrow end. Both drives are
represented in the following figure:
u
43
Revision A of 9 May 1988
44
Sun System Diagnostics
Figure A-1
G
Front Load and Side Load 114-inch Tape Drives
8-
~
Tape Drive
1'
L___J
0 0
5- ~
Tape Drive
1'
~o
0
The side-load drives support new features; they are 9-track drives that support
QIC-24 format, and are the only drives that use the Emulex tape controller board.
See the sections that follow for details.
Number of Tracks
All tape drives in Sun workstations have either 4 or 9 tracks. A workstation with
9 tracks can record more information on a given tape than can be recorded on a 4
track system. Sun-2/120s and "fatboxes" (archive tape drives in a black metal
box, used with the 2/120 and 100U/150U) contain 4 track drives. All other
drives are 9-track.
Tape Formats
QIC-24 is a data format used on~ inch tapes. Sun systems support two~ inch
tape formats, QIC-11 and QIC-24. All~ inch tape drives support QIC-11, and
sysdiag knows that. QIC-24 is a new, reliable format that is supported on
Sun's newer workstations. All of the drives that can use QIC-24 also support
QIC-11.
~~sun
~
microsystems
I
Revision A of 9 May 1988
i~
/
Appendix A- Tape Drive Hardware
u
45
Many tape drives support QIC-24 format, including those listed below. Not all
Sun systems support that format, however, due to the revision level. of the Boot
PROM, which is located on the CPU board. These drives are capable of supporting QIC-24:
~-inch
a
All
a
All drives in Sun-3 Mass Storage Subsystems
a
All Sun-2/120s shipped after 6/1/85
side-load (5
~-inch) tape
drives (see previous section for details)
The drives in the.older systems (Cipher or early Archive drives, for example)
only support QIC-11. Cipher drives are identified by the presence of an opaque
mylar protective sheet located across the top 'surface, inside the tape drive cartridge opening.
Revisions of the Sun-3 PROMS that are below 1.8 do not "unders tand" QIC-24
tape format. You can check the revision level of your PROM by becoming
super-user and halting the system with
exampl e # sync
exampl e # sync
exampl e # /etc/h alt
and typing kb after the > prompt from the PROM monitor. Any system with a
Boot PROM of revision 1.8 or higher will read the new 9-track, QIC-24 tapes.
I
!
"\
Also, if you load a QIC-24 tape into a workstation.that can read only a QIC-11
.tape, you will see an 8 6A8 or an 8 6AO error message from the controller. This
error indicates the controller was unable to read the header block on the tape. It
is possible that this error will result from a faulty tape even if the tape controller
will read QIC-24 tapes, so check your PROM revision level or try another tape if
you get this error message.
\
\.__.,;!
Controller Board
Every ~ inch tape drive has a tape controller board driving it. This is a small
printed circuit board located inside the workstation.
To tell if you have an Emulex controller board, insert a tape into your system. If
the tape is running off an Emulex controller, the tape automatically rewinds, and
the drive's LED stays on continuously. The Emulex Controller takes about two
or three seconds to find the beginning of the tape and then stop.
The Sysgen Controller takes about one second to find the beginning and stop.
u
Revision A of 9 May 1988
n
n
',
/
(
'\
~/
B
Multiple Disk Drive Testing
Multiple Disk Drive Testing ................................................................................................
u
u
49
/)
'
J
~/
'
(
~
I
B
Multiple Disk Drive Testing
sysdiag automatically tests the first disk drive it finds in the system. If more
than one drive is to be tested, these procedures are required:
For unformat ted disks:
(
\
1.
Refer to the appropriate manual (such as Installing the Sun Operating System) and fonnat, partition and label the disk.
2.
Create a I dev entry as shown under For formatted disks, below.
3.
Use the command I etc/new fs to create a new filesystem for the disk as
shown in this example for a second SCSI disk.
)
I
~
Refer to the Maintenance Commands section of the SunOS Reference
Manual, NEWFS(8) for more infonnatio n on the newf s command.
For formatted disks:
1.
Make sure a MAKEDEV disknam e is done for each disk to be tested:
or
/
u
'
49
Revision A of 9 May 1988
50
Sun System Diagnostics
2.
Make sure at least one partition of the to-be-tested disk is mounted onto a
file system. (Normally, this is already done on the first disk during SunOS
operating system installation). The other disks need to be mounted manually:
If permanent disk additions are to be made, manually add the line entries for each
disk to I etc/ fstab and then use the mount -a command to mount each
partition. Refer to mount(8),fstab(5) and mtab(5) in the SunOS Reference
Manual.
.n
\
Revision A of 9 May 1988
/
lJ
Index
A
FPC, 38
~.18,21,28,39
G
B
GPl, 28
GP2,28
gp2test, 38
gpmtest, 38
graphics processor tests, 28
boldfaced type, 3
c
i
\__)
changing
the display, 5
color, 38
console type, 16
controller
identification, 45
options, 21
conventions,3
core dumps, 10
customizing windows, 29
H
halting tests, 32
hardware tested, 4, 8, 15
help, 17, 31
I
intervention tests, 17, 18
introduction, 3
IPC, 18, 19, 25
ipctop, 8
italic type, 3
D
data comnnmication ports, 19
data communications processor, 23
date and time, 15
DCP,39
/dev, 8
device list
verify,14
device tests, 37
devtest, 37
devtop, 8
disks
testing multiple, 6, 49
disktop, 8
display type, 5
L
log files, 10, 15
logging in, 13
loopback connectors, 22
M
main menu
example, 14
selection, 13
manufacturing tests, 17, 27
MC68881,38
MCP, 19, 23, 24, 39
memtop,8
messages, 10, 39 thru 40
diagnostic, 39
SunOS,39
multiple disks, 6
E
exiting sysdiag,32
F
u
ffpusr, 8, 38
floppy tests, 19, 26
fonts
italic, 3
Roman bold, 3
typewriter bold, 3
fpatest, 38
0
options menu, 15, 17
-51-
Index -
Continued
p
T
passwd, 7, 13
password
changing under sysdiag, 16
file editing, 7, 13
pmem, 8, 37
printenv, 5
printer port options, 19, 24
printer ports test, 38
programs, 8
n
\
,/
tape drive
identification, 43
information, 43
options, 19, 20, 21
tapetop, 8
termcap, 6
terminal, 9' 16
tests, 8, 37
typewriter font, 3
u
Q
using sysdiag, 13 thru 33
QIC-11 tape format, 44
QIC-24 tape format, 6, 20, 44
quitting
sysdiag, 16, 18
the main menu, 18
v
valid terminal types, 6
verify mode, 14
vmem, 8, 28, 30, 37
R
reset log files, 16
s
SCP, 23, 39
script files, 10
security, 7
selections
date and time, 15
hardware to test, 15, 37
main menu, 14
serial port
options, 19,21,30
test hardware, 22
test program, 39
setterm, 5
single test mode, 15
Sky board
renaming files, 6
softdcp, 39
softfp, 39
software environment, 4
storing current options, 17
SunIPC, 18, 19, 25, 38
SunLink, 19, 23, 39
SunView, 9
sysdiag
cautions, 6
caveats, 6
core dumps, 10
exiting, 32
introduction, 3
messages, 39
password, 8
problems, 6
programs, 8
setting terminal type, 5
what it tests, 4
windows, 9
()
)
-52-