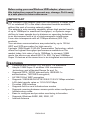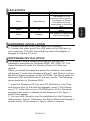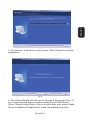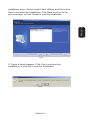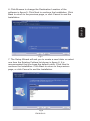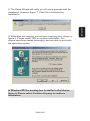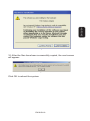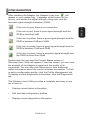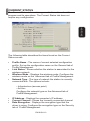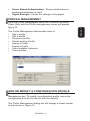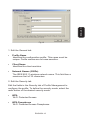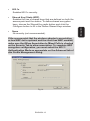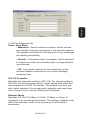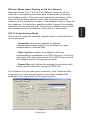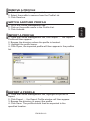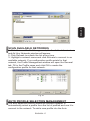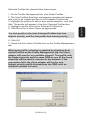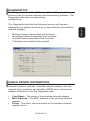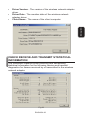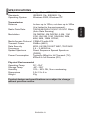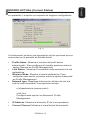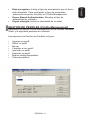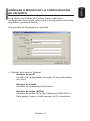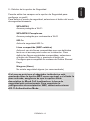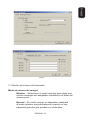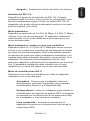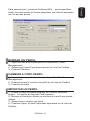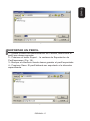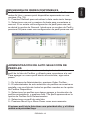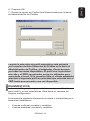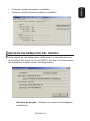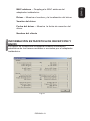
1
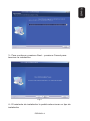
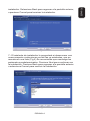
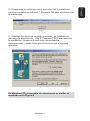
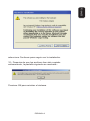
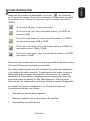
Before using your new Wireless USB adapter, please read
this instruction manual to prevent any damage. Put it away
in a safe place for future references.
The Wireless USB Adapter gives you the flexibility to install your
PC or notebook PC in the most convenient location available,
without the cost of running network cables.
The adapter’s auto-sensing capability allows high packet transfer
of up to 108Mbps for maximum throughput, or dynamic range
shifting to lower speeds due to distance or operating limitations
in an environment with a lot of electromagnetic interference.
It can also interoperate with all 11Mbps wireless (802.11b)
products.
Your wireless communications are protected by up to 152-bit
WEP and WPA encryption for high security.
It adopts 108M Super G WLAN Transmission Technology, which
offers the highest throughput performance available on the
market today, link rates of up to 108Mbps. In dynamic 108M
mode, the device can attach 802.11b, 802.11g and 108Mbps
Super G devices at the same time in an integrated environment.
FEATURES
•
•
•
•
•
•
•
•
•
•
•
Complies with IEEE802.11g, IEEE802.11b standards
Adopts 108M Super G wireless LAN transmission
technology and eXtended Range 2x and 3x
Supports WPA / WPA2 data security, IEEE802.1x
authentication, TKIP/AES encryption,
64/128/152-bit WEP encryption
Supports 108/54/48/36/24/18/12/9/6/11/5.5/2/1Mbps wireless
LAN data transfer rates or 11/5.5/3/2/1Mbps
Provides USB interface
Supports Ad-Hoc and Infrastructure modes
Supports roaming between access points when configured in
Infrastructure mode
Ease to configure and provides monitoring information
Supports Windows 98SE, ME, 2000, XP
Internal Antenna
ENGLISH-2
ENGLISH
IMPORTANT
LED Indications
Status
Green
Intermittently
Green
Lit
Green
Flashing
Working Status
The adapter is in an
electricity saving status or
the adapter is already
connected but is not
transmitting or receiving
data.
The adapter is on wake up
status.
The adapter is transmitting
and receiving data.
HARDWARE INSTALLATION
1. Connect one end of the USB cable to the Adapter.
2. Connect the other end of the USB cable to the USB port on
your computer. The LED should light up when the Adapter is
plugged in and the PC is on.
SOFTWARE INSTALLATION
The Adapter’s Setup Wizard will guide you through the
installation procedure for Windows 98SE, ME, 2000, XP. The
Setup Wizard will install the Wireless Drivers & Utility and
drivers.
When you install the hardware before the software, the system
will prompt “Found New Hardware Wizard”, click Cancel, and run
the Setup Wizard program on the CD-ROM. The Setup steps for
Windows 2000 and Windows XP are very similar. The following
setup steps are for Windows 2000.
1. Insert the Resource CD into your CD-ROM drive, click Start
and choose Run. In the field that appears, enter F:\XXX\Setup.
exe (if “F” is the letter of your CD-ROM drive; XXX is the setup
program path, which is labeled on the Resource CD), figure 1
should then appear.
2. You can click Cancel to end the installation on the Preparing
Setup screen, figure1. Otherwise, the Setup Wizard will display a
screen similar to that shown in figure 2 after a moment.
ENGLISH-3
ENGLISH
LED STATUS
ENGLISH
Fig 1
3. To continue, click Next on the screen. Click Cancel to end the
Installation.
Fig 2
4. The Setup Wizard will ask you to choose a Setup type (Fig. 3)
It is recommended that you select Install Client Utilities and
Driver. Select Install Driver Only to install driver only, select Make
Driver Installation Diskette(s) to make the diskette(s) as the
ENGLISH-4
ENGLISH
installation driver. Select Install Client Utilities and Driver and
Next to continue the Installation. Click Back to return to the
previous page, or click Cancel to end the Installation.
Fig 3
5. Figure 4 should appear. Click Yes to continue the
Installation, or click No to end the Installation.
Fig 4
ENGLISH-5
ENGLISH
6. Click Browse to change the Destination Location of the
software in figure 5. Click Next to continue the Installation. Click
Back to return to the previous page, or click Cancel to end the
Installation.
Fig 5
7. The Setup Wizard will ask you to create a new folder or select
one from the Existing Folders list shown in figure 6. It is
recommended that you keep the default value. Click Next to
continue the Installation. Click Back to return to the previous
page, or click Cancel to end the Installation.
Fig 6
ENGLISH-6
Fig 7
9. While files are copying, you will see a warning box, shown in
figure 8. Please select YES to continue installation. Our
drivers have been tested thoroughly, and are able to work with
the operating system.
Fig 8
In Windows XP, the warning box is similar to that shown
figure 9, Please select Continue Anyway to continue
installation.
ENGLISH-7
ENGLISH
8. The Setup Wizard will notify you of how to proceed with the
installation, shown in figure 7. Click OK to continue the
Installation.
ENGLISH
Fig 9
10. After the files have been successfully copied, the next screen
will appear.
Fig 10
Click OK to reboot the system.
ENGLISH-8
CONFIGURATION
After installing the Adapter, the Adapter’s tray icon
will
appear in your system tray. It appears at the bottom of the
screen, and shows the signal strength using color and the
received signal strength indication (RSSI).
If the icon is red, there is poor signal strength and the
RSSI is less than 5dB.
If the icon is yellow, there is poor signal strength and the
RSSI is between 5dB and 10dB.
If the icon is green, there is good signal strength and the
RSSI is between 10dB and 20dB.
If the icon is green, there is excellent signal strength and
the RSSI is more than 20dB.
Double-click the icon and the Current Status screen of
Wireless Client Utility will appear. From this screen, you can view
the strength of the Adapter’s signal and the quality of its
connection. You can also click Advanced to view additional
status information about the current wireless connection. To Edit
or add a configuration profile, click the Profile Management tab.
To display current diagnostics information, click the Diagnostics
tab.
The Wireless client Utility provides a complete and easy to use
set of tools to:
•
Display current status information
•
Edit and add configuration profiles
•
Display current diagnostics information
ENGLISH-9
ENGLISH
If the icon is gray, there is no connection.
CURRENT STATUS
ENGLISH
The Current Status tab contains general information about the
program and its operations. The Current Status tab does not
require any configuration.
Fig 11
The following table describes the items found on the Current
Status screen.
•
•
•
•
Profile Name - The name of current selected configuration
profile. Set up the configuration name on the General tab of
Profile Management.
Link Status - Shows whether the station is associated to the
wireless network.
Wireless Mode - Displays the wireless mode. Configure the
wireless mode on the Advanced tab of Profile Management.
Network Type - The type of network the station is currently
connected with. The options include:
• Infrastructure (access point)
• Ad Hoc
Configure the network type on the Advanced tab of
Profile Management.
•
•
•
IP Address - Displays the computer’s IP address.
Current Channel - Shows the currently connected channel.
Data Encryption - Displays the encryption type that the
driver is using. Configure the encryption type on the Security
tab of Profile Management.
ENGLISH-10
•
•
Server Based Authentication - Shows whether server
based authentication is used.
Signal Strength - Shows the strength of the signal.
PROFILE MANAGEMENT
The Profile Management tab provides tools to:
• Add a profile
• Edit a profile
• Remove a profile
• Switch another Profile
• Import a Profile
• Export a Profile
• Scan Available Networks
• Order profiles
Fig 12
ADD OR MODIFY A CONFIGURATION PROFILE
To add a new configuration profile, click New on the Profile
Management tab. To modify a configuration profile, select the
configuration from the Profile list and click Modify.
The Profile Management dialog box will display a screen similar
to that shown in Figure 13
ENGLISH-11
ENGLISH
Click the Profile Management tab of the -WN620G Wireless
Client Utility and the Profile management screen will appear,
figure 12.
ENGLISH
Fig 13
1. Edit the General tab
•
Profile Name
Identifies the configuration profile. This name must be
unique. Profile names are not case sensitive.
•
Client Name
Identifies the client machine.
•
Network Names (SSIDs)
The IEEE 802.11 wireless network name. This field has a
maximum limit of 32 characters.
2. Edit the Security tab
Edit the fields in the Security tab of Profile Management to
configure the profile. To define the security mode, select the
radio button of the desired security mode.
•
WPA
Wi-Fi Protected Access
•
WPA Passphrase
Wi-Fi Protected Access Passphrase
ENGLISH-12
802.1x
Enables 802.1x security.
•
Shared Key (Static WEP)
Enables the use of shared keys that are defined on both the
access point and the station. To define shared encryption
keys, choose the Shared Key radio button and click the
Configure button to fill in the Define Shared Keys window.
•
None
No security (not recommended).
If the access point that the wireless adapter is associating
to has WEP set to optional and the client has WEP enabled,
make sure that Allow Association to Mixed Cells is checked
on the Security Tab to allow association. To complete WEP
encryption configuration, you must select the 802.11
Authentication Mode as appropriate on the Advanced tab of
this Profile Management dialog.
Fig 14
ENGLISH-13
ENGLISH
•
3. Edit the Advanced tab
Power Save Mode
• Maximum - Select maximum mode to let the access
point buffer incoming messages for the wireless adapter.
The adapter will detect the access point if any messages
are waiting periodically.
• Normal - In Normal mode, the adapter will be switched
to maximum mode automatically when no large packets
are retrieved.
• Off - turns power saving off, thus powering up the
wireless adapter continuously for a short message
response time.
802.11b Preamble
Specifies the preamble setting in 802.11b. The default setting is
Short & Long (access point mode), which allows both short and
long headers in the 802.11b frames. The adapter can only use
short radio headers if the access point supports and uses them.
Set to Long Only to override allowing short frames.
Wireless Mode
Specifies 2.4 GHz 54 Mbps, 2.4 GHz 11 Mbps, or Super G
operation in an access point network. The wireless adapter must
match the wireless mode of the access point with which it
associates.
ENGLISH-14
ENGLISH
Fig 15
802.11 Authentication Mode
Select which mode the wireless adapter uses to authenticate to
an access point:
• Automatic causes the adapter to attempt
authentication using shared, but switches it to open
authentication if shared fails.
• Open System enables an adapter to attempt
authentication regardless of its WEP settings. It will only
associate with the access point if the WEP keys on both
the adapter and the access point match.
• Shared-Key only allows the adapter to associate with
access points that have the same WEP key.
For infrastructure (access point) networks, click Preferred APs…
to specify up to four access points to the client adapter that
attempts to be associated to the access points.
Fig 16
ENGLISH-15
ENGLISH
Wireless Mode when Starting an Ad Hoc Network
Specifies Super G or 2.4 GHz 54/11 Mbps to start an ad hoc
network if no matching network name is found after scanning
all available modes. This mode also allows the selection of the
channel the wireless adapter uses. The channels available
depend on the regulatory domain. If the adapter finds no other ad
hoc adapters, this selection specifies which channel the adapter
starts the ad hoc network with. The wireless adapter must match
the wireless mode and channel of the clients it associates.
REMOVE A PROFILE
1. Go to the Profile Management tab.
2. Select the profile to remove from the Profile List.
3. Click Remove.
1. Go to the Profile Management tab.
2. Click on the profile name in the Profile List.
3. Click Activate.
IMPORT A PROFILE
1. From the Profile Management tab, click Import…. The Import
Profile will then appear.
2. Browse the directory where the profile is located.
3. Highlight the profile name.
4. Click Open, the imported profile will then appear in the profiles
list.
Fig 17
EXPORT A PROFILE
1. From the Profile Management tab, highlight the profile to
export.
2. Click Export…, the Export Profile window will then appear.
3. Browse the directory to export the profile.
4. Click Save. The profile should then be exported to the
specified location.
ENGLISH-16
ENGLISH
SWITCH ANOTHER PROFILE
ENGLISH
Fig 18
SCAN AVAILABLE NETWORKS
1. Click Scan on Profile Management, the Available Infrastructure
and Ad Hoc Networks window will appear.
2. Click Refresh to refresh the list at any time.
3. Highlight a network name and click Activate to connect to an
available network. If no configuration profile exists for that
network, the Profile Management window will open the General
tab. Fill in the Profile name and click OK to create the
configuration profile for that network.
Fig 19
AUTO PROFILE SELECTION MANAGEMENT
The auto selection feature allows the wireless adapter to
automatically select a profile from the list of profiles and use it to
connect to the network. To add a new profile into the Auto
ENGLISH-17
1. On the Profile Management tab, click Order Profiles….
2. The Auto Profiles Selection management window will appear,
with a list of all created profiles in the Available Profiles box.
3. Highlight the profiles to add to auto profile selection, and click
Add. The profile will appear in the Auto Selected Profiles box.
4. Highlight a profile in the Auto Selected Profiles box.
5. Click Move Up or Move Down as appropriate.
The first profile in the Auto Selected Profiles box has
highest priority, and the last profile has lowest priority.
6. Click OK.
7. Check the Auto Select Profiles box on the Profile Management
tab.
When auto profile selection is enabled by checking Auto
Select Profiles on the Profile Management tab, the client
adapter will scan for an available network. The profile with
the highest priority and the same SSID as one of the found
networks will be used to connect to the network. If the
connection fails, the client adapter will try the next
highest priority profile that matches the SSID until an
available network is found.
Fig 20
ENGLISH-18
ENGLISH
Selected Profiles list, please follow these steps.
DIAGNOSTICS
The Diagnostics tab lists the following receive and transmit
diagnostics for frames received by or transmitted by the wireless
network adapter:
•
•
•
•
Multicast frames transmitted and received
Broadcast frames transmitted and received
Unicast frames transmitted and received
Total bytes transmitted and received
Fig 21
CHECK DRIVER INFORMATION
The Adapter Information contains general information about the
network interface card (the wireless network adapter) and the
network driver interface specification (NDIS) driver. Access the
adapter information from the Diagnostics tab.
•
•
•
Card Name - The name of the wireless network adapter.
MAC Address - The MAC address of the wireless network
adapter.
Driver - The driver name and path of the wireless network
adapter driver.
ENGLISH-19
ENGLISH
The Diagnostics tab of the S Wireless Client Utility provides
buttons used to retrieve receiving and transmitting statistics. The
Diagnostics tab does not require any
configuration.
•
•
ENGLISH
•
Driver Version - The version of the wireless network adapter
driver.
Driver Date - The creation date of the wireless network
adapter driver.
Client Name - The name of the client computer.
Fig 22
CHECK RECEIVE AND TRANSMIT STATISTICAL
INFORMATION
The Advanced Statistics show receiving and transmitting
statistical information for the following receive and transmit
diagnostics for frames received by or transmitted to the wireless
network adapter.
Fig 23
ENGLISH-20
SPECIFICATIONS
Interface:
Standards
Operating System
A-type Male USB 2.0 Connector
IEEE802.11b; IEEE802.11g
Windows 2000; Windows XP
In door up to 100m, out door up to 300m
(it is limited to the environment).
Radio Data Rate
108/54/48/36/24/12/9/6/11/5.5/2/1 Mbps
(Auto Rate Sensing)
Modulation
1M DBPSK; 2M DQPSK; 5.5M, 11M
CCK; 6M, 9M, 12M, 18M,24M, 36M,
48M, 54M, 108M OFDM;
Media Access Protocol CSMA/CA with ACK
Transmit Power
20dBm (MAX)
Data Security
WPA; 64/128/152 BIT WEP; TKIP/AES
Frequency
2.4 ~ 2.4835GHz
Spread Spectrum
Direct Sequence Spread Spectrum
(DSSS)
Power Consumption
Typically 480mA in full Transmit (TX),
420mA in full Receive (RX)
Physical Environmental
Operating Temp
32°~104°
Storage Temp
-40°~158°
Humidity
10% - 95% RH, Non-condensing
Dimensions
3.9×1.2×.4 in
Weight
23g
Product design and specifications are subject to change
without previous notice.
ENGLISH-21
ENGLISH
Transmission
Distance
INTRODUCCIÓN
El adaptador USB le ofrece la flexibilidad de instalarlo en su
computadora personal o portátil, sin la necesidad de cables.
La capacidad de auto medición del adaptador le permite hacer
transferencias de hasta 108Mbps , o a través del cambio de
rango dinámico podrá obtener velocidades bajas cuando se
encuentre en largas distancias o ambientes con mucha
interferencia electromagnética.
Inclusive puede interactuar con todos los productos inalámbricos
de 11Mbps (802.11b).
Sus comunicaciones inalámbricas están protegidas por una
encriptación WEP y WPA de 152-bits de alta seguridad.
Adopta la tecnología de transmisión WLAN de rango extendido
2x y 3x, por lo que la distancia de transmisión es de 2 a 3 veces
mayor que las soluciones de 11g/b tradicionales.
Así mismo, cuenta con la tecnología de transmisión Super G
WLAN 108M, que le ofrece la mayor calidad de salida disponible
en el mercado, con tasas de unión de hasta 108Mbps. El modo
dinámico 108M, el dispositivo puede agregar equipos 802.11b,
802.11g y 108Mbps Super G mismo tiempo en un ambiente de
integración.
CARACTERÍSTICAS
•
•
•
•
•
•
•
•
•
•
Cumple con los estándares IEEE802.11g, IEEE802.11b
Adopta las tecnologías de transmisión para redes
inalámbricas 108M Super G y eXtended Range 2x y 3x
Soporta seguridad en datos WPA/WPA2, autentificación
IEEE802.1x, encriptación TKIP/AES, y encriptación WEP
64/128/152 bits
Soporta tasas de transferencia de 108/54/48/36/24/18/12/9/
6Mbps o 11/5.5/3/2/1Mbps
Interfase USB
Soporta modos Ad-Hoc e Infraestructura
Soporta el roaming entre puntos de acceso cuando se
encuentra configurado en modo de Infraestructura
Configuración sencilla y provee información de monitoreo
Compatible con Windows 98SE, ME, 2000, XP
Antena interna
ESPAÑOL-2
ESPAÑOL
Antes de utilizar su nueva Tarjeta de Red inalámbrica USB
lea este instructivo para evitar cualquier mal
funcionamiento. Guárdelo para futuras referencias.
Indicador
Estado
Verde
Parpadeando
Verde
Encendido
Verde
Parpadeando
Estado de
funcionamiento
El adaptador esta
ahorrando energía o esta
conectado pero no
transmite o recibe data
Esta en funcionamiento
Transmitiendo o
recibiendo información
INSTALACIÓN DE HARDWARE
1.- Conecte una Terminal del cable USB al adaptador.
2.- Inserte la otra Terminal del cable USB en un puerto USB de
la computadora. El LED indicador debe encender.
INSTALACIÓN DE SOFTWARE
El asistente lo guiará a través del proceso de instalación en
Windows 98SE, ME, 2000, XP, e instalará los drivers y utilidades
del dispositivo.
Cuando instala el hardware antes que software, el sistema
mostrará el mensaje “ Nuevo Hardware encontrado” y se
ejecutará el asistente de nuevos dispositivos, presione Cancel y
ejecute el asistente de instalación que se localiza en el CD-ROM
incluido en el paquete. Los pasos de instalación para Windows
98Se, Me, 2000 son muy similares. Las siguientes instrucciones
son para Windows 2000.
1.- Inserte el disco de instalación en el CD-ROM, presione Inicio
y seleccione Ejecutar. En la ventana que aparece, introduzca
F:\XXX\Setup.exe, donde F es la letra que corresponde a su
CD-ROM, XXX es la dirección donde se encuentra el fólder que
contiene Setup.Exe, el cual viene impreso en la cubierta del
disco de instalación, la figura 1 se muestra en pantalla.
2.- Presione Cancel para terminar la instalación en la pantalla
previa de Preparación, como se muestra en la figura 2, el
asistente de instalación mostrará una pantalla similar que se
muestra en la siguiente imagen.
ESPAÑOL-3
ESPAÑOL
INDICADOR LED
ESPAÑOL
Fig 1
3.- Para continuar, presione Next... presione Cancel para
terminar la instalación.
Fig 2
4.- El asistente de instalación le pedirá seleccionar un tipo de
instalación
ESPAÑOL-4
Fig 3
5.- La imagen 4 debe aparecer. Presione Yes para continuar con
la instalación, o seleccione No para concluirla.
Fig 4
6.- Seleccione Browse para cambiar el destino donde se
instalará el software (Fig 5) Presione Next para continuar con la
ESPAÑOL-5
ESPAÑOL
Se recomienda que seleccione Install Cliente Utilities and Driver.
Seleccione Install driver only para instalar únicamente el driver,
o seleccione Make Driver Installation Diskette(s) para realizar un
diskette como ejecutable que contiene el driver de instalación.
Seleccione Install Cliente Utilities and Driver y presione Next
para continuar con la instalación. Seleccione Back para regresar
a la pantalla previa, o presione Cancel para terminar la
instalación.
Fig 5
7.- El asistente de instalación le preguntará si desea crear una
nueva carpeta o seleccionar una de las ya existentes, que se
muestra en una lista (Fig 6) Se recomienda que mantenga los
parámetros predeterminados. Presione Next para continuar con
la instalación. Presione Back para regresar a la pantalla anterior
o seleccione Cancel para concluir la instalación.
Fig 6
ESPAÑOL-6
ESPAÑOL
instalación. Seleccione Back para regresar a la pantalla anterior,
o presione Cancel para terminar la instalación.
Fig 7
9.- Mientras los archivos se están copiando, se mostrará un
mensaje de advertencia... (Fig 8) Presione YES para continuar
la instalación. Nuestros drivers han sido probados
rigurosamente, y están listos para funcionar con el sistema
operativo.
Fig 8
En Windows XP, el mensaje de advertencia es similar al
mostrado en la Figura 9
ESPAÑOL-7
ESPAÑOL
8.- El asistente le notificará cómo proceder con la instalación,
como se muestra en la figura 7. Presione OK para continuar con
la instalación.
ESPAÑOL
Fig 9
seleccione Continuar para seguir con la instalación.
10.- Después de que los archivos han sido copiado
exitosamente, la pantalla siguiente se mostrará...
Fig 10
Presione OK para reiniciar el sistema.
ESPAÑOL-8
Después de instalar el Adaptador, un ícono
se mostrará
en la barra de tareas. Este ícono indicará la intensidad de señal
de acuerdo a un color y la fuerza en que se recibe una señal
(RSSI).
Si el ícono es gris, no hay conexión.
Si el ícono es rojo, hay una señal pobre y el RSSI es
menor a 5dB
Si el ícono es amarillo, hay una señal pobre y el RSSI
se encuentra entre 5dB y 10dB
Si el ícono es verde, hay una buena señal y el RSSI se
encuentre entre 10dB y 20dB
Si el ícono es verde, hay una excelente señal y el RSSI
es mayor a 20dB
Presione dos veces sobre el ícono y la pantalla de Estado Actual
(Current Status) se mostrará en pantalla.
En esta pantalla podrá ver la intensidad de señal del adaptador
y la calidad de esta conexión. Puede presionar sobre la opción
Advanced para mostrar información adicional de la conexión
inalámbrica. Para editar o agregar una configuración de perfil,
presione sobre la opción Profile Management. Para mostrar
información de diagnóstico, presione sobre la opción Diagnostic.
La utilidad del cliente inalámbrico, le ofrece una serie de
herramientas fáciles de utilizar:
•
Información actual del programa
•
Edición y adición de configuración de perfiles
•
Información de perfil actual
ESPAÑOL-9
ESPAÑOL
CONFIGURACIÓN
Esta opción contiene información general acerca del programa y
su operación. La opción no requiere de ninguna configuración.
Fig 11
A continuación se hace una descripción de las opciones que se
encuentran en la pantalla de Estado Actual.
•
•
•
•
Profile Name: Muestra el nombre del perfil actual
seleccionado. Para configurar el nombre presione sobre la
opción General en Profile Management.
Link Status: Muestra si la estación está asociada a la red
inalámbrica.
Wireless Mode: Muestra el modo inalámbrico. Para
configurar esta opción, presione sobre la opción Advanced
en Profile Management.
Network type: Despliega información del tipo de red a la
cuál se está conectado. Las opciones incluye:
o Infraestructura (access point)
o Ad Hoc
Configure esta opción en Advanced, Profile
Management.
•
•
IP Address: Muestra la dirección IP de la computadora
Current Channel: Muestra el canal actual de conexión
ESPAÑOL-10
ESPAÑOL
ESTADO ACTUAL (Current Status)
•
•
Data encryption: Indica el tipo de encriptación que el driver
está utilizando. Para configurar el tipo de encriptado,
seleccione la opción Security en Profile Management.
Server Based Authentication: Muestra el tipo de
autentificación utilizado
Signal strength: Indica la intensidad de la señal
GESTIÓN DE PERFILES (Profile Management)
Seleccione la opción Profile Management en la utilidad Wireless
Client y la siguiente pantalla se mostrará:
Las opciones de Gestión de Perfiles incluyen:
•
•
•
•
•
•
•
•
Agregar un perfil
Editar un perfil
Borrar
Cambiar a otro perfil
Importar un perfil
Exportar un perfil
Buscar redes disponibles
Ordenar perfiles
Fig 12
ESPAÑOL-11
ESPAÑOL
•
Para agregar una nueva configuración de perfil, presione New
en la opción de Gestión de Perfiles. Para modificar la
configuración de un perfil, seleccione la configuración de la lista
de perfiles y presione Modify.
Una pantalla se desplegará en pantalla:
Fig 13
1.- Edición de la opción General
Nombre de perfil
Identifica la configuración del perfil. Este nombre debe
ser único.
Nombre de cliente
Identifica al computadora de cliente
Nombre de redes (SSIDs)
Muestra el nombre de la red inalámbrica IEEE 802.11.
Este campo tiene un límite máximo de 32 caracteres.
ESPAÑOL-12
ESPAÑOL
AGREGAR O MODIFICAR LA CONFIGURACIÓN
DE UN PERFIL
Permite editar los campos en la opción de Seguridad para
configurar un perfil.
Para definir el modo de seguridad, seleccione el botón del modo
de seguridad deseado.
WPA/WPA2
Acceso protegido a Wi-Fi
WPA/WPA2 Passphrase
Acceso protegido por contraseña a Wi-Fi
802.1x
Activa la seguridad 802.1x
Llave compartida (WEP estática)
Activa el uso de llaves compartidas que son definidas
tanto en el access point como en la estación. Para
definir las llaves encriptadas compartidas, seleccione
el botón de Shared Key y presione el botón de
Configure para completar la ventana de Define Shared
Keys.
Ninguna (None)
No existe seguridad alguna (no recomendado)
Si el access point que el adaptador inalámbrico está
asociando tiene la opción WEP como opcional y el cliente la
tiene activada, asegúrese de que la opción Allow
Association to Mixed Cell localizada en la barra de
Seguridad esté seleccionada. Para completar la
configuración de encriptación WEP, deberá seleccionar
802.11 Authentication Mode.
ESPAÑOL-13
ESPAÑOL
2.- Edición de la opción de Seguridad
ESPAÑOL
Fig 14
Fig 15
3.- Edición de la barra de Avanzado
Modo de ahorro de energía
Máximo – Seleccione el modo máximo para dejar que
entren mensajes del adaptador inalámbrico al búfer del
access point.
Normal – En modo normal, el adaptador cambiará
al modo máximo automáticamente cuando no hay
paquetes grandes que puedan ser obtenidos.
ESPAÑOL-14
Introducción 802.11b
Especifica el ajuste de introducción en 802.11b. El ajuste
predeterminado es Corto y Largo (modo de access point), que
permite encabezados largos y cortos en frames 802.11b. El
adaptador solo puede utilizar encabezados cortos si el access
point los soporta y los utiliza.
Modo inalámbrico
Especifica la operación de 2.4 GHz 54 Mbps, 2.4 GHz 11 Mbps,
o Super G en una red access point. El adaptador inalámbrico
debe coincidir con el modo inalámbrico del access point con
el que está asociado.
Modo inalámbrico cuando se inicia una red Ad Hoc
Especifica Super G o 2.4 GHz 54/11 Mbps para iniciar una red
ad hoc si no coincide con el nombre de red después de buscar
por todos los modos disponibles. Este modo también permite
la selección de canal que utiliza el adaptador inalámbrico. Los
canales disponibles dependen del dominio de regulación. Si el
adaptador no encuentra otros adaptadores ad hoc, esta
selección especifica cuál canal inicia el adaptador con la red ad
hoc. El adaptador inalámbrico debe coincidir con el modo
inalámbrico y el canal del cliente con el que está asociado.
Modo de autentificación 802.11
Selecciona que modo de autentificación utiliza el adaptador
inalámbrico con un access point:
Automático - Provoca que el adaptador intente la
autentificación utilizando Compartido, pero cambia a
autentificación Abierta si el Compartido falla.
Sistema abierto - activa un adaptador para intentar la
autentificación sin importar los ajustes WEP. únicamente
se asociará con el access point si los parámetros Wep
en el adaptador y el access point coinciden.
Llave compartida – únicamente permite que el
adaptador se asocie con el access point que tenga la
misma llave WEP.
ESPAÑOL-15
ESPAÑOL
Apagado – Desactiva la función de ahorro de energía
Fig 16
BORRAR UN PERFIL
1.- Vaya a la barra de Administración de perfiles (Profile
Management).
2.- Seleccione el perfil que desee borrar de Lista de Perfiles.
3.- Presione Remove.
CAMBIAR A OTRO PERFIL
1.- Vaya a la barra de Administración de perfiles (Profile
Management).
2.- Presione sobre el nombre del perfil en la Lista de Perfiles
3.- Presione Activate.
IMPORTAR UN PERFIL
1.- Desde la barra de Administración de Perfiles, presione
Import... La opción de Importa Perfil aparece.
2.- Busque el directorio donde se encuentra el perfil que desea
utilizar.
3.- Seleccione el nombre del perfil.
4.- Presione Open, el perfil importado aparecerá en la Lista de
Perfiles.
ESPAÑOL-16
ESPAÑOL
Para access point , presione Preferred APs… para especificar
hasta 4 access points al cliente adaptador que intente asociarse
con los access points.
ESPAÑOL
Fig 17
EXPORTAR UN PERFIL
1.- Desde la barra de Administración de Perfiles, seleccione el
perfil que desea exportar.
2.- Presione el botón Export... la ventana de Exportación de
Perfil aparecen (Fig. 18).
3.- Busque el directorio donde desea guardar el perfil exportado.
4.- Presione Save. El perfil deberá ser exportado a la dirección
especificada.
Fig 18
ESPAÑOL-17
1.- Presione Scan en la barra de Administración de Perfiles, las
redes Ad Hoc y access point disponibles aparecerán en una
ventana (Fig. 19).
2.- Presione Refresh para actualizar la lista cada cierto tiempo.
3.- Seleccione una red y presione Activate para conectarse a
esa red. Si no existe una configuración de perfil para esa red,
se abrirá la opción de General. Introduzca un nombre de Perfil y
presione OK para crear una configuración de perfil para esa red.
Fig 19
ADMINISTRACIÓN DE AUTO SELECCIÓN DE
PERFILES
Esta función permite seleccionar al adaptador inalámbrico un
perfil de la lista de Perfiles y utilizarlo para conectarse a la red.
Para agregar un nuevo perfil dentro de esta lista, siga estos
pasos:
1.- En la barra de Administración, presione Order Profiles...
2.- El administrador de auto selección de perfiles se muestra en
pantalla, con una lista de todos los perfiles creados en la opción
de Perfiles Disponibles.
3.- Seleccione los perfiles que desee agregar a la selección de
perfiles automáticos, y presione Add. The perfil aparecerá en la
opción de Perfiles Auto Seleccionados.
4.- Seleccione un perfil de esta lista.
5.- Presione Move Up o Move Down como sea necesario.
El primer perfil de la lista tiene una prioridad alta, y el último
tendrá una prioridad baja.
ESPAÑOL-18
ESPAÑOL
BÚSQUEDA DE REDES DISPONIBLES
Fig 20
Cuando la selección de perfil automático está activado
por la opción de Auto Selección de Perfiles en la barra el
Administración de Perfiles, el adaptador cliente buscará
por todas las redes disponibles. El perfil con la prioridad
más alta y el SSID encontrados serán los utilizados para
conectarse a la red. Si la conexión falla, el cliente adaptador
intentará el siguiente perfil en prioridad que coincida con el
SSID hasta que encuentre una red disponible.
DIAGNÓSTICOS
La barra de Diagnósticos provee botones que son utilizados
para recibir y enviar estadísticas. Esta barra no requiere de
ninguna configuración.
Le muestra la siguiente información enviada o transmitida por el
transmisor inalámbrico:
•
•
Frames multicast enviados y recibidos
Frames broadcast enviados y recibidos
ESPAÑOL-19
ESPAÑOL
6.- Presione OK.
7.- Revise la opción de Perfile Auto Seleccionados en la barra
de Administración de Perfiles.
Frames unicast enviados y recibidos
Número total de bytes enviados y recibidos
Fig 21
REVISAR INFORMACIÓN DEL DRIVER
Esta opción contiene información general acerca de la interfase
de la tarjeta de red (adaptador inalámbrico) y especificaciones
de interfase del driver de la red (NDIS). Acceda a la información
del adaptador desde la barra de Diagnóstico.
Fig 22
Nombre de tarjeta – Muestra el nombre del adaptador
inalámbrico
ESPAÑOL-20
ESPAÑOL
•
•
Driver – Muestra el nombre y la localización del driver
Versión del driver
Fecha del driver – Muestra la fecha de creación del
driver
Nombre del cliente
INFORMACIÓN ESTADÍSTICA DE RECEPCIÓN Y
ENVÍO
La opción de Estadística Avanzada muestra información
estadística de los frames recibidos o enviados por el adaptador
inalámbrico.
Fig 23
ESPAÑOL-21
ESPAÑOL
MAC address – Despliega la MAC address del
adaptador inalámbrico
Interfase:
Estándares:
OS:
USB 2.0
IEEE802.11b; IEEE802.11g
98Se, Me, 2000, XP
Transmisión
Distancia:
interiores hasta 100m, exteriores hasta
300m (distancia de transmisión
estándar, pero está limitado al
ambiente)
Interiores hasta 200m, exteriores hasta
830m (adoptando la tecnología de
rango extendido WLAN, pero está
limitado al ambiente)
Transferencia de datos: 108/54/48/36/24/18/12/9/6Mbps o
11/5.5/3/2/1Mbps Mbps
Modulación:
1M DBPSK; 2M DQPSK; 5.5M, 11M
CCK; 6M, 9M, 12M, 18M, 24M, 36M,
48M, 54M, 108M OFDM
Protocolo de acceso
Multimedia:
CSMA/CA con ACK
Potencia de
transmisión:
18dBm (Típico)
Seguridad de datos:
WPA/WPA2; 64/128/152 BIT WEP;
TKIP/AES
Frecuencia:
2.4 ~ 2.4835GHz
Seguridad de datos:
WPA/WPA2; 64/128/152 BIT WEP;
TKIP/AES
Dispersión de espectro: DSSS
Consumo de energía: 480mA en Transmisión Completa (TX),
420mA en recepción completa (RX)
Ambiente físico
Temp. de operación:
Temp. de almacenaje:
Humedad:
Dimensiones:
Peso:
0°~40°
-40° – 70°
10% - 95% RH, No condensada
100x30x12mm
23g
El diseño del producto y las especificaciones pueden
cambiar sin previo aviso.
ESPAÑOL-22
ESPAÑOL
ESPECIFICACIONES
Product: Wireless USB adapter
Part number: COM-878
Brand: Steren
WARRANTY
This Steren product is warranted under normal usage against defects in workmanship and materials
to the original purchaser for one year from the date of purchase.
CONDITIONS
1.- This warranty card with all the required information, invoice or purchase ticket, product box or
package, and product, must be presented when warranty service is required.
2.- If the product stills on the warranty time, the company will repair it free of charge.
3.- The repairing time will not exceed 30 natural days, from the day the claim was received.
4.- Steren sell parts, components, consumables and accesories to costumer, as well as warranty
service, at any of the addresses mentioned later.
THIS WARRANTY IS VOID IN THE NEXT CASES:
If the product has been damaged by an accident, acts of God, mishandling, leaky batteries, failure
to follow enclosed instructions, improper repair by unauthorized personnel, improper safe keeping,
among others.
a) The consumer can also claim the warranty service in the purchase establishment.
b) If you lose the warranty card, we can reissue it, if you show the invoice or purchase ticket.
RETAILER INFORMATION
Name of the retailer
Address
Product
Brand
Part number
Serial number
Date of delivery
In case your product fails or have any doubt, please contact your nearest retailer. If you are in
Mexico, please give a call to our Call Center.
Call Center
Mexico City: 53 54 22 90
Province: 01 800 500 9000
Producto: Tarjeta de Red inalámbrica USB
Modelo: COM-878
Marca: Steren
PÓLIZA DE GARANTÍA
Esta póliza garantiza el producto por el término de un año en todas sus partes y mano de obra,
contra cualquier defecto de fabricación y funcionamiento, a partir de la fecha de entrega.
CONDICIONES
1.- Para hacer efectiva la garantía, presente ésta póliza y el producto, en donde fue adquirido o en
Electrónica Steren S.A. de C.V.
2.- Electrónica Steren S.A de C.V. se compromete a reparar el producto en caso de estar defectuoso
sin ningún cargo al consumidor. Los gastos de transportación serán cubiertos por el proveedor.
3.- El tiempo de reparación en ningún caso será mayor a 30 días, contados a partir de la recepción
del producto en cualquiera de los sitios donde pueda hacerse efectiva la garantía.
4.- El lugar donde puede adquirir partes, componentes, consumibles y accesorios, así como hacer
válida esta garantía es en cualquiera de las direcciones mencionadas posteriormente.
ESTA PÓLIZA NO SE HARA EFECTIVA EN LOS SIGUIENTES CASOS:
1.- Cuando el producto ha sido utilizado en condiciones distintas a las normales.
2.- Cuando el producto no ha sido operado de acuerdo con el instructivo de uso.
3.- Cuando el producto ha sido alterado o reparado por personal no autorizado por Electrónica
Steren S.A. de C.V.
El consumidor podrá solicitar que se haga efectiva la garantía ante la propia casa comercial donde
adquirió el producto. Si la presente garantía se extraviara, el consumidor puede recurrir a su
proveedor para que le expida otra póliza de garantía, previa presentación de la nota de compra o
factura respectiva.
DATOS DEL DISTRIBUIDOR
Nombre del Distirbuidor
Domicilio
Producto
Marca
Modelo
Número de serie
Fecha de entrega
En caso de que su producto
presente alguna falla, acuda
al centro de distribución más
cercano a su domicilio y en caso
de tener alguna duda o pregunta
por favor llame a nuestro Centro
de Atención a Clientes, en
donde con gusto le atenderemos
en todo lo relacionado con su
producto Steren.
Centro de Atención a Clientes
Ciudad de México:
53 54 22 90
Interior de la República:
01 800 500 9000
ELECTRONICA STEREN S.A. DE C.V.
Camarones 112, Obrero Popular, 02840, México, D.F. RFC: EST850628-K51
STEREN PRODUCTO EMPACADO S.A. DE C.V.
Biólogo MaximIno Martínez No. 3408 Int. 3 y 4, San Salvador Xochimanca, México, D.F. 02870,
RFC: SPE941215H43
ELECTRONICA STEREN DEL CENTRO, S.A. DE C.V.
Rep. del Salvador 20 A y B, Centro, 06000, México. D.F. RFC: ESC9610259N4
ELECTRONICA STEREN DE GUADALAJARA, S.A.
López Cotilla No. 51, Centro, 44100, Guadalajara, Jal. RFC: ESG810511HT6
ELECTRONICA STEREN DE MONTERREY, S.A.
Colón 130 Pte., Centro, 64000, Monterrey, N.L. RFC: ESM830202MF8
ELECTRONICA STEREN DE TIJUANA, S.A
Calle 2a, Juárez 7636, Centro, 22000, Tijuana, B.C.N. RFC: EST980909NU5