1
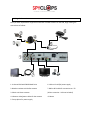
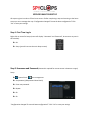
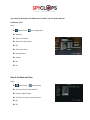
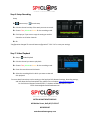
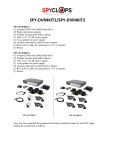
SPY-DVR4KIT1 / SPY-DVR4KIT2 Quick Setup Guide The SPY-DVR4KIT1 / SPY-DVR4KIT2 are a complete home surveillance kit that has everything needed for a simple plug-n-play operation. Below is the list of components that come in the kits: SPY-DVR4KIT1 (1) 4 channel DVR with 500GB Hard Drive (2) Plastic mini dome cameras (2) Weather resistant mini bullet cameras (1) 120v to 12v AC/DC power supply (1) 5 way splitter for power supply (4) 18 meter video/power cables for the cameras (1) BNC to RCA cable for connection to a TV or monitor (1) Mouse SPY-DVR4KIT2 (1) 4 channel DVR with 500GB Hard Drive (4) Weather resistant mini bullet cameras (1) 120v to 12v AC/DC power supply (1) 5 way splitter for power supply (4) 18 meter video/power cables for the cameras (1) BNC to RCA cable for connection to a TV or monitor (1) Mouse Making the Connections Once you have unpacked the equipment and found a suitable location for the DVR, begin making the connections as follows: TV MONITOR 1. 4 channel DVR with 500GB Hard Drive 6. 120v to 12v AC/DC power supply 2. Weather resistant mini bullet cameras 7. BNC to RCA cable for connection to a TV 3. Plastic mini dome cameras (VGA to a monitor—VGA not included) 4. 18 meter video/power cables for the cameras 8. Mouse 5. 5-way splitter for power supply SPYCLOPS BASIC DVR SETUP All steps are given in order as if from home screen. If after completing a step and returning to the home screen you see a message that says “Configuration changed! To save the latest configuration?” Click “Yes” to save your settings. Step 1: First Time Log In Right click on mouse for Setup (screen will display “Username” and “Password”, do not enter any text in this window). OK. Setup (you will now see the main Setup screen). Step 2: Username and Password (Password is required for remote access in browsers or apps) Setup System Tools -- User management Set password, (Old password leave blank). Enter new password. Repeat. Ok. Ok. “Configuration changed! To save the latest configuration?” Click “Yes” to save your settings. If you want the Username to be different than “admin” you will need to add user. To add new “User” Setup System Tools-- User management Add User. Type in User Name. Select User Access Level. OK. Select new “User”. New Password. Repeat. Ok. Ok. Step 3: Set Date and Time Setup System setup – General setup Select the correct Date and time. Click the ‘Apply’ button. Click ‘Yes’ to ‘Are you sure to continue’. Ok. Ok. Step 4: Basic Network Setup To generate the Esee ID the DVR must be connected to the network through an Ethernet cable. Setup System setup – Network setup. Check the DHCP box to dynamically assign an IP through the router and click the Esee box to populate the Esee ID. Ok. It may take up to 10 minutes for the Esee number to populate. “Configuration changed! To save the latest configuration?” Click “Yes” to save your settings. Step 5: Access the DVR from a browser connected to the same network Setup System setup – Network setup -- make note of your DVR IP address and Esee number. In a web browser in the same network, enter the IP address you just took note of from the DVR. Accept the pop up and install Active X controls. Enter the username and password for the DVR in the log in screen and select the log in button. Step 6: Setup Recording Setup System setup – Record setup Pick the channel and day of the week you want to record. Choose Time, Motion or Sensor for the recording mode. Click Copy to if you want to copy the setting to another channel or to all other channels. Ok. “Configuration changed! To save the latest configuration?” Click “Yes” to save your settings. Step 7: Video Playback Setup – Video Playback Pick the channel you want to play back. Choose Time, Motion or Sensor for the recording mode. Enter the record time and hit Search. Select the recording block in which you want to view and click playback. For more detail instructions such as setting up the Spyclops DVR, Network settings, Recording settings, and info about the free Smartphone app, please visit our website: www.spyclopsusa.com For live Technical Support assistance M-F / 9-6 please call 866.839.9187 Ext 2393 Email: [email protected] METRA HOME THEATER GROUP 460 Walker Street, Holly Hill, FL 32117 866.839.9187 metrahometheatergroup.com