1
S ON&"_
3-856-609-11
(1)
Color Rear Video
Projector
Operating
Manual
Instructions_
de instrucciones_
KP-46V35
KP-53 V35
KP-61V35
© 1996 by Sony Corporation
I:1_1
Note on Closed Caption
(Caption
Vision)
This television receiver provides display of television clo>ed
captioning in accordance with §15.119 of the FCC rules.
Note on CATV system
installer
This reminder is provided to call the CATV system installer',,,
attention to Article 820-40 of the NEC that provides
guidelines for proper grounding
and, m particular, specifies
that the cable ground shall be connected to the grounding
system of the building, as close to the point of cable entry as
practical.
To prevent
expose
the
fire or shock hazard,
do
unit to rain or moisture.
[l tljl
not
[o l
Use of this television receiver for other than private viewing
of programs broadcast on UHF or VHF or transmitted by
cable companies for the use of the general public may require
authorization
from the broadcaster,
cable company and/or
program owner.
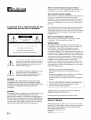
Note on convergence adjustment
Before you use your projectmn TV, make sure to adjust
convergence. For the procedure, see page 15.
RIb)x Wk ELLG I HIC bHOCK
DO NOT OPEN
NOTIFICATION
LAUIILJN
ILJIILDUoI
DO
NO
REFER
NOT
lilt
REMOVE
tll__Ku_
COVER
USER-SERVICEABLE
SERVICING
TO
I hl_ >) nJbol
QUALiFiED
LLLL,
{OR
BACK)
PARTS
SERVICE
l> intended
JHIL_b_(JOI_
INSIDE
PERSONNEL
to akq t the_ u>c_
t,, the
presence of umnsulated "dangerous voltage"
within the product's enclosure that may be of
sufficient magmtude to constitute a risk of
electric shock to persons.
ThB symbol is intended to alert the user to the
presence of important operating and
maintenance
(servicing) instructions
in the
literature accompanying
the appliance.
Tins equipment
has been tested and found to comply with
the limits for a Class B digital device pursuant to Part 15 of
the FCC Rules. These limits are designed to provide
reasonable protection against harmful interference in a
residential installation.
This equipment
generates, uses, and
can radiate radio frequency energy and, if not installed and
used in accordance with the instructions, may cause harmful
interference with radio communications.
Howe\,er, there is
no guarantee that interference will not occur in a particular
installation.
If this equipment
does cause harmful
interference to radio or television reception, which can be
determined
by turning the equipment
off and on, the user is
encouraged
to try to correct the interference by one or more
of the following measures:
- Reorient
or relocate
- Increase
receiver.
the separation
between
antennas
the equipment
and
- Connect
the equipment
into an outlet on a circuit
from that to which the receiver
is connected.
- Consult
CAUTION
TO PREVENT ELECTRIC SHOCK, DO NOT USE THIS
POLARIZED AC PLUG WITH AN EXTENSION CORD,
RECEPTACLE OR OTHER OUTLET UNLESS THE BLADES
CAN BE FULLY INSERTED TO PREVENT BLADE
the receiving
the dealer
or an experienced
radio/TV
different
technioan
for help.
You are cautioned that any changes or modifications
expressly approved in this manual could void your
authority to operate this equipment.
not
EXPOSURE.
CAUTION
When using TV games, computers, and similar products with
your projection TV, keep the brightness and contrast
functions at low settings. If a fixed (non-moving)
pattern is
left on the screen for long periods of time at a high brightness
or contrast setting, the image can be permanently
imprinted
onto the screen. These types of imprints are not covered by
your warranty because they are the result of misuse.
2-EN
This document is for the remote commander.
MODELS: KP-46V35/53V35/61V35.
Please keep this notice with the instruction
Owner's
RM-Y137
manual.
Record
The model and serial numbm_ are located at the _ear ot the
projection TV. Record these numbers in the spaces provided
below. Refer to them whenever you call upon your Sony
dealer regarding this product.
Model No..
Serial No
4
Welcome!
4
Precautions
Getting
Started
5 Step 1: Installing
the projection
TV
6 Step 2: Connections
14 Step 3: Setting up the remote commander
15 Step 4: Setting up the projection TV automatically
(AUTO
SET
UP)
Operations
20 Watching TV programs
22 Watching two programs at one time - I'IP
23 Selecting picture and sound effects (PROGRAM
PALETTE)
24
25
26
26
27
28
Adjusting the picture (VIDEO)
Adjusting the color temperature
(TRINITONE)
Reducing picture noise (NR)
Adjusting sound (AUDIO)
Listening to surround sound (SURROUND)
Listening to orchestra seat effect sound - OSE
[tI
28 Selecting stereo or bilingual programs (MTS)
29 Setting the speaker switch (SPEAKER)
29 Setting subwoofer sound
30 Setting audio out (AUDIOOUT)
30 Setting daylight saving time (DAYLIGHTSAVING)
31 Setting the clock (CURRENTTIMESET)
32 Setting the timer to turn the projection TV on and
off (ON/OFF TIMER)
33
34
35
36
37
39
Blocking out a channel (CHANNELBLOCK)
Customizing
the channel names (CHCAPTION)
Setting video labels (VIDEOLABEL)
Displaying Caption Vision (CAPTIONVISION)
Operating video equipment
Operating a cable box or DBS receiver
Additional
Information
40
Troubleshooting
41
Specifications
42
Index
The captions
in parentheses
indicate
menu
names.
3-EN
'lhank
).ou tol }_urcha_ing
Projection
enjoy
TV.
Here
with your
projection
• AUTO SET UP feature
your projection
button
ti_u buny
are some
_olor
you
will
that allows you to set up
the SET UP
that let you set the picture quality,
settings
that allows you to watch another
or cable image as a window
picture
• On/off timer that allows you to make the TV
program of your choice be displayed on the screen
for a specified duration
• Dynamic Focus circuitry that automatically
focuses
the scanning electron beam for enhanced sharpness,
especially at the corners
• Universal remote commander
supplied that allows
you to operate Sony and other manufacturers'
video
equipment
• S-Link TM that allows you to automatically
change
the projection TV's input mode, turn on the VCR,
and play a tape by just pressing the VCR's play
button. This feature is originally designed by Sony.
About
this manual
The instructions in this manual
are for models KP-
46V35, KP-53V35 and KP-61V35. Before you start
reading this manual, please check your model number,
located at the rear of the projection TV. Model KP46V35 is used for illustration purposes in this manual.
There are no differences between these models in
operation.
The differences
indicated in the text.
in specifications
Safety
• Operate the projection TV only on 120 V AC.
• One blade of the plug is wider than the other for safety
purposes and will fit into the power outlet only one way.
If you are unable to insert the plug fully into the outlet,
contact your dealer.
• Should any liquid or solid object fall into the cabinet,
unplug the projection TV and have it checked by
qualified personnel before operating it further.
• Unplug the projection TV from the wall outlet if you are
not going to use it for several days or more. To
disconnect the cord, pull it out by the plug. Never pull
the cord itself.
For details concerning
lea flet "IMPORTANT
the projection TV if they have the same name as those
on the remote commander.
safety precautions,
SAFEGUARDS."
see the supplied
Note on cleaning
Clean the cabinet of the projection TV with a dry soft cloth.
To remove dust from the screen, wipe it gently with a soft
cloth using vertical strokes only. Stubborn stains may be
removed with a cloth slightly dampened
with a solution of
mild soap and warm water. Never use strong solvents such
as thinner or benzine for cleaning.
If the picture becomes dark after using the projection TV for a
long period of time, it may be necessary to clean the inside of
the projection TV. Consult qualified service personnel.
Installing
• To prevent internal heat build-up, do not block the
ventilation
openings.
• Do not install the projection TV in a hot or humid place,
or in a place subject to excessive dust or mechanical
vibration.
•
are
Instructions in this manual are based on use of the
remote commander.
You can also use the controls on
4-EN
I his projechun 1V opel atc_ _)11 L'xtlcnlcly
high \ oltagc. 1 o
prevent fire or electric shock, please follow the precautions
below.
TV:
TV easily by pressing
• On screen menus
sound, and other
• Picture-in-Picture
TV channel, video
Rear Video
of the features
•
Avoid operating the projection TV at temperatures
below
5°C (41°F).
If the projection TV is transported
directly from a cold to
a warm location, or if the room temperature
has changed
suddenly,
the picture may be blurred or show poor color.
This is because moisture has condensed on the mirror or
lenses inside. If this happens, let the moisture evaporate
before using the projection TV.
• To obtain the best picture, do not expose the screen to
direct illumination
or direct sunlight.
It is recommended
to use spot lighting directed down from the ceiling or to
cover the windows that face the screen with opaque
drapery.
It is desirable to install the projection TV in a
room where the floor and walls are not of reflecting
material. If necessary, cover them with dark carpeting or
wall paper.
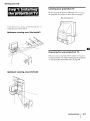
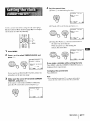
Getting
Started
Carrying
Be sure
your
to grasp
the projection
projection
the portions
TV, and
TV
indicated
to use more
(Rear of projection
For the best pictme quality, install the projection
within the areas shown below.
Optimum
viewing
area
for
TV automatically
_.';'_o_.
your
you use your
For the procedure,
area
two
people.
TV)
(Horizontal)
Before
viewing
than
carrying
'IV
Preparing
Optimum
when
projection
projection
see "Step
(AUTO
TV
TV, adjust
4: Setting
SET UP)"
convergence.
up the projection
on page
15.
(Vertical)
7_
Getting
Started
5-EN
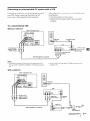
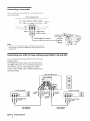
Connecting
an antenna/cable
system
without
a VCR
To cable
TV
or antenna
(Rear of projection
VHF/UHF
Cable
TV)
To cable box
Although
you can use either an indoor ,lntenna
outdoor anterma with your projection TV, we
recommend connecting to an outdoor antenna
cable TV system for improved picture quality.
If your
or
cable
company
requires
box, make the connection
you
to connect
a cable
as follows:
(Rear of projection
VHF/UHF
or a
TV)
Cable
To an antenna
Connect your antenna cable to tile Vt IF/UHF antenna
terminal. If you cannot connect your antenna cable
directly to the terminal, follow one of the instructions
below depending
on your cable type.
A
Cable box
To cable
box
and cable
(Rear of projection
AUX
(Rear of projection TV)
VHF/UHF
• VHF only
75-ohm
or
coaxial
cable
Cable box
• VHF/UHF
or
• Cable
B
• VHF only
or
• UHF only
or
• VHF/UHF
C
300-ohm
Antenna
7S-ohm
• VHF
twin
TV)
lead cable
TO
CONVERTER
75-ohm coaxial
(not supplied)
(Rear of projection TV)
VHF/UHF
cable
CATV cable
VHF/UHF
clnnecto_
coaxial
l'ay cable TV systems use scrambled or encoded signals
requiring the cable box* in addition to the normal cable
connection.
cable
____
f-I
(Rear of projection
TV)
* The cable box will be supplied
by the cable
company.
Note
and
__HF
EAC-66
• UHF
--]_
300-ohm
_
twin
U/V mixer
(not supplied)
• You cannot watch
window picture.
the signal
through
AUX connector
as a
To cable and antenna
lead cable
(Rear of projection
AUX
TV)
CATV cable
Notes
• Most VHF/UHF combination antennas have a signal splitter.
Remove the splitter before attaching the appropriate connector.
• If you use the U/V mixer, snow and noise may appear in the
picture when viewing cable TV channels over 37.
TO
CONVERTER
Antenna
cable
VHF/UHF
Note
• Do not connect
this case.
6-EN
Getting
Started
anything
to the TO CONVERTER
connector
in
Connecting
an
antenna/cable
For details on connection,
see the instruction
your VCR. Before connecting,
power cords of the equipment
To a conventional
Without
a cable
TV system
manual
with
of
a VCR
After making these connections, you will be able to do
the following:
• View the playback of video tapes
• Record one TV program while viewing another
program
disconnect the AC
to be connected.
VCR
box
(Rear of projection
I,=0,'%
TV)
°°'
Aux
@
0
TO
CONVERTEP
VHF/UHF
VHF/UHF
VHF/LIHF
output
VCR
AUDIO VIDEO
AUDIO L (white)
AUDIO R (red)
Antenna
_u_m
_
VHF/UHF
cable
input
Video and audio
outputs
VMC-810S/820S
(not supplied)
I
Notes
• To connect a monaural VCR, connect the audio output of the
VCR to AUDIO L (MONO) of VIDEO 1/3 IN on the projection
TV.
• Do not connect
projection
the cable to the S VIDEO
connector
on the
TV.
With a cable box
(Rear of projection
+_
TV)
out
AUX
D
0
t_
$_0
I
_v,_os
,l_os _ITO. ¸
TO
_ONVER_ER
i+++++
VHF_Hr
VHF/UHF
e
+ __ ,+,+++
VCR
I +0,0++
AUDIO
R (red)
AUDIO
L (white)
VIDEO
(yellow)
OUTer
u
Video
and
audio outputs
_
VHF/UHF
_
input
Cable box
i
VMC-810S/820S
|
=
_
te
_
Cab
(not supplied)
_
I
pPld'ttterp pile d )
Getting
Started
I
7EN
To an S video
equipped
VCR
If your VCR has an S video output jack, make d_e
connection as follows.
Whenever
you connect
the cable to the S VIDEO
connector, the projection
video signals.
Without
TV automatically
receives b
a cable box
(Rear of projection
TV)
V_o_LNI_o: vt_O_ OUT
VHI-/UII/
vll|/Utn
gg___
,_
Ou Lpu_.
D
VHF/UHF
AUDIO L (white)
AUDIO R (red)
outputs
S VIDEO
RK-74A
(not supplied)
_Audio
t
input
output
_
Svideo
t
YC-15V/30V
(not supplied)
Note
• Video
signals
signals.
preventing
compared
are composed
The S connection
of Y (luminance)
sends
and C (chroma)
the two signals
degradation,
and gives better
to conventional
connection.
separately
picture
quality
With a cable box
(Rear of projection
TV)
R
Aux
0
0
TO
CONVERTeF
VHF/UHF
VHF/UHF
___
_ZD
VCR
i
AUDIO R (red)
AUDIO L (white)
S VIDEO
RK-74A
outputs
output
(not supplied)
I
t
YC-15V/30V
(not
supplied)
_
Cable
box
Splitter
(not supplied)
8-EN
Getting
Started
Connecting
For connection
a DBS
details,
the DBS (Digital
To a projection
receiver
see the instruction
Broadcasting
Satellites)
manual
of
receiver.
TV
(Rear of projection
(.able
TV)
or cable box
/
i_
o3 out
vl_o I vmEo_lVl_
=o_T0_l,_
®
Antenna
To
_ONVERTER
@
VHF/
I
Satellite
WF_HF
antenna
input
DBS receiver
VHF/UHF
AUDIO VIDEO SVIDEO F_
AUDIO-L
1
IN I
I_l°UTI
(white)
AUDIO-R
(red)
VIDEO
(yellow)
VMC-810S/820S
(not supplied)
1
Note
• You can use the S VIDEO
the video connection.
To a projection
jack or tile composite
TV and
video jack for
VCR
Antenna
Satellite/_
antenna
input
DBS
_]
receiver
VHF/UHF
AUDIO
(Rear of projectionTV)
IN
VIDEO
S VIDEO
m
our
Aux
@
TO
:ONWRrER
-0
0
@@
v.,,_.r
VHF/UHF
VCR
¢
AUDIO-L
VHF/UHF
__o
[_
L,N OUT
(white)
i
AUDIO-R
(red)
VIDEO
(yellow)
I
II
VHF/UHF
IN
. _Ill>--'--
To
Cable or
cable box
i
F-type cable
(not supplied)
VMC-810S/820S
(not supplied)
L
Getting
Started
9-EN
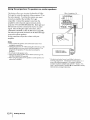
Connecting
a camcorder
Ihis
is convenient
connection
fox" watching
the picture
from a camcorder.
(Front
SET UP
TV/VIDEO
-
of projection
VOLUME
o Oc
+
- CHANNEL
II
pl
IV)
+
OPOWER
90
°2SS'"°°'
_ )
VIDEO
_l
_--_AUDIO
-_-AUDIO
R (white)
L
(red)
to audio and
video outputs
VMC-810S/820S
(not supplied)
Note
• To connect a monaural
camcorder,
connect the audio output of
the camcorder
to AUDIO L (MONO) of VIDEO 2 INPUT on the
projection
TV.
Connecting
two
VCRs
for
tape
editing
using
VIDEO
3 IN and
OUT
You can watch input images different from the image
being recorded.
The VIDEO 3 OUT jacks output only the signal from
the VIDEO 3 IN jacks. If you make the connection as
shown below, you can watch images from either
antenna, cable, VIDEO 1 IN or VIDEO 2 INPUT jacks
during recording.
(Rear of projection
m
TV)
m
OUT
Au×
O
®
TO
CONVERTEF
VHF/UHF
0
m
VCR (for playback)
AUDIO VIDEO
VCR (for recording)
OUT[_]
LINE
OUT
IN L_
to video
input
_X_
_
inputs
_
to audio_
to audio "
outputs
l
output
o video
__/NE
==
OUT[OIN
i
•
outputs
inputs
to audio/video
to audio/video
i
VMC-810S/820S
(not supplied)
10"EN I Getting Started
VMC-810S/820S
(not supplied)
Connecting
two
VCRs
for
tape
editing
using
MONITOR
OUT
You can record input images displayed on the screen.
This type of connection should be used only when you
connect from the line input of one VCR, and from the
line output of a second VCR.
(Rear of projection IV)
I.......
I=0,
Aux
O
0
to
:x)wve_rim
S
¢
0
J
VCR (for
playback)
=
VCR (for recording)
to video h
I t° aud'°
I
AUDIO
VIDEO
_
OUT_
input
t
A
h
I oo,ov,o o ooq
ht°vide°
to audi
=
=
=
outputs
o audio/video
inputs
to audio/video
inputs
_
outputs
VMC-810S/820S
(not supplied)
VMC-810S/820S
(not supplied)
Notes
• Do not change the input signal
MONITOR
OUT, or the output
• You call use the S VIDEO
while editing
through
signal will also change.
playback
jack to connect
• When connecting
a single VCR to the projection
TV, do not
connect MONITOR
OUT to the VCR's line input, while at the
same time connecting
from the projection
TV's VIDEO IN jacks
to the VCR's
and either
conector
S VIDEO
to connect
connector
a VCR for
or composite
video
a VCR for recording.
line output.
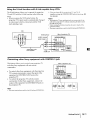
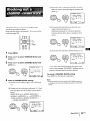
Connecting
an audio
When connecting
more information.
system
audio equipment,
see page 29 for
(Rear of projection TV)
Aux
O
1to
co.ve.,E. AUDIO OU'f L (white)
RK-74A (not supplied)
_
y
___
Note
• You can adjust the bass, treble and balance, or select
an MTS (Multichannel
TV Sound) or OSE (Orchestra
Effect) mode
with the supplied
remote
AUDIO
I
OUT
R (red)
1
Set
Afunction
the
amplifier's
to line
input.
Stereo amplifier
surround,
Seat
commander.
Getting
Started
11-EN
Using
the
projection
TV speakers
as center
speakers
(Rear of projection
This feature allows you to enjoy the benefits of Dolby
Pro Logic by using the speakers of the projection TV as
the center speaker. To utilize this system, you must
connect an amplifier that is Dolby Pro Logic
compatible.
Connect the speaker wires from the
amplifier's center channel output terminals to the
projection TV's CENTER SPEAKER IN. Both right and
left terminals must be connected to receive an audio
IV)
I v,xo i_,_o: Iv,_o 3 _lTo_
out
@
@
rL
tn
vl01(_
s-tml
S-LJmll
_T_OLS
i R-I_
ol
signal. After making the right connections, select
"SPEAKER: CENTER" in the AUDIO menu (page 29).
The left and right audio channels can be heard through
your audio system speakers.
In this connection, adjust the volume with your
amplifier.
Notes
• Always
match
making
• Unplug
the connections.
the projection
TV when
exposed
plugged
the speaker
cord and terminal
making
colors
when
the connections.
If the
to
speaker cord wires touch while the projection
TV is
in, the projection
TV may short-circuit
and be
damaged.
• Do not pull
on the speaker
Dolby* Pro Logiccompatible
amplifier
cords.
• Always turn off the amplifier
power
CENTER SPEAKER IN terminals.
• When using the projection
subwoofer
is disabled.
I center
before
TV speakers
connecting
as center
I Speaker
I cords
to the
speakers,
the
* Manufactured
under
Licensing Corporation.
more
of the following
license from Dolby Laboratories
Additionally
licensed under
patents:
U.S. numbers
Canadian
numbers
1,004,603 and 1,037,877. "Dolby',
Logic", and the double-D
symbol rid are trademarks
Laboratories
Licensing Corporation.
12-EN
Getting
Started
one oJ
3,959,590.
"Pro
of Dolby
Using
the
S-Link
function
with
S-Link
capable
Sony
VCRs
• You can turn off tile projection 'IV and VCR
together using the SYSTEM OFF button (see page 38
for details).
The S-Link feature allows you to operate the projection
TV and VCR with the S-Link function in the following
ways:
• When you press the VCR's play button, the
projection TV's input mode is automatically
changed
to video input which is connected, and the VCR
starts playing a tape.
Notes
• The projection
TV may malfunction
cable to the projection
TV without
the cable to the VCR.
• When
making
connectors
• The same
the S-Link
firmly.
terminals
if you connect the S-Link
connecting
the other end of
connection,
are used
be sure to insert
for both S-Link
all the
and CONTROL
S.
VCR
AUDIO
VIDEO
VIDEO
_,,_,, [® ® @Is.u,,
(yellow)
(Rear of projection
TV)
CENTER SP£XKER In
J
Audio/video
cable
(not supplied)
Connecting
other
Sony
equipment
This feature allows you to control your projection
and other Sony equipment with one remote
commander.
_WINOM_WIUA
X/I_
with
CONTROL
S jack
TV
(Rear of projection
TV)
....
0
• To control other Sony equipment with the projection
TV's remote commander, connect the input of the
equipment to CONTROL S OUT jack on the
projection TV.
• To control the projection TV with the remote
commander
of other Sony equipment, connect the
output of the equipment to CONTROL S IN jack on
the projection
TV.
Note
• The same terminals are used for both S-Link and CONTROL S.
Getting
Started
13 -EN
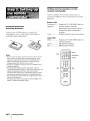
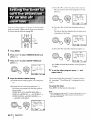
Getting to know buttons
remote commander
Names
of buttons
on the remote
indicated in different
functions.
Button
(light up)
batteries
Insert two size AA (R6) batteries (supplied) by
matching the + and - on the battery to the diagram
inside the battery compartment.
commander
colors to represent
arc
the available
color
Transparent
Inserting
on the
....... Projection
TV/VCR/DBS/Cable
box
function buttons. Press the
appropriate
function button first to
change the remote commander's
function.
Green .................. Buttons relevant
to power operations.
Label color
White
.................. Projection TV/VCR/DBS/Cable
operation buttons.
Yellow ................. PIP operation buttons.
Blue ..................... DBS operation buttons.
"_Green
Blue _
Notes
,-_oTransparent
• Under normal conditions,
If the remote commander
indicators
of the buttons
light up, the batteries
may be worn
out. When
the battery
should
leak, wipe
C:D C_
©
tile
Blue --"
and
o®o
2o2
--Blue
electrolyte
from leaking, remove the batteries when you don't
plan to use the remote commander
for a long period of time.
• Do not handle the remote commander
roughly.
Do not drop it,
step on it or let it get wet.
• Do not place the remote commander
heater,
14-EN
or where
{
Getting
the humidity
Started
is high.
in direct
sunlight,
¢Z9
Q®®
®®®
®®®
types
contaminated
area of the battery compartment
with a cloth
replace the old batteries with new ones. To prevent
the
Ge
_-Yellow
_
replacing
batteries,
replace both of them with new ones.
• Do not mix old batteries
with new ones or mix different
of batteries together.
• If the electrolyte
inside
OG
batteries wilt last up to six months.
does not operate properly
or the
on the remote commander
do not
near a
SONY
box
3
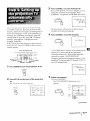
Press CHANNEL+ to start AUTO SET UP.
If you prefer Spanish or French to English, you can
change the on-screen menu language. Press
CHANNEL - for Spanish or VOLUME+ for French.
-- CHANNEL
+
CONTINUE
AUTO
TO
PROGRAM?
YEs:
NO:Ega:t
You can set up your
AUTO
channels,
screen
projection
SET UP feature.
adjusts
menu
manually,
"Setting
by using
and
changes
the on-
To set up the projection
see "Adjusting
convergence"
TV on or off" (page
channels"
(page
19) and
language"
(page
19).
All of the menus will be set to the factory preset
condition in the selected language.
all the receivable
the convergence
language.
cable
TV easily
It presets
TV
(page
4
17),
Press CHANNEL+ to preset channels.
18), "Presetting
"Changing
-- CHANNEL
the menu
+
AUTO
PROGRAM
If the TV is set to a video input, you cannot execute
AUTO SET UP. Press TV/VIDEO
so that a channel
number
appears.
(Front
SEtUp
WNIDEO
of projection
VOLUME
_
CHANNtL
"AUTO PROGRAM" appears on the screen and the
projection TV starts scanning and presetting
channels automatically.
When all the receivable
channels are stored, "AUTO PROGRAM"
TV)
$
OPOWEa
OJI_WS_A_B_
PiP
IV/VIDEO
....
1
Press
......
_
I
VOLUMEI
VOLUME+
POWER
disappears and the following menu appears. If the
projection TV receives cable TV channels, CATV is
set to ON automatically.
1
I
_ ..... POWER
]
CHANNEL+
CHANNEL-
to turn
the
projection
front
of the
TV on.
CONTINUE
TO
CONVERGENCE?
OPOWER
5
2
Press
SET UP on the
projection
Adjust
convergence.
(1) Press
CHANNEL+.
The CONVERGENCE
TV.
The AUTO
SET UP screen
adjustment
appears.
appears.
R \_
SET UP
screen
AUTO
{5;1
AUTO
AJUSTES
RI_GLAGE
UP
AUTO
DEMO:
Press
[CHq
: [CH
]
-
CHANNEL
+
: RED
'r ICH+I
B
qVOL
: [VOL+)
[VOL
[SETUP]to
CONVERGENCE
G _
Ex it
*l
]
B
G
R
E : _//VIDEO]
E x i t : SETUP
R=Red
G=Green
B=Blue
(continued)
Getting
Started
I 15 "EN
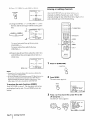
(2) Press
IV/VIDEO
to select
RED or BLUE.
Erasing
CONVERGENCE
TV/VlDEO
t [CH+]
[VOL-]_
or adding
+
After AUTO SET UP you can erase unnecessary
channels or add the channels you want. Preset
channels during the day rather than late at night, when
some channels may not be broadcasting.
-*[VOL+]
,_[CH-]
RED/BLUE
: [TV,'VIDE0
Ex i t :[SEI UP
(3) Using CHANNEL +/- or VOLUME +/-, move
the line until it converges with the center green
line.
B_
CONVERGENCE
G+R _
-- VOLUME
+
-- CHANNEL
C
_
CE) CDC3E_
....
TV (FUNCTION)
O®®e
:RED
0®®®
t[CH+]
C:DOCZ3C:D
4-
[VOL +]
9
$ [CH-]
RED/BLUE
: _'VIDE0
Exit:SETUP
B
G+R
To move horizontal
CHANNEL+/-.
channels
: RED
line up/down,
.®
®W -_0-9
buttons
.--_ENTER
2G2
press
,--MENU
To move vertical line right/left,
VOLUME+/-.
press
......
CH +1-
(4) Repeat
steps (2) and (3) to adjust the other lines
until all three lines converge and are seen as a
white cross.
I CONVERGENCE
_ [CH
I
SONY
: BLUE
+]
1
-F
Press TV (FUNCTION).
--
White
cross "7
I
Exi
FUNCTION-
-
TV
I:[SETUP]
Notes
• If more
menu
than 90 seconds
disappears
elapse
after
you press
a button,
tile
automatically.
• In case of using the AUX connector,
press TV (black button)
the remote commander
first and make sure thdt "AUX" is
displayed
follow
beside
steps
the channel
2 to 5 above
number
to perform
on the screen.
AUTO
on
2
Then
SET UP.
MENU
To preview the main functions (DEMO)
Press VOLUME- in step 3. Tile functions and menus
are displayed
button.
Press MENU.
The main menu appears.
• L_I V I DEC
[_AUD
IO
C_)PROGRAM
_T IMER/CH
SET UP
_]CAPT
ION
one by one. To exit DEMO, press any
Use
3
#
PALETTE
BLOCK
I
V IS ION
[_
Exit
_l
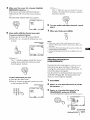
Press t or € to move the cursor (I_) to SET
UP and press _:p.
The SET UP menu appears.
_SET
UP
I_CHANNEL
Started
/ADD
,
I
V I DEO LABEL
CABLE :
ON
AUTO
PROGRAM
LANGUAGE
: ENGL I BH
CONVERGENCE
[
I
|
I
|
J
DMENU
l
lu,e ; _
16"EN I Getting
ERASE
I
I
I
|
|
Exit _1
4
(3) Press _.
Make sure the cursor (1_) is beside CHANNEL
ERASEIADD and press _.
If the cursor is not beside CHANNEL ERASE/
The "+" indication appears beside the channel
number, showing that the channel is added to
the preset memory.
ADD, press tt or • to move the cursor and press
C[).
The CHANNEL
ERASE/ADD
menu appears.
,ERASE
ADD
6
_:]CHANNEL
DMENU
Use
5
Erase andlor
To erase
ERASE/ADD
€ _
Exit
_1
7
and/or
When you finish,
add the channel you want:
an unwanted
add
other
channels,
repeat
press MENU.
MENU
channel
(1) Make sure the cursor (1_) is beside ERASE.
(2) Press CH + or - to select the channel you want
to erase.
Selected
CH
To erase
step 5.
[
I EICHANNEL.
channel
number
ERASE/ADI_$.jl
Notes
• If you erase or add a VHF or UHF channel, the cable TV
channel with the same number
is also erased or added, and
vice versa.
• If more than 90 seconds elapse after you press
menu disappears
automatically.
• Erasing and adding channels
are also available
a button,
the
for the AUX
input.
Isl'°c'_°
°hln?;'_1
(3) Press CE).
The "-" indication appears beside the channel
number, showing that the channel is erased
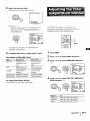
from the preset memory.
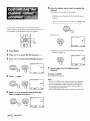
Adjusting
convergence
(CONVERGENCE)
The projection tube image appears oll the screen in
three layers (red, green and blue). If they do not
converge, the color is poor and the picture blurs. To
correct this, adjust convergence.
You do not have to do this procedure if you execute
AUTO SET UP (page 15). Do this procedure only
when you want to adjust it manually.
To add a channel that you want
(1) Press tt or 4 to select ADD.
(2) Press 0 - 9 button to select the channel
to add, and press ENTER.
you want
Selected
channel
number
1
Press MENU.
2
Press t or • to move the cursor (1_) to SET
UP and press _.
/
®®®
®®®
®
I _CHANNEL
ERASE/AD(I_I
3
Press _ or • to move the cursor (1_) to
CONVERGENCE and press RETURN.
The
CONVERGENCE
adjustment
screen
appears.
G"
R
/
R=Red
G=Green
B=Blue
Getting
Started
(continued)
/
17
"EN
4
Press t or • to move
the
cursor
symbol
line
you want
showing
the
(1_) to the
Setting
to
adjust, and press _C_.
5
RED:
RED:
BLUE:
BLUE:
TV on
or off
If you have connected the projection TV to a cable TV
system, set CABLE to ON, the factory setting. If not, set
CABLE to OFF.
You do not have to do this procedure if you execute
AUTO SET UP (page 15). Do this procedure only
when you want to set it manually.
"_
Use_:ICONVERGENCE
_MENU-BLuEIBLUE
€ __111
Exit
I
-I
--
cable
Red vertical line (left/right
adjustment)
Red horizontal line (up/down
adjustment)
Blue vertical line (left/right
adjustment)
Blue horizontal line (up/down
adjustment)
1
Press MENU.
2
Press • or • to move the cursor (I_) to SET
UP and press _.
Press • or • to move the line until it
converges
press C_.
with
the center green
Press • or • to move the cursor (1_) to
CABLE and press 3.
line, and
_JSET
UP
CHANNEL
" DONVERGENCE
B_se
€
_
Exit
1
@(_
_
I
ERASE/ADD
I
VIDEO
LABEL
CABLE:
ON
AUTO PROGRAM
LANGUAGE:ENGLISH
CONVERGENCE
OH
CAPTION
I
I
I
I
II
_MENU
Use
_L_
€
I
_
Exit
_Jl
G+R
4
To move up/right,
press t.
To move down/left,
press _.
6
Repeat steps 4 and 5 to adjust the other
lines until all three lines converge and are
seen as a white cross.
Press • or • to select ON or OFF and press
-_JSET
UP
CHANNEL
ERASE/ADD
CH CAPTION
VIDEO
LABEL
I
I
,CABLE:
I
Press MENU to return
to the original
screen.
I
AUTO PROGRAM
LANGUAGE:ENGLISH
CONVERGENCE
I
I
I
_MENU
Use
7
I
OFF
5
€
I
_
Press MENU to return to the original
Exit
_1
screen.
Note
• If CABLE appears
in black, tile projection
TV is set to a video
input and you cannot select CABLE. Press TV (black) so that a
channel number
appears.
18 -EN
Getting
Started
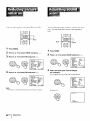
Presetting
channels
Changing
You can preset TV channels
PROGRAM
feature.
You do not have
AUTO
when
15).
if you execute
Do this procedure
only
to set it manually.
1
Press MENU.
2
Press
• or • to move
UP and press
the
cursor
(,)
to SET
Press MENU.
2
Press
language
tl, or • to move
UP and
I
3
UP
ERASE/ADD
CH CAPTION
VIDEO
LABEL
CABLE:
ON
AUTO
PROGRAM
LANGUAGE:ENGLISH
CONVERGENCE
press
the
cursor
_.
Press • or • to move the cursor (1_) to
LANGUAGE
and press _z.
{:_SET
UP
CHANNEL
ERASE/ADD
CH CAPTION
VIDEO
LABEL
CABLE:
ON
AUTO PROGRAM
LANGUAGE:ENGLISH
CONVERGENCE
I
I
lUse
Exit
* T_
_E[_I
Press • or • to move the cursor (1_) to AUTO
Use
4
"AUTO PROGRAM"
appears
press G:D.
The menu in selected
language
channel
is
_
Exit
_
and
appears.
_AJUSTES
BORRAR/ANADIR
CANAL
NOMBRE
DEL CANAL
ETIQUETA
DE VIDEO
CABLE:
SI
AUTO
PROGRAMACION
,LENGUAJE:ESPANOL
CONVERGENCIA
on the screen and the
and the lowest numbered
_
Press • or • to select the language
PROGRAM
projection TV starts scanning and presetting
channels automatically.
When all the receivable
channels are stored, "AUTO PROGRAM"
disappears
displayed.
I
_MENU
PROGRAM and press ___.
AUTO
(1_) to SET
I
I
3
1
_).
CdSET
"CHANNEL
menu
If you prefer Spanish or French to English, you can
change the menu language.
You do not have to do this procedure if you execute
AUTO SET UP (page 15). Do this procedure only
when you want to set it manually.
by AU'IO
to do this procedure
SET UP (page
you want
easily
the
_MENU
Usar
5
Press
MENU
to return
to the
I
I
I
I
I
I
I
I
I
_ _
original
Salir_
I
screen.
Note
4
Press
MENU
to return
to the
original
screen.
• Even when
parts
you select
of the menus
Spanish
remain
or French
language,
certain
in English.
Notes
• If AUTO PROGRAM appears in black in the SET UP menu, the
projection TV is set to a video input and you cannot select
AUTO PROGRAM. Press TV (black) so that a channel number
appears.
• If more than 90 seconds elapse after you press a button, the
menu disappears automatically.
• Presetting channels is also available for the AUX input.
Getting
Started
19 "EN
Operations
3
Select the channel you want
To select a channel directly
to watch:
Press the 0 - 9 buttons and then press ENTER.
For example, to select channel 10, press 1, 0 and
ENTER.
®®®
®®®
®
To scan through
Press CH +/MU]ING
_,v..
channels
until the channel
appears.
--_ TV (POWER)
you want to watch
CH
--" "IV (FUNCTION)
DISPLAY --,o
SLEEP --
---_ "I'V/VID EO
"-" TV (black button)
.-- 0-9
JUMP --*
buttons
4
Press
VOL +/- to adjust
VOLUME
IIIIIIIIIIIIlflllllllPII
..........................................
"_ CH +1-
Switching
channels
1
Press TV (POWER) to turn on the projection
TV.
The TIMER/STAND
picture
BY indicator
quickly
between
two
You can use the JUMP button to switch or "jump"
and forth between two channels.
back
flashes until the
Press JUMP.
appears.
JUMP
POWER
Pressing
If "VIDEO" appears on the screen, press TV (black
button) so that a channel number appears.
2
volume.
VOL
'_-ENTER
VOL +1- --
the
JUMP
again
switches
back the channel.
Note
• You cannot jump to channels you scanned through using the
CH +/- buttons.
Press "13/(FUNCTION).
FUNCTION
--
Muting
the sound
TV
Press MUTING.
"MUTING"
appears
on the screen.
MUTING
Once you press TV (FUNCTION), the projection TV
function is set unless another function button is
pressed.
To restore the sound,
VOL +.
20-EN
Operations
press MUTING
again, or press
Displaying
on-screen
rl'o cancel tile Sleep 'limer, press SLEEP repeatedly
until "SLEEP OFF" appears, or turn off the projection
TV.
information
Press DISPLAY repeatedly
until the desired
display appears.
Each time you press DISPLAY, the display changes
follows:
Status display* -+ XDS** --+ Caption
_-DISPLAY OFF 4
as
Vision***
]
The sleep timer is also cancelled when you select
AUTO PROGRAM under the SET UP menu.
Watching
a video
input
picture
DISPLAY
Press TVNIDEO repeatedly
video input appears.
until
the desired
Each time you press TV/VIDEO, the display changes
as follows: TV _ VIDEO 1 _ VIDEO 2 _ VIDEO 3.
*
Channel number, the current time, channel caption
(if set), and MTS mode (if SAP is selected) are
displayed.
seconds.
SAP indication
disappears
TVNIDEO
after three
** Some programs are broadcast with XDS (Extended
Data Service) which shows a network name,
To return to TV picture,
press TV (black button).
program name, program type, program length, call
letters, and time of the show. When you select XDS
with the DISPLAY button, this information will be
displayed
service.
on the screen if the broadcaster
offers this
*** Some programs are broadcast with Caption Vision.
When you select Caption Vision with the DISPLAY
button, Caption Vision will be displayed on the
screen if the broadcaster
offers this service. (See
page 36 for selecting
Caption
the
Sleep
input
to the
Press TV (black button).
"AUX" appears
beside the channel
number.
TV
Vision.)
To cancel the display, press DISPLAY repeatedly until
"DISPLAY OFF" appears. "DISPLAY OFF" goes off
after three seconds.
Setting
Changing
the VHF/UHF
AUX input
Pressing TV (black button) again switches back to the
VHF/UHF input.
When switching from "VIDEO" to "AUX," TV must be
pressed twice.
Timer
The projection TV stays on for tile length of time you
specify and then shuts off automatically.
Press SLEEP repeatedly
minutes)
you want
until the time
(in
appears.
Each time you press SLEEP, the time changes
follows: 30 ---+60 --+ 90 --+ OFF.
as
SLEEP
"SLEEP" appears about one minute before the
projection TV shuts off.
Operations
I 21-EN
I
Changing
mode
the
window
Press TV/VIDEO (yellow
select the input mode.
picture
labeled
input
button)
to
Each time you press TV/VIDEO (yellow labeled
button), "TV," "VIDEO 1," "VIDEO 2" and "VIDEO 3"
appear
in sequence.
TV/VIDEO
The l'icturc-in-l'icture
(PII') feature allows you to
watch both the main picture and a window
picture
simultaneously.
You can also watch two TV channels
one time.
IO
FREEZE ='_"
CH +/- (yellow
labeled button---,
POSITION
AUDIO
at
_(_,
..[
Note
pl$ 4-g
---
SWAP
PIP
_-- TV/VIDEO (yellow
labeled button)
* If you connect your VCR without
a cable box, your PIP input
source is a VCR. If you connect your VCR with a cable box,
your
PIP input
source
is a VCR or cable box.
Q®®
I
Use the yellow labeled buttons
Displaying
Press
Changing
for PIP operations.
a window
in the
Press CH +/- (yellow
labeled
button).
Input-source mode or TV
channel for the main picture
TWVTR_(_+O
I_
,V,D11
O
I
PIP
Window picture--_
(1/9 size)
Press
PIP again
to
",'
_[
_ -_ a
|
Input-source mode or TV
channel for the window
picture
|
display
a smaller
s
To remove
Main picture ....... _
6 [
to
the
sound
of the
'1
'1
window
picture
The "d'" display appears next to the PIP channel
number for a few seconds, indicating that the window
picture sound is being received.
VIDEO
1 [
AUDIO
Window picture
(1/16 size)
the window
picture, press PIP again.
The sound of the window
picture is received.
Notes
• The widow
picture
main picture.
• If the main picture
may be affected
is not receiving
by the condition
an image,
picture may be in black and white.
• The widow picture sound is also output from
(VAR/FIX)
OUT jacks when you listen to it.
_._-E_I
Listening
v,o_o
Press AUDIO.
window
picture.
PIP
window
picture
picture
PIP.
TV channels
/ Operations
of the
the window
the AUDIO
To restore the main picture sound, press AUDIO again.
The '_'" display moves to the main picture channel
number.
Changing
picture
the
position
of the window
Press POSITION.
Each time you press POSITION,
will move as illustrated.
the window
picture
POSITION
You can select one of three settings for picture and
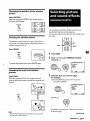
sound effects that best suits the program.
You can also adjust picture effect for each setting to suit
your taste.
Freezing
the
window
picture
®®®
o
This feature is useful when you want to write down a
recipe from a cooking program, a displayed address or
a phone number and so on.
o®o
RE!
VlENU
Press FREEZE.
FREEZE
1
2
Press MENU.
Press • or • to select PROGRAM
PALETTE
and press _.
To restore the normal screen, press FREEZE again.
I U]]PROGRAM
PALETTE
I
I SPORTS
I
IU,_ = I_
Exi, li_ I
_)MENU
Swapping
pictures
the
main
and window
3
Press SWAP.
Each time you press SWAP, the images and sound
from the main and window pictures switch places with
another.
Select the item you want
to adjust.
For example:
(1) To selectMOVIE, press t or • to move the
cursor (_) to MOVIE.
STANDARD
,MOVI E
SPORTS
] [_]PROGRAM
_MENU
Use
SWAP
PALETTE
€ _q_
Exit
]
I_
(2) Press (3D.
VIDEO
1
For details on each item, see "Effect of three items"
on the next page.
Note
• The channels being received through
displayed
as a window
picture.
(continued)
the AUX jack cannot be
Operations
] 23-EN
Effect
of three
items
Item
STANDARD
Picture effect
Standard
Sound effect
Standard
MOVIE
Finely detailed
picture
Theatrical
SPORTS
Vivid, bright picture
Sound with a sports
stadium effect
Adjusting
PALETTE
the
picture
audio effect
in PROGRAM
When watching
'IV programs,
you call adjust the
quality of the picture to suit your taste. The adjusted
level is stored in PROGRAM PALETTE in which that
1
Press
MENU.
2
Press
t or • to select
adjustment is done.
You can adjust the picture
VIDEO
and press
I
of video input(s)
as well.
L&9.
®®®
_qv I DEO
MODE:STANDARD
o®o
I
I
I
I
@_
HUE
...............
I ...............
COLOR
IIIIIIIIIIIIIIII
................
I
BR I GHTNESS
IIIIIIIIllllllll
................
I
SHARPNESS
IIIIIIIIIIllllll
................
I
II.PICTURE
TR INITONE
:HIGH
IIIIIIIIIIIIIlllllllllllll
I1.,..II
I NR :
OFF
I
I _MENU
I
@
Iu,0;_
3
Press t or # to select
MODE
and press
CD.
I
I
I
II
...............
I ...............
I
COLOR
IIIIIIIIIIIIIIII
................
I
BR I GHTNESS
IIIIIIIIIIIIIIII
................
I
SHARPNESS
Illlllllllllllll................
I
TRINITONE
:HIGH
PICTURE
IIIIllllllllllllll{lllllllll,
-, II
I
_MENU
I NR:
OFF
Iuso ; _
4
Press
t or I to select
want
to adjust
the
item
and press
C_9.
which
I_Vl
5
Adjust
the picture
to 5 in "Adjusting
according
the
Press 4, or 4 to move the cursor to VIDEO
and press _.
The VIDEO adjustment
I
Exit
menu appears.
I_VIDEO
MODE:STANDARD
I
I CTURE
IIIIIIIIIIIIIIIIIIIIHIIF,,
I
HUE
...............
I ...............
I
COLOR
IIIIIIIIIIIIIIII
................
BR I GHTNESS
IIIIIIIIIIIIIIII
................
I
SHARPNESS
IIIIIIIIIIIIUll
................
TRINITONE:HIGH
I
NR:
OFF
I
_MENU
I
you
oo
_
2
,P
I
DEO
€
Press MENU.
I
Exit _I
I_P I CTURE
illllllllllllllllllllllllllP,,I
HUE
...............
I ...............
I
COLOR
IIIIIIIIIIIIIIII
................
I
BR I GHTNESS
IIIIIIIIIIIIIIII
................
I
SHARPNESS
nllllllllllllll................
I
TRI NITONE
:HIGH
I
NR:
OFF
I
::)MENU
I
Use
1
I
I HUE
@
MENU
Exit_l
I_lV I DEO
I MODE: STANDARD
@_
RESET--
I_J
Use
3
:
E_
Exit
_l
Select the item you want to adjust.
For example:
(1) To adjust brightness,
BRIGHTNESS.
to the steps 3
press t or • to select
ITIV I DEO
MODE: STANDARD
picture."
HUE
...............
I ...............
I
COLOR
IIIIIIHIIIIIIII
................I
D'BR I GHTNESS
IIIIIlllllllllll
................I
SHARPNESS
IIIIIIIIIIIIIIII
................I
TRI NITONE
:HIGH
I
NR:
OFF
I
;MENU
Use
_ _
Exit
To restore the factory setting
Press RESET while the VIDEO menu is displayed.
(2) Press CD.
@
24"EN
I Operations
E£]V I DEO
STANDARD
BR I GHTNESS
IIIIIIllllllllllllllllllllltllll................................
4
Adjust the selected item:
(1) Press e/,*. or _/4, to adjust the item.
[]VIDEO
STANDARD
BR I GHTNESS
IIIIIIIIIIIIIIIIIIIIIIIIIIIIIIIIIIIIIIIIII
......................
(2) Press -OZg.
The new setting appears in the VIDEO menu,
and is stored in the displayed PROGRAM
PALETTE mode.
The TRIN I*I'ONE feature
5
To adjust
Description
other items, repeat
of adjustable
items.
Item
Press 4./* to
Press $/_ to
PICTURE
Increase picture
contrast for vivid
color
Decrease picture
contrast for soft
color
HUE
Make picture tones
become greenish
Make picture tones
become purplish
COLOR
Increase color
intensity
Decrease
intensity
BRIGHTNESS
Brighten
the picture
Darken
SHARPNESS
Sharpen
the picture
Soften the picture
To restore the factory setting
Press RESET on the remote commander.
®®®
ioo®
o
00
of
steps 3 and 4.
the color
temperature,
permitting white balance preference
adjustment without affecting skin tones.
F43VlDEO
MODE: STANDARD
P I CTURE
UlIIIIIIIIIIIlUlIIIIIIIIII
....
HUE
...............
I ...............
COLOR
lUlIIIIIIIIIIII
................
J
_BRIGHTNESS
lUlIIIIIIIIIIIIIIIIIIII..,,.,-I
SHARPNESS
lUlIIIIIIIIIIII
................
I
TRINITONE:HIGH
|
NR:
OFF
I
DMENU
_
l
Use
_ _
Exit
j_._J
For details on each item, see "Description
adjustable items" below.
controls
---"-
MENU
1
Press MENU.
2
Press t or ! to select VIDEO and press _.
3
Press t or 4 to select TRINITONE
and press
....
MODE: STANDARD
HUE
...............
I...............
COLOR
IIIIIIIIIIUlIII
................
I
BR I GHTNESS
Illl[lllllllllll
................
SHARPNESS
IIIIIIIIIIIIIIII
................
I
TR INITONE
:HIGH
I
[vNR : DEO
OFF
I
DMENU
I
Use
-" _
Exi'
I
color
I_1
the picture
4
Press • or 4 to select NTSC STD, MEDIUM
or
HIGH and press _.
I [VIDEO
I
I
I
u
MODE:STANDARD
I
I
HUE
...............
I ...............|
COLOR
llllllllllllllll
................
I
I BR I GHTNESS IIIIUlIIlIIIIII
................
I
l
SHARPNESS
1111111111111111
................
l
l _TR I N I TONE : NTSC STD
l
I NR:
I
DMENU
I us_, _-_
Choose
NTSC
OFF
I
I
ExJ,_1
To
STD
Make
the white
color
reddish.
MEDIUM
Make
the white
color
whitish.
HIGH
Make
the white
color
bluish.
Operations
I 25"EN
You can reduce
picture
noise when NR is set to ON.
You can adjust the quality of the TV sound to suit your
taste. You can adjust the sound of video input(s) as
well.
®®®
@
o®o
®®®
--t
00@0
-CD
_t
MENU
RESET-MENU
6G
1
Press MENU.
2
Press t or 4 to select VIDEO and press G_D:.
3
Press
t or 4 to select
NR and press
1
Press MENU.
2
Press t or 4 to select AUDIO
and press _.
_.
[2_AUD I O
,TREB L E
MODE:
@_
BALANCE
...............
I ...............
J
SURROUND:
OFF
OSE:
OFF
MTS :
MA I N
I
SPEAKER
:
ON
]
AUDIO
OUT:VARIABLE
I
DMENU
I
Use
€ _
Exit
_ENUlI
I
HUE
...............
I ...............
I
COLOR
llllllllllllllll................
BR I GHTNESS
IIIIIIIIIIIIIIII
................
SHARPNESS
IIIIIIlIJIIIIlll
................
I
PICTURE
TRI
NITONE
:HIGH
I,II,lll,lllllrl,lll,
Hi,Ill
-. II
J i_3V
NR :I DEO
OFF
I
DMENU
I
_
us,, = I_
4
I
STANDARD
Press t or • to select
Exit _J
3
ON and press CE).
J
lllJllllillllJll
................
I
Select the item you want
For example:
to adjust.
(1) To adjust bass, press t or • to select BASS.
MODE: STANDARD
I
@i_
(_AUD
HUE
...............
I ...............
COLOR
IIIIIIIIIIIIIIII
................
BR I GHTNESS
IIIIIIIIIIllllll
................
I
SHARPNESS
IIIIIIIIIIIIIIII
................
I
TRINITONE
:HIGH
II
P I CTuR E
I.II.ll.llllljllllll.llll.l_''''
I I_NR:
E_]V I DEC
ON
I
DMENU
I
_
Use
€
_
Exit
IO
IOSE:
I MTS:
I
I
I
IA]J
OFF
MAIN
SPEAKER:
ON
AUDIO
OUT:VARIABLE
DMENU
lus0, _
Note
• This feature
is useful
when
watching
a weak
broadcast
signal.
IIIIIIIIIIIIIIII
................
I,BASS
TREBLEBALANCE IIIIIIIIIIIIIlll
-- .......................
...............
I SURROUND:
O'FF
I
Ex,, _l
(2) Press GE).
(2_] AUD
I 0
BASS
iiitlllllllllllllglli!llllllLII
...............................
26-EN
[ Operations
I
I
I
I
4
Adjust the selected item:
11) Press e/,Ip or _/_, to adjust the item.
I [_AUDIO
BASS
IIIHIIIIIIIIIIIIIIIIII!IIIIIIIIIIIIIIItlHI
illllll..........
(2) Press CE).
The new setting appears
The SURROUND
in the AUDIO menu.
1
I
I
I
i
I
I
I
_]AUD I 0
T REB L E
IIII111111111111
................
I
,BASS
Illlflllllllllllllll
illlllt
I,...I
BALANCE
...............
I ...............
I
SURROUND:
OFF
I
OSE:
OFF
I
MTS :
MA I N
I
SPEAKER:
ON
I
AUDIO
OUT:VARIABLE
|
DMENU
_1
Iuse ; _
5
To adjust other
above.
Description
items, repeat
of adjustable
items
TREBLE
Increase
Decrease
Increase
Emphasize
speaker's
@
o®o
_e
the treble
MENU
OG
I=IN
1
Press MENU.
2
Press t or 4 to select AUDIO and press CSD.
3
Press • or 4 to select SURROUND
and press
response
the bass
response
BALANCE
®®®
steps 3 and 4
Press #/_ to
BASS
stereo programs.
_
Press #/e to
the treble
or
of
Item
response
sound
reproduction
with the atmosphere
of a movie theater
a concert hall. Surround sound is only effective for
Exit _1
For details on each item, see "Description
adjustable items" below.
feature simulates
Decrease
the bass
[20AUD
T REB LI O
E
response
the right
volume
Emphasize
speaker's
l
llllllllllillill................
BALANCEBASS
!!!!!!!!!!!!!!!I:::.:::::::.:
I
the left
SURROUND:
OFF
OSE:
OFF
MTS :
MA I N
SPEAKER
:
ON
AUDIO
OUT:VARIABLE
DMENU
Use
_ _
Exi t
volume
To restore the factory settings
Press RESET on the remote commander.
4
Press
t or • to select
ON and
press
_
I
_J
CD.
{20AUO 0
TREBLE
_(_
|
I
I
I
IIIIIIIIIIIIIIII
................
I
BALANCE
...............
I ...............
,SURROUND:
ON
I
OSE:
OFF
I
MTS:
MAIN
I
SPEAKER:
ON
I
BASS
IIIIIIIIIlllllll
................
AUDIO
OUT:VARIABLE
II
DMENU
I
Use
€
_
Operations
Exit
_1
27-EN
Orchestra
harmonic
'l'he Mulhchannel
Seat Effect* (OSE) teature restores the
balance of the sound to dramatically improve
'IV Sound (MIS) Ieaturc
gives you
the overall reproduction
of programs.
It gives the
sound more clarity, depth, and definition, making the
sound more dynamic.
the choice to enjoy stereo sound or Second Audio
Programs (SAP) when available. The initial setting is
stereo sound (MAIN).
®®®
®®®
Q
o®o
_t
o®o
_t
--GD
_*---"
1
2
3
8G
MENU
1
2
3
Press MENU.
Press t or • to select
AUDIO and press ____.
Press • or • to select OSE and press _).
[_AUD I0
TREBLE
Press
• or • to select
press
GE).
LOW,
HIGH
MENU
Press MENU.
Press t or • to select AUDIO and press _.
Press t or • to select MTS and press 9.
llllIllllllIllll
................
BALANCE
...............
I...............
SURROUND:
OFF
I
OSE:
OFF
I
MTS:
MAIN
|
SPEAKER :
ON
|
AUDIO
OUT:VARIABLE
DMENU
I
Use
€ _
Exit
_l
4
.........
BA LANCE
...............
I ...............
I
SURROUND:
OFF
I
OSE:
OFF
I
MTS :
MAI N
I
BASS
SPEAKER
:
ON,,,,,u,, ................
II
AUDIO
OUT:VARIABLE
I
DMENU
I
@_
[]AU0,O
or OFF and
Use
4
Press 4, or • to select MAIN,
and press CD.
€
_
I
Exit
_I
SAP or MONO
]
IIIIIIIIIlllllll
................
I
@,.os"................,
....................
'''
[] AUD
IO
llllllIllllIllIl
................
J _AUDIO
I
TREBLE
I
BALANCE
SURROUND:
I
...............
I ...............
OFF
I
OFF
I
I_MTS:
MAIN
I
| SPEAKER :
CENTER
I
| AUDIO
OUT:VARIABLE
|
I DMENU
I
I
I OSE:
JUse
€
_
Exit
Choose
To
LOW
Listen to news programs,
HIGH
OFF
Listen to music, sports, video games or movies.
Deactivate the OSE effect.
_J
etc.
lUse
Choose
MAIN
* Orchestra Seat TM Sound Effect (OSE) feature is using BBE
technology under licence from BBE sound Inc.
Note
• OSE may also be output through audio outputs.
28-EN
[ Operations
_
Exit
J_J
To
Listen to stereo sound.
The STEREO indicator on the projection TV
lights up while a stereo broadcast is received.
SAP
For the best sound quality, we recommend that AUDIO
to be set at factory setting when you set OSE to LOW or
HIGH.
=
Listen to bilingual programs.
The sound of non-SAP programs
when SAP is selected.
MONO
Reduce noise during
will be muted
stereo broadcasts.
Note
•
Stereo
and
SAP
sounds
are
subject
to
program
sources.
The projection TV is incorporated with the subwoofer
at the rear designed primarily for reproduction
of
lower audio frequency. You can select the level of the
subwoofer.
You may switch off the projection TV speakers when,
for example, you want to listen to the sound through a
stereo system.
If you connect a Dolby Pro Logic-compatible amplifier
to the CENTER SPEAKER IN terminals, you can use
the projection TV speakers as center speakers.
After making the connections (pages 12), set SPEAKER
to "CENTER."
®®®
Q
o- 2@:
®®®
o
o®o
o®o
wGD
MENU
Press @.
Each time you press ©, the display changes as follows:
1
Press MENU.
2
Press • or • to select AUDIO and press (:D.
3
F
Press • or • to select SPEAKER and press
GD.
{_AUDIO
TREBLE
t
.........
I
|
BALANCE
_'1
.........
SURROUND:
OFF
OSE:
OFF
MTS:
MAIN
SPEAKER :
ON
AUDIO
OUT:VARIABLE
_'MENU
_
I
I
I
I
I
I
I
Use ,
4
SUBWOOFER:OFF --* HIGH --_ MIDDLE --'*LOW
I
Press • or • to select MAIN,
and press C_.
_
_
Exit
Bu I
CENTER or OFF
I []AUra0
I BASS
I BALANCE
e 3@,
I
lUllllHII
...........
I
....... I ........
I SURROUND:
OFF
| OSE:
OFF
I MTS:
MAIN
I b'SPEAKER :
CENTER
I AUDIO
OUT:VARIABLE
I DMENU
_
I
|
|
|
I
|
I
,.=L. -, ..........
,
lu_ ; _
E=it _r_lI
Choose
To
ON
Listen to the sound from the projection
CENTER
Use the projection TV speakers
speakers.
OFF
Cut off the projection TV speaker sound and
listen to the projection TV's sound solely
through the audio system speakers.
TV.
as center
Operations
I 29"EN
You can _clect audio
SPEAKER
Audio
out to variable
or fixed when
If your alea USL}Sdaylight saving time, change
DAYLIGHT SAVING setting depending
on the season,
before setting the current time.
is set to OFF or CENTER.
out is variable
when
SPEAKER
is set to ON.
Daylight saving start
• After the first Sunday in April, set DAYLIGHT
SAVING to YES. Current time setting (page 31)
automatically
moves one hour ahead.
®®®
o®o
@
_t
-(2D
Daylight saving end
• After the last Sunday in October, set DAYLIGHT
SAVING to NO. Current time setting automatically
moves one hour back.
MENU
®®®
o@o
1
Press
2
Press t or 4 to select AUDIO and press _p.
@
MENU.
--
3
MENU
Press t or • to select AUDIO OUT and press
1
2
Press MENU.
Press t or • to move the cursor (_) to
TIMER/CH BLOCK and press _.
I [2_AUD
l O
use: I_
4
'
,'''''
[[
_"_
"'I_
Z
_'I_
L
_]'I
B
_I
_
A
'
'
N
_
F
F
_'_'_'_
VA
[
O
MA
OFFOFF
_
_
[
OUT
C
N
L
O
_
A
_
E':
E
L
Z
a
)MENUAugSPEAKERMTSOS
SURROUND
_A
BASST
_
__
(_ T I MER/CH
lllllllllllllIll ................
Exit _]
WED 1_..._0
Use
_ _
Press t or 4 to select VARIABLE or FIXED
3
and press _.
TREBLE
BLOCK
_CURRENT
TIME
SET
ON/OFF
TIMER
CHANNEL
BLOCK
DAYLIGHT
SAVING:NO
DMENU
Press t or # to select DAYLIGHT
press _.
IIIIIIlIIlIIllll
................
1
AM
Exit
SAVING and
@TIMER/CH
_LOOK
I
I
BALANCE
...............
I...............
I
SURROUND:
OFF
OSE:
OFF
I
MTS:
MAIN
I
SPEAKER:
OFF
I ,AUDIO
[2OAUD O OUT:FIXED
I
DMENU
I
Use
# _
Exit
I
ON/OFF
TI MER
CHANNEL
BLOCK
DAYLIGHT
SAVING:NO
_MENU
I
@_
_
BASS
IIII'IHII'II
'11 ................
@_
@
CURRENT
VARIABLE:
FIXED:
30EN
4
Sound output varied according to the
TV settings. You can adjust the
volume, bass, treble and balance.
Sound output is always fixed to a
certain level. You cannot adjust the
volume.
I Operations
TIME
WED 12:00
Use
8 _
_1
I
I
I
SET
I
Ex it
I
_TNUlI
AM
Press t or • to select YES or NO and press
O TIMER/CH
(_,
BLOCK
]
|
ON/OFF
CHANNEL
,DAYLIGHT
DMENU
@(_
@
TIMER
BLOCK
SAVING:YES
CURRENT
WED
12:00
use : _
Choose
YES
To
Set for daylight
saving
start
NO
Set for daylight
saving
end
TIME
A_
SET
|
I
I
I
I
E×it I_ I
4
Set the current
time.
(1) Press C_) to start setting the time.
,SUN
12:00
DMENU
AM
I Q CURRENT
TIME
SET
Set
the
day.
Use
_ _
Exit
_-_
(2) Press • or • to set the day and press Cm._.
Set the current time before using On/off Tinier (page
32) and Channel Block features (page 33). For example,
set the clock to 3:15 P.M., Monday.
I G CURRENT
,MON
®@®
TIME
12:00
SET
I
AM
I
DMENU
o®o
@
Set
the
Use
€
[
time.
I
_
Exit
_l
_GD
(3) Using • or # and CK), set hour and minute
the same way as in step (2).
When you press C_) after setting the
minute, the clock starts.
MENU
1
Press MENU.
2
Press • or 4 to select TIMER/CH BLOCK and
OURRENT
T,ME
SET I
,_NUa
press _.
Use
(]) T I MER/CH
DAYLIGHT
@(_
DMENU
"CURRENT
_
Use-."
If you need to set DAYLIGHT
procedure
in
on the previous
_
BLOCK
I
SAVING:NO
I
I
- -:
AM
TIME
SET
Exit
II
_
: 15 PM
_
I
Exit
If you make a mistake while setting the time
Press RESET while the CURRENT TIME SET menu is
displayed,
then repeat
step 4.
_EKiLI
SAVING, follow the
To display the current time
Press DISPLAY.
page.
Note
3
Make sure the cursor (,) is beside CURRENT
TIME SET, and press _.
If the cursor is not beside CURRENT TIME SET,
• If you unplug the projection TV or a power interruption
occurs, the clock will be erased. Reset the current time.
press • or 4 to move the cursor and press (Xg.
Operations
] 31"EN
(3) Press t or ! to set the time (hour then minute)
that you want to turn on the projection TV and
press CE).
TIMER
OON/OFF
I
I
1.EVERY
SUN-SAT
I
I
2 _!_Y__!___"
-.o.-I
You can set the projection TV to turn on and off at the
time you specify. Make sure the clock is set correctly.
Set
the
Use
0
duration.
Exit
_
(4) Press t or ! to set the hour duration
_.
You can set the hour duration
a maximum of six hours.
If it is not, set the clock first (page 31).
_I
I
and press
by one hour up to
®®®
o
o®o
0 ON/OFF
TIMER
1. EVERY
SUN
I
I
SAT
I
2 _!27_ _2__"--- I
_QD
MENU
Select
Use
(5) Press t or ! to select the channel
1
Press MENU.
2
Press t or ! to select TIMER/CH BLOCK and
channel.
Exit
I
_1
and press CE).
O ON/OFF
TIMER
2 -!!3-°_-"-3-2-TM _o
press CD.
@(_
3
the
_ _
_
1.
EVERY
;:)IVI_Io--Ai
Press t or ! to select ON/OFF TIMER and
SUN-SAT
-h
I 8seleect_-_hle
CH---
da_xit
_]I
press _.
J OON/OFF
TIMER
The 3-IMER/STAND
TV lights.
I
5
To set the other program,
repeat
4
BY indicator
on the projection
press CD and
step 4.
Enter the ON/OFF TIMER setting.
(1) Press t or ! to select program 1 or 2 and press
CE).
One minute before the projection TV switches
off, a message "TV will turn off." is displayed
screen.
(2) Press t or ! to set the days and press CE).
Each time you press t or i, the days cycle as
shown below.
EVERY SUN-SAT--*EVERY
MON-FRI---*
SUND AY--*MOND AY---*...--*SATURD AY--,
To cancel the timer
Press RESET on the remote commander.
EVERY SUNDAY--*EVERY
...---*EVERY SATURDAY
MONDAY
12:OOAM
• --'7
.........
D_O--_
__
@
1. EVERY
CH---
• If you unplug
the projection
ON/OFF
TIMER settings
time, then set the timer.
|
-h c,--SUN-SAT
Ex,,
32"EN I Operations
Note
--*
-h
to turn
on the
I
TV or a power
will be erased.
interruption
Reset the current
occurs,
(3) Press t or $ to set the time (hour then lninute)
that you want to start blocking the channel and
press Cg).
I
rlhis feature
watching
allows
unsuitable
Make
sure
clock
first
the clock
(page
you
to prevent
children
(4) Press • or • to select the hour duration you
want to block and press GE).
Each time you press (EC), the hour duration
increases by one hour up to a maximum of 12
hours.
from
programs.
is set correctly.
If it is not, set the
31).
®®®
Q
o®o
(_ CHANNEL
X
I
BLOCK
I
1. EVERY
SATURDAY
10:30PM12h
CH---
I
MENU
Select
Use
the
channel.
€ _
I
Exit
_]1
I:1_1
1
2
(5) Press • or I, to select the channel
Press MENU.
(_ CHANNEL
I _,1 . EVERY
Press • or • to select TIMER/CH BLOCK and
I
Press • or • to select CHANNEL BLOCK and
I
BLOCK
SATURDAY
2 10:30PM12h
i
press _.
3
and press CE).
Iu_e : _
CH 38
I
I
Exit _1
press _.
ieCHANNEL
BLOCK
If you select the blocked channel during the time
you set, the message "BLOCKED" appears and the
picture is blocked and the sound is muted.
I
To cancel a CHANNEL BLOCK setting
Press RESE1- on the remote commander.
4
Note
Enter a CHANNEL BLOCK setting.
• If the CHANNEL
(1) Press • or € to select program I or 2 and press
C!9.
overlapped,
BLOCK
and ON/OFF
the later time setting
TIMER
has priority
settings
are
over the other
setting.
(2) Press • or • to set the days and press (D. Each
time you press • or _, the days cycle as shown
below.
EVERY SUN-SAT--+EVERY
MON-FRI---*
SUND AY---+MOND AY-+...---+S ATURD AY--+
EVERY SUNDAY-+EVERY
MONDAY---+
...---*EVERY SATURDAY
I O CHANNEL
BLOCK
I
I _2:oo_--h c,--- I
| 2.-:---_,---_h-_,.___|
_%
@
|
|Set
1.FVERY
t h._i
iuse = _
SATURDAY
me.
I
_1
Exi_
_-_1
Operations
33 "EN
6
Enter the
channel:
(1) Press
letters
(up to four)
4' or • to select
to caption
the first
the
letter.
Each time you press t or 6, the letter changes
follows:
0,--_ l*--_...*_9*-*A*-*B*-*...*-*Z*-*&_*/*-__(bla
n k space)
T
You can add
feature
allows
are watching.
a caption
you
tor up to ZO channels.
to easily
You can make
identify
your
channel
you
caption.
®®®
Q
(2) Press CE).
o®o
@
_t
MENU
00
1
Press MENU.
2
Press 4, or 4 to
I
[his
which
own
F_CH
CAPTI
ON
I
I
Select
the
use = _
letter.
I
Ex tF_l I
(3) Repeat steps (1) and (2) to select the remaining
letters and press CE).
select
SET UP and
press (Z).
_CH
3
as
Press 4, or • to select
CH CAPTION
CAPTION
I
Es_l
and press
DMENU
Select
Use
7
lu_e ; _
4
Press (i_
Repeatsteps4to
channels.
6to
caption
the
_
_
letter.
Exit
other
E, it
To erase a caption
Press RESET after step 4.
again.
Notes
• If the CH CAPTION menu appears in black, the projection TV
is set to a video input, and you cannot select CH CAPTION.
Press TV (black button) so that a channel number appears.
• If more than 90 seconds elapse after you press a button, the
menu disappears automatically.
• The channel caption feature is not available for the AUX input.
5
Press
t or • to select
the
want
to caption
press
and
channel
that
you
_.
{_CH
CAPTION
I
_-_
|Select
|Use
34-EN
Operations
the
_
_
letter.
Exit
/
_|
5
Press
t or _ to select
the
label
@.@
and
press
J _VIDEO
I
LABEL
VIDEO
2:
VIDEO
2
i _,_o 3: V,OEO
3
luse ; _
_lhis feature
allows
you
to label
that you can easily identify
For example,
you can label
each input
mode
Each time you press_
shown below.
so
the connected
equipment.
VIDEO 1 IN as VHS.
or 0, the label
Exit
changes
as
VIDEO 1
VIDEO 1--*S-VIDEO---*BETA----. 8n'lm ---*VHS --* LD---*DB S
®®®
Q
t
I
o@o
VIDEO 2
VIDEO 2-_B ETA--*8mm--*VHS---*LD--*DBS
06
I-----.
t
MENU
VIDEO 3
Press MENU.
2
Press • or • to select SET UP and press ._.
t
6
Press
• or • to select
VIDEO
LABEL and
@i
press
luse ; _
I
Repeat steps 4 and 5 to label other
modes.
input
Note
• If more than 90 seconds elapse after you press a button, the
menu disappears automatically,
i v,_o 3: V,OEO
3
4
i=l_d
VIDEO 3-_BETA---*8mm--*VHS--*LD--*DBS
1
3
I
Exit
Press • or 4 to select the input mode you
want
to label and press _.
@
_
3:V,OEO3
LABEL
_VIDEO
Use
_
_
I
Exit
Operations
35-EN
To display
Press
Caption
DISPLAY.
Vision
(See page 21 for details.)
Notes
• Poor reception
of TV programs
Vision and XDS.
Captions may appear
of a certain word.
• XDS, Caption Vision,
the same time.
• For details
Some
programs
arc broadcast
with
Caption
Vision.
To
display
Caption
Vision, select either CC1, CC2, CC3,
CC4, TEXT1, TEXT2, TEXT3 or TEXT4 from the menu.
CC1, CC2,
printed
CC3 or CC4 shows
version
program.
information
screen.
of the dialog
(The mode
programs.)
TEXT1, TEXT2,
you a caption,
should
or sound
presented
effects
of a
be set to CC1 for most
TEXT3 or TEXT4
using
It is not usually
that is a
shows
either
related
you text,
that is
half or the whole
to the program.
®®®
o
o®o
_t
MENU
1
Press
MENU.
2
Press
* or _ to select
press
CD.
CAPTION
VISION
and
I CC2
I cc3
I 004
I TEXT1
I TEXT2
I TEXT3
[r_CAPT
I ON
I TEXT4
I DMENU
IUse
3
Press
• or • to select
press
CD.
The selected
caption
type
the
,
caption
is colored
[
VISION
_
Exit
type
and
green.
@,cc I
IFC"_ICAPTI ON V IS ION
I
]
cc2
I CC3
I
cc4
|
I
I
|
I
TEXT1
TEXT2
TEXT3
TEXT4
DMENU
luse -" _
36-EN
Operations
Exit
F_]
can cause
with a white
and the status
on XDS, see page 21.
errors
box or other
display
in Caption
errors
cannot
instead
be used
at
VCR manufacturer
You can use the supplied
operate
remote
Sony or non-Sony
infrared
remote
manufacturer's
Setting
the
video
commander
to
equipment
that has an
sensor. For this operation,
code number.
manufacturer's
set the
code
VTR (FUNCTION)
0
0
®
CD
®
®
C:D CZD C::D
0-9 buttons
"-- ENTER
2@2
OG
CODE SET--,-
Press the CODE SET, VTR (FUNCTION),
and 0 - 9
buttons
to enter the manufacturer's
code
number
(see the chart), then press ENTER. For
example,
to operate
a Sony 8 mm VCR, press
CODE SET, VTR (FUNCTION),
3, 0, 2, and ENTER.
code
Manufacturer
Sony
Admiral (M. Wards)
Aiwa
Audio Dynamic
Bell & Howell (M. Wards)
Broksonic
Canon
Citizen
Craig
Curtis Mathis
Daewoo
DBX
Dimensia
Emerson
Fisher
Funai
General Electric
Go Video
Goldstar
Hitachi
Instant Replay
JC Penney
JVC
Kenwood
LXI (Sears)
Magnavox
Marantz
Marta
Memorex
Minolta
Mitsubishi/MGA
Multitech
NEC
Olympic
Optimus
Panasonic
Pentax
Philco
Philips
Pioneer
Quasar
RCA/PROSCAN
301,302,303
327
338
314,337
330,343
319,317
309,308
332
315,302,332
304,338,309
341,312,309
314,336,337
304
319,320,316,317,318,341
330,334,335,333
338
329,304,309
322
332
3O6,304,305
309,308
309,305,304,330,314,336,337
314,336,337
314,336,332,337
332,305,333,334,330,335,338
310,308,309
314,336,337
332
309,335
305,304
323,324,325,326
325,338,321
314,336,337
309,308
327
308,309,306,307
305,304
308,309
310,308,309
308
308,309,306
304,305,308,309,310,311,312
313
309,330,328,335,324,338
314
315
322,313,321
330,335
312,313,321,335,323,324,325,
326
327,328
315
338,327
310,308,309,338
338
332
314,336,337
314,336,338,337
309,308
312,311
327,328,335,331,332
315
330,314,336,337
331
Realistic
Sansui
Singer
Samsung
Sanyo
Scott
FUNCTION
ENTER
CODE
(_
SET
...1_
(_
VTR
j[_
_..__
_
.___
_..{_
_
numbers
Code number
Sharp
Shintom
Signature 2000 (M. Wards)
Sylvania
Symphonic
Tashiro
Tatung
Teac
Technics
Toshiba
Wards
XR-1000
Yamaha
Zenith
(continued)
Operations
37-EN
tVlDP monufacturer
code
numbers
Operating
Manufacturer
Code number
Sony
Kenwood
701
707
Magnavox
Maranz
Mitsubishi
Panasonic
703
702
702
704
Philips
Pioneer
RCA
703
702
702
Sanyo
Sharp
Yamaha
706
705
703
a VCR
Buttons on the remote
commander
To turn on or off
To select a channel
directly
Press VTR (POWER).
Press the 0 - 9 buttons.
To change channels
Press CH +/-.
To record
Press I_ while pressing @.
First release IP'-, then release
@.
To play
Press I_.
To stop
Press II.
To fast forward
Press I_1_.
To rewind
Press ._1.
the tape
To pause
Press II.
To resume normal
press again.
Notes
• If more than one code number
is listed, try entering
by one, until you come to the correct code for your
them one
equipment.
• In some rare cases, you may not be able to operate your nonSony video equipment
with this remote commander.
This is
because
your
equipment
• The code numbers
factory as follows:
for Sony equipment
VHS VCR
8 mm VCR
301 (preset
remote
302
Beta, ED Beta VCRs
303
video
Press _
or _
during
playback.
To resume normal playback,
release the button.
To change
Press TV/VTR.
use the
are assigned
input mode
at the
code for the supplied
commander)
• Whenever
you remove the batteries
-- to replace them, for
example -- if too much time is taken, the code number
may
revert to the factory setting and must be reset.
Operating
To search the picture
forward or backward
may use a code that is not provided
with this remote commander.
In this case, please
equipment's
own remote control unit.
Operating
player
a laser-disc
Press I1_.
To stop
Press II.
To pause
Press II.
To resume normal
press again.
To search the picture
forward and backward
equipment
VTR (FUNCTION)
OFF
Video operating
buttons
O@®e
Buttons on the remote
commander
To play
"--* VTR (POWER)
SYSTEM
playback,
To search the chapter
forward and backward
Keep pressing _
during playback.
To resume normal
release the button.
playback,
or
playback,
Press CH +/-.
Note
0-9 buttons
• If the video equipment does not have a certain function, the
corresponding button on this remote commander will not
operate.
ENTER
Turning
II
-_p
U
i_-,,_
Ill
_-
17
ii-- iJ_ii_
the
system
You can turn off the projection TV and Sony equipment
with the S-Link function, such as a VCR, together when
Ill
is
off
CH +1-
,i,
you make the S-Link connection
connection).
(see page 13 for the
Press SYSTEM OFF.
SONY
SYSTEMOFF
Use the video
operating
buttons
on the remote
commander
to operate the video equipment.
Press VTR (FUNCTION) before operating the
video equipment.
38"EN
I Operations
3
Press DBS/CABLE (POWER) to turn on the
cable box or DBS receiver.
POWER
DBS/CABLE
4
Use the cable box/DBS control
check if the code number
You can program tile supplied remote conm_ander to
operate a cable box or DBS receiver. Follow the
procedures
below to set the manufacturer's
code number
in the remote commander.
buttons
to
works.
For example, to operate a cable box or DBS receiver,
you can use the DBS/CABLE (POWER), JUMP, CH
+/-, 0 - 9 and ENTER buttons.
Note
• If the cable
function,
box or DBS receiver
the corresponding
does not have a certain
button
on this remote
commander
will not operate.
_ DBS/CABLE
(POWER)
To operate the projection TV
Press TV (FUNCTION).
Then use the projection
control buttons to control the projection TV.
_'_.DBS/CABLE
(FUNCTION)
DISPLAY*
,.,,,Q® ® ®
For more details
DBS receiver
Refer to the operating
equipment.
0 - 9 buttons
_ENTER
If the
_GUIDE*
'-_ ",1_'1.1"_1_
*
_-_MENU*
_CH
buttons
1
GUIDE,
can be used
DISPLAY,
only with
._/._/._./.o./_
remote
and MENU
a DBS receiver.
• First, try repeating
the setup
listed for your equipment.
FUNCTION DBS/CABLE
procedures
using
the other
222, 223, 224, 225, 226
Jerrold/G.
201,202,
218
I.
codes
(cable box)
Code
number
203, 204, 205, 206, 207, 208,
Oak
227, 228, 229
Panasonic
219, 220, 221
214, 215
Atlanta
209, 210, 211
Tocom
216, 217
Zenith
212, 213
-
Manufacturer
code numbers
Code
Press the CODE SET, DBS/CABLE (FUNCTION),
and 0 - 9 buttons to enter the
code number
(see the chart),
then press ENTER. For example, to program
your remote commander
to operate a Sony
DBS receiver, press CODE SET, DBS/CABLE
(FUNCTION), 8, 0, 1, and ENTER.
FUNCTION
ENTER
(DBS receiver)
number
801 (preset code for the supplied
remote commander)
802
Sony
manufacturer's
work
Hamlin/Regal
Manufacturer
2
that come with the
doesn't
code numbers
Pioneer
to set up,
the cable box or
Manufacturer
Scientific
Turn off the equipment
you want
and press DBSICABLE (FUNCTION).
instructions
commander
Manufacturer
+/-
CODE SET
* The TV/DBS,
on operating
TV
RCA
Notes
• If more than one code number
is listed, try entering
them
one until you come to the correct code for your equipment.
• If you enter a new code number,
the code number
you
previously
entered
• In some rare cases,
provided
with
at that setting is erased.
your equipment
may use a code that is not
this remote
commander
and you may not be able
to operate your equipment
with the supplied
commander.
In this case, use the equipment's
control unit.
* Whenever
one by
you remove
the batteries
remote
own remote
-- to replace
them,
example -- if too much time is taken, the code numbers
revert to the factory setting and must be reset.
Operations
for
may
I 39-EN
Additional
Information
Dotted
lines or stripes
--b Adjust the antenna.
-_'Move the projection TV away from noise
sources such as cars, neon signs, and hairdryers.
Double
images
or ghosts
,,,_ Use a highly directional
outdoor
antenna
or
acable (when the problem
is caused by
reflections
from nearby
mountains
or tall
buildings.)
After trying the methods below, if the problem
contact your nearest Sony dealer.
No picture
persists,
(screen not lit), no sound
"_ Make sure the power cord is connected
securely.
-_Operate
with the buttons on the projection
TV.
•,,_ Check to see if the TV/VIDEO setting is
correct: when watching TV, set to TV, and
when watching video tapes, set to VIDEO 1,
2 or 3. (page 21)
•,_Try another channel. It could be station
trouble.
Poor or no picture (screen lit), good sound
"_Adjust
PICTURE in the VIDEO menu. (page
Cannot operate menu
'_ If the item you want to choose appears in
black, you cannot select it. Press TV/VIDEO
correctly.
,,,_Check the CABLE setting in the SET UP
menu. (page 18)
Cannot receive upper channels (UHF) when
using an antenna
-€'Check if CABLE is OFF in the SET UP menu.
(page 18)
Use AUTO PROGRAM
channels
memory.
Good
picture,
-_Press
BRIGHTNESS in the VIDEO menu.
24)
the convergence. (page 17)
antenna/cable
connections. (page 6)
no sound
MUTING so that "MUTING"
disappears
from the screen. (page 20)
•"_Check the MTS setting in the AUDIO menu.
(page 28)
•'_Make sure SPEAKER is set to ON in the
(page 18)
"_Use AUTO PROGRAM
channels
memory.
Commander's
power,
channel
buttons
do not function
-_Press
on the screen
,,,_ Check the CABLE setting in the SET UP
menu. (page 18)
•,_ Check the antenna/cable
connections.
(page 6)
•,_Make sure the channel
programs.
,,,_ Press TV (black button)
mode. (page 21)
is broadcasting
to change the input
in the
your projection TV.
•,_ Are fluorescent lights too close to the
projection TV? Move lights at least 3 - 4 feet
away from the projection TV.
Check the S-Link connection. (page 13)
No color
Only snow and noise appear
to add receivable
that are not presently
(pages 19)
Remote commander
does not operate
,_Battery
could be weak. Replace the battery.
(page 14)
•,_Make sure the projection TV's power cord is
connected securely to wall outlet.
-_Press TV (FUNCTION) when operating
AUDIO menu. (page 29)
•,_Adjust
COLOR in the VIDEO menu. (page
24)
,,_ Confirm that black and white program is
not being broadcast.
in the
Cannot receive any channels when using cable TV
•"_ Check if CABLE is ON in the SET UP menu.
24)
Adjust
(page
Adjust
,,,_ Check
to add receivable
that are not presently
(page 19)
up/down,
TV (FUNCTION)
channel
or CABLE
(FUNCTION).
Cannot
box
gain
enough
,,,_Increase
volume
the volume
when
at the cable
press TV (FUNCTION)
projection
TV's volume.
Projection
TV malfunctions
Link function
using
box.
and adjust
when
a cable
using
Then
the
the
S-
•,,€-Make sure the projection
TV's power
cord
connected
securely
to the wall outlet.
-_Check
the S-Link connection.
(page 13)
40"EN
I Additional Information
is
VIDEO OUI3
VIDEO (phono jack): I Vp-p,
75 ohms unbalanced,
sync
negative
AUDIO (phono jack):
500 mVrms
(100% modulation),
Impedance: 10 kilohms
MONITOR OUT
Projection
system
3 picture tubes, 3 lenses,
horizontal in-line system
Picture tube
7 inch high-brightness
monochrome
tubes (6.3 raster
size), with optical coupling
and liquidcooling
system
Projection lenses
High performance,
largediameter hybrid lens FI.0
Screen size (measured diagonally)
KP-46V35
46 inches
KP-53V35
53 inches
KP-61V35
61 inches
Speaker output
Screen brightness
Television system
Channel coverage
Antenna
Inputsloutput
Speaker
KP-46V35
1500 cd/m 2
KP-53V35
1200 cd/m 2
KP-61V35
1000 cd/m 2
American TV standards
VHF: 2-13/UHF: 14-69/
CATV: 1 - 125
75 ohm external antenna
terminal for VHF/UHF
VIDEO IN 1
S VIDEO IN (4-pin mini
DIN):
Y: 1 Vp-p, 75-ohms
unbalanced,
sync negative
C: 0.286 Vp-p (Burst signal),
75 ohms
VIDEO (phono jack):
1 Vp-p, 75-ohms
unbalanced,
sync negative
AUDIO (phono jacks):
500 mVrms (100%
modulation)
Impedance : 47 kilohms
VIDEO INPUT 2 and VIDEO
IN 3
VIDEO (phono jacks):
1 Vp-p, 75-ohms
unbalanced,
sync negative
AUDIO (phono jacks):
500 mVrms (100%
modulation)
Impedance: 47 kilohms
VIDEO (phono jack): 1 Vp-p,
75 ohms unbalanced,
sync
negative
AUDIO (phono jacks):
500 mVrms
(100% modulation),
Impedance: 10 kilohms
AUDIO (VAR/FIX) OUT (phono
jacks): 900 mVrms (100%
modulation)
Impedance: 5 kilohms
Full range speaker:
100 mm (3.9 inches)
Subwoofer speaker:
130 mm (5.1 inches)
Front: 15 W x 2
Subwoofer: 40 W x 1
Power requirement
120 V, 60 Hz
Power consumption
Max. 330 W
Standby
mode: 4 W
Dimensions (W/H/D)
Mass
KP-46V35
1,066 x 1,336 x 698 mm
(42 x 52 5/8 x 27 1/2 inches)
88 kg
(193 lbs 10 oz)
KP-53V35
1,218 x 1,442 x 698 mm
(48 x 56 3/4 x 27 1/2 inches)
94 kg
(207 lbs 1 oz)
KP-61V35
1,338 x 1,619 x 774 mm
(52 3/4 x 63 3//4 X 30 1/2 inches)
151 kg
(332 lbs 14 oz)
Supplied
accessories
Remote
commander
Size AA (R6) battery
Optional
RM-Y137 (1)
(2)
accessories
U/V mixer EAC-66
Connecting cables RK-74A,
VMC-810S/820S,
YC-15V/30V,
VMC-720M
High-contrast
protective screen
SCN-46X1 (For KP-46V35)
SCN-53X1 (For KP-53V35)
Design and specifications
notice.
are subject to change without
Additionallnformation
41-EN
Names
of controls
tt/_buttons
17
CE) button 17
0 - 9 buttons 17
AUDIO L(MONO)/R IN jacks 7-11
AUDIO L/R OUT jacks 10, 11
AUDIO (VAR/FIX) OUT jacks 11
AUX antenna terminal 6
CH(channel) +/-buttons
15, 20
CODE SET button 37
CONVERTER antenna terminal 6
Adjusting
convergence
sound 26
the picture
Antenna 6
15, 17
CONTROL S jacks 13
DISPLAY button 21
24
ENTER button
Auto program
15, 19
Battery 14
Cable box 60 39
Cable TV 18
MONITOR OUT jacks 11
MENU button 16
MUTING
Caption Vision 36
Changing the menu language
Channel block 33
19
Channel Caption 34
Connection
with a DBS 9
with a VCR 7
with an antenna 6
without a VCR 6
Daylight saving
DBS 9, 39
DEMO 16
Erase/add 16
30
VTR (POWER, CH +/-, I_-, II, I,_,
REC @, TV/VTR) buttons 38
VHF/UHF antenna terminal 6, 7
SAP (Second Audio Program)
Setting
daylight saving time 30
the clock 31
Sleep timer 20
S-Link 13, 38
STEREO indicator
28
Surround
27
TIMER/STAND
BY indicator
28
20, 32
35
Watching
TV 20
42-EN
21
Additional
20° 38° 39
S- LINK jack 13
TV (black) button 21
TV/DBS Q button 38
TV/VlDEO button 21
PIP (Picture-in-picture)
22
Presetting channels
15, 19
PROGRAM PALETTE 23
Remote commander
14
S video 8
video tapes
XDS 21
button 20
PIP operating buttons 22
POWER (DBS/CABLE, TV, VTR) buttons
RESET button 23
S VIDEO input jack 8
SLEEP button 20
Jump 20
MTS (Multichannel
TV Sound) 28
Muting 20
OSE (Orchestra Seat Effect) 28
Video label
17o20
FUNCTION (DBS/CABLE, TV, VTR) buttons 20, 38, 39
JUMP button 20
Information
VIDEO 1 IN jack 7-11
VIDEO 2 INPUT jack 10
VIDEO 3 IN jack 10
VIDEO 3 OUT jack 10
VOL (volume) +/-buttons
20
.ql_l, II,