1
SON_
4-095493-11
LCD Color TV
Operating
Instructions
Before operating the unit, please read this manual
and retain it for future reference.
KLV-23HR1
© 2003 Sony Corporation
thoroughly
(1)
WARNING
NOTIFICATION
To Reduce the risk of fire or shock hazard,
do not expose the TV to rain or moisture.
This equipment has been tested and fbund to comply with the limits lbr a
Class B digital device pursuant to Part 15 of the FCC Rules. These limits
are designed to provide reasonable protection agai_st hannthl interference
in a l'esidential installation. This equipment generates, uses, and can radiate
radio l?'equency energy and, if not installed and used in accordance with
the thstmctions, may cause harmful interference with radio
communications. However, there is no guarantee that intert?rence will not
occm- in a pallicular installation. If this equipment does cause harmful
intert?rence to radio or television reception, which can be determined by
ATTENTION
turnthg the equipment offand on, the user is encouraged to tit to correct
the intert?rence by one or more of the following measures:
RISQUE DE CHOC ELECTRiQUE,
NE PA$
Reorient or relocate the receiving antennas.
Increase the separation between the equipment and receiver.
Connect the equipment into an outlet on a circuit different fi'om that to
which the receiver is connected.
QUVR[R
PRECAUCION
R]ESGO
DE CHOQUE
ELECTRICC
NO ABRIR
Consult the dealer or an experienced radio/TV technician for help.
You are cautioned that any changes or modifications not expressly
DO
NO
REFER
NOT REMOVE
COVER
USER-SERV[CFJ_.BLE
SERVICING
TO QUALIFIED
approved in this manual could void your warranty and your authority
to operate this equipment.
(OR BACK)
PARTS
INSIDE
SERVICE
PERSONNEL¸
Safety
This symbol is intended to alert the user to the presence
of uninsulated "dangerous voltage" wilhin the product's
enclosure that may be of sufficient ma_itade
to
Operate the TV only on 120 V At.
The plug is designed, for safety purposes, to fit into the wall outlet
only one way. If you are unable to insert the plug fhlly into the outlet,
contact your dealer.
constitute a risk of electric shock to persons.
If any liquid or solid object should fall inside the cabinet, unplug the
TV immediately and have it checked by qualified service personnel
This symbol
before operating it lhrther.
If you will not be using the TV for several days, disconnect the power
presence
is intended
of important
(servicing)
instructions
accompanying
to alert the user to the
operating
and maintenance
by pulling the plug itsel£ Never pull on the cord.
in the literature
Installing
the appliance.
To prevent internal heat buildup, do not block the ventilation
CAUTION
TO PREVENT ELECTRIC SHOCK, MATCH WIDE BLADE OF
PLUG TO WIDE SLOT, FULLY INSERT.
openings.
Do not install the TV in a hot or humid place, or in a place sul_iect to
excessive dust or mechanical vibration.
CAUTION
As an ENERGY STAR _ Partner,
The fbllowing SONY appliance for use only with the following WALLHANGING RACK UNIT. Use with other WALL-HANGING RACK
Sony Corporation has determined
UNIT is capable of resulting in instability causing possible injmy.
SONY
APPLIANCE
MODEL
that this product meets the ENERGY
STAR _':guidelines for energy
NO.
efficiency.
KLV-23HRI
WALL-MOUNT
UNIT
MODEL
ENERGY STAW' is a U.S. registered mark.
NO.
SU-W200
SONY
SRS WOW and d_e (_)
Corp.
SRS WOW technology
symbol are trademarks
is incorporated
of SRS Labs, Inc.
under license fi'om SRS
Note on Caption Vision
Labs, Inc.
This television receiver provides display of television closed captioning
in accordance with § 15. I 19 of the FCC rules.
Owner's Record
Note to CATV system installer
backside of the rear cover, on the sticker, and also on the TV box (white
The model and serial numbers m'e located at the rein"of the TV, on the
This reminder is provided to call the CATV system installer's attention
to Alticle 820-40 of the NEC that provides guidelines for proper
grounding and, in particular, specifies that the cable ground shall be
connected to the grounding system of the building, as close to the point
of cable entry as practical.
Use of this television receiver for other than p_ivata viewing of programs
broadcast on UHF, VHF, transmitted by cable companies or satellite for
the use of the general public may require authorization
broadcaster/cable compmly and/or program owner.
2
fi'om the
label). Record these numbers in the spaces provided below. Ref?r to
them whenever yeu call upon your Sony dealer regarding this product.
Model No.
Serial No.
Important Safeguards
Do riot use attachnlents
Attachments
For your protection,
please read these insu uctions
manual for foture reference.
arid keep this
Installation
instructions
Water and Moisture
Carefolly
placed
manua!
observe
on
and
comply
the set or described
with
completely,
all warnings,
in the
operating
cautions
and
instructions
manufacturer,
or service
against injury, the following basic safety precautions
in the inst anation, use and servicing of the set.
by tile
Do not use powerdine
operated sets near water
for
example, near a bathtub, washbowl,
kitchen sink, or
latlndlaj tub, in a wet basenlent, or near a swimming
pool,
etc
WARNING
3"o guard
obsel_ed
not recommended
as they may cause hazards
should
he
Use
Power Sources
Corrosion
This set should be operated
only fiom the type of
power source indicated
on the seria!/model
plate If you are not sure of the type of electrical
power supplied to your home, consult your
dealer or local power company. For those sets
designed to operate fi'om battery power, refer to
the operating
instructions
Use of this set near the seashore may subject the set to excessive salt,
corrosion and internal damage and result in deterioration
of the set's
performance.
If the set will be subjected to these conditions,
steps should be
taken to reduce the humidity
and temperature
of the area where the set is
located
Accessories
Grounding or Polarization
Do not place tl_e set on an unstable cart, stand, table or
shelf ]'he set may fall, causing serious injury to a child
or an adult and serious damage to tbe set. Use orfly a
cart or stand recommended by Sony far the specific
mode] of TV No part of the TV set should overhang
This set is equipped
with a polarized AC power cord plug (a plug [laving
one blade wider than the otbel), or wRb a three-wire
grounding
type plug
(a })lug having a tltird pin for grounding}
Follow the insu uctions below:
For the set with a polarized AC
power cord plug
a safety hazard
An appliance
and cart combination
should
Quick any
stops,
excessive edge
force, is
any edgebe ofmoved
the TVwith
cart care.
or starld;
overbanging
and uneven surfaces nlay cause the appliance
and cart
combination
to overturn
This plug will fit into tbe power outlet only one
way Tbis is a safety feature If you are unable to
insert the plug fully into the outlet, try reversing
the plug If the plug still fails to fit, contact your
electrician to [lave a sutiahle outlet installed Do not defPat the safPty
purpose of the polarized
plug hy forcing it in.
Ventilation
Tbe slots and openings
in the cabinet and in the hack or hottom are
p_ovided for necessary ventilation
To ensure reliable operation
of the se
and to protect it from overheating,
tbese slots and openings {llust never be
blocked or covered
For the set with a three-wire
grounding
type AC plug
This plug will only fit into a grounding-type power
outlet. This is a safety feature, ffyou are unable to
insert the plug into the outlet, contact your electrician
to have a suitable outlet installed Do not defoat the safety purpose of the
grounding plug
Overloading
Do riot overload wall outlets, extension cords or
convenience
receptacles beyond their capacity, since this
can result in fire or elecnic shock
Always
turn the set off when
it is not being used. When
the set is left unattended
and unused for fang periods
time, unplug it from the wall outlet as a precaution
against the possibility of an internal malfunction
that
could create a fire hazard.
[]
Never cover the slots and openings
other materials
[]
Never block the slots and openings
on a bed, sofa, rug or other similar
[]
Never place the set in a confined space, such as a
bookcase or buihdn cabinet, unless proper ventilation
is provided.
[]
Do not place the set near or over a radiator or heat
register, or where it is exposed to direct sunlight
£@-'CY?)_
of
._11} _Y/-2?g',
_
with a cloth or
by placing
surface.
_
the set
9 _°_l P_" _,_ _I
_, ' ',.
'"'L_
If a snapping
or popping sound from a TV set is
continuous
or frequent while the TV is operating, unpblg
the TV and consult your dealer or service technician
It is
no_ real for some TV sets to make occasional snapping
or
popping sounds, particularly
when being turned on or
off
Power-Cord Protection
DO riot afiow anyihing
to rest on or roll over the power
cord, and do not place the s_t where the power cord is
subject to wear or abuse
Object and Liquid Entry
Never push objects of any kind into the set tbrougb the
cabinet slots as they may touch dangerous
voltage
points or short out paris that could result in a fire or
electiic shock. Never spill fiq uid of any kind on tbe set
Cleaning
[]
Be sui_ to unplug
[]
Minimize contact with the LCD screen surface
since the special coating applied may be
affected Use a dry soft cloth when removing
dust from the screen
[]
Do not use alcohol, benzine, thinner,
or catlse LeD screen deterioration¸
[]
Always
use
accordance
[]
Do not
commercially
with
allow
the TV unit hefore cleaning
their
the LCD
compounds,
such
contact
rubber
with
This type of contact
to deteriorate.
available
supplied
screen
may
chemical
fiber
cleaning
the coating
cloths
in
inst1_ctions
to come
as insecticide
or plastic
etc, as it may damage
Also,
products
damage
in contact
never
for an
the coating,
with
let the
volatile
LCD
extended
or cause
screen
period
ffle
LCD
corlle
in
of time
screen
3
Antennas
Servicing
Outdoor Antenna Grounding
If an outdoor antenna is installed, follow the precautions
belo_ An outdoor
antenna system should not be located in the vicinity of overhead power
Bnes or other electric light or power circuits, or whelp it carl come in contact
with such power lines or circuits
54 300 of Canadian
Electrical
Code for Antenna
Antenna
Parts
parts are required,
be sure the service technidan certifies
in writing that he has used replacement parts specified by the manufacture1
that have the same characteristics as die origina! parts
replacement
Unauthorized substitutions may result in fire, electric shock or othel
hazards
Safety Check
of
Antenna Grounding According to the NEC
Refor to section
Replacement
When
WHEN INSTALLING AN OUTDOOR ANTENNA SYSTEM, EXTREME
CARE SHOULD BE TAKEN TO KEEP FROM CONTACTING SUCH
POWER LINES OR CIRCUITS AS CONTACT WlTII THEM IS ALMOST
INVARIABLY FATAL.
Be sure the antenna system is grounded
so as to provide some protection
against voltage surges and buih-up static charges Section 810 of the
National Electrical Code (NEC) in USA and Section 54 of the Canadian
Electrical Code in Canada provides information
with respect to proper
grounding
of the mast and supporting
structure,
grounding
of the leaddn
wire to an antenna discharge
unit, size of grounding
conductors,
location
antenna discharge unit, connection
to grounding
elecu odes, and
requirements
for the grounding
electrode
Do not attempt to service the set yourself since opening the
cabinet may expose you to dangerous
voltage or other
hazm-ds Refer all servicing to qualified service personnel
Grounding.
Upon completion
of any service or repairs to the set,
ask the service technician
to perform routine safety
checks (as specified by the manufacturer}
to
determine
tllat the set is in safe operating
condition,
and to so certify.
When the set reaches the end of its useflll life, impropel
disposal could result in an LCD panel implosion.
Ask a
qualified service technician
to dispose of the set
tead-in wire
Carrying the TV
Antenna
_-• _2___
discharge
(NEC Section
Electrical wire
equipment
-_ _
Electrical
810-20)
Grounding conductors
_1 (NEC Section 810-21)
Ground clamps
_
NEe: National
unit
;._-Code
When cariying the TV, hold it as shown in the diagram on
the right Do not hold only the rein" cover As the rear cover
comes off easily, doing so may cause you to drop the TV,
resulting in damage to the TV or injury
Optional Accessories
Power service grounding
electrode
system (NEe Art 250 Part H)
Be sure to follow the operating
insuucOons
supplied with your wall mount
unit when installing the TV using a wall mount unit¸ If not, the TV may fall
and cause serious injury¸
Oils
Lightning
For added protection for this television receiver during a lightning storm, or
when it is left unattended
and unused for long periods of time, unplug it
flora the wall oudet and disconnect the antenna
This will prevent damage
to the receiver due to lightning and power4ine
surges
Service
DO not install this TV in iestaurants
where
oil nlay enter into the TV and damage it.
Ventilation
oil vapors
occur.
Dust absorhing
holes
DO not insert anyd_ing in the ventilation
holes If metal ol
something flammable
enters, it may result in fire or
electric shock
AC power cord
Damage Requiring Service
Unplug the set from the wall outlet and refer servicing
personnel
undel the following conditions:
[]
[]
Whenthepowelcordorplugisdamagedor
If liquid has been spilled
to qualified
smwice
Unplug the AC power cord when moving the TV.
Do not move the TV with the AC power cord plugged
the AC power cord and result in fire or electric shock.
in. It may damage
Protruding location
_I_='_---_.N=,,_
DO not install the TV in prot]uding
lo(ations
following locations, injul T may result
If you install
[]
Do not install the TV in a location
pillars
where
the TV protrudes,
[]
Do not install the TV in a location
that
into the set
the TV in the
such as
may cause facial injury
Broken pieces
DO not throw anything
at the TV
The screen glass may explode by the impact
[]
If the set has been exposed
[]
If the
set has
cabinet
has
If the
set does
[]
the operating
that
damage
qualiffad
4
When
the
it indicates
subject
not operate
will
technician
no1 mafiy
Adjust
in the operating
adjustment
and
to excessive
shock
by
being
damaged
instructions
are specified
Improper
[]
been
been
to rain ol water.
of other
often
require
to iestore
set exhibits
a distinct
a need
for selwice
when
only
fofiowing
those
controls
instructions
controls
extensive
may
result
work
the set to normal
change
by
in
a
operation
in performance,
dropped,
or the
and cause serious
injury
Important
Safety Instruction
1)
Read these instructions
g)
Keep these instructions
3)
Heed all warnings
4)
Follow all instructions
5)
Do not use this apparatus
6)
Clean
7)
Do not block any ventilation
manufacturer's
instructions
8)
Do not install near any heat sources such as radiators,
heat registers,
stoves, or other apparatus
{including amplifiers) that produce heat
9)
Do not defeat the safety purpose of the polarized or grounding
type
plug A polarized plug has two blades with one wide1 than the other A
grounding
type plug has two blades and a third grounding
prong The
wide blade or the third prong are provided
for your safety If the
pl ovided plug does not fit into your outlet, consult an electrician
fol
ieplacement
of the obsolete outlet
10)
Protect the power cord from being walked on ol pinched particularly
at plugs, convenience
ieceptacles,
and the point where they exit fi'om
the apparatus
11)
Only use attachments/accessories
12)
Use only with the cart, stand, tripod, brackeh or table
specified by the manufacturer,
or sold with the apparatus.
When a cart is used, use caution when moving the cart/
apparatus
combination
to avoid injury fiom tip over
13)
Unplug this apparatus
long periods of time.
14)
Refer all servicing to q ualified service personnel
Servicing is mqui1_d
when the apparatus
has been damaged
in any way, such as powersupply cord or plug is danlaged, liquid has been spilled ol objects have
fallen into the apparatus,
the apparatus
has been exposed to rain or
moisture, does not operate no1 really, or has been dropped
near water
only with dry cloth
openings
during
Install
specified
lighming
in accordance
with the
by the manu fact urer
stornls
or when
unused
for
Handling the LCD screen
[]
Do not leave the LCD screen facing the sun as it can damage
screen Take care when you place the TV by a window
[]
Do not push on or scratch the LCD screen Do not place a heavy
oll the LCD screen This may cause the screen to lose uniforn3ity
cause LCD panel malfunctions
[]
If the TV is used in a cold place, a smear may appear on the screen.
This is not a malf_lnC tion The screen returns to norma! as the
temperature
rises to a nornlal operating
level
[]
If a still picture is displayed
for a long time, a ghosting
while The ghosting will eventually
disappear
[]
The LCD panel
malfunction.
becomes
warm
during
operation
the LCD
object
or
may occur for a
This is not a
Note on the LCD (Liquid Crystal Display)
Please note that the LCD screen is made with high-precision technology
However, black points or bright points of light (red, blue, or green) may
appear constantly on the LCD screen, and irregular colored stripes or
brigfimess may appear on the LCD screen This is not a malfunction.
(Effective dots: more than 9999%)
Handling
of Broken
Glass
and
Liquid Crystal Leakage
If the LCD panel gets damaged,
crystalline liquid leakage may occur, or
scattered broken glass may result Do not touch broken glass or crystafiine
liquid (which is toxic), with bare hands as cuts or poisoning/skin
irritation
may occur Also, do not let glass fi'agments or leaked crystalline
liquid get
into your eyes or mouth Should either comact your eyes or mouth, rinse
the contacted
area thoroughly
with water and consult your doctor
Fluorescent Lamp
This TV uses a special fluorescent
lamp as its light source If the scloen
image becomes dark, fickers or does not appear, the fluorescent
lamp has
run down and should be replaced
For replacement,
consult qualified
service personnel
Disposal
of the
TV
[]
Do not dispose
of the TV with genera!
[]
The LCD contains a small amount of liquid crystal and mercury. The
fluorescent
lamp used in this TV also contains mercury
Follow your
local ordinances
and regulations
for disposal.
household
waste
5
I_ble_F©onI_en_s
Table of Contents
Installing and Connecting
Unpacking
Inserting
..........................................................
Batteries
Connector
Identifying
the TV
into the Remote
Control...
Types ................................................
Front and Rear Connectors
Basic Connections
(Connecting
7
Operating
Attaching
the rear cover ............................
9
Using Favorite
Cord
...........................
cords and cables
Adjusting
the viewing
......................
9
favorite
11
11
a VCR and Cable
TV ..................
12
Connecting
a Satellite
......................
13
Connecting
a Satellite Receiver with a VCR ... 14
Connecting
an Audio Receiver
............ 31
.................
.................................
Using Advanced
Connecting
34
channels .....................
35
Features
36
Adjusting
the Picture
Position ........................
37
Adjusting
the Picture
Quality
........................
38
Adjusting
the Sound Quality ..........................
39
Selecting
Stereo or Bilingual
Programs
Selecting stereo or bilingual
......... 41
programs
Connecting
a Digital Satellite
Connecting
a Digital TV Receiver
Setting
the Channels
Selecting
16
..................................................
Receiver
17
........................................
the On-screen
Menu Language
Watching
Selecting
a Custom Rating ......................
44
What
Turning
the Ratings Mean ..................................
46
Ratings in the U.S.A ...............................
46
Ratings in Canada
48
Off the TV Automatically
the TV .............................................
Selecting
the Picture
Selecting
the Effect Mode
Saving
the Power
Using the Wide Screen
6
23
................. 24
Mode .............................
...............................
Consumption
................
50
Information
Troubleshooting
with closed caption
...................................
...... 22
the TV
Watching
............... 42
42
Additional
Watching
Feature
the Parental Control feature...
19
20
Control
Activating
......... 18
.................
41
15
a DVD Player with A/V
Connectors
34
Using the Menu ................................................
Using the Parental
Connecting a DVD Player with Component
Video Connectors .......................................
33
channels .................
using the menu ...................................
.......................
31
10
Connecting
Receiver
equipment
Channels
30
9
angle of the TV ... 11
the TV ......................................
optional
28
with Your TV
..........................................
Setting your favorite
Watching
..............................
Bundling
Carrying
Operating
directly to cable
the Power
Control
Programming the remote control
9
.......................................
..................................
Video Equipment
Remote
Cable TV or
9
Connecting
the Wide Screen Mode using
the menu .............................................
Setting the Video Inputs
the rear cover ...........................
Cable box connections
Changing
7
Removing
or an antenna
the Wide Screen Mode ........... 27
7
.......... 8
an Antenna) ...................................................
Connecting
Changing
24
25
.....................
26
Mode .........................
27
...............................................
Self-diagnosis
Trouble
Specifications
function ...........................
symptoms
and remedies
51
51
............ 51
...................................................
Index .................................................................
53
54
_
ouppllea
,' o-ohm
coaxial
cable
Screw-on type
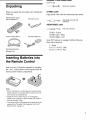
Unpacking
When you unpack
following:
Screw into connection,
this unit, make sure it includes
the
S VIDEO
cable
High quality video cable for enhanced
Remotecontrol (1) and
size AA batteries(2)
AC powercord (1)
Align guides
connection.
AUDIONIDEO
picture quality
and push into
cable
Push into connection.
V1DEO - Yellow
75-ohm coaxial cable (1)
AC poweradaptor(1)
AUDIO
AUDIO
(Left) - White
(Right) - Red
Some DVD players are equipped
three video connectors:
with the following
Y - Green
PB (CB, Cb or B-Y) - Blue
PR (CI_, C, or R-Y) - Red
Operating Instructions
Warranty Card
Inserting Batteries into
the Remote Control
Insert two size AA batteries (supplied) by matching
the + and - on the batteries to the diagram inside the
remote control's battery compartment.
Notes
• Remove
leakage
the batteries
whenever
to avoid damage
you anticipate
from possible
that the remote
not be used for an extended period.
• Handle the remote control with care. Avoid
getting
it wet, or placing
where the humidity
• Your remote control
equipment
Remote
sunlight,
dropping
will
it,
near a beater or
is high.
can be programmed
(See "Operating
Control"
it in direct
battery
control
to operate
Video Equipment
most video
with Your TV
on page 31 ).
7
Ir_sta_[ng and Colr_lr_e(:_ir_g
the IV
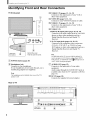
Identifying Front and Rear Connectors
TV front
panel
[]
VIDEO 2 IN (pages 12 - 14, 17)
Connects to the output jacks of your VCR or
other video equipment.
[]
VHF/UHF (pages 9, 12 - 14)
Connects to your VHF/UHF antenna or cable.
[]
VIDEO 1 IN (pages 12 - 14, 17)
Connects to the output jacks of your VCR or
other video equipment.
[]
VIDEO
[]
L
AUDIO (L/R) input jacks (pages 16, 18, 19)
Connects to the audio output jacks of your DVD
player or other video equipment such as a
Digital Satellite Receiver and Digital TV
Receiver.
[
V_
L-_JB_O-R
O[
IN
o++,
[]
Behind
the bottom
[]
3 IN
P., P. input jacks (pages 16, 18, 19)
Connects to the component video connectors
(Y/CdCR, Y/B-Y/R-Y, or Y/PdPR) of your
DVD player or other video equipment such as a
Digital Satellite Receiver and Digital TV
Receiver.
the cover
Tip
Push to open the cover.
The HD Mode
[]
POWER
[]
Headphones jack
Connects to your headphones.
If your headphones do not match the jack, use a
suitable plug adaptor (not supplied).
8
To
[]
AUDIO OUT (page 15)
Connects to the input jacks of your audio
equipment.
Audio output through the AUDIO OUT jacks is
available only when the TV's speaker is off(See
page 15).
[]
DC IN (page 10)
Connects the supplied
Note
Rear of TV
by default.
watch a program in 1035i fore, 1at, such_as digital HDTV
VCR pictures, set "HD Mode
in the _
(Setup) menu to
"1035" while viewing the program.
button (page 20)
The headphones jack is disabled when you set the TV's
speaker to off.
of this TV is set to I080i
AC power adaptor.
hr_s_a_i
hg and Cow_w_ec_ing
_heIV
Basic Connections
(Connecting Cable TV or
an Antenna)
When connecting an antenna or cables, remove
rear cover of the TV beforehand.
Connecting
antenna
directly to cable or an
VHF only or VHF/UHF
75-ohm coaxial
cable (supplied)
the
or cable
Rear of TV
_'_
VHF/UHF
Note
Removing the rear cover
1
Slide the rear cover upward
by approx.
1 cm
inch) while holding it with both hands as
shown in the diagram below.
(13/32
2
Pull the rear cover towards
you.
It is strongly recommended to connect the antenna using a 75ohm coaxial cable to get optimum picture quality. A 300-ohm
twin lead cable can be easily affected by radio noise and the like,
resulting in signal deterioration, if you use a 300-ohm twin lead
cable, keep it away as far as possible from the TV.
Cable box connections
Use this hookup
if:
• You subscribe to a cable TV system that uses
scrambled or encoded signals requiring a cable
box to view all channels, and
• You do not intend to hook up any other audio or
video equipment to your TV.
1
Connect
the coaxial
connector
from your cable
service to the cable box's IN jack.
2
Using the supplied
75-ohm
coaxial cable,
connect the cable box's OUT jack to the TV's
VHF/UHF jack.
Attaching
1
the rear cover
75-ohm
Cable
Hold the rear cover with both hands, then fit the
,1
four detents on the rear cover into the
corresponding
keyholes on the TV while keeping
the rear cover approx. 1 cm (_3/32inch) higher
than the TV as shown in the diagram below.
2
Slide the rear cover downward
while keeping it
IN
pressed against the TV. If the rear cover fails to
fit in the lower keyholes, push it simultaneously
at the positions marked A in the illustration
below.
coaxial
cable (supplied)
_;_LE_
_
,_
Rear of TV
OUT
Cable box
Also, set "Cable" to "On" in the _
menu (See page 20).
(Channel)
Tips
• Your Sony remote
control
can be programmed
cable box (See "Programming
the remote
to operate
control"
your
on page
31).
• To change channels using the cable box, set your TV to
channel 3 or 4 depending on the cable box channel output.
• if you will be controlling
all channel
cable box, consider using the Channel
TV to channel 3 or 4 (See page 21).
selection
through
your
Fix feature to set your
9
Ir_stNI ng and Cor_r_eo_ingthe IV
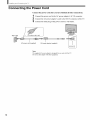
Connecting the Power Cord
Connect
Wall outlet
the power cord after you have finished
all other connections.
1
Connect
the power cord to the AC power adaptor's AC IN connector.
2
Connect
the AC power adaptor's cord to the DC IN connector of the TV.
3
Connect
the other plug of the power cord to a walt outlet.
For 100to 120 V AC
•
AC power cord (supplied)
AC power adaptor
I
(supplied)
Note
The supplied
AC power
Do not use this adaptor
10
adaptor
is designed
with other equipment.
for use only with this TV.
hns_,a_l
ng and Connecting_heIV
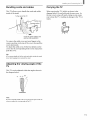
Bundling cords and cables
Carrying the TV
This TV allows you to bundle the cords and cables
inside of the stand.
When carrying the TV, hold it as shown in the
diagram below. Do not hold only the rear cover. As
the rear cover comes off easily, doing so may cause
you to drop the TV, resulting in damage to the TV or
injury.
To the rear of the TV
\
/
To the AC power adaptor
optional video equipment
and
To remove the cable cover, put your fingers in the
concave portion on the top of the cover, then pull the
cover downwards.
To attach the cable cover, fit the four detents on the
cover into the corresponding
holes on the stand, then
push the cover.
Tip
if you cannot
bundle
leave them hanging
Adjusting
TV
all of the cords and cables
down
outside
inside the stand,
the stand.
the viewing angle of the
This TV can be adjusted
the diagram below.
within the angles shown in
Note
Be sure to hold the stand of the TV to prevent an upset of the TV
when you adjust the viewing angle of the TV.
11
InstNI ng and Connecting the IV
Connecting a VCR and Cable TV
Use this hookup
if:
• You have Cable TV that does not require a cable box.
Disconnect
all power sources before
1
Connect
the CATV cable to the VCR's
2
Using the supplied
75-ohm coaxial
to the TV's VHF/UHF
3
Using AUDIO
VIDEO
making any connections.
IN jack.
cable, connect the VCR's
OUT jack
jack.
and S VIDEO
cables,
connect
OUT jacks to the TV's AUDIO
the VCR's
and S VIDEO
AUDIO
and S
IN jacks.
Rear of TV
75-ohm 2
coaxial _i_[].,,
cable
(supplied)
L
oc _ _4 5v
AUDIO-R (red)__
75-ohm
coaxial cable
(supplied)
(_2
VCR
r
_S
VIDEO
AUDIO-L (white)-_
VIDEO (yellow)-_-_
"
VMC-810S/820S
(not supplied)
YC-15V/30V (not supplied)
Note
To watch the pictures
(Setup)
input from the S VIDEO
input jack,
set "Auto
YC" to "On" in the
menu (See below).
Tips
• YOUcan also use the VIDEO 2 IN jacks on the front panel of the TV to connect your VCR.
• If your VCR is not equipped with S VIDEO, use a VIDEO cable (yellow) instead of the S
VIDEO cable.
When connecting
both VIDEO OUT and S VIDEO
OUT
You can select which jack the TV receives the input signal from on the menu
screen. You can set it for each video input (V1DEO 1 IN and V1DEO 2 IN)
separately. The TV is factory set to receive S V1DEO input signals.
1
Press TV/V1DEO
2
Press MENU.
:3
Press l_/t_ to select _
4
Press l_/t_ to select "Auto YC," then press (Z).
5
To watch the pictures input from the S V1DEO input jack:
Press l_/t_ to select "On," then press (5_).
repeatedly
until the desired
(Setup), then press (Z).
To watch the pictures input from the VIDEO
Press l_/t_ to select "Off," then press (i).
12
6
video input appears.
Press MENU to exit the menu screen.
input jack:
hr_s_a_[
ng and ConnectingtheIV
Connecting a Satellite Receiver
Disconnect
all power sources
1 Connect
the satellite
before
antenna
making any connections.
cable to the satellite
receiver's
SATELLITE
IN jack.
2
Using AUDIO and S V1DEO cables, connect the satellite receiver's
and S VIDEO
3
OUT jacks to the TV's AUDIO
AUDIO
and S V1DEO IN jacks.
Connect the supplied 75-ohm coaxiat cabte from your cable or antenna to the
TV's VHF/UHF
jack.
Rear of TV
75-ohm _,
coaxial
cable
(supplied)
AUDIO-R
Satellite
(red) ____
AUDIO-L (white)
VIDEO (yellow)
__.2_J
_-_
--
S VIDEO
',_r-_HF
receiver
_'_
I. _[_ U..OUT_
_]_
(not supplied)
1
@
/
Satellite
_
/
ant_n na
""
I
_
L
YC-15V/30V (not supplied)
Note
To watch the pictures
(Setup)
input from the S VIDEO
menu (See page
input jack,
set "Auto YC" to "On" in the
12).
Tips
• YOU can also use the VIDEO
satellite receiver.
• If your satellite receiver
instead of the S VIDEO
2 IN jacks
is not equipped
cable.
on the fi'ont panel of the TV to connect
with S VIDEO,
use a VIDEO
your
cable (yellow)
13
Ir_stNI ng and Cor_r_ec_ingthe IV
Connecting a Satellite Receiver with a VCR
Disconnect
all power sources
1 Connect
the satellite
before
antenna
making any connections.
cable to the satellite receiver's
SATELLITE
IN jack.
2
Connect
the CATV cable to the VCR's
3
Using the supplied
75-ohm
to the TV's VHF/UHF
4
Using AUDIO
VHF/UHF
coaxial cable, connect
Using AUDIO
the VCR's
and S VIDEO
cables, connect
and S VIDEO
cables, connect
VIDEO OUT jacks to the TV's AUD10
the satellite
AUDIO
the VCR's
receiver's
and S V1DEO
AUD10
and S
and S V1DEO IN jacks.
Rear of TV
Satellite
75-ohm
coaxial
cable
(supplied)
OUT jack
jack.
AUDIO and S V1DEO OUT jacks to the VCR's
IN jacks.
5
IN jack.
receiver
Satellite
antenna
cable
J[ 4
_ •
"
VMC810S/820S
"-_ S VIDEO
AUDIO-R (red) .-o_ /
AUDIO-L (white) _
VIDEO (yellow) _--------
VMC-810S/820S
(not supplied)
(not supplied)
YC-15V/30V o
(not supplied)
4
VCR
YC-15V/30V
_- (not supplied)
_-
3
75-ohm
coaxial
cable (supplied)
Note
To watch the pictures input from the S VIDEO
(Setup)
menu (See page
input jack,
set "Auto YC" to "On"
in the _]_
12).
Tips
• You can also use the VIDEO 2 IN jacks on the front panel of the TV to connect
• Be sure your VCR's video input is set correctly. Consult your VCR's operating
instructions.
• Use TV/VIDEO
on the remote
control
VIDEO 2 IN jacks for this hookup)
(your VCR must be turned on).
• If your VCR or satellite
(yellow)
14
instead
receiver
of the S VIDEO
to select VIDEO
to watch
satellite
is not equipped
cable.
1 IN (or VIDEO
TV or to watch
with S VIDEO,
your VCR.
manual for
2 IN if you use the
a tape on the VCR
use a VIDEO
cable
hr_s_a_l
ng and Cormec[ingtheIV
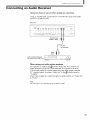
Connecting an Audio Receiver
Disconnect
all power sources
before
making any connections.
Using an AUDIO cable, connect the TV's AUDIO OUT jacks to the audio
receiver's AUDIO IN jacks.
Rear of TV
iii!ii_i
.y
RK-74A(not
_-'-"
supplied)
Audio
input
_
_I
Audio receiver (Compact
AV system DAV-C990, etc)
When
using your audio system
speakers
Set "Speaker" to "Off" in the _._ (Audio) menu. The TV's sound is not
output from the AUDIO OUT jacks when the TV's speaker is set to on.
You can still control the volume output from your audio system using the
TV's remote
"Variable?'
control, by setting "Audio
If you want to adjust the volume
to "Fixed?'
through
Out" in the (._ (Audio) menu to
your audio system, set "Audio Out"
Note
The video signal is not output through the AUDIO OUT jacks.
15
Ir_stNEng and Cor_r_eo_ingthe IV
Connecting a DVD Player with Component Video
Connectors
This is the preferred
hookup
to use if:
• Your DVD player has component
Disconnect
1
all power sources
(Y, B-Y, R-Y) jacks.
before
Using three separate component
making any connections.
video cables, connect the DVD player's
Y, B-Y and R-Y jacks to the Y, PB and P_ jacks on the TV. Use the
VIDEO 3 1N connections.
Tip
The Y, B*Y and R-Y jacks on your DVD player are sometimes labeled as Y, C_ and C_,
or Y, P_ and P_. if so, connect the cables to the matching colors.
2
Using an AUDIO
cable, connect the DVD player's
the TV's AUD10
IN jacks.
AUD10
OUT jacks to
Note
The Y, B*Y and R-Y jacks
provide
do not provide
audio, so audio cables
must be connected
to
sound.
Rear of TV
VMC-IOHG
(not supplied)
Tips
• To take advantage
DVD player.
of the Wide
For details,
• Some DVD players
Screen Modes,
refer to the operating
are equipped
set the TV's
aspect ratio to 16:9 on your
instructions
supplied
with the three component
(Cf_, Cb or B-Y) - Blue and P_ (CR, C_ or R-Y) - Red.
16
video
with your DVD player.
connectors:
Y - Green,
P_
Nr_sta_l
ng and Connec[ingtheIV
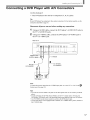
Connecting a DVD Player with AN Connectors
Use this hookup
if:
• Your DVD player does not have component
(Y, PB, PR) jacks.
Tip
If your DVD player
connection
described
Disconnect
1
2
has component
video
output connectors,
for best picture
quality,
use the
on page 16.
all power sources
before making any connections.
Using an AUDIO
cable, connect
the TV's AUDIO
IN jacks.
Using an S VIDEO
cable, connect
the DVD player's
AUDIO
the DVD player's
OUT jacks to
S VIDEO jack to
the TV's S VIDEO jack.
Rear of TV
p_
2UDTIo?R(red)
_
RK-74A-------"_
_
--$
R
t
0C
IN ,4 SV
VIDEO
_-'-'-'(YnCiJs5u;;31i0e
V)
(not supplied)
DVD player
Note
To watch the pictures input from the S VIDEO input jack, set "Auto YC" to "On" in the
(Setup) menu (See page 12).
Tips
• YOUcan also use the VIDEO 2 IN jacks on the fi'ont panel of the TV to connect your DVD
player.
• To take advantage of the Wide Screen Modes, set the TV's aspect ratio to 16:9 on your
DVD player. For details, refer to the operating instructions supplied with your DVD player.
• Use TV/VIDEO on the remote control to switch to the DVD player inpm.
• If your DVD player is not equipped with S VIDEO, use a VIDEO cable (yellow) instead of
the S VIDEO cable.
17
Install ng and Connecting the IV
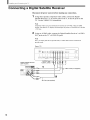
Connecting a Digital Satellite Receiver
Disconnect
1 Using
all power sources
before
three separate component
making any connections.
video cables, connect the Digital
Satellite Receiver's Y, PB and PRjacks to the Y, PB and PR jacks on the
TV. Use the VIDEO 3 1N connections.
Note
Component video (Y, P_, P_) connection is necessary to view 480p, 720p, and I080i
formats. Note that this TV displays all format types of picture in a resolution of 1280 dots
x 768 lines.
2
Using an AUDIO
cable, connect the Digital Satellite
OUT jacks to the TV's AUDIO
Receiver's
AUDIO
IN jacks.
Note
The Y, P_ and P_ jacks
provide
do not provide
audio, so audio
cables must be connected
to
sound.
Rear of TV
Digital Satellite
(SAT-HD200)
Receiver
Y
VMC-10HG (not supplied)
2
RK-74A (not supplied)
18
hr_s_N[
ng and Cow_w_ecling
theIV
Connecting a Digital TV Receiver
Disconnect
1
all power sources
Using three separate
before
component
making any connections.
video cables, connect the Digital TV
Set-top box's Y, PB and PR jacks to the Y, PB and P_ jacks on the TV. Use
the V1DEO 3 IN connections.
Note
Component
video
(Y, Pm P_0 connection
formats. Note that this TV displays
× 768 lines.
2
is necessary
all format
types
to view 480p,
of picture
720p, and I080i
in a resolution
of 1280 dots
Using an AUD10 cable, connect the Digital TV Set-top box's AUD10
OUT jacks to the TV's AUDIO IN jacks.
Note
The Y, P_ and P_ jacks do not provide
provide
audio,
so audio cables
must be connected
to
sound.
Rear of TV
Digital TV Set-top
box
VMC-10HG (not supplied)
RK-74A (not supplied)
19
Ir_stNEng and Cor_r_ecling the IV
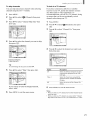
2
Setting the Channels
Press CH+ on the remote control or on the front
panel of your TV to perform
After you finish connecting your TV, you can run
Auto Program to set up your channels. The Auto
Program screen appears when you turn your TV on
for the first time after installing it.
To skip channels, see page 21.
Auto Program.
When all the receivable channels are stored, the
lowest numbered channel will be displayed.
Auto Program is set to scan cable TV channels by
default. To watch UHF channels with an antenna, see
"To watch UHF channels with an antenna" below.
To perform
Auto
Program
again
1 Press MENU.
1
2
Press */_ to select _
(5iD.
3
Press i_/,1_to select "Auto Program,"
(Channel), then press
then press
(5iD.
"Auto Program" appears and the TV starts
scanning and presetting channels automatically.
When all the receivable channels are stored, the
"Channel Skip/Add" menu appears. Using this
menu, you can start skipping unwanted channels
(See "To skip channels" on page 21).
4
Press MENU to exit the menu screen.
To cancel
Auto Program
While "Auto Program" is displayed
MENU on the remote control.
2
in step 3, press
Note
To watch
cable TV channels,
you have to subscribe
to a cable
TV company. Note that cable TV cannot be received in some
areas. This TV receives 1- 125 cable TV channels. For details on
cable TV subscription,
To watch
1
Press POWER
on the TV. The Auto Setup menu
appears.
consult
your nearest
UHF channels
cable
TV company.
with an antenna
1 Press MENU.
2
Press */_ to select _
(Channel),
then press
(5}D.
Auto
Exit:
Program:
First please
cable/antenna
[CH+ l
[CH--]
3
Press */_ to select "Cable,"
then press QD.
4
Press t_/_ to select "Off," then press (5}D.
5
Perform step 3 in "To perform
again" above.
connect
Auto Program
Note
You cannot receive
channels
and set the cable TV channels
and UHF
at the same time.
When you have a cable box or satellite
connected
receiver
The Channel Fix feature is useful when you have a
cable box or satellite receiver connected. For details,
see page 21.
2O
hnstN[ng and ConnectingtheIV
To lock
To skip channels
You can skip unnecessary channels
channels using the CH +/- buttons.
1
Press MENU.
2
Press i_/_ to select _
when selecting
(Channel),
then press
(D.
3
Press i_/t_ to select "Channel
Skip/Add,"
then
press (_).
in a TV channel
If you have connected a cable box or satellite
receiver to your TV, and do not intend to connect
any other audio or video equipment, it is
recommended
that you lock in a TV channel. Doing
so ensures that you do not accidentally switch
channels when using your TV.
1
Press MENU.
2
Press tl./,1!,to select _
(Channel),
then press
CE).
3
Press tl./,1!,to select "Channel
Fix," then press
GE).
4
Press t/t_ to select the channel you want to skip,
then press QE).
,_-°-'_J_:%,a_=----q
.............:
?
]
4
....
{{:
Press tl./,I, to select the channel
then press (i).
you want to set,
s :
5>_1 ;
Example: Select this
to skip channel
5.
Tip
To scroll through the list, press and hold t/tr,.
5
Press t/_
to select "Skip,"
then press GE).
Option
Description
2-6
Select one of these settings
connected
the equipment
if you have
to the VHF/
UHF jack.
Video
1
Select this if you have connected the
equipment
to the AUDIO and VIDEO
IN jacks.
Off
Select this to turn offthe
Channel
Fix
feature.
If you want to re-enter
select "Add."
6
the skipped
channel,
5
Press MENU to exit the menu screen.
Notes
Press MENU to exit the menu screen.
• When you lock in a TV channel, the Favorite Channel feature
cannot he used.
• When you lock in a TV channel, you cannot select "Channel
Skip/Add" in the menu. To use it, set "Channel Fix" to "Off."
21
Ir_stNEng and Cor_r_ec_ingthe IV
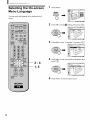
Selecting the On-screen
Menu Language
You can select the language
menus.
to be displayed
1 Press
MENU.
MENU
in all
2
Press i_/t_ to select _
(Setup),
then press (_).
3
Press i_/t_ to select "Language,"
then press @.
J
/
Espa
o
i
4
Press t_/t_ to select your preferred
press @.
language,
s
5
22
Press MENU to exit the menu screen.
then
POWER
Tip
When the STANDBY/SLEEP
POWER on the TV.
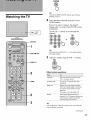
Watching the TV
2
Select the desired
ENTER buttons.
indicator
goes off, press
channel using the 0-9 and
Press 0-9 to select a channel.
changes after 2 seconds.
immediately.
The channel
Press ENTER
to select
Use the CH +/- buttons to scan through
channels.
CH
STANDBY/
the
or
MUTING
1
Tip
When you press _nd hold CH + o1"--,the channel number
will change rapidly.
SYSTEM OFF
3
Adjust the volume using the VOL +/- buttons.
VOL
DISPLAY
2
JUMP
Other button
operations
Press
To
MUTING
Mute the sound. Press again or press
VOL + to restore sound.
SYSTEM
OFF
Turn offthe
TV and all other Sony
equipment.
DISPLAY
Display the current channel number.
When the channel display is turned on,
the current channel number remains
displaye&
Press again to turn the display
2
JUMP
Jump back and forth between two
channels. The TV alternates between
current
selected
3
off.
channel
the
and the last channel
using the 0-9 buttons.
Tip
You can adjust the volume by referring to the value beside the
volume indicator (on screen).
(Continued)
23
W_tohilr_g _he YV
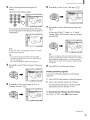
Watching
with closed caption
You can display Caption
offers this service.
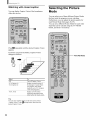
Selecting the Picture
Mode
Vision if the broadcaster
You can select one of three different
Picture Modes
that best suits the program you are watching.
Furthermore, you can adjust the picture quality for
each Picture Mode (See pages 38, 39).
You can set a different Picture Mode for each video
input that can be selected using the TV/V1DEO
button, and store it in memory.
Press []
repeatedly
until the desired
Caption
Vision
appears.
Each time you press the button, Caption
changes as follows:
Select
Vision
PICTURE MODE
To
Off
Turn off Caption
Vision.
CC I (Capture
1),
Display
version
CC2 (Capture
2)
the dialogue
a printed
of a program.
should
of
or sound effects
(The mode
be set to CCI
(Capture
1) for most programs.)
Textl,
Text2
Display
network/station
information
presented using
either half or the whole screen.
Tip
You can select Caption Vision on the menu screen, Select
"Caption Vision" in the _
(Setup) menu, then select the
desired Caption Vision.
24
Watchir_g the fV
Press PICTURE
mode appears.
MODE repeatedly
until the desired
Each time you press the button, the Picture Mode
changes as follows:
PICTURE
MODE
Selecting the Effect
Mode
"SRS WOW"* creates a panoramic stereo audio
image by producing deep and rich bass tones and
clear treble tones, enabling you to enjoy powerful
sounds effects like those in a movie theater.
You can set the Effect mode for each video input that
can be selected using the TV/VIDEO button, and
store it in memory.
Picture
Mode
Vivid
Description
Select for enhanced
picture
contrast
and
sharpness.
Standard
Select to display
a picture
to suit your room's lighting
This mode is recommended
viewing
Pro
with contrast
conditions.
for normal
* "SRS WOW" increases the sound quality of a diverse range of
audio sources dramatically based on proprietary state-of-theart technologies from SRS Labs, inc.
SRS WOW and the 110) symbol are trademarks of SRS
Labs, inc.
SRS WOW technology is incorporated under license from
SRS Labs, inc.
conditions.
Select for professional
monitor-like
appearance.
Tip
You can adjust
"Brightness,"
the picture
and "Color,"
quality
options,
for each Picture
such as "Picture,"
Mode
(See pages
38, 39).
(Continued)
25
W_tohilr_g lhe TV
Notes
• You cannot select the Effect mode if the TV's speaker is set to
oil"
• The Effect mode is valid only on the TV's speakers, So you
cannot enjoy souurt effects of SRS WOW when you listen to a
program through the AUDIO OUT jacks or on headphones.
• SRS WOW may he restricted in the effects it produces when
you listen to a program in monaural.
Saving the Power
Consumption
You can save the power consumption
of the TV.
Tip
You can adjust other sound quality options, !;'or details, see
"Adjusting the Sound Quality" on page 39.
1
Press MENU.
MENU
2
Press 4"/!!" to select (_
(Audio),
then press
(SD
Press POWER
SAVING.
POWER
SAVING
To cancel the Power Saving
Press POWER SAVING
"Power Saving:Standard"
mode
again.
appears.
Tips
• If you turn oil'the TV while the Power Saving mode is on, the
mode stays on next time you turn on the TV.
• You can adjust picture quality options, such as "Picture" and
"Brightness," even if the Power Saving mode is active
(See page 38). Note that if you increase "Picture" or
"Brightness," power consumption is not reduced.
Press MENU to exit the menu screen.
26
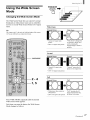
Using the Wide Screen
Mode
Changing
the Wide Screen Mode
The Wide Screen Mode lets you watch 4:3 normal
broadcasts or other picture sizes such as Letterbox
movies in several Wide Screen Modes (16:9 aspect
ratio).
Wide
Zoom
Original Picture
Tip
The "aspect ratio" is the ratio of width to height
16:9 is also referred to as widescreen
format.
Wide Zoom
of the screen.
• Normal
picture
4:3 aspect
• DTV 4:3 aspect
ratio
ratio picture
"Wide Zoom" enlarges the
4:3 picture to fill the 16:9
screen, keeping the
original image as much as
possible.
Normal
Original
Picture
Normal
WIDE MODE
• Normal 4:3 aspect ratio
picture
"Normal" returns the 4:3
picture to its original size.
• DTV 4:3 aspect ratio picture
Full
Original
Full
Picture
• Widescreen
video camera
or
DVD picture
• DTV
Press WIDE MODE repeatedly
Wide Screen Mode appears.
16:9 aspect ratio picture
"Full"
picture
stretches
the 4:3
horizontally
only,
to fill the 16:9 screen.
until the desired
Each time you press the button, the Wide Screen
Mode changes as follows:
27
(Continued)
W_tohilr_g lheTV
Zoom
Original Picture
Zoom
Changing the Wide Screen Mode
using the menu
1 Press
• Letterbox
movie of a video
tape or a DVD disc
MENU.
MENU
"Zoom" enlarges the 4:3
picture horizontally and
vertically to an equal
aspect ratio that fills the
16:9 screen. Useful for
watching Letterbox
movies.
2
Press i_/t_ to select _
3
Press t_/t_ to select the option you want to set,
Tip
(Screen),
then press
GD.
You can also access the Wide Screen Mode settings in the
(Screen) menu. For details, see page 29.
then press @.
ii!!is_¸
_=_:_ >,
_:=
ii_i!
ili;i;i{
_ii;h
iih_,
4
Press t_/_ to select the desired screen mode,
then press Q_).
5
28
,
Press MENU to exit the menu screen.
__ _
Watchir_g the fV
The Wide Screen
Mode options
available
in the _:_ (Screen)
Option
Wide Mode
Select a Wide Mode to use for 4:3 sources.
4:3 Default
Select the default Screen Mode to use
for 4:3 sources.
menu
Description
Wide Zoom
Select to enlarge the 4:3 picture to fill the 16:9 screen, keeping
the original image as much as possible.
Normal
Select to return the 4:3 picture to its original size.
Full
Select to enlarge the 4:3 picture horizontally only, to fill the
16:9 screen.
Zoom
Select to enlarge the 4:3 picture horizontally and vertically to
an equal aspect ratio that fills the 16:9 screen. Useful for
watching Letterbox movies.
OFF
Select to continue using the current Wide Screen Mode setting
when the channel or input is changed.
Tip
To change from one Wide Screen Mode to another, use the
WIDE MODE button on the remote control.
Notes
• The 4:3 Default functions only when the TV receives 480i or
480p signals.
• If "4:3 Default" is set to anything but "Off," the Wide Screen
Mode setting changes only for the current channel.
When you change channels (or inputs), the Wide Screen Mode
is automatically replaced with the 4:3 DetSult setting.
To retain the current Wide Screen Mode setting as channels
and inputs are changed, set "4:3 Default" to "Off" (See page
28).
Notes on the Wide Screen Mode
• The Wide Screen Mode function of this TV allows for various
display options: select the approprime Wide Screen Mode for
the original aspect ratio of the picture you are watching.
• if you change the screen size using the Wide Mode feature
with the TV installed in a public space for commercial use or
public purpose, it might be on infringement of copyright.
• if you select "Wide Zoom" when watching the picture with
4:3 aspect ratio, part of the picture is transformed. You can
winch the picture with its original aspect ratio in "Normal"
mode.
• The upper and lower parts of the picture may not appear in the
screen according to the size of the original picture. In this
case, adjust the vertical position (See page 37).
29
W_tohilr_g lhe TV
Setting the Video Inputs
1
Press TV/V1DEO repeatedly
video input appears.
until the desired
Each time you press TV/VIDEO,
changes as follows:
You can enjoy images (and sound) from optional
video equipment connected to this unit by selecting
the appropriate input. For details on connection, see
pages 9 through 19.
Select
Display
• TV
indication
TV
1
<--1
• VIDEO
1 IN
Video
• VIDEO
2 IN
Video 2*
• VIDEO
3 IN
Video 3**
* if a piece
S VIDEO
the input
1"
of video equipment is connected,_ to the
input and "Auto YC in the |1_ (Setup)
is set to "On" (page
1I), "S Video
I" or '% Video
menu
2"
appears.
**The type of picture
appears
1
signal
under "Video
(480i,
480p, 720p,
or 1080i)
3."
Tip
You can also select the inputs by using the TV/VIDEO
button on the TV.
0-9 and ENTER
buttons
2
Operate the selected
optional equipment.
For details, see "Operating Video Equipment
with Your TV Remote Control" on page 31, or
refer to the instructions supplied with each
equipment.
To watch the TV
Press the 0-9 and ENTER
CH +/-
®@@
®®®
®®®tm
@ ,6o-._
3O
buttons or CH +/-
_.
o,
Watchir_gthe fV
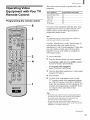
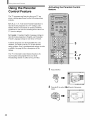
Operating Video
Equipment with Your TV
Remote Control
Programming
the remote control
5
The remote
equipment.
Sony
control is preset to operate Sony video
equipment
Programmable
Beta, ED Beta VCRs
303
8mm VCR
302
VHS
301
VCR
DV VCR
348
DVD player
751
code number
If you have video equipment other than Sony video
equipment that you want to control with the TV's
remote control, use the following
program the remote control.
procedures
to
Note
2
The equipment must have infrared (IR) remote
order to be used with this remote control.
capability
in
From the "Manufacturer's
codes" listed on page 32,
select the three-digit code number for the
manufacturer's
code of your equipment. If more than
one code number is listed, start with the number
listed first. Use the code number to complete the
following procedure.
3
1
Press CODE SET.
2
Press the function
4
button you want to program.
To program a cable box or a satellite
Press SAT/CABLE (FUNCTION).
receiver
To program video equipment
Press VCR!DVD (FUNCTION).
1
3
Enter the three-digit manufacturer's
using the 0-9 buttons.
4
Press ENTER.
5
To check if the code number works, aim the
TV's remote control at the equipment and press
the VCR/DVD and/or SAT/CABLE (POWER)
button that corresponds with that equipment. If it
responds, the programming
is completed. If not,
try using the other codes listed for that
manufacturer.
code number
Tips
• if more than one number is listed, try entering them one by
one until you come to the correct code for your equipment.
• if Y°U enter a new c°de number' the c°de number Y°U
previously entered at that setting is erased.
• in some rare cases, you may not be able to operate your
equipment with the Sony remote control, in this case, use the
equipment's own remote control unit.
(Continued)
31
W_ching
th_ lV
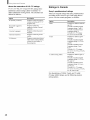
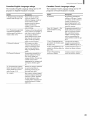
Manufacturer's
codes
Manufacturer
VCRs
Manufacturer
Sony
Admiral
(M. Ward)
Aiwa
Audio
Dynamic
Code
DVD
Players
Manufacturer
Code
Pentax
305, 304
Philco
308, 309
Sony
751
Philips
308, 309, 3 I0
Panasonic
753
752
301
Pioneer
308
Pioneer
327
Quasar
308, 309, 306
RCA
755
338,344
RCAfPROSCAN
304, 305, 308,
Toshiba
754
314, 337
Broksonic
319, 317
Canon
309, 308
Citizen
332
Craig
302, 332
Criterion
315
309, 311, 312,
313, 310, 329
Realistic
309, 330, 328,
335, 324, 338
Sansui
314
Samsung
322, 313, 321
Sanyo
330, 335
Scott
312, 313, 321,
Cable
Boxes
Manufacturer
Code
Sony
230
Hamlin/Regal
222, 223,
224, 225,226
Jerrold/G.
201,202,
Curtis Mathes
304, 338,309
Daewoo
341,312,
DBX
314, 336, 337
Dimensia
304
Sharp
327, 328
Oak
227, 228, 229
Emerson
319, 320, 316,
Shintom
315
Panasonic
219, 220, 221
317,318,341
Signature
Pioneer
214, 215
Fisher
330, 335
(M. Ward)
Funai
338
SV2000
General
Electric
309
329, 304, 309
Sylvania
2000
338, 327
Scientific
Symphonic
338
Hitachi
306, 304, 305,
Tashiro
332
338
Tatung
314, 336, 337
Instant Replay
309, 308
Teac
314, 336, 338,
JC Penney
309, 305,304,
314, 336, 337,
345,346,
337
Zenith
212, 213
Satellite
Receivers
Manufacturer
Code
Sony
801
309, 308
Toshiba
312, 311
Hitachi
805
Wards
327, 328, 335,
Hughes
804
331,332
Panasonic
803
RCA?PROSCAN
802, 808
Toshiba
806, 807
Technics
314, 336, 332,
337
Yamaha
314, 330, 336,
337
LXI (Sears)
332, 305,330,
335,338
Zenith
331
LG
332
Magnavox
308,309,
Marantz
314, 336, 337
Marta
332
Memorex
309, 335
Minolta
305,304
Mitsubishi/MGA
323,324,
326
Multitech
325,338,321
NEC
314, 336, 337
Olympic
309, 308
Optimus
327
Panasonic
308,309,
307
306,
216, 217
General
Kenwood
325,
209, 210, 211
310
347
310
Atlanta
Tocom
308, 309, 338,
332
JVC
207, 208, 218
338
Goldstar
203,
204, 205,206,
325, 326
322, 339, 340
337
1.
335, 323, 324,
Go Video
330, 314, 336,
32
Code
Electric
802
Watchir_g the IV
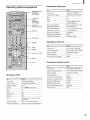
Operating
Operating
optional equipment
POWER buttons
(VCR/DVD,
SAT/CABLE)
FUNCTION
buttons
(VCR/DVD,
SAT/CABLE)
VCR/DVD
operating buttons
To
Press
Turn on/off
VCR/DVD
(POWER)
Control
VCR/DVD
(FUNCTION)
a DVD player
Play
L::>
Stop
[]
Pause
[1I](press
normal
Step through
tracks
chapters
different
of an audio
Step through
DISPLAY
a DVD player
again to resume
playback)
[>f> to step forward
disc
or
to step backward
different
CH + to step forward
of a video disc
or CH
--to step backward
Select a track directly
0-9 buttons
Display
the menu (Setup)
MENU
Operate
the DVD menu
t,
t!., _-,.,
(_
0-9 buttons
Operating
ENTER
a cable box
To
JUMP
Press
Turn on/off
GUIDE
Control
a cable
box
Select a channel
Change
SAT/CABLE
(POWER)
SAT/CABLE
(FUNCTION)
0-9 buttons,
channels
Go to the previous
ENTER
CH +/channel
JUMP
MENU
CH +/-
Operating
a satellite
To
Press
Turn on/off
Control
a satellite
receiver
Select a channel
Operating
a VCR
Change
Turn
on/off
SAT/CABLE
(POWER)
SAT/CABLE
(FUNCTION)
0-9 buttons,
channels
Go to the previous
To
receiver
CH +/channel
JUMP
Press
Display
the channel
VCR!DVD
(POWER)
Display
the DBS guide
GUIDE
(FUNCTION)
Display
the DBS menu
MENU
Control
a VCR
VCR!DVD
Change
channels
CH +/-
Move the highlight
Record
L::> and •
Play
L::>
Stop
[]
Fast forward
[>l>
Rewind
<3<3
Pause
[1t]_ress
Select the item
simultaneously
again to resume
ENTER
number
(cursor)
DISPLAY
t,
t!., _-,.
Q_D
normal
playback)
Search the picture
[>f> or _
forward
(release
or backward
during playback
to resume
normal
playback)
33
W_tohilr_g _he TV
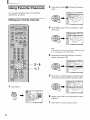
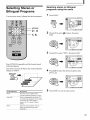
Using Favorite Channels
You can select programs
channels that you preset.
2
Press _/_
3
Press e/t_ to select "Favorite
to select _
(Channel),
then press
(D.
from a list of favorite
Setting your favorite channels
Channels,"
then
press (_).
Return
....
:
4_J
-_
7
:
8
:
4
8
Tip
If you cannot
select
to TV by pressing
4
"Favorite
Channels,"
the TV/VIDEO
change
the input
button.
Press t_/,_ to select the position you want to
change, then press (_).
5
Press ,t/tt
to scroll through
the channels
you find the desired channel,
........ i
then press (_).
;
:
_;;;i
_........
d;iiii_;_ !¸_¸ _ i;!!!_!!i_ii;
_
iiii!_i
_ Ro_
1 Press
_
_
until
_
_;_i__¸¸
[
!!!i
;
MENU.
_7_J
_
s
MENU
34
6
Repeat steps 4 and 5 to program
channels.
other favorite
7
Press MENU to exit the menu screen.
Watchir_g the fV
Watching
favorite channels
1
2
1
Press FAVORITES.
The Favorite
Channels
options appear.
FAVORITES
2
Press t/t_
to select the desired channel,
then
press (_).
The selected
channel will be displayed.
42
35
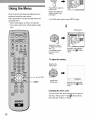
Using the Menu
Press MENU to open the
menu screen.
Most of advanced
Press _,/o to select the
desired category, then
press (_.
settings
and adjustments
are
performed using the menu screen.
Basic operations to navigate through menus are
described below.
• Items which appear in yellow are selected.
• You cannot select items which appear in pale
color.
To exit the menu screen, press MENU again.
Setting option
Press _/_
to select
the option, then press
(The ,* button cannot
be used on some
(Example: when selecting
"Mode" in the _
(Video)
menu)
menus.)
To adjust the setting
Maximize the
setting value
Minimize the
setting value
(Example:
"Picture"
menu)
Changing
the menu
when selecting
in the _
(Video)
color
You can choose the menu color from two types by
selecting "Menu Color" in the _
then selectmg
White or Black.
36
(Setup) menu,
Usir_j Advanced Features
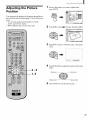
Adjusting the Picture
Position
1
Receive the picture you want to adjust, then
press MENU.
MENU
You can move the position of the picture up and down
for each Wide Screen Mode (page 27) in the following
cases:
• To move the position of the picture
Zoom" and "Zoom" modes
in "Wide
• When subtitles may not fit in the screen
2
Press _/_" to select _
3
Press _/_" to select "Vertical
4
Press i_/!!,/<./*
(Screen),
then press (_).
Center,"
then press
(SD.
to adjust the position,
then press
(SD.
5
Press MENU to exit the menu screen.
37
Usbg A(_vanced _::eal_ues
Adjusting the Picture
Quality
1
Press MENU.
Re_n
Mo6e:
_
MENU
V_v_d
You can adjust the picture quality for each Picture
Mode ("Vivid," "Standard," or "Pro").
You can adjust the picture quality differently for
each video input that can be selected using the
TV/VIDEO button, and store it in memory.
2
Press _/_
to select _
(Video), then press
(Z).
5
:_.__
3
Press */_
4
Press tl./,I, to select the Picture Mode you want
to select "Mode,"
then press (_).
to adjust, then press Q_.
5
38
Press */_
to select "Picture,"
then press (_).
Usir_j Advar_ced Features
6
Press t_/!/_,/*
to make the desired
adjustment,
then press (_.
r
5_
Mode
z
Adjustable
Adjusting the Sound
Quality
Nt_i_
Ntje
You can adjust the sound quality differently for each
video input that can be selected using the
TV/V1DEO button, and store it in memory.
For details on the Effect mode, see pages 25, 26.
0
options
Option
Press
_/_
Press t/._.
Picture
To reduce
contrast,
picture
To enhance picture
contrast.
Brighmess
To darken
the
To brighten
picture,
Color*
To decrease
color
To increase
intensity,
Hue*
the
picture.
color
intensity.
To decrease
the
To increase
the
green tones,
green tones.
Sharpness*
To soften
picture,
the
To sharpen
picture.
the
Backlight
To darken
screen,
the
To brighten
screen.
the
* You cannot select these options
signals other than 480i.
when the TV receives
Tip
You can adjust
each option by referring
to the value beside
each option indicator.
Selective
options
Option
Description
Setling
Color
Select to give bright
Cool/Neutral/
Temp.
(Color
colors a red tint.
Warm
Temperature)
Dynamic
Select to enhance
Picture
picture
the
On/Off
contrast.
7
Repeat steps 5 and 6 to adjust other options.
8
Press MENU to exit the menu screen.
To reset to the factory
Select "Reset"
settings
in step 5, then select "OK" and press
(5£)
(Continued)
39
Usbg A(_vanced t::eal.ues
1
Press MENU.
5
Repeat steps 3 and 4 to adjust other options.
6
Press MENU to exit the menu screen.
MENU
To reset to the factory
Select "Reset"
(S).
2
Press e/_" to select (_
(Audio),
then press
(SE).
3
Press tt*/_!, to select the option you want to
adjust, then press @.
4
Press It/l,/,4,/*
to make the desired
adjustment,
then press @.
(a_
8as_
Balance
0
EIreet
o_
Option*
Press _/_,
Press 4./*
Treble
To decrease higherpitched sounds,
To increase higherpitched sounds.
Bass
To decrease lowerpitched sounds,
To increase lowerpitched sounds.
Balance
To emphasize the
left speaker,
To emphasize the
right speaker.
Effect
See page 25.
* You cannot
and "Audio
"Fixed."
select these options
Out" in the (_
if the TV's
(Audio)
speaker
is off
menu is set to
Tip
You can adjust each option by referring to the value beside
each option indicator.
4O
settings
in step 3, then select "OK" and press
Usir_j
Features
Selecting stereo or bilingual
programs using the menu
Selecting Stereo or
Bilingual Programs
You can enjoy stereo, bilingual
Advar_ced
and mono programs.
1 Press
MENU.
MENU
MTS/SAP
-4
1,5
Press MTS/SAP repeatedly
indication appears.
until the desired
Press _/,_
3
Press _/,_
4
Press t_/t_ to select the desired reception,
to select (_
(Audio),
then press
(SD.
to select "MTS," then press Q_).
sound
Each time you press the button, the sound indication
changes
2
as follows:
then
press @.
Sound indication
Description
Stereo
Select for stereo reception
viewing
Auto SAP
a program
Select to automatically
to second
present,
mode.)
Mono
the TV
when a signal
(If no SAP signal
the TV remains
Select for mono reception.
reduce
in stereo.
switch
audio programs
is received.
when
broadcast
is
in Stereo
(Use to
noise dm'ing weak stereo
broadcasts.)
41
Usbg A(_vanced _::eal_ues
Activating
feature
Using the Parental
Control Feature
the Parental Control
The TV programs and movies shown on TV are
given a rating signal based on the following rating
systems.
In U.S.A.:
U.S. Television
Parental
Guidelines
to
rate television programs (U.S. TV ratings), and
Motion Picture Association of America (MPAA)
Guidelines to rate movies including those shown on
TV (movie ratings).
In Canada:
Canadian English Language ratings to
rate television programs in English, and Canadian
French Language ratings to rate those in French.
3
To block programs you feel unsuitable for your
children, you need to set the TV for the desired
rating systems. Sony's predetermined
ratings are also
available. See page 46 for a description of the
ratings.
The TV's Parental Control feature functions by
receiving the rating signal from your local
broadcasting station or cable service provider.
1,8
1 Press
MENU.
MENU
2
Press 1_/$ to select 1_
(Parent), then press
(Z).
i
42
!}
Usir_j Advar_ced Features
3
Enter a four-digit
buttons.
password
using the 0-9
6
Press l_/tt to select "Lock," then press @.
The Parent menu options appear.
]
Rg"2"g
....................
"Se ect Cou
C_Ng
:_2
ly:
Ch,ld
Ng_r_t
!
¥o_m
[
1
7
Press l_/tt
to select a desired
rating, then press
(SD
If you access the Parent menu for the first time,
you are requested to enter the password again for
confirmation.
If you select "Child," "Youth," or "Y.Adult"
(Young Adult), the Parental Control is activated
automatically.
]:
Note
Do not enter "4357" corresponding to "HELP" on a phone
number pad (See page 44).
Tip
Tip
• You need to enter the password
access
into the Parent
menu.
If you are not tZamili_r with the Parental Guideline
here for any further
system,
If you lose your password,
help simplify
see "Tip" on page 44.
• if you want to change
4
you should
the password,
the rating
selection.
"Youth,"
rating
or "Y.Adult"
to
To set more restrictive
ratings, select "Custom" (See "Selecting a Custom Rating"
on page 44).
see page 44.
Press i_/!_ to select "Select Country,"
select "Child,"
then press
GD.
8
Press MENU to exit the menu screen.
Viewing
blocked
programs
You can view blocked programs
password.
by entering the
1 Press ENTER when tuned to a blocked program.
2
Press t_/tt
Canada),
to select your country (U.S.A.
then press @.
or
Enter your password
The Parental
temporarily
To deactivate
Set "Lock"
using the 0-9 buttons.
Control feature will be canceled
until you turn the TV off.
the Parental
to "Off" in the _
Control
(Parent)
feature
menu.
(Continued)
43
Usbg A(_vanced _::eal_ues
To change
the password
Selecting
1 Press MENU.
2 Press e/_, to select q_
3
Enter your four-digit
buttons.
(Parent),
password
then press (Z).
using the 0-9
The Parent menu options appear.
4
Press e/_
to select "Change
Password,"
then
press CD.
a Custom Rating
If you want to select the ratings to be blocked
from
"Custom" once you have activated the Parental
Control feature (page 42), follow the procedure
below.
For a detailed description of each rating, see "What
the Ratings Mean" on page 46.
Note
5
Enter a new four-digit
buttons.
password
using 0-9
6
Enter the password
then press (]K).
7
Press MENU to exit the menu screen.
in the steps for selecting I_ or "-" in the following procedure,
your selection takes effect once you select I_ or "-", without
pressing (_.
set in step 5 again to confima,
Tip
If yon Lave forgotten your password, enter the master password
"4357" (corresponding to "HELP" on a phone number pad) in
step 3. Yon can then store a new password.
Notes
• If you entered "4357" as your password the first time, you
cannot store a new password (gee step 3 of"Activating the
Parental Control feature" on page 43).
• When you select a Parental Control program and the _l
indicator is displayed on the screen, you cannot view that
program even if you enter "4357" (See "Viewing blocked
programs" on page 43).
2-12
13
1
Perfonn
steps 1 to 7 in "Activating
Control feature"
options.
2
the Parental
on page 42 to display the Lock
Press 4t/,t to select "Custom,"
then press @.
In U.S.A.
In Canada
To select a rating in Canada,
44
go to step 7.
Usir_gAdvanced Features
3
Press _/,_
to select "Movie
Rating,"
To select a TV rating in Canada:
then press
(SD.
Press _/_ to select "English
Rating," or "U.S.A. Rating,"
Rating," "French
then press @.
English Rating
4
Press _/_
to select the rating to be blocked,
then
press @.
French Rating
5
Press _/_
to select 8'
then press @.
U.S.A. Rating
The _ indication automatically
appears beside
the selected rating and all ratings below it,
indicating that the programs
ratings will be blocked.
that match the
_,.
_:_
Re_
_
_
F_
_C.17:
•
a
_
5
_;
._
8
9
To unlock a rating, select 8,
Then press 4,/_ to select "-."
Press _/_ to select the TV rating to be blocked,
then press @.
Press _/_
to select 8,
then press @.
then press (_.
The _ indication changes into "-" and all
ratings above it are unlocked.
Press ,_ to return to the "Custom"
The _ indication automatically
appears
the selected rating and all ratings below
indicating that the programs that match
ratings wilt be blocked.
Exam )le: TV rating
beside
it,
the
in U.S.A.
menu.
TV-¥,
i_
_!_iii,i!•
_;ii_: _:ii%iiii;_!:i;i!i!il
¸
ii_i i:_'_!_!i_i!_ii!ii_i_,_,:
_"_';_;_i!ii_i!
::iiiii!iiil;ii_i_i!_iiiiii!i!i_i_iiil;i_;_iiiiiiill
ili_
7 Toselect
aTVrating
Press _/_
(SD.
To unlock a rating, select I_1, then press 1_).
Then press _/_ to select "-."
in U.S.A.:
to select "TV Rating,"
then press
The _ indication changes into "-" and all
ratings above it are unlocked.
Some U.S. TV ratings have additional content
ratings called "extenders."
The extenders are defined as follows:
D (sexually suggestive Dialog), FV (Fantasy
Violence), L (coarse Language), S (Sexual
situations) and V (Violence).
By setting the extenders, you can define
additional viewing limits.
(Continued)
45
I}sb 9 A(_vanced t=eal_ues
For more details of extenders,
All of the extenders
included
see page 48.
What the Ratings Mean
in the selected
ratings will be blocked. If you want to allow any
of them to be viewed, go to step 10. Otherwise,
goto step 13.
10 Press _,/,,_ to select the extender
to be viewed,
then press (_.
Ratings in the U.S.A.
Sony's
predetermined
ratings
These are original ratings that Sony has
predetermined
according to the viewer's
11 Press t_/_. to select "-," then press @.
rating allows for viewing
follows:
"-" appears beside the selected extender,
indicating that the programs that match the
extender can be viewed.
age. Each
of certain programs,
Option
Description
Child
Suitable
for children
as
under the
age of 7_
Viewable U.S. movie ratings:
G, NR, and N/A
Viewable U.S. TV ratings:
TV-Y, TV-G, and TV-NR
Youth
Suitable for children
and older.
Viewable
To relock the canceled
extender,
select _.
Viewable U.S. TV ratings:
TV-Y, TV-Y7, TV-G, TV-PG,
and TV-NR
Y.Adult
12 Repeat steps 10 and 11 for other extenders.
broadcast
Unrated option allows you to block programs
movies that are broadcast without a rating.
Perform steps 1 and 2 of"Selecting
Rating" on page 44.
2
Press t_/_ to select "Unrated,"
3
Press t_/_. to select "Block,"
Option
Description
Allow
Allows
Block
Blocks
4
a Custom
then press (Z).
and movies
without
without
that are
a rating.
all programs
broadcast
or
then press (Z).
programs
broadcast
and movies
that are
a rating.
Press MENU to exit the menu screen.
Note
If you choose
46
to block
unrated
following
types of programs
broadcast
from another
programs,
sports,
programs,
and weather.
TV programs,
be aware
may be blocked:
programs
country,
news, public
emergency
service
broadcasts,
announcements,
Adult)
Suitable for children
and older.
U.S. movie ratings:
G, PG, PG-13,
Viewable
TV-Y,
aged 13
NR, and N/A
U.S. TV ratings:
TV-Y7,
TV-G,
TV-PG,
TV- 14, and TV-NR
For descriptions of Child, Youth, and Y.Adult
(Young Adult) ratings, see the following custom
rating options.
13 Press MENU to exit the menu screen.
1
(Young
Viewable
All programs that match the ratings you select
and higher, except for the extenders that were
canceled, will be blocked.
or movies
U.S. movie ratings:
G, PG, NR, and N/A
The _ indication appears to show that the
programs that match the extender wilt be blocked
again.
Blocking programs
without a rating
aged 7
that the
political
religious
Usir_j Advanced Features
U.S. movie ratings
U.S. TV ratings
U.S. movie ratings are for movies (including those
shown on TV) rated according to the Motion Picture
Association of America (MPAA) Guidelines.
U.S. TV ratings are for TV programs rated according
to the U.S. Television Parental Guidelines.
Option
Description
G (General Audiences .........
All Ages Admitted)
In G-rated films no strong
words are used, the violence is
at a minimum, nudity and sex
scenes are not present, nor is
there any drug use.
PG (Parental Guidance
Suggested
Some Material
May Not Be Suitable For
Children)
This is a film which may need
to be monitored first by
parents.
PG-I 3 (Parents Strongly
Cautioned --- Some Material
May Be inappropriate For
Children Under 13)
Parents are alerted to be very
careful about the attendance of
their under-teenage children
when viewing.
R (Restricted -- Under 17
This film includes hard
Requires Accompanying Parent language, tough violence,
Or Adult Guardian)
nudity, drug abuse or other
elements of concern.
NC- 17 or X (No One 17 And
Under Admitted)
This is a film that most parents
would consider not suitable for
children aged 17 and under.
There may be violence, sex,
abhorrent behavior, drag abuse
or
other
elements
of
Option
Description
TV-Y (All Children)
This program is designed for
young children aged 2 - 6 and
is appropriate for all children.
TV-Y7 (Directed to Older
Children)
This program is designed for
children aged 7 and older.
Themes and elements in this
program may include mild
fantasy violence or slapstick
violence, or may frighten
children under the age of 7.
TV-G (General Audience)
Most parents would find this
program suitable for all ages.
It contains little or no
violence, no strong language
and little or no sexual dialog
or situations.
TV-PG (Parental Guidance
Suggested)
This program contains some
material that parents may find
unsuitable for younger
children.
TV- 14 (Parents Strongly
Cautioned)
This program contains some
material that many parents
would find unsuitable for
children under the age of 14.
TV-MA (Mature Audience
Only)
This program is specifically
designed to be viewed by
adults and therefore may be
unsuitable for children under
concern.
the age of 17.
(Continued)
47
Usiw_gA(_vanced Featu es
About the extenders
of U.S. TV ratings
TV-Y7, TV-PG, TV-14 and TV-MA ratings have
additional content ratings called "extenders" to
define additional viewing limits. The extenders are
defined as follows:
Option
Description
FV (Fantasy Violence)
Programs containing cartoon
violence occurring in TV-Y7
programs only.
D (sexually suggestive
Dialog)
Programs containing
suggestive dialog, or sexual
innuendo.
L (coarse Language)
Programs containing coarse
language.
S (Sexual situations)
Programs containing sexual
content.
V (Violence)
Programs containing violence,
There may be some profanity,
violence or brief nudity in
these programs.
Ratings in Canada
Sony's
predetermined
ratings
These are original ratings that Sony predetermined
according to the viewer's age. Each rating allows
you to view the certain programs, as follows:
Option
Description
Child
Suitable
for children
under
Viewable
Canadian
English
Language
Viewable
ratings: C and G
Canadian French
Language
ratings:
the
age of 8.
G
Viewable U.S. TV ratings:
TV-Y, TV-G, and TV-NR
Youth
Suitable for children
and older.
aged 8
Viewable
Canadian
English
Language
and PG
Viewable
ratings:
C, G, C8+,
Language
8 ans+
Canadian
ratings:
French
G and
Viewable U.S. TV ratings:
TV-Y, TV-Y7, TV-G, TV-PG,
and TV-NR
Y.Adult
(Young
Adult)
Suitable for children
and older.
aged
Viewable
Canadian
English
Language
ratings:
C, G, C8+,
PG, and 14+
Viewable Canadian
Language ratings:
and 13 ans+
Viewable
French
G, 8 ans+,
U.S. TV ratings:
TV-Y, TV-Y7, TV-G,
TV-14, and TV-NR
TV-PG,
For descriptions of Child, Youth, and Y.Adult
(Young Adult) ratings, see the following custom
rating options.
48
14
Usir_j Advar_cedFeatures
Canadian
English
Language
ratings
The Canadian English Language ratings are for TV
programs in English broadcast in Canada.
Option
C (Programming
children
under
intended
for
the age of 8)
C8+ (Programming generally
considered acceptable for
children aged 8 and older to
watch on their own)
G (General
Audience)
Guidance)
14+ (Programming
contains
themes or content which may
not be suitable for viewers
under the age of 14)
18+ (Adult)
French
Language
ratings
The Canadian French Language ratings are for TV
programs in French broadcast in Canada.
Description
Option
Description
There will be no realistic
scenes of violence or no
offensive language, nudity or
sexual content. Careful
attention is paid to themes,
which could threaten
children's sense of security
and well-being.
G (General)
Programming intended for
audience of all ages. Contains
no violence, or the violence it
contains is minimal or is
Violence will not be portrayed
as the preferred, acceptable, or
only way to resolve conflict;
or encourage children to
imitate dangerous acts which
they may see on television.
There will be no protSnity,
nudity or sexual content.
recommended
Will contain very little
violence, either physical or
verbal or emotional. There
may be some inoffensive
slang, no profanity and no
nudity.
PG (Parental
Canadian
Programming intended for a
general audience but which
may not be suitable for
younger children. Parents may
consider some content
inappropriate for unsupervised
viewing by children aged 8 13.
depicted appropriately with
humor or caricature or in an
unrealistic manner.
8 arts+ (8+ General
--- Not
for young
children)
Programming intended for a
broad audience but contains
light or occasional violence
that could disturb young
children. Viewing with an
adult is recommended for
young children (under the age
of 8).
13 arts+ (Programming may
not suitable for children under
the age of 13)
Viewing with an adult is
strongly recommended for
children under the age of 13.
16 arts+ (Programming is not
suitable for children under the
age of 16)
Contains fi'equent scenes of
violence or intense violence.
18 arts+ (Programming
restricted to adults)
Contains constant violence or
scenes of extreme violence.
Parents are strongly cautioned
to exercise discretion in
permitting viewing by preteens and early teens.
May contain violence integral
to the development of the plot,
character or theme, intended
for adult audiences, May
contain graphic language and
explicit portrayals of nudity
and/or sex.
49
Usilr_gA(_vanced _::eal_ues
Turning Off the TV
Automatically
You can set the TV to turn off automatically after a
predetermined
period of time (15, 30, 45, 60, or 90
minutes).
Press SLEEP repeatedly
time appears.
until the desired period of
Each time you press the button, the period of time
changes as follows:
SLEEP
While the Sleep timer is activated, the STANDBY/
SLEEP indicator on the TV lights up in red.
SLEEP
To cancel the Sleep timer
Press SLEEP repeatedly until "Sleep Off" appears.
Tips
• If you turn the TV off, and then turn it on again, the Sleep
timer returns to "Off/'
• "TV will turn offsoon" appears one minute before the TV
shuts off. This message may not appear if you perform any
operation with the menu opened.
5O
The TV is equipped with a self-diagnosis
function.
there is a problem with your TV, the STANDBY/
SLEEP indicator on the front panel wilt flash in
orange repeatedly. Writing down the duration of
flashes and interval between flashes helps you
inform qualified Sony personnel of the TV's
condition.
Troubleshooting
If, after reading the following instructions, you
have additional questions related to the use of
your Sony TV, please call one of the following
numbers.
Customers in the continental United States
contact the Direct Response Center at:
1-800-222-SONY
(7669)
Customers in Canada contact the Customer
Relations Center at:
1-877-899-SONY
(7669)
Trouble symptoms
Problem
No picture.
Caunot receive ally channels.
If
(flashing in orange)
1
Measure
indicator
how long the STANDBY/SLEEP
flashes and stops flashing.
For example, the indicator flashes for 2 seconds,
stops flashing for 1 second, and flashes for 2
seconds.
2
Press POWER on the TV to turn it off, and
disconnect the AC power adaptor and cord, then
inform qualified Sony personnel or the Direct
Response Center/Customer
Relations Center of
how the indicator flashes (duration and interval).
and remedies
Possible
•
•
•
•
remedies
Make sure the power cord is connected securely.
Turn on the power of the TV.
Check antenna/cable connections.
Check your HD Mode setting (page 8).
Select "HD Mode: 1080" when you receive a picture consisting of 1080 horizontal
with interlaced scanning, and select "HD Mode: 1035" when you receive a picture
consisting of 1035 horizontal lines with interlaced scanning.
For normal use of the TV, use "HD Mode: 1080" (factory setting).
Cannot receive upper
channels (UHF) when using
an autenna,
• Set "Cable" to "Off' ill the
(Channel) menu (page 20).
• Perform Auto Program to add receivable chaunels that are not presently
uaeuaory (page 20).
TV is locked to one chaunel.
• Perform Auto Program to add receivable chaunels that are not presently
uaeuaory (page 20).
• Check your Channel Fix setting (page 21).
in the TV's
Cannot receive any channels
when using cable TV.
• Perform Auto Program to add receivable
uaeuaory (page 20).
in the TV's
• Make sure "Cable" ill tile _
(Channel)
chaunels that are not presently
lines
in the TV's
ulenu is set to "On" (page 20).
Cannot receive or select
channels,
• Perform Auto Program to add receivable
memory (page 20).
chaunels that are not presently
in the TV's
The TV turns off
automatically,
(The TV enters the standby
mode.)
• This TV automatically chauges to the standby mode after displaying the message "TV will
turn off soon" if it receives no broadcast or input signal through the connected equipment
for 10 minutes.
• Check that the Sleep timer is activated (page 50).
(Continued)
51
A_klitionM InFo_;,_4iow_
Problem
Possible
No picture.
Some video sources do not
appear.
Poor picture.
Double images or ghosts.
remedies
• Check the connection between the optional video equipment aud the TV.
• Press TV/VIDEO on the remote control (page 30).
• If you connect the video equipment to the S VIDEO input of the TV, set "Auto YC" to
ill tile
(Setup) menu (page 12).
• Check antenna/cable connections.
• Check the antenna location and direction.
Only snow and noise appear
on the screen.
• Check if the antenna is broken or bent.
• Check if the antenna has reached the end of its serviceable
1-2 years at the seaside.)
Dotted lines or stripes.
• Keep the TV away from noise sources such as cars, motorcycles,
No color.
Color is not correct.
• Press PICTURE MODE to select the desired Picture Mode (page 24).
• Adjust the Picture Mode options
in the _
(Video) menu (page 38).
• If you set the Power Saving function to "Reduced," the picture ulay become dimmer (page
26).
Dark picture.
life. (3-5 years in normal use,
or hair-dryers.
The picture is too bright.
• Press PICTURE MODE to select the desired Picture Mode (page 24).
Picture (stripe) noise.
• Make sure that the antenna is connected using the supplied 75-ohm coaxial cable.
• Keep the antenna cable away from other connecting cords.
• Do not use 300-ohm twin lead cables as interference may occur.
No sound./Noisy sound.
Good picture, no sound.
• Check the volume control.
• Press MUTING or VOL + so that "Muting"
• Disconnect your headphones.
disappears
from the screen (page 23).
• Set "Speaker" to "On" in the (_ (Audio) menu (page 15). If it is set to "Off," sound is not
output from the TV's speakers regardless of the TV's volume control.
Audio noise.
Cannot
operate
Wide Screen
automatically.
Remote
•
•
•
•
the menu.
does
not
Lost password.
52
• The current Wide Screen Mode setting is automatically replaced with the 4:3 Default
setting when you change the chaunel or video input, if"4:3 DeFault" in the
(Screen)
menu is set to other than "Off." tfyou waut to lock in the Wide Screen Mode selected with
(Screen) ulenu (page 29).
the WIDE MODE button, set "4:3 DeFault" to "Off" in the
• The batteries could be weak. Replace the batteries.
• Check the polarity of the batteries.
• If the STANDBY/SLEEP
indicator on the TV does not light in red, press POWER
TV.
• Point the remote control at the remote control sensor of the TV.
• Install the TV away from fluorescent lights.
operate.
Cannot change channels
the remote control,
using the supplied 75-ohm coaxial cable.
connecting cords.
interference may occur.
41).
• If the option you want to select appears in a pale color, you cannot select it.
Mode changes
control
Make sure that the antenna is connected
Keep the antenna cable away from other
Do not use 300-ohm twin lead cables as
Press MTS/SAP to select "Mono" (page
with
on the
• Be sure you have not inadvertently switched your TV from channel 3 or 4 setting if you
are using another device to change channels.
• If you are using auother device to control channels, be sure the FUNCTION button for that
device has been pressed. For example, if you are using your cable box to control channels,
be sure to press SAT/CABLE (page 3 I).
• Select the q_ (Parent) menu oil the menu screen, then enter the following master
password: 4357. The master password clears your previous password and allows you to
enter a new password (page 44).
Ad(_itiona_InFo_ma_ion
Power requirement:
120 V AC, 60 Hz
Specifications
DC input:
14.5 V DC
Television system:
American TV standard
Channel coverage:
VHF: 2-13/UHF: 14-69/CATV:
Antenna:
75 ohm external terminal
Screen size (measured
23 inches
1-125
for VHF/UHF
diagonally):
VIDEO
x 768 lines (vertical)
1/2 IN:
S VIDEO 1N (4-pin mini DIN):
Y: 1 Vp-p, 75-ohms unbalanced,
sync negative
C: 0.286 Vp-p (Burst signal),
75 ohms
VIDEO:
1 Vp-p, 75-ohms unbalanced,
sync negative
500 mVrms (100% modulation)
Impedance: 47 kilohms
AUDIO:
VIDEO
3 IN:
COMPONENT
AUDIO:
AUDIO
Dimensions (W/H/D):
Including TV stand: 601 x 497 x 184 mm
(23 3/4x 19 5/sx 7 _/4inches)
Without TV stand:
601 x433 x 91 mm
(23 3/4x 17 _/sx 3 % inches)
Panel System:
a-Si TFT Active Matrix LCD panel
(Effective dots: more than 99.99%)
Display resolution:
1280 dots (horizontal)
Power consumption:
In use (Max.):
88 W
In standby:
1.2 W
VIDEO (Y, PB, Pl0 IN:
Y: 1.0 Vp-p, 75 ohms
unbalanced, sync negative
PB: 0.7 Vp-p, 75 ohms
P_: 0.7 Vp-p, 75 ohms
Signal fonnat:
480i, 480p, 720p, 1080i
500 mVrms (100% modulation)
Impedance: 47 kilohms
Mass:
lncluding TVstand:
Without TVstand:
9.0 kg (19 lb 13 oz)
7.8 kg (17 lb 3 oz)
Supplied accessories:
Remote control RM-928Y (1)
Batteries size AA (2)
75-ohm coaxial cable (1)
AC power cord (1)
AC power adaptor AC-FD002 (1)
Operating Instructions
Warranty Card
Optional
accessorios:
Note that some optional accessories
stock.
may be out of
Headphones plug adaptor
Connecting cables
VMC-810S/820S,
YC- 15V/30V,
RK-74A, VMC-10HG, SMF-403
Wall-Mount Bracket
SU-W200
Design and specifications
without notice.
are subject to change
OUT:
500 mVrms (100% modulation)
More than 500 mVrms at the maximum volume setting
(Variable)
More than 500 mVrms (Fixed)
Headphones:
Stereo minijack
Impedance: 16 ohms
Speaker:
55 mm (2 V4inches) dome woofer (2)
17 mm (./_, inches) dome tweeter (2)
Speaker output:
4 W x 2, 12 ohms
53
Ad_itior_M InFo_r a_ior_
Index
4:3 Default
............................................
29
F
R
Favorite
A
channels
..................................
Front and rear connectors
.......................
Full ........................................................
Adjusting
picture position .................................
picture quality ...................................
sound quality ....................................
viewing angle of the TV ...................
volume ..............................................
Audio Out .............................................
37
38
39
11
23
15
Auto Program .......................................
Auto SAP ..............................................
Auto YC ...............................................
20
41
12
34
Remote control .......................................
7
8
battery installation ..............................
7
27
H
HD Mode ................................................
8
I
Input select
...........................................
30
J
Jump
.....................................................
23
C
Cable TV ..............................................
20
Channel
.....................................
20
Fix ......................................
21
setting
Channel
Channel
Closed
Skip/Add
caption
Component
............................
......................................
Video
connectors
audio receiver
...................................
cable box .............................................
digital
satellite
digital
TV receiver
DVD player
power
receiver
.....................
............................
................................
cord ........................................
satellite
receiver
L
Language
selection
...............................
24
Menu .....................................................
36
Mono
9
....................................................
41
MTS ......................................................
41
Muting
..................................................
23
..................................................
27
N
10
..........................
13, 14
VCR ..................................................
12
Display
O
23
Optional
equipment
Effect
25
..............................
23
....................................
51
.......................................
20
..............................................
7
U
UHF channels
Unpacking
Vertical
Center
......................................
37
.....................................................
25
.................................................
23
31
....................................................
password
42
...........................................
44
...............................................
46
Mode
........................................
24
Power
on/off
.........................................
23
Power
Saving
........................................
26
Pro ........................................................ 25
54
System off .............................................
Wide Screen Mode
Picture
....................................................
53
25
25
41
W
ratings
E
Specifications .......................................
SRS WOW ...........................................
Standard ................................................
Stereo ....................................................
Volume
Parent
..................................................
51
50
15
Vivid
P
D
Self-diagnosis function .........................
Sleep timer ............................................
Speaker .................................................
V
Normal
19
16, 17
12
Troubleshooting
15
18
S Video input jack ................................
T
21
7
9
S
22
M
.. 16, 18, 19
Connecting
..............................................
antenna ................................................
operating optional equipment ........... 33
programming .................................... 31
Wide Zoom
...............................
...........................................
27
27
Z
Zoom
....................................................
28
hRp:lhvww.sony.net/
Printed on 100% recycled paper using VOC
(Volatile Organic Compound)-free
vegetable
based ink.
oil
Printed in Japan