1
Proliphix Remote Management
Setup and User’s Guide
Release 1.0
Part No. 600-08000-000, Rev. 1B
May 2008
Copyright
Beta Draft Confidential
Copyright © 2007 Proliphix, Inc. All Rights Reserved.
The following are trademarks of Proliphix, Inc.:
All other trademarks are the property of their respective owners.
This document contains information that is the property of Proliphix, Inc. This document may not be
copied, reproduced, reduced to any electronic medium or machine readable form, or otherwise
duplicated, and the information herein may not be used, disseminated or otherwise disclosed, except with
the prior written consent of Proliphix, Inc.
ii
Proliphix Remote Management Setup and User’s Guide, Release 1.0
Part No. 600-08000-000, Rev. 1B
Beta Draft Confidential
Software License Agreement
License for Customer Use of Proliphix Software
IMPORTANT NOTICE -- READ CAREFULLY: This License For Customer Use of PROLIPHIX
Software ("LICENSE") is the agreement which governs use of the software of PROLIPHIX Corporation
and its subsidiaries ("PROLIPHIX") downloadable herefrom, including computer software and
associated printed materials ("SOFTWARE"). By downloading, installing, copying, or otherwise using
the SOFTWARE, you agree to be bound by the terms of this LICENSE. If you do not agree to the terms
of this LICENSE, do not download or run the SOFTWARE.
RECITALS
Use of PROLIPHIX's products requires three elements: the SOFTWARE, a PROLIPHIX Thermostat,
and a personal computer. The SOFTWARE is protected by copyright laws and international copyright
treaties, as well as other intellectual property laws and treaties. The SOFTWARE is not sold, and instead
is only licensed for use, strictly in accordance with this document. The hardware is protected by various
patents, and is sold, but this LICENSE does not cover that sale, since it may not necessarily be sold as a
package with the SOFTWARE. This LICENSE sets forth the terms and conditions of the SOFTWARE
LICENSE only.
DEFINITIONS
Customer. Customer means the entity or individual that downloads the SOFTWARE.
GRANT OF
LICENSE
Rights and Limitations of Grant. PROLIPHIX hereby grants Customer the following non-exclusive,
non-transferable right to use the SOFTWARE, with the following limitations:
Rights. Customer may install and use one copy of the SOFTWARE on a single computer, and except for
making one back-up copy of the Software, may not otherwise copy the SOFTWARE. This LICENSE of
SOFTWARE may be used concurrently on different computers.
Limitations.
No Reverse Engineering. Customer may not reverse engineer, decompile, or disassemble the
SOFTWARE, nor attempt in any other manner to obtain the source code.
No Separation of Components. The SOFTWARE is licensed as a single product. Its component parts may
not be separated for use on more than one computer, nor otherwise used separately from the other parts.
No Rental. Customer may not rent or lease the SOFTWARE to someone else.
TERMINATION
This LICENSE will automatically terminate if Customer fails to comply with any of the terms and
conditions hereof. In such event, Customer must destroy all copies of the SOFTWARE and all of its
component parts.
Defensive Suspension. If Customer commences or participates in any legal proceeding against
PROLIPHIX, then PROLIPHIX may, in its sole discretion, suspend or terminate all license grants and
any other rights provided under this LICENSE during the pendency of such legal proceedings.
COPYRIGHT
All title and copyrights in and to the SOFTWARE (including but not limited to all images, photographs,
animations, video, audio, music, text, and other information incorporated into the SOFTWARE), the
accompanying printed materials, and any copies of the SOFTWARE, are owned by PROLIPHIX, or its
suppliers. The SOFTWARE is protected by copyright laws and international treaty provisions.
Accordingly, Customer is required to treat the SOFTWARE like any other copyrighted material, except
as otherwise allowed pursuant to this LICENSE and that it may make one copy of the SOFTWARE
solely for backup or archive purposes.
APPLICABLE
LAW
This LICENSE shall be deemed to have been made in, and shall be construed pursuant to, the laws of the
Commonwealth of Massachusetts. The United Nations Convention on Contracts for the International Sale
of Goods is specifically disclaimed.
Proliphix Remote Management Setup and User’s Guide
Part No. 600-08000-000, Rev. 1B
iii
Software License Agreement
DISCLAIMER OF
WARRANTIES
AND
LIMITATION ON
LIABILITY
Beta Draft Confidential
No Warranties. TO THE MAXIMUM EXTENT PERMITTED BY APPLICABLE LAW, THE
SOFTWARE IS PROVIDED "AS IS" AND PROLIPHIX AND ITS SUPPLIERS DISCLAIM ALL
WARRANTIES, EITHER EXPRESS OR IMPLIED, INCLUDING, BUT NOT LIMITED TO,
IMPLIED WARRANTIES OF MERCHANTABILITY AND FITNESS FOR A PARTICULAR
PURPOSE.
No Liability for Consequential Damages. TO THE MAXIMUM EXTENT PERMITTED BY
APPLICABLE LAW, IN NO EVENT SHALL PROLIPHIX OR ITS SUPPLIERS BE LIABLE FOR
ANY SPECIAL, INCIDENTAL, INDIRECT, OR CONSEQUENTIAL DAMAGES WHATSOEVER
(INCLUDING, WITHOUT LIMITATION, DAMAGES FOR LOSS OF BUSINESS PROFITS,
BUSINESS INTERRUPTION, LOSS OF BUSINESS INFORMATION, OR ANY OTHER
PECUNIARY LOSS) ARISING OUT OF THE USE OF OR INABILITY TO USE THE SOFTWARE,
EVEN IF PROLIPHIX HAS BEEN ADVISED OF THE POSSIBILITY OF SUCH DAMAGES.
OTHER
iv
If any provision of this LICENSE is inconsistent with, or cannot be fully enforced under, the law, such
provision will be construed as limited to the extent necessary to be consistent with and fully enforceable
under the law. This LICENSE is the final, complete and exclusive agreement between the parties relating
to the subject matter hereof, and supersedes all prior or contemporaneous understandings and agreements
relating to such subject matter, whether oral or written. This LICENSE may only be modified in writing
signed by an authorized officer of PROLIPHIX. Customer agrees that it will not ship, transfer or export
the SOFTWARE into any country, or use the SOFTWARE in any manner, prohibited by the United
States Bureau of Export Administration or any export laws, restrictions or regulations.
Proliphix Remote Management Setup and User’s Guide
Part No. 600-08000-000, Rev. 1B
Beta Draft Confidential
Contents
Preface
Audience ix
Proliphix Documentation Library 6-x
Conventions xi
Technical Publications xii
Technical Support xii
Proliphix Welcomes Your Comments xiii
Chapter 1
Configuring Remote Management
Product Registration 1-3
Configuring the Thermostat(s) 1-4
Configuring the Router and Port Forwarding 1-5
Connecting to Proliphix Devices on a local LAN Connection 1-6
Connecting to Proliphix Devices across an Internet (WAN) Connection Using a
Non-Translating Requirement 1-10
Router Configuration Parameters 1-10
Proliphix Network Settings Configuration Parameters 1-10
Example of Basic Port Forwarding Setup with Non-Translating Requirements 1-11
Connecting to the Proliphix Thermostat Devices across an Internet (WAN) Connection
Using a Translating Capable Router 1-12
Example of Port Forwarding Setup Using Two Network Address Translation (NAT)
Routers 1-13
Chapter 2
Using the Remote Management Interface
Logging into the RMI 2-2
Understanding the RMI 2-4
Managing a Device 2-5
Configuring a Device 2-5
Viewing a Device’s Statistics 2-6
Deleting a Device 2-6
Editing the Account Profile 2-7
Proliphix Remote Management Setup and User’s Guide
Part No. 600-08000-000, Rev. 1B
v
Contents
vi
Beta Draft Confidential
Proliphix Remote Management Setup and User’s Guide
Part No. 600-08000-000, Rev. 1B
Beta Draft Confidential
Figures
List of Figures
Figure 1-1
Figure 1-2
Figure 1-3
Figure 1-4
Figure 1-5
Figure 1-6
Figure 1-7
Figure 2-1
Figure 2-2
Figure 2-3
Figure 2-4
Figure 2-5
Figure 2-6
Remote Management and Control 1-2
Configuration Using Default Port Forwarding 1-6
Web Page Using Default Port Forwarding 1-7
Configuration Using Port Forwarding with an Assigned Value 1-8
Web Page Using Port Forwarding with an Assigned Value 1-9
Port Forwarding with Non-Translating Requirements 1-11
Port Forwarding with Two NAT Routers 1-12
Proliphix Website 2-2
Remote Management Interface Login Window 2-2
Remote Management Window 2-3
TMI Window 2-5
RMI Login Window 2-6
Account Profile Window 2-7
Proliphix Remote Management Setup and User’s Guide
Part No. 600-08000-000, Rev. 1B
vii
Figures
viii
Beta Draft Confidential
Proliphix Remote Management Setup and User’s Guide
Part No. 600-08000-000, Rev. 1B
Beta Draft Confidential
Preface
The Proliphix Remote Management Setup and User’s Guide describes how to set up
your network and manage your thermostat remotely.
Audience
The Remote Management Setup and User’s Guide is intended to be read by users who
are NOT Authorized Proliphix Installers/Dealers. If you are an Authorized Proliphix
Installer, refer to the Proliphix Installer Remote Management Guide.
This guide is ONLY intended for end-users who have purchased their Proliphix
Network Thermostats directly from an online retailer, through a catalogue distributor,
or directly from Proliphix and wish to install the product and provision the Remote
Management Service themselves.
The user should have a good working knowledge of data networking principles. They
should have had prior experience establishing a local area network in their home or
office which would include connecting patch panels and switches, as well as
configuring features on their firewall router.
If you are uncomfortable with provisioning the Remote Management Service yourself,
please contract with an authorized Proliphix Dealer to perform the configuration. If
you would like information about where the closest Proliphix Authorized Dealer is
located, please contact Proliphix at 1-866-IPLIVING. For more information, see
Technical Support (page -xii).
Note
If a VPN is used to access your thermostats remotely then they appear to reside on
your “local” network. You therefore do not need to control them through the
Proliphix Remote Management Service via the Proliphix website. However, E-mail
notification due to alarm conditions will NOT be available with VPN use.
Proliphix Remote Management Setup and User’s Guide, Release 1.0
Part No. 600-08000-000, Rev. 1B
ix
Beta Draft Confidential
Preface
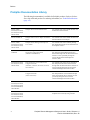
Proliphix Documentation Library
The following documentation is available for Proliphix products. Software Release
Notes ship with each product. For ordering information, see Technical Publications
(page -xii).
Proliphix Product
Title
Audience
NT10e, NT20e,
NT100e/h, NT120e/h,
NT130e/h, NT150e/h,
and NT160e/h
Proliphix Thermostat Installation Guide
For customers who want to install the Basic and
Professional series thermostat.
EPA 20 and EPA 60
Proliphix Ethernet Power Adapter Installation
Guide
For customers who want to install the EPA-20 or
EPA-60 Ethernet Power Adapter.
NT10e, NT20e,
NT100e/h, NT120e/h,
NT130e/h, NT150e/h,
and NT160e/h
Proliphix Remote Management Setup and
User’s Guide
For customers who want to remotely manage
their thermostats through secure authentication at
the Proliphix website.
TM220e/h and
TM250e/h
Thermal Management Series Network
Thermostat Configuration Guide
(TM220e/h and TM250e/h)
For customers who want to access and control
their Proliphix Thermal Management series
thermostat through either the Thermostat Device
Interface or more specifically through the
browser-based Thermostat Management
Interface (TMI).
NT100e/h, NT120e/h,
NT130e/h, NT150e/h,
and NT160e/h
Professional Series Network Thermostat
Configuration Guide
(NT100e/h, NT120e/h, NT130e/h, NT150e/h,
and NT160e/h)
For customers who want to access and control
their Proliphix Professional series thermostat
through either the Thermostat Device Interface or
more specifically through the browser-based
Thermostat Management Interface (TMI).
NT10e and NT20e
Basic Series Network Thermostat
Configuration Guide
(NT10e and NT20e)
For customers who want to access and control
their Proliphix Basic series thermostat through
either the Thermostat Device Interface or more
specifically through the browser-based
Thermostat Management Interface (TMI).
NT10e, NT20e,
NT100e/h, NT120e/h,
NT130e/h, NT150e/h,
NT160e/h TM220e/h,
and TM250e/h
UniVista Installation Guide
For customers who want to install UniVista.
NT10e, NT20e,
NT100e/h, NT120e/h,
NT130e/h, NT150e/h,
NT160e/h TM220e/h,
and TM250e/h
UniVista User’s Guide
For customers who want to manage their
Proliphix devices remotely using UniVista.
x
Proliphix Remote Management Setup and User’s Guide, Release 1.0
Part No. 600-08000-000, Rev. 1B
Beta Draft Confidential
Preface
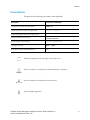
Conventions
This guide uses the following conventions, when applicable:
Description
Convention and Example
Commands or keywords, file or path names
Boldface font
Variable parameters for which you supply values
<courier italics>
Options and arguments for which you supply values
[]
Information that the user must enter
Courier Bold font
Screen messages or system output
Courier Regular font
Selecting a menu item
Menu => Option
Book titles, new terms, and emphasized text
Italics
Additional information that may apply to the subject text.
Note
Proceed carefully to avoid possible equipment damage or data loss.
Caution
Proceed carefully to avoid possible personal injury.
Warning
Provide helpful suggestions.
Tip
Proliphix Remote Management Setup and User’s Guide, Release 1.0
Part No. 600-08000-000, Rev. 1B
xi
Beta Draft Confidential
Preface
Technical Publications
Customers can obtain product documentation on our website at
http://www.proliphix.com/Documenation.aspx.
Note
Documentation is available for currently supported product releases.
Documentation is available in Adobe PDF format. You can view PDFs online using
the Adobe Reader ® 6.0 or later. To download the latest version of the Adobe
Reader software from the Adobe website, click
http://www.adobe.com/products/acrobat/readstep2.html.
Technical Support
Proliphix Technical Support provides technical support between the hours of 9:00 AM
and 5:00 PM Eastern Time, Monday through Friday. Extended 7/24 contracts are
available.
When contacting Proliphix Technical Support, please have the following information
available:
Product model and serial number
Type of heating/cooling system (for example, gas, oil, or electric; warm air, hot
water, heat pump, steam or gravity)
Location and number of wires attached to the Proliphix thermostat
To contact Proliphix Technical Support:
Proliphix, Inc.
www.proliphix.com
66 Tadmuck Road, Suite 1
Westford, MA 01886
E-mail: [email protected]
Telephone support
1-866-IPLIVING
Fax: Attention Proliphix Technical Support
1-978-692-3378
xii
Proliphix Remote Management Setup and User’s Guide, Release 1.0
Part No. 600-08000-000, Rev. 1B
Beta Draft Confidential
Preface
Proliphix Welcomes Your Comments
You can mail, email, or fax your comments. Please include the document part number
in the subject line of your email or fax message.
E-mail: [email protected]
Fax: Attention Technical Publications
978-692-3378
Proliphix, Inc.
Technical Publications
66 Tadmuck Road, Suite 1
Westford, MA 01886
Proliphix Remote Management Setup and User’s Guide, Release 1.0
Part No. 600-08000-000, Rev. 1B
xiii
Preface
xiv
Beta Draft Confidential
Proliphix Remote Management Setup and User’s Guide, Release 1.0
Part No. 600-08000-000, Rev. 1B
Beta Draft Confidential
Chapter
1
Configuring Remote Management
The Proliphix Network Thermostats are designed specifically to communicate directly
over the Internet using the Internet Protocol (IP). This capability allows the user to
securely access, manage, and control their thermostats from anywhere in the world
with the use of common web browser.
To provide this Remote Management capability, Proliphix developed Remote
Management Server Software running on a secure and highly reliable web server. This
software intercommunicates with registered Proliphix Thermostats on a periodic
interval to ensure that each thermostat is reachable by any web browser throughout the
Internet. It also provides user authentication and IP address independence.
Additionally, alarms and/or alerts detected at the thermostats are communicated
immediately to the Proliphix Remote Management Server for processing. Notification
of these alarms and exception conditions are then communicated to the user (or their
agents) via E-mail to either their cell phones or standard E-mail accounts.
Proliphix Remote Management Setup and User’s Guide
Part No. 600-08000-000, Rev. 1B
1-1
CHAPTER 1: Configuring Remote Management
Beta Draft Confidential
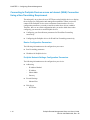
Figure 1-1 displays what happens when a user logs onto the Proliphix website using a
web browser. After the user is authenticated as a registered Proliphix thermostat
owner, the server communicates to the thermostat to open a secure channel between
the user’s web browser and the desired thermostat. Communication between the user
and the thermostat may then be invoked by the user through the Remote Management
Graphical User Interface (GUI). The user simply clicks the links in the browser to
access their thermostats with no knowledge of IP addressing.
Figure 1-1
Remote Management and Control
As an owner and end-user of the Proliphix Internet-enabled Network Thermostat, you
may administer your personal Remote Management Service by first registering the
product then configuring your thermostat(s) and router. Perform the following tasks in
the order shown below:
1
Register the product.
For information about registering the product, see Product Registration.
2
Configure the thermostat(s).
For information about configuring the thermostat(s), see Configuring the
Thermostat(s) (page 1-4).
3
Configuring the router and port forwarding.
For information about configuring the router and port forwarding, see Configuring the
Router and Port Forwarding (page 1-5).
After you have completed the provisioning of your Remote Management Service for
all of your thermostats, please consult the Proliphix Remote Management User Guide
for instructions and details on managing your thermostats.
1-2
Proliphix Remote Management Setup and User’s Guide
Part No. 600-08000-000, Rev. 1B
Beta Draft Confidential
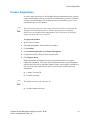
Product Registration
Product Registration
As a new owner and end-user of the Proliphix Internet-enabled thermostat, you must
register with Proliphix so that an account can be established in your name. In addition,
a unique Customer Identifier (ID) is administered to you and allows you to access
your thermostat(s) over the Internet.
You need to register only once with a single valid serial number retrieved from the
Proliphix Network Thermostat device. All other thermostats will self identify
themselves to the Proliphix Remote Management Server Software if the Proliphix
assigned Customer ID is set in each one.
Note
To register the product:
1
Open a browser window.
2
Enter www.proliphix.com in the browser window.
3
Click Products.
4
Click Product Registration under Remote Managment.
5
Complete the form by filling in all the required fields.
6
Click Register Device.
Proliphix generates an automatic E-mail reply immediately after receiving the
registration information. The E-mail states confirmation of the account information
and that an account will be established within 24 hours. After Proliphix establishes an
account, an Account Confirmation E-mail is sent to the user with the following
information:
A unique Customer ID.
An initial username.
The default username is the Customer ID.
Note
An initial random password.
Proliphix Remote Management Setup and User’s Guide
Part No. 600-08000-000, Rev. 1B
1-3
CHAPTER 1: Configuring Remote Management
Beta Draft Confidential
Configuring the Thermostat(s)
After you have registered your product and prior to configuring your router, you must
set some basic parameters in your thermostat.
To configure your thermostat:
1
Log in to the TMI (Thermostat Management Interface) as the Administrator.
2
Access the General Settings Page through the TMI.
For information about accessing the General Settings Page through the TMI, see the
appropriate Proliphix Network Thermostat Configuration Guide for your specific
product.
3
Enter the Device Name.
4
Enter the Site Name.
For example, enter the name or location of the property.
Note
1-4
5
Click Submit.
6
Access the Network Settings Page through the TMI.
7
Set the IP Address Method to Static.
8
Enter a unique IP address, Subnet Mask, Gateway address, Inbound port number
and HTTP port number.
9
Click Submit.
For more information about configuring your thermostat, see the appropriate
Proliphix Network Thermostat Configuration Guide for your specific product.
Proliphix Remote Management Setup and User’s Guide
Part No. 600-08000-000, Rev. 1B
Beta Draft Confidential
Configuring the Router and Port Forwarding
Configuring the Router and Port Forwarding
Port forwarding, also known as Virtual Server or Pinhole settings depending on your
router/firewall manufacturer, is a feature that allows a port (or range of ports) to be
opened and allow traffic to be passed to a specific device/IP address on your network.
A port is a numbered field used to identify a connection between two devices trying to
communicate with each other, for example, a numbered doorway into your network.
As a user of Proliphix products, your ultimate goal is to access your Proliphix device’s
web server from anywhere outside of your local area network (LAN). Every website
has a port with which it is associated and the most common port used is port 80. This
is the default port for almost all commercial websites that you visit everyday. Internet
browsers assume that the website you are going to is running on port 80, therefore
making it convenient for you by not requiring you to specify port 80 as part of the web
address. If a browser did require it then it would be the same address with an :80 at the
end. For example http://www.proliphix.com:80 is the same as
http://www.proliphix.com.
If the value that the web server is running on is anything other than :80 then you need
to specify it by appending the colon/port number after the address. Below are
examples of this showing both an IP address and a URL website name:
IP Address example: http://192.168.111.109:8081
URL website name example: http://www.proliphix.com:8081
This information is important because each device must have a unique port number.
Understanding how ports work helps you configure your router/firewall correctly to
allow your traffic to reach the Proliphix thermostat’s web server.
If you are going to be using the Proliphix Remote Management Interface (RMI), there
are two port settings within the thermostats that are affected:
The Inbound Firewall Port (WAN side)
The web Server HTTP Port (LAN side)
The Inbound Firewall port (WAN) has only one function to perform, which is to set
a port value that the thermostat uses to tell the Proliphix RMI what port to use when it
tries to contact the thermostat. From the thermostat’s perspective, the traffic is
inbound from the RMI to the thermostat.
The Web Server HTTP port (LAN) is the port that the web server within the
thermostat is actually running on. Your browser must be able to access this port to
retrieve web pages from the device.
Proliphix Remote Management Setup and User’s Guide
Part No. 600-08000-000, Rev. 1B
1-5
CHAPTER 1: Configuring Remote Management
Beta Draft Confidential
Connecting to Proliphix Devices on a local LAN Connection
If you are on the same LAN as the thermostat and there are no firewall/routers
involved or required then the Inbound Firewall Port is not affected because it only has
an affect when you pass through a router or firewall. Therefore, when on the same
LAN as the thermostat simply enter the IP address of the thermostat in your local PC’s
browser URL, for example http://192.168.111.109, to connect to the
thermostat.
Note
Include the forwarding port in the IP address only if the HTTP port is something
other than 80 (default forwarding port=80).
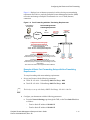
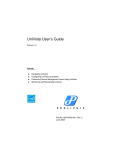
Figure 1-2 displays the basic configuration necessary to connect to Proliphix devices
on a local LAN connection.
Figure 1-2
Configuration Using Default Port Forwarding
Basic Local Ethernet Connectivity
Diagram Accessing Proliphix
Thermostats Using the Default
Fowarding Port of 80
Ethernet 192.168.111.X
192.168.111.108:80
Tstat1
Proliphix UniVista
Server
192.168.111.110
192.168.111.109:80
Tstat2
Local PC
192.168.111.107
Tstat1 Config
IP Access Method: Static
IP Address: 192.168.111.108
Subnet Mask: 255.255.255.0
Gateway: 192.168.111.1
Firewall (Inbound Port): 8081 (has no effect since it’s a local Ethernet connection)
Web Server (HTTP port): 80
*Note: Tstat2 would be configured the same way except using it’s own
IP Address 192.168.111.109
1-6
Proliphix Remote Management Setup and User’s Guide
Part No. 600-08000-000, Rev. 1B
Beta Draft Confidential
Configuring the Router and Port Forwarding
Figure 1-3 displays how you must enter http://192.168.111.109 in your
browser URL to access the thermostat because the forwarding port is using the default
80 port and therefore is not required after the IP address.
Figure 1-3
Web Page Using Default Port Forwarding
Proliphix Remote Management Setup and User’s Guide
Part No. 600-08000-000, Rev. 1B
1-7
CHAPTER 1: Configuring Remote Management
Beta Draft Confidential
In Figure 1-4, the HTTP port is not set to the default port 80, therefore you have to use
the assigned value, for example: port 8081, as part of the IP address to access the
thermostat. Therefore, to access the thermostat you must enter
http://192.168.111.109:8081 in the browser URL.
Figure 1-4
Configuration Using Port Forwarding with an Assigned Value
Basic Local Ethernet Connectivity
Diagram Accessing Proliphix
Thermostats Using the Fowarding
Port of 8081
Ethernet 192.168.111.X
192.168.111.108:8081
Tstat1
Proliphix UniVista
Server
192.168.111.110
192.168.111.109:8081
Tstat2
Local PC
192.168.111.107
Tstat1 Config
IP Access Method: Static
IP Address: 192.168.111.108
Subnet Mask: 255.255.255.0
Gateway: 192.168.111.1
Firewall (Inbound Port): 8081 (has no effect since it’s a local Ethernet connection)
Web Server (HTTP port): 8081
*Note: Tstat2 would be configured the same way except using it’s own
IP Address 192.168.111.109
1-8
Proliphix Remote Management Setup and User’s Guide
Part No. 600-08000-000, Rev. 1B
Beta Draft Confidential
Configuring the Router and Port Forwarding
Figure 1-5 displays how you must enter http://192.168.111.109:8081 to
access the thermostat in your browser URL because the forwarding port is using the
port forwarding number of 8081 and therefore required after the IP address.
Figure 1-5
Web Page Using Port Forwarding with an Assigned Value
The Port Forward rules states: “When receiving incoming traffic on port X, forward it
to the IP address of Y.Y.Y.Y and the destination port of Z.” Where X is the Inbound
Port set on the thermostat, Y.Y.Y.Y is the IP address of the thermostat on the LAN
and Z is the HTTP port on the thermostat.
Using Figure 1-5 above as an example, the traffic inbound on port 8081 would be
forwarded to 192.168.111.109 with a destination port of 8081.
Proliphix Remote Management Setup and User’s Guide
Part No. 600-08000-000, Rev. 1B
1-9
CHAPTER 1: Configuring Remote Management
Beta Draft Confidential
Connecting to Proliphix Devices across an Internet (WAN) Connection
Using a Non-Translating Requirement
The main goal is to get the web server HTTP port on the Proliphix devices to display
the web pages for configuration and management capabilities. When you need to
connect to the Proliphix devices across an Internet connection there are a few
configuration parameters you need to consider to make these devices reachable.
Therefore, there are two main configuration tasks you need to think about when
configuring your network to reach Proliphix devices:
Configuring your firewall/router parameters for IP and Port Forwarding
connectivity
Configuring the Proliphix devices for IP and Port Forwarding connectivity
Router Configuration Parameters
The following information must be configured on your router:
Port Forwarding parameters
IP address for Proliphix device
Proliphix Network Settings Configuration Parameters
The following information must be configured on your device:
Addressing
–
IP Address Method
–
IP Address
–
Subnet Mask
–
Gateway
Firewall Settings
–
Web Server
–
1-10
Inbound Port
HTTP Port
Proliphix Remote Management Setup and User’s Guide
Part No. 600-08000-000, Rev. 1B
Beta Draft Confidential
Configuring the Router and Port Forwarding
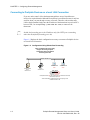
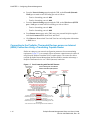
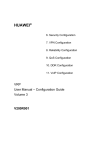
Figure 1-6 displays how an Internet connection is achieved using a non-translating
requirement and is able to reach the Proliphix Remote Management Interface (RMI)
to monitor and manage a Proliphix Thermostat device over a WAN (Internet)
connection.
Figure 1-6
Port Forwarding with Non-Translating Requirements
Port Forwarding with Non
Translating Requirements
Proliphix RMI Server
207.58.145.109:80
WAN
64.12.10.X
Ethernet
INTERNET
LinkSys Router
Internal IP
192.168.1.1:8081
DSL or Cable
Modem (Single
Ethernet port )
64.12.10.5
64.12.10.5
(Bridging)
207.58.145.X
LinkSys Router Port Forwarding Setup
Non-Translate Requirement Example
(Linksys DHCP Pool Range 192.168.1.100-150)
Router Port Forwarding Setup:
Tstat1 IP: 192.168.1.51 Start Range: 8081 End Range: 8081
Tstat2 IP: 192.168.1.52 Start Range: 8082 End Range: 8082
Ethernet 192.168.1.X
192.168.1.100
Proliphix Thermostat Configuration
Tstat1 Config:
Set Tstat1 to a “Static IP” address: 192.168.1.51
Set Firewall (Inbound - WAN) port to match router forwarding port rule : 8081
Set Web Server (HTTP port - LAN) port to match router forwarding port rule : 8081
Tstat2 Config:
Set Tstat2 to a “Static IP” address: 192.168.1.52
Set Firewall (Inbound - WAN) port to match router forwarding port rule : 8082
Set Web Server (HTTP port - LAN) port to match router forwarding port rule : 8082
192.168.1.51:8081
192.168.1.52:8082
Tstat1
Tstat2
- Add Customer ID
- Hit the “Discover Now” button to send configuration information to RMI Server
Example of Basic Port Forwarding Setup with Non-Translating
Requirements
To setup forwarding with non-translating requirements:
1
Set up your Router with the following parameters:
Tstat1 IP: 192.168.1.51 Start Range: 8081 End Range: 8081
Tstat2 IP: 192.168.1.52 Start Range: 8082 End Range: 8082
The Linksys is set up with Linksys DHCP Pool Range 192.168.1.100-150.
Note
2
Configure your thermostats with the following parameters:
a
From the Network Settings page through the TMI, set the Tstat Static IP address
as follows:
–
Tstat1 to Static IP address: 192.168.1.51
–
Tstat2 to Static IP address: 192.168.1.52
Proliphix Remote Management Setup and User’s Guide
Part No. 600-08000-000, Rev. 1B
1-11
CHAPTER 1: Configuring Remote Management
b
c
Beta Draft Confidential
From the Network Settings page through the TMI, set the Firewall (Inbound WAN) port to match router forwarding port rule as follows:
–
Tstat1 to forwarding port rule: 8081
–
Tstat2 to forwarding port rule: 8082
From the Network Settings page through the TMI, set the Web Server (HTTP
port - LAN) port to match router forwarding port rule as follows:
–
Tstat1 to forwarding port rule: 8081
–
Tstat2 to forwarding port rule: 8082
d
From Remote Access page on the TMI, enter your personal Proliphix supplied
individual Customer ID for both Tstat1 and Tstat2.
e
Click Discover Now on both Tstat1 and Tstat2 to send configuration information
to RMI Server.
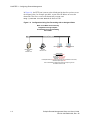
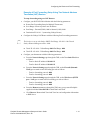
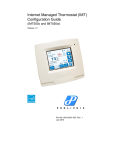
Connecting to the Proliphix Thermostat Devices across an Internet
(WAN) Connection Using a Translating Capable Router
Similar to setting up your network configuration parameters for a non-translating
requirement, Figure 1-7 is an example of how an internet connection may be achieved
using Network Address Translation (NAT) capable routers. The routers are able to
reach the Proliphix Remote Management Interface (RMI) to monitor and manage a
Proliphix Thermostat device over a WAN (internet) connection.
Figure 1-7
Port Forwarding with Two NAT Routers
Proliphix RMI Server
207.58.145.109:80
Port Forwarding with Two Network
Address Translation (NAT) Routers
WAN
DSL or Cable Modem
NAT capable (Multi
64.12.10.X
Ethernet port )
INTERNET
64.12.10.5
Ethernet
207.58.145.X
10.10.1.2
10.10.1.X
Linksys NAT Router
Internal IP
192.168.1.1:80
10.10.1.3
(Bridging)
NAT Router Port Forwarding Setup
Example (DSL/Cable Modem NAT capable )
Router Port Forwarding Setup for Multiple Thermostats
Set a Range of Ports to point to one Destination IP address
Port Range – Start Range: 8080 to End Range: 8086
Destination IP: 10.10.1.3 (connecting Linksys Router)
Linksys NAT Router Port Forwarding Setup
Example (Linksys NAT capable )
(Linksys DHCP Pool Range 192.168.1.100-150)
(Linksys Remote Management Port: 8080)
Router Port Forwarding Setup:
Tstat1 IP: 192.168.1.51 Start Range: 8081 End Range: 8081
Tstat2 IP: 192.168.1.52 Start Range: 8082 End Range: 8082
Ethernet 192.168.1.X
192 .168 .1.100
Proliphix Thermostat Configuration
Tstat1 Config:
Set Tstat1 to a “Static IP” address: 192.168.1.51
- Set Firewall (Inbound - WAN) port to match router forwarding port rule : 8081
- Set Web Server (HTTP port - LAN) port to match router forwarding port rule : 8081
Tstat2 Config:
Set Tstat2 to a “Static IP” address: 192.168.1.52
- Set Firewall (Inbound - WAN) port to match router forwarding port rule : 8082
- Set Web Server (HTTP port - LAN) port to match router forwarding port rule : 8082
192.168.1.51:8081
192 .168.1.52:8082
Tstat1
Tstat2
- Add Customer ID
- Hit the “Discover Now” button to send configuration information to RMI Server
1-12
Proliphix Remote Management Setup and User’s Guide
Part No. 600-08000-000, Rev. 1B
Beta Draft Confidential
Configuring the Router and Port Forwarding
Example of Port Forwarding Setup Using Two Network Address
Translation (NAT) Routers
To setup forwarding using two NAT Routers:
1
2
Configure your NAT DSL/Cable Modem with the following parameters:
Router Port Forwarding Setup for Multiple Thermostats
Set a Range of Ports to point to one IP address
Port Range - External (WAN): 8080 to Internal (LAN): 8086
Destination IP: 10.10.1.3 (connecting Linksys Router)
Configure the Linksys NAT Router with the following Port Forwarding parameters:
The Linksys is set up with Linksys DHCP Pool Range 192.168.1.100-150 and
Linksys Remote Management Port: 8080.
Note
3
Tstat1 IP: 192.168.1.51 Start Range: 8081 End Range: 8081
Tstat2 IP: 192.168.1.52 Start Range: 8082 End Range: 8082
Configure your thermostats with the following parameters:
a
b
c
From the Network Settings page through the TMI, set the Tstat Static IP address
as follows:
–
Tstat1 to Static IP address: 192.168.1.51
–
Tstat2 to Static IP address: 192.168.1.52
From the Network Settings page through the TMI, set the Firewall (Inbound WAN) port to match router forwarding port rule as follows:
–
Tstat1 to forwarding port rule: 8081
–
Tstat2 to forwarding port rule: 8082
From the Network Settings page through the TMI, set the Web Server (HTTP
port - LAN) port to match router forwarding port rule as follows:
–
Tstat1 to forwarding port rule: 8081
–
Tstat2 to forwarding port rule: 8082
d
From the Remote Access page through the TMI, enter your personal Proliphix
supplied individual Customer ID for both Tstat1 and Tstat2.
e
Click Discover Now on both Tstat1 and Tstat2 to send configuration information
to RMI Server.
Proliphix Remote Management Setup and User’s Guide
Part No. 600-08000-000, Rev. 1B
1-13
CHAPTER 1: Configuring Remote Management
Beta Draft Confidential
The thermostat and Remote Management Server establish an initial connection and
transfer relevant account information.
This process may take up to 5 minutes.
Note
1-14
Proliphix Remote Management Setup and User’s Guide
Part No. 600-08000-000, Rev. 1B
Beta Draft Confidential
Chapter
2
Using the Remote Management Interface
After your thermostats have successfully connected with the Proliphix Server
Software, you may access the Proliphix website at www.proliphix.com and use your
Proliphix-assigned account information to manage your thermostat over the Internet
using the Proliphix Remote Management Interface (RMI).
This chapter discusses how to access and use the RMI. Specifically, it contains the
following sections:
Logging into the RMI (page 2-2)
Understanding the RMI (page 2-4)
Managing a Device (page 2-5)
Editing the Account Profile (page 2-7)
Proliphix Remote Management Setup and User’s Guide
Part No. 600-08000-000, Rev. 1B
2-1
Beta Draft Confidential
CHAPTER 2: Using the Remote Management Interface
Logging into the RMI
To access and log into the RMI:
1
Open a browser window.
2
Enter www.proliphix.com in the browser window.
The main page of the Proliphix website appears. See Figure 2-1.
Figure 2-1
3
Proliphix Website
From the main menu, click Customer Login.
The Remote Management Interface window appears. See Figure 2-2.
Figure 2-2
2-2
Remote Management Interface Login Window
Proliphix Remote Management Setup and User’s Guide
Part No. 600-08000-000, Rev. 1B
Beta Draft Confidential
Logging into the RMI
Before you can access the RMI, you must have registered your device(s). If you
have not registered your device(s), click Register and see Product Registration
(page 1-3) for more information about registering your device(s).
Note
4
Enter your Proliphix-assigned Username and Password to access your account.
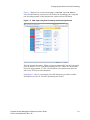
The Remote Management window appears and displays the device(s) associated
with the account. See Figure 2-3.
Figure 2-3
Remote Management Window
Device Name
Note
Note
If you are unaware of your username and/or password then contact your
Authorized Proliphix Installer for more information.
If you forget your password, click the word “here.” Enter your Username and
click Get New Password. A new password is sent to the E-mail address with which
the account is associated.
Proliphix Remote Management Setup and User’s Guide
Part No. 600-08000-000, Rev. 1B
2-3
Beta Draft Confidential
CHAPTER 2: Using the Remote Management Interface
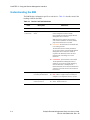
Understanding the RMI
The RMI displays information specific to each device. Table 2-1 describes each of the
headings found on the RMI.
Table 2-1
Device List Field Definitions
Field
Description
Device Name
The name of the device.
Minimum
Connectivity
Displays the status of the
device.
Parameters
Reachable - The thermostat is reachable for
remote management and successfully
intercommunicates with the Proliphix Remote
Management Server Software.
Note: If the device name is blue, the link is
active and the TMI Status & Control (default)
page for that thermostat is accessible.
Firewalled - The thermostat is unreachable due
to an existing firewall.
The thermostat has successfully notified the
server of its existence, but the Proliphix Remote
Management Server Software is unable to
respond to the thermostat because the user’s
firewall router is inhibiting access to the
thermostat.
Unreachable - The thermostat is unreachable.
The Proliphix Remote Management Server
Software is not receiving periodic messaging
from the thermostat. It is likely that the
thermostat and the Server Software maintained a
connection at one time but now that connection
has been lost.
Alarm
Device
2-4
Displays the type of alarm
received by the thermostat.
Green - There are no alarms pending.
Red - There is a high severity level alarm, for
example a Low Temperature alarm, is present.
Used to perform specific
actions on a device.
stats - Displays the device statistics.
delete - Deletes the device.
Proliphix Remote Management Setup and User’s Guide
Part No. 600-08000-000, Rev. 1B
Beta Draft Confidential
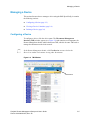
Managing a Device
Managing a Device
This section discusses how to manage a device using the RMI. Specifically, it contains
the following sections:
Configuring a Device (page 2-5)
Viewing a Device’s Statistics (page 2-6)
Deleting a Device (page 2-6)
Configuring a Device
To configure a device, click the device name. The Thermostat Management
Interface (TMI) window appears (see Figure 2-4) and contains two components: the
Remote Management header and the thermostat TMI, which is the same TMI used to
manage the thermostat on the local network.
Note
In the Remote Management header, click View Devices to return back to the
Device List window and continue viewing other thermostats.
Figure 2-4
TMI Window
View Devices
Proliphix Remote Management Setup and User’s Guide
Part No. 600-08000-000, Rev. 1B
2-5
Beta Draft Confidential
CHAPTER 2: Using the Remote Management Interface
Note
For specific information about how to configure a device, see the Proliphix
Network Thermostat Configuration Guide specific to your type of device. For more
information, see the Proliphix Documentation Library (page -x).
Viewing a Device’s Statistics
To view a device’s statistics, click stats. The Device Statistics window appears (see
Figure 2-5) and displays information specific to the device, for example: the device’s
serial number, the last know WAN IP address and port number, the last known
discovery exchange, and the time the device was remotely managed.
Figure 2-5
RMI Login Window
Deleting a Device
To delete a device, click delete. The device is removed from the device list.
2-6
Proliphix Remote Management Setup and User’s Guide
Part No. 600-08000-000, Rev. 1B
Beta Draft Confidential
Editing the Account Profile
Editing the Account Profile
You use the Account Profile window to change the account username and password,
for example. You may also set up any combination of four E-mail or SMS (text
message) addresses that are notified upon the occurrence of any device alarm or alert
associated with your account.
The SMS option is intended for cell phones equipped with text messaging
capability.
Note
To edit the account profile:
1
Click Account Profile.
The Client Profile window appears (see Figure 2-6) and displays the information
specific to the account.
Figure 2-6
Account Profile Window
2
Modify the fields, as necessary.
3
Click Update Profile to save the changes.
Proliphix Remote Management Setup and User’s Guide
Part No. 600-08000-000, Rev. 1B
2-7
Beta Draft Confidential
CHAPTER 2: Using the Remote Management Interface
2-8
Proliphix Remote Management Setup and User’s Guide
Part No. 600-08000-000, Rev. 1B