1
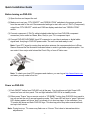
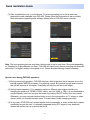
Advanced High Definition Digital TV
Tuner Decoder Box
Quick Installation Guide
Model: PHD-200
© Copyright 2006, PrimeDTV Technologies, Inc.
Quick Installation Guide
Before turning on PHD-200:
(1) Open the box and inspect the unit.
(2) Make sure to set your “DTV SELECT” and “RESOLUTION” switches to the proper positions
from the rear side of the unit. Recommended settings to start with: set to Y-Pb-Pr (Component)
output from “DTV SELECT” switch and 1080i as display resolution from “RESOLUTION”
switch.
(3) Connect component (Y-Pb-Pr) cable included inside the box from PHD-200 component
connectors (color coded as Green, Blue, Red) to your TV’s component input.
(4) Connect PHD-200 AIR/CABLE Input RF connector to over-the-air antenna or digital cable
signal feed. And plug in PHD-200 power cable. The unit is set and ready to use.
Note: If your DTV signal is coming from an indoor antenna, the recommended one is Silver
Sensor Antenna like the illustration indicated below in order to get better signal reception. You
can order it from major retail stores like Circuit City or from ePVision.com.
Note: To check your local DTV programs and stations, you can log on http://www.titantv.com
and enter your zip code to find out.
Power on PHD-200:
(1) Push ON/OFF button from PHD-200 unit all the way. You should see red light Power LED
turned on from unit front panel. This red light indicates PHD-200 is in standby mode.
(2) Either press “Power” key on remote control or “STANDBY” button from PHD-200 front panel to
turn on and set the unit in normal operation mode. The Power LED will turn to “green” light and
LED display readout will show “boot” to indicate it is in boot-up stage. In the meantime, your
TV screen will show and flash PHD-200 logo. This boot-up period may take several seconds
and up to half minute.
Note: During boot-up, TV screen may flash one or 2 times. This is due to internal resolution
adjustments.
-1-
Quick Installation Guide
(3) After completed boot-up, you should see TV screen prompting you to set up and scan
terrestrial or cable channels from PHD-200. Please follow the procedures to set up initially.
More information regarding initial settings, please refer to PHD-200 owner’s manual.
Note: The auto-scanning process may take a few minutes or up to more than 10 minutes depending
on Terrestrial or Cable channels you scan. PHD-200 will check every channel including sub-channels,
and verify if it is digital, analog or encrypted or not. Please be patient during channel scanning.
Special cares during PHD-200 operation:
(1) During normal unit operation, PHD-200 may feel a little bit warmer that is because due to the
internal powerful MPEG2 processor. It is perfectly normal. But reserve enough space around
the unit will improve air circulation. Eventually will help the unit last much longer.
(2) During normal operation, if it is needed to switch to different video output resolution by
changing the position of “RESOLUTION” switch, say from 1080i to 720p, it is recommended to
complete power on/off unit (re-cycle the power by pushing ON/OFF button from front panel).
Otherwise, you may see new switched video is not in the right position on TV screen or video
doesn’t come out normally because some TVs can’t detect mode changing smoothly.
(3) In any case, if PHD-200 can’t accept remote control commands, or video screen stuck, please
completely re-cycle the unit. It is normally happened during DTV signal is very weak and
causes the system lock up to protect the circuit.
-2-