1
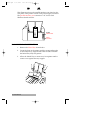
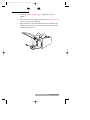
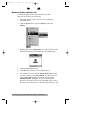
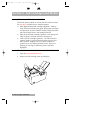
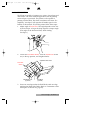
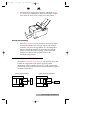
ep100.qxd 1/27/2000 1:11 PM Page i 000114-510175-(02) EP-100 Address Printer Users Manual © 1999 All rights reserved. ep100.qxd 1/27/2000 1:11 PM Page ii Notices: The information in this document is subject to change without notice. NO WARRANTY OF ANY KIND IS MADE WITH REGARD TO THIS MATERIAL, INCLUDING, BUT NOT LIMITED TO, THE IMPLIED WARRANTIES OF MERCHANTABILITY AND FITNESS FOR A PARTICULAR PURPOSE. No liability is assumed for errors contained herein or for incidental or consequential damages in connection with the furnishing, performance, or use of this material. This document contains proprietary information which is protected by copyright. All rights are reserved. No part of this document may be photocopied, reproduced, or translated into another language without prior written consent. Trademark Acknowledgments: IBM is a registered trademark of International Business Machines Corporation. Windows is a trademark of Microsoft Corporation. All other trademarks are the property of their respective owners. CandelaColor® Charged by Pictographics is a registered trademark of Pictographics International Corporation. Printing History Edition 1.1, #000114, © Copyright 1999, All rights reserved. FCC Compliance Statement: This device complies with part 15 of the FCC rules. Operation is subject to the following two conditions: (1) this device may not cause harmful interference, and (2) this device must accept any interference received, including interference that may cause undesired operation. For Users in the United States: This equipment has been tested and found to comply with the limits for a Class B digital device, pursuant to Part 15 of the FCC Rules. These limits are designed to provide reasonable protection against harmful interference in a residential installation. This equipment generates, uses, and can radiate radio frequency energy and, if not installed and used in accordance with the instructions, may cause harmful interference to radio communications. However, there is no guarantee that interference will not occur in a particular installation. If this equipment does cause harmful interference to radio or television reception, which can be determined by turning the equipment off and on, the user is encouraged to try to correct the interference by one or more of the following measures: Re-orient or relocate the receiving antenna. Increase the separation between the equipment and receiver. Connect the equipment into an outlet on a circuit different from that to which the receiver is connected. Consult the dealer or an experienced radio/TV technician for help. Use of a shielded cable is required to comply with the Class B limits of Part 15 of the FCC Rules. You are cautioned that any changes or modifications not expressly approved in this manual could void your authority to operate and/or obtain warranty service for this equipment. For Users in Canada: This digital apparatus does not exceed the Class B limits for radio noise for digital apparatus set out on the Radio Interference Regulations of the Canadian Department of Communications. Le present appareil numerique n'emet pas de bruits radioelectriques depassant les limites applicables aux appareils numeriques de la class B prescrites dans le Reglement sur le brouillage radioelectrique edicte par le ministere des Communications du Canada. CAUTION! TO PREVENT FIRE OR SHOCK HAZARD, DO NOT EXPOSE THE UNIT TO RAIN OR MOISTURE. TO REDUCE THE RISK OF ELECTRIC SHOCK, DO NOT REMOVE EXTERIOR PANELS. NO USERSERVICEABLE PARTS INSIDE. REFER SERVICING TO QUALIFIED SERVICE PERSONNEL. OPERATE THE UNIT WITH ONLY THE PROPER ELECTRICAL SPECIFICATIONS AS LABELED ON THE PRINTER AND POWER SUPPLY. ii ep100.qxd 2/1/2000 11:34 AM Page iii Table of Contents Section 1: Introduction A. Choosing a Good Location ................................................................2 B. Unpacking and Inspection.................................................................2 C. Identifying the Parts ...........................................................................3 D. Assembly of Infeed Tray ....................................................................4 E. Applying Power ..................................................................................5 Section 2: Computer Connection and Printer Driver Installation A. Connecting the Printer to Your Computer......................................6 B. Installing the Printer Driver ..............................................................7 Section 3: Ink Cartridges and Media A. About Ink Cartridges and Media ...................................................10 B. Installing/Replacing/Switching Ink Cartridges .........................10 C. Loading Media ..................................................................................13 D. Orientation of the Envelopes ..........................................................15 Section 4: Setting up the Printer Driver and Printing A. Setting Up the Printer Driver..........................................................17 B. Printing a Test Print ..........................................................................21 C. Printing ...............................................................................................21 Section 5: Interpreting the Printer’s Indicator Lights.............................22 Section 6: Maintaining the Printer A. Cleaning the Ink Cartridge Nozzles ..............................................23 B. Cleaning Output and Printer Casing .............................................23 C. Cleaning the Rollers .........................................................................23 D. Technical Support..............................................................................23 Section 7: Technical Specifications ............................................................24 Section 8: Troubleshooting ...........................................................................25 Index ..............................................................................................................28 iii ep100.qxd iv 1/27/2000 1:11 PM Page iv ep100.qxd 1/27/2000 1:11 PM Page 1 TOC INDEX Section 1: Introduction THANK YOU . . . . . . for choosing the EP-100 Address Printer. This printer is the perfect way to print addresses and postal codes on all your mailing pieces, providing an individually-typed, personalized look. The EP-100 lets you print in black monochrome and fullcolor, allowing you to put starbursts, photos, and other highlights onto envelopes. Operation is simple, quality is high, and printed images are durable and highly smudge-resistant. Media Types The EP-100 Address Printer prints directly onto many different types of media. The most common applications are #10 envelopes and postcards. It will also handle 3-fold mailers, flats, newsletters, brochures, direct mailers, and other mailing pieces quickly and automatically. It will print on non-gloss and many glossy paper stocks. The printer has a print area of 8.25" wide x 12" high. The printer handles material from 3.5"W x 3.5"H to 9.5"W x 12.5"H. It handles media thickness of .005" up to .040". Getting Started To begin using the printer, please refer to the remainder of this manual. This User's Manual is your complete step-by-step guide to quickly and easily setting up and printing with your new EP-100 Address Printer! Introduction 1 ep100.qxd 1/27/2000 1:11 PM Page 2 TOC INDEX A. CHOOSING A GOOD LOCATION Place the printer on a flat, level surface. Place the printer in a location with adequate air circulation to prevent internal heat build up. Do not place the printer near heat sources such as radiators or air ducts, or in a place subject to direct sunlight, excessive dust, mechanical vibration or shock. Allow for adequate clearance in back of printer for the feed tray and in front of the printer to accommodate the media Catch Tray. If optional conveyor/stacker is to be used with printer, adequate space in front of printer must be provided. B. UNPACKING AND INSPECTION While unpacking your printer, inspect the carton to ensure that no damage has occurred during shipping. Make sure that all supplied accessories are included with your unit. The following items should be included: Printer Catch Tray Infeed Tray Power Supply and Power Cord Parallel Cable - IEEE 1284-Compliant Printer Driver CD Black Pigment-based Ink Cartridge Spare Ink Cartridge Holder Cleaning Card Warranty Statement and Registration Card This manual and other printed information Save the carton and packing materials. They will come in handy when transporting the printer. 2 Introduction ep100.qxd 1/27/2000 1:11 PM Page 3 TOC INDEX C. IDENTIFYING THE PARTS This illustration shows the Infeed Tray, Catch Tray and all of the front panel controls including the keypad with two touchpad buttons for On/Off and Feed/Clear. The Feed/Clear Button is used to feed envelopes through the machine for testing purposes or to clear envelopes from the machine. The On/Off Button toggles the machine on and off-line. All other printer functions are controlled by the printer driver. Adjustable Side Guide Fixed Side Guide Infeed Tray Material Wedge Print Mechanism Door Ready Light Feed/Clear Button Catch Tray On/Off Button On Light There are two LED indicators. One is located above the On/Off Button. It is lit when the power is on and the printer is on-line. The other indicator [Ready Light], located above the Feed/Clear Button, illuminates when the printer is not processing, printing, or otherwise busy. Both of these lights can also indicate several other printer conditions. For complete information on these lights, please refer to Section 5 (page 22). The Print Mechanism Door provides easy access for ink cartridge replacement using the printer drivers change button (refer to 3:B, page 10). Introduction 3 ep100.qxd 1/27/2000 1:11 PM Page 4 TOC INDEX This illustration shows the parallel interface port found on the rear panel of the printer as well as the power supply connector. The parallel interface port connects to a PC for use with Windows-based software. Parallel Interface Port Power Connector D. ASSEMBLY OF INFEED TRAY 1. Remove the Infeed Tray from the box. 2. Locate the slots on the printer and the corresponding tabs on the Infeed Tray. Align the tabs with the slots and slide the Infeed Tray fully into printer. 3. Allow the Infeed Tray to rotate away from printer until it comes to rest against the tray support. 4 Introduction ep100.qxd 1/27/2000 1:11 PM Page 5 TOC INDEX E. APPLYING POWER 1. Locate the power supply adapter supplied with your printer. 2. Place one end of the adapter cord into the power connector on the rear panel of the printer. 3. Plug the power cord of the adapter into an available wall outlet. Once the power cord is connected, the printer will automatically turn ON. Introduction 5 ep100.qxd 1/27/2000 1:11 PM Page 6 TOC INDEX Section 2: Computer Connection and Printer Driver Installation A. CONNECTING THE PRINTER TO YOUR COMPUTER The EP-100 Address Printer is designed to be used with nearly any IBM-PC® or compatible running Windows NT or Windows 95/98. The printer is equipped with a standard Centronics-type parallel port. This port is the means through which it receives data from your computer. To connect the printer to your computer, refer to the following steps: NOTE: For faster printing, your computer's parallel port mode should be set to ECP. If you experience problems with this setting or if your computer's parallel port is not ECP compatible, set your computer's parallel port to the standard "Printer Port" setting. Refer to your computer's system documentation for instructions on checking and/or changing the parallel port mode. NOTE: An IEEE 1284-Compliant parallel cable is highly recommended. 1. Connect the Centronics-type parallel side of the parallel cable to the printer. Snap the fastening clips into place. 6 Computer Connection and Printer Driver Installation ep100.qxd 1/27/2000 1:11 PM Page 7 TOC 2. INDEX Connect the other side to the back of your computer at LPT1, LPT2, or the PARALLEL connector. The printer must have its On Light illuminated to receive data. If the light is not on, press the On/Off Button. B. INSTALLING THE PRINTER DRIVER The EP-100 Address Printer can be used with virtually any Windows application program. This is accomplished by installing in Windows what is called a "printer driver." The printer driver is software which gives the printer all the information needed for printing. Use the following steps to install the printer driver. NOTE: This section of the User's Manual assumes that you are already familiar with Windows and know how it operates. If you are not yet familiar with Windows, consult the appropriate Microsoft documentation to become familiar with the basics of Windows before proceeding. Computer Connection and Printer Driver Installation 7 ep100.qxd 1/27/2000 1:11 PM Page 8 TOC INDEX Windows 95/98 or Windows NT To install the printer driver into Windows 95/98 or Windows NT, refer to the following: 1. Insert the included driver CD into your computer's CD-ROM drive. 2. Click the Start button, point to Settings, and select Printers. 3. Double-click on the Add Printer icon. This will launch the Add Printer Wizard. Click Next, then click Next again. 4. Click the Have Disk button. 5. Click Browse and select your CD-ROM drive. 6. For Windows 95/98, open the Win 95 & 98 Driver folder and select the file named EP_100.INF. For Windows NT, open the NT Driver folder and select the file named OEMSETUP.INF. (Example: If you are installing the Windows 95/98 driver, and your CD-ROM drive is drive D:, then you would browse to D:\Win 95 & 98 Driver. You 8 Computer Connection and Printer Driver Installation ep100.qxd 1/27/2000 1:11 PM Page 9 TOC INDEX would then select the file named EP_100.INF.) Follow the on-screen instructions to complete installation. Once installed, the "EP-100 Address Printer" icon will appear in the Printer's folder. EP-100 Address Printer NOTE: Before installing updated printer driver versions, always delete the existing printer driver version from your system. To do this, select the printer driver icon from within the Printers folder, and press the Delete key. HINT: To speed up printing for Windows NT, the following setup steps will help optimize processing time: a. Click on Start/Settings/Printers. Click with the right mouse button on the EP-100 Address Printer. Click on Properties. Click on Print Processor button. Click on the Always spool RAW datatype box so that it becomes checked. Click on OK. b. Click on the Scheduling tab. Move the Priority slide bar from Lowest to Highest so that the Current Priority is a high number (99 is maximum possible). c. For fastest printing, click on the Print directly to the Printer option. Note that if this is selected the application will have control over your computer during printing, and you will not be able to do other tasks until printing is completed. If you wish to do other tasks during printing then do not select this option. Click on OK. Computer Connection and Printer Driver Installation 9 ep100.qxd 1/27/2000 1:11 PM Page 10 TOC INDEX Section 3: Ink Cartridges and Media A. ABOUT INK CARTRIDGES AND MEDIA The EP-100 prints in black as well as full-color. There are three ink cartridges available for use with this printer: Black pigment-based ink cartridge (supplied) - Ideal for most print jobs including non-gloss, plain-paper envelopes and postcards. It offers a blacker, sharper image than other inks and is highly water- and smudge-resistant. Black dye-based ink cartridge (optional) - Fast drying and ideal for glossy materials, but not as waterproof. CMY color ink cartridge (optional) - Provides full-color printing. Prints in process-black and three process-color inks of yellow, magenta, and cyan which combine to produce up to 16.7 million printable colors. Allows for printing of color logos, starbursts, photos and other highlights. B. INSTALLING/REPLACING/SWITCHING INK CARTRIDGES 1. Open the Print Mechanism Door. 2. Remove the ink cartridge from its packaging. 10 Ink Cartridges and Media ep100.qxd 1/27/2000 1:11 PM Page 11 TOC INDEX 3. Remove the tape covering the cartridge's print head. DO NOT TOUCH THE COPPER AREA! 4. On your computer, click the Start button, then click on Settings, and select Printers. Then click with the right mouse button on the EP-100 Address Printer icon, and select Properties if using Windows 95/98 or Document Defaults if using Windows NT. 5. For Windows 95/98 click on the Cartridge tab; for Windows NT click on the Cartridge Maintenance Functions option and the button by the same name. 6. After making sure the printer is powered on and the parallel cable is connected to the printer and the computer, click on the Change button. The printer carriage should move over to the changing position. 7. If a cartridge is already installed in the printer, remove this cartridge by grasping the top fimly and pulling straight toward you. You will hear the cartridge snap out of position. Discard the cartridge if empty or place in the spare Ink Cartridge Holder.* *USING THE INK CARTRIDGE HOLDER The spare Ink Cartridge Holder is included with your printer. This holder provides a convenient place to store an extra ink cartridge and also prevents an opened ink cartridge from drying out. Insert an ink cartridge into the holder, copper-end first, until it snaps into place. Simply set the Ink Cartridge Holder next to your printer. The spare Ink Cartridge Holder must always remain in an upright or vertical position. To remove the Ink Cartridge, push back on the holders securing tab and lift the Ink Cartridge out. Ink Cartridges and Media 11 ep100.qxd 1/27/2000 1:11 PM Page 12 TOC INDEX 8. Insert the ink cartridge into the cartridge carrier, copper end first. 9. Push the cartridge back until it snaps into place. 10. Click on the appropriate button depending on the cartridge type just installed. The cartridge should now move back to its home position. Choosing New Cartridge will cause the printer to reset the ink levels for the chosen cartridge and the ink level indicator should go back to full capacity for that cartridge type. 11. Close the Print Mechanism Door. 12 Ink Cartridges and Media ep100.qxd 1/27/2000 1:11 PM Page 13 TOC INDEX C. LOADING MEDIA The EP-100 is capable of printing on a variety of envelopes and other media. The most common applications will be printing #10 envelopes or postcards. The printer is also capable of printing 3-fold mailers, flat sheets, newsletters and more. For simplicity, "envelopes" will represent all media types for the balance of this manual. To load the printer follow these steps: 1. Adjust angle of Infeed Tray. The angle depends on the size of the envelope. A larger envelope requires a steeper angle. (The angle can be fine-tuned later, while feeding envelopes.) 2. Loosen the Feed Block Knobs, raise the Feed Blocks all the way to the top position, and retighten knobs. Adjustable Side Guide Fixed Side Guide Feed Block Knob (3 places) 3. Feed Block (3 places) Insert one envelope under the Feed Blocks with one edge touching the Fixed Side Guide. (Refer to "Orientation of the Envelopes" in Section 3:D, page 15). Ink Cartridges and Media 13 ep100.qxd 1/27/2000 1:11 PM Page 14 TOC 4. INDEX Loosen Feed Block Knobs and allow the Feed Blocks to drop onto the inserted envelope (the Feed Blocks are spring-loaded). Then tighten the Feed Block Knobs. Do not apply any upward or downward pressure to the knobs as you tighten them. NOTE: If printing narrow envelopes, leave any Feed Block not in use in the fully raised position so that Feed Block remains out of the way during the printing operation. 5. Slide Adjustable Side Guide toward envelope until there is about 1/16 space between guide and envelope. 6. Load five additional envelopes one at a time making sure the leading edge of each envelope is touching the Feed Block. This creates a staggered effect of the stacked envelopes. 3/4 7. Load remaining envelopes. Fan envelopes before loading them. Also check for nested envelopes (envelopes that are underneath the flap of another envelope). 8. Slide the Material Wedge into place against the edge of the envelopes so the second envelope from the bottom is lifted about 3/4 off the Infeed Tray. 14 Ink Cartridges and Media ep100.qxd 1/27/2000 1:11 PM Page 15 TOC 9. INDEX Using one of the envelopes to measure, adjust the Catch Tray so that it is slightly more than one envelopes length away from the front of the output slot of the printer. Testing the Feeding 1. Press the feed button on the printer to send one envelope through the printer. One envelope will be sent through each time you press the feed button. It is recommended that you feed approximately 10 envelopes through the printer to verify the proper feeding of your particular material. If it doesn't feed properly refer to the Troubleshooting section. D. ORIENTATION OF THE ENVELOPES The typical orientation of envelopes is with the flap down and toward the output side of the printer (typical portrait orientation). If the envelopes are over 9.5 wide, orient them with the flap down and toward the front panel buttons (typical landscape orientation.). Typical Portrait Orientation Typical Landscape Orientation Ink Cartridges and Media 15 ep100.qxd 1/27/2000 1:11 PM Page 16 TOC INDEX Depending on where printing is desired on the envelope, you may need to rotate the orientation by 180 degrees; this is because the print area must have a margin on the bottom of the envelope of about 0.4 and will have a margin on the side if the envelope is wider than the maximum print width of 8.25. The print area for a #10 envelope is shown below. Top Non-printable Region Printable Region 0.4 8.25 9.5 If the print margin on the bottom is undesired, then you can use the landscape print orientation. If the print margin on the right side for wide envelopes is undesired, then you can orient the envelope with the flap toward the back of the printer (where the power and interface cable connect) and select the Rotate 180 Degrees option in the driver; this will move the margin to the other side of the envelope. Use the Print Preview option of your application before printing to determine the proper orientation. It is also suggested that you print a single envelope of each new layout before printing a job. 16 Ink Cartridges and Media ep100.qxd 1/27/2000 1:11 PM Page 17 TOC INDEX Section 4: Setting up the Printer Driver and Printing A. SETTING UP THE PRINTER DRIVER Once the printer driver has been successfully installed, you will need to set the driver up with the appropriate print options. Refer to the following steps to change or verify your printer driver options: 1. Click the Start button, point to Settings, and select Printers. Then, click on the EP-100 Address Printer icon with the right mouse button and select Properties if using Windows 95/98 or Document Defaults if using Windows NT. 2. In Windows 95/98, you will see several tabs from which printer settings can be changed including Paper, Device Options, and Cartridge. In Windows NT, click on the Advanced tab of the Document Settings window. NOTE: Most applications allow you to change these same printer driver options from their "Print" and/or "Printer Setup" screens. This means that you don't have to go back to the main printer setup window each time you want to change a setting or option in the printer driver. These applications will usually give you the same choices and options, but in a slightly altered format. 3. In Windows 95/98, you must click on one of the three tabs to see the printer setting options; each tab contains different printer settings. In Windows NT, the EP-100 Address Printer Document Settings appear. Although each printer driver displays the print options in a slightly different format, the basic options are the same. Refer to the remainder of this section for a description of each printer driver option. Setting up the Printer Driver and Printing 17 ep100.qxd 1/27/2000 1:11 PM Page 18 TOC INDEX Envelope Size The Envelope Size option will give a list of common paper sizes as well as a custom size option. Orientation Select either portrait or landscape depending on the orientation of the envelopes loaded in the printer. Cartridge Type Select either Color or Monochrome according to the type of ink cartridge you have installed. Print Quality Select the appropriate print quality option for your image. Keep in mind that Fast 600 provides the lowest quality but fastest print, and that Presentation 1200 provides the highest quality but slowest print. You may wish to experiment with these options to see which one is best for the job the printer is performing. Dither Mode Select this option to choose the appropriate dither mode for your image. Select Optimize for Photos if printing a design primarily composed of photographic images. Select Optimize for Text & Graphics if mainly printing text, lines, and graphics. Color Matching Click on the Color Matching down arrow and choose the color matching option you need. Select None if you are more interested in print speed than print color, if you have already color-corrected your image for printing, or if you are using some other third party color matching software. Select Algebraic if you would like the printer driver to make very simple color balance adjustments based on an RGB color model. This option gives you more natural looking images without utilizing any specific color matching software. 18 Setting up the Printer Driver and Printing ep100.qxd 1/27/2000 1:11 PM Page 19 TOC INDEX Ink Saturation This option controls the ink saturation of the printed image. You may need to decrease from 100% in order to optimize the ink saturation for the different types of printable materials. For glossy envelopes, decreasing ink saturation will speed up drying time and reduce smudging. Click and drag on the slide's box, to change the ink saturation setting. Moving the slide's box to the left reduces the overall ink saturation, while moving it to the right increases it. Eject Delay This option controls how long the printer waits between the printing of consecutive envelopes. The eject delay can be increased to allow more time for the envelopes to dry. The optional AC-24 accessory conveyor allows for more drying time without this delay. Cartridge (Cartridge Maintenance Functions) Select this tab or button to display the type of ink cartridge currently installed, its current ink levels, and options for cleaning and changing a cartridge. Select the Clean button to send a simple test print pattern to the printer. Be sure to have a #10 envelope in place. This test print purges the ink cartridge nozzles and lets you determine if any one of the nozzles is clogged. If the diagonal line is not continuous, repeat the cleaning procedure. Repeat the clean sequence several times if needed. If nozzles still appear to be clogged, remove the cartridge and gently wipe the nozzle area sideways with a clean water-dampened cloth. If, after several cleanings, the diagonal line is still not continuous on the test print, the cartridge may be damaged or empty and may need to be replaced. Setting up the Printer Driver and Printing 19 ep100.qxd 1/27/2000 1:11 PM Page 20 TOC INDEX Diagonal lines should be continous Select the Change button to install a fresh, new ink cartridge or to switch back and forth between a previously used color cartridge and a previously used monochrome cartridge. After the cartridge has been replaced according to the instructions in Section 3:B (page 10), select either the New Cartridge Installed button or the Old Cartridge Installed button accordingly. These selections are necessary for the printer to accurately keep track of ink cartridge ink levels. NOTE: The ink type shown will be the Ink Cartridge which is selected in the driver. Also, the ink levels are shown for both color and monochrome cartridges even though only one can be installed at a time. 20 Setting up the Printer Driver and Printing ep100.qxd 1/27/2000 1:11 PM Page 21 TOC INDEX B. PRINTING A TEST PRINT Prior to printing a large job you may wish to print a test image to insure the printer is operating properly. You can click on the Print Test Page button in the printer driver properties; an even better test print is the Clean button in the driver because it shows if any nozzles are clogged. C. PRINTING Now that you have tested the print function, you are ready to proceed with printing your job. 1. Go to your favorite graphics application program. 2. Open or create the image file you wish to print. Choose the proper page size for the envelope you'll be printing. If the proper page size isn't available you'll have to create a custom page according to size of the envelope you'll be printing on. NOTE: Before creating new formats with the application it is helpful to set the EP-100 as your default printer in the Printers Folder. 3. Once you have created your image and are ready to print, select Page Setup (or the equivalent) from the program's File menu to verify that the printer driver settings are correct for your image. Be sure the proper Cartridge Type option is selected according to the cartridge you have installed in the printer. Once the driver is set, select Print from the program's File menu. 4. The printer driver will then begin to process the image. Depending upon the size of the image and the processing speed of your computer, processing time can take from several seconds to a few minutes. 5. Once processing is complete, the printer will begin to print. Print time will vary depending on whether you are printing with a color or monochrome cartridge and on which Print Quality setting you selected. Setting up the Printer Driver and Printing 21 ep100.qxd 1/27/2000 1:11 PM Page 22 TOC INDEX Section 5: Interpreting the Printer's Indicator Lights The ON and READY indicator lights located on the top of the printer can tell you a lot about what is happening inside the printer. To accurately interpret what it means when these lights are on, off, or flashing, please refer to the following: On Light Ready Light Printer on solid on solid Is ready to receive a print job on solid off Is processing and printing an image. on solid flashing rapidly The envelope feed motor or the carrier has stalled. Press the printer On/Off Button to turn the printer OFF. You may need to clear an obstruction such as a jammed envelope. Turn the printer power back ON. If you are in the middle of a print job, the printer should start up automatically with any remaining envelopes. flashing rapidly on solid 22 Interpreting the Printers Indicator Lights Has either the wrong cartridge or no cartridge installed. Make sure the proper ink cartridge is installed: Select Purge Print Jobs in the computer spooler; if this does not reset the printer you may need to turn the printer OFF and ON again. Try again after installing proper cartridge (use the Change button in the printer driver to install a cartridge). ep100.qxd 1/27/2000 1:11 PM Page 23 TOC INDEX Section 6: Maintaining the Printer The EP-100 Address Printer is designed to require very little maintenance. Nevertheless, there are a few procedures you can perform on a regular basis or as needed to ensure your printer's best performance. A. CLEANING THE INK CARTRIDGE NOZZLES It may be necessary to clean the ink cartridge nozzles if the printer does not seem to be laying the ink down evenly or if you suspect an ink cartridge nozzle has become slightly dried out or clogged. Refer to the cleaning procedure explained within the Cartridge button description on page 19 to clean the cartridge nozzles. B. CLEANING OUTPUT AND PRINTER CASING If ink gets on the printer's output area under the cartridge it may put undesired marks on envelopes. To avoid this, simply wipe off any ink from the output area as soon as you notice it. Use a damp paper towel or cloth. If necessary, use these same items to wipe off the outside casing of the printer. Always disconnect your printer's power cord before cleaning. If water does not adequately clean the printer, try using a cloth dampened with isopropyl (rubbing) alcohol, which may work better with dye-based ink. Resume printer operation only after the printer is completely dry. C. CLEANING THE ROLLERS After many envelopes have been run through the printer, the printer rollers may become dirty and feed envelopes inconsistently. To clean the rollers, first disconnect the printers power cord. The feed rollers (gray rollers adjacent to Feed Blocks) should be cleaned with a cloth dampened with isopropyl (rubbing) alcohol. Rotate the rollers by hand to get to all roller surfaces. The internal rollers should be cleaned with the supplied Cleaning Card. Place the card adhesive side down on the printers conveyor. Firmly push the card through the normal envelope path by hand until the leading edge emerges at the output slot of the printer. Grasp the leading edge and pull the card completely through the printer. D. TECHNICAL SUPPORT If you have difficulty operating your EP-100 Address Printer, refer to "Troubleshooting" section of this manual. The procedures in this section should, in most cases, solve the problem. If they dont, contact the technical support representative of the printer manufacturer. Maintaining the Printer 23 ep100.qxd 1/27/2000 1:11 PM Page 24 TOC INDEX Section 7: Technical Specifications Model: Print Method: Ink Cartridge Types: Printing Resolution Print Speed: Colors: Print Area: Material Sizes: EP-100 Address Printer Ink-Jet Pigment-based black (for plain paper) Dye-based black (for glossy surfaces) CMY Dye-based color Presentation 1200: 1200 x 600 dpi Best 600: 600 x 600 dpi Normal: 600 x 600 dpi Fast 600: 600 x 300 dpi Up to 1200 #10-envelopes per hour (three-line address, Fast 600) Black monochrome in dye-based or pigment-based black ink cartridge Up to 16.7 million colors with CMY ink cartridge 8.25" wide, 12" high (210 mm wide x 305 mm high) 3.5"W x 3.5"H minimum (89mmW x 89mmH) 9.5"W x 12.5" H maximum (242mmW x 318mmH) Up to .04" thick (1mm) Media Thickness: Minimum Recommended System Requirements: Pentium®II - 266MHz or better, 32MB RAM, 100MB free hard drive space Printer Driver: Windows 95/98/ NT Fonts, All downloadable from PC, including: bit-map and Graphics Bar Codes: True-Type fonts; capable of printing any typical bar code symbology in-specification, including USPS Delivery Point Bar Code, PDF417 (USPS IBIP bar code), British Royal Mail Customer Code, Dutch Postal Code, Interleaved 2 of 5, Codabar, Code 39, UPC and EAN; bit-map or vector graphics Print Orientation: Landscape or Portrait Cartridge Cleaning: Automatic based upon usage; also manual in printer driver Ink Monitor: Error indication when ink is low Interface: Centronics-type parallel (ECP recommended) Infeed Tray: Continuous top-load, bottom feed; holds 250 envelopes or 500 postcards Catch Tray: Included as standard; holds 150 #10 envelopes or 300 postcards Dimensions: 15.875W x 16.25"H x 25.75"D with Infeed Tray installed (403mmW x 412mmH x 654mmD) Weight: Printer: 25.2 lb. (11.4 kg) Accessory Conveyor: 13.4 lb. (6.1 kg) Electrical Ratings: 24 VDC, 1.5A Power Adapter Input: 100-240 VAC, 50/60 Hz Sound Pressure Level: 72 dBA (operator), 64 dBA (1m) Certifications: UL, UL-C, TÜV-GS, CE, FCC Class B Options: Ink Cartridges AC-24 Accessory Conveyor/Stacker Envelope Manager Software for Windows 95/98/NT Warranty: One Year 24 Technical Specifications ep100.qxd 1/27/2000 1:11 PM Page 25 TOC INDEX Section 8: Troubleshooting This section lists some common printer problems and offers suggestions on how to fix them. Prior to calling our technical support service, look for your problem below. Solving the problem on your own will allow you to resume printing sooner. FEED PROBLEMS Problem: Reason: Solution: Intermittent feed. Envelopes are not staggered properly. Adjustable Side Guide is too close to envelopes. Angle of Infeed Tray incorrect. Printer rollers are dirty. Make sure envelopes are staggered as shown in Section 2:C (page 14). Make sure there is at least 1/16 of total play between the envelopes and Adjustable Side Guide: Adjust as necessary. Adjust angle of Infeed Tray: Shorter envelopes require less angle (flatter), longer envelopes need more angle. Clean rollers as described in Section 6:C (page 23). Problem: Reason: Solution: Feeding multiple envelopes. Feed blocks not adjusted properly. Re-adjust Feed Blocks. Step by step, carefully follow directions of Section 3:C (page 13). Problem: Reason: Envelopes jamming Incorrectly loaded material. Damaged material. Feed blocks adjusted improperly. Clear jammed material by first pressing the Feed/Clear Button to eject the media. If this does not work, turn the printer power OFF using the On/Off Button and gently clear or remove the envelope(s) manually. Check to make certain envelopes are loaded correctly as shown in Section 3:D (page 14). Also, check to make certain envelopes are not warped or damaged. If they look good, readjust Feed Blocks as described in Section 3:C (page 13). Turn the printer power back ON. If you are in the middle of a print job the printer should start up automatically with any remaining envelopes. Solution: Troubleshooting 25 ep100.qxd 1/27/2000 1:11 PM Page 26 TOC Problem: Reason: Solution: INDEX Loud squealing during feeding of envelopes or envelope flaps are being peeled open. The Feed Blocks are too close to the feed rollers which causes the envelopes to be pinched as they are fed. Readjust Feed Block height as described in Section 3:C (page 13) with one exception: For step 3, place one envelope and a piece of paper under the Feed Blocks. (Additional pieces of paper may be used if problem persists). Remove paper before loading additional envelopes. PRINT PROBLEMS Problem: Reason: Solution: No Print. Ink cartridge problem. Check to make certain ink cartridge has ink. Replace cartridge if empty. If not empty, clean cartridge as detailed in Section 4:A Cartridge (page 19). Problem: Reason: Gray or Light Print. Ink supply is low, cartridge is dirty, or saturation is set too low. Check ink supply of cartridge. Replace cartridge if low or empty. If not low or empty, clean cartridge as detailed in Section 4:A Cartridge (page 19). If problem persists, increase saturation setting (see Section 4:A Ink Saturation, page 19). Solution: Problem: Reason: Solution: Index 26 Troubleshooting Ink smudges before it comes out of printer. Envelopes may be warped or damaged. Change orientation of envelopes so they run through printer in a different direction or replace damaged envelopes. ep100.qxd 1/27/2000 1:11 PM Page 27 TOC Problem: Reason: Solution: Problem: Reason: Solution: INDEX Ink smudges during stacking in Catch Tray. Printing pigment-based ink on glossy or semiglossy material or insufficient drying time (excessive ink saturation can increase drying time). If printing a monochrome image on a high gloss material you may want to switch to the dye-based ink cartridge (Part Number 64319), which dries very quickly on high gloss material. Or go to print driver and increase print time eject delay. You can also decrease the ink saturation to speed up drying time as described in Section 4:A Ink Saturation (page 19). If slower output rate or less saturation is not desired, consider purchasing the optional conveyor (Part Number 64015) which will allow full speed printing while providing sufficient drying time. Marks on underside of envelopes. Ink is not dry when stacking in the Catch Tray or the printers output area under the cartridge has ink on it. See previous solution. If the ink is dry when stacking in the Catch Tray, clean the output area of the printer under the cartridge as described in Section 6:B (page 23). INTERFACE PROBLEMS Problem: Reason: Solution: No communications; Printer does not respond. Loose parallel cable, incorrect print driver selected, or bad parallel cable. Make certain cable connections are tight. Check to make certain correct print driver is selected. Replace bad parallel cable. Troubleshooting 27 ep100.qxd 1/27/2000 1:11 PM Page 28 TOC Index Adjustable Side Guide............................................................3, 14 Algebraic ......................................................................................18 Cartridge ................................................................................17, 19 Cartridge Types.........................................................10, 18, 21, 24 Catch Tray ................................................................................3, 15 Color Matching............................................................................18 Dither Mode.................................................................................18 Eject Delay....................................................................................19 Envelope Orientation .................................................................15 Feed Blocks...................................................................................13 Feed Block Knobs........................................................................13 Feed/Clear Button ..................................................................3, 15 Fixed Side Guide .....................................................................3, 13 Infeed Tray ...........................................................................3, 4, 13 Ink Saturation ........................................................................19, 24 Interface Port............................................................................4, 24 Maintenance.................................................................................23 Material (Envelope) Size......................................................18, 24 Material Wedge .......................................................................3, 14 Media ........................................................................................1, 24 On Light ...............................................................................3, 7, 22 On/Off Button...........................................................................3, 7 Orientation .............................................................................18, 24 Parallel Interface Port ...............................................................4, 6 Power Connector.......................................................................4, 5 Power Supply Adapter .................................................................5 Print Mechanism Door ...........................................................3, 10 Print Quality ..........................................................................18, 21 Printer Driver ................................................................2, 7, 17, 24 Ready Light..............................................................................3, 22 Spare Ink Cartridge Holder.......................................................11 Technical Specifications..............................................................24 Technical Support........................................................................23 Test Print.......................................................................................21 Troubleshooting...........................................................................25 28 Index ep100.qxd 1/27/2000 1:11 PM Page 29 ep100.qxd 1/27/2000 1:11 PM Page 30 ep100.qxd 1/27/2000 1:11 PM Page 31 ep100.qxd 1/27/2000 1:11 PM Page 32 Printed in the United States of America P/N 510175