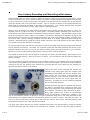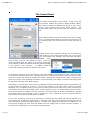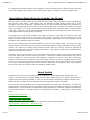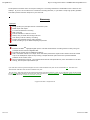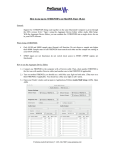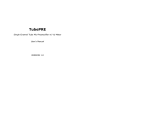
1
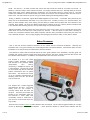
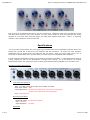
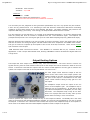
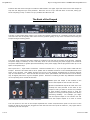
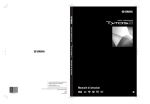
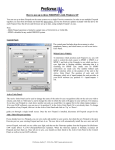
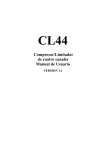
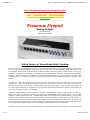
FirepodReview
http://www.hyperactivemusic.com/MSProFiles/FirepodReview/f...
Video Benchmarking and Information Site
Home
MS Pro 7 Test/Results MS Pro 6.0/6.5 Results
MS Pro 7 Review Stagetools Moving Picture Review FAQ
Firepod Review
-----------------------------------------------------------------------
Presonus Firepod
“Getting It Right”
By Mark Dileo
September 29, 2004
A Brief History of Home Studio Multi-Tracking
When a computer assumes the functions of a device that was previously not computer related the results often
turn out to be either astounding or disastrous; there seems to be little room between these two extremes. If
the computer device works as advertised the results are often astounding, when it doesn’t work correctly you
can bet on a nightmare of installation, re-installation, calls to tech support and other configuration and operation
problems. Before delivering the verdict for the new Presonus Firepod I’d like to quickly review my multi-track
recording history as I think it will help to put just how advanced these hardware recording interfaces have
become.
In 1991, my band was having some success on the local club circuit and we were looking to record our first
original demo. Since we had already used a friends reel-to-reel 4-track to record an earlier demo of cover work,
and had a lot of live recording gear, it seemed logical that having the ability to work out the arrangements of
our new material without time constraints in our own home studio would outweigh the superior sound quality of
a one time recording session in a local studio.
Knowing virtually nothing about multi-track recorders, we purchased a TOA 8 track cassette recorder for
$1200. We used our Yamaha 16 track mixing console for mic preamplifiers and mixing duties. As you might
imagine, 8 tracks squeezed onto a ¼” cassette tape running at 3.5 inches per seconds had a very, let’s just say
“unique” sound quality. I might as well be honest, it sounded terrible. It was noisy and had virtually no
dynamic range, and this is when the heads were clean! The sound quality of the edge tracks (1 and 8) was
even worse. We did however learn a lot about efficient multi-tracking by using this recorder, such as conserving
tracks, equalizing to tape to reduce noise, and keeping important parts off of the edge tracks.
Of course we quickly out grew the TOA and moved up to the best machine we could afford, an $11,000 Fostex
1 of 14
6/18/12 3:21 PM
FirepodReview
http://www.hyperactivemusic.com/MSProFiles/FirepodReview/f...
G24S. This was a 1” 24 track recorder that moved the tape across the heads at 15 inches per second. In
addition, it had the Dolby S noise reduction scheme, very highly touted at the time. Although Dolby S did quiet
things down quite a bit I always thought it produced a very non-organic sound so I never used it. The best
results were obtained on this machine when two tracks were used to record important parts like lead vocal or
snare drum. We also learned to get into very good head cleaning and demagnetizing habits.
Finally, in October of 1992 the original Alesis ADAT appeared on the scene. I remember being wowed by the
Alesis rep as he demonstrated the ADAT in my local music store. Virtually no noise, zero wow and flutter, the
ability to slave multiple units, insert editing, and the ability to create back up tapes that were identical to the
originals, all for $3600. Of course the ADAT brought with it problems of its own. Namely broken transports and
a very delicate head cleaning process, one slip could easily ruin the helical heads.
Although hardware interface boxes have been around for quite a few years, I have to admit that the firewire
based units are the ones that have really piqued my interest. I like the option of multi-track recording on
location via a hardware interface and a laptop computer and then doing overdubs at home using the same unit
with a desktop computer. All by simply plugging and unplugging the firewire cable, no PCI cards to install.
Enter Presonus
One of the first firewire hardware interfaces on the market was the Presonus Firestation. Although the
Firestation was a very good sounding unit it was plagued with convoluted software. Did Presonus learn from the
Firestation or are they doomed to repeat history with the Firepod?
I am pleased to report that the Firepod retains all of the good qualities of the Firestation, including great mic
preamps and overall recording quality while doing away with the bad ones, namely those horrible drivers and
the Yamaha mLAN interface. In addition, the Firepod adds a few new tricks of its own.
The Firepod is a one rack space
firewire based hardware interface
that includes 8 mic preamps, SPDIF
input/output,
zero
latency
monitoring, a headphone output, and
a midi interface. The first two inputs
on the Firepod may also be used with
passive instruments such as guitars
and basses. The Firepod can record
up to 10 channels simultaneously at
sampling rates from 44.1 kHz all the
way up to 96 kHz.
The Firepod has a $799 suggested
manufacturer’s list price. The street
selling price for the Firepod is
currently about $200 less than the
list price. This price point makes the
Firepod a very reasonable option for
the musician or video editor that
occasionally needs to multi-track or
just record a vocal overdub with very
high quality.
Presonus also includes Cubase LE audio software with the Firepod. As the name suggests Cubase LE is a light
version of Steinberg’s Cubase audio software. I think Presonus decided to include audio software with the
2 of 14
6/18/12 3:21 PM
FirepodReview
http://www.hyperactivemusic.com/MSProFiles/FirepodReview/f...
Firepod to avoid some of the hardware/software configuration headaches users had with the Firestation. By
supplying every Firepod owner with the same audio software Presonus can guarantee the Firepod’s operation
with this audio software and also provide detailed instructions on how to get started using the Firepod with
Cubase LE. I think this was a good move on Presonus’s part, it appears they have learned at least one lesson
from the Firestation.
The minimum hardware/software requirements in the Macintosh environment are as follows:
OS: MacOS X 10.3.5 or later
Computer: Apple Macintosh series with on-board Firewire port.
CPU/Clock: PowerPC G4/800Mhz or higher (G4/Dual 1Ghz recommended)
Memory (RAM): 512MB or more
The minimum hardware/software requirements in the Windows environment are as follows:
OS: Microsoft Windows XP SP1
Computer: Windows compatible computer with firewire port.
CPU/Clock: Pentium, Celeron with 900Mhz or higher (Dual 1.2Ghz recommended)
Memory (RAM): 256MB (512MB recommended)
I find it strange that Presonus recommends dual processors. I asked a Presonus representative about this and
he told me that he has no idea why dual processors are specified and assured me that the Firepod works fine on
both hyperthreaded and non-hyperthreaded single processor systems.
The Front of the Firepod and the Mic Preamps
The most prominent aspect on the front panel of the Firepod are the 8 Neutrik combination XLR/quarter inch
connectors that occupy its left side. Presonus classifies these 8 mic preamps as being constructed using class A
input buffers followed by a dual servo gain stages. In addition, the first two of these inputs may be used
directly with instrument sources such as guitars and basses. Selectable phantom power is also available on
channels 1-4 and 5-8.
The inclusion of these mic preamps is noteworthy because Presonus is well known for the quality of its mic
preamps. (Incidentally, I thought the “Pre” in Presonus might stand for mic pre. Presonus informed me that
Presonus is Greek for “before sound.”) This would lead one to believe that the mic preamps weren’t just thrown
onto this unit to add another advertising point on the side of a box, but to actually increase the usability of the
unit to the buyer. Presonus didn’t disappoint here either. These are very good mic preamps, but that will be
discussed in greater detail later in this review.
3 of 14
6/18/12 3:21 PM
FirepodReview
http://www.hyperactivemusic.com/MSProFiles/FirepodReview/f...
Each of the 8 mic preamps has discrete its own gain control knob. Thankfully, there aren’t any difficult to locate
and adjust dual concentric pots on the Firepod. The gain control knobs are small and packed pretty closely
together so if you have some really big fingers you might have problems with them. I didn’t. A signal/clip
indicator is also included for each input channel.
Specifications
I’m not an audio testing expert so I’m not going to go into detail about every specification Presonus lists for the
Firepod but I would like to discuss the mic preamps and A/D converters. Of course the most important
specification can’t be written down, and that’s how the unit sounds. We’ll get to that shortly but it’s nice to
know that the specifications are in line with what you would expect for professional audio equipment.
I did find that the specifications listed for the Firepod are somewhat incomplete. I contacted Presonus and they
quickly supplied me with all the specifications I thought were missing. All of the following mic preamp
specifications listed in the manual are shown in black, specifications Presonus supplied to me are listed in red.
Microphone Preamp Specifications
Total Harmonic Distortion
THD: <0.005%, tested at an audio level of 0dBu, the tested
Audio Level Tested: 0dBu
Testing Bandwidth: The test was conducted at 3.15 kHz but no significant
deviation was reported at other frequencies.
Gain: 54dB maximum
Equivalent Input Noise
EIN: -125dB
Bandwidth tested: 22-22kHz unweighted
Gain: Maximum
Input Resistance: 1.5 kOhm
Bandwidth
4 of 14
6/18/12 3:21 PM
FirepodReview
http://www.hyperactivemusic.com/MSProFiles/FirepodReview/f...
Bandwidth: 10Hz to 50kHz
Tolerance: +0/-0.5dB
Headroom
Headroom: +22dBu
Maximum THD for this measurement: 0.005%
Measured under both balanced and unbalanced conditions
You can make your own judgments on how good these specifications are, but in my opinion they are excellent.
I don’t see any problem areas. It is interesting to note that Presonus measured the EIN with a terminating
resistance of 1500 Ohms instead of the more standard 150 Ohms. The higher resistance will produce a less
impressive EIN rating (more noise). Even though, the Firepod’s EIN measurement is excellent.
It is also reassuring to see that there is no increase in the bandwidth specification. No correctly designed solid
state mic preamp will show an increase in amplitude from the 1 kHz calibration signal. The Firepod’s mic
preamps should provide a nice even signal right up to the units 96kHz sampling frequency (48kHz audio input).
Although Presonus was unwilling to tell me the model of the A/D converters used in the Firepod they did say
that the converters are among the higher end AKM models while their competition uses AKM’s lower models.
This got me curious so I opened up the Firepod to have a look at the A/D converters. There are two AK5384
A/D converters in the Firepod.
AKM describes these converters as follows: “The AK5384 is a 4-channel ADC for pro, consumer an auto
applications. It has a unique TDM cascade mode, allowing 2 AK5384’s to deliver 8-channels of digital audio over
a single wire!”
Output Routing Options
The Firepod has three output level controls, main, mixer and headphone. The mixer control is used to mix
signals returning from the audio software with inputs on the Firepod and will be discussed in detail in the next
section. It should be noted that the output of the mix control at what appears to be unity gain is routed to the
quarter inch outputs on the back of the Firepod labeled “cue mix line out.”
The main output control sends the output of the mix
control to the “main control room output” quarter inch
outputs located on the back of the Firepod except that
this gain of this output is controllable from the main
output control instead of being at unity gain as is the
mix output.
The headphone output sends the output of the mix
control to the headphone jack. The headphone amp is
sufficient, but not overwhelming. It was able to drive
my inefficient headphones to acceptable, but not really
loud levels. The headphone amp is okay for me but I
know a lot of people that need to really crank up their
phones when recording in a live environment.
Presonus specifies the output of the headphone amp on the Firepod as 150mw. Incidentally this is the same
rating at the Presonus HP4 dedicated headphone amplifier so if that unit was acceptable for you then so should
the Firepod. It would be nice if Presonus could increase the output of the headphone amp on the Firepod to a
value closer to the 450mw the Rane HC6 headphone amplifier is able to output to the phones.
5 of 14
6/18/12 3:21 PM
FirepodReview
http://www.hyperactivemusic.com/MSProFiles/FirepodReview/f...
Presonus also was clever enough to include an LED located in the upper right side of the front of the Firepod to
help the user diagnose sync clock problems. When the unit is in sync this LED shine a cool blue, letting you
know everything is okay. If there is a sync problem this LED turns red.
The Back of the Firepod
The back of the Firepod does contain a lot of input and output connections in a relatively small area, but the
connectors are laid out logically and I didn’t have any problem getting to any of the connectors while using the
Firepod during the testing period.
The power input connecter and power switch are located on the left side of the back of the Firepod. Although
the power supply is outboard, it’s not a wall wart, which is nice since having the power supply in the middle of
the power cable allows for greater placement flexibility of the power supply and the plug doesn’t take up a lot of
space on the power strip.
Next up are the 2 - 6 pin firewire connectors. Presonus includes one 3’ - 6 pin to 6 pin firewire cable with the
Firepod. Presonus has stated that a driver update will be available sometime in the October/November time
frame for the Firepod. This update will allow for the use of two Firepods simultaneously so that 20 channels
may be recorded at once. There should also be some driver optimizations with these drivers so that latency
may be slightly reduced for a given computer system. Presonus is unwilling to make any additional comments
on the upcoming driver release at this time.
SPDIF input and output is also located on the
back of the Firepod as well as midi in and out.
Quarter inch balanced outputs for each of the mic
preamps are also provided on the back of the
Firepod in case you want to use the mic preamps
to feed another recording device or send the
outputs to a mixing board for greater zero latency
monitoring flexibility. For example, you might
use the Firepod output for one monitor mix and
route the Firepod outputs to a mixer to create
more elaborate monitor mixes for other musicians.
The line inputs on the rear of the Firepod supersede the combo mic/instrument inputs on the front of the
Firepod so that if line inputs are plugged into both the front and rear inputs of channel 1, only signal will be
received by the rear line input.
6 of 14
6/18/12 3:21 PM
FirepodReview
http://www.hyperactivemusic.com/MSProFiles/FirepodReview/f...
The Firepod also includes quarter inch TRS balanced send and return jacks on the rear panel. These send/return
jacks are necessary when connecting compressors, limiters, or others signal processors to channels 1 and 2.
The cue mix line outs and main control room outputs discussed in the previous section “Output Routing Options”
are also located in the output section on the back of the Firepod.
7 of 14
6/18/12 3:21 PM
FirepodReview
http://www.hyperactivemusic.com/MSProFiles/FirepodReview/f...
Zero Latency Recording and Recording with Latency
Before discussing the mix control and how it affects zero latency monitoring and monitoring with latency, a brief
review of these terms is in order. Before the days of computer recording interfaces music signals to be recorded
would be routed into a mixing console where the signal would then be sent to a monitor mix (so the musician
could hear himself) and to the multi-track recorder. There is virtually no latency in this scenario because the
audio signal is traveling at the speed of light back to the performer. I say virtually because there are phase
errors introduced in the analog circuitry, which results in small time delays.
Latency occurs when there is a delay between the playing and/or singing of a note and when it is heard. For
example, let’s say you pluck the string of a bass guitar. The analog voltage representing the sound wave is
converted into its digital form within the hardware recording interface (Firepod). Then the digital version of the
signal is sent along the firewire cable to the computer, any effects or processing are added to the signal, and
then the signal is mixed into the main output busses within your audio multi-tracking software, sent back down
the firewire cable, into the recording interface, converted back to an analog signal and played through the
monitors. Remember that you must have “input monitor” selected in your audio software for the audio signal to
be returned to the Firepod for latency monitoring.
As you can imagine these A/D and D/A conversions as well as any digital signal processing takes time, and this
time is referred to as latency. The faster your computer system and the better optimized the drivers in your
hardware interface, the lower you may set your latency without hearing any pops and clicks in your recording.
Whenever you are recording with the input monitor turned on there will be some latency.
The Firepod provides the user with the ability to record with zero latency and with latency. Why would you ever
want to record with latency? We’ll get to that in a minute. First let’s discuss how the Firepod handles zero
latency recording.
Let’s say you have a song that needs to have a few overdubs recorded. If you playback your current production
in the multi-tracking software you’ll hear the result as it returns to the Firepod. The real-time result of whatever
is being fed into any mic preamp of the Firepod may be mixed with this return signal from the computer by
adjusting the “Mixer” control on the Firepod.
Turning the mixer control clockwise will increase the
loudness of the return signal from the computer (and
simultaneously decreasing the real-time Firepod input)
while turning the mix control counterclockwise will
increase the level of the real-time Firepod input (and
simultaneously decrease the return signal from the
computer). A suitable mix can be created by adjusting
the mix control appropriately.
It should be noted that while the musician will not hear
any latency, the signal being recorded will have some
delay since it does have to be processed by the Firepod
and computer. This delay is often referred to as offset.
Some audio software has controls to automatically
correct for this latency or adjust for it manually. This
may be accomplished manually by playing a percussive instrument along with a click track generated by the
audio software and manually sliding the recorded track back in time until it is right on top of the click track. Of
course you have to make sure you play right on top of the click track for this to work! Practically speaking, with
the Firepod this offset is very small and won’t be noticed.
You might have noticed that the mix control replicates the function of a mixing board by mixing the already
recorded tracks with real time version of the overdub to be recorded. If you’ve really been paying attention
8 of 14
6/18/12 3:21 PM
FirepodReview
http://www.hyperactivemusic.com/MSProFiles/FirepodReview/f...
you’ll notice that even when recording with zero latency, analog recorders will have less time delay when
overdubbing than digital recorders due to the fact that no A/D need occur to the overdubbed signal. This
phenomenon and a work around for digital recording was mentioned in the last paragraph.
It should be noted that with the ASIO 2.0 drivers the Firepod is able to record with very low latencies even when
not in the zero latency recording mode. For example, it is not at all unusual to record with 10ms (millisecond)
latency. 10ms is 10 one-thousandths of a second, or 1/100 of a second. I was able to reliably record overdubs
with various effects applied on my system with the latency set to 6ms, or 6 thousandths of a second.
So why would you ever want to record with latency? If you want to use your multi-track software to apply some
working reverb, compression, delay, or other effects to help you or your recording talent “get in the mood” of
the song while performing, this can be done by using latency recording. In this case, the mix control of the
Firepod would be turned fully clockwise so that only the return signal from the audio software is heard through
the monitors. Assuming the input monitor for the track to be recorded is on and the computer is fast enough,
the overdubbed track will be heard with any effects that are applied using the audio software.
The Test System and Test Parameters
The Firepod was only tested under the Windows environment using the following computers. In addition, midi
functions and SPDIF input/output were not tested.
Desktop System:
OS: Windows XP Home SP2
CPU: Pentium 4 3.06Ghz (Hyperthreading turned on)
Motherboard: Intel 845PE (533 effective front side bus)
Memory: 640MB PC 2700 running at 333Mhz
Hard Drive: Western Digital Caviar 800JB – 80GB, 8MB cache
Video card: ATI All-In-Wonder 9000Pro
Soundcard: Integrated on motherboard
DVD/CD ROM: Sony DRU 120A DVD+R/RW, CDR/RW recorder
Additional hardware: ADS Pyro Pro firewire card, Linksys G wireless router, Agfa scanner, Epson inkjet printer,
HP laserjet 2100 printer, Lexar flash card reader.
Laptop System (Compaq EVO n600c)
OS: Windows XP Home SP2
CPU: Pentium III 1.2Ghz
Motherboard: Intel 830 (133Mhz front side bus)
Memory: 512MB PC133
Hard Drive: 30MB Toshiba, 4200rpm
Video card: ATI Radeon mobility
Soundcard: Integrated on motherboard
Driver Installation
Presonus supplies the drivers for the Firepod on one CD ROM and the Cubase LE software on anther CD ROM.
The Firepod drivers may also be downloaded from the Presonus website. I always download drivers from the
website since you are generally guaranteed to get the latest driver version. In this case the driver on the
supplied CD is the same as the one on the Presonus website.
It has been my experience that it’s a good omen when driver file size is small. The Firepod drivers are tidy
indeed, 1.41MB zipped and 2.01MB unzipped. This leads me to believe that unnecessary software won’t be
installed all over my system.
9 of 14
6/18/12 3:21 PM
FirepodReview
http://www.hyperactivemusic.com/MSProFiles/FirepodReview/f...
So how was the Firepod driver installation? In a word, clean. Although Presonus details the procedure for
installing the drivers, the main thing to remember is that you must begin the driver installation process before
connecting the Firepod to the computer. The driver installation routine will take you though the installation
process step-by-step and it only takes a few minutes.
When the installation is finished you’ll find only the Presonus control panel icon in installed on the right side of
the taskbar (system tray) and under “programs” in the start menu. Well that was easy and it appears as
though my system hasn’t been cluttered up with a lot of useless software. But does it work?
The Firepod In Use
My audio multi-tracking and mixing software of choice is Vegas 4.0. I have to admit that I didn’t even install
Cubase LE. The best possible scenario for me was for the Firepod’s ASIO 2.0 support to work with Vegas 4.0
right out of the box. No tech support calls, no configuration hassles, just a properly functioning hardware
interface.
I opened up a Vegas project I’ve been working on and selected the Firepod as the ASIO audio device. Right off
the bat I noticed that the Firepod was listed in the Audio Device properties, a very good sign. Next, I put a
track into the record mode, selected channel one of the Firepod, selected “input monitor” and listened for
signal. Viola! There it is, a nice clean signal. The total time from opening the box to recording a track was
approximately 10 minutes. The driver installation for my Compaq EVO n600c laptop was just as painless as that
for my desktop system.
I also tested turning the Firepod on and off and pulling the firewire cable and plugging it back in. In both cases
the Firepod device simply removed itself from the computer configuration and reinstalled itself with no ill effects
to Windows XP, excellent. The only procedure that would cause my audio software to shut down was if I
changed the latency while a track was in the record mode. Remember to take all tracks out of the record mode
when making Firepod control panel adjustments.
Although this is only my installation experience I would expect most Windows installations to go just as
smoothly. I’ve been working with the Firepod daily for two weeks now and haven’t once had the Firepod not be
recognized by my desktop or laptop systems. In addition, the only crash I had was when trying to change
Control Panel settings with tracks still in the record mode. Kudos to Presonus for getting the initial release of
the drivers right.
10 of 14
6/18/12 3:21 PM
FirepodReview
http://www.hyperactivemusic.com/MSProFiles/FirepodReview/f...
The Control Panel
The Firepod Control Panel is quite simple. In fact it only has
three options, sample rate (44.1kHz, 48kHz, 88.2kHz, 96kHz),
Clock Source (Internal or SPDIF), and Latency (1.5ms, 2.0ms,
2.5ms, 3.0ms, 3.5ms, 4.0ms, 6.0ms, 8.0ms, 10.0ms). The
Control Panel options will be saved when the Firepod is turned
off.
After making changes in the Control Panel press “done” to apply
them. The status LED located on the upper right of the front of
the Firepod (Figure) will momentarily turn red and then back to
blue.
Firepod Control Panel advanced settings can be accessed by
right-clicking on the Firepod Control Panel icon in the system
tray. Three settings are available, High (CPU 2Ghz and higher,
Medium
(CPU
1Ghz to 2Ghz), and Low (CPU 800Mhz to 1Ghz). There isn’t
much information about this setting in the manual except that
“these settings optimize the buffers and audio streaming based
on the speed of your processor.”
In addition, Presonus
recommends lowering this setting if dropouts are noticed.
On my desktop system, I set the CPU setting to “high” and was able to set the latency to 6ms. Any lower and I
would hear an occasional pop or click. Reducing the CPU to “medium” and trying to reduce the latency further
would only increase the amount of popping and clicking. Although this setting is quite usable, considering the
speed of my system I was expecting to be able to reduce the latency even further. Note that I was playing back
5 tracks while recording at this latency setting.
Interestingly, I was also able to record using my outdated 1.2Ghz Pentium III laptop system with the latency set
to 6ms and the CPU setting at “medium.” This is strange because my P4 system has a 1.8GHz clock speed
advantage over my laptop system, yet they both are able to achieve the same latency when recording one
overdub track with 5 other tracks playing back. Pentium III does have a very efficient floating point unit and a
much shorter pipeline in relation to the P4, resulting in much less penalty for branch mispredictions. Perhaps
the Firepod drivers aren’t optimized for the P4 architecture. Still, I would think that my P4 system would be
able to achieve lower latency recording than my laptop.
In any event, the latency for both of my computers is excellent with the Firepod and Presonus appears to be
quite realistic with its hardware requirements. I should also note that I had no problems recording 10 tracks at
once with both my desktop and laptop systems. All eight of the analog inputs had either microphones or line
level sources plugged into them while the SPDIF input was engaged but no signal was being supplied. I
recorded in this configuration for a few minutes without glitches.
11 of 14
6/18/12 3:21 PM
FirepodReview
http://www.hyperactivemusic.com/MSProFiles/FirepodReview/f...
I do suggest that Presonus provide more information on how the latency and CPU settings interact and some
tips on how to optimize the computer for the lowest possible latency recording for a given computer setup.
Video Editors Should Seriously Consider the Firepod
I frequent quite a few video editing forums realize that audio quality isn’t a top priority for many enthusiast and
even prosumer video editors. Video editors often use standard consumer gaming sound cards to record
overdubs for their video productions. Sometimes this is the result of financial constraints and sometimes it’s
just plain not knowing how good the audio can sound with the right gear. The quality of consumer sound cards
really can’t compare to the quality of the Firepod and high quality audio really does make a video production
come to life. In addition, recording with a professional piece of gear like the Firepod makes life a lot easier since
it was designed with recording in mind, not gaming.
The Firepod does cost more than consumer sound cards, but there are a few high end consumer sound cards
that cost well over $100, and they don’t include a high quality mic preamp. Sources recorded with a high
quality mic preamp require less post processing and generally respond better to post processing such as
equalization and compression when it is needed.
Not only will recording quality increase dramatically, but so will the playback quality. By moving the audio
hardware outside of the electrically noisy computer environment spurious computer generated noises are greatly
reduced. The simple act of dragging clips around the timeline when the volume is cranked up generates all
kinds of nasty noises when using my computer sound device. When using the Firepod there is blissful silence
until there is supposed to be sound.
In addition, even if you do require a 5.1 surround sound audio device for gaming, you can still use the Firepod
when video editing and the sound card for other tasks. I should also mention Firepod outputs may also be
routed to support 5.1 mixing from your audio software if it supports 5.1 mixing. It’s simple to switch the
Windows sound device to the Firepod from the Control Panel when you sit down for an editing session with the
Firepod. Turn on the Firepod, switch the audio device and start editing. My computer speakers have two inputs
so it’s easy to switch the speaker input from the computer audio device to the Firepod. Even if your speakers
only have one input you can buy or make an inexpensive speaker switch.
Sound Quality
Subjectively the Presonus mic preamps sound very good and the Firepod specifications support what I am
hearing. I’ve worked with mic preamps ranging from the Mackie VLZ all the way up to John Hardy M1s, which I
consider to be among the best available. To give you an idea of how the Firepod mic preamps compare to the
Mackie VLZ I have recorded a bit of bass guitar and vocals using both of these mic preamps.
The vocals were recorded straight into the Firepod and Mackie VLZ 1202 mixer mic preamps. The bass was
recorded using the instrument input on the Firepod (channel 1) and into the Mackie VLZ 1202 using a Whirlwind
IMP2 direct box. Since the Mackie VLZ 1202 doesn’t have the ability to accept high impedance instruments a
direct box was necessary. No preprocessing or post-processing was applied. I have done my best to match
levels.
Firepod preamp - bass guitar
Mackie VLZ preamp - bass guitar
Firepod preamp - SM57 mic - vocal
Mackie VLZ preamp – SM57 mic – vocal
(Both of the above tracks were recorded at the same time, using two different SM57’s)
Firepod preamp – NT1000 mic – vocal (just for fun)
12 of 14
6/18/12 3:21 PM
FirepodReview
http://www.hyperactivemusic.com/MSProFiles/FirepodReview/f...
Finally, I’ve created a little mix of the bass guitar track (a little compression applied) and a vocal track recorded
using the Firepod mic pre and a Rode NT1000 mic (a little compression and reverb added to the vocal track)
that you can download here. For the record, the bass is an American Fender Jazz and the song this snippet is
from was written by me and the vocalist.*
Have a listen to the test tracks above and draw your own conclusions of the Firepod’s sound quality. I’m
extremely happy with it. Also keep in mind that mp3 compression does degrade the sound quality, even though
the kept the bit rates quite high.
In my opinion, the Presonus mic preamp gives my Fender bass more growl, which is a crucial quality (my
opinion of course!) of a bass guitar sound and is all but impossible to “process” into an already recorded track.
The vocalist also commented that the Presonus was “less closed in” and “fuller” sounding than the Mackie VLZ
mic preamp. I would characterize the Mackie VLZ mic preamp as being “spittier” than the Presonus on vocals.
I only tested the Rode NT1000 mic with the Presonus mic preamp and it performed as well as I would have
expected as you can here from the mix download. I was also quite surprised at how good the SM57 sounded
with the Firepod.
Although I only tested the Firepod mic preamps on bass guitar and vocal, in these applications I preferred them
to the Mackie VLZ preamps. This means that if I purchased a hardware recording interface that didn’t include
any mic preamps, or only 2 or 4 mic preamps, I’d have to purchase additional mic preamps to record to all
channels simultaneously. In addition, to equal the quality of the Firepod mic preamps I’d have to find
something better than the Mackie VLZ preamps, and that could get very expensive very quickly.
Technical Support
Having owned a Firestation I do have prior experience with Presonus technical support. Without hesitation I can
say that Presonus technical support is outstanding. No doubt about it, among the best I’ve ever encountered.
I’m talking about both phone support and e-mail. The tech support personnel are friendly and knowledgeable.
In addition, my wait time for phone support has never been longer than a few minutes.
Before I decided to write this review I called tech support to get some additional information about the Firepod.
As was the case when I called about the Firestation last year I was treated courteously and all of my questions
were answered. In addition, when I decided to write this review Presonus was very helpful and has answered all
of my questions in a timely manner.
Conclusion
Is the $799 Firepod a better deal than the $1200 TOA 8-track cassette multi-track? Of course, that’s really a
silly question since 15 years separate these two devices. Is the Firepod a better deal than the $11,000 Fostex
G24? Well I’m sure there are some analog stalwarts out there but I’d say that the flexibility, sound quality, and
reliability of the Firepod are in another league all together. How about the original $3600 ADAT? Again no
comparison, the Firepod includes high quality mic preamps and has much better sound quality and no tape
transport to jam.
Of course I’m just having a little fun here demonstrating how far home recording has progressed over the last
15 years. The real question is how does the Firepod compare to its current day competition, namely the MOTU
828II and the RME Fireface? Unless MOTU or RME decide to loan me one of their boxes for evaluation I can’t
answer that question. I’m unwilling to make those types of calls without a direct comparison.
What I am willing to say is that the Firepod is an enormously flexible, great sounding, and cost effective firewire
recording interface for the professional musician, casual musician, band, or aspiring video producer. The stable
drivers, easy to use interface, inclusion of 8 high quality mic preamps, and zero latency recording option make
13 of 14
6/18/12 3:21 PM
FirepodReview
http://www.hyperactivemusic.com/MSProFiles/FirepodReview/f...
the Firepod an excellent choice for anyone looking for a recording interface as comfortable on the road as on the
desktop. If you are in the market for a hardware recording interface, or just want a really high quality portable
soundcard put the Presonus Firepod on your short list.
Summary
Highlights:
8 high quality mic preamps and two instrument inputs
SPDIF input and output
10 track simultaneous recording
Midi in and out
Inserts available on channel 1 and 2
Stable, easy to install and configure drivers
Low latency and zero latency recording
Flexible and portable firewire audio interface
24 bit recording at up to 96kHz sampling frequencies
Suggestions:
TM
Inclusion of ADAT
lightpipe digital input to increase simultaneous recording tracks to 18 by using mic
preamps like the Presonus DigiMAX 96k.
Increase the output of the headphone amplifier.
Add a “talk back” switch to mic input #8 so that when pressed the signal of this channel would be routed
only to the headphone output thus providing a simple talk back option that won’t present feedback
problems in the control room
More comprehensive manual. The manual should include full specifications, more information on the CPU
setting, and computer optimization tips.
If you would like to hear the song that these snippets come from it’s called “Shakedown of My Soul” and can be downloaded here. Scroll down to the
“Recorded winter 1995/1996” section and select “Shakedown of My Soul.”
About the Author – Mark Dileo earned his BS in Mechanical Engineering from Rutgers University in 1998. He is a professional musician and had recorded
his own bands independent releases as well as local talent. Mark is the author of “Instant DVD Workshop” and the Ulead DVD Workshop 2.0 courseware
book as well the talent for the DVD Workshop Powertools Tutorial DVD.
Copyright © 2004 Mdileo. All Rights Reserved
14 of 14
6/18/12 3:21 PM