1
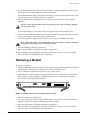
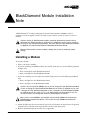
BlackDiamond Module Installation
Note
All BlackDiamond™ modules (Management Switch Fabric Modules (MSM64i) and I/O
modules) are hot-swappable. You do not need to power off the system to remove or insert a
module.
Caution: Service to BlackDiamond modules should be performed by trained service
personnel only. Before installing or removing any components of the system, or before
carrying out any maintenance procedures, you must read the safety information provided
in Appendix A of the Extreme Networks Consolidated Hardware Guide.
Warning: Blank panels must be installed in empty slots to ensure adequate system
cooling.
Installing a Module
To install a module:
1 Select a slot for the module:
• If you are installing an MSM64i module, the module slides into one of the following lettered
(orange) slots:
— Slots A through D in the BlackDiamond 6816
— Slots A through B in the BlackDiamond 6808
• If you are installing an I/O module, the module slides into one of the following numbered
slots:
— Slots 1 through 16 in the BlackDiamond 6816
— Slots 1 through 8 in the BlackDiamond 6808
Caution: You can install the MSM64i only in slots A through D in the BlackDiamond 6816
or slots A through B in the BlackDiamond 6808.You can install I/O modules only in slots
1 through 16 in the BlackDiamond 6816 or slots 1 through 8 in the BlackDiamond 6808.
I/O modules do not fit in slots A, B, C, or D. Blank panels can be installed in any slot.
Forceful insertion can damage the module or the backplane connectors.
Note: If two or more MSM64is are installed, and the master MSM64i is removed, the
BlackDiamond automatically reboots. This causes the slave MSM64i to become the
Master MSM64i
2 Attach the ESD strap that is provided to your wrist and connect the metal end to the ground
receptacle that is located on the top-left corner of the switch front panel.
3 Remove the blank faceplate from the slot, if applicable.
Part Number: 121002-00 Rev B
1
Removing a Module
4 For the BlackDiamond 6816, ensure that the module is horizontal with the module name to
the left and that the ejector/injector handles are extended.
For the BlackDiamond 6808, ensure that the module is vertical with the module name at the
top and that the ejector/injector handles are extended.
5 Slide the module into the appropriate slot of the chassis until it makes contact with the
backplane.
Caution: Ensure that the sheet metal of the module, and not the PCB board, engages
the card cage runners.
As the module begins to seat in the chassis, the ejector/injector levers begin to close.
6 Use one hand to hold the module in place and your other hand to close the ejector/injector
levers by pushing them toward the center of the module.
7 To secure the module, tighten the two captive screws using a #2 Phillips screwdriver.
Note: Tighten the screws of this module before you insert additional modules. Otherwise,
you might unseat modules that you have not secured.
8 Store the module packaging for future use.
9 Repeat this procedure for additional modules, if applicable.
10 Leave the ESD strap permanently connected to the chassis, so that it is always available
when you need to handle ESD-sensitive components.
Removing a Module
To remove a a module:
1 Attach the ESD strap that is provided to your wrist and connect the metal end to the ground
receptacle that is located on the top-left corner of the switch front panel.
2 Use a #1 Phillips screwdriver to unscrew the two captive screws.
PCMCIA
LINK /
ACTIVITY
MGMT
MODEM
CONSOLE
50015
3 Simultaneously rotate the ejector/injector handles outward to disengage the module from
the backplane as shown in Figure 1. Blank panels do not have ejector/injector handles,
because they do not engage the backplane.
EW_clips2
Figure 1: MSM64i showing extended ejector/injector handles
4 Slide the module out of the chassis.
5 If you are not going to install a replacement module, cover the slot with a blank faceplate.
Otherwise, follow the module installation procedure on page 1.
6 Repeat this procedure for additional modules, if applicable.
7 Leave the ESD strap permanently connected to the chassis, so that it is always available
when you need to handle ESD-sensitive components.
BlackDiamond Module Installation Note
2