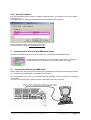
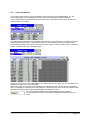
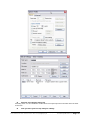
1
User’s Manual
Version 5.9x
Copyright 2002-2008 MA Lighting Technology GmbH
The reproduction and distribution of the documentation and software and the use of its contents is
subject to written authorization from MA Lighting Technology GmbH.
Trademarks
Windows ® 2000, Windows XP ® and Microsoft ® are registered trademarks of Microsoft, Corp.
QuickTime and the QuickTime Logo are trademarks of Apple Computer, Inc., registered
in the U.S. and other countries.
BluffTitler is owned by the Dutch company Outerspace Software and is protected by international
copyright laws. You agree to treat BluffTitler like any other copyrighted material.
All other names mentioned may be trademarks or registered trademarks of their respective owners.
Welcome to grandMA video
Thank you for placing your trust in this product.
This manual will provide all the necessary information for you to get the best out of your software.
The grandMA video software is subject to continual development. It is therefore possible that the
entire information printed in this manual is out-of-date.
Up-to-date information can always be found in the current readme.txt file on the CD or the downloaded
program disks.
You can download the actual software version via the internet at: www.malighting.de
H TU
UTH
We need your help!
If you have wishes or suggestions please send us an e-mail [email protected] or visit our
forum: www.ma-share.net .
Looking forward for a good cooperation
Your grandMA video team
MA Lighting Technology GmbH • Dachdeckerstr. 16 •
D-97297 Waldbüttelbrunn
•
www.malighting.de
Phone: +49 931 49 79 4- 0 Fax: +49 931 49 79 4-29 • Hotline: [email protected]
•
eMail: [email protected]
User’s Manual grandMA Video V 5. 9x
Page 2
Contents
1
What is grandMA video?.................................................................................... 6
Main Features ...................................................................................................................................... 6
Functions and Features ....................................................................................................................... 7
Video and Image Library...................................................................................................................... 7
2
2.1
System requirements ......................................................................................... 8
Recommendations for the target system................................................................................. 8
3
Copy protection (USB Dongle) .......................................................................... 8
4
Installation........................................................................................................... 9
4.1
Installation of the grandMA video Application ........................................................................ 9
4.2
Installation of the Apple QuickTime Platform.......................................................................... 9
4.3
Installation of the MPEG2 Codec .............................................................................................. 9
4.4
Installation of the Video Libraries........................................................................................... 10
4.5
Version of grandMA desk or grandMA onPC (off-line) ......................................................... 11
4.6
IP Addresses ............................................................................................................................. 11
4.6.1
How to set the IP Address of the PC................................................................................... 11
4.6.2
Artnet IP Address ................................................................................................................ 12
5
Communication with the grandMA Desk Series ............................................ 12
5.1
Connection with the grandMA desk ....................................................................................... 12
5.2
Connection with the grandMA onPC (off-line) software....................................................... 14
5.3
Preferred Operation Mode (Screen Layout) ........................................................................... 14
6
Data management............................................................................................. 16
6.1
Desk Connection ...................................................................................................................... 16
6.2
Principle function diagram ...................................................................................................... 19
6.3
Layer properties........................................................................................................................ 20
6.4
Predefined Constellations (.PED Files) .................................................................................. 22
7
Several grandMA video applications in one grandMA show ........................ 23
8
Quick Guide ...................................................................................................... 24
8.1
Step 1 – Start master session and connect to the desk ....................................................... 24
8.2
Step 2 – Controlling Images and Videos via the MA desk.................................................... 26
MA Lighting Technology GmbH • Dachdeckerstr. 16 •
D-97297 Waldbüttelbrunn
•
www.malighting.de
Phone: +49 931 49 79 4- 0 Fax: +49 931 49 79 4-29 • Hotline: [email protected]
•
eMail: [email protected]
User’s Manual grandMA Video V 5. 9x
Page 3
9
Program surface ............................................................................................... 29
9.1
Menu bar.................................................................................................................................... 30
9.1.1
File....................................................................................................................................... 30
9.1.2
View..................................................................................................................................... 30
9.1.3
Settings................................................................................................................................ 31
9.1.4
Pixel Mapper........................................................................................................................ 35
9.1.5
Help... .................................................................................................................................. 35
9.2
Toolbar....................................................................................................................................... 36
9.3
Preview ...................................................................................................................................... 37
9.4
Layer View or Edit View ........................................................................................................... 37
9.4.1
Image Pool (Layer content Images/Videos) ........................................................................ 37
9.4.2
Layer 3D Objects................................................................................................................. 39
9.5
Multi Output............................................................................................................................... 40
9.6
Fullscreen View......................................................................................................................... 41
9.7
Status Bar.................................................................................................................................. 41
9.8
Managing of video content with the grandMA desk ............................................................. 42
9.9
Video and Image Library Examples ........................................................................................ 43
10
Effects............................................................................................................. 44
10.1
11
Color keying .......................................................................................................................... 50
Softedging...................................................................................................... 51
11.1
Example for the Splitting of an HD Video:.......................................................................... 52
11.2
Example for Splitting a Video with ‚Ulead Media Studio Pro 7’ ....................................... 53
12
Keystoning ..................................................................................................... 55
13
Pixelmapper ................................................................................................... 56
13.1
Pixel Mapper Operation ........................................................................................................ 56
13.1.1 Menu.................................................................................................................................... 56
13.1.2 Pixel Mapper Graphical View .............................................................................................. 57
13.1.3 Pixel Mapper Grid View....................................................................................................... 58
13.1.4 Pixelmapper Toolbar ........................................................................................................... 59
13.1.5 Status Bar............................................................................................................................ 59
13.2
Setup of an LED Wall ............................................................................................................ 61
13.3
File Format of LED Panels ................................................................................................... 63
13.3.1 LED Panel Examples .......................................................................................................... 64
13.4
14
Artnet Panel Simulator ......................................................................................................... 66
grandMA video Admin (Video Controlling - Application)........................... 67
MA Lighting Technology GmbH • Dachdeckerstr. 16 •
D-97297 Waldbüttelbrunn
•
www.malighting.de
Phone: +49 931 49 79 4- 0 Fax: +49 931 49 79 4-29 • Hotline: [email protected]
•
eMail: [email protected]
User’s Manual grandMA Video V 5. 9x
Page 4
14.1
Video Devices Settings ........................................................................................................ 67
14.2
Softedge Settings.................................................................................................................. 67
14.3
Keystone Settings................................................................................................................. 69
15
Keyboard Shortcuts ...................................................................................... 70
16
FAQ and Troubleshooting ............................................................................ 71
16.1
Software Questions: ............................................................................................................. 71
16.2
Export System Information .................................................................................................. 73
17
BluffTitler........................................................................................................ 74
18
Appendix: How to create a Video Loop ....................................................... 75
19
Warnings ........................................................................................................ 87
20
Index ............................................................................................................... 88
MA Lighting Technology GmbH • Dachdeckerstr. 16 •
D-97297 Waldbüttelbrunn
•
www.malighting.de
Phone: +49 931 49 79 4- 0 Fax: +49 931 49 79 4-29 • Hotline: [email protected]
•
eMail: [email protected]
User’s Manual grandMA Video V 5. 9x
Page 5
1
What is grandMA video?
grandMA video is a software based media server, for both still and moving images, that is fully
integrated into the grandMA lighting control system.
-
An affordable software solution for controlling, live-accessing and altering video, still images
and 3D-objects in real-time
Fully optimized for “off-the-shelf” PC hardware, but also complete solutions including serverhardware and moving video lights available.
All videos, still images and 3D-objects can be scaled, positioned, tiled, colored and
manipulated directly from any grandMA console; including Content Browser
Six layers with full effects capabilities for high-resolution projections (e.g. XGA / 1,024 x 768
pixels)
One master layer for shaper effects iris effects and PC remote controlling
Layers for keystone effects
Layers for softedge effects
Straightforward set-up and configuration that utilizes bi-directional communication with the
grandMA console; grandMA video is an integrated part of the grandMA network session
Instant live-access to any kind of image, 3D-object or video – including content-preview in
your presets
Extensive media library included
Video In feature to fade in live videos
Synchronization of videos via MA network
Blind Programming support
Pixel Mapper to control several LED walls via Artnet
Artnet Panel Simulator
Main Features
grandMA video is a software based media server for the grandMA range of lighting control consoles. It
uses a Windows PC to facilitate the control of video and still images directly from any grandMA
console and runs on readily available PC hardware. As fully integrated part of the grandMA network
system, grandMA video is not just triggered via DMX. This has many advantages. On the one hand a
minimum of setup and configuration is required due to bi-directional communication between the
console and the grandMA video software. On the other hand the grandMA console allows for direct
access to the server (content browser) and previews the content as thumbnails in the preset.
The grandMA video software enables a console operator to control and alter videos, still images and
three-dimensional objects in real-time from a grandMA lighting console. Three-dimensional objects
can be textured with video clips or animated images. Videos, still images and three-dimensional
objects can be manipulated in multiple ways and in the same intuitive manner as a lighting fixture is
manipulated from the grandMA console.
MA Lighting Technology GmbH • Dachdeckerstr. 16 •
D-97297 Waldbüttelbrunn
•
www.malighting.de
Phone: +49 931 49 79 4- 0 Fax: +49 931 49 79 4-29 • Hotline: [email protected]
•
eMail: [email protected]
User’s Manual grandMA Video V 5. 9x
Page 6
Functions and Features
At its most basic level, grandMA video allows for the control of several moving images and highresolution images simultaneously. Videos and still images can be combined, mixed and controlled
using any grandMA console like a regular multi-parameter fixture. For this, six layers are available plus
several master layer with keystone and blade effects and additional layer for soft edge controlling.
In addition, grandMA video offers the possibility of choosing any three dimensional object as a surface
for video or still images. Cubes, cylinders, spheres, extruded logos or any other three-dimensional
shape can be “textured” with complimentary images or videos. The position and orientation of these
three dimensional objects are fully controllable from the grandMA console. You could start with a cube
rotating and progress to a three-dimensional logo flying around, but from then on, you are only limited
by your imagination.
Each image or video that is used at the same time requires a layer. Since the brightness of each layer
is controllable, it is possible to cross fade from one video image to another by cross fading from one
layer to another. By controlling and mixing the output of the grandMA video software, your grandMA
console has become a video mixer.
Video and Image Library
grandMA video comes with an library containing images, gobos and video clips.
This library contains over 50 video loops and over 1,000 licensed high-resolution gobos from
renowned designers. Over 300 textures and a number of special Video files complete your new design
tool box.
Content from other providers, and videos and images you have created yourself can easily be added
to the system. grandMA video supports *.avi and *.mov files and all required codec’s are installed as
part of the installation process. JPEG images and standard Windows bitmap images (*.bmp, *.rle,
*.dib) as well as CompuServe images (*.gif) are also supported.
MA Lighting Technology GmbH • Dachdeckerstr. 16 •
D-97297 Waldbüttelbrunn
•
www.malighting.de
Phone: +49 931 49 79 4- 0 Fax: +49 931 49 79 4-29 • Hotline: [email protected]
•
eMail: [email protected]
User’s Manual grandMA Video V 5. 9x
Page 7
2
System requirements
•
IBM® compatible PC or notebook with at least 2,4 GHz processor with at least
512 MByte RAM
•
Ethernet card with 10/100 MB
•
Highspeed 3D graphics card with hardware acceleration with at least
64 MByte video memory and 1024x768 pixel resolution or above
•
2 GByte available disk space on hard disk
•
Microsoft Windows® XP operation system (SP2)
•
Microsoft DirectX® version 9 or above
•
Actual grandMA console software or grandMA onPC
2.1
Recommendations for the target system
To setup a grandMA video system with a good performance all components should be well suited to
each other.
For example to present a video in PAL quality a great amount of data has to be handled. To imagine
the amount of data that has to be processed we give a short example for a simple PAL video:
- Resolution 768 x 576 pixel
- 25 fps (frames per second)
- 24 bit color depth
768 x 576 x 25 x 24 = 265 420 800 bps (bit per second)
That means ca. 33 MByte/second have to be streamed to the output card for only one uncompressed
PAL video!!
3
•
One important unit of measurement for the system speed is the CPU speed and its
adjustment to the main board chipset. The speed should be above 2 GHz and the chipset
must be optimized for the CPU type to reach a high data throughput.
- We do not recommend a preferred manufacturer.
- A 64 Bit CPU type will not improve the performance.
- A dual processor system will not improve the performance too.
•
To increase the drive speed we recommend a RAID array (Redundant Array of Inexpensive
Drives) configuration of two or more hard disks with RAID0 (level 0) configuration. RAID0
writes data across the drives in the array, one segment at a time. This configuration is also
referred to as "striping." Striping offers high I/O rates since read/write operations may be
performed simultaneously on multiple drives.
•
The next eye of a needle in the system is the graphic card.
Use a state of the art graphic card with at least 64 MByte memory and fast hardware
acceleration.
Copy protection (USB Dongle)
grandMA video is protected against unauthorized copying with an USB dongle (electronic key).
You can use the software without any restrictions without this dongle but the output signal will be
disturbed with a bouncing water sign and the Fullscreen view switches back after a while.
For the use of several grandMA videos in one network the use of one multi license dongle is possible.
So only one dongle connected to one PC in the network provides all applications with the necessary
licenses. Also have a look at 9.2 Toolbar.
MA Lighting Technology GmbH • Dachdeckerstr. 16 •
D-97297 Waldbüttelbrunn
•
www.malighting.de
Phone: +49 931 49 79 4- 0 Fax: +49 931 49 79 4-29 • Hotline: [email protected]
•
eMail: [email protected]
User’s Manual grandMA Video V 5. 9x
Page 8
4
Installation
The installation is divided into several parts:
• Installation of the grandMA video application (Program CD)
• Installation of the Apple QuickTime platform (Program CD)
• Installation of MPEG2 Codec for the Apple QuickTime platform (Program CD))
• Installation of the additional BluffTitler Software (Program CD)
• Installation of the grandMA video libraries (Content DVD 1..3)
4.1
Installation of the grandMA video Application
The installation is divided in several parts, the installation of the program and additional software and
the library installations.
The installation of grandMA video, Apple QuickTime and MPEG2 Codec are necessary, video libraries
and BluffTitler are optional.
So the amount of data is reduced if you want to update the program only.
You must do the installation procedure for the grandMA video program and the additional packages
separately:
The actual version of the video application can be downloaded from the Internet.
Internet downloads:
Please extract the downloaded file into a temporary folder and run the ‘Setup’ (VIDEOxxx.exe)
program.
CD/DVD version:
The installation program should start automatically after inserting the ‚grandMA video‘ CD.
If not, you can run the installation .exe program from the root directory.
Note:
You should have administration rights to install the program.
To work with grandMA video without administration rights you have to arrange the administration
rights by the administrator on the installation path e.g.:
C:\Program Files\MA Lighting Technologies\grandMA video
Before you install a new version of the program, please be sure that you have un-installed any old
versions! You must un-install the application from the control panel under ‘add/remove programs’. It’s
not sufficient to just delete the files.
4.2
Installation of the Apple QuickTime Platform
To play QuickTime movies (.mov) with grandMA video you have to install the QuickTime platform.
QuickTime enables your computer to handle Video, graphics, sounds, sprites, text VR panoramas,
animation, and content streamed over the internet. The installer lets you choose the QuickTime
software you want, and places the appropriate locations on the computer. For further installations
choose the QuickTime Updater in the QuickTime folder.
The QuickTime platform installation is available on the installation DVD and will start automatic within
the installation process.
4.3
Installation of the MPEG2 Codec
To play MPEG2 coded movies with grandMA video you have to install this licensed Codec.
For this purpose start the installation program: DWINQuickTimeMPEG2.exe
MA Lighting Technology GmbH • Dachdeckerstr. 16 •
D-97297 Waldbüttelbrunn
•
www.malighting.de
Phone: +49 931 49 79 4- 0 Fax: +49 931 49 79 4-29 • Hotline: [email protected]
•
eMail: [email protected]
User’s Manual grandMA Video V 5. 9x
Page 9
4.4
Installation of the Video Libraries
The libraries contain video clips, images and gobos. Hence it is a huge data package.
So the installation of the video libraries is distributed on several DVDs.
The following libraries exist:
Name
Description
Size
MALIGHTING-MASKS
57 MASKS 1024*768
~ 128 MB
MALIGHTING-TEXTURES
304 TEXTURES 1024*768
~ 87,7 MB
MALIGHTING-CLIPS1
91 Videos 1024*768 (Particle Illusion Clips)
~ 1,45 GB
MALIGHTING-CLIPS2
26 Videos 1024*768 (cinema Videos)
~ 2,93 GB
MALIGHTING-CLIPS3
33 Videos 768*576 (nature Videos)
~ 1,25 GB
MALIGHTING-CLIPS4
35 Videos 768*576 (nature Videos)
~ 2,15 BG
DFDESIGN
33 Videos 640*480 QMOV
~ 2,88 GB
IDYLLHANDS
34 Videos 640*480 QMOV
~ 605 MB
HIGH_D-CLIPS1
15 Videos 1024*768
~ 2,19 GB
HIGH_D-CLIPS2
14 Videos 1024*768
~ 2,03 GB
HIGH_D-CLIPS3
17 Videos 1024*768
~ 2,19 GB
HIGH_D-TEXTURES
40 Images 1024*1024 (textures)
~ 6,92 MB
DHA
1021 Images 1024*768
(DHA Black/White Gobo Library)
~ 52,6 MB
MALighting Ideas
7 Videos 768*576 (misc Videos)
~ 368 MB
SET 1
SET 2
SET 3
Sum:
MA Lighting Technology GmbH • Dachdeckerstr. 16 •
D-97297 Waldbüttelbrunn
•
www.malighting.de
Phone: +49 931 49 79 4- 0 Fax: +49 931 49 79 4-29 • Hotline: [email protected]
•
18,3 GB
eMail: [email protected]
User’s Manual grandMA Video V 5. 9x
Page 10
4.5
Version of grandMA desk or grandMA onPC (off-line)
The Version number of the desk must fit to the version number of grandMA video!
You can find the version number of the grandMA video application in the Aboutbox via the menu entry
‘About’:
The corresponding desk version is shown in brackets () behind
the grandMA video version.
The first two digits of the desk version n.n must be identical with
this number.
Otherwise the communication with the desk is faulty
Desk Version n.nxx
n.n
represents the version (streaming) number of the desk software.
This number should correspond to the desk- or onPC software version !
The grandMA onPC software can run on the same PC or on an external PC connected via Ethernet.
4.6
IP Addresses
IP addresses are what allow the internet and most modern networks to work. It’s a way of identifying a
computer by a unique set of numbers (an IP address). An IP address is made up of a set of four
numbers. Each number can have a value between 0 and 255.
Your PC and the grandMA must have their respective IP addresses set up correctly.
The first three sets of numbers must be the same and the last set must be different.
For example:
GrandMA console IP address:
192.168.0.5
PC with grandMA video IP address:
192.168.0.10
To setup the IP address of the desk, please refer to the grandMA user’s manual.
4.6.1 How to set the IP Address of the PC
Please note if you are already part of a network please check with your network
administrator before changing your IP settings (you may not need to!) and before
connecting any device, such as a lighting console, to an existing network.
Windows® XP
•
•
•
•
•
•
START – CONTROL PANEL – NETWORK CONNECTIONS
Double click on LOCAL AREA CONNECTION
Select INTERNET PROTOCOL (TCP/IP) from the list of protocols.
Click on PROPERTIES
In the properties window you will see either your existing IP address or a selection
that says OBTAIN AN IP ADDRESS AUTOMATICALLY.
In the case of the latter
Click on the radial button USE FOLLOWING IP ADDRESS.
Click OK once you have entered your required IP address.
This may prompt an error box to appear telling you that a SUBNET MASK is required,
however, when you click “OK” you should see a default SUBNET MASK (255.255.255.0) has
already been input and you can just click OK to leave it.
MA Lighting Technology GmbH • Dachdeckerstr. 16 •
D-97297 Waldbüttelbrunn
•
www.malighting.de
Phone: +49 931 49 79 4- 0 Fax: +49 931 49 79 4-29 • Hotline: [email protected]
•
eMail: [email protected]
User’s Manual grandMA Video V 5. 9x
Page 11
4.6.2 Artnet IP Address
The Artnet Standard needs a class A IP address beginning with 2. for example 2.2.2.2 and a subnet
mask 255.0.0.0.
This address can be added via the Windows dialog Advanced TCP/IP Settings:
Further information about the Artnet protocol under:
© Artistic Licence (UK) Ltd. www.artisticlicence.com
5
Communication with the grandMA Desk Series
Notice that the DMX channels have to be ‚patched’ to communicate with grandMA video.
The simplest way of ‚patching’ is to set the switch ‚Auto Patch’ in the dialog
‚Create New Fixtures or Channels’ to ‚On’ at the desk or the Offline.
5.1
Connection with the grandMA desk
Please make sure, that the program version of the grandMA desk meets the specifications described
in: 4.5 Version of grandMA desk or grandMA onPC (off-line) .
For communication you have to connect the PC with the grand MA console or another PC running the
onPC editor.
You can do this directly with a patch crossover cable with two RJ-45 connectors.
MA Lighting Technology GmbH • Dachdeckerstr. 16 •
D-97297 Waldbüttelbrunn
•
www.malighting.de
Phone: +49 931 49 79 4- 0 Fax: +49 931 49 79 4-29 • Hotline: [email protected]
•
eMail: [email protected]
User’s Manual grandMA Video V 5. 9x
Page 12
ogJQR=Å~ÄäÉ=
If you use a network with a hub or a switch, connect the PC with a regular patch network cable to the
hub or switch.
• Connect the cable to the desk.
• Start the desk and load a show
• Start a new session at the desk (MA Network Connections ‘Start New Session’)
• Start the grandMA video application with ‘New document’
The application automatically connects to the desk and receives the data of the current show.
If you do not get an automatic connection to the desk, you can invite the grandMA video to the desk
session or join the desk session from the grandMA video application via the network dialog.
MA Lighting Technology GmbH • Dachdeckerstr. 16 •
D-97297 Waldbüttelbrunn
•
www.malighting.de
Phone: +49 931 49 79 4- 0 Fax: +49 931 49 79 4-29 • Hotline: [email protected]
•
eMail: [email protected]
User’s Manual grandMA Video V 5. 9x
Page 13
5.2
Connection with the grandMA onPC (off-line) software
Please make sure, that the program version of the grandMA onPC software meets the specifications
described in: 4.5 Version of grandMA desk or grandMA onPC (off-line) .
Both applications, grandMA video and the grandMA onPC can work on the same PC or you can use
two PC’s connected via Ethernet.
• Start the grandMA onPC and load a show (Backup Load Show)
• Start a new session at the grandMA onPC (MA Network Connections ‘Start New Session’)
• Start the grandMA video application
grandMA video searches for a running grandMA onPC session wit a unique ID. If the session is found
grandMA video connects automatically with this session and loads the current show.
If you do not get a connection to the desk, make sure that grandMA video doesn’t run a master
session.
5.3
Preferred Operation Mode (Screen Layout)
To get a direct access to the channel sets of the fixture layers we recommend the smart view:
The “Smart View” offers a clearly arranged summary about the layer content and objects. All important
functions can be assessed via short keys.
MA Lighting Technology GmbH • Dachdeckerstr. 16 •
D-97297 Waldbüttelbrunn
•
www.malighting.de
Phone: +49 931 49 79 4- 0 Fax: +49 931 49 79 4-29 • Hotline: [email protected]
•
eMail: [email protected]
User’s Manual grandMA Video V 5. 9x
Page 14
To configure a “Smart View“ follow the following instructions:
• Click on the empty touch screen to call the “Create a Window” dialog
• Select the “Smart” button
• In the upcoming “Smart” window press the yellow button left above:
•
In the “Smart Window Options” dialog select the “Enable Direct Select” buttons
”Preset” + “Feature” + “Attribute”
To create the “Group” buttons carry out the following instructions:
•
•
•
Press the “Setup” key at the desk
Push “Auto create” at the touch screen
Set the “Select” entry in “Video Layer” and “Video Master” to “Yes” and press
“Create single Groups only”
• Change into the “Smart” view and resize the smart window to get space for the group buttons
• Click into the blank area and select “Groups” in the upcoming dialog
The result should look like this:
MA Lighting Technology GmbH • Dachdeckerstr. 16 •
D-97297 Waldbüttelbrunn
•
www.malighting.de
Phone: +49 931 49 79 4- 0 Fax: +49 931 49 79 4-29 • Hotline: [email protected]
•
eMail: [email protected]
User’s Manual grandMA Video V 5. 9x
Page 15
6
Data management
This section describes how data is managed by the desk and the application.
The setup of the application can be done independent from the desk.
Master / Slave:
If the console and video application are connected you can determine via the Network LED, whether
the application runs in master or slave mode. The master, usually the console, holds the current show
data.
6.1
Desk Connection
When you launch grandMA video it tries to connect to a session with the same ID.
The four possible states of the connection are indicated by the button in the toolbar:
The LED is grey.
No connection to a session exists or the ‘allow to invite’ flag is off.
The LED is red.
At least one Session was found on the Network. grandMA video is not member of a
session. Maybe that the „Allot to invite“ switch is not set or the Session ID is different
The LED is Green with an ‘S’.
GrandMA video has joined a session as slave.
The LED is orange
Grand MA Video is in the ‘Sniffer mode’ , this is a simple receiver mode.
In opposite to the slave mode no session data will be exchanged with the desk.
The LED appears blue with an ‚M’.
GrandMA video has the Master function of a session.
The creation of a session with grandMA video can be used to transfer all data of a .ped
file (grandMA video format) to a desk or onPC. If the loading is completed, the desk automatic
becomes the master and grandMA video gets the slave.
ATTENTION: With the start of a new session (Create) the session founder overwrites all data of the
other members. I.e. if a new session is founded by the grandMA video all data in the desk will be
overwritten!
If more than one console, visualizer or onPC editor is connected to the network the connections to the
equipment will have to be properly assigned.
The communication between consoles, visualizer, video applications and onPC editors takes
place in sessions.
A session has only one founder. This is e.g. the master. On connection the founder transfers
its data (fixture types) to the slaves.
From then on, all session members are synchronized and have equal rights. If a fixture is
edited in the slave the change is reflected in the master and vice-versa.
Devices not assigned to any session are not in the list.
If you press the ‘Invite’ Button you get a list of these MA devices.
MA Lighting Technology GmbH • Dachdeckerstr. 16 •
D-97297 Waldbüttelbrunn
•
www.malighting.de
Phone: +49 931 49 79 4- 0 Fax: +49 931 49 79 4-29 • Hotline: [email protected]
•
eMail: [email protected]
User’s Manual grandMA Video V 5. 9x
Page 16
A Session always has a master and up to 31 Slaves, i.e. max. 32 devices. For example a
slave can be another MA desk, an NSP, a grandMA Offline application or a grandMA video
application. So up to 31 grandMA Video applications can be operated simultaneously at one
desk. In the ‘Sniffer mode’ more video sessions are possible because similar to the Artnet
protocol the video server is only receiving data.
The network configuration can be managed by the ‚Desk Connection’ dialog:
Remark: If the session
entry appears in red, the
streaming version is wrong.
You have to update the
software.
With the ‘>>’ button you
can expand the dialog.
The upper part of the dialog shows the active sessions and their members in a tree view.
The session master is printed bold.
GrandMA video is printed green.
Create (a new session):
GrandMA video creates a new session as master. This function is used for example if a show exists
as .ped-file (grandMA video Format). The show with all data is sent to the slave. It must not be loaded
via disk to the desk. If the loading is completed, the desk automatic becomes the master and grandMA
video gets the slave.
Join as Slave:
Join the selected session as a member (usually as slave).
After that data of the desk is transferred to the grandMA video.
Join as Sniffer:
Join the selected session as a sniffer i.e. the Video application is only receiving data similar to an
Artnet receiver application. If you change settings in the Video application no data is sent to the desk.
Leave (Session):
Leave the session.
>>:
Expand the dialog view.
Settings:
Session ID:
Every session in the grandMA network has a unique ID.
Only members with this ID can take part in this session.
Session Name:
Input or display for the name of a session.
MA Lighting Technology GmbH • Dachdeckerstr. 16 •
D-97297 Waldbüttelbrunn
•
www.malighting.de
Phone: +49 931 49 79 4- 0 Fax: +49 931 49 79 4-29 • Hotline: [email protected]
•
eMail: [email protected]
User’s Manual grandMA Video V 5. 9x
Page 17
Password:
If a password is required for the session you can enter it in this field.
IP:
Use this listbox to choose an IP address for network communication. If there is more than one IP
available (e.g. multiple network cards installed) select the IP address which is linked to the
grandMA desk.
Allow Invite:
If the switch is on, grandMA video can be invited to a session.
Invite:
Opens a dialog showing all connected MA members (desks and onPC) in the network.
You can invite new members via the dialog.
MA Lighting Technology GmbH • Dachdeckerstr. 16 •
D-97297 Waldbüttelbrunn
•
www.malighting.de
Phone: +49 931 49 79 4- 0 Fax: +49 931 49 79 4-29 • Hotline: [email protected]
•
eMail: [email protected]
User’s Manual grandMA Video V 5. 9x
Page 18
6.2
Principle function diagram
The following pattern demonstrates how data is processed.
If you connect the grandMA video to an MA desk you can compare the result with some slide
projectors remote controlled by an MA desk.
In contrast to a slide projector the slides are not projected on the screen. The screens or 3D objects
are active light emitters like monitors and can take the shape of any geometric form. This takes place
on so called “Layers”. Every Layer output feeds a virtual camera.
The virtual camera outputs can be mixed up to a resulting video output.
Every layer has its own magazine containing emitting 3D objects.
Every layer has its own magazine containing videos, images and masks.
The number of layers can vary in dependence of the complexity of your show.
If the grandMA video is invited in a session by the desk, every layer behaves similar to a fixture.
The application receives the amount of layers and every layer magazine is assembled with several
images and videos. These are indicated by their relative paths and names.
If a layer 3D object or the content of a magazine is changed within grandMA video, the changed
properties are immediately taken up by the desk.
Several grandMA video applications are shown in several “Layers” on the MA-desk.
The following diagram shows a principle structure with 4 layers.
MA Lighting Technology GmbH • Dachdeckerstr. 16 •
D-97297 Waldbüttelbrunn
•
www.malighting.de
Phone: +49 931 49 79 4- 0 Fax: +49 931 49 79 4-29 • Hotline: [email protected]
•
eMail: [email protected]
User’s Manual grandMA Video V 5. 9x
Page 19
6.3
Layer properties
For a better overview shows can be arranged in Fixture Layers on the grandMA desks. E.g. the
conventional lights can be separated from the multi functional fixtures and video engines.
In the example below you see a show in the Fixture Layer named ‘New Device Layer’ with two VL
2000 W and two VL 1000 A:
According to this example for every grandMA video show an own Fixture Layer is created. This Layer
accepts several Video Layers. These Video Layers can be combined to meet your requirements.
In the following example the Fixture Layer with the name ‚Video’ contains 6 Video Layers, 4 Keystone
Layers, 1 Master Layer and 4 Softedge Layers:
Layers for a video show can be arranged for your requirements on the desk. You can find them in the
fixture library at the entry: ‚MA LIGHTING’.
One Fixture Layer can contain multiple Keystone- and Softedge Layers. In this case the application
offers a ‘Softedge ID’ selection box in the status bar. Through this one video show can control several
grandMA video applications with several Softedge- and Keystone Layers.
For every grandMA video PC an individual Softedge ID is selected.
So each projector shows his individual Softedging and Keystoning for this
show.
MA Lighting Technology GmbH • Dachdeckerstr. 16 •
D-97297 Waldbüttelbrunn
•
www.malighting.de
Phone: +49 931 49 79 4- 0 Fax: +49 931 49 79 4-29 • Hotline: [email protected]
•
eMail: [email protected]
User’s Manual grandMA Video V 5. 9x
Page 20
The different Layer Types have the following meanings:
Video Layer:
This Layer can use several 3D
Objects from the library to
represent images and videos.
One grandMA video application
can contain up to 6 Video Layers
for images and videos.
Master Layer:
One grandMA video application
can contain only one Master
Layer. This layer represents a
total view on all other layers. It
serves the shapers and iris effects
and the position of the camera
‘VCamera X, Y and Z’ for the
resulting output image.
A control channel offers
- remote controlled PC shut down
- Switch to the Fullscreen View
Keystone Layer:
One grandMA video application
can contain several Keystone
Layers.
Switching between these layers is
done with the select box in the
status bar:
.
This layer represents a total view
on all other layers to realize the
keystone effects.
MA Lighting Technology GmbH • Dachdeckerstr. 16 •
D-97297 Waldbüttelbrunn
•
www.malighting.de
Phone: +49 931 49 79 4- 0 Fax: +49 931 49 79 4-29 • Hotline: [email protected]
•
eMail: [email protected]
User’s Manual grandMA Video V 5. 9x
Page 21
Softedge Layer:
One grandMA video application
can contain several Keystone
Layers.
Switching between these layers is
done with the select box in the
status bar:
.
These layers represent a total
view on all other layers and
realize the soft edging, i.e. the
seamless cross fading to show
one image with several projectors.
Therefore the channels of the
shapers are used similar to the
blades of the master layer.
6.4
Predefined Constellations (.PED Files)
Softedge
Layer
Master Layer
new.ped
6
1
-
1
-
new softedge.ped
6
4
4
-
1
Filename
(in folder New)
Video Layer
Keystone
Layer
Master
Control Layer
With the installation of grandMA video the most common constellations are installed. These are
available via the menu entry ‚File – Open…’ in the folder ‚New’.
If a grandMA video application is started, and a new show is created via ‘File – New’ the application
loads the configured file ‘New.ped’. Other predefined shows can be loaded via ‚File – Open…’ from
the folder ‚New’.
These files contain the following configurations:
MA Lighting Technology GmbH • Dachdeckerstr. 16 •
D-97297 Waldbüttelbrunn
•
Description
Will be loaded via ‚File – New’.
Projection of 6 Layers without
Softedging
Projection of 6 Layers with Softedging
for up to 4 projectors
www.malighting.de
Phone: +49 931 49 79 4- 0 Fax: +49 931 49 79 4-29 • Hotline: [email protected]
•
eMail: [email protected]
User’s Manual grandMA Video V 5. 9x
Page 22
7
Several grandMA video applications in one grandMA show
Several grandMA video applications can be provided with one desk simultaneously.
For each grandMA video application one fixture layer is created on the desk.
A grandMA video application is working in the "MA-Net" and is identified via the fixture layer name.
All PCs running grandMA video with the same fixture layer name will "grab" what they need out of the
data stream and show the same show with the same content. Several "video-fixtures" configured in
the desk can be selected in the grandMA video application via a drop down menu:
Example with one connected grandMA video application in one Fixture Layer:
A layer in grandMA video is analog to a Fixture in the grandMA desk
So if you use for example 6 layers 6 fixtures are patched and shown in the Fixture Layer of the desk.
In this example a second Fixture Layer named Video2 has been added for a second grandMA video
application with one Master Layer named Master 2 and three Video Layers named Layer 2-1…2-3:
MA Lighting Technology GmbH • Dachdeckerstr. 16 •
D-97297 Waldbüttelbrunn
•
www.malighting.de
Phone: +49 931 49 79 4- 0 Fax: +49 931 49 79 4-29 • Hotline: [email protected]
•
eMail: [email protected]
User’s Manual grandMA Video V 5. 9x
Page 23
8
Quick Guide
This capture gives a brief description how to operate with the grandMA video application.
To give you a sense of achievement grandMA video is delivered with a short demo file ‘New.ped’ that
gives a survey of the possibilities of manipulation.
If you carry out this example the video application starts a master session and transfers its show to the
connected desk or onPC.
Attention! Consider that the actual desk show will be overwritten if you carry out this example. So
please start a new empty show on the desk as described.
For the following steps a grandMA desk or the grandMA onPC should be connected.
Without the connected desk, or onPC editor, you are able to do the setup of the .ped (Projector Engine
Document) file where the used pictures and videos are stored, but you cannot control the resulting
output via the desk.
8.1
Step 1 – Start master session and connect to the desk
•
•
•
•
Start the connected desk or onPC with an empty show.
(Backup; Load Show; New Show)
At: ‚Tools’ ‚MA Network’ make sure, that no session is running.
If not, stop the session with ‘Leave Session’.
Then start grandMA video.
The default show ‘new.ped’ will be loaded
If no MA session is found, this is indicated by a grey LED.
Create a new session by opening the network dialog (click on MA Network), and then
click the ‘Create’ button.
The Master state will be indicated by the blue LED framing the ‘M’.
Now you can invite the desk or onPC to the MA session:
MA Lighting Technology GmbH • Dachdeckerstr. 16 •
D-97297 Waldbüttelbrunn
•
www.malighting.de
Phone: +49 931 49 79 4- 0 Fax: +49 931 49 79 4-29 • Hotline: [email protected]
•
•
Expand the network
dialog with the ‘>>’button
•
Open the next dialog with
the ‘Invite’ button
eMail: [email protected]
User’s Manual grandMA Video V 5. 9x
Page 24
•
Select the station to be invited and confirm with ‘OK’
The show data of grandMA video will be transferred
to the desk. This is signaled on the desk with a bar.
Note:
GrandMA video can create a session as a Master. If a desk joins into this session, the desk will
become the master and grandMA video will become the slave. All show data on the desk will be
overwritten!
From now on the desk becomes the master of the grandMA session and grandMA video joins as
slave:
This is indicated by the green LED ‘S’.
GrandMA video had joined the session as slave-
You also can join the session via
the desk or onPC.
Therefore select the ‘Tools’
button on the desk and open the
‘MA Network’ dialog.
Select the ‘Active Network
Session’ and click on ‘Join
Session’.
The show will be transferred to
the desk and the desk will
become the master of the
session (if it was created from
grandMA video).
MA Lighting Technology GmbH • Dachdeckerstr. 16 •
D-97297 Waldbüttelbrunn
•
www.malighting.de
Phone: +49 931 49 79 4- 0 Fax: +49 931 49 79 4-29 • Hotline: [email protected]
•
eMail: [email protected]
User’s Manual grandMA Video V 5. 9x
Page 25
8.2
Step 2 – Controlling Images and Videos via the MA desk
Now you have assess to the images and videos arranged in the demo show of grandMA video.
The surface of the touch screen should look like this:
l
The column ‘Name’ shows all configured layers of the show file (new.ped).
In the columns beside all available effects for this layer are listed.
Now we’ll see how to control grandMA video via the desk:
•
Click on the ‘Preview’ tab of grandMA video to watch the resulting output
preview. If you prefer a Fullscreen view, apply the ‘Fullscreen’ button in the
toolbar (back with the ‘ESC’ button).
•
•
MA Lighting Technology GmbH • Dachdeckerstr. 16 •
D-97297 Waldbüttelbrunn
•
If you want to change the image or video
for the layer, scroll through the image
selection with the encoder wheel or
select the image or video from dialog
after clicking on the image entry.
www.malighting.de
Phone: +49 931 49 79 4- 0 Fax: +49 931 49 79 4-29 • Hotline: [email protected]
Select a layer and open the
dimmer.
Now you can fade in the actual
selected image for the layer.
•
eMail: [email protected]
User’s Manual grandMA Video V 5. 9x
Page 26
For example if you select the image ‘Dots colored.bmp’
the preview window shows this image.
Now you can test the effects and see how the change of a value on the desk affects the resulting
output in the grandMA video preview window.
We will see how this Texture looks on a 3D Object:
Select the ‘Foreground Object’ at the desk:
In the next dialog you can select a 3D Object to project onto:
Select the ‘Cross_medium’
The resulting output in the Preview looks flat, because you are
looking perpendicular on the 3D cross.
So let’s rotate the cross:
MA Lighting Technology GmbH • Dachdeckerstr. 16 •
D-97297 Waldbüttelbrunn
•
www.malighting.de
Phone: +49 931 49 79 4- 0 Fax: +49 931 49 79 4-29 • Hotline: [email protected]
•
eMail: [email protected]
User’s Manual grandMA Video V 5. 9x
Page 27
Therefore enter values unequal to 128 into the Object Animation fields:
The Result in the Video Preview shows a rotating cross with the new texture:
Instead of a simple texture you also can map a running video on the 3D Object.
Feel free and change other parameters.
This is the best way to see how grandMA video works.
MA Lighting Technology GmbH • Dachdeckerstr. 16 •
D-97297 Waldbüttelbrunn
•
www.malighting.de
Phone: +49 931 49 79 4- 0 Fax: +49 931 49 79 4-29 • Hotline: [email protected]
•
eMail: [email protected]
User’s Manual grandMA Video V 5. 9x
Page 28
9
Program surface
After starting the program, the following dialog will appear on the screen:
Automatic the last used document will be opened or if you cancel a new, empty document is created.
The surface should look like this:
As already known from other applications, the program surface is divided into several parts:
Menu bar
Toolbar
Video Layer,
Output,
Multi Output,
Pixel Mapper
Overview window for images and
videos of the channel functions
or the LED panels in the
Pixel Mapper
Preview window for the selected
image or video
Status Bar
MA Lighting Technology GmbH • Dachdeckerstr. 16 •
D-97297 Waldbüttelbrunn
•
www.malighting.de
Phone: +49 931 49 79 4- 0 Fax: +49 931 49 79 4-29 • Hotline: [email protected]
•
eMail: [email protected]
User’s Manual grandMA Video V 5. 9x
Page 29
9.1
Menu bar
Like in several other Windows application you can store and recall files, and adjust the settings of the
program:
9.1.1 File...
New:
Create a new, empty file
Open…:
Open a video show file (.ped).
Export Content and Show…: Exports an .ecd file that contains the show and all included content
(videos and images).
Note: The resulting file may be very large because all videos and images
are included.
Import Content and Show…: Imports an .ecd file that contains the show and all included content
(videos and images).
View Content Export File…: Opens a window with information about the .ecd file.
Save:
Save the current file under the given name shown in the title.
Save as…:
Save the current show file (.ped) with a new name.
Recent file list:
These menu entries represent a list of the files edited previously. A mouse
click in that list opens the file.
Exit:
Leave the application.
9.1.2 View...
Status Bar:
Standard Toolbar:
Dialog Bar:
System Monitor:
Switches the Status Bar on/off
Switches the Toolbar on/off
Switches the Dialog Bar on/off
Opens a window with system monitor information messages
MA Lighting Technology GmbH • Dachdeckerstr. 16 •
D-97297 Waldbüttelbrunn
•
www.malighting.de
Phone: +49 931 49 79 4- 0 Fax: +49 931 49 79 4-29 • Hotline: [email protected]
•
eMail: [email protected]
User’s Manual grandMA Video V 5. 9x
Page 30
9.1.3 Settings...
Options…
Opens a dialog with the following options:
Options Main:
Minimal Layer Distance:
Set the minimum distance between layers
(especially for planes) to avoid artifacts.
For example if two planes are on the same
Level, the images show artifacts because
none of them is in the foreground
Content Handling: If you change the content
(for example Avi1 => Avi2) the actual
output can stop short because the new
content has to be loaded. To avoid this, the
priority of the render thread can be
increased. Certainly the loading time
decreases.
Keystoning Blademode: Changes the
direction of the keystone edges similar to
blades.
Iris Resolution: Resolution of the iris in the
Master Layer
FOH Features: If this button is checked two
additional buttons appear at the toolbar.
One button serves the ‘Blind Programming’
preview.
The other button manages the dongle
license that is connected via the Network.
So the use of a multilicence dongle for
several applications is possible.
Windowed Mode:
Settings for the Preview and Multi Preview
Output
Ratio: Set the aspect ration to
- Automatic (default setting)
- 16 / 9; 4 / 3 etc…
- If the Pixelmapper is enabled the size of the output area can be set here
see:13.1.5 Status Bar
Preview:
Ratio: Setting for the ratio W/H for the Preview windows. Her you have the
possibility to generate a complete image if several grandMA video applications
generate one image via Softedging.
Render Keystone / Softedge in Preview: In spite of the fact that several
grandMA video applications (e.g. at layer 1 and 2) produce one resulting
image that is displayed in the preview, the keystone and softedge effects can
be enabled in this preview.
MA Lighting Technology GmbH • Dachdeckerstr. 16 •
D-97297 Waldbüttelbrunn
•
www.malighting.de
Phone: +49 931 49 79 4- 0 Fax: +49 931 49 79 4-29 • Hotline: [email protected]
•
eMail: [email protected]
User’s Manual grandMA Video V 5. 9x
Page 31
Options Multi Preview:
Controlsize: Sets the size of the controls in the
‘Multi Preview’
Mode: - % - values in %
- 8 Bit - values from 0…255
- 16 Bit - values from 0…65535
Show Channel in Control: Shows the DMX
channel inside the control in []
Channels: Opens a dialog to choose the shown
channels
Show extended Informantion: Animates the
channel controls if values are changed
Options Video In:
This interface allows the input of a live video stream. It is realized via the Microsoft Direct Show
mechanism.
Video In 1…4:
In this dialog up to 4 different ‘Video In’
devices can be assigned.
Every Video Capture Device supported by
Windows can be used as input source for
grandMA video.
Available Devices:
All recognized Video Capture Devices are
listed in this selection bar. By selecting one
device this will be assigned to the ‘Video In’
source and is available for grandMA video.
>>:
Additional options to restart drivers in case
of synchronization faults.
Device…:
If a Capture Device with a driver is installed,
its property dialog will be opened after the
selection of this button.
In this dialog the device specific properties of
the manufacturer can be managed. The
following example shows the property dialog
of a webcam:
If no device property is available, nothing
happens.
MA Lighting Technology GmbH • Dachdeckerstr. 16 •
D-97297 Waldbüttelbrunn
•
www.malighting.de
Phone: +49 931 49 79 4- 0 Fax: +49 931 49 79 4-29 • Hotline: [email protected]
•
eMail: [email protected]
User’s Manual grandMA Video V 5. 9x
Page 32
Stream…:
If a Capture Device with a driver is installed,
its streaming dialog will be opened after the
selection of this button.
In this dialog the device specific streaming
properties of the manufacturer can be
managed. The following example shows the
property dialog of a webcam:
If no device property is available, nothing
happens.
Filters…:
Between Capture Device and the output
several filters can be inserted. With these
filters the output can be distorted, coloured or
deinterlaced.
Note: As a rule these filters are offered by
grandma video and the operating system. Also
rd
additional Filters of 3 party providers can be
used if they are registered.. (The registration
can be done similarly to an OCX with the
program regsvr32).
Crossbar, TV-Tuner…: Opens a manufacturer dependent dialog for the installed video in device.
MA Lighting Technology GmbH • Dachdeckerstr. 16 •
D-97297 Waldbüttelbrunn
•
www.malighting.de
Phone: +49 931 49 79 4- 0 Fax: +49 931 49 79 4-29 • Hotline: [email protected]
•
eMail: [email protected]
User’s Manual grandMA Video V 5. 9x
Page 33
Options Disable Dialogs:
If some dialogs bother you, disable them
in this dialog.
Options Driver:
Driver: Select the display driver for the
video output.
The Default setting is ‘Primary
Display Driver’
Device:
- HAL (Hardware Abstraction Layer)
for the best performance
- RGB Emulation i.e. you can use
this if you have trouble with the
graphic card
Mode: Select the resolution and the
color depth (Width x Height y color
depth in bits)
Options Pixel Mapper:
This Option is only visible if the menu entry ‚Pixelmapper’ is enabled.
Unit: Unit of the LED panel dimensions and for
the configuration of the LED walls in the
Pixelmapper
ArtNet IP: Setting of the cofigured IP address
(see: 4.6.2Artnet IP Address) for the output of
DMX data via the ArtNet protocol within the
Pixelmapper.
Show fps:
Shows the actual Framerate in ‘Frames per Seconds’ in the output window
Show Video Info (preview/Fullscreen): Display of additional information like a timeline and the
actual frame in the ‘Preview’ and ‘Fullscreen View’.
Image/Video Preview: Display of the selected Image or videos in the ‘Multi Preview’
Start in Full screen:
The application always starts in the ‘Fullscreen Mode’
MA Lighting Technology GmbH • Dachdeckerstr. 16 •
D-97297 Waldbüttelbrunn
•
www.malighting.de
Phone: +49 931 49 79 4- 0 Fax: +49 931 49 79 4-29 • Hotline: [email protected]
•
eMail: [email protected]
User’s Manual grandMA Video V 5. 9x
Page 34
9.1.4 Pixel Mapper...
Enable:
Art-Net Out Mode:
Enabling of the Pixelmapper. If this entry is selected, a new tabbed window
appears for the configuration and display of the mapped images and videos.
Switches to the art out mode like the ‘Artnet Out’ button in the toolbar.
Graphical View:
Grid View:
Shows the output of the LED panels in a graphical view.
Shows an overview grid of the connected LED panels.
Show LEDs:
Display of the LED panels in the graphical view.
Show LEDs while moving or rotating : Display of the LED output while positioning the panels.
Show DMX Address: Shows the DMX addresses of the panels.
Show-Grid:
Displays a grid.
Show Peak Color Crosses: Display of the color changes in the Output Area.
Show Render Background: Display of the complete image, also the areas that are not covered by
LED panels.
Update Background: Updates the background of videos (slows down the performance).
Slow Artnet Out while Editing: In the edit mode the Artnet output is slowed down to get a better
performance for the editor.
Patch by dropping a new Panel: Opens a patch dialog after the dropping of new panels.
Call Area/Output Editor: Opens a dialog for creating new area/output configurations. In this dialog
several configurations for output areas can be definden.
9.1.5 Help...
Help <F1>…:
About…:
Opens the help window.
Shows the about box with the current version number.
Also you get the version information of the installed QuickTime.
In the lower part of the box you can find the license information.
In the about box under the entry ‘File’ you can find the release notes (Version
history).
FAQ…:
Opens a document with the Frequently Asked Questions.
Show Release Notes…: Opens the release notes document.
MA Lighting Technology GmbH • Dachdeckerstr. 16 •
D-97297 Waldbüttelbrunn
•
www.malighting.de
Phone: +49 931 49 79 4- 0 Fax: +49 931 49 79 4-29 • Hotline: [email protected]
•
eMail: [email protected]
User’s Manual grandMA Video V 5. 9x
Page 35
9.2
Toolbar
The toolbar contains several buttons that are related to the general operations of the program.
New:
Create a new, empty grandMA video file
Open…:
Open a stored video file (.ped) or import the content and show file (.ecd)
Save: Save the current file under the given name shown in the title.
Note: To reduce the file length the button ‘Save’ only saves the .ped
file that contains the layer setups and the grandMA show.
To save the content too (video files and images) you must choose
the ‘Export Content and Show’ entry. In the upcoming dialog you can choose a filename to save the
content and the show in one file with the file extension .ecd.
MA Network… Shows the actual network state or opens the MA Network dialog as
described in 6.1 Desk Connection.
Structure Check…Performs a structure check about all resources used in the actual
grandMA video show file and shows the results in a dialog. For example if the
application has received a setup from the desk but some images are not available on
the hard disk you get an error report with the missing images.
Full screen / Artnet Out:
Switches into ‘Full-Screen’ or ‘Artnet Out’ view.
You can also use the ‘Enter’ key on the keyboard to switch into the full-screen
mode.
Leave the full screen mode with the ‘ESC’ button
Fixture Layer: Selection of the Fixture Layer appropriate to the given name at the desk.
If you use different fixture layers you can switch between these layers by selecting the
specific layer within the box
The following buttons are enabled if the ‘FOH Features’ in the Options Dialog are enabled:
Blind: You can take or reject the ‘Blind Preview’ from the desk by selecting the
appropriate check buttons. If the ‘Blind Preview is active, the button gets blue. Note: The
‘Blind Preview’ only can be watched in the ‘Preview’ not in the ‘Fullscreen’ mode.
Dongle: You can take or reject the grandMA video license from a dongle that is
connected to the MA network. So if you only want to watch the video output in the
‘Preview’ select ‘reject’ and you can take the free license for another engine.
- If no license is found the button is red.
- If a license is found and used by the machine the button is green.
- If a license is found and rejected the button is grey.
MA Lighting Technology GmbH • Dachdeckerstr. 16 •
D-97297 Waldbüttelbrunn
•
www.malighting.de
Phone: +49 931 49 79 4- 0 Fax: +49 931 49 79 4-29 • Hotline: [email protected]
•
eMail: [email protected]
User’s Manual grandMA Video V 5. 9x
Page 36
9.3
Preview
This view offers a preview of the resulting output video.
If you enter the tab, grandMA video receives the commands from the desk and shows the
resulting output but in opposite to the Fullscreen view the menus, the toolbar and the status bar are
also active.
9.4
Layer View or Edit View
In this view you can edit the content (videos and images) and the objects of the layers.
Normally all layers of the grandMA video file contain the same content.
By selecting the ‘Video Layer” tab this view is activated.
9.4.1 Image Pool (Layer content Images/Videos)
GrandMA video comes with a huge library containing images, gobos and video clips. This content is
copied within the installation process into several folders.
Similar to the magazine of a slide projector such a folder behaves like a slide magazine. Up to 255
folders can be assessed directly from the desk. The different images and videos of a folder
correspond to the ‘Channel Sets’ of the desk and can be assessed from there.
Items can be deleted via the context menu with the menu entry of the right mouse button or the ‘Del’
button on the keyboard.
To get more detailed information about the single items you
can change the view to the ‚Report Mode’ via the context
menu with the right mouse button:
MA Lighting Technology GmbH • Dachdeckerstr. 16 •
D-97297 Waldbüttelbrunn
•
www.malighting.de
Phone: +49 931 49 79 4- 0 Fax: +49 931 49 79 4-29 • Hotline: [email protected]
•
eMail: [email protected]
User’s Manual grandMA Video V 5. 9x
Page 37
To assign folder to a ‚Channel Function’ click with the left mouse button into an empty column. The
following dialog appears:
After selecting the entry a browser
window appears where you can navigate
to desired folder.
After the selection of the folder the name is taken as a name for the ‚Channel Function’ as shown in
this example ‚Videos’. You can change
the name via the context menu with the
right mouse button.
The entries ‚Items’ of the ‚Channel
Functions’ can be edited, deleted or
renumbered via the context menu with
the right mouse button.
Data of the selected item like
size, framerate and length are
shown below the name of the
item.
After the selection of the item
its preview is shown in the
preview window at the lower
left side of the screen.
9.4.1.1 Inserting customized Videos and Images
To insert your own images click with the left mouse button into an empty ‚Folder’ or ‚Channel
Functions’ field and navigate in the upcoming dialog to the folder where the images and videos are
located. This can be an external drive.
After the selection of the folder and confirming with ‘OK’ it will take a while until the images are shown
because grandMA video has to build a so-called thumbnail (little image) for every item. Therefore each
file has to be opened and searched for a usable picture.
Note that the drive and the connection offer the necessary transfer rate to supply grandMA video with
data!
Because the presentation area of the images and videos behaves like a normal Windows browser you
also can copy the files into the shown directories by dragging them from your file browser and drop
them into grandMA video. These images and videos are added to the channel sets.
MA Lighting Technology GmbH • Dachdeckerstr. 16 •
D-97297 Waldbüttelbrunn
•
www.malighting.de
Phone: +49 931 49 79 4- 0 Fax: +49 931 49 79 4-29 • Hotline: [email protected]
•
eMail: [email protected]
User’s Manual grandMA Video V 5. 9x
Page 38
9.4.2 Layer 3D Objects
The tab ‘Type’ shows the projection objects of the layers.
In the simplest case a layer contains a 2D plane object.
This is a canvas were images or videos are shown like on a TV screen.
But this screen mustn’t be flat. You can use 3D boxes, cones or other 3 dimensional objects to render
your images or videos.
You can delete an entry via the context menu with the menu entry of the right mouse button or the
‘Del’ button of the keyboard.
Note: If you use objects with the extension „@r“ like „[email protected]“ the aspect ratio of the object fits
automatically to the aspect ratio of the texture (Ratio of width / height e.g. 16/9).
So we recommend using this object ([email protected]) for the easy projection of videos.
9.4.2.1 Creation of customized 3D Objects (.xob)
3D objects in grandMA video are defined in a specialized MA format „.xob“. This format can be
created with the vizualizer grandMA 3D. grandMA 3D can be downloaded free via the MA Homepage
www.malighting.com .
3D objects created with other programs can be converted with grandMA 3D into the .xob format.
Please note, that the amount of polygones affects the performance because for each polygone the
projection has to be calculated. The lower the number of polygones the better the frame rate.
•
•
•
Build your 3D object and export it as „3D Studio Object“ (.3DS)
Import the object with grandMA 3D vie „File – Import Objects…“
Export the object by selecting it in the object tree with the right mouse button and then select
„Export Object“ within the context menu
Objects created in this way can be added to the ‚Channel Set’ via the context menu of the right mouse
button.
MA Lighting Technology GmbH • Dachdeckerstr. 16 •
D-97297 Waldbüttelbrunn
•
www.malighting.de
Phone: +49 931 49 79 4- 0 Fax: +49 931 49 79 4-29 • Hotline: [email protected]
•
eMail: [email protected]
User’s Manual grandMA Video V 5. 9x
Page 39
9.5
Multi Output
This View allows an overview of all layers, their effects and the resulting output:
The example above shows all 6 layers with several 3D objects and the resulting output picture. Also
the output signal is squeezed in the lower part via the master layer and a shaper covers the lower right
part.
The content of each layer is
shown in a small window.
The control beside allows to
watch and manipulate the effect
values.
If a video runs on the layer, a
progress bar below the window
shows the state, the name and
the actual time of the video in
seconds.
A mouse click on the effect allows the direct input of
values or opens another dialog to select for instance
images directly.
For continuous value entries you can hold the mouse
button down and change the values by dragging the
mouse.
MA Lighting Technology GmbH • Dachdeckerstr. 16 •
D-97297 Waldbüttelbrunn
•
www.malighting.de
Phone: +49 931 49 79 4- 0 Fax: +49 931 49 79 4-29 • Hotline: [email protected]
•
eMail: [email protected]
User’s Manual grandMA Video V 5. 9x
Page 40
9.6
Fullscreen View
This view uses the full screen to show the video output.
There are several ways to switch into the full-screen view:
•
Select the ‘Fullscreen’ button from the toolbar
•
Hit the ‚Enter‘ key on the keyboard.
The ‚Enter‘ key switches into the Fullscreen View. ‘ESC’ switches back.
•
Use the Master Layer control channel on the grandMA desk to switch remote controlled into
the Fullscreen View.
If the application should always start in the Fullscreen View choose the menu entry ‘Settings’ -> ‘Start
in Fullscreen’
9.7
Status Bar
The status bar offers an overview about the system status:
Shows the status of the dongle
Mode: ‚Blind Programming’ or ‚Normal’
User rights: ‚Restricted’ or ‚Administrator’
Shows the number of animated avis in the current show
Shows the total number of Video Layers
If a show contains more than one Softedge- or Keystone Layer the appropriate
ID for this video machine can be selected here.
Example: An image with a resolution of 2000 x 768 pixels has to be projected with two beamers via
Softedging. Therefore two images with 1024 x 768 and two grandMA video applications, one
for the left, and one for the right image are used.
Both applications use the same show.
The left application uses the Softedge ID 1 for controlling the right side and the right
application uses the Softedge ID 2 for controlling the left Softedge side.
Softedge controlling of the left image is done with Shaper 14A.
Softedge controlling for the right image is done with Shaper 12A.
Layer 1
Shaper 14 A MA Lighting Technology GmbH • Dachdeckerstr. 16 •
D-97297 Waldbüttelbrunn
Layer2
Shaper 12 A
•
www.malighting.de
Phone: +49 931 49 79 4- 0 Fax: +49 931 49 79 4-29 • Hotline: [email protected]
•
eMail: [email protected]
User’s Manual grandMA Video V 5. 9x
Page 41
9.8
Managing of video content with the grandMA desk
To change the arrangement of images and videos or to change the objects in the Channel Functions
you must not even leave the desk place. You can browse by means of the desk surface on the PC
hard disk in your directories for images videos or 3D objects and arrange your content in the Channel
Sets.
The simplest way to change the layer content is to use the ‘Smart’ view:
•
Push the ‘Edit’ button at the desk and then the image that has to be changed.
In the upcoming ‘Values inside Function Block’ dialog the image is selected.
•
To browse for a new image push the ‘Edit’ button at the desk, then select the image that has
to be changed at the desk.
The upcoming window allows browsing for the new entry directly on the PC drive.
All files are previewed as an icon beneath the tree view:
•
After selecting the image or video file it is inserted into the layer.
MA Lighting Technology GmbH • Dachdeckerstr. 16 •
D-97297 Waldbüttelbrunn
•
www.malighting.de
Phone: +49 931 49 79 4- 0 Fax: +49 931 49 79 4-29 • Hotline: [email protected]
•
eMail: [email protected]
User’s Manual grandMA Video V 5. 9x
Page 42
9.9
Video and Image Library Examples
The following page shows some examples from the library of seamless textures:
Etc…
MA Lighting Technology GmbH • Dachdeckerstr. 16 •
D-97297 Waldbüttelbrunn
•
www.malighting.de
Phone: +49 931 49 79 4- 0 Fax: +49 931 49 79 4-29 • Hotline: [email protected]
•
eMail: [email protected]
User’s Manual grandMA Video V 5. 9x
Page 43
10 Effects
To explain the effect engine it is illustrative to imagine grandMA video as a model of a several
movable cameras where every camera looks at a layer object like a 2D plane or a 3D cube.
In these examples an image may be a texture (picture), or an avi.
Layer Effects
Example
with 8bit values 0…255 or in %
Dimmer
Dimmer 128 (50 %)
Dimmer 255 (100 %)
Color (255,255,255)
Color(255,255,0)
Type 14
(cross_med.xob)
Type 47
(sphere_med)
Pool ‚Standard’selected
Pool ‚MA Lighting’ selected
Image 1
Image 2
Dimmer function.
To facilitate fading between different
layers the dimmer controls the
transparency of an object.
If the dimmer is 0 the object is
transparent and the projection is
invisible. If the dimmer is “full” the
object is opaque and you can only
see the front layer (front Z-position)
ColorMix (CM1; CM2; CM3)
Tint the output with the CMY(Cyan;
Magenta; Yellow ) color mixer
VObj 3D-Objects
Select an 2D or 3D object on which
surface the to image or video is
shown
VObj I-Pool
Selection of the ‘Pool’.
One ‚Pool’ can contain up to 255
images or videos
VObj Images
Choose the image or video from the
selected ‘Pool’
MA Lighting Technology GmbH • Dachdeckerstr. 16 •
D-97297 Waldbüttelbrunn
•
www.malighting.de
Phone: +49 931 49 79 4- 0 Fax: +49 931 49 79 4-29 • Hotline: [email protected]
•
eMail: [email protected]
User’s Manual grandMA Video V 5. 9x
Page 44
Layer Effects
Example
with 8bit values 0…255 or in %
VObj Darkness
Darkness 128 (50 %)
Darkness 255 (100 %)
Switch is off and two
images are selected
with Dim = 100%
Switch is on and two
images are selected with
Dim = 100%
Only the fore image is
visible
Both images or videos are
mixed
X= 50%; Y=50%;
Z=50%
X=25%; Y=25%;
Z=25%
X=40%; Y=60%; Z=50%
X=40%; Y=40%; Z=40%
X= 50%; Y=50%;
Z=50%
X= 60%; Y=60%;
Z=50%
X= 50%; Y=50%;
Z=50%
X= 50%; Y=50%;
Z=60%
Control the Brightness of an image
or video.
In opposite to the “Dim” channel that
works on the transparency of the
object type this channel works on the
brightness of the image or video that
is shown on the surface.
VObj DIT
(Dark is Transparent)
This switch causes that the black
values of the image will be switched
to transparent.
For example a grey plane will be half
transparent if the switch is set.
VPosition (X; Y; Z ; Pos. Scale)
Positioning of the projection object in
X; Y; Z – direction
Position Scaling for modifying the x,
y range
VRotation (X; Y; Z)
Rotate the projection object around
the X; Y; and Z-axis
VPosition <> (X; Y;Z)
Animate continuous moving of the
projection object in X; Y and Z direction
VRotation <> (X; Y;Z)
Animate continuous rotation of the
object around the X; Y and Z - axis
MA Lighting Technology GmbH • Dachdeckerstr. 16 •
D-97297 Waldbüttelbrunn
•
www.malighting.de
Phone: +49 931 49 79 4- 0 Fax: +49 931 49 79 4-29 • Hotline: [email protected]
•
eMail: [email protected]
User’s Manual grandMA Video V 5. 9x
Page 45
Layer Effects
Example
with 8bit values 0…255 or in %
VScale (X; Y; Z)
X= 50%; Y=50%;
Z=50%
X= 50%; Y=30%;
Z=50%
Split X 0; Split Y 0
Split X 2; Split Y 2
Offset X=0; Offset Y=0
Offset X=50%; Offset Y=0%
X= 50%;Y=50%;Z=50%
X= 60%; Y=50%; Z=50%
Scale the dimensions of the object in
X; Y ;Z direction
VImage (Split X; Split Y)
Split the image or video in X and Y
VImage (Offset X; Offset Y)
Split offset of the image or video
VImage<> (X; Y)
Animate continuous scrolling of the
image or video on the object
MA Lighting Technology GmbH • Dachdeckerstr. 16 •
D-97297 Waldbüttelbrunn
•
www.malighting.de
Phone: +49 931 49 79 4- 0 Fax: +49 931 49 79 4-29 • Hotline: [email protected]
•
eMail: [email protected]
User’s Manual grandMA Video V 5. 9x
Page 46
VPlayer Playmode
(Only for videos)
Frame 100
Frame 200
Frame Index: Select a single frame
picture with the Index channel
Play: Starts the Video once forward
from the beginning to the end
Play Loop: Starts the video endless
looped forward from the beginning
Play Reverse: Starts the video once
backward from the end to the
beginning
Play Loop Reverse: Starts the video
endless looped backward from the
end
Bounce: Run forward from the
beginning and reverses at the end
endless
Stop: Stops immediately
Pause: Pauses
Resume: Continues after Pause
(even with Bouncing or Looping)
Loop Index: Plays the loops inside
the index frames set at Frame Index
Begin and End
Play Index: Plays the video from the
indexes frames at Frame Index
Begin and End
Loop Index Reverse: reverse like
above
Play Index Reverse: reverse like
above
MA Lighting Technology GmbH • Dachdeckerstr. 16 •
D-97297 Waldbüttelbrunn
•
www.malighting.de
Phone: +49 931 49 79 4- 0 Fax: +49 931 49 79 4-29 • Hotline: [email protected]
•
eMail: [email protected]
User’s Manual grandMA Video V 5. 9x
Page 47
The Master Layer, Keystone Layer and Softedge Layer effects manipulate the complete output signal:
Master Layer Effects
Example
with 8bit values 0…255 or in %
Master Layer Camera
(Pos X; Pos Y; Pos Z)
X=50%;Y=50%;Z=50%
X=46%;Y=52%;Z=54%
1A=0; 1B=0; 2A=0;
2B=0; 3A=0; 3B=0;
4A=0; 4B=0 %
1A=30; 1B=0; 2A=30;
2B=0; 3A=30; 3B=0;
4A=30; 4B=0 %
Beam1 Iris = 100 %
Beam1 Iris = 50 %
Multi Output
Fullscreen View
All layer views are mixed up to one
view for the main camera.
This imaginary camera can be
moved to show only parts of the
whole image. So several
applications can be connected
together to project a huge image
Master Layer Shaper
(1A; 1B; 2A; 2B; 3A; 3B; 4A; 4B)
With the beam shapers the
resulting image can be masked
variable with four shapers each
with 2 channels
Master Layer Iris
(Beam1 Iris)
With the Iris function the output
picture can be covered wit an iris.
Master Layer Control
(Control)
The Control channel of the Master
Layer is used to switch to the
Fullsreen View or to shut down the
PC via the desk.
These functions are available as
buttons in the Smart View:
- No Operation: --- Shutdown: Shutdown PC
- Restart: Restart PC
- Fullscreen: Fullscreen Mode
- Windowed: Windowed Mode
- Sniffer Mode: Sniffer mode
- Slave Mode: Slave Mode
- Enter PM: Start Pixelmapper
- Leave PM: Leave Pixelmapper
MA Lighting Technology GmbH • Dachdeckerstr. 16 •
-
D-97297 Waldbüttelbrunn
•
www.malighting.de
Phone: +49 931 49 79 4- 0 Fax: +49 931 49 79 4-29 • Hotline: [email protected]
•
eMail: [email protected]
User’s Manual grandMA Video V 5. 9x
Page 48
Keystone Layer Effects
Example
with 8bit values 0…255 or in %
Keystone Layer Shaper
(1A,; 1B; 2A; 2B; 3A; 3B; 4A; 4B)
1A=0; 1B=0; 2A=0;
2B=0; 3A=0; 3B=0;
4A=0; 4B=0 %
1A=0; 1B=30; 2A=0;
2B=0; 3A=30; 3B=0;
4A=0; 4B=0 %
X Corr. = 0 %;
Y Corr. = 0 %
X Corr. = 75 %;
Y Corr. = 0 %
All layer views are mixed up to one
view for the main camera.
Each edge of this view can be
moved towards the opposite edge
to generate a keystone effect.
Keystone Layer Key.Corr.
(X - Corr.; Y – Corr.)
If a picture is projected distorted on
a surface, a perspective correction
is necessary to distribute the
content on the surface correctly.
Therefore the distribution of the
picture content can be manipulated
in X- and Y-direction.
Softedge Layer Effects
Example
with 8 Bit Values 0…255 or in %
Softedge Layer
(1A,; 1B; 2A; 2B; 3A; 3B; 4A; 4B)
1A=0; 1B=0; 2A=0;
2B=0; 3A=0; 3B=0;
4A=0; 4B=0 %
1A=0; 1B=0; 2A=50;
2B=0; 3A=0; 3B=0;
4A=0; 4B=0 %
If several projectors should show
one common image, the borders
must be cross faded. For every
border one channel for the
position and one channel for the
dispensation of the black wedge
exists. This example shows a soft
edging for the left border of the
image.
MA Lighting Technology GmbH • Dachdeckerstr. 16 •
D-97297 Waldbüttelbrunn
•
www.malighting.de
Phone: +49 931 49 79 4- 0 Fax: +49 931 49 79 4-29 • Hotline: [email protected]
•
eMail: [email protected]
User’s Manual grandMA Video V 5. 9x
Page 49
10.1 Color keying
This technique makes it possible to draw images with transparent colors.
A Color Key is when you choose a certain color in the image to be transparent.
GrandMA video attaches two conditions to use the color keying technique for an image:
• The transparent color of the image is defined as 255, 0,255 (R, G, B) i.e. you have to paint the
transparent areas exactly with this color.
• The name of the image must have the extension “@CK”. For example [email protected].
Note:
We recommend using the .BMP format for color keying images. The compression of other formats
may cause fraying effects at the transparent boarders.
The following example shows a typical result of a Color key mixture:
Picture1
Picture 2 with Colorkey
(guitar.bmp)
([email protected])
Resulting picture
Picture1 + Picture2
Additional conditions for Colorkeying Images:
Filename
Consequence
XYZ@CK(AUTO).jpg
Always the color of the first pixel in the upper left corner is taken as
key color
[email protected]
The 9 digits after the “@CK” are used as RGB value for the key
XYZ@CK(255,0,255).jpg
The key RGB values are the numbers in ()
XYZ@CK(BLACK).jpg
The key is defined as text in ()
XYZ@CK(WHITE).jpg
XYZ@CK(RED).jpg
XYZ@CK(GREEN).jpg
XYZ@CK(BLUE).jpg
Otherwise Value RGB (255,0,255) is the key color for the mask.
MA Lighting Technology GmbH • Dachdeckerstr. 16 •
D-97297 Waldbüttelbrunn
•
www.malighting.de
Phone: +49 931 49 79 4- 0 Fax: +49 931 49 79 4-29 • Hotline: [email protected]
•
eMail: [email protected]
User’s Manual grandMA Video V 5. 9x
Page 50
11 Softedging
Softedging or Soft Edge Blending is a technique to split a complete picture into several smaller tiles.
Therefore the margins of the flanking edges overlap. Inside the overlapping range both images show
the same content, but with decreasing brightness to the boarders.
GrandMA video supports this technique for videos and images. This is realized via four controllable
grayscales (gray wedges) at the borders of the image. Position and distribution of the grayscale are
controlled by the grandMA desk with each two channels:
Left Tile
Right Tile
Beamer 1
Beamer 2
Softedge controlling of the left image
with Shaper 14A ;14B
Softedge controlling of the right
image with Shaper 12A; 12B
Projection of the complete Image
The following example shows the functionality of the Softedge control channels:
Softedge Layer
Softedge Layer
Softedge Layer
Shaper 12A = 0 %
Shaper 12A = 100 %
Shaper 12A = 100 %
Shaper 12B = 0%
Shaper 12B = 50%
Shaper 12B = 0%
Automatic Selection of Files if the Image or Video is splitted:
Because in case of softedging every beamer only shows a part of the complete image it makes sense
to tile the whole image into several single files. So the amount of data can be reduced relevant first of
all if a video is processed. For example if a video file is projected with 4 beamers the original data
stream can be reduced to ca. ¼ (mind the overlapping borders).
For this case grandMA video offers a functionality for the automatic assignment of the single filenames
to the appropriate Softedge layers:
To every softedgeID the appropriate splitted file is assigned by the program. The assignment is
controlled by the filenames. For every softedge layer a single appropriate file must exist. The name of
MA Lighting Technology GmbH • Dachdeckerstr. 16 •
D-97297 Waldbüttelbrunn
•
www.malighting.de
Phone: +49 931 49 79 4- 0 Fax: +49 931 49 79 4-29 • Hotline: [email protected]
•
eMail: [email protected]
User’s Manual grandMA Video V 5. 9x
Page 51
this file must be extended by “ n” (blank + number) whereby n is a number that corresponds to the
number of the softedgeID (
).
Example:
If the name of the original file is “Flowers.mov” the four applications try to find the files
"Flowers 1.mov","Flowers 2.mov", "Flowers 3.mov" and "Flowers 4.mov" corresponding to the four
Softedge layers. If the files don’t exist, the original "Flowers.mov" will be taken.
This mechanism works for images (.jpg, .bmp…) as well as for videos (.avi, .mov…).
11.1 Example for the Splitting of an HD Video:
To reduce the amount of data when playing a high resolution video, the staple should be separated
into several lower resolved videos.
Example: An HD video is projected with 4 video beamers:
In the simples way we create 4 Softedge Layers, move the cameras to the appropriate tiles and
assemble the resulting image via Softedging. This solution will stress the PC with a high data rate of
the video file because only approx. 25% of the data is used for every video engine.
So first the video should be separated with a video program into 4 smaller files. Now every video
engine can process the smaller video and the data stream will be reduced to a minimum.
The resulting videos now have a resolution of 800 x 600 and overlap by 80 pixels for the X- and 60
pixels for the Y-direction.
MA Lighting Technology GmbH • Dachdeckerstr. 16 •
D-97297 Waldbüttelbrunn
•
www.malighting.de
Phone: +49 931 49 79 4- 0 Fax: +49 931 49 79 4-29 • Hotline: [email protected]
•
eMail: [email protected]
User’s Manual grandMA Video V 5. 9x
Page 52
11.2 Example for Splitting a Video with ‚Ulead Media Studio Pro 7’
To demonstrate how the splitting of a video file can be done, this example gives a brief introduction by
using the video software ‚Ulead Media Studio Pro 7’. Other applications work similar.
(Sorry for the german application surface)
The project settings:
Create video file:
MA Lighting Technology GmbH • Dachdeckerstr. 16 •
D-97297 Waldbüttelbrunn
•
www.malighting.de
Phone: +49 931 49 79 4- 0 Fax: +49 931 49 79 4-29 • Hotline: [email protected]
•
eMail: [email protected]
User’s Manual grandMA Video V 5. 9x
Page 53
The resulting file is a separate video with the new resolution:
MA Lighting Technology GmbH • Dachdeckerstr. 16 •
D-97297 Waldbüttelbrunn
•
www.malighting.de
Phone: +49 931 49 79 4- 0 Fax: +49 931 49 79 4-29 • Hotline: [email protected]
•
eMail: [email protected]
User’s Manual grandMA Video V 5. 9x
Page 54
12 Keystoning
If a beamer projects parallel to the plane of projection, the image is a right-angled plane.
If the beamer is shifted horizontally or vertically the right-angled projection gets trapezoid.
This effect is called Keystoning.
Distorted Projection
(tilt upward)
Original image
This effect can be minimized by using the Keystone Correction.
Keystone Correction recalculates the image that it is shown right-angled independent of the position of
the projector. Therefore the pixels must be compressed and the image is made smaller.
Pay attention, the Keystone Correction always causes a compression of the projected image. This
causes a loss of quality of your projection.
This correction is done in the Keystone Layer:
For every edge of the image 1…4
there exist two control channels
(Shaper 11A…Shaper 14B). With
these channels the edges can be
moved in horizontal and vertical
direction:
Channels Key.Corr. X and Y are
for the distribution of the picture
content in X and Y direction.
The resulting output image for this
distorted Keystone Layer looks
like the image beside.
MA Lighting Technology GmbH • Dachdeckerstr. 16 •
D-97297 Waldbüttelbrunn
•
www.malighting.de
Phone: +49 931 49 79 4- 0 Fax: +49 931 49 79 4-29 • Hotline: [email protected]
•
eMail: [email protected]
User’s Manual grandMA Video V 5. 9x
Page 55
13 Pixelmapper
The Pixelmapper allows the presentation of the video output to a DMX matrix. DMX data are send
directly from the grandMA video PC via Ethernet using the Artnet protocol.
The LED wall can be configured individually using several LED panels from different manufacturers.
Similar to the desk fixture types the attributes of the LED panels are defined in text files located in a
folder of the grandMA video PC. The operating on the desk is analog to the operating of a video wall.
The following example shows a test image mapped on a 20 x 20 LED wall
Test image original
Mapping on a 20 x 20 LED
Wall
13.1 Pixel Mapper Operation
13.1.1 Menu
The enabling of the Pixelmapper is done via the menu entry ,Pixelmapper’.
Enable: Enabling of the Pixelmapper. If this entry is selected, a new
tabbed window appears for the configuration and display of the
mapped images and videos.
Art-Net Out Mode: Switches to the art out mode like the ‘Artnet Out’
button in the toolbar.
Grid View: Shows the LED Panel data in a grid.
Grapical View: Shows the LED Panel as a graphic.
Show LED’s: Preview as an LED grid
Show DMX Address: Shows the DMX addresses of the panels.
Show-Grid: Displays a grid.
Show Peek Color Crosses: Marks the LED borders.
Show Render Background: Display of the complete image, also
the areas that are not covered by LED panels.
Slow Artnet Out while Editing: In the edit mode the Artnet output is
slowed down to get a better performance for the editor.
Patch by dropping a new Panel: Opens a patch dialog after the
dropping of new panels.
Call Area/Output Editor: Opens a dialog for creating new area/output configurations.
After the activation of the Pixelmapper via the menu entry ,Pixelmapper – Enable’ an
extra tabbed window ‘Pixelmapper’ appears. The general output of grandMA video is
done now via the Ethernet protocol Artnet instead of the graphic card of the PC.
MA Lighting Technology GmbH • Dachdeckerstr. 16 •
D-97297 Waldbüttelbrunn
•
www.malighting.de
Phone: +49 931 49 79 4- 0 Fax: +49 931 49 79 4-29 • Hotline: [email protected]
•
eMail: [email protected]
User’s Manual grandMA Video V 5. 9x
Page 56
13.1.2 Pixel Mapper Graphical View
LED Panels are defined similar to dimmer or multi function
spots via fixture type text files. These files are located on the
video PC in the default path: C:\Programm Files\MA Lighting
Technologies\grandMA Video\Data\NEWPANELS
Here the properties of the LED panels are defined as a Fixture
Types in single text files (PanelName.txt).
In the left edge of the window all configured LED panels in the
default directory are shown.
If a panel is selected in the lower part, a detailed view of the
panel is shown in the upper part.
A pop-up menu (right mouse click)
offers possibilities for other operations
and the navigation.
If an entry is selected in the overview a detailed view of the LED panel with its measurements appears
in the upper picture window. Via the context menu (right mouse click) you can select additional views
like the detailed view or the overview about the DMX channels.
Detailed view of the LED Panel:
MA Lighting Technology GmbH • Dachdeckerstr. 16 •
D-97297 Waldbüttelbrunn
DMX channel allocation of the LED Panel:
•
www.malighting.de
Phone: +49 931 49 79 4- 0 Fax: +49 931 49 79 4-29 • Hotline: [email protected]
•
eMail: [email protected]
User’s Manual grandMA Video V 5. 9x
Page 57
13.1.3 Pixel Mapper Grid View
Via the menu entry “Pixelmapper – Grid View” you can switch to the Grid View of the Pixelmapper:
This view offers an overview about all used LED panels. All values can be edited directly in the grid.
Selected panels are displayed bold.
A double click opens a property dialog of the selected panel:
MA Lighting Technology GmbH • Dachdeckerstr. 16 •
D-97297 Waldbüttelbrunn
•
www.malighting.de
Phone: +49 931 49 79 4- 0 Fax: +49 931 49 79 4-29 • Hotline: [email protected]
•
eMail: [email protected]
User’s Manual grandMA Video V 5. 9x
Page 58
13.1.4 Pixelmapper Toolbar
After turning on the pixelmapper, the ,Fullscreen’ button changes his function into
,Artnet Out’ view. The functionality of the button is analog to the ,Fullscreen' button i.e.
after activation (corresponds, Return' on the keyboard) the monitor shows the general view
of all configured LED walls.
An additional toolbar, for Pixelmapper operations
appears.
If this button is selected, single LED fixtures can be selected to arrange them inside
the LED wall or show their attributes via a right mouse click.
Multi Create Modus: If a rectangle is drawn up while holding the right mouse button
down in the right window, this rectangle will be automatically equipped with the
necessary number of the selected panels. See 13.2 Setup of an LED Wall.
Delete the selected LED panel.
Zoom the right render window to fit.
- or individual zoom in % of the original size.
13.1.5 Status Bar
After enabling the Pixelmappers via the menu entry, Pixelmapper - Enable' two additional fields
appear in the status bar:
The general output of grandMA video is done now via the Ethernet protocol Artnet instead of the
graphic card of the PC. Therefore the physical dimensions of the LED wall (Area) and the number of
pixels (Output) can be set:
Area: Here the physical width and height of the LED wall is
determined. This must not conform to the whole size of the
LED Panels. So e.g. only sub ranges of the general view of
the LED Panels can be set. The units are set via the dialog of the menu entry, Options – Pixelmapper’.
Output: Mapping of the whole output to the
range. The output range is defined in n x m
Artnet output
pixel.
Example The physical dimensions of the source picture must not confirm to the whole size of the
Panels. The LED Panels can picture, for example only a sub range of the whole output.
MA Lighting Technology GmbH • Dachdeckerstr. 16 •
D-97297 Waldbüttelbrunn
•
www.malighting.de
Phone: +49 931 49 79 4- 0 Fax: +49 931 49 79 4-29 • Hotline: [email protected]
•
eMail: [email protected]
User’s Manual grandMA Video V 5. 9x
Page 59
1.25 m
In this example the output area amounts
1,25m x 1,0 m with 25 x 20 pixel.
1.0 m
There are used only 16 panels (5 x 5 LEDs). The
middle stripe is not equipped with LED Panels and is
not used.
MA Lighting Technology GmbH • Dachdeckerstr. 16 •
D-97297 Waldbüttelbrunn
•
www.malighting.de
Phone: +49 931 49 79 4- 0 Fax: +49 931 49 79 4-29 • Hotline: [email protected]
•
eMail: [email protected]
User’s Manual grandMA Video V 5. 9x
Page 60
13.2 Setup of an LED Wall
An LED wall consists of several LED panels that are arranged in a grid.
The LED wall in the following example exists of 4 5x5 LED panels with 25 RGB canals each.
Therefore every panel needs 25 x 3 = 75 DMX channels.
In the example each panel is assigned to an own DMX universe.
Panel 1:
Universe 1
DMX Chan. 1…75
Panel 2:
Universe 2
DMX Chan. 1…75
Panel 3:
Universe 3
DMX Chan. 1…75
Panel 4:
Universe 4
DMX Chan. 1…75
To configure the LED wall there are two possibilities:
Pull the wished LED Panel from
the left field holding the left mouse
button down into the output area.
To move the panels you can use
the arrow keys:
Arrow key moves: 1cm
Arrow Key + Shift moves: 5 cm
Arrow Key + Ctrl moves: 25 cm
MA Lighting Technology GmbH • Dachdeckerstr. 16 •
D-97297 Waldbüttelbrunn
•
www.malighting.de
Phone: +49 931 49 79 4- 0 Fax: +49 931 49 79 4-29 • Hotline: [email protected]
•
eMail: [email protected]
User’s Manual grandMA Video V 5. 9x
Page 61
Or choose the button ,New Panels'
in the tool bar and draw a
rectangle while holding the left
mouse button down. Draw from
the upper left down to the lower
right corner diagonally. The area
will be filled automatically with the
necessary amount of panels.
After lifting the mouse key you are
requested to patch the panels.
This happens in the following
dialog:
For each panel a DMX university, a start address and an offset to the next DMX address must be
assigned:
Panel Count: Number LED panels
Channels per Panel: Number of the DMX
channels per panel
Universe: Address of the first DMX universe
for patching
DMX Address: DMX start address of the first
panel
Panel Offset: Distance between the start
addresses of the single panels.
For example: With the offset of 512 for each
panel a new DMX universe is taken. This
happens because the DMX universe range
reaches from 1 to 512.
The following example shows the distribution of the DMX addresses on the DMX universes:
DMX 1
1
512 DMX 1
Panel 1 - Universe 1
5 x 5 RGB LED Panel
75 DMX Channels
75
Panel 2 - Universe 2
5 x 5 RGB LED Panel
75 DMX Channels
1
75
DMX Startaddress = 1
DMX Offset = 512
MA Lighting Technology GmbH • Dachdeckerstr. 16 •
D-97297 Waldbüttelbrunn
•
www.malighting.de
Phone: +49 931 49 79 4- 0 Fax: +49 931 49 79 4-29 • Hotline: [email protected]
•
eMail: [email protected]
User’s Manual grandMA Video V 5. 9x
Page 62
13.3 File Format of LED Panels
The properties of an LED panel are specified in a text file e.g. „5x5-25cm.txt“. This text files are
located in the folder:
C:\ProgramFiles\MA Lighting Technologies\grandMA video\Data\NEWPANELS
Parallel to the text file exists a bitmap (.bmp) with the same name in the folder for the visualization.
The file construction is similar to the fixture description file of the desk.
The LED panel file describes the physical dimensions of the panel, the optical visualization and the
dimensions of the
LEDs as well as the DMX channels and the patching order.
The file is structured hierarchically as a tree with single blocks. The blocks are described within {}.
They contain tags (Keywords or marks) beginning with a ‘_’. A tag is followed by a set value.
Block
_LEDTYPE
{
Tag Name
Description
Sample
_NAME
_PHYS_WIDTH
_PHYS_HEIGHT
_PHYS_WIDTH_LED
_PHYS_HEIGHT_LED
_LED_IS_ROUND
Displayed title of the LED Panel as text
Physical width of the panel in cm
Physical height of the panel in cm
Physical width of one LED in cm
Physical height of one LED in cm
Flag for the visualization of the LED
appearance (0 = false; 1 = true)
Other appearances may follow. At the
moment only circular or square.
1=> Shift the first line / column right and the
second line / column left
-1=> Shift the first line / column up and the
second line / column down
5x5-25cm
25.0
25.0
0.4
0.4
1
Amount of LED columns
Amount of LED rows
Counting direction for patching:
1 – left to right
-1 – right to left
Counting direction for patching:
1 – top down
-1 – down to top
Patch order:
0 – first X then Y
1 – first Y then X
Not supported yet
5
5
1
Count how often the following value is
repeated.
(Here Value = LED_UNIT 25 times)
Patch rule for channel or following tag that is
described in the following:
While patching this list is processed.
For each detected _VALUE = LED_UNIT a
new LED_UNIT is inserted.
The amount of ‘_COLS’ multiplied with
‘_ROWS’ complies with the number of
‘SUBBLOCK’ entries.
If _VALUE = NONE there is an DMX gap.
25
Function description of the channels.
Valid values:
CYAN, MAGENTA, YELLOW, RED, GREEN,
BLUE, WHITE
RED
GREEN
BLUE
_LED_SHIFT_X
_LED_SHIFT_Y
_LAYOUT
{
_COLS
_ROWS
_DELTAX
_DELTAY
_DIRECTION
}
_CHANNELS
{
_MEANDER
_REPEAT
_VALUE
}
_LED_UNIT
{
_VALUE
_VALUE
_VALUE
}
See the
sample
below:
curtain
1
0
0
LED_UNIT
or
NONE
}
MA Lighting Technology GmbH • Dachdeckerstr. 16 •
D-97297 Waldbüttelbrunn
•
www.malighting.de
Phone: +49 931 49 79 4- 0 Fax: +49 931 49 79 4-29 • Hotline: [email protected]
•
eMail: [email protected]
User’s Manual grandMA Video V 5. 9x
Page 63
13.3.1 LED Panel Examples
Because LED Panels can take different shapes here some examples:
In the simplest case LEDs are numbered continuous:
_LEDTYPE
{
_NAME
"5x5-25cm"
_WIDTH
25.000000
_HEIGHT
25.000000
_PHYS_WIDTH
25.000000
_PHYS_HEIGHT 25.000000
_PHYS_WIDTH_LED 4.0
_PHYS_HEIGHT_LED 4.0
_LED_IS_ROUND 1
_LAYOUT
{
_COLS
5
_ROWS
5
_DELTAX 1
_DELTAY 1
_DIRECTION 0
_MEANDER 0
}
_CHANNELS
{
_REPEAT 25
_VALUE
LED_UNIT
}
_LED_UNIT
{
_VALUE
RED
_VALUE
GREEN
_VALUE
BLUE
}
}
5 X 5 LED Matrix
LED Curtain, LEDs have an offset in Y direction:
_LEDTYPE
{
_NAME
"Star Cloth"
_PHYS_WIDTH
360.000000
_PHYS_HEIGHT
280.000000
_PHYS_WIDTH_LED 4.000000
_PHYS_HEIGHT_LED 4.000000
_LED_IS_ROUND 1
_LED_SHIFT_Y
-1
_LED_SHIFT_X
0
_LAYOUT
{
_COLS
36
_ROWS
28
_DELTAX 1
_DELTAY 1
_DIRECTION 1
_MEANDER 0
}
_CHANNELS
{
_REPEAT 168
_VALUE
LED_UNIT
_REPEAT 8
_VALUE
NONE
_REPEAT 168
_VALUE
LED_UNIT
:
:
}
_LED_UNIT
{
_VALUE
RED
_VALUE
GREEN
_VALUE
BLUE
}
}
MA Lighting Technology GmbH • Dachdeckerstr. 16 •
LED curtain with 3072 channels and offset in
Y-direction. This offset is described by the
_LED_SHIFT_Y = -1 tag.
Dimensions 3.6 m X 2.8 m
Patch:
D-97297 Waldbüttelbrunn
•
www.malighting.de
Phone: +49 931 49 79 4- 0 Fax: +49 931 49 79 4-29 • Hotline: [email protected]
•
eMail: [email protected]
User’s Manual grandMA Video V 5. 9x
Page 64
LED Panel unusual patching
_LEDTYPE
{
_NAME
"Crazy-Patch"
_WIDTH
80.000000
_HEIGHT
80.000000
_PHYS_WIDTH
80.000000
_PHYS_HEIGHT 80.000000
_PHYS_WIDTH_LED 5.0
_PHYS_HEIGHT_LED 5.0
_LED_IS_ROUND 1
_LAYOUT
{
_COLS
8
_ROWS
8
_DELTAX 1
_DELTAY 1
_DIRECTION 0
_MEANDER 0
}
_CHANNELS
{
_LEDUNIT 0
_LEDUNIT 3
_LEDUNIT 6
_LEDUNIT 9
_LEDUNIT 12
_LEDUNIT 102
_LEDUNIT 99
_LEDUNIT 96
_LEDUNIT
_LEDUNIT
_LEDUNIT
_LEDUNIT
_LEDUNIT
_LEDUNIT
_LEDUNIT
_LEDUNIT
8 x 8 LED Panel with strange DMX-Patch
27
24
21
18
15
105
108
111
etc.
MA Lighting Technology GmbH • Dachdeckerstr. 16 •
D-97297 Waldbüttelbrunn
•
www.malighting.de
Phone: +49 931 49 79 4- 0 Fax: +49 931 49 79 4-29 • Hotline: [email protected]
•
eMail: [email protected]
User’s Manual grandMA Video V 5. 9x
Page 65
13.4 Artnet Panel Simulator
The Artnet Panel Simulator is a useful tool to visualize date received via Artnet as an LED panel.
The Panel Simulator is copied with the installation program into the following directory:
C:\Program Files\MA Lighting Technologies\grandMA video
If you need this tool more often, draw a shortcut on your desktop by dragging it on the desktop holding
the right mouse button down.
The program can be started by a double click:
Artnet Panel Simulator
Visualization of grandMA
video data received via
Artnet. This shows a
simulation of a 20 x 20
pixel LED panel with
squared LEDs.
The program visualizes data received via Artnet after the start like an LED panel. The properties of the
panels are described in the chapter above (13.3 File Format of LED Panels).
The parameterization of the program is done via the menu entries:
File:
File Open… - Selecting of the LED panel description file (xxx.txt).
These files are located at: C:\Program Files\MA Lighting Technologies\grandMA
video\Data\NEWPANELS
View:
Artnet Receive Grid – Representation of the received data in a grid
Panel Visualizer – Representation of the received data as LED panel
Properties:
Options – Setting of the Artnet IP address as described in 4.6.2 Artnet IP Address
MA Lighting Technology GmbH • Dachdeckerstr. 16 •
D-97297 Waldbüttelbrunn
•
www.malighting.de
Phone: +49 931 49 79 4- 0 Fax: +49 931 49 79 4-29 • Hotline: [email protected]
•
eMail: [email protected]
User’s Manual grandMA Video V 5. 9x
Page 66
14 grandMA video Admin (Video Controlling - Application)
This additional application is installed also with the grandMA video installation
package. All grandMA video detected inside the MA Net can be controlled centrally
via this program.
On starting the application it is checked if a video session is found inside the MA Net. If a session is
found, grandMA video Admin joins as slave. All identified video devices are listed in a grid view. The
most common settings of the video devices can be controlled from here.
14.1 Video Devices Settings
The following example shows two video applications found in the MA Net and their settings:
If you are in an MA session (Connect LED is green:
) and change the settings of one or more
parameters the changes work directly on the grandMA video machines and the master of the session
(normally the desk).
14.2 Softedge Settings
Controlling of the Softedge parameters takes place on the following page:
With the first start of the application all located Softedge Layer are
presented one upon the other.
-
First arrange the Layers in that way as the projectors are
arranged in reality.
-
Therefore drag the Layer (green rectangle) by pushing the left
mouse button down and drag it to the desired side, depending
on what side the projector shows its image in reality.
Now the Softedge Parameter can be controlled via the
mouse.
MA Lighting Technology GmbH • Dachdeckerstr. 16 •
D-97297 Waldbüttelbrunn
•
www.malighting.de
Phone: +49 931 49 79 4- 0 Fax: +49 931 49 79 4-29 • Hotline: [email protected]
•
eMail: [email protected]
User’s Manual grandMA Video V 5. 9x
Page 67
The following example shows the settings for a softedge projection with two video beamers when the
overlapping edges are dimmed with a greyscale:
To control these settings the layers must be arranged side by side in the admin application. Therefore
drag the left layer by holding the left mouse button down beneath the right layer:
The softedge borders of the overlapping ranges can be controlled for every
beamer with the mouse via the buttons.
The grey button below this serves the distribution of the greyscale. While
moving the mouse the result can be checked directly at the projection.
MA Lighting Technology GmbH • Dachdeckerstr. 16 •
D-97297 Waldbüttelbrunn
•
www.malighting.de
Phone: +49 931 49 79 4- 0 Fax: +49 931 49 79 4-29 • Hotline: [email protected]
•
eMail: [email protected]
User’s Manual grandMA Video V 5. 9x
Page 68
14.3 Keystone Settings
Analog to the softedge settings the admin application also controls the keystone settings centrally. To
control these settings layers must be arranged side by side inside the grandMA video application.
Therefore drag the layers holding the left mouse button down and drop them to the right position:
Now the keystone settings for several projectors can be controlled simultaneously via the blue
. While running over the button with the mouse the involved channels are marked
buttons
red:
. The activity of the button is signalized by a bright fringe:
Keystone Button
Effect
Description
Simultaneous movement of the upper left edges in X- and Ydirection.
Simultaneous movement of the lower left edges in X- and Ydirection.
Layer 1
Layer 2
Simultaneous movement of the adjoining
edges in X-and Y-direction on both
keystone layers.
Simultaneous movement of both boarders
in X- or Y-direction on both keystone
layers.
MA Lighting Technology GmbH • Dachdeckerstr. 16 •
D-97297 Waldbüttelbrunn
•
www.malighting.de
Phone: +49 931 49 79 4- 0 Fax: +49 931 49 79 4-29 • Hotline: [email protected]
•
eMail: [email protected]
User’s Manual grandMA Video V 5. 9x
Page 69
15 Keyboard Shortcuts
The common shortcuts:
Fullscreen
Edit / Preview
View
Key
Function
Enter
Fullscreen Mode
Shift + l. Mouse Select several objects from the first selected to the last
Ctrl + l. Mouse Add object to the selection with the mouse
ESC
Leave Fullscreen view
Please note, that possible installed drivers for example for graphic cards affect the keyboard shortcuts
as well.
MA Lighting Technology GmbH • Dachdeckerstr. 16 •
D-97297 Waldbüttelbrunn
•
www.malighting.de
Phone: +49 931 49 79 4- 0 Fax: +49 931 49 79 4-29 • Hotline: [email protected]
•
eMail: [email protected]
User’s Manual grandMA Video V 5. 9x
Page 70
16 FAQ and Troubleshooting
Should you have any problems with the application, you can refer to the frequently asked questions
below:
16.1 Software Questions:
Nr.
Question
1. problems with the communication
PC <-> desk
2. Two network cards installed – no
communication with the console
3. Cannot find the connected
grandMA desk
4. Video codec’s
Answer
Check the TCP/IP settings:
- Is a network card installed?
- Is the TCP/IP protocol configured?
- The TCP/IP subnet mask of the PC must be equal with
the subnet mask of the desk for example 255.255.255.0
- The first 3 numbers of the IP address of the PC must be
equal to the first three numbers of the desk for example:
PC: 192.168.0.10
Desk: 192.168.0.5
- The last number of the IP address must be unique in the
complete network.
- Please don’t use the automatic distribution of IP settings
as offered by Windows because this IPs doesn’t fit the
requirements.
Select the IP address belonging to the network card
attached to the grandMA desk.
See: 6.1 Desk Connection
Check the IP Settings.
See: 6.1 Desk Connection
Recommended Video Codec’s:
At the moment we get the best results with the “Cinepak"
or the “MPEG2” codec.
Generally if a video a can be shown with the QuickTime
Player it also can be shown with grandMA video.
Additional codec’s are available at:
http://www.apple.com/quicktime .
5. Fullscreen mode does not work
6. Fullscreen shuts off
The “Fullscreen” mode requires the dongle.
Disable the screensaver and power management
7. Firewalls and Antivirus Software.
Program won’t start or
PC looses connection
The MS firewall that comes with SP 2 makes no
problems. After the installation you must allow grandMA
video and onPC the access to the network.
Third party firewalls and anti virus software must be
configured. If this doesn’t help, the programs have to be
disabled or de-installed.
Note that in this case the virus protection etc. doesn’t
work.
(To configure your firewall enable the Remote Call TCP
Port 7003 in your Firewall Options)
8. Bad Performance
Disable virus checks on the content files like .AVI; .IMG or
.MOV files!
Change the Device Settings from, RGB Emulation to
HAL: Settings/Options/Driver
9. Content Browsing from desk
doesn’t work
10. Black output screen
MA Lighting Technology GmbH • Dachdeckerstr. 16 •
Check the IP-address (same subnet!) and configure or
disable the firewall.
Properties of Hardware Interface - disable Checksum
Offload in the advanced Setting of the Network Adapter.
- May be your graphics board has too less memory
D-97297 Waldbüttelbrunn
•
www.malighting.de
Phone: +49 931 49 79 4- 0 Fax: +49 931 49 79 4-29 • Hotline: [email protected]
•
eMail: [email protected]
User’s Manual grandMA Video V 5. 9x
Page 71
11. Video Capture Cards:
The Decklink Blackmagic SDI
Capture Cards can support two
SDI Inputs. Does this work with
grandMA video?
Live Input (BM DeckLink Card)
Stream freezes:
(64 MB or less) and you are using a high display
resolution (e.g. 1400 *1050).
Reduce the screen resolution.
- DMC channels are not patched
- No Output without Desk" Flag is checked
- Dimmer, Grandmaster, Blades closed
- 3D Object moved out of focus or wrong scaled
- Keystoning parameter stupid
- No valid Fixture Layer
- Output device (for example a Beamer) doesn’t
support the high resolution
If the card works with the Windows Direct Show this
should work. We have tested the small SDI-In card and
the PCI Express Extreme. Here we only have the
possibility to choose one video (from the Decklink driver)
– As mentioned, if there is a card that supports two
interfaces via the driver we’ll support this.
Enable the “Watchdog” (Settings/Options/Video)
12. Is the smallest Blackmagic SDI
See 11
Capture card sufficient, I mean the
card that does not support HDTV ?
13. PCI or PCIe SDI capturing? The
Yes
bus type is irrelevant?
14. No administration rights
To work with grandMA video without administration rights
you have to arrange the administration rights by the
administrator on the installation path e.g.:
C:\Program Files\MA Lighting Technologies\grandMA
video
15. System crashes or stocks
The Widows XP Service Pack 2 must be installed
16. Problems with content browsing
Open the properties of the network card settings:
via the desk
and set “Rx Checksum Offload” to “disable”
(default = enable )
17. Video cannot be shown
Maybe codec problems see: “4.3 Installation of the
MPEG2 Codec”.
Not all available codec’s are installed per default with the
Quick Time Player installation.
18. Timing problems with Dual Core
The use of Dual Core processors can cause timing
processors
problems. Please use the actual drivers of the processor
manufacturer.
If you have further problems set the switch via the menu
entry ‚Settings – Options – Dual Core’.
19. Aspect Ratio of the output image is The aspect ratio can be set via the menu entry ‚Settings –
wrong
Options – Main – Output Ratio’.
The setting ‚Automatic’ is recommended.
To play a simple video file on a screen you should use
the layer object “[email protected]”. Objects with the ending
‚@r.xob’ adapt automatically to the aspect ratio (Ratio of
width / height e.g. 16:9) of the used image or video.
MA Lighting Technology GmbH • Dachdeckerstr. 16 •
D-97297 Waldbüttelbrunn
•
www.malighting.de
Phone: +49 931 49 79 4- 0 Fax: +49 931 49 79 4-29 • Hotline: [email protected]
•
eMail: [email protected]
User’s Manual grandMA Video V 5. 9x
Page 72
16.2 Export System Information
To facilitate service inquiries we need specific information about your system configuration.
This information can be provided via an information file as follows:
Press the,Check’ button in the toolbar
In the ‘Strucure Check’ dialog push the button ,Export’
Type a file name with the extension ,.nfo'
The information is compiled in a file. This takes approx. 30-60 seconds
Additional to the system
information grandMA video
information are assorted.
The resulting file (.nfo) can be
opened with the Windows
standard information
application and be evaluated.
MA Lighting Technology GmbH • Dachdeckerstr. 16 •
D-97297 Waldbüttelbrunn
•
www.malighting.de
Phone: +49 931 49 79 4- 0 Fax: +49 931 49 79 4-29 • Hotline: [email protected]
•
eMail: [email protected]
User’s Manual grandMA Video V 5. 9x
Page 73
17 BluffTitler
grandMA Video comes with a licensed software package BluffTitler .
With BluffTitler you can create spectacular 3D text animations and export them
as AVI. All TrueType fonts installed on your computer can be used.
For further information consult the BluffTitler documentation.
The BluffTitler license is an MA Lighting OEM-licence which is only valid together
with a valid grandMA video licence. It is not allowed to redistribute any license
keys!
BluffTitler End User License Agreement
Before installing this software, carefully read the following terms and conditions.
Installing BluffTitler indicates your acceptance of this agreement.
Ownership of BluffTitler
BluffTitler is owned by the Dutch company Outerspace Software and is protected by international copyright laws.
You agree to treat BluffTitler like any other copyrighted material.
Evaluation Version (demo version)
The evaluation version of BluffTitler may be freely distributed as long as no charge is made by you for such
redistribution, excepting for nominal fees for the distribution media. There are no restrictions with regards to
copying, transferring or otherwise distributing the evaluation version in its complete and original form.
The latest version of the evaluation version can be found here:
http://www.blufftitler.com/BluffTitlerSetup.exe
You may put the evaluation version on the coverdisc of your magazine.
Licensed Version (full version)
Upon payment of the license fee and your acceptance of this agreement, Outerspace Software grants you a nonexclusive, non-transferable license to use the full version of BluffTitler.
Each licensed copy of BluffTitler may either be used by a single person who uses BluffTitler personally on one or
more computers, or installed on a single computer used nonsimultaneously by multiple people, but not both.
You turn the evaluation version into the licensed version by entering your own personal license keys into the
dialog that is displayed after selecting the menu item "settings/enter license keys..." and clicking the "ok" button.
You can return to the evaluation version by clicking the "Transfer" button in the same dialog.
Restrictions
You may not use, copy, modify, or transfer BluffTitler or the documentation, or any copy in whole or in part, except
as expressly provided for in this agreement.
You may not redistribute any license keys.
You may not disassemble or reverse compile BluffTitler.
You may not use BluffTitler to promote violence, terrorism, drugs, criminal activities, racism or discrimination.
Redistribution
You have to contact us if you want to bundle BluffTitler with your own software or hardware product.
Termination
This agreement and your license to use BluffTitler will automatically terminate without notice if you fail to comply
with any provision of this agreement. Upon termination you shall destroy all copies and license keys of BluffTitler.
Selection and Use
You assume full responsibility for the selection of BluffTitler to achieve your intended results and for the
installation, use, and results obtained from the product.
Limited Warranty
Outerspace Software does not warrant that the functions contained in BluffTitler will meet your requirements or
that the operation of BluffTitler will be uninterrupted or error free.
You are advised to test the evaluation version before purchasing the product to see if it meets your requirements.
Liability
In no event will Outerspace Software, its employees, agents or distributors be liable for any damages suffered by
you or any third party resulting from the use of BluffTitler.
Our entire liability, without exception, is limited to the purchase price of BluffTitler.
If you have any questions concerning this agreement write to:
Outerspace Software
[email protected]
Postbus 12441
1100 AK Amsterdam
the Netherlands
MA Lighting Technology GmbH • Dachdeckerstr. 16 •
D-97297 Waldbüttelbrunn
•
www.malighting.de
Phone: +49 931 49 79 4- 0 Fax: +49 931 49 79 4-29 • Hotline: [email protected]
•
eMail: [email protected]
User’s Manual grandMA Video V 5. 9x
Page 74
18 Appendix: How to create a Video Loop
This is a short tutorial on how to create a video loop with the software Ulead Video Editor.
Let's assume that you just returned home from a trip and now want to create a loop from one of your recorded
scenes on our tape.
Video capture
• Insert the tape which contains your video material into the camera. Rewind the tape to
the start if necessary.
•
Connect the camera with an i-link wire to the FireWire port of your computer.
To transfer the video material with the best possible quality from the tape to the computer, make sure that
your computer has a FireWire adapter.
•
Switch your camera to Playback Mode
Every camera has two main operational modes. One is for recording and is often called the camera mode.
The second mode is the playback-mode. This mode is for watching your video in the camera or capturing
(transferring) it to an external device.
If you have any problems regarding the handling of your camera, you should look at the user operating manual for
your camera.
•
Start the Ulead Video Capture software (current version 7.0)
Ulead divides the functions of capturing and editing video into two applications. The module which helps
you to transfer the video material onto your hard drive is called Ulead Video Capture. You can find it in
your start menu under the entry for Ulead Video Editor.
•
By now you should see an image of your tape in the main preview window.
If this isn't the case, just click the play button in the control panel in the lower screen area. Make sure that
preview mode is active. You can find it under menu/view.
MA Lighting Technology GmbH • Dachdeckerstr. 16 •
D-97297 Waldbüttelbrunn
•
www.malighting.de
Phone: +49 931 49 79 4- 0 Fax: +49 931 49 79 4-29 • Hotline: [email protected]
•
eMail: [email protected]
User’s Manual grandMA Video V 5. 9x
Page 75
If you still see no image of your video, you have to make sure that your recording-plug-in is configured
correctly. You can do this under menu/setup/recording-plug-in.
Common types are:
•
Ulead VFW Recording Plug-in (for Adaptec/PAPI 1394 capture-adapters)
•
Ulead DirectShow Recording Plug-in (for TI 1394 capture-adapters)
•
Ulead DV Recording Plug-in (for other types of DV capture-adapters)
MA Lighting Technology GmbH • Dachdeckerstr. 16 •
D-97297 Waldbüttelbrunn
•
www.malighting.de
Phone: +49 931 49 79 4- 0 Fax: +49 931 49 79 4-29 • Hotline: [email protected]
•
eMail: [email protected]
User’s Manual grandMA Video V 5. 9x
Page 76
If your settings are correct, but you still see no image and many or all of the control panel-elements are
not active, you have to make sure that the right entry for your camera is set under menu/setup/devicecontrol. In most cases, this will be one of the DV-cam drivers. You can see information about the selected
driver in the info field under the dropdown menu.
Now I will explain the simplest procedure: capturing one video-clip
-------------------------------------------------------------------------------------------------------------------
•
Recording a single video clip
This is the easiest way to capture a single clip from tape to your hard disk.
•
Wind your tape to the position where your clip starts.
Give your clip some extra space at the start (head) and the end (tail), because it will be safer for later
editing to have a bit of overhang at the ends of the clip. From the position where your clip should start
looping, wind the tape back approximately three seconds. You can trim the parts you don't want to see
later in the video editor very easily.
You can see information about your position in the clip in the lower screen area. If you want to jump to an
exact time, just go to menu/jump to and enter the time you want to jump to.
Now that you have found your start position, click the inpoint button to mark the starting point.
Repeat this step for the stopping point of your clip. Click the button for the outpoint of the clip.
MA Lighting Technology GmbH • Dachdeckerstr. 16 •
D-97297 Waldbüttelbrunn
•
www.malighting.de
Phone: +49 931 49 79 4- 0 Fax: +49 931 49 79 4-29 • Hotline: [email protected]
•
eMail: [email protected]
User’s Manual grandMA Video V 5. 9x
Page 77
•
Click the Record Button in the Control Panel
Recording will not start immediately. First a dialogue window pops up, where you can set some
parameters. Important at the beginning are:
• The name and local path of the video file you want to save
• The recording method
•
Auto (with time limit):
of time.
records the video from the inpoint for the specified amount
•
Auto (no time limit):
the mouse or hitting
•
device control:
should stop,
configure batch-
records the video, until you stop it by left-clicking
ESC
you can specify when the recording shall start and when it
by setting an inpoint and outpoint. You can also
capturing
For our example we choose „device control“, because we had already set the in and outpoints.
Remember? ;-). Another window opens with parameters for the recording. Check the name and the path
of the file. Make sure that there is only one clip in the lower area of the window, the one which you set up.
MA Lighting Technology GmbH • Dachdeckerstr. 16 •
D-97297 Waldbüttelbrunn
•
www.malighting.de
Phone: +49 931 49 79 4- 0 Fax: +49 931 49 79 4-29 • Hotline: [email protected]
•
eMail: [email protected]
User’s Manual grandMA Video V 5. 9x
Page 78
•
Start the recording by hitting OK.
Recording starts. You can observe the current status of the capture process in the status bar in the lower
screen area.
•
Now you have your first clip ready for editing!
MA Lighting Technology GmbH • Dachdeckerstr. 16 •
D-97297 Waldbüttelbrunn
•
www.malighting.de
Phone: +49 931 49 79 4- 0 Fax: +49 931 49 79 4-29 • Hotline: [email protected]
•
eMail: [email protected]
User’s Manual grandMA Video V 5. 9x
Page 79
After the capturing has been finished, a message window pops up which informs you about the result of
the process. Usually everything is fine, so you can just close the window.
If you open the folder, where you saved your clip file, you should find an avi file. This can be, depending
on the length of the clip, rather big, because it is uncompressed video.
•
You can quit Ulead Video Capture now.
Video editing
•
Start the software Ulead Video Editor.
A window will pop up first, asking what kind of project you want to create. Choose DV(PAL, 25 B/S, Audio 48
kHz).
MA Lighting Technology GmbH • Dachdeckerstr. 16 •
D-97297 Waldbüttelbrunn
•
www.malighting.de
Phone: +49 931 49 79 4- 0 Fax: +49 931 49 79 4-29 • Hotline: [email protected]
•
eMail: [email protected]
User’s Manual grandMA Video V 5. 9x
Page 80
•
Import the previously created clip.
You can import clips by double clicking one of the video tracks in the timeline. A file-open-dialog will appear, in
which you can select your clip. When you open the file, the window will disappear and the clip „becomes glued“
to your mouse pointer. Place this clip at the beginning of the first videotrack Va.
•
Doubleclick the clip in the timeline.
The clip will appear in the source window. This is, as its name indicates, the video source from which you will
work, and not the clip which will be created by editing the it.
MA Lighting Technology GmbH • Dachdeckerstr. 16 •
D-97297 Waldbüttelbrunn
•
www.malighting.de
Phone: +49 931 49 79 4- 0 Fax: +49 931 49 79 4-29 • Hotline: [email protected]
•
eMail: [email protected]
User’s Manual grandMA Video V 5. 9x
Page 81
•
Click in the timeline above the video tracks
When you hover with the mouse pointer a bit above the video tracks, the pointer will turn into a little „star“. If
you press the mouse button now and move the mouse, you will move the play head on the timeline. The upperleft preview window will change now, because it always shows the video directly under the play head.
•
Reduce the length of the clip to the right duration.
You know now how to view your clip in the video editor. It's very likely that the clip is not have the right length
anymore. Changing the length (duration) is very simple. Move the mouse pointer over the right edge of the
clip.
The mouse pointer will change into a symbol of two little arrows.
MA Lighting Technology GmbH • Dachdeckerstr. 16 •
D-97297 Waldbüttelbrunn
•
www.malighting.de
Phone: +49 931 49 79 4- 0 Fax: +49 931 49 79 4-29 • Hotline: [email protected]
•
eMail: [email protected]
User’s Manual grandMA Video V 5. 9x
Page 82
Left-click the mouse button and drag the edge of the clip toward the beginning of the clip. When you release
the mouse button, you have reduced the length of the clip. It will stop now at the new end. You can do the
same with the beginning of the clip.
•
If necessary: Move the clip back to the beginning of the videotrack
It is likely that you have now some spare room at the start of your clip, because you reduced its length. Drag
the clip to the very beginning of the video track and drop it there. Notice that the clip will snap to the beginning
of the video track.
•
Copy the clip and place the copy at the end of the original
Hit CTRL and left-click the clip. Drag it into the second video track Vb and place it there. Now you have created
a copy of the original clip. Adjust the clip so that it starts approximately 3 seconds before the original clip ends.
A cross-fade effect could later be placed in the area where both clips overlap each other.
MA Lighting Technology GmbH • Dachdeckerstr. 16 •
D-97297 Waldbüttelbrunn
•
www.malighting.de
Phone: +49 931 49 79 4- 0 Fax: +49 931 49 79 4-29 • Hotline: [email protected]
•
eMail: [email protected]
User’s Manual grandMA Video V 5. 9x
Page 83
•
Place a cross-fade effect between both clips
Drag the effect into the video track area. Crossfade effects can only be placed in the transition effects track.
Place it right into the area where both video clips overlap. The crossfade effect will adjust its own length to the
length of the overlapping area automatically. You now have created a soft crossfade from the end of the first
clip into the beginning of the second.
A window pops up and gives you more options to configure the crossfade effect. But we are happy with the
default-settings right now. Just click OK.
Notice that Ulead Video Editor computes the manipulated video frames each time you use an effect on the clip.
This can lead to a short delay because you must wait until the application has finished rendering the new
frames.
•
Reduce the length of the second clip
Reduce the length of the second clip until its end meets the end of the first clip. The whole movie is now as
long as the first clip.
MA Lighting Technology GmbH • Dachdeckerstr. 16 •
D-97297 Waldbüttelbrunn
•
www.malighting.de
Phone: +49 931 49 79 4- 0 Fax: +49 931 49 79 4-29 • Hotline: [email protected]
•
eMail: [email protected]
User’s Manual grandMA Video V 5. 9x
Page 84
But what is the difference now?
The clip now will crossfade into its own beginning. For that we needed the copy. Now the clip is ready for a loop
playback.
Save the project.
•
Compress and export the clip.
You can export the finished clip under menu/file/create/video file. Enter a path and a name for your file in the
next dialog.
MA Lighting Technology GmbH • Dachdeckerstr. 16 •
D-97297 Waldbüttelbrunn
•
www.malighting.de
Phone: +49 931 49 79 4- 0 Fax: +49 931 49 79 4-29 • Hotline: [email protected]
•
eMail: [email protected]
User’s Manual grandMA Video V 5. 9x
Page 85
In the options section you can choose a specific compression codec, which will reduce the size of your video
file significantly, though causing some loss of quality. This will help you to maintain constant playback without
delays during which the video player would have to wait for new data.
You have to make a compromise here. You can get really good codecs which offer both: very good imagequality and very low file-size. However these codecs are often not free for commercial use. The DivX codec
belongs in this section. But you cannot expect that this codec will be available on the target platform of your
video. The worst thing which can happen is that you see a plain black rectangle instead of your clip.
A good standard choice is the cinepak codec. This codec is a bit older, and cannot compete with the image
quality/file size ratio of modern codecs, but it has some advantages.
1. An acceptable image quality which comes with a reasonable file size.
2. Cinepak is installed on every Windows system by default
That means that in 99.9% of all cases your clip will be playable on any Windows computer.
So, we decided to use the Cinepak codec for our example. Choose the codec in the codec settings. You can
find them under the third tab „AVI“. The default settings for the cinepak codec are ok for us.
We also recommend the Apple Photo JPEG and Motion JPEG.
You can set the output size of the video under the second tab „General“. Switch to „User Defined“ and enter
1024 x 768 to adjust the size to the resolution of a video projector. In the data track dropdown menu switch to
„only video“, because you usually drop the audio track.
Save the file with the chosen settings.
Good luck!
MA Lighting Technology GmbH • Dachdeckerstr. 16 •
D-97297 Waldbüttelbrunn
•
www.malighting.de
Phone: +49 931 49 79 4- 0 Fax: +49 931 49 79 4-29 • Hotline: [email protected]
•
eMail: [email protected]
User’s Manual grandMA Video V 5. 9x
Page 86
19 Warnings
SEIZURE WARNING
Some people (about 1 in 4000) may have seizures or blackouts triggered by light flashes or patterns,
such as while watching TV or playing video games, even if they have never had a seizure before.
Anyone who has had a seizure, loss of awareness, or other symptom linked to an epileptic condition
should consult a doctor before working with the application.
Parents should watch when their children while using the program. Stop working immediately and
consult a doctor if you or your child has any of the following symptoms: Convulsions, Eye or muscle
twitching, Loss of awareness, Altered vision, Involuntary movements, Disorientation.
TO REDUCE THE LIKELIHOOD OF A SEIZURE WHEN WORKING WITH THE PROGRAM:
1. Sit or stand as far from the screen as possible.
2. Use the smallest available screen.
3. Do not work if you are tired or need sleep.
4. Work in a well-lit room.
5. Take a 10 to 15 minute break every hour.
REPETITIVE MOTION INJURIES WARNING
Working with the application can make your muscles, joints or skin hurt after a few hours. Follow these
instructions to avoid problems such as Tendonitis, Carpal Tunnel Syndrome or skin irritation:
• Take a 10 to 15 minute break every hour, even if you don’t think you need it.
• If your hands, wrists or arms become tired or sore while working, stop and rest them for
several hours before playing again.
• If you continue to have sore hands, wrists or arms during or after play, stop working and see a
doctor.
MA Lighting Technology GmbH • Dachdeckerstr. 16 •
D-97297 Waldbüttelbrunn
•
www.malighting.de
Phone: +49 931 49 79 4- 0 Fax: +49 931 49 79 4-29 • Hotline: [email protected]
•
eMail: [email protected]
User’s Manual grandMA Video V 5. 9x
Page 87
20 Index
.
I
.ecd file .........................................................30
.PED Files .....................................................22
.xob ...............................................................39
3D Objects ....................................................39
3D objects customizing ..............................39
Image Library ........................................ 42, 43
Image Pool................................................... 37
Import Content and Show .......................... 30
Installation ............................................... 9, 14
IP 18
IP adress ...................................................... 11
Iris................................................................. 48
A
K
ArtNet IP .......................................................34
Artnet IP Address ........................................12
Artnet Out Mode ..........................................35
Art-Net Out Mode.........................................35
Artnet Panel Simulator................................66
Aspect Ratio...........................................39, 72
Keyboard Shortcuts.................................... 70
Keystone ...................................................... 49
Keystone Layer ........................................... 49
Keystone Settings....................................... 69
3
L
Layer content Images/Videos .................... 37
Layer Effects ............................................... 44
Layer properties.......................................... 20
Layer View ................................................... 37
LED Panel Examples .................................. 64
Libraries ....................................................... 10
B
Blind Preview ...............................................36
BluffTitler......................................................74
C
Capture Device ............................................32
Colorkeying ..................................................50
Controlling Images and Videos via the MA
desk ...........................................................26
Copy protection .............................................8
customized Images .....................................38
customized Videos ......................................38
M
Master .......................................................... 16
Master Layer................................................ 21
Master Layer Control .................................. 48
Master Layer Effects................................... 48
Menu bar ...................................................... 30
MPEG2 ..................................................... 9, 72
Multi Preview ............................................... 40
multilicence dongle .................................... 31
multiple lichense......................................... 36
D
Data management........................................16
Desk Connection .........................................16
different fixture layers.................................36
Disable Dialogs............................................34
N
network license ........................................... 36
E
P
Edit View.......................................................37
Effects...........................................................44
Export Content and Show...........................30
Export System Information.........................73
Pixel Mapper................................................ 34
Pixel Mapper Menu ..................................... 35
Pixelmapper................................................. 56
Pixelmapper Toolbar .................................. 59
Pool .............................................................. 37
Predefined Constellations (.PED Files) .... 22
Preview ........................................................ 37
Principle function diagram ........................ 19
Program surface ......................................... 29
F
FAQ ...............................................................71
File Format of LED Panels ..........................63
Filters ............................................................33
FOH Features ...............................................31
founder .........................................................16
fps .................................................................34
Full screen....................................................36
Fullscreen View ...........................................41
Q
QuickTime...................................................... 9
R
G
release notes ............................................... 35
grandMA video Admin ................................67
Graphical View .............................................57
Grid View ......................................................58
MA Lighting Technology GmbH • Dachdeckerstr. 16 •
D-97297 Waldbüttelbrunn
S
Screen Layout ............................................. 14
session......................................................... 16
•
www.malighting.de
Phone: +49 931 49 79 4- 0 Fax: +49 931 49 79 4-29 • Hotline: [email protected]
•
eMail: [email protected]
User’s Manual grandMA Video V 5. 9x
Page 88
Session ID ....................................................17
Several grandMA Video applications in one
grandMA show .........................................23
Shaper...........................................................48
shut down the PC via the desk ..................48
Slave .......................................................16, 17
Sniffer ...........................................................17
Sniffer mode.................................................16
Softedge .......................................................49
Softedge Layer.......................................22, 49
Softedge Settings ........................................67
Softedging ..............................................51, 55
Start in Full screen ......................................34
Start master session and connect to the
desk ...........................................................24
Status Bar.....................................................41
streaming dialog ..........................................33
Structure Check...........................................36
System requirements ....................................8
MA Lighting Technology GmbH • Dachdeckerstr. 16 •
D-97297 Waldbüttelbrunn
T
Toolbar ......................................................... 36
Troubleshooting.......................................... 71
U
USB Dongle ................................................... 8
V
Version history............................................ 35
Version of grandMA desk or off-line (onPC)
....................................................... 11, 12, 14
Video In ........................................................ 32
Video Layer.................................................. 21
Video Library ......................................... 42, 43
Video Loop .................................................. 75
W
Warnings...................................................... 87
•
www.malighting.de
Phone: +49 9 31 49 79 4- 0 Fax: +49 9 31 49 79 4-29 • Hotline: [email protected]
•
eMail: [email protected]
User’s Manual grandMA Video V 5.9x
Page 89