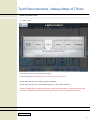
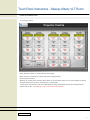
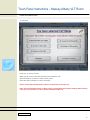
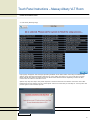
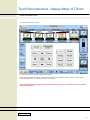
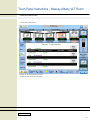
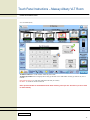
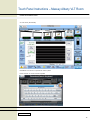
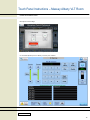
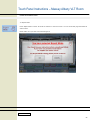
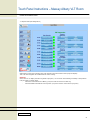
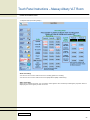
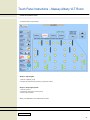
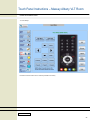
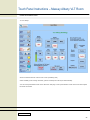
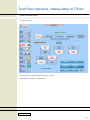
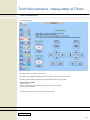
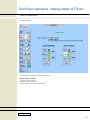
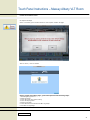
1
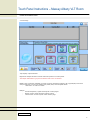
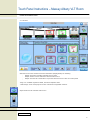
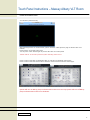
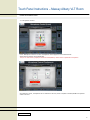
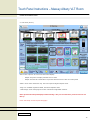
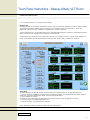
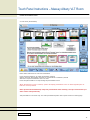
Touch Panel Instructions – Massey Albany VLT Room QUICK REFERENCE GUIDE 1. Logo Page *TPMC-8X-GA and TPMC-12 have the same layout. Touch screen to start the system, system will enter Home Page immediately. System will recall the following on startup: i. Room Volume set to medium level ii. Lighting preset 2 iii. Turn on the Document Camera ix. Turn on the Blu-ray player Internal use only 1 Touch Panel Instructions – Massey Albany VLT Room QUICK REFERENCE GUIDE 2. Home Page Top: Display output selection. Right Side: Output selection of Audio and Video preview on control panel. The output destination is greyed out until the first source is selected. Middle: Source selection available on Lectern sources (Resident Computer, Blu-ray/DVD/CD, Document Camera and Plug-in source for Display Port, HDMI, VGA, and Composite Video. “Select VLT” to enter VLT mode. Bottom: Access Microphone, Lights and Projector control pages. Expert mode to enter advanced system control. “Room Reset” to enter system reset confirm page. Internal use only 2 Touch Panel Instructions – Massey Albany VLT Room QUICK REFERENCE GUIDE 2.1. AV Menu Select the source first and then select the destination (Display/Audio) for switching. Output “Projector” to display selected source’s video Output “Audio” to hear audio from selected audio source Output “Preview On Control Panel” to preview selected source’s video on Control panel *Plug-in 2: Available signals are HDMI, VGA and Composite Video. *”Hide Image” under each projector screen controls the image blank function. Adjust audio level for selected audio source. Internal use only 3 Touch Panel Instructions – Massey Albany VLT Room QUICK REFERENCE GUIDE 2.2. AV Menu (Video Preview) After selecting Preview on Control Panel, system will enter “video preview” page to stream video over network. Press “Return” to go back Home Page. You can press “View” button again to preview the video on Control panel *Please wait for 15 seconds (maximum) after selecting video source. Press “Control” under Blu-ray/DVD/CD button to enter Blu-ray/DVD/CD control page. Press “Control” under Document Camera button to enter Document Camera control page. System will turn on Bluray player and Document Camera on start-up. System will turn off Bluray player and Document Camera on shutdown. Internal use only 4 Touch Panel Instructions – Massey Albany VLT Room QUICK REFERENCE GUIDE 3.1. Microphone Control Press “Microphone Control” to enter microphone control page for local reinforcement. Adjust the microphone level individually. *If you see this warning displayed check the Mute/Battery status of the Lapel Radio microphone. In Conference mode, microphone set to conference call only. Press “On/Off” to enable/disable microphone audio to far end. Internal use only 5 Touch Panel Instructions – Massey Albany VLT Room QUICK REFERENCE GUIDE 3.2. Lights Control Press “Lights Control” to enter lighting control page. Recall the lighting pre-sets (lighting pre-sets can be saved in Expert Mode). System will recall “Preset 1” when system is shutdown. System will recall “Preset 2” from system start up, or VLT mode is entered. **With the application of Occupancy sensor, system will recall “Preset 1” when people first enter the room. The lights and system power will turn off after 1 hour of no detected movement. Internal use only 6 Touch Panel Instructions – Massey Albany VLT Room QUICK REFERENCE GUIDE 3.3. Projector Control Press “Projector Control” to enter projector control page. Basic control for each projector (Access full control in Expert Mode) Screen Up/Down control Warming up/ Cooling down message will be shown on the top of this page. It is not recommended to change the power status when projector is warming up / cooling down. **Projector on side wall can recall a lens shift preset to merge two projected image and change both the position and the size. (Lens Shift pre-sets can be saved in Expert Mode). Internal use only 7 Touch Panel Instructions – Massey Albany VLT Room QUICK REFERENCE GUIDE 4.0 VLT Mode Press “VLT” to enter VLT mode. Albany has A1 to A5 pre-sets and Manawatu has M1to M5 pre-sets. Select “Phonebook” to enter VLT mode without preset. Select “Exit with connecting” to return home page. Please contact the ITS Help Desk on 82111 for the detail of each pre-set. Note: System will setup all calls, camera presets, presentation and projector display while entering a VLT pre-set. Therefore you don’t need to manually set this up. Internal use only 8 Touch Panel Instructions – Massey Albany VLT Room QUICK REFERENCE GUIDE 4.1 VLT Mode (Entering Page) Pop up page will appear with messages providing feedback of the status while connecting to facilitated end. System will go through all necessary steps one by one to make sure there is no error in the pre-set setup. Please wait for the system to finish the process which takes about 5seconds depending on if the Far End receives the VC Calls in a short time or not. System may stop at a step in the preset sequence if it has to wait for the Far End to receive the call. If this happens and no one answers you for a period press “Cancel” to cancel the pre-set setup if. You may enter the pre-set again or select another pre-set. Internal use only 9 Touch Panel Instructions – Massey Albany VLT Room QUICK REFERENCE GUIDE 5.1 VLT Mode (Source) Select codec output or AV source and then select display. - Output “Projector” to display selected source’s video Output “Preview On Control Panel” to preview selected source’s video on Control panel Audio is set to video conference only. This can only be changed in Expert mode. *Plug-in 2: Available signals are HDMI, VGA and Composite Video. *”Hide Image” under each projector screen controls the image blank function. Note: System will setup all displays while entering a VLT pre-set. Therefore you don’t need to set this up Press “Tile Setup” to enter layout setup page. Internal use only 10 Touch Panel Instructions – Massey Albany VLT Room QUICK REFERENCE GUIDE 5.1.1 VLT Mode (Source) - Tile Setup (Layout Setup) Background: The term layouts can be used to describe the various ways a video image appears on a screen. Different types of meetings will require different layouts. A layout is a composition of one or more frames. The codec supports a maximum of four simultaneous participants in a video conference. The Tile Setup Page is a visual editor that lets you customize different parts of the Cisco Telepresence System Codec C90 by the use of simple source selection and assignment. The first thing you should do is to consider which layouts you are going to need. A good way of doing this is to ask yourself which layouts will best fit the meeting setup and how many monitors are required. Setup Step: 1. Select AV source on the left column and then select the required VC Source to apply the Source to. => Source selection available on Lectern sources (Resident Computer, Blu-ray/DVD/CD, Document Camera and Plug-in source for Display Port, HDMI, VGA, and Composite Video) => Two available VC sources. 2. Select VC source and then select the frame in the layout that you wish to apply this source to. => VC Call sources are available during VC Call. => Select “No Input” to clear the frame of layout. Press “Next Step” button to advance to step 3 & 4 for output setup. Internal use only 11 Touch Panel Instructions – Massey Albany VLT Room QUICK REFERENCE GUIDE 5.1.2 VLT Mode (Source) - Tile Setup (Output Setup) Setup Step: 3. Apply layout to desired VC1 output / Remote site view. 4. Apply VC1 Output to desired Projector display to be viewed locally. Press “Previous Step” to return to step 1 & 2 for Layout setup. Note: System will setup all Tile Layouts while entering a VLT pre-set. Therefore you don’t need to setup manually. Internal use only 12 Touch Panel Instructions – Massey Albany VLT Room QUICK REFERENCE GUIDE Tile Setup Example: To display Document Camera on Side Front projector with full screen 1. Assign Document Camera (under AV Sources) to an available VC Source 2. Assign VC Source (with the selected Document Camera) to Layout7’s frame1 3. Apply Layout7 to VC1 Output3 4. Apply VC1 Output3 to Side Front Projector To display Teaching Wall Camera and Call1 to Front Left Projector with side by side layout 1. Assign Teaching Wall Camera (under VC Sources) to Layout3’s frame1 2. Assign Call1 (under VC Sources) to Layout3’s frame2 3. Apply Layout3 to VC1 Output1 4. Apply VC1 Output1 to Front Left Projector To receive Presentation from Call1 and then display on Front Right Projector 1. Assign Call1 Presentation (under VC Sources) to Layout9’s frame1 2. Apply Layout9 to VC1 Output2 4. Apply VC1 Output2 to Front Right Projector To display Call1, Call2 and Call3 to Front Left, Front Right and Side Front Projector each with full screen 1. Assign Call1 (under VC Sources) to Layout7’s frame1 2. Assign Call2 (under VC Sources) to Layout8’s frame1 3. Assign Call3 (under VC Sources) to Layout9’s frame1 4. Apply Layout7 to VC1 Output1 5. Apply Layout8 to VC1 Output2 6. Apply Layout9 to VC1 Output3 7. Apply VC1 Output1 to Front Left Projector 8. Apply VC1 Output2 to Front Right Projector 9. Apply VC1 Output3 to Side Front Projector When VLT Pre-set “Phonebook” is selected, system will default as follows when there is a call connection: Call1 connected: Call1 source sets to layout7’s frame1 and then applied to VC1 output1 Call1&2 connected: Call1&2 sources set to layout3’s frame1&2 and then applied to VC1 output1 Call1&2&3 connected: Call1&2&3 sources set to frame of layout4 and then applied to VC1 output1 **VC1 output 1 will apply to Front Left Projector by default Internal use only 13 Touch Panel Instructions – Massey Albany VLT Room QUICK REFERENCE GUIDE 5.2 VLT Mode (Presentation) Follow these instructions to send out Presentation Press “Start Presentation” to enable presentation function System will send “Presentation Camera” as a presentation to FarEnd by default Select the required Presentation source to send Press “Stop Presentation” to stop sending the presentation source While “Phonebook” pre-set is selected, system will display presentation source on Front Right Projector of both VLT rooms by default. Note: System will automatically setup the presentation while entering a VLT pre-set therefore you don’t need to setup manually. This presentation is for video only. For audio presentation please enter expert mode’s VC1 Setup page. Internal use only 14 Touch Panel Instructions – Massey Albany VLT Room QUICK REFERENCE GUIDE 5.3 VLT Mode (Camera Control) Rear Wall Camera and Teaching Wall Camera control Press and hold “Preset” button for 2 seconds to save the current position of two cameras to a new preset. Press “Preset Number: to recall the preset of two cameras. Note: System will recall camera presets while entering a VLT pre-set. Therefore you don’t need to set this up manually. Internal use only 15 Touch Panel Instructions – Massey Albany VLT Room QUICK REFERENCE GUIDE 5.4 VLT Mode (Call Status) Number of call connections and detail To hang up call one by one if needed. Internal use only 16 Touch Panel Instructions – Massey Albany VLT Room QUICK REFERENCE GUIDE 5.5. VLT Mode (Dial) To make a call: Enter a call number and then press “Dial” To Hang Up a Call: Press “Hang Up All” to hang up all calls. Go to Call Status to hang up call one by one if needed. Mute Linked Rooms: To mute the audio from Far End (VC Codec) Mic Mute: To mute the audio to Far End Note: System will dial to all facilitated ends while entering a VLT pre-set. Therefore you don’t need to dial manually. Internal use only 17 Touch Panel Instructions – Massey Albany VLT Room QUICK REFERENCE GUIDE 5.6 VLT Mode (Phonebook) Phonebook from local or corporate of codec system Press “Search” to access search keyboard Internal use only 18 Touch Panel Instructions – Massey Albany VLT Room QUICK REFERENCE GUIDE Microphone Control Page Press “On/Off” to enable/disable microphone audio to far end. 6.0 AC Mode (Backup for VLT Mode) currently not enabled Internal use only 19 Touch Panel Instructions – Massey Albany VLT Room QUICK REFERENCE GUIDE 7.0 Expert Mode Press “Expert Mode” to enter. Press OK to continue or cancel to return. You can access this page from both AV and VC Menu. Please make sure you have received training first. Internal use only 20 Touch Panel Instructions – Massey Albany VLT Room QUICK REFERENCE GUIDE 7.1 Expert Mode (DM Diagnostics) Information on this page indicates the video detection and information of the projector display. This is for the integrator to troubleshoot the video routing. Example In AV menu if no display from Blu-ray/DVD to projector, we can check the following to identify if the problem is at the input or output stage. Check the video detection of Bluray (may have lost the video from Blu-ray) Check the EDID information from Projector (may have lost the connection to projector) Internal use only 21 Touch Panel Instructions – Massey Albany VLT Room QUICK REFERENCE GUIDE 7.2 Expert Mode (Devices Connection) To indicate the network connection of all devices, during normal operation all devices should be online. Two Occupancy Sensors in VLT room. Scenario 1: People come in Turn the lights on to preset 1 Scenario 2: No human detection for 1 hour Turn lights off and system off (system will cancel the process if people come in during this period) Scenario 3: Receive a VC Call from Far End then the system turns on automatically but not if no human detection for 1 hour. Turn lights off and system off (system will cancel the process if people come in during this period) Internal use only 22 Touch Panel Instructions – Massey Albany VLT Room QUICK REFERENCE GUIDE 7.3 Expert Mode (Recording Setup) Audio recording: You can mix one or more audio sources to recording patch for recording. You can mix one or more audio sources to Laptop IN for laptop conferencing. Video recording: Video source cannot be mixed. You can set the video signal to be recorded by selecting the projector which is displaying the video signal you wish to record. Internal use only 23 Touch Panel Instructions – Massey Albany VLT Room QUICK REFERENCE GUIDE 7.4 Expert Mode (Lights Setup) Steps to adjust lights 1. Select a lighting group 2. Adjust the light level by pressing “Up/Down” button Steps to setup lights preset 1. Select a preset 2. Adjust the light level of each group 3. Press “Save” button Albany and Manawatu have different floor plans. Internal use only 24 Touch Panel Instructions – Massey Albany VLT Room QUICK REFERENCE GUIDE 7.5 VC2 Setup Provides manual control of VC Codec2 (Radvision XT1000) Internal use only 25 Touch Panel Instructions – Massey Albany VLT Room QUICK REFERENCE GUIDE 7.6 VC1 Setup Access an advanced level control of VC Codec (Tandberg C90) If the Tandberg C90 is being rebooted, system will setup the Tile layout automatically. You can send presentation audio to Far End from this page. Press “presentation” audio source and then adjust the audio of needed. Internal use only 26 Touch Panel Instructions – Massey Albany VLT Room QUICK REFERENCE GUIDE 7.7 Projector Control Select projector on the top and then control as required Lamp Hours are available on all projectors. Internal use only 27 Touch Panel Instructions – Massey Albany VLT Room QUICK REFERENCE GUIDE 7.8 Lens Shift Setup Lens Shift setup is for Side wall projectors This allows the images to be shifted and resized. This pre-set can then be recorded. Pressing “Centre position” will reset the image position to the center position. Steps to save a preset: 1. Press record 2. Move the image to the desired position and zoom to required size. 3. Press “Stop” to finish. Press “Recall Preset” to recall recorded Lens Shift preset Internal use only 28 Touch Panel Instructions – Massey Albany VLT Room QUICK REFERENCE GUIDE 7.9 Volume Setup To setup different volume presets for local audio Steps to setup a preset: 1. Select a volume preset 2. Adjust volume ramp level 3. Press “SAVE” to store the volume value Internal use only 29 Touch Panel Instructions – Massey Albany VLT Room QUICK REFERENCE GUIDE 7.10 Audio Mixer In AV Menu, system will set the audio routing from source selection. In Audio mixer mode, you can mix the audio for different speakers. Example: You can enable Blu-ray/DVD to the speaker which is in front of Side Rear Projector, and then enable Resident Computer to the Ceiling speaker. By Default, program audio will not output to ceiling speakers. Internal use only 30 Touch Panel Instructions – Massey Albany VLT Room QUICK REFERENCE GUIDE 8.0 System off Page In AV or VC Menu, press “Room Reset” to enter system confirm off page. “No” to return, “Yes” to confirm During system off waiting page, system will perform the following steps: 1. Recall Lighting preset 1 2. Mute the audio 3. Clear the audio and video routing 4. Turn off all projectors 5. Hang up all calls 6. Turn off Document Camera and Blu-ray player 6. Go back to Logo Page. Internal use only 31 Touch Panel Instructions – Massey Albany VLT Room QUICK REFERENCE GUIDE Appendix I: Software Installation A. Crestron Software [When installing the Crestron software development system, it is important to install programs in the correct order as there are some interdependencies.] 1. Device Database => The Device Database represents data for the general programming applications. The general programming applications are used by advanced programming applications 2. Crestron Database => The Crestron Database represents data for the advanced programming applications. The data consists of module files, mdb control files, and other necessary files needed in support of these applications. 3. Toolbox Crestron Toolbox is a broad-based mechanism that performs numerous system tasks, such as logging system data and error messages, setting network IDs, uploading programs and device firmware, transmitting device status information, changing system communication parameters, and detecting network devices and control cards. The Crestron Toolbox fully replaces the Crestron Viewport and provides an extended range of diagnostic and communications tools. The Toolbox is an easy-to-use, graphically based program that uses a drag and drop interface, and provides real-time feedback. With built-in diagnostic tools, such as Network Analyzer, Video Test Patterns, and infiNET™ Diagnostics, coupled with network and SIMPL Windows program views, Toolbox simplifies system setup and troubleshooting, saving a considerable amount of time and effort. 4. VT Pro-e VisionTools Pro-e (VTPro-e) is comprehensive Crestron touchscreen design software. 5. SIMPL Windows Crestron SIMPL Windows is the premier development environment for building powerful and flexible Crestron control system applications. 6. SIMPL+ Cross Compiler => SIMPL+ takes Crestron programming a step beyond SIMPL. Completely integrated into SIMPL Windows, SIMPL+ is a powerful language extension to Crestron's popular SIMPL programming language. Users can now combine the ease-of-use and simplicity of the graphical SIMPL language with the power and flexibility of SIMPL+. B. Biamp Nexia Software 1. Nexia NEXIA software includes a broad selection of audio components, routing options, and signal processing. The internal system design is completely user definable via PC software, and can be controlled via dedicated software screens, RS-232 control systems, and/or a variety of optional remote control devices. Internal use only 32 Touch Panel Instructions – Massey Albany VLT Room QUICK REFERENCE GUIDE Appendix II: Software Program Configuration A. Crestron 1. Open Crestron Toolbox 2. Open Massey Toolbox Address Book 3. Connect to DIN-AP2 4. Connect to MC3 5. Connect to TPMC-12 6. Connect to TPMC-8X-GA Internal use only 33 Touch Panel Instructions – Massey Albany VLT Room QUICK REFERENCE GUIDE 7. Download programme -Send -Send -Send -Send vtz file to TPMC-8X-GA vtz file to TPMC-12 spz file to DIN-AP2 lpz file to MC3 8. Setup IP Table ALBANY: -Set IPID 08, IP Address 10.123.241.11 on TPMC-8X-GA -Set IPID 09, IP Address 10.123.241.11 on TPMC-12 MANAWATU: -Set IPID 08, IP Address 10.123.142.11 on TPMC-8X-GA -Set IPID 0A, IP Address 10.123.142.11 on TPMC-V12 Example: To replace a TPMC-12 in Albany VLT room 1. Update the latest firmware to TPMC-12 2. Record the MAC address and send it to Massey ITS 3. Download the vtz file to TPMC-12 4. Setup IP table IPID 09, IP Address 10.123.241.11 on TPMC-12 Example: To replace a DIN-AP2 in Manawatu VLT room 1. Update the latest firmware to DIN-AP2 2. Record the MAC address and send it to Massey ITS 3. Set the IP address to 10.123.142.11 3. Download the spz file to DIN-AP2 ** All DM devices “DM-TX, DM-RX and DM cards” are plug and play, they can retrieve all configuration once the DM connection is built with DM switcher. Internal use only 34 Touch Panel Instructions – Massey Albany VLT Room QUICK REFERENCE GUIDE B. Biamp 1. Open Biamp Nexia 2. Select IP range 3. Select desired system ID 4. Press “Send System Config” or “Connect to System. 5. Start audio after uploaded the system configuration Internal use only 35 36