1
Operator's
Manual
I RN
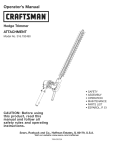
Hedge Trimmer
ATTACHMENT
Model No. 316.792490
,, SAFETY
o ASSEMBLY
OPERATION
MAINTENANCE
PARTS LIST
ESPANOL, R E1
CAUTION:
Before using
this product, read this
manual and follow
all
safety rules and operating
instructions.
Sears,
Roebuck
and Co., Hoffman
Visit our website:
Estates,
www.sears.com/craftsman
769-04167
IL 60179, U.S.A.
TABLE OF CONTENTS
Service Information ....................................
Rules for Safe Operation ................................
Warranty Information ...................................
Know Your Unit .......................................
Assembly Instructions
..................................
Operating Instructions
..................................
Maintenance and Repair Instructions
......................
Specifications .........................................
Parts List ..........................................
1
2
4
4
5
6
7
7
E11
Before beginning, locate the unit's model plate. It lists the model and
serial numbers of your unit. Refer to the sample plate below and
copy the information for future reference.
Serial Number
_S/N
:
Copy the model and parent part number here:
Copy the serial number
here:
The purpose of safety symbols is to attract your attention to possible dangers. The safety symbols, and their explanations, deserve your
careful attention and understanding. The safety warnings do not by themselves eliminate any danger. The instructions or warnings they
give are not substitutes for proper accident prevention measures.
SYMBOL
SYMBOL
MEANING
MEANING
WARNING:
caution. Attention is required in order to avoid serious
SAFETY
ALERT:
indicates
warning
personal injury.
May be
used in danger,
conjunction
with orother
symbols or pictographs.
NOTE:
Advises you of information or instructions vital to the
operation or maintenance of the equipment.
CAUTION:
DANGER:
Failure to obey a safety warning will result
in serious injury to yourself or to others. Always follow
the safety precautions to reduce the risk of fire, electric
shock and personal injury.
Read the Operator's
Manual and follow
Failure to obey a safety warning can
result in injury to yourself and others. Always follow the
safety precautions to reduce the risk of fire, electric
shock and personal injury.
Failure to obey a safety warning may
result in property damage or personal injury to yourself
or to others. Always follow the safety precautions to
reduce the risk of fire, electric shock and personal injury.
all warnings and safety instructions. Failure to do so can result in serious
operator and/or bystanders.
FOR QUESTIONS,
CALL
1-800-659-5917
,, iMPORTANT SAFETY iNSTRUCTiONS
READ ALL iNSTRUCTiONS
BEFORE OPERATING
WARNING:
When using the unit, you must follow the
safety rules. Please read these instructions before operating
the unit in order to ensure the safety of the operator and any
bystanders. Please keep these instructions for later use.
• Carefully read and understand the operator's manual of the unit
that powers this attachment.
Read this operating instruction manual carefully. Be thoroughly
familiar with the controls and the proper use of the equipment.
Know how to stop the unit and disengage the controls quickly.
Do not operate this unit when tired, ill, or under the influence of
alcohol, drugs, or medication.
Never allow children to operate the equipment. Never allow
adults unfamiliar with the instructions to use the unit. Never
allow adults to operate the equipment without proper instruction.
All guards and safety attachments must be installed properly
before operating the unit.
Inspect the unit before use. Ensure the blade is installed
correctly and secure.
Clear the area to be hedged before each use. Remove all objects
such as rocks, broken glass, nails, wire, or string which can be
thrown or become entangled in the hedge trimmer attachment.
injury to the
,,
SAFETY WARNINGS
TRIMMERS
FOR GAS POWERHEADS
AND HEDGE
WARNING:
Gasoline is highly flammable, and its
I vapors can explode if ignited. Take the following
precautions:
Store fuel only in containers specifically designed and approved
for the storage of such materials.
Always stop the engine and allow it to cool before filling the fuel tank.
Never remove the cap of the fuel tank, or add fuel, when the engine
is hot. Never operate the unit without the fuel cap securely in place.
Loosen the fuel tank cap slowly to relieve any pressure in the tank.
Mix and add fuel in a clean, well-ventilated area outdoors where
there are no sparks or flames. Slowly remove the fuel cap only
after stopping engine. Do not smoke while fueling or mixing fuel.
Wipe up any spilled fuel from the unit immediately.
Avoid creating a source of ignition for spilled fuel. Do not start
the engine until fuel vapors dissipate.
Move the unit at least 30 feet (9.1 m) from the fueling source and site
before starting the engine. Do not smoke. Keep sparks and open
flames away from the area while adding fuel or operating the unit.
Never start or run the unit inside a closed room or building.
Breathing exhaust fumes can kill. Operate this unit only in a well
ventilated area outdoors.
1
SAFETY WARNINGS
HEDGE TRIMMERS
FOR ELECTRIC POWERHEADS
AND
o
WARNING:
To reduce the risk of electrical shock,
use only extension cords approved for outdoor use,
such as an extension cord of cord type SW-A, SOW-A,
STW-A, STOW-A, SJW-A, SJOW-A, SJTW-W or
SJTOW-A. Extension cords are available from your Ioca
retailer. Use only round-jacketed extension cords
approved for outdoor use.
• CORD SETS: Make sure your cord set is in good condition. When
using a cord set, be sure to use a cord that is heavy enough to
carry the current that your unit will draw. An undersized cord set
will cause a drop in line voltage resulting in loss of power and
overheating. See the operator's manual for the unit that will power
this attachment for the recommended cord size.
Inspect all extension cords and the unit power connection
periodically. Look closely for deterioration, cuts or cracks in the
insulation. Also inspect the connections for damage. Replace the
cords if any defects or damage appear.
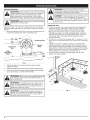
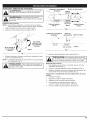
Prevent disconnection of the hedge trimmer powerhead from
extension cord during operation by using a plug-receptacle
retaining strap, connector, or by making a knot as shown below:
Extension
Cord
Hedge
Trimmer Cord
o
Extension
Cord
Hedge
Trimmer Cord
DANGER:
RISK OF CUT OR SHOCK -- Keep hands
away from blades. Keep one hand on assist handle on the
powerhead and on the loop handle of attachment when
power is on. Do not attempt to remove cut material or hold
material to be cut when blades are moving. Make sure the
switch on the power unit is off when clearing jammed material
from blades. Do not grasp the exposed cutting blades or
cutting edges of the hedge trimmer. Wear gloves when
handling the blade. Do not operate unit wi_ one hand.
Avoid dangerous environments. Never operate your unit in damp
or wet conditions. Moisture is a shock hazard.
Do not use the unit in the rain. Do not use in or around water. Do
not use on wet hedges or shrubbery.
Do not handle the plug or unit with wet hands or standing on any
wet surfaces.
Do not leave the unit plugged in when not in use, changing
attachments, or while being serviced.
WHILE OPERATING
• Keep all bystanders, especially children and pets, at least 50 ft (15
m) away.
Wear safety glasses or goggles that are marked as meeting ANSI
Z87.1-1989 standards, and ear/hearing protection when operating
this unit. Wear a face or dust mask if the operation is dusty.
Wear heavy long pants, boots, gloves, and a long sleeve shirt. Do
not wear loose clothing, jewelry, short pants, sandals, or go
barefoot. Secure hair above shoulder level.
Use the unit only in daylight or good artificial light.
Use hedge trimmer properly. Only use this tool for the purpose
intended. Use only for trimming the type of shrub, growth, etc.,
described in the operating instructions.
o
o
o
o
Do not force unit. It will do the job better and with less likelihood
of injury at a rate for which it was designed.
Use extreme caution when reversing or pulling the unit towards you.
Do not overreach, take extra care when working on steep slopes
or inclines. Always keep proper footing and balance.
DO NOT stand on an unstable support. Do not use on a ladder.
Always hold the unit with both hands when operating. Keep a
firm grip on both the front and rear handle or grips.
Keep hands, face, and feet at a distance from all moving parts.
Do not touch or try to stop the blades when they are moving.
in the "OFF" position.
Blades will coast after the powerhead
I CAUTION:
is
Do not operate the engine faster than the speed needed to do
the job. Do not run the engine at high speed when not in use.
o Always stop the engine/motor
when operation is delayed or when
walking from one location to another.
o Stop the engine/motor
for maintenance, repair, to install or
remove the blades. The unit must be stopped and the blades no
longer moving to avoid injury.
Always wear heavy gloves when handling, removing, installing or
cleaning the blades.
If you strike or become entangled with a foreign object, stop the
engine/motor immediately and check for damage. Have any
damage repaired before attempting further operations.
Stop the unit IMMEDIATELY if you feel excessive vibration.
Vibration is a sign of trouble. Inspect thoroughly for loose nuts,
bolts or damage before continuing. Repair or replace affected
parts as necessary.
Stop and switch the unit to off for maintenance, repair, or for
changing other attachments.
Maintain hedge trimmer with care. Keep blades sharp at all
times, and clean for best and safest performance. Follow
maintenance instructions. Always use a clean cloth when
cleaning. Never use brake fluid, gasoline, petroleum-based
products, or any strong solvents to clean your unit.
Use only genuine Sears replacement parts and accessories for
this unit. These are available from your authorized service dealer.
Use of any non- Sears parts or accessories could lead to serious
injury to the user or damage to the unit, and void your warranty.
OTHER SAFETY WARNINGS
Allow the unit to cool before storing or transporting. Be sure to
secure the unit while transporting.
Store the unit in a locked up and dry or high and dry place to
prevent unauthorized use or damage, out of the reach of
children.
Never douse or squirt the unit with water or any other liquid. Keep
handles dry, clean and free from debris. Clean after each use.
Keep these instructions. Refer to them often and use them to
instruct other users. If you loan someone this unit, also loan them
these instructions.
Only qualified personnel should perform any repairs or
maintenance procedures that are not described in this manual.
Always refer to the Operator's Manual instructions for important
details if the unit is to be stored for an extended period.
Do not attempt to repair the machine unless you have the proper
tools, and instructions for disassembly and repair of the machine.
o
SAVE THESE iNSTRUCTiONS
• SAFETY
AND
iNTERNATiONAL
SYMBOLS
•
This operator's manual describes safety and international symbols and pictographs that may appear on this product.
manual for complete safety, assembly, operating and maintenance and repair information.
SYMBOL
MEANING
SYMBOL
Read the operator's
MEANING
• SAFETY ALERT SYMBOL
• wEAREyEANDHEARING
PROTEC ON
WARNING:
Indicates danger, warning or caution. Maybe used in
conjunction
w ith other SYmbOlS or Pictographs,
• READ OPERATOR'S MANUAL
WARNING:
Read the 0perat0r,s manual(s)
follow all warnings and safety instructions. Failure to
do So can result in serious injury to the operator
and/or bystanders.
I
face shield when needed.
J
• KEEP HANDS AWAY FROM BLADES'
B DESCAN
MOVING
Do not put hands on blades when starting the engine
orwh e operatng hedge tr mmer attachment.
J
• HOTSURFACE
WARNING:
Do not touch a hot surface: You may
get burned. These parts get extremely hot from
operation. They remain hot for a short t me after the
unit is turned off.
Thrown objects and loud noise Can
cause severe eye injury and hearing loss; Wear eye
protection meeting ANS! Z87:1-1989 standards and
ear protection when operating this unit. Use a full
_i, 50ft(!sm, KEEP BYSTANDERS
•
_}_le->l T
J
"
AWAY
e
WARNING:
Keep all bystanderS, especially
children and pets, at least 50 feet (15 m) from the
operating area:
CRAFTSMAN FU LL WARRANTY
If this Craftsman product fails due to a defect in material or workmanship within one year from the date of purchase, return it to any Sears
store or other Craftsman outlet in the United States for free replacement.
This warranty applies for only 90 days if this product is ever used for commercial or rental purposes.
This warranty covers ONLY defects in materal and workmanship.
Sears will NOT pay for:
•
Expendable items which can wear out from normal use within the warranty period.
Repairs necessary because of accident or failure to operate or maintain the product according to all supplied instructions.
This warranty gives you specific legal rights, and you may also have other rights which vary from state to state.
Sears, Roebuck and Co., Hoffman Estates, IL 60179
Gear Housing
Indexing Ring
Adjustment
Bolt
Blade
Drive Shaft
Assembly
Hanger
<Y
Angle
Adjustment
Handle
WARNING:
DO NOT USE an extension boom with
this product. It is not designed to be used with an
extension and using one may cause serious injury.
I
I
I
I
|
J
iNSTALLiNG / REMOVING
THE ATTACHMENT
Craftsman Convertible TM
Coupler
/
Primary Hole
_
for unit to be used with this attachment prior to
operation.
WARNING:
Read and understand operator's
manualj
damage to the unit, shut unit off before removing or
WARNING:
To avoid serious personal injury and
installing attachments.
J
Installing the attachment:
NOTE: To make installing or removing the attachment easier, place
the unit on the ground or on a work bench.
1. Remove the hanger from the top of the shaft housing.
2.
Turn knob counterclockwise
Release Button
,
Upper Shaft
Housing
-_f
-v
Knob _
Lower Shaft
Housing
Fig. 2
to loosen (Fig. 1).
Craftsman Convertible
Coupler
TM
Release Button
Guide Recess
Loosen
Knob
Tighten
Knob
L
Fig. 3
Fig. 1
4.
While firmly holding the attachment, push it straight into the coupler
until the release button snaps firmly into the primary hole (Fig. 2).
NOTE: Aligning the release button with the guide recess will help
installation (Fig. 3).
Turn the knob clockwise to tighten (Fig. 1).
3.
CAUTION:
Lock the release button in the primary
hole (Fig. 2) and securely tighten the knob before
operating this unit.
I
are to be used in the primary hole only. Using the wrong
could leadThe
to personal
injurywith
or damage
to the
unit.
| hole
CAUTION:
attachments
the coupler
system
]
Removing the attachment:
1. Turn the knob counterclockwise
2.
3.
to loosen (Fig. 1).
Press and hold the release button (Fig. 2).
While firmly holding the upper shaft housing, pull the hedge
trimmer attachment out of the coupler (Fig. 2).
Check Coupler Engagement
1. Start the unit.
Prior to Use
2.
3.
Briefly engage and release the trigger.
Check that attachment is operating.
4.
If the attachment is not operating, remove attachment
repeat steps for installing the attachment.
Recheck operation of attachment.
5.
and
BEFORE
OPERATING
WARNING:
Dress properly to reduce the risk of injury
when operating this unit. Do not wear loose clothing or
jewelry. Wear eye and ear/hearing protection. Wear
heavy long pants, boots and gloves. Use a full face
shield when needed. Secure hair above shoulder level.
adjusting the trimming angle.
Make sure the unit is powered off before
,i_b
WARNING:
Keep hands and fingers away from
moving parts. Any part of body coming in contact with
moving parts could result in serious injury.
DANGER:
If the blade jams on any electrical cord or
line, DO NOT TOUCH THE BLADE. It can become
ELECTRICALLY LIVE and VERY DANGEROUS. Release
the unit in the safest manner possible, and turn off the
power source.
[WARNING:
Adjust the angle of the trimmer to suit the area you are trimming;
adjust the blade angle based on the situation. Adjust the blade as
follows:
1. Grasp the adjustment bolt (Fig. 4) and turn counterclockwise to
unscrew the bolt from the hole in the indexing ring.
ndexing
-Adjustment
"_
__4_f
_
_--!L_'L
T'_]]_-I
oo,t y
Angle
_
Adjustment
!
_
Holes
indexing
Ring
I
__
I __€""-'_'_
_
"1
f
OPERATING TIPS
• To trim new growth, use a wide sweeping motion, feeding the
blade teeth through the hedge or twigs. The most effective
cutting is achieved with a slight downward tilt of the blade.
., Wear gloves when trimming thorny or prickly growth. When
trimming new growth, use a wide sweeping action, so that the
stems are fed directly into the cutting blade. Older growth will
have thicker stems and will be trimmed easiest by using a
sawing movement.
Do not try to cut stems that are larger than 7/16 inches (11 mm)
thick. Use a non-powered hand saw or pruning saw to trim large
stems.
If desired, you can use a string to help cut your hedge level.
Decide how high you want the hedge. Then, stretch a piece of
string along the hedge at this height. Trim the hedge just above
this guide line of string. Trim the side of a hedge so that it will be
slightly narrower at the top. More of the hedge will be exposed
when shaped this way, and be more uniform (Fig. 5).
To trim the sides of hedges, hold the hedge trimmer at the
bottom and sweep upwards.
v
Fig. 4
2.
3.
4.
Rotate the blade to the desired position using the angle
adjustment holder.
Align the adjustment bolt with the appropriate indexing hole.
Screw the bolt into the indexing hole clockwise until hand-tight
to secure the blade. DO NOT OVERTIGHTEN.
! iw.°.,.°
.e oa'd.e
eeachuse
du
Iodca
n.
use, check to make sure that the adjustment
properly tightened.
bolt is
WARNING:
If operating the unit on a slope, stand
below the cutting attachment. DO NOT operate on a
slope or hilly incline if there is the slightest chance of
slipping or losing your footing.
WARNING:
If any parts are missing, damaged, or
broken, do not operate your hedge trimmer until they
have been replaced. Failure to do so could result in
possible serious personal injury.
Fig. 5
LUBRiCATiNG
BLADE
2.
WARNING:
Before maintenance, be sure your hedge
trimmer is disconnected from the power supply. Failure I
to do so can result in accidental starting, causing
serous persona njury,
j
For easier operation and longer blade
trimmer attachment blade before and
lubricating, be sure the powerhead is
machine oil along the edge of the top
life, lubricate the hedge
after each use. Before
turned OFR Apply light
blade strap (Fig. 6).
Occasionally, you should oil your hedge trimmer attachment
during use. Before oiling, stop the engine, then oil. You then
can resume trimming. Do not oil while hedge trimmer
attachment is running.
OTHER MAINTENANCE
1. The cutting blades are made from high quality, hardened steel
and with normal usage, they will not require resharpening.
However, if you accidentally hit a wire fence, stones, glass or
other hard objects, you may put a nick in the blade. There is
no need to remove this nick as long as it does not interfere
with the movement of the blade. If it does interfere, turn the
powerhead off and use a fine toothed file or sharpening stone
to remove the nick.
2.
If you drop the trimmer, carefully inspect it for damage. If the
blade is bent, housing cracked, or handles broken or if you
see any other condition that may affect the trimmer's
operation contact a Sears or another qualified service dealer
for repairs before putting it back into use.
3.
Fertilizers and other garden chemicals contain agents which
greatly accelerate the corrosion of metals. Do not store the
tool on or adjacent to fertilizers or chemicals.
4. With the unit powered off (and the spark plug disconnected),
use only mild soap and a damp cloth to clean the tool. Never
let any liquid get inside the tool; never immerse any part of the
tool into a liquid.
NOTE: To assure product SAFETY and RELIABILITY, repairs,
maintenance and adjustments should be performed by a
Sears or another qualified service dealer using identical
replacement parts.
©
Fig. 6
Approximate Operating Weight of Attachment ...........................................................................................................................
Blade Length ...................................................................................................................................................................................
5.11 Ibs. (2.3 kg)
22" (558.8 mm)
HELP?
You, ll find
the answer
and moK_ on m, anagem,yhOmeoCOm-
o Find this and a[[ your other product manuals online.
o Get answers from our team of home experts.
o 6et a personalized
maintenance
plan for your home.
o Find information and tools to help with home projects.
÷anage
ho e
brosght
to yos
by Sears
for free!
Manual
del Operador
lliRN
Accesorio
de
RECORTADOR
DE SETOS
Modelo No. 316.792490
o
o
o
o
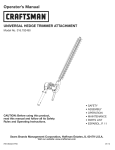
SEGURIDAD
ENSAMBLE
OPERACION
MANTENIMIENTO
LISTA DE PIEZAS
PRECAUCION:
Antes de
utilizar
este producto,
lea
este manual y siga todas
las reglas de seguridad
y
las instrucciones
de
funcionamiento,
Sears,
Roebuck
and Co., Hoffrnan Estates,
Visite nuestro
sitio
IL 60179, U.S.A.
web: www.sears.com/craftsman
769-04167
INDICE DE CONTENIDOS
Llamadas a apoyo al cliente ............................
Normas pars una operaci6n segura ......................
Garantia ............................................
Conozca su unidad ...................................
Instrucciones de ensamble .............................
Instrucciones de operaci6n .............................
Instrucciones de mantenimiento
.........................
Especificaciones
.....................................
Lists de piezas ......................................
E1
E2
E4
E4
E5
E6
E7
E7
E11
Antes de que empiece a ensamblar su nuevo equipo, por favor
ubique la placa que contiene el modelo de la unidad y escriba esa
informaci6n en el espacio en blanco aqui debajo. Aqui debajo se
explica la muestra de una placa del modelo.
h,
.
. N_mero del modelo Numero de la
umeroae sene _
.
.
--_
\
piezadelf_aDricante
\MODEL:
/
II II
I
S/N:
I
Copiez
le num_ro
de module / piece m_re ici :
Copiez
le num_ro
de s6rie ici :
Los simbolos de seguridad se utilizan pars Ilamar su atenci6n sobre posibles peligros. Los simbolos de seguridad y sus explicaciones
merecen toda su atenci6n y comprensi6n. Los simbolos de seguridad no eliminan ningQn peligro por si mismos. Las instrucciones o
advertencias que ofrecen no substituyen las medidas adecuadas de prevenci6n de accidentes.
SIMBOLO
SIGNIFICADO
SIMBOLO
A
ALERTA DE SEGURIDAD:
Indica peligro,
advertencia o precauci6n. Debe prestar atenci6n pars
evitar sufrir graves lesiones personales. Puede ser
utilizado junto con otros simbolos o figuras.
NOTA:
I_
Le ofrece informaci6n o instrucciones que son esenciales
pars la operaci6n o mantenimiento del equipo.
PREGUNTAS,
• IMPORTANTE
LEA TODAS LAS INSTRUCCIONES
LLAME
El no seguir una advertencia de
seguridad puede conducir a dado patrimonial o a que usted
u otras personas sufran lesiones personales. Siga siempre
las precauciones de seguridad pars reducir el riesgo de
incendio, descarga electrica y lesiones personales.
AL
INFORMACION
ANTES DE LA OPERACION
las reglas de seguridad. Lea estas instrucciones antes
de operar la unidad a fin de garantizar la seguridad del
operador
y cualquier AI
transeQnte.
Guarde debe
estas observar
DVERTENCIA:
utilizar la unidad,
instrucciones pars uso posterior.
• Lea cuidadosamente y entienda el manual del operador de la
unidad que impulsa a este acople.
Lea este manual de instrucciones de funcionamiento detenidamente.
Familiaricese completamente con los controles y el uso apropiado
del equipo. Sepa c6mo apagar la unidad y desactivar los controles
con rapidez.
No opere esta unidad siesta cansado, enfermo, o bajo los efectos
del alcohol, drogas o medicamentos.
Nunca permits que los ni5os manejen el equipo. Nunca permits
que los adultos usen la unidad cuando no esten familiarizados
con las instrucciones. Nunca permits que las personas adultas
manejen el equipo si no cuentan con las instrucciones apropiadas.
Se debe instalar adecuadamente todos los protectores y
dispositivos de seguridad antes de hacer funcionar la unidad.
Inspeccione la unidad antes de usarla. Compruebe que la
cuchilla este instalada correctamente y que este segura.
Despeje el Area que va a cortar antes de cads uso. Quite todos
los objetos tales como piedras, vidrios quebrados, clavos,
alambre o cuerdas que puedan ser lanzados o que se puedan
enredar en el aditamento de la cortadora de setos.
E2
El no seguir una advertencia de
seguridad puede conducir a que usted u otras personas
sufran lesiones. Siga siempre las precauciones de
seguridad pars reducir el riesgo de incendio, descarga
electrica y lesiones personales.
y siga todas las advertencias
e instrucciones de seguridad.
espectadores
pueden sufrir graves lesiones.
Sl TIENE
_
ADVERTENClA:
PRECAUCl0N:
seguridad puede conducir a que usted u otras personas
sufran graves lesiones. Siga siempre las precauciones
de seguridad El
pars
el riesgo
de incendio,de
_PELIGRO:
no reducir
obedecer
una advertencia
descarga electrica y lesiones personales.
Lea el manual del operador
SIGNIFICADO
De no hacerlo,
el operador
y/o los
1-800-659-5917
DE SEGURIDAD
•
ADVERTENCIAS DE SEGURIDAD ESPECIALES PARA LAS
UNIDADES MOTRICES Y RECORTADOR DE SETOS A GASOLINA
I sus
gases pueden explotar
si se encienden.
Tome las
ADVERTENClA:
La gasolina
es muy inflamable
y
[ siguientes precauciones:
Guarde el combustible en envases que hayan sido dise_ados y
aprobados especialmente pars el almacenamiento de dichos materiales.
Antes de Ilenar eltanque de combustible, apague siempre el motor y
espere que se enfrie.No quite nunca la taps del tanque de combustible ni
abastezca combustible mientras el motor este caliente. No opere nunca la
unidad sin lataps del combustible puesta firmemente en su lugar.Afloje la
taps del combustible lentamente pars disipar lapresi6n del tanque.
Mezcle y abastezca el combustible en un Area exterior, limpia y
bien ventilada donde no hays chispas ni llamas. Quite lentamente
la taps del combustible s61o despues de apagar el motor. No
fume mientras abastezca o mezcle el combustible. Limpie de
inmediato todo el combustible que se hays derramado.
Evite crear una fuente de encendido por combustible derramado.
No arranque el motor hasta que se hayan disipado los vapores
del combustible.
Aleje la unidad a por Io menos 30 pies (9.1 m) del lugar y fuente
de abastecimiento de combustible antes de arrancar el motor.
No fume, mantenga las chispas y las llamas abiertas lejos del
Area mientras abstece el combustible u opere la unidad.
• No arranque ni opere la unidad en una sala o edificio cerrado. Los
gases de escape de monCxido de carbono pueden set letales en un
Area cerrada. Opere esta unidad s61oen un Area exterior bien ventilada.
ADVERTENCIAS DE SEGURIDAD ESPECIALES PARA LAS
UNIDADES MOTRICES Y RECORTADOR ELECTRICO DE SETOS
Use la cizalla para corte de setos apropiadamente. Use esta
herramienta solamente para el prop6sito pretendido. Usela para
recortar el tipo de arbusto, crecimiento, etc., descrito en las
instrucciones de funcionamiento.
No esfuerce ni sobrecargue el podador. El podador funcionara de
la mejor manera y en forma mas segura cuando se maneje
dentro de los parametros bajo los cuales fue disefiado.
Tenga mucho cuidado cuando retroceda o hale la unidad hacia usted.
No se estire demasiado, tenga cuidado adicional cuando trabaje
en pendientes o inclinaciones. Mantenga la pisada firme y buen
equilibrio en todo momento.
NO se pare sobre una superficie inestable. No la use mientras
est6 en una escalera.
Sostenga siempre la unidad con ambas manos durante la operaci6n.
Agarre firmemente ambas manijas o mangos anteriores y posteriores.
Mantenga lasmanos, cara y pies lejos de todas las piezas que se muevan.
ADVERTENCIA:
Para reducir el riesgo de descarga
electrica, use s61o cables de extensi6n aprobados para ser
usados en exteriores, como los cables de extensi6n tipo
SW-A, SOW-A, STW-A, STOW-A, SJW-A, SJOW-A,
SJTW-W o SJTOW-A. Puede adquirir cables de extensi6n
en su distribuidor local. Use s61o cables de extensi6n de
camisa cilindrica aprobados para set usados en exteriores.
CABLES DE EXTENSION: Verifique que su cable de extensi6n este en
buenas condiciones. Cuando utilice un cable de extensi6n, verifique
que el mismo sea Io suficientemente grueso para conducir la corriente
que consume la unidad. Si utiliza un cable demasiado delgado, eso
ocasionara una caida de voltaje de la linea, yen consecuencia, una
perdida de potencia y recalentamiento. Lea el manual del operador de
la unidad que accionara este accesorio para informarse acerca del
tamafio recomendado de cable de extensi6n.
Inspeccione con frecuencia todos los cables de extensi6n y la
conexi6n de la unidad a la corriente. Revise con cuidado para
ver si hay deterioros, cortes o grietas en el aislamiento.
Inspeccione tambien las conexiones para ver si han sufrido
dafios. Cambie los cables si observa algQn defecto o dafio.
Evite la desconexi6n del cable de extensi6n del cabezal motorizado
de la cortadora de setos durante el funcionamiento, utilizando un
retenedor de enchufe-receptaculo, conector o haciendo un nudo
como se muestra aqui debajo:
Cable de
extensiCn
Cable de la
Cizalla
Cable de
extensiCn
Cable de la
Cizalla
PELIGRO:
PELIGRO DE CORTE O DESCARGA Mantenga las manos lejos de lascuchillas. Mantenga una
mano en el mango auxiliardel cabezal motorizado yen el
mango curvo del aditamento cuando la unidad este prendida.
No intente quitar el material cortandolo ni sostener el material a
cortar cuando las cuchillas esten en movimiento. Compruebe
que el interruptor de la unidad motorizada est6 apagado
cuando despeje el material atascado en las cuchillas. No
agarre las cuchillas expuestas o los bordes de corte de la
cizalla para corte de setos. Use guantes cuando manipule la
cuchilla. No hagafundonar la unidadcon una mano.
Evite los ambientes peligrosos. No opere nunca su unidad en
ambientes hQmedos ni mojados. La humedad representa un
peligro de descarga electrica.
No use la unidad bajo la Iluvia. No la use dentro del agua ni
alrededor de ella.
No toque el enchufe ni la unidad con las manos mojadas ni
cuando este parado sobre una superficie mojada.
No deje la unidad enchufada mientras no la use, mientras cambie
los accesorios o aditamentos, ni mientras le haga mantenimiento.
DURANTE LA OPERACION
• Mantenga retirados a los espectadores, especialmente a los nifios
y animales domesticos por Io menos a 50 ft (15 m) de distancia.
Use lentes o gafas de protecci6n que cumplan con las normas
ANSI Z87.1-1989, y protecci6n para sus oidos/audici6n mientras
opere esta unidad. Use siempre una mascara facial o para
protegerse contra el polvo si la operaci6n levanta polvo.
Use pantalones largos y gruesos y guantes. No vista ropa
holgada, alhajas, pantalones cortos, sandalias ni este descalzo.
Asegure su cabello sobre el nivel de los hombros.
Use la unidad Qnicamente con la luz diurna o con buena luz artificial.
_
despues de poner la unidad en la posici6n de apagado.
RECAUCl6N:
Las cuchillas continOan moviendose
No toque ni intente detener lascuchillas cuando esten en movimiento.
No opere la unidad a una velocidad mayor que la necesaria para
recortar bordes. No opere la unidad a alta velocidad cuando no
esta recortando bordes.
Pare siempre la unidad cuando se demora el trabajo o mientras
camina entre diferentes zonas de corte.
Detenga el motor para hacerle mantenimiento, reparaciones,
para instalarle o quitarle las cuchillas. Detenga la unidad y las
cuchillas deben dejar de moverse para evitar lesiones.
P6ngase gafas resistentes en todo momento cuando manipule,
quite, instale o limpie las cuchillas.
Si golpea algOn objeto extrafio o se enreda con 61, pare el motor
inmediatamente y busque dar_os. Haga arreglar cualquier dar_o
antes de intentar el funcionamiento ulterior.
Pare la unidad DE INMEDIATO si siente una vibraci6n excesiva.
La vibraci6n es serial de que hay problemas. Inspeccione bien si
hay tuercas o pernos flojos o dafios antes de continuar. Repare o
cambie las piezas afectadas segOn sea necesario.
Pare y apague la unidad para hacerle mantenimiento, reparaci6n
o para cambiarle accesorios.
Mantenga la cizalla para corte de setos de manera cuidadosa.
Mantenga las cuchillas afiladas y limpias en todo momento para que
provean el rendimiento mas seguro y mejor. Siga las instrucciones
de mantenimiento. Use un patio limpio cuando limpie en todo
momento. Nunca use aceite de frenos, gasolina, productos a base
de petr61eo o ningQn otro disolvente para limpiar la unidad.
Use Onicamente piezas de repuesto y accesorios Sears genuinos para
esta unidad. Se encuentran disponibles en el distribuidor autorizado.
El uso de piezas o accesorios que no sean Sears puede ocasionarle
lesiones graves al usuario o dar_ar la unidad y anular la garantia.
OTRAS ADVERTENCIAS DE SEGURIDAD
= Espere que el motor se enfrie antes de guardar o transportar la
unidad. Compruebe que la unidad este segura al transportarla.
Guarde la unidad bajo Ilave en un lugar adecuado y seco para
evitar que sea usada por personas no autorizadas y se dafie,
lejos del alcance de los nifios.
Nunca remoje o chorree la unidad con agua o cualquier otro liquido.
Mantenga los mangos secos, limpios y libres de escombros. Limpiela
despues de cada uso.
Guarde estas instrucciones. ConsQItelas con frecuencia y utilicelas
para ensefiar a otros usuarios. Si le presta esta unidad a alguien,
prestele tambien estas instrucciones.
Cualquier reparaci6n o procedimientos de mantenimiento que no
esten descritos en este manual deben ser hechos Qnicamente
por personal calificado.
Consulte siempre las instrucciones del Manual del Operario para
que se informe sobre detalles importantes, siva a guardar la
unidad durante un periodo de tiempo prolongado.
No intente arreglar la maquina a menos que tenga las herramientas
apropiadas y las instrucciones para desensamblarla y arreglarla.
GUARDE
ESTAS INSTRUCCIONES
E3
• SIMBOLOS
DE SEGURIDAD
E INTERNACIONALES
=
Este manual del operador describe los simbolos y figuras de seguridad e internacionales que pueden aparecer en este producto. Lea el manual
del operador para obtener informaci6n completa acerca de la seguridad, ensamble, operaci6n y mantenimiento y reparaci6n.
SIMBOLO
SIGNIFICADO
SIMBOLO
SIGNIFICADO
• s MBOLo
DEALERTA
DESEGUR DAD
A_
I
• USE PROTECCION
ADVERTENCIA:
Indica peligro, advertencia o precauci6n. Puede ser
utilizado junto con otros simbolos o figuras. ......
• LEA EL MANUAL DEL OPERADOR
ill i_ iiii
ADVERTENCIA:
Lea el manual dei operadOr Y siga
todas las advertencias e instrucciones de seguridad. De
no hacerlo, el operador Y/O !0S espectad0res pueden
sufrir graves !esiones,
|
• SUPERFICIE
OCULAR Y AUDITIVA
Los objetos arrojados pot la
unidad y el ruido fuerte pueden causar graves lesiones
oculares y p6rdida auditiva. Utilice protecci6n ocular
que cumpla con las normas ANSI Z87.1-1989 y
protecci6n auditiva cuando opere esta unidad. Use una
careta completa cuando la necesite.
• MANTENGA LAS MANOS LEJOS DE LAS
CUCHILLAS. LAS CUCHILLAS EN MOVIMIENTO
CAUSAN LESIONES GRAVES.
No ponga las manos en las cuchi las cuando ponga
el motor en marcha o mientras maneje el accesorio
para corte de setos.
CALIENTE
NO toque una superficie que est_
ADVERTENCIA:
caliente. Puede quemarse. Estas paths se calientan
mucho con el uso. Luego de apagarse permanecen
I
calientes durante un corto tiempo.
]
Mia.50ft
(15m)le MANTENGA ALEJADOS
A LOS ESPECTADORES
._,"de->l_ I ADVERTENCIA:
"
Mantenga retirados a los
especiaimente a los ni_os y animaies
espectadores,
dom_st cos por o menos a 15 m (50 ft) de d stanc a.
GARANTJA TOTAL DE CRAFTSMAN
Si este producto Craftsman falla debido a un defecto en el material o en la mano de obra dentro de un periodo de uno a_o a partir de la
fecha de compra, devuelvalo a cualquier tienda Sears u otro establecimiento de Craftsman en Estados Unidos para que sea reemplazado
sin costo alguno.
Esta garantia se aplica solamente durante 90 dias si este producto en algQn momento se utiliza para fines comerciales o de alquiler.
Esta garantia abarca SOLAMENTE los defectos en el material o en la mano de obra. Sears NO pagar_:
•
Los articulos consumibles que se desgasten debido al uso normal dentro del periodo de garantia.
•
Las reparaciones necesarias debidas a accidente asi como pot no operar o no mantener el equipo de acuerdo con todas las
instrucciones provistas.
Esta garantia le concede a usted derechos legales especificos, y usted pudiera tenet otros derechos que varian de un estado a otto.
Sears, Roebuck and Co., Hoffman Estates, IL 60179
LengQeta divisora
Caja de engranaje
Perno para ajustar
Conjunto de eje
impulsor
Cuchilla
\
Asa para colg___
E4
Palanca para
ajustar el _ngulo
ADVERTENCIA:
NO UTILICE una pluma de
extensi6n con este producto. No esta dise5ado para
ser utilizado con una extensi6n y utilizarla puede
ocasionar lesiones graves.
INSTALACION
/ REMOCION
DEL ACOPLADOR
Craftsman Convertible
Acoplador
operador de los accesorios antes de su operaci6n.
ADVERTENCIA:
Lea y comprenda el manual del
primario _4-"-'-_,
personales, apague la unidad antes de sacar o instalar
Para evitar graves lesiones
Orificio
ADVERTENCIA:
accesorios.
Instalaci6n del accesorio
NOTA: Para facilitar la instalaci6n o remoci6n de los accesorios,
ponga la unidad sobre el suelo o sobre un banco de trabajo.
1. Quite el colgador de encima de la cubierta del eje.
2. Apriete el bot6n girandolo hacia la derecha (Fig. 1).
Cubierta superior
del eje
,_
TM
Bot6n
Bot6n de
desconexi6n
Hueco de guia
J
Bot6n
Fig. 3
4.
Mientras sostiene el accesorio con firmeza, empOjelo en linea
recta en el acoplador (Fig. 2).
La alineaci6n del bot6n de desconexi6n
en la instalaci6n (Fig. 3).
Cubierta inferior
del eje
__
Fig. 1
NOTA:
__
Bot6n
En sentido
contrario al de
las maneciJlas
del reloj
En el sentido de
las maneciJlas
del reloj
_
Fig. 2
Craftsman Convertible
Acoplador
3.
Bot6n de desconexi6n
TM
hacia la derecha (Fig. 1).
[
en el orificio primario. El usar el orificio incorrecto puede
Los accesorios deben ser usados
conduc r a es ones persona es o da_o de a un dad.
j
con la guia ayuda
el orificio primario (Fig. 2) y ajuste bien la perilla antes
PRECAUCl0N:
Trabe el bot6n de desconexi6n en
de operar esta unidad.
Apriete el bot6n girandolo
| PRECAUCl0N:
]
Remoci6n del accesorio
1. Para aflojarlo, gire el bot6n en el sentido opuesto al de las
manecillas del reloj (Fig. 1).
2.
3.
©prima y sostenga oprimido el bot6n de liberaci6n (Fig. 2).
Mientras sostiene con firmeza el bastidor del eje superior, tire
del accesorio hacia afuera del acoplador (Fig. 2).
Inspeccione el acoplamiento
del eje acodado
unidad
1. Arranque la unidad.
2. Enganche y suelte el gatillo brevemente.
3.
4.
5.
antes de usar la
Verifique que el accesorio este funcionando.
Si el accesorio no esta funcionando, retire el
accesorio y repita los pasos para su instalaci6n.
Vuelva a verificar el funcionamiento del accesorio.
E5
PREPARACION
PARAELFUNCIONAMIENTO
ADVERTENClA:
Vista en forma adecuada para
reducir el riesgo de lesiones cuando opere esta unidad. No
use ropa holgada ni alhajas. Use protecci6n ocular y
auditiva. Use pantalones largos y gruesos, botas y guantes.
No use pantalones cortos, sandalias ni trabaje descalzo.
apagada antes de ajustar el angulo de recorte.
ADVERTENCIA:
Cerci6rese de que la unidad este
Ajuste el angulo del recortador para adaptarse al Area que usted
este recortando; ajuste el angulo de la cuchilla segOn la situaci6n.
Ajuste la cuchilla como se indica a continuaci6n:
1. Sujete el perno de ajuste (Fig. 4) y hagalo girar hacia la izquierda
para destornillar el perno del orificio en el anillo divisor.
__,
_
.
Orift cios
.
_-_
Paianca para
divisor
_.
I
_--_--.
ADVERTENClA:
Mantenga
lejos de piezas en movimiento.
cuerpo que haga contacto con
movimiento podria ocasionarle
PELIGRO:
si la cuchilla se atasca en cualquier cable
electrico, iNO TOQUE LA CUCHILLA! PUEDE SER
I
CONDUCTORA DE ELECTRICIDAD Y SER MUY
I
PELIGROSO. Suelte la unidad de la manera mas
segura pos b e y apague a e ectr c dad.
CONSEJOS 0TILES PARA EL FUNCIONAMIENTO
= Cortado de setos: Un movimiento amplio, alimentando los
dientes de las cuchillas de pequer_as ramas es Io mas efectivo.
Un peque5o angulo hacia abajo en las cuchillas en la direcci6n
del movimiento genera un mejor corte.
• P6ngase guantes cuando corte arbustos espinosos o con pOas.
Cuando corte crecimientos nuevos, aplique un movimiento de
recorrido amplio de manera que las ramas entren directamente en la
cuchilla. El crecimiento mas viejo tiene tallos mas gruesos y estos se
cortan con mayor facilidad al aplicar un movimiento de aserrado.
No intente cortar tallos que tengan mas de 11 mm (7/16 pulg) de
grosor. Use una sierra manual o sierra de poda para recortar los
tallos gruesos.
Si Io desea, puede usar una cuerda para que ayude en el corte
nivelado. Decida c6mo quiere hacer el corte. Luego, estire un pedazo
de cuerda a Io largo del cerco a esa altura. Haga el corte justo por
encima del nivel de la cuerda. Corte el borde de manera que sea
ligeramente mas angosto en la parte superior. Asi expone mas parte
del cerco cuando le da esa forma yes mas uniforme (Fig. 5).
Cortes laterales: Mantenga su herramienta como se ve en la
ilustraci6n, y comience en la parte inferior moviendo su maquina
de abajo hacia arriba.
Fig. 4
2.
Haga girar la cuchilla hacia la posici6n deseada utilizando
sostenedor de ajuste del angulo.
3.
Alinee el perno de ajuste con el orificio correspondiente
anillo divisor.
4.
Atornille el perno en el orificio divisor girandolo hacia la derecha
hasta que quede apretado con la mano para fijar la cuchilla. NO
APRiETE DE MAS.
el
en el
ADVERTENCIA:
Antes de cada uso, y de manera
peri6dica cuando se use, asegOrese de que el perno de
ajuste este correctamente apretado.
ADVERTENCIA:
Si opera la unidad en un declive,
permanecer abajo del aditamento de cortado. NO OPERAR
en declive o en una pendiente empinada si existe la minima
posibilidad de resbalarse o perder el equilibrio.
ADVERTENOIA:
si falta alguna pieza, si hay piezas
dar_adas o quebradas, no haga funcionar la cizalla
hasta que las cambie. El no hacerlo podria ocasionar
lesiones corporales graves.
E6
las manos y los dedos
Cualquier parte del
las piezas en
lesiones graves.
Fig. 5
LUBRICACION
DELACUCHILLA
2.
ADVERTENClA:
Antes de mantenimiento, asegOrese
que su cortador de setos esta desconectado de la
corriente electrica. Falla en este procedimiento podria
causar que se encendiera su unidad accidentalmente,
causando serias lastimaduras personales.
1.
Para que la cuchilla funcione m_.s facily dure mas, lubriquela
antes y despues de cada uso. Compruebe que el interruptor
del cabezal este apagado (OFF) antes de lubricarla. Apliquele
aceite liviano para maquinas a Io largo del borde de la correa
superior (Fig. 6).
©
Usted debe aceitar ocasionalmente el accesorio de la cizalla
durante el uso. Antes de aceitarlo, pare la cizalla y aceitelo.
Puede continuar con el corte despues de hacerlo. No Io aceite
mientras el accesorio de la cizalla este funcionando.
OTRO MANTENIMIENTO
1. Las cuchillas de corte estan fabricadas de acero endurecido
de alta calidad y con el uso normal no requeriran de afilado.
Mas sin embargo si accidentalmente usted toca o golpea una
roca, un cable, vidrio, o cualquier otro objeto duro, pudiera
mellar la cuchilla, no hay necesidad de remover la melladura
de la cuchilla siesta no interfiere con el movimiento natural de
corte. En caso que si interfiera la melladura,apague la unidad
y con una lima plana lime la melladura hasta que vea que no
interferira con el movimiento de esta.
2.
Si deja caer accidentalmente su unidad, inspecci6nela
cuidadosamente. Si las cuchillas se doblaron, si la carcasa se
rompi6, si el maneral se rompi6 o si usted ve algOn otto
desperfecto, Ileve la unidad a un Sears o a otto proveedor de
servicio calificado par que se la repare antes que usted
pretenda encender otra vez su herramienta.
3.
Fertilizantes y otros quimicos usados en el jardin contienen
agentes que aceleran el proceso de corrosi6n de metales. No
almacene su herramienta en lugares donde pudiera tener
contacto su herramienta a estos materiales.
4.
Con la unidad apagada (y la bujia desconectada), use jab6n
de manos y un trapo hOmedo para limpiar su herramienta. No
permita que ningOn liquido se introduzca dentro de su
maquina, nunca meta partes de su herramienta en liquidos.
NOTA:
Fig. 6
Para asegurar la SEGURIDAD y FUNCIONAMIENTO,
reparaciones, mantenimiento y ajustes deberan ser
realizados pot un Sears o a otto proveedor de servicio
calificado usando partes originales e identicas.
Peso de la unidad (S61o el accesorio) .......................................................................................................................................
Longitud de la cuchilla .............................................................................................................................................................
2,3 kg (5,11 libras)
558.8 mm (22 pulg)
HAS AYUDA?
Encontrar
la respu, esta y muN o K@s en
o Busque este y todos sus demos manuales de productos
o
agemyh
gratis!
en [inea.
o 0btenga respuestas de nuestros expertos en productos para el hogar.
o Redba un plan de mantenimiento
personalizado para su hogar.
Encuentre [a informad6n
y [as herramientas que [e ayudar_n en sus proyectos
÷anage
para su hogar.
ho e
p_ese_ta..ao
pot Sears
E7
{:8
E9
EIO
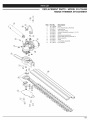
REPLACEMENT
PARTS - MODEL 316.792490
HEDGE TRIMMER ATTACHMENT
item
1
Part No.
791-182886
Description
Screw
2
3
4
753-05616
753-05617
753-05698
Drive Shaft Housing Assembly
Indexing Ring
Anti-rotation Screw
5
6
753-05618
753-05619
Gearbox Assembly
Screw
7
8
9
10
753-05620
753-05621
753-05623
753-05624
Blade Housing Hardware
Upper Blade Housing (includes 7)
Blade Assembly
Guard
11
12
753-05625
791-182215
Lower Blade Assembly
Lock Washer
(includes 3, 6 & 12)
Ell
Your Home
For expert troubleshooting
and home solutions advice
anage
www.managemyhome.com
For repair- in your home- of all major brand appliances,
lawn and garden equipment, or heating and cooling systems,
no matter who made it, no matter who sold it!
For the replacement parts, accessories and
owner's manuals that you need to do-it-yourself.
For Sears professional installation of home appliances
and items like garage door openers and water heaters.
1-800-4-MY-HOME
Call anytime,
®
(1-800-469-4663)
day or night (U.S.A. and Canada)
www.sears.com
www.sears.ca
Our Home
For repair of carry-in items like vacuums, lawn equipment,
and electronics, call anytime for the location of your nearest
Sears Parts & Repair Service
1-800-488-1222
(U.S.A.)
1-800-469-4663
www.sears.corn
To purchase a protection
1-800-827-6655
agreement
on a product serviced by Sears:
1-800-361-6665
Para pedir servicio de reparacion
a domicilio, y para ordenar piezas:
Au Canada
® Marca
MC Marque
Trademark
Registrada
pour service
en frangais:
®
Mc
(1-800-533-6937)
www.sears.ca
/ TMTrademark
/ rM Marca
de commerce
(Canada)
1-800-LE-FOYER
(1-888-784-6427)
® Registered
(Canada)
www.sears.ca
(U.S.A.)
1-888-SU-HOGAR
Center
/ SMService Mark of Sears Brands, LLC
de Fa_brica / SM Marca de Servicio de Sears Brands,
/ MD Marque
depos6e
de Sears
Brands,
LLC
LLC
® Sears
Brands,
LLC