1
J4
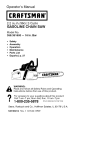
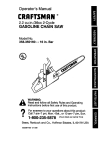
Operator's Manual
CRRFTSMRN
2.5 HP Motor
ELECTRIC CHAIN SAW
Model No.
358.341240 - 14 in. Bar
®
WARNING:
Read and follow all Safety Rules and Operating
Instructions before first use of this product.
Jl!_ '
I1"
•
For answers to your quest!ons about this product:
Call 7 am-7 pro, Mon-Sat, Sun, 10 am-7 pm
1-800-235-5878
Sears, Roebuck and Co., HoffmanEstates,IL 60179 USA
530.-O87622 08/24/98
2
2
If this
chase,
and
If this
Service and Adjustments
Storage
Trouble Shooting
Spanish
Parts Ordedng
13
15
15
18
Back
In _aw.fails to perform pmpedy due to a
wdhin (1) year from the date of pup
it, free of charge.
chain, which are expendable parts
is used for commercial purposes,
from the date of purchase. If this
for rental purposes, this warranty
'date of purchase. This warranty apin use in the Un=ted States.
WARRANTY SERVICE IS AVAILABLE BY RETURNING THE CRAFTSMAN
ELECTRIC CHAIN SAW TO THE NEAREST SEARS SERVICE CENTER IN THE
UNITED STATES.
This warranty gives you specific legal rights, and you may also have other rightswhich vary from state to state.
Seam, Roebuck and Co., Inc., Hoffman Estates, IL 60179 U.S.A.
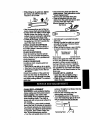
WARNING: When using an electdc
chain saw, basic safety precautions, includingthe following,should always be
followed to reduce the dsk of fire, electdc shook, and injuryto persons. Read
all instructions.
WARNING: Always disconnectpower
source when makingrepairs.Becausea
chainsaw is a high.speedwoocbutting
tool,carelessor ,'nproper use of thistool
can cause serious Injury.
PLAN AHEAD
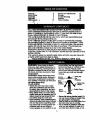
.. Rastrict_e use of your s_v to adult
userswho undemtandend cen fdllow
Iear
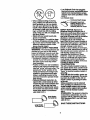
or mufflers) to pro-
tect
have headng checked regularly as chain saw noise can damage
hearing.
Hearing ._. _
Protection _" iu_-----
Safety Hat
Snug
Duty
thes_fstyroles,precautions,
andoporinstructions
found In this manuaL
• Ksep chgc_enawey. Do nct ist vldtom
_
correct chainm or extenskmcord.All
vlsitomshould10eic_ st is_t aOfsat
• Bacure hair above shoulderisngth. Do
(10 rnetm) away fromwork area.
not wear looseclothingorjewelry;,they
• Dress properly.Wear protective gear.
can get
ht in
Always use steel-toed safety footwear • Keep allpaC_ of your _way
from
with non-shpsoles; snug-fitting clothing; heavy-duty, non-slip gloves, eye
protectionsuch as non-fogging,
vented goggles or face screen; an ep-
the chain when saw ls running.
• Do not handle or.ope.ra__a chainsaw
when you are fatigued, dl,upset,or if
you have taken alcohol, drugs,or me2
_on... Youmustbe in gcodphysical • Keep the handles dry and dean and
ndlticnand msntailyaierL If youhave • free from-oiland grease.
_ny cond_cothatmightbe aggravated Keep oil cap andfastenem securely
tightened.
y strenuouswork,checkwithdoctor
before operating.
Watch what you are doing. Use common sense.
• Do not start cutting untilyou have a
clear work area, secure footing_and
especially if you am felling a tree, a
rstreat path. Keep work area dean.
Cluttered areas inviteinjudes.
OPERATE YOUR SAW SAFELY
• Do not operate with one hand. Sedous injuryto the oparator, helpem, or
bystandem may result from onehanded operation. A chain saw is intended for two-handed use.
• Do not operate saw from a ladder or
in a tree.
• Make sure the chain will not make
contact with any object while starting
the saw. Never start the saw when the
guide bar is in a cut.
• Don't tome chain saw. It willdo the job
better and safer at the rate for which it
was intended.
• Do not put pressure on the saw, especially at the end of the cuL Doing
so can cause you to lose control
when the cut is completed.
• Stop the saw before setting it down.
• Hand carry sew only when motor is
stopped. Cany the cha_ saw by the
fronthandiswith_e saw stopped,_gsr offthe switch,the guidebar and
saw chainto the rear.
• Use the dght tool, cut wood only.
Don't use chain saw for purpose not
intended; for example, don't use
chain saw for cutting plastic, masonry,
non-wood building materials.
• Use extreme caution when cutting
small size brush and saplings because the tender matedaJmay catch
the saw chain and I_ewhipped toward
you or pull you off balance.
• When cutting a limb that is under tendon be alert for spdng back so you
will not be struck when the tension in
the wood fibers is released.
MAINTAIN YOUR SAW IN GOOD
WORKING ORDER
• Have all chain saw service performed
by a Sears Service Center except the
items listedin the maintenance section of this manual.
• Make certain sew chain stops moving
when tdgger switch is released.
• Nonconform g
compo-
nents orthe removalof safsty devices
may cause damage to the unitand
possiblestarpos_/em.iniury
tothe operatoror byUseonlyCraftsmsnaccessorissand replacam_ perts as recommended. Neverrood@.,
yoursew..
• Maintainchainsew with_are.
• Keep unitsharp and dsan for better
and safer performance. .
• Follow instructionsfor lubricatingand
changing a.cc.essofies.
• Unplug the chainsew from the power
sourcewhen not in use, beforeservin-
_g,andwhencha_ng_
and sttschments, suchas sew chain
•
ed pads. Beforefurther use of the chain sew, a guard or
otherpartthat is damagsd shouldbe
carefullycheckedto determinethat it
will operateproperlyand performits intendedfunction.Checkfor alignmentof
moving per__ biting of movingparts,
breakage _ pads, mountingand any
otfterconditionsthat may affectits operation.A guard or otherpart that is
damagsd
sho dbepropedy
rep=red
or replacedby a Sears Service Center
unless
o_erwiseindicatedelsewherein
the operator'smanual.
• Do not operate a chain saw that is
damaged, improperlyadjusted, or is
not completely and securely assembled. Inspectchain sew cords ped_ically, and if damaged have repaired by a Sears Service Center.
• When not in use, chain sews should
be stored in a dry, high or locked-up
place out of the reach of children.
• When stodng sew, unplugand use a
bar sheath orcarrying case. Store idle
chainsaw.
ELECTRICAL SAFETY
• Usaa voitsgs
supply
es shown
onunit.
Avoid d,_..,gerou..s,
environments. Don't
," use al_hanses m damp_orwet locations. Donl u_e Inrain.
• Avoid dangeroussituations. Do not
use in the presence of flammable liquids or gases to avoid creating a fire
or explos'mnand/or causing damage
to unit.
• To reducethe dsk of electricalshock,
thisappl'Bncehas a polarizedplug
(one blade iswider thanthe other) and
willrequirethe use of a polarizedex-
tens n
Thaappr nca w=
intoa polarizedextensioncord only
Oneway.if the.p_gdosenot_tfuUy
saw cords pedodk:aUyand if
aged, have repaired by a Se'g_S-Sdtvice Center.
GUARD AGAINST KICKBACK
Fo ow
al
to
=,o dck-
back and otherforceswhichcan resultin
serous
_=y.
intothe extans_ cord, roversethe
plug. If the plug alill does not fit,obtain
a correct polarizedextensioncord. A
poladzedexmndoncordwillrequirethe
useofa peladzedwalloutJet.
"l'hisplug
willfit Intothepeladzedwalloutletonly
onsway.If plug doesnot_ funyInto
the wallcotlet,roversethe plug. if the
plugstilldoes not fit, contacta qualified
electddanto Installthe properwall outlet Donotchange
thaequ_omant
plug,
extensioncord receptacle,or extension
•
use
Clear The Working Area
extensioncordsspecificallymarkedas
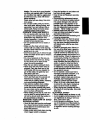
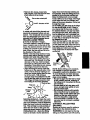
WARNING: Rotational Kickback can
suitablefor outdoorapprBnceshaving
electricalratingnot less thanthe rating occur when the moving chain contacts
of unit.Cord must be markedwith surf's<an object at the upper portionof the tip
"W'. Make sure your extensioncord is of the guide bar. Contact at the upper
portionof the tip of the guide bar can
in goodconcrdion.
Inspectextension
cause
the chain to dig into the object,
cord before use and replaceif damwhichstops
thb chain for an instant.
aged. An undem'rpedextensioncord
The
result
is
a lightningfast, reverse
willcause a dropin Finevoltageresulting in lossof power and overheating.If reaction which Idcksthe guide bar up
and back toward the operator.
in doubt,use the next heaviergauge.
Pinch-Kickbackand PuIHn occurwhen
The I_v.e.rthe gauge number,the
heavierthe cord (see "Selectan exten- the chain is suddenly stoppeclby being
pinched, caught, or by contactinga forsion cord3.
eign object in the wood. This sudden
• Do not abuse cord. Never carry the
of the chain results in a reverunit by the extension cord or yank ex- stopping
sal
of
the
chain force used to cut wood
tension cord to disconnect unit.
and
causes
the saw to move in the op• Secure extension cord to power cord
posite directionof the chain rotation.
to preventdisconne_i.'onfrom unit.
• Do not use the unit if the swdch does Pinch-Kickback drives the saw straight
not tum the unit on and off properly,or back toward the operator. PuN-Inpulls
the saw away from the operator.
if the lockoutdoes not work. Repairs
IOCKBACK WARNING:
to the switch must be made by a
IC._kbackcan occurwhen the moving
Sears Service Center.
• Keep extensionco_ clear of operator chaincontactsan objectat the upper
and obstaclesat all times. Position
porUon
ofthetipoftheguidebarorwhan
the wcod dosas in and pinches the saw
cord so that it will not be caught on
chaJnin the cut.The Compuled W.K:kback
branches. Do not expose cords to
Angle (CKA) listedOn yoursaw and r_ed
heat, oil, water, or sharp edges.
in the folowingCKA Tabla represen__e
• To avoidthe possibilityof electric
shcok_avoid body contact with any
an_._0f Idckba_ your bar and cha_
_
will=havewhen tested in
groundedconductor, such as metal
accordancewith CSA and ANSI stanfences or pipes.
dards. Computed
aries rsprasanted
in
• Ground Fault Circuit Interrupter
(GFCI) protectionshould be provided the CKA cclumnindicate totalanergy and
on circuitor outletto be used. Recep- angleassodaled withouta chain'brake.
Whenpurch_ngrep_camants,
conddtacles are available having built-in
GFCI protectionand may be used for erationsshouldbe givanto the lower
CKA values. In all cases, lowerCKA valthis measure of safety. Inspectchain
4
uesrepresenta _
meritforthe user.
operatingenviron- CKA requirements
per standard.
REDUCE-THE CHANCE OF
Do not rely exclusively upon the safety
devices built intoyour .saw.
• Either ofthase feastions may cause
you to lose control of the saw which
. couidresult in serious,injury..
.
• Pinching.thesaw cnmn along me tip
of the guide bar may push the guide
bar rapidly back toward the operator.
• TIp cohtad in some cases may cause
a lightningfast RFJ,.CnON,kiddng the
KICKBACK
The _
precautionsshouldbe followedto minimizel_kbadc
• G.dpsaw firmly.Hold chain.saw
with bothhandswhen motorIs nmrmg.
Use a finn.gripwith thumbsand falgem
endrcEngchainsaw handk_
Do not over rea_.".
." _
proper footing and balance at
ail timas.
g_debarupandbacktowardoperetor.• Don't let the nose of the guide bar
CKA TABLE
contact a log, branch, ground or other
obstruction.
BAR
CHAIN
.OOEL _,_ L.,_! e_. c_ • Don't cut above shoulder height.
• Use devices such as low kickioack
358341240
71-3_g4
16"
71-3617
16o
chain, guide bar nose guards, chain
brakes, and..,specialgu!de bars..,
that
CHAIN BRAKE & CKA ANGLE
reduce the nsks associated with kickWARNING: The effectiveness
ofa
back.
chainbrake in redudngoperat,
_ injuries • Only use replacement bars and
has not yet been fubj dsterminsd.We
chains spec.ified by the manufacturer
cannotrepresentUlat a chainbrake is an
or the equwalent,
effoclivesafety deviceto preventor reAvoid Pinch-IQcid)adc
duce thehazardof_judasresu_ng
from • Be extremely aware of situationsor
Idcld)ack.DONOTASSUMETHATTHE
obstructionsthat can cause matadal
CHAINBRAKEWILLPROTECTYOU IN THE
to pinchthe top of or otherwise stop
EVENTOF A KICKBACK.instead,use
the chain..'
saw properlyand carefullyto avoidkickDo nct cutmore thanons logat a time.
: Do not twist the saw as the bar is
back. ReducedKickbackbars and Low
Kickbackchainsreducetha hazard of
withdrawnfrom an undercut when
_
and are rocommended.Repa_
bucking.
Avoid PulHn:
on a chainbrake shouidbe made by a
Sears Sewice Center.Take your unitto
• Always begin cuttingwith the saw at
full speed and the saw housing
the pisce of purchaseifpurchasedfrom
against wood.
a ServicingCenter,or to the nearest
Seam ServiceCe_t..er,
• Use wedges made of plastic or wood.
Never use metal to holdthe cut open.
WARNING: Computedkickbackangle
(CKA) Estedon your saw and listedin the MAINTAIN CONTROL:
c|<._taUerepresents
.a_e of_ckback The followingprecautions should be followed to minimize kickback.
your bar and chaincombinsltons_1
l-_ve
wben te_edinaccorde_ewilh
• A good, firm gdp on the saw with bath
hands will help you maintain control.
CSA and ANSI standan:b. When.pur.cccccccc
.
rep cem
.. barandcha con- Don't let go. Grip the rear handle wi_
sideraUons
should
begivenIo'd_elower
your right hand whether you are right
or left handed.
CKA valuas. LowerCKA valuesrepre-
sentsaferanglasto the user,higherval-
uesincicate
rnoreangleandhigher
kick
energiss.
InallcaseslowerCKAvaltm
. representa safer op_
enviromnent
,Right,__Left
Hand
forthe user.
The guide bar and chain combinatlen(s)
shown in the CKA Table meet kictd_ck
requirements of CSA Z62.1, Z62.3, & • Wrap the ringers of your left hand
over and around the front handlebar,
ANSI B175.1 when used onsaw(s) listed
and your left thumb under the front
inthis manual. Use of bar and cl_aincomhandlebar.
binations other than those listed is not
recommended and may not meet the
back performance requl_
_vhen
tested on,the representative sample
of these chain saws specified in ANSI
• B175.1.
Low 1<3ckback
Chain has m__kLowK)ckbackChain
_(_
• When making bucking or pruning
cuts, position your left hand on the
front handlebar so it is in a straight
line with your dght hand on the rear
handle. Stand slightlyto the left side
of the saw to keep your body from being in a direct line with the cut_ng
chain. Keep your left arm straightwith
the elbow locked.
• Stand with your weight evenly balanced on both feeL
• Do not overreach.You could be drawn
or thrown off balanceand lose contrd.
• Do not cut above shoulderheight. It is
d'_cuit to maintain control of saw
above shoulder height.
KICKBACK SAFETY FEATURES
WARNING: The following features are
included on your saw to help reduce
hazard of kickback;however, such features will not totally eliminate this danger. Do not rely only on safety devices.
Handguard: designed to reduce the
chance of your left hand contacting
the chain if your hand slips off the
front handlebar.
• Positionof front and rear handlebars:
designed with distance between handles and "in-line"with each other. The
spread and "in-line"positionof the
hands provided by this design work
together to give balance and re=stance in controllingthe pivot of the
saw back toward the operator if kick°
back occurs.
• Reduced-Kickback Guide Bar:.designed with a small radiustip which
roducsa the size of the kickback dandgerzone. This type bar has been
ernonstratedto significantlyreduce
the number and sedousnese of kickbacks when tested in accordance
with ANSI B175.1.
_"_
_
/calif.,P--_,
_
'_
Contoured Depth Gauge
Elongated Guard Unk
Deflects Kickback Force
And/_ows Wood To
Gradually Ride Into Cutter
SAFETY NOTICE: Exposure to
vibrstions_through prolonged use of
hand tools could cause blood vessel or
nerve damage in the fingersrhands,.
and joints of people prone to circulatmn
disoiders or abnormal swelling.
Prolonged use in cold weather has
been linked to bloodvessel damage in
otherwise healthy people. If symptoms
occur such as numbness, pain, lossof
strength,change in skin color or
texture, or loss of feeling/in the fingers,
hands, or joints, discontinuethe use of
this tool and seek medical attention. An
anti-vibrationsystem does not
guarantee the avoidance of these
problems. Usf_m
- who operate power
tools on a continualand regular basis
must closely monitortheii" physical
condition and the condition of this tool.
DOUBLE INSULATION
CONSTRUCTION
This unitis Dot._le Insulatedto hsip pro.
tect againstelectricshock.Doubleinsula_on _
condstsof two ssparate
"1_
of eisctfica]insul_on insteadof
ingmsemisprovided
ana-isur_t.nor
shoulda msans of groumingbe added
to Ulis ur_
whanSafstYopen
anyPrsCau
must
°m
ng
ba°bseved
elec_cai tcoLThe
added
pfo c ega t
re dng
froman intemalaiecMcal Insulation
fanuro.
STANDARDS: This product is listed by
Underwriters Laboratodes, Inc. in accordance.withaL Standard 1662 and
CSA Standards Z62.1 and Z62.3 and
ANSI B175.1.
SmallRadius
SAVE THESE INSTRUCTIONS
6
CARTON CONTENTS
Model358.341240
ChainSaw(fullyassembled)
"BarSheath
ExtraChain
Examinepartsfor dam_e. Do notuse
NOTE: ff you needass.stanceorfind
partsmissingor damaged,pleasecall
1-800-235-5878
ASSEMBLY
Yoursaw isfullyassembled;no
assemblyis necessary.
damaged parts.
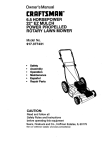
KNOW YOUR SAW
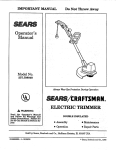
READ THIS OPERATOR'S MANUAL AND SAFETY RULES BEFORE OPERATING YOUR CHAIN SAW. Compare the illustrationswith your unit to familiarize
yourseffwith the location of the various contmis and adjustments. Save this
manual for future reference.
OilerActuator/
BarOilCap
ChainAdjustmentScrew
Lockout
Butt'on
°t
.Bar
ChsJn
Tdgger Switch
Recessed Rug
TRIGGER SWITCH
The _gger switchis used to tom on the
unit. Squeeze the trigger switchto operate the unit after Iockc;utbuttonhas
been pushed in. Release the tdgger to
turn the unit off.
LOCKOUT BUTTON
The Lockout Buttonis a control feature
designed to prevent the motorfrom being accidently starl.ed. When the mar
handle is gripped m a normal cutting
position,the-10ckout buttoncan be
pu,?hedin by the thumb, permitting the
index finger to squeeze the rigger. It is
not necessary to maintain pressure on
the lockout button once the tdgger has
been engaged.
BAR OIL CAP/OILER ACTUATOR
The oil cap is used to access the bar oil
tank and pressed to supply oil to chain.
CHAIN ADJUSTMENT
SCREW
The chain adjustment screw is used to
adjustthe chain tension.
RECESSED PLUG
The recessed plug is used to connect
the saw to an approved extension cord.
CHAIN TENSION
It is normal for a new chain to stretch
dudng first 30 minutes of operation. You
should check your chain tension frequently. Readjustchain after every 15
minutes of 0peration.sae Chain Tension under the Service and Adjustments section.
OPERATING INSTRUCTIONS
orCy
avo gesumy
on youruniL
Extensionscrdsare avanaBlefor _is unit.
Sacureextendoncordto pov_.
r. cordto
preventdsconnsc_n_om un_L
SELECT
AN EXTENSION
CORD
MINIMUMWlREe_UGE
RECOMMENDATIONS
|
I
• Stop the saw If the ch_n_Idksa a foreign object. Inepectthe s_v and repairpartsas necass___:
• Keep the chain out of dirt and sand.
Even a small amount of dirt ..willquickly dull a _aln and increase me possibility of kickback.
• Practice cuffinga few small logs using
the following steps. Thin will help you
get the "feel" ofualng your saw before
you begin a major sawing operation.
• Sq.u_ze the trigger switchand allow
unitto roach full _
before cutting,
• Begin _-'ut_g with the saw frame
vo=I100, orl,=100 to150
I
12o I
I
14.
AW.G.
12 |
AW.G."l
•/k'aed,:_W_ Ga,_le
BEFORE STARTING SAW
WARNING: Be sure to read the electrical safety informationin the safety
rules section of this manual before you
begtn. If you do not understandthe
electrical safety Informationdo not attempt to usa your unit.Seek help from
someone that does understandthe informationor call the customerassistence help line at 1-800-235-5878.
GUIDE BAR AND CHAIN OIL
The _
ope_.
chainoilerprovides_
to the chin and gtJde
bar.Be sure to fillt'_e bar oiltank before
each cuttingsesdon. The olierscllvator/
bar c_1cap mustbe used regularlyand
ollen enoughto maintaina thinfilmof _
on the bar and chab whilesaw is cut_ng.
Itis recommendedthstthe oileractuator/
bar o=1
csp be operatedsix.(6) _'ms per
minuteand heklfor approximatelythree
(3) secondseach time it is prsased. For
maximumguidebar and chainIde,we
recommendyou use Craftsmanchain
saw bar ='L If Craftsmanbar oil is not
_,
you may use a gcod grade
SAE 30 _ untl you are able to chtain
Craftsmanbrand.The olioutputis manually metereddurbg operaJon. Usa a funnel to fll the tank. Replaceoa cep sa_mly. Check olilev_ aiter eve_ 15
rrmutesdi opera,on.
STOPPING YOUR SAW
Release the trigger switch.
: If motor does not step, olsconnectthe
extension cord.
STARTING YOUR SAW
• Connect the saw toa power source
using the proper size extensioncord;
see SELECTAN.EXTENSIONCORD.
• Push in switchlock out button.
againstthe log.
• Keep the motor at fu!l spsad-tbe entire time _u are cutting.
• Release tngger switchas soon as cut
is complet_l, allowing motorto stop.
• To avoid losingcontrol when cut is
complete, do not put pressure on saw
at end of cut.
• Stopmotorbeforesetting saw down.
TREE FELLING TECHNIQUES
Checkfor brokenor dsad _
whichcan fali whilecurlingcausingsedous injury.Do notcutnearb_lcingsor
electricalwiresifyou do notkncwthe directicoof tree ,b!l,nor cutat n_ht since.
you will not be ableto see well,nor dur
ingbad wsathersuchas rain,snow,
strongwinds,etc. II the tree makes contact withany ufirltyline,the utT_ compla-
nyshouU
benot ed
• Carefullyplan yoursavangoperationin
advance.
• Cle_ the workar_ You need a dsar
area all aroundthe trse so you can
have securefoot_9.
• Stay the_
coedHk_s_ can
causa U_etree to faliin a padJcular
direclJon,
such as:
• The wind direction and speed.
• The lean ofthe tree.The Isanof a treo
mightnetbe epperentduetouneven
orslopingterrain.Use e plumborlevel
to determinethe directionof tree lean.
• Weight and branches on one side.
• Surroundingtrees and obstacles.
• Look for decay and rot. If the trunk is
rotted,If can snap and fall toward the
• Squeezeand hdd the tdggerswitch.
OPERATING TIPS
operator.
• Check chain tension before first use
• Make sure tlzere is..enough.r_m for
and after 1 minute of operation. See
the tre_ to fall. Maintain a distance of
Chain Tension in the Maintenance
2-1/2 tree lengths from the nearest
sectionand Service end Adjustment
person or other objects. Motor noise
section,
can drown out a warning call.
• Cut wood only. Do not cut metal, plastics, masonry, non-wood buliding materials, etc.
8
• Remove dirt, stones, loose bark,
nails, staples, and wire from the tree
where cuts are to be made.
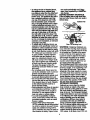
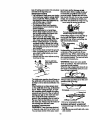
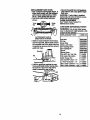
Plana clearretreatpath
....
_
._"_"
Direction of Fall
_p_'/
A retreat path should be planned and
cleared as necessary before cuts are
staded. The retreat path should extend
back and diagonally to the rear of the
expectedlineof fall as illustratedabove.
FELLING LARGE TREES
(6 inches in diameter or larger)
The notch method Is used to fell large
trees. A notch is cut on the side of the
tree in the desired directionof fall. After
a felling cut is made on the opposite
side of tree, the tree will tend to fall in
the direction of the notch.
NOTE: If tree has large buttress roots,
remove them before making the notch.
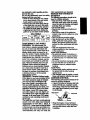
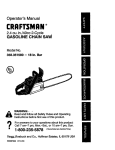
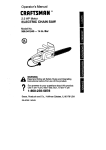
NOTCH CUT AND FELLING TREE
• Make notch cut by cutting the top of
the notchfirsL Cut through 1/3 of the
diameter of the tree. Next complete
the notch by cuttingthe bottom. See
illustration.Once notch is cut, remove
• the wedge of wood from the tree.
After removingthe wood, make the
felling cut on the opposite side of the
notch. This is done.by making a cut
about two inches higher than the canter of the notch.This will leave
enough uncut wood between the felling cut and the notch to form a hinge.
This hinge will help prevent the tree
frem fsilmg in the wrong direction,
Rrstcut
Notch ""_',
Oirection"_
otfall
r
_
_! "-)/_._,
Finalcut hem
/
,.P'.t...=,.
.._._.
higher than the horizontal notchingcut
as illustrated. Keep the felling back cut
parallel to the horizontal notchingcut.
wood
to actback
as acut
hinge...Thehinge
Make is
theleft
felling
so enough
wood helps the tree from twisUngand
falling in the wrong direction.Do not cut
through the hinge.
As the fesl_g cut gets dsse ot the hinge
the
shouldbe_n
to falL
is
anytree
chance
thst the ires
mayIf them
notfagin
the dsslred d'_Dcliono[ it may rcokI_ck
andbindthesawchalh,stT0p
cuit_ beforethe feting back cut is cumpiste and
usewedgssofwcod,ples_or¢uminum
toopenthecutanddropthetreesiong
the dssiredrmeot falL
When the tree beginstc feE,remove the
chein saw from the cut, stopthe motor,
put the chainsaw down, then use the rebeat pathplanned.Be alert for overhead
limbsfallingand watch your fooling.
Hinge holds tree on stump and helps
control fall.
Opening
of felling
Closing of
notch
NOTE: Before fellingcut is complete,
use wedges to open the cut when
necessary to control the d'.m_.'.'on
of fall.
To avoid Idckbaokand chain damage,
use wood or plastic wedges, but never
steel or iron wedges.
• Be alert to signs that the tm.e is reedy
to fall: crasldngsounds, widening of
the felling cut, or movement in the upper branches.
• As
treeand
starts
fall, stop
saw, put
it
down,
gettoaway
quicklyon
your
pisnnedretreetpath.
• fallen
Be extremolycautlous
partially
trees that may bewith
poody
sup-
//
_mnd_
, _
..
,cut,....j /
\ X,_ge
,v,,.,y._
<f__
.._---_
Notching Undercut- Make the notch
1/3 the diameter of the tree, perpendiculer to the direction of fall as illustrated,
Make the lower horizontal notchingcut
fi.mLThis will help to avoid pinchingof
either the sew chain or the guide bar
ported. When a tree doesn't fall completely, set the _...waside and pull
• down the tree with.a _
winch
block and tackle, or ba_0r. Do not
use your eew to cut down a parUally
fallen tree.
CUTTING A FALLEN TREE
(BUCKING)
Bucking is the term used for cutting a
when the second not_Hh
= is being made.
Felling Bsck Cut Make the felling
back cut at least 2 inches (50.8ram)
fallen tree to the desired logsize.
WARNING: Do not stand on the log
being cut. Any portioncan roll causing
lossof footingandcontrol.Donotstand ingin injuryand/ordamageto _
downhillof the log being cut+
IMPORTANT POINTS
• it is importmltto m_. sureyour footing
is firmand yourweightis evenlydistffS,
uted on _
feeL..Whenposalde, the
logshouldbe raisedand suppodedby
use of _
,.
utop the saw;,ddve a wedge of pl_,uc
or wood Into cut untilthe saw can be
removed easily. Rastart saw and carefully reenter the cut. Do not use a metal
wedge. Do not attempt to restartyour
sew when it is pinched or hung in a log.
logs, or blocks..
Use a wedge to remove plndled saw
• Cut shattered Woodvery carefully;,
sharp pieces of wood could be flung
•• toward
o+onelog=.m..
operator. cutsmall logs.
Use a sawhorseto
Never allow _..._r
parasn to hold
the logwhile cuttingand never hold
the log with your leg or foot.
• Do notcut b an area where k_s,
-_m _
OFF _
_
A l)las_cor
e of
• When "cuffing through', to mainta.!n
complete control, release the cutting
pressure near the end of the cut without Icosen,ngyour grip on the chain
saw handles.
• Don't let the .chaincontactthe ground.
• After completing the cut, walt for the
sew chain to stop before you move
the chain sew.
• Always stop the motorbefore moving
from tree to tree.
Standon uphlflside
whencuffingbecause
I
Undercutting Involves cuttingon the
underside of the log with top of saw
against the log. When undercuttinguse
lightupward pressUre. Hold saw firmly
and maintaln.dontmLThe saw willtend
to push back toward you:
WARNING:
Never tum saw upside
down to undercut. The sew cannot be
controlled in this position.
When the log is supported along its entire length as illustrated below, it is cut
from the top (overbuck).
_may_.
The chain saw operatorshould keep On Always
^
make your -,'_'_'_w_-wa_-_'_a
first cut on the cornthe uphill side of the terrain as the tree
pression side of the log.
ls likelyto roll or slide downhillafter it is
felled.
.
Whon buddng on a slope always stand
:-_'
_.=
,,_j._.
_. -_- :r,,:i" --
"_,s_+, +:
Second
cut
ontheUl_lll_leofllmlog, asi_,mtreted
ahove.
Whon"coflJng
through',to maintain COmldeteonntn_ reloasethe cut6ng
_
.: .....
,- _;V"
Secondcut
pressurenearthe endof the cutwithout
raiaxingyour griponthe chainsew handie_ Don't_ the cha_ contactthe
ground.Aftercomplel_ the oJt, wait for
the saw che_ to stophofore you move
c n.m.
stop rnotor
fore mov_ fromthe trse to trco.
BUCKING TECHNIQUES
WARNING: If sew becomes pinched
or hung in a log, don'ttry to force it out.
You can lose control of the saw, result-
Rrstcutoncompression
sldeoflog
BUCKING WITHOUT A SUPPORT
• Ovemut through 1/3 of the diameter of
the log.
• Roll the log over and finish with a second overcut.
10
• Watch for logs with a compression.
side. See illdstrationabove for oumng
logs with a compression side.
• Frequentlyclear branches out of the
way to avoid trippingover them.
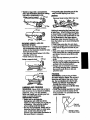
UMBING
u Qalogtorsuppo f 2 Cut
_
. r
----
--dr--
Remove Small Umbs WHh One Cut
Umbing isremovingthe branches from
a fallen tree. When lirnDing; leave larger lower limbs to supportthe log off the
ground. Remove the small limbs in one
cut as Illustrated in the figure above.
Branches under tension should be cut
from the bottom up to avoid bindingthe
chain saw.
__ 1_
BUCKING USING A LOG OR
SUPPORT STAND
: Limb a tree only after it is cut down.
Leave the larger limbs undemeath the
• Remember your first cut is always on
felled
tree to support the tree as you
the compression side of the log.
work.
(Refer to the illustrationbelow for your • Start at the base of the felled tree and
first and second cut)
work toward the top,-cuttin_ branches
• Your first cut shouidextend 1/3 of the
and limbs. Remove small limbswith
diameter of'the log.
one out.
• Finishwith your second cut.
• Keep the tree between you and the
chain.
/
• Remove la_jer, supporUngbranches
with the 1/3, 2/3 cuttingtechniques descdbed in the bucking section.
• Always use an overcutto cut small
and freely hanging limbs. Undercutting could cause limbsto fall and
pinch the saw.
PRUNING
WARNING: Umit pruningto limbs
shoulder heightor below. Do not cut if
branches are higher than your shoulder. Get a professionalto do the job.
• Make your F_'t out 1/3 of _e way
through the bottom of the limb.
• Next make a second cut all the way
LIMBING AND PRUNING
through the limb.
WARNING: Neverclimbintoa treeto • Finish-the pruningoperation by using
an overcutso that the stump of the
limb or prune. Do not stand on .ladders,
platforms, a log, or in any position
limb protrudes I to 2 inches from the
which can cause you to lose your baltrunk of the tree.
ance or control of the saw.
i Secondcut
IMPORTANT POINTS
__
ptCut
• Watch out for spdngi_les.
Spdngpolas are small size limbs
which can whip toward you or pull you
off balance. Use extreme caution
when cutting small size limbs.
• Be alert for Spdngback.Watc_ out for
branches that are bent or under pressure. Avoid being struck by the
branch or the saw when the tension in
the wood fibers is released.
_',,
_1_1
l_'n _
_21n.
tree
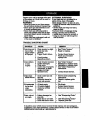
CUSTOMER RESPONSIBILITIES
RII in dates as you complete
regular service
Before Afteri Every Every Yearly Service
Use Use 15min. 5hm.
Dates
Check for damaged/worn parts
k.,
Check for loose festenem/parts
Check chain tension
p.,
p*
k"
v"
p.,
Check chain sharpness
:
p.,
Check guide bar
Clean unit & labels
p.,
GENERAL RECOMMENDATIONS
The warranty on this unit does not cover itemsthat have been subjected to
operator abuse or negligence. To recalve full value from the warranty, the.
operator must maintain unit as instruct
ed in this manual. Various adjustments
will need to be made periodicallyto
propedy maintainyour unit.
• Once a year, check guide bar and
chain for wear.
• Extension Cord - Discontinueusa if
chain saw extension cord shows
signs of damage or wear.
CHECK FOR LOOSE
FASTENERS AND PARTS
• Bar Clamp Nut
• Chain
• Bar AdjustingScrew
t
CHECK CHAIN TENSION
• Use the screwdriverend of the bar
WARNING: Disconnectthe power
sourcebeforeperformingmaintenance. tool to move chain around guide bar
to ensure kinks do not exist. "[he
LUBRICATION
chain should rotate freely. ,
1 Bar
Sprocket
2 BarOil
RII Cap
/
\r,=
1 Use sprocketlubrication
2 Use Craftsman chaln saw bar oli
CHECK FOR DAMAGED OR
WORN PARTS
Replacement of damage_wom parts
should,be referred to your Sears Service Center.
NOTE: It is normal for a small amount
of oil to appear under the saw after motor stops. Do not confuse this _,ith a
leaking oil tank.
• Td_.gerSwttc.h - Ensure the trigger
switch funotionspropedyby squeezing and holdingthe tdgger switch.
sureDiscontinueusa
motor starts andof
stops.
• Make
Oil Tank
chain
saw ifoil tank shows signsof damage
or leaks.
BarC_np Nuts
• Loosen bar clamp nuts untilthey are
finger tight against the bar d.amp..
• Ium adjustingscrew untilchain Darely touches the bottom of guide bar.
• Usingbar tool,rollchain aroundguide
bar to ensore all linksam in bar _aroove.
• Lift up tip of guide berto check'for
sag. Release tip of guide bar, then
turn adjusting screw until sag does
not exist.
12
• While liftingtip of guide bar, tighten
bar clamp nutswith the bar tool.
Torque to 10-15 ft-lbs.
I
• Use the screwdriver end of the bar
.toolto move chain around.guide .bar.
• If chain aces not rotate, it s too tigm.
Slightlyloosen bar clamp nuts and
loosen chain by fuming the adjusting
screw. Retightan bar ola_m,
p nuts.
• If cnain is too lOOSe,it w,, sag below
the guide bar. DO NOT operate the
saw ifthe chain is loose.
CHECK CHAIN SHARPNESS
A sharp chain makes wood chips. A
dull chain makes a sawdust powder
and cuts slowly.
CHAIN SHARPENING
Chain sharpening requires special
tools. You can pumhase sharpening
tools at Sears or go to a professional
chain sharpener.
CHECK GUIDE BAR
Conditionswhich require guide bar
maintenance:
• Disconnect the chain saw from the
i_r
source. See Instructionsunder
n Replacement'.
• Remove bar and chain from saw.
• CI.asnall sawdust and any other
debns ,'ore the guide bar groove and
sprocket hole after each use.
RemoveSawdustFromGuide
BarGroove_
• Add lubricantto sprocket hole after
each use.
• Burringof guide bar mils is a normal
process of railwear. Remove these
burrs with a fiat file.
• When rail top is uneven, use a fiat file
to restore square edges and sides.
File Edges and
sides Square
WornGroove
CorrectGroove
Replace the guide bar when the groove
is wom, the guide bar is bent or
cracked, or when excess heating or
burringof the rails occurs. If replacement is necessary, use only the guide
bar specifiedfor your sawin the repair
Saw
has
to
be
forced
through
the
cut.
Saw cuts to one aide or at an angle.
pads list or on the decal locatedon the
Inadequate supply of oil to the bar
and chain.
chain sew.
Check the conditionof the guide bar
CLEAN UNIT & LABELS
each time the chain is sharpened. A
• Clean the unitand labals uaing a
wom guide bar will damage the chain
damp cloth with a mild detergent.
and make cuttingdifficulLTo maintain
• W';)e off the unitand labels with a
guide bar:.
dean dry cloth.
CHAIN REPLACEMENT
WARNING: Avoid accidentalstinting.
Alwayste¢_gsawfrompowerscurce
beforebstar_ a bar andi'orchab.
CAUTION: Wear protective gloves
when handling chain. The chain is
sharp and can cut you even when it is
not moving.
It is normalfor a new chain to stretch
duringthe first 30 minutes of operation.
You should recheck your chain tension
frequently and adjust the chair_tension
as required. See "Check Chain Tension"in the Maintenance section.
• Turn the uqit upside down on a flat
surface. Straighten out chain, then lay
it on a flat surface.
• Remove bar mountingnuts, bar
clamp plate, and old chain.
•Tum adjustingscrew on the bar to
move the tension!ngr_k as far as it
will go toward thefront {)fthe bar.
Tendor_ng Rack
REPLACEMENT SAW CHAIN
• See "CustomerServiceable Parts'. A
chain must complywith the Iddd_ck
performance requirementsof ANSI
S175.1 when tasted wlth thls saw.
• Hold chain with cuttersfacing as
shown.
Tip of
Bar
Chain
Saw
• Secure.the guide bar end ba_lamp
plate _
the bar nuts; _ghten finger
tight on_.,
CAUTION: If saw chain is installed
backwards, the saw willvibrate excessively and will not cut wood.
CHAIN ADJUSTMENT
See "Check Chain Tension"in
Maintenance section.
CUSTOMER SERVICEABLE PARTS
WARNING: Use of any other accessory or attachment might present a risk
of injuryt6 theopemtor.
REPLACEMENT PART
-PART NO.
\
CUTTERS MUST FACEIN
DIRECTIONOF ROTATION
• Slide the chain between the housing
and the sprocket. Place chain around
the sprocket and f'dthe drive links into
the guide bar groove and then around
guide bar nose.
Sprocket
Bar
• Hold the guide bar against the saw
frame and install the bar clamp plate.
Be sure the tab on the bar clamp
plate is toward the mar of bar.
He:<Nuts
O, Cap
GuidePlate
SafetyLockButton
53OO153O3
53O029282
530025873
530015514
53O023492
Bar_
Pin
530015832
Spacer
5,3OO15835
Spacer,Screw
71-36524
File(5/32"dia.)Twin Pal(
71-36565
FileGuide(FileHolder)
71-36557
DepthGauge.Tool
XtraGUARD®Chain-14"
71-3617
Lo-Wuc_GuideBar- 14"
71-36594
Bar & ChainLubricant-1qt 71-36556
Bar & ChainI.ubricant-1 gal 71-36554
BarA_usUng
Screw
AdjustingPin Slot
14
Prepareyourunitforstorageat the end EXTERNAL SURFACES
of the season or if it will not be used for
30 days or more.
WARNING:
• Allow the motor to cool, then secure
the unit before atodng or transporting.
• Store chain sew and extension cord
in a well ventilated area
• Store chain sew with _1 guards in
place and position chain sew so that
any sh.arpobject cannot accidentally
cause injury.
• Store chain saw unplugged, well out
of the reach of children.
if yonrchainsaw ls to be storedfor a
ps d oi
, oug y
.beUlah
storage.
Storeina desnd#Y
are_
Ughtly oil external metal sudases and
guide bar.
• Oil the chain and wrap it in heavy
ToPaperor cloth.
.
prevent chain oil seepage dunng
storage, store the se_das Tollows:
• upside down if stored on a shelf, or
• hung on a hook or nail through the
hole in the bar
TROUBLE SHOOTING CHART
TROUBLE
CAUSE
Chain does not • Chain tension too tight.
move when
• Guide bar rails
trigger switch
pinched.
is engaged.
• Tdgger Switchfailure.
• Circuit breaker
tripped/fuse blown.
Chain clatters
or cuts
roughly.
• Chain tension incorrect.
• Cutters damaged.
• Chain wom.
sharpened, or depth
i gauges
utters too
dull,high.
improperly
Sprocket wom.
REMEDY
• See =Chain Tension."
• Repair or replace,
• Contact Sears Service.
• Reset circuitbreaker/
replace fuse.
.t
•
i
See =Chain Tension."
Rasharpan or replace chain.
Resharpen or replace chain.
See "Chain Sharpening"
instructions.
• Contact Sears Service.
Chain stops
• Chain cutter tops not
within the cut.
filed fiat.
• Guide bar burred or
bent; rails uneven.
• See the chain sharpening
instructions.
• Repair or replace guide
bar.
Oil inadequate
for bar and
chain
lubrication.
• Oil tank empty.
• Oil outletdogged.
• Guide bar oil hole
blocked.
• RII oil tank.
• Contact Sears Service.
• Remove bar and dean.
Chain cuts at
an angle.
• Cuttersdamaged on
one side.
• Chain dull on one side.
• Guide bar bent or wom.
• See'Sharpening Chain."
• See'Sharpening-chain."
• Replace guide bar.
If situationsoccur which are not covered in this manual, use care and good
judgement. If you need ass_ance, contact Sears Service or the CUSTOMER
ASSISTANCE HELPUNE at 1-800-235-5878.
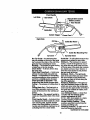
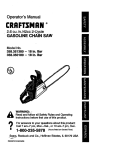
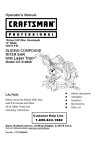
Front Handle
Left Side
Saw Chain.
Manual Oiler Control
Switch Lockout
Rear Handle
Guide Bar
Power Cord
Right Side
o.cap- _
t_
-/
Sprocket J
'_"
"- GuldeBarMountlngPad
_- Spocket Guide
.,
Bar Tip Guide - An attachmentthst
Guide Bar- A s()lid railed structurethat
may be providedon the end of the guide supportsand guides the saw chain.
barto preventthe chain atthe end of the Kickback- The backward or upward
motion, or both of the guide bar occurcldng The process of cross cutting dng when the saw chain near the nose
a felled tree or log into lengths.
of the top area of the guide bar contacts
Chain Brake - A device used to stop
any object such as a log or branch, or
the chain saw.
when the wood closes in and pinches
Chain Saw Powerhead - A chain saw the saw chain in the cut.
withoutthe saw chain and guide bar.
Kickback, Pinch - The rapid pushClutch - A mechanism for connecting
back of the saw which can occur when
and disconnectinga driven member to
the wood doses in and pinches the
end from a rotatingsource of power.
moving sawchaln in the cut along the
Drive Sprocket or.Sprocket-The
_°c°f the guide bar" _
toothed pert that dnvas the saw chain.
kbaok, Rotutional The rapid upFelling - The prnce_, of cuttingdown a ward and backward motionof the saw
tree.
which can occurwhen the moving saw
Felling Back Cut -The final cut in a
chain near the upper portion of the tip of
tree felling opemUonmade on the opthe guide bar contacts an object,such
posite of the tree from the notchingun- as a logor branch.
dercut. '
Low--Kickback Cheln - A chain that
Front Handle - The support handle lo- complies with the kickbackporforcated at or toward the front of the chain manos requirementsof ANSI
saW.
B175.1-1991 when tested on a repreFront Handle Guard - A structural bar- sentative sample of chain saws.
der between the front handle of a chain Normal Cutting Poaltlon - Those
saw and the guide, t_.._callylocated
positionsassumed in performingthe
close to the hand position on the front
buckingand felling cuts.
'
handle and sometimes employed as an Notching Undercut -A notchcut in a
activating lever for a chain brake.
tree that directsthe tree's fail.
Continued on next page
wood.
16
Oiler Control - A systemfor oilingthe
guide
bar and saw chain.
Rear Handle-The
support handle Ioceted at or toward the rear of the saw.
Reduced Kickback Guide Bar - A
guide bar which has been demonstratsd to reduce Idckbecksignifican,
tly.
Replacement Saw Chain -A chain
that complies withthe Idckbackperformance requirementsof ANSI
B175.1-1991 when tested with specW_c
chain saws. It may not meet the ANSI
performance requirements when used
with other saws.
Saw Chain - A loop of chain having
cuttingteeth, that cut the wood, and
thatis ddvenby _
motor and is supthe guide bar.
SpllmBporteddbYumper
(Spike) The pointed
tooth or teeth for use when felling or
bucldngto pivot the saw and maintain
_i_'eon while sa..wing.
h - A de,nee that when operated
willcomplete or interruptan electrical
power circuitto the motor of the chain
m
,SAW.
Switch Unkage' The mechanism g'mt
transmits motion from the_trigger to the
sw't,_h.
Switch Lockout - A movable stop that
prevents the unintentionaloperation of the switchuntilmanually actuated.
For the repair or replacement parts you need
delivered directly to your home
Cali7 am - 7 pm, 7 days a week
1-800-366-PART
(1-800-366-7278)
Para ordenar piezas con entrega a
domicilio - 1-800-659-7084
For in-house major brand repair service
Call 24 hours a day, 7 days a week
1-800-4-REPAIR
(1-800-473-7247)
Para pedir servicio de reparaci6n a
domicilio - 1-800-676-5811
For the location of a Sears Parts and
Repair Center in your area
Call 24 hours a day, 7 days a week
1-800-488-1222
For information on purchasing a Sears
Maintenance Agreement or to inquire
about an existing Agreement
Call 9 am - 5 pm, Monday-Saturday
1-800-827-6655
When requesting service or ordering
parts, always provide the following
nnformat,on:
• Product Type
• Part Number
• Model Number • Part Description
SEARS
America's Repair Spec_ists