1
IPAQ
H3000 SERIES EXPANSION PACK
DEVELOPER GUIDE
NOTICE
The information in this document is subject to change without notice.
THE INFORMATION IN THIS PUBLICATION IS PROVIDED “AS IS” WITHOUT WARRANTY OF ANY KIND. THE ENTIRE RISK ARISING OUT OF THE USE OF THIS INFORMATION REMAINS WITH RECIPIENT. IN NO EVENT SHALL COMPAQ BE LIABLE FOR
ANY DIRECT, CONSEQUENTIAL, INCIDENTAL, SPECIAL, PUNITIVE OR OTHER DAMAGES WHATSOEVER (INCLUDING WITHOUT LIMITATION, DAMAGES FOR LOSS OF
BUSINESS PROFITS, BUSINESS INTERRUPTION OR LOSS OF BUSINESS IFORMATION), EVEN IF COMPAQ HAS BEEN ADVISED OF THE POSSIBILITY OF SUCH DAMAGES AND WHETHER IN AN ACTION OF CONTRACT OR TORT, INCLUDING
NEGLIGENCE.
The limited warranties for Compaq products are exclusively set forth in the documentation
accompanying such products. Nothing herein should be construed as constituting a further
or additional warranty.
This document contains information protected by copyright. No part of this document may be
photocopied or reproduced in any form without prior written consent from Compaq Computer
Corporation.
© 2002 Compaq Computer Corporation.
Compaq and the Compaq logo Registered in the U.S. Patent and Trademark Office. iPAQ is a
trademark of Compaq Information Technologies Group, L.P. Microsoft, ActiveSync, Outlook,
Pocket Outlook, Expedia, AutoRoute Express, MapPoint, Windows, Windows NT, and the Windows logo are either registered trademarks or trademarks of Microsoft Corporation in the United
States and/or other countries.
Intel and StrongARM are trademarks of Intel Corporation.
Microsoft products are licensed to OEMs by Microsoft Licensing, Inc., a wholly owned subsidiary of Microsoft Corporation.
All other product names mentioned herein are may be trademarks and/or registered trademarks of
their respective companies.
iPAQ H3000 Series Expansion Pack Developer Guide
iPAQ H3000 Series Pocket PCs
Third Edition 5/16/2002.
213235-003
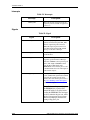
TABLE OF CONTENTS
Overview
Welcome . . . . . . . . . . . . . . . . . . . . . . . . . . . . . . . . . . . . . . . . . . . . . . . . . . . . . . . . . . . . 1–1
Symbols and Conventions . . . . . . . . . . . . . . . . . . . . . . . . . . . . . . . . . . . . . . . . . . . . . . . 1–2
Reference Documents
Order of Precedence . . . . . . . . . . . . . . . . . . . . . . . . . . . . . . . . . . . . . . . . . . . . . . . . . . .
Reference Materials. . . . . . . . . . . . . . . . . . . . . . . . . . . . . . . . . . . . . . . . . . . . . . . . . . . .
Software Tools Needed . . . . . . . . . . . . . . . . . . . . . . . . . . . . . . . . . . . . . . . . . . . . . . . . .
Definition of Terms . . . . . . . . . . . . . . . . . . . . . . . . . . . . . . . . . . . . . . . . . . . . . . . . . . . .
2–1
2–1
2–1
2–2
Electrical Interface
Overview . . . . . . . . . . . . . . . . . . . . . . . . . . . . . . . . . . . . . . . . . . . . . . . . . . . . . . . . . . . . 3–1
Signals and Descriptions . . . . . . . . . . . . . . . . . . . . . . . . . . . . . . . . . . . . . . . . . . . . . . . . 3–5
Detailed Pin Description . . . . . . . . . . . . . . . . . . . . . . . . . . . . . . . . . . . . . . . . . . . . . . . . 3–9
Summary of Subtle Electrical Points. . . . . . . . . . . . . . . . . . . . . . . . . . . . . . . . . . . . . . 3–19
DC Characteristics. . . . . . . . . . . . . . . . . . . . . . . . . . . . . . . . . . . . . . . . . . . . . . . . . . . . 3–20
AC Characteristics. . . . . . . . . . . . . . . . . . . . . . . . . . . . . . . . . . . . . . . . . . . . . . . . . . . . 3–23
Insertion/Removal . . . . . . . . . . . . . . . . . . . . . . . . . . . . . . . . . . . . . . . . . . . . . . . . . . . . 3–24
Software Interface
Overview . . . . . . . . . . . . . . . . . . . . . . . . . . . . . . . . . . . . . . . . . . . . . . . . . . . . . . . . . . . . 4–1
EEPROM Data Structure. . . . . . . . . . . . . . . . . . . . . . . . . . . . . . . . . . . . . . . . . . . . . . . . 4–1
Other Software considerations . . . . . . . . . . . . . . . . . . . . . . . . . . . . . . . . . . . . . . . . . . . 4–6
Battery, Power Supply
and Charging
Overview . . . . . . . . . . . . . . . . . . . . . . . . . . . . . . . . . . . . . . . . . . . . . . . . . . . . . . . . . . . .
Battery and Power Supply . . . . . . . . . . . . . . . . . . . . . . . . . . . . . . . . . . . . . . . . . . . . . . .
Battery Charger Implementation . . . . . . . . . . . . . . . . . . . . . . . . . . . . . . . . . . . . . . . . . .
Extended Battery Implementation. . . . . . . . . . . . . . . . . . . . . . . . . . . . . . . . . . . . . . . . .
5–1
5–2
5–3
5–4
Mechanical Interface
Overview . . . . . . . . . . . . . . . . . . . . . . . . . . . . . . . . . . . . . . . . . . . . . . . . . . . . . . . . . . . . 6–1
Contents
3
Contents
Interface (Universal) Connector . . . . . . . . . . . . . . . . . . . . . . . . . . . . . . . . . . . . . . . . . . 6–7
Reference Schematics
Regulatory Requirements
and Approvals
Suggested Agency Approvals . . . . . . . . . . . . . . . . . . . . . . . . . . . . . . . . . . . . . . . . . . . . 8–1
Agency Acceptance Testing . . . . . . . . . . . . . . . . . . . . . . . . . . . . . . . . . . . . . . . . . . . . . 8–1
Environmental Requirements
Operational Environment . . . . . . . . . . . . . . . . . . . . . . . . . . . . . . . . . . . . . . . . . . . . . . . 9–1
Environmentally Safe Materials . . . . . . . . . . . . . . . . . . . . . . . . . . . . . . . . . . . . . . . . . . 9–1
Toxic Materials . . . . . . . . . . . . . . . . . . . . . . . . . . . . . . . . . . . . . . . . . . . . . . . . . . . . . . . 9–1
4
Contents
Overview
1
Overview
Welcome
This document describes the technical requirements for expansion packs on the Compaq
iPAQ H3000 Series Pocket PCs. The expansion pack includes an interface to the main unit.
Possible expansion packs include wireless communication, extended battery life, high-end
audio playback, PCMCIA/CF interface, GPS, video recorder and many non-functional
expansion packs to personalize the main unit.
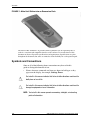
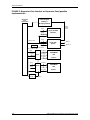
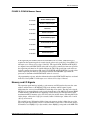
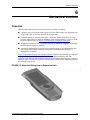
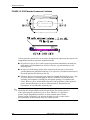
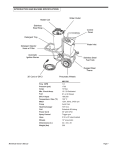
Figure 1 (Main Unit Sliding into an Expansion Pack) illustrates the principle of a main unit
sliding onto an expansion pack (in this case, a CompactFlash expansion pack). The
expansion pack and main unit eventually make electrical connection through their respective
universal connector plug and receptical located near the bottoms of the expansion pack and
the main unit, respectively.
iPAQ H3000 Series Expansion Pack Developer Guide
1–1
Overview
FIGURE 1: Main Unit Sliding into an Expansion Pack
The intent of this document is to provide technical guidelines for all expansion packs to
result in a consistent and compatible interface to the end-user. It is not the intent of this
document to dictate all possible specifications and requirements. Specifications are given
throughout the document, but some are omitted to allow flexibility for each expansion pack.
Symbols and Conventions
Some or all of the following format conventions may be used in this
guide to distinguish elements of text:
•
!
Names of menus, commands and icons are shown in bold type as they
appear on the display, for example, Settings, Power.
Text set off in this manner indicates that failure to follow directions could result in
bodily harm or loss of life.
Text set off in this manner indicates that failure to follow directions could result in
damage to equipment or loss of information.
NOTE: Text set off in this manner presents commentary, sidelights, or interesting
points of information.
1–2
iPAQ H3000 Series Expansion Pack Developer Guide
Reference Documents
2
Reference Documents
Order of Precedence
In the event of a conflict between this specification and references cited herein, this
specification shall take precedence.
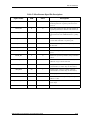
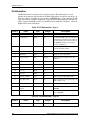
Reference Materials
Table 1: Reference Materials
Reference Title
Intel StrongARM SA-1110
Microprocessor Advanced
Developer’s Manual
CF+ and CompactFlash Specification Revision 1.4
PC Card Standard
Revision 2.1
Location/Author
Intel Corporation
http://developer.intel.com/design/strong/manuals/
http://www.compactflash.org
http://www.pc-card.com
Microsoft OEM
Adaptation Kit
Programming Windows CE
Douglas Boling
Essential Windows CE
Application Programming
Robert Burdick
Software Tools Needed
■
Microsoft Embedded Tools
■
Microsoft Pocket PC 2002 SDK
■
Development Machine including:
❏
Pentium II processor
❏
Windows NT SP5, Windows 2000, or Windows XP
❏
CD-ROM drive
iPAQ H3000 Series Expansion Pack Developer Guide
2–1
Reference Documents
Definition of Terms
This document describes Compaq's iPAQ H3000 series of products and expansion pack
options. The term "main unit" refers to the iPAQ H3000 series product.
This document describes the batteries in the main unit and the expansion pack. The term
main battery refers to the battery in the main unit. The term "extended battery" refers to the
battery in the expansion pack.
In some parts of the text, the terms “EEPROM” and “NVRAM” are used interchangeably.
Although technically not the same type of IC, both terms refer to the EEPROM on the SPI
bus of the expansion pack.
The expansion pack connectors that electrically mate the main unit and the expansion pack
are sometimes referred to as “universal connectors”. The plastic portion of the expansion
pack that wraps around the main unit is called a “sleeve” or “base part”. The plastic portion
of the expansion pack that protrudes from the back is called a “turtle shell” or “cover part”.
2–2
iPAQ H3000 Series Expansion Pack Developer Guide
Electrical Interface
3
Electrical Interface
Overview
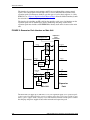
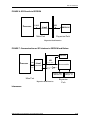
The 100-pin electrical connection between the main unit and the expansion pack includes
pins for two PCMCIA/CF devices, a 16/32-bit static memory/I/O interface, battery
expansion, an SPI serial bus and other miscellaneous functions. The interface leverages the
capability of the processor in the main unit. Figure 2 (Expansion Pack Interface on Main
Unit) and Figure 3 (Expansion Pack Interface on Expansion Pack) show block diagrams of
the interface on the main unit and a possible implementation of an expansion pack,
respectively.
The address, data and control signals from the processor are connected to the expansion pack
through isolation buffers. The isolation buffers are tri-stated when the system is in idle mode
or not accessing the expansion pack. It is recommended that the expansion pack handle the
tri-stating bus without excessive current draw (one recommendation is to include light
pull-down or pull-up resistors on the signals). The address bus, A[25:0] and data bus,
D[31:0], are used for parallel interfacing to PCMCIA/CF, static memory and I/O devices.
The various control signals for PCMICA/CF, static memory and I/O enable different
functions on the expansion pack. A portion of the address bus, A[25: 11], is multiplexed with
most of the upper bytes of the data bus, D[30:16], to provide a 32-bit data bus interface. (This
is available only with memory accesses using MCS4.) The 32-bit interface can perform these
accesses only with an 11-bit address. The 32-bit data bus capability provides faster access for
expansion packs that require high data throughput. Typically, the interface accesses 16-bit
data with a 26-bit address bus.
The expansion pack interface supports two PCMCIA/CF devices in the expansion pack. If an
expansion pack has two PCMCIA or CF devices, it must include buffers and control logic to
isolate the signals.
iPAQ H3000 Series Expansion Pack Developer Guide
3–1
Electrical Interface
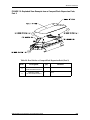
The interface also supports static memory and I/O accesses through the separate control
signals. The control signals include chip selects to access different memory banks on the
expansion packs. Each memory bank has specific types of cycles that it supports (i.e. flash,
ROM, I/O, etc.) Figure 4 (Expansion Pack Memory Map) shows the different memory banks
the main unit can access on the expansion pack.
The interface also includes an SPI serial bus that provides serial access for functions on the
expansion pack such as identification, battery monitoring and charge control. Each
expansion pack must include an SPI EEPROM to identify itself and its features to the main
unit.
FIGURE 2: Expansion Pack Interface on Main Unit
Power Supply/ Battery
& Charging Control
D [31:0]
Expansion
Pack
Connection
D [31,15:0]
D[30:16] or A[25:11]
A [10:0]
A [25:0]
Processor
UART
Microcontroller
SPI
SPI
Memory IO
Control
Memory IO Control
PCMCIA Control
PCMCIA
Control
Control
Logic
Buffer
Control
Expansion
Main Unit
Pack
The main unit can supply up to 300 mA at 3.3V to an expansion pack. If an expansion pack
requires more than 300 mA peak or requires a voltage other than 3.3V, it must include its own
battery, power supply and/or charging circuit. The interface includes various pins to control
the charging and power supplies between the main unit and expansion pack.
3–2
iPAQ H3000 Series Expansion Pack Developer Guide
Electrical Interface
The interface also includes audio line-out signals, A_OUTR and A_OUTL, from the main
unit. These signals correspond directly to the audio signals used for the speaker and
headphone outputs of the main unit. If an expansion pack uses these signals it must amplify
them for an expansion pack audio out function and connect the A_GND signal to the analog
ground of the expansion pack.
The following sections in this document and the Intel StrongARM SA-1110 Microprocessor
Advanced Developer's Manual provide more details on the interface.
iPAQ H3000 Series Expansion Pack Developer Guide
3–3
Electrical Interface
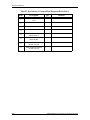
FIGURE 3: Expansion Pack Interface on Expansion Pack (possible
implementation)
Expansion
Pack
Connection
Power Supply/
Battery &
Charging Control
Battery
Monitor &
Control
A[25:0]
D[15:0]
Flash or ROM
Memory
A[25:0]
Memory Control
D[15:0]
I/O or DSP
Device
EEPROM
SPI
Buttons, etc.
To other devices
A[25:0]
D[15:0]
UART (s)
S0_A[25:0]
Buffer
PCMCIA
Control
S0_D[15:0]
S0_Control
CF/PCMCIA
Slot
Socket 0
S1_A[25:0]
A[25:0]
Buffer
S1_D[15:0]
D[15:0]
S1_Control
CF/PCMCIA
Slot
Socket 1
Control
Logic
3–4
Buffer Control
iPAQ H3000 Series Expansion Pack Developer Guide
Electrical Interface
FIGURE 4: Expansion Pack Memory Map
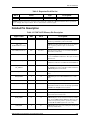
Signals and Descriptions
The following table defines the signal names and pin out for the electrical interface between
the main unit and any expansion pack.
Table 2: Expansion Pack Pin Out
Pin #
Name
Type
1
CC_ETM
P/G
2
PCM_RESET
I
PCMCIA Reset
3
VS_EBAT
O
Extended battery sense
4
RD/WR#
I
Memory&I/O Read/Write#
5
GND
P/G
6
RDY
O
iPAQ H3000 Series Expansion Pack Developer Guide
Description
Trickle charge current pin
Main unit ground
Variable Latency I/O ready signal
3–5
Electrical Interface
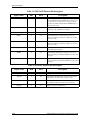
Table 2: Expansion Pack Pin Out
Pin #
Name
Type
7
CEN_ETM
OC
8
RESET
I
GP reset for expansion pack
9
INT_OP
O
Expansion Pack Interrupt
10
CD_SCKT0#
O
PCMCIA 1st sckt detect
11
PSKTSEL
I
PCMCIA Socket Select
12
PCM_CE2#
I
PCMCIA card enable
13
PCM_IORD#
I
PCMCIA IO Read
14
PCM_IOWR#
I
PCMCIA IO Write
15
D11
I/O
PCMCIA/Memory Data
16
D12
I/O
PCMCIA/Memory Data
17
D13
I/O
PCMCIA/Memory Data
18
D14
I/O
PCMCIA/Memory Data
19
D15
I/O
PCMCIA/Memory Data
20
A17/D22
I/O
PCM/Mem Address/Data
21
GND
P/G
Main unit ground
22
A18/D23
I/O
PCM/Mem Address/Data
23
A19/D24
I/O
PCM/Mem Address/Data
24
A20/D25
I/O
PCM/Mem Address/Data
25
A21/D26
I/O
PCM/Mem Address/Data
26
A22/D27
I/O
PCM/Mem Address/Data
27
A23/D28
I/O
PCM/Mem Address/Data
28
A24/D29
I/O
PCM/Mem Address/Data
29
A25/D30
I/O
PCM/Mem Address/Data
30
D08
I/O
PCMCIA/Memory Data
31
GND
P/G
Main unit ground
32
D09
I/O
PCMCIA/Memory Data
33
D10
I/O
PCMCIA/Memory Data
34
D00
I/O
PCMCIA/Memory Data
35
D01
I/O
PCMCIA/Memory Data
36
D02
I/O
PCMCIA/Memory Data
37
D31
I/O
PCMCIA/Memory Data
3–6
Description
Charge current enable
iPAQ H3000 Series Expansion Pack Developer Guide
Electrical Interface
Table 2: Expansion Pack Pin Out
Pin #
Name
Type
38
PCM_REG#
I
PCMCIA IO cycle
39
PCM_WAIT#
O
PCMCIA Wait
40
SPI_DI
I
SPI Data In to expansion pack
41
SPI_CS#
I
SPI Chip Select
42
MCS2#
I
Memory Chip Select
43
MWE#
I
Memory Write Enable
44
MOE#
I
Memory Output Enable
45
GND
P/G
46
EBAT_ON
O
Ext. battery power OK
47
OPT_ON
I
Expansion pack enable
48
V_ADP
P/G
Positive of AC adapter
49
V_EBAT
P/G
Positive of ext. battery
50
ODET2#
O
Expansion pack detect
51
ODET1#
O
Expansion pack detect
52
Reserved
53
DQM3
I
Memory & I/O byte enable
54
DQM0
I
Memory & I/O byte enable
55
VDD
P/G
56
DQM1
I
Memory & I/O byte enable
57
BATT_FLT
O
Extended battery fault
58
PCM_IRQ#0
O
PCMCIA sckt 0 RDY/IRQ#
59
PCM_CE1#
I
PCMCIA card enable
60
PCM_OE#
I
CF Output enable pin
61
PCM_WE#
I
PCMCIA write enable
62
CD_SCKT1#
O
PCMCIA sckt 1 detect
63
PCM_IRQ#1
O
PCMCIA sckt 1 RDY/IRQ#
64
D03
I/O
PCMCIA/Memory Data
65
D04
I/O
PCMCIA/Memory Data
66
GND
P/G
Main unit ground
67
D05
I/O
PCMCIA/Memory Data
68
D06
I/O
PCMCIA/Memory Data
iPAQ H3000 Series Expansion Pack Developer Guide
Description
Main unit ground
Main unit 3.3V power
3–7
Electrical Interface
Table 2: Expansion Pack Pin Out
Pin #
Name
Type
69
D07
I/O
70
A10
I
71
A11/D16
I/O
72
A09
I
PCMCIA/Memory Address
73
A08
I
PCMCIA/Memory Address
74
A13/D18
I/O
PCM/Mem Address/Data
75
A14/D19
I/O
PCM/Mem Address/Data
76
GND
P/G
Main unit ground
77
A16/D21
I/O
PCM/Memory Address/Data
78
A15/D20
I/O
PCM/Mem Address Data
79
A12/D17
I/O
PCM/Mem Address/Data
80
A07
I
PCMCIA/Memory Address
81
A06
I
PCMCIA/Memory Address
82
A05
I
PCMCIA/Memory Address
83
A04
I
PCMCIA/Memory Address
84
A03
I
PCMCIA/Memory Address
85
A02
I
PCMCIA/Memory Address
86
GND
P/G
87
A01
I
PCMCIA/Memory Address
88
A00
I
PCMCIA/Memory Address
89
PCM_WP
O
PCMCIA WP/IOIS16#
90
A_OUTR
I
Right audio channel
91
A_OUTL
I
Left audio channel
92
A_GND
P/G
93
Reserved
94
MCS4#
I
95
VDD
P/G
96
SPI_SCK
I
SPI Clock Signal
97
MCHG_EN
I
Main battery recharging
98
V_ADP
P/G
Positive of AC adapter
99
V_EBAT
P/G
Positive of ext. battery
3–8
Description
PCMCIA/Memory Data
PCMCIA/Memory Address
PCM/Mem Address/Data
Main unit ground
Analog GND for audio ONLY
Memory chip select
Main unit 3.3V power
iPAQ H3000 Series Expansion Pack Developer Guide
Electrical Interface
Table 2: Expansion Pack Pin Out
Pin #
Name
Type
100
SPI_DO
O
Description
SPI Data Out from expansion pack
NOTE: Signal type referenced to expansion pack. I = Input; O = Output; I/O = Bidirectional; P/G = Power, ground, battery or charging; OC = Open Collector. The “#” symbol denotes active low signal.
Detailed Pin Description
Table 3: PCMCIA/CF/Memory Pin Description
Signal Name
DIR
Pin #
Description
A10 - A00 (CF mode)
I
See above
PCMCIA/CF/Memory address pins used to address card or
expansion pack in Memory, I/O and True IDE.
A25 - A11
(PCMCIA/Memory mode)
PCMCIA or memory address pins used to access devices
in the expansion pack. These pins are shared with
D31:D16.
D15 - D00 (16-bit mode)
I/O
See above
Data pins used for 16-bit accesses in standard CF/PCMCIA, memory or I/O modes.
D31 - D16 (32-bit mode)
I/O
See above
Data pins for special accesses 32-bit read and write
accesses in PCMCIA or I/O modes. These pins are shared
with A25:A11.
PCM_CE1#, PCM_CE2#
I
59, 12
PCMCIA/CF card enable for 8 or 16-bit select in memory
and I/O mode. Functions as CS0# and CS1# in IDE mode.
CD_SCKT0#,
CD_SCKT1#
O
10, 62
PCMCIA/CF card detects pins for devices/slots 0 and 1.
CD_SCKT0# represents logical OR of CD1# and CD2# of
PCMCIA/CF pins for device/slot 0.
PCM_IORD#
I
13
PCMCIA/CF pin used in I/O and IDE modes as a read
strobe.
PCM_IOWR#
I
14
PCMCIA/CF pin used in I/O and IDE modes as a write
strobe.
PCM_OE#
I
60
PCMCIA/CF pin used as an output-enable strobe.
PCM_IRQ#0, PCM_IRQ#1
O
58, 63
PCM_RESET
I
2
PCMCIA/CF reset pin.
PCM_REG#
I
38
PCMCIA/CF pin used to distinguish between common and
register memory in memory mode.
PCM_WAIT#
O
39
PCMCIA/CF pin to insert wait states in memory and I/O
mode. Used as IORDY in True IDE mode. If there are two
sockets in an expansion pack, the expansion pack must
logically OR the WAIT# signals from each socket.
PCM_WE#
I
61
PCMCIA/CF pin used for write strobing into the CF card
in memory and I/O modes.
iPAQ H3000 Series Expansion Pack Developer Guide
PCMCIA/CF pins used in memory mode to determine the
card status for transfers. Used as an interrupt signal in I/O
and IDE modes. IRQ#0 is for device/slot 0.
3–9
Electrical Interface
Table 3: PCMCIA/CF/Memory Pin Description
Signal Name
DIR
Pin #
Description
PCM_WP
O
89
PCMCIA/CF pin used as a write protect in memory mode.
Used as IOIS16# in I/O and IDE modes for 16-bit operation. If there are two sockets in an expansion pack, the
expansion pack must logically OR the WP/IOIS16# signals from each socket.
RDY
O
6
Ready signal for slow expansion pack devices to insert
wait states on the variable latency I/O port.
RD/WR#
I
4
Read/Write pin for the variable latency I/O port.
MCS2
I
42
Memory bank chip select from the processor to use
address and data pins for memory or I/O cycles. (16-bit
data cycles only)
MCS4
I
94
Memory bank chip select from the processor to use
address and data pins for memory or I/O cycles. (32-bit
data cycles only)
DQM[3,1:0]
I
53, 56, 54
Byte enables for the 32-bit data bus of the static memory
and variable latency I/O port.
MOE#
I
44
Memory bank output enable from the processor to use
address and data pins for high bandwidth across the expansion pack.
MWE#
I
43
Memory bank write enable from the processor to use
address and data pins for high bandwidth across the expansion pack.
Table 4: Serial Bus Interface Pin Description
Signal Name
DIR
Pin #
SPI_SCK
I
96
Clock pin for the SPI interface.
SPI_DI
I
40
Data input for the SPI interface. The pin is driven by the
main unit for data written to the expansion pack.
SPI_DO
O
100
Data output pin for the SPI interface. the pin is driven by
the expansion pack for data written to the main unit.
SPI_CS#
I
41
Chip select pin for the SPI interface.
3–10
Description
iPAQ H3000 Series Expansion Pack Developer Guide
Electrical Interface
Table 5: Miscellaneous Signal Pin Descriptions
Signal Name
DIR
Pin #
Description
ODET1#, ODET2#
O
51, 50
Expansion pack detect signals. These signals generate
an interrupt when the expansion pack is inserted or
removed.
BATT_FLT
O
57
Active-high signal that notifies the main unit that the
expansion pack battery is below its critical low level.
INT_OP
O
9
Expansion pack general-purpose interrupt used for
various functions such as FIFO maintenance, polling,
etc.
V_ADP
P/G
48, 98
Positive DC voltage from the AC adapter. Power can
come from the main unit or expansion pack.
V_EBAT
P/G
49, 99
Positive battery voltage from the expansion pack to
the main unit.
VS_EBAT
O
3
Positive terminal sense line for the extended battery.
OPT_ON
I
47
Notifies the expansion pack that it can run at full
power.
MCHG_EN
I
97
Notifies the expansion pack battery charger to limit its
current.
EBAT_ON
O
46
Notifies the main unit that the extended battery has
sufficient energy to run the main unit.
CC_ETM
P/G
1
Charge current source from the expansion pack
extended battery to trickle charge the main battery.
CEN_ETM
OC
7
Signal from the expansion pack that enables the
extended battery to trickle charge the main battery.
RESET
I
8
General purpose reset for the expansion pack.
PSKTSEL
I
11
PCMCIA/CF socket select pin for expansion packs
with two sockets.
A_OUTR, A_OUTL
I
90, 91
Line out right and left channels from the main unit
audio output.
Reserved
TBD
52, 93
Reserved for future use.
iPAQ H3000 Series Expansion Pack Developer Guide
3–11
Electrical Interface
PCMCIA/CF Signals
The interface includes PCMCIA support for up to two PCMCIA/CF sockets or devices. This
16-bit interface supports 8- and 16-bit PC cards and handles common memory, I/O and
attribute memory accesses. The processor does not support the PCMCIA DMA protocol or
CardBus.
The PCMCIA memory space (Figure 5) is divided into eight partitions, the four for each card
slot are common memory, I/O, attribute memory and a reserved space.
The expansion pack interface does not include the VS[1:0]#, VPP[2:1], BVD[2:1] and
INPACK# signals. If an expansion pack requires these signals it must implement them on the
expansion pack. The VS[1:0]# and VPP[2:1] signals are used by the expansion pack power
supply to control the power supplied to the PCMCIA/CF socket(s). There is no provision on
implementing BVD[2:1] or INPACK# on the expansion pack due to the lack of support on
the processor.
Embedded inside the PCMCIA interface are the CompactFlash (CF) signals. Similar to the
PCMCIA support, the CF implementation does not include VS[1:0]# and INPACK#. It also
does not support CSEL# which is unique to CF. Again, if an expansion pack requires these
signals it must implement them on the expansion pack.
The buffers between the processor on the main unit and the electrical components on the
expansion pack are tri-stated during idle mode. If buffers are required to isolate a PCMCIA
or CF slot from other component on the expansion pack, it is recommended that the buffers
are disabled when the slot is not accessed to minimize power consumption. One possibility is
to enable the buffers to the slot with the PCM_CE[2:1]# from the processor and the
CD[2:1]# signals from the PCMCIA or CF slot.
3–12
iPAQ H3000 Series Expansion Pack Developer Guide
Electrical Interface
FIGURE 5: PCMCIA Memory Space
Socket 1 Memory Space
0h3C00 0000
Socket 1 Attribute Space
0h3800 0000
Reserved
0h3400 0000
Socket 1 I/O Space
0h3000 0000
Socket 0 Memory Space
0h2C00 0000
Socket 0 Attribute Space
0h2800 0000
Reserved
0h2400 0000
Socket 0 I/O Space
0h2000 0000
If an expansion pack includes more than one PCMCIA or CF socket, additional logic is
required on the expansion pack for certain signals (please refer to the Intel StrongARM 1110
Microprocessor Advanced Developer's Manual). The signals PCM_WAIT# and PCM_WP
are outputs from each PCMCIA/CF socket and are logically connected to form one signal for
the expansion pack interface. In similar fashion, the CD[2:1]# signals from each socket are
logically connected to form one CD signal, CD_SCKT0# and CD_SCKT1#, for each socket
on the expansion pack interface. The interface includes the PSKTSEL signal from the
processor to determine which PCMCIA/CF socket is accessed.
All programming registers and other information about the PCMCIA/CF interface are found
in the Intel StrongARM 1110 Microprocessor Advanced Developer's Manual.
Memory and I/O Signals
The expansion pack interface includes a static memory and I/O interface that uses the same
address and data buses as PCMCIA/CF. The static memory and I/O control signals
differentiate the accesses from PCMCIA/CF with chip select signals. The chip select signals,
MCS[4,2]#, correspond directly to the signals from the processor. MCS[4,2]# support ROM
or flash memory, with MCS4# also supporting variable latency I/O. The data bus is 16-bit
maximum for MCS3 memory cycles and 32-bit only for variable latency I/O using MCS4. In
16-bit designs, address bit 0 (A[0]) is not used,d and in 32-bit designs, address bits 1 and 0
(A[1:0]) are not used.
The variable latency I/O interface differs from static memory in that it allows the use of the
data ready input signal, RDY, to insert a variable number of wait states. The variable latency
I/O interface uses DQM[3,1:0] as byte enables, where DQM[3] corresponds to the MSB. The
iPAQ H3000 Series Expansion Pack Developer Guide
3–13
Electrical Interface
variable latency portion of the interface allows the main unit to access slower devices such as
micro-controllers and DSPs. A micro-controller on the expansion pack can provide functions
such as a UART, battery monitoring, button control, etc.
Caution is required when using the variable latency I/O feature due to the fact it
can hold the system bus for excessive amounts of time. If this occurs, it can
adversely impact the performance of the main unit.
Other memory signals, MWE# and MOE#, are implemented to complete the static memory
and I/O interface.
The SA-1110 includes registers that control the timing of the I/O accesses. Please refer to the
Intel StrongARM 1110 Microprocessor Advanced Developer's Manual for more details and
timing diagrams.
Serial Bus
The expansion pack interface includes pins for the Motorola serial peripheral interface (SPI)
for system management and identification. The master SPI device is a micro controller. It is
an Atmel AT90LS4434, on the main unit of a 3600/3700 and an ASIC on the 3800 series that
interfaces to a single slave SPI device on the expansion pack. The expansion pack interface
includes the four standard SPI signals; SPI_DI, SPI_DO, SPI_CS# and SPI_SCK.
The SPI bus is primarily used to identify expansion packs upon insertion via an EEPROM on
the expansion pack. The EEPROM contains configuration, ID, control information and
optionally contains bootstrap programs and OEM information.
The SPI bus is used to communicate to the EEPROM on the expansion pack and possibly to
a micro controller to get battery status information. The communication over the SPI bus is
soley to get EEPROM information and to get battery status information if the expansion pack
has a battery. The A maximum of two devices is allowed on the SPI bus of an expansion
pack. The SPI_CS# signal goes directly to the EEPROM and an inverted version of SPI_CS#
goes to the other device. Figure 6 (SPI Directly to EEPROM) and Figure 7 (Multiple Devices
Communicating on SPI Interface) show the two possible implementations of the SPI
interface on the expansion pack.
The Software Interface (Chapter 4) portion of this specification provides more details on the
EEPROM contents, communication over the SPI bus, and the protocol to get battery status
information.
3–14
iPAQ H3000 Series Expansion Pack Developer Guide
Electrical Interface
FIGURE 6: SPI Directly to EEPROM
UART
Processor
SPI
Atmel
EEPROM
Serial Port #1 AT90LS8535
Main Unit
Expansion Pack
Expansion Pack Interface
FIGURE 7: Communicating on SPI Interface to EEPROM and Battery
EEPROM
SPI
Processor
UART
Atmel
DI, DO, CLK
Microcontroller
Serial AT90LS8535
Port #1
SPI_CS#
Buttons, Other
Functions, etc.
Main Unit
Expansion Pack Interface
Battery, P/S,
Charger, etc.
Expansion
Pack
Information
iPAQ H3000 Series Expansion Pack Developer Guide
3–15
Electrical Interface
Battery Signals
The battery signals are primarily designed to support a lithium-ion or lithium polymer
rechargeable battery in the expansion pack. If an expansion pack does not include a battery, it
should not connect the folloiwng battery signals:
■
V_EBAT
■
V_ADP
■
MCHG_EN
■
EBAT_ON
■
VS_EBAT
■
CEN_ETM
■
CC_ETM
The BATT_FLT signal, however, should be pulled down. If an expansion pack uses a
different battery technology or does not want to share AC adapter charging with the main
unit, it should not use any of the charging signals on the interface (V_ADP and MCHG_EN).
Please read the following paragraphs, Chapter 5 (Battery, Power Supply and Charging) and
the DC Characteristics and AC Characteristics carefully for guidelines.
When using a lithium-ion or lithium polymer battery in the expansion pack, the battery
signals provide the ability to charge the expansion pack battery simultaneously with the main
unit battery and optionally, extend the battery life of the main unit. The batteries in the main
unit and the expansion pack are charged from multiple sources. The user can charge the
batteries from the DC jack on the main unit (3600 or 3700 only), the DC jack on the
expansion pack (if provided), or through the synchronizing serial connector on the main
unit. This allows the main unit and the expansion pack to charge their respective batteries
separately or at the same time.
The V_ADP signals are the positive DC voltage from the AC adapter to charge the batteries.
The V_ADP signals can be sourced from the main unit or the expansion pack, since the AC
adapter can be plugged into either one. When charging is sourced from the cradle through the
serial connector, the main unit passes the charge to the expansion pack. The charging circuits
are designed for lithium-ion or lithium polymer batteries, so if an expansion pack uses
another battery technology it should not connect the V_ADP signals. Also, if an expansion
pack does not want to share AC adapter charging with the main unit it should not connect the
V_ADP signals.
MCHG_EN is an active-high signal from the main unit to notify the expansion pack that the
main battery is charging and it should limit its charging current to prevent blowing the fuse in
the AC adapter. Typically, the expansion pack should limit its charging current by one-third.
If MCHG_EN is low, then the expansion pack can charge its battery at the full charge
current. Again, MCHG_EN is used only with lithium-ion or lithium polymer batteries. If an
expansion pack uses another battery technology or does not use the V_ADP signals it should
not connect MCHG_EN.
The V_EBAT signals are the positive DC voltages from the expansion pack battery to the
main unit power supply that provide extended battery life. Generally, the only case the
V_EBAT pins are connected is for an expansion pack that is specifically designed as an
extended battery.
The CC_ETM and CEN_ETM signals provide a mechanism for the expansion pack battery
to provide a trickle charge to the main battery. It is optional for an expansion pack to
implement the trickle charge feature. If the feature is not implemented, an expansion pack
should not connect CC_ETM and CEN_ETM. The CC_ETM signal provides trickle charge
3–16
iPAQ H3000 Series Expansion Pack Developer Guide
Electrical Interface
from the expansion pack battery to the main battery. The CEN_ETM is an active-high,
open-collector signal that enables the trickle charge from the expansion pack battery to the
main battery. The expansion pack must pull this signal up to the extended battery voltage
through a resistor (220kΩ to 470kΩ). The expansion pack should pull CEN_ETM low when
the AC adapter is plugged in or when the expansion pack battery charge is too low. A current
limiter, such as MAX890L or MAX893L, must exist on the expansion pack between its
battery and the CC_ETM pin to limit the trickle charge.
VS_EBAT is the positive terminal sense line for the battery in the expansion pack. The main
unit uses it to determine if it should trickle charge the main battery with the extended battery.
If VS_EBAT has a higher voltage than the main battery, CEN_ETM is driven by the
expansion pack to determine if the trickle charge is provided. If VS_EBAT has a lower
voltage than the main battery, the main unit pulls CEN_ETM (open collector) low and
disables the trickle charge.
EBAT_ON is an active high signal driven by the expansion pack to notify the main unit that
the expansion pack battery has sufficient charge to power the main unit. The expansion pack
battery voltage should be greater than 3.72V on the 3600 and 3700 series, and greater than
3.5 V on the 3800 series before EBAT_ON is driven true. It is only connected when the
expansion pack battery is designed to provide extended battery life to the main unit.
BATT_FLT is an active high signal that notifies the main unit that the expansion pack battery
has reached its critical low voltage level, typically 3.4V. The main unit then proceeds to
shutdown the expansion pack by forcing OPT_ON inactive (low).
More details are given in Chapter 5 (Battery, Power Supply and Charging), the DC
Characteristics and the AC Characteristics on the battery and charging signals.
iPAQ H3000 Series Expansion Pack Developer Guide
3–17
Electrical Interface
Power and Ground Signals
The interface includes seven ground signals and two 3.3V signals. The recommended
maximum current an expansion pack can draw from the VDD pins is 300 mA. If an expansion
pack requires more than 300 mA peak or requires a voltage other than 3.3V, it should include
its own power supply and/or battery and charging circuit. The power and ground pins
protrude 0.5 mm farther than the other signals on the main unit connector. This provides
power and ground to the expansion pack before the other signals make a connection.
When an expansion pack is first connected to the main unit, the expansion pack is
recommended to draw no more than 10 mA from the VDD pins for identification. Once the
main unit asserts OPT_ON, an expansion pack can draw the full 300 mA from the main unit.
Table 6 (Expansion Pack Current consumption) shows the maximum peak current
consumption for an expansion pack given each state of OPT_ON.
Table 6: Expansion Pack Current Consumption
Expansion Pack Current
Consumption from VDD
OPT_ON = Low
OPT_ON = High
Approx. 10 mA
300 mA (max recommended)
The expansion pack should use the power, ground and OPT_ON signals to detect whether it
is connected to the main unit, so it can enable the power supply and other functions on the
expansion pack.
A_GND is the ground associated with the analog, audio portion of the main unit. It
is connected only to expansion packs that use the A-OUTR and A_OUTL signals
and should route directly to the analog, audio section of the expansion pack. It is
very important not to couple digital noise into A_GND (i.e., connect A_GND to digital ground). If the audio signals are not used by an expansion pack, A_GND is not
connected.
Miscellaneous Signals
The expansion pack interface also includes other signals to provide insertion/removal
detection, reset and interrupt functions. INT_OP is an active high signal that allows the
expansion pack to interrupt the processor for various functions such as event notification,
data transfer, etc. This signal is pulled down on the main unit. Please refer to Section 4,
Software Interface, for more details on the interrupt service routine and support.
The RESET signal is a general-purpose reset signal from the main unit and is an active high
signal. RESET is asserted only when an expansion pack is first connected to the main unit.
Its pulse width and duration are controlled by the EEPROM settings. Please refer to Chapter
4 (Software Interface) for details on programming the length of RESET.
A_OUTR and A_OUTL are line out signals from the right and left channels of main unit's
audio codec.
The OPT_ON signal notifies the expansion pack that it can turn on and run at full power.
When an expansion pack is first inserted, OPT_ON is low and the expansion pack should
draw a minimal amount of current for identification. When the OPT_ON signal is asserted,
the expansion pack can draw the recommended maximum allowed current from the VDD
pins.
3–18
iPAQ H3000 Series Expansion Pack Developer Guide
Electrical Interface
The ODET[2:1]# signals notify the main unit when an expansion pack is inserted or
removed. These signals are pulled high (3.3V) on the main unit and the expansion pack
should tie them low. Upon insertion, the signals interrupt the processor and the routine goes
through the process of identifying the expansion pack through the SPI signals. Upon
removal, the signals go high and again interrupt the processor to notify the system.
The ODET[2:1]# pins on the mating connector are 0.5 mm shorter than normal I/O pins and
1.0 mm shorter than the power pins. This implementation ensures that the expansion pack is
fully inserted before the main unit communicates with the expansion pack.
Summary of Subtle Electrical Points
This section summarizes subtle but critical points to the electrical interface into one section.
Table 11 (Signal Conditioning Requirements) also shows signal conditioning requirements
for the interface.
Bus State in Idle Mode
The buffers between the processor on the main unit and the electrical components on the
expansion pack are tri-stated during idle mode. All digital logic that connects to the interface
should have proper signal conditioning to prevent erroneous logic levels and/or excessive
power consumption. Light pull-down or pull-up resistors (e.g. 100kΩ) are a possible solution
to keep the bus in a known state during idle mode.
Variable Latency I/O Mode
If an expansion pack utilizes the variable latency I/O mode, special caution is required due to
the fact it can hold the system bus for excessive amounts of time. If this occurs, it can
adversely impact the performance of the main unit.
A_GND Usage
A_GND is the ground associated with the analog, audio portion of the main unit. It is only
connected to expansion packs that use the A_OUTR and A_OUTL signals and should route
directly to the analog, audio section of the expansion pack. It is very important not to couple
digital noise into A_GND (i.e. connect A_GND to digital ground). If the audio signals are
not used by an expansion pack, A_GND is not connected.
Battery Signals
The battery signals are primarily designed to support a lithium-ion or lithium polymer
rechargeable battery in the expansion pack. If an expansion pack does not include a battery,
none of the battery signals (V_EBAT, V_ADP, MCHG_EN, BATT_FLT, EBAT_ON,
VS_EBAT, CEN_ETM and CC_ETM) should not be connected. If an expansion pack uses a
different battery technology or does not want to share AC adapter charging with the main
unit, it should not use any of the charging signals on the interface (V_ADP and MCHG_EN).
If an expansion pack includes a battery, special attention to the details provided in other
sections to ensure safety. Please refer to the reference schematics as a guideline discussed in
Chapter 7 (Reference Schematics).
iPAQ H3000 Series Expansion Pack Developer Guide
3–19
Electrical Interface
DC Characteristics
These tables show various DC characteristics between the main unit and expansion pack.
Table 7: DC Supply to Expansion Pack
Parameter
Comments
Symbol
Min.
Max.
Units
Vdd Supply Voltage
Operating
VDD
3.13
3.46
V
Peak Current Draw
by Expansion Pack
from VDD pins
OPT_ON = Low
IDD
10
mA
OPT_ON = High
300
Table 8: Battery and Charging Specifications
Parameter
Symbol
Min.
Max.
Units
V_ADP Voltage
V_ADP
4.75
5.25
V
Total Discharge Current
IVADP_D
2.0
A
IVADP_C
0.2
A
Total Charge Current
Comments
MCHG_EN = H and
OPT_ON = H
MCHG_EN = L or
OPT_ON = L
0.6
Extended Battery Capacity
Only when expansion
pack battery used
for extended battery
of main unit
BCAP
500
Extended Battery Voltage
Only when expansion
pack battery used
for extended battery
of main unit
VEBAT
3.72 for
3600 and
3700 series,
3.5 for 3800
series
EBAT_ON Trip Point,
3600 and 3700 Series
Extended Battery
Voltage too low and
EBAT_ON driven low
EBAT_ON Trip Point,
3800 Series
Trickle Charge from Option
Battery to Main Battery
3–20
maH
4.25
V
VEBAT ON
3.72
V
Extended Battery
Voltage too low and
EBAT_ON driven low
VEBAT ON
3..5
V
CEN_ETM = Low
ITR
500
mA
iPAQ H3000 Series Expansion Pack Developer Guide
Electrical Interface
Table 9: Main Unit Output Drive Characteristics
Parameter
Comments
Symbol
Min.
Output Voltage
Signals: A[25:0], D[31:0]
IOH = -2 mA
VOH
2.75
IOL = 2 mA
VOL
IOH = -18 mA
VOH
IOL = 16 mA
VOL
IOH = -1.5 mA
VOH
IOL = 10 mA
VOL
IOH = -24 mA
VOH
IOL = 24 mA
VOL
Output Voltage
Signals: See Note 1.
Output Voltage
Signals: See Note 3.
Output Voltage
Signals: See Note 4.
Max.
Units
V
0.4
2.4
V
0.4
2.3
V
0.5
3.0
V
0.2
Table 10: Main Unit Input Characteristics
Parameter
Comments
Symbol
Min.
Input Voltage
Signals: D[31:0]
VIH
2.0
VIL
Input Voltage
Signals: RDY
VIH
Signals: See Note 2.
VIH
Signals: SPI_DO
VIH
V
2.0
V
0.8
2.5
VIL
Input Voltage Signals:
Units
0.8
VIL
Input Voltage
Max.
V
0.7
2.1
VIL
V
0.8
Tri-state Leakage Current
VOH = VDD/VOL = GND
IOZ
-5.0
5.0
µA
Input Leakage Current
VIH = VDD/VIL = GND
IL
-5.0
5.0
µA
iPAQ H3000 Series Expansion Pack Developer Guide
3–21
Electrical Interface
Table 11: Signal Conditioning Requirements
(See Note 5)
Signal
Main Unit
Expansion Pack
ODET[2:1]#
Pull-up to VDD with 100kΩ
Connected to GND
PCM_IRQ[2:1]#
Pull-up to VDD with 100kΩ
Buffered from card
socket to main unit
CD_SCKT[2:1]#
Pull-up to VDD with 100kΩ
CD[2:1]# from socket OR’d to
form CD_SCKT# signal
INT_OP
Pull-down to GND with 100kΩ
Pull-down to
GND with 100kΩ
SPI_SCK, SPI_DI
None
Pull-down to
GND with 100kΩ
RDY
Pull-up to VDD with 100kΩ
None
OPT_ON
Pull-down to GND with 100kΩ
Pull-down to GND with 100kΩ
RESET
Pull-down to GND with 100kΩ
Pull-down to GND with 100kΩ
(optional)
PCM_WAIT#, PCM_WP
Pull-up to VDD with 100kΩ
OR gate each signal separately
with CD_SCKT#
PCM_RESET
Pull-down to GND with 100kΩ
Buffered to card socket
VS_EBAT
None
Pull-up to extended battery with
1.2kΩ
CEN_ETM
Open Collector
Pull-up to extended battery with
470kΩ
BATT_FLT
Pull-up to VDD with 100kΩ
Pull-up to VDD with 100kΩ (min.)
EBAT_ON
Pull-down to GND with 100kΩ
None
MCHG_EN
Pull-down to GND with 50kΩ
Pull-down to GND with 100kΩ
NOTE:
3–22
1.
Signals include MCS[4,2]#, MWE#, MOE#, RD/WR#, DQM[3,1:0]#, PSKTSEL, PCM_CE[2:1]#,
PCM_REG#, PCM_OE#, PCM_WE#, PCM_IOR#, PCM_IOW#.
2.
Signals include INT_OP, PCM_IRQ[2:1]#, CD_SCKT[2:1]#, PCM_WAIT#, PCM_WP, ODET[2:1]#,
BATT_FLT.
3.
Signals include SPI_CS#, SPI_SCK, SPI_SI and SPI_SO.
4.
Signals include OPT_ON, RESET, PCM_RESET.
5.
Signal conditioning is required only if the expansion pack connects the respective signals.
iPAQ H3000 Series Expansion Pack Developer Guide
Electrical Interface
AC Characteristics
Table 12: Interface AC Characteristics
(See Notes 2 & 3)
Parameter
Comments
Symbol
Signal Delay from
Processor to Interface
Signals: A[25:0]
Max.
Units
TDPIA
8
ns
Signals: D[31:0]
TDPID
10
Signal Delay from
Processor to Interface
Signals:
See Note 1 & 2
TDPIC
6.0
ns
Signal Delay from
Interface to Processor
Signals: D[31:0]
TDPID
10
ns
Signal Delay from
Interface to Processor
Signal: RDY
TDPIB
7.0
ns
Signals: PCM_WAIT#,
PCM_WP
TDPIC
10.0
Active time after
OPT_ON asserted
TRST
RESET
Min.
100
ms
NOTE:
1.
Signals include MCS[4,2]#, MWE#, MOE#, RD/WR#, DQM[3,1:0]#, PSKTSEL, PCM_CE[2:1]#,
PCM_REG#, PCM_OE#, PCM_WE#, PCM_IOR#, PCM_IOW#.
2.
Signal waveforms and timing requirements are found in the Intel StrongARM 1110 Microprocessor
Advanced Developer’s Manual, PC Card Standard Release 7.0 and CF+ and CompactFlash Specification
Revision 1.4. This specification provides the delay of the buffers between the processor and interface.
3.
Times are specified with a 30 pF equivalent load.
FIGURE 8: RESET Timing Waveform
OPT_ON
TRST
RESET
iPAQ H3000 Series Expansion Pack Developer Guide
3–23
Electrical Interface
Table 13: Audio Specifications
(See Notes 1 & 2)
Parameter
Comments
Symbol
Min.
Output Voltage
Rl = 20 kΩ
VO
1.0
V
Signal to Noise Ratio
f = 1kHz, RL = 10 kΩ
SN
94
dBr
Total Harmonic
Distortion Plus Noise
-3dB FS, f = 1 kHz,
RL = 10kΩ
THD + N
-78
dBr
Output Load
Expansion pack load
RL
Frequency Response
-3 dB points
FR
20
Typ
Max.
Units
10k
Ω
20k
Hz
NOTE:
1.
Audio specifications refer to A_OUTR and A_OUTL.
2.
Specifications assume A_GND is properly isolated from digital noise on the expansion pack.
Insertion/Removal
Overview
One of the key features of the expansion packs is the ability to exchange them "on the fly",
with power on or off. The user can remove one expansion pack and insert another without
significant interaction with the system. Upon insertion, the hardware interface invokes a
device manager on the main unit that interrogates the expansion pack on its features without
significantly impacting battery life. The interrogation includes data on drivers, applications,
configuration and miscellaneous requirements of the expansion pack. This identification
process allows the expansion pack to store information, drivers and applications on the
expansion pack, so the main unit does not have to use its memory to store information on a
large number of expansion packs. It also allows the main unit to remove the drivers and
applications from memory when the expansion pack is removed.
Ideally, the software application and drivers to run the expansion pack are on the expansion
pack.
Sequence of Events for Insertion
The flow chart in Figure 9 (Insertion Flow Chart) outlines the insertion sequence of events.
Starting from a power-on detection, the system boots and detects whether an expansion pack
is installed. If an expansion pack is inserted, the expansion pack detect signals, ODET[2:1]#,
interrupt the processor to notify the system. The interrupt routine starts a timer to allow the
detect signals to debounce. Once the timer times out, it checks to verify the detect signals are
still active. If the signals are inactive the sequence starts over. If the detect signals are active,
the interrupt routine starts a "device manager" that enables the SPI interface and the VDD pins
on the expansion pack. In this state, the expansion pack can draw only 10 mA for
identification purposes. The device manager starts downloading information from the SPI
EEPROM on the expansion pack. The device manager uses the information from the
EEPROM to locate drivers and applications, enable interrupts, determine memory
specifications and type, power consumption, slot configuration, etc. The device manager
loads the expansion pack drivers and applications based on the information in the EEPROM.
3–24
iPAQ H3000 Series Expansion Pack Developer Guide
Electrical Interface
Once the device manger identifies the expansion pack, it determines if it has enough battery
life to fully power on the expansion pack. Also, data in the memory device gives the option
to display a message to allow the user to enable power to the expansion pack or decline and
enable it at later time. Providing the user interface to enable the expansion pack is optional to
each individual design. Some expansion packs such as an extended battery or a low power
devices may not want to burden the user with the question after an insertion.
When the device manger enables the expansion pack, either automatically or through user
interaction, the main unit powers the remaining buffers for the entire interface into a high
impedance state. The OPT_ON signal is asserted and notifies the expansion pack to turn on
fully. At this point, the expansion pack can draw up to 300 mA peak and/or enable its own
battery and power supply circuitry. Afterward, the device manager installs the application
software and drivers, typically stored on the expansion pack, to main memory.
If the user does not want to enable the expansion pack or the device manger determines there
is not sufficient power upon insertion, the main unit removes power to the VDD pins and
disables the SPI interface.
Sequence of Events for Removal
If the expansion pack is removed while the system is on or in hibernation, the expansion pack
detect signals, ODET[2:1]#, interrupt the processor to notify the system. The device manger
starts a timer to allow the detect signals to debounce. Once the timer times out, it checks to
verify the detect signals are still inactive. If the signals are active (expansion pack still
installed) the sequence starts over. If the detect signals are inactive, the device manager
subsequently deasserts OPT_ON, disables the buffers and removes power to the VDD pins.
If the drivers and application were loaded from the EEPROM driver table, the device
manager then unloads the drivers and application. After inserting the expansion pack, the
device manager starts IHVInstall and copies IHVUninstall into RAM. Upon removal of the
expansion pack, this application is run and subsequently is removed from memory.
iPAQ H3000 Series Expansion Pack Developer Guide
3–25
Electrical Interface
FIGURE 9: Insertion Flow Chart
Start
N
Power
On
Y
From Removal
Flow Chart
System
Boot
N
Expan
Pack
Y
Debounce
Timer
Detect Pins
Active
N
Y
Power Expansion Pack and
Detect Type
Y
Detect Pins
Inactive
N
Sufficient
Power or
User
Enabled
N
Y
Load SW and
Start Application
To Expansion Pack Removal Flow Chart
3–26
iPAQ H3000 Series Expansion Pack Developer Guide
Electrical Interface
FIGURE 10: Removal Flow Chart
Start
(from insertion
flow chart)
Detect
Signals
Inactive
N
Y
Disable Control
Buffers via HW
Stop
Application
Debounce timer
for detect signals
N
Detect
Signals
Inactive
Y
Remove
Application
Go to Expansion Pack Insertion Flow Chart
iPAQ H3000 Series Expansion Pack Developer Guide
3–27
Electrical Interface
3–28
iPAQ H3000 Series Expansion Pack Developer Guide
Software Interface
4
Software Interface
Overview
Upon insertion of an expansion pack, a “device manager” type driver on the main unit
interrogates the expansion pack and starts the appropriate drivers. The drivers and
application software are ideally stored on the expansion pack in ROM or flash memory. The
drivers are responsible for communicating with the various pieces of hardware available on
the expansion pack. The “device manager” is NOT involved in any of the interactions
between the device drivers and the devices on the expansion packs.
The mechanism to load the device drivers is dynamic and dependent on the expansion pack.
This requires that the device manager is more data driven. The device manager loads the
appropriate drivers based on the available information on the expansion pack identification
EEPROM. The next sections describe some of the key data elements that are needed to
facilitate this kind of dynamic operation.
EEPROM Data Structure
After an expansion pack is inserted, the "device manager" interrogates the expansion pack to
identify its features. This occurs over the SPI bus to an EEPROM on the expansion pack that
contains data on drivers, applications, configuration and requirements of the expansion pack.
Every expansion pack is required to have EEPROM on the SPI bus for identification. The
first version of software only supports 256 bytes or less of EEPROM.
The following table shows the data structure in the EEPROM.
Table 14: EEPROM Data Structure
Expansion Pack Information
ID Information
Description
Mandatory information that identifies the expansion pack.
Control Information
Mandatory information that identifies where the flash memory is located.
Driver Table
Used to identify the drivers that might not have been present
in the original unit.
Configuration
Specific configuration information on the option such as
power consumption, battery capacity, etc.
Bootstrap Program
If needed, an OEM may store a bootstrap program in this
region.
Optional OEM Information
iPAQ H3000 Series Expansion Pack Developer Guide
This is a free-form area. It is the OEM’s responsibility to lay
out this area. It could be used to store software keys, expansion pack parameters, etc.
4–1
Software Interface
ID Information
The ID information is mandatory for all expansion packs. This information is used to
identify the expansion pack and indicates if further information is needed to start drivers, etc
There are currently two different types of tables of EEPROM data—Type I and Type II. The
Type II structure was added to support the Compaq Dual Slot Expansion Pack. The Type II
table is supported in ROM versions 1.69 and higher in the 3600 and 3700 Series, and for all
ROM versions of the 3800 Series.
Table 15: ID Information—Type I
Field #
Name
1
Start of ID
2
Length of data
3
Type
Length
Description
1b
0xaa
integer
4b
Used by the ID API to allow for a block read
of identification information. The number in
this field should include ALL information in
the EEPROM including the information
stored in the OEM area.
Version Indicator
integer
1b
Used to determine the information’s format.
Currently, defaulting to 0x01.
4
Vendor ID
integer
2b
Unique vendor ID (Compaq assigned).
5
ID Number
integer
2b
Unique per vendor Product ID.
6
Text Description
string
variable
Text description for display to user. Zero
delimited.
7
Reserved
BYTE
1b
8
Reserved
BYTE
1b
9
Extended Battery
BYTE
1b
10
Reserved
BYTE
1b
11
Reserved
BYTE
1b
12
Time Reset Width
integer
2b
Time reset pulse held in milliseconds.
13
Time Wait_stable
integer
2b
Time to wait after reset for option pack to be
stable in milliseconds.
14
Bootstrap Address
integer
2b
Address of the Bootstrap in this EEPROM
15
OEM Information
Address
integer
2b
Address of OEM Information in this
EEPROM
16
Terminator
integer
4b
Marks end of ID information.
Value: 0x0f0f0f0f
‘Y’/’N’
Table 16: ID Information—Type II
Field #
1
4–2
Name
Start of ID
Type
Length
1b
Description
0xaa
iPAQ H3000 Series Expansion Pack Developer Guide
Software Interface
Table 16: ID Information—Type II
Field #
Name
Type
Length
Description
2
Length of data
integer
4b
Used by the ID API to allow for a block read
of identification information. The number in
this field should include ALL information in
the EEPROM including the information
stored in the OEM area.
3
Version Indicator
integer
1b
Used to determine the information’s format.
Currently, defaulting to 0x01.
4
Vendor ID
integer
2b
Unique vendor ID (Compaq assigned).
5
ID Number
integer
2b
Unique per vendor Product ID.
6
Text Description
string
variable
Text description for display to user. Zero
delimited.
7
Reserved
BYTE
1b
8
Reserved
BYTE
1b
9
Extended Battery
BYTE
1b
10
Reserved
BYTE
1b
11
Reserved
BYTE
1b
12
Time Reset Width
integer
2b
Time reset pulse held in milliseconds.
13
Time Wait_stable
integer
2b
Time to wait after reset for option pack to be
stable in milliseconds.
14
Bootstrap Address
integer
2b
Address of the Bootstrap in this EEPROM
15
OEM Information
Address
integer
2b
Address of OEM Information in this
EEPROM
16
PCMCIA socket (0)
controller type
integer
2b
Indicates which kind of PCMCIA controller
is being used.
0x0000, 0x0001: PCMCIA driver will control OPT_ON signal
0x0002: LinkUPL110 controller, used for
PCMCIA socket. PCMCIA driver will not
handle OPT_ON signal.
00x0003: Other controller, PCMCIA socket
driver will handle OPT_ON signal
17
PCMCIA socket (1)
controller type
integer
2b
Indicates which kind of PCMCIA controller
is being used.
0x0000, 0x0001: PCMCIA driver will control OPT_ON signal
0x0002: LinkUPL110 controller, used for
PCMCIA socket. PCMCIA driver will not
handle OPT_ON signal.
00x0003: Other controller, PCMCIA socket
driver will handle OPT_ON signal
iPAQ H3000 Series Expansion Pack Developer Guide
‘Y’/’N’
4–3
Software Interface
Table 16: ID Information—Type II
Field #
Name
Type
Length
Description
18
OPT_ON control
BYTE
1b
Device manager will handle OPT_ON signal
on jacket insertions.
0: NO
1: Yes
19
Terminator
integer
4b
Marks end of ID information.
Value: 0x0f0f0f0f
Control Information
The control information is mandatory. The control information identifies the flash area for
the driver that provides “disk” support for it.
Table 17: Control Information
Field #
Name
Type
Length
Description
1
Start of Control
integer
1b
0xbb. Occurs once per Control Information
block.
2
Reserved
integer
4b
3
Reserved
integer
4b
4
Memory Location
integer
4b
Memory location for start of flash part in
expansion pack. Used by flash driver.
5
Stop Memory Location
integer
4b
Ending memory location of flash part.
6
Control Information
Terminator
4b
Occurs once per Control Information block.
Value: 0x0f0f0f0f
Driver Table
The driver table information is optional. It represents the information needed to start the
drivers dynamically. It could be stored on the expansion pack as a way to extend the driver
table being maintained in the main unit. This information is similar to the information stored
in the registry.
This is a list of the drivers that can be found in the expansion pack flash. Multiple drivers are
allowed in this section. Only the drivers that are included in the Control information, that are
loaded from the expansion pack flash, are included. The Vendor ID and Driver ID can be
combined to create a unique key for the Device manager to use when looking up the driver.
Table 18: Driver Information
Field
#
1
4–4
Name
Vendor ID
Type
integer
Length
4b
Description
Vendor identifier. 0xffffffff means the end of driver
table
iPAQ H3000 Series Expansion Pack Developer Guide
Software Interface
Table 18: Driver Information
Field
#
Name
Type
Length
Description
2
Driver ID
integer
4b
Driver identifier.
3
Driver
string
variable
File name of driver, i.e. Driver.dll.
4
Display Name
string
variable
Display name of driver.
5
Stream Prefix
string
3b
Identifies the prefix for the Stream interface, i.e.
“COM”.
6
Record Terminator
char
1b
0x03
7
Section Terminator
4b
Occurs once per Driver Table block.
Value: 0x0f0f0f0f
Bootstrap Program
This is a binary program in an "exe" format to bootstrap expansion packs that do not have a
dedicated ROM memory bank. It is copied into the main unit's file system for execution.
While resident drivers may be started, it is assumed that the bootstrap program is responsible
for loading and starting the necessary drivers and applications.
Table 19: Bootstrap Program Information
Field #
Name
Type
Length
Description
1
Size of Bootstrap
DWORD
4b
Size of bootstrap in bytes
2
Bootstrap program
binary
variable
Binary data in “exe” format
3
Section Terminator
DWORD
4b
0x0f0f0f0f
OEM Area
The OEM area is an optional field. Some examples include part numbers, serial numbers,
revision history, manufacturing date, etc. The field contains all remaining memory following
the bootstrap area.
Table 20: OEM Area Information
Field #
Name
Type
Length
Description
1
Size of OEM Area
DWORD
4b
Size of OEM area in bytes
2
OEM Data
binary
variable
OEM data
3
Section Terminator
DWORD
4b
0x0f0f0f0f
iPAQ H3000 Series Expansion Pack Developer Guide
4–5
Software Interface
Other Software considerations
In addition, this section addresses the Expansion Pack SDK. These functions are provided by
Compaq to enable the hardware developer to better control the expansion pack and the
Device Manager as it relates to the EEPROM, expansion pack insertion and insertion pack
removal.
Expansion Pack SDK
Compaq is planning an SDK with some functions that will be useful in creating the software
for an expansion pack. The following functions are provided as a part of the Expansion Pack
SDK:
BOOL PPC_GET_BATT_LEVEL(HWND hwnd, UINT32 *bufout);
BOOL PPC_GET_TIME_RESETWIDTH_WAITSTABLE(HWND hwnd, UINT32 *pbuf);
BOOL PPC_SET_INTERRUPT_ENABLED(HWND hwnd, BOOL bflag);
BOOL PPC_SET_POWER(HWND hwnd, BOOL bflag);
BOOL PPC_GET_POWER(HWND hwnd, UINT32 *pbuf);
BOOL PPC_REBOOT(HWND hwnd);
BOOL PPC_SET_VDD(HWND hwnd, BOOL flag);
BOOL PPC_GET_VDD(HWND hwnd, UINT32 *bufout);
BOOL PPC_SET_INTERRUPT_WAKEUP(HWND hwnd, BOOL flat);
void PPC_EnableFlashWrite(void);
void PPC_DisableFlashWrite(void);
void PPC_DestroyPartitionWhenRegistered(void);
PBYTE PPC_NVM_AddStr(HWND hWnd, PBYTE pbuf, const char *strSource);
PBYTE PPC_NVM_AddBin(HWND hWnd, PBYTE pbuf, const char *strSource, UINT32
size);
BOOL PPC_NVM_Write(HWND hWnd, PVOID pnvm_in, HWND hwndProgress);
BOOL PPC_NVM_Read(HWND hWnd, PVOID pnvm_out, HWND hwndProgress);
BOOL PPC_NVM_FreeRead(HWND hWnd, PVOID pv);
PPC_GET_BATT_LEVEL
This function reports remaining charge for the main and extended battery as a percentage
range from 0 to 100 in increments of 10. It reports “BATTERY_PERCENTAGE_
UNKNOWN” if the percentage of battery life is unknown.
Syntax
BOOL PPC_GET_BATT_LEVEL(HWND hwnd, UINT32 *bufout)
Parameters
hWnd[in]: Handle of current window. Reserved, set
it to be NULL.
bufout [out]:
4–6
iPAQ H3000 Series Expansion Pack Developer Guide
Software Interface
HIWORD: Reserved.
LOWORD:
HIBYTE: Percentage remaining of the main battery
charge.
LOBYTE: Percentage remaining of the extended battery charge.
Return Value
Nonzero indicates success.
Example
DWORD dwResult;
.// Read percentage of full battery charge remaining
if (PPC_GET_BATT_LEVEL(NULL, &dwResult) )
{
ShowDbgString(L"PPC_GET_BATT_LEVEL success\r\n");
.
.
ShowDbgString(L"Main=%d%%, Extended=%d%%\r\n”,
(dwResult >> 8 )& 0xff,
dwResult & 0xff);
}
PPC_GET_TIME_RESETWIDTH_WAITSTABLE
This function provides the width of the RESET signal. This data is provided in the
EEPROM. The Device Manager only resets the expansion pack the first time it is inserted.
Syntax
BOOL PPC_GET_TIME_RESETWIDTH_WAITSTABLE(HWND hwnd, UINT32 *pbuf)
Parameters
hWnd[in]: Handle of current window. Reserved, set
it to be NULL.
pbuf [out]:
HIWORD: Width to reset expansion pack; measured
in ms.
LOWORD: Time to wait for the hardware to become
stable after reset; measured in ms.
NOTE: Set to 0xFFFF if you don’t need to reset expansion pack or wait until the
hardware is stable.
Return Value
Nonzero indicates success.
iPAQ H3000 Series Expansion Pack Developer Guide
4–7
Software Interface
Example
DWORD dwWidth;
if (PPC_GET_TIME_RESETWIDTH_WAITSTABLE(NULL,
&dwWidth) )
{
WORD wRwidth, wWwidth;
ShowDbgString(L"PPC_GET_TIME_RESETWIDTH_WAITSTABLE
OK\r\n");
wRwidth = (dwWidth >> 16 )& 0xffff;
wWwidth = dwWidth & 0xffff;
ShowDbgString(L"reset width=%d, waitstable=%d\r\n”,
wRwidth, wWwidth);
.
.
}
4–8
iPAQ H3000 Series Expansion Pack Developer Guide
Software Interface
PPC_SET_INTERRUPT_ENABLED
This function sets the interrupt-enabled bit for expansion pack in the HAL layer. When the
expansion pack is designed to interrupt the main unit for event handling, this function is used
to enable the interrupt. By default, the interrupt is disabled.
Syntax
BOOL PPC_SET_INTERRUPT_ENABLED(HWND hwnd, BOOL bflag);
Parameters
hWnd[in]: Handle of current window. Reserved, set
it to be NULL.
bflag [in]: TRUE enables the interrupt and FALSE
disables the interrupt.
Return Value
Nonzero indicates success.
Example
HANDLE XXX_Init( ULONG Identifier )
{
// enable the interrupt
PPC_SET_INTERRUPT_ENABLED(NULL, TRUE);
.
}
iPAQ H3000 Series Expansion Pack Developer Guide
4–9
Software Interface
PPC_SET_INTERRUPT_WAKEUP
This function enables the option pack interrupt to wakeup the main unit from a suspense
state. By default, the interrupt will not wake up the main unit.
Syntax
BOOL PPC_SET_INTERRUPT_WAKEUP(HWND hwnd, BOOL bflag);
Parameters
hWnd[in]: Handle of current window. Reserved, set
it to be NULL.
bflag [in]: TRUE enables WAKEUP and FALSE disables the WAKEUP.
Return Value
Nonzero indicates success.
Example
// enable WAKEUP
PPC_SET_INTERRUPT_WAKEUP (NULL, TRUE) ;
4–10
iPAQ H3000 Series Expansion Pack Developer Guide
Software Interface
PPC_SET_POWER
This function sets or resets the state of hardware pin OPT_ON.
Syntax
BOOL PPC_SET_POWER(HWND hwnd, BOOL bflag);
Parameters
hWnd[in]: Handle of current window. Reserved, set
it to be NULL.
bflag [in]: Set TRUE to power up the expansion
pack through OPT_ON. Set others to power down.
Return Value
Nonzero indicates success.
Example
// reset OPT_ON to power up the expansion pack
PPC_SET_POWER(NULL, FALSE);
iPAQ H3000 Series Expansion Pack Developer Guide
4–11
Software Interface
PPC_GET_POWER
This function returns current state of hardware pin OPT_ON.
Syntax
BOOL PPC_GET_POWER(HWND hwnd, UINT32 *pbuf);
Parameters
hWnd[in]: Handle of current window. Reserved, set
it to be NULL.
pbuf [out]: Current state of OPT_ON. 0 means
expansion pack is powering up, other mean it’s
powering down.
Return Value
Nonzero indicates success.
Example
DWORD dwState;
. . .
// read OPT_ON state
PPC_GET_POWER(NULL, &dwState);
if (0 == dwState)
{
// if powering up do something here …
}
else
{
// if powering down do something here …
}
4–12
iPAQ H3000 Series Expansion Pack Developer Guide
Software Interface
PPC_REBOOT
This function provides an interface to reboot the main device by software.
Syntax
BOOL PPC_REBOOT(HWND hwnd);
Parameters
hWnd[in]: Handle of current window. Reserved, set
it to be NULL.
Return Value
Nonzero indicates success.
Example
switch (LOWORD(wParam))
{
case IDC_BTN_RESET:
// if button clicked
if (BN_CLICKED == HIWORD(wParam))
PPC_REBOOT(NULL); //reboot main device
return TRUE;
}
iPAQ H3000 Series Expansion Pack Developer Guide
4–13
Software Interface
PPC_SET_VDD
This function turns on or off VDD to the expansion pack .
Syntax
BOOL PPC_SET_VDD(HWND hwnd, BOOL bflag);
Parameters
hWnd[in]: Handle of current window. Reserved, set
it to be NULL.
bflag [in]: Set TRUE to turn on VDD to the expansion pack. Set FALSE to turn off VDD.
Return Value
Nonzero indicates success.
Example
// Turn on VDD to expansion pack
PPC_SET_VDD(NULL, TRUE);
4–14
iPAQ H3000 Series Expansion Pack Developer Guide
Software Interface
PPC_GET_VDD
This function returns current state of VDD to the expansion pack.
Syntax
BOOL PPC_GET_VDD(HWND hwnd, UINT32 *bufout);
Parameters
hWnd[in]: Handle of current window. Reserved, set
it to be NULL.
bufout [out]: Current state of VDD. 0 means VDD
is on, other means VDD is off.
Return Value
Nonzero indicates success.
Example
DWORD dwState;
. . .
// read VDD state
PPC_GET_VDD(NULL, &dwState);
if (0 == dwState)
{
// if powering up do something here …
}
else
{
// if powering down do something here …
iPAQ H3000 Series Expansion Pack Developer Guide
4–15
Software Interface
PPC_EnableFlashWrite
This function enables flash memory for write operations.
Syntax
void PPC_EnableFlashWrite(void);
Parameters
None.
Return Value
None.
Example
// Here we Enable the write function
PPC_EnableFlashWrite();
.
.
// Do something here, e.g. write files into flash
memory…
.
.
// Here we disable the write function
PPC_DisableFlashWrite();
.
.
4–16
iPAQ H3000 Series Expansion Pack Developer Guide
Software Interface
PPC_DisableFlashWrite
This function enables flash memory for write operations.
Syntax
void PPC_DisableFlashWrite(void);
Parameters
None.
Return Value
None.
Example
// Here we Enable the write function
PPC_EnableFlashWrite();
.
.
// Do something here, e.g. write files into flash
memory…
.
.
// Here we disable the write function
PPC_DisableFlashWrite();
.
.
iPAQ H3000 Series Expansion Pack Developer Guide
4–17
Software Interface
PPC_DestroyPartitionWhenRegistered
This function allows you to format the flash memory in the expansion pack as a disk.
Syntax
void PPC_DestroyPartitionWhenRegistered(void);
Parameters
None.
Return Value
None.
Example
// Here we enable the flag to perform a destroy partition table of flash disk to
// get an opportunity to re-format the flash disk
when it has been registered.
PPC_DestroyPartitionWhenRegistered();
4–18
iPAQ H3000 Series Expansion Pack Developer Guide
Software Interface
PPC_NVM_AddStr
This function provides an entry to add a string type of variable into EEPROM (sometimes
referred to as NVRAM) structure. It allocates a memory block to store the source string and
returns the address.
Syntax
PBYTE PPC_NVM_AddStr(HWND hWnd, PBYTE pbuf, const char *strSource);
Parameters
hWnd[in]: Handle of current window. Reserved, set
it to be NULL.
pbuf[out]: Destination stored in the string. It
is always in the field of the EEPROM structure,
which has string type.
strSource[in]: Address of a source string which
is filled into EEPROM structure with.
Return Value
Return NULL if function failed, e.g. insufficient
memory.
It returns the start address of allocated memory
block, which is the same as destination address
(i.e. pbuf).inat.
Example
// fill “Compaq PC-Card Expansion” as the text
description to user
nvm_in.ssc_nvm_id_info.strTextDesc =
PPC_NVM_AddStr(NULL,
nvm_in.ssc_nvm_id_info.strTextDesc,
"Compaq PC-Card Expansion");
.
// write contents into NVRAM
if (PPC_NVM_Write(NULL, &nvm_in, hwndProgress) ==
FALSE)
{
ShowDbgString(L"WRITE ERROR");
return 0;
iPAQ H3000 Series Expansion Pack Developer Guide
4–19
Software Interface
PPC_NVM_AddBin
This function provides an entry to add a binary data into a BLOB type of variable into
EEPROM (sometimes referred to as NVRAM) structure. It allocates a memory block to store
the source binary data and returns the address.
Syntax
PBYTE PPC_NVM_AddBin(HWND hWnd, PBYTE pbuf, const char *strSource, UINT32
size);
Parameters
hWnd[in]: Handle of current window. Reserved, set
it to be NULL.
pbuf[out]: Destination to be stored the binary
data. It should always be the field of the EEPROM
structure, which has the CEBLOB type.
strSource[in]: Address of a source binary data
which will be filled into EEPROM structure with.
Size[in]: Specifies the size, in bytes, of the
BLOB. It also means the memory size that will be
allocated for pbuf.
Return Value
Return NULL if function failed, e.g. insufficient
memory.
It returns the start address of allocated memory
block, which is the same as destination address
(i.e. pbuf).
Example
//fake binary data
char bs[]={0x0, 0x1, 0x2, 0x3, 0x4, 0x5};
nvm_in.blobIntrEnableInfo.dwCount =
sizeof(Bin1)/sizeof(char);
nvm_in.blobIntrEnableInfo.lpb =
PPC_NVM_AddBin(NULL,
nvm_in.blobIntrEnableInfo.lpb,
bs,
nvm_in.blobIntrEnableInfo.dwCount);
.
.
// write contents into NVRAM
if (PPC_NVM_Write(NULL, &nvm_in, hwndProgress) ==
FALSE)
{
4–20
iPAQ H3000 Series Expansion Pack Developer Guide
Software Interface
ShowDbgString(L"WRITE ERROR");
return 0;
PPC_NVM_Write
This function writes structure pnvm_in into physical EEPROM (sometimes referred to as
NVRAM). It fills the relevant settings in pnvm_in to EEPROM and frees the memory that
may be allocated by both functions of PPC_NVM_AddStr and PPC_NVM_AddBin.
Syntax
BOOL PPC_NVM_Write(HWND hWnd, PVOID pnvm_in, HWND hwndProgress);
Parameters
hWnd[in]: Handle of current window. Reserved, set
it to be NULL.
pnvm_in[in]: Address of structure SSC_NVM to be
written.
hwndProgress[in]: The handle of the progress bar
indicates the progress of a lengthy operation by
displaying a colored bar inside a horizontal
rectangle. Set to NULL if it is not needed.
Driver may update its parent window with standard
API UpdateWindow.
Return Value
It returns a nonzero value if the referred structure data has been successfully written into
physical EEPROM. If the operation fails, it
returns a FALSE.
Example
// write contents into NVRAM
if (PPC_NVM_Write(NULL, (PVOID)&nvm_in, hwndProgress) == FALSE)
{
ShowDbgString(L"WRITE ERROR\r\n");
return 0;
}
iPAQ H3000 Series Expansion Pack Developer Guide
4–21
Software Interface
PPC_NVM_Read
This function reads from physical EEPROM (sometimes referred to as NVRAM) and fills
the data into the structure pnvm_out. To avoid a memory leak, user must manually free the
allocated memory with function PPC_NVM_FreeRead.
Syntax
BOOL PPC_NVM_Read(HWND hWnd, PVOID pnvm_out, HWND hwndProgress);
Parameters
hWnd[in]: Handle of current window. Reserved, set
it to be NULL.
pnvm_out[out]: Address of structure SSC_NVM that
is filled with the data read from physical
EEPROM.
hwndProgress[in]: The handle of the progress bar
indicates the progress of a lengthy operation by
displaying a colored bar inside a horizontal
rectangle. Set to NULL if a lengthy operation is
not needed.
Driver may update its parent window with the
standard API UpdateWindow.
Return Value
It returns a nonzero value if the referred structure data has been successfully read and filled
from physical EEPROM. If failed at physical read
or structure filled, it returns a FALSE.
Example
// read contents from NVRAM
if ( PPC_NVM_Read(NULL, (PVOID)&nvm_out, hwndProgress) )
{
PPC_ShowDbgString(L"Read success\r\n");
// do something here
.
.
// release extra-allocated memory at last
PPC_NVM_FreeRead(NULL, (PVOID)pnvm_out);
}
4–22
iPAQ H3000 Series Expansion Pack Developer Guide
Software Interface
PPC_NVM_FreeRead
This function releases the allocated memory by PPC_NVM_Read. The developer must call
this function when it no longer needs the data that was read via the PC_NVM_Read function.
Syntax
BOOL PPC_NVM_FreeRead(HWND hWnd, PVOID pnvm_out);
Parameters
hWnd[in]: Handle of current window. Reserved, set
it to be NULL.
pnvm_out[in]: The address of SSC_NVM that had
been stored the read data. Driver will release
the extra-allocated memory for it.
Return Value
It returns a nonzero value if allocated memory
successfully released. If it failed at releasing
the extra-allocated memory, it returns a FALSE.
Example
Refer to section PPC_NVM_Read.
Interrupts
The following interrupt is generated as a part of the expansion pack implementation. It
should be defined as (SYSINTR_FIRMWARE +12).
iPAQ H3000 Series Expansion Pack Developer Guide
4–23
Software Interface
Interrupts
Table 21: Interrupts
Interrupt
Description
SYSINT_OPT
This is the interrupt signal generated by the
expansion pack. It is available for application
or driver use.
Signals
Table 22: Signal
Signal
Description
OPT_IND
The ODET[2:1]# signals are combined to
generate an insertion signal, OPT_IND,
when an expansion pack is inserted.
When this signal is present, the lower
level drivers will send an OPT_PLUG
message to the device manager.
Opt_Int
This corresponds to the INT_OP signal
on the interface.
Opt_Reset
This is the reset signal that is sent to the
expansion pack. The Device Manager
will issue a RESET to the expansion pack
device. The length of RESET is taken
from the Reset Time field of the
EEPROM. For more details, please refer
to the ID information section description
earlier in this chapter.
Opt_Pwr_On
This signal controls the expansion pack
power (VDD). This signal must be turned
on before the expansion pack can be
enabled. For more details, please refer to
the power handling routine description
earlier in this chapter.
Note: Before reading or writing to
the EEPROM, this signal will be
turned ON with a 5 ms delay before
reading the EEPROM. The developer
needs to maintain the pin state, while
device is been powered on or down.
The Device Manager maintains the
setting of Opt_Pwr_On.
4–24
iPAQ H3000 Series Expansion Pack Developer Guide
Software Interface
Table 22: Signal
Signal
Description
Opt_On
Opt_On is used to notify the expansion
pack that it can turn on all the electronics.
Note: This signal is not required to
read the EEPROM. The card
detection of CF/PCMCIA signals are
controlled by this signal. Before this
signal is turned on, the main unit
cannot receive card detect
notification. The device driver must
maintain the pin state while device
has been powered on. The Device
Manager maintains the setting. The
device driver should use the
appropriate functions to affect the
state in power handling routines.
Expansion Pack flash Memory Support
The expansion pack can have flash memory on board that can be used to store drivers and
software. This flash must be decoded using MCS2. Only the following flash chips are
supported:
■
Intel 32Mbit -- 28F320J3A (4MB)
■
Intel 64Mbit -- 28F640J3A (8MB)
■
Intel 128Mbit -- 28F128J3A (16MB)
■
Fujistzu 8Mbit -- MBM29LV800/BA (1MB)
■
AMD 8Mbit -- Am29LV800B (1MB)
The expansion pack device manager will automatically detect the flash and will setup a
storage device called CPQ_DISK of the appropriate size, using the fields in the EEPROM.
The storage device will look like any other storage device. The file is readable by default. It
can be made writable by calling the appropriate API function to enable writes. After writing
to the file, the disable write function API should be called to lock the write access to the file
again. The expansion pack drivers, software, etc. can be placed in the flash and
automatically loaded when an expansion pack is attached to the iPAQ. See the following
section, Specific Applications Used By Device Manager, for details.
iPAQ H3000 Series Expansion Pack Developer Guide
4–25
Software Interface
Specific Applications Used By Device Manager
To facilitate insertion, removal and control panel information. The device manager and
associated programs look for and use specific applications from the expansion pack flash.
The following table briefly identifies these applications:
Table 23: Specific Applications Used by Device Manager
Application
Description
IHVInstall.exe
Facilitates Expansion Insertion
IHVUninstall.exe
Facilitates Expansion Removal
Diagnostic.exe
Helps end-user gather information about
expansion pack.
IHVInstall.exe
The Device Manager identifies this installation executable as a setup program. It is executed
when the expansion pack is inserted. This application is used for installation, but could be
used to load specific device drivers, registry settings or application files. It should also start
the appropriate application for the expansion pack.
It must contain the SDK call PPC_InstallCompleted. This enables the Device manager to
proceed with processing.
IHVUninstall.exe
The Device Manager identifies this executable as the opposite of the installation executable.
It is copied to the main unit. It is called automatically upon expansion pack removal. It
performs the appropriate notifications to device drivers and applications that are using the
expansion pack. The application is deleted after execution completes. Another good use for
this application is to remove any unneeded files or registry settings.
It must contain the SDK call PPC_UninstallCompleted. This enables the device manager to
perform some necessary housekeeping.
Diagnostic.exe
The Device Manager identifies this executable as the diagnostic or “self test” application.
When this application is present, the Device Manager enables the “Diagnostic” button on the
expansion pack control panel applet. The end user could then start this application by tapping
on that button. This application is also used to display information that is specific to the
expansion pack. There are no specific requirements for this application. Compaq
recommends that the application be compliant with the guidelines for Windows CE logo
certification.
4–26
iPAQ H3000 Series Expansion Pack Developer Guide
Software Interface
Expansion Pack SPI Protocol
Protocol between Main Unit and Expansion Pack for Battery Status Information
over SPI
Table 24: Protocol Format
STX
1 byte
Command &
Length
Data Stream
1 byte
variable
length
STX
ASCII 0xA1
Command
MSB 4 bits
Length
LSB 4 bits
Data Stream
CHKSUM
CHKSUM
1 byte
defined by each command
Bytes summation of “Command & Length” and
“Data Stream”
**Limitation:
Support only 16 commands type.
Data length range in 0 to 15.
iPAQ H3000 Series Expansion Pack Developer Guide
4–27
Software Interface
Functional description
Support functions, such as Version ID and Battery Status:
Command
Direction
Data
Version ID Request
0x1
Main Unit >
Option Jacket
no data
Version ID
0x1
Option Jacket >
Main Unit
3 bytes data
stand for x.xx.
Battery Status
Request
0x2
Main Unit >
Option Jacket
no data
Battery Status
Report
0x2
Option Jacket >
Main Unit
4 bytes data:
• First byte—battery’s
chemistry.
• Second byte—battery’s
remaining power
percentage.
• Third byte—battery flag.
• Fourth byte—battery’s
current voltage.
The following definition is used on battery chemistry byte:
#define BATTERY_CHEMISTRY_ALKALINE
0x01
#define BATTERY_CHEMISTRY_NICD
0x02
#define BATTERY_CHEMISTRY_NIMH
0x03
#define BATTERY_CHEMISTRY_LION
0x04
#define BATTERY_CHEMISTRY_LIPOLY
0x05
#define BATTERY_NOT_INSTALLED
0x06
#define BATTERY_CHEMISTRY_UNKNOWN
0xFF
The battery's remaining power percentage is districted as 10, 20, 30…..90, 100.
4–28
iPAQ H3000 Series Expansion Pack Developer Guide
Software Interface
The following definition is used on battery flag byte:
#define BATTERY_FLAG_HIGH
0x01
#define BATTERY_FLAG_LOW
0x02
#define BATTERY_FLAG_CRITICAL
0x04
#define BATTERY_FLAG_CHARGING
0x08
#define BATTERY_FLAG_CHARGE_MAIN_BAT
0x10
#define BATTERY_NOT_INSTALLED
0x20
#define BATTERY_FLAG_UNKNOWN
0xFF
iPAQ Voltage Level for EBAT_ON of 3.5 allowed:
Command: 0x3
Direction: Main Unit -> Option Jacket.
Data: no data.
iPAQ units that can support a EBAT_ON minimum voltage level or 3.5 volts will send this
command to the expansion pack. This allows the expansion pack to dynamically set the
EBAT_ON minimum voltage level to 3.5 volts versus 3.72 volts. This command is sent to the
expansion pack when the iPAQ expansion pack manager initializes the expansion pack. The
expansion pack that supports an external battery which supplies power to the iPAQ should
use 3.72 volt threshold if the command is not sent and can use 3.5 if the command is sent.
This allows better external battery usage on some iPAQs. The 3100/3600/3700 iPAQs will
not . The 3800 will send this command.
iPAQ H3000 Series Expansion Pack Developer Guide
4–29
Software Interface
4–30
iPAQ H3000 Series Expansion Pack Developer Guide
Battery, Power Supply and Charging
5
Battery, Power Supply
and Charging
Overview
An expansion pack can obtain power for its electronics from two sources. The first one is the
main unit through the VDD pins on the interface. The other source is to provide its own power
from a built-in battery. Figure 11 (Expansion Pack Power Circuit Block Diagram) shows a
block diagram of a sample power circuitry and distribution scheme.
The main unit can provide up to 300 mA peak at a regulated 3.3V to the expansion pack.
When an expansion pack is first connected to the main unit, the expansion pack can only
draw approximately 10 mA from the VDD pins to allow the main unit to identify it. Once the
main unit asserts OPT_ON, an expansion pack can draw the full 300 mA from the main unit.
If an expansion pack requires more than 300 mA peak or requires a voltage other than 3.3V,
it should include its own power supply and/or battery and charging circuit. Upon insertion,
the expansion pack must use power from the main unit while OPT_ON is low to allow the
main unit to identify it. Typically, an expansion pack uses VDD to supply power for the critical
logic, EEPROM and the flash memory. Once OPT_ON is high, the expansion pack can
enable its own power supply circuits for the remaining circuitry.
The batteries in the main unit and the expansion pack are charged from multiple sources. The
user can charge the batteries from the DC jack on the main unit (3600 or 3700 only), the DC
jack on the expansion pack (if provided), or through the synchronizing serial connector on
the main unit. This allows the main unit and the expansion pack to charge their respective
batteries separately or at the same time.
iPAQ H3000 Series Expansion Pack Developer Guide
5–1
Battery, Power Supply and Charging
It is optional for the expansion pack to provide extended battery life to the main unit. The
implementation depends on the total peak current consumption of the expansion pack and the
main unit. The user, therefore, needs to choose the appropriate battery capacity to meet his
needs.
If the expansion pack includes a battery, specific requirements must be met to ensure proper
operation and safety. The following sections and Chapter 7 (Reference Schematics) give
more details on a possible implementation.
Battery and Power Supply
Figure 11 (Expansion Pack Power Circuit Block Diagram) shows a block diagram of the
battery, charger, safety circuit and power supply. The expansion pack battery supplies power
to the expansion pack power supply through the power switch on top of Figure 11. The
power switch also can supply power to the power supply from the AC adapter signal,
V_ADP. If the AC adapter is plugged in, the power switch disconnects the expansion pack
battery from the power supply and the AC adapter supplies the power to the power supply. If
the AC adapter is not plugged in and the battery has sufficient charge, the power switch
enables the battery to supply the power.
The critical-low detect circuit monitors the voltage level of the battery to verify it does not go
below the critical voltage level specified by the battery (typically 3.4V). This circuit also
generates the BATT_FLT signal to notify the main unit if the battery has reached this point.
The power switch is controlled by OPT_ON, which enables the expansion pack to run at full
power. If OPT_ON is inactive, the power switch is disabled and no power is supplied to the
expansion pack power supply.
The micro controller monitors the battery voltage, temperature and charging. It typically
includes A/D converters to monitor the battery parameters and communicates to the main
unit through the SPI bus. Battery status can be displayed on the main unit via the SPI bus and
APIs provided in the Software Interface section (Chapter 4).
5–2
iPAQ H3000 Series Expansion Pack Developer Guide
Battery, Power Supply and Charging
Battery Charger Implementation
Figure 11 also includes a block diagram of the charging circuit. The signals V_ADP and
MCHG_EN signals provide the ability to charge the expansion pack battery simultaneously
with the main unit battery.
FIGURE 11: Expansion Pack Power Circuit Block Diagram
V_ADP
DC
JACK
Power
Switch
Charger
V_ADP
Power
Supply
Expansion
Pack
Electronics
LED
Microcontroller
and Logic
SPI
CEN_ETM
CC_ETM
Trickle
Charger
BATT_FLT
OVP
Switch
MCHG_EN
Level Detect
and Power
Switch
Expansion
Pack
Battery
VS_EBAT
V_EBAT
EBAT_ON
VS_EBAT
Critical Low
Detect
Flash Memory,
Buffers, etc.
OPT_ON
VDD
NVRAM
SPI
The V_ADP signals are the positive DC voltage from the AC adapter to charge the batteries.
The V_ADP signals can be sourced from the main unit or the DC jack on the expansion
pack, since the AC adapter can be plugged into the main unit or the expansion pack. When
charging is sourced from the synchronizing cradle through the serial connector, the main unit
passes the charge to the expansion pack through the V_ADP signals.
The V_ADP signals feed the charger circuit that includes a power transistor and charge
regulator such as the MAX846 to control the current to the expansion pack battery. The
battery charger is designed to charge the lithium polymer battery with constant current and
constant voltage charge modes. MCHG_EN is a signal from the main unit to notify the
expansion pack that the main battery is charging and the expansion pack must limit its
charging current to prevent blowing the fuse in the AC adapter. OPT_ON is also typically
used by the charging circuit to limit the charge current when OPT_ON is active.
iPAQ H3000 Series Expansion Pack Developer Guide
5–3
Battery, Power Supply and Charging
The charging units are designed for lithium-ion or lithium polymer batteries, so if an option
pack uses another battery technology it should not connect the V_ADP or MCHG_EN
signals. Also, if an expansion pack does not want to share AC adapter charging with the main
unit it should not connect the V_ADP and MCHG_EN signals.
The micro controller is used to monitor the battery and charge conditions. It is typically used
to monitor charge time, battery temperature, battery voltage and system power requirements
to control the charger. The micro controller also controls an LED that notifies the user that
the battery is being charged by blinking at 1 Hz. If the battery is fully charged and the AC
adapter is plugged in, the LED is turned on.
The OVP (over-voltage protection) switch monitors the battery and disconnects the
expansion pack battery if the battery voltage exceeds the specification.
If an expansion pack includes a DC jack, the developer may choose to use the same one as
the main unit.
The charging circuits are designed for lithium-ion or lithium polymer batteries, so if an
option pack uses another battery technology, it should not connect the V_ADP signals. Also,
if an expansion pack does not want to share AC adapter charging with the main unit, it
should not connect the V_ADP signals.
Extended Battery Implementation
An expansion pack can provide extended battery life to the main unit in two ways. First, it
can connect the V_EBAT and EBAT_ON signals when the expansion pack battery is used to
run the main unit. Second, it can connect the CC_ETM, CEN_ETM and VS_EBAT signals
with a current limiter to provide a trickle charge to the main unit battery. The trickle charge
keeps the main battery at a sufficient level to power the main unit in the event the expansion
pack is removed while the unit is on. The V_EBAT signals are the positive DC voltages from
the expansion pack battery to the main unit power supply. The V_EBAT signals are
connected to the expansion pack battery through a power switch. A voltage level detect
circuit is used to enable the power switch and EBAT_ON signal when the battery has
sufficient charge to supply power to the main unit. EBAT_ON is driven low level when
extended battery voltage is lower than 3.72V.
If an expansion pack does not function as an extended battery to the main unit, the V_EBAT
and EBAT_ON signals should not be connected.
The CC_ETM, CEN_ETM and VS_EBAT signals provide a mechanism for the expansion
pack battery to provide a trickle charge to the main battery. The CC_ETM signal provides the
trickle charge from the expansion pack battery to the main battery. The CEN_ETM is an
active high, open-collector signal that enables the trickle charge from the expansion pack
battery to the main battery. The expansion pack must pull this signal up to the extended
battery voltage. The expansion pack should pull CEN_ETM low when the AC adapter is
plugged in or when the expansion pack battery charge is too low. A current limiter, such as
MAX890L or MAX893L, must exist on the expansion pack between its battery and the
CC_ETM pin to limit the trickle charge.
VS_EBAT is the positive terminal sense line for the battery in the expansion pack. The main
unit uses it to determine if it should trickle charge the main battery with the extended battery.
If VS_EBAT has a lower voltage than the main battery, the main unit pulls CEN_ETM (open
collector) low and disables the trickle charge. If VS_EBAT has a higher voltage than the
main battery, CEN_ETM is pulled high by the expansion pack. If the AC adapter is plugged
in or the expansion pack battery is too low (typically 3.65V), then the expansion pack must
pull CEN_ETM low and disable the trickle charge.
5–4
iPAQ H3000 Series Expansion Pack Developer Guide
Battery, Power Supply and Charging
If an expansion pack does not provide a trickle charge to the main unit, the CC_ETM,
CEN_ETM and VS_EBAT signals should not be connected.
iPAQ H3000 Series Expansion Pack Developer Guide
5–5
Battery, Power Supply and Charging
5–6
iPAQ H3000 Series Expansion Pack Developer Guide
Mechanical Interface
6
Mechanical Interface
Overview
All functional expansion packs consist of four basic structures, including:
■
a uniquely-curved, injection-molded plastic base part which enables any expansion pack
to physically slide up and onto the back of any main unit;
■
a common universal connector soldered to a PCB with absolute dimensions as to the
position of the connector and of the thickness of the board but with less criteria as to the
board area dimensions (see Figure 13: PCB Topside Component Limitation);
■
an unknown volume of “new” electronics that will, at minimum, communicate through
the PCB and the universal connector;
■
an injection-molded plastic top cover part of specified shape at its bottom mating edge
but of unspecified volume and shape (and possibly with unspecified openings)
throughout its remainder.
Figure 12 (Main Unit Sliding into an Expansion Pack) illustrates the principle of a main unit
sliding onto an expansion pack (in this case, a CompactFlash expansion pack). The
expansion pack and main unit eventually make electrical connection through their respective
universal connector plug and receptacle located near the bottoms of the expansion pack and
the main unit, respectively.
FIGURE 12: Main Unit Sliding into an Expansion Pack
iPAQ H3000 Series Expansion Pack Developer Guide
6–1
Mechanical Interface
FIGURE 13: PCB Topside Component Limitation
Certain constraints of form factor in any future development of expansion packs must also be
comprehended and these constraints would include that:
■
the plastic base part or sleeve of the expansion pack which immediately surrounds the
main unit has specified dimensions and close tolerance gap with main unit (see the
following Note),
■
the lower rear and bottom portions of the expansion pack base part or sleeve have
specified dimensions and Industrial Design so as to preserve a reliable fit when inserted
into the iPaq Pocket PC docking cradle and
■
NO future design of an expansion pack’s form factor should allow blockage of (i.e., deny
access to) those user-accessible hardware features around the top of the main unit
(including, the headphone jack, FIR port, microphone openings, record button and
stylus). However, please understand that the total stack-up thickness of the expansion
pack as measured from the rear surface of the main unit is determined by the
requirements of each individual expansion pack.
is recognized that developers may discover certain complications when
✎ Itinterfacing
their designs with the unusual shape and the close mating tolerances
of the expansion pack’s plastic base part or sleeve. Therefore, it is possible to
procure sample and production volumes of certain common parts from the
original vendors. Nevertheless, the injection-molded cover part or turtle-shell is
the responsibility of the developer of the new expansion pack.
6–2
iPAQ H3000 Series Expansion Pack Developer Guide
Mechanical Interface
Figure 14 (Exploded View Example from a CompactFlash Expansion Pack, Part 1) and
Figure 15 (Exploded View Example from a CompactFlash Expansion Pack, Part 2) show
exploded views of an expansion pack using the example of a CompactFlash expansion pack.
These figures are intended to only provide a general understanding of how the mechanical
structures fit together. They are not intended for actual mechanical design.
FIGURE 14: Exploded View Example of a CompactFlash Expansion Pack, Part
1.
Table 27: Part List for a CompactFlash Expansion Pack (Part 1)
Item
Description
1
OPTION PACK BASE, iPAQ
1
PC/ABS (MEP MB1700 BK 37)
2
OPTION PACK COVER, iPAQ
1
PC+ABS (MEP MB1700 BK 37)
3
PCB ASSY, CF CARD, iPAQ
(Example only)
1
PCB THICKNESS=0.8 mm
4
LOCK BUTTON, iPAQ
1
PC/ABS (MEP MB1700 BK 37)
5
LOCK BUTTON SPRING, iPAQ
1
PC/ABS (MEP MB1700 BK 37)
6
UNIVERSAL CONNECTOR,
OPTION PACK, iPAQ
1
Foxcon QL11503-C608
iPAQ H3000 Series Expansion Pack Developer Guide
Qty
Material
6–3
Mechanical Interface
Table 27: Part List for a CompactFlash Expansion Pack (Part 1)
6–4
Item
Description
Qty
Material
7
UNIVERSAL CONN, SUPPORT,
iPAQ
1
PC/ABS (Kobelco ku2-1517)
8
INSERT F-20-36-17, iPAQ
3
Brass
9
INSERT F-20-36-42, iPAQ
1
Brass
10
INSERT F-20-35-30, iPAQ
4
Brass
11
PHILLIPS SCREW, FLAT PAN
HEAD M2.0X2.5
3
Nickel
12
PHILLIPS SCREW, FLAT PAN
HEAD M2.0X4
1
Nickel
13
TORX SCREW FLAT HEAD
M2.0X2.3 BLACK
2
14
TORX SCREW FLAT HEAD
M2.0X5.5 BLACK
2
iPAQ H3000 Series Expansion Pack Developer Guide
Mechanical Interface
FIGURE 15: Exploded View Example from a CompactFlash Expansion Pack,
Part 2
Table 28: Part List for a CompactFlash Expansion Pack (Part 2)
Item
Description
11
PHILLIPS SCREW,
FLAT PAN HEAD M2.0x2.5
3
Nickel
12
PHILLIPS SCREW,
FLAT PAN HEAD M2.0x4
1
Nickel
iPAQ H3000 Series Expansion Pack Developer Guide
Qty
Material
6–5
Mechanical Interface
Additional mechanical design highlights that are noted for development of an expansion
pack include:
6–6
■
The cosmetic texture surface of the expansion pack plastic turtle shell or “cover part”
(the developer’s responsibility) are specified in the figures above to ensure seamless
appearance with the expansion pack’s sleeve or base plastic textured part.
■
The PC/ABS resin manufacturer and type and color of the expansion pack plastic turtle
shell or “cover part” (the developer’s responsibility) is specified in the figures above to
ensure seamless cosmetic and material appearance with the expansion pack’s sleeve or
base plastic part.
■
The format for all mechanical drawings is Pro-Engineer Version 20. The drawings are
available at http://csa.compaq.com/CSA_For_iPAQ_Developers.shtml.
■
It is possible to procure the following components from the original vendors.
❏
Expansion Pack Sleeve
❏
Plastic resin, PC/ABS, MEP MB1700 BK 37
❏
Expansion Pack Connector (or Universal Connector)
❏
Lock Button
❏
Lock Button Spring
❏
Expansion Pack Connector plastic support part
iPAQ H3000 Series Expansion Pack Developer Guide
Mechanical Interface
Interface (Universal) Connector
The interface between the expansion pack and the main unit is a 100-pin plug/receptacle
connection with the plug connector on the main unit and the receptacle connector on the
expansion packs. The connectors mate 180° from each. Each connector solders to the
respective PCB with a mixture of through-hole and surface mount pins on a 0.8mm pitch.
See the following figure for a view of the two connectors fully mated.
Some of the pins on each connector protrude out at different lengths to ensure certain events
happen sequentially. Table 29 (Interface ‘Universal’ Connector) shows the various lengths
for each of the plugs and receptacles on the connectors.
Table 29: Interface (Universal) Connector
Pin #
Plug Distance
from Front
Receptacle Distance
from Front
Shorten Receptacle
Pins
10, 47, 50, 51, 92
0.90 mm
1.82 mm
Extended Plug Pins
5, 21, 31, 45, 49, 55,
66, 76, 86, 95, 99
0.40 mm
1.32 mm
Normal Pins
All others
0.90 mm
1.32 mm
FIGURE 16: Expansion Pack Connectors Mated
iPAQ H3000 Series Expansion Pack Developer Guide
6–7
Mechanical Interface
6–8
iPAQ H3000 Series Expansion Pack Developer Guide
Reference Schematics
7
Reference Schematics
As available, reference schematics for expansion packs are planned to coincide with this
specification. Future schematics are listed below. Please refer to
http://csa.compaq.com/CSA_For_iPAQ_Developers.shtml for updates.
■
Lithium Polymer Battery support circuitry
■
UART connection
■
CF Expansion Pack
■
CF Expansion Pack Plus
■
PCMCIA Expansion Pack
■
PCMCIA Expansion Pack Plus
iPAQ H3000 Series Expansion Pack Developer Guide
7–1
Reference Schematics
7–2
iPAQ H3000 Series Expansion Pack Developer Guide
Regulatory Requirements and Approvals
8
Regulatory Requirements
and Approvals
Suggested Agency Approvals
It is the responsibility of the manufacturer to obtain the necessary regulatory certifications
for their product. Certifications that should be considered include, but are not limited to the
following:
■
FAA - US
■
FCC Part 15 - US
■
UL 1950 - US
■
FCC Part 68 - US
■
ICES-003 - Canada
■
CSA 950 - Canada
■
CS-03 - Canada
■
RSP100 - Canada
■
RSS210 - Canada
■
CE - Europe
■
ETS300328 - Europe
■
ETS300826 - Europe
■
CTR21 - Europe
■
CISPR 22 - International
■
IEC 60950 - International
Agency Acceptance Testing
The manufacturer of expansion packs for the Compaq iPAQ H3000 Series is responsible for
all agency testing.
iPAQ H3000 Series Expansion Pack Developer’s Guide
8–1
Regulatory Requirements and Approvals
8–2
iPAQ H3000 Series Expansion Pack Developer’s Guide
Environmental Requirements
9
Environmental Requirements
The developer is responsible to assure the expansion pack meets all environmental
requirements of the customer. Some suggested specifications are listed below:
Operational Environment
Temperature Ranges
Operating Temperature (Independent of altitude) 0°C to 40°C.
Non-Operating Temperature (Independent of altitude) -30°C to 60°C.
Humidity
Operating (non-condensing) 20% to 80% at 25°C.
Non-Operating (38.7°C maximum wet bulb temperature) 5% to 85%.
Altitude
Operating 0 to 15,000 feet [4,572 m]. Equivalent to 14.7 to 8.29 psia.
Non-Operating 0 to 40,000 feet [12,192 m]. Equivalent to 14.7 to 4.4 psia.
Environmentally Safe Materials
Any plastic casework and the packaging material shall not contain any ozone depleting
chemicals such as CFCs, PBDE, PBDPE or Halon compounds.
Toxic Materials
Materials which produce toxic effects during service usage or due to component failure shall
not be used in the expansion pack construction. Cadmium and polychlorinated biphenyls
may not be used in any form. The use of beryllium is only allowed in semi-conductors and
shall not be exposed upon failure.
iPAQ H3000 Series Expanison Pack Developer Guide
9–1
Environmental Requirements
9–2
iPAQ H3000 Series Expanison Pack Developer Guide