1
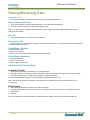
2012 C Business Solutions Contents Page Polycom 450 Model .................................................................................................................................................................................................... 2 Phone Labels / Description ...................................................................................................................................................................................... 2 Placing/Receiving Calls ........................................................................................................................................................................................... 6 Emerge Voicemail ..................................................................................................................................................................................................... 8 Accessing the Voicemail Message Main Menu ................................................................................................................................................... 9 Record Your Personalized Greetings. ............................................................................................................................................................... 10 Voice Mail Overview ......................................................................................................................................................................................... 11 Distribution List Options .................................................................................................................................................................................... 13 Accessing Your Voice Messaging Menu ........................................................................................................................................................... 14 Personalizing your IP Phone ..................................................................................................................................................................................... 15 Accessing your Call History .............................................................................................................................................................................. 15 Dialing from your Call History............................................................................................................................................................................ 15 Adding Contacts to Your Directory .................................................................................................................................................................... 15 Editing a Contact .............................................................................................................................................................................................. 16 Deleting a Contact ............................................................................................................................................................................................ 16 Change the Ring Tone ...................................................................................................................................................................................... 16 Changing the LCD Screen Contrast .................................................................................................................................................................. 17 Using your Headset .......................................................................................................................................................................................... 17 Other Feature Codes ........................................................................................................................................................................................ 18 Rebooting your IP Phone .................................................................................................................................................................................. 18 Codes .................................................................................................................................................................................................................... 18 Direct Voicemail Transfer.................................................................................................................................................................................. 18 Call Pick-up from a Different Extension ............................................................................................................................................................. 19 Parking a Call ................................................................................................................................................................................................... 19 Push to Talk ..................................................................................................................................................................................................... 19 Customer Service and Support ...................................................................................................................................................................................... 20 Page | 1 Business Solutions Polycom 450 Model Phone Labels / Description Number 1 2 Page | 2 Feature Function Blinks Red when a voicemail message Message Indicator Light is present Individual multi-color LEDs display the dynamic call state and remote user status. The mapping is: •Solid Green – An active call is in progress •Fast flashing green – There is an incoming (ringing) call •Flashing Green – the call is held by the Line Indicators other party •Flashing Red – The call is on hold •Solid Red – The line is busy remotely (Shared lines) Business Solutions Use these keys to activate up to three lines or speed dials that can be assigned to your phone 3 Arrow Keys scroll through information or options 4 Select a field of displayed data The Speakerphone button activates the speakerphone. W hen in use, it lights up green. 5 6 Feature Keys The Menu button displays the Main Menu options, where you can access features such as your contact directory and call lists, check the status of the phone and system for problems, and change your settings. The messages button accesses your voice mail messages The Redial button calls the last number dialed from your phone 7 8 Page | 3 Mute Button Picks up audio during hands-free calls. Hands-free Microphone Place your phone on a hard, flat surface for best results. 9 Volume Keys 10 Dial Pad Adjusts the volume of the handset, headset, speaker and ringer. Provides the 10 digits, the alphabetic characters, and special characters available in context-sensitive applications Business Solutions Page | 4 11 Headset 12 Hold 13 Speaker For ringer and hands-free audio output 14 Soft Keys These keys are automatically labeled to identify their context-sensitive functions. 15 Graphic Display 16 Hookswitch Allows you to place and receive calls through an optionally connected headset. Holds an active call or resumes a held call Shows information about calls, messages, soft keys, time, date, and other relevant data. • Caller display information – first party, second party, number of calls • Information status scrolling list in order of precedence highest to lowest. Associated line icons are described in the following table Business Solutions Icons for Line Key appearances on Polycom Phone Page | 5 Business Solutions Placing/Receiving Calls Answering a Call 1. Pick up the handset, press the Answer soft Key, or press Speakerphone key Dialing a Number or Extension 1. Pick up the handset, press the New Call soft Key, or use the Speakerphone Key. 2. Dial the number or extension and press the Send soft key Note: You may switch to a different call mode during a call in progress by pressing the Speakerphone key or picking up the handset. End a Call 1. Hang up the handset, or press the End Call soft key. Place a Call on Hold 1. While you are on a call, press the Hold Key, or select the Hold soft key. To resume the call, press the Hold Key or press the Resume soft key. Do Not Disturb – Activation 1. Press the Menu Key. 2. Press 1 for Features 3. Press 1 for Do Not Disturb. Do not Disturb has been activated. Do Not Disturb- Deactivation 1. Press the Menu Key 2. Press 1 for Features 3. Press 1 again to deactivate Transferring a Call (Consulted, Blind) Consulted Transfer 1. During the call, press the Transfer Key or Transfer soft key. 2. Dial the number or extension you wish to transfer the call, press the Send soft key then announce the caller 3. Press the Transfer key or Transfer soft key again to connect the parties. If the party is unavailable press the cancel soft key to bring the caller back to you. Note: The Caller ID will show the number of the person that is transferring the call not the Caller ID of the incoming call Blind Transfer 1. 2. 3. 4. During the call press the Transfer key or Transfer soft key. Press the Blind soft key and enter the number or extension you want to which you want to transfer the call. Press Send Hang up Note: The Caller ID will show the number of the person that is calling in not the person transferring the call Page | 6 Business Solutions Direct Voicemail Transfer Follow these steps to send a caller directly to voicemail and bypass the users greeting. 1. During the call press the Transfer Soft Key. 2. Press *55, enter the extension of the desired person and press the # Key. Note: Headset use: if you will be using a headset for full time use page 19 for setting up your headset Placing a Conference Call Basic Conferencing/3 Way 1. Call the first party then press the Conference Soft Key to place the new call idle. 2. Call the second party when the second party answers press the Conference Soft key to join all parties. Pressing the Split Soft Key will split the conference into two calls on hold. You may use the arrow keys to toggle between parties. To Join parties again; Press the More Soft Key followed by the Join Soft Key and all parties will be connected. Placing the conference on hold from the originator’s phone will place the other parties on hold. Ending a call on from the originator’s phone will allow the other parties to continue the conference. Note: A conference maybe created during an active call, or a call on hold (same line or another line). Call Forwarding 1. 2. 3. 4. Press the Forward soft key Use the Arrow Keys to Highlight Call Forward Always, Call Forward No Answer, or Call Forward Busy. Press the Select soft key. Enter the Contact Phone number and press the Enable soft key Call Pick-up from a Different Extension Note: This is a Premium Feature Only 1. Press *97, then the extension number of the phone that is ringing. 2. Press Send Soft Key or Dial Soft Key to pick up the call. Park a Call You can Park a call on any extension, including your own. 1. Press the Transfer Soft Key 2. Press *68 and follow the prompts. 3. Dial the desired extension number followed by the (#) Key. To park to your extension dial the (#) Key. To Retrieve a Parked Call 1. Press *88 and follow the prompts 2. Press the extension number the call was parked against followed by the (#) Key. Push to Talk This feature code allows for immediate communication useful for quick conversations between callers. The call will be answered automatically, if the party is available. 1. Press *50, then press Dial Soft Key (you will hear a stutter dial tone after pressing *50) 2. Enter the extension. Page | 7 Business Solutions Note: Push to talk is a premium seat feature Voice Mail Flow Chart 1 – Play Messages 2 – Busy Greeting Menu 3 – No Answer Greeting Menu 5 – Compose Message Menu 7 – Delete All Messages Play Message Menu 2 – Play/Repeat:Skip Envelope 4 – Play Previous 5 – Play Envelope 6 – Play Next 7 – Delete 8 – Call Sender 9 – Additional Opts # - Save Messages “ – Return to Previous While Playing Msgs 1 – Skip Back 2 – Pause 3 – Fast Forward 4 – Skip to beginning 6 – Skip to END 8 – Call Sender Additional Options 1 – Reply to MSG 2 – Forward message “ – Return to Previous # - repeat Menu * - Return to Previous # - Repeat Menu Compose Message 1 – Change 2 – Listen 3 – Send 4 – Send to Group 5 – Send to Dist 6 – Set/Clear Urgent 7 – Set/Clear Private * – Return to Previous # - Repeat Menu Select Dist List 1 – Select List 1 --15 – Select List 15 * – Return to Previous # - Repeat Menu Page | 8 Greeting Menu 1 – Record 2 – Listen 3 – Revert to Default * – Return to Previous # - Repeat Menu Distribution List 1 – Select Another List 2 - Review List * – Return to Previous # - Repeat Menu Reply to Message 1 – Change 2 – Listen 3 – Send 6 – Set/Clear Urgent 7 – Set/Clear Private * – Return to Previous # - Repeat Menu While Playing Msgs 1 – Change 2 – Listen 3 – Send 4 – Send to Group 5 – Send to Dist 6 – Set/Clear Urgent 7 – Set/Clear Private * – Return to Previous # - Repeat Menu Business Solutions Emerge Voicemail Accessing the Voicemail Message Main Menu Setting up your Voicemail Box Step Action 1 Pick up the handset and press the Message Key 2 Press 1 and then press the Connect Soft Key 3 Enter your Default Passcode ___________________ 4 Enter a new passcode at the Voice Portal prompt Re-enter your new passcode at the prompt Follow the prompts to record your Personalized Name Greeting by recording your First and Last name. The voicemail box has now been initialized Subsequent Use Step Action 1 Press the Message Key 2 Press 1 and then press the Connect Soft Key 3 Enter your new passcode 4 Press 1 to access your voice mail box 5 Follow the menu table to record personalized greetings and play messages. Voice Messaging Main Menu Key Page | 9 Option 1 Play message (enabled with new or saved) 2 Record/Change Busy Greeting 3 Change No Answer Greeting 5 Compose and Send Menu 7 Delete ALL Messages * Voice portal Admin Menu # Repeat this menu Business Solutions Record Your Personalized Greetings The System has two greetings; Busy and No Answer. The default greetings will play until a personal greeting has been recorded. Busy Greeting Menu Busy greeting will play when Do not Disturb is on or the Ignore soft key is pressed on incoming call. To Record a Busy Greeting Step 1 Action Access the Voice Message Main Menu. Press 2 and follow the voice prompts. 2 Key Option 1 Record new Busy Greeting 2 Listen to current Busy Greeting 3 Revert to System Default Busy Greeting * Voice Messaging Main Menu # Repeat this menu No Answer Greeting Menu The no answer greeting plays when a call is not answered. To Record a No Answer Greeting Step 1 Action Access the Voice Message Main Menu. Press 3 and follow voice prompts. 2 Key Option 1 Record New No Answer Greeting 2 Listen to current No Answer Greeting 3 Revert to System default No Answer Greeting * Voice Messaging Main Menu # Repeat this menu To listen to your messages Step Action 1 Access the Voice Message Main Menu 2 Press 1 to listen to messages. You are now in the *Play Messages Menu. (See voicemail overview for more options) Note: if there are no new or saved messages you will hear the voice announcement indicating the status Page | 10 Business Solutions Voice Mail Overview Key Option 1 Play messages # Save a Message 7 Delete a Message 2 **Play or repeat message: skip envelope Key Option 1 Skip Backward 3 seconds 2 Pause Playback 3 Skip forward 3 seconds 4 Skip to beginning of message 6 Skip to end of message 4 Return to previous message 5 Play message envelope (date & time info) 6 Move to next message 8 **Initiate Call to Sender. This will dial out to the Caller ID of the caller. After the caller hangs up you will still be in the system at this menu. **Additional Options Menu ( See Menu below) Key Option 1 Reply to Message Menu 2 Forward Message Menu (more below) * Return to Play Messages Menu # Repeat this menu Key Option 1 Change Current introduction 2 Listen to current introduction 3 Send Message to specific group member(s) 4 Send Message to entire group 5 Send message to distribution list- (See Select Distribution List Menu) 6 Set or clear urgent indicator 7 Set or clear confidential indicator * Return to Play Messages Menu Repeat this Menu # Note: Messages marked Confidential cannot be forwarded. Page | 11 Business Solutions Key Option 2 Record/ Change Busy Greeting 3 Change No Answer Greeting 5 Compose and Send Menu Key 1 Change current message 2 Listen to current message 3 Send message to specific group member 4 Send Message to entire group 5 Send Message to distribution list (if configured) 6 Set or clear urgent indicator 7 Set or clear confidential indicator * Return to voice Messaging Main Menu # Repeat this menu 7 Delete ALL Messages * Voice portal Admin Menu Key # Option 1 Access voice message Main Menu 2 Change CommPilot Express Profile 3 Record personalized name 4 Change Call forwarding Options 6 Make Calls 8 Change Passcode 9 Exit # Repeat this menu Repeat this menu Page | 12 Option Business Solutions Distribution List Options (from the Voice Messaging Menu Options) Distribution Lists are created in the users Profile through the Emerge Customer Dashboard. Up to 15 distribution list(s) can be created. Select Distribution List Menu- (from Forward Message menu, Key 5) Key Description 0 Select distribution list 0 1 Select Distribution list 1 (Distribution lists are numbered consecutively 1 through 15.) * Return to previous Menu # Repeat this menu Distribution List Menu (from key 0-15 in Select Distribution List Menu) Key Description 1 Select another distribution List 2 Review the selected distribution list 3 Send the message * Return to the previous Menu # Repeat this menu Reply to Message Menu (from Key 1 in Additional Options Menu). Key Description 1 Change current reply 2 Listen to current reply 3 Send reply 6 Set or clear urgent indicator 7 Set or clear confidential indicator * Return to Play Messages Menu # Repeat this menu. Note: If this is the first time you are accessing this voicemail box, use the default passcode then you will be prompted to enter a new passcode. Page | 13 Business Solutions Accessing Your Voice Messaging Menu From your Polycom phone Step Action 1 Press the Message key 2 Press #1 or the Select soft key 3 Press the Connect soft key 4 Enter your password From Any Internal Polycom Phone Step Action 1 Pick up the Handset and press the Message Key 2 Press the Select Soft Key 3 Press the Connect Soft Key 4 At the password prompt, press * 5 At the next prompt, enter the extension number of the mailbox you are checking 6 Enter the password for that mailbox From Any External Telephone Step Action 1 Dial your Personal DID (Direct Dial number) 2 Press *, during your greeting 3 Enter your passcode press the (#) Key 4 Press 1 to access your voicemail box Or, dial your organizations Voice Portal Backdoor Number ________ Step Action 1 Enter the extension number or Mailbox ID. 2 Enter the passcode press #. 3 Press 1 to access your voicemail box Page | 14 Business Solutions Personalizing your IP Phone Accessing your Call History To view the Call History lists: Step Action 1 Press the Menu Key, Press 1 (Features) 2 Press 4 for (Call Lists) Select Call Lists and then the number key for the list you want to review. Press 1 for Missed Calls Press 2 for Received Calls Press 3 for Placed Calls Press 4 to Clear List(s) ( you will need to use your bottom arrow key and scroll down to see option 4) 3 Note: Pressing 4 (Clear) will clear individual Lists. After selecting 4 to clear, choose the list to be cleared (missed, received, or placed). Dialing from your Call History Once in your Redial, Received or Missed Call Lists, select the Dial Soft Key. Adding Contacts to Your Directory Step 1 2 3 Action Press Menu Key, Press 1 (Features) Press 3 for Contact Directories Select the Add Soft Key. Enter the first and last name using the dial pad, press the 1/A/a soft Key to toggle between the upper and lower case text and numbers 4 Enter the Contact number and Speed Dial if desired and press Save. 5 Press Back and Exit Soft Keys to return to the idle Screen Note: The first contacts entered will be listed in the line keys Page | 15 Business Solutions Editing a Contact To edit a contact’s phone information Step Action 1 Press the Menu Key, press 1 for Features 2 Press 3, select Contact Directory 3 Use the Arrow Keys to locate the contact to edit. Press the Edit soft key 4 Update the contact information and press the Save soft key Deleting a Contact Step 1 Action Once in the contact directory use the Arrow Key to locate the contact to be deleted, and highlight the contact 2 Press the More Soft Key 3 Press the Delete Soft Key 4 Press Back and Exit Soft Keys to return to the idle display Change the Ring Tone Step Action 1 Press the Menu button 2 Press 3 (Settings) or use the Arrow key to highlight and press the Select Soft Key 3 Press 1 for Basic 4 Press 4 5 Page | 16 Scroll through the list of ring types using the Arrow Keys. Press the Play Soft Key to hear the ring Press Select Soft Key to put a check in the box. Press Back to return to Menu Business Solutions Changing the LCD Screen Contrast To Adjust the Contrast of the LCD Screen Step Action 1 Press the Menu Key and then Press 3 (Settings) 2 Use the Arrow Keys or Press 1 (Basic) 3 Either use the Arrow Keys or Press 2 (Contrast) 4 Use the Up or Down Soft Keys to the desired contrast Level 5 Press OK Soft Key to accept change Using your Headset If you plan to use a headset for permanent use, there is an optional setting to default all calls to the headset. To enable Headset Memory Mode: Full-time Use 1. Press the Menu Key, using your Soft Keys select. (3) Settings followed by (1) Basic, (1) Preferences, (3) Headset, then (1) Headset Memory. 2. Use the Up and Down Arrow Keys and press the Select soft key to Enable Headset Memory Mode. (All Calls will go through your headset automatically now, simply follow the directions for Placing and Receiving Calls) To disable Headset Memory Mode: Repeat Steps 1 & 2 select disable To activate Headset Memory Mode: Press the Headset Key twice. You may change between handset, speaker or headset at any time during a call. Temporary Use With the headset connected 1.Press the Headset Key 2.Dial the number or dial the number and press the Headset Key To answer a call, press the Headset Key Note: You will need to press the headset each time prior to making or answering calls without the headset Memory Feature enabled. Page | 17 Business Solutions Other Feature Codes Feature Codes are the key commands used on the phone to change settings. The most common have been outline previously. The following, is a complete list of the access codes available. Note: Feature codes may vary per company policy. See your administrator for a list of your Feature Codes. Feature Access Code NameCall Forwarding Always Activation # *72 Call Forwarding Always Deactivation *73 Call Forward Busy Deactivation *91 Call Forwarding No Answer Deactivation Feature Access Code Name Call W aiting Activation # *43 *99 *93 Clear Voice Message Waiting Indicator Directed Call Pickup ( premium feature) Direct Voice Mail Transfer Call Park *68 Do Not Disturb Activation *78 Call Park Retrieve *88 Do Not Disturb Deactivation *79 Call Pickup ( Group extension *98 Last Number Redial *66 assignment) Call Return *69 Push to Talk *50 Cancel Call Waiting #43 *97 *55 Rebooting your IP Phone Due to upgrades, or work on your phone you may be asked to reboot your phone. If you are asked by a technician to reboot you phone do the following. Step Action 1 Press the Menu Key 2 Press 3 (settings) 3 Select Basic or Press 1 4 Press 5 to restart your phone Codes Your Emerge service includes a variety of star feature codes which use a 2 digit number prefixed with a * (star). Each feature code maps directly to an action on the phone system. Below is a quick reference to our most commonly used feature codes. Direct Voicemail Transfer This feature allows you to send a caller directly to a user’s voicemail box bypassing the user’s ring cycle and instantly plays their recorded greeting. Press the Transfer soft key Enter *55, followed by the voicemail extension and the # key Page | 18 Business Solutions Call Pick-up from a Different Extension Directed Call Pick-up This is a premium feature and allows you to pick up a call from any ringing phone from your own phone using the feature code *97. Enter *97, press the “dial” soft key Enter the extension of the ringing phone, followed by the # key Group Call Pick- up The feature allows you to pick up any ring phone in your group and can be programmed for basic, standard, and premium users. Service must be programmed for use. Enter *98, press the dial soft key Parking a Call Call Park is a feature that allows a person to put a call on hold at one Handset set and continue the conversation from any other handset. Press the Hold Soft key and enter *68 and the extension where you want to park the call followed by the # key. Pressing # will park the call to your own phone. Retrieving a parked call Enter *88, and press the dial soft key, followed by the extension and the # key. The parked is retrieved. Push to Talk This feature code allows for immediate communication useful for quick conversations between callers. The call will be answered automatically, if the party is available. Enter *50, press the dial soft key Enter the extension you wish to call, followed by the # key. You will hear a tone soon as the connection is made Note: Push to Talk is a premium seat feature. Page | 19 Business Solutions Customer Service and Support Congratulations and Welcome to your new Emerge Service we are pleased to have you on board and look forward to serving your organization! Please contact our Customer Care Support Number with questions about your service, billing or changes that need to be made to your system. Customer Care: 877.290.2777 Option 4 or [email protected] To report any service issues or to place a trouble ticket, please contact Technical Support. Technical Support: 877.290.2777 Option 3 If you would like to learn more about your Emerge system please check out our Emerge Webinars. Available free to all Emerge customers every other week! Visit us on the web at www.cincinnatibell.com/webinar To find out more about new features and service on your Emerge system go to www.cincinnatibell.com/voip Page | 20