1
Avaya Hospitality Features Card
Avaya Business Communications Manager
Document Status: Standard
Document Number: NN40010-100
Document Version: 04.02
Date: October 2010
© 2010 Avaya Inc.
All Rights Reserved.
Notices
While reasonable efforts have been made to ensure that the information in this document is complete and accurate at the time of printing,
Avaya assumes no liability for any errors. Avaya reserves the right to make changes and corrections to the information in this document
without the obligation to notify any person or organization of such changes.
Documentation disclaimer
Avaya shall not be responsible for any modifications, additions, or deletions to the original published version of this documentation
unless such modifications, additions, or deletions were performed by Avaya. End User agree to indemnify and hold harmless Avaya,
Avaya’s agents, servants and employees against all claims, lawsuits, demands and judgments arising out of, or in connection with,
subsequent modifications, additions or deletions to this documentation, to the extent made by End User.
Link disclaimer
Avaya is not responsible for the contents or reliability of any linked Web sites referenced within this site or documentation(s) provided by
Avaya. Avaya is not responsible for the accuracy of any information, statement or content provided on these sites and does not
necessarily endorse the products, services, or information described or offered within them. Avaya does not guarantee that these links
will work all the time and has no control over the availability of the linked pages.
Warranty
Avaya provides a limited warranty on this product. Refer to your sales agreement to establish the terms of the limited warranty. In
addition, Avaya’s standard warranty language, as well as information regarding support for this product, while under warranty, is
available to Avaya customers and other parties through the Avaya Support Web site: http://www.avaya.com/support
Please note that if you acquired the product from an authorized reseller, the warranty is provided to you by said reseller and not by Avaya.
Licenses
THE SOFTWARE LICENSE TERMS AVAILABLE ON THE AVAYA WEBSITE, HTTP://SUPPORT.AVAYA.COM/
LICENSEINFO/ ARE APPLICABLE TO ANYONE WHO DOWNLOADS, USES AND/OR INSTALLS AVAYA SOFTWARE,
PURCHASED FROM AVAYA INC., ANY AVAYA AFFILIATE, OR AN AUTHORIZED AVAYA RESELLER (AS APPLICABLE)
UNDER A COMMERCIAL AGREEMENT WITH AVAYA OR AN AUTHORIZED AVAYA RESELLER. UNLESS OTHERWISE
AGREED TO BY AVAYA IN WRITING, AVAYA DOES NOT EXTEND THIS LICENSE IF THE SOFTWARE WAS OBTAINED
FROM ANYONE OTHER THAN AVAYA, AN AVAYA AFFILIATE OR AN AVAYA AUTHORIZED RESELLER, AND AVAYA
RESERVES THE RIGHT TO TAKE LEGAL ACTION AGAINST YOU AND ANYONE ELSE USING OR SELLING THE
SOFTWARE WITHOUT A LICENSE. BY INSTALLING, DOWNLOADING OR USING THE SOFTWARE, OR AUTHORIZING
OTHERS TO DO SO, YOU, ON BEHALF OF YOURSELF AND THE ENTITY FOR WHOM YOU ARE INSTALLING,
DOWNLOADING OR USING THE SOFTWARE (HEREINAFTER REFERRED TO INTERCHANGEABLY AS "YOU" AND "END
USER"), AGREE TO THESE TERMS AND CONDITIONS AND CREATE A BINDING CONTRACT BETWEEN YOU AND
AVAYA INC. OR THE APPLICABLE AVAYA AFFILIATE ("AVAYA").
Copyright
Except where expressly stated otherwise, no use should be made of the Documentation(s) and Product(s) provided by Avaya. All content
in this documentation(s) and the product(s) provided by Avaya including the selection, arrangement and design of the content is owned
either by Avaya or its licensors and is protected by copyright and other intellectual property laws including the sui generis rights relating
to the protection of databases. You may not modify, copy, reproduce, republish, upload, post, transmit or distribute in any way any
content, in whole or in part, including any code and software. Unauthorized reproduction, transmission, dissemination, storage, and or
use without the express written consent of Avaya can be a criminal, as well as a civil offense under the applicable law.
Third Party Components
Certain software programs or portions thereof included in the Product may contain software distributed under third party agreements
("Third Party Components"), which may contain terms that expand or limit rights to use certain portions of the Product ("Third Party
Terms"). Information regarding distributed Linux OS source code (for those Products that have distributed the Linux OS source code),
and identifying the copyright holders of the Third Party Components and the Third Party Terms that apply to them is available on the
Avaya Support Web site: http://support.avaya.com/Copyright.
Trademarks
The trademarks, logos and service marks ("Marks") displayed in this site, the documentation(s) and product(s) provided by Avaya are the
registered or unregistered Marks of Avaya, its affiliates, or other third parties. Users are not permitted to use such Marks without prior
written consent from Avaya or such third party which may own the Mark. Nothing contained in this site, the documentation(s) and
product(s) should be construed as granting, by implication, estoppel, or otherwise, any license or right in and to the Marks without the
express written permission of Avaya or the applicable third party. Avaya is a registered trademark of Avaya Inc. All non-Avaya
trademarks are the property of their respective owners.
Downloading documents
For the most current versions of documentation, see the Avaya Support. Web site: http://www.avaya.com/support
Contact Avaya Support
Avaya provides a telephone number for you to use to report problems or to ask questions about your product. The support telephone
number is 1-800-242-2121 in the United States. For additional support telephone numbers, see the Avaya Web site: http://
www.avaya.com/support
3
Hospitality features
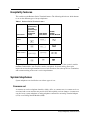
This card shows the Business Series Terminals buttons. The following table shows which buttons
to use on the different types of Avaya telephones.
Table 1 Business Series Terminals buttons
Button Name
Avaya 7100
Digital Desktop,
Avaya 7208
Digital Desktop,
Avaya 7316/
7316E Digital
M7100, M7208,
Desktop
M7310, M7324
ƒ
Feature
Hold
Volume Control
Release
M7100N,
M7208N,
M7310N, M7324N
≥
˙
√
√
®
®
Hospitality Services (HS) is a group of features that increases the value of the system in small to
medium-sized facilities, such as hotels, motels, or hospitals. In a hotel setting, guests gain
improved services through immediate access to basic functions, like wake-up service or reminders,
and accurate tracking of the room’s service requirements.
System telephones
System telephones are classified as one of three types of sets:
Common set
A common set can be a telephone found in a lobby, office, or common area. A common set is not
associated with a room and does not provide all of the hospitality services features. A common set
can also be any system telephone or analog telephone connected to an Analog Terminal Adapter
(ATA) or an Analog Station Module (ASM).
Avaya Hospitality Features Card
4
Room set
A room set is a set assigned to a room. A room set can be any system telephone or analog
telephone connected to an ATA or an ASM. A maximum of five sets can be assigned to the same
room (they all share same room number).
Hospitality Services (HS) admin set
An HS admin set is any two-line display system telephone. You can program an HS admin set to
require the Desk admin password before you gain access to HS administration features.
Note: The initial configuration of sets is programmed in system programming.
Alarm Time
The Alarm time feature provides alarm clock capability on the system set and analog telephones
connected to an ATA or an ASM. You can program both room sets and common sets to sound an
audible alert at a requested time.
You can program one alarm time within a 24 hour period on a room or common set. You must
reset the alarm time. When the alarm sounds, all sets in a given room sound an audible alert.
Canceling the alarm on any set cancels the alarm on all the sets in the room. A new alarm time
entered on a room or common set overwrites any alarm set previously.
To program the Alarm time feature on a system telephone:
1
Press
°‡fi.
The display shows Alrm:07:00am Off.
2
If the alarm time is correct press ON/OFF. The display shows Alrm:07:00am ON.
3
Press DONE to exit.
or
4
To enter a new alarm time press CHG. The display shows Enter time:.
5
Enter a new four-digit alarm time.
If the 24 hour clock format is used (hour: 00 to 23 and minutes: 00 to 59), no confirmation is
required. The display shows Alarm ON hh:mm.
If the 12 hour format is used, the display shows hh:mm AM or PM?. Press the AM or PM display key. The
display shows Alarm ON hh:mm.
To program the Alarm time feature on an analog telephone:
1
Press ˚•°‡fi. A tone sounds.
2
Enter a four-digit alarm time.
If the 24 hour clock format is used (hour: 00 to 23 and minutes: 00 to 59), a tone sounds.
NN40010-100
5
If the 12 hour format is used, press • to select a.m. or £ to select p.m. A tone sounds.
At the selected times, sets in the room ring to wake-up the occupants or remind them of the next
event or meeting.
To cancel the alarm time on a system telephone:
1
Press
£°‡fi.
The display shows Alarm OFF.
To cancel the alarm time on an analog telephone:
1
Press ˚£°‡fi.
If you do not cancel the alarm, the alarm rings again after an interval specified through Business
Element Manager. The alarm makes the number of attempts specified in Business Element
Manager.
To set the alarm to snooze on a system telephone:
1
Press the HOLD button when the alarm rings.
The alarm rings again after the time interval specified through Business Element Manager. The
alarm makes the number of attempts specified in Business Element Manager.
To turn off the alarm:
1
When a set rings at the selected time, the occupant can release the Alarm ring as follows:
a
On a system telephone, press any button except the ≥ button.
or
b
On an analog, digital, or IP telephone, lift and replace the handset.
HS admin set
Only an HS administrator set can use the HS admin alarm feature. The HS admin alarm feature is
room-oriented only; it does not control the alarms on common sets.
The HS admin alarm feature can:
•
•
•
•
•
query the current or last alarm time set for a room
overwrite previous alarm times programed for a room on the system
assign an alarm time for any room on the system
change an alarm time for any room on the system
cancel an alarm pending for any room on the system
Avaya Hospitality Features Card
6
To program the alarm time for a room with the HS admin alarm
feature:
1
Press
°‡‡
on a two-line display system telephone. If configured, the display shows
Password:.
2
Enter the Desk admin password. The display shows Al of rm#:.
3
Enter the room number.
4
Press VIEW. The display shows Alrm: 07:00am OFF:.
5
If the alarm time is correct, press the ON/OFF display key to activate the alarm.
6
Enter a four-digit alarm time.
If the 24 hour format is used (hour: 00 to 23 and minutes: 00 to 59), no confirmation is required.
The display shows Alarm hh:mm ON.
If the 12 hour format is used, the display shows the four-digit time plus AM or PM?. Press the AM or
PM display key. The display shows Alarm hh:mm am or pm ON.
7
Press the ® button to exit programming.
Room condition
The Room condition (RC) feature allows you to exchange information about the serviced state of a
room. The RC feature is available from a room set or an HS admin set.
Room sets can:
•
•
•
set the associated room’s state to Service done (Srvc done)
set the associated room’s state to Needs service (Needs srvc)
query the state of the associated room on a set with a display
HS admin sets can:
•
•
•
set any room’s state to Service done (Srvc done)
set any room’s state to Needs service (Needs srvc)
query the state of any room
The system changes the state of occupied rooms to Needs service on a daily basis at a set time as
configured in the system.
Maintenance personnel program the condition of the room to Service done when service in the
room is complete.
The front desk attendant can query or program the condition of a room with an HS admin set. The
system automatically assigns the status of a room to Needs srvc, when a Room occupancy status
changes from occupied to Vacant.
NN40010-100
7
To update the Room condition using a room set:
1
Press
°‡fl on
a system telephone or press ˚•°‡fl on an analog telephone.
2
At the prompt, enter the status of the room.
3
Press
on the dialpad to indicate Set to srv done. If required, enter the Room condition
password.
or
Press ¤ on the dialpad to indicate Set to needs srv. If required, enter the Room condition
password.
4
The display shows Set to srv done or Set to needs srv.
To update or query the Room condition using an HS admin set:
1
Press
2
If configured, the display shows Password:. Enter the Desk admin password. The display shows
Cd of rm#:.
3
Enter the room number and press OK. The display shows rrrrr:Vacant.
4
Press the CHANGE display key and select the required status for the room set: if the room is
occupied, select Srvc done or Needs srvc; if the room is vacant, select Vacant or Needs srvc.
The default setting is Vacant.
5
To update or query other room sets, press the FIND or NEXT display key and return to step 3. If
there are no more room sets updates or queries, press the ® button to exit programming.
°‡°
on a two-line display system telephone.
Room occupancy
The Room occupancy (RO) feature allows front desk operators to assign dialing restrictions to
room sets, and also works with the Room condition (RC) feature. Dialing restrictions for room sets
are defined in system programming. The RO feature does not apply to common sets.
To access the Room occupancy feature and assign the state of a
room to a set:
1
Press
°‡·
on a two-line display system telephone. If configured, the display shows
Password:.
2
Enter the Desk admin password. The display shows Oc of rm#:.
3
Enter the room number and press OK. The display shows rrrrr:Vacant.
4
Press the CHANGE display key and select the required status for the room set: Vacant, Basic, Mid,
or Full. The default setting is Vacant.
Avaya Hospitality Features Card
8
5
To program other rooms, press the FIND or NEXT display key and return to
step 3. If no more rooms require programming, press the ® button to exit programming.
Note: Programming a room to Vacant state cancels any outstanding alarms.
Hospitality passwords
The HS feature allows for two types of passwords to access different areas of Hospitality
programming:
•
•
The Desk password is used to access all HS administration features.
The Room condition password controls the ability to change the room condition.
Default passwords are created and changed in system programming.
NN40010-100