1
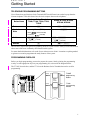
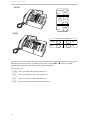
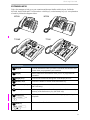
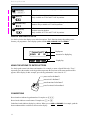
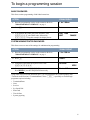
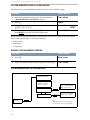
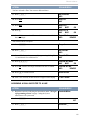
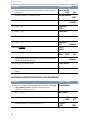
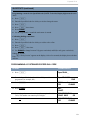
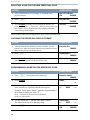
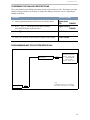
Norstar
Compact Plus Release 5
Quick Programming Guide
Published by Nortel Networks on behalf of British Telecommunications PLC. All
possible care has been taken in the preparation of this publication, but British
Telecommunications PLC assumes no liability for any inaccuracies that may occur.
British Telecommunication PLC reserves the right to make changes without notice both
to this publication and to the product that it describes.
No part of this publication may be reproduced, transmitted, transcribed, stored in a
retrieval system, or translated into any human or computer language in any form or by
any means without prior written permission of British Telecommunications PLC.
If you find any errors in this publication, or would like to make suggestions for its
improvement, please write to:
British Telecommunications
Norstar Product Manager
6th Floor, Parker Tower
43-49 Parker Street
London, WC2B 5PS
British Telecom is a registered trademark of:
British Telecommunications PLC
Registered Office 81, Newgate Street
London, EC1A 7AJ
Registered in England, Number 1800000
Meridian, Companion, and Norstar are trademarks of Nortel.
Meridian Norstar Business Communication System is manufactured by Nortel.
This document is for use with Compact Plus Release 5 Norstar UK.
P0607115 Issue 01
Printed in Canada
© 2003 Nortel Networks
Copyright Notice
This Nortel documentation is protected by copyright. It cannot be copied in any form
or medium except pursant to the Nortel Licence to Copy Documentation (“Licence”).
If a licence has been purchased, it is enclosed with this copy of Nortel documentation.
Table of Contents
SECTION I: GENERAL INFORMATION
Getting Started ..................................................................................................... 1
TELEPHONE PROGRAMMING BUTTONS
PROGRAMMING OVERLAYS
EXTENSION KEYS
DISPLAY AND DISPLAY KEYS
USING THE KEYPAD TO ENTER LETTERS
CONVENTIONS
To begin a programming session....................................................................... 5
BASIC PASSWORD
SYSTEM ADMINISTRATOR PASSWORD
SYSTEM ADMINISTRATOR PLUS PASSWORD
ENDING A PROGRAMMING SESSION
PROGRAMMING MAP FOR PASSWORDS
SECTION II: PROGRAMMING USING THE BASIC PASSWORD
Time and Date....................................................................................................... 7
CHANGING THE TIME AND DATE SETTINGS
PROGRAMMING MAP FOR TIME AND DATE
SECTION III: PROGRAMMING USING THE SYSTEM ADMINISTRATOR
PASSWORD
Pickup Groups...................................................................................................... 9
ASSIGNING AN EXTENSION
ANSWERING AN EXTENSION
PROGRAMMING MAP TERMINALS AND EXTENSIONS
SECTION IV: PROGRAMMING USING THE SYSTEM ADMINISTRATOR PLUS
PASSWORD
Line Access ........................................................................................................ 11
LINE ASSIGNMENT
LINE APPEARANCES
PROGRAMMING MAP FOR LINES
Restrictions......................................................................................................... 14
SELECTING A FILTER OR ADDING RESTRICTIONS AND EXCEPTIONS TO AN EXTENSION
ASSIGNING A DIALLING FILTER TO A LINE
ASSIGNING A RESTRICTION FILTER TO AN EXTENSION
PROGRAMMING MAP FOR LINE RESTRICTIONS
3
Ta b l e o f C o n t e n t s
PROGRAMMING USING THE SYSTEM ADMINISTRATOR PLUS PASSWORD
(continued)
Speed Dial ...........................................................................................................18
SHORTCUTS
PROGRAMMING A SYSTEM-WIDE SPEED DIAL CODE
SHORTCUTS (continued)
SELECTING A LINE FOR THE NEW SPEED DIAL CODE
CHOOSING THE SPEED DIAL DISPLAY FORMAT
PROGRAMMING A NAME FOR THE SPEED DIAL CODE
CONFIRMING THE DIALLING RESTRICTIONS
PROGRAMMING MAP FOR SYSTEM SPEED DIAL
Call Forward No Answer ....................................................................................22
PROGRAMMING MAP FOR TERMINAL CAPABILITIES
Call Forward on Busy.........................................................................................24
PROGRAMMING MAP FOR TERMINAL CAPABILITIES
Naming Extensions ............................................................................................26
PROGRAMMING MAP FOR NAMING EXTENSIONS
Moving Extensions .............................................................................................28
PROGRAMMING MAP FOR SETTING SYSTEM PROGRAMMING
Ringing Service...................................................................................................30
TURNING RINGING SERVICE ON OR OFF
PROGRAMMING MAP FOR SERVICES
SECTION V: Reference
Programming map (System Administrator Plus password)...........................32
4
S E C T I O N
1
Getting Started
TELEPHONE PROGRAMMING BUTTONS
You will note that your Business Series Terminal (BST) has different icons on the keycaps than the
Norstar telephones. This table shows how the icons compare between the telephones.
Button Name
Business Series Terminals
T7000, T7100, T7208, T7316,
T7316E
M7000, M7100N, M7208N,
M7310N, M7324N
≤
ƒ or ƒ
Feature
Handsfree
Mute
Bottom right button.(T7208)
Mute:
Handsfree:
Hold
©
(T7316/T7316E)
(T7316E)
≥˙
˙or ˙
≥(M7000)
≥(T7000)
Release
®
® or ™
The Norstar Compact Plus Quick Programming Guide is a quick reference when you need information
about some of the more commonly-used features on this system.
For more detailed information, refer to the System Administration Guide. It contains everything needed
to gain access to and to programme the many features of the system.
PROGRAMMING OVERLAYS
Before you begin programming, you need to prepare the system. Start by placing the programming
overlay over the appropriate keys on your programming set, as shown in the diagrams below.
The T7316E, shown below, and the T7316 are the Business Series Terminals that can be used for
programming.
Heading
Show
Back
Next
T7316E
programming
buttons
Business
Series
Terminal
Heading
Show
Back
Next
T7316
programming
buttons
Programming
overlay
1
Getting Started
M7310
Heading
Norstar
Programming
Overlay
M7310N
Back
Show
Next
M7324
Norstar Programming Overlay M7324N
Heading
Show
Back
Next
The four keys covered by the overlay have special functions for programming features on your system.
When one of the keys is active, the indicator next to it is lit with a ª or a º. Once you end the
programming session, the keys return to their usual call functions.
The four keys are:
– shows you the heading for the current level
“ moves you back one item at the current level
≠ shows you the first setting within the level
‘ moves you one item forward at the current level
2
Getting Started
EXTENSION KEYS
Take a few moments to look over your extension and become familiar with its layout. Unlike the
M7310N, the M7324N and T7316 do not have a shift key (5) or dual memory keys (6). An explanation
of each key follows the diagrams below.
M7324
8 7
9
3
2
8 7
6
2
6
M7310
33
1
1
4
5
4
5
4
4
T7316E
T7316
2
3
9
3
7
8
9
4
1
11
1
2
7
4
8
4
4
10
12
DESCRIPTION
1 Keypad
Used to dial numbers when you make a call and to enter numbers and
letters when you programme your extension.
2 Display
Shows instructions and numbers when you use or programme the
extension.
3 Display keys
Activates the instruction that appears on the display above it.
4 Memory keys
Activates a number or feature code stored in the key.
5 Dual memory keys
Allows you to store two numbers or feature codes
(M7310N only).
6 Shift key
Allows you to use the number or feature code stored in the secondary
memory of the dual memory key (M7310N only)
7 Feature key
(≤, ƒ or
ƒ)
Allows you to enter a feature code while using or programming the
telephone.
8 Hold key
(˙, ˙,
≥)
Puts an active call on hold.
3
Getting Started
DESCRIPTION
9 Release key
(®, ™)
Hangs up an active call or ends programming.
10 Mute key
Mutes handset and microphone.
Only available on T7316 and T7316E keystations.
11 Handsfree key
Turns on speaker so user does not have to pick up handset or use
headset. Only available on T7316E keystations.
12 Headset key
Allows user to use switch between headset and handset answer mode
without removing headset.
Only available on T7316 and T7316E keystations.
DISPLAY AND DISPLAY KEYS
Use the keys below the display to set and select options. Their functions change depending on the
features you programme. Some display options include ADD, CHANGE, OK and DOWN.
Contrast level 2
DOWN UP
OK
Display text
Instruction for display key
Display key
USING THE KEYPAD TO ENTER LETTERS
Use the keypad to enter both letters and numbers. For example, to name a Speed Dial code “Terry,”
repeatedly press the number on the keypad that represents the first letter of the name until that letter
appears on the display. In this example, press the keypad number 3 two times for “E.”
press once for the letter D
press twice for the letter E
press three times for the letter F
press four times for the number 3
CONVENTIONS
Boxed numbers indicate keypad numbers. Examples are flfl‹.
Boxed words indicate actual buttons. Examples are ≤ or ®.
Underlined words indicate display key choices. When you see ADD or CHANGE, for example, push the
button underneath the word that is shown on the display.
4
To begin a programming session
BASIC PASSWORD
This allows routine programming of individual extensions.
ACTION
VISUAL DISPLAY
1. Place the programming overlay on the extension. Refer to
"PROGRAMMING OVERLAYS" on page 1.
1 Jan 1:00 am
2. Press ≤.
Feature:
3. To programme the TIME code (time and date), enter
••°›fl‹ (the TIME code), followed by
¤¤‡›¤. Using this example, the display shows:
Hour: 12:00
NEXT
CHANGE
SYSTEM ADMINISTRATOR PASSWORD
This allows access to most of the settings for administration programming.
ACTION
VISUAL DISPLAY
1. Place the programming overlay on the extension. Refer to
"PROGRAMMING OVERLAYS" on page 1.
1 Jan 1:00 am
2. Press ≤.
Feature:
3. Using the keypad, enter the System Access code:
••¤flfl‹››.
Password:
4. Enter your password: ¤‹fl›fl.
Press RETRY if you enter the password incorrectly.
Terminals&Extns
RETRY
Using either of the passwords described above, you can programme the system beginning with
“Terminals and Extensions” (Terminals&Extns). Press ‘ repeatedly to scroll through
programme options including:
• Terminals&Extns
• Lines
• Services
• Sys Speed Dial
• Passwords
• Time & Date
• System prgrming
5
To b e g i n a p r o g r a m m i n g s e s s i o n
SYSTEM ADMINISTRATOR PLUS PASSWORD
This allows access to all administration settings as well as several installer settings.
ACTION
VISUAL DISPLAY
1. Place the programming overlay on the extension. Refer to
"PROGRAMMING OVERLAYS" on page 1.
1 Jan 1:00 am
2. Press ≤.
Feature:
3. Using the keypad, enter the System Access code:
••¤flfl‹››.
Password:
4. Enter your password: ‡¤‡fi°‡.
Press RETRY if you enter the password incorrectly
Terminals&Extns
RETRY
When you use the System Administrator Plus password, you can access all the programme options
shown on the previous page, as well as the following:
• Software Keys
• Maintenance
• Using Metrics
ENDING A PROGRAMMING SESSION
ACTION
VISUAL DISPLAY
1. Press ®.
End of session
2. After a few seconds, the date and time reappear on the display.
1 Jan 1:00 am
PROGRAMMING MAP FOR PASSWORDS
COS pswds
ˆ Show, Show pwd#
Call Log pswds
ˆ Show, Show extn#
ˆ Show, Log pswd
Progrming pswds
SysAdmin+ (727587)
ˆ Next Sys admin (23646)
ˆ Next Basic (22742)
ˆ Show
ˆ Next
Hospitality
Passwords
6
ˆ Show
ˆ Show
Desk pswd 4677 (HOSP)
ˆ Next Cond None
Note:
The ˆ symbol means ‘Press’. For example,
Press Show, Press Next, or Press Heading.
S E C T I O N
I I
Time and Date
To adjust the time and date on the entire system, you need only adjust the clock at one
extension using the Basic password. The clock, which also controls the schedules for
your routing and ringing features, must be reset after a power failure.
CHANGING THE TIME AND DATE SETTINGS
Use this feature to change the clocks to GMT (winter) and BFT (summer) times. Clocks in spring is
**forward and in fall is **back. In this example, the time is changed to 1:30 p.m. and the date is changed
from January 1, 2001, to July 15, 2001.
ACTION
VISUAL DISPLAY
1. Place the programming overlay on the extension. Refer to
"PROGRAMMING OVERLAYS" on page 1.
1 Jan 1:00 am
2. Press ≤ followed by ••°›fl‹ (the Time and Date
code) followed by ¤¤‡›¤(the Basic password).
Hour: 01
NEXT
3. Press CHANGE.
Hour:__
CANCL
4. Use the keypad to enter the two-digit hour. The display shows
one or two digits. The display prompts you to choose AM or PM.
AM
OK
CHANGE
AM
OK
CHANGE
Hour:01
NEXT
CHANGE
Minutes:01
NEXT
CHANGE
5.
6.
7.
8.
Press CHANGE.
Press OK.
Press NEXT.
Press CHANGE.
9. Using the keypad, enter the minutes.
CHANGE
Minutes: __
CANCL
Minutes:30
NEXT
CHANGE
Year:01
NEXT
CHANGE
Press to ® to end the session if you do not want to go on to change
the date. To change the date, continue with Step 10.
10. Press NEXT.
11. Press CHANGE.
Year:___
CANCL
12. Use the keypad to enter the year.
Year:01
NEXT
CHANGE
7
Time and Date
ACTION
VISUAL DISPLAY
13. Press NEXT.
Month:01
NEXT
CHANGE
14. Press CHANGE.
Month:__
CANCL
15. Use the keypad to enter 07 for July (01 is January; 12 is
December).
Month:07
NEXT
CHANGE
16. Press NEXT.
Day:01
NEXT
CHANGE
17. Press CHANGE.
DAY:__
CANCL
18. Use the keypad to enter the day (15).
Day:15
NEXT
19. Press ®.
CHANGE
End of session
After a few seconds, the date and time reappear on the
display.
15 July 1:30 pm
SHORTCUT – DATE CHANGE ONLY
To change the date only, jump to that section after beginning the programming session.
To change only the date, begin by placing the overlay on your extension (see page 2).
1. Press ≤ followed by ••°›fl‹ (the Time and Date code);
2. Press ¤¤‡›¤ (the Basic password).
3. Press ‘ twice. Then continue with the instructions above, starting at Step 12.
PROGRAMMING MAP FOR TIME AND DATE
ˆ Next
ˆ Next
Time & Date
Note:
The ˆ symbol means ‘Press’.
For example, press Show, Press Next, or Press Heading.
8
ˆ Show
Hour
Minutes
Year
ˆ Next
ˆ Next
ˆ Next
Month
Day
S E C T I O N
I I I
Pickup Groups
This feature allows you to answer calls for and from any extension in a Pickup Group.
This section shows you how to assign an extension to a Pickup Group and how to
answer a call from any extension within a Pickup Group. You can assign extensions to
one of four Pickup Groups. The options are 1 to 4 and None.
ASSIGNING AN EXTENSION
ACTION
VISUAL DISPLAY
1. Begin the session by following the instructions under "To begin
a programming session" on page 5 using the System
Administrator password.
Terminals&Extns
2. Press ≠.
Show Extn#:
LIST
3. Enter the number of the extension that you want to programme.
We used extension 234 for this example.
Show Extn#:23_
BKSP
234:234
COPY
LIST
FIND
4. Press ≠.
Capabilities:
COPY
5. Press ≠ once.
Fwd no answer
6. Press ‘ until the display shows:
Pickup grp:None
CHANGE
7. Press CHANGE until you find the Pickup Group
(1–9 or None) that you want to assign to the extension.
(We have used 1 as an example.)
Pickup grp:1
8. Press ®.
End of session
After a few seconds, the date and time reappear on the
display.
CHANGE
1 Jan 1 am
9
Pickup Groups
ANSWERING AN EXTENSION
If there is more than one incoming call at an extension in a Pickup Group, calls are answered in this
sequence:
1. on an extension line,
2. on the prime line, and
3. on internal lines.
This feature cannot be used to retrieve a camped call.
ACTION
VISUAL DISPLAY
1. Pick up any extension in your pickup group and press ≤‡fi.
PROGRAMMING MAP TERMINALS AND EXTENSIONS
(System Administrator Plus password)
Show extn#
ˆ Show
Line access
Enter extension or
Terminals & Extns
ˆ Next
ˆ Next
ˆ Show
to go through a list of
telephones.
Capabilities
ˆ Show
ˆ Show
(System Administrator password)
Fwd no answer
ˆ Show, Fwd to
ˆ Next Fwd on busy
Note:
The ˆ symbol means ‘Press’.
For example, Press Show, Press Next, or Press Heading.
10
ˆ Show, Fwd to
ˆ Next DND on busy
ˆ Next Handsfree
ˆ Next HF on answerback
ˆ Next Pickup grp
ˆ Next Page zone
ˆ Next Paging
ˆ Next D-Dial
ˆ Next Priority call
ˆ Next Hotline
ˆ Next Aux. ringer
ˆ Next Redirect ring
ˆ Next Receive tones
ˆ Next ATA settings
ˆ Next Intrusion
S E C T I O N
I V
Line Access
This section shows you both how to assign lines to individual extensions, and how to
programme the number of appearances of DIA lines at each extension.
LINE ASSIGNMENT
With this setting, you assign physical lines and Direct Inward Access (DIA) lines to each extension.
• DIA lines are assigned and removed in the same manner as other lines.
• In general, exchange lines are not assigned to extensions unless the extension is used for monitoring
incoming calls or making outgoing calls.
• You cannot assign a private line to another extension.
• Each assigned line must appear at an extension at a key with an indicator. If you set a line to Ring
only, incoming calls appear on the intercom key
EXCEPTION: Central Answering Position module is only available on the M7324N. The M7100N has
no line keys and is assigned any number of lines, but you must be sure that all lines assigned to the
M7100N are set to ring. Otherwise, incoming calls are not heard.
ACTION
VISUAL DISPLAY
1. Begin the session by following the instructions under "To begin
a programming session" on page 5 using the System
Administrator Plus password.
Terminals&Extns
2. Press ≠.
Show Extn#:
LIST
3. Enter the number of the extension that you want to programme.
We used extension 221 for this example.
Show Extn#:22_
BKSP
221:221
COPY
LIST
FIND
4. Press ≠.
Line access:
COPY
5. Press ≠ twice.
Show line ...
SCAN
LIST
Show line:001
SCAN BKSP
LIST
6. Enter the line number. Line number 001 is used as an example.
7. Press SCAN to see the setting.
L001:Ring Only
SCAN FIND CHANGE
8. Press CHANGE to change the setting for each line to: Ring only,
Appr&Ring, Appr. Only or Unassigned.
Appr&Ring
SCAN FIND CHANGE
9. Press ® to exit the session.
End of session
After a few seconds, the date and time reappear on the
display.
15 Jul 1:30 pm
11
Line Access
LINE APPEARANCES
With this setting, you can programme the number of appearances a DIA line is permitted at each
extension.
• Line appearances rely on the previously described line-assignment setting, Ring Only, Appr&Ring or
Appr. only. If you choose Appr&Ring or Appr. only, there can be as many simultaneous DDI calls as
there are DIA key appearances. If Ring only is chosen, there can be as many simultaneous DDI calls
as there are intercom keys. At least one intercom key needs to remain open for outgoing calls.
• It is best to limit the number of line keys to four per extension. More line keys can be programmed
on any given extension by programming fewer on another extension. For example, choose this option
to programme 20 keys on an extension equipped with a Central Answering Position module.
ACTION
VISUAL DISPLAY
1. Begin the session by following the instructions under "To
begin a programming session" on page 5 using the System
Administrator Plus password.
Terminals&Extns
2. Press ≠.
Show Extn#:
LIST
3. Enter the number of the extension that you want to programme.
We used extension 221 for this example.
Show Extn#:22_
BKSP
221:221
COPY
LIST
FIND
4. Press ≠
Line access
COPY
5. Press ≠ twice.
Show line ....
SCAN
LIST
Show line:282
SCAN BKSP
LIST
6. Enter the line number. Line number 282 is used as an example.
7. Press SCAN to see the setting.
L282:Appr&Ring
SCAN FIND CHANGE
8. Press ≠.
Appearances:1
CHANGE
9. Press CHANGE and enter 4. For our example, we have chosen
to have DIA line 282 appear on extension 221 four times.
Appearances:4
CANCL BKSP
10. Press OK.
Appearances:4
OK
CHANGE
11. Press ® to exit the session.
After a few seconds, the date and time reappear on the
display.
12
End of session
1 Jan 1:00 am
Line Access
PROGRAMMING MAP FOR LINES
Show extn#
Enter extension or
Terminals & Extns
ˆ Next
ˆ Show
to go through a list of
telephones.
ˆ Show
Line access
ˆ Show
Line assignment
ˆ Show, Show line
ˆ Next Line Pool access
ˆ Show, Line Pool A
ˆ Show, Line Pool B to O
ˆ Next Prime line
ˆ Next Intercom keys
ˆ Next Answer extns
ˆ Show, Show extn#
ˆ Show, 221
ˆ Next OLI #
Note:
The ˆ symbol means ‘Press’.
For example, Press Show, Press Next, or Press Heading.
13
Restrictions
This feature prevents users from dialling certain numbers by assigning filters
(packages of pre-set restrictions) to a line or extension. Filters can be added to an
extension even if that extension shares a line. You can also programme extensions to
override the filters.
Some of the more popular filters that restrict long-distance calls are already in place by
default. Please refer to your System Administration Guide for a complete list of default
filters.
In the following example, we assign restriction filter 11 to extension 221. Then we add
a restriction and an exception to restriction filter 11.
SELECTING A FILTER OR ADDING RESTRICTIONS AND
EXCEPTIONS TO AN EXTENSION
ACTION
VISUAL DISPLAY
1. Begin the session by following the instructions under "To begin
a programming session" on page 5 using the System
Administrator Plus password.
Terminals&Extns
2. Press ≠.
Show Extn#:
LIST
3. Enter the number of the extension that you want to programme.
We used extension 221 for this example.
Show Extn#:22_
BKSP
221:221
COPY
4. Press ≠.
Line access:
COPY
5. Press ‘ four times.
Restrictions
COPY
LIST
FIND
You can now add a filter
6. Press ≠.
Restrn filters
7. Press ≠.
Show filters:__
COPY
LIST
Show filter:1_
COPY
BKSP
LIST
Restrn filter11
COPY
FIND
8. Press ⁄⁄
The display shows:
14
Restrictions
ACTION
VISUAL DISPLAY
You have selected a filter. You can now add restrictions.
9. Press ≠.
No restrictions
ADD
10. Press ADD.
Restrn 01:
ANY
11. Press ANY.
Restrn 01:•__
ANY
BKSP
OK
Restrn 01:•8
ANY
BKSP
OK
12. Press °.
13. Press OK. Now, extension 221 cannot dial out a number with 8 as
the second digit.
Restrn 01:•8
ADD
REMOVE
You can now add an exception.
14. Press ≠
Deny:•8
15. Press ‘.
No overrides
ADD
16. Press ADD. Remember, you are still programming dialling filter
11, restriction 01 for extension 221.
Override 001:
ANY
17. Press ‚°‚‚
Override 001:0800
ANY
BKSP
OK
18. Press OK. Numbers that begin with 0800 can now be dialled.
Override 001:08..
ADD
REMOVE
19. Press ® to exit the session.
End of session
20. After a few seconds, the date and time reappear on the display.
1 Jan 1:00 am
ASSIGNING A DIALLING FILTER TO A LINE
ACTION
VISUAL DISPLAY
1. Begin the session by following the instructions under "To begin
a programming session" on page 5 using the System
Administrator Plus password.
Terminals&Extns
2. Press ‘.
Lines
LIST
3. Press ≠.
Show lines __
15
Restrictions
ACTION
VISUAL DISPLAY
4. Enter the three-digit line number to which you want to assign
restrictions.
Show lines: 00BKSP
For this example, we chose line 001.
LIST
Line 001:Line 001
FIND
5. Press ≠.
Name:Line 001
CHANGE
6. Press ‘.
Restrictions
COPY
7. Press ≠.
Restrn filters
8. Press ‘.
Line restrns
9. Press ≠.
Normal:03
CLR
CHANGE
10. Press CHANGE.
Use flt:__
CANCL
11. Press ‚‚ to define restriction 00.
Use flt: 0_
COPY
BKSP
Restriction 00 has no restrictions. Now, any number can be
called, but from this line only.
12. Press ® to exit the session.
After a few seconds, the date and time reappear on the
display.
LIST
Normal:00
CHANGE
End of session
1 Jan 1:00 am
ASSIGNING A RESTRICTION FILTER TO AN EXTENSION
ACTION
VISUAL DISPLAY
1. Begin the session by following the instructions under "To begin
a programming session" on page 5 using the System
Administrator Plus password.
Terminals&Extns
2. Press ≠.
Show extn#:__
3. Enter the extension to which you want to add a restriction filter.
Show extn#:22_
BKSP
For this example, we used extension 227.
16
227:227
COPY
LIST
FIND
Restrictions
ACTION
VISUAL DISPLAY
4. Press ≠.
Line access
COPY
5. Press ‘ four times.
Restrictions
COPY
6. Press ≠.
Restrn filters
7. Press ‘.
Extn restrns
8. Press ≠.
Filters
9. Press ≠.
Normal:02
CLR
CHANGE
10. Press CHANGE.
Use flt:__
CANCL
11. Press ‚⁄ to assign dialling filter 01.
Use flt:0_
CANCL BKSP
Dialling filter 01 restricts calls to local numbers only. You
cannot dial long-distance numbers, even using line 001.
Normal:01
CLR
12. Press ® to exit the session.
CHANGE
End of session
After a few seconds, the date and time reappear on the
display.
1 Jan 1:00 am
PROGRAMMING MAP FOR LINE RESTRICTIONS
Show extn#
ˆ Show
Line access
Enter extension or
Terminals & Extns
ˆ Next X 4
ˆ Next
ˆ Show
to go through a list of
telephones.
Restictions
ˆ Show
ˆ Next
Extn restrns
Filters
Extn Lock
Allow last no
Allow saved no
Allow recall
Allow redirect
ˆ Next Line/extn rstrn
ˆ Next
Lines
ˆ Show
Show line
Enter line number
ˆ Show
Name
ˆ Next
Restictions
Note:
The ˆ symbol means ‘Press’. For example,
Press Show, Press Next, or Press Heading.
Restrn filters
ˆ Show, Show filter
ˆ Show, Show line
ˆ Show
Restrn filters
ˆ Next Line restrns
ˆ Next
Remote restrns
17
Speed Dial
This Speed Dial section shows you how to programme a new Speed Dial code from start
to finish, including:
• Programming a system-wide Speed Dial code
• Selecting a line for the Speed Dial code
• Choosing the Speed Dial display format
• Programming a name for the Speed Dial code
• Confirming the dialling restrictions
ACTION
VISUAL DISPLAY
1. Begin the session by following the instructions under "To begin
a programming session" on page 5 using the System
Administrator Plus password.
Terminals&Extns
2. Press ‘ three times.
Sys Speed Dial
3. Continue programming using the instructions under each feature
in the pages that follow.
SHORTCUTS
If you want to re-programme just one part of the Speed Dial feature – for example, Choosing a
Speed Dial format display – you can jump to that section after beginning a programming session.
To do that, complete steps 1 and 2 as above. Then follow the steps below to accomplish the task.
Selecting a line for the Speed Dial code
1. Press ≠.
2. Enter the Speed Dial code for which you wish to select a line.
3. Press ≠.
4. Press ‘.
5. Press CHANGE until the line assignment you want is on the display.
Changing the Speed Dial display format
1. Press ≠.
2. Enter the Speed Dial code for which you wish to change the format.
3. Press ≠.
4. Press ‘ twice.
5. Press CHANGE to change between Y (do not display digits) and N (display digits).
18
Speed Dial
SHORTCUTS (continued)
Programming a name for the Speed Dial code (NOTE: To do this, Display digits must be set to
“No.”
1. Press ≠.
2. Enter the Speed Dial code for which you wish to change the name.
3. Press ≠.
4. Press ‘ three times.
5. Press CHANGE.
6. Use the keypad and – –> until the entire name is entered.
Confirming dialling restrictions
1. Press ≠.
2. Enter the Speed Dial code for which you wish to select a line.
3. Press ≠.
4. Press ‘ four times.
5. Use CHANGE to change between Y (bypass restrictions) and N (do not bypass restrictions).
Ending the session
Press ®. “End of session” appears on the display. After a few seconds, the display shows the date
and time.
PROGRAMMING A SYSTEM-WIDE SPEED DIAL CODE
ACTION
VISUAL DISPLAY
1. Press ≠.
Speed Dial#:__
2. Enter the Speed Dial code (from 001 to 255) you wish to
programme (for example, 001).
Speed Dial#:001
3. Press ≠.
001:No number
CLR
CHANGE
4. Press CHANGE.
001:__
CANCL
5. Use the keypad to enter the exchange (for example: 0191 256
7843). The number can contain up to 24 digits.
001:01912567843
CANCL BKSP
OK
6. Press OK.
001:01912567843
CLR
CHANGE
FIND
19
Speed Dial
SELECTING A LINE FOR THE NEW SPEED DIAL CODE
ACTION
VISUAL DISPLAY
1. After programming the new exchange, as explained in the
previous section:
001:01912567843
CLR
CHANGE
2. Press ‘.
Use prime line
CHANGE
3. Press CHANGE repeatedly to scroll through the options (Use
prime line, Use line: ___, Pool code _, and Use routing table). In
this example, choose the prime line. Stop scrolling when this
comes back up on the display:
Use Lines ____
CHANGE
Only extensions where this line appears have access to this Speed Dial code.
CHOOSING THE SPEED DIAL DISPLAY FORMAT
ACTION
VISUAL DISPLAY
1. After choosing the line with the previous procedure, you can
choose to see either the extension number being dialled or a name
that you have chosen. The display shows:
Use prime line
2. Press ‘.
Display digits:Y
CHANGE
3. Press CHANGE to change between Y (see the extension number)
and N (to choose a name for the Speed Dial code).
Display digits:N
CHANGE
CHANGE
PROGRAMMING A NAME FOR THE SPEED DIAL CODE
ACTION
VISUAL DISPLAY
1. Press ‘. This default name is displayed:
Name:Sys Spd Di..
CHANGE
2. Press CHANGE.
Name:__
--->
3. Press the number on the keypad that represents the first letter of the
name. Press the key repeatedly until the letter appears.
Name:S__
<--BKSP
--->
Name:Sutton
<--BKSP
--->
Example: for the name “Sutton,” press the keypad number 7
three times to display the letter “S”.
Press ---> to move to the next letter in the name.
Press # to enter a space.
4.
Use the keypad and --> until the entire name is entered.
The name can be up to 16 characters long.
5. Press ‘ to continue programming.
20
Name:Sutton
CLR
CHANGE
Speed Dial
CONFIRMING THE DIALLING RESTRICTIONS
The system cannot bypass dialling restrictions already on the extension or line. This feature can either
confirm existing restrictions or lift them. To change the dialling restrictions, refer to “Adjusting the
Dialling restrictions.”
ACTION
VISUAL DISPLAY
1. After programming the Speed Dial name, the display shows:
Name:Sutton
CLR
CHANGE
2. Press ‘. This display shows that the dialling
restrictions on that line remain in effect.
Bypass rest’n:N
CHANGE
3. Press ® to exit the session.
End of session
4. After a few seconds, the date and time reappear on the display.
1 Jan 1:00 am
PROGRAMMING MAP FOR SYSTEM SPEED DIAL
Speed dial number is displayed
ˆ Show, Use prime line
Speed dial #
(Enter number)
Sys speed dial
ˆ Show
ˆ Show
ˆ Next
Display digits
(if display digits=N)
ˆ Show, Name
ˆ Next Bypass restr’n
Note:
The ˆ symbol means ‘Press’. For example,
Press Show, Press Next, or Press Heading.
21
Call Forward No Answer
You can programme an extension to forward a call to a pre-determined extension if the
call is not answered within a set number of rings. The default setting is 4, but options 2,
3, 4, 6 and 10 rings are available.
If a designated extension is set on Do Not Disturb or Do Not Disturb On Busy, the
incoming call continues to ring at the original extension and the caller continues to hear
ringback. To lessen the chance of this happening, you can designate a second back-up
extension.
Calls coming in on an outside line are automatically transferred to the Prime extension
for that line.
ACTION
VISUAL DISPLAY
1. Begin the session by following the instructions under "To begin
a programming session" on page 5 using the System
Administrator Plus password.
Terminals&Extns
2. Press ≠.
Show extn#:__
3. Enter the number of the extension you wish to programme (234
represents the number of the extension you have chosen to
programme.)
234:234
COPY
4. Press ≠.
Line access
COPY
5. Press ‘
Capabilities
COPY
6. Press ≠.
Fwd no answer
7. Press ≠.
Fwd to:None
FIND
CHANGE
8. Press CHANGE.
Fwd to:__
CANCL
9. Use the keypad to enter the extension to which you want the calls
sent. (Extension 221 is used in this example.)
Fwd to:2__
CANCL BKSP
When you have entered all the numbers, the display shows:
10. Press ® to exit the session.
After a few seconds, the date and time reappear on the
display.
22
Fwd to:221
CLR
End of session
1 Jan 1:00 am
CHANGE
Call Forward No Answer
PROGRAMMING MAP FOR TERMINAL CAPABILITIES
Show extn#
ˆ Show
Line access
Enter extension or
Terminals & Extns
ˆ Next
ˆ Next
ˆ Show
to go through a list of
telephones.
Capabilities
ˆ Show
Fwd no answer
ˆ Show, Fwd to
Note:
The ˆ symbol means ‘Press’. For example,
Press Show, Press Next, or Press Heading.
ˆ Next, Forward Delay
ˆ Next Fwd on busy
ˆ Show, Fwd to
ˆ Next DND on busy
ˆ Next Handsfree
ˆ Next HF on answerback
ˆ Next Pickup grp
ˆ Next Page zone
ˆ Next Paging
ˆ Next D-Dial
ˆ Next Priority call
ˆ Next Hotline
ˆ Next Aux. ringer
ˆ Next Redirect ring
ˆ Next Receive tones
ˆ Next ATA settings
ˆ Show, ATA ans timer
ˆ Next ATA mode
ˆ Next ATA tones
ˆ Next ATA use
ˆ Next Intrusion
ˆ Show Protect lvl
23
Call Forward on Busy
You can programme your extension to forward a call to a different extension if you are
engaged at your station or if you have Do Not Disturb activated.
ACTION
VISUAL DISPLAY
1. Begin the session by following the instructions under "To begin
a programming session" on page 5, and by using the System
Administrator Plus password.
Terminals&Extns
2. Press ≠.
Show extn#:__
3. Enter the number of the extension you wish to programme
(234 represents the number of the extension you have chosen to
programme)
234:234
COPY
4. Press ≠.
Line access
COPY
5. Press ‘.
Capabilities
COPY
6. Press ≠.
Fwd no answer
7. Press ‘.
Fwd on busy ....
8. Press ≠.
Fwd to:None
FIND
CHANGE
9. Press CHANGE
Fwd to:__
CANCL
10. Use the keypad to enter the extension to which you want the
calls sent. (Extension 221 in this example.)
Fwd to:2__
CANCL BKSP
11. When you have entered all the digits, the display shows:
Fwd to:221
CLR
12. Press ® to exit the session.
End of session
13. After a few seconds, the date and time reappear on the display.
1 Jan 1:00 am
24
CHANGE
Call Forward on Busy
PROGRAMMING MAP FOR TERMINAL CAPABILITIES
Show extn#
ˆ Show
Line access
Enter extension or
Terminals & Extns
ˆ Next
ˆ Next
ˆ Show
to go through a list of
telephones.
Capabilities
ˆ Show
Fwd no answer
ˆ Show, Fwd to
Note:
The ˆ symbol means ‘Press’. For example,
Press Show, Press Next, or Press Heading.
ˆ Next, Forward Delay
ˆ Next Fwd on busy
ˆ Show, Fwd to
ˆ Next DND on busy
ˆ Next Handsfree
ˆ Next HF on answerback
ˆ Next Pickup grp
ˆ Next Page zone
ˆ Next Paging
ˆ Next D-Dial
ˆ Next Priority call
ˆ Next Hotline
ˆ Next Aux. ringer
ˆ Next Redirect ring
ˆ Next Receive tones
ˆ Next ATA settings
ˆ Show, ATA ans timer
ˆ Next ATA mode
ˆ Next ATA tones
ˆ Next ATA use
ˆ Next Intrusion
ˆ Show Protect lvl
25
Naming Extensions
This section allows you to assign a name to each extension in your office.
ACTION
VISUAL DISPLAY
1. Begin the session by following the instructions under "To begin
a programming session" on page 5, and by using the System
Administrator Plus password.
Terminals&Extns
2. Press ≠.
Show extn#:__
3. Enter the number of the extension you wish to programme.
(234 represents the number of the extension you have chosen to
programme.)
234:234
COPY
4. Press ≠.
Line access
COPY
5. Press ‘.
Capabilities
Copy
6. Press ‘. (The default “name” is the extension number.)
Name:234
CLR
7. Press CHANGE.
FIND
CHANGE
Name:__
--->
8. Press the number on the keypad that represents the first letter of
the name.
Name:B..
<--BKSP
--->
Press the key repeatedly until the letter appears. Example:
For the name “B JONES,” press 7 on the keypad, three
times. For more information about this, please see
"USING THE KEYPAD TO ENTER LETTERS" on
page 4.)
Press ---> to move to the next letter. Press £ to enter a space.
Use the keypad and the arrows until the entire name is
entered. The name can be up to seven characters long.
Name:B JONES
BKSP
9. Press ‘ to save.
Name:B JONES
CLR
CHANGE
10. Press ® to exit the session.
End of session
11. After a few seconds, the date and time reappear on the display.
1 Jan 1:00 am
26
Naming Extensions
PROGRAMMING MAP FOR NAMING EXTENSIONS
Show extn#
ˆ Show
Line access
Enter extension or
Terminals & Extns
ˆ Next
ˆ Next
ˆ Show
to go through a list of
telephones.
Capabilities
ˆ Next
Note:
The ˆ symbol means ‘Press’. For example,
Press Show, Press Next, or Press Heading.
Name
27
Moving Extensions
This feature allows you to move an extension to another socket without losing all of its
custom programming or its assigned extension number.
There are some things to know about this feature to ensure success:
• It may take up to 60 seconds for the Central Control Unit to recognise the extension
at the new location.
• Direct Inward Access (DIA) lines are virtual lines, not physical ones. Therefore,
when you move an extension, the DIA lines programmed for that extension are not
moved with the telephone.
• Make one complete move at a time. In other words, take one extension, plug it in to
the new socket and wait for the CCU to accept it before using the abandoned socket.
• If you do not wait, the new extension going into the old socket receives all the
programming from the old extension.
• It is important to ensure that all sockets used support a Norstar unit.
• If a fax machine, ATA, analogue telephone or modem was plugged into the socket,
do not use a Norstar unit in that socket.
ACTION
VISUAL DISPLAY
1. Begin the session by following the instructions under "To begin
a programming session" on page 5, and by using the System
Administrator Plus password.
Terminals&Extns
2. Press ‘ six times.
System prgrming
3. Press ≠.
Hunt Groups
4. Press ‘.
Featr settings
5. Press ≠.
Backgrnd music:N
CHANGE
6. Press ‘ until this appears on the display:
Extn relocatn:N
CHANGE
7. Press CHANGE to choose Y (Yes).
Extn relocatn:Y
CHANGE
8. Press ® to exit the session.
End of session
9. After a few seconds, the date and time reappear on the display.
1 Jan 1:00 am
28
Moving Extensions
PROGRAMMING MAP FOR SETTING SYSTEM PROGRAMMING
Note:
The ˆ symbol means ‘Press’. For example,
Press Show, Press Next, or Press Heading.
Hunt groups
ˆ Next
Featr settings
System prgrming
ˆ Show
ˆ Show
Backgrnd music
ˆ Show On hold
ˆ Next Receiver volume
ˆ Next Camp timeout
ˆ Next Park timeout
ˆ Next Park Mode
ˆ Next Trnsfr callbk
ˆ Next Netwk callbk
ˆ Next Held reminder
ˆ Next Remind delay
ˆ Next Confrence tone
ˆ Next Directd pickup
ˆ Next Page tone
ˆ Next Page Timeout
ˆ Next AutoTime&Date
ˆ Next Call log space
ˆ Next Alarm Extn
ˆ Next Extn relocation
ˆ Next Answer Extn
ˆ Next SWCA Cntrls
ˆ Next CLID Match
29
Ringing Service
This service is used if you want to treat incoming calls differently during the lunch
hour, in the evening or during holidays.
You can set up the Ringing Service to handle calls according to any one of six different
pre-programmed schedules:
• Night
• Evening
• Lunch
• Schedule 4
• Schedule 5
• Schedule 6
If the Ringing Service feature is set to manual, it remains in effect until you switch it
off, regardless of any pre-existing automatic schedules. Manual also overrides any
automatic service that is currently active.
The default control extension for all lines is 221.
TURNING RINGING SERVICE ON OR OFF
ACTION
VISUAL DISPLAY
1. Begin the session by following the instructions under "To begin
a programming session" on page 5, and by using the System
Administrator Plus password.
Terminals&Extns
2. Press ‘ twice.
Services
3. Press ≠.
Ringing Service
4. Press ≠.
Ringing groups
5. Press ‘.
Sched:Night
6. Press ≠.
Service:Manual
CHANGE
7. Press CHANGE to choose Manual, Auto or Off.
Service:Auto
CHANGE
8. Press ® to exit the session.
End of session
9. After a few seconds, the date and time reappear on the display.
1 Jan 1:00 am
30
Ringing Service
PROGRAMMING MAP FOR SERVICES
Services
ˆ Show
Note:
The ˆ symbol means ‘Press’. For example,
Press Show, Press Next, or Press Heading.
Ringing groups
ˆ Show, Sched:Night
Ringing service
ˆ Show
ˆ Next
Restrn service
ˆ Show
ˆ Next
Routing service
Sched:Evening
Sched:Lunch
Sched:Sched 4
Sched:Sched 5
Sched:Sched 6
Sched:Night
ˆ Next Sched:Evening
ˆ Next
ˆ Next
ˆ Next
ˆ Next
Sched:Lunch
Sched:Sched 4
Sched:Sched 5
Sched:Sched 6
ˆ Show
ˆ Next
Common settings
ˆ Show
ˆ Next
ˆ Next
ˆ Next
ˆ Next
ˆ Next
ˆ Next
ˆ Next
ˆ Next
Control extns
Routes
ˆ Next Dest codes
ˆ Show, Sched:Night
ˆ Next
ˆ Next
ˆ Next
ˆ Next
ˆ Next
Sched:Evening
Sched:Lunch
Sched:Sched 4
Sched:Sched 5
Sched:Sched 6
Schedule names
Schedule times
31
S E C T I O N
V
Programming map (System Administrator Plus password)
Show extn#
Line access
ˆ Show
ˆ Show
Enter extension or
Terminals & Extns
ˆ Next
ˆ Next
ˆ Show
to go through a list of
telephones.
Capabilities
ˆ Show
ˆ Next
ˆ Next
Lines
Show line
ˆ Show
Name
Enter line number or
ˆ Next
Services
ˆ Next
ˆ Show
User prefernces
Sys speed dial
ˆ Next
Name
Restictions
ˆ Next
ˆ Next
Passwords
Restictions
Restrn filters
ˆ Next Line restrns
ˆ Next Remote restrns
Time & Date
ˆ Next
Ringing groups
ˆ Show, Sched:Night
System prgrming
ˆ Next
Software keys
ˆ Next
Maintenance
ˆ Next
Ringing service
ˆ Show
ˆ Next
Restrn service
ˆ Show
ˆ Next
Routing service
Common settings
These
Headings
continued on
next page.
ˆ Show
ˆ Next
ˆ Next
ˆ Next
ˆ Next
ˆ Next
ˆ Next
ˆ Next
ˆ Next
Sched:Evening
Sched:Lunch
Sched:Sched 4
Sched:Sched 5
Sched:Sched 6
Sched:Night
ˆ Next Sched:Evening
ˆ Next
ˆ Next
ˆ Next
ˆ Next
Sched:Lunch
Sched:Sched 4
Sched:Sched 5
Sched:Sched 6
ˆ Show
ˆ Next
Usage Metrics
32
ˆ Show
ˆ Show
ˆ Next
ˆ Next
ˆ Show
ˆ Next
Call Services
Call Services
ˆ Show
ˆ Show
ˆ Next
Control extns
Schedule names
Schedule times
Routes
ˆ Next
ˆ Next Line Pool access
ˆ Show, Line Pool A
ˆ Show, Line Pool B to O
ˆ Next Prime line
ˆ Next Intercom keys
ˆ Next Answer extns
ˆ Show, Show extn#
ˆ Show, 221
ˆ Next OLI #
Fwd no answer
ˆ Show, Fwd to
ˆ Next Fwd on busy
ˆ Next
to go through a list of
the lines.
Line assignment
ˆ Show, Show line
Dest codes
ˆ Show, Sched:Night
ˆ Next Sched:Evening
ˆ Next Sched:Lunch
ˆ Next Sched:Sched 4
ˆ Next Sched:Sched 5
ˆ Next Sched:Sched 6
Note:
The ˆ symbol means ‘Press’. For example,
Press Show, Press Next, or Press Heading.
ˆ Show, Fwd to
ˆ Next DND on busy
ˆ Next Handsfree
ˆ Next HF on answerback
ˆ Next Pickup grp
ˆ Next Page zone
ˆ Next Paging
ˆ Next D-Dial
ˆ Next Priority call
ˆ Next Hotline
ˆ Next Aux. ringer
ˆ Next Redirect ring
ˆ Next Receive tones
ˆ Next ATA settings
ˆ Show, ATA ans timer
ˆ Next Intrusion
Model
ˆ Next
ˆ Next
ˆ Next
ˆ Next
ˆ Next
ˆ Next
ˆ Next
Key prgrming
User speed dial
Call log opt’ns
Dialling opt’ns
Language
Display cntrst
Ring type
Restrn filters
ˆ Show, Show filter
ˆ Next Extn restrns
ˆ Show
ˆ Next
ˆ Next
ˆ Next
ˆ Next
ˆ Next
Filters
Extn Lock
Allow last no
Allow saved no
Allow recall
Allow redirect
ˆ Next Line/extn rstrn
ˆ Show, Show line
Auto call info
ˆ Show, Show line
ˆ Next
ˆ Next
ˆ Next
1stDisplay
Auto Called ID
Log space
Programming map (System Administrator Plus password)
Speed dial # (enter #)
ˆ Show
ˆ Next
Display digits
(if display digits=N)
ˆ Show, Name
COS pswds
ˆ Show, Show pwd#
ˆ Next
ˆ Next
Call Log pswds
ˆ Show, Show extn#
ˆ Show, Log pswd
Terminals & Extns
ˆ Next
Progrming pswds
Lines
ˆ Show
Hospitality
Services
Hunt groups
ˆ Show
ˆ Next
ˆ Next
Sys speed dial
ˆ Show
Featr settings
ˆ Next
Passwords
ˆ Next
Time & Date
ˆ Show
ˆ Next
System Prgrming
ˆ Show
ˆ Next
Direct-dial
ˆ Show, D-dial1
ˆ Next, Intrnl #
ˆ Show
Hour
ˆ Next
ˆ Next
Minutes
Year
ˆ Next
ˆ Next
Month
Day
ˆ Next
Auto Attendant
ˆ Show
ˆ Next
ˆ Show
Remote access
ˆ Show
Sys ID
ˆ Next Password
keys
ˆ Show
ˆ Next
Hospitality
ˆ Show
ˆ Next
Maintenance
ˆ Show
ˆ Next
Usage Metrics
ˆ Show
Hunt Groups
System version
ˆ Next Clear lines
ˆ Next
ˆ Next
Sys admin log
Remote montr
Room/desk info
ˆ Show, Show extn#
ˆ Next Call restrns
ˆ Next Service time
ˆ Next Alarm
ˆ Show Attn attempts
ˆ Next Retry intrvl
ˆ Next Attn duration
ˆ Next Time format
Note:
The ˆ symbol means Press. For example,
Press Show, Press Next, or Press Heading.
Desk pswd 4677 (HOSP)
ˆNext Cond None
Show group
ˆ Show, Member extns
ˆ Next
ˆ Next
ˆ Next
ˆ Next
ˆ Next
ˆ Next
ˆ Next
ˆ Next
Line assignment
Mode
Hunt delay
If busy
Q Timeout
Overflow
Name
Dstnct ring
Backgrnd music
ˆ Show On hold
ˆ Next
Software keys
Basic (22742)
ˆ Show
ˆ Next
ˆ Next
Bypass restr’n
SysAdmin+ (727587)
ˆShow Sys admin (23646)
ˆ Next
ˆ Next
Speed dial number is displayed
ˆ Show, Use prime line
Rem access pkgs
ˆ Show, Show pkg
ˆ Next Rem line access
ˆ Next Receiver volume
ˆ Next Camp timeout
ˆ Next Park timeout
ˆ Next Park Mode
ˆ Next Trnsfr callbk
ˆ Next Trnsfr callbk
ˆ Next Netwk callbk
ˆ Next Held reminder
ˆ Next Remind delay
ˆ Next Confrence tone
ˆ Next Directd pickup
ˆ Next Page tone
ˆ Next Page Timeout
ˆ Next AutoTime&Date
ˆ Next Call log space
ˆ Next Alarm Extn
ˆ Next Extn relocation
ˆ Next Answer Extn
ˆ Next SWCA Cntrls
ˆ Next CLID Match
Auto attend
ˆ Show Attd Extn
ˆ Next System Answer
ˆ Next CCR
ˆ Show, After
ˆ Next CCR lines
ˆ Next CCR Groups
ˆ Show, Show group
ˆ Next CCR grp 1
ˆ Show, Show line
33
Programming map (System Administrator Plus password)
34
Programming map (System Administrator Plus password)
35
Published by Nortel Networks on behalf of British Telecommunications PLC. All
possible care has been taken in the preparation of this publication, but British
Telecommunications PLC assumes no liability for any inaccuracies that may occur.
British Telecommunication PLC reserves the right to make changes without notice both
to this publication and to the product that it describes.
No part of this publication may be reproduced, transmitted, transcribed, stored in a
retrieval system, or translated into any human or computer language in any form or by
any means without prior written permission of British Telecommunications PLC.
If you find any errors in this publication, or would like to make suggestions for its
improvement, please write to:
British Telecommunications
Norstar Product Manager
6th Floor, Parker Tower
43-49 Parker Street
London, WC2B 5PS
British Telecom is a registered trademark of:
British Telecommunications PLC
Registered Office 81, Newgate Street
London, EC1A 7AJ
Registered in England, Number 1800000
Meridian, Companion, and Norstar are trademarks of Nortel.
Meridian Norstar Business Communication System is manufactured by Nortel.
This document is for use with Compact Plus Release 5 Norstar UK.
P0607115 Issue 01
Printed in Canada
© 2003 Nortel Networks
Copyright Notice
This Nortel documentation is protected by copyright. It cannot be copied in any form
or medium except pursant to the Nortel Licence to Copy Documentation (“Licence”).
If a licence has been purchased, it is enclosed with this copy of Nortel documentation.