1
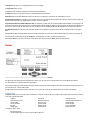
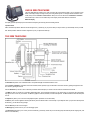
AVAYA 3904 TELEPHONE
The Avaya 3904 telephone enables users a variety of functions. Be sure to watch the display. The four “Soft Keys” at the
bottom of the display change according to what you are doing with the phone. For example, when the handset is on the
cradle, the keys read: FORWARD-CALLERS-REDIAL. When you’re on a live call it reads: CONFERENCE-TRANSFER.
Use the SHIFT key to access six more Feature Keys on the display. Use the QUIT button to exit Features.
Watch the Display
The display provides important prompts and information when placing and receiving calls and activating features.
Important Terms
PDN – Prime Directory Number. Extension number assigned to key 1 (Green Key) on your phone. When you lift your handset, you automatically access your PDN.
DN – Directory Number. Extension numbers assigned to keys on your phone other than key 1.
THE 3904 TELEPHONE
The Handsfree Key allows one to activate Handsfree. The speaker LED lights to indicate handsfree is active.
Use the Volume Control Bar to control the volume of the handset, headset, speaker, ringer, and handsfree. Increase the volume by pressing the right side of the
bar. Lower it by pressing the left side.
Press the Headset Key to answer a call on a headset (connected to the headset jack) or to switch a call from handset or handsfree to the headset.
The Mute Key allows you to listen to a conversation without being heard. This is especially useful when you only want to listen on a conference call. Push the Mute
Key again to return to a two way conversation. The Mute Key applies to handsfree, handset, and headset microphones. The Mute LED flashes when the Mute option
is in use.
The Options Key allows you to access and modify telephone options. (See below for more information).
The Quit Key ends an active application. Pressing the Quit Key does not affect the status of calls currently on your telephone. Note: If you press the Quit Key before
the Done Key, you exit without saving changes.
Press the Done Key to exit and save changes.
The Message Key provides access to your voice messaging system.
The Directory/Log Key allows you to access your Personal Directory (100 entries), Callers List (last 100 incoming calls) and Redial list (last 20 outgoing calls). See
below for more information.)
The Navigation Keys allow you to scroll through Menus and lists on the display.
The Applications Key is not used.
The Copy Key copies incoming or outgoing call numbers into the Personal Directory.
The Shift Key allows you to access the second layer of the Programmable Line/Feature Keys.
Fixed Feature Keys are the hard-labeled feature keys across the lower row of the phone. These features are standardized for every set.
Context Sensitive Soft Keys are configured for various features and functions. The Soft Keys are located below the display area. These keys have an LCD label
above them that changes based on available features, functions, or the active application.
Programmable Line/Directory Number (DN)/Feature Keys are assigned to your 3904. They can be a Primary Directory Number (PDN) or secondary DN(s). The
lower right hand Line/Feature Key on the first layer is your Primary Directory Number (PDN) Key. When you pick up the handset, the line associated with this key is
ready for you to make a call. NOTE: Although you have only one PDN, you can have additional Line/Directory Number (DN) Key(s) assigned to your telephone.
Line (DN)/Feature Keys are located at the sides of the upper display area. The Telephone Icon appears beside a line key to indicate changes in call or feature
status.
Message Waiting Light/Incoming Call Indicator glows red to indicate a message in the voice mail box or flashes with the ringing of the phone on an incoming call.
You can terminate an active call by pressing the Goodbye Key. The Goodbye Key is useful for disconnecting a handsfree call.
By pressing the Hold Key, you can put an active call on hold. Return to the caller by pressing the DN Key beside the flashing indicator.
Display
The upper portion of the display gives the preprogrammed 12 buttons. Only six show at a time. Press the SHIFT key to view additional layer of buttons.
The central display area is a three-line feature information display.
The lower portion displays the context sensitive soft keys that change according to the status of the phone and the features available according to that status. The
ones shown above are: Forward Callers Redial.
The entire display provides important information to prompt you as you place and receive calls and utilize the features and functions of the telephone.
OPTIONS LIST
The Options List allows you to customize certain characteristics of your phone. Screen prompts take you step-by-step through procedures and keep you informed
on the status of the following settings:
Language,
Change feature key label,
Screen contrast,
Volume adjustment,
Ring type,
Call log options,
To change any option’s setting:
-
-
Live dial pad,
Preferred name match,
Area code set-up,
Call timer enable,
Date/time format,
Key click enable,
Press the Options Key.
Use the Navigation Keys to move up or down through the options list.
-
Headset port on call,
Headset port external alerter and
recorder interface,
Call indicator light,
On hook default path,
Display diagnostics
-
Press the Select Key when the desired option is highlighted.
Change the option’s settings. Refer to the following pages for details. The display also provides you with information to adjust your selection.
Press the Done Key to save your changes.
-
Press the Quit Key or Options Key to exit.
OR
NOTE: If you press the Quit Key or Options Key before you press the Done Key, you exit the Options List without saving your changes.
Select a Language
The display is available in multiple languages. After you select Language from the Options List menu:
-
Use the Navigation Keys to highlight the desired language (e.g., English).
Press the Select Key.
Press the Done Key to save changes. – orPress the Quit Key or Options Key to exit.
Change a Feature Key label
You can change the name on the Line (DN)/Feature Keys (self- labeled). These keys are located on both sides of the top portion of the display area.
To change a Feature Key label:
-
Press the down Navigation Key once to highlight Change feature key label.
Press the Select Key. This action takes you to the Feature Key menu and highlights Change feature key label.
Press the Select Key again. The prompt asks you to select the key you want to change.
Press the Line(DN)/Feature Key whose label you want to change.
Press the Dial Pad Key that contains the first letter in your new label. Press
the key until the correct character appears.
Repeat until you have changed the entire label.
Press the Done Key to save changes.
Press the Quit Key or Options Key to exit.
NOTE: You cannot change the label on your primary DN(green key). Press the Shift Key if the label you want to change is on the second layer of the Line
(DN)/Feature Keys.
NOTE: Use the Case Key to change the case of the letter, as needed. You can use the Delete Key to delete one character.
NOTE: Press the Up Navigation Key to access special characters you may want to include in the label. Use the Navigation Keys to locate the character you want to
include. Press the Select Key to choose the highlighted character. Press the Done Key to return to label entry without selecting a special character.
To restore one key label:
-
From the Feature Key menu, use the down Navigation Key to highlight Restore one key label option.
Press the Select Soft Key.
Press the Line(DN)/Feature Key (self-labeled) that you want to restore to the original label.
Press the Done Key to return to the Options List menu.
Press the Quit Key or Options Key to exit.
To restore all key labels:
-
Use the down Navigation Key to highlight Restore all key labels option.
Press the Select Key. The display asks you to verify that you want to restore all labels.
Press the Yes Key.
Press the Done Key to return to the Options List menu.
Press the Quit Key or Options Key to exit.
Adjust Screen Contrast
The Screen contrast option allows you to adjust the contrast of the display on your telephone.
After you select Screen contrast from the Options List menu:
-
From the Contrast screen, press the Lower Key to decrease the display contrast level, or press the Higher Key to increase the display contrast level.
Press the Done Key to save changes.
Press the Quit Key or Options Key to exit.
Adjust Volume
NOTE: After you select Volume adjustment from the Options List menu, a list of adjustable items appears.
To adjust the Ringer volume:
-
Select Ringer from the Volume menu.
-
Press the Lower Key to decrease the ringer volume, or press the Higher Key to increase the ringer volume.
Press the Done Key to save changes.
Press the Quit Key or Options Key to exit.
Use the procedure above to adjust the volume on the following items:
•
•
•
•
•
•
•
Buzzer
Handset listen
Headset listen
Headset sidetone
Headset talk
Handsfree listen
Speaker
Choose Ring Type
The Ring type option allows you to choose from several ringing sounds available.
After you select Ring type from the Options List menu:
-
Use the Navigation Keys to scroll through the list of ring types.
Press the Play Key to sample a ring tone.
Press the Select Key to activate the desired ring type.
Press the Done Key to save changes.
Press the Quit Key or Options Key to exit.
Select Call Log options
The Call Log options provide a choice of logging all incoming calls or logging only the unanswered calls. The Call Log holds up to 100 different incoming entries.
After you select Call log options from the Options List menu:
-
From the Log options menu, use the Navigation Keys to highlight and select either: Log all calls or Log unanswered calls
NOTE: New call indication must be set to On, if you want Call Log notification.
-
Press the Done Key to save selection.
Press the Quit Key or Options Key to exit.
Use Live dial pad
The Live dial pad option allows you to press any dial pad key to automatically access a dial tone.
After you select Live dial pad from the Options List menu:
-
From the Live dial pad screen, press the On Key to turn on Live dial pad, or press the Off Key to turn off Live dial pad.
Press the Done Key to save changes.
Press the Quit Key or Options Key to exit.
Select Preferred name match
The Preferred name match option displays the names of incoming and outgoing callers as stored in your Personal Directory, if the telephone number matches the
one stored in your directory. This option allows you to personalize the displayed names for incoming and outgoing calls.
After you select Preferred name match from the Options List menu:
-
From the Name match screen, press the On Key to turn on Preferred name match,
or press the Off Key to turn off Preferred name match.
Press the Done Key to save changes.
Press the Quit Key or Options Key to exit.
Set up area code
Using the Area code set-up option causes the Callers List and Calling Line ID (CLID) display to show the number/extension followed by the area code/prefix in
parenthesis. This makes it easier to identify local calls and internal calls. You can define up to three codes.
After you select Area code set-up from the Options List menu:
-
Use the Navigation keys to place your cursor in the first line and enter an area/country code of your choice.
NOTE: You can enter up to three codes of your choice.
Press the Done Key to save changes.
Press the Quit Key or Options Key to exit.
Enable Call timer
The Call timer enable option measures how long you are on each call only if it is NOT an ACD phone.
After you select Call timer enable from the Options List menu:
-
From the Call timer screen, press the On Key to turn on the Call timer,
or press the Off Key to turn off the Call timer.
Press the Done Key to save changes.
Press the Quit Key or Options Key to exit.
Select Date/Time Format
There are eight Date/time formats. Four formats are based on the 12-hour clock and four are based on the 24-hour clock.
After you select Date/time format from the Options List menu:
-
Use the Navigation Keys to scroll through the eight formats. The sample formats appear on the upper right side of the display area.
Press the Done Key to select the highlighted format.
Press the Quit Key or Options Key to exit.
Enable Key click
The Key click option causes the handset or speaker to produce a clicking sound when you press the telephone keys.
After you select Key click enable from the Options List menu:
-
From the Key click screen, press the On Key to turn on Key click,
or press the Off Key to turn off Key click.
Press the Done Key to save changes.
Press the Quit Key or Options Key to exit.
Use Headset port on call/Activate
Headset port external alerter
These two functions require external equipment that is not currently in use on our system.
Use Call Indicator Light
The flashing red light that indicates an incoming call can be turned off.
After you select Call indicator light from the Options List menu:
-
From the Indicator screen, press the Off Key to turn off Call indicator light.
Press the Done Key to save changes.
Press the Quit Key or Options Key to exit.
Set On-hook default path
The On-hook default path option automatically opens the voice path on either a Headset (connected to the headset jack) or on Handsfree when you press a Line
(DN) Key.
After you select On hook default path from the Options List menu:
-
From the On hook path menu, use the Navigation Keys to highlight and select either: Handsfree selected or Headset selected
Press the Done Key to save selection.
Press the Quit Key or Options Key to exit.
Display diagnostics
Note: To be used by technicians.
PLACE A CALL
-
Lift the handset.
-
OR
-
Press the Line (DN) Key.
-
OR
-
Press the Handsfree Key.
-
OR
-
Press the Headset Key if you have a headset connected to your telephone’s headset jack
-
Dial the number.
NOTE: Whenever you read “Lift the handset,” in this guide, you may alternatively press a free Line (DN) Key, Handsfree Key, or the Headset Key. You receive dial
tone with each of these actions.
To change from handset to headset:
The Headset Key is used to switch to the headset mode of operation. The LED lights steadily to indicate that you are in headset mode.
ANSWER A CALL
When you receive an incoming call, your telephone rings and the red LCD indicator flashes.
To answer a call:
-
Lift the handset.
-
OR
-
Press the Handsfree Key
-
OR
-
Press the Line (DN) Key beside the LCD indicator as it flashes.
-
OR
-
Press the Headset Key if you have a headset connected to your telephone.
STANDARD FEATURES
Auto Dial
Auto Dial lets you dedicate a Line (DN)/feature Key to a specific telephone number. When the Auto Dial Key is pressed, the number is dialed automatically.
To store an Auto Dial number:
-
Press the Auto Dial Key, without lifting the handset.
Enter the number to be stored on the Auto Dial Key.
NOTE 1: Remember the appropriate dialing format when programming autodials—use 5 digits for internal numbers and insert 8 before external numbers.
-
Press the Auto Dial Key again. The number is stored on the key.
To use Auto Dial:
-
Lift the handset. - Press the associated Auto Dial Key. The number is dialed automatically.
NOTE: To change the key label “AutoDial”, select Change feature key label from the Options List menu.
Call Forward All Calls
The Call Forward feature allows you to direct your calls to ring at another line (DN).
To forward your calls:
-
Press the Forward Key (soft key). The previously stored forward number appears, if one exists, and the screen displays Enter forward number.
If desired, enter a new number. The existing number is automatically deleted. If you make a mistake, use the Delete Key to delete the previous digit(s).
Press Cancel to leave this screen without forwarding your telephone or changing the number.
Press the Done Key (soft key) to activate Call Forward.
To view the number that your calls are being forwarded to:
-
Press the Check Forward Key (soft key).
Press the Exit Key (soft key) to return to the previous screen. This action will leave Call Forward active.
To cancel Call Forward:
- Press the Check Forward Key (soft key).
- Press the Cancel Forward Key (soft key).
Call Pickup Group
To answer a call:
-
Lift the handset.
Press the Pickup Key (soft key). You are now connected to the caller.
NOTE: If more than one telephone in the call pickup group is ringing, the telephone that has been ringing the longest will be answered.
Conference Call
You can set up a Conference Call for up to six people (including yourself).
To set up a conference call:
- Press the Conference Key (soft key) while you are on a call. The other party is on hold and you receive dial tone. The screen displays Call on hold, dial
number.
- Dial the number of the person you want to add to the conference.
- Press the Swap Key to switch between talking with the original caller and the new caller if necessary -OR- Press the Connect Key to complete the conference. Everyone is able to join the conversation.
Proceed to add additional parties to the call.
If the person you attempt to add to the conference is unavailable, e.g., no answer, voice mail, wrong number…:
-
Press the Goodbye Key.
Press the Line (DN) Key with the flashing icon to return to your original call.
Intercom
The Group Intercom allows you to use abbreviated dialing to call another member in your intercom group.
To make an Intercom call:
-
Lift the handset.
Press the Group Intercom Key.
Dial the one or two digit code for the intercom group member you wish to call.
To answer an Intercom call:
-
Lift the handset.
Press the Intercom Key.
NOTE: Intercom calls can be put on hold to use other lines on your phone.
Hold
Allows you to place an existing call on hold.
To place a call on Hold:
-
Press the Hold Key.The LCD indicator flashes beside the line on hold.
To retrieve a call on hold:
-
Press the Line (DN) Key beside the flashing LCD indicator.
NOTE : The caller hears music while on hold
Last Number Redial
Last Number Redial allows you to automatically redial the last number you dialed.
To use Last Number Redial:
-
Lift the handset or press a Line (DN) key twice.
Message Waiting Light & Message Key
The Message Waiting Light indicates that you have new messages in your voice mail box. The message waiting indicator is the red bar located across the top of the
phone.
To retrieve messages:
-
Lift the handset or press a Line (DN) key.
Press the Message key. You will be connected to the Voice Mail system and prompted to enter your passcode. (Follow regular voice mail procedures.)
Ring Again
Use the Ring Again feature when you dial a campus number and receive a busy tone. The Ring Again feature notifies you when the person you dialed is available.
Upon your response, the Ring Again feature automatically redials the number.
To use Ring Again:
-
Dial a campus number, receive a busy tone.
Press the Ring Again Key (soft key). The screen displays Ring again is active.
To call a Ring Again party when you receive notification:
When the number you want to reach is available, you hear the Ring Again tone.
-
Lift the handset or press a Line (DN) key.
Press the Ring Call Key (soft key). Your phone dials the designated number.
To cancel Ring Again before notification:
-
Press the Cancel Ring Again Key (soft key). he screen displays Ring Again is cancelled.
NOTE: A “fast busy” indicates that Ring Again is not available on the phone you are calling.
NOTE: Ring Again only works for on campus calls.
Speed Call
The Speed Call feature allows you to automatically dial frequently called numbers by entering a one or two digit access code.
To store or change a Speed Call number:
-
Press the Speed Call Controller Key (soft key). The screen displays Enter Code, then number.
Enter a one or two digit code—one for speed call short list, two digits for speed call long list.
Use the Delete Key if you make a mistake.
Use the Cancel Key to leave the screen without storing a speed call number.
NOTE: A dash is automatically inserted after the required number of digits have been entered. - Enter the associated telephone number.
Use the Delete Key if you make a mistake. Use the Cancel Key to leave the screen without storing a speed call number.
NOTE 2: Remember the appropriate dialing format when programming speed dials—use 5 digits for internal numbers and insert 8 before external numbers.
- Press the Done Key (soft key) to save the code and number.
To make a Speed Call:
-
Lift the handset or select a Line (DN) key.
Press the Speed Call Controller Key (soft key). The screen displays Enter code.
Dial the Speed Call code assigned to the telephone number. The number is automatically dialed.
Transfer/Three Way Conference
Use the Transfer feature to redirect a call to another party or to place a Three Way Conference call.
To use the Transfer feature:
- Press the Transfer Key (soft key). The other party is placed on hold and you receive a dial tone. The screen displays Call on hold, dial number.
- Dial the number of the telephone where the call is to be transferred. (Connect soft key appears).
- If you do not wish to announce the call, press the Connect Key to complete the transfer. The screen displays Conference.
- Press the Goodbye Key to release from the call.
- To announce the call, stay on the line until the called party answers.
-
Announce the call, then press the Connect Key to complete the transfer. The screen displays Conference.
Press the Goodbye Key to release from the call.
NOTE: The Swap option that appears on the soft key display allows you to switch between the original caller and the new caller, if desired, before completing the
transfer.
To go back to the original call if the transfer is incomplete—misdial, no answer, etc:
-
Press the Goodbye Key.
Press the Line (DN) Key with the flashing icon to return to your original call.
NOTE: To complete a three way conference call, do not press the Goodbye Key. All three parties will be connected. The screen displays Conference.
ADDITIONAL FEATURES AND OPTIONS
DIRECTORY FUNCTIONS
Personal Directory and Call Log display and navigation
With the display, you can view three lines of information. The figure below shows the status once you log into the directory.
Personal Directory and Call Log password protection
Your Call Log and Personal Directory can be password protected.
To Initiate A Password:
-
Press the Directory/Log Key.
From the Directories menu, use the Navigation Keys to highlight Password Administration.
Press the Select Key. The Password Administration menu appears.
Use the Navigation Keys to highlight Define password.
Press the Select Key
Then as prompted, enter New password. Press Enter key.
Enter password again to Confirm password. Press Enter key.
Press the Done Key to save changes. Your Personal Directory is now protected by a password. Password is turned ON automatically
Press the Quit Key or Directory/Log Key to exit.
To access the Directory/Log:
-
Press the Directory/Log Key.
Enter your Password.
Press Enter Key.
NOTE: When you enter the Directory/Log function, your Personal Directory is automatically selected. At this point, you may begin searching the directory using the
telephone’s dial pad.
-
Use the Navigation Keys to highlight the personal Directory or the Call Log that you want to view.
Press the Select Key.
To exit the Directory/Log:
- Press the Quit Key or the Directory/Log Key to exit.
To access the Redial or Callers List using a Context Sensitive Soft Key:
- Press the Redial or Callers Soft Key.
Call Log
The Call Log records the name and number of incoming and outgoing calls. You can activate Call Log to record all calls or record only the unanswered calls. The
Callers List stores incoming calls,.
The Redial List stores outgoing calls in order of date and time received/made. The oldest call is stored at the top of the list. The newest call is stored at the bottom of
the list. The Call Log list holds up to 100 entries for incoming and 20 entries for outgoing calls. An entry from the Callers List or Redial List can be copied and stored
in the Personal Directory.
Callers List
The Callers List stores the last 100 incoming calls and can be password protected. You can also copy these numbers to your Personal Directory.
Using the Callers List: When you have selected the Callers List from the Directory/Log menu, - Press the Up Key to go to the top of the new calls list, - or press the
Down Key to go to the top of the old calls list.
To make a call from the Callers List:
- Use the Navigation Keys to highlight the number you want to call.
NOTE: If you are calling an external or long distance number, you will need to edit the number to add the access code (8) required to make an external or long
distance call.
–
-
Press the Dial Key to call the number selected. You leave the Callers List when you make the call.
To exit the Callers List without making a call:
Press the Quit Key or the Directory/Log Key to exit.
Redial List
The Redial List records your last 20 outgoing calls and can be password protected. You can also copy these numbers to your Personal Directory. Using the Redial
List: When you select the Redial List from the Directory/Log menu, you are presented with the most recently dialed numbers. Scroll up or down to find other entries.
To make a call from the Redial List: - Use the Navigation Keys to highlight the number you want to call.
NOTE: If you are calling an external or long distance number, check that the appropriate access code (8) is included in the entry. - Press the Dial Key. Your call is
automatically dialed and you exit the Redial List.
Personal Directory
The Personal Directory provides a personalized directory of names and telephone numbers. The Personal Directory allows you to add, delete, search, and edit
entries and can be password protected. This Directory holds up to 100 entries (an entry is one name and one telephone number).
When viewing entries, initially only the name displays. Use the right navigation key to view the telephone number. You can add a directory entry by copying the entry
from your Callers List or Redial List. You can also add entries with the “AddNew” Key.
To Add a Personal Directory entry:
Select the Personal Directory from the Directory/Log menu.
Press the Add New Key.
Use the dial pad to spell out the name. Press the dial pad key with the desired letter repeatedly until that letter appears on the display. Press the right
arrow key to go to the next letter.
NOTE: The cursor automatically advances to the next position, if a different-from-last key is pressed, or after a short pause.
-
Press the Next Key.
Use the dial pad to enter the telephone number associated with the name entered above.
NOTE: If you are adding an external or long distance number, be sure to include the access codes required to make an external or long distance call, e.g. 8 for a
local call, 8 1 for long distance, etc.
-
When you have finished entering all of the digits, press the Done Key to save the changes.
Press the Quit Key or the Directory/Log Key to exit.
To Add a Personal Directory entry from Callers List or Redial List or from an active call:
From an entry in either the Callers List or the Redial List or from an incoming or outgoing call:
-
Press the Copy Key. The display shows the message Copy to.
Press the Dir/Log or Directory Soft Key.
Press Next to copy the incoming call without editing the name. Edit the number, if required. OR - Edit the name using the dial pad, Delete, and Case Keys
as needed.
Press the Next Key. Make changes to the telephone number, if required.
-
NOTE: If you are adding an external or long distance number, be sure to include the access codes required to make an external or long distance call, e.g. 8 for a
local call, 8 1 for long distance, etc.
-
Press the Done Key to save the entry in your directory.
Press the Quit Key or the Directory/Log Key to exit.
NOTE: You can edit the name or number before or after you save to the directory.
To Delete or Edit a Personal Directory entry:
To delete:
-
Use the Navigation Keys to highlight the entry you want to edit or delete.
Press the Delete Key to delete the currently highlighted entry in your Personal Directory.
Press the Yes Key to confirm the deletion.
To edit:
-
Press the Edit Key to change the telephone number or name.
Use the Navigation Keys to highlight the character you want to change.
Use the dial pad to enter the desired changes.
Press the Next Key. Edit the number if necessary.
Press the Done Key to save the changes.
Press the Quit Key or the Directory/Log Key to exit.
To Delete your Personal Directory:
Press the Delete List Soft Key.
The display shows Delete all entries?.
Press the Yes Soft Key if you want to delete all the entries in your Personal Directory,
-
Press the No Soft Key if you want to return to the top of the Personal Directory with no changes made.
OR
To Use your Personal Directory to Place a call:
- Use the Navigation Keys to highlight the desired name or number.
NOTE: If you are dialing an external or long distance number, be sure that your directory entry includes the access codes required to make an external or long
distance cal, e.g. 8 for a local call, 8 1 for long distance, etc.
- Press the Dial Key. You can search for a particular entry in your Personal Directory.
To search for an entry
-
Use the Navigation Keys to highlight Personal Directory.
Press the Select Key.
Use the dial pad to enter the first letter of the name you are seeking. For
example, press the 2 key twice to go to the first entry that begins with the
letter “B”.
NOTE: To further refine your search, wait a couple of seconds and use the dial pad to enter the second letter of the name you are seeking. You may enter up to the
first three letters in the name using this method. NOTE: When viewing entries, initially only the name displays. Use the right navigation key to view the telephone
number.