1
QUICKBOOKS
FOR CPAS - 2005
BUSINESS PRACTICAL APPLICATIONS
ADVISORCPE
QuickBooks for CPAs 2005
QUICKBOOKS FOR CPAS
TABLE OF CONTENTS
Course Information .................................................................................................5
1. Introduction .............................................................................................................8
2. Versions of QuickBooks .......................................................................................11
3. Pricing ...................................................................................................................15
4. Competing Products ..............................................................................................17
5. New Features ........................................................................................................20
6. Navigating QuickBooks ........................................................................................26
7. Settings & Preferences ..........................................................................................31
8. Setting Up Customers, Vendors, & Employees.....................................................50
9. Setting Up Inventory & Service Items...................................................................61
10. Writing Checks ......................................................................................................65
11. Receiving Cash & Credit Cards.............................................................................70
12. Month End Closing & Bank Reconciliation .........................................................77
13. Financial Reporting................................................................................................81
14. Payroll ....................................................................................................................91
15. QuickBooks Tips & Tricks .................................................................................102
16. Contractor Edition................................................................................................112
17. POS Edition .........................................................................................................114
18. QuickBooks Shortcuts .........................................................................................118
19. Accountant Edition .............................................................................................125
20. QuickBooks Problems & Solutions .....................................................................128
Copyright 2005, AdvisorCPE – www.QuickBooksAdvisor.info
2
QuickBooks for CPAs 2005
21. QuickBooks Services ...........................................................................................151
• Insurance (AFLAC)
• Merchant Account
• Send Invoices Online
• Accept Online Payments
• QuickBooks BillPay
• Get a MasterCard
• Get D & B Credit Reports
• Bank Online
• Ship with FedEx & UPS
• Backup Data Remotely
• Set-Up Remote Access
• Create a Web Site
22. QuickBooks Advisor Program.............................................................................166
23. QuickBooks Affiliate Program ............................................................................168
24. Instructor’s Biography .........................................................................................172
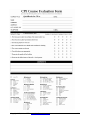
25. Evaluation Form...................................................................................................173
Copyright 2005, AdvisorCPE – www.QuickBooksAdvisor.info
3
QuickBooks for CPAs 2005
QUICKBOOKS FOR CPAS
COURSE INFORMATION
Learning Objectives
To increase the productivity of accountants using
QuickBooks.
Course Level
Intermediate – Advanced
Pre-Requisites
Basic familiarity with QuickBooks
Advanced Preparation
None
Presentation Method
Lecture with follow up materials
Recommended CPE
Credit
8 hours
Handouts
Checklists, manual
Instructors
J. Carlton Collins, CPA
AdvisorCPE is registered with the National Association of State
Boards of Accountancy (NASBA) as a sponsor of continuing
professional education on the National Registry of CPE Sponsors.
State boards of accountancy have final authority on the acceptance
of individual courses for CPE credit. Complaints regarding
registered sponsors may be addressed to the national Registry of
CPE Sponsors, 150 Fourth Avenue, Nashville, TN, 37219-2417.
Telephone: 615-880-4200.
Today, QuickBooks is used by over 2 million customers. Whether you are a user yourself, or
you are providing advice and services to your clients, it’s time that you mastered QuickBooks
once and for all.
In this one day CPE course, you will learn how to use QuickBooks to its fullest potential. You
will learn what to watch out for, how to maximize the capabilities of QuickBooks, when it is
time to move to another system, how to extract the information you need for other applications
such as tax software, workpaper tools, Microsoft Office products, and more. You will also learn
about the latest product developments including QuickBooks Simple Start, the Accountant
edition Financial Statement Designer, and security changes in Enterprise.
In this class, we will bring you up to date on the latest developments in QuickBooks,
QuickBooks Basic, QuickBooks Pro, QuickBooks Premier, QuickBooks Online, QuickBooks
Enterprise, and QuickBooks Point of Sale. We will also apprise you of developments with the
QuickBooks acquisitions of American Fundware, Master Builder, and Eclipse Software, to name
Copyright 2005, AdvisorCPE – www.QuickBooksAdvisor.info
4
QuickBooks for CPAs 2005
a few. QuickBooks is on the move and this class is designed to help you keep up. A few features
and highlights from the course include:
•
Accepting credit card receipts within QuickBooks
•
Paying bills online
•
Importing credit card details into QuickBooks via the web rather than inputting them
manually
•
Important setup options
•
Exporting data to Microsoft Office
•
Pricing levels which now include up to 100 price levels
•
Working with inventory - this can be tricky in QuickBooks
•
Working with Jobs in QuickBooks
•
Managing reporting periods within QuickBooks - the number one source of trouble
•
Recovering from improper data entry - what every CPA needs to know – it’s really easy
if you know the undocumented tricks
•
Report Writing - QuickBooks actually has some of the best report writing capabilities on
the planet - even stronger than SAP which sells for millions of dollars - we will show you
•
Data storage - this is a hotspot where many companies run into trouble
•
Multi-user access - the Enterprise version promises 10 concurrent users - but QuickBooks
does not really deliver - find out why
•
Protecting prior period entries - the secret to this trick is hidden and not well documented
•
Industry solutions – yes, QuickBooks does point of sale very well
The 2005 QuickBooks for CPAs course (and the related course manual) were developed by the
partners, associates, and staff of AdvisorCPE. Our goals for this course are to deliver to you a top
quality educational course that provides you with an executive level education of QuickBooks
that moves along at a fast pace. Too often QuickBooks courses cover material at the slowest
possible speed in order to accommodate the novice bookkeeper with practically no understanding
of accounting. It is not our goal to cover every tedious keystroke needed to perform various
functions. Instead, we want to make you aware of the features and functionality within
QuickBooks. We expect you to be able to recreate and utilize these functions at your office
using the help of this manual, the QuickBooks help files, and the QuickBooks menus. Because
this course is targeted towards CPAs, we assume that the audience is already well versed in
accounting practices, and we further assume that an executive summary approach is a better use
of your time.
Copyright 2005, AdvisorCPE – www.QuickBooksAdvisor.info
5
QuickBooks for CPAs 2005
To further maximize your time, and the benefits of attending this course, we have worked hard to
filter out the trivial, obscure, and seldom used features within QuickBooks. We will try to
concentrate our time on the more powerful and most often used features, which will best serve
your needs on a day-to-day basis.
Our course style is typically designed for business professionals who have evolved beyond the
beginning stages. Through numerous short case studies and feature reviews, we strive to deliver
concise information in a context that is easy to understand and may be easily absorbed by the
attendee. Our goal is not to spoon feed each keystroke and menu option to the audience. We
strive to provide a faster paced course that focuses on the bigger picture of what the technology
can do for you, rather than on the specific, detailed mechanics of operating the products.
We have found that this lecture/demo/discussion style of course allows us to cover far more
material in an effective manner (please be aware that “hands-on” courses are best suited for
novice users with little or no computer experience). We hope that you find our style better for
keeping your interest and maximizing your learning.
Copyright 2005, AdvisorCPE – www.QuickBooksAdvisor.info
6
QuickBooks for CPAs 2005
INTRODUCTION
TO QUICKBOOKS
FOR CPAS
CHAPTER 1
Copyright 2005, AdvisorCPE – www.QuickBooksAdvisor.info
7
QuickBooks for CPAs 2005
INTRODUCTION
QuickBooks is the world’s most popular accounting system with more than 2 million customers,
most of which are located throughout the United States. QuickBooks was originally introduced
in 1987 as the Quicken Check-Writing tool that featured a basic check register and a great
WYSIWYG check writing screen. In time, QuickBooks was released to include full balance
sheet and income statement reporting, followed a few years later with multi-user access and
limited customization capabilities. Today, QuickBooks comes in many versions and offers a
wide and growing breadth of modules that can intimidate even the most knowledgeable of CPAs.
Whether you are a user yourself, or you are providing advice and services to your clients, it’s
time that you mastered QuickBooks once and for all.
In this one-day CPE course, you will learn how to use QuickBooks to its fullest potential. You
will learn what to watch out for, how to maximize the capabilities of QuickBooks, when it is
time to move to another system, how to extract the information you need for other applications
such as tax software, work paper tools, Microsoft Office products, and more. You will also learn
about the latest product developments including QuickBooks Simple Start, the Accountant
edition Financial Statement Designer, and security changes in Enterprise.
In this class we will bring you up to date on the latest developments in QuickBooks, QuickBooks
Basic, QuickBooks Pro, QuickBooks Premier, QuickBooks Online, QuickBooks Enterprise, and
QuickBooks Point of Sale. QuickBooks is on the move, and this class is designed to help you
keep up. A few features and highlights from the course include:
•
Accepting credit card receipts within QuickBooks
•
Paying bills online
•
Importing credit card details into QuickBooks via the web rather than inputting them
manually
•
Important setup options
•
Exporting data to Microsoft Office
•
Pricing levels which now include up to 100 price levels
•
Working with inventory - this can be tricky in QuickBooks
•
Working with Jobs in QuickBooks
•
Managing reporting periods with in QuickBooks - the number one source of trouble
•
Recovering from improper data entry - what every CPA needs to know - its really easy if
you know the undocumented tricks
•
Report Writing - QuickBooks actually has some of the best report writing capabilities on
the planet - even stronger than SAP which sells for millions of dollars - we will show you
Copyright 2005, AdvisorCPE – www.QuickBooksAdvisor.info
8
QuickBooks for CPAs 2005
•
Data storage - this is a hotspot where many companies run into trouble
•
Multi-user access - the Enterprise version promises 10 concurrent users - but QuickBooks
does not really deliver - find out why
•
Protecting prior period entries - the secret to this trick is hidden and not well documented
•
Industry solutions – yes, QuickBooks does point of sale very well
Copyright 2005, AdvisorCPE – www.QuickBooksAdvisor.info
9
QuickBooks for CPAs 2005
THE DIFFERENT
EDITIONS OF
QUICKBOOKS
CHAPTER 2
Copyright 2005, AdvisorCPE – www.QuickBooksAdvisor.info
10
QuickBooks for CPAs 2005
EDITIONS OF QUICKBOOKS
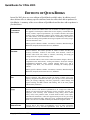
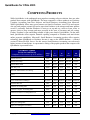
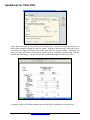
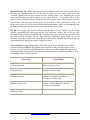
In total for 2005, there are seven editions of QuickBooks available today. In addition, two of
these editions offer six industry-specific solutions. Intuit also offers three add-on products for
QuickBooks. A summary of the seven editions of QuickBooks and the three add-on products is
provided below:
ENTERPRISE
SOLUTIONS
Priced at $3,500. This edition comes with 12 months of technical support and
free upgrades. The Enterprise edition offers 10-user capacity, customizable user
security controls, improved performance, up to 29,000 customers and 29,000
inventory items, and multiple company report creation. Also includes all the
new 2005 features of Pro and Premier editions. Unfortunately, this edition is
based on file locking which prohibits most larger companies from really using it
with more than three users.
Industry-specific editions available: Accountant, Contractor, Manufacturing &
Wholesale, Nonprofit, Professional Services, and Retail.
PREMIER
Priced at $499.95. This edition provides all features of Basic and Pro plus
inventory assemblies, creation of sales orders from estimates, creation of
purchase orders from sales orders or estimates, forecasting, and strong job
costing such as new reports and change orders.
The Accountant edition comes with a financial statement designer, editor for
compilation letters and footnotes, working trial balance, fixed asset manager,
voided/deleted transaction report, retained earnings detail view, and is
compatible with Basic, Pro, and Premier including the industry-specific
editions.
Industry-specific editions available: Accountant, Contractor, Manufacturing &
Wholesale, Nonprofit, Professional Services, and Retail.
PRO
Priced at $299.95. This edition provides all features of Basic plus 5-user
capacity; integration with Microsoft Office; up to 100 price levels; customizable
forms; job costing; budgeting; cash flow projections; vehicle mileage and
expense tracking; and PDF creation and emailing. This is the most popular
edition used by businesses.
BASIC
Priced at $199.95. This edition of QuickBooks is for a single-user. With this
edition you can track income and expenses, invoice customers, pay bills, pay
employees, track inventory, track customers owing money, track vendors
money owed, create purchase orders, reconcile bank accounts, create reports,
and memorize transactions. It does not support custom price levels, job costing,
integration to Microsoft Office, multi-user access, customizable statements, etc.
There is no reason we can think of that anyone should be using this edition.
SIMPLE START
Priced at $99.95. This edition of QuickBooks is new for 2005. It should be
considered for use by first-time QuickBooks users who do not have a
Copyright 2005, AdvisorCPE – www.QuickBooksAdvisor.info
11
QuickBooks for CPAs 2005
computerized bookkeeping system only. It is for a single-user. This edition was
designed to target businesses without a computerized bookkeeping system by
providing a quick, easy way for businesses with simple accounting needs to
switch to a computerized bookkeeping system. This edition provides for
tracking income and expenses, invoicing customers, paying bills, creating
estimates, generating reports, and reconciling bank accounts.
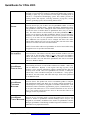
ONLINE
Priced at $219.95 per year for three users for QuickBooks Online. A total of
three editions are available online – Simple Start Online, QuickBooks Online,
and QuickBooks Online Plus. Although the online edition names might seem
just like the name of another edition of QuickBooks above, they are not the
same. The online editions are built similarly to the other QuickBooks editions,
but they are not based on the other QuickBooks editions. You will find many
differences. All online editions allow for at least two users plus free accountant
access. Up to 20 users can use QuickBooks Online and QuickBooks Online
Plus. Additional users beyond 20 can be arranged with Intuit. The online
editions allow multiple users 24/7 access from anywhere, but none of the online
editions are as feature rich as the non-online editions.
NOTE: The non-online editions of QuickBooks can also be hosted online using
an application service provider other than Intuit.
PRO FOR MAC
Priced at $299.95. This edition is the only edition available for MAC users and
requires OS X. The Pro MAC edition is not the same as the Pro Windows
edition. The features of the MAC edition are not as powerful as the Windows
edition. Pro MAC users can share their QuickBooks data with an accountant
who uses a Windows edition.
QUICKBOOKS
POINT OF SALE
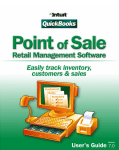
Priced starting at $799.95. A total of three editions are available – Basic, Pro,
and Pro Multi-Store. Replaces a cash register and rings up sales, tracks
inventory, stores customer information, transfers summarized sales data and
inventory asset account values into QuickBooks Pro, Premier, or Enterprise
editions only, works with Intuit-tested point of sale hardware – receipt printer,
cash drawer, bar code scanner, and credit card swipe, which can be purchased
for an additional $700.
QUICKBOOKS
CUSTOMER
MANAGER
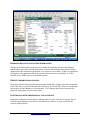
Priced at $79.95. This product can work as a standalone product or integrate
with QuickBooks Simple Start, Basic, Pro, or Premier editions and Outlook or
Outlook Express. The product is designed to consolidate small business’ client
information (contact information, appointments, projects, communications, etc.)
in one place and enable users to view customer information on one screen. It
has a 5 user capacity and all users have access to the same data. There is no
setting up of users or permissions.
Priced at $0. As of 4/29/05, Intuit is giving this product away for free. This
QUICKBOOKS
product is similar to QuickBooks Customer Manager above except it was
CLIENT MANAGER designed for accountants. In addition to the features of QuickBooks Customer
Manager, QuickBooks Client Manager includes integration with Intuit’s Lacerte
and ProSeries tax preparation software.
Copyright 2005, AdvisorCPE – www.QuickBooksAdvisor.info
12
QuickBooks for CPAs 2005
Copyright 2005, AdvisorCPE – www.QuickBooksAdvisor.info
13
QuickBooks for CPAs 2005
QUICKBOOKS COMPARISON TABLE
Copyright 2005, AdvisorCPE – www.QuickBooksAdvisor.info
14
QuickBooks for CPAs 2005
Copyright 2005, AdvisorCPE – www.QuickBooksAdvisor.info
15
QuickBooks for CPAs 2005
Copyright 2005, AdvisorCPE – www.QuickBooksAdvisor.info
16
QuickBooks for CPAs 2005
QUICKBOOKS
PRICING
CHAPTER 3
Copyright 2005, AdvisorCPE – www.QuickBooksAdvisor.info
17
QuickBooks for CPAs 2005
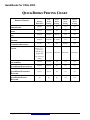
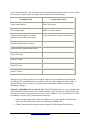
QUICKBOOKS PRICING CHART
PRODUCT EDITION
SIMPLE START
BASIC
PRO
PREMIER
ENTERPRISE SOLUTIONS
ONLINE
Starting
Retail Price
Single
User
Street
Pricing
5 User
Street
Pricing
10 User
Street
Pricing
20 User
Street
Pricing
$99.95
$79.95
n/a
n/a
n/a
$199.95
$179.95
n/a
n/a
n/a
$299.95
$254.95
$599.95
n/a
n/a
$499.95
$399.95
$1,199.95
n/a
n/a
$3,500
n/a
n/a
$2,800
n/a
$19.95/mo
$29.95/mo
$29.95/mo
$49.95/mo
$299.95
$254.95
n/a
n/a
n/a
$799.95
$639.95
n/a
n/a
n/a
$79.75
$63.95
n/a
n/a
n/a
$0
$0
$0
n/a
n/a
$99.95/1st yr +
$9.95/mo
thereafter for
Simple Start
$19.95/mo for
Online
PRO FOR MAC
QUICKBOOKS POINT OF SALE
QUICKBOOKS CUSTOMER
MANAGER
QUICKBOOKS CLIENT
MANAGER
Copyright 2005, AdvisorCPE – www.QuickBooksAdvisor.info
18
QuickBooks for CPAs 2005
SUMMARY OF
COMPETING
PRODUCTS
CHAPTER 4
Copyright 2005, AdvisorCPE – www.QuickBooksAdvisor.info
19
QuickBooks for CPAs 2005
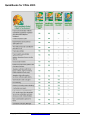
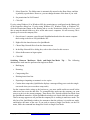
COMPETING PRODUCTS
While QuickBooks is the undisputed most popular accounting software solution, there are other
products that compete with QuickBooks. The most competitive of these products are Peachtree
Complete Accounting from Best Software and Small Business Accounting from Microsoft.
While QuickBooks offers many great features not found in Peachtree, most CPAs and experts
who use both products extensively tend to agree that Peachtree is the stronger and better product
overall. I personally find that Peachtree is easier to set up and use, easier to learn, easier to
operate, easier to keep accurate and more powerful in the areas of inventory and job costing.
Further, Peachtree’s time and billing solution is light years ahead of QuickBooks. On the other
hand, QuickBooks offers superior financial reporting compared to Peachtree and much better
online payment capabilities. Microsoft’s Small Business Accounting product offers superior
technology than QuickBooks or Peachtree because it runs on the MSDE database – a limited
version of Microsoft SQL Server. For this reason, Small Business Accounting can scale much
higher in terms of transactions. A representative listing of the popular products that compete with
QuickBooks is presented below:
Product Name
For the low-end Market
(companies with revenues up to $5 million)
Single
User
5
Users
10
Users
25
Users
100
Users
BusinessVision 32
$995
$5,495
$6,790
$10,675
N/A
BusinessVision SQL
N/A
N/A
$9,995
$16,985
$54,995
BusinessWorks Gold
$3,760
$4,750
$5,255
$6,745
N/A
DAC Easy 11.0
$250
$500
N/A
N/A
N/A
Microsoft Small Business Accounting
$99
$99
$99
N/A
N/A
Microsoft Small Business Financials (Includes 9 Great Plains
$995
$2,595
$,595
N/A
N/A
$249
$647
$1,142
N/A
N/A
Modules)
M.Y.O.B. Plus v13.0
Oracle Small Business Manager
$1,200/Yr $3,600/Yr $6,600/Yr $16,200/Yr $60,000/Yr
One Write Plus 8.0
$89
N/A
N/A
N/A
N/A
Peachtree Accounting 2006
$199
N/A
N/A
N/A
N/A
Peachtree Complete Accounting 2006
$298
$729
$729
N/A
N/A
$1,149
$1,149
$1,149
N/A
N/A
QuickBooks Pro
$259
$629
N/A
N/A
N/A
QuickBooks Premier
$429
$1,248
N/A
N/A
N/A
Simply Accounting 2005
$38
N/A
N/A
N/A
N/A
Simply Accounting Pro (ACCPAC)
$319
$725
N/A
N/A
N/A
Peachtree Premium Accounting Multi-User
Copyright 2005, AdvisorCPE – www.QuickBooksAdvisor.info
20
QuickBooks for CPAs 2005
While QuickBooks has earned its place in the world as a low cost accounting software
application, the world’s lowest price entry-level product that is well proven is ACCPAC Simply
Accounting. If you or your client is looking for a good low cost accounting software solution,
Simply Accounting is the best choice on the market today.
GAP ACCOUNTING PRODUCTS
There is a significant GAP between entry-level accounting packages such as QuickBooks and
Peachtree and popular mid range accounting software solutions such as MAS 90 and ACCPAC
Advantage. The entry-level products are typically priced at $500 or so, while the mid-range
solutions are typically priced at $15,000 to $20,000. That is a significant jump for most
businesses to make once they have outgrown Peachtree or QuickBooks.
Within this range, there are a handful of products that strive to fill this void. These products
include BusinessVision 32, Oracle Small Business Manager, and Microsoft Small Business
Financials. Additionally, Best Software and ACCPAC have both tried to position their mid-range
products for this GAP market with the Peachtree Edition of MAS 90 and the Discovery Series of
ACCPAC Advantage. While these products probably represent the best value in the marketplace
to end users, GAP accounting products suffer from a lack of an effective distribution channel.
Priced at $2,000 to $5,000, these products are too expensive to sell off the store shelves, and too
inexpensive to provide enough profit incentive for resellers to highly recommend them. These
products are commonly referred to as GAP accounting products because they fit in this GAP (not
to be confused with the phrase GAAP accounting which refers to generally accepted accounting
practices).
As a general rule, these GAP products blow the doors off QuickBooks and Peachtree with
advanced features such as support for serialized inventory, multiple warehouse locations,
customer specific pricing, etc. If you or your client has outgrown QuickBooks, you might be
well advised to take a look at the GAP class of accounting products.
Copyright 2005, AdvisorCPE – www.QuickBooksAdvisor.info
21
QuickBooks for CPAs 2005
NEW FEATURES IN
QUICKBOOKS
2005
CHAPTER 5
Copyright 2005, AdvisorCPE – www.QuickBooksAdvisor.info
22
QuickBooks for CPAs 2005
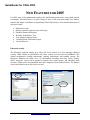
NEW FEATURES FOR 2005
For 2005 most of the enhancements made to the QuickBooks product line were geared towards
accountants. Presented below is a quick listing of some of the more noteworthy new features
found in the higher end editions of QuickBooks 2005 followed by a more detailed discussion of
each new feature:
•
•
•
•
•
•
•
Enhanced security
Manage customer payments more efficiently
Financial Statement Designer
Working Trial Balance Tool
View retained earnings entries
Voided/Deleted Transactions report
Version Detector
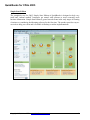
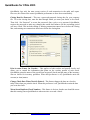
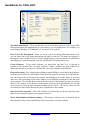
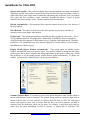
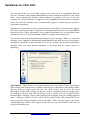
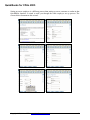
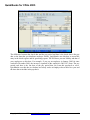
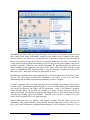
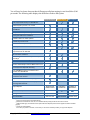
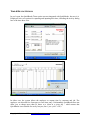
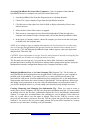
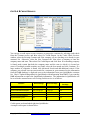
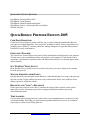
Enhanced security
The Enterprise Solution edition now allows for more control over users through enhanced
security. Other editions of QuickBooks only allow control over ten areas in QuickBooks. The
control encompasses creating transactions, printing transactions, and printing reports. The
Enterprise Solution now allows over 115 entitlements including view-only, create, modify,
delete, and print. Access can be granted to specific lists, report groups, and individual bank
accounts. Thirteen roles are predefined and can be assigned to users (shown below). The thirteen
roles can be edited or new roles can be created.
Copyright 2005, AdvisorCPE – www.QuickBooksAdvisor.info
23
QuickBooks for CPAs 2005
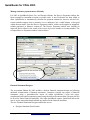
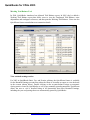
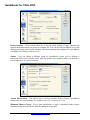
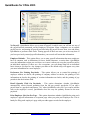
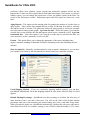
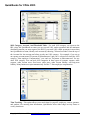
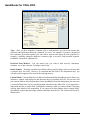
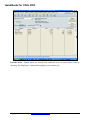
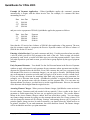
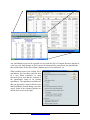
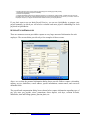
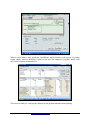
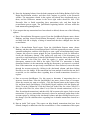
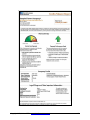
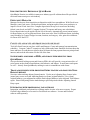
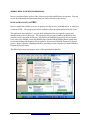
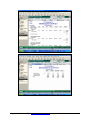
Manage customer payments more efficiently
For 2005 in QuickBooks Basic, Pro, and Premier editions, the Receive Payments window has
been revamped to streamline accounts receivable tasks. A new Preference has been added to
allow QuickBooks to automatically calculate the payment amount for invoices selected. Onscreen reminders appear when a customer over or underpays, has a credit balance, or has paid
within discount terms. From the Receive Payments window, credits can be applied or unapplied,
refunds generated, or balances written off. The Receive Payments window now includes an
improved find to allow for the search of an invoice by invoice number or account number. The
revamped Receive Payments window is shown below.
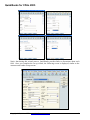
Financial Statement Designer
The Accountant Edition for 2005 includes a built-in financial statement design tool allowing
unlimited customization of financial statements. Customize virtually any aspect of financial
statements, using a spreadsheet-like layout all within QuickBooks. Create title pages,
compilation letters and accompanying notes using the built-in document editor. Designs can also
be saved for future financial statements. Like other QuickBooks reports, QuickZoom allows the
user to see the transaction details behind any number on the financial statement.
The new Financial Statement Designer enables the user to:
•
Design a Statement From Scratch
Copyright 2005, AdvisorCPE – www.QuickBooksAdvisor.info
24
QuickBooks for CPAs 2005
•
•
•
•
•
•
•
Customize an Existing Statement Layout
Select Desired Statement Date
Insert Columns/Insert Rows
Filter by Classes or Customer:Jobs
Group Accounts
Round Statement
Create Formulas
Copyright 2005, AdvisorCPE – www.QuickBooksAdvisor.info
25
QuickBooks for CPAs 2005
Working Trial Balance Tool
In 2004, QuickBooks introduced an Adjusted Trial Balance report. In 2005, they’ve added a
Working Trail Balance report that allows users to view the Unadjusted Trial Balance, enter
adjustments and workpaper references, and then print the Working Trial Balance. Users can also
QuickZoom from account balances to transaction details.
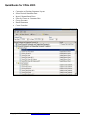
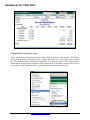
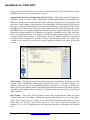
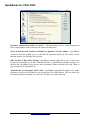
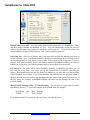
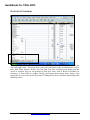
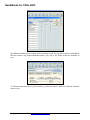
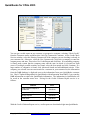
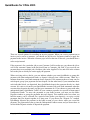
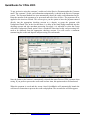
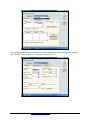
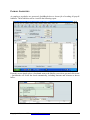
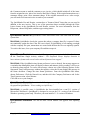
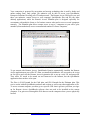
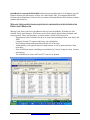
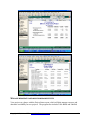
View retained earnings entries
For 2005 in QuickBooks Basic, Pro, and Premier editions, the QuickZoom feature is available
for the Retained Earnings account from either the Chart of Accounts or reports to view the detail
in the account (shown below). Double clicking on the account balance brings up automatic
closing entries created by QuickBooks as well as any manually posted transactions. QuickZoom
allows the user to view a detailed listing of all transactions that affect Retained Earnings,
including the year-end postings that were automatically posted by QuickBooks.
Copyright 2005, AdvisorCPE – www.QuickBooksAdvisor.info
26
QuickBooks for CPAs 2005
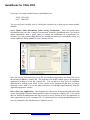
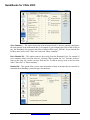
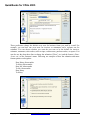
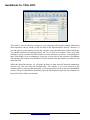
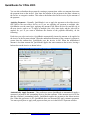
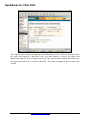
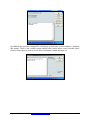
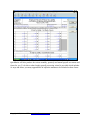
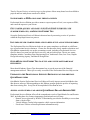
Voided/Deleted Transactions report
A new report shows transactions that have been voided or deleted in the data file. This feature
can assist accountants in detecting errors or fraud, and works even if the Audit Trail is turned
off. The standard format presents the transaction in a summary report. The detailed history
format shows all line items associated with the transaction. Accountants can then drill down to
see the details of the transaction in the event the transaction needs to be corrected.
Copyright 2005, AdvisorCPE – www.QuickBooksAdvisor.info
27
QuickBooks for CPAs 2005
QuickBooks Payroll Options for 2005
QuickBooks Payroll offerings also increased for the 2005 editions. Five separate options are now
possible for handling payroll, including one that accountants can use to perform payroll services
for multiple clients. The five options are Standard Payroll (formerly Do-it-Yourself Payroll),
Enhanced Payroll Plus (new), Enhanced Payroll Plus for Accountants (new), Assisted Payroll,
and Complete Payroll. The 2005 payroll options include new features for Worker’s
Compensation Tracking, Net to Gross Calculations, Processing State Payroll Forms, Automatic
Overtime Calculations, and Healthcare Savings Account tracking.
Enhanced Payroll Plus
The Payroll Plus option is intended for small businesses with advanced payroll requirements.
Enhanced Payroll Plus offers business owners an efficient, cost-effective, do-it-yourself
payroll solution that includes advanced features not found in Standard Payroll. The service
functions by downloading tax tables into QuickBooks where the user manages the payroll
process. Enhanced Payroll Plus adds the capability to create state payroll forms directly from
QuickBooks data.
Enhanced Payroll Plus for Accountants
Enhanced Payroll Plus for Accountants is intended specifically for accounting professionals.
Like Enhanced Payroll Plus, the system functions by downloading current tax tables into
QuickBooks where accountants can process their clients’ payroll. Enhanced Payroll Plus for
Accountants can process payroll for up to 50 clients under one subscription.
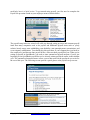
Interactive Tutorials
For 2005, QuickBooks is designed with interactive tutorials that explain fundamental
QuickBooks concepts and teach users how to complete key business tasks via step-by-step
instructions. The new learning center appears when a user launches QuickBooks for the first
time. The learning center contains a series of interactive tutorials that teach users how to perform
key tasks. Designed primarily for businesses or accountants unfamiliar with previous versions of
QuickBooks, the interactive tutorials allow users to get up and running with QuickBooks more
easily, and find out how to use QuickBooks to best support the way they do business.
Copyright 2005, AdvisorCPE – www.QuickBooksAdvisor.info
28
QuickBooks for CPAs 2005
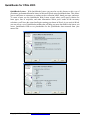
Simple Start Edition
The completely new for 2005, Simply Start Edition of QuickBooks is designed to help very
small and “manual method” businesses get started with software to more accurately track
business information. Simple Start Edition is geared toward clients in the early stages of forming
a business or considering bookkeeping software for the first time. The product provides easy-touse tools to help your client and is available in Desktop or online implementations.
Copyright 2005, AdvisorCPE – www.QuickBooksAdvisor.info
29
QuickBooks for CPAs 2005
Version Detector
For 2005 in QuickBooks Premier Accountant edition only, a Version Detector tools is available
to allow accounts to determine the version of QuickBooks a client is using without opening the
file. With QuickBooks open, simply mouse over the file. QuickBooks will identify files as far
back as 1999 (shown below) as well as when they were last modified.
Copyright 2005, AdvisorCPE – www.QuickBooksAdvisor.info
30
QuickBooks for CPAs 2005
QUICKBOOKS IN-DEPTH
NAVIGATING
QUICKBOOKS
CHAPTER 6
Copyright 2005, AdvisorCPE – www.QuickBooksAdvisor.info
31
QuickBooks for CPAs 2005
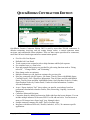
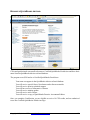
NAVIGATING QUICKBOOKS
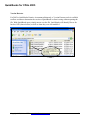
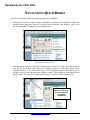
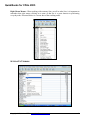
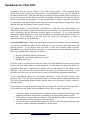
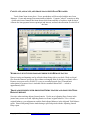
There are four primary methods for getting around in QuickBooks:
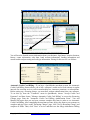
•
The built-in Navigator is more intuitive and helpful for those who are unfamiliar with using
Windows based programs. However, for those who are familiar with Windows, this is also
the slowest method. A sample screen is shown below.
The Customer Navigation Screen
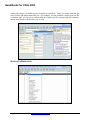
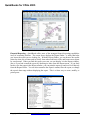
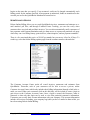
•
The drop-down menus are typically accessed using a mouse. For many users this approach
may not be much faster than using the Navigator. However, each menu option offers
underlined letters in the drop-down menus called keyboard shortcuts that allow you to
navigate using the drop-down menus without a mouse. This method is much quicker than
using a mouse, even if you are quick with the mouse. A sample screen is shown below.
The Drop-Down
Menus are the most
popular method for
navigating
QuickBooks
Copyright 2005, AdvisorCPE – www.QuickBooksAdvisor.info
32
QuickBooks for CPAs 2005
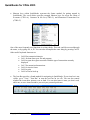
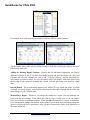
•
Shortcut keys within QuickBooks represent the fastest method for getting around in
QuickBooks. The screen below provides example Shortcut keys for access the Chart of
Accounts (CTRL+A), Customer & Job list (CTRL+J), and Memorized Transaction List
(CTRL+T).
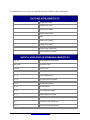
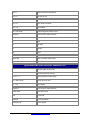
One of the more frequently used functions is writing checks. This task could be accessed through
the menu, or by typing Alt, A, W. You can also accomplish the same thing by pressing Ctrl-W.
Other useful keyboard shortcuts are
•
•
•
•
•
•
•
•
Ctrl-H for transaction histories
Ctrl-1 for data about your file and program
Ctrl-R to open the register associated with the type of transaction currently
displayed
Ctrl-T for memorized transactions
Ctrl-I for invoice forms
Ctrl-P to print
Ctrl-F to find or look up
The Icon Bar provides a fourth method for navigating in QuickBooks. If your icon bar is not
visible, go to "View," "Icon Bar" to turn the icon bar on (or off). You can also control
whether the icons show pictures, text or both. You can also remove items you don’t need,
add icons, or move items around to your suit your personal preference.
Copyright 2005, AdvisorCPE – www.QuickBooksAdvisor.info
33
QuickBooks for CPAs 2005
MEMORIZE REPORTS
To help you navigate to the reports you use most frequently, you should memorize those reports.
This procedure helps prevent the need to recreate the same report over and over again. The
screen shot below provides an example of this functionality:
FORMULAS
The use of formulas in various data fields can be a big time saver. All the user need do in any
field is simply type in an Excel-like formula. QuickBooks calculates the results automatically.
ENTER KEY BEHAVIOR
In QuickBooks, the enter key can react in one of two ways. It can act as the tab key and move
you from one field to another, or you can set it to affect the navigation buttons only. Setting the
enter key in this latter configuration can be frustrating to those who use to a 10-key approach as
they sometimes end up entering transactions before they are completed. To be safe, use the first
configuration. If you set your enter key to move between fields, you can still use it to activate
buttons by pressing Ctrl-Enter.
Unfortunately, QuickBooks is not always consistent. Some screens, such as the log on/password
screen, the enter key will engage the OK button in 6.0, but jump between fields in 5.0. On
invoice screens in 5.0, the enter key will act as a carriage return in the description field, which
forces you to use the tab key to jump to the next field. In 6.0, this problem has been corrected,
and to enter a carriage return you must press Shift-Enter.
We recommend that should set your data entry to assume a decimal point. For those who use a
10-key, this is a must. However, this setting becomes effective for any currency field, as well as
for all mathematical fields. Certain fields such as quantities are not affected.
Copyright 2005, AdvisorCPE – www.QuickBooksAdvisor.info
34
QuickBooks for CPAs 2005
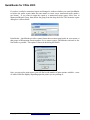
QUICKBOOKS FORMS
Make use of the forms provided in QuickBooks. For those with little to no knowledge of
accounting, you should definitely stick to using the forms and avoid using the journal entries
unless instructed to do so by your accountant or other knowledgeable person. The advantage of
the forms is that it puts the credits and debits in the right places automatically via an interface
where you don’t have to think about that. With a journal entry, you have to know when to credit
and when to debit an account. However, it is not fool proof. One does need to be able to know
the difference between a bill and an invoice. The enter bills form is shown below:
Even for those familiar with accounting and journal entries, it is still better to use the forms as
much as possible. This is in part because QuickBooks makes extensive use of items, and a
journal entry cannot affect items. Therefore, if you affect a payroll account, or inventory account
using items with a journal entry, the items internal register will not match the account register,
and any items that this journal entry should have affected will not show up on reports for that
item. The other is just for consistency sake, which in accounting and bookkeeping is one of the
critical factors. If one needs to credit an amount from payables to accounts receivable (as in a
barter transaction), it is better to do that with the forms designed to be used with those accounts
and send it to a clearing account than to just do a journal entry from one account to the other.
Copyright 2005, AdvisorCPE – www.QuickBooksAdvisor.info
35
QuickBooks for CPAs 2005
QUICKBOOKS IN-DEPTH
SETTINGS &
PREFERENCES
CHAPTER 7
Copyright 2005, AdvisorCPE – www.QuickBooksAdvisor.info
36
QuickBooks for CPAs 2005
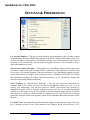
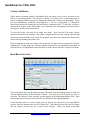
SETTINGS & PREFERENCES
Use Account Numbers – This gives you the ability to assign numbers to your accounts, instead
of alphanumeric characters. When this preference is in effect, a Number field appears in the New
Account and Edit Account windows. QuickBooks includes your account numbers in the Chart of
Accounts, in all Account fields, and on reports and graphs. However, you are limited to only 7
digits when numbers are used.
Show Lowest Subaccount Only – This controls how QuickBooks displays subaccounts when
you choose a subaccount in the Account field of a transaction. This preference is available only
if you select Use Account Numbers. When this preference is on, QuickBooks displays only the
lowest subaccount. For example, if the account you select is 5400·Rent:5410·Office:5411·Main;
then QuickBooks displays 5411·Main. When this preference is off, QuickBooks displays the
parent accounts along with the subaccount.
Class Tracking (Or “Departmental Tracking”) – this lets you categorize transactions by
assigning them to the classes on your Class list. In QuickBooks, classes give you a way to
classify your transactions. You can use classes to classify your income and expenses by
department, business office or location, separate properties you own, or any other meaningful
breakdown of the business you do. For example, a general contractor might classify all income
and expenses as relating to either residential or commercial work. At the end of an accounting
period, the contractor could create separate reports for the residential and commercial parts of the
business.
Use Audit Trail - Automatically logs all transaction changes in the audit trail report. This gives
you a running account of how each transaction has changed. When this preference is off,
Copyright 2005, AdvisorCPE – www.QuickBooksAdvisor.info
37
QuickBooks for CPAs 2005
QuickBooks logs only the most recent version of each transaction in the audit trail report.
However, this feature also causes QuickBooks performance to slow down considerably.
Closing Date/Set Password – This sets a password-protected closing date for your company
file. To set the closing date, enter the date through which you want your books to be closed.
Then click “Set Password” to create the password. Once you've set a password, QuickBooks
requires the password to make any changes that would alter balances for the accounting period
you have closed. This includes editing or deleting transactions entered on or before the closing
date, and entering new transactions dated on or before the closing date.
Print Account Names On Voucher – This applies to both voucher and payroll checks, and
allows you to control the information that prints on the voucher portion of each check.
QuickBooks prints the name of the payroll item on payroll checks and the name of the inventory
item on checks for inventory purchases. When this preference is off, QuickBooks omits the
account (or item) names.
Change Check Date When Check Is Printed – This feature changes the date on a check to
today's date when you print the check. When this preference is off, QuickBooks retains the date
you wrote the check.
Warn About Duplicate Check Numbers – This feature is obvious, but the user should be aware
that this warning causes QuickBooks to take more time to record a check.
Copyright 2005, AdvisorCPE – www.QuickBooksAdvisor.info
38
QuickBooks for CPAs 2005
Desktop Options – These features allow you to specify which windows (if any) automatically
open on the desktop when you open your company file. You can also tell QuickBooks to save the
desktop positioning when closing company, and upon reopening that company file, QuickBooks
will display the desktop exactly as it was.
Sounds - You can choose a different sound for QuickBooks events, such as deleting a
transaction. This feature may be useful when the sounds your computer makes can distract or
irritate other users in a given work area.
Annual Interest Rate - The interest rate is used to calculate finance charges. QuickBooks
assumes the rate is a percentage. For example, type 12.5 if your rate is 12.5%.
Minimum Finance Charge - If you want QuickBooks to apply a minimum finance charge
regardless of the amount overdue, enter the minimum charge here.
Copyright 2005, AdvisorCPE – www.QuickBooksAdvisor.info
39
QuickBooks for CPAs 2005
Grace Period (Days) - If you want to give your customers a grace period before finance charges
apply, enter the length of the grace period in days. This delays the application of finance charges.
For example, if the starting date is June 1st and the grace period is 3 days, QuickBooks waits
until June 4th to assess finance charges. QuickBooks also allows you to assess finance charges
on overdue finance charges. You should be aware that some laws prohibit charging interest on
overdue interest payments.
Calculate Finance Charges From – QuickBooks allows you to specify whether interest charges
should start the day the invoice or statement is due. For example, if a customer is 5 days overdue
on an invoice that was due in 30 days, QuickBooks assesses finance charges on the 5 overdue
days, but not the original 30 days.
Pressing Enter Moves Between Fields - Normally, pressing Enter is the equivalent of clicking
OK or Record (both of which close the current window). If you select this preference, the text
cursor moves to the next field when you press Enter. When this preference is on, you can press
Enter to move between fields, but you must record transactions by clicking OK, Record, Save &
Close, Save & New, or by pressing Ctrl+Enter. When this preference is off, you must press Tab
or click in a field to move from field to field.
Automatically Place Decimal Point – QuickBooks automatically inserts a decimal point
between the second and third digit from the right when you enter a number with no decimal
point. For example, if you type 4995, the number becomes 49.95. When this preference is off,
QuickBooks places a decimal point at the end when you enter a number with no decimal point.
For example, if you type 4995, the number becomes 4995.00.
Warn When Editing A Transaction - Warns you when you change a transaction and then try to
leave it without recording the change. When this preference is off, QuickBooks allows you to
change a transaction and then leave it without warning. QuickBooks automatically records the
Copyright 2005, AdvisorCPE – www.QuickBooksAdvisor.info
40
QuickBooks for CPAs 2005
change if the transaction does not have links to other transactions. (If the transaction has links,
QuickBooks asks if you want to record the changes.)
Automatically Recall Last Transaction For This Name – This feature turns on AutoRecall.
Thereafter, when you enter a name, QuickBooks automatically completes the transaction by
filling in what you entered in the last transaction of that type for that person. For example, when
you enter a vendor's name on a bill and press Tab, QuickBooks fills in the entire bill, just like the
last one you entered for that vendor. If you have more than one previous bill from the vendor,
QuickBooks bases the new bill on the bill with the most recent date. When this preference is off,
QuickBooks does not complete transactions automatically. You still have the ability to recall a
transaction from the Memorized Transaction list, however. AutoRecall works only with bills,
checks, or credit card charges. You cannot use AutoRecall with purchase orders, invoices, sales
receipts, payroll liability checks, or credit memos. Also, you cannot AutoRecall a transaction
from one account to another. For example, if you have two checking accounts, you cannot write
a check in one account, go to the other account, and then AutoRecall the check in the other
account.
Time Format – This option sets the format for time entries in QuickBooks. When you select the
decimal format, QuickBooks automatically interprets time entries as decimal fractions. For
example, when you enter 4:30, QuickBooks converts your entry to 4.5 (4 and one-half hours).
When you select the Minutes format, QuickBooks automatically interprets time entries as hours
and minutes. For example, when you enter 4.5, QuickBooks converts your entry to 4:30 (4 hours
and 30 minutes).
Date Format – This option sets the format for date entries in QuickBooks. When you select
"Always show years as 4 digits," QuickBooks automatically displays the year as four digits.
When "Always show years as 4 digits" is not selected, QuickBooks displays the year as two
digits, that is "00" for 2000, "01" for 2001, and so on. If you enter a year using two digits, for
example, "98" or "99," QuickBooks uses the following convention to determine the four-digit
year.
Copyright 2005, AdvisorCPE – www.QuickBooksAdvisor.info
41
QuickBooks for CPAs 2005
If you type a two-digit number between, QuickBooks uses:
28-99 1928-1999
00-27 2000-2027
You can verify the four-digit year by clicking the calendar icon to bring up the current month's
calendar.
Never Update Name Information When Saving Transactions - Does not update name
information when you enter a change in a transaction. Normally, QuickBooks asks if you want to
update information about a name when you change the information in a transaction. For
example, if you enter a new billing address for a customer on an invoice, QuickBooks asks if you
want to update the billing address on your Customer:Job list.
Here, you can set preferences that govern the way integrated applications are allowed to access
the current QuickBooks company file. The preferences set in this window apply to all integrated
applications seeking to access the company file. You can allow or deny access to individual
applications by clicking in the Allow Access column of the "Applications that have previously
requested access" table. You can set other preferences for individual applications by using the
Application properties window.
Don't Allow Any Applications - Checking this box will prevent all integrated applications that
use the QuickBooks Software Development Kit from accessing the company file. If you check
this box, neither the administrator nor the user will see access screens or have the opportunity to
allow applications to access a company file. Un-checking the box will permit administrators and
users (if permitted by the administrator) to authorize access.
Copyright 2005, AdvisorCPE – www.QuickBooksAdvisor.info
42
QuickBooks for CPAs 2005
Job Status Descriptions – These options allow you to record the progress of a job. If any of the
default descriptions are inappropriate for your business, you can change them. For example, you
could change "Pending" to "Submitted," or "Awarded" to "Accepted."
How To Use The Descriptions - When you set up a job or are editing information about a job,
you can choose one of the status descriptions and apply it to the job. The status you assign to a
job appears in the Customer:Job list. If a job's status changes, you must edit the job information
and assign a new status description to the job. QuickBooks will not do this for you.
Create Estimates - If you create estimates, you must make sure that "Yes" is selected in
response to the question "Do you create estimates?” Many companies go years without ever
turning this feature on, and have no idea that they can create estimates in QuickBooks.
Progress Invoicing - Also called progress billing or partial billing, is invoicing from an estimate
in stages instead of for the full estimate. When you turn progress invoicing on in QuickBooks,
you can create an invoice for part of an estimate. QuickBooks gives you the choice of invoicing
either for a fixed percentage of the entire estimate, or for different percentages of each line item
on the estimate. You can also show on the invoice how much of the estimate you have previously
billed to the customer. If you decide to turn progress invoicing off in QuickBooks, you can still
create an invoice from an entire estimate and then edit the invoice. The invoice, however, will
not include previous totals billed for the job or comparisons to the estimate.
Don't Print Zero Amounts - Select this checkbox to indicate that you do not want line items
that have zero amounts to print on your progress invoices.
Warn About Duplicate Estimate Numbers – This feature is obvious, but you should be aware
that using this feature causes QuickBooks to take more time to record an estimate.
Copyright 2005, AdvisorCPE – www.QuickBooksAdvisor.info
43
QuickBooks for CPAs 2005
No Payroll - QuickBooks allows you to turn off payroll, in which case you will not see any of
the payroll-related commands on the Employees Navigator. Many companies use an outside
payroll service, and turning off payroll provides hides the payroll screens from view and allows
QuickBooks to perform a little faster. Turning payroll off does not cause you to lose any data. If
you have previously entered payroll information, your records will retain that information.
Employee Defaults – This option allows you to enter payroll information that most employees
have in common, such as deductions for taxes, health insurance, or union dues. QuickBooks
saves the information so that you won't have to re-enter it when you set up the payroll record for
an individual employee. If there are a few exceptions, you can change them on an individual
basis whenever you need to. Any changes you make to the default setup will appear every time
you enter information for a new employee.
Preferences For Printing Paychecks – This option allows you to control the printing of
employee address on checks; the printing of company address on checks; the printing of sick
information on checks; the printing of vacation information on checks; and the printing of pay
periods in the check memo field.
Recall Quantity Field On Paychecks – This option determines whether QuickBooks
automatically carries forward quantities from the last pay period's paychecks. If you add a
payroll item to a paycheck and answer "No" when QuickBooks asks you if you want to add the
item to the employee's record, QuickBooks does not carry the quantity forward to the next
paycheck.
Print Employee List One Per Page – This option determines whether QuickBooks prints each
employee's payroll information on a separate page when you print your Employee list. This is
handy for filing each employee's page with your other paper records for the employee.
Copyright 2005, AdvisorCPE – www.QuickBooksAdvisor.info
44
QuickBooks for CPAs 2005
Inventory And Purchase Orders Are Active – This option allows you to create inventory part
items, write purchase orders, and create inventory-related reports.
Warn If Item Exceeds Amount on Hand Less Quantity On Sales Orders - QuickBooks
warns you when the quantity you try to sell plus the quantities already on sales orders is more
than the quantity you currently have in stock.
Bills Are Due X Days After Receipt - QuickBooks assumes that bills are due 10 days after
receipt. This means that if you enter a bill dated January 1, QuickBooks will show January 11 as
the due date. QuickBooks uses the due date to determine when to add the bill to the "Bills to
pay" section of your Reminders list.
Automatically Use Discounts And Credits - QuickBooks automatically applies any vendor
discount or credits to the bill that you are paying in the Pay Bills window. You can choose the
Default Discount Account that you want to use to track your vendor discounts.
Copyright 2005, AdvisorCPE – www.QuickBooksAdvisor.info
45
QuickBooks for CPAs 2005
Show Summary – This option selects the least amount of detail: a one-line summary that shows
the total amount of the transactions due. For example if your company has $500 worth of bills to
pay, the Reminders list represents the bills as follows: Bills to pay -$500.00. If you want the list
to show more detail, select "Show list" instead of "Show summary."
Don't Remind Me – This option removes the activity from the Reminder's list. For example if
your company doesn't send out invoices, selecting "Don't remind me" for "Overdue invoices"
removes the entry for overdue invoices from the list. To add an activity back to the list select
either "Show list" or "Show summary."
Remind Me – This option allows you to enter the number of days in advance that you need to be
reminded about handling a particular type of transaction.
Copyright 2005, AdvisorCPE – www.QuickBooksAdvisor.info
46
QuickBooks for CPAs 2005
Reports And Graphs - This preference applies only when QuickBooks can't make an automatic
adjustment and the entire report or graph needs to be refreshed. Because refreshing a report or
graph often takes much longer than an automatic adjustment, this preference gives you control
over when and how refreshing occurs. Normally, QuickBooks adjusts a report or graph
automatically when a change occurs. The three options are discussed below:
Refresh Automatically - This option provides up-to-the-minute accuracy but is the slowest of
the three options.
Don't Refresh - This option is the fastest of the three options, but you must remember to
manually refresh your graphs when needed.
Graphs Only – This option determines how QuickBooks draws graphs on your screen – 2D or
3D. QuickBooks draws the 2D graphs faster. Additionally, QuickBooks draws 2D graphs by
using black-and-white patterns to differentiate bars, pie segments, and legend entries. When this
preference is off, QuickBooks uses color instead of patterns (if you do not have a color monitor,
QuickBooks uses shades of gray).
Display Modify Report Window Automatically – This option opens the Modify Report
window automatically when you create a report. You use this window to change the date range
of the report, add or delete columns, and change appearance of the report in other ways. When
this preference is off, the Modify Report window doesn't appear automatically. To display the
window, you must click “Modify Report” on the report's button bar.
Summary Reports Basis - For summary reports, this option determines when income counts as
income and expenses count as expenses. The accrual option produces reports to show sales as
income from the date of a sale, and bills as expenses from the date of a bill. The cash option
causes your reports to show sales as income from the date you receive payment, and bills as
expenses from the check date when you pay them. For example, a cash basis profit and loss
report does not show outstanding invoices as income, or unpaid bills as expenses. This
Copyright 2005, AdvisorCPE – www.QuickBooksAdvisor.info
47
QuickBooks for CPAs 2005
preference affects most summary reports (reports that summarize amounts and do not list
transactions). It does not affect reports that list individual transactions, 1099 reports, or sales tax
liability reports. You can change the report basis of sales tax liability reports in the Sales Tax
section of the Preferences window. Transaction reports and 1099 reports are always on a cash
basis.
Aging Reports – This option sets the starting point for counting the number of overdue days on
aging reports. These reports track unpaid invoices or bills by showing how much is currently
due and how much is overdue. This preference affects all aging reports as well as the accounts
receivable and accounts payable graphs. Age from due date – Select this option if you want the
overdue days to start from the due date that appears on an invoice, statement, or bill. Age from
transaction date – Select this option if you want the overdue days to start from the date you
wrote an invoice, wrote a statement, or received a bill.
Format – This option allows you to change the appearance of the report, including fonts,
negative amounts, rounding to thousands of dollars, eliminating cents, and eliminating all zero
amounts.
Show Accounts By - Normally, accounts appear by name in reports. Alternatively, you can have
your reports list accounts by the descriptions you entered when you created the accounts.
Usual Shipping Method - If you use a particular shipping method regularly, you can have
QuickBooks automatically fill in that shipping method on sales forms where the Ship Via field
appears.
Default Markup Percentage - QuickBooks uses this percentage to calculate the sales price of
items that have both a cost and a sales price. You will see the effect of the default markup
percentage when you create inventory part, non-inventory part, service, and other charge items.
When you enter the item's cost, QuickBooks automatically calculates the sales price and enters it
in the Sales Price field. For example, entering a cost of $10.00 when the markup is 25% causes
Copyright 2005, AdvisorCPE – www.QuickBooksAdvisor.info
48
QuickBooks for CPAs 2005
QuickBooks to fill in the sales price as $12.50. If you don't want to use the default markup for a
particular item, simply change the sales price that QuickBooks fills in.
Usual FOB - FOB, which stands for "free on board," refers to the site from which you usually
ship your invoiced products. It has no accounting implications within QuickBooks. You can
specify an FOB site, to be filled in automatically on sales forms where the FOB field appears.
Track Reimbursable Expenses As Income - This preference lets you track an expense and your
customer's reimbursement for the expense in separate accounts. When this preference is on,
QuickBooks adds this checkbox and field to the New and Edit Account windows for expense
accounts so you can select an income account to track reimbursable income. When you bill a
customer for this type of expense, QuickBooks records the customer's payment in the income
account. This is useful when you charge sales tax on reimbursement income. When this
preference is off, QuickBooks does not let you track customer reimbursements in a separate
income account. The income you receive for reimbursable expenses posts to the expense
account, thus canceling the original expense.
Price Levels - Price levels let you automatically increase or decrease inventory, non-inventory,
and service item prices. You create price levels, then use them on sales forms to adjust the price
of an item. For example, you might create a price level called "wholesale" and specify a decrease
of 20%. Then when you sell an item and attach the "wholesale" price level, the amount of that
item is automatically reduced by 20%. For each price level you create, you assign a name and
percentage of increase or decrease. You can use price levels on invoices, sales receipts, or credit
memos. When you apply a price level to an item on a sales form, the adjusted price appears in
the Rate column.
You can assign price levels to customers and jobs. Then, whenever you use that customer and
job on a sales form, the associated price level is automatically used to calculate the item price.
Price levels associated with customers will not automatically be used when reimbursable items
are added to invoices or sales receipts or when invoices are created from estimates. In both
cases, the item amount you originally entered will be carried over. You can then manually adjust
the rate, using price levels, after the invoice or sales receipt has been created.
Automatically Apply Payments - QuickBooks automatically applies a customer's payment to
the outstanding invoices for that customer. If the amount received is less than the customer's
outstanding balance, QuickBooks applies the payment to the oldest invoices first. When this
preference is off, QuickBooks does not automatically apply customer payments. You must
specify how to apply each payment when you are in the Receive Payments window.
Copyright 2005, AdvisorCPE – www.QuickBooksAdvisor.info
49
QuickBooks for CPAs 2005
Default Sales Tax Codes - At initial setup, items marked non-taxable are identified as “Non”,
and those marked taxable are identified as “Tax”. You can subsequently set up your own tax
codes to accommodate any situation for which you collect sales tax. If you never collect sales
tax, QuickBooks assigns a default code of “Non” just for reporting purposes.
Owe Sales Tax - Select As of invoice date if you owe sales tax from the moment you write an
invoice or make a sale. QuickBooks handles your sales tax liability on an accrual basis even if
the accounting basis for your reports is set to cash. Select Upon receipt of payment if you owe
sales tax only when you finally receive cash from a customer. QuickBooks handles your sales tax
liability on a cash basis even if the accounting basis for your reports is set to accrual.
Pay Sales Tax - No matter which choice (monthly, quarterly, or annually) you make, you can
pay sales tax at any time. Your choice sets up the period of time covered by your sales tax
reports. You should always use the Pay Sales Tax window to pay your sales tax, not the Write
Checks window. For example, if you select Monthly, QuickBooks uses the previous month as
the base for your sales tax reports (you can change the date range of the report if you need to). In
the Pay Sales Tax window, QuickBooks displays the sales tax due through the end of the
previous month.
Mark Taxable Amounts With "T" When Printing – If a line item on a sales form is taxable,
QuickBooks places a "T" next to the amount on the printed form, for example:
Description
T-shirts
Qty
5
Rate Amount
10.00 50.00T
If you don't want the Ts to print on your sales forms, clear the checkbox.
Copyright 2005, AdvisorCPE – www.QuickBooksAdvisor.info
50
QuickBooks for CPAs 2005
These preferences change the default cover note for business forms you send by e-mail. For
example, you can have one cover note for invoices or statements and a separate one for
estimates. You can choose whether you want the new note to be the default for invoices,
estimates, statements, sales orders, sales receipts, credit memos, purchase orders, or reports. You
can also use the drop-down lists to change the salutation ("Dear," etc.) and the format (<First>
<Last> etc.) of the customer's name. Following are examples of how the salutation and name
format options work together:
Dear Kristy Abercrombie
To Kristy Abercrombie
Dear Ms. Abercrombie
To Ms. Abercrombie
Dear Kristy
To Kristy
Copyright 2005, AdvisorCPE – www.QuickBooksAdvisor.info
51
QuickBooks for CPAs 2005
You can specify how you (and other company file users) log in to QuickBooks Business
Services. You must be the company administrator in order to change this preference. This option
allows you to automatically connect without asking for a password. All users of the same
company file will automatically be logged in to the QuickBooks Business Services network.
When you make this selection, you are automatically logged in without having to provide a
Login name or password.
Alternatively, you can always ask for a password before connecting. Users of the same company
file will be required to provide a Login name and password each time they access QuickBooks
Business Services. Choose this option if you've granted individual service access rights to other
company file users or if you have multiple employees using the same company file.
You can also control the background downloading of service messages. When you select this
checkbox, service updates are automatically downloaded from the Intuit server to your computer.
QuickBooks periodically checks the Intuit server for new updates, and downloads information
gradually when your open Internet connection is not being used by another process or
application.
Spell Checker - Spell Checker can check the spelling in the Description, Memo, and Message
fields of most sales forms invoices, estimates, sales receipts, credit memos, and purchase orders,
and text fields on certain forms and lists. The Spell Checker does not have the broad
functionality of other spell checkers you may have used. It is intended to help you quickly check
the spelling of words in most fields in which text can be entered. You can run Spell Checker
automatically by checking "Always check spelling before printing, saving, or sending supported
forms." When you click Save & New or Save & Close, Spell Checker runs automatically. If you
want to run Spell Checker manually, clear the checkbox. Then, when you create a sales form,
click Spelling in the toolbar. In the "Ignore words with" area, you can tell Spell Checker when to
skip special spelling cases.
Copyright 2005, AdvisorCPE – www.QuickBooksAdvisor.info
52
QuickBooks for CPAs 2005
1099 Category, Account, And Threshold Table - For each 1099 category you report to the
IRS, select the QuickBooks account you use to track 1099 vendor payments and the minimum
(threshold) amount you must report to the IRS. If you track 1099 vendor payments in more than
one QuickBooks account, identify each account by choosing "Selected accounts" from the top of
the Account list. An account can belong to only one 1099 category. For example, if you set up
an expense account named "Payments to Subcontractors" and you've selected it to track the 1099
category "Non employee Compensation," you can't use "Payments to Subcontractors" for any
other 1099 category. You can track 1099 categories in these types of accounts: expense, other
expense, other current asset, fixed asset, other asset, other current liability, and long-term
liability. Many businesses report amounts only for Box 7: Non-employee compensation.
Time Tracking – This option allows you to track time for yourself, employees, owners, partners,
and vendors. For entering time information, QuickBooks offers either single activity forms or
weekly timesheets.
Copyright 2005, AdvisorCPE – www.QuickBooksAdvisor.info
53
QuickBooks for CPAs 2005
You can use the Stopwatch to time a current activity, such as when you answer a phone call from
a client. You can assign time to particular jobs and then bill those hours back to the customer.
You can preview your employees' time information along with their paychecks when you pay
them. You can edit the hours to be paid; the original record of time worked remains unchanged.
You can create four customizable time reports to break down your company's time spent by
employee, by job, or by the type of work or services your company provides.
When you track time, QuickBooks displays a Time Tracking submenu on the Customers and
Employees menus and four time-related reports on the Jobs & Time submenu of the Reports
menu. If you answer No, you can always turn on time tracking later by clicking Yes in this
window.
First Day of Work Week - QuickBooks adjusts your timesheets so that each weekly period
begins with the day of the week you select. If a timesheet happens to be open when you make
this change, the change does not occur in the timesheet until you close and reopen it.
Copyright 2005, AdvisorCPE – www.QuickBooksAdvisor.info
54
QuickBooks for CPAs 2005
QUICKBOOKS IN-DEPTH
SETTING UP
CUSTOMERS,
VENDORS, &
EMPLOYEES
CHAPTER 8
Copyright 2005, AdvisorCPE – www.QuickBooksAdvisor.info
55
QuickBooks for CPAs 2005
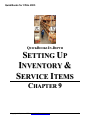
SETTING UP CUSTOMERS
The screen above shows the Customer:Job list, including the Customer:Job pop up menu in the
lower left hand corner. This menu allow you to affect the status of the list and its items, such as
New, Edit, Make Inactive, Delete, Use, and Print List. The Activities menu button provides
access to activities that you can perform on that list's items, such as Receive Payments for
customers or Enter Bills for vendors. Finally, the Reports menu button shows many of the
reports that you can create for the list's items. Clicking on the New Customer button displays the
following screen:
Copyright 2005, AdvisorCPE – www.QuickBooksAdvisor.info
56
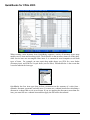
QuickBooks for CPAs 2005
This screen is used to add new customers to your Customer:Job list and to change information
about customers who are already on the list. Most of the fields should be obvious. However, if
you don't plan to set up separate jobs for this customer, enter job information on the Job Info tab.
You should determine the opening balance and "as of" date for a customer. These two fields
establish a correct accounts receivable balance as of the start date you choose. You should leave
these fields blank if you are planning to set up one or more jobs for this customer. QuickBooks
will calculate and track the overall balance for this customer from the balances you enter for the
individual jobs.
While this should be obvious, we will point out that you must enter all historical transactions
from the day after your start date through today. For example, if you wrote invoices to this
customer between your start date and today, you must enter those invoices into your QuickBooks
records. This gives QuickBooks the ability to provide full financial reports for your company for
any period of time after your start date.
Copyright 2005, AdvisorCPE – www.QuickBooksAdvisor.info
57
QuickBooks for CPAs 2005
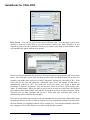
Type – Once you have assigned a customer type to each customer, you can create reports that
provide useful information about the customers you serve. For example, if you have categorized
your customers by market segment, you can create a separate sales report for each segment. For
example, a building contractor might use customer types to record a client's market segment:
residential, commercial, industrial, etc.
Preferred Send Method – You can choose how you want to send invoices, statements,
estimates, etc. to this customer, including e-mail or fax.
Resale Number – Entering a number here indicates that you don't charge sales tax on items that
a customer buys for resale. However, be cautioned that this field is for information only; you
will still need to suppress sales taxes in the ordering process.
Custom Fields - Custom fields let you add to the information that QuickBooks tracks about your
customers, vendors, and employees and the items that you purchase and sell. You can also add
your custom fields to sales and purchase forms. QuickBooks treats the information you enter into
a custom field the same way it treats information entered into any other field. If you memorize a
transaction that has a custom field, QuickBooks memorizes what you entered in the field along
with the other details of the transaction. If you export a list that contains data in custom fields,
QuickBooks exports that data along with the other data from the list. The custom field screen is
shown below:
Copyright 2005, AdvisorCPE – www.QuickBooksAdvisor.info
58
QuickBooks for CPAs 2005
QuickBooks handles jobs as a subset of the customer record. As you can see below, QuickBooks
does not capture very much information about a job; only a few fields of data are available to
save.
To add more than one job to a given customer, you need to choose “Add Job” from the customer
menu screen.
Copyright 2005, AdvisorCPE – www.QuickBooksAdvisor.info
59
QuickBooks for CPAs 2005
Right Mouse Menus - When working with customer lists, as well as other lists, it is important to
remember that right mouse clicking on a name of that list is a great shortcut to performing
everyday tasks. Presented below is a screen shot of the resulting menu.
SETTING UP VENDORS
Copyright 2005, AdvisorCPE – www.QuickBooksAdvisor.info
60
QuickBooks for CPAs 2005
Setting up vendors is a similar process to setting up customers. There is a similar look and feel
to the screens and similar data fields, etc. For example, you can establish a vendor type just like
a customer type, you can set up custom field for vendors just like custom fields for customers,
and the user menus work the same way, as well.
SETTING UP EMPLOYEES
Copyright 2005, AdvisorCPE – www.QuickBooksAdvisor.info
61
QuickBooks for CPAs 2005
Setting up a new employee is a different process than setting up a new customer or vendor in that
QuickBooks launches a wizard to walk you through the entire employee set up process. The
screens below demonstrate this wizard:
Copyright 2005, AdvisorCPE – www.QuickBooksAdvisor.info
62
QuickBooks for CPAs 2005
Notice that during this wizard process, QuickBooks provides links to discussions about each
field. Once you complete the set up wizard, the following screen is displayed, similar to the
customer and vendor set up screens.
Copyright 2005, AdvisorCPE – www.QuickBooksAdvisor.info
63
QuickBooks for CPAs 2005
You can get a credit report on any customer, or prospective customer, selecting “Check Credit”
from the Customers menu, and then select Look Up Commercial Customer. At the Credit Check
Services window, select the Existing Customer tab if the company you are checking is already in
your customer list. Otherwise, select the New Customer tab. Next select a company or enter the
company name and state. Then select Get Credit Report and click Start. If no matching company
is found, make certain that the company name and the state in which it is located are both
correct. If multiple possible matches are found, select the best match and click Continue. If a
large number of companies is found, click Advanced Search and add additional criteria. If the
company you selected is not an exact match for a customer in your customer list, the information
from the D&B database is displayed next to the information from your QuickBooks customer
list. Check "Update billing address in QuickBooks with information from D&B" if you want the
D&B information to replace the QuickBooks information. The information in QuickBooks will
be saved in the customer notes area. Pricing for the Credit eValuator Report service is as
follows:
Features
Price
Credit eValuator Reports in
QuickBooks
$24.99 ea
Comprehensive Reports
$121.99 ea
Industry Reports
$24.99 ea
Credit Alerts
$49.99/mo
With the Credit eValuator Report service, credit reports are downloaded right into QuickBooks.
Copyright 2005, AdvisorCPE – www.QuickBooksAdvisor.info
64
QuickBooks for CPAs 2005
QuickBooks Letters – With QuickBooks Letters you can also use this feature to edit a set of
prewritten, preformatted business letters in Microsoft Word using QuickBooks data. This allows
you to send letters to customers or vendors such as collection letters, thank you notes, and more.
To create a letter, use the QuickBooks Write Letters wizard, where you'll specify choices for
letter types, lists of recipients, and other information. When you've made all the necessary
selections, you'll leave the wizard and begin creating your letters in Word. As you work in Word,
you can access a set of QuickBooks toolbars that will help you enter data fields in the letters you
create. QuickBooks fields act as placeholders for the QuickBooks data extracted from your
names lists.
Copyright 2005, AdvisorCPE – www.QuickBooksAdvisor.info
65
QuickBooks for CPAs 2005
QUICKBOOKS IN-DEPTH
SETTING UP
INVENTORY &
SERVICE ITEMS
CHAPTER 9
Copyright 2005, AdvisorCPE – www.QuickBooksAdvisor.info
66
QuickBooks for CPAs 2005
When creating a new inventory item, QuickBooks supports a variety of inventory types, most
notably service items and inventory items. The difference is that inventory items sit on the shelf,
while service items are non-tangible labor items. It is common for most companies to sell both
types of items. For example, an auto repair shop might charge you $250 for a new fender
(inventory item), and $200 for 8 repair hours (service items). Presented below is the screen that
is used to indicate the item type.
QuickBooks has four item types that perform calculations on the amounts of a sales form subtotals, discounts, payments, and sales taxes. You must use a subtotal item before calculating a
discount or a charge that covers several items. If you are applying the discount to more than one
item, you must first use a subtotal item and then apply the discount to the subtotal.
Copyright 2005, AdvisorCPE – www.QuickBooksAdvisor.info
67
QuickBooks for CPAs 2005
According to Intuit, a common inventory mistake made by QuickBooks users is to create
separate inventory part items for both sales and purchases. You must use the same inventory
part item on both sales forms and purchase orders to keep the inventory accurate. (For example,
you should not receive 1006 doorknobs, and sell 1007 doorknobs.) Why people make this
mistake, I have no idea. Most likely this is a common occurrence because you can set up items
on the fly in the Sales Order screen.
Item Name or Number – You can set up inventory items as a name or number. Which you use
depends largely on what you are selling. Basically, the best rule is to use a name or number that
will help you distinguish this item from all the others on the list.
Sub items – You can create a sub item of an existing item. For example, you may set up the item
Door Knockers, with sub items of brass, metal, plastic, or solid gold. Sub items let you create a
hierarchy of items so you can group information about similar items in sales reports and graphs.
Sub items are purely for your own convenience. They look the same as items on sales forms and
purchase orders.
EOQ Modeling – QuickBooks supports minor Economic Order Quantity (EOQ) functions such
as reorder points. This information is useful in producing a list of inventory items that need to be
re-ordered.
Custom Fields – QuickBooks provides only 5 custom fields for inventory items, but they work
the same way as other custom fields found elsewhere in the system. The screen where these
fields are set up is shown below:
Copyright 2005, AdvisorCPE – www.QuickBooksAdvisor.info
68
QuickBooks for CPAs 2005
Price Levels – You can use price levels in two different ways. You can apply a price level
directly to items on a sales form or you can associate a price level with a customer. If you
associate a price level with a customer, whenever you create a sales form for that customer, items
will automatically appear with the new amount.
Price levels let you automatically increase or decrease inventory, non-inventory, and service item
prices. You create price levels, then use them on sales forms to adjust the price of an item. For
example, you might create a price level called "wholesale" and specify a decrease of 20%. Then
when you sell an item and attach the "wholesale" price level, the amount of that item is
automatically reduced by 20%. For each price level you create, you assign a name and
percentage of increase or decrease. You can use price levels on invoices, sales receipts, sales
orders, or credit memos. When you apply a price level to an item on a sales form, the adjusted
price appears in the Rate column. You can also assign price levels to customers and jobs. Then,
whenever you use that customer and job on a sales form, the associated price level is
automatically used to calculate the item price.
Price levels associated with customers will not automatically be used when reimbursable items
are added to invoices or sales receipts or when invoices are created from estimates. In both cases,
the item amount you originally entered will be carried over. You can then manually adjust the
rate, using price levels, after the invoice or sales receipt has been created.
Copyright 2005, AdvisorCPE – www.QuickBooksAdvisor.info
69
QuickBooks for CPAs 2005
QUICKBOOKS IN-DEPTH
WRITING CHECKS
CHAPTER 10
Copyright 2005, AdvisorCPE – www.QuickBooksAdvisor.info
70
QuickBooks for CPAs 2005
The process of writing a check is the most fundamental aspect of QuickBooks – more than
anything else, the entire accounting system is centered around this activity. In QuickBooks, the
user interface for writing checks looks like a normal checkbook. You should NOT use the Write
Checks window to do any of the following: Write a paycheck, pay your payroll liabilities, pay
sales tax, or pay bills you've already entered in the Pay Bills window. There are separate
functions in the Employee and Vendor navigators for preparing checks for these purposes.
Three things to keep in mind while writing a check are as follows:
1. AutoRecall - Recalling the last transaction for a particular payee can be a time saver,
especially if the data is the same or similar. To do this you must turn on AutoRecall.
Then when you enter a name, QuickBooks automatically completes the transaction by
filling in what you entered in the last transaction of that type for that person. For
example, when you enter a vendor's name on a bill and press Tab, QuickBooks fills in
the entire bill, just like the last one you entered for that vendor. If you have more than
one previous bill from the vendor, QuickBooks bases the new bill on the bill with the
most recent date. When this preference is off, QuickBooks does not complete
transactions automatically. You still have the ability to recall a transaction from the
Memorized Transaction list, however. AutoRecall works only with bills, checks, or
credit card charges. You cannot use AutoRecall with purchase orders, invoices, sales
receipts, payroll liability checks, or credit memos. Also, you cannot AutoRecall a
transaction from one account to another. For example, if you have two checking
accounts, you cannot write a check in one account, go to the other account, and then
AutoRecall the check in the other account.
Copyright 2005, AdvisorCPE – www.QuickBooksAdvisor.info
71
QuickBooks for CPAs 2005
2. If an open purchase order exists for this vendor, you are prompted to receive against
it. You should click “Yes” to receive against one or more purchase orders. Keep in
mind that all item information (quantity received, etc.) can be edited prior to saving
the check.
3. If time data exists for this payee (ie: if this payee is a subcontractor, owner, or
partner) QuickBooks prompts you to pay for the time worked if there is time data for
the person if you have not previously paid this person for time worked, and there is
time data within the last 12 months; or if there is time data dated on or after the first
day after the ending date of the last payment to this person for time worked. To
specify a time period so QuickBooks can pre-fill the Items tab of the check with time
data, click "Yes" at the prompt. If you don't want this check to pay for time based on
the time data, click No at the prompt. If you answer No and then change your mind,
you can specify a time period by clicking Time in the Items tab of the Write Checks
window.
Leaving the Dollar Field Blank – You can enter the amount of the check in the dollar field.
However, if you leave this field blank, the amounts you enter in the detail area of the check will
total automatically and display here.
Memorizing Transactions - If you have transactions that occur often, such as monthly bills or
recurring invoices for clients, you can save time by memorizing the details of the transactions.
Once you memorize a transaction, you can have QuickBooks reenter it for you at any time. You
can even have QuickBooks automatically enter the transaction at intervals you specify. You
cannot memorize the following transactions:
Receipt or deposit of payments
Bill payments
Paychecks
Time records
Sales tax payments
YTD payroll adjustments
Copyright 2005, AdvisorCPE – www.QuickBooksAdvisor.info
72
QuickBooks for CPAs 2005
Payroll Checks - Payroll checks are written from a different screen as shown above. Start by
choosing “Pay Employees” and mark the employees you want to pay.
Copyright 2005, AdvisorCPE – www.QuickBooksAdvisor.info
73
QuickBooks for CPAs 2005
The difference between the check date and the pay period end date is the check date is the pay
date or the date that you distribute employee checks. QuickBooks uses this date to record the
entry in the check register and for generating reports. The IRS bases your tax liability and that of
your employees on this date. For example, if you pay an employee in January 2002 for time
worked in December 2001, the income is reported on the employee's 2002 W-2 form. The pay
period ends date is the last date of the pay period that you want this paycheck to cover.
QuickBooks uses this date to calculate how many weeks an employee has worked in a year and
the time data to include in the paycheck.
Copyright 2005, AdvisorCPE – www.QuickBooksAdvisor.info
74
QuickBooks for CPAs 2005
QUICKBOOKS IN-DEPTH
RECEIVING CASH
& ACCEPTING
CREDIT CARDS
CHAPTER 11
Copyright 2005, AdvisorCPE – www.QuickBooksAdvisor.info
75
QuickBooks for CPAs 2005
There are several options for recording an invoice payment. When you receive payment on an
invoice you've sent to a customer, you should use the Receive Payments window to apply the
payment to the invoice. When the customer pays in full at the time of the sale, you should enter a
sales receipt instead.
If the payment is for a particular job on your Customer: Job list, make sure you choose the job as
well as the customer's name in the Received From or Customer: Job field. If you received one
payment that covers multiple jobs, find those jobs in the Applied To list, and click in the column
next to the jobs to which you want to apply the payment.
When receiving cash or checks, you can indicate whether you want QuickBooks to group this
payment with other undeposited funds, or deposit it directly into a bank account. Think for a
moment about how your bank statement shows deposits. If the statement shows a lump sum for
each deposit, group your payments for later deposit. On the other hand, if your statements show
each individual check you deposited, have QuickBooks deposit the payment directly in a bank
account. It's easier to reconcile your QuickBooks accounts with your bank statements when the
accounts show deposits the same way that your statements do. If you choose to group with other
undeposited funds, QuickBooks "holds" all your customer payments in a special account named
Undeposited Funds. To move the payments to your bank account, you must use the Make
Deposits window to group the payments into one deposit. This method works best when you
hold the money you've collected for a period of time before you deposit it, or receive several
payments that you deposit together in a lump sum. If you choose the “Deposit To” method,
QuickBooks deposits the payment in the bank account of your choice when you record the
payment. The payment does not go into the Undeposited Funds account, and you do not have to
use the Make Deposits window to deposit the payment.
Copyright 2005, AdvisorCPE – www.QuickBooksAdvisor.info
76
QuickBooks for CPAs 2005
You can also redistribute the payment by creating a payment item with a zero amount; then enter
the payment item on the invoice. Next enter the amount of the payment in the Rate column on
the invoice as a negative number. This reduces the balance due on the invoice by the amount of
the payment.
Applying Payments - Normally, QuickBooks is set to apply the payment to the oldest invoice
first, then to the next oldest, and so on. If you are applying one payment to multiple jobs,
QuickBooks uses the same logic, applying the amount to the oldest invoice first and the rest to
the next invoice, and so on. To apply to multiple jobs, click Auto Apply and the jobs will be
marked for you. If you want to distribute the amount of the payment differently, do the
following:
Each time you select an invoice, QuickBooks automatically inserts the amount to be applied to
the invoice in the Payment column. When the undistributed amount of the customer's payment is
greater than the amount due, QuickBooks pays the invoice in full. When the undistributed
amount is less than amount due, QuickBooks applies the entire amount to the invoice, leaving a
balance due on the invoice as shown below:
Automatically Apply Payments - This preference causes QuickBooks to automatically apply a
customer's payment to the outstanding invoices for that customer. If the amount received is less
than the customer's outstanding balance, QuickBooks applies the payment to the oldest invoices
first. When this preference is off, QuickBooks does not automatically apply customer payments.
You must specify how to apply each payment when you are in the Receive Payments window.
Copyright 2005, AdvisorCPE – www.QuickBooksAdvisor.info
77
QuickBooks for CPAs 2005
Example Of Payment Application - When QuickBooks applies the customer's payment
automatically, it begins with the oldest invoice first. For example, if a customer has these
outstanding invoices:
Date
5/1
5/17
6/2
Amt. Due
$100.00
$200.00
$300.00
Payment
and you receive a payment of $500.00, QuickBooks applies the payment as follows:
Date
5/1
5/17
6/2
Amt. Due
$100.00
$200.00
$300.00
Payment
$100.00
$200.00
$100.00
Note that the 6/2 invoice has a balance of $200.00 after application of the payment. The next
time the customer sends in a payment, the Receive Payments window will show a balance of
$200.00 due for the 6/2 invoice.
Entering A Sales Receipt (if you track customers and jobs) - Use this procedure when you make
a sale for which you receive full payment at the time of the sale. Sales receipts can include
payments by cash, check, or credit card. Make sure you select the payment method. Later, when
you make deposits to your bank account, you will want to group deposits by the type of payment
method.
Early Payment Discounts – You should Use the Set Discount button in the Receive Payments
window to apply a discount for early payment for any customers whose payment terms include a
discount for payment before the due date. Even if the customer has sent you a payment for the
full amount of the invoice (or statement charges), you can apply a discount. QuickBooks holds
any credit amount in accounts receivable until you apply it to an invoice or issue a refund check.
If you are offering a discount for something other than early payment (a sales promotion, for
example), use a Discount item instead. QuickBooks calculates a suggested discount amount
based on your payment terms with the customer and the payment date. You can enter any
discount amount you choose; you don't have to use the suggested amount. However, the amount
of the discount can't be higher than the original invoice.
Assessing Finance Charges - When you assess finance charges, QuickBooks creates an invoice
for each charge. Customers and jobs marked with an asterisk (*) have credits in the form of
payments or credit memos that you have not yet applied to any invoice. The overdue balance
shown in the Assess Finance Charges window does not reflect these credits. You can change
any finance charge amounts by typing over the amounts shown in the Fin. Charge column. You
can also change the interest rate by clicking “Settings” and entering the new rate. If you plan to
print the finance charge invoices to send to customers, you should select the "Mark invoices to
be printed" checkbox. If you send statements, leave this checkbox cleared. The finance charges
will be included the next time you print statements.
Copyright 2005, AdvisorCPE – www.QuickBooksAdvisor.info
78
QuickBooks for CPAs 2005
Credit Card information is entered in the Customer Information screen one time. This
information is automatically available for payment of future invoices for this customer.
Copyright 2005, AdvisorCPE – www.QuickBooksAdvisor.info
79
QuickBooks for CPAs 2005
To pay an invoice using the customer’s credit card, select Receive Payments under the Customer
menu. The customer’s credit card information automatically is shown in the Receive Payments
screen. The Payment Method line item automatically shows the credit card information on file.
Enter the amount of the payment to be processed and select Save & New. The payment will be
applied to the invoices selected. This screen gives you the option to have the payment entered
directly into the appropriate checking account as a deposit, or group the payment with
Undeposited Funds. Due to the fact that there is a delay in the funds being transferred into the
checking account and also merchant processing fees apply, it is advisable to select the Group
with other Undeposited Funds option. Once a month the associated credit card processing fees
need to be deducted from the appropriate checking account. You will receive a statement
summarizing the credit card deposits and processing fees each month.
Note the button at the bottom is automatically selected that states Process VISA payment when
saving. If you prefer to process the credit card at a later time, this option needs to be unselected.
When the payment is saved and the screen closed, QuickBooks will automatically launch the
web browser connection to process the credit card payment. The screen below will then appear:
Copyright 2005, AdvisorCPE – www.QuickBooksAdvisor.info
80
QuickBooks for CPAs 2005
The credit card processing screen appears and all information can be verified a final time before
the credit card payment is processed. Once the Send button is selected, the credit card
authorization approval code will appear on screen. This page should be printed and filed in case
the transaction needs to be accessed in the future. The credit card approval process takes only
seconds.
Copyright 2005, AdvisorCPE – www.QuickBooksAdvisor.info
81
QuickBooks for CPAs 2005
QUICKBOOKS IN-DEPTH
MONTH END
CLOSING & BANK
RECONCILIATION
CHAPTER 12
Copyright 2005, AdvisorCPE – www.QuickBooksAdvisor.info
82
QuickBooks for CPAs 2005
CLOSING THE BOOKS
Unlike many accounting systems, QuickBooks does not require you to close your books at the
end of an accounting period. The reason for closing is to restrict access to the transactions of
prior accounting periods so that no one changes the transactions without your knowledge. When
you close QuickBooks, technically what happens is 1. You set a closing date; 2. Transactions
entered on or before the closing date are protected by a password; and 3. To add, edit, or delete a
transaction on or prior to the closing date, a user must know the closing date password and have
privileges to modify closed transactions.
To close the books, you must be in single user mode. Next from the Edit menu, choose
Preferences and select Accounting. Next on the Company Preferences tab, enter the date through
which you want your books to be closed. As an option, you can create a password to limit access
to the closed accounting period here also.
Keep in mind that in single-user mode, only one person at a time can access and work with your
company file. If other people are working with the company file, you should ask them either to
close the file or exit QuickBooks, then from the File menu, choose Switch To Single-User Mode.
BANK RECONCILIATION
The screen shown above opens when you choose Reconcile from the Banking menu or when you
click the Modify button on the Reconcile window. You must select the account you want to
reconcile. The balance for the selected account appears in the Beginning Balance field. Only
transactions with an associated reconcile date are included in the beginning balance.
If the statement shows a service charge that you haven't yet entered into your QuickBooks
records, enter the amount in the Service Charge field. Then enter the date of the service charge
and the expense account you use to track service charges. When you finish reconciling,
Copyright 2005, AdvisorCPE – www.QuickBooksAdvisor.info
83
QuickBooks for CPAs 2005
QuickBooks adds the service charge to your bank account register. If the statement shows
earned interest that you haven't yet entered into your QuickBooks records, enter the amount in
the Interest Earned field. Then enter the date you earned the interest and the income account you
use to track interest income. When you finish reconciling, QuickBooks also adds the interest
income to your bank account register. If the statement shows a finance charge that you haven't
yet entered into your QuickBooks records, enter the amount in the Finance Charges field. Then
enter the date and your finance charge expense account.
The Ending Balance, Cleared Balance, and Difference fields show the ending balance you
entered from your bank or credit card statement, the total balance you've marked (cleared) so far
while reconciling, and the difference between those two numbers. If you finish marking
transactions and the Difference is zero, your QuickBooks records and financial statements are in
agreement. If the Difference is not zero, find and correct the discrepancies, or enter an
adjustment to make up for the difference.
Correcting Differences - When your QuickBooks account doesn't balance with your statement,
you can have QuickBooks adjust for the difference, or you can track down and correct the
problem yourself. If you discover that your bank or credit card company made a mistake,
QuickBooks can compensate for the error until it is corrected on your next statement. There are
three ways to handle these differences as follows:
1. Having QuickBooks adjust for differences
2. Finding and correcting the difference yourself
3. Handling bank errors
If it's not worth your time to track down the source of a slight difference between your account
balance and the ending balance on your statement, you can choose to ignore the difference.
QuickBooks then adds a transaction that adjusts your account balance for the amount of the
difference. You will start with accurate totals the next time you reconcile your account. If you
find and correct the source of the error later, be sure to also delete the adjustment transaction.
To have QuickBooks adjust for reconciliation differences, in the Reconcile window, click
Reconcile Now. Click the Enter Adjustment button to create the balance adjustment transaction.
The Select Reconciliation Report window appears where you can choose to show a detail or
summary report.
If you want your account to balance exactly with your statement, you must track down the source
of each difference and update your QuickBooks records. Here are some suggestions:
1. Count the number of transactions on your bank or credit card statement and compare that
against the number of transactions you marked as cleared in the Reconcile window.
2. If the number of transactions you marked is different than the number of transactions on
your statement, look for the source of the discrepancy.
3. If you're sure that you marked the transactions correctly, check the amounts shown in the
Reconcile window against the amounts on your statement.
Copyright 2005, AdvisorCPE – www.QuickBooksAdvisor.info
84
QuickBooks for CPAs 2005
If you can't find any errors or omissions in your QuickBooks records, the problem may be the
result of a bank error. In this case, contact your bank or credit card company and report the
error. When you receive your next statement, verify that it contains an adjustment for the error.
Then be sure to delete the previous adjustment transaction you made regarding this difference
from the account register. Finally reconcile the new statement with the account.
Copyright 2005, AdvisorCPE – www.QuickBooksAdvisor.info
85
QuickBooks for CPAs 2005
QUICKBOOKS IN-DEPTH
FINANCIAL
REPORTING
CHAPTER 13
Copyright 2005, AdvisorCPE – www.QuickBooksAdvisor.info
86
QuickBooks for CPAs 2005
Financial Reporting – QuickBooks offers some of the strongest financial reporting capabilities
in all of accounting software. The screen above displays the Report Finder – a utility that helps
you locate the report you are looking for. With the Report Finder, you can browse the reports
related to what you are interested in, briefly learn what each has to offer, and locate exact reports
by search terms. When you find the report you want, you can display it in the Report window,
just as if you had created the report by choosing its name from the Report menu. If you don't
need to view the report in the Report window, you can print the report or send it to Excel directly
from the Report Finder. You can also customize the report's content, filter the report, or change
the report's date range without displaying the report. This is a faster way to create, modify, or
print reports.
Copyright 2005, AdvisorCPE – www.QuickBooksAdvisor.info
87
QuickBooks for CPAs 2005
The reports menu shown above also provides an extensive listing of reports, organized by
accounting module.
Once you have printed a report to the screen, the real reporting power of QuickBooks starts to
shine. As shown in the screen below, buttons at the top of each report make it easy to modify,
memorize, print, or export the report to Microsoft Excel.
For example, the Modify Report dialog box allows you to specify the date range, toggle cash or
accrual, add sub-columns, and choose from a variety of display columns. You can also control
the sorting of data and add columns showing percents to totals. The Advanced button allows you
to suppress the printing of zero balance amounts, rows, or columns.
The display columns pull down shown below is particularly powerful as it allows you to indicate
the types of columns to be displayed. This pull-down is also available at the top of the displayed
report, as “Columns”.
Copyright 2005, AdvisorCPE – www.QuickBooksAdvisor.info
88
QuickBooks for CPAs 2005
For example, here is the same report presented with two different column formats:
The first report shows P&L data by customer and job, while the second report displays the same
P&L data by item sold.
Adding Or Deleting Report Columns - Reports that list individual transactions can display
additional columns of data. To do this, click Modify Report and from the Display tab, click Add
Columns and select the columns you want to add. To delete columns, clear the checkmark for
each column you want to delete. As a tip, the column titled "left margin" adds white space along
the left edge of the report. By deleting this column, you can gain some extra room for report
data.
Refresh Button - The refresh button appears in the toolbar of every report and graph. If refresh
is needed, a message appears in the title bar indicating that the report or graph doesn't reflect the
latest changes to your company data.
Memorizing a Report – Whenever you change the settings for a report, you can memorize the
report with the new settings. Then, when you want to create a similar report, you can recall it
from your own list of memorized reports. When QuickBooks memorizes a report, it memorizes
your custom report settings, not the data in the report. If you want to save actual data, export the
report to a Microsoft Excel spreadsheet. After you have customized a report, click Memorize on
the report button bar.
Copyright 2005, AdvisorCPE – www.QuickBooksAdvisor.info
89
QuickBooks for CPAs 2005
If you have recalled a memorized report and changed it, indicate whether you want QuickBooks
to replace the earlier report (under the same name) or create a new memorized report (under a
new name). If you want to assign the report to a memorized report group, select Save in
Memorized Report Group, then choose the group from the drop-down list. The memorize report
dialog box is shown below:
Print Breaks – QuickBooks provides a smart feature that can insert page breaks in your reports so
that groups of information remain together. Or, to conserve paper, QuickBooks can insert as few
line breaks as possible. This option is shown in the dialog box below:
Once you proceed to print reports, you will find a wide number of print options available – some
of which will differ slightly depending upon the printer you are printing to.
Copyright 2005, AdvisorCPE – www.QuickBooksAdvisor.info
90
QuickBooks for CPAs 2005
A nice feature to always use is print preview. In many cases, you can access the information you
need without actually printing the report to paper. Printing to paper not only takes time, but it
costs money for paper and toner, and creates wear and tear on your printer. Ultimately the
reports you print will need to be burned or thrown away in a landfill or garbage heap. Why eat
valuable time and money – use the screen and avoid printing on paper whenever possible.
A complete listing of all of the standard reports produced by QuickBooks is shown below:
Copyright 2005, AdvisorCPE – www.QuickBooksAdvisor.info
91
QuickBooks for CPAs 2005
Reports that show how well your
business is doing:
•
•
•
•
•
•
•
•
•
•
•
•
•
•
•
•
•
Profit & loss standard
Profit & loss detail
Profit & loss YTD comparison
Profit & loss previous year
comparison
Profit & loss by job
Profit & loss by class
Profit & loss unclassified
Income by customer summary
Income by customer detail
Expenses by vendor summary
Expenses by vendor detail
Balance sheet standard
Balance sheet detail
Balance sheet summary
Balance sheet previous year
comparison
Statement of cash flows
Cash flow forecast
Budget Reports:
•
•
Balance sheet budget vs. actual
Customer & AR Reports:
Accountant Reports:
• Trial balance
• General ledger
• Transaction detail by account
• Journal
• Audit trail
• Transaction list by date
• Account list
• Income tax preparation
• Income tax summary
• Income tax detail
•
•
•
•
Profit & loss budget overview
Profit & loss budget vs. actual
Profit & loss budget by job
overview
Profit & loss budget vs. actual by
job
Balance sheet budget overview
•
•
•
•
•
•
•
•
•
•
•
•
A/R aging summary
A/R aging detail
Customer balance summary
Customer balance detail
Open invoices
Collections report
Unbilled costs by job
Transaction list by customer
Customer phone list
Customer contact list
Item price list
Customer QuickReport
Sales Reports:
•
•
•
•
•
•
•
Sales by customer summary
Sales by customer detail
Sales by item summary
Sales by item detail
Sales by rep summary
Sales by rep detail
Pending sales
Goods Or Services Reports
•
•
•
•
•
•
•
•
•
•
•
•
•
Copyright 2005, AdvisorCPE – www.QuickBooksAdvisor.info
Sales by item summary
Sales by item detail
Purchases by item summary
Purchases by item detail
Job profitability detail
Job estimates vs. actuals detail
Item profitability
Item estimates vs. actuals
Time by job
Time by item
Item price list
Item listing
Item QuickReport
92
QuickBooks for CPAs 2005
Jobs Reports:
•
•
•
•
•
•
•
•
•
•
•
Job profitability summary
Job profitability detail
Job estimates vs. actuals
summary
Job estimates vs. actuals detail
Job progress invoices vs.
estimates
Item profitability
Item estimates vs. actuals
Time by job summary
Time by job detail
Time by name
Time by item
•
•
•
•
•
•
•
•
•
•
•
•
•
•
•
•
Payroll item detail
Payroll detail review
Employee earnings summary
Payroll transactions by payee
Payroll transaction detail
Payroll liabilities
Employee phone list
Employee contact list
Employee withholding
Employee QuickReport
Payroll item listing
Payroll item QuickReport
New Hire List
Paid Time Off List
Emergency Contact List
Terminated Employee List
Vendors & AP Reports:
•
•
•
•
•
•
•
•
•
•
•
•
•
A/P aging summary
A/P aging detail
Vendor balance summary
Vendor balance detail
Unpaid bills detail
Transaction list by vendor
Sales tax liability
Sales tax revenue summary
1099 summary
1099 detail
Vendor phone list
Vendor contact list
Vendor QuickReport
Inventory Reports:
•
•
•
•
•
•
Inventory valuation summary
Inventory valuation detail
Inventory stock status by item
Inventory stock status by vendor
Physical inventory worksheet
Inventory item QuickReport
Employees and Payroll Reports:
•
Payroll summary
Copyright 2005, AdvisorCPE – www.QuickBooksAdvisor.info
93
GRAPHS
QuickBooks also produces a wide variety of graphs and charts, like the sample income and
expense graph shown below:
The types of graphs that you can produce from QuickBooks include:
•
•
•
•
•
•
Income and Expenses
Net Worth
Accounts Receivable
Sales
Accounts Payable
Budget vs. Actual
Copyright 2005, AdvisorCPE – www.QuickBooksAdvisor.info
94
Any QuickBooks report can be exported to Excel with the click of a button. Be aware that this is
a one way ride, data changes in Excel can not be automatically carried back into QuickBooks –
this would violate all the rules of data validation and a secure audit trail, etc.
When sending report to an existing Excel
spreadsheet, you can either send your data
to a new blank worksheet, or open
Microsoft Excel and add the contents of
the QuickBooks report to an existing
spreadsheet. The spreadsheet could be one
that you previously created in Excel or one
that QuickBooks created during a previous
export. Some of the advanced options are
shown in the screen to the right.
Copyright 2005, AdvisorCPE – www.QuickBooksAdvisor.info
95
QUICKBOOKS IN-DEPTH
PAYROLL
CHAPTER 14
Copyright 2005, AdvisorCPE – www.QuickBooksAdvisor.info
96
QuickBooks provides a fairly good payroll module for the price. The Payroll navigation screen
above shows some of the functionality included in this module such as employee time entry,
leave of absence, etc. However, to use Payroll, Intuit’s literature is vague and it seems to imply
that you are required to sign up for and pay an ongoing monthly fee. In reality, it is possible to
use the Payroll module without the monthly service fee, but you will need to update your payroll
tax tables manually. When this new online requirement for updating payroll tax tables and
related monthly pricing approach came out in 1998, many CPAs cried foul. With the recent
release of QuickBooks 2003, Intuit has made it virtually automatic to update your payroll tax
tables for no fee – Intuit even reminds you periodically to do so.
QuickBooks payroll does have shortcomings in that it will not produce your SUTA forms, and it
will not file 1099 forms electronically. Nonetheless, the reality is that even with these
shortcomings and the online requirement, QuickBooks payroll is a bargain.
For those companies who want help with their payroll and filing requirements, Intuit offers a
monthly service. QuickBooks Assisted Payroll is a service in which Intuit professionals handle
your payroll tax deposits, tax filings, and W2 preparation – with a "No Penalties" guarantee
which basically states: “If the data you provide is accurate, on time and your account is
sufficiently funded, your payroll tax deposits and filings will be on time and accurate or Intuit
will pay any resulting payroll tax penalties.” Basically, your Payroll is outsourced via your
choice of on-line, phone, fax or PC input data entry.
Most bookkeepers who are familiar with payroll reporting feel that these services are
unnecessary, and in particular they do not like the fact that using these services forces you to
have your payroll information completed and submitted a week in advance. However, if you
Copyright 2005, AdvisorCPE – www.QuickBooksAdvisor.info
97
need help, here is a brief review. To get started using payroll, you first need to complete the
Payroll set up routine found on your employee menu as shown below:
The payroll setup interview wizard will walk you through setting up taxes and common payroll
items that many companies need to do payroll and additional payroll items such as yearly
salaries; hourly wages; state withholding; state disability; state unemployment; commissions; and
even company contributions. You should skip this procedure if your company has just hired its
first employee(s) and has not done payroll before, or has not done payroll this year. When you're
setting up payroll in QuickBooks, you need to enter summarized payroll amounts if you're just
beginning to use QuickBooks payroll but you've already written paychecks earlier in the calendar
year. The summarized amounts ensure correct year-to-date totals on the paychecks you write for
the rest of this year. The following screens provide a quick glance at the payroll set up screens:
Copyright 2005, AdvisorCPE – www.QuickBooksAdvisor.info
98
You will need to choose between three different payroll plans ranging in cost from $80 to $160
per month. The following table displays the differences in these three plans:
Complete Payroll
Deluxe Payroll
Basic Payroll
Enter Payroll Data Directly into QuickBooks
Submit Payroll by Phone, Fax, or Web
Payroll Data Downloaded and/or Stored in
QuickBooks
Compliance with Payroll Tax Regulations
Earnings & Deductions Calculation
Federal & State Tax Table Updates 1
Federal Payroll Tax Forms 2
Electronic Direct Deposit of Paychecks 3
Print Paychecks from QuickBooks
optional
4
Paycheck Delivery to Your Office or Print
Paychecks from our Web Site
"No Penalties" Guarantee 5
Automatic Federal and State Payroll Tax Deposits
and Filings 6
Print W-2s from QuickBooks 7
Service Automatically Prints and Mails W-2s to You
Local Payroll Tax Deposits and Filing
Print 1099-MISC Forms for Contractors and
Vendors from QuickBooks
Service Prepares and Files 1099-MISC Forms for
Contractors and Vendors
Preparation of State New Hire Reporting Forms
Calculation and Payment of 3rd Party Payments
and Wage Garnishments
Delivered and
available online
Available in
QuickBooks
Available in
QuickBooks
Pricing
*$115/month
*$80/month
$169/year
More Information
800-542-1227
866-820-6378
800-624-2106
Payroll Reports
QuickBooks Required
1
Internet access required for download delivery.
Federal forms included are: 940, 941, 941 Schedule B, and printing formats for W-2 and W-3 forms.
3
Additional fees apply and Internet access required for Direct Deposit (Internet access applies to Deluxe and Basic
Payroll)
4
Checks are sold separately
5
If the data you provide is accurate, on time and your account is sufficiently funded, your payroll tax deposits
2
Copyright 2005, AdvisorCPE – www.QuickBooksAdvisor.info
99
and filings will be on time and accurate or Intuit will pay the resulting payroll tax penalty.
Certain state deposits are subject to availability.
7
W-2s are sold separately.
* Complete and Deluxe Payroll pricing example is based on 10 employees, paid bi-weekly. Includes W-2 and year-end
processing fees, but does not include applicable setup fees. Prices vary depending on the service you choose, number of
employees, frequency of payroll and the number of states in which you file payroll taxes.
6
If you don't want to use an Intuit Payroll Service, you can use QuickBooks to prepare your
payroll manually in which you will need to calculate and enter payroll withholdings for each
paycheck in QuickBooks.
SETTING UP AN EMPLOYEE
There are numerous screens provided to capture an very large amount of information for each
employee. The screens below provide only a few examples of these screens:
Above we see that the personal information dialog boxes provide fields to capture citizenship,
military service, disabilities, e-mail address, spouse information, contact names, and even user
definable fields.
The payroll and compensation dialog boxes shown below capture information regarding type of
pay, pay rates, pay periods, raises, promotions, direct deposit, sick days, vacation accruals,
deductions, time and billing options, pension plans, etc.
Copyright 2005, AdvisorCPE – www.QuickBooksAdvisor.info
100
The employment dialog boxes shown below capture information such as starting date, employee
type, job titles, leave of absences, termination, active status, etc.
Copyright 2005, AdvisorCPE – www.QuickBooksAdvisor.info
101
QuickBooks also provides a notepad for collecting free form notes on each employee, including
date stamps. There is also a tickler system (shown below) which allows you to schedule future
tasks for each employee such as review dates, celebrations, health checkups, etc.
Copyright 2005, AdvisorCPE – www.QuickBooksAdvisor.info
102
TIME & BILLING OPTIONS
In year’s past, the QuickBooks Timer option was not integrated with QuickBooks, but now it is.
Employees have two options for capturing and inputting their time, including the activity dialog
box or the time sheet view.
In either case, the system allows the employee to capture time by customer and job. The
employee can also add free form notes to each time entry. Unfortunately QuickBooks does not
allow you to charge more than 24 hours to a client in a given day – which means that
QuickBooks is not suitable for use by lawyers (that’s just a joke – OK?).
Copyright 2005, AdvisorCPE – www.QuickBooksAdvisor.info
103
When it comes time to write paychecks, QuickBooks works similarly to the process of writing
regular checks. One key difference is that you can view the employee’s paycheck details with
one click of a button as shown below:
This screen is handy for verifying the deductions and payment amounts before printing.
Copyright 2005, AdvisorCPE – www.QuickBooksAdvisor.info
104
PAYROLL LIABILITIES
As employee paychecks are processed, QuickBooks does a decent job of tracking all payroll
liabilities. These liabilities can be viewed in the following report:
From this screen simply place a checkmark next to the liability you wish to pay and click create
– QuickBooks will create the check automatically, including amounts and accounts as shown
below:
Copyright 2005, AdvisorCPE – www.QuickBooksAdvisor.info
105
QuickBooks will also produce the various monthly, quarterly and annual payroll tax returns and
forms for you. To do this a rather lengthy payroll processing wizard is provided which includes
16 steps and allows you many opportunities to adjust the amounts to be included on these forms.
Copyright 2005, AdvisorCPE – www.QuickBooksAdvisor.info
106
QUICKBOOKS
TIPS & TRICKS
CHAPTER 15
Copyright 2005, AdvisorCPE – www.QuickBooksAdvisor.info
107
Report Filtering Tip - When filtering reports in QuickBooks, you may want to select most of
the items on a particular list, but not all items to appear on your report. First choose the
"selected" option from the list (selected accounts. selected names, etc). Normally you would
check each item that you want to appear on your report. However, if you want to check all the
items on the list, click the first item and do not release the mouse button. While holding down the
mouse button, slide the mouse pointer down just below the list. When QuickBooks is done – all
of the items on the list will be checked. Release the mouse button. Now you can manually click
the items to remove the ones that you do not wish to include in your filter.
941 Tip - Do not pay your payroll liabilities from the "Write Checks" window. If you use this
window, QuickBooks will warn you to use the "Pay Liabilities" window, but will let you write
the check. However when you print the 941, it will not reflect any payments that you made using
the "Write Checks" window. Use the "Pay Liabilities" window to create checks for all tax
liabilities. Using this window will ensure that the payments are reflected accurately on the 941
report and that your liability accounts are properly reduced.
The Accountant’s Copy Feature Tip - When users create an Accountant’s Copy of their
company books, QuickBooks implements some functions to make sure this feature works
properly. On the Client Side, QuickBooks locks certain parts of the company file to make sure
users cannot make changes that would affect the information the accountant is working on. Here
are the things users can and cannot do:
Users Can
Users Cannot
Create transactions
Delete an entry in a list.
Edit transactions
Rename an item in a list
Delete transactions
Change an account in the Chart of
Accounts to a subaccount
Add new items to lists
Change a subaccount in the Chart of
Accounts to an account
Edit items in lists
Copyright 2005, AdvisorCPE – www.QuickBooksAdvisor.info
108
On the Accountant Side, the restrictions on the accountant are designed to make sure the records
for customers, vendors, and Lists remain intact while the user keeps working.
Accountants Can
Accountants Cannot
Create journal entries
Delete List entries
Edit account names
Make List entries inactive
Change account numbers (if you use
numbers for your chart of accounts)
Create transactions (except journal entries)
Edit tax information for accounts
Adjust inventory quantities and values
Print 1099 Forms
Print 941 Forms
Print 940 Forms
Print W-2 Forms
When the file goes back to the user, the changes made by the accountant are merged into the
QuickBooks file. QuickBooks does not indicate to the user what changes have been made, or
what procedures have been taken. It’s important that accountants send their clients a note
detailing the changes.
Setting Up QuickBooks On A Network Tip - Install QuickBooks Pro on every computer that
will be involved in this network. One of those installed copies becomes the main network copy.
That copy can reside on a network server or on a user's computer. To set up shared access of the
QuickBooks company files, perform the following steps:
1. On the computer that will act as the QuickBooks server, open Windows Explorer and
right-click on the folder into which you installed QuickBooks Pro.
2. Choose Sharing from the shortcut menu to open the Folder Properties dialog box.
Copyright 2005, AdvisorCPE – www.QuickBooksAdvisor.info
109
3. Select Shared As. The folder name is automatically entered as the Share Name, and that
is probably a good choice. However, you can change the name of the share if you wish.
4. Set permissions for Full Control.
5. Click OK.
If you're using Windows 98 or Windows ME, the permissions are configured on the Sharing tab
of the Properties dialog box. If you're using Windows NT, Windows 2000, or Windows XP,
click the Permissions button on the Sharing tab to use the Permissions dialog box. It's a good
idea to map the shared folder as a drive on the other users' computers. It's not necessary, but it
speeds up access to the company files:
1. On each user’s computer, open Network Neighborhood and select the remote computer
that's acting as the server for QuickBooks Pro.
2. Right-click the shared resource for QuickBooks.
3. Choose Map Network Drive from the shortcut menu.
4. In the Map Network Drive dialog box, select a drive letter for this resource.
5. Select the Reconnect at logon option.
6. Click OK.
Switching Between Multi-user Mode and Single-User Mode Tip - The following
administrative tasks must be performed in single-user mode:
•
Backing up
•
Restoring
•
Compressing files
•
Deleting items from lists
•
Exporting or importing accountant's review copies
•
Certain other setup tasks (QuickBooks displays a message telling you to switch to singleuser mode when you access those setup tasks)
On the computer that's acting as the host/server, you must enable multi-user mode before
other users can access the data files. To accomplish this, make sure the company you want
users to work in is the current company. Then choose File | Switch to Multi-user Mode from
the QuickBooks menu bar. All the QuickBooks windows are closed while the switch is made.
Then a message appears to tell you that the company file is working in multi-user mode. The
title bar of the QuickBooks window also announces that the software is in multi-user mode,
and displays the name of the user. If you need to return to Single-User Mode, use the File
menu, where the command has changed to Switch to Single-User Mode.
Copyright 2005, AdvisorCPE – www.QuickBooksAdvisor.info
110
Accessing QuickBooks Pro from Other Computers - Users at computers other than the
QuickBooks host/server computer can reach the network data easily:
1. Launch QuickBooks Pro (from the Program menu or a desktop shortcut).
2. Choose File | Open Company/Login from the QuickBooks menu bar.
3. Click the arrow to the right of the Look In field to display a hierarchy of drives and
shared resources.
4. Select the drive letter if the resource is mapped.
5. If the resource is not mapped, select Network Neighborhood. Then select the host
computer and continue to make selections until you find the shared QuickBooks folder.
6. In the Open A Company window, choose the company you want to use and click Open,
or double-click the company name.
NOTE: If you attempt to open a company that someone else on the network is currently using,
you see a message that QuickBooks has opened in multi-user mode because someone else is
using the file. Click OK When the QuickBooks Login window appears, enter your login name
and password. Then click OK.
CAUTION: If your login name exist in the User List, and if anyone is already accessing the files
with that name you are told to use a different name or try later.
The first time each user logs on, it’s a good idea to choose Edit | Preferences and establish
personal preferences in all the My Preferences tab that contain configuration options. (Only the
administrator can make configuration changes to the Company Preferences tabs).
Multiple QuickBooks Users on the Same Company File Computer Tip - The first time you
used QuickBooks, the EasyStep Interview program asked if other people use your computer to
perform work in QuickBooks. If you answered Yes, you were asked to provide names and
passwords for each person. After the additional users are configured, you, as the administrator,
can determine who can use the various features in QuickBooks. You can add users, delete users,
and change access permissions at any time. Only the administrator can perform these tasks. If
you said No during the interview, you can change your mind and set up multiple users now.
Creating, Removing, and Changing User Information Tip - When you want to create or
modify users, choose Company | Set Up Users from the QuickBooks menu bar. If you are setting
up multiple users for the first time, QuickBooks displays the Set Up QuickBooks Administrator
window. You must have an administrator (I'm assuming it's you) to manage all the other user
tasks. It's a good idea to leave the name as Admin. Then use the TAB key to move to the
password box and enter a password. Press the TAB key again and type the same password to
confirm it. You won't see the text you're typing; instead, the system shows asterisks as a security
measure (in case someone is watching over your shoulder).
Copyright 2005, AdvisorCPE – www.QuickBooksAdvisor.info
111
Configuring Inclusive Permissions Tip - The first permissions window asks if you want this
user to have access to selected areas of QuickBooks or all areas. If you want to give the user full
permission to do everything, you're asked to confirm your decision. After that, there's no further
work to do in the wizard.
Configuring Rights to Individual Areas of QuickBooks - If you want to limit the user's access
to selected areas of QuickBooks, select that option and click Next. The ensuing wizard windows
take you through all the QuickBooks features (Accounts Receivable, Check Writing, Payroll, and
so on) so you can establish permissions on a feature-by-feature basis for this user. You should
configure permissions for every component of QuickBooks that you installed. Any component
not configured is set as No Access for this user.
Configuring Special Areas of QuickBooks Tip - There are two wizard windows for setting
permissions that are not directly related to any specific area of the software: sensitive accounting
activities and sensitive accounting reports. Sensitive accounting activities are those tasks that
aren't directly related to specific QuickBooks features:
•
Making changes to the chart of accounts
•
Manipulating the register for any balance sheet account
•
Using online banking
•
Transferring funds between banks
•
Reconciling bank accounts
•
Creating journal entries
•
Preparing an accountant's review
•
Working with budgets
Sensitive financial reports are those reports that reveal important financial information about
your company, such as:
•
Profit & Loss reports
•
Balance sheet reports
•
Budget reports
•
Cash flow reports
•
Income tax reports
•
Trial balance reports
•
Audit trail reports
Configuring Rights for Existing Transactions Tip - If a user has permissions for certain areas
of QuickBooks, you can limit his or her access to manipulate existing transactions within those
Copyright 2005, AdvisorCPE – www.QuickBooksAdvisor.info
112
areas. This means the user can’t change or delete a transaction, even if he or she created it in the
first place. It's generally not a good idea to let users other than the administrator (that's probably
you) work in closed books. In fact, it's generally not a good idea for a software program to
permit anyone to mess around in a closed year, but since QuickBooks does permit this, you
should limit the permissions severely. When you have finished configuring user permissions, the
last wizard page presents a list of the permissions you've granted and refused. If everything is
correct, click Finish. If there's something you want to change, use the Prev button to back up to
the appropriate page.
Working Around the QuickBooks "Rule" for Vendor Discounts Tip - If you receive
discounts for timely payments from vendors, and the purchases that qualify are for inventory, it's
normal (and good accounting practice) to post the discounts to a Cost of Goods Sold account.
However, older versions of QuickBooks won't let you do that. Instead, QuickBooks forces you to
post vendor discounts to an Expense account. This is a serious design flaw in QuickBooks, and it
doesn't qualify as a "bug". (Bugs are "oops, that was a mistake" programming errors that
programmers fix). Set up two accounts for vendor discounts, one as an Expense and the other as
COGS. Post the discounts to the Expense account. Then, before you print or display a P & L
report, make a Journal Entry to move the discounts from the Expense account to the COGS
account. This gives you a real number for COGS. This problem has been fixed beginning with
the 2003 version of QuickBooks (see page 107).
Paying Commissions to Sales Reps Tip - To track and pay commissions that are due sales
representatives, the sales reps can be Vendors, Other Names, or Employees. However, you need
to perform some setup and configuration tasks. You must create each sales rep in the Sales Rep
list; every sales rep must also exist on the Employee, Vendor, or Other Names list. QuickBooks
can differentiate a sales rep's listing from the original listing because the sales rep listing is the
person's initials. If your sales reps are employees, you must create a commission item in the
Payroll Items list and you must enter the specific commission information in the employee's
record.
The QuickBooks Accountant Edition – This version includes the following features not found
in any other version of QuickBooks:
AutoReverse Journal Entries
Autofill Memo Fields in Journal Entries
Previous Bank Reconciliation Reports
Bank Reconciliation Discrepancy Reports
Closing Date Exception Reports
Remote Access Tip – The Remote Access feature lets you work on QuickBooks files that are
located on a remote computer. The two computers don't connect to each other directly. Instead, a
third-party company brings the computers together via an Internet connection. Both computers
enter the same Internet site, and that site provides all the tools and services required to interact,
along with a high level of security.
In QuickBooks Premier 2002, the remote access feature is called Access Anywhere. You can use
Access Anywhere to work with your own QuickBooks Premier 2002 files when you're away
Copyright 2005, AdvisorCPE – www.QuickBooksAdvisor.info
113
from the office. This means if you're traveling, taking a day off, or visiting a customer's site, you
can get to your QuickBooks files as long as you can get your hands on a computer that has
access to the Internet (the computer does not have to contain QuickBooks software). Access
Anywhere also provides a way for an offsite bookkeeper to work on your books.
For QuickBooks Premier 2002: Accountant Edition, the remote access feature is called OnCall.
You can use OnCall from any computer (even a computer that doesn't have QuickBooks
installed) to access QuickBooks 2002 files on your clients' computers. OnCall lets you open, and
work directly in, a client's QuickBooks 2002 file. OnCall is better than the Accountant's Copy
Feature, which has limited functionality. Also, while you have the accountant's copy, your clients
are prevented from performing some basic tasks in QuickBooks.
Turning Off Back Up Reminders Tip - If you have a regular backup routine for the computer
that holds your QuickBooks files, you don't need to back up those files separately. In this case,
you are probably answering No to the intermittent backup messages that appear when you close
QuickBooks. These reminders to back up (along with an offer to buy backup services from
Intuit) stop the software closing process until you respond by clicking No. This means you can't
click the Close icon on the upper right corner of the QuickBooks window, or choose File, Exit,
and then walk away from the computer. Your QuickBooks company file is still open, which may
interfere with the nightly backup process (many backup software programs skip open files). You
can stop QuickBooks from issuing these reminders (by default, the backup reminder appears
every fourth time you use QuickBooks). To do this, close the QuickBooks software and open
Windows Explorer or My Computer. Look for a file named qbw.ini in the folder that holds your
QuickBooks software. Double-click qbw.ini. If your computer is configured to open .ini files in
Notepad, the file appears in the Notepad editor window. If your computer is not configured to
open .ini files automatically, Windows will present a list of programs for opening the file.
Choose Notepad. Scroll through the file to find the line AutoBackupFrequency=4 (the number
may not be a 4, depending on your version of QuickBooks or whether anyone previously made
changes to the line). Change the line so it reads AutoBackupFrequency=0. Then choose File,
Save. The reminders will stop.
If you don't have a regular backup process that backs up your QuickBooks files every day,
change the line to AutoBackupFrequency=1. The reminder will appear every time you close
QuickBooks. Pay attention to it and back up your files.
Invoicing and Tracking Reimbursed Costs Tip - To track reimbursed costs from customers,
you need to do three things: 1. Create an income account that holds the revenue that comes in as
a reimbursed cost. 2. Create the configuration options to automate postings to that income
account when you invoice your customers for a reimbursable cost. 3. Use the accounts
configured for reimbursement when you enter transactions for reimbursed costs.
Unfortunately, QuickBooks is limited in its methods for tracking reimbursed costs. Unlike many
other accounting software applications, QuickBooks does not let you post all of your
reimbursable expenses into one income account. Instead, it insists on a one-to-one relationship
between a reimbursable expense and the income from a reimbursable expense. As a result, if you
have more than one expense account for reimbursement, you must also create more than one
Copyright 2005, AdvisorCPE – www.QuickBooksAdvisor.info
114
income account for accepting reimbursed expenses. The best way to do this is to create a parent
income account and subaccounts for each reimbursement type.
To create the income accounts, click Chart of Accounts (COA) on the Shortcuts pane to open the
COA window. Press Ctrl+N to open a New Account window. Select Income as the account type.
Enter an account number (if you use numbers) and name the account Reimbursed Expenses (or
something similar). Click OK. Then create the specific child accounts in the COA window, by
pressing Ctrl+N to open the New Account window. Select Income as the account type.
Enter a number (use the next sequential number after the number of the parent account) and a
name for the account. Select the Subaccount check box. Enter the parent account you created.
Repeat this process as many times as necessary. Assign the Income Account to the Expense
Accounts. You must tell QuickBooks that when an expense account is used to invoice a customer
for reimbursement, it should automatically post the Reimbursed Costs invoice item to the Income
account you created for that purpose. To do this, open the Chart of Accounts; Select (highlight)
the expense you bill back to customers for reimbursement. Press Ctrl+E to edit this account.
Select the check box Track reimbursed expenses in. Entering the check mark automatically
makes the Income Account field accessible. Enter the appropriate income account. Click OK.
Repeat for the additional Expense accounts that are reimbursed.
To create Transactions for Reimbursed Costs, when you enter a vendor bill, if that bill, or part of
the bill, is subject to customer billing for reimbursement, you must indicate that fact with two
additional steps: Enter the job in the Customer:Job column making sure the little "Invoice" icon
is showing in the last column. When you enter the customer's Invoice, take these steps: Enter the
invoice items as usual, along with the amount. Click the Time/Costs icon at the top of the
Invoice form. Click the Expenses tab to see all the reimbursable expenses you've posted for this
job since the last time you invoiced this job. Click Select All to select all reimbursable costs for
this invoice. A check mark appears in the Use column for every cost. To select only certain costs,
click the Use column to the left of that cost's listing to place a check mark in the column. Costs
you do not use for this invoice will be displayed on this window the next time you create an
invoice for this job, so take this step only for costs you're not ready to pass on to the customer at
this time (this rarely occurs). Click Print Selected Time And Costs As One Invoice Item if you
just want one line (Reimbursed Expenses) to show on the invoice, instead of listing each
reimbursement by category. Click Hide for any cost that you don't want to invoice the expense to
the customer. This removes the cost permanently from the list of reimbursable expenses for this
job. It does not remove the original transaction from your records. Your Customer:Job reports
will still show the cost as associated with the customer or job. After you've made your selections,
click OK. QuickBooks automatically makes the appropriate entries in the Invoice. Your P&L
Report will list the subtotals for each individual income item that's a reimbursed cost, and give
you a total for all reimbursed costs. It does the same thing on the expense side . The totals 'wash'
but you get information about how much of your spending and income is within these items.
In QuickBooks 2003, Vendor Discounts Problem is Finally Fixed - Intuit has finally fixed the
annoying problem of not letting you apply vendor discounts to Cost of Goods accounts.
Copyright 2005, AdvisorCPE – www.QuickBooksAdvisor.info
115
QUICKBOOKS
PREMIER
CONTRACTOR
EDITION
CHAPTER 16
Copyright 2005, AdvisorCPE – www.QuickBooksAdvisor.info
116
QUICKBOOKS CONTRACTOR EDITION
QuickBooks Premier Contractor Edition 2003 is used by more than 350,000 contractors. It
includes estimating, invoicing, and job costing change orders, a custom contractor menu,
navigator, and customizable forms templates. There are nine reports specialized for contractors,
more than 100 new form designs and more customization options.
•
•
•
•
•
•
•
•
•
•
•
•
•
Five New Job Cost Reports
Drillable Job Costs Detail
Tracks expenses not assigned to jobs to help eliminate unbilled job expenses.
See estimated costs vs. actual costs
New and expanded help topics are provided for job costing functions such as “Doing
take-offs”, “Change Orders”, and “Estimating.”
Print change orders on estimates
Multiple estimates per job, duplicate estimates fro previous jobs
Nine new contractor-specific reports - Job Status, Time by Name with Billable Status,
Certified Payroll – Box 1 Employee Information, Time by Name and Job with Billable
Status, Time by Name and Item with Billable Status, Open Purchase Orders by Vendor,
Open Purchase Orders by Vendor Detail, Vendor Account Information, Customer
Account Information.
A new “Expert Analysis Tool” shows where you stand in your industry based on
performance benchmarks related to Profits, Sales, Borrowing, Liquidity, Assets and
Employees.
Contractor Menu and Navigator
Customize forms by adding and removing fields right from the layout designer. You can
include multiple instances of the same field. You can add text boxes. You can insert as
many as 256 images into a form (in gif, jpeg, bitmap & other)
Sample contractor company file with 3 years of realistic data
Integrates with Microsoft Excel®, Word®, Outlook®, ACT®, 20 contractor-specific
applications
Copyright 2005, AdvisorCPE – www.QuickBooksAdvisor.info
117
RETAIL POINT OF
SALE (POS)
EDITION
CHAPTER 17
Copyright 2005, AdvisorCPE – www.QuickBooksAdvisor.info
118
QUICKBOOKS POINT OF SALE
The QuickBooks Point of Sale Solution is touted to be an easy-to-use, affordably priced system.
The system works with your PC and monitor, and includes fully integrated hardware/software.
The system updates inventory, scans bar codes, processes credit card transactions, captures
customer information, and prints detailed sales receipts. This POS system is integrated with
QuickBooks financial software, which allows you to transfer sales information to your
QuickBooks file with one mouse click.
Intuit claims that this system provides everything you need in one guaranteed-compatible
package: software, bar code scanner, credit card swipe, receipt printer and electronic cash drawer
(these items are also sold separately).
This solution can track inventory in real-time, allowing you to see exactly what you have on
hand at all times without manual counting. You can sort inventory items by department, item
number or other description, so you can locate items to check its in-stock status or price. You can
also find the variations of a single inventory item. For instance, you can see how many t-shirts
you have on hand in each color and size without looking up each item individually.
Basically, you ring up sales just like you would on a cash register using your computer keyboard.
You can also scan product UPC codes, or you can start typing and choose the right item from a
pop-up list. With each sale, the cash drawer opens automatically, and the receipt printer prints a
receipt, just like a cash register. You can also process credit card sales with one swipe, - just run
your customer’s credit card through your POS card reader, and the rest is automatic.
QuickBooks POS Merchant Service authorizes the sale, the card number and authorization code
Copyright 2005, AdvisorCPE – www.QuickBooksAdvisor.info
119
are entered into the transaction record, and a receipt is printed for signature. This requires POS
Merchant Service. Application approval and fees apply.
Presented below are some sample screens from the QuickBooks Point of Sale system:
Copyright 2005, AdvisorCPE – www.QuickBooksAdvisor.info
120
Copyright 2005, AdvisorCPE – www.QuickBooksAdvisor.info
121
QUICKBOOKS
SHORTCUTS
CHAPTER 18
Copyright 2005, AdvisorCPE – www.QuickBooksAdvisor.info
122
Presented below are a variety of keyboard shortcuts available within QuickBooks:
DATE RELATED SHORTCUTS
Y
First day of the Year
R
Last day of the yeaR
M
First day of the Month
H
Last day of the montH
T
Today
W
First day of the Week
K
Last day of the weeK
+
Next day (also next form #)
-
Prior day (also prior form #)
MOVING AROUND IN QUICKBOOKS SHORTCUTS
1 (or 2, 3 ...)
Before popular list items (fast)
Down arrow
Move down a line
Up arrow
Move up a line
Ctrl + 1
Show important QuickBooks data.
Ctrl + 2
Turn on QBWIN.LOG
Ctrl + G
Go to other account register
Ctrl + H
Get transaction history
Ctrl + N
New transaction
Ctrl + R
Go to transaction register
Ctrl + Y
Display transaction journal
Ctrl + Z
Drill down report/undo last change
Ctrl + >
Next word in field (right arrow)
Ctrl + <
Prior word in field (right arrow)
Copyright 2005, AdvisorCPE – www.QuickBooksAdvisor.info
123
Ctrl +DownArrow
Scroll through list while in form
Ctrl + Enter
Record entry (if Enter moves)
Ctrl + Page Up
First item/ list, prior month/ register
Ctrl + Page Down
Last item/ list (next month/ register)
Ctrl + UpArrow
Scroll through list while in form
End
End of field
End End
End of transaction
End End End
End of register
Enter
Record transaction, default
Esc
Cancel edit, close window
Home
Beginning of field
Home Home
Beginning of transaction
Home Home Home
Beginning of register
Page Down
Scroll down a page
Page Up
Scroll up a page
Shift + Tab
Move to prior field
Shift
Center open window
Tab
Move to next field (or Enter)
Ctrl + 1
Show important QuickBooks data.
Ctrl + 2
Turn on QBWIN.LOG
Ctrl + A
Chart of Accounts
Ctrl + C
Copy text to clipboard
Ctrl + D
Delete transaction - item
Ctrl + E
Edit
Ctrl + F
Find
Ctrl + G
Go to other account register
Copyright 2005, AdvisorCPE – www.QuickBooksAdvisor.info
124
Ctrl + H
Get transaction history
Ctrl + I
Create Invoice
Ctrl + J
Customers, Jobs
Ctrl + L/Down Arrow
List
Ctrl + M
Memorize
Ctrl + N
New transaction
Ctrl + O
Copy transaction in register
Ctrl + P
Print
Ctrl + Q
Quick Report from List
Ctrl + R
Go to transaction register
Ctrl + T
Recall memorized transaction
Ctrl + U
Use item on list
Ctrl + V
Paste text from clipboard
Ctrl + W
Write checks
Ctrl + X
Cut text to clipboard
Ctrl + Y
Display transaction journal
Ctrl + Z
Drill down report/undo last change
Ctrl + Up Arrow
Scroll through list entries in form
Ctrl + Del
Delete line
Ctrl + Down Arrow
Scroll through list while in form
Ctrl + Enter
Record entry (if Enter moves)
Ctrl + F1
Hide / show cue cards
Ctrl + F6
Next window
Ctrl + Ins
Insert line
Ctrl + Left Arrow
Prior word in field
Ctrl + Page Up
First item/ list, prior month/ register
Copyright 2005, AdvisorCPE – www.QuickBooksAdvisor.info
125
Ctrl + Page Down
Last item/ list (next month/ register)
Ctrl + Right Arrow
Next word in field
Ctrl + Up Arrow
Scroll through list while in form
CUT & PASTE SHORTCUTS
Ctrl + C
Copy text to clipboard
Ctrl + D
Delete transaction - item
Ctrl + V
Paste text from clipboard
Ctrl + X
Cut text to clipboard
Ctrl + Z
Undo last change or drill down report
Ctrl + Del
Delete line
Ctrl + Ins
Insert line
OTHER SHORTCUTS
Alt + Down Arrow
Display list for a field
Alt + F4
Exit program
Ctrl + A
Chart of Accounts
Ctrl + E
Edit
Ctrl + F
Find
Ctrl + I
Create Invoice
Ctrl + J
Customers, Jobs
Ctrl + L/Down Arrow
List/Scroll through list in form
Ctrl + M
Memorize
Ctrl + O
Copy transaction in register
Ctrl + P
Print
Ctrl + Q
Quick Report from List
Copyright 2005, AdvisorCPE – www.QuickBooksAdvisor.info
126
Ctrl + T
Recall memorized transaction
Ctrl + U
Use item on list
Ctrl + W
Write checks
Ctrl + F1
Hide / show cue cards
Ctrl + F6
Next window
Ctrl + Up Arrow
Scroll through list entries in form
Diamond
Move list item, make sub-item
Escape
Cancel entry or close window
F1
Help
F2
Edit data
F5
Refresh
Ins
Insert
Shift
Open window in center of screen
Space bar
Mark or unmark check boxes
Type initial letters
Quick Fill names in list
QUICKBOOKS DATA ENTRY SHORTCUTS
+
Next day (also next form #)
-
Prior day (also prior form #)
1 (or 2, 3 ...)
Before popular list items (fast)
Alt + down arrow
Display list for a field
Alt + F4
Exit program
Diamond
Move list item, make sub-item
Down arrow
Move down a line
End
End of field
End End
End of transaction
End End End
End of register
Copyright 2005, AdvisorCPE – www.QuickBooksAdvisor.info
127
Enter
Record transaction, default
Esc
Cancel edit, close window
F1
Help
F2
Edit data
F5
Refresh
H
Last day of the montH (in date)
Home
Beginning of field
Home Home
Beginning of transaction
Home Home Home
Beginning of register
Ins
Insert
K
Last day of the weeK (in date)
M
First day of the Month (in date)
Page Down
Scroll down a page
Page Up
Scroll up a page
R
Last day of the yeaR (in date)
Shift
Open window in center of screen
Shift + Tab
Move to prior field
Space bar
Mark or unmark check boxes
T
Today (in date)
Tab
Move to next field (or Enter)
Type first letters
Quick Fill names in list
Up arrow
Move up a line
W
First day of the Week (in date)
Y
First day of the Year (in date)
Copyright 2005, AdvisorCPE – www.QuickBooksAdvisor.info
128
QUICKBOOKS
2005
ACCOUNTANT
EDITION
CHAPTER 19
Copyright 2005, AdvisorCPE – www.QuickBooksAdvisor.info
129
The QuickBooks Premier Accountant Edition 2003 is designed for accounting professionals with
multiple QuickBooks clients. This specialized version offers Remote Access, which lets the
accountant work on client files from your home or office, plus much, much more. This Edition is
designed for accountants with accounting functionality to help CPAs work with their clients'
files. The accountant-specific features include the ability to keep closed periods closed, new
condensed reports that allow you to view and edit all journal entries on a single screen, and
Remote Access lets you work on client files from your home, office, or on the road via the
Internet, without the hassles of exchanging disks or files, or driving to client offices.
Key Advantages
•
•
•
•
•
•
•
•
•
Remote access to clients' QuickBooks files
Multiple journal entry view
Enhanced closing procedures
Condensed reports
Reports designed for accountants
Improved class tracking
Advanced inventory tracking features
Enhanced journal entry options
Better Integration with ProSeries
Copyright 2005, AdvisorCPE – www.QuickBooksAdvisor.info
130
Compatibility - Be aware that in order to take full advantage of all of the features in Premier:
Accountant Edition, your clients need to use one of the QuickBooks 2003 products: QuickBooks
Basic, Pro, or Premier 2003.
Caution - Also be aware that with Remote Access, your client cannot be working on their file at
the time you access it.
Remote Access - To use Remote Access you need to have Internet access, a user I.D. and
password to your client’s data. Thereafter, any time you want to access your client's file, simply
click the Remote Access button in QuickBooks. Enter your I.D. and password, and click on
"Start Session". QuickBooks generates a Session ID Number. To set them up, you must direct
your client to the QuickBooks Remote Access Web site, have them enter the Session ID number,
and you're connected! Once connected, you can do anything you could do if you had their files
on your desktop-update information, run reports, close out periods and password-protect them.
You have all the control with none of the inconvenience of driving to your clients' offices or the
risk of working in duplicate data files.
Security - Intuit claims that the Remote Access sessions protect your clients’ data with the same
security technology used by banks and online trading firms for their online transmissions. Data
is encoded using state-of-the encryption and transmitted over the secure socket layer (SSL) to
prevent interception. You initiate Remote Access sessions, but permission for each session must
be granted by your client using their private password, so they’re always in control of access to
their data.
Copyright 2005, AdvisorCPE – www.QuickBooksAdvisor.info
131
QUICKBOOKS
PROBLEMS
& SOLUTIONS
CHAPTER 20
Copyright 2005, AdvisorCPE – www.QuickBooksAdvisor.info
132
SOLUTIONS TO THE QUICKBOOKS PROBLEMS
THAT CPAS MOST FREQUENTLY ENCOUNTER
QUICKBOOKS PROBLEM: You receive fatal error messages from QuickBooks, or you notice
errors on reports, invoices, bills, etc. You are missing transactions or items are missing off
reports or lists.
SOLUTION: You should run Verify Data to check for damage whenever QuickBooks appears to
be functioning improperly or erroneously. The Verify Data utility detects data damage, and then
logs any errors it finds in a file named Qbwin.log. The Qbwin.log file is contiguous, so that
every time you verify, rebuild, condense, or update your data, any integrity issues found will be
appended to the end of the Qbwin.log file. It is common for the Qbwin.log to become very large.
You can identify only current errors in the data file by renaming the Qbwin.log file, located in
your QuickBooks directory, to Qbwin.old. QuickBooks will create a new Qbwin.log file to store
the results of the utility you ran most recently. To run the Verify Data utility:
1. From the QuickBooks Windows menu, choose Close All.
2. From the File menu, choose Utilities, and then choose Verify Data.
3. If the Verify Data operation completes with the message QuickBooks detected no
problems with your data, then your data is clear.
4. If the Verify Data completes with the message “Your data has lost integrity...,” then there
is damage in the file, and QuickBooks will display a message with instructions for
running the Rebuild Data utility to attempt to repair the damage. The Rebuild Data utility
should never be run across a network. Before starting the Rebuild Data process, the file
information from the Product Information window should be noted for future reference
(press Ctrl + 1 to open the Product Information window). If the file is on a network, it
should be copied locally before the Rebuild Data utility is run. You will be prompted to
make a backup as part of the Rebuild Data process. Make sure that you do not overwrite
your existing backup. The Rebuild Data utility will run as soon as the backup completes,
and it should only be run once. When the Rebuild process has finished, close your
company file and then reopen it in order to refresh the lists in the file. Note: It is a good
idea to run Verify Data again after the Rebuild Data process to check for remaining
damage.
5. If the Verify Data run after rebuilding the file indicates that there is still damage, you
should consider restoring a recent backup of your company file. Make sure that you do
not overwrite your existing company file. From the File menu, choose Restore. Any
information entered in the company file since the backup was made will need to be
manually reentered after you restore.
Copyright 2005, AdvisorCPE – www.QuickBooksAdvisor.info
133
QUICKBOOKS PROBLEM: QuickBooks run slowly in multi-user mode.
SOLUTION: QuickBooks can run slowly in multi-user mode for several reasons as follows:
•
The data file size is too large to be handled efficiently by the system.
•
There are three or more users accessing one module at the same time.
•
A large report is being run (for example, Transaction report) in data files with more
than 32,000 targets.
•
The data file is located on a slow computer.
•
The Audit Trail is turned on.
•
A Network Interface Card (NIC) is slow or defective.
To resolve this issue, try one or more of these measures:
•
Condense the data file.
•
Limit the number of users accessing a module at any one time.
•
Narrow the date range on a large report.
•
Locate the data file on the fastest machine on the network.
•
Turn off the Audit Trail.
•
Upgrade to faster Network Interface Cards, cables, and hubs.
QUICKBOOKS PROBLEM: Trouble backing up a QuickBooks company data file.
SOLUTION: If you use the built-in QuickBooks backup utility, you need to be in Single-user
Mode to use the back up feature. The QuickBooks backup compresses data into a compact file
that has the same file name as the company data file, but with the extension .qbb, rather than
.qbw. If you are backing up to a disk that already contains a file with the same name, the
following message will appear: The backup file you chose already exists. Do you want to replace
it? We recommend that you back up to a different name each time, preserving older back ups
permanently in case they are ever needed.
Copyright 2005, AdvisorCPE – www.QuickBooksAdvisor.info
134
QUICKBOOKS PROBLEM: Trouble mapping a network drive in Microsoft® Windows® 9x,
NT® or Millennium Edition.
SOLUTION: You can only map a folder that is shared. For example: If a user on Computer 1
shares his or her C: drive, you will only be able to map the C: drive, not the subfolders contained
within the C: drive. If you do not see the option Map Network Drive when you right-click the
folder containing your company file, you will need to move up a level and check the higher-level
folder (or the drive itself) for the mapping option. If you do not see the option, please check with
your system administrator.
You should not map a network drive if your company file resides on the same computer where
you are using QuickBooks – this will cause QuickBooks to operate slower. Instead, open the file
from the drive where the data file resides. The default installation location is C:\Program
Files\Intuit\QuickBooks. Navigate through the local C: drive and the appropriate folder levels to
open your company file. To map a network drive from within QuickBooks:
•
From the QuickBooks File menu, choose Open Company.
•
Select Network Neighborhood from the Look in drop-down list.
•
Double-click the computer where the company file resides.
•
Right-click the folder containing the company file, and select Map Network Drive.
•
Select an unassigned drive letter. Windows defaults to the first available letter, but you
can choose any drive letter that is unassigned.
•
Select Reconnect at Logon.
•
Click OK.
•
From the Look in drop-down list, select the drive letter you assigned, and then in the
main window, choose your company file name and click Open.
•
When the company file opens, press Ctrl+1 to open the Product Information window.
Look at the path provided under Location in the File Information area. The location of
your file should be something like:
G:\QuickBooks Pro\[company name].qbw.
You can also map a network drive within Windows Explorer as follows:
•
Right-click the Microsoft® Windows® Start button, and choose Explore.
•
Scroll down the left side of Windows Explorer to Network Neighborhood.
•
Double-click Network Neighborhood to expand the network view on the right side.
•
Double-click the computer where the company file resides.
Copyright 2005, AdvisorCPE – www.QuickBooksAdvisor.info
135
•
Right-click the folder containing the company file, and select Map Network Drive.
•
Select an unassigned drive letter. Windows defaults to the first available letter, but you
can choose any drive letter that is unassigned.
•
Select Reconnect at Logon.
•
Click OK.
•
Start QuickBooks, and from the File menu, choose Open Company.
•
From the Look in drop-down list, select the drive letter you assigned, and then in the
main window, choose your company file name and click Open.
•
When the company file opens, press Ctrl+1 to open the Product Information window.
Look at the path provided under Location in the File Information area. The location of
your file should be something like:
G:\QuickBooks Pro\[company name].qbw.
QUICKBOOKS PROBLEM: You need to rebuild a QuickBooks company data file.
SOLUTION: You should run the Rebuild Data utility if you receive the message that the Verify
Data utility has failed, if the Verify Data utility returns a b-check error, or if a QuickBooks Help
& Support Knowledge Base article calls for a data rebuild to fix errors. The Rebuild Data utility
will attempt to fix damage in a QuickBooks data file. If the file is on a network drive, copy the
file locally before attempting to run this utility. Follow these steps to rebuild the data file:
•
From the QuickBooks Window menu, choose Close All.
•
From the QuickBooks File menu, choose Utilities, and then choose Rebuild Data.
•
Rebuilding requires that you back up your company file. Click OK on the message
informing you that a backup must be made.
•
Do not replace your current backup. Instead, use a different 3.5-inch disk (or other
media) for this backup, or back up to your hard disk. Click No if you see a message
asking if you want to replace the backup file. To avoid overwriting your current file,
enter a new name in the Filename field.
•
At the bottom of the Back Up Company File window, click Back Up.
•
The Rebuild Data utility will begin as soon as the backup is complete. Click OK on the
message informing you that the rebuild has completed.
•
Close your company data file and then reopen it to refresh the lists in the file:
⇒ From the File menu, choose Close Company.
Copyright 2005, AdvisorCPE – www.QuickBooksAdvisor.info
136
⇒ From the File menu, choose Open Company.
⇒ Select the company you want to open, and then click Open.
QUICKBOOKS PROBLEM: You receive the following message while trying to start
QuickBooks, and when no one else is using the company file: “The company file has been
opened by another user. Ask that user to switch to multi-user mode so that you can use the
company file.” Microsoft® Windows® 98 and Millennium Edition will display the message:
"Cannot access this file. Check security privileges over the network drive."
SOLUTION: This situation can occur if the computer you are using has either Microsoft®
Windows® 2000 or XP as the operating system – the permissions to the shared folder where the
QuickBooks company file resides may be set to Read Only. The default permissions are
Everyone = Read. To resolve this problem, the share permissions need to be changed to give
QuickBooks users "full control" access to the shared folder where the company file resides.
QUICKBOOKS PROBLEM: I get the following warning when trying to use or set up online
banking: Unable to connect. Try again later. [OL-202].
SOLUTION: This error might appear on three different occasions as follows: 1. When you click
Send in the Online Banking Center; 2. When you are attempting to add a financial institution
during the online banking setup process; 3. If you are a CheckFree® client (on July 3,
2002, CheckFree issued a new security certificate, and you may need to update your QuickBooks
program). If the message occurs when you click Send in the Online Banking Center, it may
indicate a server issue, and you should try the procedure again later. However, if you receive the
message after repeated tries, or over an extended period, there may be a problem with your
network configuration. Make sure that your Internet access is functioning properly outside of
QuickBooks, and that the Internet Connection Setup is configured correctly in QuickBooks.
Additionally, if you use firewall software, make sure it is configured to allow QuickBooks access
to the Internet.
If you receive the message while attempting to add a financial institution during online banking
setup, it will be followed by a second message: "Warning: There has been an error which has
prevented the retrieval of Financial Institution information. This may have been caused by a
network service problem, which will prevent you from using QuickBooks Online Banking
features. Please check your network setup and try again." This message should not prevent you
from adding the financial institution, nor from using online banking functions, unless you are
also signing up for Online Bill Payment. If you are acquiring Online Bill Payment, you may
encounter a separate sign-up issue.
QUICKBOOKS PROBLEM: The computer stops responding while running QuickBooks.
SOLUTION: The most probably cause for this problem may be that the computer may be
running low on resources. As a short-term fix, either restart your computer or end tasks for
specific programs that are not responding. As a long-term fix, either add more memory to the
computer, or purchase a new computer.
Copyright 2005, AdvisorCPE – www.QuickBooksAdvisor.info
137
QUICKBOOKS PROBLEM: QuickBooks users receive the following message for an extended
period of time when attempting to perform tasks in QuickBooks: “Waiting for company file”.
SOLUTION: If one computer is running a utility, such as Verify Data, all other computers
accessing the same company file in multi-user mode will be locked out until the process has
finished. If the company file is large, or if the file is stored on a computer that has slow or
limited resources, the utility may take a long time to complete. To allow utilities to complete in
the shortest time possible, have all users who are not running the utility exit QuickBooks, and
then switch to single-user mode on the remaining computer to run the utility. (From the
QuickBooks File menu, choose Switch to Single-user Mode.) When the utility is complete,
choose Switch to Multi-user Mode from the File menu and have other users log in again.
QUICKBOOKS PROBLEM: When you attempt to open a data file that is stored on a network
drive, you receive the error message: “This file cannot be accessed.”
SOLUTION: Make sure you have security privileges on the network drive. It could be that the
"File and printer sharing for Microsoft Networks" component is installed on Microsoft®
Windows® 95 or 98, and the data file is being opened from a shared folder that was set up with
read-only access. To resolve this issue, change the shared folder's access type to “Full Control”
on the computer that the shared folder is stored on.
QUICKBOOKS PROBLEM: You receive the following error message that occurs when
restarting the computer: “An error occurred while reconnecting [drive letter] to [folder path].”
SOLUTION: This problem is usually caused when you rename the folder where the QuickBooks
company data file is stored. To resolve this error, on your desktop, right-click the Network
Neighborhood or My Network Places icon and choose Disconnect Network Drive. A list of
mapped drives will appear in the Disconnect Network Drive window. Select the drive noted in
the error message. Click OK. The next time you start your computer, you should not receive this
message.
QUICKBOOKS PROBLEM: You receive the following error message while attempting to send
online payments: “Unexpected Error: OL 206”
SOLUTION: Your financial institution or CheckFree® may be experiencing server difficulties,
or your company file may be in an "error recovery" status. Contact your financial institution
or CheckFree at (630) 692-3030 to learn if they are experiencing server difficulties, or to have
them clear the "error recovery" status from your company file. To find your financial
institution's contact number: From the QuickBooks Banking menu, choose Online Banking
Center. From the Financial Institution drop-down list, select your financial institution.
Copyright 2005, AdvisorCPE – www.QuickBooksAdvisor.info
138
Click Contact Info. Call the Customer Service phone number listed in the QuickBooks
Information window to confirm the server status.
QUICKBOOKS PROBLEM: You receive the following message when attempting to log in to a
company data file as Administrator: “The QuickBooks Administrator is editing the user
information for user (Admin). You can try to log in as a different user.”
SOLUTION: Various situations may cause this message to appear. For example, another user
may already be logged in as Administrator (Admin). A temporary image file has not refreshed
properly. The User list is damaged. To resolve this issue, use a name other than Admin to log in
to the company data file. From the QuickBooks Company menu, choose Set Up Users. If Admin
(logged on) appears in the User List window, another user has already logged in as
Administrator. The other user must log off before you can log in as Administrator. If Admin
(logged on) does not appear in the User List window, click Close. On each workstation,
including the one that you are trying to log in from, exit QuickBooks and all other programs that
are running. Turn off each workstation by choosing Shut Down from the Microsoft® Windows®
Start menu, selecting Shut down from the drop-down list, and then clicking OK.
Important: Do not select Restart from the drop-down list. After all workstations have been turned
off, turn them on again. Restart QuickBooks on your workstation and then try to log in as
Administrator. If the message persists, try restoring a recent backup copy of your company file
(however, you will need to reenter any new information that was entered since the backup was
made).
QUICKBOOKS PROBLEM: You receive the following runtime errors, which occur after
installing QuickBooks:
Runtime error -91
Runtime error -2147418105
Runtime error: 429 Active X components cannot create object
Runtime error ID = 1AD
Runtime error ID = 1CE
SOLUTION: The possible cause of this problem may be caused by incomplete registration of all
QuickBooks files during program installation. To resolve these messages: Restart your computer,
and then restart QuickBooks. If the message persists, search for the file reboot.bat, and then
double-click the file in the search results. (If the search results contain multiple files named
reboot.bat, only double-click the file in the current QuickBooks installation folder.) If the
message persists, install QuickBooks over the existing installation. If the issue is still unresolved,
uninstall QuickBooks, and then install the program again.
QUICKBOOKS PROBLEM: Trouble getting QuickBooks Pro and Enterprise Solutions to use
Multi-user Mode.
Copyright 2005, AdvisorCPE – www.QuickBooksAdvisor.info
139
SOLUTION: When running on a network, QuickBooks Enterprise Solutions will allow up to 10
users to work in the same data file at the same time. When more than one person is using the
same company file, the file is in Multi-user Mode. To set up a multi-user environment, make
sure you have your computers connected to the network properly. Install a copy of QuickBooks
Enterprise Solutions on each user's computer. Each user must have a unique copy of the same
version of QuickBooks with a unique Installation Key Code. Choose a location for the
QuickBooks company file. Be sure each user has read/write access and create/delete rights to the
directory where the QuickBooks company file is stored. On a peer-to-peer network you may
want to put the company file on the computer of the person who uses QuickBooks the most. This
allows that person to have the fastest access to the file. On a Client-Server network you will most
likely put the company file on the server. Make sure you have the network drives correctly.
QUICKBOOKS PROBLEM: Lost registration number.
SOLUTION: To locate your registration number: In QuickBooks, press Ctrl+1 to open the
Product Information window. Your registration number will be located in the top left corner of
the window. To close the Product Information window, click OK.
QUICKBOOKS PROBLEM: You receive the following message, after downloading a patch
from the QuickBooks Update Service? "Insufficient disk space to apply patch" followed by
"Unable to apply patch."
SOLUTION: This message sequence can occur when your computer has less than 62 megabytes
(MB) of hard disk space available. To resolve this message, erase some unnecessary files to free
up approximately 62 MB of hard disk space. In many cases, this is a good indication that a new
computer is needed. Once your computer has more hard disk space available, you can attempt
the update again.
QUICKBOOKS PROBLEM: Why is an Internet browser required for QuickBooks and how do I
make sure that I have the right version loaded?
SOLUTION: The latest versions of QuickBooks require Microsoft® Internet Explorer (IE)
version 6.0 or higher. If you do not have the required version of IE on your computer when you
install QuickBooks, it will be installed along with QuickBooks. If you ever need to reinstall IE,
you can install it directly from the QuickBooks CD, or you can download and install the latest
version from the Microsoft Website. To install IE from the QuickBooks CD: Insert the
QuickBooks CD in the CD-ROM drive. Click Reinstall QuickBooks when the installation starts.
(If you are asked if you want to install QuickBooks now, click Yes.) Enter your Installation Key
Code and click Next. (The code from the previous installation should be displayed just above the
entry field, or you can find the code on the sticker on the back of the CD envelope.) Click Next
past the QuickBooks installation location (you will not be reinstalling QuickBooks). Select
Copyright 2005, AdvisorCPE – www.QuickBooksAdvisor.info
140
Custom as the Setup Type and click Next. Clear the QuickBooks checkbox and select Internet
Explorer 6.0. Click Next. Follow the onscreen instructions for the remainder of the installation.
QUICKBOOKS PROBLEM: You receive the following message after choosing the type of
business and chart of accounts in the Easy-Step Interview: “Error on line XXX: imported account
has a duplicate account number”
SOLUTION: If you are in the sample company and go to the Easy-Step Interview and then
choose any type of business, QuickBooks will return the error. Click OK on the error message.
The chart of accounts selected will be set up correctly. Intuit is aware of this issue, however,
there is no resolution at this time.
QUICKBOOKS PROBLEM: The check numbering sequence used for printing batch checks
does not continue in the Write Checks window.
SOLUTION: By design, there are two separate numbering sequences used for QuickBooks
checks. One sequence is used for printing sequential groups (batches) of checks, whereas a
different sequence is used for manually written checks. If you select the To Be Printed checkbox
in the Write Checks window, the check will grouped with others for continuous (batch) printing.
When printed, the check will be assigned a number from the sequence used for batch printing. If
you do not select the To Be Printed checkbox, QuickBooks assigns a check number from the
numbering sequence used for manually written checks. To correct the check number in the Write
Checks window, double-click the incorrect check number in the No. field and then enter the new
number (this will not affect the batch numbering sequence). After you save the corrected check,
the next assigned check number in the Write Checks window will continue sequentially from the
number you entered. Note: You can correct the starting check number for a batch sequence as
well (from the QuickBooks File menu, choose Print Forms, choose Checks, and then update the
First Check Number field).
QUICKBOOKS PROBLEM: I can't see the account numbers for split detail accounts when
printing from an account register.
SOLUTION: If the Print Splits Detail checkbox is selected when printing from a register,
account numbers will print for single-account transactions, but not for multiple detail accounts.
To see account number detail, you can print a Journal report instead of printing from the register.
To do this, from the QuickBooks Reports menu, choose Accountant & Taxes, and then choose
Journal. Click Modify Report, and in the Columns box, clear the checkmark from Trans #, Type,
Debit, and Credit. Also, in the Columns box, select Clr, Amount, and Balance to add these
columns. Click the Filters tab. Select Account in the Filter list, and then select the specific
account from the drop-down list. Under Include Split Detail? Select Yes. Select Date in the
Filters list, and then enter the appropriate date range. Click OK. Click Print at the top of the
Copyright 2005, AdvisorCPE – www.QuickBooksAdvisor.info
141
report. Memorize the report if you would like to use this setup again. Intuit is aware of this issue,
however, there is no resolution at this time.
QUICKBOOKS PROBLEM: QuickBooks does not consistently check spelling on forms.
SOLUTION: If a form is printed from the Print Preview window, QuickBooks does not perform
the spelling check, even though the preference to always check spelling may be active.
(Preferences are found on the QuickBooks Edit menu.) To ensure that the spelling check will be
performed, click Close in the Print Preview window, and then print directly from the form.
QUICKBOOKS PROBLEM: I can't see the complete customer notes on my QuickBooks Time
Detail report.
SOLUTION: Time Detail reports can display 99 characters in the notes column. If the customer
notes are longer than 99 characters, then they will not display completely. To see important
customer note information on Time Detail reports, your notes can either be reduced in length, or
rearranged to ensure that the most important information appears at the beginning.
QUICKBOOKS PROBLEM: When printing a QuickBooks report in Microsoft® Excel, the
report header is not automatically centered.
SOLUTION: To center the report header in Excel, change the Advanced Printing options:
Run the report in QuickBooks. Click Excel, and then click Advanced. In the Printing options
section of the Export Report to Excel window, select Send header to Page Setup in Excel. Click
OK. When you print the report, the header will now be centered. Note: Excel features are not
available in QuickBooks Basic.
QUICKBOOKS PROBLEM: Trouble reconciling an account in QuickBooks with its financial
statement and what to do if you do not balance.
SOLUTION: To reconcile a QuickBooks bank account with the bank statement, from the
QuickBooks Banking menu, choose Reconcile. Enter or select the appropriate account in the
Account field. Compare your statement’s opening balance with the amount shown in the
Beginning Balance field. If you reconcile regularly and the QuickBooks Beginning Balance
differs from the beginning balance on your statement, the discrepancy could be caused by
clearing a transaction directly in the account register (as opposed to the Reconcile window), or
by changing or deleting a previously reconciled transaction (see the next Problem and Solution in
this case). Enter your statement’s ending balance in the Ending Balance field. Enter any new
service charges, finance charges, or interest earned from your statement. Click Continue to open
the Reconcile [Account] window. Now you are ready to reconcile individual transactions. When
you find a transaction that matches one on the statement, click the checkmark column to clear it.
If you click Leave in the Reconcile [Account] window before you are completely finished,
Copyright 2005, AdvisorCPE – www.QuickBooksAdvisor.info
142
QuickBooks does not retain the transactions you marked. You will need to start over at step 1 the
next time you reconcile. For each transaction that you clear, verify that it matches the one on the
statement. If the transaction does not match and the statement is incorrect, please contact your
financial institution. If the statement amount is correct, double-click the transaction in
QuickBooks to display it. Correct the error, and then click Save & Close. Click the corrected
transaction to clear it. When you have finished clearing transactions, look at the Difference
amount in the bottom right corner of the Reconcile Account window. If the amount is 0.00, click
Reconcile Now. You have successfully reconciled the account with the statement. If the amount
is anything other than 0.00, the account does not balance for the period of time covered by the
statement. Choose one of the following options: (1) Start again, making sure that all amounts and
transactions have been recorded correctly or (2) Click Reconcile Now, and then click Enter
Adjustment to finish the reconciliation for the time being. (QuickBooks will enter an adjustment
to your account.) Eventually, however, you should locate and correct the cause of the
discrepancy.
QUICKBOOKS PROBLEM: The beginning bank reconciliation balance in Begin
Reconciliation window in QuickBooks does not match bank statement.
SOLUTION: The beginning balance in the Begin Reconciliation window may be incorrect if any
of the following have occurred:
1) A transaction was cleared directly in the account register, causing the transaction to be
excluded from the beginning balance in the Begin Reconciliation window. To include the
transaction in the beginning balance, you must clear it in the Reconcile window. Unlike
QuickBooks 2001 and earlier versions, transactions cleared directly in the register are no
longer used to calculate the beginning balance for reconciliation. If you are familiar with the
way QuickBooks formerly calculated beginning (opening) balances, the amount may be
different than expected. A previously cleared transaction was somehow modified since the
last reconciliation. This includes voiding or deleting a cleared transaction and changing the
amount of a cleared transaction.
2) Additionally, there may be data damage in the company data file. If so, and if you are certain
that the discrepancy is due only to transactions cleared in the account register, choose one of
the following options:
a) Complete the reconciliation with the beginning balance discrepancy. If you ignore the
discrepancy in the Begin Reconciliation window and click Continue to proceed to the
Reconcile window, any transactions cleared through the register will appear and will
already have checkmarks next to them. Use your bank statement to select all other
cleared transactions for the period. Assuming there are no other issues, the reconciliation
should balance correctly. Complete the reconciliation of the transactions cleared in the
register before reconciling to the bank statement. Because the sum of transactions cleared
in the register is causing the variance between the QuickBooks and the bank statement
beginning balances, if you complete the reconciliation of these items, you should then be
able to reconcile properly to the bank statement.
Copyright 2005, AdvisorCPE – www.QuickBooksAdvisor.info
143
b) Enter the beginning balance from the bank statement in the Ending Balance field of the
Begin Reconciliation window, and then click Continue to proceed to the Reconcile
window. The transactions cleared in the register will already have checkmarks next to
them, and the Difference amount in the lower right corner should be 0.00. Click
Reconcile Now to finish reconciling these transactions only, and then begin the
reconciliation process again. The QuickBooks beginning balance will now match the
bank statement beginning balance.
3) If you suspect that any transactions have been altered or deleted, choose one of the following
options:
a) Run a Reconciliation Discrepancy report. From the QuickBooks Reports menu, choose
Banking, and then choose Reconciliation Discrepancy. Select the appropriate account,
and then click OK to display a listing of transactions that have changed since the last
reconciliation.
b) Run a Reconciliation Detail report. From the QuickBooks Reports menu, choose
Banking, and then choose Reconciliation Detail. Select the appropriate account, select the
statement ending date, and then click Display to open a prior reconciliation detail report.
Compare this report to reports printed for past reconciliations to look for differences.
Locate the discrepancy amount. (This option will work only if the discrepancy was
caused by a single transaction.) From the QuickBooks Edit menu, choose Advanced Find.
Select Amount in the Filter list, select the equals (=) option, and then enter the
discrepancy amount in the field to the right. Click Find. If a transaction is found,
determine whether it is the transaction causing the discrepancy, and correct it as needed.
Note: If the transaction was previously reconciled but is now uncleared, correct the status
through the account register by clicking in the checkmark column, and then clicking
Record to save the change. If the transaction has been marked cleared but has not been
reconciled, see the solutions above regarding how to handle transactions cleared in a
register.
c) Run an account QuickReport: Use this report to determine if transactions have an
incorrect cleared status. From the QuickBooks Lists menu, choose Chart of Accounts.
Select the account you want to reconcile. Click the Reports button at the bottom of the
list, and then choose QuickReport. Click Modify Report, and then click the Display tab.
Select Clr in the Columns list. Click the Filters tab. In the Filter list, select Cleared. To
the right of the Filter list, select either Yes (to filter for cleared transactions) or No (to
filter for uncleared transactions), and then click OK to return to the report. Look at recent
transactions. If you see transactions incorrectly cleared or uncleared, update them in the
account register by clicking in the checkmark column, and then clicking Record to save
the change. (See the solutions above regarding how to handle transactions cleared in a
register.)
d) Run an Audit Trail report. This report can help identify transactions that have been
deleted, changed, or added since the last reconciliation. A close examination of this report
Copyright 2005, AdvisorCPE – www.QuickBooksAdvisor.info
144
can often help locate a problem, however, if the Audit Trail feature has not been active,
you will not be able to see changes or deletions that occurred while the Audit Trail was
inactive. To activate the Audit Trail feature: From the QuickBooks Edit menu, choose
Preferences. Click the Accounting icon on the left. Click the Company Preferences tab.
Select the Use Audit Trail option, and then click OK. To run the report, from the
QuickBooks Reports menu, choose Accountant & Taxes, and then choose Audit Trail.
You may need to adjust the report dates to see modifications for the appropriate time
period. If the options listed above do not resolve the issue and you suspect damage, use
the QuickBooks Verify Data and Rebuild Data utilities to detect and repair the damage.
QUICKBOOKS PROBLEM: Transactions are missing from the Match Transactions window
after downloading a bank statement.
SOLUTION: There are various reasons why transactions might be missing from the Match
Transactions window after downloading a bank statement. The transactions may not have
reached the Intuit server yet. Your financial institution uploads transactions to the server once a
day, and until transactions are on the server, they cannot be downloaded. Historical or older
information may not have been sent with your statement. Financial institutions decide how far
back historical information goes, and they will send you a confirmation letter indicating how old
your first downloaded statement transactions will be. Additionally, the server will not hold
statement information older than three months.
The Show Matched checkbox in the Match Transactions window may have been cleared. This
prevents matched transactions from showing on the QuickStatement.
If you find transactions missing from the Match Transactions window, choose the appropriate
solution below:
If the only missing transactions are from within two business days, try the download
again tomorrow, when the transactions may have reached the server. If you would like to
contact your financial institution: From the QuickBooks Banking menu, choose Online
Banking Center. Select the correct name from the Financial Institution drop-down list.
Click the Contact Info button in the upper right corner of the Online Banking Center
window.
If the only missing transactions are your oldest transactions, in the first statement, try
entering the missing transactions manually. All future transactions should download
correctly. Make sure the Show Matched checkbox is selected in the Match Transactions
window: From the QuickBooks Banking menu, choose Online Banking Center. Click
Send (if you have not already done so) to download transactions that have occurred since
the last time you downloaded transactions. After the download has completed, select an
account from the Items Received From Financial Institution area. Click View to display
the QuickStatement in the Match Transactions window. Select the Show Register
checkbox if it is not already selected. This will allow QuickBooks to match transactions
from your QuickStatement with those in your register. Transactions that have already
Copyright 2005, AdvisorCPE – www.QuickBooksAdvisor.info
145
been reconciled will not be matched. Verify that the Show Matched checkbox is selected
in the bottom left corner of the Match Transactions window.
QUICKBOOKS PROBLEM: You receive the following error, which occurs when attempting to
send or delete an online banking transaction – C=43.
SOLUTION: C=43 errors indicate possible damage to the data file. To resolve this issue, run the
Verify Data utility described earlier. [If data damage is detected, you will then be prompted to
rebuild your data file (also described earlier).]
QUICKBOOKS PROBLEM: Your computer stops responding when you open a transaction
window (such as the Write Checks or Pay Bills window) or edit an online transaction in a
register.
SOLUTION: A possible cause of this problem could be that your financial institution's
information may need to be updated. To update your financial institution's data: From the
QuickBooks Banking menu, choose Set Up Online Financial Services, and then choose Online
Financial Institutions List. Scroll through the Financial Institutions Directory Web page and
select your financial institution. Click the Apply Now button. After the page loads, close the
browser using the “X” in the upper right corner. You do not need to fill out the application.
QuickBooks will connect online to receive updated online financial institution information. Once
the transmission is complete, you should be able to use online banking functions, as well as open
transaction windows, and edit online entries in the register. If the above did not solve the issue,
follow the steps below completely and without interruption: From the QuickBooks Banking
menu, choose Online Banking Center. Check for any online service notifications or e-mails, view
and then delete them. Select the message and click View. If you want to retain this information,
click Print to print the message for your records. Click Close to close the message window. With
the same message selected, click Delete. Make sure any transactions in the Match Transaction
window are either matched, added to the register, or deleted. (For more information on matching
transactions, from the QuickBooks Help menu, choose Help Index, and then type “matching
online transactions.”) Send any payments waiting in the Items to Send section. Back up your
company file. Disable any accounts that use online banking and/or online bill payment services
as follows: from the Lists menu, choose Chart of Accounts. Select any accounts that are set up
to use online banking. (These accounts have a lightning bolt to the left of the Type column.)
Click the Account button and choose Edit. Click the Online Info tab. Record all online account
information on this tab, so you can re-enter it later. Clear the Online Account Access and/or
Online Payment checkboxes. You will receive a message "You have just disabled online services
for this account. Do you wish to retain the online information associated with this account?"
Click No. Repeat the steps for any other online bank accounts. Re-enable all online accounts as
follows: in the Chart of Accounts window, select the accounts you want to re-enable. Click the
Account button and choose Edit. Click the Online Info tab. Re-enter all online account
information on this tab. Select the Online Account Access and/or Online Payment checkboxes as
appropriate. Click OK to save your changes.
Copyright 2005, AdvisorCPE – www.QuickBooksAdvisor.info
146
QUICKBOOKS PROBLEM: The AutoRecall feature in QuickBooks not automatically filling in
information from the last transaction for this name.
SOLUTION: AutoRecall memorizes the information on the first transaction recorded for a
specific name on a given date. The information from that transaction is used on all subsequent
transactions until a new transaction for the same name is recorded on a different date. If a second
transaction with different information is entered on the same date, AutoRecall does not store the
new information. To resolve this issue, either update your transactions manually, or follow these
steps to use AutoRecall to create updated transactions for the same day: Create a new transaction
with updated information using a future date. Click Save & New, and then click Previous.
Change the date back to today’s date. Click Save & New again. AutoRecall works with bills,
checks, or credit card charges. AutoRecall does not work with purchase orders, invoices, sales
receipts, payroll liability checks, or credit memos. In addition, AutoRecall cannot transfer
information from one account to another. For example, if you have two checking accounts, you
cannot write a check in the first account, and then AutoRecall the check information in the
second account.
QUICKBOOKS PROBLEM: Trouble setting up custom fields.
SOLUTION: Custom fields let you add to the information that QuickBooks tracks about your
customers, vendors, and employees and the items that you purchase and sell. You can add your
own custom fields to the windows where you set up customers, vendors, employees, or items.
Information you enter into the fields can be just for your use, or it can prefill on certain forms
when you enter a name or item on the form. You can also include data from custom fields in
your reports. QuickBooks treats the information you enter into a custom field the same way it
treats information entered into any other field. If you memorize a transaction that has a custom
field, QuickBooks memorizes what you entered in the field along with the other details of the
transaction. If you export a list that contains data in custom fields, QuickBooks exports that data
along with the other data from the list. For example, if you want to track your sales by region,
add a field titled Sales Region to the New/Edit Customer window. Fill in the sales region for
each customer on your Customer:Job list. Add the new Sales Region field to each form. From
then on, a customer’s sales region prefills when you enter a sale. You can filter your reports so
they show only sales for a particular region.
QUICKBOOKS PROBLEM: Trouble setting Outlook or ACT! to work with QuickBooks.
SOLUTION: During the synchronization process, each name from your contact manager
(Outlook or ACT!) needs to be selected and placed in a QuickBooks list. To assign the contact
names to the appropriate lists in QuickBooks, from the QuickBooks Company menu, choose
Synchronize Contacts. Follow the instructions in the wizard. Once the synchronization has
started, you are prompted you to assign the contact name(s) to the appropriate QuickBooks list.
Select the contact name(s) from the list. At the bottom of the window, select the appropriate list
Copyright 2005, AdvisorCPE – www.QuickBooksAdvisor.info
147
in QuickBooks in which to place the contact name(s). (You can select multiple contact names by
pressing the Ctrl key on your keyboard as you click each name. Continue to press the Ctrl key
until all names have been selected.) Click Apply. This categorizes the contact names so that they
will automatically synchronize with the correct QuickBooks list. After all of the names have
been categorized, click OK to resume synchronization. When the process is complete, a
Synchronization Complete window will appear with an option to view the Sync Log file. You
may view the file for information on the results of the synchronization.
QUICKBOOKS PROBLEM: Problems memorizing transactions in QuickBooks.
SOLUTION: You cannot memorize receipts or deposits of payments, bill payments, paychecks,
time records, sales tax payments, or year-to-date (YTD) payroll adjustments. If you are entering
the transaction information for future use and do not want to record the transaction now, click
Clear to close the transaction window. To memorize a transaction in QuickBooks, enter the
transaction. If the content of certain fields will change each time you recall the transaction, leave
those fields blank. For example, your monthly utility bill should be memorized with a
blank Amount field. From the QuickBooks Edit menu, choose Memorize. In the Name field of
the Memorize Transaction window, enter a name that will help you recognize the transaction in
the Memorized Transaction list. In the Detail area of the Memorize Transaction window, indicate
how you want the transaction handled. (If you need assistance, press F1 while the Memorize
Transaction window is open.) Click OK to memorize the transaction.
QUICKBOOKS PROBLEM: Problems entering journal entries made in the General Journal
Entry window.
SOLUTION: This option is available for accountants or users who prefer the traditional system
of accounting in which transactions are entered into a general journal. If you are not an
accountant, you might use the general journal to transfer amounts from one income or expense
account to another, or from one class to another. In order to complete your year-end activities,
your accountant may instruct you to record miscellaneous journal entries in QuickBooks. To
record a journal entry, from the QuickBooks Banking menu, choose Make General Journal
Entry. In the Make General Journal Entry window, change the Date field, if desired. If you
number your general journal entries, enter the number in the Entry No. field. In the detail area,
enter distribution lines – in the Account column, enter or select the first account in your
transaction. If you are using an A/R (accounts receivable) or A/P (accounts payable) account, the
first account in the general journal transaction should be the accounts receivable or accounts
payable account. In the Debit (or Credit) column, enter the debit (or credit) amount for the
account you selected in the previous step. (Optional) Enter a memo about the amount in the
Memo column. The memo appears on reports that include the general journal entry. Enter or
select the customer, vendor, employee, or other name associated with the transaction in the
Name column (required for A/R or A/P accounts.) (Optional) If you selected an expense account
along with a customer or job, you can make the amount billable to the customer. To avoid billing
the customer for an expense, click the billable icon to put an “X” through it. (Optional) Assign a
class to the amount. Repeat Steps 4a through 4f to enter distribution lines until the transaction
Copyright 2005, AdvisorCPE – www.QuickBooksAdvisor.info
148
reaches a zero balance (that is, the total in the Debit column equals the total in the Credit
column). Click Save & Close to save the journal entry and close the window, or Save & New to
save the journal entry and create a new one.
QUICKBOOKS PROBLEM: Understanding and using the Opening Balance Equity account.
SOLUTION: QuickBooks creates this account the first time you enter an opening balance for a
balance sheet account. As you enter the opening balances, QuickBooks records the amounts in
the Opening Balance Equity account. This ensures that you have a correct balance sheet for your
company, even before you have entered all your company's assets and liabilities. After you have
entered all of your opening balances, you may want to move the amount in Opening Bal Equity
to your other equity accounts. This is an optional adjustment if you want to identify retained
earnings or the equity of several owners.
To transfer all or part of the amount, from the QuickBooks Lists menu, choose Chart of
Accounts. Double-click the Opening Balance Equity account to open its register. Enter a transfer
transaction – in the Account field, select the equity account that you are transferring the money
to from the drop-down list. Enter the amount to transfer in the Decrease column of the register.
Click Record, and then repeat steps for any other amounts you want to transfer.
QUICKBOOKS PROBLEM: Problems handling bounced checks from customers.
SOLUTION: When a customer's check has "bounced" (returned to you for insufficient funds),
handle it in the following manner – first, create items for tracking bounced checks and their
associated charges if these items do not already exist in your company data file. From the
QuickBooks Lists menu, choose Item List. Click the Item button and choose New. Select Other
Charge from the Type drop-down list and name this item Bad Check or similar. Leave 0.00 in
the Amount or % field and select Non from the Tax Code drop-down list. Select your bank
account from the Account drop-down list and then click Next.
Repeat steps to create a second item named Bad Check Charge or similar. This is for the service
charge you will assess customers for bounced checks when you send them another invoice.
Select an income account (such as Returned Check Charges) from the Account drop-down list. If
the account does not exist, click the drop-down arrow and choose Add New, and add the new
income account. Click OK to save both items.
Record your bank's charges for a bounced check: From the Banking menu, choose Use Register.
If prompted, select the appropriate bank account and click OK. Create a new transaction, naming
it NSF Fee or similar. Enter the bank charge amount in the Payment field. In the Account field,
enter the income account. Enter a memo if desired, and then click Record. Record a credit memo
to reverse the original sale: From the Customers menu, choose Create Credit Memo/Refunds.
Enter all of the items from the original invoice or sales receipt, including the sales representative
and sales tax if applicable. Enter the Bad Check line item from Step 1.c with a negative amount.
This amount should match the total of all the items on the credit memo, creating a credit memo
with a zero total. Click Save & Close to record the credit memo. Choose Create Invoices from
Copyright 2005, AdvisorCPE – www.QuickBooksAdvisor.info
149
the Customers menu to send the customer a new invoice, which should include all of the items
from the original invoice, plus a line item for Bad Check Charge. If the original transaction was a
statement charge, print a new statement charge. If the original transaction was a sales receipt,
you still need to recreate an invoice to send to your customer.
Tip: QuickBooks Pro and Premier versions have a "bounced check" letter that you can send in
addition to the new invoice. This is one of the prewritten letters available through the Write
Letters feature in the QuickBooks Pro and Premier versions. For more information, from the
Help menu, choose Help Index, and then type writing letters.
QUICKBOOKS PROBLEM: QuickBooks creates transactions with a date other than the current
system date.
SOLUTION: QuickBooks checks the system date when a company data file is opened. It does
not continually update the date if the file is not closed. If QuickBooks is left running overnight
with the company file open, transactions are created with the date the file was originally opened.
To resolve this issue, close your company file and then reopen it.
QUICKBOOKS PROBLEM: I receive the following message every time I click the Start button
on the Time/Enter Single Activity window? “The Stopwatch always displays duration in
hours:minutes format and reverts back to decimal format when stopped.”
SOLUTION: If the QuickBooks time format preference is set to decimal, the message appears as
a reminder that although the time will display in hours and minutes while recording, it will revert
to decimals when stopped. To resolve this message, choose one of the following options: In the
Stopwatch Time Format message window that appears, select the Do not display this message in
the future checkbox. Change the time format preference: From the QuickBooks Edit menu,
choose Preferences. Click the General icon, and then click the Company Preferences tab. In the
Time Format section, select Minutes.
Click OK to save your changes.
QUICKBOOKS PROBLEM: I receive the following error message when attempting to set up
my payroll in QuickBooks: “Error reading tax info library.”
SOLUTION: A possible cause is QuickBooks has been installed on a non-U.S. version of
Microsoft® Windows®. QuickBooks is designed to run on the U.S. version of the Microsoft
Windows operating system only. Therefore you must install a U. S. version of Windows.
QUICKBOOKS PROBLEM: The old tax table version number still appears after updating
payroll.
Copyright 2005, AdvisorCPE – www.QuickBooksAdvisor.info
150
SOLUTION: The payroll may not have updated correctly, or the computer's date and time setting
is incorrect. To resolve this issue: First, check your computer's date and time setting and correct
it if necessary. From the QuickBooks Employees menu, choose Get Updates, and then choose
Get Payroll Updates. While holding down the Ctrl key, click Update. After the download is
complete, a message will appear. Click OK. Reopen the Get Payroll Updates window (see Step
2). Your updated tax table version should now appear at the top of the window. If the issue
persists, select the Download entire payroll update option, and then click Update. It may take
several minutes to download the update. After the download is complete, click OK at the
message, and then reopen the Get Payroll Updates window to check your tax table version.
QUICKBOOKS PROBLEM: Hyperlinks are broken when QuickBooks exports employee
summary reports to Microsoft® Excel.
SOLUTION: In QuickBooks, employee summary reports contain hyperlinks so that you can
access a particular employee record. When summary reports are exported to Excel, the records
they were linked to in QuickBooks are not accessible from Excel. Do not click the hyperlinks in
Excel. You may remove broken hyperlinks from the Excel spreadsheet. For information on how
to remove them, please refer to the Help files in Excel. Note: Employee summary reports are
produced by the Employee Organizer. The Employee Organizer is available only by subscription
and is not available for QuickBooks Basic.
QUICKBOOKS PROBLEM: An Internet address appears in the footer when printing an
Employee Summary report.
SOLUTION: The employee summary reports that you print from the Employee Organizer use
the Microsoft® Internet Explorer Page Setup settings for printed headers and footers. To resolve
this problem, change the Page Setup settings in Internet Explorer:
Start Internet Explorer. From the Internet Explorer File menu, choose Page Setup. Delete or edit
the information in the Header and Footer boxes. Note: Headers and footers can consist of both
text and codes. Codes begin with an ampersand (&), and you can use them to print information
that changes, such as the date or time. You can use codes alone or in combination with text that
you type. To display information about the codes you can use in headers and footers: Click the
Help button (the small ? at the top right of the Page Setup window). Click anywhere in the
Header and Footer areas of the window.
QUICKBOOKS PROBLEM: Problems with leave of absence records.
SOLUTION: Each employee can only have up to 50 historical leave of absence records.
QuickBooks will not accept any further records. You must supplement QuickBooks with some
other record keeping method, such as a spreadsheet.
Copyright 2005, AdvisorCPE – www.QuickBooksAdvisor.info
151
QUICKBOOKS PROBLEM: The screen does not return to the Edit Employee window when
the user finishes using an Employee Organizer wizard.
SOLUTION: When you choose any of the following in the Edit Employee window, a wizard
starts, and the Edit Employee window closes: Raises & Promotions on the Payroll Info tab
Process Leave or Return from Leave on the Leave of Absence tab Terminate Employee or
Termination Details on the Termination tab. To continue making changes to an employee record,
you will need to reopen the Edit Employee window by double-clicking on the Employee List the
name of the employee whose record you want to edit.
QUICKBOOKS PROBLEM: A blank window displayed when I choose a form or letter in the
Employment Regulations window.
SOLUTION: A possible cause for this problem is that Microsoft® Word is not installed on your
computer or it is not set up as the editing program for rich text format (RTF) documents. If
possible, install Microsoft Word on your computer or set it up as the editing program for RTF
files (see "File types: associating extension with," in Microsoft® Windows® Help). If that is not
possible, you can save a copy of the document and then open it with a different word processing
program. In this case, your word processing program must be capable of editing
RTF documents. To save a copy of an Employment Regulations document: From the
QuickBooks Employees menu, choose Employment Regulations. Click Forms and Letters. Click
the link for the document you want to save. In the File Download window, select Save it to disk..
In the Save As window, choose where you want to save the file, and then click Save. After you
save the file, you can edit the document with your word processing program.
QUICKBOOKS PROBLEM: Trouble importing information from another financial program
into QuickBooks.
SOLUTION: If you have been using another financial software product, you can import
information from that product into QuickBooks if the product allows you to export to a
spreadsheet or text file. You can import lists that correspond to individual transactions, budgets,
and QuickBooks lists. To transfer transaction data from another product, the data must be in
Intuit Interchange Format (IIF). Important notes for importing data: All account, customer, and
vendor names must be either added to QuickBooks before importing data, or placed in the
spreadsheet before the transactions using them. When using the INVITEMTYPE header for item
type, all the data in the column must be in upper case. Note: The easiest way to see and
understand the format QuickBooks needs to import data is to export some lists from the sample
company and view the resulting file in a spreadsheet. To create an IIF file for your company,
choose one of the following options: Download and open one of the several sample IIF files that
are available online. Use the existing spreadsheet headers and replace the sample data with your
own. Then see steps below to import the data into QuickBooks. Create your own IIF file: Start
Copyright 2005, AdvisorCPE – www.QuickBooksAdvisor.info
152
the spreadsheet program that contains the data that you want to import into QuickBooks. Move
the contents of all the cells in your spreadsheet one column to the right by inserting a column so
that the first column is blank. Please refer to the Help files in the spreadsheet program for
instructions on inserting columns and rows. Move the contents of all the cells down one row by
inserting a row so that the first row is blank. Check the structure of the spreadsheet. If it contains
more than one type of list or a mixture of lists, budgets, and transactions, make sure that each
type of information has its own block in the spreadsheet. Insert a blank row to separate the
blocks. For example, a list of customers might fill rows 12 through 75, row 76 would be blank,
and rows 77 through 150 would be made up of vendor information. In the first cell in the blank
row above each block of information (row 76 in the example above), enter a keyword. Be sure to
include the exclamation point (!). Complete the first row by adding the headings that
QuickBooks expects to find for the information. From the QuickBooks Help menu, choose Help
Index, type the topic importing data, and choose Creating an import file to see a list of the
headings you can use. Make sure that the content of the columns in each block matches the
headings you just added. Note: If a vendor's entire address is in one column, divide it so that the
first line of the address appears under the ADDR1 column, the second line under the ADDR2
column, and so forth. The same can be done with customer addresses. Save the spreadsheet as a
text file. Click Yes to the message asking if you want to save the file as tab delimited. Search for
the file, and then rename it with the extension .iif. Start QuickBooks. From the File menu,
choose Utilities, and then choose Import. From the Look in drop-down list, locate the folder
containing the new file and select the file name from the list. Click OK.
Copyright 2005, AdvisorCPE – www.QuickBooksAdvisor.info
153
QUICKBOOKS
SERVICES
CHAPTER 21
Copyright 2005, AdvisorCPE – www.QuickBooksAdvisor.info
154
QUICKBOOKS SERVICES:
Intuit offers a variety of services that may be of interest to you or your clients. These
services are listed below, and descried in more detail on the following pages.
•
•
•
•
•
•
•
•
•
•
•
•
•
•
•
Insurance (AFLAC)
Merchant Account for Credit Card Payments
Send Invoices Online
Accept Online Payments
Online Bill Pay
Get a MasterCard
Get D & B Credit Reports
Bank Online
Establish Retirement Plans
Ship with FedEx
Backup Data Remotely
Set-Up Remote Access
Create a Web Site
Call for Accounting Advice
Find a QuickBooks Advisor
Copyright 2005, AdvisorCPE – www.QuickBooksAdvisor.info
155
INSURANCE (AFLAC)
QuickBooks now offers Insurance Products and Services from AFLAC (American Family Life
Assurance Company), located in Columbus, GA. AFLAC is reported to be the largest provider
of worksite insurance products in the United States. QuickBooks now includes built-in AFLAC
forms that allow users to apply for insurance. There is also a report to help reconcile AFLAC
invoices to employee payroll deductions.
The AFLAC functionality in QuickBooks is not available in previous
versions of QuickBooks. To use the AFLAC functionality, you must have
QuickBooks 2003 (Basic, Pro, Premier or Enterprise Editions). The
Employee Organizer is not required. The AFLAC Setup, audit report and
forms are available without the Employee Organizer. Also, you do not
have to subscribe to QuickBooks payroll subscription to access the AFLAC features. However, if
you use the AFLAC features to set up pre-tax deductions, QuickBooks payroll will calculate
your taxes automatically, so you don’t need to calculate them manually.
MERCHANT ACCOUNT
The QuickBooks Merchant Account Service is offered by Wells Fargo Merchant Services and
Chase Merchant Services, LLC. These are the only two Merchant Account services that work
with QuickBooks. You must use QuickBooks Financial Software version 2002 or higher, or
QuickBooks Enterprise Solutions 2.0. This account allows you to accept credit cards –
everything you need to process credit cards is built right into QuickBooks - no extra software or
phone lines needed. Simply enter credit card and customer information in QuickBooks, and click
Send. Credit card payments are authorized and processed on the spot, and data is stored in
QuickBooks. With this service, you can process credit cards in QuickBooks or remotely – such
as at a trade show or at home – using Virtual Terminal Plus1. The service includes a card reader
and features a 1.89% card-swiped rate. The card reader is available and is sold separately.
Your application must be approved before you can use this service, and you can apply from
within QuickBooks as shown in the screen below. This process typically takes 7 to 10 days to be
processed, approved and activated.
Copyright 2005, AdvisorCPE – www.QuickBooksAdvisor.info
156
You will need to furnish current information about your business: legal name, location, business
history, owner information, sales data, bank account information, funding information and
current credit card processing and card type information. Pricing for this service is as follows:
Automatic Credit Card Billing - If you have a QuickBooks merchant account, the Automatic
Credit Card Billing feature allows you to bill a customer's credit card a fixed amount at regular
intervals for recurring services, such as membership fees, insurance premiums, or subscriptions.
Before setting up a recurring charge, you must have written authorization from your customer.
To set this up, from the "Customers" menu in QuickBooks, choose "Accept Credit Card
Payments" and then choose "Manage Automatic Credit Card Billing" to access the Recurring
Charges page. Print the "Automatic Credit Card Billing Authorization Form." Visa and
MasterCard require that you and your customer complete this form in order to use Automatic
Credit Card Billing. After completing the merchant sections, deliver the form to your customer to
complete and sign. Next, on the "Recurring Charges" page, click "Set Up Recurring Charge" and
complete all fields. Then, click "Next" to review and then save the charge information. Billing
Copyright 2005, AdvisorCPE – www.QuickBooksAdvisor.info
157
begins on the start date you specify. Your customer's credit card is charged automatically each
billing period for the amount specified. After payment is authorized, funds are transferred to the
account you use for the QuickBooks Merchant Account Service.
SEND INVOICES ONLINE
Deluxe Online Billing allows you to e-mail QuickBooks invoices, statements and estimates as email attached .pdf files; and through E-mailed Forms Tracking, you can also verify when
customers have received and read their invoices. You can also automatically notify customers of
late payments with Payment Reminders and give them access to a password protected web page
where they can view billing history, print invoices, submit inquiries, and set payment reminders.
There is a fee associated this service of $14.95 per month, but you can try it free for 45 days. To
set this up, select the Online Billing options page from the customer menu as shown below.
The Customer Account Center tracks all e-mail invoices, statements and estimates from
QuickBooks. Thereafter, each of your customers will be able to access a private, online
Customer Account Center (which only includes their billing information) through a link in the emails you send. When your customers click on this link they will be invited to create a login to
gain access to the Customer Account Center. Once a login is created, the Resource Center is
protected so that only that login can be used to view that particular customer's information.
Customers can see only their account information with your company. This account information
includes all invoices (including your company logo) that you have e-mailed to them while you
have been using Deluxe Online Billing.
Copyright 2005, AdvisorCPE – www.QuickBooksAdvisor.info
158
To make the transition smooth for your customers, you should contact them first and tell them
about this new option that is available to them.
If you've added your company's logo to your form(s), you will need to upload the graphic to
Intuit servers first so that it can be converted to a Web-viewable version. Your logo will then be
displayed in the same location on the forms as when printed. To add a logo to invoices,
statements and estimates, click on the Online Billing Options button on the Edit E-mail dialogue
and upload your logo before you e-mail the form to your customers.
You can e-mail forms from QuickBooks without signing up for Deluxe Online Billing. However,
Deluxe Online Billing gives you E-mailed Forms Tracking, Payment Reminders, customized
forms with your own logo, and a Customer Account Center. The basic Online Billing service
allows you to e-mail invoices, estimates and statements without your logo from your
QuickBooks 2001/2002 software for free. You can only e-mail statements if you are using
QuickBooks 2002 or higher.
ACCEPT ONLINE PAYMENTS
QuickBooks offers a service that allows you to accept payments online. Once you have set up
this service, all you need to do different is checked the “Allow Online Payment” box on your
invoices before sending them to your customers. The first time you set this up, you will be
prompted to select a payment provider. Thereafter, you can choose the invoices you want to
enable for online payment. When you send an enabled invoice and your customer receives the
invoice via e-mail, he or she can click on the link in the e-mail to make a payment online. Once
payment is received, an alert is displayed in your Company Home Page. Simply go to the Accept
Payments screen and click on the Get Online Payment button. With one click, you can record the
payment information in QuickBooks.
Copyright 2005, AdvisorCPE – www.QuickBooksAdvisor.info
159
QUICKBOOKS BILL PAY
With QuickBooks Bill Pay you can pay your U.S. bills online. Bill Pay records payments directly
into the QuickBooks General Ledger. This service can reduce the amount of labor, supply cost,
and processing time by handling accounts payable online. You can make up to 20 payments per
month for $15.95; thereafter each additional set of 10 payments is $6.95 per month. There is a
free 30-day trial.
To use this service, select the "online bank payment" box and choose the date you want the
payment delivered. As an alternative, you could also go to the "pay bills" screen, and select
"online bank payment" and choose the date you want the payment delivered. Next, send the
payments from the Online Banking Center within QuickBooks – the payments are then made by
the delivery date (when setting delivery date, please allow 4 business days for processing).
All online payments are sent using encryption and are protected with a PIN that only you know.
QuickBooks Bill Pay transactions are guaranteed by the payment processor to be on time. To use
this service, you need a checking account at a bank that offers online banking with QuickBooks,
an Internet connection and a version of QuickBooks that supports online banking, and
QuickBooks version 2000 or higher.
Copyright 2005, AdvisorCPE – www.QuickBooksAdvisor.info
160
GET A MASTERCARD
The QuickBooks Business MasterCard is offered through Travelers Bank & Trust, FSB (a
member of Citigroup) and it allows you to download your credit card transactions directly into
all versions of QuickBooks 2000 and higher – all you need is an internet connection. You can
automatically categorize expenses. The credit card features a low introductory APR on purchases
and balance transfers, no annual fee, and no fees for additional employee cards. You can also
apply spending controls on individual cards. You also earn traveler discounts quickly when you
enroll in the optional TravelerMiles rewards program. This program has an annual enrollment fee
of $39. You can apply online. Details and an enrollment form of the TravelerMiles program will
be delivered with your card. It usually takes 3-4 weeks to process an application.
As a consolidated payment option, you can set up one master account for the business that
receives a billing statement detailing activity for all individual credit card accounts.
Once you are approved for your credit card, Travelers Bank will send you a customer ID
number, a temporary PIN, and a set of "Getting Started" instructions to set up your card for
online account access. This will allow you to download credit card transaction data. The
transaction data is sent using SSL encryption and is protected with a PIN that only you will
know.
Copyright 2005, AdvisorCPE – www.QuickBooksAdvisor.info
161
GET D & B CREDIT REPORTS
You can get a credit report on any customer or prospective customer by selecting credit check
from the Customer menu, and then select Get Credit Report. At the Credit Check Services
window, select the Existing Customer tab if the company you are checking on is already in your
customer list. Otherwise, select the New Customer tab. Next select a company or enter the
company name and state. Then select Get Credit Report and click Start. If no matching company
is found, make certain that both the company name and the state in which it is located are
correct. If multiple possible matches are found, select the best match and click Continue. If a
large number of companies is found, click Advanced Search and add additional criteria. If the
company you selected is not an exact match for a customer in your customer list, the information
from the D&B database is displayed next to the information from your QuickBooks customer
list. Check "Update billing address in QuickBooks with information from D&B" if you want the
D&B information to replace the QuickBooks information. The information in QuickBooks will
be saved in the customer notes area. Pricing for this service is as follows:
Features
Membership Fee
Credit eValuator Reports
Bonus Credit eValuator Reports
Credit Alerts
Additional Credit Reports
Discount on Dun & Bradstreet
Targeted Marketing Lists
Gold Package
Silver Package
Transactional
Package
$39.99/month
4 reports per month
10 FREE reports
when you sign up!
Yes
$12.99 each
$19.99/month
2 reports per month
4 FREE reports when
you sign up!
Yes
$12.99 each
N/A
$24.99 each
15%
10%
None
None
No
$24.99 each
Credit reports are downloaded right into QuickBooks.
A sample credit report is shown below:
Copyright 2005, AdvisorCPE – www.QuickBooksAdvisor.info
162
Copyright 2005, AdvisorCPE – www.QuickBooksAdvisor.info
163
BANK ONLINE
QuickBooks Online Banking allows you to download transactions directly from your
participating financial institution to reduce data entry time and errors. You can also transfer
funds online between any two accounts at the same financial institution. With this service, you
can immediately see which checks have cleared your accounts and get up-to-date account
balances. You can also write checks, pay bills, reconcile accounts and transactions, and transfer
funds between accounts at the same financial institution.
If your bank does not offer Online Banking with QuickBooks, you can still pay bills online using
QuickBooks Bill Pay. To do this, download transactions and account information from your
financial institution. Go to the Online Banking Center and select "Get New QuickStatement" and
click "Send." Once you've downloaded your transactions, match them to your records and
reconcile your account. You can also write checks or pay bills as you normally would in
QuickBooks, and select "Online Bank Payment" and choose the date when you'd like the
payment to be delivered (allow up to 4 days to process). Then send your payments from the
Online Banking Center within QuickBooks, and the payments will be made by the delivery date.
The cost of Online Banking services varies by financial institution. You need a checking account
at a bank that offers online banking with QuickBooks, an Internet connection and a version of
QuickBooks that supports online banking (QuickBooks version 2000 or higher).
SHIP WITH FEDEX
As a registered QuickBooks user, you qualify for reduced shipping rates from FedEx for U.S.
domestic and international services, FedEx Priority Overnight®, FedEx Ground® services for
business-to-business shipping, FedEx Standard Overnight®, FedEx 2Day®, FedEx International
Priority® and FedEx International Economy® services. These rates may or may not be lower
than your own discounted rates. Savings do not include FedEx SameDay® or FedEx First
Overnight® services.
Most importantly, you can prepare and print your shipping labels from QuickBooks 2003, using
your customer list. To get started, call 1-888-411-5174 or sign up online. If you already have an
existing FedEx account, you can continue to ship as you always have. Your discount will be
automatically figured into your bill.
Copyright 2005, AdvisorCPE – www.QuickBooksAdvisor.info
164
BACKUP DATA REMOTELY
With QuickBooks Online Backup Service, files are compressed, encrypted, securely transferred
across the Internet, and stored at mirrored off-site data centers managed by Connected TLM
software - based in Framingham, Massachusetts. You schedule the days and times for your
backups to occur, and thereafter, the backups are performed automatically. The cost is about $7 a
month, based on an annual subscription at $79.95. This service supports backups up to 100 MB.
You may select up to 100 MB of additional files for $99.95 a year. The Premium Data Backup
plan protects all your PC data files, up to 4 GB, for $14.95/month. The Premium Plus System
Backup will back up all your data files and software applications, up to 10 GB, for
$19.95/month.
The initial data backup usually takes the longest time (Approximately 15 minutes). Subsequent
backups will scan your files for any changes, and only the incremental changes will be
transferred. Triple DES encryption (112-bit) is an advanced encryption standard used by many
banks, as well as the United States government. The service includes PC Heal which claims to
provide the ability to "heal" your PC and repair damaged configurations.
To get started, select your backup plan and download a small software file via the Internet. A
2MB file will be downloaded to your hard drive to enable the service. Run this file to install the
software and follow the prompts to register for the service. Downloading this file will take
approximately 10-15 minutes using a 56K modem. As an alternative, you can also install from
your QuickBooks 2002 or 2003 CD. Click to get step-by-step instructions on how to select your
backup plan and install the software from your QuickBooks 2002 and 2003 CD.
Copyright 2005, AdvisorCPE – www.QuickBooksAdvisor.info
165
Your files are automatically backed up according to the days and times you've selected. As a
subscriber to the QuickBooks Online Backup Service, you may also manually start an online
backup of your files at any time, from the QuickBooks Back Up menu option. You can retrieve
your backup files anytime, anywhere, from any computer that has Windows installed and an
Internet connection. To do this, log in to the data center Web site with your account number and
encryption key, select the files you want to retrieve, and download over the Internet to your
computer.
You may back up your data as often as you like. To restore files, from the QuickBooks 2002
"File" drop-down menu select "Restore" and then "Online." Click "Restore" and the backup
software will display the home page for your account. Choose the "Retrieve" tab and your
previously backed up files will be displayed.
SET-UP REMOTE ACCESS
QuickBooks Remote Access, is powered by WebEx, and it allows you to access your
QuickBooks files from any Internet-connected remote PC. There is no need to drive to the office
and no need to copy files. Thereafter you can use QuickBooks exactly like you do at the office
from your remote location. All your work is saved to your QuickBooks file. There are no
duplicate files. Additionally, there is no need to be running QuickBooks at your office. As long
as your office PC is on and connected to the Internet, you can access QuickBooks – or any
application installed on your office PC – through your remote PC's Web browser.
Copyright 2005, AdvisorCPE – www.QuickBooksAdvisor.info
166
Your connection is protected by encryption and security technology that is used by banks and
online trading firms. Only people you authorize will be able to access your QuickBooks
Enterprise Solutions file using your I.D. and password. The Remote Access Gold gives you, and
those you authorize, remote access to your company's QuickBooks files and all your other
desktop applications, while the Remote Access Platinum plan is designed especially for
accountants with multiple clients or for business owners who need to access several computers
remotely. The Platinum plan allows remote access to up to 5 computers at your office, plus
attended (client-authorized) access to an unlimited number of clients' computers.
To get started with Remote Access, QuickBooks Premier automatically installed the Remote
Access application on your office PC when you installed QuickBooks. All you need to do is sign
up for service and visit the Remote Access registration site to set up a user I.D. and password.
Your office PC needs to be turned on and connected to the Internet, but the QuickBooks
application does not have to be open.
The Price is $14.95/month for the Gold plan, and $29.95/month for the Platinum plan. This
service works with all QuickBooks products and versions as well as any other application or file.
To access a remote computer you must go to a specific URL that is given to you when you signup for Remote Access. QuickBooks software does not need to be installed on the remote
computer. You gain access through the Web browser on the computer where you are physically
located.
Copyright 2005, AdvisorCPE – www.QuickBooksAdvisor.info
167
CREATE A WEB SITE
The QuickBooks Web Site Solution is provided by Verisign and is designed to help you design,
launch, and host a beginner web site. The service includes a web site address with matching email as well as web hosting The web site manager tool guides you through a wizard driven
design process that allows you to set up a 5-page Web site. You can add photos and graphics. No
special programming or Internet software is required. Prices start at $19.95/month for a custom
5-page web site with a personalized web address, matching e-mail, site hosting, and editing tools.
This solution is not integrated with the QuickBooks data. The web site options provided by
Peachtree are far superior and are priced at $0 for a basic web site to $50 per month for an
integrated web store. The web site solutions offered by BusinessVision 32 ($99 per month) and
ACCPAC Advantage ($300 per month) are far superior and highly recommended.
If you prefer, you can use an existing Web Address. If you choose to use an existing domain
name you will continue to be billed for the registration of your domain name by your domain
name provider. You will have one e-mail box, and up to 4 e-mail addresses, with your 5-page
Web site subscription. If you choose the 10-page Web site subscription, you get 3 e-mail boxes,
and up to 4 e-mail Addresses with each e-mail box. All e-mail boxes are configured through
Website Manager. You can add Web pages in 5-page increments (5-page packs) and additional
e-mail boxes after your purchase using Website Manager.
Copyright 2005, AdvisorCPE – www.QuickBooksAdvisor.info
168
THE
QUICKBOOKS
ADVISOR
PROGRAM
CHAPTER 22
Copyright 2005, AdvisorCPE – www.QuickBooksAdvisor.info
169
BECOME A QUICKBOOKS ADVISOR
CPAs and professionals can enroll to become a Certified QuickBooks ProAdvisor and have their
name listed in QuickBooks Advisor referral database.
The program costs $549 and as a Certified QuickBooks ProAdvisor:
Your name can appear in the QuickBooks Advisor referral database
You will receive special Alerts, Newsletters and reference materials
You will receive priority technical support
You will have access to informative webcasts
You will receive training guides
You will receive trial versions
You will receive a copy of QuickBooks Premier: Accountant Edition
Once you complete Certification, you are eligible to receive 16 CPE credits, and are authorized
to use the Certified QuickBooks ProAdvisor logo.
Copyright 2005, AdvisorCPE – www.QuickBooksAdvisor.info
170
THE
QUICKBOOKS
AFFILIATE
PROGRAM
CHAPTER 23
Copyright 2005, AdvisorCPE – www.QuickBooksAdvisor.info
171
THE QUICKBOOKS AFFILIATE PROGRAM
The QuickBooks Affiliate Program allows you to make money by referring customers to the
Intuit web site where QuickBooks offers several affiliate programs that may be useful to you or
your clients. CPAs can offer QuickBooks these to their customers, and earn commissions up to
5% on QuickBooks sales originating from your Web site. Intuit does most of the work - Intuit
does all the difficult work of taking orders, shipping products and handling customer service.
Anyone can apply to the program, as long as they have a web site. Next, you place links on your
site and every time you refer a customer to Intuit through your site and that customer makes a
purchase, you earn a commission. To get started, you must read and accept the terms and
conditions of the QuickBooks Affiliate Agreement, and fill out the simple online application.
There is no cost to apply or participate in this program.
Copyright 2005, AdvisorCPE – www.QuickBooksAdvisor.info
172
QUICKBOOKS
MA N U A L
SUPPLEMENT
Copyright 2005, AdvisorCPE – www.QuickBooksAdvisor.info
173
SUPPLEMENT TOPICS INCLUDE:
QuickBooks: Premier Edition 2005
QuickBooks Client Manager
QuickBooks Financial Statement Reporter
QuickBooks Premier - Professional Services Edition
Add-On Software
QUICKBOOKS: PREMIER EDITION 2005
CASH FLOW PROJECTOR
Cash Flow Projector helps to predict cash flow for six weeks, using the QuickBooks data and
your answers to simple questions. View projected "available to spend" weekly cash balances in a
printable report. "What if?" scenarios show how making changes to receipts and disbursements
could affect weekly cash balances.
FIXED ASSET TRACKER
The Fixed Asset Tracker helps to keep track of basic information and depreciate for tax purposes
of fixed assets, such as equipment, trucks, cash registers, and computers. Track details such as
asset name, serial number, acquisition date, and disposal date and use it to calculate depreciation
and tax benefits.
SET "PER ITEM" PRICE LEVELS
More flexible price levels allow users to set the exact prices you want to charge each customer
for each item you sell.
MANAGE ADDRESSES MORE EASILY
Quickly and easily copy and paste entire addresses, rather than having to cut, copy, and paste just
one line at a time. Export address lists more easily to Microsoft® Excel, since each line of the
address exports to a different column.
RECONCILE AND "UNDO" A RECONCILE
Undo a previous reconcile in one click. Customize the layout of the reconcile screen, and an
improved reconcile discrepancy report shows changes and deletions made to previously
reconciled transactions.
TIME TRACKING
Gives an alert when creating an invoice where there is any outstanding time or expenses, to help
avoid under-billing. Plus bring over both item descriptions and notes to invoices, so customers
can clearly see what you are billing them for.
Copyright 2005, AdvisorCPE – www.QuickBooksAdvisor.info
174
INDUSTRY SPECIFIC EDITIONS OF QUICKBOOKS
QuickBooks Premier is available in many new industry-specific editions that offer specialized
tools and features unique to each industry.
FIXED ASSET MANAGER
Manages fixed assets from acquisition to disposition with fewer spreadsheets. With Fixed Asset
Manager, enter fixed assets, calculate depreciation, and print reports. Enter asset purchases, or
import a clients' Fixed Asset List. Compute depreciation for up to six asset bases including
federal, state, book, and AMT. Compute Section 179 expense and luxury auto calculations.
Project depreciation can be applied for the life of the asset. Automatically create journal entries
for depreciation, as well as gains and losses from asset sales. Print 20 different reports, including
asset schedules by General Ledger Account, location, and category. Also, print tax worksheets
for Forms 4562 and 4797.
CALCULATE, ALLOCATE, AND TRACK LOANS IN ONE PLACE
Track all clients' loans in one place with Loan Manager. Create and manage loan amortization
schedules. Compute "what if" scenarios to help clients make better financial decisions about the
loans and lines of credit that are right for them. Allocate the loan payment between principal and
interest, and track the allocation over the life of the loan.
SAVE REPORTS AND FORMS AS PDFS, AND E-MAIL THEM DIRECTLY FROM
QUICKBOOKS
Save professional looking reports and forms as PDFs, this will provide a convenient archive of
prior reports such as bank reconciliations, trial balances, and ledgers. E-mail forms and reports
as well — directly from QuickBooks, making it easier to communicate with clients.
TRACK ADJUSTMENTS WITH ADJUSTING ENTRY FEATURE AND ADJUSTED TRIAL
BALANCE REPORT
Save time when tracking adjusted journal entries. Use the new Adjusting Entry feature in the
journal entry screen to record Adjusting Entries to clients' original balances. View clients'
original balances, your adjustments, and the final adjusted balances in the Adjusted Trial Balance
report. Print all Adjusting Entries made during a specified period with the Adjusting Journal
Entry report.
INTEGRATION WITH PROFESSIONAL TAX SOFTWARE
Integration with Intuit professional tax offerings makes it easier to be more accurate. Export
General Ledger balances to Lacerte® or ProSeries® tax software. Lacerte and ProSeries
software sold separately.
Copyright 2005, AdvisorCPE – www.QuickBooksAdvisor.info
175
QuickBooks Accountant Edition 2005 includes the reports and features of all industry-specific
Premier editions plus the features of Basic, Pro, and Premier 2005. Accountant Edition 2005
facilitates the manipulation of clients' files, no matter which QuickBooks 2005 financial software
products the clients use.
MANAGE FIXED ASSETS FROM ACQUISITION TO DISPOSITION WITH INTEGRATED
FIXED ASSET MANAGER
Manage fixed assets with fewer spreadsheets directly from QuickBooks. With the new fullfeatured Fixed Asset Manager, fixed assets can be easily entered, depreciation calculated, and
reports printed. Enter asset purchases, or easily import a clients' Fixed Asset List.
•
Depreciation can be calculated for up to six asset bases including federal, state, book, and
AMT.
•
Compute Section 179 expense and luxury auto calculations.
•
Project depreciation can be determined for the life of the asset.
•
Automatically create journal entries for depreciation, as well as gains and losses from
asset sales.
•
Print 20 different reports, including asset schedules by General Ledger Account, location,
and category.
•
Tax worksheets for Forms 4562 and 4797 can also be printed.
Copyright 2005, AdvisorCPE – www.QuickBooksAdvisor.info
176
CALCULATE, ALLOCATE, AND TRACK LOANS WITH LOAN MANAGER
Track clients' loans in one place. Fewer spreadsheets will be needed with the new Loan
Manager. Create and manage loan amortization schedules. Compute "what if" scenarios to help
clients make better financial decisions about which loans and lines of credit are right for them.
Allocate the loan payment between principal and interest, and track the allocation over the life of
the loan.
WORK ON CLIENTS' FILES FROM ANYWHERE WITH REMOTE ACCESS
Data reviewing and inputting can be utilized without being tied to your desk. Work on clients'
files from the Internet, and access files without exchanging disks or driving to a clients' offices.
Remote access powered by WebEx™ is easy to use and protected. One 12-month basic
subscription for remote access is included with Accountant Edition 2005 — valued at
approximately $300.
TRACK ADJUSTMENTS WITH ADJUSTING ENTRY FEATURE AND ADJUSTED TRIAL
BALANCE REPORT
Save time when tracking adjusted journal entries. Use the new Adjusting Entry feature in the
journal entry screen to record Adjusting Entries to clients' original balances. View a clients'
original balances, your adjustments, and the final adjusted balances in the Adjusted Trial Balance
report. Print all Adjusting Entries made during a specified period with the Adjusting Journal
Entry report.
Copyright 2005, AdvisorCPE – www.QuickBooksAdvisor.info
177
IMPROVED RECONCILIATION TROUBLESHOOTING
The Reconcile Discrepancy report provides a means for searching of deleted and changed
transactions to previously cleared transactions. Quickly identify transactions that have been
changed since the last bank reconciliation, so it's easier to correct them. If there are significant
discrepancies, the application allows for an undo of the previous reconciliation. It is also
possible to save PDFs of prior reconciliation reports.
PREVENT PRIOR PERIOD CHANGES
Keep prior periods closed by password-protecting closing dates. Simply select the closing date,
such as the end of a period or the end of the fiscal year, in a client's file. Then set a closing-date
password to prevent changes to a closed period. View changes made before the passwordprotected closing date in a convenient report.
INTEGRATION WITH PROFESSIONAL TAX SOFTWARE
Integration with Intuit professional tax offerings makes it easier to be more accurate. Export
General Ledger balances to Lacerte® or ProSeries® tax software. Lacerte and ProSeries
software sold separately.
Copyright 2005, AdvisorCPE – www.QuickBooksAdvisor.info
178
QUICKBOOKS CLIENT MANAGER
$249.00
AVOID ENTERING DATA TWICE
Reduce time-consuming double entry with the integration of QuickBooks financial software,
Lacerte® and ProSeries® tax software, and Microsoft Outlook software programs. Client
Manager can synchronize contact information among these programs and help eliminate
redundant data entry. One central system reduces the risk of inaccurate data across multiple
sources.
WORK FASTER WITH ONE CLICK ACCESS
Provides one-click access to some of the tools currently being used and the client information
stored, so new software can be implemented without changing job procedures. Jump instantly to
Lacerte and ProSeries tax returns or transaction detail in QuickBooks. Launch a Microsoft
Outlook e-mail or Microsoft Word letter to a client.
ORGANIZE CLIENT INFORMATION
View critical client information from one main screen. Quickly gain access to contact
information, client history, ProSeries® and Lacerte® tax returns, recent QuickBooks
transactions, linked documents, projects, appointments, and to-do's — from one screen.
ATTACH FILES TO CLIENT RECORDS
Attach relevant document files such as tax returns, letters, faxes, e-mail messages, and
spreadsheets to client records.
VIEW AND TRACK RECENT COMMUNICATIONS HISTORY
Save client interactions and review them from a single screen — including notes, e-mail
messages, letters, appointments, and more.
CUSTOMIZE DATA FIELDS, ORGANIZE CLIENT DATA, AND STORE MULTIPLE FORMS
OF CONTACT INFORMATION
Create an unlimited number of custom fields to record and track information. Organize clients
by groups and categories, and filter and sort client lists, to-do lists, project lists, or
communications history. Store up to 10 different addresses, phone numbers, and e-mail
addresses per contact.
Copyright 2005, AdvisorCPE – www.QuickBooksAdvisor.info
179
EASILY SET UP, LEARN, AND USE WITH STARTUP WIZARD
Import data with the Startup Wizard so the application can be up and running in less than 30
minutes. Choose the application you want to pull data from, and the type of data, such as
Microsoft® Outlook e-mails, Lacerte® and ProSeries® tax returns, and QuickBooks financial
transactions. On-screen help is available. The program also includes an intuitive design,
including text links and back buttons.
MANAGE CLIENT RELATIONSHIPS
Schedule appointments and link them to specific clients to facilitate follow through. Track
project information, such as files and notes. Link clients and other contact types, such as
vendors, to projects for quick reference. Set pop-up alerts for to-do's and appointments so that
entered engagements don't slip through the cracks. Track critical information about clients,
referrals, associations, projects, and more.
GROW YOUR PRACTICE
QuickBooks Client Manager enhances client service — which can drive more revenue and grow
your practice.
Software sold separately. QuickBooks Client Manager will synchronize with QuickBooks Basic
2003 - 2005, QuickBooks Pro 2003 - 2005, and QuickBooks Premier 2003 - 2005, Lacerte® tax
software 2003, ProSeries® tax software 2003, Microsoft Outlook 2000, 2002, Microsoft Outlook
Express 5.5 and 6.0, and Microsoft Word 97, 2000, and 2002. Apply the appropriate Client
Manager update in order to enable 2003 tax software integration, which is available free-ofcharge. Client Manager will also import data from Lacerte tax software 2002 and ProSeries tax
software 2002. Other applications, such as Microsoft Access and Microsoft Excel, may be
imported using a CSV (comma separated value) file format.
Client Manager is a stand-alone desktop software package that also works with QuickBooks
financial software, as well as Lacerte® and ProSeries® tax software, Microsoft Outlook® and
Microsoft Outlook Express messaging software.
Client Manager can be set up easily and in less than 30 minutes the data can be imported with
Client Manager up and running. Plus, on-screen help on most pages makes it a quick and easy
program to learn and use.
One screen access gives a comprehensive view of files and notes on one screen, data can be
managed and tracked efficiently, respond to client questions faster, and get more detailed
information at the touch of a key. The critical client data is accessible from just one screen.
Client Manager is integrated with some of the applications currently use, new programs can be
utilized without changing current business operations. Client Manager synchronizes with
Microsoft Outlook software and provides one-click access to the information contained in it.
Copyright 2005, AdvisorCPE – www.QuickBooksAdvisor.info
180
Client Manager will synchronize with QuickBooks Basic, QuickBooks Pro, and QuickBooks
Premier 2003 - 2005, Lacerte® tax software 2003, ProSeries® tax software 2003, Microsoft
Outlook 2000 and Outlook 2002, Microsoft Outlook Express 5.5 and Express 6.0, and Microsoft
Word 97, Word 2000, and Word 2002.
Data can be imported from all of the above and ProSeries and Lacerte tax software 2002. Other
databases are acceptable, such as Microsoft Excel, Microsoft Access, or Quicken® software,
require formats capable of exporting CSV (comma-separated values), or text data files.
One screen can be used to view contact information and client history almost instantly. Plus, the
application provides the ability to connect to linked documents, projects, tax returns,
appointments and to-do's all on a single screen.
Client Manager features intuitive designs such as text links and back buttons, similar to those
found on Web sites. Questions can be answered via Client Manager’s on-screen help.
Copyright 2005, AdvisorCPE – www.QuickBooksAdvisor.info
181
$79.95
QUICKBOOKS CUSTOMER MANAGER
Customer Manager is a powerful customer information system that works with QuickBooks to
help organize business-critical customer data more efficiently, intelligently, and profitably.
STRENGTHEN CUSTOMER RELATIONSHIPS BY HAVING INSTANT ACCESS TO
CRITICAL INFORMATION
QuickBooks Customer Manager consolidates all the customer information into one system. This
stand-alone software works with or without QuickBooks and Microsoft® Outlook.
Track critical information concerning customers, clients, donors, suppliers, contractors, referrals,
associations, projects, sales leads, and more.
FIND KEY CUSTOMER DATA IN ONE EASY CLICK
View contact information, customer history, recent QuickBooks transactions, linked documents,
projects, appointments, and to-do's all on a single screen. Track customer projects and
relationships. Store multiple forms of customer information. Attach files, such as letters, faxes,
e-mail messages, and spreadsheets, to customer records.
STRENGTHEN CUSTOMER RELATIONSHIPS
One-click access to key customer data allows for quick responses to customers without making
them wait while systems are being switched, or manually sorting through paper files.
GROW YOUR BUSINESS
Customer Manager gives you the tools to serve your customers even better.
BE MORE PRODUCTIVE
Provides seamless integration with QuickBooks, Microsoft® Outlook and Microsoft® Outlook
Express so that data doesn’t have to be entered twice. One central system maintains key
customer information and ensures that it is both accurate and up to date.
•
Attach relevant document files such as letters, faxes, e-mail messages, and spreadsheets
to customer records.
•
Save and review all customer interactions from a single screen — including notes, e-mail
messages, letters, appointments, and more.
•
Create custom fields to record and track information.
•
Organize contacts by groups and categories. Filter and sort contact lists, to-do lists,
project lists, or communications history.
Copyright 2005, AdvisorCPE – www.QuickBooksAdvisor.info
182
Communicate with customers with one click by launching an e-mail message or Microsoft®
Word letter. Or set-up automated e-mail communications for thank-you notes, "keep-in-touch"
messages, electronic birthday cards, and more.
SET-UP, LEARN, AND USE WITH STARTUP WIZARD
Be up and running in about 30 minutes by importing data with the Startup Wizard. Onscreen
help provides answers to questions quickly. Find frequently asked questions on every page.
Plus, the program includes an intuitive design, including text links and back buttons.
Customer Manager organizes customer data. Schedule and link appointments to ensure you
follow through with customers.
Store multiple forms of contact information: Store up to 10 different addresses, phone numbers,
and e-mail addresses per contact.
Track customer projects: Keep all information about a project, such as files and notes, together
on one screen. Link customers and other contacts, such as vendors and contractors, to projects
for quick reference.
Keep on top of appointments or important tasks by utilizing pop-up alerts for important to-dos
and appointments.
Integrates with QuickBooks Financial Software, Microsoft® Outlook, and Microsoft® Outlook
Express. Use Customer Manager to view and schedule appointments in Microsoft® Outlook, or
to view customer-specific transactions, records, or reports in QuickBooks Financial Software.
Customer Manager is a stand-alone desktop software package that also works with QuickBooks,
Microsoft® Outlook and Microsoft® Outlook Express.
Customer Manager set up is easy and in about 30 minutes data can be imported and Customer
Manager up and running. On-screen help on every page makes Customer Manager easy to learn
and use.
Customer Manager integrates with Microsoft® Outlook and Microsoft® Outlook Express so
business processes can remain the same. Customer Manager synchronizes with Microsoft®
Outlook and Microsoft® Outlook Express and provides one-click access to information.
Customer Manager will synchronize with QuickBooks Basic, Pro, and Premier 2003 - 2005,
Microsoft® Outlook 2000 and 2002 and Microsoft® Outlook Express 5.5 and 6.0.
Data can also be imported from other programs, such as Microsoft® Excel, Microsoft® Access,
or Quicken, that allow for exporting in the CSV (comma-separated values) or text data file
format.
Copyright 2005, AdvisorCPE – www.QuickBooksAdvisor.info
183
QUICKBOOKS FINANCIAL STATEMENT
REPORTER
QuickBooks Financial Statement Reporter gives accountants the flexibility to quickly create
professional-looking financial statements — all from within QuickBooks: Premier Accountant
Edition.
1 User - Full-version CD-ROM $319.95
5-Pack - Full version, 5 CD-ROMs $1,115.95
SELECT FROM OVER 20 REPORT LAYOUTS
Select from over 20 financial statement layouts, including balance sheets, income statements,
cash flow statements, and comparative and trend financial reports. Automatically pull in data
from your clients' QuickBooks 2003 – 2005 financial files.
SUPPORTING DOCUMENTS
Title Page
Compilation
Review
Audit
BALANCE SHEETS
Current Year
Current Year Two Column
Current Year with %
Current/Prior Year
Current/Prior Year with %
Current/Prior Year with Variance
Current/Prior Year with Variance and %
INCOME STATEMENTS
Current Period
Current Period with %
Current Period/Year
Current Period/Year with %
Current/Prior Period
Current/Prior Period with %
Current/Prior Period and Current/Prior Year
Current/Prior Period and Current/Prior Year with %
Current/Prior Period with Variance and
12 Months of Fiscal Year
Most Recent 12 Months
4 Quarters of Fiscal Year
Most Recent 4 Quarters
Copyright 2005, AdvisorCPE – www.QuickBooksAdvisor.info
184
STATEMENTS OF CASH FLOWS
Current Period
Current Period/Year
Current/Prior Period
CREATE SUPPORTING DOCUMENTATION — ALL WITHIN QUICKBOOKS
Use the built-in word processor to create supporting documentation to accompany financial
statements. Create notes, title pages, and engagement letters. Select from a list of standard
compilation, review, and audit templates that automatically fill in company and client
information. Print supporting documentation as-is, customize, or start from scratch.
EDIT FINANCIAL STATEMENTS PER CLIENT
Eliminate double-data entry by customizing financial statements from within QuickBooks.
Customize section and column headers; customize the footer and add up to three lines of text and
change the positioning; easily change the column alignments, column widths, and fonts; and
control indentations.
EXPAND AND COLLAPSE ACCOUNT GROUPS
QuickBooks Financial Statement Reporter provides control over how much detail to show. Show
the detail by collapsing or expanding individual account groups. Re-order accounts within
account groups, or move accounts into different account groups for financial statement purposes
only. Easily create a supporting schedule of any collapsed account group.
MEMORIZE CLIENTS' FINANCIAL STATEMENTS AND UPDATE IN SECONDS
Save customized financial statements and produce a complete set of updated financials in
seconds by selecting a new statement date. Automatically update financial statements, all title
pages, notes, and letters.
CHANGE QUICKBOOKS DATA AND ALL STATEMENTS UPDATE AUTOMATICALLY
Financial Statement Reporter is integrated with QuickBooks: Premier Accountant Edition or
QuickBooks Enterprise Solutions, so the data in financial statements is "live." Make a change in
the QuickBooks data and all statements update automatically. The QuickZoom® feature allows
you to jump directly from an amount on the financial statement to the source data in the
QuickBooks file. Edit the amount, and the statement is instantly updated.
PRINT DOCUMENTS IN THE CORRECT ORDER
Choose the print order of documents, from opinion pages to financials. Automatically number
pages. Use "smart" page breaks to keep sections together.
Copyright 2005, AdvisorCPE – www.QuickBooksAdvisor.info
185
QUICKBOOKS PREMIER
PROFESSIONAL SERVICES EDITION
QuickBooks: Premier Professional Services Edition is specifically designed to support the needs
of professional services firms
Full-version CD-ROM $499.95
Upgrade CD-ROM $379.95
5-User Value Pack:
Full-version CD-ROM $1,499.95
Upgrade CD-ROM $1,349.95
CUSTOMIZED PROPOSAL AND INVOICE TEMPLATES
New Professional Services invoice templates and a proposal template streamline proposal and
invoicing process, while providing a professional look. New invoice templates include Time &
Expense, Fixed Fee, Invoice From Proposal, and Attorney's Invoice.
ACCESS KEY WORKFLOWS THROUGH THE PROFESSIONAL SERVICES-SPECIFIC
NAVIGATOR
One-click access to the most frequently used features and reports. A new specially designed
Professional Services Navigator graphically displays key business tasks.
PROFESSIONAL SERVICES-SPECIFIC SAMPLE FILES
There are four new sample files designed by professional services industry experts to optimize
software functionality. The sample files include: Consulting Firm, Law Office, Engineering,
Architecture Firm, Graphic Design/Advertising Agency. View the sample file that most closely
matches a particular business to learn ways to tailor the system for a business. Use the sample
file to try new features without changing the current data file.
ELIMINATE DOUBLE DATA ENTRY
Track time spent on projects and transfer all or part of timesheet and description details to
invoices. Select any or all hours from a timesheet, and transfer them to the invoice with a few
clicks. No retyping. No manual calculations.
MORE FLEXIBLE BILLING RATES
The Professional Services Edition allows for variable rates to clients and services, and the right
rates are automatically applied to the client invoice.
Copyright 2005, AdvisorCPE – www.QuickBooksAdvisor.info
186
ALERTS HELP TO DETER UNDER BILLING
Invoice creation includes an alert if the client or project has unbilled time or expenses. You can
review the information and determine what you want to include on the invoice.
SAVE YOUR INVOICES AS PDFS
Invoice completion includes a variety of options; save the invoice, print and mail it, or email it to
a client as a PDF. The program provides a method to select the option preferred by the client.
The application also includes 11 new pre-built Professional Services-specific reports help
manage business more effectively. The reports provide a means to analyze profitability and
accurately track costs with the Project Costs Detail and Unbilled Expenses by Project reports.
Users can review billable versus non-billable time with the Billed/Unbilled Hours reports and
avoid under billing with Expenses Not Assigned to Projects and Unbilled Expenses by Project
reports. Improve project estimating and show remaining revenue on projects with the Billed vs.
Proposal by Project report.
The following screens demonstrate some of the reporting functionality:
Copyright 2005, AdvisorCPE – www.QuickBooksAdvisor.info
187
Copyright 2005, AdvisorCPE – www.QuickBooksAdvisor.info
188
MANAGE RESOURCES AND MONITOR PRODUCTIVITY
View projects at a glance with the Project Status report, which will help manage resources and
determine availability for new projects. The program also includes Track Billed and Unbilled
Copyright 2005, AdvisorCPE – www.QuickBooksAdvisor.info
189
Time by Person, Project, or Activity to get a clear picture of how many hours have been billed to
projects and how many hours remain to be billed.
SAVE REPORTS AS PDFS AND E-MAIL THEM TO CLIENTS
Professional Services Edition provides a means to export reports to Excel, save reports as PDFs,
and e-mail the reports to your clients.
GET STARTED QUICKLY AND EASILY WITH EASYSTEP® INTERVIEW, NEW
STARTER TEMPLATES, AND INDUSTRY EXPERT TIPS
Set up the Professional Services Edition in about an hour by answering a series of questions
within the EasyStep® interview process.
INCLUDES SIX NEW STARTER TEMPLATES TO HELP SET UP ACCOUNTING RECORDS
The Professional Services Edition includes six new starter templates, each based on a different
type of professional services business. Choose the file that most closely matches a business and
QuickBooks automatically sets up the accounting records, including a Professional Servicesspecific chart of accounts, an item list for services, and pre-built reports. The six new starter
templates include: Consulting Firm, Engineering Firm, Architecture Firm, Law Firm, Graphic
Design/Advertising Agency, and Interior Design Firm.
OVER 60 INDUSTRY EXPERT TIPS TO SET UP AND USE THE SOFTWARE MOST
EFFICIENTLY
More than 60 Industry Expert Tips demonstrate how to get the most out of the financial
management software. These tips are easily accessible in the Professional Services Help section.
UPGRADE TO THE PROFESSIONAL SERVICES EDITION IS EASY FOR PREVIOUS
QUICKBOOKS USERS
QuickBooks Premier Professional Services Edition will easily import current QuickBooks data
into the new software. When upgrading to this Edition, prompts guide the process of importing
data from existing files. Set up can be accomplished in less than an hour.
ACCESS ALL FEATURES AVAILABLE IN QUICKBOOKS PRO AND PREMIER 2005
Professional Services Edition offers all the comprehensive tools of QuickBooks Pro and Premier
2005, including these key features important to professional services firms:
•
Remote Access powered by WebEx™ functionality provides the flexibility to access data
from a client's office.
•
Vehicle Mileage Tracker helps organize vehicle expense information.
•
Fixed Asset Tracker collects depreciation information easily.
Copyright 2005, AdvisorCPE – www.QuickBooksAdvisor.info
190
ADD-ON SOFTWARE
SORTED BY CATEGORY
Enhancement tools
Sales Management (includes remote access for sales)
Shipping
Manufacturing & Inventory
Financial Reports
Remote Access
Contractors
Project Management
Real Estate
Passwords and Permissions
Time and Billing
Enhancement tools
E-mail reports from
QuickBooks
For QuickBooks users with versions prior to QuickBooks 2004
Email a Quickbooks report by creating a PDF file . The Win2PDF family of products
creates PDF files from any Windows NT, Windows 2000, or Windows XP application.
They install as print drivers, select "print" from your application to create the PDF file.
There is an option at the print screen to send as an E-mail. Cost: Basic version is Free.,
the Pro version which allows for password protection of documents is $69
Another site offers free file conversion to PDF format is PDF995.com. The free
version is supported by sponsor links
QuickBooks Pro and QuickBooks Premier Version 2004 added the capability of emailing all forms, creating PDFs of all forms and creating or e-mailing reports in PDF
format. Upgrades are priced at $154.95. QuickBooks offers a free basic Online Billing
service, which can be used to e-mail invoices, statements and estimates , the Deluxe
Online Billing, ($14.95 per month) offers additional features for managing billing and
accounts receivable Both of these services requires registration of your e-mail. Click
on the email icon click on send click on send now. The first time you will be
taken to a page on QuickBooks website to register your e-mail address- don't forget to
connect to the internet.
Transaction Copier
Transaction Copier for QuickBooks allows you to copy transactions and lists from
one QuickBooks company to another. It is intended for use where transactions and list
items are entered into one QuickBooks file and then need to be moved to another file.
Examples include accountants doing monthly review for their clients and data entry in
a temporary copy of the company file. A QuickBooks Add On priced at $59
Copyright 2005, AdvisorCPE – www.QuickBooksAdvisor.info
191
Sample iif files
You can import any transaction into QuickBooks from another software package
using an .iif file. An .iif is basically a tab-delimited txt file with an iif file extension.
Follow the link to QuickBooks.com for sample .iif files.
You can open the sample iif file in Excel. You need to map your exported txt data to
the format in the sample file.
QuickBooks version 2004 makes the job easier by allowing an import directly from
excel by assigning each excel column to a QuickBooks field such as customer name,
address, phone number, price. Upgrades are priced at $154.95.
Costco American Express
Cash Rebate Credit Card.
Get money back and save time with transaction entry to boot! Download into
QuickBooks your daily purchases to maintain better control on how, where, and why
the purchases were made. An annual membership fee of under $40 will can net you
thousands of dollars in a rebate check depending on your volume of purchases.
Visa / Mastercard purchase
transactions
ccImport is a transaction processing tool which will quickly and efficiently read
downloaded statements and post them to QuickBooks. ccImport currently only accepts
Quicken .QFX files (OFX version 1.02) and QIF files so check credit card website's
download file types. QuickBooks 2003 Pro or Later is needed $99.
Reconcile credit card
merchant accounts
Get paid for every credit card sale -An easy way to match credit card deposits with
the monthly credit card statements. A QuickBooks Add On priced at $149.
Print Your Own Checks
Buy blank check stock, a separate MICR toner cartridge (about $75) and save money
by printing your own checks. Print Boss Express (can print a signature on the check
and contains security features) will print the bank information from within
QuickBooks. Requires a HP printer and before purchasing, decide if you want to
dedicate 1 printer to checkwriting, or, change the toner each time you print checks. Or
for a less expensive solution, preprint from blank check stock first with Versa Check or
Check Magic Look for check stock that chemically bonds the laser toner to the paper
so that any modification of characters printed on the paper requires the actual paper
fibers to be ripped away.
Electronic payment from
customers
New customers can provide their bank information which you can set-up to
automatically withdraw your money on the due date. No more statements, telephone
calls, collection agencies. Might be a very good alternative for service industries.
A QuickBooks Add On priced at $295 for 100 transactions.
Fax from within QuickBooks Send an invoice, PO, etc. Fax directly from any program on your computer without fax
modem or any additional hardware or software. Bypass the phone company to send
faxes without long-distance charges. Access your QuickBooks 2002/3 customer and
vendor lists to send invoices, quotes, mail merges and mass fax blasts in seconds. A
QuickBooks Add On priced at $7.95/mo.
Copyright 2005, AdvisorCPE – www.QuickBooksAdvisor.info
192
Link documents to
QuickBooks
Examples of businesses that might find this handy are wholesalers or contractors who
must keep track of tax exemption certificates and tax exempt transactions.
Manufacturers who need to keep track of engineering diagrams related to their
components and/or parts. Insurance companies that must maintain secure patient
records and claims related information. Legal Departments that need to keep secure
copies of contracts and other legal agreements. Construction companies that must track
contracts, change orders and signoffs. Companies that must maintain confidential
employee records, including resumes, health forms, benefit forms, performance
reviews, etc. A QuickBooks Add On priced at $99 .
QuickBooks 2004 Premier
will create a purchase order
from a sales order.
QuickBooks 2004
Auto Create PO's based on
inventory levels
POMaker™ gives you the ability to decide how you would like to generate your
purchase orders. Automate by products for a specific vendor based on thresholds that
you predefine. Or, automate arbitrarily selecting all the products you would like to
reorder and letting POMaker™ figure out from whom to order them.
Multi-user, limited license?
You have a 5 user license but 7 users need access to QuickBooks throughout the day.
Do you purchase another 5 user license or AUTOCLOSE, a program that will the close
QuickBooks on the most idle user automatically without the administrator's
intervention . A QuickBooks Add On priced at $395
For versions 2003 and earlier - Create PO's from Estimates
If you use estimates and purchase orders, this tool looks to be very handy. Create a
PO by assigning a vendor, purchase price and PO number to every item on the
estimate. The tool is external to QB therefore, and requires importing the .iif into QB
A QuickBooks Add On priced at $69. A free trial is offered.
Sales Management
Sales access management. Allows secure access for more than 5 users from anywhere
SAM Sales Access Module
Remote access for customers, in the world. Give Sales and support personnel access to view and process REAL
TIME data THEMSELVES. Provides enhanced access to tasks and reports for your
staff and sales staff
employees and customers (a need to know/access basis). Allow customers to enter the
orders directly into the Sales Order window or look at their account information. The
remote users do not need QuickBooks installed on their computer A QuickBooks Add
On priced at $100 per user.
Customer payment analyzer Inexpensive add-ons for credit management and time management .
Transfer Utility
Import Pay Pal Transactions Including QuickBooks invoice or payment and the PayPal fee transactions.
Expense Reports
Get expense reports from the field in a format for immediate import into QuickBooks.
Encourages timely submissions, control over costs, and timely chargebacks to
customers (when appropriate) A QuickBooks Add On priced at $69 per license.
Commission Tracking
Split commissions on an invoice between unlimited Sales Reps and prevent an invoice
from being paid twice. A QuickBooks Add On priced at $49
Sophisticated commission
tracking
Setup complex sales commission plans ,Tracks sales, commissions and bonuses. Clear
and complete sales commission statements. Complete reporting ability
Copyright 2005, AdvisorCPE – www.QuickBooksAdvisor.info
193
Begin your web marketing
campaign without a
webmaster
A professionally designed website, eCommerce-enabled product catalogs,
sophisticated email marketing, private customer accounts, and customer service tools into a single streamlined eBusiness solution.
QuickBooks Customer
Manager
New September 13th 2003
Information and task management tool that tracks customer information in multiple
systems. This new software consolidates all of a client's critical customer information,
and displays it on a single, easy-to-understand screen. Use Customer Manager as
stand-alone software, or with QuickBooks Financial Software and Microsoft
Outlook to reduce duplicate data entry ... and to give a complete view of customers'
information. (5 users)
-- Organize contacts by groups and categories, and filter and sort
contact lists, to-do lists, project lists, or communications histories.
--Changes made in QuickBooks or Outlook are automatically transferred to Customer
Manager, and vice-versa.
-- View and track recent communications history. Save and review
all customer interactions from the single screen--including
notes, emails, letters, appointments, and more.
-- Toggle between both non-financial and financial data for any
customer, with one click. A QuickBooks Add On priced at $79.95.
Scan business cards and
update outlook
automatically. Then sync
Outlook with QuickBooks,
QuickBooks Customer
manager
CardScan gets business cards into your PC without typing. Syncs with Plan, Pocket
PCs, Outlook, Act, Lotus Notes, Goldmine. $249.
AccuCard sends updates to all contacts by email to make sure contact information is
accurate $49/ year.
Shipping
ShipGear
ShipGear® transparently connects to your FREE UPS OnLine® WorldShip® to
QuickBooks. A QuickBooks Add On priced at $100 for single user .
Labels for mailing via US
post
Access QuickBooks Customer/Vendor lists for bar coded labels for tracking, postage
pricing and more. FREE
Manufacturing &
Inventory
ERPlite an Inventory
solution
Below are just a few that we thought looked interesting, see the Intuit website for more
solutions :
ERPlite offers a truly complete and integrated manufacturing inventory software for
small and medium size manufacturers.
Multiple Inventory Locations, Low getting started cost inventory software, Serial/Lot
number Tracking, Different Units of Measure for Purchasing and Inventory, Work
Orders, and much more. A QuickBooks Add On priced at approx $900 (single user).
Copyright 2005, AdvisorCPE – www.QuickBooksAdvisor.info
194
Numbercruncher work order Work Orders™ - an innovative QuickBooks® companion program for manufacturers
that handle inventory and/or order management.
solution
Work Orders interacts with QuickBooks for better controls and efficiency in the
inventory and manufacturing process
Work Orders™ features include:
Extensive inventory and component management
Works orders and order tracking
Bill or Materials, product cost and margin analysis
A significant enhancement to QuickBooks Assemblies.
A QuickBooks Add On priced at $249.
Light manufacturing
For the light manufacturer, custom job shop, Visual Job Shop software integrates with
QuickBooks and includes the following functionality: Estimating, Engineering, Sales,
Inventory Control, Purchasing, Planning, Infinite Scheduling, Shop Floor Control,
Shipping and Job Costing.
Inventory Control
Warehouse and Inventory Management Solutions Bin Location used to easily
locate products, even handle dynamic storage.
Serialized inventory: to keep track of serial numbers.
Time sensitive material: to handle the inventory in the first-in-first-out fashion to avoid
products such as food, drug getting expired.
UOM(Unit of Material): to handle same item with different packaging.
Wireless bar code terminal: to have full mobility in the warehouse or show room.
Price each item by the
customer
Set “Per Item” price levels to match the right price to the right customer. Flexible
price levels enable clients to set the exact prices they want to charge each customer for
each item they sell.
Financial Reports
Smart Reports
Smart Reports tool is an Add-in that integrates into Excel and works with
QuickBooks reports. It updates QuickBooks financial reports for presentation
purposes. Produce highly customized monthly reports, picking up where QuickBooks
leaves off. Merge two or more similar QuickBooks reports; Ability to move rows,
merge rows, and delete row subtotals on a report; Forced-balance Balance Sheet.
Designate which equity account should be used for the rounding difference; Re-label
report rows and columns; Manage report headers and footers; Memorize specific
instructions in Profiles; so different settings can be applied to different report types or
similar reports from different companies. A QuickBooks Add On priced at $179. As of
May 2003, Intuit has added to its software products a report writer for accountants. Be
sure to investigate all products for the one most suitable to your needs.
Regularly printing reports
Auto Reporter will facilitate in the running of a series of reports or memorized reports
daily, weekly, monthly. It will format and generate reports, as well as change the
dates. There is a QuickBooks Add On software sells for $95.
Remote Access
Copyright 2005, AdvisorCPE – www.QuickBooksAdvisor.info
195
Mangomind remote access
MangoMind software offers a unique solution to remote access QuickBooks writeup. An easy-to-use, shared Internet workspace for mobile professionals, teleworkers,
and geographically dispersed work teams. A step up from the QuickBooks remote
access, no need to monopolize a computer in the remote location, the file is stored on a
hard drive on the internet with access anytime, day or night. A QuickBooks Add On
priced at under $30 per month 5 remote viewers may work on the file at their
convenience (if single user license is owned, only one at a time allowed in the file. The
remote drive may be used for more than QuickBooks files. Consider those word files
that need to be downloaded or those excel spreadsheets that require additional data.
QuickBooks Premier
Editions
WebEx services: Premier Contractor, Healthcare, Non Profit, & Accountant's edition
all include remote access capabilities. The free access (for the first year) will give you
a taste of how convenient it is to access your books and records no matter where you
are and what the circumstance. QuickBooks offers this service using WebEx services,
a leader in remote access technology. Support for remote access may be obtained by email by contacting WebEx at [email protected].
For telework, travel and Inviting others to participate in a collaboration or a
demonstration of your product or service. Hook up one PC for only $15 per month
on an annual plan. Only the host computer requires the service, not the remote
computer on which you are working. Free Trial! GoToMyPC Personal allows you to
remotely access your computer from any other Internet-connected computer in the
world with almost any operating system through a secure, private connection. Named
to list of Top 50 Web Sites by Time Magazine, April 2002. A QuickBooks Add On
priced at $19.95 per month
Free Remote access
VNC is used to tap into a colleague’s computer to have a “joint session” on the one
computer from our respective offices. Saves time, cuts down on chit chat and offers
less disruption to the workday. Works remotely or with the WebEx service through
QuickBooks Premier as a means of connection.
Do you have more than one
location using the same
QuickBooks file?
Remote accounting solutions will allow the bookkeeper or CPA to take the data file
to add new transactions and prevent the sales department or office staff to make any
new transactions until the file is returned. It simplifies the transferring of QuickBooks
data and notifies those that the QuickBooks file is inaccessible, in addition it removes
the desktop icon until the Bookkeeper/Accountant used the same utility to return the
file and will then notify the file is available and replaces the QuickBooks icon onto the
desktop. A QuickBooks Add On priced at $10 per month
Data Transfer Utility allows QuickBooks users to quickly and easily transfer (merge)
list and transaction data from one QuickBooks file to another QuickBooks file without
erasing or overwriting existing data. A solution to non networked computers needing
access to the QuickBooks file.
Contractors
Contractor solutions
AIA billing software - A solution for reporting Certified Payroll Reports, EEOC/Work
Utilization tracking reports, Benefit Reporting, AIA format billing, and the generation
of various contract documents. There is a nice slide show on their website that
demonstrates what the AIA billing software can do.
Project Management
Copyright 2005, AdvisorCPE – www.QuickBooksAdvisor.info
196
Smart Tools® Contact
Manager
Smart Tools Project
Manager
Web based project
management
Contact Manager is used to create and retrieve documents. Built-in Easy Word
Processor, Built-in Email Package, Manage Team To-Do Lists, Form letters, envelopes
and Labels Share Customer and Vendor lists with QuickBooks. A QuickBooks Add On
priced at $159 .
One worksheet where you enter all your project information, dates and costs alike. Use
QB estimates and list items to create project schedules. Project manager creates Perfect
Gantt Charts in Minutes! A QuickBooks Add On priced at $249 .
Easy to use online timesheets with components for expense reporting, hr, purchasing,
contracting, invoicing and project management. Integrated with MS Project and
Quickbooks with a one click synchronizer. Monthly fee based on features needed (1099 users) ranges from $ 11.95/mo to $35.26/mo per user.
Real Estate
MyProp
Property Management System - Keep track of owners, buildings, units and tenants.
When you add a building it uses the building name to create a Customer and Class in
QuickBooks A QuickBooks Add On priced at $79 .
Passwords and Permissions
An answer to QuickBooks
limited password and
restriction options1
Plus a tool to design reports
that are not available in
QuickBooks
Forgotten password?
The password and permissions for a new employee seems to cause a dilemma for
many employers. QuickBooks makes you choose - should you give your employee full
access to department reports or none?
With this add on software, QODBC, you can reach into the QuickBooks database and
select by field what information you want the employee to see. The software
works with Excel and Word. $99.00. Be sure to watch the demo's on the developer
website for a great presentation of what can be done for an additional $100, you can
also create transactions and import them into QuickBooks. Finally, restrict employee
access to some of the data and still give them the information needed to perform
his/her job. A real plus is a users group moderated on the developer's website. Get
help from those who have become proficient in the software. It will surely help get
over the learning curve hump. For those knowledgeable in Crystal report writing, the
developer sells a viewer product for $99.00. Restrict use to the crystal report on a
computer by computer basis. Provides an answer to increasing internal controls of the
business. For those companies who do not have the expertise in excel or crystal, the
developer also provides a report writing service.
There are several companies that proclaim to remove the password. Intuit seems to be
the company of choice if you can wait 1 week for $65 or get faster service for about
double. Or do it yourself now with Elcom ($30 home use or $60 commercial) or Lost
password.com. Make sure that your version of QuickBooks is supported.
Time Tracking
Flexible billing rates
BillQuick offers a dramatically streamlined method for invoicing, tracking time and
expenses, project phasing, billing against retainers, and meeting the requirements from
one-person offices to larger, network-based organizations. Assign a rate based on a
customer, employee, task or any combination of the these three. In addition each job
can have a different fee schedule assigned to it A QuickBooks Add On priced at $395
Copyright 2005, AdvisorCPE – www.QuickBooksAdvisor.info
197
QuickBooks Premier Version 2004 added the capability of assigning a different price
per service item per customer. Upgrade for as low as $279.95.
Timesheets on the Web 2
Webtimer uses a web interface to provide time recording from anywhere in the world.
Provides the capability to edit time entries and to select whether to export these
changes or not. Interface is written ASP for use with Microsoft's IIS internet server. A
QuickBooks Add On priced at $199.95 buys unlimited employee use.
Service call management
Service Repair Operations
Reclaim control over the operations of your business. Integrate the functions of your
service business. Manage routing, scheduling and dispatching of service, repair and
collection personnel. Control revenue (specializes in point of sale service calls),
control inventory, controls costs.
Copyright 2005, AdvisorCPE – www.QuickBooksAdvisor.info
198
INSTRUCTOR’S
BIOGRAPHY &
CONTACT
INFORMATION
CHAPTER 24
Copyright 2005, AdvisorCPE – www.QuickBooksAdvisor.info
199
J. CARLTON COLLINS, CPA
SHORT BIOGRAPHY
J. Carlton Collins is an accounting software analyst and the editor of the
Accounting Software Advisor web site. Since 1984, Carlton has worked in
the accounting software industry installing systems, consulting with end
users, lecturing to more than one hundred thousands businesses, consulting
to accounting software companies, publishing books, articles and web sites.
Carlton is experienced with many of the top accounting software packages
such as MAS 500, BusinessWorks, Microsoft Dynamics & eEnterprise, Navision Attain,
Microsoft Axapta, ACCPAC Advantage Series, Platinum for Windows, E by Epicor, Open
Systems Traverse, MAS 90, MAS 200, Exact's Macola ES, Peachtree Complete Accounting,
Solomon IV, SAP R/3, QuickBooks Pro, BusinessVision 32, and more.
SELECTED POSITIONS, AWARDS & ACCOMPLISHMENTS:
Has published extensive articles on accounting software in the Journal of Accountancy .
Has delivered over 1,500 technology lectures as far away as Australia & New Zealand.
Past Chairperson of the AICPA Technology Conference.
Past two-term Chairperson of the Georgia Society of CPAs PC Advisory Committee.
Past five-term President of the PC Consultant’s Group of Atlanta -- an which he founded.
Has published articles in LAN Magazine, Accounting Today, and other magazines.
Recipient of the Outstanding Discussion Leader Award from the Georgia Society of CPAs.
Recipient of the AICPA Lifetime Technical Contribution to the CPA Profession Award.
Named “Top Ten CPA Technologists” by Accounting Technologies Magazine.
Lead author for PPC’s Guide to Installing Microcomputer Accounting Systems.
Has lectured in more than 40 States and five countries.
Has delivered keynote lectures at more than a dozen accounting software conferences.
Created the GSCPA National Microcomputer Consulting Certificate program.
Has provided consulting services to many computer companies (including Compaq, IBM, Microsoft,
Apple, Novell, Peachtree, Epicor, Best, Softline, Exact, ACCPAC, Intuit, Peachtree, Great Plains
Software, and others).
Carlton’s diverse background is an asset in providing his specialized consulting skills. He has
six years of accounting, auditing and tax experience in the areas of health care, construction,
distribution, automobile dealerships, insurance, manufacturing, and general business. His tax
experience includes corporate, individual, partnership, fiduciary, and estate tax planning work.
Carlton also has been heavily involved in the other areas of financial forecasts, bond issues,
Medicare and Medicaid reimbursement, conventional financing, pension and profit sharing
plans, and business planning.
Copyright 2005, AdvisorCPE – www.QuickBooksAdvisor.info
200
QuickBooks for CPAs
QuickBooks for CPAs
J. Carlton Collins, CPA
J. Carlton Collins, CPA
Copyright 2005, AdvisorCPE – www.QuickBooksAdvisor.info
201