1
Symantec™ Web Security
Implementation Guide
Symantec™ Web Security Implementation Guide
The software described in this book is furnished under a license agreement and may be
used only in accordance with the terms of the agreement.
Documentation version 3.0
PN: 10053969
Copyright Notice
Copyright 1996–2003 Symantec Corporation. All Rights Reserved.
Any technical documentation that is made available by Symantec Corporation is the
copyrighted work of Symantec Corporation and is owned by Symantec Corporation.
NO WARRANTY. The technical documentation is being delivered to you AS-IS, and
Symantec Corporation makes no warranty as to its accuracy or use. Any use of the
technical documentation or the information contained therein is at the risk of the user.
Documentation may include technical or other inaccuracies or typographical errors.
Symantec reserves the right to make changes without prior notice.
No part of this publication may be copied without the express written permission of
Symantec Corporation, 20330 Stevens Creek Blvd., Cupertino, CA 95014.
Trademarks
Symantec and the Symantec logo are registered trademarks of Symantec Corporation and
its subsidiaries. Symantec Web Security, AutoLock, AutoAlert, Dynamic Document
Review, and Bloodhound are trademarks of Symantec Corporation and its subsidiaries.
Sun, Sun Microsystems, the Sun logo, Solaris, Java, Netra, Sun ONE and all Sun ONEbased trademarks and logos are trademarks or registered trademarks of Sun Microsystems,
Inc., in the United States and other countries. SPARC is a registered trademark of SPARC
International, Inc. Products bearing SPARC trademarks are based on an architecture
developed by Sun Microsystems, Inc. Apple and Macintosh are trademarks of Apple
Computer, Inc., registered in the United States and other countries. Microsoft, Windows,
Windows NT, Active Directory, and the Windows logo are registered trademarks or
trademarks of Microsoft Corporation in the United States and other countries. IBM and
SecureWay are registered trademarks of IBM in the United States. Netscape Navigator is a
registered trademark of Netscape Communications Corporation in the United States and
other countries. Red Hat is a registered trademark of Red Hat Software, Inc., in the United
States and other countries. Linux is a registered trademark of Linus Torvalds. Intel and
Pentium are registered trademarks of Intel Corporation. Adobe, Acrobat, and Acrobat
Reader are trademarks of Adobe Systems Incorporated.
THIS PRODUCT IS NOT ENDORSED OR SPONSORED BY ADOBE SYSTEMS
INCORPORATED, PUBLISHERS OF ADOBE ACROBAT.
Other brands and product names mentioned in this manual may be trademarks or
registered trademarks of their respective companies and are hereby acknowledged.
Printed in the United States of America.
10 9 8 7 6 5 4 3 2 1
SYMANTEC LICENSE AND WARRANTY
SYMANTEC CORPORATION AND/OR ITS SUBSIDIARIES
("SYMANTEC") IS WILLING TO LICENSE THIS SOFTWARE (THE
"SOFTWARE") AND DOCUMENTATION (THE
"DOCUMENTATION") TO YOU AS AN INDIVIDUAL, THE
COMPANY, OR THE LEGAL ENTITY THAT WILL BE UTILIZING
THE SOFTWARE (REFERENCED BELOW AS "YOU OR YOUR")
ONLY ON THE CONDITION THAT YOU ACCEPT ALL OF THE
TERMS OF THIS LICENSE AGREEMENT. READ THE TERMS AND
CONDITIONS OF THIS LICENSE AGREEMENT CAREFULLY
BEFORE USING THE SOFTWARE. THIS IS A LEGAL AND
ENFORCEABLE CONTRACT BETWEEN YOU AND SYMANTEC.
BY OPENING THIS PACKAGE, BREAKING THE SEAL, CLICKING
ON THE "AGREE" OR "YES" BUTTON OR OTHERWISE
INDICATING ASSENT ELECTRONICALLY, OR LOADING THE
SOFTWARE, YOU AGREE TO THE TERMS AND CONDITIONS OF
THIS AGREEMENT. IF YOU DO NOT AGREE TO THESE TERMS
AND CONDITIONS, CLICK ON THE "I DO NOT AGREE", "NO"
BUTTON, OR OTHERWISE INDICATE REFUSAL AND DO NOT
USE THE SOFTWARE.
The enclosed Software and Documentation are licensed, not sold, to
you by Symantec. You shall inform all users of the Software of the
terms and conditions of this Software License Agreement.
1. GRANT OF LICENS; USE RESTRICTIONS. The Software is the
property of Symantec or its licensors and is protected by copyright law.
Symantec grants you a personal, nontransferable, and nonexclusive
right to install the Software on servers for your own internal use.
While Symantec continues to own the Software, you will have certain
rights to use the Software after your acceptance of this license. This
license governs any releases, revisions, or enhancements to the
Software that Symantec may furnish to you. Except as may be
modified by a Symantec license certificate, license coupon, or license
key (each a "License Module") which accompanies, precedes, or
follows this license, your rights and obligations with respect to the use
of this Software are as follows:
(A) You may use the Software on a network to scan the Internet traffic
and email messages for that number of your employees equal to the
number of pre-paid licenses granted under this license. Alternatively,
you may use the Software on the entire network, provided that you
have a pre-paid licensed copy of the Software covering each computer
that can access the Software over that network.
(B) You shall not permit any other party to use the Software or process
or permit to be processed the data of any other party; provided,
however, that if you are an "Internet Service Provider," as hereinafter
defined, you may install the Software on a single server to provide "ISP
Services," as hereinafter defined. If you are an Internet Service
Provider as defined below, you are allowed to use the Software to scan
the Internet traffic and email messages for that number of your
subscribers equal to the number of pre-paid licenses granted under this
license. You are an "Internet Service Provider" or "ISP" if you are a
firm, company, or organization that provides (if they are offering it for
free it just means their business model is not based on a per node basis
but they are surely charging some entity for the access) Internet access
or services to your subscribers, none of whom are under your
immediate employ or the employ of any parent, subsidiary, or affiliate
firm, company, or organization. "ISP Services" means contentmanaged Internet access service or electronic mail service provided by
you as an Internet Service Provider to your subscribers using the
Software.
(C) You agree that you shall not disassemble, reverse compile, reverse
engineer, decrypt, reproduce, adapt, modify, translate, distribute,
duplicate, copy, transfer possession of, loan, rent, lease, sublicense,
resell for profit, create derivative works based upon, or make any
attempt to discover the source code of the Software or any portion
thereof. The Documentation may be used for your internal use only.
(D) You may not duplicate, copy, or otherwise reproduce the
Documentation nor may you distribute the Documentation to any
third party. Prior to disposing of any media or apparatus containing
the Software or Documentation, you will ensure that any Software or
Documentation contained on such media or stored in such apparatus
has been completely erased or otherwise destroyed.
2. OWNERSHIP. Symantec is the owner or licensee of all intellectual
property in the Software and Documentation. You agree that no title
to the Software or the Documentation, or to the intellectual property in
any of the Software or Documentation or in any copy of the Software
or Documentation, is transferred to you, and that all rights not
expressly granted to you hereunder are reserved by Symantec.
3. CONTENT UPDATES. Certain Symantec software products utilize
content that is updated from time to time (antivirus products utilize
updated virus definitions; content filtering products utilize updated
URL lists; firewall products utilize updated firewall rules; vulnerability
assessment products utilize updated vulnerability data, etc.;
collectively, these are referred to as "Content Updates"). You may
obtain Content Updates for any period for which you have purchased a
subscription for Content Updates for the Software (including any
subscription included with your original purchase of the Software),
purchased upgrade insurance for the Software, entered into a
maintenance agreement that includes Content Updates, or otherwise
separately acquired the right to obtain Content Updates. This license
does not otherwise permit you to obtain and use Content Updates.
4. LIMITED WARRANTY. Symantec warrants that the media on
which the Software is distributed will be free from defects for a period
of sixty (60) days from the date of delivery of the Software to you. Your
sole remedy in the event of a breach of this warranty will be that
Symantec will replace any defective media returned to Symantec within
the warranty period. This Limited Warranty is void if failure of the
Software media has resulted from accident, abuse, or misuse of the
media. Symantec does not warrant that the Software will meet your
requirements or that operation of the Software will be uninterrupted or
that the Software will be error-free.
5. DISCLAIMER OF WARRANTIES. THE ABOVE WARRANTY IS
EXCLUSIVE AND IN LIEU OF ALL OTHER WARRANTIES,
WHETHER EXPRESS OR IMPLIED, INCLUDING THE IMPLIED
WARRANTIES OF MERCHANTABILITY, FITNESS FOR A
PARTICULAR PURPOSE AND NONINFRINGEMENT. THIS
WARRANTY GIVES YOU SPECIFIC LEGAL RIGHTS. YOU MAY
HAVE OTHER RIGHTS, WHICH VARY FROM STATE TO STATE.
6. LIMITATION OF LIABILITY. IN NO EVENT SHALL SYMANTEC
BE LIABLE TO YOU FOR ANY DAMAGES WHATSOEVER,
INCLUDING WITHOUT LIMITATION LOSS OF DATA, USE,
PROFITS, OR GOODWILL, OR INDIRECT, SPECIAL,
INCIDENTAL, EXEMPLARY, PUNITIVE OR CONSEQUENTIAL
DAMAGES, ARISING FROM ANY CAUSE AND ON ANY THEORY
OF LIABILITY INCLUDING WITHOUT LIMITATION
CONTRACT, WARRANTY, STRICT LIABILITY, NEGLIGENCE OR
OTHER TORT, BREACH OF ANY STATUTORY DUTY,
PRINCIPLES OF INDEMNITY, THE FAILURE OF ANY LIMITED
REMEDY TO ACHIEVE ITS ESSENTIAL PURPOSE, OR
OTHERWISE, EVEN IF SYMANTEC HAS BEEN NOTIFIED OF THE
POSSIBILITY OF SUCH DAMAGES. THESE LIMITATIONS SHALL
APPLY NOTWITHSTANDING THE FAILURE OF THE ESSENTIAL
PURPOSE OF ANY LIMITED REMEDY, AND REGARDLESS OF
WHETHER YOU ACCEPT THE SOFTWARE.
Symantec for any reason, please write: Symantec Customer Service, 555
International Way, Springfield, OR 97477.
7. EXPORT RESTRICTIONS. You agree that you shall not directly or
indirectly export the Software.
I-Gear is Copyright © 1996-2003 Symantec Corporation. All rights
reserved.
8. TERMINATION. This license terminates automatically if you fail to
perform or observe any covenant, condition, or term to be performed
or observed under this Agreement. Symantec, at its sole option, may
provide written notification of the termination of the License for any
reason, and in addition to any other rights or remedies available to
Symantec, you shall promptly return to Symantec or destroy the
original and all copies of the Software and Documentation in your
possession, in whole or in part, in any form, including partial copies or
modifications, and within two (2) weeks after any such termination
you shall certify in writing to Symantec that you have done so. In
addition, Symantec reserves the right to disable the Software remotely
without any prior notification if you fail to perform or observe any
covenant, condition, or term to be performed or observed under this
Agreement, or in the event of non-payment of the license fee for the
Software.
Mail-Gear is Copyright © 1998-2003 Symantec Corporation. All rights
reserved.
9. U.S. GOVERNMENT RESTRICTED RIGHTS: RESTRICTED
RIGHTS LEGEND. Use, duplication or disclosure by the Government
is subject to restrictions as set forth in the Commercial Computer
Software-Restricted Rights clause at FAR 52.227-19(c)(1) and (2) or
subparagraph (c)(1) of the Rights in Technical Data and Computer
Software clause at DFARS 252.227-7013 or in similar or successor
clauses in the FAR, or the DOD or NASA FAR Supplement, as
applicable. Unpublished rights reserved under the Copyright Laws of
the United States. Contractor/manufacturer is Symantec, 20300
Stevens Creek Boulevard, Cupertino, California 95014, United States of
America.
10. LAWS GOVERNING WARRANTIES AND LIABILITY. Some U.S.
states do not allow the limitation or exclusion of liability for incidental
or consequential damages, or allow the exclusion of implied
warranties, so the above limitation and exclusion above may not apply
to you, and you may have other rights which vary from state to state.
In any event, Symantec's liability shall not exceed the purchase price
actually paid for the Software.
11. GENERAL. This Agreement shall be governed by and interpreted in
accordance with the laws of California. You hereby submit to the
jurisdiction of the courts of Santa Clara County, California, United
States of America, and the District and Circuit Courts for the Northern
District of California, and agree that these shall be the sole fora to
resolve all disputes arising under this Agreement or connected in any
way with the Software. You agree to pay all costs associated with any
such action or suit, including Symantec's costs and attorney's fees.
This Agreement may only be modified by a written document which
has been signed by both you and Symantec. You may not assign this
Agreement or transfer the Software without Symantec's consent. The
headings of the Sections of this Agreement are for convenience only
and will not be of any effect in construing the meanings of the Sections.
The right to require performance of any duty hereunder is not barred
by any prior waiver, forbearance or dealing. If any provision of this
Agreement is deemed invalid by a court of competent jurisdiction, it is
to that extent to be deemed omitted, unless the court can modify said
provision to make it valid and enforceable, in which case the provision
shall be so modified. The remainder of the Agreement shall be valid
and enforceable to the maximum extent possible. Should you have any
questions concerning this Agreement, or if you desire to contact
PowerAdmin is Copyright © 1996-2003 Symantec Corporation. All
rights reserved.
Symantec, the Symantec logo, Unified Research Laboratories, URLabs,
I-Gear, and Mail-Gear are U.S. registered trademarks of Symantec
Corporation and its subsidiaries. Mail-Gear Web Client, PowerAdmin,
Dynamic Document Review, AutoLock, AutoAlert, Audit Mode,
"Defining the Role of Content Management," the URLabs logo, the IGear logo, and the Mail-Gear logo are trademarks of Symantec
Corporation and its subsidiaries. Sun, Sun Microsystems, the Sun logo,
Solaris, Java, Netra, Sun ONE and all Sun ONE-based trademarks and
logos are trademarks or registered trademarks of Sun Microsystems,
Inc., in the United States and other countries. SPARC is a registered
trademark of SPARC International, Inc. Products bearing SPARC
trademarks are based on an architecture developed by Sun
Microsystems, Inc. Apple and Macintosh are trademarks of Apple
Computer, Inc., registered in the United States and other countries.
Microsoft, Windows, Windows NT, Active Directory, and the
Windows logo are registered trademarks or trademarks of Microsoft
Corporation in the United States and other countries. Netscape
Navigator is a registered trademark of Netscape Communications
Corporation in the United States and other countries. IBM and
SecureWay are registered trademarks of IBM in the United States. Red
Hat is a registered trademark of Red Hat Software, Inc., in the United
States and other countries. Linux is a registered trademark of Linus
Torvalds. Intel and Pentium are registered trademarks of Intel
Corporation. Lotus and Lotus Notes are registered trademarks of Lotus
Development Corporation. Eudora is a registered trademark of
QUALCOMM, Inc. Acrobat Reader is a trademark of Adobe Systems
Incorporated. THIS PRODUCT IS NOT ENDORSED OR
SPONSORED BY ADOBE SYSTEMS INCORPORATED,
PUBLISHERS OF ADOBE ACROBAT. All other trademarks are the
sole property of their respective owners.
Support
Service and support
solutions
Service and support information is available from the Help system of your
Symantec product (if Help is available). Click the Service and Support topic in
the Help index.
Technical support
As part of Symantec Security Response, our global technical support group
maintains support centers throughout the world. Our primary role is to respond
to specific questions on product feature/function, installation, and configuration,
as well as to author content for our Web-accessible Knowledge Base. We work
collaboratively with the other functional areas within Symantec, such as Product
Engineering and our Security Research Centers, to provide alerting services and
virus definition updates for virus outbreaks and security alerts.
Highlights of our offerings include:
■
A range of support options that give you the flexibility to select the right
amount of service for any size organization.
■
Telephone and Web support components that provide rapid response and
up-to-the-minute information.
■
Upgrade assurance that delivers automatic software upgrade protection.
■
Content updates for virus definitions and security signatures that ensure the
highest level of protection.
6 Service and support solutions
Registration and Licensing
■
Global support from Symantec Security Response experts that is available
24x7 worldwide in a variety of languages.
■
Benefits such as the Symantec Alerting Service and Technical Account
Manager role that offer enhanced response and proactive security support.
Please reference our Web site for current information on Support Programs.
Registration and Licensing
If the product you are implementing requires registration and/or a license key,
the fastest and easiest way to register your service is to access our licensing and
registration site at www.symantec.com/certificate. Alternatively, you may go to
www.symantec.com/techsupp/ent/enterprise.html, select the product you wish to
register, and from the Product Home Page, select the Licensing and Registration
link.
Contacting Support
Customers with a current support agreement may contact the Technical Support
team via phone or Web at www.symantec.com/techsupp.
When contacting Support, please be sure to have the following information
available:
■
Product release level
■
Hardware information
■
Available memory, disk space, NIC information
■
Operating system
■
Version and patch level
■
Network topology
■
Router, gateway, and IP address information
■
Description of problem
■
Error messages/log files
■
Troubleshooting performed prior to contacting Symantec
■
Recent software configuration changes and/or network changes
Service and support solutions
Customer Service
Customer Service
Contact Enterprise Customer Service online at www.symantec.com, select the
appropriate global site for your country, then choose Service and Support.
Customer Service is available to assist with the following types of issues:
■
Questions regarding product licensing and serialization.
■
Updates to product registration such as address and name changes.
■
General product information (for example, features, language availability,
dealers in your area).
■
Latest information on product updates and upgrades.
■
Information on upgrade insurance and maintenance contracts.
■
Information on Symantec Value License Program.
■
Advice on Symantec’s technical support options.
■
Nontechnical presales questions.
■
Missing and defective CD-ROMs and manuals.
Worldwide service and support
Technical support and customer service solutions vary by country. For
information on Symantec and International Partner locations outside of the
United States, please contact one of the service and support offices listed below,
or connect to http://service.symantec.com, and select your region under Global
Service and Support.
7
8 Service and support solutions
Worldwide service and support
Service and support offices
North America
Symantec Corporation
555 International Way
Springfield, OR 97477
U.S.A.
http://www.symantec.com/
Argentina and Uruguay
Symantec Region Sur
Cerrito 1054 - Piso 9
1010 Buenos Aires
Argentina
http://www.service.symantec.com/mx
+54 (11) 5382-3802
Asia/Pacific Ring
Symantec Australia
Level 2, 1 Julius Avenue
North Ryde, NSW 2113
Sydney
Australia
http://www.symantec.com/region/reg_ap/
+61 (2) 8879-1000
Fax: +61 (2) 8879-1001
Brazil
Symantec Brasil
Market Place Tower
Av. Dr. Chucri Zaidan, 920
12° andar
São Paulo - SP
CEP: 04583-904
Brasil, SA
http://www.service.symantec.com/br
+55 (11) 5189-6300
Fax: +55 (11) 5189-6210
Europe, Middle East, and Africa
Symantec Customer Service Center
P.O. Box 5689
Dublin 15
Ireland
http://www.symantec.com/region/reg_eu/
+353 (1) 811 8032
Service and support solutions
Subscription policy
Mexico
Symantec Mexico
Blvd Adolfo Ruiz Cortines,
No. 3642 Piso 14
Col. Jardines del Pedregal
Ciudad de México, D.F.
C.P. 01900
México
http://www.service.symantec.com/mx
+52 (5) 661-6120
Other Latin America
Symantec Corporation
9100 South Dadeland Blvd.
Suite 1810
Miami, FL 33156
U.S.A.
http://www.service.symantec.com/mx
Subscription policy
If your Symantec product includes virus, firewall, or Web content protection, you
might be entitled to receive protection updates via LiveUpdate. The length of the
subscription could vary by Symantec product.
Every effort has been made to ensure the accuracy of this information. However,
the information contained herein is subject to change without notice. Symantec
Corporation reserves the right for such change without prior notice.
March 1, 2003
9
10 Service and support solutions
Subscription policy
Read this first
Symantec Web Security offers antivirus protection and content filtering for a
comprehensive solution for protecting Web traffic on your network.
■
Antivirus protection: Industry-leading antivirus technology, featuring
Symantec’s patented Bloodhound™ technology, which heuristically detects
new and unknown viruses
■
Content filtering: Award-winning content filtering and Web access control
software, with patented Dynamic Document Review™ (DDR) scanning
technology
You activate comprehensive antivirus protection and content filtering by license.
To activate a license, you must have the serial number required for activation.
The serial number is printed on the Symantec Serial Number Certificate for the
product.
Note: The Symantec Serial Number Certificate is not part of the Symantec Web
Security software distribution package. The Symantec Serial Number Certificate
is mailed separately and should arrive in the same time frame as your software.
12 Read this first
Where to start
Where to start
This guide contains all of the instructions necessary to install and manage the
antivirus protection and content filtering.
■
Section 1: About Symantec Web Security
For both antivirus protection and content filtering, review Section 1 of this
guide to become familiar with the design and organization of the software.
Read Chapter 1, “How Symantec Web Security works” on page 25, as well as
Chapter 2, “Understanding Symantec Web Security” on page 35. Several
concepts must be thoroughly understood in order to maximize the
software’s effectiveness. Careful and thoughtful planning gives you the
control you want and eliminates end-user confusion.
■
Section 2: Installing and licensing
For licensing, follow the instructions in Section 2. The license automatically
activates both antivirus protection and content filtering. This section also
covers how to integrate Symantec Web Security with SESA.
Verify that your system meets the minimum requirements before installing.
■
Section 3: Getting started
For both the antivirus protection and content filtering, Section 3 explains
how to access the software, set administrative options, and configure your
network for proper operation.
■
Section 4: Content filtering
Section 4 explains how to establish and manage content filtering and access
control features.
Read this first
Where to start
■
Section 5: Antivirus protection
Section 5 explains how to configure antivirus protection.
After installation, you must make sure that you always have the necessary
information to detect and remove newly discovered viruses.
See “Keeping protection current through LiveUpdate” on page 284.
Symantec Web Security is a powerful, flexible software solution to protect and
manage Web traffic. It includes both network-wide coverage that applies to all
users and policy-based coverage that applies to specified users, computers, or
groups. Although it may seem a daunting task to understand and configure a fully
customized installation, it is a relatively simple task to establish blanket coverage
for your network.
For more information on establishing a protection policy for your network, or on
Web security concepts, see Chapter 5, “Activating and configuring Symantec
Web Security” on page 85 for the steps required to establish and enable networkwide protection. After you complete these procedures, your network is protected.
In many cases, this is sufficient. For others, it is a starting point from which you
can adapt to your particular network requirements.
13
14 Read this first
Where to start
Contents
Service and support solutions
Read this first
Where to start .................................................................................................. 12
Section 1
About Symantec Web Security
Chapter 1
How Symantec Web Security works
What is Symantec Web Security? ................................................................... 26
Directory service support in Web Security 3.0 .............................................. 26
Policy-based versus system-wide settings ...................................................... 27
About policy-based settings .................................................................... 27
About system-wide settings .................................................................... 27
Symantec Web Security objects ...................................................................... 28
Symantec Web Security methods ................................................................... 30
Hierarchy of access permissions ..................................................................... 31
Hierarchy of events ......................................................................................... 33
Ranking of groups ........................................................................................... 34
Chapter 2
Understanding Symantec Web Security
Overview .......................................................................................................... 36
Virus protection .............................................................................................. 36
Virus detection methods ......................................................................... 36
Content filtering .............................................................................................. 37
Filtering lists ............................................................................................ 37
List access states ....................................................................................... 43
Adding URLs to lists ................................................................................ 45
Dynamic Document Review (DDR) ...................................................... 46
How filter lists and DDR work together ................................................ 49
16 Contents
Section 2
Installing and Licensing
Chapter 3
Preparing for installation
Minimum system requirements .....................................................................58
Upgrading from earlier versions .....................................................................59
Installing and running setpass .................................................................59
Upgrading from Symantec I-Gear 3.5.14 (when 3.5.14 was initial
install) ...............................................................................................61
Windows upgrade from Symantec I-Gear 3.5.14 to Symantec Web
Security 3.0 ........................................................................................62
Windows upgrade from Symantec Web Security 2.0 or Symantec Web
Security 2.5 that has been installed on top of I-Gear 3.5.14 ..........63
Solaris upgrade from I-Gear 3.5.14 to Symantec Web Security 3.0 ......64
Solaris upgrade from Symantec Web Security 2.0 or Symantec Web
Security 2.5 that has been installed on top of I-Gear 3.5.14 ..........65
Upgrading from Symantec Web Security 2.0 .........................................65
Windows Upgrade from Symantec Web Security 2.0 to Symantec
Web Security 3.0 ...............................................................................66
Solaris upgrade from Symantec Web Security 2.0 .................................67
Upgrading from Symantec Web Security 2.5 .........................................67
How upgrading affects user and group disposition ...............................68
Installing and configuring the operating system ...........................................68
Installing and configuring TCP/IP .................................................................68
Verifying DNS settings ....................................................................................68
Windows NT ............................................................................................68
Windows 2000 ..........................................................................................69
Solaris .......................................................................................................70
Configuring the DNS server ...........................................................................71
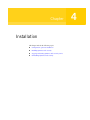
Chapter 4
Installation
Configuration options at installation .............................................................74
Installation directories .............................................................................74
Built-in HTTP server port .......................................................................77
Virtual administrator account password ................................................77
Using Symantec Web Security with an LDAP directory service ...........78
Installing Symantec Web Security ..................................................................78
Solaris .......................................................................................................79
Windows NT and Windows 2000 ...........................................................79
Stopping and starting Symantec Web Security service .................................80
Stopping service .......................................................................................80
Starting service .........................................................................................81
Contents
Uninstalling Symantec Web Security ............................................................ 82
Manually deleting configuration files ..................................................... 82
Retaining shared configuration files ....................................................... 82
Reenabling conflicting services ............................................................... 82
Uninstalling the software ........................................................................ 83
Chapter 5
Activating and configuring Symantec Web Security
Activating Symantec Web Security ................................................................ 86
Activating a license .......................................................................................... 86
License warning and grace periods ......................................................... 86
Removing license files ............................................................................. 87
Activating a license .................................................................................. 87
Configuring your network to work with Symantec Web Security ............... 89
Configuring client settings ...................................................................... 90
Configuring Symantec Web Security ............................................................. 94
Additional configuration procedures for the antivirus
configuration .................................................................................... 95
Additional configuration procedures for content filtering ................... 96
Chapter 6
Integrating Symantec Web Security with SESA
About SESA ................................................................................................... 104
Configuring logging to SESA ....................................................................... 105
Configuring SESA to recognize Symantec Web Security .................... 105
Installing the local SESA Agent ............................................................. 107
Installing the SESA Agent manually by command line ....................... 111
Configuring Symantec Web Security to log events to SESA ............... 112
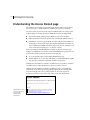
Interpreting Symantec Web Security events in SESA ................................. 113
Uninstalling the SESA integration components .......................................... 114
Uninstalling the local SESA Agent ............................................................... 114
Section 3
Getting started
Chapter 7
Understanding the user interface
Overview ........................................................................................................ 118
The toolbar .................................................................................................... 118
Accessing administrative functions ...................................................... 119
Accessing online manuals ..................................................................... 120
Logging on ............................................................................................. 120
Logging off ............................................................................................. 121
Changing a password ............................................................................ 121
Viewing settings ..................................................................................... 122
17
18 Contents
Viewing filter settings for other users ...........................................................122
Sorting feature for FTP .................................................................................123
Chapter 8
Administering Symantec Web Security
Accessing the administrative functions ........................................................126
The main administration page .....................................................................126
About administrative permissions ...............................................................128
Assigning administrative permissions ..................................................128
Search capability for object lists ....................................................................128
Understanding the Access Denied page .......................................................132
Editing the Access Denied page .............................................................133
Chapter 9
Working with the System object
Modifying the System object ........................................................................136
Modifying the proxy configuration ......................................................136
Modifying the built-in HTTP server options .......................................138
Defining an HTTPS server connection .................................................139
Licensing Symantec Web Security ........................................................142
Initiating list/dictionary download .......................................................142
Modifying object box controls ..............................................................143
Modifying other system attributes ........................................................145
Modifying regional settings ...................................................................150
Backing up the Symantec Web Security configuration .......................151
Restoring a backed-up configuration ...................................................152
Modifying directory services .................................................................153
Modifying policy management .............................................................153
Configuring Centralized Policy Management ......................................157
Modifying logging configuration ..........................................................165
Scheduling the System object .......................................................................165
Generating system-level reports ...................................................................166
Access reports .........................................................................................166
Access Summary reports .......................................................................169
Defining a directory service connection .......................................................170
Configuring for virtual user and group support ..................................171
Configuring for system user and group support ..................................171
Configuring for RADIUS user support ................................................171
Configuring for LDAP user and group support ...................................172
Contents
Section 4
Content filtering
Chapter 10
Establishing system-level filtering settings
About system-level filtering .......................................................................... 180
Scheduling the system defaults for filtering ................................................ 181
Setting the default logon mode and the filtering mode ....................... 181
Assigning access states for filter lists ..................................................... 183
Setting additional filtering options ....................................................... 186
Activating AutoLock ............................................................................. 188
Activating AutoAlert ............................................................................. 190
Chapter 11
Understanding hierarchical administration
Why hierarchical administration? ................................................................ 194
About Access Control permissions .............................................................. 194
Access Control Lists .............................................................................. 194
Setting quotas for object creation/modification ......................................... 197
Preventing filtering overrides ....................................................................... 198
Chapter 12
Working with the Client object
About clients ................................................................................................. 202
Adding a client .............................................................................................. 202
Deleting a client ............................................................................................ 203
Modifying a client ......................................................................................... 204
Modifying attributes .............................................................................. 204
Adding and deleting objects on Access Control Lists .......................... 205
Modifying permissions on Access Control Lists .................................. 208
Scheduling an event for a client ................................................................... 209
Setting defaults for a client .................................................................... 209
Scheduling a daily event ........................................................................ 219
Scheduling an event for a specific date ................................................. 220
Editing an existing event ....................................................................... 221
Deleting an existing event ..................................................................... 221
Generating a report for a client .................................................................... 222
Chapter 13
Working with the User object
Adding a user ................................................................................................ 226
Understanding user disposition changes due to upgrading ................ 226
Understanding user disposition changes due to change in LDAP
platform selection .......................................................................... 227
Adding virtual users .............................................................................. 228
Adding NT or Solaris system users ....................................................... 231
19
20 Contents
Adding RADIUS users ...........................................................................233
Adding LDAP users ...............................................................................233
Adding one user at a time (advanced) ..................................................234
Deleting a user ...............................................................................................238
Modifying a user ............................................................................................239
Modifying attributes ..............................................................................239
Modifying object creation/modification attributes .............................242
Adding and deleting objects on Access Control Lists ..........................244
Modifying permissions on Access Control Lists ..................................244
Disabling existing users .........................................................................244
Reenabling existing users .......................................................................245
Scheduling an event for a user ......................................................................246
Generating a report for a user .......................................................................246
User Summary reports ...........................................................................247
Chapter 14
Working with the Group object
About groups .................................................................................................250
Adding a group ..............................................................................................250
Deleting a group ............................................................................................252
Modifying a group .........................................................................................253
Modifying group membership ..............................................................253
Modifying attributes for a group ..........................................................255
Modifying group ranking ......................................................................257
Adding/deleting objects to/from Access Control Lists ........................258
Modifying permissions on Access Control Lists ..................................258
Scheduling an event for a group ...................................................................258
Generating a report for a group ....................................................................258
Chapter 15
Customizing lists
About lists ......................................................................................................260
Adding a list ...................................................................................................260
Creating a new list ..................................................................................260
Adding URLs to the new list ..................................................................261
Deleting a list .................................................................................................261
Modifying a list ..............................................................................................262
Adding URLs to local lists .....................................................................262
Removing URLs from lists ....................................................................263
Changing the public/private status for a list .........................................264
Adding/deleting objects to/from Access Control Lists ........................265
Modifying permissions on Access Control Lists ..................................266
Changing the filtering override setting for a list ..................................266
Generating a report for a list .........................................................................267
Contents
Chapter 16
Customizing dictionaries
About dictionaries ........................................................................................ 270
Modifying a dictionary ................................................................................. 270
Adding words to dictionaries ................................................................ 270
Deleting words from dictionaries ......................................................... 271
Generating a report for a dictionary ............................................................ 272
Section 5
Antivirus protection
Chapter 17
Antivirus protection
Configuring antivirus protection ................................................................. 278
Setting scan policy ......................................................................................... 278
Specifying what to scan ................................................................................. 281
Configuring container file limits .................................................................. 283
Generating reports ........................................................................................ 284
Keeping protection current through LiveUpdate ....................................... 284
Setting up your own LiveUpdate server ............................................... 287
Appendix A
Using the content filtering component: examples
Initial setup (configuring the content filtering component) ...................... 289
Automated policy enforcement (using AutoLock) ..................................... 296
Monitoring Internet access (using Audit Mode and AutoAlert) ............... 298
Controlling access (scheduling daily events) ............................................... 302
21
22 Contents
Section
About Symantec Web
Security
■
How Symantec Web Security works
■
Understanding Symantec Web Security
1
24
Chapter
How Symantec Web
Security works
This chapter includes the following topics:
■
What is Symantec Web Security?
■
Directory service support in Web Security 3.0
■
Policy-based versus system-wide settings
■
Symantec Web Security objects
■
Symantec Web Security methods
■
Hierarchy of access permissions
■
Hierarchy of events
■
Ranking of groups
1
26 How Symantec Web Security works
What is Symantec Web Security?
What is Symantec Web Security?
Symantec Web Security is a proxy server that runs on your Internet server. A
proxy server is an application that acts as a gateway between your network and
the Internet. If a client computer requests a document, it asks the proxy server to
retrieve the document instead of retrieving the document directly. Because
Symantec Web Security acts as the proxy between your network and the Internet,
the software provides effective access control and antivirus protection.
The protocols proxied by Symantec Web Security are:
■
Hypertext Transfer Protocol (HTTP)
■
Hypertext Transfer Protocol Secure (HTTPS) (standard port only)
■
File Transfer Protocol (FTP) (browser-based only)
Note: Because nonbrowser FTP clients (either command-line utilities or
graphical utilities such as WS_FTP or CuteFTP) establish FTP sessions directly
with FTP hosts, such FTP traffic is not scanned by Symantec Web Security.
Administrators should block this traffic at the firewall.
Directory service support in Web Security 3.0
Symantec Web Security can be configured to work with a directory service that
resides on your network in order to authenticate its users and groups. With this
feature, a connection between Symantec Web Security and your directory service
enables directory service users and groups to receive content filtering and virus
scanning without having to be added to Symantec Web Security. The software
can be configured to support directory service users and groups in one of two
ways:
■
Authenticate the directory’s users and groups without adding them to
Symantec Web Security’s local database.
In this case, only system-wide settings apply to the directory’s users and
groups.
■
Add the directory’s users and groups to Symantec Web Security.
In this case, individual settings may be established for the users and groups
by a Symantec Web Security administrator. Individual settings take
precedence over system settings.
Symantec Web Security supports the following types of directory services:
■
Microsoft™ NT™ system user
How Symantec Web Security works
Policy-based versus system-wide settings
■
Sun™ Solaris™ system user
■
Remote Authentication Dial In User Service (RADIUS)
You must have the appropriate Symantec Web Security license to receive
RADIUS support.
■
Lightweight Directory Access Protocol (LDAP)
Symantec Web Security works with the following LDAP platforms: Sun
ONE, Microsoft™ Active Directory™, and IBM® SecureWay®.
Only one form of directory service can be supported at any time. The default
directory service is Virtual Users Only, in which case no external directory service
is supported.
You can configure Symantec Web Security to work with a directory service
through the Modify method for the System object.
See “Defining a directory service connection” on page 170.
Upgrading to Symantec Web Security 3.0 may affect the disposition of users and
groups.
See “How upgrading affects user and group disposition” on page 68.
Policy-based versus system-wide settings
The content filtering and virus protection features of Symantec Web Security can
be applied universally across your entire network. Content filtering settings can
be further customized to provide different levels of filtering to individual objects
as necessary.
About policy-based settings
The content filtering features of Symantec Web Security can be established on a
per-user, per-computer, or per-group basis, which provides flexibility in
establishing and enforcing your site’s acceptable-use policies for Web access.
Individual users or groups of users can have different filtering settings. The peruser, per-computer, and per-group controls are available for content filtering and
Internet access control.
About system-wide settings
For virus protection, one level of protection is established for your entire
network. You set your site’s preferences for blanket virus protection across your
network. The per-user, per-computer, and per-group controls are not applicable
for virus protection.
27
28 How Symantec Web Security works
Symantec Web Security objects
You can make content filtering settings system wide by setting only the system
defaults for filtering. These default settings apply to all users, clients, and groups
that have not had individual filtering settings established.
Symantec Web Security objects
Each Symantec Web Security object represents an entity that can be manipulated
to customize the security features of the software. Symantec Web Security uses
intuitive methods for manipulating these objects.
The following objects can be manipulated.
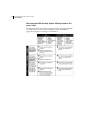
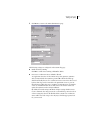
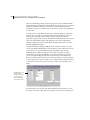
Table 1-1
Object
Symantec Web Security objects
Symbol
Description
Client
A computer connected to the network with a unique IP
address. Clients can be given unique permissions that apply
regardless of which user uses the computer.
User
A person using your network. Users can be given unique
permissions regardless of which computer on the network
they use.
Group
A collection of users or clients that can be designated to
operate in a specific manner. Permissions assigned to a
group apply to all members of the group. User and Client
objects may belong to only one group at a time.
AntiVirus
Manipulating the AntiVirus object lets you establish settings
for controlling how antivirus activity is carried out on your
network, including how traffic is monitored for viruses and
what to do if a virus is found, which files are to be scanned
under what protocols, how to handle container files, and
how virus activity is reported.
List
An object that contains Uniform Resource Locators (URLs)
that control access to certain sites. Lists can be uniquely
applied to Client, User, and Group objects or to the system
defaults to allow or restrict access to the URLs contained in
the list.
How Symantec Web Security works
Symantec Web Security objects
Table 1-1
Object
Symantec Web Security objects
Symbol
Description
Dictionary
The Dynamic Document Review (DDR) dictionaries
contain words and phrases used to dynamically score pages
as the material is downloaded from the Web. Based on the
score, access to Web sites is blocked or allowed. The DDR
rules supplied by Symantec include context-sensitive
information.
System
An object that represents the server running Symantec Web
Security. The default properties for the software are
established using the System object, including configuring
the software based on your particular network setup. System
default settings for filtering are also established using the
System object.
LiveUpdate
Manipulating the LiveUpdate object lets you update virus
definitions and list and dictionary downloads, generate
LiveUpdate reports, and view content license status.
29
30 How Symantec Web Security works
Symantec Web Security methods
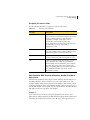
Symantec Web Security methods
The Symantec Web Security objects are manipulated using methods. Use
methods to change the permissions or the functionality for each object. Five basic
methods can be applied to objects to provide the per-client, per-user, and pergroup control for content filtering and access control.
Modify
Delete
Schedule
Add
Report
Client object
Not all methods are available for each object (for example, the System object
cannot be added or deleted), and some objects have more methods than the
standard five. The following table describes the methods available in Symantec
Web Security.
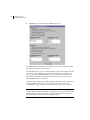
Table 1-2
Symantec Web Security methods
Method
Description
Add
Lets you add objects to Symantec Web Security.
Delete
Lets you remove objects from Symantec Web Security.
Modify
Lets you adjust the settings for defined objects. For example, URLs can be
added to and deleted from lists, and group memberships can be modified
with the Modify method.
Schedule
Lets you define default access permissions, as well as schedule filtering events
that can alter access permissions based on date, time of day, or day of the
week.
Report
Shows the activity for various objects. Reports can include, for example, Web
sites that a Client, User, or Group object has visited on the Internet or URLs
that have been added to a List object.
How Symantec Web Security works
Hierarchy of access permissions
There are additional methods available for the AntiVirus and LiveUpdate objects.
Table 1-3
Additional methods
Method
Description
Policy
Lets you establish settings to control how virus protection is carried out
on your network, including how traffic is monitored for viruses and
what to do if a virus is found.
Configuration
Lets you select which types of files to scan under specific protocols.
Container
Lets you establish settings for handling container files.
Report
Lets you examine virus protection activity on your network.
LiveUpdate
Lets you download new virus definition files and lists and dictionaries,
generate LiveUpdate reports, and view content license status.
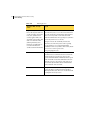
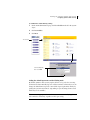
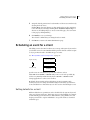
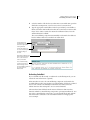
Hierarchy of access permissions
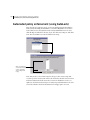
When establishing policy-based filtering and access control, you must
understand the priorities that the software assigns to different access permissions
that are set for Symantec Web Security objects. For example, if a client computer
is locked (no Internet access is allowed from that computer) and a user with
unfiltered and unrestricted access permissions tries to use the computer, which
permission has priority?
The default settings for Symantec Web Security specify that client and client
group permissions take priority over user and user group permissions. You also
can reverse the hierarchy for object access permissions by specifying that user and
user group permissions take precedence over client and client group permissions.
31
32 How Symantec Web Security works
Hierarchy of access permissions
See “Modifying other system attributes” on page 145.
Client has priority
Highest priority
User has priority
Client
permissions
User
permissions
Client’s group
permissions
User’s group
permissions
User
permissions
Client
permissions
User’s group
permissions
Client’s group
permissions
System
permissions
System
permissions
Lowest priority
In the example above, whether or not the user can access the Internet from the
client depends on which object (user or client) permissions have priority. If client
permissions have priority, the user, regardless of the assigned access permissions,
has no Internet access from the locked computer. If user permissions have
priority, any user with access permissions can browse from the client, regardless
of the client settings.
Because you can schedule events for each object, the events for objects with the
highest priority supersede the events and default permissions for the objects
below them. For example, if a user’s permissions are set to Locked (no Internet
access permitted) and a client group called Room 141 is scheduled to have guest
access with filtering turned on for computers in Room 141 (and client
permissions have priority), then the user has filtered Internet access in Room 141
and is locked from other clients not in that group.
How Symantec Web Security works
Hierarchy of events
Hierarchy of events
Filtering is scheduled in terms of events. Three types of events can be scheduled:
■
Specific events are scheduled for a specific date and time, such as July 27,
2002, from 2:00 PM to 3:00 PM. A specific event has the highest priority.
After a specific event is past, it drops automatically from the system.
■
Daily events reoccur each specified day, such as every Monday and
Wednesday from 11:00 AM to 1:00 PM. You must delete daily events (the
event continues to occur as specified until you cancel the event).
■
Default settings apply when no other event is in effect. The System object has
a default event, which cannot be deleted and applies to all defined users
unless other events are scheduled. Default events can also be scheduled for
other individual objects as necessary.
Objects, with the exception of the System object, are not required to have a
default event. Clients, users, and groups inherit their default settings from
the system defaults unless you specifically change the default settings for that
object.
In addition to the hierarchy of object permissions, types of events also have
specific priorities.
Higher priority
Specific event
Daily event
Lower priority
Defaults
For example, you can schedule the computers in a school library to be locked by
default; then schedule a daily event that allows filtered Internet access on Monday
through Thursday from 10:00 AM to 2:00 PM. You can also schedule a specific
event on Monday, August 14, 2001, for a faculty workshop with unfiltered
Internet access from 11:00 AM to 1:00 PM. The specific event for Monday,
August 14, overrides the daily event that occurs every Monday.
33
34 How Symantec Web Security works
Ranking of groups
Ranking of groups
If you are using Symantec Web Security with a directory service, it is possible to
have users who are members of more than one group. For example, a user might
be a member of a virtual group and an LDAP group that has been added to
Symantec Web Security.
A user cannot be a member of more than one virtual group.
Groups are ranked so that precedence of settings is established. Initially, rank is
determined by the order in which they are created in or added to Symantec Web
Security.
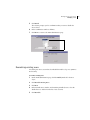
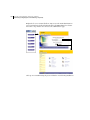
To view the current ranking of groups
1
On the main administration page, click the Modify shortcut for the Group
object.
2
Click Modify Group Ranking.
Settings for the group that appears first on the list take precedence, settings for
the group ranked second take second precedence, and so on. You can change the
ranking of groups through the Modify method for the Group object.
See “Modifying group ranking” on page 257.
Chapter
Understanding Symantec
Web Security
This chapter includes the following topics:
■
Overview
■
Virus protection
■
Content filtering
2
36 Understanding Symantec Web Security
Overview
Overview
Symantec Web Security is a powerful, flexible software solution for protecting
and managing Web traffic. To achieve the desired level of protection requires an
understanding of several key concepts. This chapter will familiarize you with
these Web security concepts. Review the information in this chapter to simplify
your setup and help you achieve the level of protection that you want on your
network.
Virus protection
Symantec Web Security protects your network against virus attacks by scanning
all HTTP and FTP traffic that passes from your browser through your firewall for
viruses. You can specify the specific file types that are scanned for viruses. If a
virus is detected, Symantec Web Security can be configured to do any of the
following:
■
Eliminate the virus automatically.
■
Deny access to the infected item.
■
Log the virus detection.
■
Forward the infected item to the separately installed Quarantine.
Operation is transparent to users, with little performance degradation to the
network.
Virus detection methods
Symantec engineers work around the clock tracking reported outbreaks of
computer viruses to identify new viruses. Once identified, information about the
virus (a virus signature) is stored in a virus definitions file. When Symantec Web
Security scans for viruses, it searches for these telltale virus signatures. Each time
a new virus is discovered, its virus signature is added to the virus definitions files.
The LiveUpdate feature makes sure you are not at risk of infection by newly
discovered viruses. Updated virus definitions files, which contain the necessary
information to detect and eliminate viruses, are supplied by Symantec at least
every week and whenever a new virus threat is discovered. LiveUpdate connects
automatically to a Symantec site, downloads the proper files, and installs them in
the proper location. Your site stays secure from viruses without interruption in
protection.
To supplement detection of virus infections by virus signature, Symantec Web
Security includes the Symantec patented Bloodhound technology, which
Understanding Symantec Web Security
Content filtering
heuristically detects new or unknown viruses. New viruses discovered by this
technology can be forwarded to a separately installed Quarantine Server to
prevent them from spreading, then sent to Symantec Security Response for
analysis. A new set of definitions that detects and removes the virus is returned to
update the Symantec Web Security installation.
You can schedule LiveUpdate to run more often than weekly through the
LiveUpdate method for the LiveUpdate object.
See “Keeping protection current through LiveUpdate” on page 284.
Content filtering
Content Category Lists and Dynamic Document Review (DDR) combine to
provide effective filtering of Web content. Lists contain URLs for which to allow
or deny access. Dictionaries contain words and phrases used to score Web
content. Depending on the list, access to the URLs contained in the list may be
restricted or allowed, and the corresponding dictionary may or may not be used
by DDR to score Web content.
Filtering lists
Symantec Web Security uses filter lists to control access to Internet sites.
Predefined Content Category Lists are included with the software, and you can
create additional lists based on your specific needs.
Predefined lists
A number of predefined Content Category Lists come with Symantec Web
Security. Symantec has populated these lists with URLs that contain related
subject matter. The following table describes each predefined list and includes
sample URLs that represent the list content. (If you believe that any of the URLs
shown here are incorrectly categorized, please contact Symantec Service and
Support.)
Table 2-1
Predefined lists
List
Description
Alcohol-Tobacco
Sites selling, promoting, or advocating the use of alcoholic
beverages (including beer, wine, and hard liquors) and tobacco
products (including cigarettes, cigars, and pipe and chewing
tobacco).
http://www.brownderby.com/
http://www.cigarettesbymail.com/
37
38 Understanding Symantec Web Security
Content filtering
Table 2-1
Predefined lists
List
Description
Anonymous Proxies
Sites allowing Internet content to be retrieved on behalf of a
user with the intent of obscuring the user’s identity from the
content server or obscuring the source of the content from
content filtering software, or both.
http://www.anonymizer.com/
http://www.idzap.com/
Crime
Sites providing instructions on performing criminal activities
or acquiring illegal items, including defeating security,
disabling, or otherwise interfering with computer systems
(hacking or cracking); unauthorized use of telephone or
communications equipment to place free calls or charge
another's account for calls (phreaking); deactivating copy
protection or registration schemes of software or hardware
systems (pirating and warez); construction and usage of
munitions such as pipe bombs, letter bombs, and land mines;
and lock picking, spying, or general subterfuge and defeating of
security measures.
http://www.2600.com/
http://internetterrorist.com/
Drugs/Advocacy
Sites advocating the use of illegal drugs for medical and
personal use.
http://www.mpp.org/
http://www.norml.org/
Drugs/Nonmedical
Sites providing information on growth, distribution, and
advocacy of drugs for nonmedical use (typically mood
altering). Does not include alcohol or tobacco products.
http://www.cannabis.com/
http://www.hightimes.com/
Entertainment/Games Sites dedicated to games, gaming, game tips, game downloads,
interactive games, and multiplayer games.
http://www.wizards.com/
http://www.gamesdomain.com/
Entertainment/Sports
Sites dedicated to professional and amateur sports and sporting
events.
http://cnnsi.com/
http://www.espn.com/
Understanding Symantec Web Security
Content filtering
Table 2-1
Predefined lists
List
Description
Finance
Sites dedicated to personal finance, banking, stock trading, and
wealth accumulation.
http://etrade.com/
http://cnbc.com/
Gambling
Sites dedicated to the promotion of or participation in
wagering, gambling, casinos, or lotteries.
http://www.valottery.com/
http://casinotreasureisland.com/
Humor
Sites dedicated to jokes, comedians, comic strips, “stupid
news,” email jokes, and other humorous material.
http://www.emailjoke.com/
http://archiebonkers.com/
Interactive/Chat
Sites providing interactive communication services, such as
Webchat, bulletin boards, and IRC.
http://chat.yahoo.com/
http://cyber-beach.com/gateway.html
Interactive/Mail
Sites providing interactive electronic-mail services.
http://www.hotmail.com/
http://www.rocketmail.com/
Intolerance
Sites advocating intolerance or hatred of a person or group of
people.
http://www.rahowa.com/
http://www.k-k-k.com/
Job Search
Sites dedicated to job searching, job listings, resume exchanges,
and head hunting.
http://www.jobsearch.com/
http://www.monster.com/
News
Sites providing news coverage of regional and international
events and weather services.
http://cnn.com/
http://www.weather.com/
Occult/New Age
Sites dedicated to occult and New Age topics including but not
limited to astrology, crystals, fortune-telling, psychic powers,
tarot cards, palm reading, numerology, UFOs, witchcraft, and
Satanism.
http://churchofsatan.org/
http://tarot.readers.com/
39
40 Understanding Symantec Web Security
Content filtering
Table 2-1
Predefined lists
List
Description
Prescription Medicine
Sites dedicated to providing information on prescription drugs
that are used for medical purposes. These sites deal with side
effects issues, prescription drug manufacturing, prescription
filling, and common treatment issues.
http://www.rxlist.com/top200.htm
http://www.usaprescription.com/
Real Estate
Sites dedicated to providing information on buying and selling
properties, property listings, commercial property listings, and
real estate agents.
http://www.erealty.com/
http://www.realtor.com/
Religion
Sites dedicated to or describing one of the 12 classical world
religions: Babi & Baha’i, Buddhism, Christianity,
Confucianism, Islam, Jainism, Judaism, Hinduism, Shinto,
Sikhism, Taoism, and Zoroastrianism.
http://www.graceglendale.org/
http://www.resurrectionwels.net/
Sex/Acts
Sites depicting or implying sex acts, including pictures of
masturbation not categorized under sexual education. Also
includes sites selling sexual or adult products.
http://www.cyberos.com/
http://persiankitty.com/
Sex/Attire
Sites featuring pictures that include alluring or revealing attire,
lingerie and swimsuit shopping, or supermodel photo
collections but do not involve nudity.
http://www.victoriassecret.com/
http://avalonusa.com/
Sex/Nudity
Sites featuring pictures of exposed breasts or genitalia that do
not include or imply sex acts. Includes sites featuring nudity
that is artistic in nature or intended to be artistic, including
photograph galleries, paintings that may be displayed in
museums, and other readily identifiable art forms. Includes
nudist and naturist sites that contain pictures of nude
individuals.
http://www.artcreate.com/photo/body/
http://nighttrips.com/
Understanding Symantec Web Security
Content filtering
Table 2-1
Predefined lists
List
Description
Sex/Personals
Sites dedicated to personals, dating, escort services, or mailorder marriages.
http://www.one-and-only.com/
http://www.datingline.com/
SexEd/Advanced
Sites providing medical discussions of sexually transmitted
diseases such as syphilis, gonorrhea, and HIV/AIDS. May
include medical pictures of a graphic nature. Includes sites
providing information of an educational nature on pregnancy
and family planning, including abortion and adoption issues.
Also includes sites providing information on sexual assault,
including support sites for victims of rape, child molestation,
and sexual abuse. Includes sites providing information and
instructions on the use of birth control devices. May include
some explicit pictures or illustrations intended for instructional
purposes only. May include slang names for reproductive
organs or clinical discussions of reproduction.
http://www.plannedparenthood.org/
http://www.immunet.org/
SexEd/Basic
Sites providing information at the elementary level about
puberty and reproduction. Includes clinical names for
reproductive organs (such as penis).
http://nocirc.org/
http://www.mum.org/
SexEd/Sexuality
Sites dealing with topics in human sexuality. Includes sexual
technique, sexual orientation, cross-dressing, transvestites,
transgenders, multiple-partner relationships, and other related
issues.
http://www.youth.org/
http://waf.org/
Travel
Sites dedicated to facilitating personal travel planning,
vacations, car rental, lodging, cruises, and tour guides.
http://www.expedia.com/
http://www.travelocity.com/
Vehicles
Sites dedicated to personal transportation vehicles, dealers,
vehicle reviews, buying information, and vehicle accessories.
http://www.edmunds.com/
http://www.autotrader.com/
41
42 Understanding Symantec Web Security
Content filtering
Table 2-1
Predefined lists
List
Description
Violence
Sites depicting or advocating violence, including sites
promoting violent terrorist acts against others that do not fall
under the Intolerance category.
http://www.usapublications.com/
http://www.homestead.com/admiralluke/
Weapons
Sites that display, sell, or advocate the use of weapons,
including guns, knives, and martial-arts weaponry.
http://dalesguns.com/
http://www.shooters.com/
allow
Historical default list for sites to which access is to be permitted.
This list is empty when Symantec Web Security is initially
installed.
deny
Historical default list of sites to which access is to be denied.
This list is empty when Symantec Web Security is initially
installed.
Two versions of each predefined Content Category List exist in Symantec Web
Security: a local version and the version populated by Symantec. The local version
of each list is provided so that you can add URLs to the lists.
When a request for Internet access is made, Symantec Web Security checks the
local versions of all active lists before it checks the Symantec versions. If the
software finds a match in one or more active local lists (lists not in the Off state),
it does not check the Symantec versions of the lists. You can override any
Symantec categorization of a site by adding the site to a local list, and you can add
sites not contained in the Symantec lists.
Symantec regularly updates the predefined Content Category Lists. Symantec
Web Security automatically downloads updated lists periodically if you subscribe
to the list updates. These updates relieve you from trying to identify all sites on
the Internet that fall within the content categories. If you do not subscribe to the
list updates, then you must update your local lists frequently to make sure that
you have the most current and comprehensive lists.
Understanding Symantec Web Security
Content filtering
Periodically, Symantec creates new predefined Content Category Lists to address
additional content areas. If you subscribe to the list updates, these new lists are
automatically downloaded along with the regular updates to existing lists. New
lists are in the Off state and must be activated.
Note: To have a URL considered for inclusion in a Symantec Web Security list,
send to [email protected] the URL and the name of the list to which you
think it should be assigned.
Local lists
You can also create any number of your own lists. You may want to create specific
lists of sites you have identified for a specific use. For example, you may want to
create a list containing sites with information on earthquakes and allow students
access to only the URLS in that list for a specific project.
List access states
Each list is in one of four access states: Allow (Filtering Enabled), Allow (Filtering
Disabled), Deny, or Off. The state of each list is set when scheduling filtering for
objects. The state of each list can be different based on the access restrictions for
individual users, clients, or groups.
Table 2-2
State
Filter states
Description
Allow (Filtering Permits requests for URLs contained in an Allow (Filtering Enabled)
Enabled)
list, and the document text is subject to DDR scanning using active
dictionaries (that is, dictionaries associated with Content Category lists
in the Deny state).
Allow (Filtering Permits requests for URLs contained in an Allow (Filtering Disabled)
Disabled)
list, and the document text is not scanned by DDR.
Deny
Does not permit requests for URLs contained in a Deny list. When a
request is made for a URL contained in a Deny list, an Access Denied
page indicates the list in which the URL was found.
Off
Symantec Web Security does not consider lists in the Off state when
checking lists for URLs. Requests for URLs contained in an Off list are
not denied, and the document text is subject to DDR review using
active dictionaries (that is, dictionaries associated with Content
Category lists in the Deny state).
43
44 Understanding Symantec Web Security
Content filtering
Allow lists
Allow lists should contain URLs known to contain material appropriate for a
particular activity. You can choose either Allow (Filtering Enabled) or Allow
(Filtering Disabled). Keep in mind that setting a list to Allow (Filtering Disabled)
allows unconditional access to the URLs in that list. Allow lists often are used to
restrict users or clients to accessing only permitted URLs.
Objects scheduled for Allow Only access can view only URLs in lists in either of
the Allow states. When a request is made for a URL that is not in the assigned
lists, the request is blocked and Symantec Web Security displays an Access Denied
page that lists the permitted URLs.
Note: Deny lists override Allow lists. If you place a URL in an Allow list and that
URL appears in any other list currently in the Deny state, the URL is blocked,
with one exception. Symantec Web Security checks the local versions of all active
lists before it checks the Symantec versions. If the software finds a match in one
or more active local lists (lists not in the Off state), it does not check the Symantec
versions of the lists.
Deny lists
Deny lists should contain URLs known to contain inappropriate material. Deny
lists override Allow lists. If you place the same URL in two different local lists, and
one list is in the Deny state and the other list is in the Allow state for a given user,
access to the site is denied because at least one list in the Deny state contains the
site.
Objects scheduled for Filtered Access are prevented from accessing URLs in the
assigned Deny lists. When a request is made for a URL in an assigned Deny list,
Understanding Symantec Web Security
Content filtering
the request is blocked, and an Access Denied page is returned to indicate the list
in which the denied URL was found.
Off lists
The Off state is used to cancel the effect of a list. Lists in the Off state are not
consulted when Symantec Web Security is checking lists for URLs. The URLs
contained in an Off list are not denied, and the text is subject to screening by
DDR using active dictionaries of lists in the Deny state.
When Symantec Web Security is initially installed, the predefined lists are in the
Off state. Most sites will want to immediately change the state of some of these
lists to Deny, based on local acceptable-use policies.
See “Establishing system defaults for filtering” on page 96.
Note: Two predefined lists (Allow and Deny) have names that, for historical
reasons, indicate state. The lists are intended to be used as the names imply (the
Allow list is meant to be in the Allow state). However, you could put the Allow list
in the Deny state and the Deny list in the Allow state.
Adding URLs to lists
Symantec Web Security looks for the most exact match when checking a URL
against assigned lists. Based on the entry in a list, you can block or allow
individual Web pages or entire directories, computers, or domains. When
entering URLs in the filter lists, host names are preferable to IP addresses.
Table 2-3
Filtering by URL
Filtered URL
Effect
www.badsite.com/pics/apr.html
Matches this one specific page
www.badsite.com/pics
Matches entire directory
www.badsite.com
Matches this computer
45
46 Understanding Symantec Web Security
Content filtering
Table 2-3
Filtering by URL
Filtered URL
Effect
badsite.com
Matches entire domain
For example, if your Deny list contains badsite.com, access to all URLs in that
domain is denied. If a site within that domain contains some content to which
you wanted to permit access, you can add the specific directory to an Allow list
(such as www.badsite.com/daily-news). Because Symantec Web Security looks
for the most exact match, access to that directory is permitted, while access to any
other content from that domain is denied.
Symantec Web Security lists do not provide a means to allow or deny a particular
protocol (for example, HTTP, FTP, and HTTPS). When a URL is placed in a list
in the Deny state, all connections are uniformly blocked.
Dynamic Document Review (DDR)
List-based content filtering alone is ineffective. Because of the size of the Internet
and the variety of sites, creating and maintaining lists of all sites that potentially
contain objectionable material is impossible. The robust capabilities of today’s
search engines and Web robots enable users to easily find sites not in Deny lists.
In addition, the language returned by search engines in the descriptions of sites
can be objectionable even if the actual site is contained in a Deny list. In addition
to checking URLs against lists, Symantec Web Security reviews Web content as
the information is being downloaded to the user. Symantec Web Security scans
each page and header to perform a realtime evaluation of the information. This
process is referred to as Dynamic Document Review (DDR).
When a user requests a URL from the Internet, Symantec Web Security first tries
to find a match in the lists. If the URL is not found in any Allow or Deny lists, the
software processes the document’s content to determine its suitability. For
example, if a user tries to access a site such as www.badsite.com and that site is
not contained in any Deny or Allow lists, Symantec Web Security scans the
headers and contents of the page as it is retrieved from the Internet.
Scoring Web content
To determine whether to block or allow access to a site, Symantec Web Security
compares the text on the requested site to predefined DDR dictionaries that
contain trigger words in multiple languages. Each occurrence of a word
contained in an active dictionary receives a numerical score, and Symantec Web
Security keeps a total score for a given amount of text. If the total score exceeds 50
Understanding Symantec Web Security
Content filtering
(a score of 50 is the default setting), access to the site is blocked and an Access
Denied message is returned to the requesting user’s Web browser.
If a page is
blocked by DDR,
the resulting
score is shown
A Web page is scored in sections as the page is being retrieved (rather than scored
by entire page). This feature allows users with filtered access on your network to
view a page that is not objectionable at the beginning but blocks access to later
sections of the page if these sections are rated as objectionable.
Note: Each of the predefined lists has an associated DDR dictionary with trigger
words that has been populated by Symantec. When a particular list is placed in
either of the Allow states (Filtering Disabled or Filtering Enabled) or in the Off
state, Symantec Web Security assumes that the type of content associated with
that list is acceptable and does not use the dictionary associated with that list in
DDR scanning.
Replacing words in text
If objectionable words are found on a page as the information is being retrieved
and scanned, Symantec Web Security automatically replaces the objectionable
words in the text. For example, the word is dashed out (- - -) in the text displayed
to the user, even in site descriptions returned to the user by a search engine.
Note: Word replacement by DDR may occasionally result in a broken link on a
Web page when part of the hyperlink text is replaced.
Changing the sensitivity of DDR
Symantec Web Security lets you change the sensitivity of DDR. The default
setting is a score of 50. Any page that receives a score of 50 or above is blocked.
You can adjust DDR to be more or less sensitive by selecting another score choice
in a range of 1 to 200.
See “Setting additional filtering options” on page 186.
47
48 Understanding Symantec Web Security
Content filtering
Evaluating Web content
In addition to vulgar words, Symantec Web Security also looks for words that
may be conditionally inappropriate. The software reviews each word on a page
and examines the surrounding words to determine the context of these
potentially inappropriate terms. For example, in a standard filtering
configuration the following two phrases are rated differently by DDR.
Table 2-4
Filtering by DDR
Phrase
Action
Hot sexual pictures
DDR rates this string of words with a positive score.
Sexual harassment
DDR rates this string of words with a score of zero (no
effect).
The context review performed by DDR is based on extensive rules supplied with
the Symantec Web Security package. These rules, along with the categorized filter
lists, are routinely updated and refined. Symantec Web Security automatically
downloads updated lists and rules if you subscribe to the list updates.
Adding words to DDR dictionaries
A local version of each dictionary is also provided. You can add words to any of
these dictionaries based on your specific requirements. When you enter a word in
a local dictionary, you must also provide a point value for the word for use in
DDR scoring. Local dictionary entries override predefined dictionary entries for
the same word. If you add the word sex to the Sex/Acts dictionary, with a score of
5 points for the word, and the word already exists in the predefined dictionary
with a different point value, your point value is the one DDR uses when scoring
Web content.
Try not to be overly aggressive in adding what may be considered conditionally
objectionable words to the DDR dictionary. Entering words such as sex or
bottom may cause many more pages to be blocked than you intend. The default
settings, predefined dictionaries, and predefined lists included in Symantec Web
Security have been designed to filter Internet content effectively. Initially,
adjusting the sensitivity of DDR to suit your local policies rather than adding a
large number of words to dictionaries may be the most effective way to achieve
the desired level of filtering. As you become familiar with the functionality of the
software, you can add additional words to dictionaries.
Understanding Symantec Web Security
Content filtering
How filter lists and DDR work together
You control the degree of filtering applied to objects by placing lists in one of the
four access states. Depending on the state of a particular list, access to the URLs
contained in the list may be restricted or allowed, and the corresponding
dictionary may or may not be used by DDR to score Web page content. By
placing lists in different states, you control not only access to sites contained in
lists, but whether DDR is filtering for a particular type of content.
See “List access states” on page 43.
The Allow states (Filtering Enabled and Filtering Disabled) are typically applied
only to local lists, since those lists contain URLs for sites that you know contain
appropriate material. However, some sites deemed appropriate may contain links
to sites you wish to block. In those cases, placing predefined lists in the Allow
(Filtering Enabled) state enables DDR to scan the site using active dictionaries.
Based on your local acceptable-use policies, you may want to place some of the
predefined Content Category Lists in the Deny state (to restrict access to all URLs
in those lists) and leave some lists in the Off state (to cancel the effect of the lists
and permit access to the contained URLs).
49
50 Understanding Symantec Web Security
Content filtering
How Symantec Web Security applies filtering based on list
access state
The following table demonstrates how Symantec Web Security applies filtering
according to list access states. When managing your lists, determine the
appropriate list states for certain types of information.
Understanding Symantec Web Security
Content filtering
Assigning list access states
Use the following guidelines to assign access states to list content.
Table 2-5
Filtering state guidelines
List state
List content
Allow (Filtering Enabled)
Assign to lists containing sites to which you want to allow
access or to lists you do not want to block but do not have
complete confidence that the content will remain
acceptable (for example, search engines, such as
www.altavista.com), knowing that DDR, using
corresponding dictionary terms for lists in the Deny state,
may still block access to any objectionable or
inappropriate content.
Allow (Filtering Disabled)
Assign to lists containing sites to which you want to allow
access and for which you have confidence that the content
will remain acceptable (such as www.disney.com).
Deny
Assign to lists containing sites to which you definitely do
not want to allow access (such as www.penthouse.com).
Off
Assign to predefined Content Category Lists you do not
want to be blocked. For example, the predefined list
Interactive/Chat can be in the Off state, given acceptableuse policies that consider chat to be acceptable. DDR,
using corresponding dictionary terms for lists in the Deny
state, will block certain chat topics based on other
filtering that is in effect.
How Symantec Web Security determines whether to allow or
deny access
The following examples describe the process that Symantec Web Security uses to
determine whether to allow or deny access to a site requested by a user. The
examples explain each decision point reached by Symantec Web Security, subject
to filtering currently in effect, in determining whether to allow or deny access to a
site. In each example, a user requests access to a particular site. The basic filtering
that applies to the user is given for each example.
Example 1
A user requests access to the site www.pornography4U.com. The user is in
Filtered mode, and the Symantec predefined Content Category Lists Sex/Acts and
Sex/Nudity are in the Deny state for this user. However, the requested site is a
51
52 Understanding Symantec Web Security
Content filtering
new Internet site and has not yet been published in a Content Category List by
Symantec or does not appear in any local lists on your network.
Example 2
A user is in Allow Only mode for a period of focused research on government.
The user has accessed the House of Representatives home page, www.house.gov,
which is in a local Allow (Filtering Enabled) list called Government for this
research period. While searching this site, the user comes across the Independent
Counsel Kenneth Starr’s report to the U.S. House of Representatives (which
graphically describes a sexual encounter).
Example 3
A user is enrolled in an art class to learn how to draw the human body. The
teacher wants to allow the art students access to several sites. These sites contain
some nude photography and are in the predefined Sex/Nudity Content Category
List. The teacher does not want to allow access to the entire Sex/Nudity list, but
wants to override for the semester the filtering on these few sites. The teacher
places the URLs for these sites into a new local list called Art, and places the list in
the Allow (Filtering Disabled) state for the students in the art class. The students
remain in filtered mode, with the Sex/Nudity and Sex/Acts lists in the Deny state
and the Art list in the Allow (Filtering Disabled) state. In this example, the user
requests one of the sites contained in the Art list:
www.drawingthehumanbody.com.
Table 2-6
Filtering process
Symantec Web Security
action
Result
Step 1: Symantec Web Security If the URL is found in any local list, Symantec Web
checks the local versions of all Security allows or restricts access based on the state of
lists for the requested URL.
the list. If the URL is in more than one local list and the
lists are in different states, Symantec Web Security
makes a decision based on the hierarchy of access states:
Deny, Allow (Filtering Enabled), and then Allow
(Filtering Disabled). If the URL is in any local list in the
Deny state, access to the site is denied, even if the URL
is also in a local list in either of the Allow states. If the
URL is found in any local list, Symantec Web Security
does not check the predefined lists published by
Symantec.
Example 1: The requested site,
www.pornography4U.com, is not found in any local
list. Symantec Web Security goes to the next step.
Understanding Symantec Web Security
Content filtering
Table 2-6
Filtering process
Symantec Web Security
action
Result
Example 2: The user, in Allow Only mode, can access
the site www.house.gov because this site is in the local
list titled Government in the Allow (Filtering Enabled)
state. Because the list is in the Allow (Filtering Enabled)
state, DDR (using all active dictionaries) scans any URL
accessed by the user.
Example 3: Symantec Web Security finds the requested
URL, www.drawingthehumanbody.com, in only one
local list, Art, which is in the Allow (Filtering Disabled)
state, and the user is allowed access to this site.
Step 2: If the URL is not found
in a local list, Symantec Web
Security checks the predefined
lists for the requested URL.
If the URL is found in any predefined list, Symantec
Web Security allows or restricts access based on the
state of the list. If the URL is contained in more than
one predefined list and those lists have different states,
Symantec Web Security makes access decisions based
on the hierarchy of access states: Deny, Allow (Filtering
Enabled), and then Allow (Filtering Disabled). If the
URL is in any predefined list in the Deny state, access to
the site is denied, even if the URL is also in any
predefined list in either of the Allow states.
Example 1: The requested site,
www.pornography4U.com, is not in any predefined list.
The site is new, and Symantec has not published the site
in any Content Category List. Symantec Web Security
goes to the next step.
Example 2: Symantec Web Security does not check the
predefined lists for www.house.gov because the URL is
contained in a local list.
Example 3: Symantec Web Security does not check the
predefined lists for www.drawingthehumanbody.com
because the URL is in a local list.
53
54 Understanding Symantec Web Security
Content filtering
Table 2-6
Filtering process
Symantec Web Security
action
Result
Step 3: For any document that
has not already been denied as
a result of being in a list in the
Deny state, Symantec Web
Security applies DDR to the
document content (unless that
URL is in a list in the Allow
[Filtering Disabled] state).
DDR runs on small blocks of
text as the information is
downloaded from the Internet.
DDR uses the active dictionaries (dictionaries for any
lists in the Deny state) to score the content of the Web
site as the document is downloaded from the Internet.
If the score for any block of text reaches the DDR
threshold established for the requesting user, Symantec
Web Security blocks access to the site.
Example 1: Because the Sex/Nudity and Sex/Acts
dictionaries are in the Deny state for the requesting
user, the DDR score is over the DDR threshold
established for this user. Symantec Web Security blocks
the user’s access to the requested site,
www.pornography4U.com.
Example 2: DDR continues to scan the new
information as it is downloaded for the user from the
domain www.house.gov. The user can access the
requested material until the DDR threshold for a given
block of material exceeds that established for the user.
When the user gets to the portion of the Starr report
that contains objectionable content, DDR blocks the
entire remainder of the document.
Example 3: DDR does not run on the requested URL
because the URL is contained in a list in the Allow
(Filtering Disabled) state. The user is not blocked from
accessing this site for any reason.
Section
Installing and Licensing
■
Preparing for installation
■
Installation
■
Activating and configuring Symantec Web Security
■
Integrating Symantec Web Security with SESA
2
56
Chapter
Preparing for installation
This chapter includes the following topics:
■
Minimum system requirements
■
Upgrading from earlier versions
■
Installing and configuring the operating system
■
Installing and configuring TCP/IP
■
Verifying DNS settings
■
Configuring the DNS server
3
58 Preparing for installation
Minimum system requirements
Minimum system requirements
Verify that the computer on which Symantec Web Security is to be installed
meets the following requirements:
■
■
Intel® Pentium® or compatible processor running one of the following
operating systems:
■
Microsoft Windows NT Server 4.0 with Service Pack 6a or later
■
Microsoft Windows 2000 Server with Service Pack 2 or later
■
Windows 2000 Advanced Server
Symantec Web Security functions on a Windows 2000 Server with the
same level of compatibility as on a Windows NT Server 4.0. However,
Symantec Web Security does not adhere to Windows 2000 Logo
Requirements.
SPARC®-based server running Solaris 7 or later
Hardware requirements:
■
At least 256 MB of memory
■
At least 500 MB of available disk space for the Symantec Web Security
program files, online documentation, configuration files, and so on
■
At least 400 MB additional disk space (1 GB recommended) for caching
■
Additional disk space as required for storage of activity logging
■
A CD-ROM drive (if you are installing from CD-ROM)
Additional requirements:
■
Access to your server’s local Administrator password (Windows NT) or to
your server’s root password (Solaris).
■
Internet access and a Web browser. Suitable browsers include Netscape
Navigator®4.7 or later or Microsoft Internet Explorer 5.0 or later.
■
Your Symantec Serial Number Certificate
You activate comprehensive antivirus protection and content filtering by
license. To activate a license, you must have the serial number listed on the
Serial Number Certificate in order to activate the software.
The Symantec Serial Number Certificate is not part of the Symantec Web
Security software distribution package. The Symantec Serial Number
Certificate is mailed separately and should arrive in the same time frame as
your software.
Preparing for installation
Upgrading from earlier versions
■
Any other antivirus product on the Symantec Web Security server disabled
prior to installing Symantec Web Security 3.0. After installation, be sure to
reenable the antivirus protection.
If another antivirus product is installed on the Symantec Web Security
server, it is possible that the competing product may try to scan and delete
files temporarily placed by Symantec Web Security in the temporary
directory during its scanning process.
Upgrading from earlier versions
Note: When you upgrade to Symantec Web Security 3.0, you must relicense the
product.
See “Activating a license” on page 87.
You can upgrade to Symantec Web Security 3.0 from Symantec I-Gear 3.5.14 or
from Symantec Web Security (any version). To upgrade, install the new version
over the earlier version.
After installing Symantec Web Security, do not uninstall the earlier version or
Symantec Web Security may not function properly. Uninstalling the earlier
version may remove settings (such as defined users, scheduled events, and list
definitions) that you do not want to lose. These settings are retained in Symantec
Web Security.
Symantec Web Security 3.0 uses an enhanced password-hashing scheme that
differs from that used in certain previous versions. Some upgrades require the use
of a utility, setpass. Setpass is included on the Symantec Web Security
distribution CD.
Installing and running setpass
◆
Copy setpass to the Symantec Web Security server.
It is suggested that Windows users copy setpass to C:\.
Solaris users may copy setpass to the directory of choice. Make sure that
setpass has execution privileges.
Setpass works by creating a password using the new hashing scheme. As a
precaution, the original password is maintained for each user when the new
password is created.
If you use the default setpass installation, the new password is automatically
assigned the value $userlogon$. For example, if the user logon is joe, the new
password for joe will be $joe$.
59
60 Preparing for installation
Upgrading from earlier versions
If your security policy does not allow for these automatically generated
passwords, setpass can do one of the following:
■
Generate a random password for each user
■
Allow you to assign a password for each user as it executes
If you have a large number of virtual users, assigning passwords to each user will
be time consuming.
Note: If you use setpass to either randomly generate passwords or to assign
passwords yourself, it is your responsibility to provide these passwords to your
users.
To assign random passwords to virtual users
◆
Run setpass as follows:
■
Windows: setpass /r /c filename
■
Solaris: setpass -r -c filename
where filename is the path and file name to which each randomly generated
password and user logon combination will be written.
For example, setpass /r /c C:\temp\random will write the password and user
to a file named random.
To assign passwords to virtual users
◆
Run setpass as follows:
■
Windows: setpass /p /c filename
■
Solaris: setpass -p -c filename
where filename is the path and file name to which each assigned password
and user combination will be written.
You will be prompted to enter a password for each user.
Deleting the setpass password file
If you have used either the -r or -p flag for setpass, the file created contains user
logons and passwords in plain text. After you have provided passwords to your
users, Symantec recommends that you delete this file.
Preparing for installation
Upgrading from earlier versions
Non-standard installations
If you do not intend to use the default install directories for Symantec Web
Security 3.0, you will need to contact Technical Support for upgrade instructions.
Upgrading from Symantec I-Gear 3.5.14 (when 3.5.14 was initial
install)
The upgrade process from a base install of Symantec I-Gear 3.5.14 to Symantec
Web Security 3.0 requires the use of a utility, setpass, that converts the old
password-hashing scheme to the one used by Symantec Web Security 3.0. Setpass
modifies the password-hashing scheme for virtual users. If only system, RADIUS,
or LDAP users are being proxied through Symantec Web Security, you do not
have to run setpass. However, you will have to move configuration files to their
new locations.
Additionally, certain key files used by Symantec Web Security 3.0 are placed by
default into directories that are different from the default directories used by IGear 3.5.14. These files must be copied to the new location used by Symantec
Web Security 3.0. In order to make for a safe transition to Symantec Web Security
3.0, upgrade procedures must be followed carefully.
Determining if I-Gear 3.5.14 is your base install
If Symantec I-Gear 3.5.14 is your base install, or if you have installed Symantec
2.0 and/or Symantec Web Security 2.5 on top of I-Gear 3.5.14, the upgrade
process is different than if your initial installation of this product line was either
Symantec Web Security 2.0 or Symantec Web Security 2.5. Follow these
instructions to determine if Symantec I-Gear 3.5.14 is your base install
To determine if Symantec I-Gear 3.5.14 is your base install on Windows
1
Go to C:\Program Files\Symantec and locate the shared-config file.
2
Go to C:\Program Files\Symantec\I-Gear\Local and locate the dictionaries,
lists, and local-config files.
If these directories do not exist, or if the files are not in these directories,
either Symantec I-Gear 3.5.14 is not your base install or the defaults were
overridden during the original installation of Symantec I-Gear. If the
defaults were overridden, go to the correct directories and verify that all
necessary files are present.
61
62 Preparing for installation
Upgrading from earlier versions
To determine if Symantec I-Gear 3.5.14 is your base install on Solaris
1
Change directories to /var/opt/URLabs and locate the shared-config file.
2
Change directories to /var/opt/I-Gear/local and locate the dictionaries, lists,
and local-config files.
If these directories do not exist, or if the files are not in these directories,
either Symantec I-Gear 3.5.14 is not your base install or the defaults were
overridden during the original installation of Symantec I-Gear. If the
defaults were overridden, navigate to the correct directories and verify that
all necessary files are present.
Windows upgrade from Symantec I-Gear 3.5.14 to Symantec Web
Security 3.0
To upgrade from Symantec I-Gear 3.5.14 to Symantec Web Security 3.0, you
must first locate and copy certain configuration files, as they will be needed in a
later step of the upgrade.
To upgrade from Symantec I-Gear 3.5.14 (Windows)
1
Create a directory called temp on the server desktop.
2
Navigate to C:\Program Files\Symantec.
3
Copy the shared-config file to the temp directory.
4
Navigate to C:\Program Files\Symantec\I-Gear\Local.
5
Copy the dictionaries, lists, and local-config files only to the temp directory
(do not copy other files, including the local-config.old file).
Note: If these directories do not exist, or if the files are not in these directories,
either Symantec I-Gear 3.5.14 is not your base install or the defaults were
overridden during the original installation of I-Gear. If the defaults were
overridden, navigate to the correct directories and copy the shared-config,
dictionaries, lists, and local config files to the temp directory.
6
Reboot the I-Gear server.
7
Stop the I-Gear service.
8
Start the installation of Symantec Web Security 3.0.
9
When you reach the Installation Directory window, click Browse.
10 In the Choose Folder window, in the Path box, change the path to
C:\Program Files\Symantec\Symantec Web Security.
Preparing for installation
Upgrading from earlier versions
11 Click OK.
The Symantec Web Security directory will be created.
12 Accept all the directory locations and complete the installation.
13 License Symantec Web Security 3.0.
14 Stop the Symantec Web Security service.
15 Copy the dictionaries, lists, and local-config files from the temp directory to
C:\Program Files\Symantec\Symantec Web Security\Local. Do not copy the
shared-config file. It was included in the original copy as a backup file in the
chance that the conversion process were to fail.
16 If you have virtual users, run setpass by doing the following:
17 Choose Start>Run.
18 Type cmd in the window that appears.
The command line interpreter window will appear.
19 Type dir to confirm that the setpass executable exists.
If you have placed setpass in a different directory, navigate to that directory.
Note: The Symantec Web Security service must be stopped before setpass is run.
If you try to run setpass with the Symantec Web Security service running, you will
receive an error message.
20 Type setpass. If you want setpass to randomly generate passwords or you
want to assign passwords yourself, see the section Special setpass flags.
21 Press Enter to start setpass.
You will receive confirmation that setpass has changed the password to the
new password-hashing scheme. Users will have the new passwords created by
setpass.
22 Restart the Symantec Web Security service. All of your users and settings will
be preserved.
Windows upgrade from Symantec Web Security 2.0 or Symantec
Web Security 2.5 that has been installed on top of I-Gear 3.5.14
Follow the same procedures as the I-Gear installation except when you are asked
to stop a service, stop the currently running Symantec Web Security service.
63
64 Preparing for installation
Upgrading from earlier versions
Solaris upgrade from I-Gear 3.5.14 to Symantec Web Security 3.0
In order to upgrade to Symantec Web Security 3.0 from I-Gear 3.5.14, you must
first locate and copy certain configuration files as they will be needed in a later
step in the upgrade.
To upgrade from I-Gear 3.5.14 (Solaris)
1
Log on as root.
2
Create a temp directory.
3
Change directories to /var/opt/URLabs.
4
Copy the shared-config file to the temp directory.
5
Change the directories to /var/opt/I-Gear/local.
6
Assuming that the default directories were used, copy only the dictionaries,
lists, and local-config files to the temp directory. Do not copy any other files,
including the local-config-old file.
If these directories do not exist, or if the files are not in these directories,
either I-Gear 3.5.14 is not your base install or the defaults were overridden
during the original installation of I-Gear. If the defaults were overridden,
navigate to the correct directories and copy the shared-config file,
dictionaries, lists, and local config files to the temp directory.
7
Type /etc/init.d/igear stop to stop the I-Gear service.
8
Start the installation of Symantec Web Security 3.0. When you reach the step
in the installation process where you are asked to either accept or change the
default install directories, respond to each of the queries as follows:
Table 3-1
Default installation directories query
SWS 3.0 installation suggestion
Modify to:
/opt/I-Gear
/opt/SYMCsws
/var/opt/SYMCsws/quarantine
accept
/var/opt/SYMCsws/tempdir
accept
/var/opt/I-Gear/local
/var/opt/SYMCsws/local
/var/opt/I-Gear/logs
/var/opt/SYMCsws/logs
/var/opt/SYMCsws/Certificates
accept
Preparing for installation
Upgrading from earlier versions
9
Accept all other defaults. Please note that the shared-config file is written to
/var/opt/URLabs/shared-config instead of the Symantec Web Security 3.0
default of /var/opt/Symantec/shared-config. This is desired behavior as it
allows for the correct merging of I-Gear shared-config with the Symantec
Web Security 3.0 shared-config.
10 Type /etc/init.d/sws stop to stop the Symantec Web Security service.
11 Copy the dictionaries, lists, and local-config files from the temp directory to /
var/opt/SYMCsws/local. Do not copy the shared-config files. It was included
in the original copy as a backup file, if, for any reason, the conversation
process fails.
If you have virtual users, navigate to the directory in which you installed
setpass. The Symantec Web Security service must be stopped before setpass is
run. If you want setpass to randomly generate passwords or if you want to
assign passwords yourself, see the previous section Special setpass flags.
12 Type ./setpass to execute it.
13 Type /etc/init.d/sws start to restart the Symantec Web Security service.
License Symantec Web Security 3.0. All of your users and settings will be
preserved. Users will have the new passwords created by setpass.
Solaris upgrade from Symantec Web Security 2.0 or Symantec Web
Security 2.5 that has been installed on top of I-Gear 3.5.14
Follow the same procedures, except when you are asked to stop a service, stop the
currently running Symantec Web Security service by typing /etc/init.d/sws stop.
Upgrading from Symantec Web Security 2.0
If you are installing Symantec Web Security 3.0 on top of an initial 2.0 or 2.5
installation (you have never installed I-Gear 3.5.14), and you do not have any
virtual users, you do not need to run setpass.
The upgrade from Symantec Web Security 2.0 to Symantec Web Security 3.0
requires only the installation and execution of setpass in order to modify the
password hash. The initial installation of Symantec Web Security 2.0 places all
directories by default in locations expected by Symantec Web Security 3.0, so that
no files have to be copied to new locations. As a precaution, however, you should
make backups of configuration files.
65
66 Preparing for installation
Upgrading from earlier versions
Windows Upgrade from Symantec Web Security 2.0 to Symantec
Web Security 3.0
To upgrade from Symantec Web Security 2.0 (Windows)
1
Create a temp directory on C:\
2
Copy C:\Program Files\Common Files\Symantec Shared\shared-config to
the temp directory.
3
Navigate to C:\Program Files\Symantec\Symantec Web Security\Local. Copy
dictionaries, lists, and the local config-file to the temp directory.
If these directories do not exist, or if the files are not in these directories, the
defaults were overridden during the original installation of Symantec Web
Security 2.0. If the defaults were overridden, navigate to the correct
directories and copy the shared-config, dictionaries, lists, and local config
files to the temp directory.
4
Stop the Symantec Web Security service.
5
If you have virtual users, run setpass.
6
Choose Start > Run.
7
Type cmd in the window that appears.
The command line interpreter window will appear.
8
Type dir to confirm that setpass is available. If you have placed setpass in a
different directory, navigate to that directory.
The Symantec Web Security service must be stopped before setpass is run. If
you try to run setpass with the Symantec Web Security service still running,
you will receive an error message.
9
Type setpass.
10 Press Enter to start setpass.
You will receive confirmation that setpass has changed the password to the
new password-hashing scheme. Users will have the new passwords created by
setpass.
11 Restart the Symantec Web Security service.
All of your users and settings will be preserved.
Preparing for installation
Upgrading from earlier versions
Solaris upgrade from Symantec Web Security 2.0
To upgrade from Symantec Web Security 2.0 (Solaris)
1
Log on as root.
2
Create a temp directory.
3
Change directories to /var/opt/Symantec.
4
Copy the shared-config file to the temp directory.
5
Change directories to /var/opt/SYMCsws/local.
6
Assuming that the default directories were used, copy only the dictionaries,
lists, and local-config files to the temp directory. Do not copy any other files,
including the local-config.old file.
If these directories do not exist, or if the files are not in these directories, the
defaults were overridden during the original installation of Symantec Web
Security 2.0. If the defaults were overridden, navigate to the correct
directories and copy the shared-config, dictionaries, lists, and local config
files to the temp directory.
7
Type /etc/init.d/sws stop to stop the Symantec Web Security service.
8
Install Symantec Web Security 3.0. Accept all default directories.
9
If you have virtual users, type /etc/init.d/sws stop to stop the Symantec Web
Security service.
10 Navigate to the directory in which you installed setpass.
11 The Symantec Web Security service must be stopped before setpass is run.
12 Type ./setpass to execute it.
13 Type /etc/init.d/sws start to restart the Symantec Web Security service.
License Symantec Web Security 3.0. All of your users and settings will be
preserved. Users will have the new passwords created by setpass.
Upgrading from Symantec Web Security 2.5
If Symantec Web Security 2.5 is your initial install, simply install Symantec Web
Security 3.0 following the directions in the implementation guide.
67
68 Preparing for installation
Installing and configuring the operating system
How upgrading affects user and group disposition
The disposition of certain types of users and groups may be affected when
upgraded.
The following is true about upgrading to Symantec Web Security 3.0:
■
If you install version 3.0 and do not have a previous version of Symantec Web
Security or Symantec I-Gear installed, the Directory Services selection
defaults to Virtual Users Only.
■
If you have only virtual users and groups supported in a previous version of
Symantec Web Security or Symantec I-Gear, and you upgrade to version 3.0,
users and groups are considered virtual in the current version also.
■
If you have virtual and system users supported in a previous version and
upgrade to version 3.0, virtual users remain virtual users and system users
remain system users. Group status is not affected.
Installing and configuring the operating system
Ensure that your server’s operating system software and applicable updates are
installed, configured, and working properly before you install Symantec Web
Security. Consult your server’s documentation for more information. Installation
of your operating system software and updates is outside the scope of this guide.
Installing and configuring TCP/IP
Ensure that a valid Transmission Control Protocol/Internet Protocol (TCP/IP)
configuration exists and is working properly before you install Symantec Web
Security. Symantec Web Security will not function without TCP/IP configured.
Verifying DNS settings
You must verify that your server is configured as a Domain Name Server (DNS)
client prior to installing Symantec Web Security, and TCP/IP DNS settings must
be correct.
Windows NT
Your server’s TCP/IP DNS settings must be correct before you install Symantec
Web Security.
Preparing for installation
Verifying DNS settings
To verify DNS settings on Windows NT
1
In the Network window, on the Protocols tab, click TCP/IP Protocol.
2
Click Properties.
Do not
leave empty
List at least one
valid server
3
In the Microsoft TCP/IP Properties window, on the DNS tab, verify that
both the Host Name and Domain boxes have the appropriate entries and
that at least one valid DNS server is listed in the DNS Service Search Order
list, and make the necessary changes.
Consult with your network administrator or Internet service provider (ISP)
if you are unsure of the settings that should be used here.
4
Click OK.
5
Restart your server if necessary.
Windows 2000
Your server’s TCP/IP DNS settings must be correct before you install Symantec
Web Security.
To verify DNS settings on Windows 2000
1
Right-click My Network Places, then click Properties.
2
Right-click Primary Network Connection, then click Properties.
3
Click Internet Protocol (TCP/IP), then click Properties.
69
70 Preparing for installation
Verifying DNS settings
4
Verify that the appropriate IP address for a valid DNS server is selected.
Consult with your network administrator or Internet service provider (ISP)
if you are unsure of the settings that should be used here.
5
Click Advanced.
6
On the DNS tab, check Append these DNS Suffixes.
7
Click OK.
8
Restart your server if necessary.
Solaris
Your server must be configured as a DNS client prior to installing Symantec Web
Security.
Note: On Netra™ systems, the Web-based Netra administration interface should
be used to configure the system as a DNS client. After the settings have been made
using the Netra administration interface, you are encouraged to verify the settings
as shown here.
To verify DNS settings on Solaris
1
Examine the following file:
/etc/resolv.conf
This file should contain lines similar to the following:
domain yourdomain.here
nameserver 192.168.1.2
nameserver 192.168.9.7
2
Verify that the specific domain name and name server addresses used in your
file are appropriate for your site and make any necessary changes.
Consult with your network administrator or ISP if you are unsure of the
values that should be used.
3
If the /etc/resolv.conf file does not exist on your server, create the file using
the above example as a template.
Be sure to replace the domain name and name server addresses with values
that are appropriate for your site.
Preparing for installation
Configuring the DNS server
Configuring the DNS server
In addition to your server being configured to use DNS, your site’s DNS zone
must be configured to contain at least the following records:
■
An A (address) record that corresponds to your server’s host name.
■
A PTR (pointer) record that maps your server’s IP address to its host name,
including the domain name (for example, server.brightcorp.com).
Check with your Domain Name Server Administrator or ISP if you are uncertain
whether the necessary records have been installed on the DNS server that you are
using.
71
72 Preparing for installation
Configuring the DNS server
Chapter
Installation
This chapter includes the following topics:
■
Configuration options at installation
■
Installing Symantec Web Security
■
Stopping and starting Symantec Web Security service
■
Uninstalling Symantec Web Security
4
74 Installation
Configuration options at installation
Configuration options at installation
During the install process, Symantec Web Security prompts you for certain
configuration options.
Installation directories
The Symantec Web Security software is organized into five directories. Each
directory contains specific kinds of files. To support sites with large, specialized
disk configurations, the locations of each of these directories can be specified as
Symantec Web Security is installed. As the program prompts you for the location
of each directory during installation, a default location is shown. Unless you have
a compelling reason to do otherwise (for example, inadequate disk space on the
root disk drive), accept the default locations.
If you have uninstalled Symantec Web Security (or Symantec I-Gear) and have
not deleted certain shared configuration files, at reinstallation the install program
will give you the option to select the directory locations used previously.
Note: If you do not use the default locations for the Symantec Web Security
directories, identify a unique directory/folder on the disk for each Symantec Web
Security directory. Do not use the same value for more than one directory
location. If two directories are located in the same folder/directory on the disk,
Symantec Web Security will not operate properly.
Installation
Configuration options at installation
Warning: If you are installing more than one Symantec product on the same
server, install each product in a separate directory. If more than one product is
located in the same directory, at least one of the products will not function
properly.
Table 4-1
Directories
Directory
Description
InstallDir
Stores the Symantec Web Security program files and read-only data
files. The recommended total disk space required for this directory is
165 MB. Initial installation requires approximately 40 MB of disk
space. After the product is licensed, automatic downloads of filter lists
and dictionaries are necessary to keep protection current. This
download requires an additional 100 MB as a minimum.
The default location for Solaris is /opt/SYMCsws.
The default location for Windows NT/2000 is
C:\Program Files\Symantec\Symantec Web Security\.
LocalDir
Stores server-specific configuration files, such as list definitions and
scheduled events. This directory usually requires less than 1 MB of
disk space.
The default location for Solaris is /var/opt/SYMCsws/local.
The default location for Windows NT/2000 is
C:\Program Files\Symantec\Symantec Web Security\Local.
LogDir
Contains log files that record Symantec Web Security activity. The
disk space varies with the amount of activity and how long log files are
retained.
For Solaris, make sure that the partition on which you place this
directory has enough space to accommodate potentially large
amounts of data. This directory can get quite large in short periods of
time.
See “Modifying other system attributes” on page 145.
The default location for Solaris is /var/opt/SYMCsws/logs.
The default location for Windows NT/2000 is
C:\Program Files\Symantec\Symantec Web Security\Log.
75
76 Installation
Configuration options at installation
Table 4-1
Directories
Directory
Description
TempDir
Contains temporary copies of downloaded files, for antivirus
scanning purposes. The disk space required for this directory varies
with the number of users and amount of Internet activity. Keep in
mind that files must be downloaded in their entirety to this directory
for antivirus scanning to occur. Correct antivirus functionality is
dependent on this directory being able to accommodate potentially
large numbers of large files during periods of peak usage.
The default location for Solaris is /var/opt/SYMCsws/tempdir.
The default location for Windows NT/2000 is
C:\Program Files\Symantec\Symantec Web Security\TempDir.
QuarantineDir
Contains quarantined files that cannot be repaired.
The default location for Solaris is /var/opt/SYMCsws/quarantine.
The default location for Windows NT/2000 is
C:\Program Files\Symantec\Symantec Web Security\Quarantine.
Warning: A sixth directory contains the virus definitions. Virus definitions are
stored in a shared directory so that all Symantec antivirus products installed on
the same computer can use the same definitions.
Table 4-2
Virus definitions directory
Directory
Description
SymShared
Contains virus definitions for use by all Symantec antivirus products
installed on the same computer. If you already have other Symantec
AntiVirus products installed on the same computer, this directory
should exist and you should accept the default location shown. If
you do not have other antivirus products installed, you can specify
another location if desired.
The default location for Solaris is /opt/Symantec/Virusdefs.
The default location for Windows NT/2000 is
C:\Program Files\Common Files\Symantec Shared\Virusdefs.
Contains the License directory, which contains the 2 license files
(product and content). The default location for Solaris is /opt/
Symantec/License. The default location for Windows NT/2000 is
C:\Program Files\Common Files\Symantec Shared\License.
Note: The License directory does not get removed when a license is
removed. During reinstallation, you do not need to relicense.
Installation
Configuration options at installation
Built-in HTTP server port
Symantec Web Security is managed through a Web-based interface. This
interface is provided through a built-in Hypertext Transfer Protocol (HTTP)
server. This HTTP server is independent of any existing HTTP server that already
may be installed on your server and is not a general purpose Web server.
During the installation process, you are prompted for the TCP/IP port number
on which this built-in HTTP server listens. The port number specified must be
exclusive to Symantec Web Security and must not already be in use by any other
program or service.
Because the built-in HTTP server is not a general purpose Web server, do not use
port number 80 (the default port number for general purpose Web servers).
Unless you have a compelling reason to do otherwise, you should use the default
port number of 8002 to be consistent with the examples contained in the rest of
this manual. If you select a port number other than the default port number of
8002, do not forget which port number you chose.
Note: This port number is the port number that you use to access the Symantec
Web Security administration page, as well as the port specified when configuring
browsers on client workstations to use Symantec Web Security as a proxy server.
Virtual administrator account password
A virtual administrator account is created at installation with a logon name of
virtadmin. You are prompted to provide a password for this account during the
installation process. Do not forget the password that you enter for this account
because initially the virtual administrative account is the only account with
privileges to manage Symantec Web Security. You must log on using the virtual
administrative account and delegate administrative privileges to other accounts.
Note: For security reasons, the virtadmin timeout period is automatically set at 5
minutes. You will receive an error message if you attempt to modify the
virtadmin timeout.
77
78 Installation
Installing Symantec Web Security
Using Symantec Web Security with an LDAP directory service
When installing Symantec Web Security on Windows NT or 2000, you are
prompted to specify whether you will use Symantec Web Security with an LDAP
directory service and to specify the LDAP-compliant platform you want
supported. The LDAP-compliant platforms that Symantec Web Security
supports are Sun ONE, Microsoft Active Directory, and IBM SecureWay. The
decision to use the software with an LDAP server can be changed at any time
through the Modify method for the System object.
See “Defining a directory service connection” on page 170.
You must reinstall Symantec Web Security to change your selection of LDAPcompliant platform if that change involves switching from or to Microsoft Active
Directory.
Consider the following when reinstalling Symantec Web Security:
■
If you switch from Virtual Users Only to System Users, RADIUS, or LDAP,
the virtual users are assumed to exist also in the newly selected directory
service, and the virtual groups are assumed to exist on the system server. If
they do not, they are considered obsolete.
RADIUS does not support groups.
■
If you switch from NT or Solaris System Users to LDAP or RADIUS, system
users are assumed to exist also on the LDAP or RADIUS server, and system
groups are assumed to exist also on the LDAP server. If they do not, they are
considered obsolete. Virtual users and groups remain virtual users.
Note: An obsolete user is one who has been added to Symantec Web Security
from a directory service, then deleted from the directory service. Deleting a user
from a directory service does not delete that user from Symantec Web Security.
The added user must be manually deleted from Symantec Web Security.
Likewise, deleting a user from Symantec Web Security does not remove that user
from the directory service. See “Deleting a user” on page 238.
Installing Symantec Web Security
Symantec Web Security runs on either Solaris or Windows 2000/NT.
Installation
Installing Symantec Web Security
Solaris
The Solaris version of Symantec Web Security is distributed as a self-extracting,
self-installing shell archive (shar) file, sws-3.0.0.<build number>.sh.
To install Symantec Web Security on Solaris
1
Log on as root.
2
Copy the distribution file, sws-3.0.0.<build number>.sh, to a directory on
the computer on which you plan to install Symantec Web Security.
3
Change the directory to the location where you copied the distribution file.
4
Type the following command:
# /bin/sh ./sws-3.0.0.<build number>.sh
5
Follow the on-screen instructions.
A transcript of the installation is saved as /var/log/Symantec-Web-Securityinstall.log for later review.
Windows NT and Windows 2000
Symantec Web Security functions on a Windows 2000 Server with the same level
of compatibility as on a Windows NT Server 4.0. However, Symantec Web
Security does not adhere to Windows 2000 Logo Requirements.
Windows users can now install Symantec Web Security via the command line
(perform a silent install).
To install Symantec Web Security on Windows NT and Windows 2000
1
Log on as Administrator or with administrative rights.
2
Locate Setup.exe on the CD.
3
Double-click Setup.exe.
4
Follow the on-screen instructions.
5
Restart the system.
In rare cases, not restarting prevents you from being able to log on using the
virtadmin account.
A transcript of the installation is saved to the NT Event log for later review.
79
80 Installation
Stopping and starting Symantec Web Security service
To perform a silent install
Warning: Do not use the Back button or the backspace during a silent install.
Doing so corrupts the script, and you will have to stop the installation and
begin again.
1
Create the silent install file by doing the following:
■
At the command line, type setup -r.
■
Follow the on-screen instructions to configure the product and install it.
Do not choose to reboot after the installation is complete.
■
Manually restart the server.
A new file called setup.iss is created (this is the silent install file). The
path for this file could be C:\\Winnt for WinNT/Win2K environments.
The silent install file is specific to the installation being performed. If it is
created while installing a new installation (nonupgrade) it cannot be
used to perform upgrades. If different environments require different
installations, multiple silent install files are needed.
2
Go to the computers where you want to perform the silent install.
3
To perform the silent install, do the following:
■
Copy the folder containing the .exe file to the local computer.
■
Copy the silent install file (setup.iss by default) to the folder that
contains the setup files.
■
At the command prompt, go to the location where you copied the folder
containing the .exe file, then type setup -s.
The installation is performed. If an error occurs during installation (if
the result code is something other than 0), when the installation is
complete, setup.exe places a setup-log file in the folder where setup.exe
was run. This log file indicates the result of the installation.
Stopping and starting Symantec Web Security
service
Stopping service
It may be necessary at times to stop Symantec Web Security service.
Installation
Stopping and starting Symantec Web Security service
To stop the Symantec Web Security service on Solaris
1
Log on as root.
2
Type the following command:
# /etc/init.d/sws stop
To stop the Symantec Web Security service on Windows NT
1
On the Windows taskbar, click Settings > Control Panel.
2
Click Services.
3
On the list of services, click Symantec Web Security.
4
Click Stop.
To stop the Symantec Web Security service on Windows 2000
1
On the Windows taskbar, click Programs > Administration Tools > Services.
2
On the list of services, right-click Symantec Web Security, then click Stop.
Starting service
It may be necessary at times to restart Symantec Web Security service.
To start the Symantec Web Security service on Solaris
1
Log on as root.
2
Type the following command:
# /etc/init.d/sws start
To start the Symantec Web Security service on Windows NT
1
On the Windows taskbar, click Settings > Control Panel.
2
Click Services.
3
On the list of services, click Symantec Web Security.
4
Click Start.
81
82 Installation
Uninstalling Symantec Web Security
To start the Symantec Web Security service on Windows 2000
1
On the Windows taskbar, click Programs > Administration Tools > Services.
2
On the list of services, right-click Symantec Web Security, then click Start.
Uninstalling Symantec Web Security
When Symantec Web Security is uninstalled, some files may not be deleted
automatically. After uninstallation is complete, some files may need to be deleted
manually depending on your system configuration.
Note: If you have installed Symantec Web Security 3.0 as an upgrade to a
previous version of Symantec Web Security or Symantec I-Gear, do not uninstall
the previous version. Symantec Web Security will not function properly if the
previous version is uninstalled.
Manually deleting configuration files
If you did not select the default locations for any Symantec Web Security
directories, the uninstall script will not delete these directories. Remove any
directories in nondefault locations manually.
Retaining shared configuration files
Certain files that are part of Symantec Web Security are shared configuration files
when more than one Symantec product is installed on the same computer. Local
settings in Symantec Web Security, such as scheduled events, user account
settings, and local lists, are contained in these configuration files. Uninstalling
Symantec Web Security does not delete these files.
If you are not running other Symantec products on the same computer or if you
do not need to retain local settings for Symantec Web Security, these
configuration files can be deleted manually after uninstalling the product. If you
do not delete these files and you reinstall Symantec Web Security at a later time,
configuration settings from the previous installation are retained.
Reenabling conflicting services
If Symantec Web Security was permitted to automatically disable conflicting
services when it was installed, an attempt is made to reenable the services that
were disabled during installation.
Installation
Uninstalling Symantec Web Security
Uninstalling the software
To uninstall Symantec Web Security on Solaris
1
Log on as root.
2
Type the following command:
# pkgrm SYMCsws
3
Follow the on-screen instructions.
The uninstall script displays a list of shared configuration files that are not
removed during uninstallation. If you are running other Symantec products
on the same computer, do not delete these shared configuration files. If you
are not running other Symantec products, these files can be deleted
manually.
To uninstall Symantec Web Security on Windows NT
1
On the Windows taskbar, click Settings > Control Panel > Add/Remove
Programs.
2
Select the Symantec Web Security program item.
3
Click Add/Remove.
4
Follow the on-screen instructions.
5
Do one of the following to confirm the deletion of shared configuration files:
6
■
If you are running other Symantec products on the same computer,
click No.
■
Click Yes to All.
Do one of the following:
■
If a Detail button appears in the bottom of the window following
uninstallation, click Detail. This displays a list of files that can be deleted
manually if desired.
■
Click OK.
83
84 Installation
Uninstalling Symantec Web Security
To uninstall Symantec Web Security on Windows 2000
1
On the Windows taskbar, click Settings > Control Panel > Add/Remove
Programs.
2
Select the Symantec Web Security program item.
3
Click Change/Remove.
4
Follow the on-screen instructions.
5
Do one of the following to confirm the deletion of shared configuration files:
6
■
If you are running other Symantec products on the same computer,
click No.
■
Click Yes to All.
Do one of the following:
■
If a Detail button appears in the bottom of the window following
uninstallation, click Detail. This displays a list of files that can be deleted
manually if desired.
■
Click OK.
Chapter
Activating and configuring
Symantec Web Security
This chapter includes the following topics:
■
Activating Symantec Web Security
■
Activating a license
■
Configuring your network to work with Symantec Web Security
■
Configuring Symantec Web Security
5
86 Activating and configuring Symantec Web Security
Activating Symantec Web Security
Activating Symantec Web Security
To activate the full functionality of Symantec Web Security, you must activate the
license.
Warning: Keep your license current. If your subscription information expires, no
further URL lists will be downloaded.
Activating the software requires the following:
■
Fully installed software product
Follow installation procedures explained in this Implementation Guide.
■
Your Symantec Serial Number Certificate
You activate comprehensive antivirus protection and content filtering by
license. To activate a license, you must have the serial number listed on the
Serial Number Certificate.
Note: The Symantec Serial Number Certificate is not part of the Symantec
Web Security software distribution package. The Symantec Serial Number
Certificate is mailed separately and should arrive in the same time frame as
your software.
Activating a license
Key features for Symantec Web Security, including antivirus scanning
functionality and content list updates, are activated by licenses (a content and a
product license). A product license enables you to use Symantec Web Security. A
content license enables you to receive virus definition, list, and dictionary
updates. Licenses are initially installed following product installation, through the
Symantec Web Security administrative interface.
Product licenses do not expire. When a content license expires, a new license
must be installed in order to receive current updates.
License warning and grace periods
When a content license is within 30 days of the expiration date, it is considered to
be in a warning period. After a license expires, the licensed feature continues to
operate for a specified period of time. This is the grace period. If the grace period
expires with no license renewal, the product continues to function, but you will
not receive virus definition, list, and dictionary updates.
Activating and configuring Symantec Web Security
Activating a license
The LiveUpdate page, which can be accessed from the main administration page,
also contains a License status entry that indicates whether any installed license is
in either a grace or warning period (this information also appears on the logon
page).
Removing license files
Licenses are not uninstalled automatically when the product is uninstalled. The
license files remain in place, so that if you must uninstall and reinstall Symantec
Web Security, the license is intact on reinstall. Each installed license is stored in a
separate file in the shared license directory that contains the licenses for all
Symantec products that are activated by license. The license files must be
removed manually. If you must remove a license file, contact Symantec Service
and Support.
Activating a license
Symantec Web Security protection capabilities are not available when the
software is operating in unlicensed mode, and Symantec Web Security filter lists
are empty. A valid serial number is required to activate these features.
If you have installed Symantec Web Security on multiple servers, you must claim
the license file for each server. The same license files are used for all servers.
To activate a license, you must have the serial number required for activation.
The serial number is printed on the Symantec Serial Number Certificate for the
product.
The Symantec Serial Number Certificate is not part of the Symantec Web Security
software distribution package. The Symantec Serial Number Certificate is mailed
separately and should arrive in the same time frame as your software.
Activating a license is a two-step process. You must complete both steps to
activate a license:
■
Obtain the license files from Symantec by completing the online form. You
must have a serial number to complete the online form. Once you complete
the online form, you receive the license files via email from Symantec (each
complete license file is provided as an attachment to the email).
■
Via the administrative interface, install the license files that you receive.
To obtain and install the license files
1
On the administrative interface, click the Modify method for the System
object.
87
88 Activating and configuring Symantec Web Security
Activating a license
2
In the Modify System window, click Licensing.
3
Click Next.
4
In the Software License dialog box, follow the instructions for installing both
a product and a content license.
You must have the appropriate serial number to complete the form.
The license file is returned via email as an attachment. Make sure that the
email address you provide on the online form is appropriate so that the
license file will be accessible.
5
Click Done.
Activating and configuring Symantec Web Security
Configuring your network to work with Symantec Web Security
The main administration page appears, indicating that Symantec Web Security is
fully functional.
The main Symantec
Web Security
administration page
If you have licensed Symantec Web Security for the first time, the predefined
filter lists are empty. As soon as you install your license, Symantec Web Security
automatically begins to download the predefined filter lists from Symantec.
Depending on your bandwidth, this process can take anywhere from a few
minutes to a few hours. You can continue to configure Symantec Web Security
during this initial list download. However, if during this initial download process
you attempt to visit a site that would normally be blocked by one of the
predefined lists, access may not be denied.
To check to see if the download is complete
◆
On the main administration page, click the LiveUpdate method for the
LiveUpdate object.
If the list download is complete, the creation dates for the newly installed
lists/dictionaries are displayed.
After the initial list download is in place, Symantec Web Security
automatically polls the Symantec server every 12-24 hours for additional list
updates if you have purchased a support package that includes list updates.
Filtering is not affected during subsequent downloads of updated filter lists.
Configuring your network to work with Symantec Web
Security
For proper operation of the software, you must configure the browser settings for
all clients that access Symantec Web Security.
89
90 Activating and configuring Symantec Web Security
Configuring your network to work with Symantec Web Security
Configuring client settings
Configuring client browser settings includes modifying client proxy settings, disk
cache, and memory cache settings. Suitable Web browsers include Microsoft
Internet Explorer 5.0 or later and Netscape Navigator 4.7 or later.
Modifying client proxy settings
For proper operation of the software, you must configure the browser HTTP
proxy settings for all clients that access Symantec Web Security, so that all
Internet requests are proxied through the Symantec Web Security server.
If you want to proxy FTP requests through the Symantec Web Security server,
you must configure the browser proxy settings to support this feature.
Because nonbrowser FTP clients (either command-line utilities or graphical
utilities such as WS_FTP or CuteFTP) establish FTP sessions directly with FTP
hosts, such FTP traffic is not scanned by Symantec Web Security. Administrators
should block this traffic at the firewall.
To configure client proxy settings using Netscape Navigator
1
On the Edit menu, click Preferences.
2
Click Advanced.
3
Click Proxies.
4
Click Manual Proxy Configuration.
5
Type the host name or the IP address of the server running Symantec Web
Security in the Proxy Address to Use boxes for HTTP, FTP, and Security
proxies.
6
In the Port box for each entry, type the port number you selected during
Symantec Web Security installation.
The same port number is used for each entry. The port number is the builtin HTTP server port number you selected during installation.
Leave the Socks, Gopher, and Exceptions boxes empty.
7
Click OK.
8
Repeat these steps for each client that accesses the Symantec Web Security
server.
Activating and configuring Symantec Web Security
Configuring your network to work with Symantec Web Security
To configure client proxy settings using Microsoft Internet Explorer
1
On the Tools menu, click Internet Options.
2
On the Connections tab, click Lan Settings.
3
Under Proxy Server, check Use a Proxy Server.
4
Click Advanced.
5
Type the host name or the IP address of the server running Symantec Web
Security in the Proxy Address to Use boxes for HTTP, FTP, and Secure
proxies.
6
In the Port box for each entry, type the port number you selected during
Symantec Web Security installation.
The same port number is used for each entry. The port number is the builtin HTTP server port number you selected during installation.
Leave the Socks, Gopher, and Exceptions boxes empty.
7
Click OK.
8
Repeat these steps for each client that accesses the Symantec Web Security
server.
Set the HTTP,
Secure, and FTP
proxies to the server
running Symantec
Web Security
Leave the Socks,
Gopher, and
Exceptions boxes
empty
Type the same port
number for each
entry
91
92 Activating and configuring Symantec Web Security
Configuring your network to work with Symantec Web Security
Select Manual Proxy
Configuration
Enter the same port
number for each entry
Set the HTTP, FTP,
and Security proxies to
the server running IGear
Leave the SOCKS
Host field empty
Type the name of the
server running I-Gear
and the port number in
the No Proxy For field
Activating and configuring Symantec Web Security
Configuring your network to work with Symantec Web Security
Modifying disk cache and memory cache settings
In addition to configuring the browser to proxy through the server running
Symantec Web Security, you should adjust the browser settings for the disk cache
and the memory cache so that information cannot be cached on the client
workstation. Set the browser’s Verify Documents setting to Once per Session or
Every Time.
Note: Some browsers do not allow the memory cache to be adjusted. These
browsers automatically retain a small memory cache. When adjusting memory
cache, do not set the number to 0. Some memory is necessary to retain complete
browser functionality (for example, the Print Screen function).
To modify the disk cache and memory cache settings using Netscape
Navigator
1
On the Edit menu, click Preferences.
2
Click Advanced.
3
Click Cache.
4
Set the Memory Cache to a small value (for example, 512 Kilobytes).
5
Set the Disk Cache value to 0.
6
Set the Verify Documents setting to Once per Session or Every Time.
A session ends when a user quits the browser.
7
Click OK to save your changes.
8
Repeat these steps for each client that accesses the Symantec Web Security
server.
To modify the disk cache settings using Microsoft Internet Explorer
1
On the Tools menu, click Internet Options.
2
On the General tab, under temporary Internet files, click Settings.
3
Under Check for Newer Versions of Stored Pages, select one of the following:
4
■
Every Visit to the Page
■
Every Time you Start Internet Explorer
Under Temporary Internet Files Folder, set the Amount of Disk Space to Use
value to the smallest number allowed by the browser.
93
94 Activating and configuring Symantec Web Security
Configuring Symantec Web Security
5
Click OK to save your changes.
6
Repeat these steps for each client that accesses the Symantec Web Security
server.
Configuring Symantec Web Security
After you have activated the software, you may need to modify the proxy
configuration, depending on your network setup.
In a standard configuration, the server running Symantec Web Security functions
as the proxy server for all Internet requests. If your network configuration
requires the Symantec Web Security server to proxy all Internet requests through
another server, you must specify the proxy settings.
If your network has been set to transparently proxy all HTTP requests through
the server running Symantec Web Security, you must enable transparent proxy
support for Symantec Web Security.
To modify the proxy configuration
1
On the main administration page, click the Modify method for the System
object.
2
Click Proxy Configuration.
3
Click Next.
4
Type any other host names by which the server running Symantec Web
Security can be identified (one per line).
Other host names must be identified so that Symantec Web Security treats
any requests using these alternate host names as local requests.
5
If proxy chaining is used on your network, type the host name or IP address
of the server through which you want Symantec Web Security to proxy
Internet requests and the appropriate port number.
6
Activate transparent proxy support if applicable.
Transparent proxy is not supported on Windows NT.
7
Click Finish.
Changing your proxy settings here has no effect on the browser settings on client
workstations. The browser settings should remain set to proxy through the server
that is running Symantec Web Security.
Activating and configuring Symantec Web Security
Configuring Symantec Web Security
See “Configuring your network to work with Symantec Web Security” on
page 89.
Identify other host
names to treat as
local requests
If you want the
software to proxy
requests through
another server, type the
server name/address
and port number
Enable transparent
proxy support if
applicable
Additional configuration procedures for the antivirus configuration
You should verify the default settings to ensure that they are adequate for your
network and install the Central Quarantine.
Verifying settings for antivirus protection
As soon as Symantec Web Security is initially installed and licensed, antivirus
protection is active. The antivirus settings are preconfigured appropriately for
most environments. You can verify these antivirus settings and customize the
settings for your network. In many cases, usage is the only way to determine the
exact settings that are appropriate for your network.
See “Antivirus protection” on page 277.
Note: If you change the Bloodhound sensitivity level after installation, stop and
restart Symantec Web Security service. See “Stopping and starting Symantec Web
Security service” on page 80.
Installing the Central Quarantine
Symantec Web Security can forward infected items to the separately installed
Central Quarantine. The Central Quarantine must be installed on a Windows NT
computer. If you are running Symantec Web Security on Solaris, you must have a
separate Windows NT computer to act as the Central Quarantine.
95
96 Activating and configuring Symantec Web Security
Configuring Symantec Web Security
To enable forwarding to the Central Quarantine, you must enter the host name
or IP address of the computer on which the Quarantine server is installed and the
port on which it is configured to listen.
See “Setting scan policy” on page 278.
Additional configuration procedures for content filtering
Establishing your default settings for content filtering is extremely important
because the software is shipped with filtering turned off. You must activate
filtering according to your site’s acceptable-use policy.
Establishing system defaults for filtering
Unlike the antivirus portion of the product, content filtering default settings are
not activated upon installation. To establish a basic level of filtering, you must
activate filtering by moving the appropriate lists to the Deny state, based on your
organization’s local policies.
See “Filtering lists” on page 37.
Note: When Symantec Web Security is first installed, the predefined filter lists are
empty. The software automatically initiates a download of these lists after the
license is installed. Depending on your bandwidth, this process can take
anywhere from a few minutes to a few hours. You can continue to configure
Symantec Web Security while the download process is in progress. However, if
you attempt to test Symantec Web Security’s filtering capability during this time,
access to sites that would normally be blocked may not be denied until the
download is complete.
When you establish default filtering, all clients and users inherit the system
default settings unless you schedule these objects independently. Once you
establish the system defaults and understand how to schedule events, group
objects, and so on, you can refine filtering properties to suit your needs.
Establishing default filtering settings includes the following:
■
Setting the default logon mode and the filtering mode
■
Assigning access states for filter lists
■
Setting additional filtering options
■
Activating AutoLock
■
Activating AutoAlert
Activating and configuring Symantec Web Security
Configuring Symantec Web Security
To establish the default filtering settings
1
On the main administration page, click the Schedule method for the System
object.
2
Click Set Defaults.
3
Click Next.
The toolbar
Click Set Defaults,
then click Next
Setting the default logon mode and the filtering mode
By default, Symantec Web Security requires all users to log on before accessing
the Internet and automatically logs users off after 5 minutes of inactivity. You can
change the default timeout period or turn off the logon requirement entirely by
putting the system in Guest Mode. (Depending on your licensing scheme, Guest
Mode may not be available.)
Note: For security purposes, the virtadmin account is automatically logged out
after 5 minutes of inactivity, regardless of the logon setting.
97
98 Activating and configuring Symantec Web Security
Configuring Symantec Web Security
The default filtering mode is Filtered. In Filtered mode, any attempts to access
Internet materials are subject to the established filtering guidelines. Use Filtered
mode when initially configuring Symantec Web Security to verify correct
operation of the software. The default filtering mode can be changed later.
To set the default logon mode and the filtering mode
1
2
In the Edit Settings System window, select one of the following:
■
Unfiltered: No filtering of Internet content.
■
Audit: Users can access inappropriate content. Attempts are logged as
though users are blocked from accessing the inappropriate material.
Audit mode is transparent to the user, but Symantec Web Security’s
reporting features allow you to monitor user browsing activity.
■
Filtered: Access to Internet materials is subject to established filtering
guidelines. Attempts to access inappropriate content are logged, and
users see an Access Denied screen to indicate that access to
inappropriate content has been blocked.
■
Allow Only: Access is permitted only to those sites that have been
designated as Allow (Filtering Enabled) or Allow (Filtering Disabled).
Access to all other Internet sites is prevented.
■
Local Sites Only: Access is permitted only to sites with the same Internet
domain name as the server running Symantec Web Security. Access to
all other Internet sites is prevented.
■
Locked: No Internet access is permitted. This option is typically used to
deny Internet access for specific users or clients and is not normally used
as a default system mode.
Click Next.
Select logon
behavior
Select default
filtering mode
If you select Unfiltered, Locked, or Local Sites Only, the software confirms that
your changes have been made.
Activating and configuring Symantec Web Security
Configuring Symantec Web Security
Assigning access states for filter lists
If you select Filtered, Audit, or Allow Only as the default filtering mode, you must
specify the access state of the Content Category Lists. If the default state for a
given list is to remain Off, leave the list in the Off box.
More than one list can be selected at a time, usually by pressing Ctrl while clicking
the lists. The exact method to select more than one list item is browser and
operating-system dependent.
To assign access states for filter lists
1
Select the Content Category Lists for which you want to assign access states.
See “List access states” on page 43.
2
Select one of the following:
■
Allow (Filtering Enabled): Category Lists in the Allow (Filtering
Enabled) state specify content to which access is permitted. Content
specified by a Category List in the Allow (Filtering Enabled) state is
scanned by DDR using active dictionaries (dictionaries for which the
associated Content Category list is in the Deny state). The dictionary
terms associated with categories in this state are not active. If the system
is in the Allow Only filtering mode, access is permitted only to the
content specified by lists that are in either of the Allow states.
■
Allow (Filtering Disabled): Category Lists in the Allow (Filtering
Disabled) state specify content to which access is unconditionally
permitted. Content specified by a Category List in the Allow (Filtering
Disabled) state is not scanned by DDR, and the associated dictionary is
not activated. If the system is in the Allow Only filtering mode, access is
permitted only to the content specified by lists that are in either of the
Allow states.
■
Deny: Category Lists in the Deny state specify content to which access is
not permitted. The related terms found in the associated dictionaries are
used by DDR in scanning content for appropriateness. Lists in the Deny
state and the associated dictionaries are considered “active.”
■
Off: Category Lists in the Off state are not considered when Symantec
Web Security checks lists for URLs. The URLs in a Category List in the
Off state are not denied but are still subject to other filtering. That is,
these URLs are still blocked if they are contained in other lists in the
Deny state and are still scanned by DDR using dictionary terms for other
active dictionaries. When a Category List is in the Off state, the terms in
99
100 Activating and configuring Symantec Web Security
Configuring Symantec Web Security
the corresponding dictionary are ignored by DDR in scanning content.
All Content Category Lists are in the Off state at installation.
Select the lists to
be changed
Specify new state
for selected lists
Click Next
Placing lists in either of the Allow states for the system default settings is not
recommended. Based on your local acceptable-use policies, you may want to
place some of the predefined lists in the Deny state and leave some lists in the
Off state.
See “Understanding Symantec Web Security” on page 35.
The Allow Category List should contain locally added URLs to which access
is unconditionally permitted and should be placed in one of the two Allow
states. The Deny Category List should contain locally added URLs to which
access is not permitted and should be placed in the Deny state. Unlike the
other Content Category Lists, these two lists do not contain any predefined
entries. These lists are provided to administrators to simplify allowing or
denying additional content.
3
Click Next.
Setting additional filtering options
You can make changes to DDR thresholds as well as specify other blocking
options. Leave these filtering settings at their default values when initially
configuring Symantec Web Security to verify correct operation. The settings can
be changed later.
See “Establishing system-level filtering settings” on page 179.
Activating and configuring Symantec Web Security
Configuring Symantec Web Security
Activating AutoLock
If Filtered or Allow Only was selected as the filtering mode, you can activate the
AutoLock feature (optional). The AutoLock feature is not available in Audit
mode. Leave AutoLock off when initially configuring Symantec Web Security
until correct operation of the software has been verified. The settings can be
changed later.
See “Activating AutoLock” on page 188.
Activating AutoAlert
If you selected Filtered, Allow Only, or Audit mode as the filtering mode, you can
activate the AutoAlert feature (optional). Leave AutoAlert off when initially
configuring Symantec Web Security until correct operation of the software has
been verified. The settings can be changed later.
See “Activating AutoAlert” on page 190.
101
102 Activating and configuring Symantec Web Security
Configuring Symantec Web Security
Chapter
Integrating Symantec
Web Security with SESA
This chapter includes the following topics:
■
About SESA
■
Configuring logging to SESA
■
Interpreting Symantec Web Security events in SESA
■
Uninstalling the SESA integration components
■
Uninstalling the local SESA Agent
6
104 Integrating Symantec Web Security with SESA
About SESA
About SESA
In addition to standard local logging for Symantec Web Security, you can also
choose to log events to the Symantec Enterprise Security Architecture (SESA).
SESA is an underlying software infrastructure and a common user interface
framework. It integrates multiple Symantec Enterprise Security products and
third-party products to provide a central point of control of security within an
organization. It provides a common management framework for SESA-enabled
security products, such as Symantec Web Security, that protect your IT
infrastructure from malicious code, intrusions, and blended threats.
SESA helps you increase your organization's security posture by simplifying the
task of monitoring and managing the multitude of security-related events and
products that exist in today's corporate environments. SESA includes an event
management system that employs data collection services for events generated on
computers that are managed by Symantec security products. The event categories
and classes include antivirus, content filtering, network security, and systems
management. The range of events varies depending on the Symantec applications
that are installed and managed by SESA.
You can monitor and manage these security-related events through the SESA
Console. The SESA Console is the common user interface that provides
manageable integration of security technologies (Symantec or otherwise),
Symantec Security Services, and Symantec Security Response. You can query,
filter, and sort data to reduce the security-related events that you see through the
SESA Console, which allows you to focus on threats that require your attention.
You can configure alert notifications in response to events, and generate, save,
and print tabular and graphical reports of event status, based on filtered views
that you have created.
SESA is purchased and installed separately. SESA must be installed and working
properly before you configure Symantec Web Security to log events to SESA.
For more information, see the SESA documentation.
Integrating Symantec Web Security with SESA
Configuring logging to SESA
Configuring logging to SESA
The logging of events to SESA is in addition to the standard local logging features
for Symantec Web Security. Logging to SESA is activated independently of
standard local logging. If you have purchased SESA, you can choose to send a
subset of the events logged by Symantec Web Security to SESA.
To configure logging to SESA, you must complete the following steps:
■
Configure SESA to recognize Symantec Web Security. In order for SESA to
receive events from Symantec Web Security, you must run the SESA
Integration Wizard that is specific to Symantec Web Security on each
computer that is running the SESA Manager. The SESA Integration Wizard
installs the appropriate integration components for identifying the
individual security product (in this case, Symantec Web Security) to SESA.
See “Configuring SESA to recognize Symantec Web Security” on page 105.
■
Install a local SESA Agent on the computer that is running Symantec Web
Security. The local SESA Agent handles the communication between
Symantec Web Security and SESA.
See “Installing the local SESA Agent” on page 107.
■
Configure Symantec Web Security (through the administrative interface) to
communicate with the local SESA Agent and to log events to SESA.
See “Configuring Symantec Web Security to log events to SESA” on
page 112.
Configuring SESA to recognize Symantec Web Security
To configure SESA to receive events from Symantec Web Security, run the SESA
Integration Wizard that is specific to Symantec Web Security on each computer
that is running the SESA Manager. The SESA Integration Wizard installs the
appropriate integration components for identifying Symantec Web Security to
SESA. You must run the SESA Integration Wizard for each SESA Manager
computer to which you are forwarding events from Symantec Web Security.
105
106 Integrating Symantec Web Security with SESA
Configuring logging to SESA
Each product that interfaces with SESA has a unique set of integration
components. The integration components for all products that interface with
SESA are available when you purchase SESA and are not distributed with the
individual security products. Thus, the SESA Integration component is not part
of the Symantec Web Security software distribution package.
See “Uninstalling the SESA integration components” on page 114.
To configure SESA to recognize Symantec Web Security
1
On the computer on which the SESA Manager is installed, insert the
Symantec Event Manager CD into the CD-ROM drive.
2
At the command prompt, change directories on the CD to \SWS 3.0\Sesa.
3
At the command prompt, type:
java -jar setup.jar
The SESA Integration Wizard starts.
4
Click Next until you see the SESA Domain Administrator Information
window.
5
In the SESA Domain Administrator Information window, type the specific
information about the SESA Domain Administrator and the SESA Directory.
SESA Domain Administrator
Name
The name of the SESA Directory Domain
Administrator account.
SESA Domain Administrator
Password
The password for the SESA Directory Domain
Administrator account.
IP Address of SESA Directory
The IP address of the computer on which the SESA
Directory is installed (may be the same as the SESA
Manager IP address if both are installed on the
same computer).
If you are using authenticated SSL instead of SESA
default, anonymous SSL, you must enter the host
name of the SESA Directory computer. For
example, mycomputer.com.
For more information on SESA default,
anonymous SSL and upgrading to authenticated
SSL, see the Symantec Enterprise Security
Architecture Installation Guide.
SSL Port
The number of the SESA Directory secure port.
The default port number is 636.
Integrating Symantec Web Security with SESA
Configuring logging to SESA
6
Follow the on-screen instructions to install the appropriate SESA integration
components and complete the SESA Integration Wizard.
7
Repeat steps 1 through 6 on each SESA Manager computer to which you are
forwarding Symantec Web Security events.
Installing the local SESA Agent
The local SESA Agent handles the communication between Symantec Web
Security and SESA and is installed on the same computer that is running
Symantec Web Security. The local SESA Agent is provided as part of the software
distribution package for Symantec Web Security. You have the option to install
the local SESA Agent at the same time you install Symantec Web Security, or you
can install the Agent at a later date. If you install the Agent at a later date, a
separate installation package for installing only the Agent, sesa_agent_installer, is
located in the SESA_agent directory on the distribution CD for Symantec Web
Security.
If you have more than one SESA-enabled product installed on a single computer,
these products can share a local SESA Agent. However, each product must
register with the Agent. Thus, even if an Agent has already been installed on the
computer for another SESA-enabled security product, you must run the installer
to register Symantec Web Security.
The local SESA Agent is preconfigured to listen on the IP address 127.0.0.1 and
port number 8086. Symantec Web Security uses this information to
communicate with the Agent. If you must change the IP address or port number
for the Agent, you must do so through the SESA Console. (Once an Agent is
installed, it is controlled through the SESA Console, even though it is running on
the computer that is running the security product.) You must also update,
through the Symantec Web Security administrative interface, the information
that Symantec Web Security uses to contact the local SESA Agent.
See the SESA documentation for more information.
See “Configuring Symantec Web Security to log events to SESA” on page 112.
See “Uninstalling the local SESA Agent” on page 114.
To install the SESA Agent on Windows 2000 Server/Advanced Server
1
Log on to the computer on which you have installed Symantec Web Security
as administrator or with administrator rights.
2
Copy the executable (.exe) file to install the Agent from the Symantec Web
Security distribution CD onto the computer.
3
Run the setup.exe file.
107
108 Integrating Symantec Web Security with SESA
Configuring logging to SESA
4
Indicate that you agree with the terms of the Symantec license agreement,
then click Next.
If you indicate No, the installation is aborted.
5
From the list of products to register with SESA, select Symantec Web
Security.
You can register only one product at a time. If you are installing the SESA
Agent to work with more than one Symantec product, you must run the
installer again for each product.
6
Under Choose Destination Location, select the location in which to install
the local Agent, then click Next.
The default location is C:\Program Files\Symantec\SESA.
If the SESA Agent is already installed on the same computer, this option does
not display.
7
In the Primary SESA Manager IP address or host name box, type the IP
address or host name of the computer on which the primary SESA Manager
is running.
If SESA is configured to use anonymous SSL (the default setting), type the IP
address of the primary SESA Manager. If SESA is configured to use
authenticated SSL, type the host name of the primary SESA Manager (for
example, computer.company.com).
8
In the Primary SESA Manager port number box, type the port number on
which the SESA Manager listens.
The default port number is 443.
9
If you are running a Secondary SESA Manager that is to receive events from
Symantec Web Security, do the following:
■
In the Secondary SESA Manager IP address or host name box, type the
IP address or host name of the computer on which the Secondary SESA
Manager is running.
■
In the Secondary SESA Manager port number box, type the port
number on which the Secondary SESA Manager listens.
The default port number is 443.
10 In the Organizational unit distinguished name box, type the organizational
unit distinguished name to which the Agent will belong.
If the organizational unit is unknown or not yet configured, this setting can
be left blank. Use the format shown in the example:
ou=Europe,ou=Locations,dc=SES,o=symc_ses
The domain(s) (dc=) portion of the path should correspond to the domain
that is managed by the selected SESA Management Server.
Integrating Symantec Web Security with SESA
Configuring logging to SESA
11 Select one of the following:
■
Start SESA Agent Automatically: The SESA Agent starts automatically
whenever the computer is restarted.
■
Start SESA Agent Manually: You must manually restart the SESA Agent
each time that the computer is restarted.
12 Check Check box here if you want the SESA Agent to start at installation
completion to have the SESA Agent start immediately after the installation
finishes.
If you do not check the check box, you must manually start the SESA Agent
after the installation is complete.
The installer proceeds from this point with the installation. When the
installation is complete, the Agent is installed as a Windows 2000 service, and
is listed as SESA AgentStart Service in the Services Control Panel.
To install the SESA Agent on Solaris
1
Log on as root to the computer on which you have installed Symantec Web
Security.
2
Do one of the following:
■
Copy the shell (.sh) file to install the Agent from the Symantec Web Security
distribution CD onto the computer, and change directories to the location
where you copied the file.
■
Run the Agent Installer file from the Symantec Web Security distribution
CD.
3
Type sh ./sesa_agent_installer.sh, then press Enter.
4
Indicate that you agree with the terms of the Symantec license agreement,
then press Enter.
If you indicate No, the installation is aborted.
5
From the list of products to register with SESA, select Symantec Web
Security.
You can register only one product at a time. If you are installing the Agent to
work with more than one Symantec product, you must run the installer
again for each product.
6
Select the location in which to install the SESA Agent, then click Next.
The default location is /opt/Symantec/SESA.
If the SESA Agent is already installed on the same computer, this option does
not display.
7
Do the following:
109
110 Integrating Symantec Web Security with SESA
Configuring logging to SESA
■
Type the IP address or host name of the computer on which the primary
SESA Manager is running.
If SESA is configured to use anonymous SSL (the default setting), type the IP
address of the primary SESA Manager. If SESA is configured to use
authenticated SSL, type the host name of the primary SESA Manager (for
example, computer.company.com).
■
Type the port number on which the SESA Manager listens.
The default port number is 443.
8
If you are running a Secondary SESA Manager that is to receive events from
Symantec Web Security, do the following:
9
■
Type the IP address or host name of the computer on which the
Secondary SESA Manager is running.
■
Type the port number on which the Secondary SESA Manager listens.
The default port number is 443.
Type the organizational unit distinguished name to which the Agent will
belong.
If the organizational unit is unknown or not yet configured, this setting can
be left blank. Use the format shown in the example:
ou=Europe,ou=Locations,dc=SES,o=symc_ses
The domain(s) (dc=) portion of the path should correspond to the domain
that is managed by the selected SESA Management Server.
10 Type one of the following to indicate when the SESA Agent should start
automatically on system boot:
■
y: The SESA Agent starts automatically on system boot.
■
n: You must manually restart the SESA Agent after each system boot.
11 Type one of the following to indicate whether the SESA Agent should start
immediately after the installation finishes:
■
y: The SESA Agent starts immediately after installation.
■
n: You must manually start the SESA Agent after installation.
The installer proceeds from this point with the installation. Unless you
indicated otherwise during the installation, the SESA Agent starts
automatically when the installation is complete. You may need to stop and
restart the SESA Agent. A transcript of the installation is saved as /var/log/
SESAAGENT-install.log.
Integrating Symantec Web Security with SESA
Configuring logging to SESA
Installing the SESA Agent manually by command line
As an alternative to using the SESA Agent Installer, you can install the SESA
Agent by command line.
Install the SESA Agent manually by command line
To install the SESA Agent, you do the following:
■
Prepare to install the SESA Agent.
■
Install the SESA Agent by command line.
To prepare to install the SESA Agent
1
On the computer on which Symantec Web Security is installed, create a
folder for the SESA Agent files.
For example, C:\Agent.
2
Insert the SESA CD1 - SESA Manager into the CD-ROM drive.
3
Copy the files from the \Agent folder on the CD and paste them in the newly
created folder on the Symantec Web Security computer.
4
In a text editor, open theAgent.settings file.
For example, C:\Agent\Agent.settings.
5
Change the value of the mserverip setting to the IP address of the SESA
Manager to which Symantec Web Security will forward events.
6
Save and close the Agent.settings file.
111
112 Integrating Symantec Web Security with SESA
Configuring logging to SESA
To install the SESA Agent by command line
1
On the computer on which Symantec Web Security is installed, at the
command prompt, change to the folder in which the SESA Agent files reside.
For example, C:\Agent.
2
At the command prompt, type the following:
java -jar agentinst.jar -a3015
3015 is a unique product ID to install the Agent for Symantec Web Security.
To remove the SESA Agent, you must use the same product ID parameter
(for Symantec Web Security, 3015).
Optionally, you can append any of the following parameters:
-debug
Writes logging information to the screen
-log
Turns off the installation log and instructs the SESA Agent to
write logging information to the Agntinst.log file in the local
Temp directory
Configuring Symantec Web Security to log events to SESA
After you have installed the local SESA Agent to handle communication between
Symantec Web Security and SESA, you must configure Symantec Web Security to
communicate with the Agent by specifying the IP address and port number on
which the Agent listens, and you must ensure that logging to SESA has been
activated. These settings are located on the Symantec Web Security
administrative interface.
To configure Symantec Web Security to log events to SESA
1
On the main administration page, click the Modify method for the System
object.
2
In the Modify System window, click Logging Configuration.
3
Click Next.
4
In the Modifying Logging Configuration window, under SESA logging,
check Enable SESA logging.
5
In the SESA agent host box, type the IP address on which the local SESA
Agent listens.
The default setting is 127.0.0.1 (the loopback interface), which restricts
connections to the same computer.
Integrating Symantec Web Security with SESA
Interpreting Symantec Web Security events in SESA
6
In the Port number box, type the TCP/IP port number on which the local
SESA Agent listens.
The port number you enter here must match the port number on which the
local SESA Agent listens. The default port is 8086.
7
Under Activity logging, select on the Type of browsing activity to log pulldown menu, select the type of browsing activity that Symantec Web Security
logs (None, Violations, Violations and text pages visited, or All).
This setting applies to browsing activity only. Administrative functions are
always logged, and logging of administrative activity cannot be disabled.
Many of the report functions do not operate when activity logging is
disabled.
In order for content categories to be reported, the applicable Use Vendor
Lists setting must be set to Yes and the Content Category lists must be in one
of the active states.
See “Scheduling the system defaults for filtering” on page 181.
The settings for specific clients, users, and groups may be inherited from the
system default settings for logging browsing activity.
8
Under System activity to log, select which activities Symantec Web Security
will log.
9
Click Finish.
Interpreting Symantec Web Security events in SESA
SESA provides extensive event management capabilities. SESA provides common
logging of normalized event data for SESA-enabled security products like
Symantec Web Security. The event categories and classes include antivirus,
content filtering, network security, and systems management. SESA also provides
centralized reporting capabilities, including graphical reports. Currently, the
events forwarded to SESA by Symantec Web Security take advantage of the
existing SESA infrastructure for events.
You can create alert notifications for certain events, including those generated by
Symantec Web Security. Notifications include pagers, SNMP traps, email, and OS
Event Logs. You can define the notification recipients, day and time ranges when
specific recipients are notified, and custom data to accompany the notification
messages.
For more information on interpreting events in SESA and on SESA’s event
management capabilities, see the SESA documentation.
113
114 Integrating Symantec Web Security with SESA
Uninstalling the SESA integration components
Uninstalling the SESA integration components
If Symantec Web Security is no longer forwarding messages to SESA, you can
uninstall the SESA Integration components from each computer that is running
the SESA Manager.
To uninstall the SESA Integration components
◆
On the taskbar, click Start > Run, then type:
java -jar setup.jar -uninstall
Uninstalling the local SESA Agent
The local SESA Agent is automatically uninstalled when you uninstall Symantec
Web Security. If more than one product is using the Agent, the uninstall script
removes only the Symantec Web Security registration and leaves the Agent in
place. If no other security products are using the Agent, the uninstall script will
uninstall the Agent as well.
Section
Getting started
■
Understanding the user interface
■
Administering Symantec Web Security
■
Working with the System object
3
116
Chapter
Understanding the user
interface
This chapter includes the following topics:
■
Overview
■
The toolbar
■
Viewing filter settings for other users
■
Sorting feature for FTP
7
118 Understanding the user interface
Overview
Overview
The Symantec Web Security user interface permits easy access to the software
functions for administrators and for all users who authenticate through Symantec
Web Security to access the Internet. To access the interface, you must have a Web
browser that supports frames and, optionally, JavaScript 1.1. Netscape
Navigator® 4.7 or later and Microsoft Internet Explorer 5.0 or later are two
examples of suitable Web browsers.
The Symantec Web Security user interface:
■
Requires users to log on to access the Web, regardless of the type of
computer being used
■
Provides quick access to the administrative functions of Symantec Web
Security
■
Provides easy access to certain features for users, such as changing the
Symantec Web Security password
Note: The Symantec Web Security user interface is ideal for large Internet-based
networks in which users do not have dedicated computers or client computers do
not require user authentication. Because users must log onto Symantec Web
Security before they begin browsing, the user’s filtering settings are available from
any computer on the network.
The toolbar
The Symantec Web Security toolbar consists of a series of buttons that are
hypertext links to the various functions of the Symantec Web Security suite.
The Symantec Web Security toolbar can appear in two forms, depending on the
type of browser used and the browser’s capabilities.
■
If your browser supports JavaScript 1.1, the toolbar appears in a separate
window. The toolbar remains in a separate window, regardless of the URLs
visited in the main browser window.
■
If your browser does not support JavaScript or if JavaScript is turned off, the
toolbar appears in a side frame within a single browser window.
Symantec Web Security can be configured to display the toolbar automatically.
See “Modifying other system attributes” on page 145.
Understanding the user interface
The toolbar
To manually invoke the toolbar
◆
Visit the URL http://<servername>:port/toolbar
where <servername> is the host name or IP address of the server running
Symantec Web Security.
The software provides a Web server for its own use; this server is assigned a
port number (8002 is the default port number). All URLs for the
administrative and user interfaces begin with http://<servername>:port/
If Symantec Web Security is not configured to automatically display the toolbar
at logon time, and you attempt to manually invoke the toolbar, an error message
is displayed. To manually invoke the toolbar, you must configure the software
through System > Modify > Other Settings to display the toolbar at logon time.
The toolbar changes based on permissions assigned to the logged-on user. For
example, the Web Security, Manual, and Password buttons appear only if the user
that is currently logged on has permissions related to those functions. For
example, users who do not have permission to change their passwords do not see
the Password button.
The following displays as the default toolbar.
Administrative functions
Online manual
Log on
Log off
Change password
Current access permissions
Accessing administrative functions
Logged-on users with administrative permissions can access the appropriate
administration page using the toolbar. You can also access the administration
page by visiting the following URL:
http://<servername>:port/admin
To display the Symantec Web Security administration page
◆
On the Symantec Web Security toolbar, click Web Security.
119
120 Understanding the user interface
The toolbar
Accessing online manuals
Users with administrative permissions can access the Symantec Web Security
Implementation Guide in PDF format from the toolbar.
To display the manual and table of contents
◆
On the Symantec Web Security toolbar, click Manual.
Logging on
When a user first attempts to visit an Internet site outside of the local network, a
logon screen appears. Users must log on, unless the logon feature is disabled.
User names are not case sensitive. Passwords are case sensitive.
To log on to Symantec Web Security
1
In the Symantec Web Security logon window, in the User Name box, type
your user name.
2
In the Password box, type your password.
3
Click Logon.
Note: When logging on to Symantec Web Security on a Solaris computer, if you
press Enter in the password box, you get an “Invalid Password” message. Click
Logon instead.
Understanding the user interface
The toolbar
Note: When a user who is not logged on to the content filtering component
submits a POST command, the content filtering component processes the
request without prompting the user to log on. This would generally occur only if
the user were automatically logged off of the content filtering component and
then redirected a request to a POST. This type of request is filtered using
applicable client and system settings.
Logging off
After a user has logged off, access to nonlocal Internet sites or to the
administrative functions is not permitted from that computer until a user logs on
and begins a new session.
Quitting the Web browser alone is not sufficient to log off of Symantec Web
Security. (Quitting the Web browser is sufficient, however, to eliminate the
logged-on user’s access to administrative functions.) A user must click Logout to
prevent the next user from being able to browse (on the same computer) using
their account. If a client has no activity for a given period of time (5 minutes is the
default time period), the current user is automatically logged off of Symantec
Web Security.
To log off of Symantec Web Security
◆
On the Symantec Web Security toolbar, click Logout.
Changing a password
Users must have been granted permission to change their own passwords. The
Password button does not display on the toolbar for users who do not have
password permission.
Check with your network administrator for any local password policies or
conventions.
To change a password
1
On the Symantec Web Security toolbar, click Password.
2
In the Old Password box, type your current password.
3
In the New Password boxes, type your new password.
4
Click Change.
121
122 Understanding the user interface
Viewing filter settings for other users
Users who have permission to change their passwords must be able to access the
toolbar. Configure the software through System > Modify > Other Settings to
automatically display the toolbar at logon time.
Viewing settings
The Show Settings feature lets you see the antivirus and filtering settings for users
and their current client workstations. This function helps in determining why a
user or client cannot access a given URL. The display indicates, based on the
Symantec Web Security permission hierarchy (client, user, group, and system),
the permissions that apply to the current user and client. The Settings display
indicates, for example, the filtering that applies and the states of all lists that apply
to that user and client.
To view the content filtering permissions for the current user and client
◆
On the Symantec Web Security toolbar, click Show Settings.
Viewing filter settings for other users
Normally, clicking Show Settings shows the filtering settings for the user that is
currently logged on and the current client workstation. However, if the logged-on
user has Reporting permission for the System object, that user can view the
settings for another user simply by adding the other user name to the Show
Settings URL. This feature lets an administrator check filtering settings for any
user regardless of the administrator’s location relative to the user.
The URL for the Settings display appears as follows for the logged-on user:
http://<servername>:port/showsettings
To display settings for a different user
◆
Change the URL by adding the string ?user=<user name>
where <user name> is the user whose settings you want to display, so that the
URL reads as
http://<server name>:port/showsettings?user=<user name>
Understanding the user interface
Sorting feature for FTP
Sorting feature for FTP
If you are using Symantec Web Security to proxy FTP requests, the software can
organize data at an FTP site in several ways: alphabetical by name, by the size of
the directory or file, according to type, or by date last modified. Use this sort
feature to locate files or directories on larger sites.
Note: The availability and functionality of this feature varies depending on the
type and version of the browser that you are using.
In the browser display for an FTP site, the column headings are actually links. A
single click on a link should sort the messages in descending order according to
the criteria for that column. A second click should sort messages in ascending
order. An asterisk indicates the column criteria by which the entries are currently
being sorted.
To sort FTP data by name, file or directory size, type, or date modified
◆
Click the appropriate
column heading (link)
to sort the entries by
that criteria
Click the link at the top of the appropriate column.
An asterisk appears
to indicate how the
information is
currently sorted
123
124 Understanding the user interface
Sorting feature for FTP
Chapter
Administering Symantec
Web Security
This chapter includes the following topics:
■
Accessing the administrative functions
■
The main administration page
■
About administrative permissions
■
Search capability for object lists
■
Understanding the Access Denied page
8
126 Administering Symantec Web Security
Accessing the administrative functions
Accessing the administrative functions
The administrative functions for both content filtering and antivirus protection
are performed through the Symantec Web Security administration page. Access
the administration page using a standard Web browser such as Netscape
Navigator or Microsoft Internet Explorer.
To access the administration page
1
Launch a Web browser on any computer system on your network that can
access the server running Symantec Web Security.
2
Do one of the following:
■
On the Symantec Web Security toolbar, click Web Security.
■
Visit http://<servername>:port/admin
where <servername> is the host name or IP address of the server
running Symantec Web Security and port is the port number selected
during installation for the built-in Web server (8002 is the default port
number).
3
In the Logon name box, type the logon name for an account that has
administrative privileges.
At installation, Symantec Web Security creates a virtual account with all
global administrative privileges set. Initially, you must log on using this
account to create your account and grant administrative privileges to this
account. The user name for the virtual account is virtadmin. At installation,
if you followed the on-screen prompts, you should have typed your own
password for this account. In the Password box, type the password for the
admin account.
4
Click Logon.
An administration page based on the product features that are licensed
displays.
The main administration page
The administration page contains icons for each object. You can click any of the
object icons to display the object page. From the object page, you can access any
method for that object.
You can also use method shortcuts, which appear next to each object icon on the
main administration page. Only the applicable methods for an object appear next
to that object.
Administering Symantec Web Security
The main administration page
If you do not have administrative permission to perform a particular method for
an object, the method is unavailable (and the link does not function) on both the
main administration page and the object page.
See “Assigning administrative permissions” on page 128.
Method shortcut
Object page
Method
Use the toolbar located at the left of most administration pages to quickly access
various sections of the Symantec Web Security package. You can use this toolbar
from most administrative screens to keep from having to return to the main
administration page each time you want to perform a new function.
127
128 Administering Symantec Web Security
About administrative permissions
About administrative permissions
You must have global administrative permissions to administer Symantec Web
Security. Permissions for administering Symantec Web Security can be given to
any user. (A user must have appropriate permissions to grant administrative
permissions to another user.)
If this is the first time you have installed the software, a virtual administrative
account, virtadmin, is created at installation. Initially, the virtual administrative
account is the only account with privileges to manage Symantec Web Security.
You must log on using the virtual administrative account and delegate
administrative privileges to other accounts as necessary.
Assigning administrative permissions
Permissions for administering Symantec Web Security are assigned using the
Modify method for the User object.
See “Modifying attributes” on page 239.
Permissions can also be assigned at the same time a new user account is created if
you use the advanced user creation setting.
See “Adding one user at a time (advanced)” on page 234.
Global permissions apply to all selected objects. For example, if a user has global
permission to schedule users and groups, that user can schedule any existing user
or group. If you have licensed the antivirus component, you must have Modify
permissions for the System object to control the system-wide antivirus settings.
Global permissions are assigned per object and per method. For example, if a user
has the Add objects permission but only has permission to apply the Add method
to Group objects, then this user cannot add new users or clients, but can create
new groups.
To assign global permissions to another account, you must have the Can Grant
Permissions permission, as well as Modify permissions for the User object.
Search capability for object lists
Symantec Web Security offers a search capability that eliminates the need to scroll
through a long list to locate a particular user or client, and is useful for sites that
support large numbers of users or clients. This search capability can be turned on
and off individually for each object.
See “Modifying object box controls” on page 143.
Administering Symantec Web Security
Search capability for object lists
In addition to the search capability, you can specify whether to automatically
display all of the objects in a list (Show All) or to show no objects until search
results are posted (Show None). This feature is useful for sites that have large
numbers of users. By choosing not to show users by default, you can eliminate a
potential processing delay that may be incurred because the software must
request this information from the system. When a screen with active search
capability is first displayed, the menu on the left displays the Show all or Show
none default setting.
Note: When searching for system users, the domain must be included in the
search. For example, entering <domain>/b as a search parameter would render
all user names in that domain that begin with b.
In this case, Show
none is the default
setting; the list of
users contains no
entries until search
results are displayed
If the default
setting is Show
all, the complete
list of users
displays
The search parameters for the User object differ from those for other objects.
Table 8-1
Search parameters for User object
Search parameter
Description
Accounts Starting With
Searches for all account names that start with specific text
Accounts Containing
Searches for all account names that contain specific text
Last Names Starting With
Searches for all user last names that start with specific text
Last Names Containing
Searches for all user last names that contain specific text
Full Names Starting With
Searches for all user names (including first names) that
start with specific text
129
130 Administering Symantec Web Security
Search capability for object lists
Table 8-1
Search parameters for User object
Search parameter
Description
Full Names Containing
Searches for all user names (including first names) that
contain specific text
The search parameters for Client, Group, and List objects are described in the
table below.
Table 8-2
Search parameters for Client, Group, and List objects
Search parameter
Description
Starting With
Searches for all entries that start with specific text
Containing
Searches for all entries that contain specific text
To use the search capability
1
In a screen with active search capability, select a search parameter from the
menu.
2
In the box on the right side, type the text for which to search.
3
Click Search.
Symantec Web Security displays the search results in the object list box.
4
Select the desired objects from the returned entries.
Even if only one entry is returned, you must select this entry in order to
proceed.
Administering Symantec Web Security
Search capability for object lists
5
Continue with the function you are performing.
Type the
desired search
parameter,
then click
Search
In this case, the search
has returned three groups
entries that contain the
desired text training (the
returned results appear in
the list box)
Select the entries returned
in the search, and
continue with the function
(in this case, deleting a
group)
131
132 Administering Symantec Web Security
Understanding the Access Denied page
Understanding the Access Denied page
The Symantec Web Security Access Denied page displays when users attempt to
access Web pages or download files for which they do not have permission.
The Access Denied screen shows the requested URL and the reason the user has
been blocked from viewing the requested URL. Reasons for blocking include:
■
User is Allow Only (sample permitted URLs are listed as active links).
■
URL found in Denied list (the specific lists containing the URL are shown).
■
The DDR score for the requested URL exceeds the threshold (the DDR score
for the page is shown). If the requesting user has administrative permissions,
the words that caused DDR to block the page are also shown. You must scroll
down on the Access Denied page to see the list of words.
If the requesting user has administrative permissions, the Access Denied page
displays several links for convenience. A user with administrative permissions can
perform the following actions from the Access Denied page:
■
Go to the Symantec Web Security main administration page.
■
Add the URL to one or more lists. This feature is useful if DDR blocks a URL
not currently contained in any list that should be categorized.
Clicking Give the machine 1-2 minutes of unfiltered access provides 1-2 minutes
of unfiltered access only if client has been given precedence over user.
Clicking Give the machine 1-2 minutes of unfiltered access occasionally may
result in the Access Denied page being displayed again. Browser caching of the
Access Denied page is the cause of this problem. To access the requested
document, clear the browser cache, wait a few seconds, and click Refresh.
Administrative choices
display if logged-on
user has any
administrative
permissions
Administering Symantec Web Security
Understanding the Access Denied page
Editing the Access Denied page
The Access Denied page can be customized to suit your organization’s needs by
editing two configuration files: blocked.mhtml and blocked.txt. The
blocked.mhtml file is used for the Access Denied page when the browser is able to
display an HTML document, and the blocked.txt file is used when only a text file
can be displayed. (The file that is displayed depends on the type of file the
browser is working on when the Access Denied page is needed. Both files should
be edited to be the same so that your Access Denied message is consistent.)
For Windows NT/2000, these two files are located in the \Program
Files\Symantec\Symantec Web Security\html\english\Default directory. For
Solaris, these files are located in /opt/SYMCsws/html/english/Default.
Note: The two files noted above are the only two files that you are licensed to
modify. Any HTML modifications beyond those described here require a
separate license from Symantec. If you feel you need to modify other HTML files,
contact a Symantec representative for more information.
The Access Denied page contains text that remains the same each time the page is
displayed, as well as dynamic information specific to the blocked event. Both the
standard and the dynamic text can be changed as necessary using HTML editing
convention.
To insert the dynamic information, use the following HTML tags.
Table 8-3
HTML tags for changing Access Denied text
HTML tag
Description
%%R
Displays the reason that the requested site was blocked (for example,
DDR, Allow Only, Deny list)
%%F
Displays words found by DDR that resulted in the page being blocked
(only for users with administrative permissions)
%%A
Displays administrative options (only for users with administrative
permissions)
%%H
Inserts the name of the host running Symantec Web Security (to let
you construct any desired local links)
%%L
Displays denied URL as an active link
%%U
Displays denied URL as text only (not as an active link)
133
134 Administering Symantec Web Security
Understanding the Access Denied page
The following is an example of a customized Access Denied page.
The denied URL can be
displayed as an active
link (%%L) or as text
only (%%U)
The reason the user has
been blocked can be
displayed (%%R)
Administrative choices
can be displayed if user
has administrative
permissions (%%A)
Chapter
Working with the System
object
This chapter includes the following topics:
■
Modifying the System object
■
Scheduling the System object
■
Generating system-level reports
■
Defining a directory service connection
9
136 Working with the System object
Modifying the System object
Modifying the System object
The Modify method for the System object lets you do the following:
■
Modify the proxy configuration.
■
Modify the built-in HTTP server options.
■
Define an HTTPS server connection.
■
Modify Symantec Web Security licensing.
■
Modify object box controls.
■
Modify other system attributes.
■
Modify regional settings.
■
Back up the Symantec Web Security configuration.
■
Restore a backed-up configuration.
■
Define a directory service connection.
■
Configure policy management.
■
Modify logging configuration.
Modifying the proxy configuration
Depending on your network setup, you may need to modify the proxy
configuration for Symantec Web Security.
In a standard configuration, the server running Symantec Web Security functions
as the proxy server for all Internet requests. If your network configuration
requires the Symantec Web Security server to proxy Internet requests through
another server (called proxy chaining), you must specify those proxy settings.
If your network has been set to transparently proxy all HTTP requests through
the server running Symantec Web Security, you must enable transparent proxy
support for Symantec Web Security.
Working with the System object
Modifying the System object
To modify the proxy configuration
1
On the main administration page, click the Modify method for the System
object.
2
Click Proxy Configuration.
3
Click Next.
4
Type any other host names by which the server running Symantec Web
Security can be identified (one per line).
You must specify other host names so that Symantec Web Security treats any
requests using these alternate host names as local requests.
5
If you have established proxy chaining, type the host name or IP address of
the server through which you want Symantec Web Security to proxy Internet
requests and the appropriate port number.
6
Activate transparent proxy support if applicable.
Transparent proxy is not supported for Windows NT.
7
Click Finish.
8
Click Done to return to the main administration page.
Changing your proxy settings has no effect on the browser settings on client
workstations. The browser settings should remain set to proxy through the server
that is running Symantec Web Security.
See “Configuring your network to work with Symantec Web Security” on
page 89.
137
138 Working with the System object
Modifying the System object
Modifying the built-in HTTP server options
The built-in HTTP server settings let you change the number of simultaneous
connections permitted to the Symantec Web Security HTTP server. You can also
change the server port number selected during installation.
To modify the built-in HTTP server options
1
On the main administration page, click the Modify method for the System
object.
2
Click Built-in HTTP Server Options.
3
Click Next.
4
Select the maximum number of simultaneous connections permitted to
Symantec Web Security from the range in the menu.
The number of connections that you enable should be some fraction of the
total number of client workstations you have on your network (the total
number of client workstations equaling the maximum number of
simultaneous connections that are possible on your network). The default
setting of 50 is the recommended setting for most networks.
In determining a suitable number of simultaneous connections for Symantec
Web Security, take into account the following. Generally, the higher the
number of connections permitted, the more overhead that is required to
support these connections, which may slow performance. Consider network
performance and available memory (because each simultaneous request will
use additional memory) in selecting the number of simultaneous
connections. If the number of simultaneous connections is set too low, too
few resources will be available to handle network delays that may be
encountered.
If during periods of high network usage the number of requests to Symantec
Web Security exceeds the number of simultaneous connections specified
here, then each additional request is queued and processed as soon as
another request is completed.
5
In the HTTP Port Number box, type a new port number.
The port number specified during installation appears as the default in this
box (8002 is the default Symantec Web Security port number). Only change
the port number to avoid conflict with another application.
6
Click Finish.
7
Click Done to return to the main administration page.
Working with the System object
Modifying the System object
Defining an HTTPS server connection
You can define an HTTPS server connection between client computers and
Symantec Web Security for SSL encryption of user names and passwords during
logon sessions.
Note: You must have a certificate installed prior to enabling SSL encryption for
logons.
To define an HTTPS server
You must do the following to define an HTTPS server:
■
Generate a private key.
■
Generate an SSL certificate request.
■
Submit the certificate request to a recognized Certificate Authority.
■
Submit to Symantec Web Security the certificate returned from the
Certificate Authority.
■
Identify an HTTPS server.
■
Restart the HTTPS server.
To generate a private key
1
On the main administration page, click the Modify method for the System
object.
2
Click Manage Certificates.
3
Click Next.
4
In the Manage Certificates window, click Private Key.
A private key is generated. At the bottom of the Manage Certificates window,
Generated is displayed beneath Status for Certificate, and the date and time
that the key was generated are displayed beneath Date.
5
In the Success window, click Done.
139
140 Working with the System object
Modifying the System object
To generate a certificate request
1
In the Manage Certificates window, click Certificate Request.
2
In the Certificate Request window, you must do all of the following:
3
■
In the Common Name box, type the IP address or resolvable host name
of the computer running Symantec Web Security, for example,
brightschool.com.
■
In the Organization box, type the name of your organization, for
example, Bright School.
■
In the Organization Unit box, type the type of business for your
organization, for example, Education.
■
In the City/Locality box, type your city or locality.
■
On the State/Province menu, select your state or province.
■
On the Country/Region menu, select your country or region.
■
In the Email Address box, type your email address.
The certificate will be mailed to the email address entered in this box.
Click Done.
The Generated Certificate Request window is displayed with the certificate
request in the text area.
To submit the generated certificate request to a recognized Certificate
Authority
1
In the Generated Certificate Request window, copy the entire contents of the
generated request, including the header and footer, to your clipboard or to a
text file.
2
Click Done.
The main administration page is displayed.
3
Submit the clipboard contents or the copied text file to a recognized
Certificate Authority (for example, VeriSign) by pasting it at the Certificate
Authority’s site, as they direct.
The recognized Certificate Authority emails your certificate to the address
you typed on the Certificate Request page.
Working with the System object
Modifying the System object
To submit the returned certificate to Symantec Web Security
1
Copy the entire certificate, including the header and footer, received via
email from the Certificate Authority.
2
In the Symantec Web Security main administration page, click the Modify
method for the System object.
3
Click Manage Certificates.
4
Click Next.
5
Click Install Certificate.
6
In the Certificate Installation window, paste the entire copied certificate,
including header and footer.
7
Click Done.
The Manage Certificates window displays. Generated is displayed beneath
Status for Certificate, and the date the certificate was generated is displayed
beneath Date.
8
Click Done to return to the main administration page.
To identify an HTTPS server
Warning: If you attempt to identify an HTTPS server without first installing a
certificate, and you stop and restart the service, you will no longer be able to log
on to Symantec Web Security.
1
On the main administration page, click the Modify method for the System
object.
2
Click HTTPS Server.
3
Click Next.
4
Check SSL Encryptions for Logins.
5
In the Maximum Number of Simultaneous HTTPS Connections box, type
the maximum number of simultaneous connections that the HTTPS server
may open with client computers at one time.
50 is the default for this box. The default accommodates most environments.
6
In the HTTPS Port Number box, type the port number of the HTTPS server.
The default port number is 443.
7
Click Finish.
8
Restart the HTTPS server.
141
142 Working with the System object
Modifying the System object
Licensing Symantec Web Security
Key features for Symantec Web Security, including antivirus scanning
functionality and content list updates, are activated by licenses (a content and a
product license). A product license enables you to use Symantec Web Security. A
content license enables you to receive virus definition, list, and dictionary
updates. Licenses are initially installed following product installation, through the
Symantec Web Security administrative interface.
See “Activating a license” on page 86.
Initiating list/dictionary download
The Symantec Web Security predefined Content Category Lists and dictionaries
are continually updated by Symantec. The software automatically polls Symantec
several times a day to determine whether updated versions have been posted. If
new versions are posted, Symantec Web Security automatically initiates a
download. Filtering is not affected during a list/dictionary download.
Note: If you do not subscribe to list updates, you cannot download updated lists.
When your support expires, the Symantec lists that you are currently using are
deleted.
You can manually initiate a download, if necessary. You can also check to see
which versions of the lists and dictionaries Symantec Web Security is currently
using and the date and time that these versions were created. You can also check
to see when your current subscription to the list updates expires.
To initiate a list/dictionary download
1
On the main administration page, click the LiveUpdate method for the
LiveUpdate object.
2
Click LiveUpdate Now.
Symantec Web Security confirms that a download cycle has been initiated.
Symantec Web Security checks to see if a new version is available. If so, the
download occurs in the background and may take several minutes. Recheck
the version numbers on this display in a few minutes to see whether an
updated list has been posted. You can also check to see if an update has been
posted by running an Access Report and checking the File Downloaded
check box.
See “Access reports” on page 166.
3
Click Done to return to the main administration page.
Working with the System object
Modifying the System object
Modifying object box controls
Symantec Web Security offers a search capability that eliminates the need to scroll
through a long list to locate a user or client. This feature is useful for sites that
support large numbers of users or clients. This search capability can be turned on
and off individually for each object.
See “Search capability for object lists” on page 128.
To modify the object box controls
1
On the main administration page, click the Modify method for the System
object.
2
Click Object Box Controls.
3
Click Next.
4
Activate the search capability for the appropriate objects.
Setting
Description
Show User’s Full
Name in User Box?
Select whether to display the user’s full name in brackets next
to the account name, for those functions that include lists of
user accounts, such as Delete User.
When this feature is turned off, lists of accounts include only
the actual account name, for example, ayates. When this
feature is turned on, the following account information
displays: ayates [Andrew Yates].
Note: For sites with large numbers of system users, selecting
Yes to display users’ full names may cause the software to take
more time loading lists of user accounts because the software
must request this information from the system.
Enable Searchable
User Boxes When
Available?
Select whether to enable the search capability for functions
that include lists of users, such as Delete User. If you do not
want the search capability activated, select No. To enable the
search capability, select either Yes (Show all Users by Default)
or Yes (Show no Users by Default).
For sites with large numbers of users, selecting the Yes (Show
all Users by Default) option to activate the search capability
may cause the software to take more time loading lists of user
accounts.
143
144 Working with the System object
Modifying the System object
Setting
Description
Enable Searchable
LDAP User Boxes
When Available?
The default is Yes (Show no LDAP Users by Default). The
other option is Yes (Show all LDAP Users by Default).
Enable Searchable
Group Boxes When
Available?
Select whether to enable the search capability for functions
that include lists of groups, such as Delete Group. If you do
not want the search capability activated, select No. To enable
the search capability, select either Yes (Show all Groups by
Default) or Yes (Show no Groups by Default).
For sites with large numbers of users, selecting the Yes (Show
all LDAP Users by Default) option to activate the search
capability may cause the software to take more time loading
lists of user accounts.
For sites with large numbers of groups, selecting the Yes
(Show all Groups by Default) option to activate the search
capability may cause the software to take more time loading
lists of groups.
Enable Searchable
LDAP Group Boxes
When Available?
The default is Yes (Show no LDAP Groups by Default). The
other option is Yes (Show all LDAP Groups by Default).
Enable Searchable
Client Boxes When
Available?
Select whether to enable the search capability for functions
that include lists of clients, such as Delete Client. If you do
not want the search capability, select No. To enable the search
capability, select either Yes (Show all Clients by Default) or
Yes (Show no Clients by Default).
For sites with large numbers of LDAP groups, selecting the
Yes (Show all LDAP Groups by Default) option to activate the
search capability may cause the software to take more time
loading lists of LDAP groups.
For sites with large numbers of client boxes, selecting the Yes
(Show all Client Boxes When Available) option to activate the
search capability may cause the software to take more time
loading lists of clients.
Working with the System object
Modifying the System object
Setting
Description
Enable Searchable
List Boxes When
Available?
Select whether to enable the search capability for functions
that include lists of lists (for example, the Modify a List
display). If you do not want the search capability activated,
select No. To enable the search capability, select either Yes
(Show all Lists by Default) or Yes (Show no Lists by Default).
For sites with large numbers of list boxes, selecting the Yes
(Show all List Boxes when Available) option to activate the
search capability may cause the software to take more time
loading lists of list boxes when available.
Note: Enabling searchable list boxes for lists also activates
searchable list boxes for the Dictionary object.
5
Click Finish.
6
Click Done to return to the main administration page.
Modifying other system attributes
Functions that can be performed include:
■
Customize logging settings.
■
Set default password settings.
■
Change default logon settings.
■
Reverse object hierarchy.
■
Establish default filtering restrictions for users with administrative
permissions.
■
Enable debugging.
■
Edit formats for dates and times displayed in Symantec Web Security report
output.
To modify other system attributes
1
On the main administration page, click the Modify method for the System
object.
2
Click Other Settings.
3
Click Next.
145
146 Working with the System object
Modifying the System object
4
Change the appropriate system attributes.
Setting
Description
Can users change
their password?
Select the system default setting for whether virtual users can
change their passwords.
Note: The settings for specific users and groups may be
inherited from the system default settings for changing
passwords. Only virtual users can change their passwords.
Working with the System object
Modifying the System object
Setting
Description
Use browser
comforting?
Select whether browser comforting (with or without user
notification) will be invoked.
Note: Browser comforting settings for User, Client, and
Group that were present in Symantec Web SEcurity, versions
2.5 and earlier, have been removed. A new setting under
System has been added to configure browser and user
comforting. If Symantec Web Security is installed as an
upgrade, any previous entries saved for browser comforting
(under User, Client, or Group) are ignored, and only what is
entered in the new setting under System is recognized.
■
Yes (with user notification)
Browser and user comforting are invoked when files are
downloaded. Upon five seconds of invoking a
download, two windows open: Processing Document
window (window in which the status of the download
displays) and Processing Download window (window in
which you can continue to browse during the
download). After download is complete, clicking the
Back button on this window returns you to the referring
page.
Note: When the download completes, in some cases, clicking
Back on the Processing Download window causes the
download to restart. This is browser behavior that Symantec
Web Security cannot control. You must manually stop the
download in your browser window. Selecting the Save Target
As option for downloads may cause you to receive system
notification that the download is complete when, in fact, only
the download of the Symantec Web Security user comforting
window is complete. This is browser behavior that Symantec
Web Security cannot control and occurs only when the Save
Target As option is selected. To avoid such behavior,
download files by clicking the link for the targeted file instead
of using the Save Target As option.
■
■
Yes (without user notification)
This is the default behavior. Browser comforting is
invoked when files are downloaded, but no window
opens to display the status of the download.
No
No browser comforting is invoked.
147
148 Working with the System object
Modifying the System object
Setting
Description
Disable user
notification for these
sites, if browser
comforting is
enabled
Specify host names of sites (one per line) for which user
notification will not be invoked (browser comforting will still
take place during long downloads to prevent the browser
from timing out).
By default, download.windowsupdate.com and
ntservicepack.microsoft.com display so that downloads
performed via these sites can be completed.
Should the toolbar
be automatically
displayed at logon?
Specify whether Symantec Web Security should
automatically display the toolbar at logon.
JavaScript must be enabled to automatically display the
toolbar.
Default URL to use Specify the default URL to display when no other URL has
when none specified been requested (the URL that the browser displays
automatically after a user has clicked Logon).
Redirect timeout
Select the length of time the Logon Completed page remains
on the screen after a successful logon. To make the Logon
Completed page appear only briefly, select 1 second.
Client revalidation
timeout
Select the desired period of inactivity after which the software
challenges the client browser for a cookie to ensure that the
user has not changed.
This setting can be used in situations in which pools of IP
addresses are distributed randomly to users, to prevent a
second user (having received the same IP address as the first
user) from browsing under the first user’s permissions if the
first user did not log out of Symantec Web Security.
Select which object Select the object (Client or User) that has the highest priority
has higher
in terms of object permissions.
precedence when
See “Hierarchy of access permissions” on page 31.
determining settings
Should a user be
allowed to log on
from more than one
client?
Indicate whether a user can log on to Symantec Web Security
from more than one client workstation at any time. If this
setting is set to No, a user is prevented from logging on to a
second computer until the initial session terminates
automatically or the user is logged off of the first computer
manually.
Note: At the second client, the user receives a message that he
is already authenticated, and the logon is blocked.
Working with the System object
Modifying the System object
Setting
Description
Should users be able
to add URLs found
in public lists to
their private lists?
Specify whether users with access control for private lists can
add URLs that are found in any public list (currently in an
active state) to a private list. Thus, the user is restricted from
adding a given URL to a private list only when a public list
containing the URL is in an active state.
Selecting No prevents users from adding URLs that are found
in public lists to their private lists to override filtering settings
that may have been established for the public list.
Can grant unfiltered Specify the default setting for whether users can grant
access to
Unfiltered (or Audit Mode) access to another user with
administrators?
administrative privileges.
If this setting is set to No, the Unfiltered and Audit Mode
filtering settings cannot be assigned by users with Access
Control to other accounts with administrative permissions
over which they have administrative control. In addition, the
two-minute administrative override for blocked sites
(normally available to users with administrative permissions)
is not available.
Enable debugging?
Enable or disable the debugging feature. When the debugging
feature is enabled, Symantec Service and Support can view
the error messages via a Web page to help them resolve a
problem.
During normal operation of the software, the debugging
feature should be disabled. This setting should only be
enabled when requested by Symantec Service and Support
personnel and should be disabled immediately after the
problem has been resolved.
5
Click Finish.
6
Click Done to return to the main administration page.
149
150 Working with the System object
Modifying the System object
Modifying regional settings
To keep settings that affect locale, date, and time formats together, those settings
have been moved from System > Modify > Other Settings > Modify System
Attributes to their own window.
Table 9-1
Regional settings
Setting
Description
Default Server Locale
Select a new default server locale (language) if necessary.
Changing the default server locale enables the software to
handle the characters for the selected locale in all text entry
boxes. You must stop and restart the Symantec Web Security
service for a default server locale change to take effect.
At installation, Symantec Web Security checks the locale of
the server on which it starts, and uses that locale if it is
supported. The list of supported locales is in the Default
Server Locale drop-down menu. If Symantec Web Security
does not support the locale, English is used.
Ordering of (D)ay,
(M)onth, (Y)ear in date
querying combo boxes
Type D for day, M for month, and Y for year to indicate the
order in which month, day, and year display in date querying
combo boxes.
Show hour querying
combo boxes in AM/PM
or 24-hour format
Select from the menu whether to show hours in AM/PM
format or in 24-hour format.
Short date format string
for reporting
Customize the short date format for Symantec Web Security
reporting output using some or all of the following variables:
%D = day, %M = month, %Y = year, %T = time, %Z = time
zone, and %W = day of the week.
Use commas and dashes as desired in this box to format the
date string, for example, %M-%D-%Y.
Note: Using commas may affect column output when
reports are exported to comma-separated-value format.
Long date format string
for reporting
Customize the long date format for Symantec Web Security
reporting output using some or all of the following variables:
%D = day, %M = month, %Y = year, %T = time, %Z = time
zone, and %W = day of the week.
Use commas and dashes as desired in this box to format the
date string, for example, %M-%D-%Y.
Note: Using commas may affect column output when
reports are exported to comma-separated-value format.
Working with the System object
Modifying the System object
Backing up the Symantec Web Security configuration
The Backup feature lets you back up the Symantec Web Security configuration
(such as group attributes and group memberships, scheduled events, and so on).
No other system files are included in this backup. You can save the backup files to
a directory on the server that is running Symantec Web Security, or you can save
the files directly to your local computer.
Note: Symantec Web Security must be running in local mode (not central policy
mode) for Symantec Web Security to back up configuration.
To back up the Symantec Web Security configuration
1
On the main administration page, click the Modify method for the System
object.
2
Click Backup Configuration.
3
Click Next.
4
Do one of the following:
■
Click Save to the following directory on the server, and type the
directory of the server that is running Symantec Web Security.
Click Download backup to your computer.
If you save the backup file to the server running Symantec Web Security, the
backup file is named automatically. (The file extension is .gfh.) Record the
file name that is shown on the confirmation screen. You will need this file
name to restore from the backup file.
■
5
If you choose to download the backup file to your local computer, specify a
location for the file.
The backup file is given a default name by the browser. You can change this
file name.
6
Click Backup.
Symantec Web Security confirms that the backup has been accomplished.
7
Click Done to return to the main administration page.
151
152 Working with the System object
Modifying the System object
Restoring a backed-up configuration
If you have backed up the Symantec Web Security configuration, you can restore
the backup if necessary.
To restore a Symantec Web Security configuration from backup
1
On the main administration page, click the Modify method for the System
object.
2
Click Restore Configuration.
3
Click Next.
4
Choose whether to restore the backup from a file already on the server or to
upload it from your local computer.
5
Do one of the following:
■
If you are restoring the backup from a file on the server, type the path
for the file.
■
If you are uploading the file from another computer, type the name of
the computer, then click Browse. Select the appropriate file from the
local computer, then click Open.
6
Click Restore.
The software confirms that the backup has been accomplished.
7
Click Done to return to the main administration page.
8
Stop and restart Symantec Web Security.
Working with the System object
Modifying the System object
Modifying directory services
You can define a directory service connection so that Symantec Web Security can
query a directory service that resides on your network in order to authenticate its
users and groups.
See “Defining a directory service connection” on page 170.
Modifying policy management
Centralized policy management lets administrators store and retrieve
configuration data from a centralized LDAP server. The LDAP platforms
supported are Sun ONE (formerly iPlanet), Microsoft Active Directory Server
(ADS), and IBM SecureWay.
You can merge Symantec Web Security local configuration data with Symantec
Web Security data stored on the centralized LDAP server. The configuration data
includes information for virtual and imported user accounts; user, client, group,
and system policy settings; local lists; and local dictionaries. The data is usually
stored locally in the shared configuration, local configuration, local list, and local
dictionary files.
Importing schema for Sun ONE to the LDAP directory structure
There are two options for importing schema for Sun ONE:
■
Import schema via the Sun ONE console
■
Import schema via the command line
Import schema via the Sun ONE console
1
Download the following two files to your hard drive:
■
sws_ou.ldif
■
sws_iplanet_schema.ldif
2
In the sws_ou.ldif file, replace all occurrences of %%%suffix%%% with your
root DN.
For example, dc=web,dc=school,dc=edu
3
Open the Sun ONE console.
4
On the Servers and Applications tab, double-click the computer icon where
the host name is designated.
5
Double-click the Server Group folder.
6
Double-click Directory Server.
153
154 Working with the System object
Modifying the System object
7
Click Open.
8
On the Configuration tab, on the Console menu, click Import Databases.
9
Browse for the two files that you saved to your hard disk:
■
sws_ou.ldif
■
sws_iplanet_schema.ldif
10 Click one of the files (either sws_ou.ldif or sws_iplanet_schema.ldif), then
click OK.
11 Click the other file, then click OK.
When confirmation is needed to overwrite contents of the rejects file, click
Yes.
Import schema via the command line
1
Download the following two files to your hard drive:
■
sws_ou.ldif
■
sws_iplanet_schema.ldif.
2
In the sws_ou.ldif file, replace all occurrences of %%%suffix%%% with your
root DN.
For example, dc=web,dc=school,dc=edu
3
Locate the ldapmodify.exe file.
4
At the command line, type the following:
cd <path of ldapmodify.exe file>
ldapmodify -h <host name> -p <port> -D <admin account DN> -w
<password> -f <import file path and name of a schema LDIF file>
For example: -h corpdev -p 389 -D “cn=directory manager” -w pass -f
c:\ldapschema\sws_ou.ldif
Any command entry containing a space must be placed in quotation marks.
5
Press Enter.
6
Repeat steps 2 and 3, changing the input file path to that of the second file.
Importing schema for IBM SecureWay
Importing Symantec Web Security schema is done at the command line.
Working with the System object
Modifying the System object
To import Symantec Web Security for IBM SecureWay
1
Download the following two files to your hard drive:
■
sws_ou.ldif
■
sws_ibm_schema.ldif
2
In the sws_ou.ldif file, replace all occurrences of %%%suffix%%% with your
root DN.
For example: o=brightcorp,c=us
3
At the command line, type the following:
cd <path of ldapmodify.exe file> [Default path is C: \Program
Files\IBM\LDAP\bin]
ldapmodify -h <host name> -p <port> -D <admin account DN> -w
<password> -f <import file path and name of a schema LDIF file>
For example: -h corpdev -p 389 -D cn=root -w pass -f
c:\ldapschema\sws_ou.ldif
Any command entry containing a space must be placed in quotation marks.
4
Press Enter.
5
Repeat steps 2 and 3, changing the input file path to that of the second file.
Importing schema for Microsoft Active Directory Server (ADS)
Note: To import schema, you must be a member of the Schema Admins group.
You must complete four tasks to import schema for ADS:
■
Install the ADS Schema snap-in on the centralized LDAP server.
■
Register the snap-in with the Microsoft Management Console.
■
Enable the LDAP server to modify the schema.
■
Import the Symantec Web Security schema to the LDAP server.
To install the ADS Schema snap-in
1
On the Windows taskbar, click Start > Run.
2
In the Run dialog box, type mmc, then click OK.
3
On the Console menu, click Add/Remove Snap-in.
4
Click Add.
5
In the Standalone snap-in window, double-click Active Directory Schema.
155
156 Working with the System object
Modifying the System object
6
Click Close.
7
Unless you are adding more snap-ins, click OK.
8
On the Console menu, click Save.
9
Select a location in which to save the file.
To register the snap-in with the Microsoft Management Console
◆
At the command line, type the following:
regsvr32 schmmgmt.dll
To enable the LDAP server to modify the schema
1
On the Console menu, click Active Directory Schema.
2
Right-click Active Directory Schema, then click Operations Master.
3
Check The schema may be modified on this domain controller.
4
Click OK.
To import the schema
1
Download the following two files to your hard drive:
■
sws_ads_schema1.ldf
■
sws_ads_schema2.ldf
2
In both files, replace all occurrences of %%%suffix%%% with your root DN.
For example: dc=your,dc=domain,dc=name
3
Type mmc, then click OK.
4
Type the following:
ldifde -i -f <path of sws_ads_schema1.ldf file>
5
Press Enter.
6
On the ADS Schema Microsoft Management Console, right-click Active
Directory Schema, then click Reload schema.
7
Repeat steps 2-4, replacing the path for the sws_ads_schema1.ldf file with the
path for the sws_ads_schema2.ldf file.
Note: You must import sws_ads_schema1.ldf first, and sws_ads_schema2.ldf
second.
Working with the System object
Modifying the System object
Configuring Centralized Policy Management
You configure Centralized Policy Management through the Symantec Web
Security administrative interface. Only users with administrative privileges can
configure Centralized Policy Management.
To configure Centralized Policy Management
1
On the administrative interface, under System, click Modify.
2
In the Modify System window, click Policy Management, then click Next.
3
In the Modify Policy Mode window, click Central Policy Mode, then click
Next.
4
In the Central Policy Management Configuration window, in the LDAP
Server Name/Address box, type either the host name or IP address of the
LDAP server that stores the Symantec Web Security configuration data.
5
In the Server Port Number box, type the port number of your LDAP server.
6
In the Administrator Name (DN) box, type the administrator user name for
the LDAP server to which your Symantec Web Security server connects.
For Sun ONE, the Administrator DN is typically cn=directory manager. For
Microsoft Active Directory (ADS), the Administrator DN is typically
cn=administrator,cn=users,dc=domain,dc=domain,dc=com. For IBM
SecureWay, the Administrator DN is typically cn=root.
157
158 Working with the System object
Modifying the System object
7
In the Administrator Password box, type in the LDAP Administrator
password.
8
In the Root DN box, in the following format, type the distinguishing name
for the root node of your LDAP directory:
AttributeType=AttributeValue,AttributeType=AttributeValue, etc.
For example: dc=web,dc=school,dc=edu
9
In the Auto Sync drop-down list, select the number of seconds between
LDAP data updates to Symantec Web Security.
10 In the Local Configuration Data Merge Option, select one of the following:
■
Merge, overwrite local with central: A Symantec Web Security
administrator exports local Symantec Web Security configuration data
to the centralized LDAP server, and imports centralized data from the
LDAP server. If there is matching data (for example, identical list
names), local data is replaced by matching centralized data. All
Symantec Web Security servers that are connected to the LDAP server
receive the updated data when their next sync occurs.
■
Merge, overwrite central with local: A Symantec Web Security
administrator exports local Symantec Web Security configuration data
to the centralized LDAP server, and imports centralized data from the
LDAP server. If there is matching data (for example, identical list
names), centralized data is replaced by the matching local data. All
Symantec Web Security servers that are connected to the LDAP server
receive the updated data when their next sync occurs.
■
Delete local, import central: The local configuration data is cleared, and
all centralized data from the LDAP server is exported to all Symantec
Web Security servers on the networks that are connected to the central
LDAP server.
11 In the Notification Email box, type one or more email addresses to which a
notification will be sent if and when the LDAP server connection is broken.
For example: [email protected],[email protected]
12 Click Finish.
In the bottom of the Central Policy Management Configuration window,
beside Connection Status, On or Off will appear to show whether the LDAP
server connection is active (On) or not active (Off).
Note: Merges may take up to a few minutes to complete.
Working with the System object
Modifying the System object
What configuration data is merged?
Generally, the configuration data currently stored in the shared configuration,
local configuration, and the local list and dictionary files is stored in the
centralized LDAP directory with Symantec Web Security schema.
The following configuration data is not centralized and, therefore, cannot be
merged with data on local Symantec Web Security servers:
■
Proxy Configuration
■
Built-in HTTP server options
■
Manage Certificates
■
HTTPS Server
■
Licensing
■
Other Settings
■
Regional Settings: Locale
■
Backup Configuration
■
Restore Configuration
■
Policy Management
159
160 Working with the System object
Modifying the System object
Centralization scenarios
Working with the System object
Modifying the System object
161
162 Working with the System object
Modifying the System object
Working with the System object
Modifying the System object
163
164 Working with the System object
Modifying the System object
Working with the System object
Scheduling the System object
Modifying logging configuration
Logging settings have been moved from System > Modify > Other Settings >
Modify System Attributes to their own window. A new option for SESA
(Symantec Enterprise Security Architecture) logging is available.
Table 9-2
Setting
Description
Local logging
Select to enable local logging, and select the length of time
that Symantec Web Security retains activity logs.
Note: Log files can become extremely large depending on the
amount of activity and the length of time activity logs are
retained. You may need to adjust this number accordingly.
SESA logging
Select to enable SESA logging, and type the SESA Agent host
name and port ID.
Activity logging
Select the type of browsing activity that Symantec Web
Security logs. You can specify None, Violations, Violations
and text pages visited, or All.
This setting applies to browsing activity only. Administrative
functions are always logged, and logging of administrative
activity cannot be disabled.
Many of the report functions do not operate when activity
logging is disabled.
In order for content categories to be reported, the applicable
Use Vendor Lists setting must be set to Yes and the Content
Category lists must be in one of the active states.
See “Scheduling the system defaults for filtering” on
page 181.
The settings for specific clients, users, and groups may be
inherited from the system default settings for logging
browsing activity.
Scheduling the System object
Scheduling the System object lets you establish system defaults for Web filtering
(when content filtering is licensed).
See “Establishing system-level filtering settings” on page 179.
165
166 Working with the System object
Generating system-level reports
Generating system-level reports
The Report feature lets you examine summary and statistical information
regarding your network usage.
Access reports
Generating an Access report lets you examine access history for selected objects
or for all users, clients, and groups on your network.
In an Access report, each access is reported on two to three lines, depending on
the amount of data available. For each access, the report contains the date and
time the reported action occurred, the realm (Symantec Web Security or
Administration), the action (logon, URL visited, object scheduled, content
violation), and the result (succeeded or failed). The report also indicates the user,
the client from which the action was initiated, and the URL accessed or for which
access was attempted (if appropriate). Additional information may include
information available on the particular action (logoff due to timeout, violation
due to DDR, and so on).
To generate an Access report
1
On the main administration page, click the Report method for the System
object.
2
Click Access Report.
3
Click Next.
4
Select the specific objects on which to report.
You can report on any number of Client, User, and Group objects
simultaneously. If no objects are selected, the system report includes
information on all objects.
5
Click View Usage.
6
Select the date and time range of the report.
Working with the System object
Generating system-level reports
7
Specify the type of information to be included in the report.
If none of the check boxes are selected, the report includes all types of
information. If one or more check boxes are selected, the report contains
only the requested content. The types of information are described in the
tables below.
Content realms
Description
Administration
Reports administrative functions performed by users
with administrative privileges, as well as antivirus
activity including successful LiveUpdate sessions and
virus definition updates. Administration will also
display list and dictionary download attempts.
Symantec Web Security
Reports all browsing activity for the selected objects.
Reported actions
Description
Login
All login activity for the selected objects.
Logout
All logout activity for the selected objects.
Content Violation
All Internet access attempts that were blocked for the
selected objects.
Audit Violation
All Internet access attempts in Audit mode for the
selected objects that would have been blocked if the
user was actually being filtered.
AutoLocked
All activity for the selected objects that resulted in a
user being AutoLocked.
Access Violation
All attempts for the selected objects to access the
administration pages by users who do not have
administrative permissions.
Object Added
All objects added to Symantec Web Security for the
selected objects.
Object Deleted
All objects deleted from Symantec Web Security for
the selected objects.
Object Modified
All modified objects for the selected objects.
Object Scheduled
All scheduled objects for the selected objects.
167
168 Working with the System object
Generating system-level reports
Reported actions
Description
File Downloaded
All files automatically downloaded (i.e., filter lists,
dictionaries).
URL Visited
All URLs visited for the selected objects.
Viruses Found
All viruses found for the selected objects.
Virus Defs Updated
Virus definition update attempts for the selected time
period.
LiveUpdate
LiveUpdate sessions attempted for the selected time
period.
Scan Error
All antivirus engine and decomposer errors that occur
in scanning files for the selected objects.
8
Select whether you want the report output to display as a Web form or to be
exported in comma-separated-value (CSV) format to a file.
If you select CSV format, the information displays in your Web browser and
you must choose the Save As function to save the output to a file.
The first line of data in this display contains the headers (separated by
commas) for each possible box in the report file. Subsequent lines contain
data for each log entry. If a particular type of information is not requested in
a given report, no information is displayed for that box, and no text appears
between the respective comma separators.
9
If you want the URLs that appear in the report to be active links for easy
review, click Turn URLs into Links.
Keep in mind that for larger reports selecting the Turn URLs into Links
option may generate too much data for the Web browser to process in a
timely manner.
10 In the Search box, optionally type any text for which you want to search.
This action narrows the scope of the report. For example, to see how many
users tried to access a particular site, such as playboy.com, type playboy in
the search box. The report displays any report entries that contain that text.
Working with the System object
Generating system-level reports
11 Click Generate Report.
Access Summary reports
An Access Summary report includes the most frequently accessed URLs, the most
active users, the most active clients, and a summary of access violations for the
selected objects.
To generate an Access Summary report
1
On the main administration page, click the Report method for the System
object.
2
Click Access Summary Report.
3
Click Next.
4
Select the specific objects on which to report.
You can report on any number of Client, User, and Group objects
simultaneously. If no objects are selected, the system report includes
information on all objects.
5
Click View Usage.
6
Select the date and time range of the report.
7
In the Search box, optionally type any text for which you want to search.
This action narrows the scope of the report. For example, to see how many
users tried to access a particular site, such as playboy.com, type playboy in
the search box. The report displays any report entries that contain that text.
8
Click Generate Report.
169
170 Working with the System object
Defining a directory service connection
Defining a directory service connection
You can define a directory service connection so that Symantec Web Security can
query a directory service that resides on your network in order to authenticate its
users and groups.
Symantec Web Security supports the following types of directory services:
■
Microsoft NT system user
■
Sun Solaris system user
■
Remote Authentication Dial In User Service (RADIUS)
You must have the appropriate Symantec Web Security license to receive
RADIUS support.
■
Lightweight Directory Access Protocol (LDAP)
Symantec Web Security works with the following LDAP platforms: Sun
ONE, Microsoft Active Directory, and IBM SecureWay.
Only one form of directory service can be supported at any time. The default
directory service is Virtual Users Only, in which case no external directory service
is supported.
System-wide settings apply to directory service users and groups authenticated
through Symantec Web Security. To change settings for directory service users
and groups, they must be added to Symantec Web Security.
See “Adding a user” on page 226.
Symantec Web Security can support only one directory service at a time. You can
change the directory service you want supported through the Modify method for
the System object.
When you change directory services, the directory service users and groups
previously added to Symantec Web Security are assumed to exist in the newly
supported directory service. If they do not, they are considered obsolete. Obsolete
users are inactive but remain in Symantec Web Security until deleted.
See “Deleting a user” on page 238.
If you change from having a directory service supported to having only virtual
users supported, all directory service users and groups previously added to
Symantec Web Security are assumed to be converted to virtual users and groups.
Since Symantec Web Security does not store the password of the external
directory service users, passwords for users added to the software from a
directory service must be updated in Symantec Web Security.
See “Changing a password” on page 121.
Working with the System object
Defining a directory service connection
Configuring for virtual user and group support
Symantec Web Security can be configured to support virtual users and groups, in
which case either system-wide or individual settings can be established.
To configure Symantec Web Security to support only virtual users and groups
1
On the main administration page, click the Modify method for the System
object.
2
In the Modify System window, click Directory Services.
3
Click Next.
4
Click Virtual Users Only.
5
Click Done.
Configuring for system user and group support
System-wide settings apply to system users and groups authenticated through
Symantec Web Security. To change settings for system users and groups, they
must be added to Symantec Web Security.
To define a directory service connection with an NT or Solaris directory server
1
On the main administration page, click the Modify method for the System
object.
2
In the Modify System window, click Directory Services.
3
Click Next.
4
Click the appropriate system user choice.
In the Modify Directory Services window, either NT System users or Solaris
System users appears as a directory option, based on the operating system of
the computer running Symantec Web Security.
Only users exist in Solaris directories. Solaris does not support groups.
5
Click Done.
Configuring for RADIUS user support
RADIUS support is an option only if the EXTERNAL_DIRECTORY_SERVICES
license feature is enabled.
Only users exist in RADIUS directories. RADIUS does not support groups.
System-wide settings apply to RADIUS users authenticated through Symantec
171
172 Working with the System object
Defining a directory service connection
Web Security. To change settings for RADIUS users, they must be added to
Symantec Web Security.
To define a directory service connection with a RADIUS directory server
1
On the main administration page, click the Modify method for the System
object.
2
In the Modify System window, click Directory Services.
3
Click Next.
4
In the Modify Directory Services window, click RADIUS.
5
Click Next.
6
In the Modifying RADIUS User Source window, type the following for each
RADIUS server in the appropriate boxes:
■
Name/IP address
■
Authentication port
■
Accounting port
■
Secret (encryption) information
7
Click Modify.
8
Click Done.
Configuring for LDAP user and group support
System-wide settings apply to LDAP users and groups authenticated through
Symantec Web Security. To change settings for LDAP users and groups, they
must be added to Symantec Web Security. The LDAP-compliant platforms that
Symantec Web Security supports are Sun ONE, IBM SecureWay, and Microsoft
Active Directory.
You must reinstall Symantec Web Security if you make either of the following
changes:
■
Switch from having Symantec Web Security support Sun ONE or IBM
SecureWay to having it support Microsoft Active Directory.
■
Switch from having Symantec Web Security support Microsoft Active
Directory to having it support Sun ONE or IBM SecureWay.
Working with the System object
Defining a directory service connection
To define a directory service connection with an LDAP-compliant directory
server
Note: For Sun ONE and IBM SecureWay, to configure Symantec Web Security
for Secure Socket Layer (SSL) encryption between the Symantec Web Security
server and the LDAP server, you must have Netscape 4.0 or later installed on the
same computer running Symantec Web Security. The cert7.db file generated
when Netscape is installed is where the SSL certificate is located. The full path of
that cert7.db file must be supplied while configuring for SSL encryption.
Microsoft Active Directory does not require a certificate for SSL encryption.
1
On the main administration page, click the Modify method for the System
object.
2
In the Modify System window, click Directory Services.
3
Click Next.
4
In the Modify Directory Services window, click LDAP.
5
Click Next.
6
In the Server Name/Address box, type either a host name or an IP address
that specifies the location of your LDAP server.
7
In the Server Port Number box, type the port number of your LDAP server.
8
In the Administrator Name box, type your LDAP administrator user name.
For Sun ONE, the Administrator DN is typically cn=directory manager.
For Microsoft Active Directory, the Administrator DN is typically
cn=<Administrator>, where <Administrator> is the administrator logon on
the Windows 2000 server.
For IBM SecureWay, the Administrator DN is typically cn=root.
173
174 Working with the System object
Defining a directory service connection
9
In the Administrator Password box, type your LDAP administrator
password.
The administrator password is the password for the administrator designated
in the Administrator Name box.
For Sun ONE, the password is typically set during installation of the LDAP
server.
For Microsoft Active Directory, the password is typically the Windows 2000
password for the server that hosts Active Directory.
For IBM SecureWay, the password is typically set during installation of
SecureWay.
Your password is stored within the shared configuration file in an encrypted
format.
10 In the Root Node DN box, type the distinguishing name for the root node of
your LDAP directory in the following format:
AttributeType=AttributeValue,AttributeType=AttributeValue
For example: dc=web,dc=school,dc=edu
11 In the Maximum Number of Simultaneous Connections box, type the
maximum number of simultaneous connections that Symantec Web Security
may open with the LDAP server at one time.
Allowing a maximum of 50 simultaneous connections accommodates most
environments. The maximum number of simultaneous connections that
Symantec Web Security can open with the LDAP server at one time is 1000.
A large number of simultaneous connections might slow performance.
12 On the LDAP Server Platform menu, select the platform of your LDAP
server.
Default setting is iPlanet.
13 Check SSL Security if you want correspondence between the Symantec Web
Security server and the LDAP server encrypted using SSL technology.
This setting is inactive by default.
Working with the System object
Defining a directory service connection
14 In the SSL Certificate Database File box, type the full path of a cert7.db file
that contains a Netscape certificate database containing a certificate for
LDAP SSL.
This box may be left blank if using Microsoft Active Directory, as Active
Directory does not require a certificate for LDAP SSL support.
15 Click Finish.
Note: While Symantec does not guarantee support of LDAP server platforms
other than Sun ONE, Microsoft Active Directory, and IBM SecureWay, other
LDAP vendor platforms might be supported by configuring Symantec Web
Security to work with Sun ONE.
175
176 Working with the System object
Defining a directory service connection
Section
Content filtering
■
Establishing system-level filtering settings
■
Understanding hierarchical administration
■
Working with the Client object
■
Working with the User object
■
Working with the Group object
■
Customizing lists
■
Customizing dictionaries
4
178
Chapter
Establishing system-level
filtering settings
This chapter includes the following topics:
■
About system-level filtering
■
Scheduling the system defaults for filtering
10
180 Establishing system-level filtering settings
About system-level filtering
About system-level filtering
The system default settings are the basic filtering settings that apply to all objects.
The System object must have default settings, and you cannot delete the System
object’s default settings. The system defaults can be changed, but never deleted.
Because of the hierarchy of permissions, the system default filtering settings are
automatically inherited by all clients, users, and groups unless default settings or
filtering events are scheduled independently for the individual object. Objects can
be scheduled for specific or daily events and rely on the system defaults when no
other event is in effect.
Objects (clients, users, groups) automatically inherit system settings unless you
change the settings for the specific object, in which case the settings for the
specific object take precedence over system settings. In the case where you change
the setting for a specific object to Use Defaults, the default settings applied to that
object are those set for the next object in the hierarchy of permissions. For
example, when Symantec Web Security is configured with the following
hierarchy of permissions (user > user’s group > client > client’s group > system)
and a user is configured to use default settings, Symantec Web Security first
checks to determine if settings have been established for the object immediately
following the user in the hierarchy chain (in this case, user’s group). If settings
have been established for that object (user’s group), those settings are applied to
the user. If no settings have been established for the object immediately following
(user’s group), Symantec Web Security checks each subsequent object for
established settings (in this case, client > client’s group > system) until it reaches
an object with such, at which point it assigns those settings to the user.
When the content filtering portion of Symantec Web Security is initially installed,
the system default settings for all predefined lists are in the Off state. You must
activate filtering by setting at least the system defaults, based on your
organization’s policies.
See “Scheduling an event for a client” on page 209.
Establishing system-level filtering settings
Scheduling the system defaults for filtering
Scheduling the system defaults for filtering
System default settings are established using the Schedule method for the System
object. Scheduling the default filtering settings for the System object includes the
following:
■
Setting the default logon mode and the filtering mode
■
Assigning access states for filter lists
■
Setting additional filtering options
■
Activating AutoLock
■
Activating AutoAlert
When establishing or changing the system defaults, keep in mind that settings for
specific clients, users, and groups can be inherited from the system defaults unless
they have been specifically scheduled.
To schedule the default filtering settings for the System object
1
On the main administration page, click the Schedule method for the System
object.
2
Click Set Defaults.
3
Click Next.
Setting the default logon mode and the filtering mode
By default, Symantec Web Security is configured to require that all users log on
before accessing the Internet and to automatically log users off after 5 minutes of
inactivity. You can change the default timeout period or turn off the logon
requirement entirely by putting the system in Guest Mode.
Note: For security purposes, the virtadmin account automatically logs off after 5
minutes of inactivity, regardless of the logon setting.
Following installation, the filtering mode is set to Filtered. In Filtered mode, any
attempts to access Internet materials are subject to the established filtering
guidelines. The default filtering mode can be changed.
181
182 Establishing system-level filtering settings
Scheduling the system defaults for filtering
To set the default logon mode and the filtering mode
1
Select a default logon behavior and time-out period (i.e., the period of
inactivity after which Symantec Web Security automatically logs the current
user off).
2
Select the level of filtering.
3
■
Unfiltered: No filtering of Internet content.
■
Audit: Users can access inappropriate content. Attempts are logged as
though users are blocked from accessing the inappropriate material.
Audit mode is transparent to the user; however, Symantec Web
Security’s reporting features allow you to monitor user browsing
activity.
■
Filtered: Access to Internet materials is subject to established filtering
guidelines. Attempts to access inappropriate content are logged, and
users receive an Access Denied screen to indicate that access to
inappropriate content has been blocked.
■
Allow Only: Access is permitted only to those sites that have been
designated as Allow (Filtering Enabled) or Allow (Filtering Disabled).
Access to all other Internet sites is prevented.
■
Local Sites Only: Access is permitted only to sites with the same Internet
domain name as the server running Symantec Web Security. Access to
all other Internet sites is prevented.
■
Locked: No Internet access is permitted. This option is typically used to
deny Internet access for specific users or clients and is not normally used
as a default system mode.
Click Next.
Select logon
behavior
Select default
filtering mode
If you selected Unfiltered, Locked, or Local Sites Only, the software confirms that
your changes have been made.
Establishing system-level filtering settings
Scheduling the system defaults for filtering
Assigning access states for filter lists
If you select Filtered, Audit, or Allow Only as the default filtering mode, you must
specify the access state of the Content Category Lists. All Content Category Lists
are in the Off state at installation. If the default state for a given list is to remain
Off, leave the list in the Off box. Lists in the Off state are not considered when
Symantec Web Security checks lists for URLs. The URLs in a Category List in the
Off state are not denied but are still subject to other filtering. These URLs are
blocked if they are contained in other lists in the Deny state and are still scanned
by DDR using dictionary terms for other active dictioanries. When a Category
List is in the Off state, the terms in the corresponding dictionary are ignored by
DDR in scanning content.
Other objects (users, groups, clients) automatically inherit system settings unless
you change the settings for the specific object, in which case the settings for the
specific object take precedence over system settings. In the case where you change
the setting for a specific object to Use Defaults, the default settings applied to that
object are those set for the next object in the hierarchy of permissions. For
example, when Symantec Web Security is configured with the following
hierarchy of permissions (user > user’s group > client > client’s group > system)
and a user is configured to use default settings, Symantec Web Security first
checks to determine if settings have been established for the object immediately
following the user in the hierarchy chain (in this case, user’s group). If settings
have been established for that object (user’s group), those settings are applied to
the user. If no settings have been established for the object immediately following
(user’s group), Symantec Web Security checks each subsequent object for
established settings (in this case, client > client’s group > system) until it reaches
an object with such, at which point it assigns those settings to the user.
More than one list may be selected at a time, usually by pressing Ctrl while
clicking the lists. The exact method to select more than one list item is browser
and operating system dependent.
183
184 Establishing system-level filtering settings
Scheduling the system defaults for filtering
To assign access states for filter lists
1
Select the lists for which you want to assign access states.
2
Select one of the following:
■
Allow (Filtering Enabled): Category Lists in the Allow (Filtering
Enabled) state specify content to which access is permitted. Content
specified by a Category List in the Allow (Filtering Enabled) state is
scanned by DDR (using active dictionaries). The dictionary terms
associated with categories in this state are not active. If the system is in
the Allow Only filtering mode, access is permitted only to the content
specified by lists that are in either of the Allow states.
■
Allow (Filtering Disabled): Category Lists in the Allow (Filtering
Disabled) state specify content to which access is unconditionally
permitted. Content specified by a Category List in the Allow (Filtering
Disabled) state is not scanned by DDR, and the associated dictionary is
not activated. If the system is in the Allow Only filtering mode, access is
permitted only to the content specified by lists that are in either of the
Allow states.
■
Deny: Category Lists in the Deny state specify content to which access is
not permitted. The related terms found in the associated dictionaries are
used by DDR in scanning content for appropriateness.
■
Off: Category Lists in the Off state are not considered when Symantec
Web Security checks lists for URLs. The URLs in a Category List in the
Off state are not denied but are still subject to other active filtering. That
is, the URLs in Off lists can still be blocked if they are contained in other
lists in the Deny state and are still scanned by DDR using dictionary
terms for other active dictionaries. When a Category List is in the Off
state, the terms in the corresponding dictionary are ignored by DDR in
Establishing system-level filtering settings
Scheduling the system defaults for filtering
scanning content. All Content Category Lists are in the Off state at
installation.
Select the lists
to be changed
Specify new state
for selected lists
Click Next
The Allow states (Filtering Enabled and Filtering Disabled) are typically
applied only to local lists, since those lists contain URLs for sites that you
know contain appropriate material. However, some sites deemed appropriate
may contain links to sites you wish to block. In those cases, placing
predefined lists in the Allow (Filtering Enabled) state enables DDR to scan
the site using active dictionaries. Based on your local acceptable-use policies,
you may want to place some of the predefined Content Category Lists in the
Deny state (to restrict access to all URLs in those lists) and leave some lists in
the Off state (to cancel the effect of the lists and permit access to the
contained URLs).
See “Understanding Symantec Web Security” on page 35.
The Allow Category List should contain URLs to which access is
unconditionally permitted and should be placed in one of the two Allow
states. The Deny Category List should contain URLs to which access is not
permitted and should be placed in the Deny state. Unlike the other Content
Category Lists, these two lists are empty when Symantec Web Security is
installed. These lists are provided to administrators to simplify allowing or
denying additional content.
3
Click Next.
185
186 Establishing system-level filtering settings
Scheduling the system defaults for filtering
Setting additional filtering options
You can make changes to DDR thresholds as well as specify other blocking
options. If you have placed lists in the Allow (Filtering Disabled) state, these
filtering options do not apply to those lists.
To set additional filtering options
◆
Make the necessary changes to the following filtering options:
Filtering option
Description
Use vendor lists?
If Yes is selected, the software uses the lists provided by
Symantec that are in the Allow or Deny access state
(based on the selections made from the previous
screen).
If No is selected, vendor lists are not consulted in
determining whether to allow or deny access to a
particular URL. Selecting No for this setting does not
guarantee that you will not be blocked unless DDR is
also turned off.
Use local lists?
If Yes is selected, the software uses the local versions of
the lists that are in the Allow and Deny access state
(based on the selections made from the previous
screen).
If No is selected, local lists are not consulted in
determining whether to allow or deny access to a
particular URL. Selecting No for this setting does not
guarantee that you will not be blocked unless both
vendor lists and DDR are also turned off.
Use DDR for incoming
data?
If Yes is selected, DDR scans documents as they
download, unless the document URL appears in an
active Allow (Filtering Disabled) list.
If No is selected, DDR is not used to scan incoming
data. Selecting No for this setting does not guarantee
that you will not be blocked unless both vendor and
local lists are also turned off.
Establishing system-level filtering settings
Scheduling the system defaults for filtering
Filtering option
Description
Use DDR for outgoing
requests?
If Yes is selected, DDR scans all outgoing requests (e.g.,
search strings). Because a search string typically has
fewer words, the DDR threshold for outgoing requests
is much lower than for incoming data. (See the next
option for information on selecting DDR thresholds.)
If No is selected, DDR is not used to scan outgoing
requests.
DDR Thresholds
If Yes is selected for either or both DDR options, the
DDR thresholds must be set. Certain words and
phrases have been assigned point values, which DDR
uses to score a Web page. With a lower threshold
setting (lower numbers), the DDR sensitivity
increases, and pages that contain potentially
inappropriate material are more likely to be blocked.
Likewise, selecting a higher threshold (higher
numbers) lessens the sensitivity of DDR and results in
fewer potentially inappropriate pages being blocked.
The default threshold values are 50 for incoming data
and 10 for outgoing requests.
Block Unresolved IP
Addresses?
If Yes is selected, requests for documents from remote
servers for which the Internet domain name of the
remote server cannot be determined are blocked.
Block Extensions?
Access to documents is blocked based on the extension
of the document’s URL. This option can be used to
prevent specific document types from being
downloaded. You can block unlisted additional
extensions by entering the extension without a leading
dot in the Other box. More than one extension can be
entered, each separated by a space. Some of the
extensions listed end with ... to indicate that more than
one related extension is blocked. For example, mov...
blocks both mov and moov.
187
188 Establishing system-level filtering settings
Scheduling the system defaults for filtering
Activating AutoLock
If Filtered or Allow Only was selected as the filtering mode, you can activate the
AutoLock feature (optional). The AutoLock feature is not available in Audit
mode.
When AutoLock is active, Symantec Web Security automatically locks a user’s
account (suspends Internet access using one of two methods until the system
administrator unlocks the account) if a specified number of blocked accesses are
attempted within a given period of time.
Note: If directory users who have not been added to Symantec Web Security
violate the number of access attempts within a set time period, Symantec Web
Security creates a Web Security account for those users, and those accounts are
locked. Users who have Modify and Add global permissions cannot be
AutoLocked.
To activate AutoLock
1
In the drop-down list, select one of two methods for locking a user’s account.
Locking method
Description
Schedule default
user event
If you select Yes - schedule default user event, a default event is
scheduled for the user in which the user’s filtering mode is set
to locked. To unlock the account, you must either delete or edit
the event.
If you select this method for locking an account, the locked user
may still have Internet access, depending on other, higher
priority events that may be scheduled for the user or for the
clients used. For example, even though a student’s account may
be AutoLocked, the student still has access from a client that is
scheduled to have Allow Only access for a certain research
period. Even though the account is AutoLocked, the student
can complete normal studies during the period of time the
account is locked. However, any Internet access that is not
covered by a higher priority event is prevented.
Establishing system-level filtering settings
Scheduling the system defaults for filtering
Locking method
Description
Disable user
If you select Yes - disable user, the user cannot log on to
Symantec Web Security. All Internet access is denied. To unlock
the account, the user must be reenabled using the Modify
method for the User object.
Disabling a user retains the user’s scheduled events and other
settings in Symantec Web Security. If you are running other
Symantec products such as Mail-Gear on the same computer as
Symantec Web Security and are taking advantage of the
information sharing capability between the products, disabling
a user does not affect the settings in any other Symantec
product.
Users who have administrative permission to add or modify
users cannot be AutoLocked in this manner. Selecting this
method for AutoLocking users protects you from accidently
having all users with the permission needed to reinstate users
locked out at the same time.
2
Select the number of blocked accesses that must occur and the time period in
which these attempts must occur for an account to be AutoLocked.
3
Type the appropriate email address in the box provided to initiate automatic
email notification when an account has been AutoLocked.
If you do not want to activate the AutoLock notification feature, leave the
email notification box blank. Symantec Web Security automatically sends
189
190 Establishing system-level filtering settings
Scheduling the system defaults for filtering
email to the addresses listed to indicate that an account has been
AutoLocked.
Select whether to
activate AutoLock and
select the appropriate
locking method
Select the number of
accesses and the time
period for AutoLocking
an account
Type email addresses
for email notification
when an account has
been locked, if
desired
Symantec Web Security sends an
email message to the specified
address when an account has
been AutoLocked
Activating AutoAlert
If you selected Filtered, Allow Only, or Audit mode as the filtering mode, you can
activate the AutoAlert feature (optional).
When AutoAlert is active, Symantec Web Security sends email to the specified
addresses when a user attempts a specified number of blocked or audited
accesses. The software automatically sends email to the addresses listed to
indicate that a user has attempted to access restricted material.
The AutoAlert feature functions when Symantec Web Security is operating in
Audit mode. You can set Symantec Web Security to operate in Audit mode and,
with the AutoAlert feature activated, receive automatic notification of
inappropriate access attempts.
The logging of AutoAlert browsing activity is separate from Symantec Web
Security activity logging. AutoAlert functions regardless of the settings that you
have established for normal activity logging. If normal activity logging is turned
Establishing system-level filtering settings
Scheduling the system defaults for filtering
off, you cannot use the reporting features to review the access attempts that
resulted in the AutoAlert notification.
Select the number of
blocked accesses after
which the software
sends immediate
notification
Type email addresses
for AutoAlert
notification when a
specified number of
blocked attempts have
been made
Select the period of
time after which the
software sends
notification of any
blocked accesses
To activate AutoAlert
1
Type the appropriate email address in the box provided.
If you do not want to activate the AutoAlert feature, leave this box blank.
2
Select the number of blocked accesses that will result in immediate email
notification to the addresses indicated.
3
Type the amount of time (in minutes) after which the software provides
notification of any blocked accesses.
The two AutoAlert parameters function independently of one another. If the
number of blocked accesses is set to 2 and the number of minutes is set to 30
and a user makes two blocked access attempts in a 30-minute period, the
software sends a notification message immediately after the second attempt.
If that same user makes only one blocked attempt in the same 30-minute
period, the software sends email at the end of the 30-minute period to report
the single blocked attempt. For sites with large numbers of users, you may
want to set the time period for notification to a larger block of time to limit
the potential amount of email received.
191
192 Establishing system-level filtering settings
Scheduling the system defaults for filtering
4
Click Finish to activate the new system default settings.
5
Click Done to return to the main administration page.
The AutoAlert message
lists a sample of the
content and audit
violations that resulted in
the notification
Chapter
Understanding
hierarchical
administration
This chapter includes the following topics:
■
Why hierarchical administration?
■
About Access Control permissions
■
Setting quotas for object creation/modification
■
Preventing filtering overrides
11
194 Understanding hierarchical administration
Why hierarchical administration?
Why hierarchical administration?
Symantec Web Security lets you set up hierarchical administration if desired.
Hierarchical administration lets you give a user permission to control the filtering
permissions for other selected users without having to release global
administrative control of the software to the user. Symantec Web Security
provides a second level of administrative control in addition to the global
administrative permissions, called Access Control permissions. Access Control
permissions let users administer only those objects for which they have been
placed on an Access Control List.
About Access Control permissions
Symantec Web Security provides Access Control permissions in addition to
global permissions. Global permissions permit the overall administration of
Symantec Web Security. Access Control permissions let users perform
administrative functions only for those individual objects (Users, Groups,
Clients, or Lists) for which they have been given control. For example, a user who
is on the Access Control List for a given group (with appropriate permissions)
can control only that group and the group’s individual members.
See “About administrative permissions” on page 128.
The Access Control List feature lets you delegate some administrative
permissions to selected users for certain objects. Managers can have
administrative responsibility for their employees, and teachers can have
responsibility for certain students or for the workstations in a particular
classroom.
Although the Symantec Web Security hierarchical administration feature lets you
delegate administrative permissions to certain users, you can still implement
general acceptable-use policy settings that apply to all users. Even users who have
been granted certain Access Control permissions (such as scheduling
permissions) can be prevented from overriding certain filtering settings that have
been established. For example, with the filtering override protection in place, a
manager would not be able to schedule a favored employee for unfiltered access.
Access Control Lists
Any Client, User, Group, or List object can have an associated Access Control
List. Users and groups can be placed on Access Control Lists. Any user or
member of a group that is on an Access Control List for an object is permitted to
perform administrative functions for that object.
Understanding hierarchical administration
About Access Control permissions
Access Control permissions
Access Control List permissions are individually assigned to members of an
Access Control List. The administrative functions that can be performed for an
object are based on the Access Control permissions that have been granted to
each member of the Access Control List. Access Control permissions apply only
to the object to which the Access Control List applies.
A user can be on several Access Control Lists for different objects, and the
permissions can be different for each object. For example, a manager might be on
two Access Control Lists for two different groups and have all permissions for
one group and only reporting capability for the other group. Access Control
permissions are described in the following table.
Table 11-1
Access permissions
Assigned permission
Functions that can be performed
Access Control List Modify
Modify the attributes for an object for which you have
Access Control.
Access Control List Delete
Delete an object for which you have Access Control.
Access Control List Schedule
Schedule an object for which you have Access Control.
Access Control List Report
Report on an object for which you have Access
Control.
Note: An object does not need to have an Access Control List. If no Access
Control List is active for an object, that object can only be controlled by users
with the appropriate global permissions.
Setting up an Access Control list
Users and groups are placed on an object’s Access Control List using the Modify
method for that object. A particular Access Control List can contain any number
of groups and users.
See “Adding and deleting objects on Access Control Lists” on page 205.
Access Control List permissions are assigned to members of an object’s Access
Control List using the Modify method for that object.
See “Modifying permissions on Access Control Lists” on page 208.
195
196 Understanding hierarchical administration
About Access Control permissions
To assign Access Control permissions to another account, you must have the
global Can Grant Permissions permission, as well as Modify permission (global
or Access Control) for the object to which you are granting permissions (that is,
Group or User).
Using Access Control: an example
Use of Access Control is illustrated with an example. A user (anelson) is placed on
an Access Control List for a group (the nelsonfamily group). User anelson is
assigned certain permissions that let the user manipulate that group and its
members. The user can delete, modify, schedule, and report only on the members
in that group.
When a group is placed on an Access Control List for an object, any member of
that group can control the object (based on the assigned permissions).
User anelson has been
added to the Access
Control List for the
nelsonfamily group; this
user can apply the
permissions assigned below
to perform certain
functions for this group
User anelson has been
given all Access Control
permissions for the
nelsonfamily group
If a user has Access Control for a group, the Access Control permissions for the
group automatically apply individually to members of the group. You do not
need to be on the Access Control List for each member of the group to be able to
control the members. However, if you are placed on the Access Control List for a
user and that user is a member of a group for which you also have Access Control,
the hierarchy of permissions then applies (the Access Control permissions for
controlling that user override the Access Control permissions for the user’s
group).
Understanding hierarchical administration
Setting quotas for object creation/modification
Setting quotas for object creation/modification
Quotas can be established for individuals who have global permissions to add
users and lists to Symantec Web Security. Quotas can be set for:
■
The number of new users that can be added
■
The number of new lists that can be added
■
The total number of URLs that can be added to all private lists created by that
user
This feature can easily be used in conjunction with the Access Control List feature
to allow greater delegation of responsibility in managing accounts.
For example, a head of household (anelson) has been placed on the Access
Control List for the family group (nelsonfamily). An Internet Service Provider
(ISP) can let anelson, as head of household, create, for example, three additional
users for other family members and up to four different lists for customized
filtering for family members. The ISP can limit the total number of URLs that
anelson is allowed to add to private lists. The ISP can also set up anelson’s
account so that anelson is automatically added to the Access Control List for all
users and lists created by the head of household.
To add new lists and users, anelson must be granted global permissions for
adding lists and users.
See “Modifying attributes” on page 239.
Next, the quotas for anelson’s account must be set.
See “Modifying object creation/modification attributes” on page 242.
Note: The account for a user who has permission to add new users and filter lists
can be set up so that the user is automatically added to the Access Control List
(with appropriate permissions) for the newly created object.
197
198 Understanding hierarchical administration
Preventing filtering overrides
When a user who is both on the Access Control List for a group and a member of
that group creates new users, the new users are not automatically added to the
same group. This must be done manually.
If anelson is to create new
users or lists for the
nelsonfamily group, anelson
must also be given global
permissions for the Add
method for both User and
List objects
In addition, anelson’s
account has been set up
so that anelson is
automatically added to the
Access Control List with
the appropriate
permissions for each new
user and list created by
this user
User and list creation quotas have been
established for anelson, and the maximum
number of URLs that can be added to
each new list has been established
Preventing filtering overrides
Because filtering settings can get complex with both Access Control and global
permissions, the software provides several safeguards to prevent users with
relevant permissions from overriding certain filtering settings that have been
established by a particular organization.
Symantec Web Security lets you restrict individual users or all users with
scheduling permissions from being able to schedule other users for unfiltered
access or for Audit Mode. You can prevent an individual from scheduling
unfiltered access using the Modify method for the User object.
See “Modifying attributes” on page 239.
Understanding hierarchical administration
Preventing filtering overrides
Symantec Web Security also lets you restrict users from overriding the default
filtering state of a list. You can prevent users from changing the state of any
existing list using the Modify method for the List object. This can also be
accomplished when a new list is first created.
See “Changing the filtering override setting for a list” on page 266.
199
200 Understanding hierarchical administration
Preventing filtering overrides
Chapterr
Working with the Client
object
This chapter includes the following topics:
■
About clients
■
Adding a client
■
Deleting a client
■
Modifying a client
■
Scheduling an event for a client
■
Generating a report for a client
12
202 Working with the Client object
About clients
About clients
A client is a computer connected to the network with a unique IP address. Clients
can be given unique settings that apply regardless of which user uses the
computer.
See “Setting defaults for a client” on page 209.
Adding a client
Using the Add method for the Client object, you can add clients to Symantec
Web Security and configure associated settings for those clients.
To add a client
1
On the main administration page, click the Add method for the Client
object.
2
In the Adding a Client window, in the IP address or client name box, type the
client’s IP address or computer name.
3
Click Add.
The IP address should now appear in the Existing Clients list. If you enter the
computer name, Symantec Web Security automatically converts the
computer name and displays the IP address in the list.
4
When you finish adding clients, click Done to return to the main
administration page.
You can add a range of client IP addresses at once. If you are familiar with the
classless interdomain routing (CIDR) representation, you can also use this
notation to specify a range of client IP addresses.
Working with the Client object
Deleting a client
To add a range of client IP addresses at once
1
On the main administration page, click the Add method for the Client
object.
2
In the Adding a Client window, in the IP address or client name box, type the
range of IP addresses in the IP address or client name box as in the example
or use the CIDR representation.
For the IP addresses 192.168.1.1 through 192.168.1.100, type the range as
192.168.1.1 - 192.168.1.100.
3
When you finish adding clients, click Done to return to the main
administration page.
Deleting a client
Using the Delete method for the Client object, you can delete clients and their
associated settings from Symantec Web Security.
To delete a client
1
On the main administration page, click the Delete method for the Client
object.
2
In the Delete Client(s) window, select the IP addresses you wish to delete.
You can select more than one client at a time, usually by pressing Control
while selecting multiple IP addresses.
3
Click Finish.
4
Click Done to return to the main administration page.
203
204 Working with the Client object
Modifying a client
Modifying a client
The Modify method for the Client object lets you do the following:
■
Modify attributes.
■
Add and delete objects on Access Control Lists.
■
Modify permissions on Access Control Lists.
Modifying attributes
The attributes that can be modified for clients include the client’s group, the types
of activity to log, the default URL, and the default administrative interface.
If you retain the Use Default Settings option for any attribute, other inherited
settings that have been established apply, based on the hierarchy of permissions.
See “How Symantec Web Security works” on page 25.
To modify attributes for a client
1
On the main administration page, click the Modify method for the Client
object.
2
Select the IP address of the client to modify.
3
Click Modify Attributes.
4
Click Next.
5
Optionally select a group for the client. If you do not want to assign a client
to a group, select the blank space.
Working with the Client object
Modifying a client
6
Select the type of browsing activity to log for the client.
Many of the report functions do not operate when activity logging is
disabled. For example, if you select no activity logging for a client and Client
object permissions have the highest priority in Symantec Web Security, a
report generated for a user using that client contains no information on the
user’s browsing activity (regardless of the user’s settings) because Client
object permissions have the highest priority.
7
Specify the default URL to display for the client (the URL that the browser
displays automatically after a user clicks Logon).
8
When you complete your changes, click Finish.
9
Click Done to return to the main administration page.
Adding and deleting objects on Access Control Lists
Objects (users or groups) added to a client’s Access Control List have
administrative control over that client, depending on the Access Control
permissions that have been granted to the user or group.
To add objects to the Access Control List for a client
1
On the main administration page, click the Modify method for the Client
object.
2
Select the IP address of the client to modify.
3
Click Add/Delete Objects to/from Access Control List.
205
206 Working with the Client object
Modifying a client
4
Click Next.
5
Select the appropriate objects from the list of users and the list of groups.
You may add as many users and groups as necessary to the Access Control
List.
6
Click Add.
The Access Control List updates to reflect your changes. When a user or
group is first added to a client’s Access Control List, that object is
automatically granted all permissions for controlling the selected client.
7
If you need to change the Access Control permissions for the objects on the
Access Control List for the selected client, click Modify.
To assign Access Control permissions to a user or group, you must have the
global Can Grant Permissions permission, as well as global Modify
permission for User and/or Group objects (depending on the objects to
which you want to assign permissions).
See “Modifying permissions on Access Control Lists” on page 208.
Select the users
and/or groups,
then click Add
Working with the Client object
Modifying a client
8
Click Done to return to the main administration page.
Click Modify to
change the
permissions for an
object on the Access
Control List
To remove objects from the Access Control List for a client
1
On the main administration page, click the Modify method for the Client
object.
2
Select the IP address of the client to modify.
3
Click Add/Delete Objects to/from Access Control List.
4
Click Next.
5
Select the objects to be removed from the list of Objects on Access Control
List.
6
Click Remove.
The Access Control List updates to reflect your changes.
207
208 Working with the Client object
Modifying a client
7
Click Done to return to the main administration page.
Select the object to
remove from the
Access Control List
and click Remove
Modifying permissions on Access Control Lists
To assign Access Control permissions to a user or group, you must have the
global Can Grant Permissions permission, as well as global Modify permission for
User and/or Group objects (depending on the objects to which you want to assign
permissions).
To modify permissions on Access Control Lists
1
On the main administration page, click the Modify method for the Client
object.
2
Select the IP address of the client to modify.
3
Click Modify Permissions on Access Control List.
4
Click Next.
Working with the Client object
Scheduling an event for a client
5
Assign the desired permissions for each member of the Access Control List by
selecting the check boxes.
Clicking Reset clears any changes you have made and resets the permissions
to the currently saved settings. Clicking Go to Add/Delete Objects Page is a
shortcut to the Adding Objects to Access Control List page. (You can return
to this page by clicking Modify.)
6
Click Modify to save your changes.
The software confirms that your changes have been made.
7
Click Done to return to the main administration page.
Scheduling an event for a client
Scheduling events is the same for Client, User, Group, and System objects. Before
you schedule events, become familiar with the priorities that the software assigns
to object permissions and to the different types of events.
See “How Symantec Web Security works” on page 25.
Higher priority
Specific event
Daily event
Lower priority
Defaults
Specific events are scheduled for a specific date and time, such as
10/28/2002 from 2:00 PM to 3:00 PM. Daily events reoccur each specified day,
such as every Monday and Wednesday from 11:00 AM to 1:00 PM. Default
settings apply when no other event is in effect.
By default, client permissions have the highest priority in Symantec Web
Security. If you do not change the default settings for hierarchy of permissions,
events scheduled for a client affect any user who uses the client during the event.
Setting defaults for a client
Different default access permissions can be scheduled for the System object and
other users, clients, and groups. This feature gives you the flexibility, for example,
to make filtering options less strict for adults than for young children. You can
design your network to require individuals to use specific clients to download
certain file types.
209
210 Working with the Client object
Scheduling an event for a client
Only the System object must have default filtering settings. Other objects can be
scheduled for specific or daily events and fall back to the system default settings
when no other event is in effect.
Scheduling the default filtering settings for a client includes:
■
Setting the default logon mode and the filtering mode
■
Assigning access states for filter lists
■
Setting additional filtering options
■
Activating AutoLock
■
Activating AutoAlert
To set the defaults for a client
1
On the main administration page, click the Schedule method for the Client
object.
2
Select the appropriate client.
3
Click Set Defaults.
4
Click Next.
Setting the logon mode and the filtering mode
Symantec Web Security requires all users to log on before accessing the Internet
and automatically logs users off after a selected period of inactivity. You can
change the default time-out period for a client or turn off the logon requirement
entirely for that client by selecting Guest Mode.
You can also establish the filtering mode for a client. The filtering mode selected
applies to anyone using the client.
Working with the Client object
Scheduling an event for a client
To set the logon mode and filtering mode for a client
1
Select a logon behavior and time-out period (i.e., the period of inactivity
after which the content filtering component automatically logs the current
user out). You also can turn off the logon requirement by putting the client
into Guest Mode.
2
Select one of the following:
3
■
Unfiltered: No filtering of Internet content.
■
Audit: Users can access inappropriate content. Attempts are logged as
though users are blocked from accessing the inappropriate material.
Audit mode is transparent to the user; however, the content filtering
component’s reporting features allow you to monitor user browsing
activity.
■
Filtered: Access to Internet materials is subject to established filtering
guidelines. Attempts to access inappropriate content are logged, and
users receive an Access Denied screen to indicate that access to
inappropriate content has been blocked.
■
Allow Only: Access is permitted only to those sites that have been
designated as Allow (Filtering Enabled) or Allow (Filtering Disabled).
Access to all other Internet sites is prevented.
■
Local Sites Only: Access is permitted only to sites with the same Internet
domain name as the server running the content filtering component.
Access to all other Internet sites is prevented.
■
Locked: No Internet access is permitted. This option is typically used to
deny Internet access for specific users or clients.
Click Next.
If you selected Unfiltered, Locked, or Local Sites Only, the software confirms that
your changes have been made.
211
212 Working with the Client object
Scheduling an event for a client
Assigning access states for filter lists
If you select Filtered, Audit, or Allow Only as the default filtering mode, you must
specify the access state of the Content Category Lists.
The System object is the only object that must have default settings. Other objects
automatically inherit the system default settings unless you change the settings
for a specific object. Therefore, the Category Lists for Client, User, and Group
objects initially are shown under Use Defaults. If the default settings for certain
Content Category Lists for a given object do not need to be different from the
system default settings, these lists can be left under Use Defaults. If you need to
change the Content Category List default settings for an object, move the lists to
one of three states.
Note: Lists can be in the Off state for the System object. Category Lists in the Off
state are not considered when the content filtering component checks lists for
URLs. The URLs in a Category List in the Off state are not denied but are still
subject to other filtering. These URLs are blocked if they are contained in other
lists in the Deny state and are still scanned by DDR using dictionary terms for
other active dictionaries. When a Category List is in the Off state, the terms in the
corresponding dictionary are ignored by DDR in scanning content. All Content
Category Lists are in the Off state at installation.
More than one list may be selected at a time, usually by pressing Ctrl while
clicking the lists. The exact method to select more than one list item is browser
and operating-system dependent.
To assign access states for filter lists
1
Select the lists for which you want to assign access states.
2
Select one of the following:
■
Allow (Filtering Enabled): Category Lists in the Allow (Filtering
Enabled) state specify content to which access is permitted. Content
specified by a Category List in the Allow (Filtering Enabled) state is
scanned by DDR (using active dictionaries). The dictionary terms
associated with categories in this state are not active. If the system is in
the Allow Only filtering mode, access is permitted only to the content
specified by lists that are in either of the Allow states.
Working with the Client object
Scheduling an event for a client
3
■
Allow (Filtering Disabled): Category Lists in the Allow (Filtering
Disabled) state specify content to which access is unconditionally
permitted. Content specified by a Category List in the Allow (Filtering
Disabled) state is not scanned by DDR, and the associated dictionary is
not activated. If the system is in the Allow Only filtering mode, access is
permitted only to the content specified by lists that are in either of the
Allow states.
■
Deny: Category Lists in the Deny state specify content to which access is
not permitted. The related terms found in the associated dictionaries are
used by DDR in scanning content for appropriateness.
Click Next.
Select the lists to
be changed
Specify new state
for selected lists
Click Next
when done
Setting additional filtering options
You can make changes to DDR thresholds as well as specify other blocking
options. Lists in the Allow (Filtering Disabled) state do not have these filtering
options.
213
214 Working with the Client object
Scheduling an event for a client
To set additional filtering options
◆
Make the necessary changes to the following filtering options:
Filtering option
Description
Use vendor lists?
If Yes is selected, DDR uses the lists provided by
Symantec that are in the Allow or Deny access state
(based on the selections made from the previous
screen).
If No is selected, vendor lists are not consulted in
determining whether to allow or deny access to a
particular URL. Selecting No for this setting does not
guarantee that you will not be blocked unless DDR is
also turned off.
Use local lists?
If Yes is selected, DDR uses the local versions of the
lists that are in the Allow and Deny access states (based
on the selections made from the previous screen).
If No is selected, local lists are not consulted in
determining whether to allow or deny access to a
particular URL. Selecting No for this setting does not
guarantee that you will not be blocked unless both
vendor lists and DDR are also turned off.
Use DDR for incoming
data?
If Yes is selected, DDR scans documents as they
download, unless the document URL appears in an
active Allow (Filtering Disabled) list.
If No is selected, DDR is not used to scan incoming
data. Selecting No for this setting does not guarantee
that you will not be blocked unless both vendor and
local lists are also turned off.
Use DDR for outgoing
requests?
If Yes is selected, DDR scans all outgoing requests (e.g.,
search strings). Because a search string typically has
fewer words, the DDR threshold for outgoing requests
is much lower than for incoming data. (See the next
option for information on selecting DDR thresholds.)
Working with the Client object
Scheduling an event for a client
Filtering option
Description
DDR Thresholds
If Yes is selected for either or both DDR options, the
DDR thresholds must be set. Certain words and
phrases have been assigned point values, which DDR
uses to score Web pages. With a lower threshold setting
(lower numbers), the DDR sensitivity increases, and
pages that contain potentially inappropriate material
are more likely to be blocked. Likewise, selecting a
higher threshold (higher numbers) lessens the
sensitivity of DDR and results in fewer potentially
inappropriate pages being blocked. The default
threshold values are 50 for incoming data and 10 for
outgoing requests.
Block Unresolved IP
Addresses?
If Yes is selected, requests for documents from remote
servers for which the Internet domain name of the
remote server cannot be determined are blocked.
Block Extensions?
Access to documents is blocked based on the extension
of the document’s URL. This option can be used to
prevent specific document types from being
downloaded. You can block unlisted additional
extensions by entering the extension without a leading
dot in the Other box. More than one extension can be
entered, each separated by a space. Some of the
extensions listed end with ... to indicate that more than
one related extension is blocked. For example, mov...
blocks both mov and moov.
Activating AutoLock
If you select Filtered or Allow Only as the filtering mode, you can activate the
AutoLock feature (optional). The AutoLock feature is not available in Audit
mode.
215
216 Working with the Client object
Scheduling an event for a client
When AutoLock is active, the content filtering component automatically locks a
user’s account (suspends Internet access using one of two methods until the
system administrator unlocks the account) if a specified number of blocked
accesses are attempted within a given period of time.
To activate AutoLock
1
In the drop-down list, select one of two methods for locking a user’s account.
Locking method
Description
Schedule default user event If you select Yes - schedule default user event, a default
event is scheduled for the user in which the user’s
filtering mode is set to locked. To unlock the account,
you must either delete or edit the event.
If you select this method for locking an account, the
locked user may still have Internet access, depending
on other, higher priority events that may be scheduled
for the user or for the clients used. For example, even
though a student’s account may be AutoLocked, the
student still has access from a client that is scheduled to
have Allow Only access for a certain research period.
Even though the account is AutoLocked, the student
can complete normal studies during the period of time
the account is locked. However, any Internet access
that is not covered by a higher priority event is
prevented.
Disable user
If you select Yes - disable user, the user cannot log on to
the content filtering component. All Internet access is
denied. To unlock the account, the user must be
reenabled using the Modify method for the User
object.
If you are running other Symantec products such as
Mail-Gear on the same computer as Symantec Web
Security and are taking advantage of the information
sharing capability between the products, disabling a
user does not affect the settings in any other Symantec
product.
Users who have administrative permission to add users
cannot be AutoLocked in this manner. Selecting this
method for AutoLocking users protects you from
accidently having all users with the permission needed
to reinstate users locked out at the same time.
Working with the Client object
Scheduling an event for a client
2
Select the number of blocked accesses that must occur and the time period in
which these attempts must occur for an account to be AutoLocked.
3
Type the appropriate email address in the box provided if you would like to
initiate automatic email notification when an account has been AutoLocked.
If you do not want to activate the AutoLock notification feature, leave the
email notification box blank.
The content filtering component automatically sends email to the addresses
listed to indicate that an account has been AutoLocked.
Select whether to
activate AutoLock and
select the appropriate
locking method
Select the number of
accesses and time period
for AutoLocking an
account
Enter email addresses for
email notification when
an account has been
locked, if desired
The content filtering
component sends an
email message to the
specified address when an
account has been
AutoLocked
Activating AutoAlert
If you select Filtered, Allow Only, or Audit mode as the filtering mode, you can
activate the AutoAlert feature (optional).
When AutoAlert is active, the content filtering component sends email to the
specified addresses when users attempt a specified number of blocked or audited
accesses. The software automatically sends email to the addresses listed to
indicate that users have attempted to access restricted material.
The AutoAlert feature differs from the AutoLock feature in that AutoAlert
functions when the content filtering component is operating in Audit mode. You
can set the content filtering component to operate in Audit mode and, with the
AutoAlert feature activated, receive automatic notification of inappropriate
access attempts.
217
218 Working with the Client object
Scheduling an event for a client
The logging of AutoAlert browsing activity is separate from Symantec Web
Security activity logging. AutoAlert functions regardless of the settings that you
have established for normal activity logging. However, if normal activity logging
is turned off, you cannot use the reporting features to review the access attempts
that resulted in the AutoAlert notification.
Select the number of
blocked accesses after
which the software
sends immediate
notification
Select the period of
time after which the
software sends
notification of any
blocked accesses
Enter email addresses
for AutoAlert
notification when a
specified number of
blocked attempts have
been made
To activate AutoAlert
1
Type the appropriate email address in the box provided.
If you do not want to activate the AutoAlert feature, leave this box blank.
2
If you have activated AutoAlert, select the number of blocked accesses that
will result in immediate email notification to the addresses indicated.
3
Enter the amount of time after which the software will provide notification
of any blocked accesses.
The two AutoAlert parameters function independently of one another. That
is, if the number of blocked accesses is set to 2 and the number of minutes is
set to 30 and a user makes two blocked access attempts in a 30-minute
period, then the software sends a notification message immediately after the
second attempt. However, if that same user makes only one blocked attempt
in the same 30-minute period, then the software sends email at the end of the
30-minute period to report the single blocked attempt. For sites with large
numbers of users, you may want to set the time period for notification to a
larger block of time to limit the potential amount of email received.
4
Click Finish to activate the default filtering settings for the client.
5
Click Done to return to the main administration page.
Working with the Client object
Scheduling an event for a client
If you click Cancel Change, no default event is scheduled for the selected
client.
The AutoAlert message
lists a sample of the
content and audit
violations that resulted
in the notification
Scheduling a daily event
A daily event can be scheduled to override the default access permissions for an
object. For example, if you lock a client, user, or group by default, you can
schedule a daily event to permit Internet access.
Daily events occur on the days specified until the event is edited or deleted.
To schedule a daily event
1
On the main administration page, click the Schedule method for the Client
object.
2
Select the appropriate client.
3
Click Schedule a Daily Event.
4
Click Next.
5
Select the days of the week and the time of the event.
6
Click Next.
7
Set the filtering options.
The filtering options for a daily event are identical to those for setting
defaults.
See “Setting defaults for a client” on page 209.
219
220 Working with the Client object
Scheduling an event for a client
Scheduling an event for a specific date
Specific events repeat for up to 14 days. Specific events are automatically deleted
when they expire.
To schedule an event for a specific date
1
On the main administration page, click the Schedule method for the Client
object.
2
Select the appropriate client.
3
Click Schedule An Event for a Specific Date.
4
Click Next.
5
Select the date and time of day for the event and the number of days to repeat
the event.
6
Click Next.
7
Set the filtering options.
The filtering options for a specific event are identical to those for setting
defaults.
See “Setting defaults for a client” on page 209.
Working with the Client object
Scheduling an event for a client
Editing an existing event
You can edit existing events. You cannot change an event from one type to
another, for example, from a daily event to a specific event.
To edit an existing event
1
On the main administration page, click the Schedule method for the Client
object.
2
Select the client to which the event applies.
3
Click Edit/View an Existing Event.
4
Click Next.
5
Select the event to edit.
In the list of all events that apply to the specified client, the event with the
lowest priority (the default settings for the client) is shown at the top and the
events with the highest priority (the specific events) are listed at the bottom.
6
Click Next.
7
Make the desired changes to the filtering options.
See “Setting defaults for a client” on page 209.
Deleting an existing event
Default settings and daily events remain in effect until they are deleted. Specific
events are automatically deleted when they expire.
221
222 Working with the Client object
Generating a report for a client
To delete an existing event
1
On the main administration page, click the Schedule method for the Client
object.
2
Select the client to which the event applies.
3
Click Delete an Existing Event.
4
Click Next.
5
In the list of events that apply to the specified client, select the events to
delete.
6
Click Delete.
7
Click Done to return to the main administration page.
Generating a report for a client
Two types of reports can be generated for Client objects: Access reports and
Access Summary reports. Client reports are identical to system-level reports,
except that system reporting lets you examine activity for any number of selected
objects or for the entire system. Client reporting only lets you examine activity for
selected clients.
The client-level Access report lets you review the browsing activity from the
selected clients (such as URLs that were accessed or for which access was
attempted and violations) and the administrative activity (such as logons and
logoffs).
Working with the Client object
Generating a report for a client
The client-level Access Summary report summarizes information on access
frequency for popular URLs and the frequency and types of violations.
See “Generating system-level reports” on page 166.
Reporting for a particular client depends both on the settings for the specific
client and the system default settings for the type of browsing activity that the
content filtering component is to log.
See “Modifying other system attributes” on page 145 and “Modifying a client” on
page 204.
For example, if you choose to not have browsing activity logged for a particular
client, an Access report generated for that client does not contain information on
browsing activity.
223
224 Working with the Client object
Generating a report for a client
Chapter
Working with the User
object
This chapter includes the following topics:
■
Adding a user
■
Deleting a user
■
Modifying a user
■
Scheduling an event for a user
■
Generating a report for a user
13
226 Working with the User object
Adding a user
Adding a user
You can add the following types of users to Symantec Web Security:
■
Virtual
■
NT or Solaris system
■
RADIUS
■
LDAP
Symantec Web Security currently supports the following types of LDAPcompliant platforms: Sun ONE, IBM SecureWay, and Microsoft Active
Directory.
By adding users from a directory service to Symantec Web Security, a Web
Security administrator can establish individual settings. Otherwise, directory
service users authenticate through Symantec Web Security, and system-level
settings apply.
Understanding user disposition changes due to upgrading
To upgrade from a previous version of Symantec Web Security or Symantec IGear, you must install the current version on top of the existing version.
See “Upgrading from earlier versions” on page 59.
Consider the following when upgrading to Symantec Web Security 3.0:
■
If you install version 3.0 and do not have a previous version of Symantec
Web Security or Symantec I-Gear installed, the Directory Services selection
defaults to Virtual Users Only.
■
If you have only virtual users and groups supported in a previous version,
and you upgrade to version 3.0, users and groups are considered virtual in
the current version also.
■
If you have virtual and system users supported in a previous version and
upgrade to version 3.0, virtual users are still considered virtual, and system
users are still considered system. Group status is not affected.
Working with the User object
Adding a user
Warning: The encryption algorithm used to decrypt user passwords in Symantec
Web Security has become more secure in version 3.0. Virtual user passwords set
in a previous version Symantec Web Security or in Symantec I-Gear 3.5.14 must
be reset by a Symantec Web Security administrator so that those virtual users can
log on to version 3.0. To convert user passwords of virtual users, a user
conversion password utility (setpass) is included on the Symantec Web Security
3.0 distribution CD.
See “Upgrading from earlier versions” on page 59.
Understanding user disposition changes due to change in LDAP
platform selection
You must reinstall Symantec Web Security 3.0 to change your selection of LDAPcompliant platform, if that change involves switching from or to Microsoft Active
Directory.
Consider the following when reinstalling Symantec Web Security:
■
If you switch from Virtual Users Only to System Users, RADIUS, or LDAP,
the virtual users are assumed to exist also in the newly selected directory
service, and the virtual groups are assumed to exist on the system server. If
they do not, they are considered obsolete.
RADIUS does not support groups.
■
If you switch from NT or Solaris System Users to LDAP or RADIUS, system
users are assumed to exist also on the LDAP or RADIUS server, and system
groups are assumed to exist also on the LDAP server. If they do not, they are
considered obsolete. Virtual users and groups remain virtual users.
Note: An obsolete user is one who has been added to Symantec Web Security
from a directory service, then deleted from the directory service. Deleting a user
from a directory service does not delete that user from Symantec Web Security.
The added user must be manually deleted from Symantec Web Security.
Likewise, deleting a user from Symantec Web Security does not remove that user
from the directory service. See “Deleting a user” on page 238.
227
228 Working with the User object
Adding a user
Adding virtual users
A virtual user is recognized only by Symantec Web Security. Virtual users can be
used in Symantec Web Security when users do not require system accounts.
Valuable network resources are not used to maintain unnecessary system
accounts, and virtual users do not have access to other parts of your network,
which minimizes the security risks associated with large numbers of system
accounts.
You can add one virtual user at a time, or you can create a simple text (.txt) file
that contains the necessary information on multiple users and submit the text file
to create multiple virtual users at once. To create a .txt file in most popular wordprocessing programs, use the Save As command and choose Text Only (.txt) as
the file type.
To add a virtual user
1
On the main administration page, click the Add method for the User object.
2
Click Add One Virtual User.
3
Click Next.
4
Type the user’s full name in the space provided.
5
Select a group for the user, if appropriate.
6
Specify a Symantec Web Security logon name and password, if appropriate.
If you do not specify an account name and password, the software generates
these for you.
You cannot use the following characters in user account names: %, &, ^, !, #,
$, *, (, ), +, {, }, [, ], =.
7
Click Add.
The software confirms creation of the new virtual user account.
Working with the User object
Adding a user
8
Click Done to return to the main administration page.
Note: If a virtual user forgets a password, any administrator with the Modify
User permission can issue a new password using the Modify method for the User
object. Virtual users with permission to change their own passwords can still do
so; however, in order to change their own passwords, users must know their old
passwords.
To add more than one virtual user
1
Create a file in simple text format that contains a block of information about
each virtual user you wish to add.
To create a .txt file in most popular word-processing programs, use the Save
As command and choose Text Only (.txt) as the file type.
The information for each user must be on a separate line and formatted as
follows:
Full name,account name,password,group
The full name is mandatory; other boxes are optional. If you do not specify
an account name or password, the software generates these for you. The
generated account names and passwords are shown on the next screen after
the users have been created.
You must type all three commas even if you do not specify any information
other than the full name:
Joe Smith,smith,boat,xyz
Jane Smith,,,
229
230 Working with the User object
Adding a user
You cannot use the following characters in user account names: %, &, ^, !, #,
$, *, (, ), +, {, }, [, ], =.
2
When the file is complete, on the main administration page, click the Add
method for the User object.
3
Click Add Multiple Virtual Users.
4
Click Next.
5
Supply the file to the server in one of three ways:
■
If the file is already located on the server, under Use a File Already on the
Server, type the path name of the file, then click Go.
■
If the file is located on the computer you are currently using, in the
Upload File from Client box, type the path name of the file in the space
provided, then click Go, or click Browse to find the file (this option
requires a browser capable of file uploads). Select the file in the browse
window, then click Open. Click Go.
■
Type or paste the file into the text area under Enter information here,
then click Go.
Provide path name
to file on server
or
Provide path name
to file on client
or
Type or paste
account information
The software confirms that the accounts have been created.
Working with the User object
Adding a user
6
Click Done to return to the main administration page.
Note: When large numbers of users (for example, 10,000 users) are added to
Symantec Web Security, stop and restart Symantec Web Security service. If you
do not stop and start service, you may experience a delay when administering
users.
Adding NT or Solaris system users
A system user is one who has an account on the same domain as the server
running Symantec Web Security and has been added to Symantec Web Security.
You can add system users to Symantec Web Security to change their settings
within Symantec Web Security if the software has been configured to support
system users.
To add one NT or Solaris system user at a time
1
On the main administration page, click the Add method for the User object.
2
In the Adding User(s) window, click Add one system user at a time.
3
Click Next.
4
In the Add a System User window, do one of the following:
■
On the Search menu, select the search method, click Search, then select
the user name of the user to add.
■
In the System Account box, type the user name.
5
Click Add.
The added user names appear in the Symantec Web Security Users list.
Domain names are shown with system user names if you are running
Symantec Web Security on Windows NT or 2000.
6
If you prefer a different name for the Symantec Web Security account name,
type the different name in the Symantec Web Security Account Name box.
If you leave this box blank, the Symantec Web Security account name will be
the same as the system account name.
For Windows NT, the default Symantec Web Security account name
contains only the user name. The domain name is stripped off. For example,
if the system account name is asmith in domainA (DomainA\asmith), the
Symantec Web Security user name is asmith.
You cannot use the following characters in user account names: %, &, ^, !, #,
$, *, (, ), +, {, }, [, ], =.
231
232 Working with the User object
Adding a user
7
Click Add.
The new user account name appears in the list on the right side of the page.
8
Click Done to return to the main administration page.
Note: The password from the system account is the password for the Symantec
Web Security account.
To add more than one NT or Solaris system user at a time
1
On the main administration page, click the Add method for the User.
2
Click Add multiple system users at once.
3
Click Next.
4
In the Add Multiple System Users window, do one of the following:
■
On the search menu, select the search method, click Search, then select
the user name of the user to add.
■
In the System Account box, type the user name.
5
Click Add.
The added user names appear in the Symantec Web Security Users list.
Domain names are shown if you are running Symantec Web Security on
Windows 2000 or NT.
When multiple system users are added at the same time, the Symantec Web
Security account names and passwords are the same as for the system
accounts.
6
Click Done to return to the main administration page.
Note: When large numbers of users (for example, 10,000 users) are added to
Symantec Web Security, restart the computer on which Symantec Web Security is
running on Windows 2000 or NT. If you do not stop and start the service, you
may experience a delay when administering users.
Working with the User object
Adding a user
Adding RADIUS users
You can add users from a RADIUS directory to Symantec Web Security to change
their permissions within Symantec Web Security if the software is configured to
support RADIUS users.
The default Symantec Web Security account name matches the RADIUS account
name.
To add RADIUS users
1
On the main administration page, click the Add method for the User object.
2
In the Adding User(s) window, click Add one RADIUS user at a time.
3
Click Next.
4
In the Add One RADIUS User window, in the RADIUS Account box, type
the name of the RADIUS account you wish to add to Symantec Web Security.
In the Symantec Web Security Account Name box, you may type a new name
for the added RADIUS account.
5
Click Add.
Once the user is added, the RADIUS account name appears in the Symantec
Web Security Users list.
6
Click Done to return to the main administration page.
Adding LDAP users
You can add users from an LDAP directory to Symantec Web Security to change
their settings in Symantec Web Security if the software has been configured to
support LDAP users.
The default Symantec Web Security account name matches the LDAP account
name.
To add LDAP users
1
On the main administration page, click the Add method for the User object.
2
In the Adding User(s) window, click Add LDAP Users.
3
Click Next.
233
234 Working with the User object
Adding a user
4
In the Add an LDAP User window, do one of the following:
■
On the Search menu, select the search method, click Search, then select
the user name of the user you want to add.
■
In the LDAP Account box, type the LDAP user name.
5
Click Add.
The added user names appear in the Symantec Web Security Users list.
Domain names are shown if you are using Windows NT.
6
Click Done to return to the main administration page.
Note: Sun ONE displays no more than 10,000 users at once. To view more users,
you can provide a filter. See your Sun ONE documentation.
Adding one user at a time (advanced)
The advanced method for adding any type of user lets you assign permissions and
set certain parameters for the newly created user without having to use the
Modify method for the user.
You must have appropriate permissions to use the advanced method. For
example, if you have Add permission for the User object but not for the Group
object, you can create the new user, but you cannot create a new group for the
new user.
To use the advanced method to add a user
1
On the main administration page, click the Add method for the User object.
2
Click Add One User at a Time (Advanced).
Working with the User object
Adding a user
3
Click Next.
4
In the Advanced User Creation window, under Account Source, select one of
the following:
5
6
■
Virtual user
■
System user
■
RADIUS user
■
LDAP user
Do one of the following:
■
If you are adding a system, RADIUS, or LDAP user, in the Account
Name box, type the existing user account name.
■
If you are adding a virtual user, in the Account Name box, optionally
type an account name.
You do not need to enter an account name for a virtual user. If you do
not enter an account name, the software generates one automatically.
You cannot use the following characters in user account names: %, &, ^,
!, #, $, *, (, ), +, {, }, [, ], =.
If you are creating a virtual user, under Account Information, type the user’s
full name.
235
236 Working with the User object
Adding a user
7
If you are creating a virtual user, optionally type a password for the virtual
user account.
If you do not supply a password for the virtual user account, the software
generates one automatically.
For system, LDAP, and RADIUS users, it is not necessary to supply
passwords. Symantec Web Security authenticates users via their directory
passwords.
8
Specify other account information:
■
The type of browsing activity to log for the user
■
The default URL to display when no other URL has been requested
Whether users can change their passwords
If you select the Use Default Settings option for any of these settings, other
inherited settings apply, based on the hierarchy of permissions.
■
9
Under Group Information, do one of the following to place a user in a group:
■
To place the user in an existing group, select the group from the list of
existing groups.
To create a new group for the user, type a new group name in the Create
Group and Add User box.
You do not have to place a user in a group.
■
10 Optionally place the user on the Access Control List for the group.
11 If you placed the user on the Access Control List for the group, select the
Access Control List permissions for the user.
12 Set global permissions for the user by clicking appropriate check boxes under
Global Symantec Web Security Administration Permissions.
If you have placed the new user on an Access Control List for a group and
want the user to be able to create new users and lists, you must give the user
global Add permission for the User and List objects.
Working with the User object
Adding a user
13 If you have given the user global permission to add users and lists, optionally
specify quotas for the user (the total number of users that can be created, the
number of lists that can be created, and the maximum number of URLs that
can be added to lists by this user).
14 Click Add.
The software confirms that your changes have been made.
15 Click Done to return to the main administration page.
237
238 Working with the User object
Deleting a user
Deleting a user
Deleting a user permanently removes the user’s scheduled events and other
settings from Symantec Web Security and deletes the user from other Symantec
applications (such as Mail-Gear) installed on that computer.
Note: An obsolete user is one who has been added to Symantec Web Security
from a directory service, then deleted from the directory service. Deleting a user
from a directory service does not delete that user from Symantec Web Security.
The added user must be manually deleted from Symantec Web Security.
Likewise, deleting a user from Symantec Web Security does not remove that user
from the directory service.
To delete an active user
1
On the main administration page, click the Delete method for the User
object.
2
In the Delete Users window, select one or more users to delete.
3
Click Delete.
The software asks for confirmation that you want to delete the selected users.
4
In the Confirmation window, click Yes.
The software confirms that your changes have been made.
5
Click Done to return to the main administration page.
Working with the User object
Modifying a user
To delete an obsolete user
1
On the main administration page, click the Delete method for the User
object.
2
In the Delete Users window, under Delete Obsolete User(s), click Delete.
The software asks for confirmation that you want to delete the obsolete users.
3
In the Confirmation window, click Yes.
The software confirms that your changes have been made.
4
Click Done to return to the main administration window.
Modifying a user
The Modify method for the User object lets you:
■
Modify attributes.
■
Modify object creation/modification attributes.
■
Add and delete objects on Access Control Lists.
■
Modify permissions on Access Control Lists.
■
Disable existing users.
■
Reenable existing users.
Modifying attributes
The attributes that you can modify for users include the user’s group, the type of
activity to log, and the administrative permissions. You must have the Can Grant
Permissions permission to view and set the permissions of other users. You can
also change the password for a virtual user account.
If you retain the Use Default Settings option for any attribute, other inherited
settings that have been established apply, based on the hierarchy of permissions.
See “How Symantec Web Security works” on page 25.
239
240 Working with the User object
Modifying a user
To modify attributes for a user
1
On the main administration page, click the Modify method for the User
object.
2
Select the user to be modified.
3
Click Modify Attributes.
4
Click Next.
5
Optionally select a group for the user.
6
Specify whether this user can grant Unfiltered (or Audit Mode) access to
another user at any time (with the appropriate permissions).
7
Specify whether the users can change their own passwords.
8
Select the type of browsing activity to log for the user.
Many of the Report functions do not operate when activity logging is
disabled.
9
Specify the default URL to display for the user (the URL that the browser
displays automatically after the user logs on).
10 Optionally change the full name of the user.
When the selected user is a system, LDAP, or RADIUS user, you can supply
the account you want SWS to use to authenticate that user.
11 Optionally set a new password for the account by typing the new password
twice. (The password boxes appear only if the account is a virtual account.) If
a virtual user forgets a password, an administrator with the Modify User
permission can set a new password. System users must modify their
passwords at the system level rather than through Symantec Web Security.
Virtual users with permission to change their own passwords can still do so;
however, in order to change their own passwords, users must know their old
passwords.
Working with the User object
Modifying a user
12 Select the appropriate check boxes to change the global administrative
permissions for the user. The following table describes each permission that
may be granted to User objects.
Permission
Description
Can Grant
Permissions
User can grant or change permissions of other users.
Add Objects
User can use the Add method on objects.
Delete Objects
User can use the Delete method on objects.
Report
User can use the Report method on objects.
Modify Objects
User can use the Modify method on objects.
Schedule Objects
User can use the Schedule method on objects.
You cannot change the permissions on your own account. Instead, another
user with the Can Grant Permissions permission must do so.
13 Select the specific objects to which the selected administrative permissions
apply.
If the selected user is on an Access Control List and you want the user to be
able to create new users and private lists for that group, you must give the
user global Add permissions for the User and List objects, in addition to the
User’s Access Control List permissions.
When assigning global administrative permissions, you must select at least
one object and one method. If you select only objects or only methods, the
permissions are invalid and do not take effect. (The software does not return
an error message.)
14 When you finish making selections, click Finish.
The software confirms that your changes have been made.
241
242 Working with the User object
Modifying a user
15 Click Done to return to the main administration page.
The boxes for
setting a new
password appear
only for virtual
user accounts
The permissions
assigned here are
global permissions for
the overall
administration of the
software
Modifying object creation/modification attributes
To modify the object creation/modification attributes for a user, the selected user
must have global permissions for adding users or lists.
See “Modifying attributes” on page 239.
Working with the User object
Modifying a user
To modify the object creation/modification attributes for a user
1
On the main administration page, click the Modify method for the User
object.
2
Select the user to be modified.
3
Click Modify Object Creation/Modification Attributes.
4
Click Next.
5
In the User creation quota box, type the number of users the selected user
can create.
Leaving this box blank lets the user create an unlimited number of users.
6
Under On User creation, indicate whether to place the selected user on the
Access Control List for accounts created by the user.
If you add the user to the Access Control List, set the Access Control
permissions.
7
In the List creation quota box, type the number of lists the selected user can
create.
Leaving this box blank lets the user create an unlimited number of lists.
8
Under On List creation, indicate whether to place the selected user on the
Access Control List for lists created by the user.
If you add the user to the Access Control List, set the Access Control
permissions.
9
In the Maximum number of URLs that can be added to lists box, type the
maximum number of URLs that can be added to lists created by this user.
Leaving this box blank lets the user add an unlimited number of URLs to new
lists.
243
244 Working with the User object
Modifying a user
10 Click Finish.
The software confirms that your changes have been made.
11 Click Done to return to the main administration page.
Adding and deleting objects on Access Control Lists
Adding objects to and deleting objects from Access Control Lists is the same for
the Client, User, Group, and List objects.
See “Adding and deleting objects on Access Control Lists” on page 205.
Modifying permissions on Access Control Lists
Modifying the permissions for objects on Access Control Lists is the same for the
Client, User, Group, and List objects.
See “Modifying permissions on Access Control Lists” on page 208.
Disabling existing users
Note: Only users created in or added to Symantec Web Security can have their
accounts disabled.
Disabling a user retains the user’s scheduled events and other settings in
Symantec Web Security but prevents the user from logging on to Symantec Web
Security. Use this option to prevent a user from having any Internet access. If you
are running other Symantec products (such as Mail-Gear) on the same computer
as Symantec Web Security and are taking advantage of the information-sharing
capability between the products, disabling a user from Symantec Web Security
does not affect the settings in any other Symantec product.
To disable existing users
1
On the main administration page, click the Modify method for the User
object.
2
Click Disable Users.
3
Click Next.
A list of active user accounts appears on the next display.
4
In the Disable Users window, select the users you want to disable from the list
of user accounts.
Working with the User object
Modifying a user
5
Click Finish.
The software prompts you for confirmation that you want to disable the
selected users.
6
In the Confirmation window, click Yes.
7
Click Done to return to the main administration page.
Reenabling existing users
An existing user whose account has been disabled is unable to log on to Symantec
Web Security.
To reenable existing users
1
On the main administration page, click the Modify method for the User
object.
2
Click Reenable Existing Users.
3
Click Next.
4
In the Reenable Users window, under Existing (Disabled) Users, select the
disabled users to enable from the list of user accounts.
5
Click Reenable.
245
246 Working with the User object
Scheduling an event for a user
6
Click Done to return to the main administration page.
Scheduling an event for a user
The Schedule method is the same for Client, User, Group, and System objects.
User permissions travel with users regardless of the computer they use on the
network. However, user permissions can be affected, depending on the settings
for the client computer used.
See “Scheduling an event for a client” on page 209.
When scheduling events for users, remember that client and client group
permissions have a higher priority by default than user and user group
permissions.
See “How Symantec Web Security works” on page 25.
An event scheduled for a user may be affected by permissions set for a particular
client or group of clients.
Generating a report for a user
Three reports can be generated for users: Access reports, Access Summary
reports, and User Summary reports. The Access and Access Summary reports are
identical to system-level Access reports and Access Summary reports, except that
system reporting lets you examine activity for any number of selected objects or
the entire system. User reporting only lets you examine activity for selected users.
Working with the User object
Generating a report for a user
Access reports let you review the browsing and administrative activities for
selected users. Access Summary reports provide summary information on
frequency of access for popular URLs and the frequency and types of violations.
See “Generating system-level reports” on page 166.
User Summary reports
User Summary reports let you review account information for selected users,
including account name, account type, user’s full name, user’s group, and global
permissions that have been granted to the user.
To generate a User Summary report
1
On the main administration page, click the Report method for the user
object.
2
Click User Summary Report.
3
Click Next.
4
In the Report on User(s) - Choosing Reporting Options window, select the
users on which to report.
5
Do one of the following to narrow the scope of the report:
■
Specify a particular group membership on which to report.
■
Specify a type of user account on which to report (virtual, system,
LDAP, or RADIUS accounts).
Specify only those users with global administrative permissions.
For example, if you select the Marketing group and select Virtual as the
account type, the report contains information on only those members of the
Marketing group who are virtual users. If you also choose to report on users
who have administrative permissions, then the report contains information
on only those members of the Marketing group who have administrative
permissions and are virtual users.
■
6
Select whether you want to display the report in HTML or as plain text.
If you select Show as Text Only, report results are formatted so that you can
save the report output to a file. If you select HTML format, the user
information is in a standard HTML report page.
7
After selecting the report options, click Next.
247
248 Working with the User object
Generating a report for a user
The following example shows the report generated in HTML format.
Select the report format
and click Next
The following example shows the same report generated as text only.
This report contains
the same information
as the HTML report
but in text-only
format
Chapter
Working with the Group
object
This chapter includes the following topics:
■
About groups
■
Adding a group
■
Deleting a group
■
Modifying a group
■
Scheduling an event for a group
■
Generating a report for a group
14
250 Working with the Group object
About groups
About groups
You can group Client and User objects using Symantec Web Security. Using
system and group settings minimizes administrative work. Use the following
rules as a guide when you set up groups:
■
Groups should contain like objects when possible (for example, users and
clients should not be mixed in the same group).
■
Groups should be created when you want to give a group of users or clients a
different default behavior. For example, to give certain employees less
restrictive Internet access after work hours and on weekends, you can create a
group that contains these users. Then, scheduling a single daily event for the
entire group is much more efficient than scheduling the same event for each
user individually.
■
Groups should be created when a group of users or clients needs different
permissions during specific times. For example, employee accounts can be
locked by default and scheduled to be active every day from 8:00 AM to 5:00
PM.
■
Groups for clients should be based on geographic location (such as room) or
logical group (such as teacher computers or summer employees).
If an object is a member of a group and you want to change the object’s
permissions, scheduling the object overrides the group permissions. For example,
a student may have Internet access time extended to 5:00 PM even though the
student belongs to a group for which access is denied after 4:00 PM.
Adding a group
Create a group when you want to give selected users or clients a different default
behavior or when selected users or clients need different permissions during
specific times.
Note: Only users exist in RADIUS and Solaris directory services. RADIUS and
Solaris do not support groups.
Working with the Group object
Adding a group
To add a virtual group
1
On the main administration page, click the Add method for the Group
object.
2
In the Adding Groups window, click Create Virtual Group.
3
Click Next.
4
In the Adding a Group window, type the name of the new group in the New
Group Name box.
You cannot use the following characters in group names: %, &, ^, !, #, $, *, (,
), +, {, }, [, ], =.
5
Click Add.
6
Click Done to return to the main administration page.
To add an NT system group
1
On the main administration page, click the Add method for the Group
object.
2
In the Adding Groups window, click Add System Groups.
3
Click Next.
4
In the Add a System Group window, do one of the following:
■
On the Search menu, select the search method, click Search, then select
the name of the group to add.
■
In the System Group box, type the system group to add.
5
Click Add.
The Symantec Web Security Groups list updates to reflect your changes.
6
Click Done to return to the main administration page.
To add an LDAP group
1
On the main administration page, click the Add method for the Group
object.
2
In the Adding Groups window, click Add LDAP Group.
3
Click Next.
4
In the Add an LDAP Group window, do one of the following:
■
On the Search menu, select the search method, click Search, then select
the name of the group to add.
■
In the LDAP Groups box, type the name of the LDAP group to add.
251
252 Working with the Group object
Deleting a group
5
Click Add.
The Symantec Web Security Groups list updates to reflect your changes.
6
Click Done to return to the main administration page.
Deleting a group
When a group is deleted, the members of that group still exist within Symantec
Web Security as unassigned members (they do not belong to any group until they
are reassigned).
Note: An obsolete group is one that has been added to Symantec Web Security
from a directory service, then deleted from the directory service. Deleting a group
from a directory service does not delete that group from Symantec Web Security.
The group must be manually deleted from Symantec Web Security.
To delete an active group
1
On the main administration page, click the Delete method for the Group
object.
2
Select one or more group objects to delete.
More than one group can be selected at a time, usually by pressing Control
while selecting the desired groups—the exact method to select more than
one item is browser and operating-system dependent. Clicking Clear clears
the display.
3
Click Finish.
The software confirms that your changes have been made.
4
Click Done to return to the main administration page.
To delete an obsolete group
1
On the main administration page, click the Delete method for the Group
object.
2
In the Delete Groups window, in the bottom pane, click Delete.
3
In the Confirmation window, click Yes.
Working with the Group object
Modifying a group
Modifying a group
The Modify method for the Group object lets you modify the membership or
attributes of existing groups and modify the Access Control List membership and
permissions.
Modifying group membership
Symantec Web Security lets you add or remove objects from a group, and also lets
you add a range of clients to a group.
Note: You can modify membership for virtual groups only. You cannot modify
the membership for directory service and system groups that have been added to
Symantec Web Security.
To modify the membership of a group
1
On the main administration page, click the Modify method for the Group
object.
2
In the Modify Group Membership window, select the group to be modified.
3
Click Modify Membership.
253
254 Working with the Group object
Modifying a group
4
Click Next.
Select users or
clients, then
click Add Users
or Clients
Or select group
members, then
click Remove
Or enter a range of
IP addresses, then
click Add IP range
5
Do one or both of the following:
■
To add objects to the group, select from the lists on the left side of the
display one or more unassigned users or clients, and click Add Users or
Clients.
To remove objects from the group, select from the list on the right side
of the display one or more objects and click Remove. (Objects removed
from the group become unassigned.)
Objects can belong to only one group at a time. Only those objects not
currently assigned to a group are displayed in the Unassigned lists.
You can add a range of clients to a group simultaneously. When you have
specified a range of addresses, you can also elect whether to add clients that
do not already exist that fall within the specified range, and whether to move
any specified clients that have previously been assigned to another group in
Symantec Web Security to the current group.
■
Working with the Group object
Modifying a group
To add a range of client IP addresses at once
1
On the main administration page, click the Modify method for the Group
object.
2
Select the group to be modified.
3
Click Modify Membership.
4
Type the range of IP addresses in the Range of Clients box as in the example.
For the IP addresses 192.168.1.1 through 192.168.1.100, type the range as
192.168.1.1 - 192.168.1.100. The space on either side of the hyphen is
optional. You can also type a single IP address in the box.
5
Under Add Non-existent Clients, select one of the following:
■
Yes: Adds to Symantec Web Security any clients that are specified in the
range and do not already exist.
No: Does not add non-existent clients.
The default setting is Yes.
■
6
Under Reassign Clients from Other Groups, select one of the following:
■
Yes: Reassigns any clients that are members of other groups to the
current group.
No: Does not reassign clients.
The default setting is No.
■
7
Click Add IP range.
8
The software confirms that your changes have been made. A summary screen
displays listing any clients that were not reassigned or created as requested.
Modifying attributes for a group
Symantec Web Security lets you modify password and Internet access attributes
for a group.
To modify the attributes for a group
1
On the main administration page, click the Modify method for the Group
object.
2
Select the group to be modified.
3
Click Modify Attributes.
4
Click Next.
255
256 Working with the Group object
Modifying a group
5
In the Modify A Group window, modify some or all of the attributes for the
group.
If you select Use Default Settings for any of these attributes, the settings for
the group are inherited from the system default settings.
Setting
Description
Can members
change their
password?
Set the password permission for the group.
Type of browsing
activity to log
Select the type of browsing activity to log for the group.
Default URL to
use when none
specified
Specify the default URL to display for the group when no other
URL has been requested (the URL that the browser displays
automatically after a user clicks Logon).
Can grant
unfiltered access?
Specify whether members of the group can grant Unfiltered (or
Audit Mode) access to another user.
Many of the report functions do not operate when activity
logging is disabled. This setting applies to browsing activity
only. Administrative functions are always logged, and logging
of administrative activity cannot be disabled.
6
Click Finish.
The software confirms that your changes have been made.
7
Click Done to return to the main administration page.
Working with the Group object
Modifying a group
Modifying group ranking
Users may be members of more than one group. For example, a user may belong
to a virtual group and an LDAP group that has been added to Symantec Web
Security. You can modify group ranking to determine which group has
precedence over another.
A user cannot be a member of more than one virtual group.
To modify group ranking
1
On the main administration page, click the Modify method for the Group
object.
2
In the Modify Group window, in the Action list, click Modify Group
Ranking.
3
Click Next.
4
In the Modify Group Ranking window, in the Groups in Ranking Order list,
select the group whose ranking you wish to modify.
5
In the Action list, select the ranking modification that you wish to make.
6
Click Modify.
7
After each modification, the Groups in Ranking Order list will reflect the
changes.
8
Click Done to return to the main administration page.
Select the group
whose ranking you
want to change
Select an action
for that group
257
258 Working with the Group object
Scheduling an event for a group
Adding/deleting objects to/from Access Control Lists
Adding objects to and deleting objects from Access Control Lists is the same for
the Client, User, Group, and List objects.
See “Adding and deleting objects on Access Control Lists” on page 205.
Modifying permissions on Access Control Lists
Modifying the permissions for objects on Access Control Lists is the same for the
Client, User, Group, and List objects.
See “Modifying permissions on Access Control Lists” on page 208.
Scheduling an event for a group
The Schedule method is the same for Client, User, Group, and System objects.
See “Scheduling an event for a client” on page 209.
As you schedule events for groups, remember the hierarchy of object
permissions. The permissions for individual clients or users have priority over
those for the group in which the user or client is a member. In the Symantec Web
Security default configuration, client and client group permissions have priority
over user and user group permissions. For example, you can set the default
settings for a group containing all clients in the main public area of a library to
Guest Mode with Filtered access and not allow downloading of files with the .exe
extension. You can allow library patrons to download .exe files from one
computer by scheduling a daily event for the individual client computer.
Generating a report for a group
The Report method is the same for the Client, User, and Group objects for both
Access and Access Summary reporting.
See “Generating a report for a client” on page 222.
Chapter
Customizing lists
This chapter includes the following topics:
■
About lists
■
Adding a list
■
Deleting a list
■
Modifying a list
■
Generating a report for a list
15
260 Customizing lists
About lists
About lists
Two types of lists exist in the content filtering component: predefined Content
Category Lists, which are provided by Symantec, and local lists, which you create
as needed for specific uses. There are two versions of each predefined Content
Category List: a local version and the version populated by Symantec. The local
version of each list is provided so that you can add additional related URLs to the
lists.
Lists can be either public or private. A public list is available for use by all objects.
A private list can be used only by the group members to which the list has been
assigned.
Adding a list
To add a list, you must:
■
Create the new list.
■
Add URLs to the new list.
When a list is created, the default state is Off. If you want the default setting for a
public list to be some setting other than Off, go to the Schedule method for the
System object and change the default state for the list. The state of a list can be
scheduled differently for each object; setting the default state only specifies its
initial default behavior. For example, a list that contains the host names of your
administrative intranet servers can be set to Deny for a student group and Allow
(Filtering Disabled) for a teacher group; the default state for this list can remain
Off.
See “Understanding Symantec Web Security” on page 35.
Creating a new list
Symantec Web Security lets you create public or private lists.
To create a new list
1
On the main administration page, click the Add method for the List object.
2
In the New List Name box, type the name of the new list.
No two lists can have the same name. Check the list on the right side of the
display to see whether the name you want to use is already in use.
You cannot use the following characters in list names: %, &, ^, !, #, $, *, (, ),
+, {, }, [, ], =.
Customizing lists
Deleting a list
3
To indicate whether the new list is private or public, do one of the following:
■
To make the list public, select the blank space at the top of the list of
groups or do not select any entry in the list of groups.
■
To make the list private, select the group to which this new list will be
restricted. Only one group may be selected for a given list.
4
Indicate whether the default filtering state of the list can be overridden by
users with administrative permissions to schedule events for users or groups.
This restriction does not apply to users who have Schedule permission for
the System object.
5
Select any users and groups to be placed on the Access Control List for the
new list.
6
If you placed users or groups on the Access Control List, select the
permissions to grant for the objects on the Access Control List.
You must have appropriate permissions to perform the functions on this
page. For example, if you have Add permission for the List object but do not
have Modify permission for Group and User objects, you can create a new
list, but you cannot assign any Access Control List members or permissions.
7
Click Add.
Adding URLs to the new list
You may add as many URLs as necessary to the new list unless a quota has been
established for the number of URLs that you are allowed to add to lists.
See “Adding URLs to local lists” on page 262.
Deleting a list
Only locally created lists may be deleted, not the predefined Content Category
Lists provided by Symantec. When a list is deleted, all URLs that populate that list
are lost.
To delete a list
1
On the main administration page, click the Delete method for the List object.
2
Select one or more lists to delete.
3
Click Finish.
4
Click Done to return to the main administration page.
261
262 Customizing lists
Modifying a list
Modifying a list
The Modify method for the List object lets you:
■
Add URLs to local lists.
■
Remove URLs from local lists.
■
Change the public/private status for a list.
■
Add/delete objects to/from Access Control Lists.
■
Modify permissions on Access Control Lists.
■
Change the filtering override setting for a list.
Adding URLs to local lists
The content filtering component looks for the most exact match when checking a
URL against assigned lists. By customizing your local lists, you can block or allow
individual Web pages or entire directories, computers, or domains.
For each request for Internet access, the content filtering component checks the
local versions of all active Content Category Lists before it checks the Symantec
versions. If the content filtering component finds a match in one or more active
local lists (lists that are not in the Off state), it does not check the Symantec
versions of the lists. You can completely override any Symantec categorization of
a site by adding a site to a local list, and you can add additional sites not
contained in the Symantec lists. You may add as many URLs as necessary to local
lists.
Note: Deny lists override Allow lists. If you place a URL in more than one list and
one of these lists is in the Deny state and the other is in an Allow state, access to
the URL is denied.
To add URLs to a list
1
On the main administration page, click the Modify method for the List
object.
2
Click Add URLs to Lists.
Customizing lists
Modifying a list
3
Click Next.
4
In the Adding URLs to List window, in the New URL box, type any new URL
you want to add.
5
Select any URLs from the list on the left side of the page.
The left side of the page shows URLs that already are contained in locally
created lists so that you can recategorize previously identified URLs.
6
After you have selected previously categorized URLs or typed in a new URL,
click the lists to which you want to add the URLs.
7
Click Add.
The software confirms that your changes have been made.
8
When you finish adding URLs to lists, click Done to return to the main
administration page.
Removing URLs from lists
Only URLs from the local versions of the Content Category Lists can be deleted.
The URLs added by Symantec to the predefined lists are not shown and cannot be
deleted.
263
264 Customizing lists
Modifying a list
To remove URLs from a list
1
On the main administration page, click the Modify method for the List
object.
2
Select the list from the list on the left side of the display.
3
Click Remove URLs from Lists.
4
Click Next.
5
In the Deleting URLs From List window, check the URLs that you want to
remove.
6
When you finish selecting the URLs to remove from the list, click Remove.
The software confirms that your changes have been made.
7
Click Done to return to the main administration page.
Changing the public/private status for a list
A public list is available to all objects. A private list is only available for use by a
specific group.
Customizing lists
Modifying a list
To change the public/private status of a list
1
On the main administration page, click the Modify method for the List
object.
2
Select the list from the list on the left side of the display.
3
Click Public/Private List Selection.
4
Click Next.
The Public/Private List Selection page displays the current status of the
selected list.
5
In the Public/Private List Selection window, do one of the following:
■
To make a private list public, select the blank space (no group) at the top
of the list of groups.
■
To make a public list private, select the appropriate group from the list.
6
Click Finish.
The software confirms that your changes have been made.
7
Click Done to return to the main administration page.
The current status
of the selected list
appears at the top
of the page
To make a list
public, select the
blank space
To make a list
private, select a
group
Adding/deleting objects to/from Access Control Lists
Adding objects to and deleting objects from Access Control Lists is the same for
the Client, User, Group, and List objects.
See “Adding and deleting objects on Access Control Lists” on page 205.
265
266 Customizing lists
Modifying a list
Modifying permissions on Access Control Lists
Modifying the permissions for objects on Access Control Lists is the same for the
Client, User, Group, and List objects.
See “Modifying permissions on Access Control Lists” on page 208.
Changing the filtering override setting for a list
The content filtering component provides a safeguard to prevent users with
administrative permissions from overriding the filtering list access state that has
been established at the system default level. When the filtering override setting for
a list is set to No, users with permission to schedule filtering events for users and
groups cannot change the filtering state for the given list. (This restriction does
not apply to users who have Schedule permission for the System object. These
users can still change the system defaults.)
To change the filtering override setting for a list
1
On the main administration page, click the Modify method for the List
object.
2
Select the appropriate list.
3
Click Allow Setting Override by User.
4
Click Next.
5
In the List Setting Override window, select one of the following:
■
Yes: Lets users override the default access state of the list.
■
No: Does not let users override the default access state of the list.
6
Click Finish.
The software confirms that your changes have been made.
7
Click Done to return to the main administration page.
Customizing lists
Generating a report for a list
Generating a report for a list
The Report method for the List object lets you review the locally added URLs for
a given list.
To generate a report for a list
1
On the main administration page, click the Report method for the List
object.
2
In the List Report window, select the lists to be included in the report.
3
Click View Lists.
The content filtering component displays all locally added URLs.
267
268 Customizing lists
Generating a report for a list
Chapter
Customizing dictionaries
This chapter includes the following topics:
■
About dictionaries
■
Modifying a dictionary
■
Generating a report for a dictionary
16
270 Customizing dictionaries
About dictionaries
About dictionaries
Each predefined content filtering list has an associated dictionary of trigger words
that is populated by Symantec. A local version of each dictionary is available so
that you can add words as necessary, based on your requirements. Words that are
manually added to the local version of a dictionary override Symantec dictionary
entries for the same words.
In addition, when you create a new list in the content filtering component, a
corresponding dictionary of the same name is automatically created so that you
can add words to be scored for that list. When you add words to a local
dictionary, you must provide a point value for each word or phrase for use in
DDR scoring.
The words in a dictionary are used by DDR in scoring only when the
corresponding list is active (in the Allow [Filtering Enabled] or Deny state).
Modifying a dictionary
The Modify method for the Dictionary object lets you add words to or delete
words from the local versions of dictionaries.
Adding words to dictionaries
Do not be overly aggressive in adding conditionally objectionable words to
dictionaries. Adding words such as sex or bottom may cause many more pages to
be blocked than you intend.
When assigning point values to words that you add to a dictionary, you can use
negative scores for words to offset blocking. For example, if you find that DDR
blocks a number of URLs that contain useful clinical discussions of circumcision,
you can try adding the word surgeon with a negative score (or another word that
appears on the pages in question) to the Sex Ed/Basic dictionary to offset the
blocking of these sites. Once you alter a dictionary, you should experiment with
site access to determine whether DDR is performing appropriately.
A word cannot be in more than one local dictionary. If you enter a word in one
local dictionary and that word is already in another local dictionary, the content
filtering component automatically removes the first entry. Use the Report
method for the Dictionary object to determine whether a word is already
contained in a local dictionary.
See “Dynamic Document Review (DDR)” on page 46.
Customizing dictionaries
Modifying a dictionary
To add a word or phrase to a dictionary
1
On the main administration page, click the Modify method for the
Dictionary object.
2
Select the dictionary to modify.
3
Click Next.
4
In the Modify Dictionary window, in the Word box, type the word or phrase
to be added.
5
On the Language menu, select the language to be used.
6
In the Score box, select a point value from the available range to use in DDR
scoring.
7
Select whether to replace the word or phrase in the text.
8
Click Add.
9
When you finish adding words or phrases to the dictionary, click Done.
Click Add
Type the word
Select the language
to be used
Provide a point value
for DDR to use
Select whether to
replace the word
in the text
Deleting words from dictionaries
You can delete words that have been added to dictionaries. When a word is
deleted, it is no longer used in scoring Web content.
If you need to change the score for a word in a dictionary, delete the word from
the dictionary and add the word again with the new score.
271
272 Customizing dictionaries
Generating a report for a dictionary
To delete a word or phrase from a dictionary
1
On the main administration page, click the Modify method for the
Dictionary object.
2
Select the dictionary to modify.
3
Click Next.
4
In the Modify Dictionary window, under Words in Dictionary (Score), select
one or more words to delete.
5
Click Delete.
6
When you finish deleting words from the dictionary, click Done.
Select the words
Click Delete
Generating a report for a dictionary
The Report method for the Dictionary object lets you review locally added words
and phrases and their scores in selected dictionaries.
Customizing dictionaries
Generating a report for a dictionary
To view the contents of a dictionary
1
On the main administration page, click the Report method for the
Dictionary object.
2
In the Dictionary Report window, under Dictionaries, select the dictionary
that you want to view.
3
Click View Dictionaries.
The locally added words and the associated scoring properties are displayed
for the selected dictionary.
273
274 Customizing dictionaries
Generating a report for a dictionary
Section
Antivirus protection
■
Antivirus protection
■
Using the content filtering component: examples
5
276
Chapter
Antivirus protection
This chapter includes the following topics:
■
Configuring antivirus protection
■
Setting scan policy
■
Specifying what to scan
■
Generating reports
■
Keeping protection current through LiveUpdate
17
278 Antivirus protection
Configuring antivirus protection
Configuring antivirus protection
Symantec Web Security antivirus protection is system wide. You cannot set
different options for users, clients, or groups. Customizable settings include:
■
Scanning Policy: How traffic is monitored for viruses and whom to alert if a
virus is detected
■
Configuration: What items are scanned under which protocols
■
Container: How Symantec Web Security will handle container files
■
Report: Which viruses were detected and how they were treated
Setting scan policy
The actions that Symantec Web Security can perform are set on the Scanning
Policy page.
To set the scan policy
1
On the main administration page, click AntiVirus.
2
Click Scanning Policy.
3
In the Modify Scanning Policy window, specify the Scanning Policy settings.
4
Click Finish to save the changes.
Antivirus protection
Setting scan policy
5
Click Done to return to the main administration page.
The following settings are configured on the Scan Policy page:
■
Enable antivirus scanning.
Click On to enable virus scanning. Click Off to disable.
■
Detect new or unknown viruses with Bloodhound.
To supplement detection of virus infections by virus signature, Symantec
Web Security includes the Symantec-patented Bloodhound technology,
which heuristically detects new or unknown viruses. New viruses discovered
by this technology can be forwarded to the Quarantine Server to prevent
them from spreading, then sent to Symantec Security Response for analysis.
A new set of definitions that detects and removes the virus is returned to
update the Symantec Web Security installation.
By default, the initial setting is Medium. A higher setting, which increases
resource demands, also may generate the occasional false positive detection.
A lower setting may decrease the likelihood that certain new or unknown
viruses will be detected. Usage is the only way to find the appropriate level
for your network.
279
280 Antivirus protection
Setting scan policy
If you change the Bloodhound sensitivity level after installation, stop and
restart Symantec Web Security service.
See “Stopping and starting Symantec Web Security service” on page 80.
■
How to respond when a virus is detected.
If a virus is detected, Symantec Web Security can repair the infected file to
remove the virus automatically, deny access to block the transmission of the
infected item, or continue delivery and log the event.
If a virus is detected and Symantec Web Security is unable to repair the file
with the current set of virus definitions, a secondary action can be specified:
deny access to block the transmission of the infected item, or continue
delivery and log the event.
■
How to respond if Symantec Web Security is unable to scan a file.
If a file cannot be scanned, Symantec Web Security can deny access to block
the transmission of the infected item, or continue delivery and log the event.
■
Alerts.
When a virus is detected, Symantec Web Security can send an email alert to
specified administrators or users.
If enabled, administrative alerts are emailed to the specified list of recipients.
Detailed information about the detected virus and the action taken are added
to the alert automatically.
The following events can be selected for alerts:
■
Virus detections: Viruses identified through scans
Unrepairable virus detections: Virus detected that cannot be eliminated
with the current set of definitions
To specify who receives administrative notifications, list the email addresses
one per line.
■
■
What to quarantine.
Symantec Web Security can forward infected items to the separately installed
Central Quarantine. The Central Quarantine must be installed on a
Windows NT computer. Typically, heuristically detected viruses that cannot
be eliminated by the current set of virus definitions are forwarded to the
Quarantine and isolated so that they cannot spread.
From the Central Quarantine, these items are submitted to Symantec
Security Response for analysis. If a new virus is identified, updated virus
definitions are returned. When the new virus definitions arrive, they can be
tested in the Central Quarantine before being applied to Symantec Web
Security.
Incorrectly setting the quarantine settings will cause performance issues. To
enable forwarding to the Quarantine, type the host name or IP address of the
Antivirus protection
Specifying what to scan
computer on which the Quarantine server is installed and the port on which
it is configured to listen. Select which items to forward: Nothing,
Unrepairable infections, or All infections. There is no notification if the
Quarantine server does not exist at the specified IP address and port.
Enter a host name for the Central Quarantine rather than an IP address, and
verify both the host name and port number for the Central Quarantine
before registering the Quarantine server with Symantec Web Security.
Symantec Web Security verifies the host name but does not verify the IP
address. If an incorrect IP address is used, no error message is returned. The
Central Quarantine does not acknowledge receipt of files on the designated
port. When a virus is forwarded to the Central Quarantine, the file is
assumed to have been received, and Symantec Web Security reports reflect
this assumption.
Specifying what to scan
Symantec Web Security will scan files transferred using the following protocols:
■
HTTP
■
FTP
For each protocol, you can specify all data types, only those commonly at risk of
infection, or all data types except those not likely to be infected. To balance
processing efficiency with resource demand, the default for each protocol is to
scan everything except items not likely to be infected. For maximum security, you
can have Symantec Web Security scan all traffic, regardless of data type. However,
performance can be adversely impacted when all traffic is scanned by Symantec
Web Security, depending on the traffic volume on your network and processor
speed of the computer on which Symantec Web Security is installed.
Note: Only incoming traffic is scanned for viruses.
To specify what to scan
1
On the main administration page, click AntiVirus.
2
Click Configuration.
3
In the Modifying AntiVirus Configuration window, specify what to scan.
4
Click Finish to save the changes.
281
282 Antivirus protection
Specifying what to scan
5
Click Done to return to the main administration page.
For HTTP traffic, transactions are identified by content type. Typically, only the
application content type can be infected.
For FTP traffic, files to scan are identified by file extension. The default excluded
file extensions list contains file types not at risk of infection (for example, .gif,
.jpeg, or .jpg). The default included file extensions list specifies only those file
types that are commonly at risk of infection. Extensions are not case sensitive.
Entering EXE includes .exe and .Exe.
Symantec Web Security also scans files within container files, such as .zip files. If
the included file extensions list contains .zip and .exe but not .cmd, and a
container file, test.zip, contains test.exe and test.cmd, only test.exe is scanned.
Note: The decomposer used in Symantec Web Security, which enables scanning
of nested files in container file formats, currently does not process .cab files when
Symantec Web Security is running on a Solaris computer. This is caused by an
incompatibility issue between Solaris and Microsoft files.
Antivirus protection
Configuring container file limits
Note: Because nonbrowser FTP clients (either command-line utilities or
graphical utilities such as WS_FTP or CuteFTP) establish FTP sessions directly
with FTP hosts, such FTP traffic is not scanned. Administrators should block this
traffic at the firewall.
Configuring container file limits
You can configure Symantec Web Security to protect against denial-of-service
attacks that are associated with files that contain multiple compressed formats
and with overly large container files that take a long time to decompose.
To configure container file limits
1
On the main administration page, click Container for the AntiVirus object.
2
In the Modifying Container Configuration window, do the following:
■
In the Maximum nesting level for container files box, type the
maximum number of levels that a container file can have and still be
processed by Symantec Web Security.
If a file is received that has more than the maximum number of levels
specified, the entire container file is blocked.
■
In the Maximum file size box, type the maximum size (in bytes) of files
to be processed by Symantec Web Security.
Both noncontainer files (individual files without embedded files) and
container files (files with embedded files) are processed according to the
maximum file size designated. If the size of a noncontainer file exceeds
the maximum file size designated, the file is blocked. If the size of any
file within a container file exceeds the maximum file size designated, the
entire container file is blocked.
Symantec Web Security does not calculate the file sizes of each file
within a container and check that sum against the specified limit.
283
284 Antivirus protection
Generating reports
3
Click Done.
Note: You must restart the Symantec Web Security service in order for changes
to take effect.
Generating reports
The antivirus activity report lists totals for virus infections found for which access
was allowed, allowed following repair, or denied; totals for virus infections
quarantined; as well as the specific viruses detected. For each virus detected, the
report lists the virus name, the number of times the virus was found, and when
the virus was last found.
To generate an antivirus report
1
On the main administration page, click AntiVirus.
2
Click Report.
3
In the AntiVirus Report window, select the date and time range for the
report.
4
Click Generate Report.
Keeping protection current through LiveUpdate
Symantec Web Security relies on up-to-date information to detect and eliminate
viruses. Symantec supplies updated virus definitions, which contain the necessary
information about all newly discovered viruses, to make sure your protection is
current. Updated files are provided at least once per week and whenever a new
virus threat is discovered.
Using LiveUpdate, Symantec Web Security connects to a special Symantec site
and determines if your virus definitions need updating. If so, it downloads the
Antivirus protection
Keeping protection current through LiveUpdate
proper files and installs them in the proper location. LiveUpdate is scheduled by
default to run automatically at 3:00 AM every Sunday. You can schedule the
update to run more often by selecting multiple days or a different time.
In addition to keeping virus protection current, Symantec Web Security 3.0 also
updates list and dictionary entries when LiveUpdate is invoked. (In previous
versions, List/Dictionary Download was configured by going to System > Modify
> List/Dictionary Download, and updated only virus definitions.) In version 3.0,
you continue to schedule the day(s) that LiveUpdate run and the time it runs
each day, but you now can have it run from once per hour to once every twentyfour hours. You can also update virus definitions manually at any time.
See “To update virus definitions and list and dictionary downloads manually” on
page 286.
To schedule automatic LiveUpdate
1
On the main administration page, click the LiveUpdate method for the
LiveUpdate object.
285
286 Antivirus protection
Keeping protection current through LiveUpdate
2
In the Virus Definitions, Lists and Dictionary LiveUpdate window, in the
bottom pane, select one or more days on which you want LiveUpdate to run.
3
Select the time of the first attempt and the frequency of attempts.
LiveUpdate runs on each selected day at the same time. For example,
selecting Tuesday and Thursday, 06:00 AM, Once every four hours, causes
LiveUpdate to run only on Tuesdays and Thursdays at 6:00 AM, 2:00 PM,
6:00 PM, and 10:00 PM. Since LiveUpdate considers midnight the end of the
day, it would be invoked for the last time at 10:00 PM and would not be
invoked again until 6:00 AM, which is designated as the first attempt.
4
Click Finish.
To update virus definitions and list and dictionary downloads manually
1
On the main administration page, click the LiveUpdate method for the
LiveUpdate object.
2
In the Virus Definition, Lists and Dictionary LiveUpdate window, at the
bottom of the upper pane, click LiveUpdate Now.
Note: Do not resubmit a LiveUpdate request. It may take a few minutes to
contact a LiveUpdate server to determine if new updates are available.
If you have scheduled LiveUpdate to run automatically on multiple days, the
browser may not display all selected days. Only the last day scheduled displays;
however, LiveUpdate will run on all the scheduled days.
Running a LiveUpdate report
You can run a LiveUpdate report to see information on the following:
■
List/Dictionary download results
■
Virus definition updates
■
LiveUpdate results
To run a LiveUpdate report
1
On the main administration page, click the Report method for the
LiveUpdate object.
2
In the Report window, in the From and Until menus, select the date and time
range for report.
3
Check actions to include in report.
Antivirus protection
Keeping protection current through LiveUpdate
4
Select output format.
5
Click Generate Report.
Setting up your own LiveUpdate server
Using the LiveUpdate Administration Utility on the Symantec Web Security CD,
you can set up an intranet HTTP, FTP, or LAN server, or a directory on a
standard file server to handle LiveUpdate operations for your network.
For more information, see the LiveUpdate Administrator’s Guide on the Symantec
Web Security CD.
If you set up your own LiveUpdate server, you will need to edit the LiveUpdate
configuration for Symantec Web Security to point to the local LiveUpdate server.
Contact Symantec Service and Support for more information.
287
288 Antivirus protection
Keeping protection current through LiveUpdate
Appendix
A
Using the content filtering
component: examples
This section provides sample scenarios to help you maximize the content filtering
component’s effectiveness. Although these scenarios involve specific settings, for
example, library, school, or corporate environments, the information contained
in the scenarios can be more generally applied.
Initial setup (configuring the content filtering
component)
Brightschool purchased the content filtering component. Amy is Brightschool’s
computer expert. Her task is to configure the content filtering component
specifically for the school. She installed Symantec Web Security on the school’s
server and followed the instructions in the Symantec Web Security Implementation
Guide. Amy accepted the default port number (8002), licensed the product, and
set the system defaults for basic filtering. Brightschool is not using transparent
proxying, so she configured the Web browser of each client computer to proxy
through the server running Symantec Web Security.
290 Using the content filtering component: examples
Initial setup (configuring the content filtering component)
Brightschool’s server is named balloon. Amy accesses the main administration
page by visiting http://balloon.brightschoolk12.edu:8002/admin. The software
forces her to log on before she can access the administration page.
She logs on as virtadmin using the password that she entered during installation.
Using the content filtering component: examples
Initial setup (configuring the content filtering component)
Amy first wants to grant global administrative permissions to her own account.
She clicks the Modify method for the User object on the main administration
page.
Amy selects her own
account, clicks
Modify Attributes, and
clicks Next
Amy grants all global
administrative
permissions to her
account by checking
each check box
She selects her own account from the list of users, clicks Modify Attributes, and
clicks Next. By checking all of the check boxes shown on the next screen, Amy
grants all global administrative permissions to her account. She clicks Finish to
save her changes.
Now Amy can use her own account to administer Symantec Web Security, but
she decides to continue configuring the software using the virtadmin account.
Amy next wants to customize the overall system settings. On the main
administration page, she clicks the Modify method for the System object. She
clicks Other Settings, and clicks Next.
Amy makes the following changes:
■
The server has plenty of disk space, so Amy sets the system to remove log files
automatically after one year. The log files are required in order for the
reporting functions to work correctly, and Brightschool’s policy does not
require reporting on Internet accesses more than one year in the past.
291
292 Using the content filtering component: examples
Initial setup (configuring the content filtering component)
■
The school’s policies require comprehensive reporting on Internet usage, so
Amy specifies that browsing activity logs should include text pages visited
and violations.
■
Amy sets the default URL to the school’s home page. This URL displays when
no other URL has been requested.
■
All client computers on the network support automatic refresh after logon,
so Amy sets the redirect timeout to 1 second so that the Logon Complete
page appears only briefly after a successful logon.
■
Because some computers will need to be locked to prevent any user from
browsing the Internet, Amy wants Client object permissions to have priority
over User object permissions. She makes sure that the Client object has
priority.
■
Amy does not want students to be able to log on from more than one
computer at a time. To prevent an individual from logging on multiple times,
Amy sets this setting to No.
■
Amy may need to grant unfiltered access at certain times, so she sets the
system default setting to Yes.
Amy leaves the other settings on this screen alone because the default settings for
these options are acceptable. After making the necessary changes, she clicks
Finish to save the changes and clicks Done to return to the main administration
page.
Amy next wants to verify the default filtering properties for her system, which she
specified during installation in accordance with the instructions in the Symantec
Web Security Implementation Guide. To check the system default settings, Amy
returns to the main administration page, and clicks the Schedule method for the
System object. From the next screen, she clicks Set Defaults, and clicks Next.
Amy checks each
setting on this page
to make sure
filtering has been
established
School policy requires users to log on before accessing the Internet so that reports
can be generated per user if necessary. Amy sees that Login required--5 minute
Using the content filtering component: examples
Initial setup (configuring the content filtering component)
timeout is selected. The school also wants filtering to be turned on by default.
Amy sees that Filtered is the default filtering setting. She clicks Next to check the
settings on the next page.
The next screen shows the state of all predefined Content Category Lists. Amy
checks to make sure that each list has been placed in the appropriate List state.
That is, those lists for which access is denied are in the Deny state, those for which
access is allowed are in the appropriate Allow state, and those for which filtering
is not to occur have been left in the Off state.
Brightschool has very strict rules regarding the types of material that may be
accessed over the Internet. To comply with those requirements, Amy makes sure
that all predefined Content Category Lists have been moved to the Deny state
(except the predefined list entitled allow, which she leaves in the Allow [Filtering
Enabled] state, the default state for this list). After making sure that the
predefined Content Category Lists are in the appropriate states, Amy clicks Next.
The school only has a 56Kbps modem connection to the Internet. Amy does not
want to allow movies to be downloaded because movies tend to be large files and
may tie up the modem connection. She checks to make sure that the check boxes
for .mov and .mpeg are selected under Block Extensions. She also makes sure that
the check boxes for .zip and .exe files have been selected to prevent download of
PC executable files. She also ensures that AutoLock is enabled. She makes sure
that the method for AutoLocking a user’s account is a scheduled default event for
293
294 Using the content filtering component: examples
Initial setup (configuring the content filtering component)
the individual user. She also makes sure that AutoAlert is not active (she leaves
the email address box blank). Amy can activate AutoAlert later if necessary.
Amy makes sure that
vendor and local lists
are enabled and that
DDR is activated for
both incoming data
and outgoing requests
Amy makes sure that
any extensions she
wants blocked have
been checked
She also makes sure
that AutoLock is
enabled and that her
email address has
been entered for
AutoLock notification
Amy makes sure
that AutoAlert is not
activated for now
Now that Amy is assured that basic filtering is established and that the System
default settings are correct, she clicks Finish and then clicks Done to return to the
main administration page.
Next, Amy wants to group related clients together and related users together into
groups so that she can easily schedule different filtering permissions for these
users or clients.
First she creates empty groups. She clicks the Add method for the Group object
on the main administration page. She creates the following groups for the client
computers: Lab, Library, Room 102, and Room 202. She creates each new group
Using the content filtering component: examples
Initial setup (configuring the content filtering component)
by entering the name of the new group and clicking Add. When she finishes
creating new groups, she clicks Done.
Amy proceeds to modify the memberships of each group to include the
appropriate Client objects. She clicks the Modify method for the Group object.
She selects the group that she wants to modify, clicks Modify Membership, and
clicks Next. Amy selects the Client objects to populate that group. When she
finishes selecting the clients, she clicks Add Users or Clients.
Amy repeats these steps for each new client group.
After she has populated all of the client groups with the appropriate Client
objects, Amy repeats the steps for creating and modifying groups for users. When
she has completed creating and populating user groups, Amy decides that she is
finished customizing the content filtering configuration.
295
296 Using the content filtering component: examples
Automated policy enforcement (using AutoLock)
Automated policy enforcement (using AutoLock)
Amy (the school’s computer expert) receives an email message from Symantec
Web Security informing her that Brian’s (a student at Brightschool) account is
locked. Amy accesses the Symantec Web Security administration screen, and
clicks the Report method for the User object. She clicks Access Report, and clicks
Next. She selects Brian’s account, and clicks View Usage.
Amy selects Brian’s
account by using the
search capability
and clicking View
Usage
Next, Amy needs to select a time range for the report. She enters a range that
covers the previous week. Under Actions, she checks the check boxes for Content
Violations and AutoLocked because those actions are all that she needs to see
right now. She clicks Generate Report. As Amy suspected, Brian has tried to visit
several sites that the school has determined to be inappropriate. A recent
Using the content filtering component: examples
Automated policy enforcement (using AutoLock)
administrative entry shows that Brian’s account was AutoLocked, which means
that Brian’s default filtering settings have been set to Locked automatically.
Amy can unlock Brian’s account by clicking the Schedule method for the User
object, selecting Brian’s account and clicking Delete an Existing Event. All events
scheduled for Brian (including his default setting, which is Locked) are displayed.
Amy can delete the default setting or, if specific default settings have been
established for Brian, Amy can select Set Defaults and change the filtering mode
from Locked back to the appropriate filtering mode for Brian.
School policy dictates that Brian must have a letter signed by his parents before
his Internet access can be restored, so Amy leaves his default settings alone for
now.
297
298 Using the content filtering component: examples
Monitoring Internet access (using Audit Mode and AutoAlert)
Monitoring Internet access (using Audit Mode and
AutoAlert)
Carolyn is the manager and owner of a small but growing company. Her business
depends on employees being able to use the Internet regularly. She doesn’t want
to restrict her employees’ access to the Internet. She feels that providing
unrestricted access to the Internet as a resource is an important benefit to her
employees and establishes a level of trust between herself and her staff.
She has concerns that one or two individuals may be abusing this privilege during
work hours. She decides to run the content filtering component in Audit Mode
for a while to see whether her suspicions are correct. In Audit Mode, employees
have unrestricted access, and Carolyn, with the content filtering component’s
AutoAlert feature, is notified when violations of her Internet use policy have
occurred. By using access reporting, she can see exactly where these violations
occurred.
Carolyn first schedules the system defaults to Audit Mode and activates
AutoAlert. Because Carolyn has just purchased the content filtering component,
setting the System defaults to Audit Mode is all she needs to do. If her company
had been using the software for a while, Carolyn would need to make sure that no
other events override the system defaults. To set the system defaults, she selects
the Schedule method for the System object. She clicks Set Defaults, and clicks
Next. She selects the Login mode to automatically log off after 15 minutes of
inactivity, and selects Audit as the filtering mode. She clicks Next.
She sets the Login
mode to automatically
log off after
15 minutes of
inactivity
She sets the Filtering
Mode to Audit
Carolyn selects the Content Category Lists that contain material she would
consider objectionable during work hours and moves them into the Deny state.
She leaves several Content Category Lists in the Off state because she does not
Using the content filtering component: examples
Monitoring Internet access (using Audit Mode and AutoAlert)
want to filter the type of content contained in those lists. After she places the
Content Category Lists in the appropriate states, she clicks Next.
Carolyn puts the
Category Lists into
the appropriate
states
She leaves the
default settings alone
on the top part of this
page
She sets AutoAlert
to email her
automatically after
audited accesses
have occurred
299
300 Using the content filtering component: examples
Monitoring Internet access (using Audit Mode and AutoAlert)
She leaves the filtering settings on the next page alone. She is confident that the
default settings are adequate for what she wants to know. She types her own email
address for AutoAlert notification, so that the content filtering component
notifies her of any access violations that occur. She also sets the other parameters
for AutoAlert.
Carolyn sets the content filtering component’s activity logging to log violations
only. She does not want to pry unnecessarily into how her employees use the
Internet; she only wants to know when a content violation based on her
acceptable-use policy has occurred. She clicks the Modify method for the System
object. She clicks Other Settings, and clicks Next. She sets browsing activity
logging to Only Log Violations, clicks Finish, and then clicks Done to return to
the main administration page.
Carolyn has finished setting up Audit Mode. Now she has to wait to see if she
receives any email indicating that content violations occurred. Over the next two
weeks, she receives several email messages from Symantec Web Security
indicating that two different employees violated the acceptable-use policy.
Carolyn has a few minutes and decides to run an Access Report to get a full
report. She clicks the Report method for the System object. She clicks Access
Report, and clicks Next. She can select certain users, clients, or groups on which
to report. However, because she wants to view only the audit violations that have
occurred, she doesn’t need to narrow the scope of the report. She clicks View
Usage.
Carolyn wants to see
only the audit
violations that have
occurred, so she
doesn’t narrow the
scope of the report
From the next screen, she selects the dates and times that she wants to cover in
the report. She enters a range that covers the previous two weeks. For this report,
Using the content filtering component: examples
Monitoring Internet access (using Audit Mode and AutoAlert)
Carolyn is only interested in the Audit Violations that occurred, so she checks
only that check box under Actions. She then clicks Generate Report.
She selects the
dates and times
to be covered by
the report
She selects the
appropriate action on
which to report (in
this case, only Audit
Violation)
301
302 Using the content filtering component: examples
Controlling access (scheduling daily events)
Carolyn’s Access report shows all audit violations that occurred in the previous
two-week period. The violations were committed by the two employees reported
by AutoAlert: A. Nelson and B. Murphy. The report shows Carolyn, for each
Audit violation, the user who requested the Internet access, the client workstation
used, the date and time of the request, the URL that was visited, and the reason
that the content filtering component would have denied access to the site had
filtering actually been activated. With this documented evidence of policy
violations by employees Nelson and Murphy, Carolyn is able to take appropriate
measures.
Controlling access (scheduling daily events)
The Dane County Public Library has selected the content filtering component to
meet its access control needs. The library uses the content filtering component’s
scheduling capabilities to provide an appropriate level of filtering in the
children’s areas and less restricted Internet access in other parts of the library. The
library can avoid the problem of broad, unconstitutional restriction of Internet
materials yet protect children from potentially harmful materials on the Internet.
The main branch of the library closes at 9 PM Monday through Saturday.
However, patrons have a tendency to linger, browsing the Internet well past
closing time. Library employees have a difficult time closing the library and
leaving on time. Dave, the system administrator for the library’s computer
network, decides to correct this problem by locking the library computers just
prior to closing time. The library’s computers are grouped into four Groups
according to where they are located in the library: News Room, Young Readers,
General Access, and Catalog Reference. Dave decides that he needs to lock the
computers in all areas of the library except the Catalog Reference area, because
those computers are beside the front desk. Dave clicks the Schedule method for
the Group object. He selects General Access Group, clicks Schedule a Daily Event,
and clicks Next.
Dave selects Monday through Saturday and sets the time range from 8:50 PM to
11:55 PM. On the next page he does not change the Login mode (he leaves that
setting on Guest Mode) and sets the filtering mode to Locked. He then clicks
Next. The software confirms that the changes have been made.
Dave then schedules identical daily events for the computers in the Young
Readers and News Room Groups. Now, Monday through Saturday at 8:50 PM,
Using the content filtering component: examples
Controlling access (scheduling daily events)
the client computers in the Young Readers, News Room, and General Access
areas of the library lock and do not permit access to the Internet.
Dave sets the filtering
mode to Locked
303
304 Using the content filtering component: examples
Controlling access (scheduling daily events)
Index
A
B
Access Control Lists
adding objects to 205-208
deleting objects from 205-208
description of 194-196
Access Denied page
editing of 133-134
examples of 44, 47
Access report. See reporting
Access Summary report. See reporting
Add method 30
adding clients 202-203
adding groups 250-251
adding lists 260-261
adding users 226-237
advanced user creation 234-237
administration of Symantec Web Security
accessing admin functions 119, 126
editing access denied page 133-134
standard (default) interface 126-127
administrative interface
assigning to groups 255-256
assigning to users 239-242
system defaults for 145-149
alerts, configuring 280
Audit mode
definition of 182
example of 298-302
AutoAlert
activating 190-192
definition of 190
example of 298-302
AutoLock
activating 188-189
definition of 188
email notification for 189
example of 296-297
unlocking accounts 188, 189
backing up
restoring configuration from 152
Symantec Web Security configuration 151
Bloodhound, unknown virus detection 279
C
Client object 201-223
adding clients 202-203
adding to groups 204-205
assigning Access Control List permissions
for 208-209
deleting clients 203
logging browsing activity for 204-205
modifying Access Control List for 205-208
modifying attributes 204-205
modifying clients 204-209
reporting on clients 222-223
scheduling clients 209-222
client revalidation 145-149
Content Category Lists. See Lists, filter
D
debugging, enabling 145-149
Delete method 30
deleting clients 203
deleting groups 252
deleting lists 261
deleting users 238
Dictionary object 269-273
adding words to 270-271
deleting words from 271
modifying dictionaries 270-272
reporting on dictionaries 272-273
directory service, using Symantec Web Security
with 26-27
306 Index
Dynamic Document Review (DDR) 46-52
changing threshold of 187
in conjunction with lists 49-52
negative scores 270
point values for words 271
scoring Web content 46-47
E
events
daily events, scheduling 219
defaults, scheduling 209-219
deleting existing 221-222
editing existing 221
hierarchy of 33
specific events, scheduling 220
F
filter lists. See Lists, filter
FTP proxy, sorting feature 123
G
Group object 249-258
adding groups 250-251
assigning Access Control List permissions for 258
deleting groups 252
logging browsing activity for 255-256
modifying Access Control List for 258
modifying attributes 255-256
modifying group ranking 257
modifying membership 253-255
password permissions for 255-256
ranking groups 34
reporting on groups 258
scheduling groups 258
setting up, rules for 250
Guest mode 181
H
HTTP port number, changing of 138
HTTPS server, defining connection 139-141
L
LDAP directory service, using Symantec Web Security
with 78
licensing 142
removing licenses 87
warning and grace periods 86
List object 259-267
adding lists 260-261
adding URLs to 262-263
assigning Access Control List permissions for 266
deleting lists 261
modifying Access Control List for 265
modifying lists 262-266
removing URLs from 263-264
reporting on lists 267
Lists, filter 37-52
adding URLs to 45-46
changing public/private status 264-265
determining version of 142
expiration of 142
in conjunction with DDR 49-52
initiating downloads 142
local lists 43
predefined lists 37-43
states 43-45
LiveUpdate 284
immediate 284
scheduling 285
local lists. See Lists, filter
local SESA Agent, installing 107
logging
SESA 104
logging off of Symantec Web Security 121
logging on to Symantec Web Security 120
logging, browsing activity
for clients 205
for users 239-242
system defaults for 145-149
M
manual, accessing online version 120
methods. See also individual methods
general description 30
using method shortcuts 126
Index
Modify method 30
modifying clients 204-209
modifying dictionaries 269-272
modifying groups 253-258
modifying lists 262-266
modifying system 136-152
modifying users 239-246
O
Object creation quotas
assigning at user creation 237
assigning to users 242-244
description of 197-198
Objects. See also individual objects
administration pages for 126
Client object 201-223
Dictionary object 269-273
general description 28
Group object 249-258
List object 259-267
System object 135-171
User object 225-248
P
password
changing for virtual user 239-242
changing from toolbar 121
group permissions for 255-256
system defaults for 145-149
user permissions for 239-242
permissions
assigning Access Control List
permissions 208-209
assigning global permissions 239-242
global, description of 128-129
hierarchy of (by object) 31-32
reversing hierarchy of 145-149
predefined lists. See Lists, filter
proxying
chaining 136-137
modifying proxy config. 136-137
other host names 136-137
transparent 136-137
public/private status for lists, modifying 264-265
Q
Quarantine, forwarding 280
R
redirect timeout 145-149
Report method 30
reporting on clients 222-223
reporting on dictionaries 272-273
reporting on groups 258
reporting on lists 267
reporting on the system 166-171
reporting on users 246-248
reporting
Access reports 166-169
Access Summary reports 169
User Summary reports 247-248
revalidation of client, settings for 145-149
S
Scan policy, setting 278
scanning
detection responses 280
disabling 279
enabling 279
specifying files to scan 281
Schedule method 30
scheduling clients 209-222
scheduling groups 258
scheduling the system 166-192
scheduling users 246
search capability for object boxes
description of 128-131
enabling 143-145
SESA Agent
installing
Symantec AntiVirus Scan Engine 111
SESA Integration Wizard, installing 105
SESA, logging to
configuring 105
configuring the scan engine 112
discussion 105
installing the local Agent 107
running the SESA Integration Wizard 105
simultaneous connections, changing number of 138
307
308 Index
System object 135-171
client revalidation 145-149
debugging 145-149
default URL 145-149
enabling search capability for object
boxes 143-145
HTTP server options 138
initiating downloads 142
licensing for Symantec Web Security 142
logging browsing activity for 145-149
modifying proxy config. 136-137
modifying system 136-152
password, defaults for 145-149
port number changes 138
redirect timeout 145-149
reporting on the system 166-171
scheduling the system 181-192
simultaneous connections 138
T
time-out, redirect 145-149
toolbar 118-122
accessing 118-119
displaying automatically 145-149
U
unfiltered access, permissions for granting
for groups 255-256
for users 239-242
system defaults for 145-149
unknown viruses, detecting 279
upgrading from earlier versions 59-68
User object 225-248
adding to groups 239-242
adding users 226-237
advanced user creation 234-237
assigning Access Control List permissions to 244
assigning global permissions to 239-242
deleting users 238
disabling existing users 244-245
logging browsing activity for 239-242
modifying users 239-246
password permissions for 239-242
reenabling existing users 245-246
reporting for users 246-248
scheduling users 246
User Summary report. See reporting
user, obsolete
defined 170
deleting 239
user, virtual
adding to Symantec Web Security 228-231
changing password for 239-242
definition of 228
V
viewing filter settings 122
virus definitions, updating 284
viruses
detecting unknown 279
detection responses 280
heuristic detection 279
Quarantine forwarding 280
Symantec™ Web Security
CD Replacement Form
CD REPLACEMENT: After your 60-Day Limited Warranty, if your CD becomes unusable, fill out and return 1) this form, 2)
your damaged CD, and 3) your payment (see pricing below, add sales tax if applicable), to the address below to receive
replacement CD. DURING THE 60-DAY LIMITED WARRANTY PERIOD, THIS SERVICE IS FREE. You must be a registered
customer in order to receive CD replacements.
FOR CD REPLACEMENT
Please send me: ___ CD Replacement
Name __________________________________________________________________________________________________
Company Name __________________________________________________________________________________________
Street Address (No P.O. Boxes, Please)_________________________________________________________________________
City_________________________________________________________ State _______ Zip/Postal Code _________________
Country* ___________________________________________Daytime Phone _______________________________________
Software Purchase Date ____________________________________________________________________________________
*This offer limited to U.S., Canada, and Mexico. Outside North America, contact your local Symantec office or distributor.
Briefly describe the problem: ________________________________________________________________________________
CD Replacement Price
Sales Tax (See Table)
Shipping & Handling
$ 10.00
______
$ 9.95
TOTAL DUE
______
SALES TAX TABLE: AZ (5%), CA (7.25%), CO (3%), CT (6%), DC (5.75%), FL (6%), GA (4%), IA (5%),
IL (6.25%), IN (5%), KS (4.9%), LA (4%), MA (5%), MD (5%), ME (6%), MI (6%), MN (6.5%), MO
(4.225%), NC (6%), NJ (6%), NY (4%), OH (5%), OK (4.5%), PA (6%), SC (5%), TN (6%), TX (6.25%),
VA (4.5%), WA (6.5%), WI (5%). Please add local sales tax (as well as state sales tax) in AZ, CA, FL, GA,
MO, NY, OH, OK, SC, TN, TX, WA, WI.
FORM OF PAYMENT ** (CHECK ONE):
___ Check (Payable to Symantec) Amount Enclosed $ _________
__ Visa
__ Mastercard
__ AMEX
Credit Card Number _____________________________________________________________________ Expires __________
Name on Card (please print) ____________________________________ Signature ___________________________________
**U.S. Dollars. Payment must be made in U.S. dollars drawn on a U.S. bank.
MAIL YOUR CD REPLACEMENT ORDER TO:
Symantec Corporation
Attention: Order Processing
555 International Way
Springfield, OR 97477 (800) 441-7234
Please allow 2-3 weeks for delivery within the U.S.
Symantec is a trademark of Symantec Corporation.
Other brands and products are trademarks of their respective holder/s.
© 2003 Symantec Corporation. All rights reserved. Printed in the U.S.A.