1
ManHunt Smart Agent for Dragon™ 6.0
Installation Guide
ManHunt Smart Agent for Dragon 6.0
Installation Guide
The software described in this book is furnished under a license agreement and may be
used only in accordance with the terms of the agreement.
Copyright Notice
Copyright © 2003 Symantec Corporation.
All Rights Reserved.
Any technical documentation that is made available by Symantec Corporation is the
copyrighted work of Symantec Corporation and is owned by Symantec Corporation.
NO WARRANTY. The technical documentation is being delivered to you AS-IS, and
Symantec Corporation makes no warranty as to its accuracy or use. Any use of the
technical documentation or the information contained therein is at the risk of the user.
Documentation may include technical or other inaccuracies or typographical errors.
Symantec reserves the right to make changes without prior notice.
No part of this publication may be copied without the express written permission of
Symantec Corporation, 20330 Stevens Creek Blvd., Cupertino, CA 95014.
Trademarks
Symantec, the Symantec logo, and Norton AntiVirus are U.S. registered trademarks of
Symantec Corporation. LiveUpdate, Symantec AntiVirus, Symantec Enterprise Security
Architecture, and Symantec Security Response are trademarks of Symantec Corporation.
Other brands and product names mentioned in this manual may be trademarks or
registered trademarks of their respective companies and are hereby acknowledged.
Printed in the United States of America.
10 9
8
7
6 5
4
3 2
1
SYMANTEC SOFTWARE LICENSE AGREEMENT (SMART AGENT)
SYMANTEC CORPORATION AND/OR ITS SUBSIDIARIES
("SYMANTEC") IS WILLING TO LICENSE THE SOFTWARE TO
YOU AS AN INDIVIDUAL, THE COMPANY, OR THE LEGAL
ENTITY THAT WILL BE UTILIZING THE SOFTWARE
(REFERENCED BELOW AS "YOU OR YOUR") ONLY ON THE
CONDITION THAT YOU ACCEPT ALL OF THE TERMS OF THIS
LICENSE AGREEMENT. READ THE TERMS AND CONDITIONS
OF THIS LICENSE AGREEMENT CAREFULLY BEFORE USING
THE SOFTWARE. THIS IS A LEGAL AND ENFORCEABLE
CONTRACT BETWEEN YOU AND THE LICENSOR. BY OPENING
THIS PACKAGE, BREAKING THE SEAL, CLICKING ON THE
"AGREE" OR "YES" BUTTON OR OTHERWISE INDICATING
ASSENT ELECTRONICALLY, OR LOADING THE SOFTWARE,
YOU AGREE TO THE TERMS AND CONDITIONS OF THIS
AGREEMENT. IF YOU DO NOT AGREE TO THESE TERMS AND
CONDITIONS, CLICK ON THE "I DO NOT AGREE", "NO"
BUTTON, OR OTHERWISE INDICATE REFUSAL AND MAKE NO
FURTHER USE OF THE SOFTWARE.
1. LICENSE.
The software and documentation that accompanies this license
(collectively the "Software") is the proprietary property of Symantec or
its licensors and is protected by copyright law. While Symantec
continues to own the Software, You will have certain rights to use the
Software after Your acceptance of this license. This license governs any
releases, revisions, or enhancements to the Software that the Licensor
may furnish to You. Except as may be modified by an applicable
Symantec license certificate, license coupon, or license key (each a
"License Module") that accompanies, precedes, or follows this license,
Your rights and obligations with respect to the use of this Software are
as follows:
YOU MAY:
A. use that number of copies of the Software as have been licensed to
You by Symantec under a License Module for Your internal business
purposes. Your License Module shall constitute proof of Your right to
make such copies. If no License Module accompanies, precedes, or
follows this license, You may make one copy of the Software You are
authorized to use on a single machine.
B. make one copy of the Software for archival purposes, or copy the
Software onto the hard disk of Your computer and retain the original
for archival purposes;
C. use each licensed copy of the Software on a single central processing
unit; and
D. after written consent from Symantec, transfer the Software on a
permanent basis to another person or entity, provided that You retain
no copies of the Software and the transferee agrees to the terms of this
license.
YOU MAY NOT:
A. copy the printed documentation which accompanies the Software;
B. sublicense, rent or lease any portion of the Software; reverse
engineer, decompile, disassemble, modify, translate, make any attempt
to discover the source code of the Software, or create derivative works
from the Software;
C. use a previous version or copy of the Software after You have
received a disk replacement set or an upgraded version. Upon
upgrading the Software, all copies of the prior version must be
destroyed;
D. use a later version of the Software than is provided herewith unless
You have purchased corresponding maintenance and/or upgrade
insurance or have otherwise separately acquired the right to use such
later version;
E. use, if You received the software distributed on media containing
multiple Symantec products, any Symantec software on the media for
which You have not received a permission in a License Module; nor
F. use the Software in any manner not authorized by this license.
2. CONTENT UPDATES:
Certain Software utilize content which is updated from time to time
(including but not limited to the following Software: antivirus software
utilize updated virus definitions; content filtering software utilize
updated URL lists; some firewall software utilize updated firewall rules;
and vulnerability assessment products utilize updated vulnerability
data; these updates are collectively referred to as "Content Updates").
You shall have the right to obtain Content Updates for any period for
which You have purchased maintenance, except for those Content
Updates which Symantec elects to make available by separate paid
subscription, or for any period for which You have otherwise
separately acquired the right to obtain Content Updates. Symantec
reserves the right to designate specified Content Updates as requiring
purchase of a separate subscription at any time and without notice to
You; provided, however, that if You purchase maintenance hereunder
that includes particular Content Updates on the date of purchase, You
will not have to pay an additional fee to continue receiving such
Content Updates through the term of such maintenance even if
Symantec designates such Content Updates as requiring separate
purchase. This License does not otherwise permit Licensee to obtain
and use Content Updates.
3. LIMITED WARRANTY:
Symantec warrants that the media on which the Software is distributed
will be free from defects for a period of sixty (60) days from the date of
delivery of the Software to You. Your sole remedy in the event of a
breach of this warranty will be that Symantec will, at its option, replace
any defective media returned to Symantec within the warranty period
or refund the money You paid for the Software. Symantec does not
warrant that the Software will meet Your requirements or that
operation of the Software will be uninterrupted or that the Software
will be error-free.
THE ABOVE WARRANTY IS EXCLUSIVE AND IN LIEU OF ALL
OTHER WARRANTIES, WHETHER EXPRESS OR IMPLIED,
INCLUDING THE IMPLIED WARRANTIES OF
MERCHANTABILITY, FITNESS FOR A PARTICULAR PURPOSE
AND NONINFRINGEMENT OF INTELLECTUAL PROPERTY
RIGHTS. THIS WARRANTY GIVES YOU SPECIFIC LEGAL
RIGHTS. YOU MAY HAVE OTHER RIGHTS, WHICH VARY FROM
STATE TO STATE AND COUNTRY TO COUNTRY.
4. DISCLAIMER OF DAMAGES:
SOME STATES AND COUNTRIES, INCLUDING MEMBER
COUNTRIES OF THE EUROPEAN ECONOMIC AREA, DO NOT
ALLOW THE LIMITATION OR EXCLUSION OF LIABILITY FOR
INCIDENTAL OR CONSEQUENTIAL DAMAGES SO THE BELOW
LIMITATION OR EXCLUSION MAY NOT APPLY TO YOU.
TO THE MAXIMUM EXTENT PERMITTED BY APPLICABLE LAW
AND REGARDLESS OF WHETHER ANY REMEDY SET FORTH
HEREIN FAILS OF ITS ESSENTIAL PURPOSE, IN NO EVENT WILL
SYMANTEC BE LIABLE TO YOU FOR ANY SPECIAL,
CONSEQUENTIAL, INDIRECT OR SIMILAR DAMAGES,
INCLUDING ANY LOST PROFITS OR LOST DATA ARISING OUT
OF THE USE OR INABILITY TO USE THE SOFTWARE EVEN IF
SYMANTEC HAS BEEN ADVISED OF THE POSSIBILITY OF SUCH
DAMAGES.
IN NO CASE SHALL SYMANTEC'S LIABILITY EXCEED THE
PURCHASE PRICE FOR THE SOFTWARE. The disclaimers and
limitations set forth above will apply regardless of whether You accept
the Software.
5. U.S. GOVERNMENT RESTRICTED RIGHTS:
RESTRICTED RIGHTS LEGEND. All Symantec products and
documentation are commercial in nature. The software and software
documentation are "Commercial Items", as that term is defined in 48
C.F.R. section 2.101, consisting of "Commercial Computer Software"
and "Commercial Computer Software Documentation", as such terms
are defined in 48 C.F.R. section 252.227-7014(a)(5) and 48 C.F.R.
section 252.227-7014(a)(1), and used in 48 C.F.R. section 12.212 and
48 C.F.R. section 227.7202, as applicable. Consistent with 48 C.F.R.
section 12.212, 48 C.F.R. section 252.227-7015, 48 C.F.R. section
227.7202 through 227.7202-4, 48 C.F.R. section 52.227-14, and other
relevant sections of the Code of Federal Regulations, as applicable,
Symantec's computer software and computer software documentation
are licensed to United States Government end users with only those
rights as granted to all other end users, according to the terms and
conditions contained in this license agreement. Manufacturer is
Symantec Corporation, 20330 Stevens Creek Blvd., Cupertino, CA
95014, United States of America.
6. EXPORT REGULATION:
Export, re-export of this Software is governed by the laws and
regulations of the United States and import laws and regulations of
certain other countries Export or re-export of Software to any entity
on the Denied Parties List and other lists promulgated by various
agencies of the United States Federal Government is strictly prohibited.
7. GENERAL:
If You are located in North America or Latin America, this Agreement
will be governed by the laws of the State of California, United States of
America. Otherwise, this Agreement will be governed by the laws of
England. This Agreement and any related License Module is the entire
agreement between You and Symantec relating to the Software and: (i)
supersedes all prior or contemporaneous oral or written
communications, proposals and representations with respect to its
subject matter; and (ii) prevails over any conflicting or additional
terms of any quote, order, acknowledgment or similar
communications between the parties. This Agreement shall terminate
upon Your breach of any term contained herein and You shall cease
use of and destroy all copies of the Software. The disclaimers of
warranties and damages and limitations on liability shall survive
termination. Software and documentation is delivered Ex Works
California, U.S.A. or Dublin, Ireland respectively (ICC INCOTERMS
2000). This Agreement may only be modified by a License Module
which accompanies this license or by a written document which has
been signed by both You and Symantec. Should You have any
questions concerning this Agreement, or if You desire to contact
Symantec for any reason, please write to: (i) Symantec Customer
Service, 555 International Way, Springfield, OR 97477, U.S.A., (ii)
Symantec Customer Service Center, PO BOX 5689, Dublin 15, Ireland,
or (iii) Symantec Customer Service, 1 Julius Ave, North Ryde, NSW
2113, Australia.
Contents
ManHunt Smart Agent for Dragon™ 6.0 ......................................................... 1
System requirements ................................................................................. 1
Installation overview ................................................................................. 2
Configuring Dragon .................................................................................. 2
Installing the MSA for Dragon 6.0 ........................................................... 3
Upgrading to the MSA for Dragon 6.0 ..................................................... 5
Installing the Dragon meta data ............................................................... 6
Configuring Symantec ManHunt ............................................................. 7
Configuring the MSA for Dragon ............................................................ 8
Changing the EDP passphrase ................................................................ 11
Starting and stopping the MSA .............................................................. 12
Viewing Dragon events in the ManHunt console ................................. 12
Uninstalling the MSA .............................................................................. 13
ii Contents
ManHunt Smart Agent for Dragon 6.0
™
The ManHunt Smart Agent (MSA) enables Symantec ManHunt to receive events
in real time from a Dragon™ 6.0 management console, convert these events into
the ManHunt event format, and then send the events to a ManHunt node for
aggregation and correlation with all other ManHunt events. The MSA also
enables you to set response policies for Dragon events in the ManHunt Policy
Configuration interface. (See Symantec ManHunt Administration Guide for
instructions on creating response policies.)
System requirements
The MSA for Dragon 6.0 requires the following:
■
Symantec ManHunt 2.2 patch 2 installed on Solaris 8 SPARC or Intel, or
Symantec ManHunt 3.0 installed on Solaris 8 SPARC or Intel, or Red Hat®
Linux® 8.0.
Note: Patch 2 is required for ManHunt 2.2 to enable you to properly view
event information from MSAs. You can download the patch at:
http://www.symantec.com/techsupp/enterprise/products/manhunt/
manhunt_2.2/files.html.
You can ascertain which ManHunt patches have been installed by looking in
the <ManHunt_inst_root>/patchlevel file. The content of the patchlevel file
will consist of or include the file named 1:2.220.02:ManHunt patch
2.220.02 if you have patch 2 installed. If you do not have patch 2 installed,
you must download and install it, even if you have installed patch 3. Patch 1
will not affect patch 2. If you do not have a patchlevel file, no patches have
been installed.
■
Dragon 6.0 installed on either Solaris 8 SPARC or Intel, or Red Hat® Linux®
8.0 (with kernel version 2.4).
2
ManHunt Smart Agent for Dragon™ 6.0
Installation overview
The MSA for Dragon 6.0 can be set up in seven basic steps.
To set up the MSA for Dragon
1
Ensure that you have installed Symantec ManHunt 2.2 patch 2, or Symantec
ManHunt 3.0.
2
Configure Dragon.
See “Configuring Dragon” on page 2.
3
Install or upgrade the MSA for Dragon.
See “Installing the MSA for Dragon 6.0” on page 3, or “Upgrading to the
MSA for Dragon 6.0” on page 5.
4
Install the Dragon meta data on the ManHunt node.
See “Installing the Dragon meta data” on page 6.
5
Create an external sensor node for the MSA for Dragon.
See “Configuring Symantec ManHunt” on page 7.
6
Configure ManHunt to receive events from the MSA for Dragon.
See “Configuring the MSA for Dragon” on page 8.
7
Start the MSA for Dragon.
See “Starting and stopping the MSA” on page 12.
Configuring Dragon
Use the Dragon web interface to configure the Dragon appliance, or Event Flow
Processor (EFP), to send SNMP traps to the IP address of the MSA host using
Alarmtool.
Note: The ManHunt console will receive any event data sent by Dragon.
Therefore, you may want to tune Dragon policies and signatures to avoid sending
large amounts of duplicate data to ManHunt.
To configure Alarmtool to send traps to the MSA
1
Click Alarmtool on the Dragon console.
2
Click Add on the Alarmtool Alert List.
3
Type the name of the alert against Alert Name in the Alarmtool Alert Wizard.
4
Select realtime as the Alert Type.
3
ManHunt Smart Agent for Dragon™ 6.0
5
Enter 10 as the Summary interval in seconds, then click Submit.
Note: The Summary interval field is the only configurable field.
The next Alarmtool Wizard screen says, Select Signatures to alert on.
6
Click Next.
7
Choose SNMP as the Notification Method.
The next Alarmtool Wizard screen says, Fill out notification
configuration.
8
Fill in the following fields, then press Enter:
address: <IP address where the MSA listens for SNMP traps>
port:162
oid:1.3.6.1.4.1.4471
community: public
specific-type: 100
message:%DATE% %TIME% %SIP% %DIP% %NAME% %PROTO% %SPORT% %DPORT%
Note: The address prompt requires the IP address where the MSA listens for
SNMP traps. You must also enter the message: format exactly as it appears.
No values can be added or removed, as they are required to match with the
ManHunt event format for Dragon.
9
Click Finish.
See http://www.enterasys.com for further information about Alarmtool
configuration.
Installing the MSA for Dragon 6.0
You can deploy the MSA for Dragon in either of two deployment modes:
■
Install the MSA on the ManHunt node.
■
Install the MSA on a dedicated host (recommended).
Note: The MSA can not be installed on the Dragon host.
In either deployment, the MSA listens for Dragon SNMP traps on port 162 by
default. The MSA converts the SNMP traps into the ManHunt event format, and
sends the events to ManHunt over Event Dispatch Protocol (EDP). During the
MSA installation, you specify the IP address of the ManHunt node that will
receive the event data from the MSA. The MSA and ManHunt node
4
ManHunt Smart Agent for Dragon™ 6.0
communicate over Event Dispatch Protocol (EDP). To do so, they must share an
EDP passphrase to ensure secure and encrypted communication.
Note: The Event Dispatch Protocol for Symantec ManHunt 2.2 patch 2 has an
event rate limitation of 30 events per second, and the Event Dispatch Protocol for
Symantec ManHunt 3.0 has an event rate limitation of 250 events per second.
Please note the ManHunt event rate limit when planning multiple MSA
deployments.
Note: You must be logged in as root to run the install script. Also, you can view
the ManHunt version number, and third party MSA product name and version
number in the installation log, which is located in the
<MSA_install_dir>/install directory.
To install the MSA for Dragon
1
Place the CD in the CD-ROM drive; mount the drive if necessary.
2
Change to the CD directory and enter the install command:
cd Dragon60MSA_MH<version>/install/<platform>
where <version> is 22 or 30, and <platform> is linux, solaris8-intel, or
solaris8-sparc.
./install.sh
3
Type a directory where you want to install the MSA, or accept the default
/usr/msadragon directory, then press Enter.
4
Type a directory to which the MSA will write the operational log files, or
accept the default <MSA_install_dir>/logs directory, then press Enter.
Note: The MSA cannot start properly if the log file approaches a certain size
(2-3 Gigs depending on the system). You can delete or rename the log file to
correct the problem.
5
Type the ManHunt host IP address, then press Enter.
This is the IP address of the ManHunt node that will accept the Dragon event
data.
6
Type the Event Dispatch Protocol (EDP) port number used by this ManHunt
node, or accept the default port number of 1333, then press Enter.
5
ManHunt Smart Agent for Dragon™ 6.0
This port number must match the value for the EDP Port Number
configuration parameter used by the ManHunt node that will receive the
Dragon event data.
7
Type the EDP passphrase, then press Enter.
The MSA for Dragon communicates with the ManHunt node over EDP. In
order to enable ManHunt to receive event data from the MSA for Dragon,
they must share an EDP passphrase. The passphrase must be 8 to 64
characters long, inclusive.
Note: This must be identical to the passphrase that you enter in the
ManHunt console when you create the external sensor node for the MSA for
Dragon. See “Changing the EDP passphrase” on page 11.
8
Re-enter the EDP passphrase, then press Enter.
9
Enter the path to the Dragon alerts file, or accept the default /var/log/dragon/
alert directory. Enter the complete path if you do not accept the default path.
If the file does not already exist, the install script will create it.
10 Change to the installation directory, and run the start command to start the
MSA for Dragon:
<MSA_install_dir>/start
Upgrading to the MSA for Dragon 6.0
During the upgrade process, you can choose to either retain your current MSA
configuration, or remove it completely and do a fresh install.
Note: You must be logged in as root to run the install script. Also, you can view
the ManHunt version number, and third party MSA product name and version
number in the installation log, which is located in the
<MSA_install_dir>/install directory.
To upgrade to the MSA for Dragon 6.0
1
Place the CD in the CD-ROM drive; mount the drive if necessary.
6
ManHunt Smart Agent for Dragon™ 6.0
2
Change to the CD directory and enter the install command:
cd Dragon60MSA_MH<version>/install/<platform>
where <version> is 22 or 30, and <platform> is linux, solaris8-intel, or
solaris8-sparc.
./install.sh
3
4
5
The script will detect the existing MSA for Dragon, and ask if you would like
to install the MSA for Dragon 6.0, or upgrade to the MSA for Dragon 6.0.
■
If you wish to remove your existing MSA for Dragon configuration and
perform a fresh installation, press Enter to continue.
■
If you wish to upgrade and retain your existing MSA for Dragon
configuration, type upgrade, then press Enter.
Type the complete path to the existing install directory for the MSA for
Dragon, then press Enter.
■
If you chose to perform a fresh installation in Step 3, the existing MSA
for Dragon will then uninstall itself. When it has finished uninstalling,
the MSA for Dragon 6.0 installation will begin. Proceed now to
“Installing the MSA for Dragon 6.0” on page 3.
■
If you chose to upgrade and maintain your existing MSA for Dragon
configuration in Step 3, please proceed to Step 5.
Type the complete path to the existing MSA for Dragon log directory, then
press Enter.
Note: The MSA cannot start properly if the log file approaches a certain size
(2-3 Gigs depending on the system). You can delete or rename the log file to
correct the problem.
6
The existing MSA for Dragon will now uninstall itself, then upgrade itself to
the MSA for Dragon 6.0. You will not be prompted for any more questions.
The upgrade install directory for the MSA for Dragon 6.0, as well as the
dragon2mh.conf, logs/dragon2mh.log, and installation log files, will be
retained.
7
Change to the installation directory and run the start command to start the
MSA for Dragon:
<MSA_install_dir>/start
Installing the Dragon meta data
You must install the Dragon meta data on the ManHunt node that you log into
from the administration console, typically the primary master node. This is done
7
ManHunt Smart Agent for Dragon™ 6.0
in order for you to be able to create the MSA for Dragon external sensor node,
create response policies for Dragon events, and display Dragon event data in the
ManHunt console.
In addition, you must install this meta data on the ManHunt node that will
receive the Dragon event data from the MSA for Dragon (if different from the
master node).
Note: You must be logged in as root to install the Dragon meta data.
To install the Dragon meta data
1
Place the CD in the CD-ROM drive; mount the volume if necessary.
2
Change to the CD directory and enter the install command:
cd Dragon60MSA_MH<version>/install/<platform>
where <version> is 22 or 30, and <platform> is linux, solaris8-intel, or
solaris8-sparc.
./install-md.sh
3
4
Ensure that the meta data file to be installed begins with ‘dragon’ and ends
with the ‘.md’ file extension. If you have old meta data files, you can choose
to either delete or archive them. Do one of the following:
■
Type delete and press Enter to delete the old meta data files.
■
Type archive and press Enter to archive the old meta data files.
ManHunt must be restarted to incorporate the new meta data. Type y and
press Enter when prompted to restart ManHunt.
If this is the ManHunt node used for administration, quit and restart any
administration consoles connected to the node to enable the consoles to
incorporate the new meta data.
Configuring Symantec ManHunt
To enable communication between ManHunt and the MSA for Dragon, and to
be able to set ManHunt response policies for Dragon events, you must create an
external sensor node in the ManHunt topology tree for the machine on which the
MSA for Dragon is installed.
To add an external sensor node
1
Open the ManHunt console.
8
ManHunt Smart Agent for Dragon™ 6.0
2
Right-click External Sensors in the topology tree, and click Add External
Sensor from the pop-up menu.
The Add External Sensor dialog appears.
3
In Add External Sensor, enter a name of up to 39 characters for the device.
This name will appear in the topology tree.
4
Enter an optional customer ID.
This ID is a way of labeling the devices, for example, to describe the physical
location of the device.
5
Enter the IP address for the machine on which you installed the MSA for
Dragon.
6
Select Dragon from Smart Agent Type.
Note: The Dragon Smart Agent type only appears if you have installed the
Dragon meta data.
7
Select the ManHunt node that will receive event data from the MSA for
Dragon.
Note: You must select the ManHunt node before setting the EDP
passphrase, as ManHunt sets the EDP passphrase for the ManHunt node that
is selected in the Event Receiver box at the time that you enter the EDP
passphrase.
8
Set the EDP passphrase.
This passphrase must be the same passphrase you entered during the MSA
for Dragon installation process.
9
Enter a description of the MSA for Dragon.
This description will be displayed on the main console screen when this
external sensor node is selected in the topology tree.
10 Click OK, then click Save Changes to save your topology tree changes.
Configuring the MSA for Dragon
The MSA installation process creates a configuration file called dragon2mh.conf
in the <MSA_install_dir>/etc directory. This file contains instructions and
parameters for MSA operation and for connecting to the ManHunt node. These
parameters are described in Table 1-1.
9
ManHunt Smart Agent for Dragon™ 6.0
MSA Configuration File
The configuration file is broken down into sections with section headers enclosed
in brackets []. The first section is called [MSA] and contains most of the
configuration parameters. The second section is called [Snmp] and can contain
the SnmpTrapPort parameter.
The following is a sample configuration file.
[MSA]
ManHuntHostIPAddr = 10.0.0.34:1333
EDPSecret = DokdYjNU732mnDuj
MSALogDir = /usr/msadragon/logs
MSALogLevel = 5
EventDefinitionFile = /usr/msadragon/etc/dragon2mh.evtdef
[Snmp]
SnmpTrapPort = 185
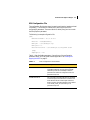
Table 1-1 lists all editable parameters. If you edit any of the configuration
parameter values, you must restart the MSA application. See “Starting and
stopping the MSA” on page 12.
Table 1-1
MSA Configuration File Parameters
Parameter
Description
EDPSecret
This is the value for EDPSecret is the encrypted form
of the EDP passphrase, and is set during the MSA
installation process. Do not attempt to edit this
parameter from within the configuration file. This
parameter is required.
EventDefinitionFile
This is the path to the event definition file. The MSA
conversion engine uses instructions contained in the
event definition file to convert Dragon events into
ManHunt events. The event definition file is installed
in the <MSA_install_dir>/etc directory. This
parameter is required.
10
ManHunt Smart Agent for Dragon™ 6.0
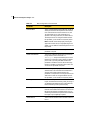
Table 1-1
MSA Configuration File Parameters
Parameter
Description
EventSendRate
This is an integer specifying the maximum number of
events per second that can be passed to the ManHunt
node. Valid values are 10-250 for ManHunt 3.0, and
10-30 for ManHunt 2.2. If this parameter is not
specified in the configuration file, the default value is
10 events per second. To change the default value for
this parameter, you must add it to the [MSA] section.
Note: The MSA cannot start properly if the log file
approaches a certain size (2-3 Gigs depending on the
system). You can delete or rename the log file to correct
the problem.
EventSourceFile
This is the file from which to read Dragon alerts. This
parameter is required.
ManHuntHostIPAddr
This is the IP address of the ManHunt node to which
Dragon events are sent. The format is IP
address:port. The port must be the port on which
ManHunt is configured to receive events. The default
port is 1333. If you change the EDP Port Number
parameter on the ManHunt node, be sure to change
the value in the MSA configuration file to match, and
vice versa. This parameter is required.
MaxEventsinCache
This is an integer specifying the maximum number of
events allowed in the cache before the oldest event is
dropped. Valid values are 500-100,000. If this
parameter is not specified in the configuration file, the
default value is 3000. To change the default value for
this parameter, you must add it to the [MSA] section.
MSALogDir
This is the directory to which the MSA should write its
log file. The default value is <MSA_install_dir>/logs. If
you delete this parameter from the configuration file,
then the default log directory becomes /tmp.
MSALogLevel
This is an integer specifying the level of logging that
the MSA uses. Possible values are from 1 to 35, with 35
being the most verbose. The default value is 5. If you
raise the log level above 5, the performance of the MSA
for Dragon may be negatively impacted.
SNMPListenIP
This is a valid IP address to which the MSA machine is
bound.
11
ManHunt Smart Agent for Dragon™ 6.0
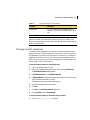
Table 1-1
MSA Configuration File Parameters
Parameter
Description
SnmpTrapPort
This is an argument that allows SNMP traps to be
collected on a port other than the default, which is port
162.
Note: It is possible to install and run two SNMP-based MSAs on the same
machine. However, that machine must have more than one IP address. Each
MSA will have a separate .conf file, in which each SNMPListenIP parameter must
be set to a different value.
Changing the EDP passphrase
To change the EDP passphrase on the ManHunt node, edit the external sensor
topology tree node. The EDP passphrase on the ManHunt node must match the
EDP passphrase on the MSA for Dragon machine. Therefore, if you change the
passphrase on the ManHunt node, you must also change the passphrase on the
MSA for Dragon machine by running the changesecret command located in the
<MSA_install_ directory>/bin directory.
To change the EDP passphrase on the ManHunt node
1
Log into the administration console.
2
Right-click the appropriate external sensor node, and select Edit Device.
The Edit External Sensor dialog appears.
3
In Edit External Sensor, click Set EDP Passphrase.
4
In EDP Passphrase, enter the new passphrase the ManHunt node will use to
communicate with the MSA for Dragon.
The passphrase must be at least 8 characters long.
5
Re-enter the passphrase for confirmation.
6
Click OK.
7
Click OK in the Edit External Sensor dialog box.
8
Go to Topology, and click Save Changes.
To change the EDP passphrase on the MSA for Dragon machine
1
Go to the <MSA_install_dir>/bin directory.
12
ManHunt Smart Agent for Dragon™ 6.0
2
Enter the following command:
changesecret <MSA_install_dir>/etc/dragon2mh.conf
3
Enter the old passphrase.
4
Enter the new passphrase.
The passphrase must be at least 8 characters long.
5
Re-enter the new passphrase.
6
Restart the MSA application with the stop and start commands.
See “Starting and stopping the MSA” on page 12.
Note: If you have forgotten the old passphrase, you can delete the EDPSecret line
from the configuration file <MSA_install_dir>/etc/dragon2mh.conf and then
run changesecret again. The script will not prompt you for the old passphrase
once the passphrase line is removed. See “Configuring the MSA for Dragon” on
page 8.
Starting and stopping the MSA
The MSA installer creates startup scripts in the system startup directories
/etc/init.d and /etc/rc2.d to automatically start the MSA for Dragon when the
machine is rebooted. In addition, start and stop scripts are provided in the
<MSA_install_dir>. You must be logged in as root to run these scripts, as they are
installed in the root MSA install directory. Simply run the start or stop
commands from <MSA_install_dir> to start or stop the MSA.
Viewing Dragon events in the ManHunt console
You can view events from the MSA for Dragon just as you would view any other
events in the ManHunt console. For more information about viewing events in
the ManHunt console, see the Symantec ManHunt Administration Guide.
To identify events as originating from Dragon
1
From the ManHunt console Event View window, expand the Base Type field.
2
Dragon events have a Base Type in the form of
DRGN|DRGN_<unique numerical identifier>
13
ManHunt Smart Agent for Dragon™ 6.0
3
The Type field in the ManHunt console contains a short description of the
Dragon event.
To see more information, double click on the event and click the Advanced
tab.
Uninstalling the MSA
The MSA for Dragon can be uninstalled. It is not necessary to uninstall the
Dragon meta data. However, if you require more space on the disk after
uninstalling the MSA for Dragon, you can remove the meta data manually by
deleting the <ManHunt_install_directory>/md/dragon.md file.
To uninstall the MSA for Dragon
1
Run the following command:
<MSA_install_dir>/install/uninstall.sh
2
The script will ask if you wish to continue uninstalling the MSA. Type y and
press Enter to uninstall the MSA for Dragon.
14
ManHunt Smart Agent for Dragon™ 6.0