1
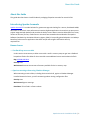
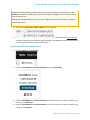
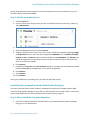
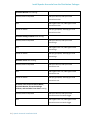
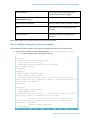
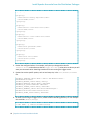
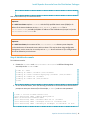
Apache Accumulo Installation Guide
for using Cloudera's packaging of Accumulo for CDH
Important Notice
© 2010-2014 Cloudera, Inc. All rights reserved.
Cloudera, the Cloudera logo, Cloudera Impala, Impala, and any other product or service names or
slogans contained in this document, except as otherwise disclaimed, are trademarks of Cloudera and its
suppliers or licensors, and may not be copied, imitated or used, in whole or in part, without the prior
written permission of Cloudera or the applicable trademark holder.
Hadoop and the Hadoop elephant logo are trademarks of the Apache Software Foundation. Apache
Accumulo, Accumulo, Apache, the Apache feather logo, and the Apache Accumulo
project logo are trademarks of the Apache Software Foundation. All other trademarks, registered
trademarks, product names and company names or logos mentioned in this document are the property
of their respective owners. Reference to any products, services, processes or other information, by trade
name, trademark, manufacturer, supplier or otherwise does not constitute or imply endorsement,
sponsorship or recommendation thereof by us.
Complying with all applicable copyright laws is the responsibility of the user. Without limiting the rights
under copyright, no part of this document may be reproduced, stored in or introduced into a retrieval
system, or transmitted in any form or by any means (electronic, mechanical, photocopying, recording, or
otherwise), or for any purpose, without the express written permission of Cloudera.
Cloudera may have patents, patent applications, trademarks, copyrights, or other intellectual property
rights covering subject matter in this document. Except as expressly provided in any written license
agreement from Cloudera, the furnishing of this document does not give you any license to these
patents, trademarks copyrights, or other intellectual property.
The information in this document is subject to change without notice. Cloudera shall not be liable for
any damages resulting from technical errors or omissions which may be present in this document, or
from use of this document.
Cloudera, Inc.
1001 Page Mill Road
Palo Alto, CA 94304-1008
[email protected]
US: 1-888-789-1488
Intl: 1-650-362-0488
www.cloudera.com
Release Information
Version: 1.4.4-cdh4.5.0
Date: February 13, 2014
Table of Contents
ABOUT THIS GUIDE ................................................................................................................................................ 1
INTRODUCING APACHE ACCUMULO ...................................................................................................................... 1
KNOWN ISSUES ..............................................................................................................................................................1
—Feedback loop on trace table ............................................................................................................................1
—Spurious warnings when using Cloudera Manager ...........................................................................................1
—Accumulo 1.4.4-cdh4.5.0 installed on top of CDH parcels cannot use LZO-compressed tables ........................2
PREREQUISITES ..............................................................................................................................................................2
INSTALL APACHE ACCUMULO BY USING CLOUDERA MANAGER ............................................................................ 2
STEP 1: INSTALL AND CONFIGURE CLOUDERA MANAGER 5 AND CDH4.5 .................................................................................2
STEP 2: INSTALL THE ACCUMULO PARCEL............................................................................................................................3
STEP 3: ADD THE ACCUMULO SERVICE ...............................................................................................................................4
INSTALL APACHE ACCUMULO FROM THE DISTRIBUTION PACKAGES...................................................................... 4
STEP 1: ADD OR BUILD THE ACCUMULO REPOSITORY ............................................................................................................4
On Red Hat-compatible Systems ...........................................................................................................................5
On SLES Systems....................................................................................................................................................5
On Ubuntu or Debian Systems ..............................................................................................................................6
STEP 2: INSTALL ACCUMULO ............................................................................................................................................7
STEP 3: CONFIGURE ACCUMULO FOR YOUR ENVIRONMENT ....................................................................................................9
STEP 4: INITIALIZE ACCUMULO........................................................................................................................................11
STEP 5: START ACCUMULO ............................................................................................................................................12
INSTALL APACHE ACCUMULO FROM THE DISTRIBUTION TARBALL ...................................................................... 13
STEP 1: CREATE A ACCUMULO USER ACCOUNT ..................................................................................................................13
STEP 2: INSTALL ACCUMULO ..........................................................................................................................................14
STEP 3: CONFIGURE ACCUMULO FOR YOUR ENVIRONMENT ..................................................................................................15
STEP 4: INITIALIZE ACCUMULO........................................................................................................................................18
STEP 5: START ACCUMULO ............................................................................................................................................19
TEST THE ACCUMULO SHELL ................................................................................................................................ 21
USING ACCUMULO WITH MAVEN ........................................................................................................................ 22
TROUBLESHOOTING............................................................................................................................................. 23
REVIEWING ACCUMULO LOGS ........................................................................................................................................23
EXAMPLE: TROUBLESHOOTING MISSING NATIVE LIBRARIES FOR TARBALL INSTALLATIONS .............................................................24
CREATING A LOCAL YUM REPOSITORY ................................................................................................................. 25
About this Guide
About this Guide
This guide describes how to install Cloudera's packaging of Apache Accumulo for use with CDH.
Introducing Apache Accumulo
Apache Accumulo™ is an ideal solution for government agencies looking for a secure, distributed NoSQL
data store to serve their most performance-intensive Big Data applications. Accumulo is an open source
project integrated with Hadoop and provides the ability to store data in massive tables (billions of rows /
millions of columns) for fast, random access. Accumulo was created and contributed to the Apache
Software Foundation by the National Security Agency (NSA). It has quickly gained adoption as a Hadoopbased key/value store for applications that have unique and stringent information security
requirements.
Known Issues
—Feedback loop on trace table
Under certain circumstances, a tablet server with a small in-memory map can get into a feedback
loop where flushes of a tablet for the trace table cause additional tracer entries about the flush.
Bug: ACCUMULO-2014
Severity: Low
Workaround: Increase the amount of memory available for the in-memory map.
—Spurious warnings when using Cloudera Manager
When executing certain utilities, including the Accumulo shell, against a Cloudera Manager
installed Accumulo cluster, you will see warnings about missing configuration files.
Severity: Low
Workaround: Ignore warnings.
Resolution: To be fixed in a future release.
Apache Accumulo Installation Guide | 1
Install Apache Accumulo by using Cloudera Manager
—Accumulo 1.4.4-cdh4.5.0 installed on top of CDH parcels cannot use LZO-compressed
tables
Because of changes in the way that native libraries are located, Accumulo 1.4.4-cdh4.5.0 installed
over a CDH parcel-based installation with optional LZO support enabled cannot locate libraries
required for LZO compression support.
Bug: ACCUMULO-1677
Severity: Low
Workaround: Use Snappy compression, or install over a CDH package-based installation.
Resolution: To be fixed in a future release
Prerequisites
Accumulo depends on Hadoop (HDFS & MapReduce) and ZooKeeper libraries and configuration
information. TabletServers and Loggers should be collocated with DataNodes. These DataNodes do not
require TaskTrackers.
The current release of the Cloudera packaging of Apache Accumulo is tested for use with CDH 4.5.0 or
later, either in parcel (Cloudera Manager 5b2 or later) or package (RPM/DEB) form.
For full cluster installations, Cloudera strongly recommends following the Tips and Guidelines found in
the CDH4 Installation Guide.
Install Apache Accumulo by using Cloudera Manager
This section describes how to install Cloudera's packaging of Accumulo by using Cloudera Manager 5
Beta 2 or later. If you prefer to install Accumulo from packages, skip this section and see the Install
Apache Accumulo from the Distribution Packages section on page 4.
Step 1: Install and Configure Cloudera Manager 5 and CDH4.5
Follow the documentation to install and configure Cloudera Manager 5 with CDH4.5. During the
installation of CDH, you must choose the CDH4.5 parcel when going through the wizard.
1. Be sure the Use Parcels option is checked.
Note:
You may also use Cloudera Manager to manage the Accumulo service when installing with
packages. To do so, follow Steps 1 and 2 under Install Apache Accumulo from the Distribution
2 | Apache Accumulo Installation Guide
Install Apache Accumulo by using Cloudera Manager
Packages. During the package installation sub-step of Step 2, only follow the instructions for All
client hosts. In particular, do not install any of the role-specific packages such as accumulo-master,
accumulo-monitor, etc.
Following the package installation, return to Step 3: Add the Accumulo Service below to configure
the Accumulo service.
2. Select version CDH-4.5.0-1.cdh4.5.0.p0.30 for the CDH parcel.
3. Click Continue and follow the rest of the installation steps as described in the documentation.
Accumulo requires that you setup the HDFS, Zookeeper, and MapReduce services (only MRv1 is
currently supported). Other services are optional.
Step 2: Install the Accumulo Parcel
1. From the Hosts tab, select Parcels.
2. Under the ACCUMULO 1.4.4-1.cdh4.5.0.p0.65 parcel, click Download.
3. Under the ACCUMULO 1.4.4-1.cdh4.5.0.p0.65 parcel for the cluster you want to install on (e.g.
Cluster 1), click Distribute.
4. Under the ACCUMULO 1.4.4-1.cdh4.5.0.p0.65 parcel for the cluster you want to install on (e.g.
Cluster 1), click Activate.
Apache Accumulo Installation Guide | 3
Install Apache Accumulo from the Distribution Packages
You will be prompted to restart the cluster. Since the Accumulo parcel was not previously in use, you
can safely skip this step and click Close.
Step 3: Add the Accumulo Service
1. Click the Home tab.
2. Click the actions menu for the cluster you want to add the Accumulo service to (e.g. Cluster 1),
select Add a Service.
3. Select Accumulo and click Continue.
4. Select the dependent services and click Continue.
5. Assign the Accumulo roles to the hosts in your cluster. Cloudera recommends assigning a Logger
and Tablet Server role on each host that is assigned the DataNode role. The Monitor, Garbage
Collector, Tracer, and Master roles should all be assigned to non-DataNodes. The Gateway role
should be assigned to any hosts where you want to use Accumulo that don’t already have any
other Accumulo roles assigned.
6. Click Continue.
7. Configure the Trace User and Trace Password settings. It is strongly recommended that you not
leave the Trace User set to root as this is not a secure configuration.
8. Click Continue.
9. Click Continue.
10. Click Continue.
Verify your installation by proceeding to the Test the Accumulo Shell section.
Install Apache Accumulo from the Distribution Packages
This section describes how to install Cloudera's packaging of Accumulo from packages (RPM or DEB)
instead of using Cloudera Manager. If you prefer to install Accumulo from a tarball, skip this section and
see the Install Apache Accumulo from the Distribution Tarball section on page 13.
Step 1: Add or Build the Accumulo Repository
•
If you are installing Accumulo on a Red Hat system, you can download the Cloudera packages
using yum or your web browser.
4 | Apache Accumulo Installation Guide
Install Apache Accumulo from the Distribution Packages
•
•
If you are installing Accumulo on a SLES system, you can download the Cloudera packages using
zypper, YaST, or your web browser.
If you are installing Accumulo on an Ubuntu or Debian system, you can download the Cloudera
packages using apt or your web browser.
On Red Hat-compatible Systems
Use one of the following methods to add or build the Accumulo repository or download the packages on
Red Hat-compatible systems:
•
•
To add the Accumulo repository: OR
OR: To build a Yum repository:
Do this on all systems in the cluster.
To add the Accumulo repository:
Click the entry in the table below that matches your Red Hat or CentOS system, navigate to the repo file
for your system, and save it in the /etc/yum.repos.d/ directory.
For OS Version
Click this Link
Red Hat/CentOS/Oracle 5
Red Hat/CentOS/Oracle 5 link
Red Hat/CentOS/Oracle 6
Red Hat/CentOS/Oracle 6 link
Now continue with Step 2: Install Accumulo.
OR: To build a Yum repository:
If you want to create your own yum repository, download the appropriate repo file, create the repo,
distribute the repo file, and set up a web server, as described under Creating a Local Yum Repository.
On SLES Systems
Use one of the following methods to download the Accumulo repository or packages on SLES systems:
•
•
To add the Accumulo repository: OR
OR: To build a SLES repository:
To add the Accumulo repository:
1. Run the following command:
$ sudo zypper addrepo –f
http://archive.cloudera.com/accumulo/sles/11/x86_64/cdh/clouderaaccumulo.repo
Apache Accumulo Installation Guide | 5
Install Apache Accumulo from the Distribution Packages
2. Update your system package index by running:
$ sudo zypper refresh
OR: To build a SLES repository:
If you want to create your own SLES repository, create a mirror of the Accumulo SLES directory by
following these instructions that explain how to create a SLES repository from the mirror.
Now continue with Step 2: Install Accumulo.
On Ubuntu or Debian Systems
Use one of the following methods to add or build the Accumulo repository or download the packages on
Ubuntu or Debian systems:
•
•
To add the Accumulo repository: OR
OR: To build a Debian repository:
Do this on all the systems in the cluster.
To add the Accumulo repository:
Create a new file /etc/apt/sources.list.d/cloudera-accumulo.list with the following
contents:
•
For Ubuntu systems:
deb [arch=amd64] http://archive.cloudera.com/accumulo/<OS-releasearch> <RELEASE>-cdh4 contrib
deb-src http://archive.cloudera.com/accumulo/<OS-release-arch>
<RELEASE>-cdh4 contrib
•
For Debian systems:
deb http://archive.cloudera.com/accumulo/<OS-release-arch> <RELEASE>cdh4 contrib
deb-src http://archive.cloudera.com/accumulo/<OS-release-arch>
<RELEASE>-cdh4 contrib
where: <OS-release-arch> is debian/squeeze/amd64/cdh, ubuntu/lucid/amd64/cdh, or
ubuntu/precise/amd64/cdh, and <RELEASE> is the name of your distribution, which you can find
by running lsb_release -c.
For example, to install Accumulo for 64-bit Ubuntu Lucid:
deb [arch=amd64]
6 | Apache Accumulo Installation Guide
Install Apache Accumulo from the Distribution Packages
http://archive.cloudera.com/accumulo/ubuntu/lucid/amd64/cdh lucidcdh4 contrib
deb-src http://archive.cloudera.com/accumulo/ ubuntu/lucid/amd64/cdh
lucid-cdh4 contrib
OR: To build a Debian repository:
If you want to create your own apt repository, create a mirror of the Accumulo Debian directory and
then create an apt repository from the mirror.
Now continue with Step 2: Install Accumulo.
Step 2: Install Accumulo
Important:
Before proceeding, you need to decide where to deploy the Accumulo Master, Accumulo
Monitor, Accumulo Garbage Collector, and Accumulo Tracer daemons. As a general rule:
•
•
•
The Accumulo Master and Accumulo Monitor run on the same "master" host unless the
cluster is large (more than a few tens of nodes), and the master host (or hosts) should
not run the Accumulo TabletServer or Accumulo Logger services.
In a large cluster, it is especially important that the Accumulo Garbage Collector and
Accumulo Tracer run on separate machines from the Accumulo Master
Each node in the cluster except the master host(s) should run the Accumulo
TabletServer and Accumulo Logger services. In particular, these services should be run
on every DataNode.
1. Install and deploy CDH4. Follow instructions under CDH4 Installation
2. Install and deploy ZooKeeper. Follow instruction under ZooKeeper Installation.
3. Install each type of daemon package on the appropriate systems(s), as follows:
Where to install
Install commands
Accumulo Master host running:
Red Hat/CentOS compatible
sudo yum clean all; sudo yum install
accumulo-master
SLES
sudo zypper clean –all; sudo zypper install
accumulo-master
Ubuntu or Debian
sudo apt-get update; sudo apt-get install
accumulo-master
Apache Accumulo Installation Guide | 7
Install Apache Accumulo from the Distribution Packages
Accumulo Monitor host running:
Red Hat/CentOS compatible
sudo yum clean all; sudo yum install
accumulo-monitor
SLES
sudo zypper clean –all; sudo zypper install
accumulo-monitor
Ubuntu or Debian
sudo apt-get update; sudo apt-get install
accumulo-monitor
Accumulo Garbage Collector host running:
Red Hat/CentOS compatible
sudo yum clean all; sudo yum install
accumulo-gc
SLES
sudo zypper clean –all; sudo zypper install
accumulo-gc
Ubuntu or Debian
sudo apt-get update; sudo apt-get install
accumulo-gc
Accumulo Tracer host running:
Red Hat/CentOS compatible
sudo yum clean all; sudo yum install
accumulo-tracer
SLES
sudo zypper clean –all; sudo zypper install
accumulo-tracer
Ubuntu or Debian
sudo apt-get update; sudo apt-get install
accumulo-tracer
All cluster hosts except Accumulo Master,
Accumulo Monitor, Accumulo Garbage
Collector, and Accumulo Tracer hosts running:
Red Hat/CentOS compatible
sudo yum clean all; sudo yum install
accumulo-tserver accumulo-logger
SLES
sudo zypper clean –all; sudo zypper install
accumulo-tserver accumulo-logger
8 | Apache Accumulo Installation Guide
Install Apache Accumulo from the Distribution Packages
Ubuntu or Debian
sudo apt-get update; sudo apt-get install
accumulo-tserver accumulo-logger
All client hosts running:
Red Hat/CentOS compatible
sudo yum clean all; sudo yum install accumulo
SLES
sudo zypper clean –all; sudo zypper install
accumulo
Ubuntu or Debian
sudo apt-get update; sudo apt-get install
accumulo
Now continue with Step 3: Configure Accumulo for your Environment.
Step 3: Configure Accumulo for your Environment
After installation, follow the steps in this section to configure Accumulo for your environment.
1. On every host, configure the following properties in /etc/accumulo/conf/accumulosite.xml with the proper values for your environment:
<property>
<name>instance.zookeeper.host</name>
<value>localhost:2181</value>
<description>comma separated list of zookeeper
servers</description>
</property>
<property>
<name>logger.dir.walog</name>
<value>/data/1/walogs</value>
<description>The directory used to store write-ahead logs on the
local filesystem. It is possible to specify a comma-separated list of
directories.</description>
</property>
<property>
<name>instance.secret</name>
<value>DEFAULT</value>
<description>A secret unique to a given instance that all servers
must know in order to communicate with one another.
Change it before initialization. To change it later
use ./bin/accumulo org.apache.accumulo.server.util.ChangeSecret
[oldpasswd] [newpasswd],
and then update this file.
</description>
Apache Accumulo Installation Guide | 9
Install Apache Accumulo from the Distribution Packages
</property>
<property>
<name>tserver.memory.maps.max</name>
<value>256M</value>
</property>
<property>
<name>tserver.cache.data.size</name>
<value>15M</value>
</property>
<property>
<name>tserver.cache.index.size</name>
<value>40M</value>
</property>
<property>
<name>trace.password</name>
<value>trace</value>
</property>
<property>
<name>trace.user</name>
<value>trace</value>
</property>
2. Review the configured values. For example, verify that you changed the value for
instance.secret and make sure that the logger.dir.walog value points to where you will
want your Accumulo write-ahead logs saved on the hosts running the Logger service.
3. Review the service specific options, such as Java heap size, in the /etc/default/accumulo
file:
ACCUMULO_TSERVER_OPTS="-Xmx1g -Xms1g -XX:NewSize=500m XX:MaxNewSize=500m"
ACCUMULO_MASTER_OPTS="-Xmx2g -Xms1g"
ACCUMULO_MONITOR_OPTS="-Xmx2g -Xms256m"
ACCUMULO_GC_OPTS="-Xmx256m -Xms256m"
ACCUMULO_LOGGER_OPTS="-Xmx1g -Xms256m"
ACCUMULO_GENERAL_OPTS="-XX:+UseConcMarkSweepGC XX:CMSInitiatingOccupancyFraction=75"
ACCUMULO_OTHER_OPTS="-Xmx1g -Xms256m"
4. On each host running the Logger service, create the write-ahead log directory. For our example
this would be /data/1/walogs:
$ sudo mkdir –p /data/1/accumulo/walogs
10 | Apache Accumulo Installation Guide
Install Apache Accumulo from the Distribution Packages
$ sudo chown -R accumulo:accumulo /data/1/accumulo
Now continue with Step 4: Initialize Accumulo.
Important:
On a multi-host cluster replace localhost with the fully qualified domain name (FQDN) or IP
address of the Accumulo Master in the masters, monitor, gc and tracers files in
/etc/accumulo/conf, and add the FQDN or IP address of the TabletServers (one per line) to the
/etc/accumulo/conf/slaves file.
Important:
On a multi-host cluster, the contents of the /etc/accumulo/conf directory must always be
synchronized across all Accumulo servers within a cluster. This may be done using configuration
management, version control or via a utility such as rsync. Servers with out-of-sync configurations
will not be allowed to join the cluster.
Step 4: Initialize Accumulo
To initialize Accumulo:
1. Create the /accumulo and /user/accumulo directoris in HDFS and change their
ownership to the accumulo user:
$
$
$
$
$
$
sudo su hadoop fs
hadoop fs
hadoop fs
hadoop fs
exit
hdfs
-mkdir
-chown
-chmod
-chmod
/accumulo /user/accumulo
accumulo:supergroup /accumulo /user/accumulo
751 /accumulo
750 /user/accumulo
2. On the Accumulo Master, enter the following commands to initialize Accumulo and follow the
prompts to name your instance (for this example, cloudera) and set a root password:
$ sudo -i service accumulo-master init
[util.Initialize] INFO : Hadoop Filesystem is
hdfs://localhost.localdomain:8020
[util.Initialize] INFO : Accumulo data dir is /accumulo
[util.Initialize] INFO : Zookeeper server is localhost:2181
[util.Initialize] INFO : Checking if Zookeeper is available. If this
Apache Accumulo Installation Guide | 11
Install Apache Accumulo from the Distribution Packages
hangs, then you need to make sure zookeeper is running
Instance name : cloudera
Enter initial password for root: ****
Confirm initial password for root: ****
[conf.Configuration] WARN : dfs.replication.min is deprecated. Instead,
use dfs.namenode.replication.min
[conf.Configuration] WARN : dfs.block.size is deprecated. Instead, use
dfs.blocksize
[security.ZKAuthenticator] INFO : Initialized root user with username:
root at the request of user !SYSTEM
Warnings:
You will be warned here if you didn’t change your instance secret in
/etc/accumulo/conf/accumulo-site.xml.
If the "Hadoop Filesystem is" line contains "fs://" instead of "hdfs://", HDFS is not
properly configured.
Step 5: Start Accumulo
To start Accumulo:
1. Run the following commands on the following hosts:
For the following service
Run this command
Accumulo Master
sudo -i service accumulo-master
start
Accumulo Monitor
sudo -i service accumulo-monitor
start
Accumulo Garbage Collector
sudo -i service accumulo-gc start
Accumulo Tracer
sudo -i service accumulo-tracer
start
All cluster hosts except Accumulo Master,
Accumulo Monitor, Accumulo Garbage
Collector, and Accumulo Tracer hosts
sudo -i service accumulo-tserver
start
12 | Apache Accumulo Installation Guide
sudo -i service accumulo-logger
start
Install Apache Accumulo from the Distribution Tarball
2. You should now be able to connect to Accumulo on http://localhost:50095. You can check the
status of each daemon with the following command:
$ sudo -i service accumulo-<service> status
where <service> is one of master, monitor, gc, tracer, tserver, or logger.
3. You can stop each daemon with the following command:
$ sudo -i service accumulo-<service> stop
where <service> is one of master, monitor, gc, tracer, tserver, or logger.
Verify your installation by proceeding to the Test the Accumulo Shell section.
Install Apache Accumulo from the Distribution Tarball
This section describes how to install Cloudera's packaging of Accumulo from a tarball instead of using
Cloudera Manager or packages.
Warning:
These instructions are meant for advanced users. It is highly recommended that you install
Accumulo using Cloudera Manager or packages.
Step 1: Create a Accumulo User Account
Before installing Accumulo, follow the instructions in this section to create a user accumulo and assign
ownership of the new /var/lib/accumulo directory to it.
To create a Accumulo user account:
1. Run the following commands on every host in your Accumulo cluster.
$
$
$
$
sudo
sudo
sudo
sudo
mkdir /var/lib/accumulo
useradd -r -s /bin/bash -d /var/lib/accumulo accumulo
cp /etc/skel/.bash* ~accumulo/
chown -R accumulo:accumulo /var/lib/accumulo
2. Verify that the accumulo user on the Accumulo Master is configured for passwordless SSH to the
accumulo account on itself as well as all other servers running Accumulo processes:
$ sudo su - accumulo
$ ssh-keygen -t rsa
Generating public/private rsa key pair.
Apache Accumulo Installation Guide | 13
Install Apache Accumulo from the Distribution Tarball
Enter file in which to save the key (/var/lib/accumulo/.ssh/id_rsa):
Created directory '/var/lib/accumulo/.ssh'.
Enter passphrase (empty for no passphrase):
Enter same passphrase again:
Your identification has been saved in /var/lib/accumulo/.ssh/id_rsa.
Your public key has been saved in /var/lib/accumulo/.ssh/id_rsa.pub.
$ cat ~/.ssh/id_rsa.pub > ~/.ssh/authorized_keys
$ chmod 600 ~/.ssh/authorized_keys
3. On every host, verify that the /var/lib/accumulo/.ssh/authorized_keys file contains the
key from /var/lib/accumulo/.ssh/id_rsa.pub as well. You should then be able to SSH from
the Master to other members of the Accumulo cluster without being prompted for a password.
Step 2: Install Accumulo
To install Accumulo:
1. On every host, extract the Accumulo tarball to /usr/lib/accumulo:
$ sudo mkdir /usr/lib/accumulo
$ sudo tar -xf accumulo-1.4.4-cdh4.5.0.tar.gz -C /usr/lib/accumulo -strip=1
$ sudo chown -R root:root /usr/lib/accumulo/
2. Move the /usr/lib/accumulo/conf directory to /etc/accumulo/cdh4_default and copy
the correct example configuration based on whether CDH was installed with parcels
(/etc/accumulo/cdh4_default/examples/CDH4_parcels) or packages (RPM/DEB)
(/etc/accumulo/cdh4_default/examples/CDH4_packages):
$
$
$
$
$
sudo mkdir /etc/accumulo
sudo mv /usr/lib/accumulo/conf /etc/accumulo/cdh4_default
sudo chown -R root:root /etc/accumulo/
sudo chmod -R og+rX /etc/accumulo/cdh4_default/examples
sudo alternatives --install /etc/accumulo/conf accumulo-conf \
/etc/accumulo/cdh4_default 20
For a parcel-based CDH install:
$ sudo cp /etc/accumulo/cdh4_default/examples/CDH4_parcels/* \
/etc/accumulo/cdh4_default/
For a packages-based CDH install:
$ sudo cp /etc/accumulo/cdh4_default/examples/CDH4_packages/* \
/etc/accumulo/cdh4_default/
14 | Apache Accumulo Installation Guide
Install Apache Accumulo from the Distribution Tarball
3. Set the ACCUMULO_CONF_DIR, ACCUMULO_HOME and JAVA_HOME variables in
/var/lib/accumulo/.bashrc to make them persistent:
$
$
$
$
$
sudo
echo
echo
echo
exit
su - accumulo
"export ACCUMULO_CONF_DIR=/etc/accumulo/conf" >> ~/.bashrc
"export ACCUMULO_HOME=/usr/lib/accumulo" >> ~/.bashrc
"export JAVA_HOME=/usr/java/jdk1.6.0_31" >> ~/.bashrc
4. Repeat step 3 for any other users who will need to use the Accumulo shell.
Step 3: Configure Accumulo for your Environment
After installation, follow the steps in this section to configure Accumulo for your environment.
1. On every host, configure the following properties in /etc/accumulo/conf/accumulo-site.xml
with the proper values for your environment:
<property>
<name>instance.zookeeper.host</name>
<value>localhost:2181</value>
<description>comma separated list of zookeeper
servers</description>
</property>
<property>
<name>logger.dir.walog</name>
<value>/data/1/walogs</value>
<description>The directory used to store write-ahead logs on the
local filesystem. It is possible to specify a comma-separated list of
directories.</description>
</property>
<property>
<name>instance.secret</name>
<value>DEFAULT</value>
<description>A secret unique to a given instance that all servers
must know in order to communicate with one another.
Change it before initialization. To change it later
use ./bin/accumulo org.apache.accumulo.server.util.ChangeSecret
[oldpasswd] [newpasswd],
and then update this file.
</description>
</property>
<property>
<name>tserver.memory.maps.max</name>
Apache Accumulo Installation Guide | 15
Install Apache Accumulo from the Distribution Tarball
<value>256M</value>
</property>
<property>
<name>tserver.cache.data.size</name>
<value>15M</value>
</property>
<property>
<name>tserver.cache.index.size</name>
<value>40M</value>
</property>
<property>
<name>trace.password</name>
<!-change this to the root user's password, and/or change the user
below
-->
<value>secret</value>
</property>
<property>
<name>trace.user</name>
<value>root</value>
</property>
2. Review the configured values. For example, verify that you changed the value for
instance.secret and make sure that the logger.dir.walog value points to where you will
want your Accumulo write-ahead logs saved on the hosts running the Logger service.
Important:
If you're using the example configuration files, you can skip this notice as the right ports are
already configured.
If running a multi-host cluster managed by Cloudera Manager, you will need to add the
following lines to accumulo-site.xml:
<property>
<name>tserver.port.client</name>
<value>10011</value>
</property>
This is to avoid a port conflict with the Cloudera Manager Service Monitor which also uses
port 9997. In addition, be sure to open up TCP port 10011 in the firewall on all hosts running
Table Servers.
Similarly, if you are running Hue (which is included but not started by default on Cloudera’s
16 | Apache Accumulo Installation Guide
Install Apache Accumulo from the Distribution Tarball
QuickStart VM) on the same server or virtual machine as Accumulo, you will need to add the
following property to accumulo-site.xml:
<property>
<name>master.port.client</name>
<value>10010</value>
</property>
You will also need to open up TCP port 10010 in your firewall if you are running Hue and the
Accumulo Master on the same node in a multi-node setup (this, however, is not
recommended).
3. Open accumulo-env.sh and edit the value of the ACCUMULO_LOG_DIR variable to be
/var/log/accumulo. Make sure that this folder is created on every host of this cluster:
$ sudo mkdir /var/log/accumulo
$ sudo chown accumulo:accumulo /var/log/accumulo
$ sudo rm -rf /usr/lib/accumulo/logs
4. Review any other settings you may want to change in accumulo-env.sh.
5. On each host running the Logger service, create the write-ahead log directory. For our example this
would be /data/1/accumulo/walogs.
$ sudo mkdir -p /data/1/accumulo/walogs
$ sudo chown -R accumulo:accumulo /data/1/accumulo
$ sudo rm -rf /usr/lib/accumulo/walogs
6. Build the native libraries:
$ sudo yum install gcc-c++ glibc-devel libstdc++-devel
$ sudo make -C /usr/lib/accumulo/src/server/src/main/c++
Apache Accumulo is now installed and configured. Continue to the next section to initialize Accumulo
and start the Accumulo services.
Important:
On a multi-host cluster replace localhost with the fully qualified domain name (FQDN) or IP
address of the Accumulo Master in the masters, monitor, gc and tracers files in
/etc/accumulo/conf, and add the FQDN or IP address of the TabletServers (one per line) to the
/etc/accumulo/conf/slaves file.
Apache Accumulo Installation Guide | 17
Install Apache Accumulo from the Distribution Tarball
Important:
On a multi-host cluster, the contents of the /etc/accumulo/conf directory must always be
synchronized across all Accumulo servers within a cluster. This may be done using configuration
management, version control or via a utility such as rsync. Servers with out-of-sync configurations
will not be allowed to join the cluster.
Step 4: Initialize Accumulo
To initialize Accumulo:
1. Since the hdfs user is not running Accumulo, create the /accumulo and /user/accumulo
directories in hdfs and change their ownership to the accumulo user.
$
$
$
$
$
$
sudo su hadoop fs
hadoop fs
hadoop fs
hadoop fs
exit
hdfs
-mkdir
-chown
-chmod
-chmod
/accumulo /user/accumulo
accumulo:supergroup /accumulo /user/accumulo
751 /accumulo
750 /user/accumulo
2. On the Accumulo Master, enter the following commands to initialize Accumulo and follow the
prompts to name your instance (for this example, cloudera) and set a root password:
$ sudo su - accumulo
$ cd /usr/lib/accumulo/
$ bin/accumulo init
[util.Initialize] INFO : Hadoop Filesystem is
hdfs://localhost.localdomain:8020
[util.Initialize] INFO : Accumulo data dir is /accumulo
[util.Initialize] INFO : Zookeeper server is localhost:2181
[util.Initialize] INFO : Checking if Zookeeper is available. If this
hangs, then you need to make sure zookeeper is running
Instance name : cloudera
Enter initial password for root: ****
Confirm initial password for root: ****
[conf.Configuration] WARN : dfs.replication.min is deprecated. Instead,
use dfs.namenode.replication.min
[conf.Configuration] WARN : dfs.block.size is deprecated. Instead, use
dfs.blocksize
[security.ZKAuthenticator] INFO : Initialized root user with username:
root at the request of user !SYSTEM
$ exit
18 | Apache Accumulo Installation Guide
Install Apache Accumulo from the Distribution Tarball
Warnings:
You will be warned here if you didn’t change your instance secret in conf/accumulosite.xml.
If the "Hadoop Filesystem is" line contains "fs://" instead of "hdfs://", your HDFS is
not properly configured.
3. Make sure that users in the accumulo group can access Accumulo utilities, such as the shell, while
leaving access to Accumulo internals restricted by altering the permissions on the Accumulo section
of HDFS:
$
$
$
$
$
sudo su hadoop fs
hadoop fs
hadoop fs
exit
accumulo
-chmod 751 /accumulo
-chmod 750 /accumulo/*
-chmod 755 /accumulo/instance_id
Step 5: Start Accumulo
To start Accumulo:
1. Run the following commands:
$ sudo su - accumulo
$ cd /usr/lib/accumulo/
$ bin/start-all.sh
Starting tablet servers and loggers .... done
Starting tablet server on localhost
Starting logger on localhost
[server.Accumulo] INFO : Attempting to talk to zookeeper
[server.Accumulo] INFO : Zookeeper connected and initialized,
attemping to talk to HDFS
[server.Accumulo] INFO : Connected to HDFS
Starting master on localhost
Starting garbage collector on localhost
Starting monitor on localhost
Starting tracer on localhost
$ exit
2. You should now be able to connect to Accumulo on http://localhost:50095/. Check the number of
processes via the following command:
$ sudo -u accumulo jps -ml | grep org.apache.accumulo.start.Main \
| wc -l
Apache Accumulo Installation Guide | 19
Install Apache Accumulo from the Distribution Tarball
3. If you need to stop your Accumulo cluster, run the following commands on the Accumulo Master:
$ sudo su - accumulo
$ cd /usr/lib/accumulo/
$ bin/stop-all.sh
Accumulo shut down cleanly
Utilities and unresponsive servers will be shut down in 5 seconds
stopping gc on localhost
stopping monitor on localhost
stopping tracer on localhost
stopping gc on localhost
stopping monitor on localhost
stopping tracer on localhost
stopping unresponsive tablet servers (if any) ...
stopping logger on localhost
stopping unresponsive tablet servers hard (if any) ...
Cleaning tablet server and logger entries from zookeeper
Cleaning all server entries in zookeeper
$ exit
Note:
If you are attempting to connect to the Accumulo Master from another host, make sure your
firewall allows inbound access on TCP port 50095. Also, in a multi-node cluster, make sure every
Accumulo node can access the following TCP ports on every other Accumulo node: 4560, 11224,
12234, 50091, and 50095.
Note:
If the bin/stop-all.sh command is unresponsive, you may need to send it an interrupt via
CTRL-C one or more times. This will cause it to forcibly stop unresponsive services.
20 | Apache Accumulo Installation Guide
Test the Accumulo Shell
Test the Accumulo Shell
You are now able to run the Accumulo shell on any client hosts (for CM installs, these are hosts assigned
the Gateway role) in your cluster. By default, the user root is created and given the password secret or
the password you set during install if you installed with packages or the tarball. It is strongly
recommended that you change this password if you installed with CM.
1. Launch the Accumulo shell for the default root user.
$ accumulo shell -u root
grep: /etc/accumulo/conf/masters: No such file or directory
Enter current password for 'root'@'accumulo': ******
Shell - Apache Accumulo Interactive Shell
- version: 1.4.4-cdh4.5.0
- instance name: accumulo
- instance id: 9863d1f1-c323-4671-9e1f-69857f0d635f
- type 'help' for a list of available commands
root@accumulo>
2. Use the passwd command to set a new password for the root user.
root@accumulo> passwd
Enter current password for 'root': ******
Enter new password for 'root': *********
Please confirm new password for 'root': *********
root@accumulo>
3. Relaunch the shell with this new password.
root@accumulo> exit
$ accumulo shell -u root
grep: /etc/accumulo/conf/masters: No such file or directory
Enter current password for 'root'@'accumulo': *********
Shell - Apache Accumulo Interactive Shell
- version: 1.4.4-cdh4.5.0
- instance name: accumulo
- instance id: 9863d1f1-c323-4671-9e1f-69857f0d635f
- type 'help' for a list of available commands
-
Apache Accumulo Installation Guide | 21
Using Accumulo with Maven
root@accumulo>
4. Verify that you can list tables.
root@accumulo> tables
!METADATA
trace
root@accumulo>
5. If the trace table doesn't exist, make sure that you've created the trace user. Use the same
password you used for the trace.password setting in /etc/accumulo/conf/accumulosite.xml for packages or tarball installations or the Trace Password setting in Cloudera
Manager for parcel installations.
root@cloudera> createuser trace
Enter new password for 'trace': *****
Please confirm new password for 'trace': *****
root@cloudera> grant System.CREATE_TABLE -s -u trace
root@cloudera> tables
!METADATA
trace
root@cloudera> revoke System.CREATE_TABLE -s -u trace
For more information on using the Accumulo shell, see the Accumulo user manual.
Using Accumulo with Maven
If you want to build applications or tools with Cloudera's packaging of Accumulo and you are using
Maven or Ivy for dependency management, you can pull the Accumulo artifacts from the Cloudera
Maven repository. The repository is available at https://repository.cloudera.com/artifactory/clouderarepos/. The following is a sample POM (pom.xml) file:
<project xmlns="http://maven.apache.org/POM/4.0.0"
xmlns:xsi=http://www.w3.org/2001/XMLSchema-instance
xsi:schemaLocation="http://maven.apache.org/POM/4.0.0
http://maven.apache.org/maven-v4_0_0.xsd">
<repositories>
<repository>
<id>cloudera</id>
<url>https://repository.cloudera.com/artifactory/cloudera-repos/</url>
</repository>
</repositories>
</project>
22 | Apache Accumulo Installation Guide
Troubleshooting
CDH4 Compatible Releases
CDH 4.5 Compatible Releases
The following table lists the project name, groupId, artifactId, and version required to access each CDH4compatible artifact.
Project
groupId
artifactId
version
Accumulo
org.apache.accumulo
accumulo
1.4.4-cdh4.5.0
org.apache.accumulo
accumulo-core
1.4.4-cdh4.5.0
org.apache.accumulo
accumulo-examples
1.4.4-cdh4.5.0
org.apache.accumulo
accumulo-minicluster
1.4.4-cdh4.5.0
org.apache.accumulo
accumulo-proxy
1.4.4-cdh4.5.0
org.apache.accumulo
accumulo-server
1.4.4-cdh4.5.0
org.apache.accumulo
accumulo-start
1.4.4-cdh4.5.0
org.apache.accumulo
cloudtrace
1.4.4-cdh4.5.0
org.apache.accumulo
examples-simple
1.4.4-cdh4.5.0
Troubleshooting
Reviewing Accumulo Logs
When troubleshooting Accumulo, first review the logs located at /var/log/accumulo. There are
separate logs for each server process within Accumulo. For example, on our single node configuration
there are four log file extensions/types: ".log", "out" (stdout), "err" (stderr) and ".debug" for each of the
Accumulo roles.
Service
Base Log Name
Garbage Collector
gc.FQDN.*
Logger
logger.FQDN.*
Apache Accumulo Installation Guide | 23
Troubleshooting
Service
Base Log Name
Master
master.FQDN.*
Monitor
monitor.FQDN.*
Tracer
tracer.FQDN.*
TabletServer
tserver.FQDN.*
Review the logs on the Master as well as the TabletServers if you encounter issues.
Example: Troubleshooting missing native libraries for tarball installations
If the native libraries Accumulo relies on aren't in /usr/lib/accumulo/lib/native, the
TabletServers will throw an error (yet continue to run). You can see this by running the following
command after starting a TabletServer where /usr/lib/accumulo/lib/native doesn't exist:
$ grep ERROR /var/log/accumulo/tserver_localhost.localdomain.log
2013-08-28 10:28:15,813 [tabletserver.NativeMap] ERROR: Failed to
load native map library
/usr/lib/accumulo/lib/native/map/libNativeMap-Linux-amd64-64.so
To fix this error, run the following commands to rebuild the native libraries Accumulo needs, and then
restart your TabletServer:
$ sudo make -C /usr/lib/accumulo/src/server/src/main/c++
$ sudo -i -u accumulo /usr/lib/accumulo/bin/tdown.sh && \
sudo -i -u accumulo /usr/lib/accumulo/bin/tup.sh
If you look at the /var/log/accumulo/tserver_localhost.localdomain.log file, you will see
there are no additional entries related to the missing library.
Note:
If you haven't previously compiled native libraries, you may need to install additional packages via
the yum command in order to build them:
sudo yum install gcc-c++ glibc-devel libstdc++-devel
24 | Apache Accumulo Installation Guide
Creating a Local Yum Repository
Creating a Local Yum Repository
This section explains how to set up a local yum repository that you can then use to install Accumulo on
the machines in your cluster. There are a number of reasons you might want to do this, for example:
•
•
•
The computers in your cluster may not have Internet access. You can still use yum to do an
installation on those machines by creating a local yum repository.
You may want to keep a stable local repository to ensure that any new installations (or reinstallations on existing cluster members) use exactly the same bits.
Using a local repository may be the most efficient way to distribute the software to cluster
members.
To set up your own internal mirror, do the following.
Note:
Before You Start
These instructions assume you already have the appropriate Cloudera repo file on the system on
which you are going to download the local repository. If this is not the case, follow the instructions
under To add the Accumulo repository:.
1. On a computer that does have Internet access, install the yum-utils and createrepo
packages if they are not already installed (yum-utils includes the reposync command):
$ sudo yum install yum-utils createrepo
2. On the same computer as the previous step, download the yum repository into a temporary
location. On Red Hat/CentOS 6, you can use a command such as:
$ reposync -r cloudera-accumulo
Note:
cloudera-accumulo is the name of the repository on your system; the name is in square
brackets and usually is on the first line of the repo file, which in this example is
/etc/yum.repos.d/cloudera-accumulo.repo.
3. Copy all of the RPMs to the machine that will serve the local repository and place them in a
directory served by your web server. For this example, we'll call it
/var/www/html/accumulo/1.4.4/RPMS/x86_64 (or i386 for 32-bit systems). Make sure
you can remotely access the files in the directory you just created (the URL should look like
http://<yourwebserver>/accumulo/1.4.4/RPMS/).
Apache Accumulo Installation Guide | 25
Creating a Local Yum Repository
4. On the server from step three, go to /var/www/html/accumulo/1.4.4/ and type the
following command:
$ createrepo .
This will create or update the necessary metadata so yum can understand this new repository
(you will see a new directory named repodata).
Important:
Check the permissions of the subdirectories under /var/www/html/accumulo/1.4.4/.
Make sure they are all readable by your web server user.
5. Edit the repo file you downloaded previously and replace the line starting with baseurl= or
mirrorlist= with baseurl=http://<yourwebserver>/accumulo/1.4.4/
6. Save this modified repo file in /etc/yum.repos.d/, and check that you can install Accumulo
through yum.
Example:
$ yum update && yum install accumulo
Once you have confirmed that your internal mirror works, you can distribute this modified repo file to all
your machines, and they should all be able to install Accumulo without needing access to the Internet.
Follow the instructions under Step 2: Install Accumulo.
26 | Apache Accumulo Installation Guide