1
GEPppliances.com
Safety Instructions
Operating
. .......
2, 3
Instructions
El) W3000
Care and Cleaning
...........
Control Panels ...............
Control
Settings
Flashing
Display
.............
i,ights
Loading the
Dishwasher
Racks
Place
Optional
Accessories
Settings
the Dishwasher
Troubleshooting
G5I) 5400
5
G5I) 5560
6
G51) 5 600
G51) 5 5 00
GSD 5 700
..........
Loading
Using
........
11
4
8, 9
.......
.........
12
.......
6, 7
Tips ....
Consumer Support
Consumer Support...
Warranty ..................
GSD5800
10
GSD5900
13, 14
Back Cover
15
0
Write the model and serial
numbers here:
Model #
Serial #
You can find them on a label on the
nab wall just inside the dooL
165D4700P249
49-5923
11-01Jfl
IMPORTANTSAFETYINFORMATION.
READALLINSTRUCTIONSBEFOREUSING.
A WARNING!
For your safety, the information in this manual must be followed to minimize the risk of fire
or explosion, electric shock, or to prevent property damage, personal injury, or death.
WATERHEATER
SAFETY
Under certain conditions hydrogen gas may be produced in a water heater that has not been
used for two weeks or more. HYDROGEN GAS IS EXPLOSIVE.
If the hot wateI has not been used foi two weeks oi moie, pievent tile possibility of damage oi
i_jmy by turning oil all hot watei faucets and allow them to Iun foI seveial minutes. Do this
befoie using any electrical appliance which is connected to tile hot water system. This simple
piocedme will allow any built-up hydiogen gas to escape. Since tile gas is flammable, do not
smoke oi use an open flame oi appliance dming this piocess.
Use this appliance only for its intended purpose as described in this Owner's Manual.
%
PROPER
INSTALLATION
AND MAINTENANCE
This dishwasher must be properly installed and located in accordance with the Instaflation
Instructions before it is used. If you did not receive an Installation Instructions sheet with
your dishwasher, you can receive one by visiting our website at GEApplianees.eem.
• Gonnect m a gnotmded
metal, pei_nanent
wi_ing sysmm; oi run an equipment-giounding
conductoi
with tile ci_cuit conductors
and
connect m tile equipment-giounding
oI lead of the appliance.
mmdnal
• Impropei connection of file equipmentgnounding conducmi can result in a iisk of
elecuic shock. Gheck with a qualified elecuician
oi seivice iepresenmtive if you aIe in doubt
whetheI tile appliance is pIopeIly gIounded.
• Use supply conductoIs
(167°F).
Iated at least 75°(;
• Dispose of discaIded appliances and shipping
oi packing mateiial propeily.
• Do not attempt to repair oI ieplace any pait
ofyoui dishwasheI unless it is specificaUy
iecommended in this manual. All othei
servicing should be refeITed m a qualified
mchnician.
• To minimize die possibility of elecuic shock,
disconnect this appliance flom the power
supply before attempting any mainmnance.
NOTE'.Turning tile dishwasheI off"does not
disconnect tile appliance flom tile poweI
supply. We iecommend having a qualified
mchnician seIMce youI appliance.
A WARNING!
DONOT...
• Do not tampei with contiols.
• Do not abuse, sit on, oi stand on tile dooi oi
dish i_ck of tile dishwasheL
• Do not discard a dishwasher without fi,st
iemoving tile dooi of tile washing compaitment.
• Do not stoie oi use combustible materials,
gasoline oi othei flammable vapors and liquids
in tile vicinity of this or any othei appliance.
2
• Do not allow children to play around dishwashei
when opening oi closing dooi due to the
possibility of small fingeis being pinched in dooL
• Do not allow chilchen to play with, oil oi around
this appliance or any discaided appliance.
GEAppliances.com
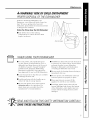
A WARNING!RISK OFCHILDENTRAPMENT
PROPER
DISPOSAL
OFTHEDISHWASHER
.]unked or abandoned
dishwashers are
dangerous...even
if they will sit for "just a few
days." If you are getting rid of your old
dishwasher, please follow the insuuctions below
to help prevent accidents.
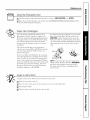
Before You ThrowAway Your Old Dishwasher:
• Take off the door of the washing
compartment
or remove the door latch
keeper (as shown).
Door/atch keeper
WHENUSINGYOURDISHWASHER
• Use only powdex, robs, liquid detergents
or rinse agents recommended
for use in a
dishwasher and keep them out of the reach
of children. Cascade :, Cascade Complete :
and ElectrasoU Automatic Dishwashing
Detergents, and.let-Dry _:rinse agent have
been approved for use in all GE dishwashers.
• I,ocate sharp items so that they are not likely
to damage the door seal.
• Load sharp knives with the handles
reduce the risk of cut-type i_juries.
up to
• Do not wash plastic items unless marked
dishwasher-safe or the equivalent. For
plastic items not so marked, check the
manufacturer's
recommendations.
• Non-Dishware Items: Do not wash items such
as elecuonic air cleaner filters, fllrnace filters
and paint brushes in your dishwasher.
Damage to dishwasher and discoloration
or staining of dishwasher may result.
• Do not touch the heating
immediately after use.
element
during or
• Do not operate your dishwasher unless all
enclosure panels are properly in place.
• Close supervision is necessary if this
appliance is used by or near children.
• Load light, plastic items so they will not
become
dislodged
and drop to the bottom
of the dishwasher--they
might come into
contact with the heating
element
and be
damaged.
READAND FOLLOWTHISSAFETYINFORMATIONCAREFULLY.
SAVE THESEINSTRUCTIONS
3
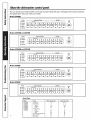
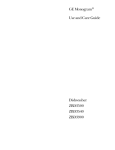
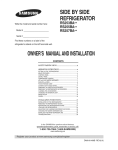
About the dishwasher controlpanel
You can locate your model number on the tub wall just inside the door. Throughout this manual, features
and appearance may vary from your model.
Model EDW3000
STATUS
LOAD SELECTIONS
OPTIONS
CLEAN
|
SENSING
|
WASHING
|
RINSING
|
DRYING
|
SANITIZED
CleanSensor
C"1/'_'"S/I"Cq/GHYSjALI/
WA:"
/l0":J__=Y_J/(ZT'MES)LJI
START
j
Models GSD5500 and GSD5560
STATUS
|
SENSING
|
WASHING
|
RINSING
|
DRYING
|
SANITIZED
LOAD SELECTIONS
OPTIONS
CLEAN
CleanSensor
Is'.,
1I.O'TS
l/..oo'.J
[_..'.
1I_.o'.
l/...',
1_I _o'.
11
=o.'.:.
1
0
@
w'.sN//'_Ns//"C°LI/GHYSIAL//WAZ//
o,:// %Y
JI'""..'"JISTA.."TJ
Models GSD5600 and GSD5700
STATUS
|
LOAD SELECTIONS
SENSING
OPTIONS
CLEAN
CleanSensor
@
WASHING
SPEED
RINSING
t
_
Jt
_
J_
Am.
LOCK
BELAY
GN.NA
SPEED
...SE
/O.y/F"""'//STA"TI
NORMA
DRYING
CRYSTAL
Jt
_
WASH
Jt
_
ONLY
J_
Am.
Jt
_
J_
Am.
Jt
_
J
SANITIZED
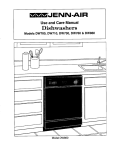
Model GSD5800
STATUS
LOAD SELECTIONS
OPTIONS
CLEAN
|
SENSING
|
WASHING
|
RINSING
|
DRYING
|
SANITIZED
CleanSensor
I
O
I
O
I
248
/w,sN/I,_NSII"Cq/CHYS2AL//WAZ
JlC_l DRY,_L_Ji_ START_J
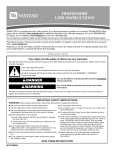
Model GSD5900
STATUS
LOAD SELECTIONS
OPTIONS
CLEAN
|
SENSING
|
WASHING
|
RINSING
|
DRYING
|
SANITIZED
CleanSensor
l w':I/"/."s//C°II'"_'L'_I/w'L"/L_
_i
o l_i
STAR
Cycle Chart
4
Model
Cycle
EDW3000,
GSD5500,
GSD5560,
GSD5600,
GSD5700,
GSD5800,
GSD5900
SaniWash
Pots & Pans
Heavy
Medium
Light
Normal Wash
Heavy
Medium
Light
Speed Wash/Light Wash
China Crystal
Rinse Only
Water
Usage (gal.)
Cycle Time (rain.)
8.5
56-101
11.5
9.9
8.2
70-85
65
61
9.9
8.2
6.6
8.3
6.6
1.6
7O
62
56
39
34
5
GEAppliances.com
ControlSettings
O
he Status
TheStatus
display tells you what is happening while the dishwasher is in operation and also any malfunctions if they occur (see page 6). Thelights
will come ONindicating the sequence of operation the dishwasher is in.
SENSING DisplayedduringperiodsusingCleanSensor
technologyto measurethe amountof soil inthe loadanddecideif anotherprewash
is needed.The SENSING
light is displayedonlyduringNORMALandPOTS& PANScycles.
WASHING Displayedduringprewashand mainwashperiods.
RINSING Displayedduringrinse periods.
DRYING DisplayedduringSPEEDDRYING/HEATED
DRYING.
SANITIZED Displayedwhencyclehasmet sanitizationconditions.LightremainsONuntildoor is opened.
O
Load
Selections
The lightabove
the selected pad will be ON to indicate
which LOADSELECTIONhas been selected.
SANIWASH Thiscycleraisesthe water temperatureinthe final rinseto sanitizeyourdishware.The cyclelengthwill varydepending
on thetemperatureof yourinlet water.
NOTE:TheSaniWashcycleis monitoredfor sanitizationrequirements.If thecycleis interruptedduringor after the mainwash
portionor if the incomingwater temperatureis so lowthat adequatewater heatingcannotbeachieved,the sanitizingconditions
will not be met.Inthesecases,the sanitizedlightwill not illuminateat the endof the cycle.
POTS& PANS Forheavilysoileddishesor cookwarewith dried-onor baked-onsoils. Everydaydishes may be included.
This cycle will not removeburned-onfoods.
NORMAL Forloadsof everydaydishes,glassesandcookwarewith mediumsoils. NOTE:Many disheshave lighter soil thannormal.
Choosinga cycle otherthan NORMALwill saveenergyand water.
SPEEDWASH/ Fordishes with light soils.
LIGHTWASH
CHINA CRYSTAL Forlightly soiled chinaand crystal.
RINSEONLY Forrinsing partial loadsthat will be washed later.Do not use detergent.
O
Options
The light above the selected pad will be ON to indicate
which OPTIONhas been selected.
POWER Foruse with heavilysoiled and/or dried-on,baked-onsoils.This option MUSTbe selectedPRIORto startingthe cycle.
PRESOAK This option adds 16minutes to the cycle time.
SPEEDDRY/ Shutsoff the drying heatoption. Dishesair dry naturallyandenergyis saved.Youcan propthe dooropenafter the
HEATEDDRY CLEANlight illuminates.
OFF
SPEEDDRY/ Turnsthe heateron for fast drying.This cycle will extendthe time to your washcycle by23 minutesfor the NORMAL
HEATEDDRY cycleand 30 minutesfor the SAM WASHcycle.NOTE:Cannotbe selectedwith RINSE ONLYcycle.
ON
LOCK WhentheLOCKpadis touchedtwicewithin3 seconds,all padsbecomeinoperative.Youcanlockthecontrolstopreventanyse/ections
from
beingmade.Oryoucanlockthecontrolsafteryouhavestartedacycleor selectedDELAYSTARTsothecycleorDELAYSTARTis notinterrupted
Children cannot accidentally start dishwasher by touching pads with this option selected.
Tounlockthe dishwasherafter it hasbeenlocked,touchthe LOCKpadtwice within3 seconds.ThelightabovetheLOCKpadwill turn off.
DELAYSTART Youcan delay the start of a washcycle for up to 8 hours.Pressthe DELAYSTARTpadto choosethe numberof hoursyou want
to delay the startof thecycle.Themachinewill countdown andstartautomaticallyat the correcttime. Pressingthe START/RESET
buttonwill cancel the DELAYSTARTselection.NOTE:If you forget to latchthe door,a remindersignalwill beepuntil you doso.
RESET Tochangea cycle after washingstarts, touch the START/RESETpadto cancel the cycle. After water is pumpedout and the
motorstops, you can reprogramand restartthe dishwasher.This will take approximately90 seconds.
O
Start
(]lose and latch the d(x)E ToudJ
the START/RESETpad
to begfin the cycle. _/\atev fill begfins, and apI)voximatelv
40 seconds
later fl-Je _tsl-J action begins.
NOTE."The dislnxetshev vememl)el_
your l_tst cycle st) you don't have to vepvog'l_,Hn each time. ¼]len the dislnx¢_shev is loaded
and flle dt×w latch is in flle locked position, the control panel lights will be ON and display the l_Lstsetting:s you mlected.
If you don't
*xemt to chang_
any of the setting:s, simply touch
flle STARTfflESETpad
to l)eg{n flle cycle.
Also, if a power failure occul3, NORMAL and SPEED DRY/HEATEDDRYwall automatically
selections and touch the START/RESETpad to beg_n the cycle.
O
be pvog'lammed.
Clean
This light is illuminated
when
a wash cycle is complete.
The
light will sta_ 0Nuntil
the door
is opened.
Make any new
5
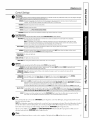
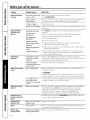
Flashingdisplaylights.
StatusLights
i STATUS
_ENS+G
What It Means
CLEANSENSOR
Error
_ WASHING
m RINSING
|
DRYING
|
SANITIZED
STATUS
_
|
If the sensing light doesn't come on during the fi,st part of the NORMALor
POTS& PANS cycles, the CLEANSENSOR is not working. Call for service. The
dishwasher will continue m work without the CLEANSENSOR.
NOTE:This light will NOT stay on the entire cycle.
START/RESET
pad
SENSING
_;;:;:+
What ToDo
has been
Allow tap to 90 seconds for the dishwasher to drain and reset before selecting
a new cycle.
pressed
DRYING
| SANITIZED
STATUS
Control
Error
SENSING
_ WASHING
Press the STARTIRESETpad
to turn off the beepeL Turn off power at the circuit
breaker for 10 seconds, then restore poweL If the rinsing light continues to
flash, then call for service.
_ DRYING
|
SANITIZED
PLUS A
BEEPING
SOUND
STATUS
Control or Sequence
SENSING
I WASHING Switch Error
0Y,N°
_ RINSING
i
Press the START/RESET
pad to turn off the beeper and the dishwasher +viii
attempt to reset. Then restart the w_tsh cycle. If dfis error continues, call
for sean'ice.
SANITIZED
PLUS A
BEEPING
SOUND
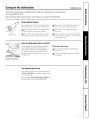
Usingthe dishwasher.
Checkthe WaterTemperature
The enmaing wamr must be at least 120°F and
not more than 150°F for effbctive cleaning and m
prevent dish damage. Check the wamr mmperamre
with a candy or meat thermometeL Turn on the
hot wamr faucet nearest file dishwashea; place
the themlomemr in a glass and let the water run
continuously into the glass until the temperature
stops rising.
UseJet-Dry+ RinseAgent
Jet-DrlF rinse agent removes spots and prevents new fihn buildup on your dishes, glasses,
flatware, cookware and plastic.
Filling the Dispenser
Fill the rinse agent dispenser until it reaches the bottom
of lip inside the opening. Replace cap.
To check if rinse agent is needed, press the clear cenmr
of the fill cap 2 or 3 times. If rinse agent fills the cenmr
of the cap, you have enough.
A full dispenser shouldlast about one month.
If rinse agent spills, wipe up the excess.
6
GEAppliances.com
UsingtheDishwasherDoor
_The
door
must be closed and locked
into place to select a LOAD SELECTIONor an OPTION.
If the door is opened during a cycle and left open,
....
- door is closed and latched into place.
the dishwasher will beep once every minute until the
ProperUseof Detergent
Use only detergent
specifically made %r use in
dishwashers. Cascade':, Cascade': Complete and
Elecmtsol c_Automatic Dishw;Mling Detergents have
been approved for use in all GE dishwashers. Keep
your detergent fresh and dry. Don't put p(swder
detergent into the dispenser until you're ready to
wash dishes.
The amount of demrgent m use depends on
whether your wamr is hard or soft. With hard wam_;
you need extra demIgent. With soft wam_; you
need less demrgent.
Promct your dishes and dishwasher by contacting
your wamr department and asking how hard your
water is. Twelve or more grains is exuemely hard
wamr. A water softener is recommended. _&qtbout
it, lime can build up in the wamr valve, which could
stick while open and cause flooding. Too much
detergent with soft water can cause a pemmnent
cloudiness of glassware, called etching.
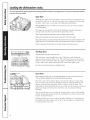
You'll find two detergent dispensei3 on the inside
door of your dishwasher. All wash cy'cles-except
RINSE0NtF-require detergent in the main cup.
_hsh cy'cleswith two washes will also use the open
cup. When using automatic dishwashing detergent
robs, simply place one mb in the main cup and
close.
Opencup_
NOTE:To open demrgent cup after it has been
closed, unlatch the dooL Press the
pad three times within two seconds and the
demxgent cup will release. A snapping sound
may be heard.
START/RESET
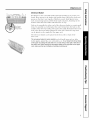
to Add a Dish?
A fb,gotten
dish can be added any time before the main wash.
Push
file door latch to file left.
Once
file water calms, open
Add fbrgotten
_
the door
Steam
may rise out of file dishw_Mler
dishes.
Close the door and push the latch to the far right.
7
Loadingthe dishwasherracks.
For best dishwashing results, follow these loading guidelines. Features and appearance of racks and silverware baskets
may vary from your model
Upper Rack
Although the upper rack is for glasses, cups and saucers, pots and pans can
be placed in this rack for eft>ctive cleaning. Gups and glasses fit best along
the sides. This is also a secure place for dishwasher-safe plastics.
The cup shelf (on some models)
to add flexibility.
may be placed in the up or down position
The upper rack is good for all kinds of odd-shaped utensils.
mixing bowls and other items should be placed face down.
Saucepans,
Securelarger dishwasher-safe
plastics overtwo fingerswhenpossible.
Make suresmallplastic itemsare secureso they can't fall onto theheater.
Be surethat itemsdo not protrudethroughthe bottomof therack and blockrotation of the
middlesprayarm. Thiscouldresult in poor washperformancefor itemsin the upperrack.
Checkto makesure that tall itemswill not blockrotation of the top washarm.
The Wash Tower
Keepthe centerareaclear in the lower rack.
The wash tower rises through the center of the lower rack during the
wash and rinse portions of the cycle. The wash tower shoots water into the
midqevel wash arm located under the upper rack. Blocking the wash tower
could result in poor wash performance
for items in the upper rack.
Don'tblock or load tall thingsnext to the WashTower.
Lower Rack
Whenloadingthe lower rack,do not load largeplatters or traysin the front right corner.
Theymayprevent detergentfrom circulatingduring the washcycle.
The lower rack is best used for plates, saucers and cookware. Large items
such as broiler pans and racks should go along the rightqmnd side. Load
platters, pots and bowls along the sides, in corners, or in the back. The
soiled side of items should face the center of the rack. If necessary, oversized
glasses and mugs can be placed in the lower rack to maximize loading
flexibility.
Also, be careful not to let a portion
of an item such as a pot or dish handle
extend through
the bottom
rack. This could block the wash arm and result
in poor wash performance.
Fold-down fingers (on some models) provide flexibility for extra-large and
hard-to-fit items. The fingers may be left in the up position or folded down
to customize the lower rack.
8
GEAppliances.com
Silverware Basket
Put flatware in the removable
basket with knife handles
up to protect your
hands. Place spoons in the basket with handles
down. Mix knives, forks and
spoons so they don't nest togethei.
Distribute
evenly. Small plastic items,
such as measuring
spoons and lids flom small containers,
should go in the
bottom
of the silverware basket with silverware
on top.
Don't let any
item extend
through bottom,
I,ids can be assembled to either end of the silverware basket to contain small
items. To assemble an end lid, place the outer lid stud into the hole on the
outside of the silverware basket. Then place the inside lid stud into tim inner
hole in the silverware basket. Repeat for other side if desired. Long items
can be placed on the cupshelf in the upper rack.
The silverware basket can be placed in the flont, side or back of the
lower rack.
The accessory basket (on some models) can hold small items such as: baby
bottle nipples, plastic lids, corn cob holders, etc. It can hang from the top hoop
of the upper rack along the right side or it can also hang on the right or left side of
the lower rack. When hanging the accessory basket on the right side in the upper
rack, make sure the top is closed and nothing is sticking out.
9
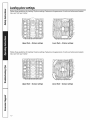
Loadingplace settings.
Follow these guidelines for loading 10 place settings. Features and appearance of racks and silverware
may vary from your model
Upper Rack--lO place settings
Lower Rack--lO place settings
Follow these guidelines for loading 12 place settings. Features and appearance of racks and silverware
may vary from your model
Upper Rack--12 place settings
10
baskets
Lower Rack--12 place settings
baskets
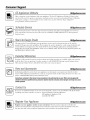
Caring for the dishwasher.
GEPppliances.com
To clean the control panel use a lightly dampened cloth then dry thoroughly. To clean the exterior
use a good appliance polish.
Never use sharp object, scouring pads or harsh cleaners on any part of the dishwasher.
Protect Against Freezing
If your
dishwasher
is left in an unheated
during
tile winteL
ask a service
place
technician
to:
D,.i.w.te, f_o,ntl,e i.letli.e a.d w.te,
..... vane. (Use a pan to catch the water)
tl,e w.te,i.letli.etotl,e
_:_;ii
cL,tof_elect,ical
po,,,_e,
totl,edish,,,_.she,: Reco..ect
water valve.
.......................
Remove
Sumpcoverscrews
Twotypesof
air gaps
fuses
or trip
circuit
Tmn off tl, e water supply
tl, e water inlet line flom
breaker
and disconnect
the water vane.
!:_ Remove the plastic sump cover in tl, e mb
.......................
bottom and tlse a sponge to soak up water
in tl,e rubber boot.
Does Your Dishwasher Have an Air Gap?
An, ah gap protects your
wamr backing up into it
The air gap is not a part
It is not covered by your
plumbing
codes require
not have one.
dishwasher
against
if a drain clogs.
of the dishwasheL
warranty. Not all
air gaps, so you mW
Theair gap is easytoclean.
!:_iiiTu,n off tt, e dishwashe, and lift off tt, e
chIoII,
Unscrew
e coveI;
the
plastic
cap
and
clean
with
.......................
a tood,pick.
Checktheak gapany t/kneyour
dishwasherisn'tdra/hingwell.
The Stainless Steel Panels
The stainless steel panels can be cleaned Mth
Stainless Steel Magic or a similar product using
a clean, soft cloth.
You can order StainlessSteel Magic #WXIOXI5
du-ough GE Parts by calling 800.626.2002.
11
About optional accessories.
You can change the door and lower access
panel appearance of your dishwasher by
ordering one of these optional accessories:
1/4" Wood Panel Trim Kit
These accessories are available at extra cost
(VISA,MasterCard or Discover cards accepted)
by calling 800.626.2002.
Specify accessory number when ordering.
3/4" Trimless Wood PanelKit
Descriptionsof OptionalAccessories
Woodpanel trim kit-This accessory contains
trim and instructions for you to supply and install
•
a 1/4 ,,z duck
decoratwe wood door and lower
access panel:
GPF425A (Almond)
GPF425B (Black)
GPF425C(Bisque)
GPF425W (White)
NOTE: The GPF100dishwasher door spring kit
must also be ordered and installed when the
Trim/ess wood panel kit-This accesso U contains
parts and instructions for you to supply and install
a 3/4" thick decorative wood door and lower
access panel:
GPF475
NOTE: The GPF100dishwasher door spring kit
will be included with the ,rimless wood panel kit
and must be installed with it.
door panel weighs four Ibs. or more.
About rack accessories.
BabyBottleHolder
PartNumber:WX69X200
Preventsmovementof baby bottles during the
dishwasher cycle
Snapseasily onto any dishwasher upper rack
Eliminateshand washing
Forbest results,the
BabyBottle Holder
shouldbe instafled
on the upperrack
of the dishwashe_
12
Fitsall baby bottles
Youcan order a package of 5 Baby Bottle Holders,
at extra cost, by calling 800.626.2002,
or through the
Intemet at GEAppliances.com(Visa,MasterCard or
Discover cards accepted).
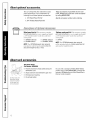
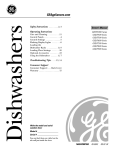
Beforeyou call forservice..,
aApp/iances.com
Save time and money! Review the charts on the following pages,
Troubleshooting
-tips
or
visit GEAppliances.com.
Youmay not need to call for service.
Problem
Possible Causes
What To Be
Controlpanel lights go
off when you're setting
controls
Time too long between
touching of selected
pads
* Each pad must be totmhed within 30 seconds of tile others.
touch any pad again, or unlock and relatch tile do(m
* Try resetting tile START/RESETpad.
Controlpanel responded
Door latch may not be
to inputs, but dishwasher properly seated
never filled with water
* Call for service.
Dishwasher
Fuse is blown, or the
circuit breaker tripped
* Replace fhse or reset circuit breakeI:
flom tile circuit.
• Try resetting tile START/RESETpad.
Some of the sounds
you'll hear are normal
* Soft _od disposal shredding
action°
* Drain xalve opening to pmnp water out.
won't run
Noise
Remove
To relight,
any other appliances
• Timer control as cycle progresses.
• Deteigent
c up opening.
• Tile motor stopping duiJng the (hying peiiod.
• Water draining out of tile aft) immediately
aRer you touch
tile
SrARr/RESEr
pad.
Utensils are not secure
* Make sure eveiything
is secured
ill dishw_MleI:
in the rack or something
small has dropped into
the rack
Motor
hums
• Dishwasher
has not been used on a regular basis, ff you do not use
your dishwasher
of Yen, set it to fill and pump out once every week.
This will help keep the sea/moist
and the garbage disposer cleaI:
Water standing in
the bottom of the tub
This is normal
* A small amount of clean wamr around the outlet (m the alb bottom
at the back of the alb keeps the wamr sea/lubricamd.
Water won'tpump
Drain is clogged
* If you have all air gap, clean it.
Out of the tub
* Check to see if your kitchen
a plumbeI:
• If file dishwasher
Sudsin the tub
Stained tub interior
Dishes don't dry
drains
sink is draining
into a disposeI;
well. If not, you may need
run disposer
cleaI:
Correct detergent
wasn't used
* Use only automatic
dishwasher
deteIgems
to avoid sudsing.
Cascadd:, Cascade <':Complem and Electrasol <':Automatic
Disbwasbing
DemIgents
have been approved
for use ill NI (;E dishwashers.
* To rein(we suds f}onl the alb, open tlle dishwasher
and let suds
evapoIam. Add 1 gNlon of cold wamr to tile alb. Close and lamh tile
dishwashel: Pump out wamr by pressing tile START/RESETpad; then
immedimely
press tile START/RESETpad again. Repeat if necessary.
Rinse agent
was spilled
* Ah,vays wipe up Iinse agent
Detergent with
colorant was used
* Some detergents
conmhl coloiant
(pigment or dyes) dial will discolor
the alb inmIior with exmnded
use. Check the demrgent
cup for signs
of ally discoloration.
If cup is discolored,
change to demIgent without
ally colorant. Cascade <:,Cascade <':Complem and Electrasol <':Automatic
Dishwasbing
Demrgems
have been approved
for use ill all
GE dishwashers.
Some tomato-based
foods can stain
* Use of tile RINSE ONLY cycle (on some models)
to the load call decrease the level of staining.
Low inlet water
temperature
* Mal<e sure inlet water mmperaalre
is correct.
* Select SPEED DRYer HEATED DRY.
Rinse agent dispenser
is empty
* Check
the rinse agent
spills immediately.
after adding
die dish
dispensei:
] o°
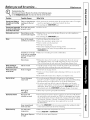
Before you call for service...
Problem
Possible Causes
What ToDo
Dishes and flatware
not clean
Inlet water temperature
is below 120°F
* Raise the water heater
* Use HI TEMP WASH.
Water pressure is
temporarily
low
* Turn on a fhucet. Is water coming ()tat more slowly than usual? If so,
wait until pressure is normal befk)re using your dishwasher
Air gap is dogged
* Clean
Improper
* Make sure large dishware
rack loading
_'V_kqh
Spotsand filming
on glassesand
flatware
Extremely
hard water
Low inlet water
temperature
Overloading
dishwasher
Improper
the
the mr gap.
does not block the demrgent
dispenser
or the
_t/'IIIS.
* Use Jet-Drg _ rinse agent to remove spots and prevent new film
build-up.
* To remove stubborn
spots and pre-existing
film fiom gl_ssware:
I Remove all metal tatensils fiom the dishwasher
3 Select the longest
loading
cycle.
4 Start the dishwasher
and allow to run fbr 18 to 22 minums.
Dishwasher will now be in file main w_ksh.
Rinse agent dispenser
empty
Open file door and pour
bottom of the dishwasher
Too little detergent
Close file door and allow to complete file cycle. If vinegar aJnse
doesn't work: Repeat as above, except use 1/4 cup (60 ml) of ciuic
acid crystals insmad of vinegar
Combination
of soft
water and too much
2 cups (500 ml) of white vinegar
into the
* This is called etching and is permanent. To prevent fllis flom
happening, use less demrgent if you have sof_ wamr Wash glassware
the shortest cycle that will get them clean.
detergent
Yellowor brownfilm
on tub
to 120°K
2 Do not add demrgent.
Old or damp powder
detergent
Cloudiness
on
glassware
temperature
Water temperature
entering the dishwasher
exceeds 150°F
* Lower
Tea or coffee
* Remove die stain by hand,
3 cups warn1 wamr
stains
file water heater
temperature.
using a solution
of 1/2 cup bleach
and
WARNING
Befbre cleaning inteaioa; wait at least 20 minutes after a cycle fkn the
heating element to cool down. Failure to do so can result in burns.
*A special filter in file water supply line is file only way to correct fills
problem. Contact a wamr softener compan>
An overall yellow or
brown f'flm can be
caused by iron deposits
in water
White film on inside
surfaces
Hard
water minerals
* To clean die interiox; apply dishwasher
demrgent
to a damp sponge.
Wear rubber gloves. DO not use any type of cleanser other than
dishwasher
demrgent
because it may cause fknmling or sudsing.
Cascade _':,C_scade _':Complem and ElectrasoY': Dishwashing
Detergents
have been approved
fk_r use in all (;E dishwashers.
Detergent cup lid
latched accidentally
by user
* Unlatch
seconds.
* Reposifion
Detergent left in
dispenser cups
Dishes are blocldng
detergent
cups
Steam
This is normal
* Steam comes through
the vent by the door
when water is being pumped
out.
Black orgray
marks on dishes
Muminum
utensils have
rubbed against dishes
* Remove
/4
the
the do(n: Press the START/RESETpad three
The detergent
cup will taJp.
times within
two
the dishes.
marks with a mild, al)rasive
cleaner
latch during
dating
and
ial
GEDishwasher Warranty.
All warranty service provided by our Factory Service Centers,
or an authorized Customer Care® technician. Toschedule service,
on-line, 24 hours a day, visit us at GEAppliances.com, or carl
800.GECARES (800.432.2737).
For The Period Of:
Staple your receipt here.
Proof of the original purchase
date is needed to obtain service
under the warranty.
GE Will Replace:
OneYear
Fromthe date of the
original purchase
Anypart of file dishwasher which fails due to a defect in materials or workmanship.
During
this full one-year warranty, GE will also provide, free of charge, all labor and in-home sexMce
to replace the defective part.
SecondYear
Fromthe date of the
original purchase
Anypart of the Water Distribution System which fails due to a defect in materials or
workmanship.
Associamd inlet and drmn plumbing
parts are not covered by this warmntT:
Dining this second-year limited warranty,you will be responsible
for any labor or in-home
sexMce costs.
Five Years
Fromthe date of the
original purchase
Theelectroniccontrolmodule,if it should fail due to a defect in materi_ds or workmanship.
During this five-year limited warranty,you will be responsible for any labor or in-home
sexMce costs.
TenYears
Fromthe date of the
original purchase
The PermaTuf®tub or door liner,if it fails m contain water due m a defect in materials or
workmanship. During this full warranty,GE will also provide, free of charge, all labor and
in-home sexMce m replace the defective part.
What Is Not Covered'.
• Service
the
trips
• Improper
• Failure
other
to your
home
to teach
you
how
• Damage to the product
or acts of God.
to use
product.
installation.
of the
product
than
the intended
• Replacement
breakers.
of house
if it is abused,
purpose
fuses
misused,
or used
or resetting
or used
commercially.
for
caused
• Incidental
or consequential
defects with this appliance.
• Cleaning or servicing
drain line.
by accident,
damage
fire, floods
caused by possible
of the air gap device in the
of circuit
This warranty is extended to the original purchaser and any succeeding owner for products purchased for home
use within the USA. In Alaska, the warranty excludes the cost of shipping or service calls to your home.
Some states do not allow the exclusion or limitation of incidental or consequential damages. This warranty gives
you specific legal rights, and you may also have other rights which vary from state to state. To know what your
legal rights are, consult your local or state consumer affairs office or your state's Attorney General
Warrantor: General Electric Company.Louisville, KY 40225
15
ConsumerSupport.
GEAppliancesWebsite
GEAppliances.com
Have a ques0on or need assistance widl your appliance? T1T die GE Appliances Website 24 hours a day,
any day of file year! For greater convenience
and faster selMce, you can now download Owner's Manuals,
order parts, catalogs, or even schedule
se_Mce onqine. You can also "Ask Our Team of Experts"*"
your ques0ons,
and so much more...
ScheduleService
GEAppliances.com
Expert GE repair service is only one step away from your door. Get on-line and schedule your service tit
your convenience 24 horns any day of the year[ Or call 800.GE.CARES (800.432.2737) dining normtfl
business
hours.
RealLife DesignStudio
GEAppliances.com
fIE supports the Universal Design concept-products,
se_Mces and environments dmt can be used by
people ofaU ages, sizes and capabiliOes. We recognize the need m design for a wide range of physical and
mental abili0es and impairments. For details of GE's Universal Design applica0ons, including kitchen
design ideas for people with disabili0es, check out our Websim today. For the hearing impaired, please caU
800.TDD.GEAC (800.833.4322).
ExtendedWarranties
GEAppliances.com
Purchase a GE extended warranty and learn about special discounts that are available while your warranty
is still in efl)ct. You can purchase it on-line anytime, or call 800.626.2224 during normtfl business hours.
GE Consumer Home Se_qces will still be there after your warranty expires.
PartsandAccessories
GEAppliances.com
IndMduals qualified to service their own appliances can have parts or accessories sent directly to their
homes (VISA, MasterCard and Discover cards are accepted). Order on-line today, 24 hours every day or by
phone at 800.626.2002 during nomml business horns.
Instructionscontainedin this manualcoverprocedurestobe performedbyanyuser.Otherservicing generally
shouldbe referredto qualifiedservicepersonnelCautionmustbe exercised,sinceimproperservicingmay cause
unsafeoperation.
ContactUs
GEAppliances.com
If you are not satisfied wifll die service you receive flom GE, contact us on our Websim wifll till die derails
including your phone numbe_; or w_im m: General Manage_; Customer Relations
GE Appliances, Appliance Park
Louisville, KY 40225
RegisterYourApplbnce
GEAppliances.com
Register your new appliance on-line-at your convenience! Timely product regdstration will allow for
enhanced communica0on and prompt se_ice under the terms of your warranty, should the need raise.
You may also mail in the pre-printed regdstration card included in the packing material.
Printed in the United States