1
Washing Machine
OWNER'S MANUAL
WD-1021WFH/1041WFH/1045FH
Thank you for purchasing LG Fully Automatic Washer.
Please read your owner's manual carefully, it provides
instructions on safe installation, use and maintenance.
Retain it for future reference.
Record the model and serial numbers of your washing machine
Contents
Product Features/BS Plug Safety Details ⁄ ⁄ ⁄ ⁄ ⁄ ⁄ ⁄
Warnings ⁄ ⁄ ⁄ ⁄ ⁄ ⁄ ⁄ ⁄ ⁄ ⁄ ⁄ ⁄ ⁄ ⁄ ⁄ ⁄ ⁄ ⁄ ⁄ ⁄ ⁄ ⁄ ⁄
Specification⁄ ⁄ ⁄ ⁄ ⁄ ⁄ ⁄ ⁄ ⁄ ⁄ ⁄ ⁄ ⁄ ⁄ ⁄ ⁄ ⁄ ⁄ ⁄ ⁄ ⁄ ⁄
Installation ⁄ ⁄ ⁄ ⁄ ⁄ ⁄ ⁄ ⁄ ⁄ ⁄ ⁄ ⁄ ⁄ ⁄ ⁄ ⁄ ⁄ ⁄ ⁄ ⁄ ⁄ ⁄
Preparing your laundry ⁄ ⁄ ⁄ ⁄ ⁄ ⁄ ⁄ ⁄ ⁄ ⁄ ⁄ ⁄ ⁄ ⁄ ⁄ ⁄
Adding detergent ⁄ ⁄ ⁄ ⁄ ⁄ ⁄ ⁄ ⁄ ⁄ ⁄ ⁄ ⁄ ⁄ ⁄ ⁄ ⁄ ⁄ ⁄ ⁄
Control panel ⁄ ⁄ ⁄ ⁄ ⁄ ⁄ ⁄ ⁄ ⁄ ⁄ ⁄ ⁄ ⁄ ⁄ ⁄ ⁄ ⁄ ⁄ ⁄ ⁄ ⁄
How to use your washing machine ⁄ ⁄ ⁄ ⁄ ⁄ ⁄ ⁄ ⁄ ⁄ ⁄
Delayed washing ⁄ ⁄ ⁄ ⁄ ⁄ ⁄ ⁄ ⁄ ⁄ ⁄ ⁄ ⁄ ⁄ ⁄ ⁄ ⁄ ⁄ ⁄ ⁄
Maintaining ⁄ ⁄ ⁄ ⁄ ⁄ ⁄ ⁄ ⁄ ⁄ ⁄ ⁄ ⁄ ⁄ ⁄ ⁄ ⁄ ⁄ ⁄ ⁄ ⁄ ⁄ ⁄
Trouble-shooting guide ⁄ ⁄ ⁄ ⁄ ⁄ ⁄ ⁄ ⁄ ⁄ ⁄ ⁄ ⁄ ⁄ ⁄ ⁄ ⁄
2
3
4
5
7
7
8
9
11
12
14
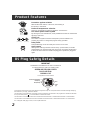
Product Features
Protection against wrinkles
With the alternate rotation of the drum, the wrinkling in
the laundry is minimized.
Preferred temperature selection
There are 4 temperature selections between cold and 95¡C
Low noise speed control system
By sensing the load and balance, evenly distributes the load to minimize the
spinning noise level.
Child-Lock
(Water Temp)
(Time Delay)
The Child-Lock system has been developed to prevent children from
pressing any button to change the program during operation.
Delay finish
Delayed Washing can be set easily from 3 hours to 19 hours.
Auto Restart
Although the washing machine is turned off by a power failure, it restarts
automatically in its stopped again and the process is properly adjusted and
it will be the same when the machine unplugged in operation is plugged in
again.
BS Plug Safety Details
IMPORTANT
THE WIRES IN THIS MAINS LEAD ARE COLOURED IN
ACCORDANCE WITH THE FOLLOWING CODE:
GREEN AND YELLOW: EARTH
BLUE: NEUTRAL
BROWN: LIVE
This appliance must be earthed
Green and Yellow(Earth)
Brown(Live)
Blue(Neutral)
E
L
Fuse
N
Cord
grip
As the colours of the wires in the mains lead of this apparatus may not correspond with the coloured markings identifying
the terminals in your plug, proceed as follows:
The wire which is coloured Green and Yellow must be connected to the terminal in the plug which is marked with the letter
E or by the earth symbol ( ) or coloured Green or Green and Yellow.
The wire which is coloured Blue must be connected to the terminal which is marked with the letter N or coloured Black.
The wire which is coloured Brown must be connected to the terminal which is marked with the letter L or coloured Red.
It a 13 amp (BS 1363) plug is used, fit a 13 amp BS 1362 fuse.
2
Warnings
You must read the whole of this instruction
objects such as coins, safety pins, nails, screws
book before you use the appliance.
or stones can cause extensive damage.
Follow the advice carefully.
ƒUDo not wash laundry stained with edible oil,
Keep the book for future reference. If you sell or
machine oil, dry-cleaning oil, gasoline, etc.
give away the appliance, make sure that the
It may cause fire or explosions.
book is passed to the new owner.
ƒUThis appliance is designed for donestic use.
The following warning are provided in the
It must not be used for purposes other than those
interests of overall safety.
for which it was designed.
You must read them before the appliance is
ƒUDo not machine wash fabrics which are saturated
installed or used.
with petroleum products. If volatile cleaning fluids
have been used, make sure that they are thoroughly
ƒUThis appliance is designed to be used by adults.
removed from the fabric before it is placed in the
Children should not be allowed to touch the controls
appliance.
or play with the product.
ƒUIt is dangerous to modify the specifications of
this appliance in any way.
ƒUThis appliance is heavy. Care should be taken
when moving it.
ƒUAll packaging and transit bolts must be removed
before the appliance is used.
Serious damage may occur if this is not done.
ƒUAny plumbing work required to install
this appliance should be carried out by a qualified
plumber or a competent person.
ƒUAny electrical work required to install this appliance
should be carried out by a qualified electrician or
a competent person.
ƒUMake sure that the appliance does not stand on
its electrical supply cable.
ƒUIf the machine is situated on a carpeted floor,
please adjust the feet to ensure that air can
circulate freely.
ƒUDo not operate near places with ignitable material
such as gasoline, benzene, etc. or inflammable gas
leak. Due to volatile nature of these material,
It can cause fire or explosions.
ƒUUse only the recommended quantities of fabric
softener. An excessive amount could damage
the laundry.
ƒULeave the porthole door slightly ajar between
washes to preserve the door seal.
ƒUBefore you open the door of the machine check
that the water has drained. Do not open the door
if you can still see water.
ƒUPets and children may climb into the washing
machines. Check your appliance each time
before use.
ƒUThe glass door becomes very hot during washing.
Keep children away from the appliance
while it is in use.
ƒUDo not overload the appliance.
ƒUYou should not attempt to repair the machine
yourself Repairs carried out by inexperienced
or unqualified persons may cause injury and/or
more serious faults to the machine.
ƒUOnly wash fabrics which are designed to be
machine washed. If in doubt, follow the instructions
you find on the label of the item itself.
ƒUThis product should be serviced by an authorized
Service Centre only, and only genuine spare parts
should be used.
ƒUAvoid electric heaters, candles, etc. near the
machine. It may ignite or deform the machine.
ƒUWhen disposing of your old washing machine, the
electric cable must be cut off and the door catch
must be made inoperative to avoid it becoming
a death trap for a child.
ƒUAlways unplug the appliance and turn off
the water tap after use.
ƒUDon¡fl
t sprinkle water. It may cause a fire or electric shock.
ƒUUse the exclusive AC 220V-240V outlet with ground
terminal. Do not use an extension cord or double
adapter.
ƒUMake sure that all pockets are empty. Hard, sharp
ƒUThe base opening must not be obstructed by
carpeting when the washing machine is installed on
a carpeted floor.
3
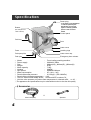
Specification
Power plug
Drawer
(For detergent and
fabric softener)
¥ If the supply cord is damaged,
it must be replaced by the
manufacturer or its service
agents or similarly qualified
person in order to avoid a
hazard.
Control panel
Drain hose
Door
Lower cover
Drum
Levelling legs
Drain pump filter
Lower cover cap
Drain plug
Emergency door release
§
§
§
§
§
§
§
§
§
§
§
§
Name
: Front loading washing machine
Power supply
: 220-240V, 50Hz
Size
: 600mm(W)¡¿600mm(D)¡¿850mm(H)
Weight
: 67kg
Wash capacity
: 7.0kg
Heating
: 2200W
Spin speed
: 600/800/1000rpm
Water consumption
: 67§⁄(9.6§⁄/ kg )
Permissible water pressure
: 0.3-10kgf/§†(30-1000kPa)
Permissible cold water temperature : 4-25¡
The hot water should ideally be 60¡ and must NOT be above 70¡
Hot inlet valve operates only when water temperature is selected at 60¡ or 95¡ .
ƒ{The appearance and specifications may be varied without notice to raise the units quality
§öAccessories
Inlet hose(2EA)
4
Spanner
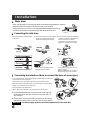
Installation
§ö How to disassemble the transit bolts.
ƒUTo protect the washer during transportation, the special
4 bolts are locked. Before operating the washer, remove
the bolts.
( If they are not removed, it may cause heavy vibration, noise and
malfunction)
ƒUKeep the transit bolts and spanner for future
use in case the machine is to be transported again.
1. Locate the 4 bolts that secures the back cover.
2. Unscrew the 4 bolts with a spanner provided.
3. Take out the 4 bolts.
§ö Level adjustment
1. Select a place for installation
ƒUPlace it at a firm and even floor
ƒUPlace it more than 2cm away from the wall or other furniture
2.Check the gap
ƒUEnsure all feet are firmly on the floor.
Levelling leg
3.Level adjustment
Higher
Lower
Position
The front is low
The rear is low
The left is low
The right is low
Adjustment
ƒUTurn the front 2 levelling legs clockwise.
ƒUTurn the rear 2 levelling legs clockwise.
ƒUTurn the left levelling legs of the front and rear clockwise.
ƒUTurn the right levelling legs clockwise.
Levelling leg
ƒUAfter adjusting the level, check it by shaking the washer.
Readjust the level if necessary.
ƒUIf the washer is not levelled, it may cause noise or
ƒULevelling
should be done within 1.5 degree angle.
vibration.
§ö Electrical connection
ƒUDo not use an extension cord or double adapter.
ƒUIf the supply cord is damaged, it must be replaced by the manufacturer or its service agents or similarly
qualified person in order to avoid a hazard.
ƒUAlways unplug the machine and turn off the water supply after use.
ƒUConnect the machine to an earthed socket in accordance with current wiring regulations.
Caution ƒUIf the appliance is supplied from a cord extension set or electrical portable outlet device, the cord
extension set or electrical portable outlet device should be positioned so it is not subject to
splashing or ingress of moisture.
ƒUIf a stationary appliance is provided with a supply cord and a plug, the instructions shall state that
the appliance must be positioned so that the plug is accessible.
5
Installation
§ö Water drain
ƒUHook over the edge of a sink using the plastic hose hanger supplied with the machine.
ƒUMake sure there are no kinks in the hose and that it is no crushed.
Secure the hose so that it can not be dislodged while the appliance is running.
ƒUThe drain hose should not be placed higher than 85cm above the floor.
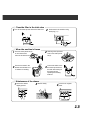
§öConnecting the inlet hose
1. Unscrew the fixing screw to attach
the faucet.
2. Push the connector up till the rubber 3 Push the water supply hose vertically
packing is in tight contact with the
faucet. Then tighten the 4 screws.
¥ Make sure that the rubber seal is
inside the hose connector.
upwards so that the rubber packing
within in the hose can adhere
completely to the faucet and then
tighten it by screwing it to the right.
¥ Your machine comes with only cold
water connection.
¥ Make sure that there are no kinks in
the hose and that it is not crushed.
§ö Connecting the inlet hose (How to connect the hose of screw type.)
¥ To prevent leaks two rubber packings are supplied with the water inlet
hose inside the valve connector.
¥ If there is only one tap, connect the hose to the cold water inlet.
¥ Make sure the correct water valve is connected to the corresponding
tap.(IE : Hot inlet valve to hot water tap.)
¥ The connections are tightly fixed.
Connector Rubber seal
Hot water tap
¥ When using only cold water, only cold inlet hose can be used.
1. Fix the red Marked inlet hose at the hot water tap and
at the inlet valve with the red filter on the rear side of
the machine.
2. Fix the other inlet hose at the cold water tap and at the
inlet with the white filter on the rear side of the machine.
WARNING
6
Cold
Hot
The water supply pressure must be between 30 kPa and 1000 kPa
Cold
water
tap
Preparing your laundry
ƒUCheck pocket for any articles (coin, safety pin, paper clips, etc.)
ƒUClose zips and fasten button or hooks : loose belt or ribbons should be tied together.
ƒUNever wash whites and coloureds together.
ƒUFollow the wash code symbols on each garment label and manufacturerÕs washing instructions.
Soiled condition
Washing
Heavily soiled
- Pre wash
- Main wash
Normally Soiled
- Main wash
Temperature
Heavily soiled cottons : cold - 95¡£
C
Normally soiled cottons : cold - 95¡£
C
Colored cottons
: cold - 60¡£
C
Synthetics
: cold - 60¡£
C
Delicate fabrics
: cold - 40¡£
C
Woollens
: cold - 40¡£
C
Adding detergent
§öWhere to place the detergent
The drawer for fabric softener
¥ Do not leave the fabric softener in the detergent drawer for more
than 2 days. (Fabric softener could harden)
¥ Do not open the drawer during water fill cycle.
¥ Softener will automatically add during last rinsing cycle.
¥ Do not fill past MAX indicator.
¥ Do not use solvents (benzine, etc.)
MAX
ƒUPull out the detergent drawer.
ƒUPut the detergent and fabric softener
in the detergent drawer before washing.
ƒUClose the detergent drawer completely.
Softener level
Detergent for
main wash
(
)
Fabric
softener
(
)
Detergent for
pre wash
(
)
¥ Programs with PRE-WASH
¥ MAIN-WASH only
ƒUThe detergent should be used according to the instruction of the detergent manufacturer.
ƒUIf the detergent is used over the recommended amount too many bubbles will be generated thus causing an
inferior washing result. Which will cause malfunction.
ƒUUse detergent only for drum washing machine.
Detergent dosages
Choosing the right detergent
Do not exceed manufacturerÕs recommended
dosages as shown on the detergent package.
The amounts depend on
The type of detergent depends on
ƒUthe type of fabric (cotton, synthetic, delicate items,
wool)
ƒUdegree and type of soiling
ƒUcolour
ƒUamount of wash
- full load : according to manufacturers'Õ instructions
- part load : 3/4 of the normal amount
- minimum load (about 1kg) : 1/2 the amount used for
full load
ƒUwash temperature
ƒUdegree and type of soiling
NOTE : use appropriate detergent only for wool
ƒUWater hardness in your area.
7
Control panel
Rinse hold
Wash program selector
¥ If you desire to
leave you fabrics in
the machine without
spining after rinse to
prevent them getting
winkled, you may
select rinse hold by
pressing the
(Rinse) button.
¥ To drain and spin,
press the
(Rinse)
button or
(Start/Pause)
button to turn off the
rinse hold lamp.
Power button
Error display
¥ 6 programs can be selected depending
on the type of laundry.
¥ If the power button is pressed, Coloreds
program is automatically set.
¥ By pressing the (Programme) button,
[Coloreds¡ Whites¡ Rapid¡ Delicate¡
Wool¡ Synthetic] can be selected.
P
LED display
¥ Display the remaining time
(Hour : Minute) to finish.
¥ In case of abnormal operation,
error indications are displayed.
(
)
¥ See trouble shooting guide.
¥ The display blinks
if there is an error.
14
Refer
¥ no Inlet : Trouble
with water supply.
¥ Imbalance :
The laundry is
titled to one side.
¥ no Drain :
The drain filter is
clogged or the
drain pump is out
of order.
¥ Press the button to
turn power on and
off.
¥ Press the button to
cancel the delay
finish.
Start/Pause button
¥ Use the button to
start or pause
wash cycle.
¥ The power turns
off automatically
4 minutes after the
pause button is
pressed.
(Power)
(Start/Pause)
(Wash)
(Rinse)
For manual wash, rinse
and spin speed
¥ Use these buttons to
change wash/rinse/spin.
¥ When lamp is off no
selection has been made.
¥ Prewash is available for
Coloreds, Whites, Synthetic.
(Spin) (Water Temp)
(Time Delay)
Water temperature selector
¥ Press the button to select water
temperature.
¥ The water temperature [40¡¡ 60¡¡ Cold]
can be selected in Coloreds, Synthetic
¥ 95¡ is selected for Whites only.
¥ By pressing the button during operating the
washer, the present temperature is displayed.
Child-Lock
¥ Once Child-Lock is set, all buttons are inoperable during operation.
¥ The Child-Lock system can be set at any time even including during PowerOff, on Pause and operation. It is automatically cancelled when an operational
error occurs and when the cycle ends.
¥ When power is off, the LED indicates [ ] only. During operation, or when
the program is paused the LED will indicate [
]and the remaining time.
8
(Programme)
(Door Open)
Door Lock lamp
Door open button
¥ It shows whether the
door can be opened
or not.
¥ When the lamp is on,
the door canÕt be
opened.
¥ Press the button to
open the door.
¥ Only operates when
the power plug is
connected to AC
220-240V outlet.
Delay finish
¥ Press the button when delayed washing is needed.
¥ When the button is pressed, [
]is delayed.
A maximum delay of [
] hours can be set.
¥ Each press advances time delay by one hour.
¥
(Time Delay ) means the time required from
the present to the completion of washing.
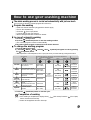
How to use your washing machine
§öThe whole washing process is carried out automatically with just one touch.
(If no program is selected, Coloreds program will commence.)
§ öPrepare the washing
ƒUMake sure that the machine is plugged in the electric supply.
ƒUTurn on the cold water tap.
ƒUPress the
(Door Open) button.
ƒULoad the laundry and close the door.
ƒUPut the detergent and fabric softener into drawer.
§ öIn case of automatic washing
1. Press the
(Power) button.
2. Press the
(Start/Pause) button to start the washing machine.
ƒUThe coloreds program is carried out automatically.
3.The optimum wash program is selected once the load is detected.
§ öTo change the washing program
1. Press the
(Power) button.
¤ì Delicate¤
¤ì Wool ¤ì Synthetic] will appear in order by pressing
2. [ Coloreds ¤ì Whites ¤ìRapid¤
the
(Programme) button.
ƒUMake adjustment to water temperature, rinse or spin cycles to suit your wash needs by pressing these buttons.
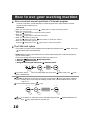
P
(Programme)
Select the function to change rinse, spin and water temperature.
( ) indicates manual operations.
(Wash)
P
(Rinse)
(Spin)
(Water Temp.)
Washing
time
Colored blouses, aprons,
shirts, bed linen
Main wash
(Pre + Main)
800
(600, 1000)
about
one hour &
46 minutes
Whites
Bed and table linen, towels,
underwear white or colour-fast
Main wash
(Pre + Main)
800
(600, 1000)
about
2 hours &
23 minutes
Rapid
For quick washing of less
dirty laundry or frequently
used towels.
600
(800, 1000)
about
43 minutes
Main wash
600
about
one hour &
9 minutes
Main wash
600
about
45 minutes
Main wash
(Pre + Main)
800
(600,1000)
about
one hour &
46 minutes
Coloreds
Delicate curtains, dresses,
(Below 2.5kg) skirts, shirts etc.
Delicate
Laundry easily shaped or
damaged.
(Below 2.0kg) Only machine washable woolens
with pure new wool label.
Synthetic Polyamide, Acrylic,
Polyester
Wool
3. Press the
Main wash
NORMAL
(SUPER)
(NORMAL+RINSE HOLD)
(SUPER+RINSE HOLD)
(Start/Pause) button to start the cycle.
Completion of washing
ƒUIf the washing is completed, the display shows [
button and take out the laundry.
ƒUSwitch off the appliance and turn off the tap.
] with a beep. Press the
(Door Open)
9
How to use your washing machine
§ ö More convenient manual operations of Coloreds program
It is more convenient to operate manually in Coloreds program than in others because Coloreds
program is firstly set with power on.
In Coloreds,
ƒUWhen you want wash only, press the
(Wash) button to select the washing mathod.
ƒUWhen you want rinse only,
press the
(Rinse) button to select the rinsing mathod.
ƒUWhen you want spin only,
press the
(Spin) button to select the Spin speed.
ƒUWhen you want wash and rinse only,
press the
(Wash) button and
(Rinse) button to select each method.
ƒUWhen you want rinse and spin only,
press the
(Rinse) button and
(Spin) button to select each method.
§ öThe Child-Lock system
ƒUThe Child-Lock system can be programed and cancelled by pressing the both
(Time Delay) buttons simultaneously.
(Water Temp.) and
ƒUChild-Lock (If you want to lock all the buttons to prevent all the setting from a child or infirm persons,
you can use this option.)
If you want to change the program when the Child-Lock system is on,
1. Press both (Water Temp.) and
(Time Delay) buttons.
2. Press the
(Start/Pause ) button.
3. Change the desired program and press the
(Start/Pause ) button.
(Start / Pause)
(Water Temp)
(Start / Pause)
(Time Delay)
Change
the desired
program
ƒUIf you want to deacitvate Child -Lock during wash cycle, press both
Delay) simultaneously.
ƒU
(Water Temp.) and
(Time
¤x If the lamp turn off, the door can be open by pressing the
(door open) button, additional
laundry can be put in during the washing. In other words, it shows whether the door can be
open or not.
ƒUIn case of adding laundry (when
(Start / Pause)
is off)
(Door open)
(Start / Pause)
Close the door after
Adding the laundry.
ƒU
10
¤x If the lamp is on, select spin cycle to drain water and press the
than
(Door Open) button to open the door.
(Start/Pause)button and
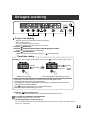
Delayed washing
(Start/Pause)
(Power)
(Wash)
(Rinse)
(Spin)
(Water temp)
(Time Delay)
(Programme)
(Door Open)
§ öPrepare the washing
ƒUPlug the power into the exclusive AC 220-240V outlet.
ƒUTurn on the water tap.
ƒUPut in the laundry and close the door.
ƒUPlace the detergent and fabric softener in the drawer.
1. Press the
2. Press the
P
(Power) button
(Programme) selection button to select the program you require.
ƒUSelect the rinse, spin and the water temperature.
3. Press the
(Time Delay) button
ƒUSelect the finish time you require by pressing the
(Time Delay) button.
§ Time Delay setting.
Example) If you want to complete the washing after 5 hours, press the
Press the (Time Delay )
button twice and
set the time to [
]
Press the
(Time Delay)
button.
ƒUMinimal 3 hours delay
(Time Delay) button and adjust the time.
ƒUThe washing will be completed after 5 hours
ƒUTime delay is possible between 3 to 19 hours and not possible under 3 hours.
ƒUTime delay does not proceed during power failure.
ƒUAccording to the condition of water supply and temperature, the delayed time and the actual
washing time can be slightly different.
ƒUThe
( Power ) button can be use to cancel the time delay.
ƒUEach press advances time delay by one hour.
4. Press the
(Start / Pause) button
ƒUAll lamps except the time delay and the remaining time display will be turned off.
The washing is completed at the selected time
ƒUUnplug the appliance and turn off the tap.
The washing program for when you go out.
If you are unable to unload the washing machine at the end of delay cycle, it is best not to select the spin
cycle or use [Rinse Hold].
11
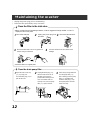
Maintaining the washer
§ Unplug the power plug prior to maintaining
§ Clean the filter periodically every 3 months.
§öClean the filter in the inlet valve
ƒUWhen no water flows through detergent drawer, or filter is clogged with foreign material Ò no inlet Ó is
displayed of the control panel.
1 Turn off the water tap.
4
2
3
Unplug the power plug from
the outlet.
Pull out the filter with a tool or by gand and
clean it using a toothbrush.
5
Disconnect the inlet hose
Connect the inlet hose and check water
leakage.
ƒUInsert the filter in itÕs original place.
§öClean the drain pump filter
the lower cover cap
1 Open
( ¥L ) by using coin.
Turn the drain plug ( ¥M) to
pull out the hose.
2
Unplug the drain plug ( ¥M),
then the water flows out, At
this time use a vessel to
prevent water flowing on the
floor. If the water does not
flow any more, turn the pump
filter ( ¥N) open to the left.
3
Take out any foreign material
from the pump filter ( ¥N).
After cleaning, turn the pump
filter ( ¥N) clockwise and
insert the drain plug ( ¥M)to
the original place. close the
lower cover cap.
100
3
1
3
12
2
2
§ Clean the filter in the inlet valve
1 Turn off the water tap and remove the inlet hose. 2
Drain water in the machine using
drain plug ( ¥L).
1
§ When the machine is frozen
1
3
Pour hot water (about 50¡£
C)
on the faucet and
remove the inlet hose.
the separated
2 Submerge
hose in hot water (about
50¡£
C).
the inlet hose to
4 Connect
the water tap and check
Pour the hot water in the
drawer and maintain it for
10 minutes for melting.
the drain after turning on
the water tap and
operating the washing
machine.
§ Maintenance of the drawer
Pull out the drawer
slightly upware.
2 Wash it clearly.
Insert it in its original
3 place.
MAX
MAX
1
13
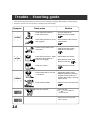
Trouble - Shooting guide
§ Check the following before asking for service if the error massage is displayed during washing, rinsing, spinning.
§ Request for service in the case of failure or damage except the followings.
Symptom
Check points
¥ Is the water tap turned off ?
¥ Is the water frozen?
Solution
¥ Turn the water tap on.
¥ Melt it with 50¡C hot water
13
no Inlet
Refer
¥ Is the water pressure low or the ¥ Disconnect the inlet hose and
filter clogged ?
clean the filter.
12
¥ Is there foreign matter in the
drain filter ?
¥ Clean and remove foreign
material from drain filter.
12
no Drain
Refer
Refer
¥ Is the drain hose bent or higher ¥ Put the drain hose evenly.
than 85cm above the floor ?
¥ Is the hose clogged ?
¥ Place the drain hose under
85cm from the floor. 6 Refer
¥ Is the hose frozen ?
¥ Melt it with 50¡C hot water.
13
Refer
¥ Is the laundry tilted to one side
in the drum?
¥ Spread the laundry evenly.
¥ Release imbalance by pressing
the [Start / Pause ] button. If it
happens after rinsing or spinning,
call for service.
¥ Is the washer leveled?
¥ Install it on a firm and even floor.
Imbalance
5
¥ Is the door opened?
Refer
¥ Close the door.
❈ If [
] is not released,
call for service.
¥ Unplug the power plug and
call for service
14
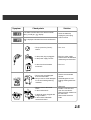
Symptom
Check points
If the water overfillsa due to the abnormal water
valve, you will get Ò
Ó display.
Ò
Solution
¥ Close the water tap.
¥ Unplug the power plug.
¥ Call for service
Óis displayed if the water level sensor malfunctions.
¥ Did you press the [ Power ]
button?
¥ Turn it on.
¥ Is the power plug unplugged?
¥ Is the power supply correct?
¥ Plug it to power supply.
¥ Use exclusive AC220-240V
outlet with ground terminal.
¥ Is the short-circuit breaker
turned off?
¥ Turn it on.
¥ Did you use more detergent
than recommended?
¥ Did you use low suds detergent
for the front loading washing
machine?
¥ Use the recommended
amount.
¥ Use detergents for front
loading washing machines
only.
¥ Did you remove the transit
bolts?
¥ Is the washer tilted?
¥ Remove it.
¥ install it on the firm and
even floor and level it.
¥ Remove foreign matter from
the drain filter.
¥ Remove the excessive
loads.
¥ Is the drain pump clogged with
foreign matters ?
¥ Is the washer loaded with
excessive clothes?
Refer
15
P/No.: 3828ER3001Q