1
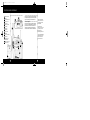
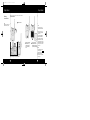
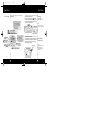
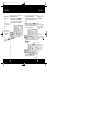
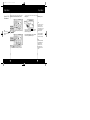
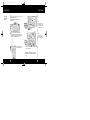
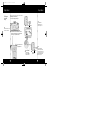
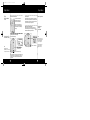
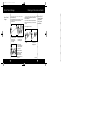
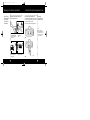
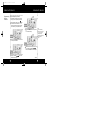
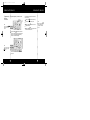
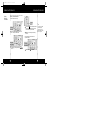
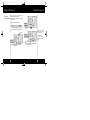
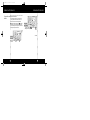
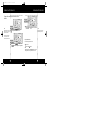
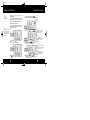
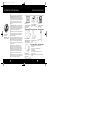
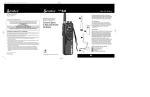
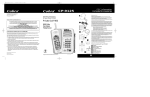
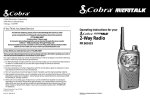
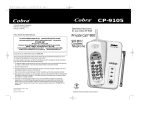
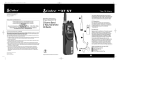
FRS300.MANUAL.qx
10/2/98 12:39 PM
Page 1
The Family Radio Service Story
The Family Radio Service Story
Cobra Electronics Corporation
6500 West Cortland Street
Chicago, IL60707
If You Think You Need Service
For technical assistance, please call our Automated Help Desk which can assist
you by answering the most frequently asked questions about Cobra products.
(773) 889-3087
24 hours a day, 7 days a week.
A Consumer Service Representative can be reached through this same number
8:00 am - 8:00 pm,Monday through Friday, CST.
Technical assistance is also available on-line in the Frequently Asked Questions (FAQ)
section at www.cobraelec.com or by e-mail to [email protected]
Ever wish you could talk to someone who wasn’t
within earshot? Like contacting ski partners back
at the lodge? Or letting a friend know how to find
you in a busy mall? Cobr a’s MicroTalk 3 is a great
way for friends or family to increase their fun–and
safety–by staying in touch while on the go.
Operating Instructions for your
Cobra MicroTalk 3
Family Radio Service
2 Way Radio
If you think you need service call 1.773.889.3087
“If your product should require factory service please call Cobra first before sending your unit in.
This will ensure the fastest turn-around time on your repair
.”
You may be asked to send your unit to the Cobra factory. It will be necessary to furnish the follo wing in order to have the product serviced and returned.
1. For Warranty Repair include some form of pr oof-of-purchase, such as a mechanical reproduction
or carbon or a sales receipt . If you send the original receipt it cannot be returned .
2. Send the entire product.
3. Enclose a description of what is happening with the unit. Include a typed or clearly print name
and address of where the unit is to be returned.
4. Pack unit securely to pr event damage in transit. If possible, use the original packing material.
5. Ship prepaid and insured by w ay of a traceable carrier such as United Parcel Service (UPS) or First
Class Mail: to avoid loss in transit to: Cobra Factory Service, Cobra Electronics Corporation,6500
W. Cortland St., Chicago, IL 60707.
6. If the unit is in warranty, upon receipt of your unit it will either be repaired or exchanged
depending on the model. Please allow approximately 3 to 4 weeks before contacting us for
status. If the unit is out of war ranty a letter will automatically be sent informing you of the
repair charge or replacement charge. If you have any questions, please call 1.773.889.3087 for
assistance.
1
FCC Warnings
2
Replacement or substitution of transistors, regular
diodes or other parts of a unique nature, with
parts other than those recommended by Cobra,
may cause a violation of the technical regulations
of part 95 of the FCC Rules, or violation of Type
Acceptance requirements of Part 2 of the Rules.
Included with your MicroTalk 3
1. Removable Belt Clip
2. Wrist Strap
Cobra Electronics Corp.© 1998
Printed in Thailand
Part No. 480-280-P-001
The FCC (Federal Communications Commission)
has created 14 license free frequency bands ,
or channels, called Family Radio Service (FRS)
frequencies. All of these 14 channels are easily
accessed on your Cobra FRS radio. These channels are in the UHF (Ultra High Frequency) band
which means great penetration through buildings, thick forests, hills, and other dense structures.
They are also FM (Frequency Modulation) signals
which means crystal clear reception even in
crowded noisy environments.
“Ingenious Products for Easier Communication.”
A1
FRS300.MANUAL.qx
10/2/98 12:39 PM
Page 4
Controls and Indicators
Our Thanks to You
1. Retractable Antenna
Thank you for purchasing the Cobra MicroTalk 3
2-way Radio. Properly used, this Cobra product
will give you many years of reliable service.
2
2. Belt Clip
1
3. On/Off Volume Control
3
4. Microphone Jack
4
5. Speaker Jack
Customer Support
5
Should you encounter any problems with the
product or not understand its many features,
please refer to this owner’s manual. If, after
referring to the manual, you still need help,
call Cobra Customer Service at 773.889.3087.
6. Battery Charge Pads
7. Lock Button
1
8. LCD Display
9. Enter Button
10. Function Button
11. Call Button
12. Channel Select Buttons
Cobra Customer Service
Live operators are available
M-F 8:00 am - 8:00 pm CST
at: 773.889.3087
Automated Technical
Assistance available 24 hours
a day, seven days a week.
E-mail questions to:
[email protected]
Cobra on the World Wide Web:
Frequently Asked Questions
(FAQ) can be found on-line
at: www.cobraelec.com
13. Microphone
14. Maximum Range
Extender Button
15. PTT (Push To Talk ) Key
7
9
16. Battery Chamber
10
11
8
14
15
12
13
16
6
A2
A3
FRS300.MANUAL.qx
10/2/98 12:39 PM
Page 7
How to Use Your Cobra
MicroTalk 2-Way Radio
Contents
Features .....................................................................................1
The FRS Story...........................................................................A1
FCC Warnings
Included Accessories
Controls & Indicators............................................................A2
Our Thanks to You .................................................................A3
Customer Support .............................................................A3
Operating your MicroTalk 3
Battery Installation............................................................2
LCD Display...........................................................................4
Turning On............................................................................5
Auto Battery Power Saver...............................................5
Select Main Channel (1-14)............................................6
Select CTCSS Subchannel (00-38)................................7
Battery Low ..........................................................................9
Calling Another Party .......................................................10
Talking To Another Party .................................................12
Talk Confirmation Tone....................................................14
Listening For Another Party ...........................................14
Auto Squelch........................................................................15
Maximum Range E xtender..............................................15
MicroTalk 3 Range..............................................................16
Making Life Easier And Safer ............................................17
External Microphone/Speaker Jack...............................19
Advanced Features ...............................................................20
Programming Memory Locations................................22
Using Memory Locations................................................26
Scan Function......................................................................28
Private Call (Voice Scramble).........................................32
Ringer/Vibrate Modes......................................................34
Tone Settings.......................................................................38
Lock Function......................................................................40
Frequency Ranges .................................................................41
Caring for Your MicroTalk 3...............................................42
MicroTalk 3 Specifications .................................................44
Limited Two Year Warranty................................................46
Optional Accessories............................................................47
Order Form ...............................................................................48
If You Think You Need Service......................Back Cover
Features of This Product
• UHF FM Frequencies
• No License Required
• No Air Time Fees
• Up to 2 mile range
• 14 Main Channels
• 38 CTCSS Subchannels
• LCD Function Display
• Private Call Voice Scramble
• Talk Confirmation Tone
• Call/Ring Button
• Recharging Pads
• Retractable Antenna
• Auto Battery Saver Circuity
• Auto Squelch
• 10 Memory Locations
• Full Channel/CTCSS Scan
• Lock Key
• Ring/Vibrate Notification
• Wrist Strap/Belt Clip
• Water Resistant
1
FRS300.MANUAL.qx
10/2/98 12:39 PM
Page 8
Operation
Operation
Install Batteries
Battery
Installation
1
Note
Batteries not included with
MicroTalk 3 2-way radio.
Clear antenna.
Note
Always use high quality
alkaline or NiMH batteries.
Incorrect positioning can
damage both the batteries
and the unit.
Only the Cobra NiMH
battery (Part # FA-BP)
pack can be recharged.
3
A.
B.
2
2
Pull lock tab down
and lift door up
(towards you) to
remove battery
cover.
4
See Accessories on page 47.
Charge ports for recharging
NiMH (Nickel Metal Hydride)
battery pack are located on
back of unit.
Insert four “AAA”
batteries. Position
batteries according
to polarity markings.
Note
When batteries are low or
need charging the
BATT LOW indicator will
blink. Replace alkaline
batteries or recharge NiMH
battery pack.
Remove belt clip by (A.) pulling tab out and
(B.) Sliding belt clip up and off unit .
3
FRS300.MANUAL.qx
10/2/98 12:39 PM
Page 10
Operation
Operation
LCD Display
LCD Display
Turning
On Your
MicroTalk 3
Turning On Your MicroTalk
Rotate ON - OFF Volume Control
clockwise.
An audible “tone” will indicate the unit is on and
then the LCD will go through a 3 second self-test
and then go to operational mode.
Note
Whenever the unit is on you
can receive communications.
Operational Mode
Auto Battery Power Saver
Auto Battery
Power Saver
Your MicroTalk 3 has a unique circuit designed t o
extend battery life. If there are no transmissions
within 10 seconds, the unit will automatically
switch to battery save mode.
Note
The Auto Battery Save Circuit
does not effect the unit ’s
ability to receive incoming
transmissions.
The PWR SAVER icon will flash.
4
5
FRS300.MANUAL.qx
10/2/98 12:39 PM
Page 12
Operation
Operation
Select Main Channel (1-14)
Select Main
Channel
1
Note
Rotate ON - OFF Volume Control
clockwise.
An audible “tone” will indicate the unit is on
and then the LCD will go through a 3 second
self-test and then go to operational mode.
Units must be on same
channel and subchannels to
communicate.
Select CTCSS Subchannel (00-38)
Select CTCSS
Subchannel
The CTCSS Subchannel allows the user to utilize
a less used channel range (00-38) within a main
channel.
1 Rotate ON - OFF Volume Control
clockwise.
An audible “tone” will indicate the unit is on and
then the LCD will go through a 3 second self-test
and then go to operational mode.
Note
If you push and hold the Function
button,the LCD display will
cycle through the different
functions.
Note
Channels 8-12 generally are
less used and give better
results for communications
in most areas.
Note
2
Note
To return to operational
mode and not save your last
...
setting push and release PTT
button.
Select channel by pushing and releasing
buttons.
Channel
Push and hold the Channel
buttons for fast channel
advance.
2
Select main channel by pushing and releasing
buttons.
Channel
Note
CTCSS (Coded Tone
Controlled Squelch System) is
an advanced subcoding
system that allows
segmentation of a main
channel.
3
6
Push and release
button. Small numbers
flash next to channel display on LCD.
continued
Function
7
FRS300.MANUAL.qx
10/2/98 12:39 PM
Page 14
Operation
Operation
Select CTCSS
Subchannel
Select CTCSS Subchannel (00-38) continued
Battery Low
Battery Low
Note
Note
4
Push and hold the Channel
buttons for fast channel
advance.
Select subcode number by pushing and releasing
buttons.
Channel
When battery capacity is at
the 1/4 level it is recommended that you replace
alkaline batteries or recharge
your NiMH (Nickel Metal
Hydride) battery pack.
When in normal use the
icon may begin
flashing. This is a warning to you that your
batteries are getting low.
Only the Cobra NiMH
battery (Part # FA-BP)
pack can be recharged.
Replace alkaline batteries as soon as possible
and/or recharge NiMH battery pack.
Note
5
NiMH rechargeable battery
Pack (item #FA-BP) and 2
port desktop charger
(item #FA-CH) are not
included with this unit.
See Accessories section on
page 47.
When desired code is displayed push and
release
button. If key stroke tone is on,
an audible tone will confirm your selection.
Enter
8
9
FRS300.MANUAL.qx
10/2/98 12:39 PM
Page 16
Operation
Calling
Another
Party
Operation
Calling Another Party
To alert another par ty that you wish to
communicate:
Note
3
Both the calling and receiving units must be on same
channel and subchannel for
the call function to work.
Select desired channel by pushing and
releasing
buttons.
Channel
1
Turn on your MicroTalk 3 2-way radio.
An audible “tone” will indicate the unit is on.
The LCD will go through a 3 second self test
and then to operational mode.
2
10
Note
Your incoming “Call” audio
ringing level is dependent on
your unit’s volume setting.
4
Push and release
button. The indicator
icon will flash and the icon will remain on
for 3 seconds. The unit you are calling will hear
a 2 second ring tone.
5
Wait for the party’s response or proceed to
“Talking To Another Party” section on next
page.
Place antenna in full
upright position.
Call
11
FRS300.MANUAL.qx
10/2/98 12:39 PM
Page 18
Operation
Talking to
Another
Party
Operation
Talking To Another Party
To send your outgoing message:
3
Push and hold
4
The
...
PTT
Note
While PTT button is
depressed you cannot
receive incoming calls.
button.
Note
Both units must be on same
channel to communicate.
1
Turn on your MicroTalk 3 2-way radio.
An audible “tone” will indicate the unit is on.
The LCD will go through a 3 second self test
and then go to operational mode.
2
icon will appear.
Place antenna in full
upright position.
...
PTT
5
12
Hold mic about
2 inches from
mouth. Speak in
a normal voice.
6
Release
button
and listen for
response.
Note
When you release the
PTT button,the person you
are talking to will hear a tone
indicating that it’s ok to talk.
See Talk Confirmation Tone
section on page 14.
13
FRS300.MANUAL.qx
10/2/98 12:39 PM
Page 20
Operation
Talk
Confirmation
Tone
Operation
Auto Squelch
Auto Squelch
Talk Confirmation Tone
Your listener will hear an
audible tone when you
release the PTT button.
Your MicroTalk 3 is equipped with Auto Squelch,
which automatically shuts off weak transmissions
and unwanted noise due to ter rain conditions or
if you have reached your range limit.
This alerts the other party
that you are finished talking
and it’s OK for them to begin
talking.
Maximum Range Extender
Auto squelch can be temporarily remo ved
to allow all signals to en ter by pressing the
button (Maximum Range Extender).
M
Maximum
Range
Extender
Listening For Another Party
Listening For
Another Party
When finished talking:
Listening
mode.
Note
While PTT button is
depressed you cannot receive
incoming communications.
Note
To learn more about the
range of your MicroTalk 3,
see MicroTalk 3 Range
Section on page 16.
1
Push and hold the M button for 1 second to
allow all signals to enter.
Range is dependent on
battery condition and
geographic territory.
...
PTT
Release
button to receive incoming
transmissions.
Your MicroTalk 3 is always in listening mode when
the PTT button is not pressed and you are not in
function mode. See Advanced Features section
on page 20.
1
14
15
FRS300.MANUAL.qx
10/2/98 12:39 PM
Page 22
MicroTalk 3 Range
MicroTalk 3
Range
Making Life Easier and Safer
MicroTalk 3 Range
Your MicroTalk 3 Radio has a range of up to 2 miles.
This effective range can be shor tened under
some conditions.
MicroTalk 3
2-Way Radio
Can Make
Life Easier
and Safer
MicroTalk 3 2-Way Radio Can Make Life
Easier and Safer
As you become familiar with your MicroTalk 3
Radio you will find many of your own uses for
the unit.
Some suggestions include:
1. Under flat, open
conditions you will
experience the
MicroTalk’s maximum range.
2. Range can be
reduced by buildings
and foliage in the
path of the signal.
3. Range will be
further reduced by
dense foliage and
hilly terrain.
To achieve maximum
range the auto squelch
can be overridden.
Refer to Maximum
Range Extender section
on page 15.
16
1. Talking with fellow
hikers.
2. Keeping track
of the kids in a
shopping mall.
continued
17
FRS300.MANUAL.qx
10/2/98 12:39 PM
Page 24
Making Life Easier and Safer
MicroTalk 3
2-Way Radio
Can Make
Life Easier
and Safer
MicroTalk 3 2-Way Radio Can Make Life
Easier and Safer continued
External Microphone/Speaker Jack
External Microphone/Speaker Jack
External
Microphone/
Speaker Jack
Your MicroTalk 3 2-Way Radio can be fitted with
an external microphone/speaker, (not included)
freeing your hands for other tasks.
To attach the external microphone/speaker:
Note
3. Communicating
between basement
and first, second or
third floor.
4. Talking to a
neighbor or a
friend.
5. Checking on traveling companions in
another car.
6. Agree on a meeting
spot after an event.
18
External microphone/
speaker (item #FA-SM) is not
included with this unit. See
Accessories section on page
47 for available units.
1
Open Mic/Spkr tab on top of unit.
2
Insert jack into the Mic/Spkr ports .
19
FRS300.MANUAL.qx
10/2/98 12:39 PM
Page 26
Advanced Features
Advanced
Features
Note
When using or programming
functions, pushing and
releasing the Function button or
the Enter button will save all
entered information.
Note
To exit out of function mode
and return to operational
mode without saving entered
information simply press the
PTT
... button.
Advanced Features
Advanced Features
Your MicroTalk 3 has many advanced features
not found on other 2-way radios.
These include:
• 10 Memory Storage Location and Recall
• Full Channel/Sub Channel Scan
• Private Call® (Voice Scramble)
• Ring/Vibrate Notification Modes
• Tone Indicator Settings
• Key Stroke Tone
• Talk Confirmation Tone
• Lock Key
Note
If you push and hold the
button,the MicroTalk 3
will cycle through the different functions.
Function
If, after 10 seconds no selection is made, the unit will
return to operational mode.
20
21
FRS300.MANUAL.qx
10/2/98 12:39 PM
Page 28
Advanced Features
Programming
Memory
Locations
Advanced Features
Programming Memory Locations
Your MicroTalk 3 has 10 memory (0-9) lo cations
for storing your most frequently used channels.
1
2
Rotate ON - OFF Volume Control
clockwise.
An audible “tone” will indicate the unit is on
and then the LCD will go through a 3 second
self-test and then go to operational mode.
4
Push and release
button again.
MAIN CHANNEL will flash and only the MEM
icon will remain flashing.
5
Select desired main channel you wish to store
(1-14) by pushing and releasing
buttons. (Use CHANNEL 12 for this example.)
Note
Once you enter memory
mode you can talk and listen
to any channel you select
after programming is
complete. See Using Memory
Locations section on
page 26.
Function
Push and release
button until MEM icon and
a memory location flashes.
Function
Channel
3
Select memory location you wish to change by
pushing and releasing
buttons (Use
MEM 6 for this example).
Channel
22
continued
23
FRS300.MANUAL.qx
10/2/98 12:39 PM
Page 30
Advanced Features
Programming
Memory
Locations
Advanced Features
Programming Memory Locations continued
Your MicroTalk 3 will stay in the subchannel
section until you:
...
PTT
Push and hold
button to set memory
location and stay in memory scan.
or...
B Push and release
button to return to
operational mode.
or...
C Push and release
button to proceed to
next function mode (Scan).
A
Note
Enter
Push and hold the Channel
buttons for fast channel
advance.
Note
If you push and hold the Function
button,the LCD display will
cycle through the different
functions.
Function
6
Push and release
button which sets main
channel in memory and moves to subchannel
selection. The subchannel begins flashing.
The MEM icon will remain flashing.
7
Select desired subchannel you wish to store
(00-38) by pushing and releasing
buttons. (Use SUBCHANNEL 38 for this
example.)
Function
Note
You can push and hold the
PTT
... button to begin talking
anytime.
Channel
24
25
FRS300.MANUAL.qx
10/2/98 12:39 PM
Page 32
Advanced Features
Using
Memory
Locations
Advanced Features
Memory Channel Recall/Talk
To recall a channel in memor y:
Note
...
PTT
1
Push and release
button until MEM icon
and a memory location flashes.
Function
3
Push and hold
button and talk. Your radio
will stay on this recalled lo cation until you
exit out of memory function mode.
4
Repeat step 2 for recalling other memor y
locations.
If function button is pushed
while listening/talking,
programming will begin.
See Programming Memory
Locations on page.22.
To exit the Memory M ode and return to
Operational Mode:
2
Select desired memory location you wish to
recall (0-9) by pushing and releasing
buttons.
Channel
26
5
Push and release
Enter
button.
27
FRS300.MANUAL.qx
10/2/98 12:39 PM
Page 34
Advanced Features
Scan Function
Advanced Features
Scan Function
1
Rotate ON - OFF Volume Control
clockwise.
An audible “tone” will indicate the unit is on
and then the LCD will go through a 3 second
self-test and then go to oper ational mode.
Note
The MicroTalk 3 “zeros out”
the subchannels to allow
scanning of the main
channels.
2
Push and release
button until SCAN icon
and main channel flashes.
Function
3
Push and release
buttons and the unit
will begin scanning the main channels.
4
Unit will continue to scan all main channels
and stop, if an incoming transmission is
detected.
Channel
Your MicroTalk 3 will pick it up for 10 seconds.
Within 10 seconds you can:
...
PTT
Push and hold
button and talk. Your
radio will return to operational mode on
that channel.
B or...
Push and release
button to rescan the
main channel.
C or...
Proceed to subchannel scan on next page.
A
Channel
continued
28
29
FRS300.MANUAL.qx
10/2/98 12:39 PM
Page 36
Advanced Features
Scan Function
Advanced Features
Scan Function continued
Your MicroTalk 3 will pick it up for 10 seconds .
Within 10 seconds you can:
To scan subchannels:
Push and hold
button and talk. Your radio
will return to operational mode on that channel.
or...
B Push and release
button to rescan the
main channel.
...
PTT
A
Channel
To exit the Scan Mode and return to
Operational Mode:
1
Push and release
button and subchannel
and scan icon will flash.
Function
1
2
30
Note
If you wish to proceed to the
next function mode, push
and release Function button.
(Private Call Voice Scramble).
Push and release
Enter
button.
Push and release
button and
subchannel scanning begins and stops
when an incoming transmission is detec ted.
Channel
31
FRS300.MANUAL.qx
10/2/98 12:39 PM
Page 38
Advanced Features
Advanced Features
Private Call (Voice Scramble)
Private Call
(Voice Scramble) Private Call ensures that no one can ea vesdrop on
your conversation.
To engage the Private Call function:
1
Rotate ON - OFF Volume Control
clockwise.
An audible “tone” will indicate the unit is on
and then the LCD will go through a 3 second
self-test and then go to oper ational mode.
4
Push and release
visible.
Channel
buttons until ON icon is
Note
When you push and hold the
PTT button,the unit exits out
to operational mode.
If, after 10 seconds no
selection is made, the unit
will return to operational
mode.
4
2
32
Push and release
icon flashes.
Function
button until
PRIVATE
Push and release
button. Unit will go to
operational mode or push function button to
proceed to next function.
Enter
33
FRS300.MANUAL.qx
10/2/98 12:39 PM
Page 40
Advanced Features
Advanced Features
Ringer/Vibrate Ringer/Vibrate Modes
Modes
Your Microtalk 3 will signal you that there is an
incoming transmission with either a tone or a
vibration or both. To set for Ringer/Vibrate:
1 Rotate ON - OFF Volume Control
clockwise.
An audible “tone” will indicate the unit is on and
then the LCD will go through a 3 second self-test
and then go to operational mode.
3
Push and release
buttons until
appears for ringer mode.
Channel
icon
continued
2
34
Push and release
flashes.
Function
button until
icon
35
FRS300.MANUAL.qx
10/2/98 12:39 PM
Page 42
Advanced Features
Advanced Features
Ringer/Vibrate Ringer/Vibrate Modes continued
Modes
6
After selecting the mode you desir e push and
release
button or
button to proceed to
Note
next function.
Enter
Note
4
When you push and hold the
PTT button,the unit exits out
to operational mode.
Push and release
buttons again.
icon appears for vibrator mode.
Function
Channel
Unit must be in operational
mode to test ring/vibrate.
If, after 10 seconds no selection is made, the unit will
return to operational mode.
Ringer/Vibrate Test
To test the ringer/vibrate mode:
5
36
Push and release
buttons again and
both icons will be displayed for ringer/vibrate
mode.
Channel
1
Turn on unit.
2
Push and hold
3
Quickly push and release
button. Unit will
ring, vibrate, or ring/vibrate for 5 seconds.
Enter
button.
Call
37
FRS300.MANUAL.qx
10/2/98 12:39 PM
Page 44
Advanced Features
Tone
Settings
Note
The Key Stroke Tone and Talk
Confirmation Tone can be
temporarily turned on or off
at any time while in operational mode.
Advanced Features
Tone Setting
The Key Stroke Tone and Talk Confirmation Tone
can be temporarily turned on or off during the
operation of your MicroTalk 3 2-Way Radio.
Talk Confirmation Tone Indicator
To temporarily eliminate the Talk Confirmation Tone:
Key Stroke Tone Indicator BEEP
You will hear an audible tone when any button is
pushed (except PTT button). You can turn the
audible tone on or off by:
Note
1
Push and release
Function
button until
icon flashes. For more information see
Talk Confirmation Tone
section on page 14.
Note
1
Push and hold
button until
disappears in the LCD display.
Enter
BEEP
To restore the Talk
Confirmation Tone repeat
steps 1- 3 as shown to
the left.
icon
2
Push and release
buttons until OFF
icon appears in the LCD display.
Channel
Note
When you push and hold the
PTT button,the unit exits out
to operational mode.
If, after 10 seconds no selection is made, the unit will
return to operational mode.
2
To return to the audible mode, push and hold
button until BEEP icon appears in the LCD
display.
Enter
38
3
Push and hold
button.
icon will
disappear or press and hold function key to
proceed to next function.
Enter
39
FRS300.MANUAL.qx
10/2/98 12:39 PM
Page 46
Advanced Features
Frequency Range
Lock Function Lock Function
The purpose of the LOCK function is to lock most
buttons to avoid accidental operation.
To engage the LOCK function:
Note
Call button, Range Extender
button and PTT button
do not lock and are fully
operational while the unit
is locked.
1
Push and release button.
Most buttons are locked.
icon flashes.
Lock
The unit cannot lock while in
function mode.
2
40
To “unlock” push and release
Buttons are “unlocked” and
pears.
Lock
button again.
icon disap-
The MicroTalk 3 unit represents one of the most
advanced FM two-way radios used.
FRS
Channel
Channel
Frequency
In MHz
1
2
3
4
5
6
7
8
9
10
11
12
13
14
462.5625
462.5875
462.6125
462.6375
462.6625
462.6875
462.7125
467.5625
467.5875
467.6125
467.6375
467.6625
467.6875
467.7125
Frequency
Ranges
41
FRS300.MANUAL.qx
10/2/98 12:39 PM
Page 48
Caring for Your MicroTalk Radio
Caring
for Your
MicroTalk 3
Radio
Caring for Your MicroTalk 3 Radio
The MicroTalk 3 2-Way Radio will give you years
of service if cared for properly.
Here are some suggestions:
Note
Modifying or tampering
with the radio’s internal
components can cause
malfunction and will
invalidate the warranty.
If your radio is not performing as it should, please call
Cobra at 773.889.3087. Do
not return the unit to the
retailer.
1. Handle unit gently.
42
2. Keep away
from dust.
3. Never place the
unit in water or in
a moist place.
4. Avoid exposure
to extreme
temperatures.
43
FRS300.MANUAL.qx
10/2/98 12:39 PM
Page 50
MicroTalk Specifications
MicroTalk Specifications
C.TRANSMITTER
I.GENERAL SPECIFICATIONS
A.GENERAL
CH=14 CHANNELS WITHIN 462-467 MHZ
B. RECEIVER
UNIT
1.SENSITIVITY
FOR 12 DB SINAD
FOR CALL SIG.DETECTION uV
44
uV
0.2
0.25
0 0.4
1. EFFECTIVE RADIATED POWER
UNIT
mW
500
2. CARRIER FREQ.STABILIT Y
IHZ
500
3. MODULATION LIMITING
3.0
5.0
4. CARRIER ATTACK TIME
mS
80
5. AUDIO FREQUENCY RESPONSE
@ 300 HZ
@ 3000 HZ
DB
DB
-6
-6
2.MAX. AUDIO OUTPUT @10% THD
MW
100
6. AUDIO DISTORTION
%
3
3.MAX.S/N RATIO @ 1mV RF INPUT
DB
45
7. HUM NOISE
DB
45
8. TRANSIENT FREQ.BEHAVIOR
a) TX ON
b) TX OFF
mS
mS
30
5
4.SQUELCH
a) SENS.
b) ATTACK TIME
c) CLOSING TIME
uV
mS
mS
0.2
120
200
5. AUDIO FREQUENCY RESP.
@ 300 HZT
@ 3000 HZ
DB
DB
-6
-6
6.SIGNAL DISPLACEMENT BW
+/-KHZ 5
7.ADJACENT CH.REJECTION
DB
55
8.INTERMODULATION REJECTION
DB
55
9.SPURIOUS RESPONSE REJECTION
DB
65
D. POWER SUPPLY
1. BATTERY LIFE (1:1:8 RATIO)
2. BATTERY
HR
24
V
4.8
45
FRS300.MANUAL.qx
10/2/98 12:39 PM
Page 52
Limited Two Year Warranty
COBRA ELECTRONICS CORPORATION warrants that its
COBRA FRS Radios, and the component parts thereof, will
be free of defects in wor kmanship and materials for period
of two (2) years from the date of first consumer purchase.
This warranty may be enforced by the first consumer
purchaser, provided that the product is utilized within
the U.S.A.
COBRA will,without charge, repair or replace, at its option,
defective FRS radios, products or component parts upon
delivery to the COBRA factory Service Department, accompanied by proof of the date of first consumer purchase,
such as a duplicated copy of a sales receipt .
Cobra Electronics
Corporation
6500 West Cortland Street
Chicago, Illinois 60707
Optional Accessories
2 Port Desktop Charger
(1) NiMH Rechargeable
Battery Pack
High performance Nickel Metal
Hydride battery pack for
multiple recharging
FA-BP
$29.95
Charges your MicroTalk Radio
and (1) NiCad battery pack
FA-CH
$24.95
Ear Bud Mic with PTT
Integrated speaker/mic adapter
that fits in your ear. Includes
shirt clip.
MA-EBM $29.95
Lapel Microphone
Remote microphone/speaker
connection.
CA-40
$25.95
Camouflage Cover
Carrying Case
Durable nylon case perfectly fits
your MicroTalk radio
FA-CC
$19.95
You must pay any initial shipping charges required to ship
the product for warranty service, but the return charges
will be at Cobra's expense, if the product is repaired or
replaced under warranty.
Exclusions: This limited warranty does not apply; 1) to any
product damaged by accident;2) in the event of misuse or
abuse of the product or as a result of unauthorized alterations or repairs;3) if the serial number has been altered,
defaced or removed;4) if the owner of the product resides
outside the U.S.A.
All implied warranties, including warranties of
merchantability and fitness for a particular purpose
are limited in duration to the length of this war ranty.
COBRA shall not be liable for any incidental, consequential or other damages;including, without limitation,
damages resulting from loss of use or cost of installation.
Some states do not allow limitations on how long an
implied warranty lasts and/or do not allow the e xclusion
or limitation of incidental or consequential damages, so
the above limitations may not apply to you.
46
Replacement Belt Clip
FA-BC
$4.95
You Can Find These Fine Accessories At Your Local
Cobra Dealer
If you wish, you can order directly from Cobra.
Vox Mic
VOX ( Voice Operated
Transmitter) adapter allows you
hands-free operation.
MA-VOX
$49.95
Order by phone
Call 1.773.889.3087
(Press 1 from the main menu) 8 a.m.-8 p.m. M-F CST. )
Order by mail or fax
Please fill out order form on next page, and mail/fax directly
to Cobra.
47
FRS300.MANUAL.qx
10/2/98 12:39 PM
Page 54
Accessory Order Form
Item #
Description
Cost Ea.
FA-BP
MA-EBM
MA-VOX
FA-CH
CA-40
FA-CC
FA-BC
NiMH Rechargeable Battery Pack
Ear Bud Mic with PTT
Vox Mic
2 Port Desktop Charger
Lapel Microphone
Camouflage Cover Carrying Case
Replacement Belt Clip
$29.95
$29.95
$49.95
$24.95
$25.95
$19.95
$4.95
Prices subject to change without notice.
Tax Table
Illinois residents add 7%
Cook Co. residents add .75% (7.75% total)
Chicago residents add 1% (8.75% total)
Indiana residents add 5%
Michigan residents add 4 %
Minnesota residents add 6%
Ohio residents add 6%
Wisconsin residents add 5%
For credit card orders fill out order
form and fax to:1.773.622.2269
or call 1.773.889.3087
(Press 1 from the main menu)
8:00 am - 8:00 pm,M-F, CST.
Qty.
Amount
Subtotal
(Tax if applicable)
Shipping/handling
Total
Make check or money order (no stamps)
payable to:
Cobra Accessories Dept.
6500 West Cortland St.Chicago,IL 60707
Please print clearly
Name
Address (No P.O. Box)
City
State
Zip
Telephone (
)
Credit Card No.
Exp. Date
Customer Signature
Circle One: Visa MasterCard Discover
Allow 4 to 6 weeks for delivery. Offer valid in Continental U.S.only.
48
$4.00