1
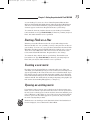
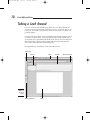
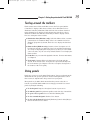
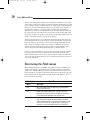
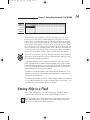
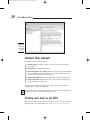
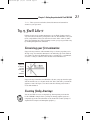
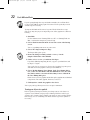
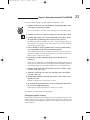
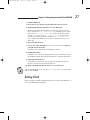
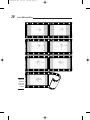
d54358X Ch01.qxd
9/16/03
8:44 AM
Page 9
Chapter 1
Getting Acquainted with
Flash MX 2004
In This Chapter
Introducing Flash
Figuring out what you can create with Flash MX 2004
Deciding when not to use Flash MX 2004
Perusing the screen
Using Help
Creating your first animation
Closing Flash
O
nce upon a time in a galaxy that seems far, far away by now, there
was the Internet, which contained only plain, unformatted text. Then
came the Web, and we gained text formatting and graphics. Then the Web
grew up a little, and Web page graphics got fancier with things like small
animations in banner ads. But people, being used to movies and TV,
wanted an even more animated and interactive Web experience. Along
came Flash.
Flash, created by Macromedia, Inc., is the software that runs some of the
coolest Web sites around. When you surf the Web and see sites that contain animation across the entire page or buttons that do spectacular stunts
when you click them, you’re probably seeing some Flash magic. If you
create a Web site, you can use Flash to rev up the basics so that your viewers will say, “Wow!”
d54358X Ch01.qxd
10
9/16/03
8:44 AM
Page 10
Part I: A Blast of Flash
In this chapter, you find out what Flash is all about, what the screen looks
like, and how to use Help. Then you create your first, simple animation so
that all the rest of this book makes sense.
Discovering Flash
Flash offers a powerful system for creating animation on the Web. In a
nutshell, here’s an overview of how you use the system:
1. Create a Flash movie by creating graphics and animating them over
the duration of the movie.
2. Use the Publish command within Flash to publish the movie into a
Flash Player file that a browser can display. At the same time, Flash
creates the appropriate HyperText Markup Language (HTML) code that
you need for your Web page.
3. Insert HTML code into your HTML document that references the Flash
Player file. It’s similar to adding a graphic to a Web page. Or, you can
use the HTML code alone as a new Web page.
4. Upload the new or edited HTML document and the Flash Player file
to the location where you keep other files for your Web pages.
5. Open your browser, navigate to your Web page, and presto! — there’s
your cool animation on your Web page.
You need the Flash Player to see the effects that Flash creates. These days,
the Flash Player comes installed with most computer systems and browsers,
so most people can view Flash-driven Web sites immediately without any special download or preparation. When you display a Web site that contains
Flash effects, your system uses the Flash Player to play the animation. Users
who don’t have a Flash Player can download it for free from Macromedia at
www.macromedia.com/shockwave/download/index.cgi?P1_Prod_Version=
ShockwaveFlash.
Web sites are getting more and more sophisticated. By using animation and
special effects, you can distinguish your Web site from the also-rans. Creating
animation isn’t hard, and you don’t have to be a professional graphic artist,
either. Anyone can create simple animations to enhance a Web site; it just
takes a little time.
To find the most up-to-date Web sites that use Flash, check out the Macromedia
site at www.macromedia.com/flash and choose Showcase➪Case Studies. Don’t
get discouraged by seeing some of the truly professional results at these sites.
You can start with a simple, animated site and go from there. (Chapter 17 lists
ten great Web sites that use Flash.)
d54358X Ch01.qxd
9/16/03
8:44 AM
Page 11
Chapter 1: Getting Acquainted with Flash MX 2004
Understanding What You Can
Create with Flash MX 2004
You can use Flash MX 2004 to create simple animation to add to your Web
page. Or, you can create an entire Web page or site and incorporate text,
graphics, interactive buttons, and animation. You can even program small
applications in Flash.
This book helps you use Flash to create a simple or complex Web site. The
following list describes some ways that you can manipulate text, graphics,
and sound by using Flash MX 2004:
Create still or animated text on your Web page. You can choose to stop
the animation after a few seconds or repeat it while your viewers view
the page.
Use Flash tools to create your own graphics for your Web page, or
import graphics. You can lay out an entire Web page graphically or add
graphics to only a part of a Web page.
Animate graphics and make objects appear and disappear by using
the transparency feature. Objects can move, get bigger or smaller, or
rotate. Flash also lets you morph — that is, transform — shapes into
new shapes.
Fill shapes and text with gradients, which are colors that gradually
change into new colors. You can even fill shapes and text with bitmap
images that you import into Flash. For example, you could fill the letters
of your name with dozens of flowers. (You aren’t a flower child any
more?)
Create Web page buttons that not only lead your viewers wherever
you want them to go but also change shape or color at the same time.
You can make buttons change when you pass your mouse over them.
People who view your page can click a button to display a movie (animation) or start a small application.
Add sound or video to your movie. You can control how long the sound
or music plays and whether it loops to play continuously. You can play
video files as well.
Create menus that viewers can use to navigate your site. You can
create navigation tools as well as forms, check boxes, and other interface elements.
As you can see, you can go far with Flash if you want. And why not? It’s
great fun!
11
d54358X Ch01.qxd
12
9/16/03
8:44 AM
Page 12
Part I: A Blast of Flash
Determining When Not to Use
Flash MX 2004
If Flash MX 2004 is so wonderful, why doesn’t every Web site designer use it?
Why aren’t most Web sites created completely with Flash?
Here’s the other side of the story.
Although the vector graphics and animation of Flash load quickly, they
don’t load as quickly as plain text and simple graphics. Adding a movie
to your Web page creates some overhead. There’s no point in using Flash
if you want simple pages consisting of mostly text and a few graphics
that you want to stay put and not move.
You can create certain graphic effects much more easily by using bitmap
graphics. Painted brushstroke and textured effects are examples. Graphic
artists create these types of graphics by using graphics editing software, and
the results are bitmaps. Similarly, to add photographs to your Web page, you
need to scan the photographs as bitmaps. Flash creates vector graphics (defined
mathematically), which are different from bitmap graphics (defined by lots of
dots). You can find out more about bitmap and vector graphics in Chapter 2.
If you want simple animation, such as a few blinking dots or a marquee effect,
animated GIFs (the animated bitmap graphics that you often see on the Web)
are smaller than Flash movies, so they load faster. You can create animated
GIFs by using animated GIF editing software.
Flash provides little in the way of 3-D graphics or animation. For those, you
need to go to more sophisticated software, such as Poser or 3D Studio Max.
(See Chapter 14 for more 3-D possibilities in Flash.)
Getting the Right Start
Well begun is half done, as the saying goes. The easiest way to begin using
Flash MX 2004 is with a shortcut or alias right on your desktop. Double-click
the Flash icon, and you’re on your way. (See Appendix A for information on
installing Flash.)
Starting Flash on a PC
Whether you installed Flash from the CD or by downloading it from the
Macromedia Web site onto your PC, you may or may not have a shortcut
d54358X Ch01.qxd
9/16/03
8:44 AM
Page 13
Chapter 1: Getting Acquainted with Flash MX 2004
on your desktop. To create one, choose Start➪Programs➪Macromedia➪
Macromedia Flash MX 2004. Right-click the Macromedia Flash MX 2004 item
and choose Create Shortcut from the pop-up menu that appears. The new
shortcut appears on the menu. Drag that shortcut to your desktop.
To rename the shortcut, click the shortcut on your desktop. Then click the
text beneath the icon. Type Flash MX 2004 (or whatever you want) and press
Enter. Just double-click the icon to open Flash.
Starting Flash on a Mac
Whether you installed Flash from the CD or by downloading from the
Macromedia Web site onto your Mac, you may or may not have an alias on
your desktop. To create one, open your drive and find the file named Flash
MX 2004 in the Macromedia Flash MX 2004 folder. Click the file to select it.
Then choose File➪Make Alias. This action creates the alias in the same
folder, named Flash MX 2004 Alias. Drag that alias to the desktop.
To rename the alias, click the alias on your desktop. Then click the text
beneath the icon. Type Flash MX 2004 (or whatever you want) and press
Enter. Now you can just double-click the icon to open Flash.
Creating a new movie
Files that you create by using Flash are commonly called movies. When you
start Flash, you’re immediately ready to create a new movie. The startup screen
appears (by default). In the Create New section, choose Flash Document. If you
have already opened a movie and have the menus available, choose File➪New.
In the New Document dialog box, choose Flash Document from the General tab
and then click OK. You usually start by creating or importing some graphics. (To
find out more about working with graphics, see Chapter 3.)
Opening an existing movie
If you want to work on a movie you’ve already created, when you first open
Flash, choose it from the Open a Recent Item section or choose Open to find
the file. If you’ve already opened a movie and have the menus available, press
Ctrl+O (Windows) or Ô+O (Mac) or choose File➪Open; then double-click the
movie to open it. The first frame appears on your screen, and you can edit
the movie any way that you want.
Windows users can click Open on the Standard toolbar. If the Standard toolbar isn’t displayed, choose Window➪Toolbars➪Main.
13
d54358X Ch01.qxd
14
9/16/03
8:44 AM
Page 14
Part I: A Blast of Flash
Taking a Look Around
If you’ve never created animation, the Flash screen is different from the
screens in other programs that you may be used to, so take the time to get
to know it. You can also customize the Flash screen. Figure 1-1 shows one
possible display.
If your screen opens with several rectangular panels strewn about the screen
or docked on various sides, don’t worry about them now. We explain how to
open and use these panels throughout this book, but you don’t need them for
this chapter. If they drive you crazy, right-click each panel’s title bar and
choose Close Panel from the menu that appears.
See Appendix B for a full layout of each panel and toolbar.
Tools panel
Layer list
Menu
Figure 1-1:
The Flash
screen.
Options (modifiers)
Stage
Timeline
Zoom Control box
d54358X Ch01.qxd
9/16/03
8:44 AM
Page 15
Chapter 1: Getting Acquainted with Flash MX 2004
Tooling around the toolbars
Flash contains two toolbars in the Mac version: the Tools panel and the
Controller. To display or hide these toolbars, choose Window➪Tools or
Window➪Controller. In Windows, Flash offers the four toolbars described
in the following list. To display or hide the first three listed here, choose
Window➪Toolbars and click the toolbar that you want to display or hide.
Here is a description of the toolbars:
Standard toolbar (Windows only): Called the Main toolbar; contains
commonly used commands. Many of these are familiar from other
Windows programs. By default, Flash does not display the Standard
toolbar.
Status toolbar (Windows only): Contains a brief description of toolbar buttons and tells you when the Caps Lock and Num Lock buttons
are on. By not displaying this mostly useless toolbar, you can reclaim
some real estate on your screen. By default, Flash does not display the
Status toolbar.
Controller: Lets you control the playback of movies. For more information,
see Chapter 9.
Tools panel: Contains all the tools that you need to draw and edit
objects. At the bottom of the Tools panel are options that modify how
the tools function. (See Chapters 3 and 4 for a complete description of
the features of the Tools panel.)
Using panels
Panels give you access to the many Flash settings. You access them from the
Window menu. The specific panels are discussed throughout this book. In
this section, we explain how to keep control over your panels.
Most panels are dockable, which means that they can sit at the side or
bottom of your Flash window without covering up your work. You control
panels by doing the following:
To dock a panel: Drag it to the right or bottom of your screen.
To undock a panel: Drag it from its grabber, at the left edge of its title bar.
To open or close a panel: Choose it from the Window panel.
To close an undocked panel: Click its Close button.
To close a docked panel: Right-click (Windows)/Control+click (Mac) its
title bar and choose Close Panel.
15
d54358X Ch01.qxd
16
9/16/03
8:44 AM
Page 16
Part I: A Blast of Flash
You can now stack panels just like you stack plastic containers in your refrigerator. Drag a panel by its grabber and drag it beneath another panel to stack
it. You can also collapse or expand panels: A collapsed panel only displays its
title bar, so it doesn’t take up much space. Use the arrow on the left side of
the title bar to collapse or expand a panel or click its title bar. Finally, on
Windows only, there are new arrow buttons above panels that are docked at
the bottom of your screen and to the left of panels docked at the right. Click
an arrow to collapse the panels to just the tiny arrow button. Click the arrow
again to expand the panels to their previous display.
The Property inspector is one of the most important panels. This panel displays information about selected objects, and you can modify objects in the
Property inspector as well. It is context-sensitive, which means that its contents change according to what you’re doing. For example, if you select a
graphic object, the Property inspector provides settings relating to that
object, and you can use the Property inspector to edit that object.
For the best in customization, you can save any layout of panels you like.
Set up the panels and choose Window➪Save Panel Layout. In the Save
Panel Layout dialog box that opens, give the layout a name and click OK.
To restore that layout at any time, choose Window➪Panel Sets and choose
your very own layout.
Discovering the Flash menus
Most drawing functions are available only in the Tools panel. Similarly, you
often use the Timeline, as we discuss in “Following a timeline” later in this
chapter, for creating animation. Almost every other function in Flash is on a
menu somewhere. You just need to find it. In general, we discuss the specific
menu functions where appropriate throughout this book. Table 1-1 offers a
brief overview of the menus.
Table 1-1
Flash Menus
Menu
What It Does
Flash
(Mac only) Enables you to set preferences, create keyboard
shortcuts, and quit Flash.
File
Enables you to open and close files; save files; import and
export files; print; publish movies for the Web; send a movie as
an e-mail attachment (Windows only); and quit Flash.
Edit
Provides commands that let you undo and redo actions; cut,
copy, and paste to and from the Clipboard; delete, duplicate,
select, and deselect objects; copy and paste entire frames; edit
symbols (see Chapter 7 for the whole story on symbols); set
preferences; and create keyboard shortcuts for commands.
d54358X Ch01.qxd
9/16/03
8:44 AM
Page 17
Chapter 1: Getting Acquainted with Flash MX 2004
Menu
What It Does
View
Helps you get a better view by letting you zoom in and out;
show or hide various parts of the screen; and view a grid for
easy layout.
Insert
Enables you to insert symbols (Chapter 7 explains this topic);
insert and delete frames and keyframes (see Chapter 9 for
more); insert layers (covered in Chapter 6); and create motion
tweens (see Chapter 9).
Modify
Helps you modify symbols, frames, scenes, or the entire movie.
Offers tools for transforming, aligning, grouping, ungrouping,
and breaking objects apart.
Text
Enables you to format text.
Commands
Enables you to re-use and manage saved commands. You can
save commands from the History panel. (See Chapter 4.)
Control
Provides options that let you control the playing of movies; test
movies and scenes; engage certain interactive functions; and
mute sounds.
Window
Enables you to open lots of things, including a new window;
panels that help you control objects; the Library (more on the
Library in Chapter 2); windows for creating interactive controls
(explained in Chapter 10); and the Movie Explorer (to help
manage your movie — see Chapter 12).
Help
Comes to the rescue when you need help.
The shortcuts are displayed on the menus, next to the command name. Here
are some of the most commonly used keyboard shortcuts. (For more shortcuts, see the tear-out Cheat Sheet at the front of this book):
Ctrl+N (Windows) or Ô+N (Mac): Open the New Document dialog box so
you can start a new movie.
Ctrl+O (Windows) or Ô+O (Mac): Open an existing movie.
Ctrl+S (Windows) or Ô+S (Mac): Save your movie. Don’t forget to use
this shortcut often!
Ctrl+X (Windows) or Ô+X (Mac): Cut to the Clipboard. Chapter 4
explains more about using the Clipboard.
Ctrl+C (Windows) or Ô+C (Mac): Copy to the Clipboard.
Ctrl+V (Windows) or Ô+V (Mac): Paste from the Clipboard.
17
d54358X Ch01.qxd
18
9/16/03
8:44 AM
Page 18
Part I: A Blast of Flash
Ctrl+Z (Windows) or Ô+Z (Mac): Undo. Would you believe that by default
Flash remembers your last 100 actions and can undo them? What a relief!
The only problem is that Flash doesn’t provide a drop-down list of each
action, so you’re somewhat in the dark about what the next Undo will
undo. Think of it as a journey into the long-forgotten past. (See Appendix
A for details on customizing the number of Undos that Flash remembers.)
Ctrl+Y (Windows) or Ô+Y (Mac): Redo redoes actions that you undid by
using the Undo button. (Got that?) This button remembers just as many
actions as the Undo button. If you undo more actions than you want, click
Redo (or press Ctrl+Y/Ô+Y) until you’re back where you want to be. Using
the Undo and Redo buttons is like traveling through Flash time — and it
gives you lots of slack while you’re working.
Ctrl+Q (Windows) or Ô+Q (Mac): Exit Flash.
We mention other keyboard shortcuts throughout this book when we discuss
their corresponding commands.
You should note, although it’s not a shortcut, that you can find the Zoom
Control box in the upper-right corner of your screen. Click the arrow and
choose a zoom factor to zoom in and out. Zooming doesn’t change the actual
size of objects — it just makes them look bigger or smaller.
You aren’t limited to the choices on the Zoom drop-down list. Type a number
in the Zoom Control box and press Enter to set your own zoom factor. For
example, type 85 to set the zoom factor to 85 percent.
Staging your movies
The white box in the center of your screen is the Stage. Think of the Stage
as a movie screen where you place objects. You can place graphics and
text there and then animate them. Flash also plays back movies on the
Stage.
Following a timeline
The Timeline window divides your movie into frames. Each frame represents
a tiny stretch of time, such as 1⁄ 12 of a second. Creating a movie is simply a
matter of assembling frames, which are then quickly played in order.
Chapter 9 explains in detail how to make using the Timeline completely painless. For now, you should just understand the basics. See Figure 1-2 for the
basic Timeline.
d54358X Ch01.qxd
9/16/03
8:44 AM
Page 19
Chapter 1: Getting Acquainted with Flash MX 2004
Figure 1-2:
The Timeline
is your key
to managing
animation.
On the left side of the Timeline is the layer list. When you open a new
movie, you see only one layer, unimaginatively named Layer 1. A layer
is like a sheet of transparent acetate on which you draw objects. Layers
help you keep objects from running into each other, causing unfortunate,
messy results. You organize your entire movie by using layers. For example, if you want to keep some text constant throughout the movie but animate a bouncing dot, you would give the dot its own layer and animate it
on that layer. The layer list has room for more layers, and you can add as
many layers as you want. (Chapter 6 gives you the lowdown on layers.)
You can move the bottom edge of the Timeline to make room for displaying
more layers. Hover the mouse cursor over the bottom line until you see the
two-headed arrow and drag downward.
To the right of Layer 1, you see a bunch of rectangles, each representing a
frame. (Actually, before you start using the Timeline, they’re just potential
frames, like unexposed frames on a roll of film.) By default, each frame lasts
1
⁄ 12 of a second. Each layer has its own row of frames because you can have
different animations or objects on each layer.
A keyframe is a frame that defines some change in your animation. In some
animations, every frame is a keyframe. Other animations need keyframes for
only the first and last frames.
You don’t use the Timeline until you’re ready to animate. While you work, however, you should organize your objects on separate layers. Don’t worry — you
can always move an object from one layer to another.
Getting Help in a Flash
This book is all that you need to start creating great animations, but we
would be remiss if we didn’t tell you about the Flash Help system.
To use Flash Help, choose Help➪Using Flash or Help➪Help. Then click the
Table of Contents button, as shown here. If you chose Help➪Using Flash,
you see a screen like the one shown in Figure 1-3.
19
d54358X Ch01.qxd
20
9/16/03
8:44 AM
Page 20
Part I: A Blast of Flash
Figure 1-3:
The Using
Flash Help
screen.
Multiple Help manuals
Flash Help contains several sections:
Getting Started contains a basic overview of Flash and creating a
Flash movie.
Using Flash is the main Help manual.
ActionScript Reference Guide explains how to use ActionScript, which is
the programming language that you use to create complex interactive
movies. (See Chapter 10 to find out more.)
ActionScript Dictionary is a thorough listing of all ActionScript terms.
Using Components explains how to use components (did you guess?),
which we explain in Chapter 10.
Click the How Do I tab in the Help panel to find some tutorials and brief
explanations of common tasks in Flash.
To search for a term, click the Search button. Then enter the term and click
Search. You can then choose from the list of topics.
Finding more help on the Web
Macromedia offers some support on its Web site. To access it, choose Help➪
Flash Support Center, which takes you to www.macromedia.com/support/
d54358X Ch01.qxd
9/16/03
8:44 AM
Page 21
Chapter 1: Getting Acquainted with Flash MX 2004
flash/. There you can search the technical document and tutorials for
answers to your questions.
Try It, You’ll Like It
Perhaps by now you’re getting impatient to try out Flash. Getting started is
easy. You collect a few ideas, put together some art, add animation, save your
movie, and publish it. Then you view it in a browser either online or offline.
That’s the gratifying part. In the following sections, you get to give Flash a try
by working through a basic animation.
Conceiving your first animation
Suppose that you want to add an animated logo to a home page that you’ve
already set up. You want the animation to run when the page loads and then
stop. Figure 1-4 shows the Rainbow Resources company logo — unanimated,
of course — that you can find on the CD that comes with this book.
Figure 1-4:
A company
logo that
could stand
some
animation.
Suppose that you want the word Rainbow to fly into your page from the right
and the word Resources to fly in from the left. At the same time, you want the
graphic to rotate 180 degrees. You find out in the following section how to
create this animation.
Creating flashy drawings
You can use Flash to create a company logo, but importing one from this
book’s CD-ROM is simpler. Often, you import existing graphics (such as a
company logo) from a file rather than create them from scratch. (Chapter 3
explains how to import and manipulate graphics.)
21
d54358X Ch01.qxd
22
9/16/03
8:44 AM
Page 22
Part I: A Blast of Flash
If you’re going through the steps and make a mistake, choose Edit➪Undo
(or press Ctrl+Z/Ô+Z) and try again. You can use Undo repeatedly to undo
several steps, if necessary.
To import the Rainbow Resources logo into Flash, follow these steps.
(The steps may vary if you’re importing some other graphic in a different
format.)
1. Start Flash.
See the instructions in “Starting Flash on a PC” or “Starting Flash on a
Mac,” earlier in this chapter, if you need help.
2. Choose Flash Document from the Create New section of the Startup
screen.
You see a spanking-new movie on your screen.
3. Choose File➪Import➪Import to Stage.
The Import dialog box opens.
4. Browse the dialog box until you find rainbow.gif in the
Samples\Ch01 folder of the CD-ROM.
5. Click to select rainbow.gif and then click Open.
If you have difficulty importing the file, copy it to your hard drive and
try Steps 3–5 again.
You see the logo on your screen. You need to break the logo into pieces
and make it a vector graphic so that you can animate it.
6. Choose Modify➪Bitmap➪Trace Bitmap. In the Trace Bitmap dialog
box, set the color threshold to 100, the minimum area to 1, the curve
fit to Pixels, and the corner threshold to Many Corners. Click OK in
the Trace Bitmap dialog box.
Flash creates a vector graphic and breaks up the graphic into individual
components. The entire graphic, however, is selected.
7. Click anywhere outside the graphic to deselect it.
You’ve got your logo! Now you need to set it up for animation.
Turning your objects into symbols
In the logo that you imported in the preceding section, each letter is a
separate object, which can get pretty confusing. Each line in the logo’s
design is also separate. But you want your words to stay together and the
little design, too. So combining each word and the logo into a symbol is
necessary.
d54358X Ch01.qxd
9/16/03
8:44 AM
Page 23
Chapter 1: Getting Acquainted with Flash MX 2004
To turn the words and the logo into symbols, follow these steps:
1. Click the Zoom Control drop-down list box (at the upper-right corner
of the Stage area) and choose 200%.
Use the scroll bar to scroll the words of the logo into view, if necessary.
2. Click the Selection tool on the Tools panel if it’s not already selected.
3. Click the upper-right corner of the word Rainbow (just above and to
the right of the w) and drag to the lower-left corner of the R.
Dragging from right to left makes it easier to avoid selecting the logo at
the same time. You should see the entire word selected. If not, click outside the word and try again.
4. Choose Modify➪Convert to Symbol. In the Convert to Symbol dialog
box, click Graphic for the behavior and then click OK.
It is normally good practice to name the symbol, but not necessary for
this exercise. When you click OK, Flash places a box around the word so
that you can see that it’s one object.
5. Repeat the procedure outlined in Steps 3 and 4 with the word
Resources.
In this case, you may want to start clicking and dragging from the upperleft area of the word; then choose Modify➪Convert to Symbol again and
click OK. Now all the letters of the word Resources are a single object.
6. Click the Zoom Control drop-down list box and choose 100% so that
you can see the entire logo.
7. Click above and to the left of the logo and drag to the lower right to
select the entire logo.
8. Hold down the Shift key and click each word to remove both words
from the selection.
Now the design portion of the logo is selected.
9. Press F8 (the keyboard shortcut to create a symbol) and click OK in
the Convert to Symbol dialog box.
Flash creates a symbol from the lines of the logo’s design.
See Chapter 7 to find out more about symbols.
Putting your graphics on layers
Placing different components on different layers is required when you’re animating. You need to use layers to organize your movie and keep shapes separate so that they don’t bump into each other. (See Chapter 6 for the complete
story on layers.)
23
d54358X Ch01.qxd
24
9/16/03
8:44 AM
Page 24
Part I: A Blast of Flash
To split your three symbols onto three separate layers, you can use a
convenient feature of Flash MX 2004: Distribute to Layers. Follow these
steps:
1. Click the Selection tool on the Tools panel if it’s not already selected.
2. Drag diagonally across the entire logo, including the two words, to
select it.
You should see two rectangles inside one bigger rectangle. All three
objects in the logo are selected.
3. Choose Modify➪Timeline➪Distribute to Layers.
You now have three new layers, named from Symbol 1 through Symbol 3.
The three objects of the logo have been distributed to Symbol 1 through
3 and removed from Layer 1.
4. Click outside the Stage to deselect any objects.
You’re now ready for the animation process.
Making graphics move
We explain earlier in this chapter that your goal is to have the word
Rainbow fly in from the right and the word Resources to fly in from the
left. You also want the graphic to rotate 180 degrees at the same time.
What you see now is how the animation will end — the last frame of
the movie.
Follow these steps to create the last frame of the movie and save the file:
1. For each of the three symbol layers, click frame 30 of the Timeline
and choose Insert➪Timeline➪Keyframe.
You can find out more about keyframes in Chapter 9.
2. Choose File➪Save and pick a location where you save other documents that you create.
We don’t recommend saving the file in the Flash MX 2004 program
folder — it may get lost among your Flash program files.
3. Give your movie a name, such as Movie of the Year, and click
Save.
Flash creates a file named Movie of the Year.fla. Flash adds
the .fla for you because that’s the filename extension for Flash
movies.
d54358X Ch01.qxd
9/16/03
8:44 AM
Page 25
Chapter 1: Getting Acquainted with Flash MX 2004
Go back and create the beginning of your movie. Flash can fill in all the
blanks in between. Follow these steps to create the beginning of the movie
and the animation:
1. If the Properties panel is not already open, choose Window➪
Properties to open it.
If the Properties panel is open but collapsed, click the arrow at the left
end of its title bar to expand the panel.
2. Select the word Rainbow. Click the first frame of the Timeline in the
highlighted row.
When you select the word Rainbow, you can tell which layer it is on by
looking at the highlighted layer.
3. Press and hold down the Shift key while you drag the word to the
right, just off the Stage into the gray area.
You may need to use the horizontal scroll bar to see the gray area.
Pressing Shift keeps the object from moving up or down while you drag
to the right.
4. Click the word Rainbow’s layer, anywhere between the first and the
30th frame.
5. On the Tween drop-down list of the Properties panel, choose Motion.
You now see a solid arrow and a light blue color on the Timeline
between the first and 30th frames.
6. Repeat Steps 2–4 for the word Resources. When you move the word
Resources, hold down the Shift key and drag the word to the left, just
off the Stage.
7. Select the logo design and click the first frame of the Timeline in the
highlighted row.
8. Choose Modify➪Transform➪Rotate 90° CW to rotate the design
90 degrees clockwise.
9. Repeat the Modify➪Transform➪Rotate 90° CW command to rotate
the design a total of 180 degrees.
10. Click the logo’s highlighted layer, anywhere between the first and
30th frames, and choose Motion from the Tween drop-down list of the
Properties panel.
11. If necessary, drag the horizontal scroll box until the Stage is in the
center of your screen.
Otherwise, you won’t be able to see the entire animation — and you
don’t want to miss this one!
25
d54358X Ch01.qxd
26
9/16/03
8:44 AM
Page 26
Part I: A Blast of Flash
12. Click the first frame of any layer.
Your screen should look like the one shown in Figure 1-5.
13. Press Enter (Return) and watch the animation. (Start writing your
Academy Award acceptance speech.)
14. Save your movie again by choosing File➪Save.
Publishing your first animation
for posterity
You can’t watch the animation in a Web browser until you publish it and
insert it into an HTML document. To do so, follow these steps:
1. Click the Stage to change the display of the Property inspector.
You should see the Settings button next to the Publish label.
2. Click Settings in the Property inspector.
The Publish Settings dialog box opens.
Figure 1-5:
Before you
run the
animation,
Rainbow
appears to
the right and
Resources
to the left,
and the line
logo is
rotated.
d54358X Ch01.qxd
9/16/03
8:44 AM
Page 27
Chapter 1: Getting Acquainted with Flash MX 2004
3. Click the HTML tab.
4. Deselect the Loop check box in the Playback section to clear it.
5. Click Publish and then click OK to close the dialog box.
With scarcely a blip, Flash publishes your movie and creates two
files, one named Movie of the Year.swf (assuming you used that
name) and Movie of the Year.html. They’re in the same folder
as your .fla movie file. Movie of the Year.swf is the file that
your browser reads to play the animation. Movie of the Year.
html contains the HTML code required to display your movie on a
Web page.
6. Open your Web browser.
7. Choose File➪Open and find Movie of the Year.html (or whatever
you named your movie file).
You may need to click Browse and navigate to the file.
8. Double-click the file.
Click OK to close the Open dialog box if necessary. Your browser opens
the HTML document and reads its instructions to play the Flash movie.
9. Sit back and watch it roll.
Don’t blink or you’ll miss it. (If you do miss it, click Refresh in your
browser.) You can see the movie in Figure 1-6.
10. When you finish watching the movie, close your browser.
You can find the Movie of the Year files (.fla, .html, and .swf) in the Ch01
folder on the CD-ROM.
Exiting Flash
When you finish creating something in Flash, choose File➪Exit (Windows) or
choose Flash MX 2004➪Quit (Mac).
27
d54358X Ch01.qxd
28
9/16/03
8:44 AM
Page 28
Part I: A Blast of Flash
1
3
4
5
6
7
Figure 1-6:
The Movie
of the Year
animation
in detail.
2