1
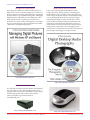
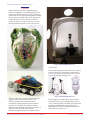
A SHORT COURSE IN NIKON COOLPIX 4500 PHOTOGRAPHY
1
A S HORT C OURSE
P OCKET G UIDE
TO THE
NIKON
COOLPIX 4500
The Editors of ShortCourses.com
http://www.shortcourses.com
THE SHORT COURSES WEB SITE
AND
ON-LINE DIGITAL PHOTOGRAPHY BOOKSTORE
HTTP://WWW.SHORTCOURSES. COM
A SHORT COURSE IN NIKON COOLPIX 4500 PHOTOGRAPHY
ShortCourses.com
A Short Course Pocket Guide
Nikon Coolpix 4500
© Copyright 2003 by Dennis P. Curtin. All rights
reserved. Printed in the United States of America.
Except as permitted under the United States
Copyright Act of 1976, no part of this publication
may be reproduced or distributed in any form or
by any means, or stored in a database or retrieval
system, without the prior written permission of
the publisher.
CONTACT INFORMATION
ShortCourses.com
16 Preston Beach Road
Marblehead, Massachusetts 01945
E-mail: [email protected]
Web site: http://www.shortcourses.com
2
Preface
Short Courses prides itself on providing helpful
and accurate information to the digital photography community. This Pocket Guide and others
like it are made available at no cost to help you get
the most out of your camera.
The step-by-step instructions in this free pocket
guide are excerpted from the comprehensive book
“A Short Course in Nikon Coolpix 4500 Photography” and its accompanying e-book. It will be a
useful guide when out in the field. To learn more
about the procedures featured here, the context in
which they are used, and tips that make them even
more useful, check out the book from which they
are excerpted by visiting the Short Course’s
bookstore at:
http://www.shortcourses.com
The page number cross-references within this guide’s
instructions refer to pages in the accompanying book
where you will find the procedures fully discussed and
all options decsribed.
http://www.greenbatteries.com
ShortCourses.com publishes books on Canon,
Nikon, Olympus, and Sony cameras as well as
textbooks and other books on digital photography
including managing your digital images and
taking table-top studio photos for ue on the Web or
in print. All of these books are available through
our on-line bookstore. Please come and visit us.
THE SHORT COURSES WEB SITE
AND
ON-LINE DIGITAL PHOTOGRAPHY BOOKSTORE
HTTP://WWW.SHORTCOURSES. COM
A SHORT COURSE IN NIKON COOLPIX 4500 PHOTOGRAPHY
Managing Your Digital Images
Since there are no film costs when shooting with your
4500, you’ll soon be overrun by images you’ve taken. To
help you organize, manage, and use this ever-expanding
image collection, we’ve published the guide “Managing
Digital Pictures with Windows XP and Beyond.” This
book explains clearly everything you need to know
about how you store, transfer, and organize your images.
It gives you the answer to the question I hear most often
“where have my digital images gone?”
Books and Batteries
3
Digital Desktop Studio Photography
If you want to photograph small subjects—coins,
stamps, glassware, pottery, jewlery, or anything else
small enough to fit on a desktop, here is the guide you
need. Using your digital camera’s white balance setting,
you can photograph under almost any kind of light,
including desk lamps you may already have. In this
book you’ll learn the entire range of possibilities from
inexpensive compact fluorescent bulbs to expensive
studio strobes. You’ll also learn about camera settings,
backgrounds, composition, and everything else you
need to know to master this hot new field. The book even
has a chapter on placing your images on eBay.
http://www.shortcourses.com
http://www.shortcourses.com
Nikon Batteries and Chargers
You will find you almost certainly need a second battery
for your camera so one can be charging while you are
using the other. You may also find that you need a faster
or better charger than the one that comes with the
camera. The place to go for these needs is
GreenBatteries.com.
http://www.greenbatteries.com
THE SHORT COURSES WEB SITE
AND
ON-LINE DIGITAL PHOTOGRAPHY BOOKSTORE
http://www.greenbatteries.com
HTTP://WWW.SHORTCOURSES. COM
A SHORT COURSE IN NIKON COOLPIX 4500 PHOTOGRAPHY
4
The ezCube
While working on the book “Digital Desktop
Studio Photography” we looked high and low for
lighting products that were easy to use AND easy
to store. We are now making arrangements to make
these products available to you at our partner site.
Neither ShortCourses nor the authors benefit
financially from any of these sales. We’re recommending them because they work! Lets see why.
Digital Desktop Studio
Photography
http://www.tabletopstudio.com
fast and easy.
Here’s what the light tent looks like with a product
inside it. The front cover has been pulled back so
you can look inside. Normally, the cover is closed
and you photograph through a slit.
http://www.tabletopstudio.com
These two objects are normally difficult to photograph because of the recesses, textures, and
reflective surfaces. What made these shots
posssible, by a photographer with very limited
experience, was a light tent called the ezCube.
When lit from outside by natural light, or lamps of
some kind, the cube is flooded with soft,
shadowless light and makes even difficult shots
THE SHORT COURSES WEB SITE
AND
ON-LINE DIGITAL PHOTOGRAPHY BOOKSTORE
The best lights we’ve been able to find are those
from Smith-Victor. They are high-quality and low
cost. To make the lights even better, we replaced the
incandescent bulbs with compact flourescent
lightbulbs (CFLs) that are daylight balanced, last
almost forever, and run cool.
HTTP://WWW.SHORTCOURSES. COM
A SHORT COURSE IN NIKON COOLPIX 4500 PHOTOGRAPHY
5
CONTENTS
Preface ........................................................................ 2
Increasing Depth of Field ............................................. 11
Books and Batteries ..................................................... 3
Using Focus Lock for Maximum Depth of Field ........... 11
Digital Desktop Studio Photography ............................. 4
Using Focus Lock for Minimum Depth of Field ............ 11
Taking a Picture in Auto Mode ...................................... 6
Decreasing Depth of Field in Automatic Mode ............. 11
Using Menus ................................................................ 6
Capturing Creative Blur ................................................ 11
Resetting the menus .................................................... 6
Setting White Balance ............................................... 12
Reviewing Images ......................................................... 6
Setting White Balance Preset .................................... 12
Managing Your Images ................................................. 6
Using White Balance Bracketing ................................ 12
Using Playback Zoom .................................................. 7
Turning Noise Reduction On and Off ........................... 12
Using Thumbnail Playback ........................................... 7
Using Bulb ................................................................. 12
Deleting Some or All Images ........................................ 7
Zooming the Lens ....................................................... 12
Turning Disable Delete On and Off ................................ 7
Turning Fixed Aperture On and Off .............................. 12
Protecting Images ........................................................ 7
Setting the Zoom Startup Position .............................. 13
Displaying a Slide Show ............................................... 8
Using Digital Zoom ..................................................... 13
Connecting the Camera to a TV ................................... 8
Turning Digital Zoom Off and On ................................. 13
Hiding and Unhiding Images ......................................... 8
Using Lens Converters ............................................... 13
Selecting an Image Quality and Size ............................ 8
Changing Flash Modes ............................................... 13
Changing Shooting Modes ........................................... 8
Changing Speedlight Options ..................................... 13
Using Scene Modes ..................................................... 8
Using red-Eye Mode ................................................... 13
Using Program and Flexible Program Mode ................. 8
Using Anytime Flash Mode ........................................ 14
Using Shutter-Priority Mode ......................................... 9
Using Slow Sync Flash Mode .................................... 14
Using Aperture-Priority Mode ........................................ 9
Using Flash Cancel .................................................... 14
Using Manual Mode ..................................................... 9
Taking Macro Close-ups ............................................. 14
Changing the Metering Mode ........................................ 9
Increasing depth of Field in Close-ups ........................ 14
Using Exposure Compensation .................................... 9
Adjusting Brightness and Contrast ............................. 14
Using Exposure Lock ................................................... 9
Specifying Image Sharpness ...................................... 14
Using Autoexposure Bracketing ................................... 9
Adjusting Saturation ................................................... 14
Displaying Histograms ................................................. 9
Taking Panoramas ..................................................... 14
Using Histograms ....................................................... 10
Attaching a Voice Memo to a Photo ........................... 15
Turning Info.txt On and Off .......................................... 10
Playing Back a Voice Memo ...................................... 15
Using the Self-Timer ................................................... 10
Using Continuous Photography .................................. 15
Using Best Shot Selector ........................................... 10
Using User Sets ......................................................... 15
Changing the ISO ....................................................... 10
Choosing or Deleting Folders ..................................... 15
Increasing The Sharpness of Moving Objects ............. 10
Using Perspective Control .......................................... 15
Changing the Autofocus Setting ................................. 10
Creating a Small Pic .................................................. 15
Using AF Area Mode .................................................. 10
Preparing Print Sets ................................................... 16
Using Manual Focus .................................................. 10
Deleting a Print Set .................................................... 16
Using Focus Lock ....................................................... 11
Using the Set-up Menu ............................................... 16
Turning Focus Confirmation On and Off ....................... 11
Using AE Lock ........................................................... 16
Selecting Continuous or Single Autofocus ................... 11
Using the Infinity Focus Setting ................................... 11
THE SHORT COURSES WEB SITE
AND
ON-LINE DIGITAL PHOTOGRAPHY BOOKSTORE
HTTP://WWW.SHORTCOURSES. COM
A SHORT COURSE IN NIKON COOLPIX 4500 PHOTOGRAPHY
1.
2.
3.
4.
5.
Taking a Picture in Auto Mode
Press the power switch toward ON and then
release it. Swivel the lens to a comfortable position,
remove the lens cap, and check the number of
pictures remaining in the lower right corner of the
monitor.
Compose the image in the viewfinder making sure
the subject that you want sharpest is in the focus
brackets in the center of the viewfinder.
Press the shutter button halfway down so the
camera can set focus and exposure. When these are
set, the green autofocus lamp next to the viewfinder glows steady. If the camera has problems
focusing, the lamp flashes (page 64). If the light is
dim, the flash will pop up (page 100).
Press the shutter button all the way down to take
the picture. The camera beeps, the image is displayed on the monitor, and the AF lamp next to the
viewfinder flashes green as the image is saved to
the CompactFlash card.
When done, press the power switch toward OFF
and release it. Replace the lens cap.
Using Menus
■ To display the menu in any mode, press the MENU
button.
■ To move down (or up) a menu to highlight commands, press the down (or up) point on the Multi
Selector to move the green highlight. As you highlight
a command, it displays a right-point, rotate, or pressdown icon telling you what action to perform.
■ To move between pages of multipage menus,
highlight the last (or first) item on the menu and press
the down (or up) point on the Multi Selector. You can
also page through long menus by pressing the MENU
button when MENU NEXT PAGE is displayed in the
lower right corner of the menu.
■ To display a submenu when a highlighted menu
command displays a right-pointing icon, press the
right point on the Multi Selector. (To hide the submenu, press the left point.)
■ To set (activate) a highlighted command (one with
a press-down icon), press down the center point on
the Multi Selector. The setting applies immediately.
This means you can change a setting, take a picture,
and the menu will reappear so you can change the
setting again. This is a great way to get just the results
you want in difficult situations.
■ To move between the main and Set-up menus in
P, S, A, or M modes, press the up point on the Multi
Selector until no menu item is highlighted in green,
then press the right or left point to highlight the other
menu icon. Press the down point to activate the menu.
■ To exit the menu, press the MENU button until
THE SHORT COURSES WEB SITE
AND
ON-LINE DIGITAL PHOTOGRAPHY BOOKSTORE
6
MENU OFF is displayed in the lower right corner of
the menu, then press it again or press the left point on
the Multi Selector.
1.
2.
3.
4.
Resetting the menus
With the camera in P, A, S, or M mode, press the
MENU button to display the shooting menu.
Press the down point on the Multi Selector to
highlight Reset All and press the right point to
display a submenu.
Press the down point on the Multi Selector to
highlight Reset and press the center or right point
to select it and reset the commands.
Press the MENU button to hide the menu.
Reviewing Images
1. With the camera in any shooting mode, press the
Playback button once to see the last photo you took
one-quarter the size of the screen (you can scroll
through these small images). Press Playback again
to see the image full-screen. If there isn’t at least
one photo on the CF card you’ll get the message
“Card contains no images.”
2. With an image displayed full-screen, use any of
the procedures described in the QuickSteps box
“Managing Your Images.”
3. To resume shooting, press the shutter button
halfway down.
Managing Your Images
■ To display one image after another, press the left/
up or right/down points on the Multi Selector. Hold a
point down to scroll quickly through the images as
you watch the image numbers on the monitor.
■ To delete the displayed image, press the delete
button marked with the trash can icon above it. When
prompted to confirm the deletion, press the down
point on the Multi Selector to highlight Yes, then press
the center or right point to delete the image.
■ To turn the information display on or off, press the
Monitor button once or twice.
■ To scroll through up to five screens of information
about the displayed image and camera settings
(including the firmware version), rotate the Command
Dial. One page shows a histogram illustrating the
levels of luminance in the image (page 52). Some of
the same information is also stored in a TXT file that
you can read with any word processing program
(page 54). If you see only the histogram screen no
matter how much you rotate the Command Dial,
press the Monitor button twice to turn the monitor’s
information display on.
HTTP://WWW.SHORTCOURSES. COM
A SHORT COURSE IN NIKON COOLPIX 4500 PHOTOGRAPHY
■ To play a movie (page 121) when the first frame is
displayed full-screen on the monitor (it’s marked with
a movie icon), press down the Multi Selector’s center
point once to load the movie and again to play it.
Press the same point to pause and restart the movie.
While paused, press the other points on the Multi
Selector to scroll through frames. Press the zoom
buttons to adjust the sound volume.
■ To add a voice memo to the currently displayed
image (page 120), hold down the FUNC button on top
of the camera and speak into the microphone. To play
back a voice memo, press and release the FUNC
button. Adjust volume with the zoom buttons. To
delete the voice memo, press the button with the trash
can icon while it’s playing.
1.
2.
3.
4.
Using Playback Zoom
With the camera in any shooting mode, press the
Playback button twice to display full-screen the
last picture you took.
Press or hold down the zoom in (T) button marked
with the magnifying glass icon to zoom the image
up to 6x. The amount of zoom is displayed in the
upper left corner of the monitor.
To scroll around the zoomed image, press the
points on the Multi Selector.
To cancel zoom, press the zoom-out (W) button.
Using Thumbnail Playback
1. With the camera in any shooting mode, press the
Playback button twice to display full-screen the
last picture you took.
2. Press the zoom out (W) button marked with the
thumbnail grid icon once to display 4 thumbnails
and twice to display 9.
3. Use any of the following commands when viewing
thumbnails:
■ To move the green selection frame from one
image to another, press the points on the Multi
Selector.
■ To move forward or back a page at a time,
rotate the Command Dial.
■ To enlarge the selected thumbnail to fill the
screen, press the zoom in (T) button twice if
viewing nine thumbnails, or once if viewing four.
■ To delete the selected image, press the delete
button marked with the trash can icon. When
prompted to confirm the deletion, press the down
point on the Multi Selector to highlight Yes, then
press the center or right point to delete the image.
THE SHORT COURSES WEB SITE
AND
ON-LINE DIGITAL PHOTOGRAPHY BOOKSTORE
7
Deleting Some or All Images
1. With the camera in any shooting mode, press the
Playback button twice to display full-screen the
last picture you took.
2. Press the MENU button, press the down point
on the Multi Selector to highlight Delete, then
press the right point to display a list of choices.
3. Press the down or up point on the Multi
Selector to do one of the following:
■ Highlight Erase All Images and press the
center or right point to select it and display a
screen asking you to confirm the deletion.
■ Highlight Selected Images and press the center
or right point to select it and display 6 thumbnails. Press the left and right points to scroll the
blue frame through the thumbnail images and
press the up or down point to mark images for
deletion with a trash can icon. (You use the
same procedures to unselect images.) When
done selecting images, press down the Multi
Selector’s center point to display a screen
asking you to confirm the deletions.
4. Press the down or up point on the Multi Selector to
highlight Yes and press the center or right point to
select it.
5. Press the MENU button to hide the menu.
1.
2.
3.
4.
5.
Turning Disable Delete On and Off
With the camera in P, S, A, or M mode, press
MENU button to display the shooting menu.
Press the right point on the Multi Selector to
highlight the Set-up menu icon, then press the
down point to activate the Set-up menu.
Press the down or up point on the Multi Selector to
highlight Disable Delete, and press the right point to
display a list of choices.
Press the down or up point on the Multi Selector to
highlight On or Off, then press the center or right
point to select it.
Press the MENU button to hide the menu.
Protecting Images
1. With the camera in any shooting mode, press the
Playback button twice to display full-screen the
last picture you took.
2. Press the MENU button, press the up or down
point on the Multi Selector to highlight Protect, and
then press the right point to select it and display 6
thumbnail images.
3. Use the left or right point on the Multi Selector to
highlight a thumbnail image and press the up or
HTTP://WWW.SHORTCOURSES. COM
A SHORT COURSE IN NIKON COOLPIX 4500 PHOTOGRAPHY
down point to protect it and mark it with a key
icon. (You use the same procedures to remove the
icon.)
4. When finished marking images, press the Multi
Selector’s center or right point to complete the
procedure.
5. Press the MENU button to hide the menu.
1.
2.
3.
4.
Displaying a Slide Show
With the camera in any shooting mode, press the
Playback button twice to display the last picture
you took full-screen.
Press the MENU button, press the up or down
point on the Multi Selector to highlight Slide Show
and press the right point on the Multi Selector to
display a list of choices.
Do one of the following:
■ Select Start and press the right point on the
Multi Selector to begin the show. To pause and
restart the show, press the center point. When
paused, you can press the other points to scroll
through frames. To cancel the show press MENU
or press the shutter button halfway down.
■ Highlight Frame Intvl and press the center point
on the Multi Selector to display a list of times
ranging from 2 seconds to 10 (3 is the default).
Highlight the interval time you want to use and
press the center or right point to select it and start
the slide show. This sets the minimum time, but it
may be longer for large files because they take
longer to load.
When the slide show ends, press MENU to quit, or
highlight Restart or Frame Intvl, and press the
center or right point on the Multi Selector again to
continue. A show ends automatically after 30
minutes if left unattended.
Connecting the Camera to a TV
1. Plug the black plug of the cable included with your
camera into the camera’s A/V out jack.
2. Plug the yellow plug into the TV’s video in jack and
the white plug into the audio-in jack.
3. Select NTSC or PAL modes using the Video Mode
command on the playback mode’s Set-up menu.
Hiding and Unhiding Images
1. With the camera in any shooting mode, press the
Playback button twice to display full-screen the
last picture you took.
2. Press the MENU button, press the up or down
point on the Multi Selector to highlight Hide Image
and press the right point to select it.
THE SHORT COURSES WEB SITE
AND
ON-LINE DIGITAL PHOTOGRAPHY BOOKSTORE
8
3. Use the left or right point on the Multi Selector to
highlight a thumbnail image and press the up
point to mark it with the hidden image icon. (You
use the same procedures to remove the icon.)
4. Press the Multi Selector’s center point to complete
the procedure.
5. Press the MENU button to hide the menu.
Selecting an Image Quality and Size
1. Press the MENU button, then do one of the following:
■ In P, A, S, M or Auto mode, press the down point
on the Multi Selector to highlight Image Quality or
Image Size.
■ In any Scene mode, press the down point on the
Multi Selector to highlight the image quality icon
(see left) and press the center point to select it.
Press the down point on the Multi Selector to
highlight Image Quality or Image Size.
2. Press the right point on the Multi Selector to
display choices, press the up or down point to
highlight your choice, then press the center or right
point to select it.
Changing Shooting Modes
1. Hold down the MODE button and rotate the
Command Dial until P (program), a Scene mode
icon, S (shutter-priority), A (aperture-priority), or M
(manual) is displayed on the monitor.
2. Release the MODE button.
Using Scene Modes
■ To select scene mode, hold down the MODE button
and rotate the Command Dial until the Scene icon for
the most recently used Scene mode is displayed.
■ To change the Scene mode, first display one of the
Scene mode icons as described above, then press the
MENU button to display the Scene mode menu. Press
the points on the Multi Selector to highlight the icon
for the mode you want to use and its name is displayed at the top of the screen. Press down the center
point on the Multi Selector to select the highlighted
mode.
Using Program and Flexible Program Mode
1. With the camera on, hold down the MODE button,
turn the Command Dial until P (program) is
displayed on the monitor, then release the MODE
button.
2. To use flexible program mode, rotate the Command
Dial to cycle through any available aperture and
shutter speed combinations that yield the same
exposure. The mode indicator changes from P to P*
HTTP://WWW.SHORTCOURSES. COM
A SHORT COURSE IN NIKON COOLPIX 4500 PHOTOGRAPHY
3. When finished, rotate the Command Dial until the
P* changes back to P, select another shooting mode,
press the Playback button, or turn off the camera.
Using Shutter-Priority Mode
1. With the camera on, hold down the MODE button
and turn the Command Dial until an S is displayed on the monitor.
2. Release the MODE button and turn the Command
Dial to select a shutter speed on the monitor.
Using Aperture-Priority Mode
1. With the camera on, hold down the MODE button
and turn the Command Dial until an A appears on
the monitor.
2. Release the MODE button and turn the Command
Dial to select an aperture on the monitor.
Using Manual Mode
1. With the camera on, hold down the MODE button
and turn the Command Dial until an M appears on
the monitor, then release the MODE button. The
aperture and shutter speed are displayed on the
monitor.
2. Press the MODE button to switch back and forth
between the aperture and shutter speed setting.
You can tell which is adjustable at the moment
because the current setting is displayed on the
monitor in green.
3. Rotate the Command Dial to change either apertures ( in one-third stops) or shutter speeds (in full
stops). As you do so, an exposure scale is displayed on the monitor to indicate how much you
are under (-) or over (+) the camera’s recommended
exposure setting.
1.
2.
3.
4.
Changing the Metering Mode
With the camera in P, S, A, or M mode, press the
MENU button to display the shooting menu.
Press the up or down point on the Multi Selector to
highlight Metering and press the right point to
display a submenu of choices.
Press the up or down point on the Multi Selector to
highlight your choice, and then press the center or
right point to set it.
Press the MENU button to hide the menu.
Using Exposure Compensation
1. With the camera in any shooting mode, hold down
the FUNC/Exposure Compensation (+/-) button on
top of the camera and rotate the Command Dial to
select a setting from –2 (darker) to +2 (lighter) in
THE SHORT COURSES WEB SITE
AND
ON-LINE DIGITAL PHOTOGRAPHY BOOKSTORE
9
increments of 1/3 of a stop. The monitor displays
the result of the changes. Selecting a + value makes
the scene look brighter, and selecting a – value
makes it look darker. (You can also set exposure
compensation on the shooting menu in P, S, A, or
M modes by selecting Exposure Options and then
Exp. +/–.)
2. When done, reset exposure compensation to 0.0. In
Auto or Scene modes, you can also cancel exposure
compensation by selecting another shooting mode
or turning off the camera.
Using Exposure Lock
1. Point the camera so the subject that you want to
lock exposure on is in the currently active focus
area.
2. Press the shutter button halfway down and hold it
there to lock in the exposure. The AF lamp next to
the viewfinder glows a steady green.
3. Without releasing the shutter button, recompose
the scene and press the shutter button the rest of
the way to take the picture.
1.
2.
3.
4.
5.
6.
7.
Using Autoexposure Bracketing
With the camera set to P, A, S, or M mode press the
MENU button to display the shooting menu.
Press the up or down point on the Multi Selector to
highlight Auto Bracketing, and press the right point
to display a submenu.
Press the up or down point on the Multi Selector to
highlight On and press the right point to display a
list of settings.
Press the up or down point on the Multi Selector to
highlight a combination of exposures and exposure increments and press the center or right point
to set it.
Press the MENU button to hide the menu. BKT0 is
displayed on the monitor.
Take each of the pictures until BKT0 is again
displayed.
When finished, repeat Steps 1–3 but select OFF. If
you don’t turn it off, it will repeat the series over
and over.
Displaying Histograms
■ In full-screen playback mode, scroll to the photo
you want to see a histogram of and rotate the Command Dial until the histogram is displayed. You can
then scroll through other images to see their histograms.
HTTP://WWW.SHORTCOURSES. COM
A SHORT COURSE IN NIKON COOLPIX 4500 PHOTOGRAPHY
Using Histograms
■ If the histogram shows most pixels toward the left
(darker) side of the graph, use exposure compensation to add exposure (page 50).
■ If the histogram shows most pixels toward the right
(lighter) side of the graph, use exposure compensation to reduce exposure (page 50).
Turning Info.txt On and Off
1. With the camera in P, S, A, or M, mode, press
MENU button to display the shooting menu.
2. Press the right point on the Multi Selector to
highlight the Set-up menu icon, then press the
down point to activate the Set-up menu.
2. Highlight info.txt and press the right point on the
Multi Selector to display a list of choices.
3. Press the up or down point on the Multi Selector to
highlight On or Off, then press the center or right
point to set it.
4. Press the MENU button to hide the menu.
Using the Self-Timer
1. With the camera in any shooting mode except
Fireworks Show in Scene mode, press the Focus
button marked with the self-timer sweeping second
hand icon until the same icon is displayed on the
monitor.
2. With the camera on a stable surface or tripod,
press the shutter button all the way down once for
a ten-second delay, then press it again once the
countdown timer displays “10” for a three-second
delay. (To cancel the timer, press the shutter button
a third time.)
1.
2.
3.
4.
5.
6.
Using Best Shot Selector
With the camera in P, A, S, or M mode, press the
MENU button to display the shooting menu.
Press the up or down point on the Multi Selector to
highlight the Best Shot Selector, and press the right
point to display a submenu.
Press the up or down point on the Multi Selector to
highlight On and press the center or right point to
select it.
Press the MENU button to hide the menu.
Hold down the shutter button to take up to 10
pictures and then release it.
When finished, repeat Steps 1–4 but select Off
instead of On.
THE SHORT COURSES WEB SITE
AND
ON-LINE DIGITAL PHOTOGRAPHY BOOKSTORE
10
Changing the ISO
1. With the camera in P, S, A, or M mode, hold down
the ISO button on the back of the camera and turn
the Command Dial to cycle through the settings
AUTO, 800, 400, 200, and 100.
2. Release the ISO button and take your photos.
3. When finished, repeat Steps 1 and 2 but select
AUTO to return to the default setting.
Increasing The Sharpness of Moving Objects
■ Photograph fast-moving subjects heading toward
or away from you and not from side to side.
■ Move farther back from the subject.
■ Zoom the lens to a wider angle of view.
■ Switch to shutter-priority (page 36) or flexible
program (page 34) mode and select a fast shutter
speed.
■ Increase the camera’s ISO although this adds some
grain to the image (page 58).
Changing the Autofocus Setting
■ With the camera in any mode (some scene modes
limit your choices), repeatedly press the Focus button
on the back of the camera to cycle through the available modes: autofocus (no icon), infinity (a mountain
icon), macro close-up (a flower blossom icon), and
macro/self-timer (flower blossom and sweeping
second hand icons).
Using AF Area Mode
1. With the camera in P, S, A, or M mode, press the
MENU button to display the shooting menu.
2. Press the up or down point on the Multi Selector to
highlight Focus Options, then press the right point
to display a submenu.
3. With AF Area Mode highlighted, press the right
point to display a submenu.
4. Press the up or down point on the Multi Selector to
highlight one of the choices, then press the center
or right point to set it.
5. Press the MENU button to hide the menu.
Using Manual Focus
1. With the camera in P, A, S, or M mode, hold down
the Focus button and turn the Command Dial to
manually focus the camera.
2. To cancel manual focus, press and release the
Focus button.
HTTP://WWW.SHORTCOURSES. COM
A SHORT COURSE IN NIKON COOLPIX 4500 PHOTOGRAPHY
Using Focus Lock
1. With the camera in any shooting mode, point it so
the subject you want to lock focus on is in the
active AF Area.
2. Press the shutter button halfway down and hold it
there to lock in the focus. The AF lamp next to the
viewfinder glows a steady green.
3. Without releasing the shutter button, recompose
the scene and press the shutter button the rest of
the way to take the picture.
Turning Focus Confirmation On and Off
1. With the camera in P, A, S, or M mode, press the
MENU button to display the shooting menu.
2. Press the up or down point on the Multi Selector to
highlight Focus Options, then press the right point
to display a submenu.
3. Press the up or down point on the Multi Selector to
highlight Focus Confirmation and press the right
point to display a submenu of choices.
4. Press the up or down points on the Multi Selector to
highlight one of the following choices, then press
the center or right point to set it.
■ MF sharply outlines subjects that are in focus
when you use manual focus (page 66).
■ On sharply outlines subjects that are in focus in
all focus modes.
■ Off turns off focus confirmation.
5. Press the MENU button to hide the menu.
1.
2.
3.
4.
5.
Selecting Continuous or Single Autofocus
With the camera in P, A, S, or M mode, press the
MENU button to display the shooting menu.
Press the up or down point on the Multi Selector to
highlight Focus Options, then press the right point
to display a submenu.
Press the up or down point on the Multi Selector to
highlight Auto-Focus Mode and press the right point
to display a submenu of choices.
Press the up or down point on the Multi Selector to
highlight Continuous AF or Single AF, then press the
center or right point to set it.
Press the MENU button to hide the menu.
Using the Infinity Focus Setting
■ With the camera in Auto, P, A, S, or M mode press
the Focus button on the back of the camera until the
infinity focus icon (a mountain) is displayed on the
monitor.
THE SHORT COURSES WEB SITE
AND
ON-LINE DIGITAL PHOTOGRAPHY BOOKSTORE
11
Increasing Depth of Field
■ Photograph in bright sun so the aperture closes
down.
■ Zoom the lens out to a wider angle of view.
■ Move farther away from the subject.
■ Switch to aperture-priority (page 38) or flexible
program (page 34) mode and select a small aperture.
■ Switch to infinity focus.
Using Focus Lock for Maximum Depth of Field
1. Point the camera so the area you want to focus on
is in the active AF Area. In a landscape, pick
something about one-third of the way between you
and the horizon. For other scenes, pick something
to focus on that’s one-third of the way between the
nearest and farthest points that you want to be
sharp.
2. Press the shutter button down halfway and hold it
there to lock in the focus. The AF lamp next to the
viewfinder glows a steady green.
3. Recompose the scene and press the shutter button
the rest of the way to take the picture.
Using Focus Lock for Minimum Depth of Field
1. Zoom the lens in to magnify the subject or move
close to it and focus the camera on, or slightly in
front of, the subject you want sharpest.
2. Press the shutter button down halfway and hold it
there to lock in the focus. The AF lamp next to the
viewfinder glows a steady green.
3. Recompose the scene and press the shutter button
the rest of the way to take the picture.
Decreasing Depth of Field in Automatic Mode
■ Photograph in dim light to open up the aperture.
■ Zoom the lens in to enlarge the subject.
■ Move closer to the subject.
Capturing Creative Blur
■ Set the camera to shutter-priority (page 36) or
flexible program (page 34) mode and select a slow
shutter speed.
■ Try blurring images in low-light situations. In
bright light, the shutter will open and close too fast.
■ In some situations, you may want to turn the flash
off when trying to blur nearby subjects (page 106).
■ At night select bulb to keep the shutter open as long
as you hold down the shutter button up to one minute
(page 83).
HTTP://WWW.SHORTCOURSES. COM
A SHORT COURSE IN NIKON COOLPIX 4500 PHOTOGRAPHY
Setting White Balance
1. With the camera in P, S, A, or M mode press the
MENU button to display the shooting menu.
2. Press the down point on the Multi selector to
highlight White Balance and press the right point to
display a submenu of choices.
3. Press the up or down point on the Multi Selector to
highlight your choice and then press the center or
right point to set it.
4. Press the MENU button to hide the menu.
1.
2.
3.
4.
5.
6.
1.
2.
3.
4.
5.
6.
Setting White Balance Preset
With the camera in P, S, A, or M mode press the
MENU button to display the shooting menu.
Press the down point on the Multi selector to
highlight White Balance and press the right point to
display a submenu of choices.
Press the up or down point on the Multi Selector to
highlight White Bal Preset and press the right point
to zoom the lens and display the White Balance
Preset screen and menu.
Do one of the following:
■ Point the camera at the white card or other white
subject so it fills the frame, highlight Measure, and
press the center or right point on the Multi Selector.
The camera beeps, measures the color temperature,
and resets white balance.
■ Highlight Cancel and press the center or right
point on the Multi Selector to return white balance
to its most recent setting.
Press the MENU button to hide the menu.
When finished, repeat Steps 1–3 to select another
white balance setting, or Steps 1–4 to reset white
balance and try again.
Using White Balance Bracketing
With the camera in P, S, A, or M mode press the
MENU button to display the shooting menu.
Press the up or down point on the Multi Selector to
highlight Auto Bracketing, and press the right point
to display a submenu.
Press the up or down point on the Multi Selector to
highlight WB Bracketing and press the center or
right point to set it.
Press the MENU button to hide the menu. WB-BKT
is displayed on the monitor.
Press the shutter button once for each picture.
When finished, repeat Steps 1–4 but select Off
instead of WB Bracketing.
THE SHORT COURSES WEB SITE
AND
ON-LINE DIGITAL PHOTOGRAPHY BOOKSTORE
12
Turning Noise Reduction On and Off
1. With the camera in P, S, A, or M mode press the
MENU button to display the shooting menu.
2. Press the up or down point on the Multi Selector to
highlight Noise Reduction, and press the right point
to display a submenu of choices.
3. Press the up or down point on the Multi Selector to
highlight On or Off and then press the center or
right point to set it. When on, the noise reduction
icon (NR) is displayed on the monitor.
4. Press the MENU button to hide the menu and take
your photos. When on, the noise reduction icon is
displayed on the monitor.
1.
2.
3.
4.
Using Bulb
With the camera on, hold down the MODE button
and turn the Command Dial until an M (for
manual exposure) appears on the monitor, then
release the MODE button. The aperture and shutter
speed are displayed on the monitor.
Press the MODE button to switch to the shutter
speed setting. You can tell which is adjustable at
the moment because the current setting is displayed in green or yellow on the monitor.
Turn the Command Dial to change the shutter
speed until BULB5M is displayed on the monitor.
Press the shutter button all the way down and
hold it there until you get the exposure time you
want and then release it.
Zooming the Lens
To zoom the lens, press zoom-out (W) to widen the
angle of view and zoom-in (T) to enlarge subjects. As
you zoom, an indicator displayed on the monitor
indicates the amount of zoom.
1.
2.
3.
4.
5.
Turning Fixed Aperture On and Off
With the camera in P, S, A, or M mode, press the
MENU button to display the shooting menu.
Press the down button on the Multi Selector to
highlight Zoom Options and press the right point to
display a submenu.
Press the down button on the Multi Selector to
highlight Fixed Aperture and press the right point
to display a list of choices.
Highlight Off or On and press the center or right
point on the Multi Selector to set it.
Press the MENU button to hide the menu.
HTTP://WWW.SHORTCOURSES. COM
A SHORT COURSE IN NIKON COOLPIX 4500 PHOTOGRAPHY
1.
2.
3.
4.
Setting the Zoom Startup Position
With the camera in P, S, A, or M mode, press the
MENU button to display the shooting menu.
Press the down button on the Multi Selector to
highlight Zoom Options and press the right point to
display a submenu.
Press the down button on the Multi Selector to
highlight Startup Position and press the right point
to display a list of choices.
Highlight one of the choices described below and
press the center or right point on the Multi Selector
to select it.
■ Last Position returns the lens to the same
position is was set to when you last turned off
the camera.
■ Wide sets the lens to the fully zoomed out
position.
5. Press the MENU button to hide the menu.
1.
2.
3.
4.
1.
2.
3.
4.
5.
Using Digital Zoom
With the camera is any shooting mode and the
monitor on, use the monitor to compose your
image.
Press the zoom-in (T) button to zoom all the way
into the subject and then continue to hold it down
for 2 seconds.
When the camera goes into digital zoom, the zoom
indicator on the monitor turns yellow and the AF
lamp next to the viewfinder blinks green. You can
adjust the degree of magnification with the zoom
in (T) or zoom out (W) buttons.
To return to optical zoom, press the zoom-out (W)
button until the digital zoom indicator on the
monitor changes back to white.
Turning Digital Zoom Off and On
With the camera in P, S, A, or M mode, press the
MENU button to display the shooting menu.
Press the down point on the Multi Selector to
highlight Zoom Options, and press the right point
to display a submenu of choices.
With Digital Tele highlighted, press the right point
to display a list of choices.
Use the up or down point on the Multi Selector to
highlight On or Off and press the center or right
point to select it.
Press the MENU button to hide the menu.
Using Lens Converters
1. With the camera in P, S, A, or M mode, press the
MENU button to display the shooting menu.
THE SHORT COURSES WEB SITE
AND
ON-LINE DIGITAL PHOTOGRAPHY BOOKSTORE
13
2. Press the up or down point on the Multi Selector to
highlight Lens, and press the right point to display
a submenu of choices.
3. Press the up or down point on the Multi Selector to
highlight your choice and then press the center or
right point to set it.
4. Press the MENU button to hide the menu.
5. When finished, repeat Steps 1–4 but select Normal.
Changing Flash Modes
■ With the camera in any shooting mode, repeatedly
press the Flash/ISO button on the back of the camera
until the icon is displayed for the flash mode you
want to use. (No flash icon indicates Auto flash.) The
flash modes available in Scene mode depend on
which Scene mode you have chosen.
1.
2.
3.
4.
Changing Speedlight Options
With the camera in P, S, A, or M mode, press the
MENU button to display the shooting menu.
Press the up or down point on the Multi Selector to
highlight Speedlight Opt, and press the right point
to display a submenu. Use the points on the Multi
Selector to choose from the following settings:
■ With Pop Up highlighted, press the right point
on the Multi Selector to display choices. Select Auto
or Manual, then press the center or right point to set
it.
■ With Variable Power highlighted, press the right
point on the Multi Selector to display a setting
scale. Press the up point to increase the flash
power (+) and the down point to decrease it (-),
then press the center or right point to set the
specified power.
■ With Speedlight Cntrl highlighted, press the right
point on the Multi Selector to display choices.
Select Internal Off or Int&Ext Active, then press the
center or right point to set it.
Press the MENU button to hide the menu.
When finished, repeat Steps 1–3 to change the
settings back.
Using red-Eye Mode
1. With the camera in any shooting mode, repeatedly
press the Flash/ISO button on the back of the
camera until the red-eye reduction icon (an eye) is
displayed on the monitor.
2. When finished, to return to auto flash, repeatedly
press the Flash/ISO button until no flash icon is
displayed on the monitor.
HTTP://WWW.SHORTCOURSES. COM
A SHORT COURSE IN NIKON COOLPIX 4500 PHOTOGRAPHY
Using Anytime Flash Mode
1. With the camera in any shooting mode, repeatedly
press the Flash/ISO button on the back of the
camera until the anytime flash icon (a lightning
bolt) is displayed on the monitor.
2. When finished, to return to auto flash, repeatedly
press the Flash/ISO button until no flash icon is
displayed on the monitor.
Using Slow Sync Flash Mode
1. With the camera in any shooting mode, repeatedly
press the Flash/ISO button on the back of the
camera until the slow sync icon is displayed on the
monitor.
2. When finished, to return to auto flash, repeatedly
press the Flash/ISO button until no flash icon is
displayed on the monitor.
14
Adjusting Brightness and Contrast
1. With the camera in P, S, A, or M mode, press the
MENU button to display the shooting menu.
2. Press the up or down point on the Multi Selector to
highlight Image Adjustment, and press the right
point to display a submenu of choices.
3. Press the up or down point on the Multi Selector to
highlight your choice and then press the center or
right point to set it.
4. Press the MENU button to hide the menu.
1.
2.
3.
Using Flash Cancel
1. With the camera in any shooting mode, repeatedly
press the Flash/ISO button on the back of the
camera until the flash cancel icon is displayed on
the monitor.
2. When finished, to return to auto flash, repeatedly
press the Flash/ISO button until no flash icon is
displayed on the monitor.
4.
1.
2.
Taking Macro Close-ups
1. With the camera in Auto, P, S, A, or M mode, press
the Focus button on the back of the camera until
the macro close-up flower blossom icon is displayed, or the macro icon and a sweeping second
hand icon if you are using the self-timer (page 57).
2. Compose the photo on the monitor. To frame and
focus the image, use the zoom buttons, and move
the camera closer to or farther from the subject.
When zoomed to the midrange where extreme
close-ups are possible, the macro icon on the
monitor turns yellow.
3. Press the shutter button halfway down to lock in
focus then all the way down to take the picture.
Increasing depth of Field in Close-ups
■ Increase the illumination of the subject to stop
down the aperture.
■ Don’t get any closer to the subject than you have to.
■ Focus on something in the middle of the scene
(front to back) since in close-ups, depth of field is half
in front and half behind the plane of critical focus.
3.
4.
1.
2.
3.
4.
5.
THE SHORT COURSES WEB SITE
AND
ON-LINE DIGITAL PHOTOGRAPHY BOOKSTORE
Specifying Image Sharpness
With the camera in P, S, A, or M mode, press the
MENU button to display the shooting menu.
Press the up or down point on the Multi Selector to
highlight Image Sharpening, then press the right
point to display a submenu.
Press the up or down point on the Multi Selector to
highlight your choice and press the center or right
point to set it.
Press the MENU button to hide the menu.
Adjusting Saturation
With the camera in P, S, A, or M mode, press the
MENU button to display the shooting menu.
Press the up or down point on the Multi Selector to
highlight Saturation Control, and press the right
point to display a submenu of choices.
Press the up or down point on the Multi Selector to
highlight your choice and then press the center or
right point to set it.
Press the MENU button to hide the menu.
Taking Panoramas
With the camera on, hold down the MODE button
and rotate the Command Dial until the most
recently used Scene mode icon is displayed in the
lower left corner of the monitor.
Press MENU, highlight the Panorama Assist mode
icon, then press the center of the Multi Selector to
select it. The default pan direction arrow (left to
right) is displayed. To change the direction in
which you will shoot the sequence, press the
points on the Multi Selector.
Take the first photograph and about one third of it
will be displayed on the monitor superimposed
over the view you see through lens. If you are
panning from left to right, the picture will be
displayed on the left side of the monitor.
Align each of the other shots and take them.
When finished, press the center point on the Multi
Selector to end the series.
HTTP://WWW.SHORTCOURSES. COM
A SHORT COURSE IN NIKON COOLPIX 4500 PHOTOGRAPHY
Attaching a Voice Memo to a Photo
1. With the camera in any shooting mode, press the
Playback button twice to display full-screen the
last photo you took.
2. Press the points on the Multi Selector to scroll to
the image you want to attach a voice memo to.
3. Hold down the FUNC button and speak into the
microphone (the three holes to the left of the
Command Dial). As you speak a countdown timer
is displayed on the monitor. When finished
recording, release the FUNC button.
Playing Back a Voice Memo
1. With the camera in any shooting mode, press the
Playback button twice to display full-screen the
last photo you took.
2. Press the points on the Multi Selector to scroll to
the image the voice memo is attached to. It will be
marked with a musical note icon.
3. Press the FUNC button to hear the message.
Playback ends when the recording ends or you
press the FUNC button a second time.
15
highlight Folders and press the right point to
display a list of folders.
3. Do one of the following:
■ To select a folder, press the up or down point on
the Multi Selector to highlight the folder you want
to use, and press the right point to select it.
■ To delete a folder, press the up or down point on
the Multi Selector to highlight Delete, then press the
right point to display a list of folders. Press the up
or down point to highlight the folder you want to
use, and press the right point to display a confirmation prompt. Highlight Yes and press the center
or right point.
4. Press the MENU button to hide the menu.
1.
2.
3.
Using Continuous Photography
1. With the camera in P, S, A, or M mode, press the
MENU button to display the shooting menu.
2. Press the up or down point on the Multi Selector to
highlight Continuous, and press the right point to
display a list of choices.
3. Press the up or down point on the Multi Selector to
highlight your choice, then press the center or right
point to set it.
4. Press the MENU button to hide the menu.
4.
5.
1.
2.
3.
4.
Using User Sets
With the camera in P, S, A, or M mode, press the
MENU button to display the shooting menu.
Highlight User Setting and press the right point on
the Multi Selector to display a list of three settings
(the numbers 1, 2, or 3 in boxes)
Press the up or down point on the Multi Selector to
select a user set, then press the center or right point
to set it.
Press the MENU button to hide the menu.
Choosing or Deleting Folders
1. With the camera in any shooting mode, press the
Playback button twice to display full-screen the
last picture you took, then press the MENU button
to display the playback menu.
2. Press the down point on the Multi Selector to
THE SHORT COURSES WEB SITE
AND
ON-LINE DIGITAL PHOTOGRAPHY BOOKSTORE
1.
2.
3.
4.
5.
Using Perspective Control
With the camera in any shooting mode, press the
Playback button twice to display full-screen the
last picture you took.
Press the points on the Multi Selector to scroll to
the image you want to correct and then press the
MENU button to display the playback menu.
Press the down point on the Multi Selector to
highlight Perspective Control and press the center or
right point to display two guidelines on the screen.
Press the up or down point on the Multi Selector to
adjust the image, then press the center or right
point to set it.
■ The up point horizontally expands or shrinks
the top of the image, reducing distortion in pictures
taken from a low angle.
■ The down point horizontally shrinks and
expands the bottom of the image, reducing distortion in pictures taken from a high angle.
Press the MENU button to hide the menu.
Creating a Small Pic
With the camera in any shooting mode, press the
Playback button twice to display full-screen the
last picture you took, then press the MENU button
to display the Playback menu.
Press the down point on the Multi Selector to
highlight Small Pic and press the center or right
point to display a list of small image sizes.
Press the up or down point on the Multi Selector to
highlight one of the sizes and then press the right
or center point to select it.
Press the MENU button to hide the menu.
Scroll to any image you want a smaller copy of
and press the MODE button. When prompted to
confirm the procedure, highlight Yes and press the
center or right point on the Multi Selector.
HTTP://WWW.SHORTCOURSES. COM
A SHORT COURSE IN NIKON COOLPIX 4500 PHOTOGRAPHY
1.
2.
3.
4.
5.
1.
2.
3.
4.
Preparing Print Sets
With the camera in any shooting mode, press the
Playback button twice to display full-screen the
last picture you took, then press the MENU button.
Press the down point on the Multi Selector to
highlight Print Set and press the right point to
display thumbnail images.
Press the left or right point on the Multi Selector to
highlight a thumbnail image and press the up or
down point one or more times to specify the
number of prints you want of that image (maximum of 9—minimum of 0).
Press the center point of the Multi Selector to
complete the procedure and a screen of choices
appears.
Highlight Done and press the center or right point
on the Multi Selector to select it. (You can also
highlight the Info and Date choices and press the
center or right point to turn them on or off. Date
prints the date on the image and Info prints the
aperture and shutter speed used to capture it.)
16
4. Press the up or down point on the Multi Selector to
highlight a setting and press the center or right
point to set it.
5. Press the MENU button to hide the menu. When
on, AE-L is displayed on the monitor in yellow
indicating that AE lock is on, but exposure has not
yet been locked.
6. If you turned AE lock on, or Reset it, take each of
the pictures. After the first one, the AE-L indicator
on the monitor changes from yellow to white to let
you know exposure has now been locked.
7. When finished, repeat Steps 1–3 but select Off. If
you don’t turn it off, AE lock will remain on.
Deleting a Print Set
With the camera in any shooting mode, press the
Playback button twice to display full-screen the
last picture you took, then press the MENU button.
Highlight the Delete command and press the right
point on the Multi Selector to display a list of
choices.
Highlight Print Set and press the center or right
point on the Multi Selector again to delete the print
set.
Press the MENU button to hide the menu.
http://www.greenbatteries.com
Using the Set-up Menu
1. With the camera in playback, P, S, A, or M mode,
press MENU button to display the shooting menu.
Press the right point on the Multi Selector to
highlight the Set-up menu icon, then press the
down point to activate the Set-up menu.
2. Follow the instructions at the end of the appropriate section that follows.
3. Press the MENU button to hide the menu.
Using AE Lock
1. With the camera set to P, A, S, or M mode press the
MENU button to display the shooting menu.
2. Press the up or down point on the Multi Selector to
highlight Exposure Options, and press the right
point to display a submenu.
3. With AE Lock highlighted, press the right point to
display a list of settings.
THE SHORT COURSES WEB SITE
AND
ON-LINE DIGITAL PHOTOGRAPHY BOOKSTORE
HTTP://WWW.SHORTCOURSES. COM