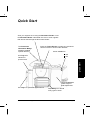
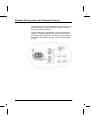
1
WorkCentre Pro® 65/75/90
CopyCentre™ C65/C75/C90
User Guide
May 2003
604S13900
Xerox Model _______________
Serial Number ____________________________
The Document Company Xerox ,
Bessemer Road,
Welwyn Garden City,
Hertfordshire AL7 1HE
England
©2003 by Xerox Corporation. All rights reserved.
Copyright protection claimed includes all forms and matters of copyrighted material and information now
allowed by statutory or judicial law or hereinafter granted, including without limitation material generated from
the software programmes that are displayed on the screen such as icons, screen display looks, etc.
XEROX®, The Document Company® and the stylised X and identifying product names and numbers are
registered trademarks of XEROX CORPORATION or Xerox (Europe) limited.
The Document Centre ST model includes an implementation of LZW licensed under U.S. Patent 4,558,302.
Product names used in this guide may be trademarks or registered trademarks of their respective companies
and are hereby acknowledged.
This document contains images of screens that were created using Zinc Application Framework software
version 3.5 © January 1997 Zinc Software Inc.
As an ENERGY STAR® partner, Xerox Corporation has determined that this product meets the ENERGY
STAR® guidelines for energy efficiency.
RAL, the German Institute for Quality Assurance and Labeling, has awarded the Document Centre 255 and
265 DC the Blue Angel Environmental Label, distinguishing it as a machine which satisfies Blue Angel criteria
for environmental acceptability in terms of machine design, manufacture, and operation.
Whilst the information in this Guide is correct at the time of first publication, Xerox reserves the right at any
time to change the information without notice. Changes are made periodically to this document. Changes
and technical updates will be added in subsequent editions.
ii
Xerox WorkCentre Pro/CopyCentre User Guide
The Document Centre ST model includes software provided by the Internet Software Consortium.
Copyright (c) 1995, 1996, 1997, 1998, 1999, 2000, 2001, 2002, 2003
The Internet Software Consortium - DHCP. All rights reserved.
Redistribution and use in source and binary forms, with or without modification, are permitted provided that
the following conditions are met:
Redistributions of source code must retain the above copyright notice, this list of conditions and the following
disclaimer.
Redistributions in binary form must reproduce the above copyright notice, this list of conditions and the
following disclaimer in the documentation and/or other materials provided with the distribution.
Neither the name of The Internet Software Consortium - DHCP nor the names of its contributors may be used
to endorse or promote products derived from this software without specific prior written permission.
This Software Is Provided By The Internet Software Consortium And Contributors "As Is" And Any Express
Or Implied Warranties, Including, But Not Limited To, The Implied Warranties Of Merchantability And Fitness
For A Particular Purpose Are Disclaimed. In No Event Shall The Internet Software Consortium Or
Contributors Be Liable For Any Direct, Indirect, Incidental, Special, Exemplary, Or Consequential Damages
(Including, But Not Limited To, Procurement Of Substitute Goods Or Services; Loss Of Use, Data, Or Profits;
Or Business Interruption) However Caused And On Any Theory Of Liability, Whether In Contract, Strict
Liability, Or Tort (Including Negligence Or Otherwise) Arising In Any Way Out Of The Use Of This Software,
Even If Advised Of The Possibility Of Such Damage.
Xerox WorkCentre Pro/CopyCentre User Guide
iii
European Union Declaration of Conformity
Approvals and Certifications
The CE marking applied to this product symbolises XEROX
Limited Declaration of Conformity with the following
applicable Directives of the European Union as of the dates
indicated:
January 1, 1995:
Council Directive 73/23/EEC amended by Council Directive
93/68/EEC, approximation of the laws of the member states
related to low voltage equipment.
January 1, 1996:
Council Directive 89/336/EEC, approximation of the laws of
the member states related to electromagnetic compatibility.
March 9, 1999:
Council Directive 99/5/EC, on radio equipment and
telecommunications terminal equipment and the mutual
recognition of their conformity.
A full declaration, defining the relevant directives and
referenced standards can be obtained from your XEROX
Limited representative or by contacting:
Environment Health & Safety,
The Document Company Xerox,
Bessemer Road,
Welwyn Garden City,
Hertfordshire AL7 1HE
ENGLAND.
iv
Xerox WorkCentre Pro/CopyCentre User Guide
WARNING
This product is certified manufactured and tested in
compliance with strict safety and radio frequency interference
regulations. Any unauthorised alteration which, includes the
addition of new functions or the connection of external
devices, may impact this certification. Please contact your
local XEROX Limited representative for a list of approved
accessories.
WARNING
In order to allow this equipment to operate in proximity to
Industrial, Scientific and Medical (ISM) equipment, the
external radiation from the ISM equipment may have to be
limited or special mitigation measures taken.
WARNING
Shielded cables must be used with this equipment to maintain
compliance with Council Directive 89/336/EEC.
Xerox WorkCentre Pro/CopyCentre User Guide
v
The Electricity at Work Regulation (in England
and Wales) UK ONLY
Electricity at Work Regulations:
The Electricity at Work Regulation 1989 came into force in
England and Wales on the 1 April 1990. This 1989 Regulation
places a duty on all employers and self-employed persons to
ensure the electrical system in their premises are constructed,
maintained and operated in such a manner as to prevent, so
far as reasonably practical, danger. This includes ensuring all
electrical equipment connected to such electrical systems are
safely constructed, maintained and operated.
All Xerox equipment have been designed to exacting safety
standards. They have all undergone a variety of stringent
safety tests including earth bond, insulation resistance and
electrical strength tests. Xerox manufacturing plants have
been awarded ISO 9000 quality certification and are subject
to regular audits by the British Standards Institution or
equivalent national standards body.
Xerox equipment which has been properly and regularly
serviced and maintained should not have to undergo
additional specific safety tests pursuant to the 1989
Regulation. Customers wishing to complete safety testing
should contact Xerox (see page 1) for advice prior to any test
implementation.
Xerox equipment should, however, be properly and regularly
serviced and maintained at all times.
QUESTION:What is the Electricity at Work Regulation?
ANSWER:The Electricity at Work Regulation 1989 came into
force in England and Wales on the 1 April 1990. This 1989
Regulation places a duty on all employers and self-employed
persons to ensure the electrical systems in their premises are
constructed, maintained and operated in such a manner as to
prevent, so far as reasonably practicable, danger. This
includes ensuring all electrical products connected to such
electrical systems are safely constructed, maintained and
operated.
QUESTION:Does Xerox comply with the Electricity at Work
Regulation?
ANSWER:The regulation places a duty on all employers and
self-employed persons to ensure the electrical systems in
their premises are, effectively safe.
The regulation does not impose on, amongst others,
manufacturers or suppliers of such electrical systems.
vi
Xerox WorkCentre Pro/CopyCentre User Guide
However, rest assured that all Xerox equipment which Xerox
and its authorised distributors supplies to customers, conform
with all the relevant safety legislation and standards.
QUESTION:Is Xerox equipment safe?
ANSWER:All Xerox equipment supplied by Xerox and their
authorised distributors conform to all relevant safety
legislation and standards.
QUESTION:Is the Xerox equipment in my premises safe?
ANSWER:All Xerox equipment supplied by Xerox and its
authorised distributors conform to all relevant safety
legislation and standards. However, like all electrical
equipment, they have to be regularly serviced and maintained
by competent persons.
Xerox Customer Service Engineers ensure Xerox equipment
is serviced and maintained to exacting Xerox safety
standards. If you would like your Xerox equipment to be
serviced and maintained to such high standards, please
contact your local Xerox Customer Service Organisation.
They will be pleased to assist you.
QUESTION:Does the Xerox equipment in my premises
comply with the Electricity at Work Regulations?
ANSWER:All employers and self-employed persons must
ensure that the electrical systems in their premises are safe.
This will include ensuring Xerox equipment in such premises
is safe.
Xerox Product Safety function has prepared a guide which
contains a list of tests which may be completed by your Xerox
Customer Service Organisation. THESE TESTS MUST BE
CARRIED OUT ONLY BY PERSONS WHO POSSESS THE
RELEVANT SKILL, KNOWLEDGE AND EXPERIENCE TO
CARRY OUT SUCH TESTS.
Please contact the Xerox Customer Service Organisation for
further information.
THE USE OF INAPPROPRIATE TEST PROCEDURES AND
TEST EQUIPMENT MAY PROVIDE MISLEADING
RESULTS AND MAY CAUSE DEATH, PERSONAL INJURY
AND/OR DAMAGE TO PROPERTY.
QUESTION:I would like to carry out my own safety tests on
the Xerox equipment in my premises.
ANSWER:You may, of course, request such tests as you
deem necessary to satisfy yourself that your Xerox equipment
is safe. Your Xerox Customer Support will be pleased to
advise you on such testing.
QUESTION:I require records of all tests
Xerox WorkCentre Pro/CopyCentre User Guide
vii
ANSWER:After safety testing, your Xerox Customer Service
Engineer will provide you with a certificate which details the
results of all tests completed.
In the event of any defect being noted, the Xerox equipment
will be switched off and disconnected from the supply until the
defect has been corrected. You will be advised of such action
to enable such defects to be corrected.
PLEASE NOTE: YOU MUST ENSURE THAT YOUR XEROX
EQUIPMENT IS SAFE AT ALL TIMES
Please contact us if you have any queries regarding the
information provided in this document.
Xerox Product Safety,
Bessemer Road,
Welwyn Garden City,
Herts AL7 1HE, England
viii
Xerox WorkCentre Pro/CopyCentre User Guide
Radio Equipment & Telecommunications
Terminal Equipment Directive 99/5/EC
The Xerox WorkCentre Pro/CopyCentre RDT modem option
has been self-certified by Xerox (Europe) Limited in
accordance with Directive 99/5/EC and has been designed to
work with the national analogue public switched telephone
networks (PSTN) and compatible PBXs of the following
countries:
Austria
Sweden
Netherlands
Iceland
France
Finland
Germany
Belgium
Switzerland
Norway
Ireland
Italy
Luxembourg
Greece
Denmark
United Kingdom
Portugal
Spain
In the event of problems, you should contact your local Xerox
representative in the first instance.
The modem may be configured to be compatible with other
country networks. Please contact your Xerox representative if
the modem needs to be reconnected to another country's
network. There are no user-adjustable settings in the modem.
NOTE: Although the modem can use either loop disconnect
(pulse) or DTMF (tone) signalling it is recommended that it is
set to use DTMF signalling. DTMF signalling provides reliable
and faster call set-up.
Modification, connection to external control software or to
external control apparatus not authorised by Xerox, will
invalidate the product's certification.
Xerox WorkCentre Pro/CopyCentre User Guide
ix
x
Xerox WorkCentre Pro/CopyCentre User Guide
Table of Contents
Safety Notes ..................................................................................... 1
Symbology .........................................................................................................2
Electrical Safety .................................................................................................2
Emergency Power Off .......................................................................................4
Disconnect Device ......................................................................................4
Ozone Information .............................................................................................5
Laser Safety ......................................................................................................6
Operational Safety .............................................................................................7
Safety Extra Low Voltage Approval ...................................................................9
Welcome ......................................................................................... 11
Features for printing from your workstation .....................................................12
Printing from the Embedded Web Server (Internet Services) ..........................13
Printing from the USB Port (Optional Feature) ................................................14
Features at the machine ..................................................................................15
Quick Reference ..............................................................................................18
Quick Start ...................................................................................... 27
Making Copies .................................................................................................28
Authentication Overview ..................................................................................30
Authentication Login ...........................................................................31
Xerox WorkCentre Pro/CopyCentre User Guide
xi
Scanning Documents (Optional Feature) ........................................................ 32
Faxing Documents (Optional Feature) ............................................................ 34
Loading paper ................................................................................................. 36
Using the Job Queue ...................................................................................... 37
Internal Auditron Login .................................................................................... 38
Network Accounting (Optional Feature) Login ................................................ 39
Security Features ............................................................................................ 40
Getting a Secure Print (Networked Models) .................................................... 41
Try These Jobs .............................................................................. 43
Making Copies ................................................................................................ 44
Stapling Copy Jobs ......................................................................................... 45
Making 2-Sided Copies ................................................................................... 48
Improving Image Quality ................................................................................. 49
Removing Unwanted Marks on the Edges of Copies ...................................... 50
Copying Pages from Books or other Bound Documents ................................. 51
Using Reduction/Enlargement ........................................................................ 52
Shifting an Image ............................................................................................ 53
Adding covers ................................................................................................. 54
Placing Multiple Images on a Single Page ...................................................... 55
Making Transparencies with Dividers ............................................................. 56
Making Brochures and Booklets ..................................................................... 57
Making Folded Booklets (optional Professional Finisher) ............................... 58
Making Tri-Fold Sheets (optional Professional Finisher) ................................ 59
Mixed Size Originals Overview ....................................................................... 60
Mixed Size Originals ....................................................................................... 61
Build Job - Overview ....................................................................................... 62
Copying Bound Documents using Build Job ................................................... 63
Using Build Job and Sample Set ..................................................................... 64
Using Tabs/Build Job ...................................................................................... 65
Creating Tab Masters ...................................................................................... 67
Network Faxing Overview (Optional Feature) ................................................. 68
xii
Xerox WorkCentre Pro/CopyCentre User Guide
Index
Xerox WorkCentre Pro/CopyCentre User Guide
xiii
Table of Contents
Faxing a Document .........................................................................................70
Network Scanning Overview (Optional Feature) .............................................72
Scanning Options ............................................................................................73
Internet Fax Overview (Optional Feature) .......................................................75
E-mail Overview (Optional Feature) ................................................................77
Sending an Internet Fax or E-mail without a template .....................................78
Document Management Fields Overview ........................................................79
Creating Document Management Fields .........................................................80
xiv
Xerox WorkCentre Pro/CopyCentre User Guide
Safety Notes
Safety Notes
Your Xerox product and supplies have been designed and tested to meet strict safety
requirements. These include safety agency examination and approval, and compliance
to established environmental standards. Please read the following instructions
carefully before operating the machine and refer to them as needed to ensure the
continued safe operation of your machine. The safety testing and performance of
this product have been verified using Xerox materials only.
Follow all warnings and instructions marked on or supplied with the product.
Xerox WorkCentre Pro/CopyCentre User Guide
Page 1
Symbology
This symbol on the machine indicates heated surface
Electrical Safety
CAUTION
Ensure that the power connection for your machine satisfies
these requirements.
Model
Power Requirements
WorkCentre Pro 90
220-240V Outlet
CopyCentre C90
Dedicated 20A circuit
WorkCentre Pro 65/75
220-240V Outlet
CopyCentre C65/C75
10A or 13A line. The
equipment must be
connected to a grounded
mains outlet
1. The power receptacle for the machine must meet the
requirements stated on the data plate on the rear of the
machine.
2. The socket outlet shall be installed near the equipment and
shall be easily accessible.
3. Use only the power cable supplied with this
equipment.Plug the power cable directly into a properly
grounded electrical outlet. Do not use an extension cord. If
you are not sure whether or not an outlet is properly
grounded, consult a qualified electrician.
Page 2
Xerox WorkCentre Pro/CopyCentre User Guide
WARNING: Improper connection of the equipment grounding
conductor can result in severe electrical shock.
5. Do not place this equipment where people might step or
trip on the power cable.
Safety Notes
4. Do not use a ground adapter plug to connect this
equipment to an electrical outlet that lacks a ground
connection terminal.
6. Do not place objects on the power cable.
7. Do not override or disable electrical or mechanical
interlock devices. Covers, guards, and interlock switches
are provided to prevent operator access to unsafe areas.
8. Do not obstruct ventilation openings. These openings are
provided to prevent overheating of the machine.
Safety Notes
WARNING: Never push objects of any kind into slots and
openings on this equipment. Contacting a voltage point or
shorting out a part could result in electrical shock or fire.
Xerox WorkCentre Pro/CopyCentre User Guide
Page 3
Emergency Power Off
If any of the following conditions occur, turn off the system
immediately and disconnect the power cable from the
electrical outlet. Contact an authorised Xerox Service
Representative to correct the problem.
l
The system emits unusual odours, or makes unusual
noises.
l
The power cable is damaged or frayed.
l
A wall panel circuit breaker, fuse, or other safety device
has been tripped.
l
Liquid is spilled into the system.
l
The system is exposed to water.
l
Any part of the system is damaged.
Disconnect Device
The power cord plug is the disconnect device for this
equipment. It is attached to the back of the machine as a plugin device. To remove all electrical power from the machine,
disconnect the power cable from the electrical outlet.
Page 4
Xerox WorkCentre Pro/CopyCentre User Guide
This product produces ozone during normal operation. The
ozone produced is dependent on copy volume and is heavier
than air. Install the system in a well ventilated room with the
minimum cubic requirements size listed below. Providing the
correct environmental parameter will ensure the
concentration levels meet safe limits.
The minimum cubic requirements are listed below:
Safety Notes
Ozone Information
Table 1: Ozone requirements
Model
Ozone Cubic
requirement
WorkCentre Pro 65/75/90
30 m3
CopyCentre C65/C75/C90
Safety Notes
To determine if the room has the required volume to meet the
ozone requirement, the length of the room multiplied by its
width and height should be equal to or greater than the cubic
volume listed above.
Xerox WorkCentre Pro/CopyCentre User Guide
Page 5
Laser Safety
CAUTION
Use of controls, adjustments or procedures other than those
specified in this guide may result in hazardous radiation
exposure.
The system complies with international safety standards and
is certified as a Class 1 Laser Product.
With specific regard to lasers, the equipment complies with
laser product performance standards set by governmental,
national, and international agencies as a Class 1 Laser
Product. It does not emit hazardous light, as the beam is
totally enclosed during all phases of customer operation and
maintenance.
LUOKAN 1 LASERLAITE
KLASS 1 LASER APPARAT
VAROITUS!
Laitteen Käyttäminen muulla kuin tässä käyttöohjeessa
mainitulla tavalla saattaa altistaa käyttäjän turvallisuusluokan
1 ylittävälle näkymättömälle lasersäteilylle.
VARNING!
Om apparaten används på annat sätt än i denna
bruksansvisning specificerats, kan användaren utsättas för
osynlig laserstrålning, som överskrider gränsen för laserklass
1.
Page 6
Xerox WorkCentre Pro/CopyCentre User Guide
The system is also certified in compliance with applicable
standards by various national bodies.
Do These
NOTE
l
Always connect equipment to a correctly grounded power
source receptacle. If in doubt, have the outlet checked by
a qualified electrician.
l
Always follow all warnings and instructions that are
marked on or are supplied with the equipment.
l
Always exercise care when moving or relocating the
equipment. Please contact your local Xerox Service
Department to arrange relocation of the machine to a
location outside of your building.
l
Always locate the machine on a solid support surface
(not on plush carpet) that has adequate strength to
support the weight of the machine.
l
Always locate the machine in an area that has adequate
ventilation and room for servicing.
l
Always use materials and supplies that are specifically
designed for your Xerox equipment. Use of unsuitable
materials may result in poor performance and possibly a
hazardous situation.
l
Always unplug this equipment from the electrical outlet
before cleaning.
Your system is equipped with an energy saving device to
conserve power when the machine is not in use. The
machine may be left on continuously.
l
Always use caution when installing or modifying
telephone lines
Xerox WorkCentre Pro/CopyCentre User Guide
Page 7
Safety Notes
The equipment is manufactured under a BS5750 Quality
system accepted by the British Standards Institution.
Safety Notes
Operational Safety
Do Not Do These
NOTE
Page 8
l
Never use a ground adapter plug to connect equipment to
a power outlet that lacks a ground connection terminal.
l
Never obstruct ventilation openings. They are provided to
prevent overheating.
l
Never push objects of any kind into the ventilation
openings.
l
Never attempt any maintenance function that is not
specifically described in the documentation.
l
Never remove any covers or guards that are fastened
with screws. There are no operator serviceable areas
within these covers.
l
Never position the machine near a radiator or any other
heat source.
l
Never override or “cheat” any of the electrical or
mechanical interlock devices.
l
Never operate the equipment if you notice unusual noises
or odours. Disconnect the power cord from the power
source receptacle and contact Xerox.
l
Never install telephone jacks in a wet location unless
specifically designated for wet locations
l
Never touch uninsulated telephone wire or terminals
unless the telephone line has been disconnected at the
network interface.
l
Avoid using a telephone (other than a cordless type)
during an electrical storm. There may be a remote risk of
electrical shock from lightning.
If you need additional safety information concerning the
machine or Xerox supplied materials, you may call the
following number: 01707 353434
Xerox WorkCentre Pro/CopyCentre User Guide
Safety Notes
These Xerox Digital Copiers/Printers are in compliance with
various governmental agencies and national safety
regulations. All system data/communication ports meet the
requirements for Safety Extra Low Voltage (SELV) circuits for
connection to customer-owned devices and networks.
Additions of customer-owned or third-party accessories that
are attached to these printers/copiers must meet or exceed
the requirements previously listed. All modules that require
external connection must be installed per Xerox installation
procedures.
Safety Notes
Safety Extra Low Voltage Approval
Xerox WorkCentre Pro/CopyCentre User Guide
Page 9
Page 10
Xerox WorkCentre Pro/CopyCentre User Guide
This User Guide supports the WorkCentre Pro® 65/75/90 and the CopyCentre™ C65/
C75/C90 models. CopyCentre models produce copies at the machine. WorkCentre Pro
models can copy and accommodate optional features such as scan, e-mail, fax.
Because of the digital design of these systems you can expect:
l
more output options. The digital design allows you to create booklets, put
multiple images on a single page, insert dividers into a transparency set, and
combine multiple segments into a single job.
l
fewer jams and damaged originals.
l
high quality output.
l
to enhance and customise your output to your unique specifications.
l
the machine to perform more than one function at a time. You can begin to
scan your copy job while the machine is printing another job.
For additional assistance at the machine press the Help button. If you have a
WorkCentre Pro model, use the CentreWare® Help system or click on the Help button
in the Printer Driver.
Xerox WorkCentre Pro/CopyCentre User Guide
Page 11
Welcome
Welcome
Features for printing from your workstation
If your system is connected to a network, you can use the
following features. See your System Administrator to get
connected.
CentreWare® Printer Drivers
The Printer Driver extends the productivity power of the
system to your desktop.
Some of the types of print jobs you can do are:
l
1-sided or 2-sided
l
Stapled sets if you have a Finisher
l
Resolutions up to 1800x1800 dpi
l
Add standard or customised watermarks
l
Secure Printing (print your confidential document after
you get to the printer)
CentreWare® Tools
The CentreWare® software suite also offers optional User
Management Tools and Network Scanning tools.
Embedded Web Server (Internet
Services)
Every system has a Home Page. This web page allows
you to send print-ready files to any WorkCentre Pro® via
the World Wide Web.
Page 12
Xerox WorkCentre Pro/CopyCentre User Guide
Printing from the Embedded Web Server (Internet
Services)
Internet Services allows you to:
l
print a document when your printer driver is not
available
l
send print jobs to your system when you are working
from a remote location
Access Internet Services through your web browser. This
feature supports print-ready file formats only. All files must be
submitted in formats such as PDF, PCL, PostScript or TIFF.
1. Type the system’s Internet Protocol (IP) address in your
browser. The system’s Home Page will open.
2. Select Services
3. Make your Job Submission selections such as printing,
paper, and delivery.
4. Select Browse to choose your print-ready file.
5. Select Submit Job.
NOTE
If you do not know the machines’ IP address, ask your Key
Operator or Administrator.
Xerox WorkCentre Pro/CopyCentre User Guide
Page 13
Welcome
Follow these steps to send a job:
Printing from the USB Port (Optional Feature)
The Universal Serial Bus (USB) Printer Port can be used for
printing directly from a PC connected via a USB cable. The
USB Print Kit is available upon request. See your System
Administrator for more information.
Prerequisites
l
the WorkCentre Pro Printer Driver installed or have the
Printer Driver CD available
l
the USB Port enabled
Connect your WorkCentre Pro to the PC with a standard USB
peripheral cable. The PC will detect the USB device. If drivers
are already installed, select the WorkCentre Pro printer driver.
If the drivers are not installed, the system will ask to install
printer drivers. Use the Printer Driver CD to install WorkCentre
Pro printer drivers.
Page 14
Xerox WorkCentre Pro/CopyCentre User Guide
Features at the machine
Using the powerful system features you can:
Scan Once and Print Many
When making copies the system only has to scan a
document once regardless of the number of copies or
prints needed. This reduces the risk of jams and damage
to originals.
You can add a job to the job queue by scanning it, even
while the system is printing another job.
Make Copies Look Like Originals
The system allows the reproduction of high quality images,
especially photographs, graphics, text, or a combination.
Compare your output to that from other copiers and see
the difference.
Customise Image Size and Placement
You can manipulate the appearance of the image on the
output stock.
l
Shift the image to create margins for a binding device.
l
Automatically reduce, enlarge, or centre your images.
l
Print multiple reduced images on a single page.
Xerox WorkCentre Pro/CopyCentre User Guide
Page 15
Welcome
Perform Different Tasks Simultaneously
Use Digital Features to Simplify your Work
Process
Use the Build Job feature to divide a copy job into
different segments and apply different settings to each of
the segments. This allows you to:
l
combine originals from the Document Glass and the
Document Feeder into a single job.
l
create a single job, using different programming
features for each original.
l
feed more than the maximum number of originals
through the Document Feeder without reprogramming.
Use the Transparency feature to produce transparencies
with transparency separators in one step.
Use the Booklet Creation feature to automatically
sequence and reduce or enlarge the images when making
booklets.
Use the Covers feature to automatically add covers to
your documents.
Use the Mixed Size Originals feature to copy or scan
mixed size originals simultaneously. Produce copies on
uniform size paper or mixed size paper.
Be Environmentally Friendly
This product complies with a variety of international
standards for environmental protection.
Page 16
l
This machine is compatible with most recycled paper.
l
The Replaceable Units as well as the Toner cartridges
are returned to Xerox where they are remanufactured
and thereby kept out of landfills.
Xerox WorkCentre Pro/CopyCentre User Guide
Scan Documents to Create Electronic Files
This optional feature allows you to create electronic files
from your originals which can be:
l
filed on a server
l
routed over the network to your desktop
l
distributed through an e-mail system
l
automatically placed into a Document Management
Application
Fax Documents
The optional Network Fax connection allows you to send
and receive faxes using the WorkCentre Pro® and your
computer network.
E-mail Documents
This optional feature enables you to convert a hardcopy
document into a Portable Document Format (PDF), single
or multi-page Tagged Image File Format (TIFF)
attachment and send it to an e-mail server for distribution.
Internet Fax Documents
This optional feature allows you to transmit and receive
image files over the internet rather than across telephone
lines.
Xerox WorkCentre Pro/CopyCentre User Guide
Page 17
Welcome
Once your original paper document has been converted to
an electronic digital document you can change, manage,
share and distribute the document in electronic form, using
a wide variety of software applications.
Quick Reference
In addition to the typical everyday documents you can
produce, the table below lists several applications that you
may not have considered.
Most of these jobs can also be done from the Printer Driver
or Internet Services if you are connected to a WorkCentre
Pro®.
Your
Original
Desired
Output
Refer to
Page
Making Copies
Page 44
Stapling
Page 45
Page 18
Xerox WorkCentre Pro/CopyCentre User Guide
2-Sided Copies
Desired
Output
Refer to
Page
Page 48
Improving Image
Quality
Page 49
Removing
Unwanted Marks
Page 50
Copying Pages
From Books or
Other Bound
Documents
Page 51
Xerox WorkCentre Pro/CopyCentre User Guide
Page 19
Welcome
Your
Original
Your
Original
Desired
Output
Refer to
Page
Using Reduction/
Enlargement
Page 52
Shifting an Image
Page 53
Adding Covers
Page 54
Placing Multiple
Images on a
Single Page
Page 55
Page 20
Xerox WorkCentre Pro/CopyCentre User Guide
Desired
Output
Refer to
Page
Making
Transparencies
with Dividers
Page 56
Making Brochures
and Booklets
Page 57
Making Folded
Booklets
Page 58
Xerox WorkCentre Pro/CopyCentre User Guide
Page 21
Welcome
Your
Original
Your
Original
Desired
Output
Refer to
Page
Making Tri-Fold
Sheets
Page 59
Mixed Size
Originals
Page 60
l
Copying
l
Network
Scanning
Page 61
Page 62
Build Job Overview
Unique
Programming for
Each Segment
Segment 1
Segment 2
Segment 3
Page 22
Xerox WorkCentre Pro/CopyCentre User Guide
Your
Original
Desired
Output
Refer to
Page
Page 63
Using Build Job
and Sample Set
Page 64
Welcome
Copying Bound
Documents Using
Build Job
Print a set to review.
Print the rest.
Xerox WorkCentre Pro/CopyCentre User Guide
Page 23
Your
Original
Desired
Output
Using Tabs/Build
Job
Refer to
Page
Page 65
Page 67
Segment 1
Segment 2
Segment 3
Segment 4
Network Faxing
l
to a Single
Number
l
to Multiple
Numbers
Page 24
Page 70
Xerox WorkCentre Pro/CopyCentre User Guide
Network Scanning
l
to File
l
to Desktop
l
to E-Mail
l
to Fax
Sending an Internet
Fax or E-mail
Xerox WorkCentre Pro/CopyCentre User Guide
Desired
Output
Refer to
Page
Page 73
Page 78
Page 25
Welcome
Your
Original
Page 26
Xerox WorkCentre Pro/CopyCentre User Guide
Quick Start
Scan your originals once using the Document Feeder or use
the Document Glass underneath the cover to scan originals
that will not feed through the Document Feeder.
The Functional
Information Badge
identifies installed
optional features.
Press the Touch Screen to make copy selections.
Use the buttons to access other features.
Power on/off here.
= Off
Use Tray 5 for
odd size or
special stock.
Quick Start
= On
Use the Finisher to
create single or
dual stapled sets.
Use Tray 6 as your main paper source.
Paper Trays 1 to 4 hold
many types of stock.
Xerox WorkCentre Pro/CopyCentre User Guide
Page 27
Making Copies
Document Feeder
1. Load your Originals
l
If using the Document Feeder...
Place the originals into the Document Feeder face up, with
page one on top. The originals should be in good
condition, and without staples or paper clips.
Adjust the edge guides against the original. Otherwise, the
copies may print incorrectly or the originals may jam.
Edge Guides
Document Glass
For fastest performance, place the originals Long Edge
Feed with the top of the document away from you.
l
If using the Document Glass...
Use the Document Glass to copy bound, stapled, folded or
wrinkled originals, odd or oversize documents, books, or
glossy photographs.
Raise the Document Glass Cover.
Place the original face down into the top left corner of the
glass. Ensure that the top left corner of the original fits into
the corner of the registration edge.
When using the copy features; Auto Paper, Auto%, Auto
Centre, or Bound Originals, the cover must be raised.
Press Clear All
If necessary, press the Clear All (
)button to reset the
selections that were made for the previous job.
Page 28
Xerox WorkCentre Pro/CopyCentre User Guide
2. Make your selections on the Touch Screen
Press the Features
button to display
Copy, Fax, or Scan
Screens
Touch the screen to make your copy selections.
Use the keypad to enter the number of sets.
3. Press Start
Quick Start
After Start (
) has been pressed, the Job Progress
screen will appear. This screen displays information about
your job. After your job is complete, or you press the
Programme Next Job button, it will close.
Xerox WorkCentre Pro/CopyCentre User Guide
Page 29
Authentication Overview
Authentication is the verification of user identity and
authorization. The Administrator can limit access to system
services such as E-mail, Network Scanning, and Network Fax
by enabling Authentication.
If Authentication is enabled, you will be presented with a Login
Required screen. Network Authenticated Access requires a
Login Name and Password. See the Administrator to login
using the Guest Access passcode.
Page 30
Xerox WorkCentre Pro/CopyCentre User Guide
Authentication Login
Using the touch screen:
1. Select Network Authenticated or Guest Access level.
2. Depending on the access level selected, enter the Guest
Passcode or your network Login Name and Password
3. Press the Enter button.
The system will validate the login information. If the account
information is authenticated the restriction will be released.
Remember to logout to prevent unauthorised access.
The system will allow 5 login attempts. If login fails after the
last attempt, you will be notified on the local user interface
and all users will be locked out of all services offering
authentication for a period of 5 minutes.
Quick Start
NOTE
Xerox WorkCentre Pro/CopyCentre User Guide
Page 31
Scanning Documents (Optional Feature)
Document Feeder
1. Load your Originals
l
If using the Document Feeder...
Place the originals into the Document Feeder face up, with
page one on top. The originals should be in good
condition, and without staples or paper clips.
Adjust the edge guides against the original. Otherwise, the
copies may print incorrectly or the originals may jam.
Edge Guides
Document Glass
For fastest performance, place the originals Long Edge
Feed with the top of the document away from you.
l
If using the Document Glass...
Raise the Document Glass Cover.
Place the original face down into the top left corner of the
glass. Ensure that the top left corner of the original fits into
the corner of the registration edge.
Press Clear All
If necessary, press the Clear All (
)button to reset the
selections that were made for the previous job.
Page 32
Xerox WorkCentre Pro/CopyCentre User Guide
2. Make your selections on the Touch Screen
Press the Features
button to display
Copy, Fax, or Scan
Touch the Network Scanning button. If Authentication is
active, you must complete a login sequence. Remember to
log out to prevent unauthorised access.
Templates tell the system how to create the scan file and
where to send it after it is processed.
For information about templates, refer to page 72.
3. Press Start
After Start (
) has been pressed, the Job Progress
screen will appear and display information about your job.
After your job is complete, or you press the Programme
Next Job button, it will close.
Xerox WorkCentre Pro/CopyCentre User Guide
Page 33
Quick Start
Select a template from the Template Destinations list.
Faxing Documents (Optional Feature)
Document Feeder
1. Load your Originals
l
If using the Document Feeder...
Place either 1 or 2 sided originals into the Document
Feeder face up, with page one on top. The originals should
be in good condition, and without staples or paper clips.
Adjust the edge guides against the original. Otherwise, the
copies may print incorrectly or the originals may jam.
For fastest performance, place the originals Long Edge
Feed with the top of the document away from you.
Edge Guides
l
Document Glass
If using the Document Glass...
Raise the Document Glass Cover.
Place the original face down into the top left corner of the
glass. Ensure that the top left corner of the original fits into
the corner of the registration edge.
Press Clear All
If necessary, press the Clear All (
)button to reset the
selections that were made for the previous job.
NOTE
Page 34
The system has an Image Rotation feature that enables you
to feed originals Long Edge Feed (LEF) even if the
destination Fax can only print Short Edge Feed (SEF).
Xerox WorkCentre Pro/CopyCentre User Guide
2. Make your selections on the Touch Screen
Press the Features
button to display
Copy, Fax, or Scan
Touch the Fax button. Touch the screen to make your
selections. If Authentication is active, you must complete a
login sequence. Remember to log out to prevent unauthorised
access.
Quick Start
Enter the fax number using the numeric keypad. For
multiple numbers Touch the Add To Send List button and
enter another number. For more information, refer to page
68.
If you have 2 sided originals, select 2 Sided.
3. Press Start
After Start (
) has been pressed, the Job Progress
screen will appear. This screen displays information about
your job. After your job is complete, or you press the
Programme Next Job button, it will close.
Xerox WorkCentre Pro/CopyCentre User Guide
Page 35
Loading paper
Loading Paper in Trays 1 - 4
1. Pull out the paper tray.
2. Load the paper neatly in the tray. Do not load paper above
the maximum fill line mark on the edge guide.
3. Ensure that the edge guides are against the top, bottom,
and side edges of the paper.
4. Push in the paper tray.
A pop-up screen may appear on the screen asking you to
confirm the paper stock settings or to load the required
paper for the tray. Confirm or change the paper and size
descriptions as required.
Insert the paper
for Tray 5
Loading paper in Tray 5, the Bypass Tray
Use Tray 5 to load special or odd-size stock. Insert paper as
shown. Do not load paper above the maximum fill line. Pull out
the extension bar to accommodate paper that is longer than
the tray. Confirm or change the paper and size descriptions as
required.
Extension
bar
5
6
0 800086C-LKS
Loading Paper in Tray 6, the High Capacity
Feeder
To load paper, open the cover and wait for the tray to lower.
When the paper has been loaded, close the cover to raise the
tray. Tray 6 can only handle 8.5 x 11 inch or A4 size paper.
Insert paper for Tray 6.
NOTE
Page 36
Use the labels for instruction on how to orient special stock
such as transparencies, labels, or hole-punched stock.
Xerox WorkCentre Pro/CopyCentre User Guide
Using the Job Queue
Press the Job Status
button to view the Job
Queue
The system provides a queuing feature that sequences the
printing of jobs. To view the Job Queue, press the Job Status
button.
Touch a job in the queue
for additional options.
l
Press Delete to remove a job from the queue. Anyone
can delete any job in the Job Queue.
l
Press Promote to move near the top of the job queue.
l
Press Release to start to print a held job. This feature
is used to print the sets that are automatically held
after using the Sample Set or Secure Print feature.
l
Press the Job Details button to view detailed
information about a job.
l
Press Hold to hold a job in the queue and print later.
l
Press Required Resources for information about the
resources that are needed for the job.
Xerox WorkCentre Pro/CopyCentre User Guide
Page 37
Quick Start
Touch a job in the queue for additional options.
Internal Auditron Login
The system is equipped with a standard feature known as the
Internal Auditron. This feature controls access to the machine
and tracks copy usage.
If the tracking feature is active you will see a screen similar to
the one above.
Remember:
Log out to prevent
unauthorised access
Press the Access
Button on the User
Interface then press
the Logout button on
the Touch Screen.
An administrator will assign you a User Number. Use this
number in the following procedure to login.
1. At the login screen enter your assigned User Number
using the keypad. Press Enter.
2. Press Login to a General Account or User Pathways.
If User Pathways is selected, copies will be charged to
your User Account.
If Login to General Accounts is selected enter the General
Account number. Copies will be charged against the
General Account number you enter.
3. Make copies as needed.
Page 38
Xerox WorkCentre Pro/CopyCentre User Guide
Network Accounting (Optional Feature) Login
If you see this screen, your site is using a network tracking
feature that provides the ability to track copy, print, fax and
scan usage.
An administrator will assign you a User and Account ID. Use
them to login to the system to access any of the system
functions.
Use the following procedure to login:
From the Machine
Log out to prevent
unauthorised access
Press either the Clear
All button or the
Access Button on the
User Interface.
Press the Logout
button on the Touch
Screen.
2. Press the Account ID button and enter your Account ID
using the keypad that appears on the Touch Screen. Press
the Save button. Press the Enter button.
3. Start your job.
From the Workstation
When printing to the machine with Network Accounting
enabled a screen will appear after you select Print from the
File menu.
1. Enter your User and Account ID then click OK.
2. Enter your Account ID and click OK.
Xerox WorkCentre Pro/CopyCentre User Guide
Page 39
Quick Start
Remember:
1. Press the User ID button and enter your User ID using the
keypad that appears on the Touch Screen. Press the Save
button.
Security Features
Xerox provides Secure Print and optional Image Overwrite to
protect your classified or private information. See your System
Administrator for more information about security.
1. Secure Print is a standard network feature. Jobs are held
in the print queue until you enter your personal 4-10 digit
Secure Print ID.
2. Image Overwrite is available upon request as an optional
feature. When available, the overwrite components are
enabled by the Machine Administrator.
Page 40
l
Immediate Image Overwrite ensures that all
information related to a job is immediately overwritten
after the successful completion of each job. You can
view job overwrite status at the machine using the Job
Status pathway button located on the User Interface.
The system will display a fault message and
instructions if the overwrite was unsuccessful.
l
On Demand Image Overwrite irretrievably overwrites
all of the physical areas of the disks that hold data. All
jobs in the active queue will be deleted and
overwritten. Jobs sent during the overwrite process
are held and released after the overwrite process has
finished.
Xerox WorkCentre Pro/CopyCentre User Guide
Getting a Secure Print (Networked Models)
Follow these steps to get a secure print.
At the Workstation
1. In the Windows printer driver, click Properties to get to a
WorkCentre Pro® Printer Driver.
2. Once in the Printer Driver select the Paper/Output tab and
click the Job Type pull down menu.
3. Select Secure Print.
4. Select Secure Print Setup, enter a 4-10 Digit Secure Print
ID then click OK.
5. When you are ready to retrieve your secure print job go to
the machine.
At the Machine
1. Press the Job Status button to display the job queue.
Touch your held job on the touch screen. It should be
easily identified by the file name.
3. Press Release Job. You will be prompted for the Secure
Print ID you assigned the job at your workstation.
4. As soon as the correct Print ID is entered, your job will
print.
Xerox WorkCentre Pro/CopyCentre User Guide
Page 41
Quick Start
2. This will display a screen with additional options.
Page 42
Xerox WorkCentre Pro/CopyCentre User Guide
Try These Jobs
This section contains step-by-step instructions to help you get the most from your
system.
Most of
what you
need is in
the Basic
Copying
tab.
Try These Jobs
Touch the screen to make selections
Xerox WorkCentre Pro/CopyCentre User Guide
Page 43
Making Copies
Typical Application
Standard copying tasks.
Procedure
1. Load your originals. Adjust the edge guides as necessary.
Use Long Edge Feed
(LEF) for the fastest
performance.
LEF
Short Edge Feed (SEF)
originals require more time
to scan.
SEF
2. Make your programming selections by touching the
screen. The most common selections are on the Basic
Copying tab (Output, 2-sided Copy, Reduction/
Enlargement, and Paper Supply).
3. Use the keypad to enter the number of copy sets.
4. Press the Start (
HINT
) button.
Auto% automatically Reduces or Enlarges your copy based
on the paper size in the paper tray you select.
Auto Paper automatically picks the tray holding the paper
size based on the size of your original.
Page 44
Xerox WorkCentre Pro/CopyCentre User Guide
Stapling Copy Jobs
Typical Application
Standard copying tasks with 1 or 2 staples.
Procedure
1. Load your originals and make your paper and
programming selections based on the table below. Press
the More... button to access 2 staples.
2. Use keypad to enter the number of copy sets.
3. Press the Start (
Feed Direction
of Common
Paper Sizes
Desired Staple Location
) button.
Paper Supply
Output Options
Select this
Staple Button
Auto Paper Supply or
select the appropriate
size LEF paper.
A4
Try These Jobs
Auto Paper Supply or
select the appropriate
size SEF paper
A4
A3
Xerox WorkCentre Pro/CopyCentre User Guide
Page 45
Feed Direction
of Common
Paper Sizes
Desired Staple Location
Paper Supply
Output Options
Select this
Staple Button
Auto Paper Supply or
select the appropriate
size SEF paper
A4
Auto Paper Supply or
select the appropriate
size LEF paper.
A4
To achieve optimum
staple location with this
feed direction you must
select 8.5 inch, SEF
Paper Supply.
A4
Page 46
Xerox WorkCentre Pro/CopyCentre User Guide
Feed Direction
of Common
Paper Sizes
Desired Staple Location
Paper Supply
Output Options
Select this
Staple Button
Auto Paper Supply or
select the appropriate
size SEF paper.
A4
A3
Auto Paper Supply or
select the appropriate
size LEF or SEF paper.
Try These Jobs
Build Job is required when
stapling copies made from
the document glass.
See page 62 for more
information about Build
Job.
Xerox WorkCentre Pro/CopyCentre User Guide
Page 47
Making 2-Sided Copies
Typical Application
Standard office copying tasks with or without staples.
Procedure
1. Load your originals.
2. Make your programming selections by touching the
screen. The most common selections are on the Basic
Copying tab (Output, 2-sided Copy, Reduction/
Enlargement, and Paper Supply).
3. Select which 2-sided option you want. These options are
displayed when the 2-sided Copy, More... selection is
pressed.
Option
Originals
Copies
Option
1
1
2
1
2
1 2
Rotate
Side 2
2
2
2 2
Rotate
Side 2
Originals
Copies
1
4. Use the keypad to enter the number of copy sets.
5. Press the Start (
Page 48
) button.
Xerox WorkCentre Pro/CopyCentre User Guide
Improving Image Quality
Typical Application
Create copies with the best possible image quality.
Procedure
1. Load your originals.
2. Make your desired programming selections from the Basic
Copying tab.
3. Use the keypad to enter the number of copy sets.
4. Depending on the configuration of your machine press
either the More Copy Features tab or the Image
Adjustment tab. Press the Image Quality button.
5. Select the setting that best matches your original then
press the Save button.
Normal
Halftone
Photo
Text
Photo
This default setting provides excellent
copies for most types of originals.
Use for high quality lithographic images
such as magazines.
Use for originals that are primarily text
and lines.
Use for photographs without text or
graphics.
Background Suppression automatically reduces or eliminates
the background from coloured originals.
6. Press the Start (
Xerox WorkCentre Pro/CopyCentre User Guide
) button.
Page 49
Try These Jobs
Lighten/Darken provides controls to adjust the lightness or
darkness of the output.
Removing Unwanted Marks on the Edges of Copies
Typical Application
Remove distracting marks on your copies.
Procedure
1. Load your originals.
2. Make your programming selections by touching the
screen. The most common selections are on the Basic
Copying tab (Output, 2-sided Copy, Reduction/
Enlargement, and Paper Supply).
3. Use the keypad to enter the number of copy sets.
4. Depending on the configuration of your machine press
either the More Copy Features tab or the Image
Adjustment tab.
5. Press the Edge Erase button.
6. Select either Edge Erase or Border Erase.
Use Edge Erase to erase any of the margins on the copies
independently.
Use Border Erase to create a uniform border around your
copies.
7. Press the Save button.
8. Press the Start (
HINT
Page 50
) button.
To erase drill hole marks on your copies, set the edge
deletion to 15 mm.
Xerox WorkCentre Pro/CopyCentre User Guide
Copying Pages from Books or other Bound Documents
Typical Application
Copy a page from a book or other bound original.
Procedure
1. Open the Document Cover and place the bound original on
the Document Glass. Align the spine of the bound
document with the Book Binding mark.
Book Binding Guide
mark
2. Touch the screen to make your selections from the Basic
Copying tab (Output, 2-sided Copy, Reduction/
Enlargement, and Paper Supply).
3. Use the keypad to enter the number of copy sets.
4. Depending on the configuration of your machine press
either the More Copy Features tab or the Image
Adjustment tab.
5. If necessary, change the image quality setting by pressing
the Image Quality button. Make the required image
adjustments then press the Save button.
6. Press the Bound Originals button then press the button
that identifies which pages you want to copy. (either left,
right, or both pages). Press the Save button.
7. Press the Start (
) button and your copies will print.
8. Repeat step 6 until all pages are copied.
If your original has information within 4mm from the bottom,
place the original anywhere on the glass at least 4mm away
from the front edge.
Try These Jobs
TIP
Xerox WorkCentre Pro/CopyCentre User Guide
Page 51
Using Reduction/Enlargement
Typical Application
Use the automatic Reduction/Enlargement features to adjust
the size of the output image.
Procedure
1. Load your originals.
2. Make your programming selections by touching the
screen. The most common selections are on the Basic
Copying tab (Output, 2-sided Copy, Reduction/
Enlargement, and Paper Supply).
3. Use the keypad to enter the number of copy sets.
4. In the Basic Copying tab under Reduce/Enlarge, select an
existing preset or press the More...button. Select from the
additional presets or enter your desired Reduction/
Enlargement percentage and press the Save button.
5. Press the Start (
) button.
HINT
Custom Auto% will fill the copy page by stretching the image
to the edges of the copy page.
Normal Auto% will proportionally enlarge the image until it
fills the copy page.
TIP
When using the Document Glass, you can enlarge an image
up to 400%. Using the Document Feeder you can enlarge up
to 300%.
Page 52
Xerox WorkCentre Pro/CopyCentre User Guide
Shifting an Image
Typical Application
Shift the image on a copy to create a binding edge.
Procedure
1. Determine the amount of space needed to shift the content
away from the binding edge.
2. Load your originals.
3. Make your programming selections by touching the
screen. The most common selections are on the Basic
Copying tab (Output, 2-sided Copy, Reduction/
Enlargement, and Paper Supply).
4. Use the keypad to enter the number of copy sets.
5. Depending on the configuration of your machine press
either the More Copy Features tab or the Image
Adjustment tab.
6. Press the Image Shift button, then press the Margin Shift
button.
7. Enter the amount of margin shift determined in Step 1 and
press the Save button.
8. Press the Start (
This feature allows you to shift the image up and down on the
page as well as left or right.
Try These Jobs
TIP
) button.
Xerox WorkCentre Pro/CopyCentre User Guide
Page 53
Adding covers
Typical Application
Add covers to any set of documents.
Procedure
1. Load the cover stock into the Bypass Tray or any
appropriate paper tray.
2. Load your originals into the Document Feeder.
3. Make your programming selections by touching the
screen. The most common selections are on the Basic
Copying tab (Output, 2-sided Copy, Reduction/
Enlargement, and Paper Supply).
4. Use the keypad to enter the number of copy sets.
5. Depending on the configuration of your machine press the
More Copy Features tab or the Image Adjustment tab.
6. Press the Image Quality button then select the appropriate
Original Type.
7. Press the Output Format tab and select Covers. Select
where you want the cover positioned - Front, Back, or
Front and Back then press the Save button.
8. Press Output Cover Images to select the sides imaged for
the cover and press the Save button.
9. Press the Cover Stock button to select the tray where the
cover stock is loaded.
10.Press the Start (
Page 54
) button.
Xerox WorkCentre Pro/CopyCentre User Guide
Placing Multiple Images on a Single Page
Typical Application
Any situation where you want to present multiple reduced
images (thumbnail images) to a reader.
Procedure
1. Load your Originals.
2. Depending on the configuration of your machine press
either the More Copy Features tab or the Output Format
tab. If the More Copy Features tab is selected press
Output Format tab.
3. Press the Multi-Up button then press On.
4. Select the correct orientation of your originals based on the
information displayed on the screen.
5. Select the number of rows and columns. Press the Save
button.
6. Ensure the originals are loaded into the Document Feeder
as illustrated on the Multi-Up screen.
7. Make your programming selections by touching the
screen. The most common selections are on the Basic
Copying tab (Output, 2-sided Copy, Reduction/
Enlargement, and Paper Supply).
8. Use the keypad to enter the number of copy sets.
9. Press the Start (
Sixteen A4 images can be displayed on A4 paper (4 rows x 4
columns).
Try These Jobs
HINT
) button.
Xerox WorkCentre Pro/CopyCentre User Guide
Page 55
Making Transparencies with Dividers
Originals
Typical Application
Produce transparency sets with divider inserts.
Procedure
1. Ensure that transparencies and divider separator stock are
loaded into different paper trays.
2. Load the originals into the Document Feeder.
3. Depending on the configuration of your machine press
either the More Copy Features tab or the Output Format
tab. If More Copy Features tab is selected press tab 3,
Output Format.
4. Press the Transparencies button.
5. On the Transparency Dividers screen, select either Blank
or Imaged Dividers. Selecting Imaged Dividers will
produce dividers with the same image as on the
transparency.
Transparencies
with Dividers
Ensure both tray selections are correct.
Press a button to change the selection.
6. Press the Transparency Stock button to change the
current tray selection. Press the Divider Stock button to
change the current divider stock selection.
7. Press the Start (
Page 56
) button.
Xerox WorkCentre Pro/CopyCentre User Guide
Making Brochures and Booklets
Typical Application
Produce a newsletter.
Procedure
1. Load the originals into the Document Feeder. The originals
must be oriented Long Edge Feed.
2. Depending on the configuration of your machine press
either the More Copy Features tab or the Output Format
tab. If the More Copy Features tab is selected press
Output Format tab.
3. Press the Booklet Creation button. Follow the instructions
on the screen.
4. Press the Booklet Creation On button then press the Save
button.
5. Press One- or Two-sided Originals then press the Save
button.
6. Make any other necessary selections from the Basic
Copying tab. Some selections will have already been
made when you selected the Booklet Creation feature.
7. Select a paper tray. The paper stock must be Short Edge
Feed.
8. Press the Start (
Ensure you do not accidently select Tray 6, as it will not have
the short edge paper needed to complete the job.
Try These Jobs
HINT
) button.
Xerox WorkCentre Pro/CopyCentre User Guide
Page 57
Making Folded Booklets (optional Professional Finisher)
Typical Application
Produce a folded single or multiple sheet booklet with and
without staples.
Procedure
1. Place the originals image-up in the Document Feeder. The
originals must be oriented Long Edge Feed.
2. Select a Paper Supply with Short Edge Feed stock.
3. Select Output Format > Booklet Creation.
4. Select On >1 or 2 Sided Originals > Save.
5. Select Basic Copying > Select More... in the Output
column.
6. Select Booklet Maker > Folded and Stapled > Save.
7. Enter the copy quantity on the keypad.
8. Press the Start button.
The table illustrates the booklet sheet count based on the
number of originals scanned.
Number of Originals
Scanned
Page 58
=
Number of Sheets in the
Booklet
4 - 20
=
1-5
24 - 40
=
6 - 10
44 - 60
=
11 - 15
Xerox WorkCentre Pro/CopyCentre User Guide
Making Tri-Fold Sheets (optional Professional Finisher)
Typical Application
Produce a single sheet letter fold to fit inside a mailing
envelope.
Procedure
1. Place the originals image-up in the Document Feeder. The
originals must be oriented Short Edge Feed.
2. Select the Basic Copying tab.
Z-Configuration
3. Select a Paper Supply with Short Edge Feed stock.
4. Select More... in the Output column > Folding Options.
5. Select Tri-Fold > Z-Configuration > Save.
6. Select Save to confirm fold settings.
7. Enter the copy quantity on the keypad
8. Press the Start button.
You can also make 2 Sided Copy and Reduce/Enlarge
selections as required.
Try These Jobs
C-Configuration
Xerox WorkCentre Pro/CopyCentre User Guide
Page 59
Mixed Size Originals Overview
This feature allows you to input mixed size original documents
of mixed sizes and process them as a single job to produce:
l
mixed size or common size copies
l
scan jobs using optional network features such as
Network Scanning, Scan to Fax, Scan to E-mail, etc.
The originals must all have the same width and must be fed
from the Document Feeder. If valid sizes are not scanned, a
warning message will appear and the job will be deleted.
Document Size Value
If the system displays a paper stock error, the machine’s
document size values might require adjustment by the
Machine Administrator.
NOTE
Page 60
Mixed Size Originals cannot be selected if both Auto Paper
and 1-2 Sided options are selected.
Xerox WorkCentre Pro/CopyCentre User Guide
Mixed Size Originals
Typical Application
Produce copies or scans of mixed size originals on either the
original sizes or a common size automatically.
Procedure
Copying
1. Place the originals face up in the Document Feeder. The
originals must be the same width.
2. Select the More Copy Features tab or tab 2, Image
Adjustment.
3. Select Original Input > Mixed Size Originals > Save.
4. Select the Basic Copying tab.
5. Select Auto Paper to produce the same size output as the
original mixed sizes.
To produce common size output you must select a Paper
Supply, Auto% Reduce/Enlarge, Auto Centre on the Image
Adjustment tab. The system will determine the reduction%.
6. Enter the copy quantity on the keypad.
7. Press the Start button.
Network Scanning (if available)
Try These Jobs
Complete steps 1, 2, 3, 7 above.
Xerox WorkCentre Pro/CopyCentre User Guide
Page 61
Build Job - Overview
Build Job is a feature that allows you to divide a job into
individual segments and apply unique programming to each
individual segment.
3 Originals
Typical Copy Job
Copy Job with Build Job
The same set of
programming applies
to entire copy job.
Each segment can be
programmed differently.
Segment 1
Segment 2
Segment 3
Build Job Examples
l
l
l
l
l
Page 62
Make image quality settings on one segment that are not
required on other segments
Copy 2-sided and 1-sided originals at the same time
Make special reductions or enlargements on a segment
Combine originals from the Document Feeder and the Glass
Feed more than the maximum number of originals through
the Document Feeder
Xerox WorkCentre Pro/CopyCentre User Guide
Copying Bound Documents using Build Job
Typical Application
Copy a multipage article that is spread throughout a bound
document all at once.
Procedure
1. Open the Document Cover and place the bound original on
the Document Glass. Align the spine of the bound
document with the Book Binding mark.
2. Make your programming selections by touching the
screen. The most common selections are on the Basic
Copying tab (Output, 2-sided Copy, Reduction/
Enlargement, and Paper Supply).
3. Use the keypad to enter the number of copy sets.
4. Depending on the configuration of your machine press the
More Copy Features tab or the Job Assembly tab.
5. Select Build Job then the Build Job On button. Press Save.
6. Press the Bound Originals button then press the button
that identifies which pages you want to copy.
7. Press the Start (
NOTE
) button.
Use the Build Job Controls button to see a sample of the last
segment scanned, delete the last segment scanned, or
cancel a sample print job that is currently running.
9. Press the Build Job Controls button then select End Build
Job.
Xerox WorkCentre Pro/CopyCentre User Guide
Page 63
Try These Jobs
8. Repeat this process until all the pages you want to copy
have been scanned.
Using Build Job and Sample Set
Typical Application
Produce multiple sets of a document where individual
segments require unique feature programme selections.
Procedure
1. Load the originals for the first job segment.
2. Depending on the configuration of your machine press the
More Copy Features tab or the Job Assembly tab. If the
More Copy Features tab is selected press the Job
Assembly tab.
3. Press Build Job then press the Build Job On button. Press
the Save button. Select Sample Set and Save to produce
a single complete set for review.
4. Press the Basic Copy tab and programme the appropriate
features for the first segment of the job.
5. Press the Start (
) button.
6. Repeat this procedure for each remaining segment.
7. After the final segment has been scanned press Build Job
Controls then press End Build Job.
A single review set will be produced because Sample Set
was selected.
8. After you review the initial set, press the Job Status (
button to display a listing of queued jobs.
)
9. Touch your job to select it.
10. If you are satisfied with your initial set press Release.
Otherwise, delete it and start again.
Page 64
Xerox WorkCentre Pro/CopyCentre User Guide
Using Tabs/Build Job
Typical Application
Insert tab stock dividers in the body of copy jobs.
Procedure
Prerequisites:
l
Tab masters, see page 67
l
Use trays 2, 3 or 4 only
l
Tab stock
1. Setup Build Job
l
Select the Job Assembly tab.
l
Select Tabs/Build Job > On > Save.
2. Programme Tab Attributes
l
Select the Basic Copying tab.
l
Select a Tray filled with tab stock.
3. Scan the Tab Master
Place the 1st original tab master face up in the
Document Feeder > Start.
Try These Jobs
l
Xerox WorkCentre Pro/CopyCentre User Guide
Page 65
4. Programme Body Attributes
l
Select the Basic Copying tab.
l
Select a Reduce/Enlarge% as required.
l
Select a Paper Supply without tabs in it.
5. Scan the Body Segment
l
Place the 1st body segment face up in the Document
Feeder > Start.
6. Repeat steps 2-5 until all the tab and original segments
have been scanned
7. End Build job
l
Select the Build Job Controls button.
l
Select End Build Job.
The entire job will start printing.
NOTE
Page 66
Copying on tabs is not fully supported on machines
configured with an Offsetting Catch Tray.
Xerox WorkCentre Pro/CopyCentre User Guide
Creating Tab Masters
The Xerox Template
Access the Xerox web site to download templates to create
3, 5, or 8 position tab masters:
1. http://www.xerox.com
2. Search using keywords: tab templates
3. In the Search Results, locate the words: Tab Templates,
Supplies Information.
4. Select Tab Templates
5. On the Tab Template page, under the black Tab Template
banner, click the number 1
6. Click to select a template to download
NOTE
Contact the Xerox Welcome Centre if you have questions
about Tab Masters on the Xerox web site.
Make Your Own Template
Type the tab headings on a blank document. The spacing of
the tabs will vary depending on the font size that you use.
Generally, the tabs are spaced about 51mm apart. You will
have to experiment with the creation of the tabs in the
document to make sure that they correspond to the
appropriate tab location that will be printed. When you have
completed the document, you should have 1 tab on each
page. For example, if you are using 5 position tabs, you
should have a 5 page document with tab data imaged on each
page.
Xerox WorkCentre Pro/CopyCentre User Guide
Page 67
Try These Jobs
If you do not have access to the internet, you can create a
template document.
Network Faxing Overview (Optional Feature)
Network Faxing is an optional feature that allows you to send
and receive faxes using a networked system connected to
network fax solution software.
The Key Operator or Administrator can limit access to this
feature by enabling Authentication. When Authentication is
active you will be required to login before using the Network
Fax feature. Remember to log out to prevent unauthorised
access.
Page 68
Xerox WorkCentre Pro/CopyCentre User Guide
Getting to Know the Process
Sending a FAX
1. The system scans the original paper document and
creates a digital file.
2. The digital file and routing information is transferred to a
Fax Repository on a Server.
3. The Network Fax Server retrieves the digital file from the
Fax Repository, processes it and sends it to the
destination.
Receiving a FAX
Try These Jobs
The Network Fax Server receives an incoming Fax. After it
processes the file, the Network Fax software determines the
destination of the incoming fax and sends it to the destination.
Xerox WorkCentre Pro/CopyCentre User Guide
Page 69
Faxing a Document
Typical Application
Fax a document to a single number or multiple numbers.
Procedure
1. Load your original face up in the Document Feeder.
2. Press the Fax button on the Touch Screen. If
Authentication is active, you must complete a login
sequence. Remember to log out to prevent unauthorised
access.
3. Enter the fax number using the numeric keypad (some
configurations require entering a digit and the Dial Pause
button to reach an outside line).
4. If originals are 2 Sided, press 2 Sided Originals.
If you are faxing to a single number, skip to step 11.
5. Press Add to Send List on the Touch Screen.
6. Enter the next fax number using the numeric keypad.
7. Repeat steps 3 and 4 until the last fax number has been
added to the list (up to 50 fax numbers may be entered).
8. Press the Send List button to verify the numbers entered
have been added to the Send List.
9. Press the Close button after verification.
Page 70
Xerox WorkCentre Pro/CopyCentre User Guide
10.Once all numbers have been entered you may select the
desired resolution and number of sides scanned.
11.Press the Start (
) button.
12.If enabled by the network fax solution software, the
machine will print a Transmission Report once the fax has
been received at the destination fax number.
Use the Phone List to store up to 30 destination fax numbers
to save time when sending a fax.
HINT
You can use the Phone List button to add preprogrammed
numbers to the Send List.
Try These Jobs
TIP
Xerox WorkCentre Pro/CopyCentre User Guide
Page 71
Network Scanning Overview (Optional Feature)
Network Scanning is an optional feature that allows you to
create and distribute an electronic file from a scanned original.
Getting to Know the Process
1. The user decides what type of settings are needed to process the scan job and
where the scanned file will need to be sent after it is processed.
2. The user selects a Distribution Template that meets these requirements.
Not all scanning features require the use of a template. You can scan to fax or
scan to e-mail without using a template.
3. When the Start button is pressed, the system scans the original document and
creates a digital file based on the template selected.
4. The system transfers the file to a folder on a file server.
5. Software installed on either a user’s workstation or a file server retrieves the file
and sends it to the specified destination.
Page 72
Xerox WorkCentre Pro/CopyCentre User Guide
Scanning Options
Option
Typical Application
Scan to File
Create an electronic file
from a hard copy original
to be shared on the
network.
Scan to Desktop
Scan a document to your
workstation.
Scan to E-mail
Distribution
Scan a document to
distribute through e-mail:
l
using a CentreWare®
template
l
without a CentreWare®
template
Scan to Fax
Scan a document to a fax
machine via telephone
number.
Scan to Internet
Fax
Scan a document to a fax
machine via an internet
address.
1. Load your originals.
2. Press the Network Scanning button on the Touch Screen.
If Authentication is active, you must complete a login
sequence. Remember to log out to prevent unauthorised
access.
Xerox WorkCentre Pro/CopyCentre User Guide
Page 73
Try These Jobs
Procedure
NOTE
If you have recently created a new template or modified an
existing one using CentreWare® Network Scanning services
tools, you must update the template list at the machine so it
reflects the latest information.
Press the More Scan Features tab then the Update Template
List button. Press the Update Template List button then the
Confirm button.
This may take a few minutes depending upon the number of
templates available.
3. Select the desired template in the Template Name List. If
the desired template does not exist, refer to the
CentreWare® Network Scanning Services guide for
information on creating a template.
You can modify your template by pressing the Sides
Scanned button to select 1 sided, 2 sided, or 2 sided,
Rotate Side 2.
4. Press the Image Quality button that corresponds to the
correct image orientation of your originals then press the
Save button.
5. Press the Start (
) button.
Scan to Desktop only:
6. If enabled, you will receive a message at your workstation
indicating a scanned document is in your folder.
7. Use the PaperPortTM software included with the system to
edit, or process scanned images.
Page 74
Xerox WorkCentre Pro/CopyCentre User Guide
Internet Fax Overview (Optional Feature)
Internet Fax is an optional feature that is available upon
request for networked systems.
The Machine Administrator can limit access to this feature by
enabling Authentication. When Authentication is active you
will be required to enter a network password or guest
passcode. Remember to log out to prevent unauthorised
access.
When available, you can send a scanned document to one or
more Internet Fax destinations and receive Internet Faxes
without requiring connectivity to a telephone connection.
With Internet Fax installed you can:
Send scanned images over the internet at internet or
intranet rates.
l
Request that the receiving machine relay the fax onto
a basic fax machine. For example you can send an
internet fax to another internet fax machine around the
world and then relay the fax to a local fax machine to
save telephone charges.
l
Receive confirmation of delivery in much the same
way as the standard fax service by returning a delivery
status notification or message for the job via the
internet.
Try These Jobs
l
Xerox WorkCentre Pro/CopyCentre User Guide
Page 75
Undelivered Internet Fax Jobs
In some cases the receiving device may return undelivered
jobs back to your WorkCentre Pro. If your system is
configured to receive Internet Fax jobs, undelivered jobs could
be returned to the WorkCentre Pro and printed as an incoming
fax job.
When sending Internet Fax jobs, check the status of your sent
job through the Job Status button. See page 37 for details on
the Job Queue and Job Status. If the job is not confirmed or
completed, the image file may not have been processed at the
destination device.
Page 76
Xerox WorkCentre Pro/CopyCentre User Guide
E-mail Overview (Optional Feature)
E-mail is an optional feature that allows you to send
electronic-mail messages without using a template. The
system must be connected to the network.
The Key Operator or Administrator can limit access to this
feature by enabling Authentication. When Authentication is
active you will be required to login before using the E-mail
feature. Remember to log out to prevent unauthorised access.
Getting to Know the Process
Sending an E-mail Message
1. The system scans the original paper document and
creates a digital file.
2. The system transfers the digital file and routing information
to a Simple Mail Transfer Protocol (SMTP) Repository on
a Server.
Try These Jobs
3. The Network Server retrieves the digital file from the SMTP
Repository, processes it and sends it to the destination.
Xerox WorkCentre Pro/CopyCentre User Guide
Page 77
Sending an Internet Fax or E-mail without a template
Typical Application
E-mail or Internet Fax a document to a single recipient or
multiple recipients.
Procedure
1. Load your original face up in the Document Feeder.
2. Press the E-mail or Internet Fax button. If Authentication is
active, you must complete a login sequence. Remember to
log out to prevent unauthorised access.
3. Select the desired resolution and number of sides
scanned. If the originals are 2 Sided, press 2 Sided
Originals.
4. Select either the To..., Cc..., or Bcc... button. The Add
Entry screen will display.
5. Using the touch screen, enter an SMTP-compliant
recipient name.
You can choose an Address Book and enter the full name
or a portion of the name of the recipient.
6. Select the enter button. The system will search the
Address Book and list all the names that match.
7. You can examine detailed information on any matches by
selecting any line in the search results window. When the
correct match is found touch the enter button to add the
recipient to the Address List.
8. Repeat steps 4 through 6 until the last recipient has been
added to the list (up to 128 recipients may be entered).
9. Press the Start (
Page 78
) button.
Xerox WorkCentre Pro/CopyCentre User Guide
Document Management Fields Overview
Document Management Fields allow you to create fields that
contain variable programmable data. The information is
stored in the Job Log with your scanned file. You can use your
company’s Document Management Information software to
access the Job Log to retrieve or route the stored files.
This feature is only available when you use a template
containing Document Management Fields information. Up to
6 Document Management Fields can be programmed for
each template.
Try These Jobs
NOTE
Xerox WorkCentre Pro/CopyCentre User Guide
Page 79
Creating Document Management Fields
Use Internet Services to create Document Management
Fields. You will need the Internet Protocol (IP) address of the
system. Your Ke y Operator or Administrator can provide the
address if you do not know it.
1. Type the system’s IP address in your browser. The
system’s Home Page will open.
2. Select Services.
3. Select the Distribution Templates button.
4. Choose the desired template.
Use the Add, Edit or Delete buttons to create, modify or
delete a Document Management Field.
5. Select Add New Field.
Up to 6 fields can be programmed for each template.
Page 80
Xerox WorkCentre Pro/CopyCentre User Guide
Index
A
B
Access to Copying 39
Account ID Number 39
Address 12
Auditron
Establishing Accounts
See Reference Guide
Using when enabled 38
Authentication
E-mail 73, 77, 78
Fax 35, 68, 70
Guest Access 30
Internet Fax 75
Login Procedures 31
Network Access 30
Overview 30
Unauthorized Access 31
Auto Paper Selection 44
Auto Reduction Enlargement 44
Binding Edge 53
Booklet Creation feature 57, 58
Booklet Fold 58
Border Erase 50
Bound Documents 23
Copying 51
Brochures
Making brochures 57
Build Job 62–67
Bypass Tray
Loading Paper 36
C
C-Configuration Fold 59
CentreWare 12
Clear All button
Copying 28
Faxing 34
Scanning 32
Copy Quality
See Image Quality 49
Copying
Adjusting Image Quality 49
Books 51
Mixed Size Originals 60
Covers 20
Adding to a document 54
D
Deleting a job 37
Digital Features 15
Distribution Template 72
Dividers
Transparency 56
Document Feeder
Loading Originals
Copying 28
Faxing 34
Scanning 32
Document Glass
Copying 28
Faxing 34
Scanning 32
Document Management Fields
Creating Fields 80
Overview 79
Double sided copies 45
Duplex copies 45
E
Edge Erase 50
Electronic Auditron 39
E-mail 17
Authentication 30, 77, 78
E-mail without a template 73, 78
Overview 77
Using a template 73
Embedded Web Server 12
Enlargement/Reduction 52
Establishing Auditron Accounts
See Reference Guide
F
Fail, Login 31
Fax, Internet Fax 73
Faxing 17, 34
Authentication 30, 35
Overview 68
Single or Multiple Numbers 70
Finisher 27, 58–59
Folded Booklets 21, 58
H
High Capacity Feeder
Loading Paper 36
I
Image
Rotating the second side 48
Image Overwrite 40
Image Quality 49
Internal Auditron 38
Internet Fax 17, 25, 75, 78
Internet Protocol (IP) 13
Internet Services 12, 13
J
Job Queue 37
Job Supplement
See Build Job 62
L
Login/Logout, Auditron 38
Login/Logout, Authentication 31
M
Masters, Tabs 67
Mixed Size Originals 60–61
Moving the image 53
Multi-Up feature 55
N
Network Accounting 39
Network Authenticated Access 30
Network E-mail
Description 17
Network Faxing 24
Authentication 68, 70
Description 17
Overview 68–69
Quick Start 34
To a Single Number 24
To Multiple Numbers 24
Network Scanning 25
Authentication 30
Create electronic files 17
Document Management Fields
79
Mixed Size Originals 61
Overview 72
To Desktop 25, 73
To E-Mail 25, 73
To Fax 25, 73
To File 25, 73
Normal 49
O
On/Off button 27
Optional Professional Finisher 58–
59
Overwrite 40
Ozone Information 5
P
Paper
Loading 35
Pathway 38
Power 27
Printer Driver, USB Port 14
Printing
Features 12
Internet Services 13
USB Port 14
Workstation 12
Professional Finisher 58–59
Proof
See Sample Set 64
Q
Queue
Managing the job queue 37
R
Recycled Paper 16
Reduction/Enlargement 52
Relocation
Ozone requirements 5
S
Safety
Electrical 2
Laser 6
Operational 7
Sample Set 23, 64
Scanning
Authentication 30, 73
Create electronic files 17
Document Management 79
Overview 72
Scan to File 73
Scanning Documents 32
Secure Print 41
Security 40
Image Overwrite
Immediate Image Overwrite
On Demand Image Overwrite
Secure Print
Shifting an image 53
Signature Booklet
See Booklet Creation 57
Stapling 45
Status of Job 37
T
Tab Masters 67
Tabs/Build Job 24, 65
Template
Creating
Refer to CentreWare Network
Scanning Services
E-mail without a template 77
Overview 72
Template List 74
Thumbnails 55
Touch Screen 27
Transparencies 21
Transparency Dividers 56
Tri-Fold 22, 59
C-Configuration
Z-Configuration
Trim
See Border Erase 50
U
Unauthorized Access 31
USB Port Printing 14
User ID 39
User Pathway 38
W
Web Server (Internet Services) 12,
13
Z
Z-Configuration 59