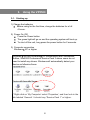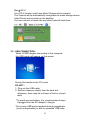
1
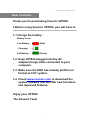
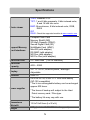
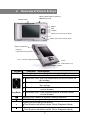
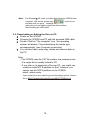
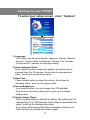
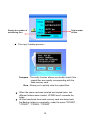
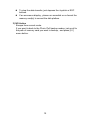
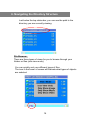
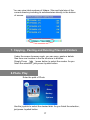
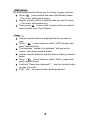
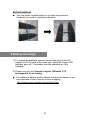
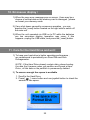
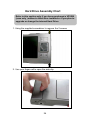
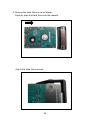
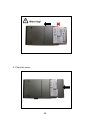
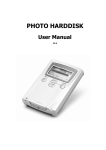
VP5500 User’s Guide Rev.B Part Number: 845550002001 Dear Customer Thank you for purchasing Vosonic VP5500. 1.Before using Vosonic VP5500, you will have to ---------------------------------------------------------------------1-1 Charge the battery : Battery Level Low Battery : Charging (Red) : Full Battery : (Green) 1-2. Keep VP5500 plugged into the AC adapter/charge while connected to your computer. 1-3. Make sure the HDD has already partition or format as FAT system. 1-4. Check www.vosonic.com to download the update firmware that we offer new functions and improved features. Enjoy your VP5500 The Vosonic Team 3 CAUTION Under no circumstances should you try to repair the system yourself, as this will invalidate the warranty. Do not open the system as there is risk of electrical shock. FCC Certifications This equipment has been tested and found to comply with the limits for a Class B digital device, pursuant to Part 15 of the FCC Rules. These limits are designed to provide reasonable protection against harmful interference in a residential installation. This equipment generates, uses and can radiate radio frequency energy and, if not installed and used in accordance with the instructions, may cause harmful interference to radio communications. However, there is no guarantee that interference will not occur in a particular installation. If this equipment does cause harmful interference to radio or television reception, which can be determined by turning the equipment off and on, the user is encouraged to try to correct the interference by one or more of the following measures: • Reorient or relocate the receiving antenna. • Increase the separation between the equipment and receiver. • Connect the equipment into an outlet on a circuit different from that to which the receiver is connected. • Consult the dealer or an experienced technician for help. 3 IMPORTANT WARRANTY INFORMATION y y y y y y y To reduce the risk of fire or shock hazard, do not expose this equipment to rain, any liquid or moisture. Vosonic shall have no obligation to repair, replace or refund until the customer returns the defective product to Vosonic. The repairs and replacement service will not apply to PRODUCT units that were misused, repaired without authorization ort by other reasons beyond the range of intended use. Any replacement product may be either new or like –new, provided that it has functionality at least equal to that of the product being replaced. Vosonic is not responsible for any data stored on returned products, please backup any data prior to shipping the unit. The limited warranty for accessories (included battery ) is only valid for 6 months from the date of purchasing.. All OUT OF WARRANTY repairs maybe subject to a normal repair fee. Please contact your dealer or Vosonic for current charges. Package Checklist y y y y y Main unit Mini 5 Pins USB Cable Leather Bag English user's guide Power Adapter (100-240V auto switched ) 4 Specifications Photo viewer Support Memory Card Interfaces Hard Disk Size Hard Disk JPEG: Baseline YUV TIFF: 1 and 8 bits grayscale, 8 bits indexed-color, 8 and 16 bits true color BMP: Monochrome, 8 bits indexed-color, RGB, RLE8 GIF RAW: Check the supported models at www.vosonic.com Compact Flash Card Memory Stick® (MS) SD High Capacity (SDHC) Secure Digital Card (SD) MultiMedia Card (MMC) Mini-SD (with adapter) RS-MMC (with adapter) MS Duo (with adapter), MS Pro Duo (with adapter). 2.5” Hard Disk ( SATA Interface) 40G ~ 250G Capacity Display 3.5” TFT LCD ,320x240 pixels , Backlight Adjustable Interface USB 2.0 5V/2.5A DC IN, Li-ion 3.7V 1900 mAh battery (NP-100 compatible) *The Li-ion rechargeable battery can be recharged approx.500 times. Power supplier *The times of backup will subject to the Hard Drive/ memory card / Files type. *The battery life may vary with use. Dimensions 13.5x7.5x2.2mm (Lx W x H) (WxLxH) Weight 290g (included 2.5” HDD & battery pack) System OS Windows R XP and Windows R 2000 SP3 above without driver Linux kernal 2.4 above without driver Mac OS 10.0.1 above without driver Windows Vista Note: VP5500 doesn't support Windows 2000 SP1 , SP2 , please upgrade to SP3 or above. Please visit our web site to download the most recent manual and software. Battery life may vary with use. The VP5500 may not read the RAW created with camera models other than above. 6 2. Overview of Panels & Keys Memory Stick / Memory Stick Pro , Compact Flash MMC/SD card slot MENU ESC JoyStick Allows you to zoom in the photo Allows you to zoom out the photo Battery Compartment USB port: Insert USB cord mini jack DC In : Insert AC adapter jack Power Power Button Lock RESET keypad Function Description Enter : takes you to execute the current selection Rotate: This function will effect under Photo Playback Mode. Direction icon: Use JoyStick button to move cursor on the screen. Direction icon: Use JoyStick button to move cursor on the screen. Direction icon : Use JoyStick button to move cursor on the screen. JoyStick Direction icon : Use JoyStick button to move cursor on the screen. [MENU] Play modes & system setting selection [ESC] Takes you go back to previous mode Allows you to zoom in the photo This function will effect under Photo Playback Mode. + Allows you to zoom out the photo This function will effect under Photo Playback Mode. 7 3. Using the VP5500 3-1. Starting up 1) Charge the batteries Before using for the first time, charge the batteries for a full 4 hours. 2) Power On /Off Press the Power button The green light will go on and the operating system will boot up. To shut off the unit, long press the power button for 2 seconds. 3) Computer connection Windows R XP or higher Windows R Me and Windows R XP HomeEdition and Professional Edition, Win2000 Professional Service Pack 3 above users do not need to install any drivers .Windows will automatically detect your device as following figure. * Right-click on ‘My Computer’ select ‘Properties’, and then look in the tab labeled ‘General’. It should say “Service Pack 1” or higher. 8 Mac R OS X Your OS X version must have Mass Storage device support. The Vosonic will be automatically recognized as mass storage device (Hard Drive) and mounted on the desktop. You can now use Vosonic like any other external hard drive. 3-2 . USB CONNECTION : When VP5500 begins connecting to the computer, the USB mode will appear on the screen. During file transfer in the PC mode DO NOT : 1. Plug out the USB cable 2. Remove memory card(s) from the card slot, otherwise, there may be a chance of lost or corrupt data. *To avoid any low battery, it is recommended to kept it plugged into the AC adapter / charger. *Do not use USB ports repeated through peripherals (such as keyboards) or with un-powered USB hubs. 9 Note: For Windows XP users, to safely disconnect the VP5500 from computer, click on the system tray remove icon and wait until you get a message saying tha you can safely unplug the device before disconnecting the USB cable. 3-3. Downloading or Editing the files on PC: Power on the VP5500 Connect the VP5500 and PC with the provided USB cable Double Click the " My computer" icon , the operating system will display 3 icons identifying the media type correspondingly. (see Computer connection) You can then read ,write,copy ,delete and remove data on the PC. Note: -The VP5500 uses the FAT file system, the maximum size of a single file is usually limited to 2G. - If you plan on to download a file over 2G , you might can create an extra NTFS partition for that , however, you cannot see the NTFS partition on the VP5500 stand –alone mode. Learn more about your partitioning and formatting options, please link to http://support.microsoft.com/kb/313348/en-us 10 4.Settings for your VP5500 To enter your setup screen , click “ Options” Photo Disks Backup Options Screen Brightness Language 10 English Date Time 2007/11/12 14:42:40 Auto Shutdown Timer OFF Screen Saver Timer Firmware Version F7-0.6.3 1) Language : This version can be set to English, Japanese, Korean, Spanish, German, French, Italian, Portuguese, Chinese, Thai ,Russian (Please wait for 3 seconds for language loading) 2) Auto shutdown Timer: Press Joystick button to adjust the setting, this setting can be changed from 0 to 30 minutes. Scroll down to decrease time value , scroll up to increase time value. 3) Date Time : Press Joystick button to adjust the setting. Scroll down to decrease value , scroll up to increase value. 4) Screen Brightness : Use Joystick button, you can change the LCD backlight Push down to decrease setting value, push up to increase setting value. 5) Screen Saver Timer : Press Joystick button to adjust the setting, this setting can be changed from 0 to 180 seconds. Scroll down to decrease time value , scroll up to increase time value. The screen will be turned off when screensaver timer is out, Press any key to activate the screen again. 11 5. Using a memory card to transfer photos to VP5500 Note: Please insert the memory card with the front of the card facing the LCD. Front of Card NOTE: Please carefully insert and remove the memory card from each slot . When a memory card is inserted, system will auto display a menu for asking "No Action", "Full Backup" or "Photo Backup". Full Backup Photo Backup No Action 12 1) Full Backup You can backup the whole folder (including it's subfolder and files) from memory card(s) to internal storage (Hard Drive ). Scroll to the Full Backup mode and press Joystick button. 2) Photo Backup The Photo Backup allows you to quickly search the digital images by saving the subfolder only. You can backup the subfolder from memory card(s) to internal storage (Hard Drive ). NOTE: Please make sure that you have DCIM (Digital Camera Image) folder on your memory card. . Scroll down to the “Photo Backup mode and press Joystick button. Use the Joystick button to reply Yes or No. 13 Display the number of Total number of files. transferring files. The copy / backup process … Compare : The verify function allows you double check if the copied files are exactly corresponding with the flash memory card. View : Allows you to quickly view the copied files. When the same card was inserted and copied twice, two different folders were created, VP5500 won't overwrite the folder. All files transfered from each memory card are stored onto the Backup folder in numerically, under the name "CF0000" , " CF0001" , "CF0002 , "CF0003” 14 z To stop the data transfer, just depress the Joystick or ESC buttons. z If an erroneous display , please run scandisk or re-format the memory card(s) to correct the disk platters. 3) NO Action Escape from current mode. If you want to back to the Photo /Full backup modes, just scroll to the path of memory card you want to backup , and press [ ] menu button. 15 6. Navigating the Directory Structure Just below the top status bar, you can see the path to the directory you are currently viewing. File Browser There are three types of views for you to browse through your folders or files (see view mode) You can quickly sort your different types of files The icon in the boom of screen will indicate what types of objects are selected. 16 You can view total numbers of folders / files and total size of the current directory including its subdirectories directly in the bottom of screen. 7. Copying , Pasting and Deleting Files and Folders Under the screen browser mode, you can copy, paste or delete files from one location in the file structure to another. Simply Press [ ] menu button to select the modes .As you finish the selection , just press Joystick button. 8.Photo Play Enter the path of Photo Photo Disks Backup Options Use the joystick to select the desired disk .As you finish the selection , just press Joystick button 17 View Mode : There are three types of views for you to browse through your photos: Press [ ] menu button and select View mode. List View : The screen will display all Icon View (3x2): The screen will display the JPEG in pictures in list of 8 . thumbnail of all the JPEG pictures in grou of 6 Icon View (4x3 ) The screen will display thumbnail of all the JPEG pictures in group of 12 18 Multi Select The multi select function allows you to choose a range of photos Press [ ] menu button and select [MultiSelect] mode ( The cursor will become green) Use the Joystick button to click the files you want to move. ( The cursor will become red) Then press [ ] menu butto to select mode you want to move the files. (see Copy,Delete) Copy Use the Joystick button to high-light the file you want to copy. Press [ ] menu button to select [ COPY ]mode, then press Joystick button The message “ copied to to clipboard “ will pop on the screen , then press Joystick button. Use the Joystick button to find the folder or Path you want to paste. Press [ ] menu button to select [ Paste ] mode, then press Joystick button It will ask “ Paste from clipboard ?” Use the Joystick button to reply Yes or No. Click “ Yes” , the copy fucntion will be performed Delete Use the Joystick button to find the file you want to delete. Press [ ] menu button to select [ Delete ]mode, then press Joystick button It will ask “Deleting…“ , Use the Joystick button to reply Yes or No. Set as Photo Icon ] Scroll to the specific JPG file you want and press the [ menu button to find “Set as Photo icon ” mode, then press joystick. This function only effect under JPG files. Show EXIF and histogram (if your picture files contain EXIF data): Click the specific JPG file you want to view and press ENTER,then press the [ ] menu button. Select [ Display Settings ] and press ENTER. Find the [Show EXIF] and press ENTER to show file information such as shutter peed, flash condition, focal length, and other image information. Slide Show : Click the specific JPG file you want to view and press [ ] menu button to select Slide Show mode. Slide Interval Setting: Hold and push the Joystick button to the left to decrease the interval time Hold and push the Joystick button to the right to increase the interval time ZOOM IN / OUT DISPLAY You can use [ + ] or [ - ] buttons to zoom in /out the picture . Use the Joystick button to pan right or left, up and down . 20 ROTATE DISPLAY You can press Joystick button to to rotate the picture in clockwise or counter –clockwise direction. 9.Battery Recharge: 1) To charge the batteries, please connect the plug of the AC adapter to DC 5V jack of the main unit. When the Power LED indicator goes off , it indicates that the batteries are fully charged. 2) Please use only the Vosonic original 1900mAh 3.7V rechargeable Li-ion battery For additional battery packs, please contact your dealer or you can purchase it from Vosonic on-line shopping http://www.vosonic.twmail.net/modules/Cart/ 21 10. Erroneous display / 1) When the copy error message pop on screen , there may be a chance of corrupt data or the memory card is damaged , please re-format your memory cards 2) If any shut dowm caused by erroneous operation , you can depress the [ reset] button located on the right side to switch off the main unit . 3) When the unit operated via USB on to PC while the batteries are low erroneous display /operation may occur, if this happens ,unplug the USB cable, and press the [ reset] button . 11. Care for the Hard Drive and unit : 1) To keep your hard drive in better operating performance , we recommend to periodically run Scan Disk and Disk Defragmenter . NOTE : If the Hard Drive already contain data, please backup the data first, because when you partition and format a Hard Drive , all the data on the partition is permanently deleted. 2) To ensure enough free space is available 1. Scroll to the Hard Drive 2. Press [ ] menu button and use joystick button to check the amount of free space. 22 3) Hard Drive must be formatted to the FAT or FAT-32 format, NTFS format is not compatible with this function . 4) If the computer or VP5500 can not detect the Hard Drive, check the suggested solutions: z Check the flat connector is plugged securely or not. z It is not recommended to format the 32G above HardDrive under Windows 2000 or Windows XP Note: Win 2K/ Win XP can not support to format the 30G above Hard Drive at FAT format. 5) Please don't use force when connecting the flat cable with the unit and Hard Drive. 6) Please carefully insert and remove the memory card from each slot . Do not drop, jar , bump , shock the unit , or expose to severe vibration while data is being transmitted . 7) To reduce the risk of electronic shock , do not remove cover (or back ). 8) To reduce the risk of fire or shock hazard, do not expose this equipment to rain ,any liquid or moisture. . 9)To avoid any dangerous to the environment and to human health. Please do not dispose of the electronic device in a regular trash. Please have this device be collected at places of distribution 23 Hard Drive Assembly Chart Refer to this section only if you have purchased a VP5500 (case only ) without a Hard drive installed or if you plan to upgrade or change the internal Hard Drive. 1. Using the supplied screwdriver to remove the 2 screws 2. Use your finger nail to open the side clip. 24 3. Ensure that Hard Drive is set to Master. Carefully slide the Hard Drive into the chassis. And fit the Hard Drive screws. 25 4. Place the cover. 26 5. Fit the case screws.. 11.Format Hard Disk without PC WARNING When you partition and format a hard disk, all data on that partition is permanently deleted. If the hard disk already contains data, please backup the data first. ] menu button. Select the Hard Drive icon and press the [ Select Format Disk option and press the joystick. Disk formatting will be performed. 27 12.Troubleshooting WARNING Under no circumstances should you try to repair the system yourself, as this will invalidate the warranty. Do not open the system as there is a risk of electrical shock. If a fault occurs, first check the points listed below before taking the system for repair. If you are unable to remedy a problem, consult your dealer or service center. Problem Solution USB Connection issues If using a USB port in the front of your computer, try a USB port in the back. Front USB ports are often from non-powered. If you cannot see the files on the device after copied files to VP5500 via USB from computer , You must properly remove ( un-mount) your VP5500 from the computer before disconnecting the USB cable to avoid loss of data or freezing the computer and VP5500 If you can not find the VP5500 Hard Drive show up in Windows for over one minute, the Files Allocation Table (FAT) of Hard Drive may gets corrupted, you can use Format Function on the VP5500 but note it will erase ALL of the data on your VP5500. Problem MacintoshTM OS issues Solutions MacOS 10.0.x does not adequately support FAT volumes. Upgrading to 10.1 or later is mandatory Problem The FAT volumes do not appear or disappear until after the mouse is being moved. Corrupt data , General Error , Can’t open Source File Solutions Due to file allocation table (FAT) has been corrupted, the data in memory card transferred into VP550 may be looks faulty, please backup the data and run ScanDisk , Dsik Defragmenter or reformat the memory card. 28 The browser will show a ? icon indicating that it is not one of the standard file types that it can play. Problems Formatting, and partitioning Solutions To work in the stand-alone mode, both the disk and the memory cards must be formatted to the FAT or FAT-32 file systems. Problems Freezes operation or Stops Press the [reset] button to off the device and the VP5500 will shut off ,then you can restart it. If you get a un-normal freezes from a photo playback , call our technical support hot-line or write it to [email protected] Frequently Asked Questions Problem Not DCF Format Solution Please make sure that you have DCIM (Digital Camera Image). folder on your memory card. The system does not react when buttons are press. How can I get an extra battery for my VP5500 Please press the reset button to recover the unit. For additional battery packs, please contact your dealer or you can purchase it from Vosonic on-line shopping http://www.vosonic.twmail.net/modules/Cart/ The unit has no display. A pin of CF slot is broken Please make sure if the LCD has broken or just faulty. Also, please make sure it is not in power saving mode. You may can contact the original dealer for repair. But if you can not find your original dealer or you need the unit to be repaired within 3 days, you can send back to Vosonic-Taiwan directly from inspection and repair. 29 How to update the firmware for my Vosonic • VISIT VOSONIC ON THE WEB Go to http://www.vosonic.com to download the latest firmware The latest version of this manual may be available on Vosonic's Web site • CONTACT VOSONIC To process a request for Technical Service, please mail the following information to [email protected] 1. Model Number : 2. Serial Number : 3. Firmware version : 4. HDD capacity and brand : 5. Memory card capacity and brand : 6. A description of the problem : 7. Your dealer name or the web site for the item was purchased : • REGISTER A MEMBER AT Vosonic CLUB The most easy way to communicate the operating problem with other users. Register a Vosonic members at Vosonic Club http://www.vosonic.twmail.net 30 THANK YOU FOR CHOOSING THIS PRODUCT We hope it will provide you with years of trouble-free enjoyment. Please look after your Vosonic. If you experience problems and cannot find solutions in the previous sections, please contact your dealer or check for updated firmware at www.vosonic.com or email to [email protected] The Vosonic Team