1
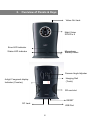
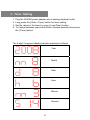
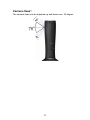
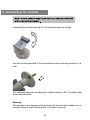
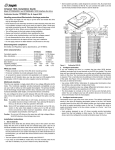
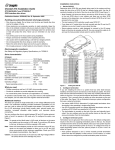
GV6200 User’s Guide Rev.A _______________________________________________________________________ ी 2008 Vosonic Technology Corporation. All right reserved. Part Number: 845550002001 Dear Customer Thank you for purchasing Vosonic GV6200. 1.Before using Vosonic GV6200, you will have to ---------------------------------------------------------------------1-1. Make sure the memory card has already partition or re-format again. 1-2. Check www.vosonic.com to download the update firmware that we offer new functions and improved features. Enjoy your GV6200 The Vosonic Team 2 CAUTION Under no circumstances should you try to repair the system yourself, as this will invalidate the warranty. Do not open the system as there is risk of electrical shock. FCC Certifications This equipment has been tested and found to comply with the limits for a Class B digital device, pursuant to Part 15 of the FCC Rules. These limits are designed to provide reasonable protection against harmful interference in a residential installation. This equipment generates, uses and can radiate radio frequency energy and, if not installed and used in accordance with the instructions, may cause harmful interference to radio communications. However, there is no guarantee that interference will not occur in a particular installation. If this equipment does cause harmful interference to radio or television reception, which can be determined by turning the equipment off and on, the user is encouraged to try to correct the interference by one or more of the following measures: • Reorient or relocate the receiving antenna. • Increase the separation between the equipment and receiver. • Connect the equipment into an outlet on a circuit different from that to which the receiver is connected. • Consult the dealer or an experienced technician for help. 3 IMPORTANT WARRANTY INFORMATION y y y y y y y To reduce the risk of fire or shock hazard, do not expose this equipment to rain, any liquid or moisture. Vosonic shall have no obligation to repair, replace or refund until the customer returns the defective product to Vosonic. The repairs and replacement service will not apply to PRODUCT units that were misused, repaired without authorization ort by other reasons beyond the range of intended use. Any replacement product may be either new or like –new, provided that it has functionality at least equal to that of the product being replaced. Vosonic is not responsible for any data stored on returned products, please backup any data prior to shipping the unit. The limited warranty for accessories (included battery ) is only valid for 6 months from the date of purchasing.. All OUT OF WARRANTY repairs maybe subject to a normal repair fee. Please contact your dealer or Vosonic for current charges. Package Checklist y y y y y y Main unit Mounting Bracket English user's guide Mini 5 Pins USB Cable Composite (RCA Yellow) Video Cable Power Adapter (100-240V auto switched ) 4 Specifications Camera Recording mode 1/3” color CMOS 1.3 Mega Pixel camera 70 degree field of view for camera and motion detection Motion detected recording Continuing recording Codec: MPEG-4 Format: MP4 Resolution: 640x480 Pixels Video Recording format Frame Rate: 20~30 fps * The frame rate is subject to the speed of memory card Support memory card Secure Digital Card (SD) SD High Capacity (SDHC) Digit display indicator Counting number of motion detected times Error message Operating status LED indicator Recording mode or stand-by mode Error message USB Interface USB 2.0 Video Output Composite Video output NTSC & PAL Power Supplier Dimensions 5V/2A DC IN 90 x 43 x 127mm (L x W x H) z Please visit our web site to download the most recent manual and software. 5 2. Overview of Panels & Keys Video-Out Jack Night Vision IR LED x 8 Error LED indicator Microphone Battery Status Status LED indicator Camera Angle Adjuster Hanging Rail (Track) 4-digit 7-segment display Indicator (Counter) SD card slot RESET DC Jack USB Port 6 keypad Function Description A short press places the recording into loop mode. Loop/Clear Continuous-loop recording Will disable to loop while recording A long press will clear all the recording files. ( Data written to memory card will be all lost) (See 5.4 Stop/Set ) A short press will stop the recording and put the unit in standby. (Data written to memory card will not be lost) Enter/Time Camera Angle Adjuster A long press allows you to set the type of your television broadcast standard. (PAL or NTSC) A short press to display the current time. A long press will allows you to set the timer. Allows you to adjust camera head. H/M/L Parameter for motion Detection (see How to configure Motion Detection) Video-Out Jack Before recording, use the video-out function on TV screen to adjust the camera head. 3. Timer Setting 1. 2. 3. 4. Plug the GV6200 power adapter into a working electrical outlet. Long press the [ Enter / Time ] button for timer setting. Set the value for the timer by using [ Loop/Clear ] button. To change between year,month,hours, minutes,seconds,short press the [ Timer] button. The 4-digit 7-segment display indicator displays as follows: Year Month Date Hour Minute Second 8 4.LED indicators: The LED indicators flash as follows: Error Unlit Red Steady for normal operation -Erroneous operation occurs See If an erroneous operation occurs Status Unlit Red Battery Unlit -USB mode No power connection Slow Flash : Steady for normal operation No Flash : - Erroneous operation occurs - USB mode Flashing : An object that appears in the region triggers the motion detection Full charged Red Charging… Note: The GV6200 includes one Li-ion battery, this is to ensure no critical shot is ever missed during 1 hour power cut. To completely shut down the unit, you can press [reset ] button. Note the night vision function will not work during power cut. 5.How to configure Motion Detection: The motion detection feature is used to generate an alarm whenever movement occurs in the image. 1. Adjust Parameter (see table below for details). Parameter Object Size History H : High Sensitivity continuous-loop recording ensures that no critical shot is ever missed *The counter will not count up in this mode. M: Middle Very small objects An object that appears in Ordinary colored trigger motion the region will trigger the objects against detection motion detection for a long ordinary backgrounds period. will trigger the motion detection L : Low Only very large An object that appears in objects trigger motion the region will trigger the detection Only very bright objects against a dark motion detection for a very background will trigger short period. motion detection 2. Plug the GV6200 power adapter into a working electrical outlet. Aim the motion detector at the field of view you want covered. 3. Insert the SD card into the SD card slot. NOTE: Please carefully insert the memory card with the front of the card facing the LED. . 4.The LED on the back side will show Fo: or Fo-- ; it is asking “Do you want to format the SD card ? “ You can press [Enter] to format the card or [ Loop] to enable the recording. 5. While the parameter is set at M or L , counter will track the number of video files when the device detects any movement occur. Note: The unit will automatically being to record when it has been idle for 10 seconds. Camera Head : The camera head can be adjusted up and down max. 35 degree 11 6. Assembling the bracket Assemble the bracket and fix it to the optional stand as shown. Use the screws provided to fix the optional stand (mounting bracket) to a wall The optional stand can be adjusted to allow camera a 950 of rotation and a pan and tilt action. Warning The camera is not waterproof and should not be mounted outside or in a position where it could become wet. For indoor use only. 7. USB connection z Connect the GV6200 and PC with the provided USB cable z Double Click the " My computer" icon , the operating system will display GV6200 as removable disk . z You can then read ,write,copy ,delete and remove data on the PC. Computer connection Windows XP or higher Windows Me and Windows XP HomeEdition and Professional Edition, Win2000 Professional Service Pack 3 above users do not need to install any drivers .Windows will automatically detect GV6200 as following figure. * Right-click on ‘My Computer’ select ‘Properties’, and then look in the tab labeled ‘General’. It should say “Service Pack 1” or higher. 13 During file transfer in the PC mode DO NOT : 1. Plug out the USB cable 2. Remove memory card(s) from the card slot, otherwise, there may be a chance of lost or corrupt data. *Do not use USB ports repeated through peripherals (such as keyboards) or with un-powered USB hubs. Note: For Windows XP users, to safely disconnect the GV6200 from computer, click on the system tray remove icon and wait until you get a message saying that you can safely unplug the device before disconnecting the USB cable. 8. Viewing the recording video The recorded data can be played on Windows Media Player or other software without the need for dedicated software. There are many free video editing programs available. here are some free programs to check out. For the Windows operating system & Mac OS X : - VLC Media player http://www.videolan.org/vlc/ - Divx Player http://www.divx.com/ For the Windows operating system - Windows Media Player 11 9. General information z A new recording file is created if the file size is about 200MB or the recording time is up to 30 minutes. z It’s best to mount this device from 0 to 30 ft. to result in better image quality. z To stop the recording, short press the stop button, then you change the memory card or switch off the device. z Built-in light sensor automatically turns on high power LEDs for night vision up to 10ft. z It is normal for the night vision LEDs to flash for brightness adjustment. z It is possible and normal for the recording image to have noise in the low-light conditions or poor wiring. z In the dark areas, use another source of light that enhances images to enable the GV6200 to detect objects and improves the detection. z The resolution may change in the direction from center towards the perimeter of the field of view. This is an inherent feature of the image tube type utilized in the device. We would recommend placing the scene of observation in the center of the field of view. z Keep GV6200 away from direct sunlight ,impacts, dust, moisture and sudden changes of temperatures . z Bright light sources (moon , projectors or headlights) may cause recording quality to degrade or recording image to have horizontal black stripes. z Poor atmospheric conditions such as fog, haze or extremely dark environments, will decrease the recording quality of the unit. z Do not touch the lens with fingers. 15 z To keep your SD card in better operating performance , we recommend to periodically run Scan Disk and Disk Defragmenter . NOTE : If the SD card already contain data, please backup the data first, because when you partition and format a SD card , all the data on the partition is permanently deleted z Please carefully insert and remove the memory card from slot . Do not drop, jar, bump, shock the unit, or expose to severe vibration while unit is recording. z To reduce the risk of electronic shock , do not remove cover (or back ). z To avoid any dangerous to the environment and to human health. Please do not dispose of the electronic device in a regular trash. Please have this device be collected at places of distribution 16 1) Error Code : The error detection method may include producing a warning sound and displaying an error message on the 4-digital 7-segment display indicator. : SD Card Lock : SD Card Error : CMOS (camera) Error 2) If any shut down caused by erroneous operation, you can depress the [ reset] button located on the bottom to switch off the main unit . 11. Troubleshooting WARNING Under no circumstances should you try to repair the system yourself, as this will invalidate the warranty. Do not open the system as there is a risk of electrical shock. If a fault occurs, first check the points listed below before taking the system for repair. If you are unable to remedy a Problem Solution Problem USB Connection issues If using a USB port in the front of your computer, try a USB port in the back. Front USB ports are often from non-powered. If you can not find the GV6200 show up in Windows for over one minute, the Files Allocation Table (FAT) of SD card may gets corrupted. Please find other card reader to reformat the memory card but not all data on the card will be erased. MacintoshTM OS issues Solutions MacOS 10.0.x does not adequately support FAT volumes. Upgrading to 10.1 or later is mandatory The FAT volumes do not appear or disappear until after the mouse is being moved. Problem Corrupt data , General Error , Can’t open Source File Solutions Please backup the data and run Scandisk , Disk Defragmenter or reformat the memory card. Problems Freezes operation or Stops Press the [reset] button to off the device and the GV6200 will shut off ,then you can restart it. If you get a un-normal freezes , call our technical support hot-line or write it to [email protected] 18 Frequently Asked Questions Problem The status indicator LED is not lit Lower frame rate than expected. Faulty power adapter Image too dark or too light The system does not react when buttons are press. Motion Detection triggers unexpectedly Solution It may be caused by faulty power adaptor or hardware failure. It may be caused by e.g kind of SD card and its manufacturer. Check you are using GV6200 power adapter Camera incorrectly configured on your workstation Please press the reset button to recover the unit. Motion detection is based upon changes in luminance in the image. This means that if there are sudden changes in the lighting, motion detection may be triggered mistakenly. Lower the sensitivity setting to avoid problems with luminance. How to update the firmware for my Vosonic • VISIT VOSONIC ON THE WEB Go to http://www.vosonic.com to download the latest firmware The latest version of this manual may be available on Vosonic's Web site • CONTACT VOSONIC To process a request for Technical Service, please mail the following information to [email protected] 1. Model Number : 2. Serial Number : 3. Firmware version : 4. Memory card capacity and brand : 5. A description of the problem : 6. Your dealer name or the web site for the item was purchased : •REGISTER A MEMBER AT Vosonic CLUB The most easy way to communicate the operating problem with other users. Register a Vosonic members at Vosonic Club http://www.vosonic.twmail.net 20 THANK YOU FOR CHOOSING THIS PRODUCT We hope it will provide you with years of trouble-free enjoyment. Please look after your Vosonic. If you experience problems and cannot find solutions in the previous sections, please contact your dealer or check for updated firmware at www.vosonic.com or email to [email protected] The Vosonic Team