1
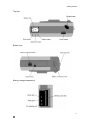
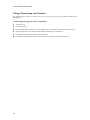
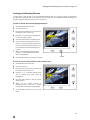
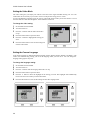
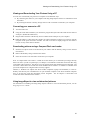
ViviCam 3200
Digital Still Camera
User Manual
Copyright © 1999 Vivitar Corporation
Vivitar Corporation
1280 Rancho Conejo Blvd.
Newbury Park, CA 91320 USA
www.vivitar.com
www.vivitar.co.jp
www.vivitar.co.uk
Image Expert and Camio are trademarks of Sierra Imaging, Inc.
Microsoft and Windows are registered trademarks of Microsoft Corporation.
CompactFlash is a registered trademark of the CompactFlash Association.
Contents
Contents
CONTENTS ............................................................................................................................I
GETTING STARTED .............................................................................................................. 1
Camera Package Contents...................................................................................................... 1
Camera Parts ......................................................................................................................... 2
Safety and Handling Information.............................................................................................. 4
TAKING A PICTURE.............................................................................................................. 5
Powering the Camera On/Off................................................................................................... 5
Taking a Picture...................................................................................................................... 6
Using Quick Review ................................................................................................................ 7
Using Focus Lock ................................................................................................................... 8
Using the Memory Card .......................................................................................................... 9
Using the Self-Timer ............................................................................................................. 10
Resolution and Quality Levels................................................................................................ 11
Flash Setting ........................................................................................................................ 12
Macro Function..................................................................................................................... 13
Battery Status....................................................................................................................... 14
REVIEWING PICTURES ....................................................................................................... 15
Viewing Images Using the Camera's LCD Screen ................................................................... 15
Displaying Information about Your Pictures ............................................................................ 16
Viewing Pictures on Your Television ...................................................................................... 17
Taking a Picture Using Your Television .................................................................................. 18
Deleting Pictures .................................................................................................................. 19
Locking and Unlocking Pictures ............................................................................................. 21
SETTING CAMERA PREFERENCES .................................................................................... 22
Setting the Resolution Level .................................................................................................. 22
Setting the Quality Level ....................................................................................................... 22
Setting the Camera Sounds ................................................................................................... 23
Setting Quick Review............................................................................................................ 23
Setting the Camera Date and Time ........................................................................................ 24
Adjusting the Brightness of the LCD screen ............................................................................ 24
Changing the Exposure ......................................................................................................... 25
Reformatting the Memory Card .............................................................................................. 25
Setting the Video Mode......................................................................................................... 26
Setting the Camera Language ............................................................................................... 26
i
V3200 Camera User’s Guide
VIEWING AND DOWNLOADING YOUR PICTURES USING A PC ......................................... 27
Connecting your Camera to a PC........................................................................................... 27
Downloading Pictures using a Compact Flash Card Reader .................................................... 27
Using Image Expert to View and Download Pictures ............................................................... 27
TROUBLESHOOTING.......................................................................................................... 28
Camera Problems................................................................................................................. 28
Image Problems ................................................................................................................... 29
APPENDIX........................................................................................................................... 30
Regulatory information .......................................................................................................... 30
Warranty .............................................................................................................................. 31
Camera Specifications .......................................................................................................... 32
ii
Getting Started
Getting Started
Congratulations on your purchase of a new ViviCam 3200 (V3200) Digital Camera! The V3200 is an
easy-to-use high-quality digital camera that features:
♦
Two resolution settings and three quality settings that enable you to take 24-bit color pictures up to a
megapixel in size
♦
Fast image processing of approximately five (5) seconds
♦
Built-in four-mode flash
♦
Self-timer with a 10-second delay
♦
Auto-Focusing lens with Macro mode
♦
Removable Compact Flash memory storage card
♦
Serial cable for transferring pictures from the camera to your PC
♦
Video cable that lets you connect your camera to a TV for viewing and even taking pictures
♦
Software for transferring, managing, editing, and printing your pictures
This guide contains complete operating information for your V3200 camera. For information on installing
and using Image Expert software to download, edit, and print your pictures, see the Image Expert User’s
Guide.
Camera Package Contents
Your camera package contains the following parts and accessories:
♦
V3200 camera
♦
1 4MB Compact Flash storage card
♦
4 AA rechargeable NiMH batteries & charger*
♦
PC serial cable
♦
Macintosh cable
♦
Video cable
♦
Hand strap
♦
V3200 Camera Quick Start Guide
♦
V3200 Camera User’s Guide
♦
Image Expert software
♦
Image Expert User’s Guide
* Please note that the basic inclusions do vary somewhat depending upon special manufacturing
circumstances, and promotional programs in which your dealer or supplier may have specified unique or
special package contents. In some instances, 4 AA alkaline batteries may be included instead of the NiMH
batteries & charger.
1
V3200 Camera User’s Guide
Camera Parts
Front View
Back View
2
Getting Started
Top View
Bottom View
Memory storage compartment
3
V3200 Camera User’s Guide
Safety and Handling Information
For your safety and the protection of your camera, observe the following tips while handling your camera.
Camera information
♦
Do not take apart or attempt to service the camera yourself.
♦
Do not expose the camera to moisture, excessive heat, or excessive cold.
♦
Let the camera warm up when moving from a cold to a warm temperature.
♦
Avoid touching the LCD screen.
♦
Do not expose the lens to direct sunlight for long periods of time.
♦
Ensure that the memory card is fully inserted before turning on the camera.
♦
Protect the memory card from heat, moisture, static electricity, and magnetic fields.
Battery information
4
♦
Turn off the camera before installing or removing batteries.
♦
Use only AA alkaline, lithium, or rechargeable NiCD or NiMH batteries.
♦
Do not mix types of batteries.
♦
Always replace all four batteries with four new or freshly charged batteries.
♦
Do not use batteries that are leaking, corroded, or damaged.
♦
Do not attempt to recharge non-rechargeable batteries.
♦
When charging rechargeable batteries, use a battery recharger specifically designed for the type of
battery. If the recharger is designed to accommodate multiple battery types, be sure to adjust its
settings to match the type of battery you are recharging.
♦
Remove the batteries from the camera if you are storing your camera for prolonged periods of time.
Taking a Picture
Taking a Picture
Using the Capture mode on your camera, you can:
♦
Take a picture
♦
Preview the picture on the LCD display before taking it
♦
Instantly review and (if you don't like what you see) delete the picture just taken
To select this mode, slide the Mode switch to the position labeled “Capture”.
Powering the Camera On/Off
To turn the camera on:
1 Press the Power button.
2 Wait until the Ready light on the back of the camera stops blinking and turns a solid, steady green.
è The camera is now ready to take pictures.
To turn the camera off:
Press the Power button again.
è The camera will preserve all preference settings (adjustments) made prior to turning it off.
Note: When the camera is powered off, your settings will be retained. However, if you remove or replace
the batteries the camera will loose the current settings and the camera will revert to the factory default
settings.
Using power-save:
Your camera contains a power-saving feature that automatically turns the camera off after three (3) minutes
of inactivity or after five (5) minutes of inactivity when the camera is connected to a computer.
If you are using the LCD to preview pictures while the camera is powered by batteries, the camera will shut
off after 30 seconds of inactivity. You can extend this time interval to 3 minutes by holding down the
Select button for 2 seconds when starting LCD preview mode.
è To restore power to the camera after it has automatically turned off, press the Power button.
è To adjust the time interval of the power-save function, see the Image Expert User’s Guide.
5
V3200 Camera User’s Guide
Taking a Picture
To take a picture with your camera:
1
2
3
4
5
Make sure you have a Compact Flash memory card inserted in the memory card slot.
Set the Mode switch to Capture.
Turn the camera on.
Frame your subject in the optical viewfinder.
Hold the camera still and press the Shutter button down fully. You will hear the sound of the autofocus motor as it adjusts and focuses the lens.
è The Ready light will blink red while the picture is processing. When the light changes to solid green,
the camera is ready to take another picture.
TIP
When using the flash, you can decrease the amount of time required for the camera to become
ready between pictures by turning off the LCD screen display.
To preview your picture on the LCD screen before taking it:
1
2
3
4
5
Set the Mode switch to Capture.
Turn the camera on.
Press the red Select button to turn on the LCD display.
Frame your subject by looking at the LCD screen.
Hold the camera still and press the Shutter button down fully.
è To turn off the LCD screen and return to using the optical viewfinder, press the Select button a second
time.
Use the optical viewfinder when...
Use the LCD to preview pictures when...
♦
You want to conserve your camera’s batteries.
♦
♦
You want the flash to charge faster between
pictures.
♦
The lighting is too bright to see the LCD
screen.
♦
The lighting is too low to get an image on the
LCD screen.
You need exact framing, particularly in Macro
mode.
è To learn how to adjust the brightness of the LCD screen, see Adjusting the Brightness of the LCD
Screen on page 24.
6
Taking a Picture
Using Quick Review
When the Quick Review preference is set to On, the camera LCD displays the picture for a short period of
time after you have taken it. This feature allows you to instantly review a picture. It also gives you a
chance to immediately delete, or discard the image you have just taken.
To review and delete pictures using Quick Review:
1
2
3
4
Set the Mode switch to Capture.
Turn the camera on.
Take a picture.
Notice how the image appears on the LCD
screen. The LCD will display a Delete
icon and a status bar indicating that the
picture is being processed.
5 If you want to delete the picture before it
is stored on the memory storage card,
press the button immediately below the
Delete icon while the image is still
processing.
è When the picture has finished processing,
the status bar disappears and the image is
displayed for two more seconds before the
screen goes blank. During this time, the camera is ready to take a new picture, although you still have
the opportunity to delete the current picture.
è For information on changing the Quick Review setting, see Setting Quick Review on page 23.
TIP
Quick Review increases the drain on your batteries. If your batteries have a low charge, or if
you want to maximize the number of pictures you can take using one set of batteries, turn
Quick Review off.
7
V3200 Camera User’s Guide
Using Focus Lock
When taking a picture, your camera automatically focuses on the object in the center of the viewfinder. If
you want the camera to focus on a subject that is not in the center of the picture, you can use the camera’s
focus lock feature to set the focus.
To take a picture using focus lock:
1
2
3
4
Set the Mode switch to Capture.
Turn the camera on.
Position the subject on which you want the camera to focus in the center of the viewfinder.
Press the Shutter button halfway down and hold it. You will hear a clicking sound as the lens adjusts to
the distance.
5 While continuing to press the Shutter button halfway down (thereby focusing on the object of interest),
frame your picture, and then press the Shutter button down fully to take a picture.
8
Taking a Picture
Using a Memory Card
Your camera stores pictures on a removable Compact Flash memory
storage card. A 4 MB Compact Flash card is included with the
camera kit. You may purchase additional cards in varying sizes.
The camera does not contain internal storage memory; therefore, the
camera will not operate fi a memory card is not inserted. The
camera’s Status LCD displays an error if you try to operate the
camera without a memory storage card. If you try to use the camera
without a CF card, the camera will also generate a volley of quick
beeps – if sounds are enabled.
To insert a CF memory card:
1 Make sure the camera power is off.
2 Hold the camera with the front facing you and open
the rubber flap covering the memory card slot.
3 Hold the memory card with the end containing the
connectors pointing in towards the camera and the
label of the CF card towards the front of the camera.
4 Insert the card into the memory card slot and push it all
the way in. The edge of the card should be flush with
the camera slot when the card is properly inserted.
5 Close the rubber cover.
6 The camera will recognize the CF card and the camera
will turn on.
7 Turn the camera off if you do not plan to use it immediately.
To remove the memory card:
1 Make sure the camera power is off.
2 Hold the camera with the bottom facing you and open
the rubber flap covering the memory card slot.
3 Slide the Card Eject switch on the bottom of your
camera until the memory storage card is released from
the slot.
4 Remove the memory storage card from the camera.
5 Note: The camera will briefly display the “No Card” icon nine to ten times.
When your camera's CF memory card is full, the picture count on the Status LCD changes to "0", the ready
light shines solid red, and the camera beeps repeatedly when you press the Shutter button. To take more
pictures when the memory card is full:
♦
Delete some of the pictures on the memory card.
♦
Download the pictures to your computer and then erase them from the memory card.
♦
Replace the full memory card with one containing free space.
9
V3200 Camera User’s Guide
Using the Self-Timer
Number of
images
remaining
Use the self-timer to delay taking a picture for 10 seconds after
pressing the shutter button.
To take a picture using the self-timer:
1 Turn the camera on.
2 Set the Mode switch to Capture.
3 Press the Self-timer button. The self-timer symbol in the Status
LCD will flash to indicate that the timer is on stand-by.
4 Frame your subject, then press the Shutter button to activate the timer. The red Self-timer light on the
front of the camera will shine steadily for 7 seconds, then flash for 3 seconds before the camera takes
the picture. The camera beeps when the image capture is complete.
To turn off the self-timer:
Press the Self-timer button again.
è The self-timer automatically turns off once the picture is taken or the camera is turned off.
TIP
10
For best image quality, use the self-timer only after securely mounting the camera on a
tripod or other solid surface.
Taking a Picture
Checking Resolution and Quality Levels
The resolution setting determines the size of the picture in pixels.
Your camera has two resolution settings: Megapixel (1152 x 864
pixels) and VGA (640 x 480 pixels).
The quality setting controls how much your pictures will be
compressed on the memory card. Your camera has three quality
settings: Best, High, and Medium.
The current resolution and quality settings of your camera are
displayed as a combined symbol on the Status LCD.
Symbol
Key:
Resolution Level
Quality Level
Approximate Picture Count
(4MB card)
1152 x 864 Megapixel resolution
Best
Stores up to 7 images.
1152 x 864 Megapixel resolution
High
Stores up to 14 images.
1152 x 864 Megapixel resolution
Medium
Stores up to 23 images.
640 x 480 VGA resolution
Best
Stores up to 21 images.
640 x 480 VGA resolution
High
Stores up to 43 images.
640 x 480 VGA resolution
Medium
Stores up to 69 images.
Two rows of dots (n) represent megapixel resolution, whereas one row is VGA resolution.
Three columns of dots represent Best, two represent High, and one represents Medium quality.
To change the resolution or quality level:
See Setting the Resolution Level and Setting the Quality Level on page 22.
TIP
In general, pictures taken at the higher resolution and quality settings capture more detail
and look sharper, but also take up more space on your memory card. To maximize the
number of pictures that can be stored, choose a lower setting. To maximize image detail,
choose a higher setting.
A resolution setting of 1152 x 864 (Megapixel) and a quality setting of High is usually
sufficient for most purposes.
11
V3200 Camera User’s Guide
Flash Settings
Your camera has four different flash modes: Flash Off, Red-Eye, On/Fill,
and Automatic. The current flash setting is displayed on the camera Status
LCD.
Symbol
Flash Setting
Use when…
Flash Off: No flash used.
Taking picture in bright lighting conditions.
Red-Eye: Automatic flash used, preceded
by a pre-flash.
Taking pictures of people, to reduce red-eye
effect.
On/Fill: Flash used with every image taken,
regardless of lighting levels.
Taking pictures of dark subjects when the area
behind the subjects is highly illuminated. (High
scene contrast)
Automatic: Flash automatically used when
lighting is insufficient for optimum image
capture.
No unusual lighting conditions are present.
To change the flash setting:
Press the Flash button repeatedly until the symbol for the desired setting is displayed in the Status LCD.
12
Taking a Picture
Macro Function
Use the Macro setting to take pictures of subjects that are close to the
camera, such as flowers. When the Macro setting is on, the Macro
symbol is displayed on the camera Status LCD.
Symbol
[No symbol]
Setting
Use when...
Macro
The distance between your camera and the subject is between 10 inches
(25 cm) and 2 feet (60 cm).
Normal
The distance between your camera and the subject is greater than 2 feet
(60 cm).
To turn the Macro setting on/off:
Press the Macro button. No symbol is displayed on the Status LCD when the camera is in Normal mode.
Tip: For accurate framing when using Macro mode use the image LCD. An optical parallax exists
between the optical viewfinder and the imager that is evident in macro mode. Using the image LCD will
avoid the optical parallax issue and ensure optimal framing of your subject.
13
V3200 Camera User’s Guide
Battery Status
Your camera kit includes 4 AA batteries. When these batteries are
drained, you may replace them with any standard AA alkaline,
lithium, or rechargeable NiCd or NiMH batteries.
The battery-shaped symbol on the Status LCD shows the
approximate charge state of the batteries in the camera. As the
batteries drain, the number of segments displayed in the symbol
decreases from two to zero.
If the battery symbol looks like this...
Then...
The batteries are at full charge, or an AC adapter is in use.
The batteries are approximately 75% discharged.
The batteries are close to empty. Recharge the batteries or
install fresh ones.
The camera can no longer be used at full functionality.
You may be able to take a few more pictures by turning off
the Quick Review setting and by not using the LCD
display to take or review pictures.
(flashing)
To insert batteries into the camera:
1
2
3
4
5
Make sure the camera power is off.
Turn the camera upside down.
Slide back the latch on the battery compartment cover and swing open the door.
Use the battery orientation diagram inside the compartment to insert the 4 batteries.
Close the door to the compartment, and slide the latch firmly shut.
TIP
14
Digital cameras are high-current devices that place heavy power demands on batteries. You
may want to consider the following tips to extend the life of your camera’s batteries:
♦
Use rechargeable NiMH or NiCad batteries instead of alkaline batteries, particularly if
you frequently use the LCD screen to preview pictures.
♦
Minimize use of the LCD screen, especially when using alkaline batteries.
♦
Do not use the LCD for previewing or reviewing pictures when the Status LCD battery
symbol contains one or no segments.
♦
If the Status LCD battery symbol displays empty and begins flashing while you are
using the camera with the LCD screen or Quick Review turned on, you can usually
take more pictures with the same battery set by doing the following:
1
2
Turn the power off.
Turn the power back on.
3
4
Immediately set the Quick Review Preferences setting to Off.
Continue taking pictures, but do not use the LCD screen to preview your shots.
♦
Use an AC power adapter when the camera is connected to a computer or TV.
♦
Turn the Flash Mode to OFF to avoid charging the flash capacitor
Viewing and Downloading Your Pictures Using a PC
Reviewing Pictures
The Review mode of your camera allows you to:
♦
Display pictures on the camera’s LCD screen and review, lock, or delete them.
♦
Display pictures on a TV monitor connected to your camera.
♦
View a slide show of the pictures stored on the camera’s memory card.
To select this mode, slide the Mode switch to the position labeled “Review”.
Viewing Images Using the Camera's LCD Screen
To review the images stored on your memory card:
1 Set the Mode switch to Review.
2 Turn the camera on.
3 Press the 6 or 5 button to display the previous or next picture stored on the memory card.
To view thumbnails of all the pictures on your memory card:
Select Button
1 Set the Mode switch to Review.
2 Turn the camera on.
3 Press the Select button to display the
4
Review menu.
Press the 6 button until the Browse
option is highlighted.
5 Press the Select button to enter Browse
mode.
6 Press the 6or 5 button to move up or
down through the pictures. If more than
nine pictures are stored on your memory
card, the LCD screen will automatically
display the next set of images when you
reach the top or bottom of the screen.
To select a thumbnail to display:
1 While in Browse mode, highlight the row
containing the picture you want to display.
2 Press the Select button.
3 Press the 6 or 5 button to move the
highlight to the picture you want to
display.
4 Press the Select button.
15
V3200 Camera User’s Guide
To display a slide show of your pictures on the LCD screen:
1 Press the Select button to display the
Review menu.
2 Press the 6 button until the Slide Show
menu option is highlighted.
3 Press the Select button to start the slide
show. The LCD will display a different
picture every four seconds.
è To reverse the order of the slide show,
press the 6 or 5 button.
è To stop the slide show and resume manual
control of the display, press the Select
button.
Displaying Information about Your Pictures
While reviewing your pictures, you can display information about each image, such as the picture number,
the total number of pictures on the card, the locked status of the picture, and the resolution/quality at which
the picture was taken.
To turn the picture information on or off while reviewing pictures:
1 Press the Select button to display the
Review menu.
2 Press the 6 button to highlight the
Information option.
3 Press the Select button to open the
Information menu.
4 Press the 6 button to highlight the setting
you want.
5 Press the Select button to activate the
setting and exit the menu.
16
Viewing and Downloading Your Pictures Using a PC
Viewing Pictures on Your Television
You can use a television to view the pictures stored in your camera. To properly display pictures on your
TV screen, your camera must be set to the correct video signal standard and must be connected to your TV.
To change the camera's video mode:
By default, the camera is set to use the NTSC video signal standard to display images on your TV. This is
the television used in the USA and Canada. If your TV uses the PAL video standard, you must reset the
camera's video mode to PAL.
You are automatically prompted to set the correct video mode the first time you use the camera. To reset
the video mode at a later time, see Setting the Video Mode on page 26.
To connect the camera to a TV:
1 Plug one end of the video cable into the TV jack located in the camera's memory compartment (behind
the rubber door.)
2 Plug the other end of the cable into the video input jack on the television.
3 Adjust the TV to use an external device as the input source.
è You will not be able to display images on the camera's LCD while your camera is connected to the TV.
To display pictures on the TV screen:
1 Turn the TV on. (Consult your TV/Monitor users guide for details.)
2 Turn the camera on. The TV will display the last picture on the memory card.
3 Press the 6 or 5 button to display the previous or next picture on the card.
To display a slide show of your pictures on the TV screen:
1 Turn the TV on.
2 Turn the camera on.
3 Press the 6 button down and hold it until the camera beeps. The TV will display a different picture
every 4 seconds.
è To reverse the order of the slide show, press the 5 button.
è To stop the slide show and resume manual control of the display, press the Select button.
17
V3200 Camera User’s Guide
Taking a Picture Using Your Television
By connecting your camera to a television set, you can use your TV screen as a viewfinder to frame and
take pictures.
To take a picture using your TV as a viewfinder:
1
2
3
4
5
Turn the TV on.
Turn the camera on.
Press the Select button. The TV screen will display the live video picture framed by the camera lens.
Adjust the position of the camera until the subject is framed to your satisfaction.
Press the Shutter button down fully to take the picture.
è To return the television and camera to review mode, press the Select button a second time.
18
Viewing and Downloading Your Pictures Using a PC
Deleting Pictures
You can delete any picture from your camera's memory card while the camera is in Review mode unless
the picture is locked.
To delete the currently displayed image:
1 Press the Delete button at the bottom of
2
Select
the LCD screen. The LCD will display the
Delete menu.
Press the 6 or 5 buttons to highlight the
Delete Current menu option.
3 Press the Select button to delete the
picture.
4 If you want to delete other pictures on the
memory card, press the buttons below the
arrows at the bottom of the LCD screen to
move backward or forward through your
pictures.
5 When you are finished deleting pictures,
press the 6 button until the Exit menu
option is highlighted.
6 Press the Select button to exit the delete menu.
Delete
è If the currently displayed picture is locked, the color of the Delete Current option will change to gray
and you will not be able to delete that picture.
19
V3200 Camera User’s Guide
To delete all the unlocked images on the memory card:
1 Press the Delete button at the bottom of
2
the LCD screen. The LCD will display the
Delete menu.
Press the 6 button until the Delete All
menu option is highlighted.
3 Press the Select button to open the Delete
All menu.
4 If you are sure that you want to delete all
the unlocked pictures on your memory
card, press the 6 button until the Delete
Now option is highlighted. If you don’t
want to delete all the pictures, highlight
the Don’t Delete option.
5 Press the Select button to execute the
option and exit the menu.
è If all the pictures have been erased, the LCD will display the message "No Pictures". If you have
locked pictures on the memory card, they will not be deleted.
!
Exercise caution when deleting pictures! Deleted pictures are permanently erased. To learn
how to save your pictures to a computer before erasing them from the camera, see the Image
Expert User’s Guide for information on downloading pictures.
To delete all the pictures on the memory card (including locked and unlocked images) and
reformat it: See Reformatting your memory card on page 25.
20
Viewing and Downloading Your Pictures Using a PC
Locking and Unlocking Pictures
You may want to lock pictures to avoid accidentally deleting them. If a picture is locked, a locked status
icon displays in the upper left corner of the LCD screen when you view information about the image (see
Displaying Information about Your Pictures on page 16).
To lock or unlock the currently displayed picture:
1 Set the Mode switch to Review.
2 Turn the camera on.
3 Press the button below the Lock symbol at
the bottom of the LCD screen.
4 Press the 6 or 5 buttons to highlight the
Lock Current menu option.
5 Press the Select button to lock the picture.
6 If you want to lock other pictures on the
memory card, press the buttons below the
arrows at the bottom of the LCD screen to
move backward or forward through your
pictures.
7 When you are finished locking pictures,
press the 6 button until the Exit menu
option is highlighted.
8 Press the Select button to exit the Lock menu.
Lock
To lock or unlock all the pictures on the memory card:
1 Set the Mode switch to Review.
2 Turn the camera on.
3 Press the button below the Lock symbol at
the bottom of the LCD screen.
4 Press the 6 or 5 buttons until the Lock
All (or Unlock All) menu option is
highlighted.
5 Press the Select button to lock or unlock
all the pictures.
6 When you are finished locking or
unlocking pictures, press the 6 button
until the Exit menu option is highlighted.
7 Press the Select button to exit the Lock
menu.
21
V3200 Camera User’s Guide
Setting Camera Preferences
The Preference mode of your camera allows you to activate or change the following settings:
♦
Image resolution
♦
LCD brightness
♦
Image quality
♦
Camera exposure
♦
Camera sounds
♦
Memory card reformat
♦
Image quick review
♦
Video standard
♦
Camera date and time
♦
Language of camera display
To select the Preference mode, slide the Mode switch to the position labeled “PREF”.
Setting the Resolution
1 Set the Mode switch to PREF.
2 Turn the camera on.
3 Press the 6 button until the Resolution menu tab
is on top.
4 Press the Select button to open the menu.
5 Press the 6 button to move the highlight to the
setting you want.
6 Press the Select button to activate the setting and
exit the Resolution menu.
Setting the Quality level
1 Set the Mode switch to PREF.
2 Turn the camera on.
3 Press the 6 button until the Quality menu tab is
on top.
4 Press the Select button to open the menu.
5 Press the 6 button to move the highlight to the
setting you want.
6 Press the Select button to activate the setting and
exit the Quality menu.
22
Viewing and Downloading Your Pictures Using a PC
Setting the Camera Sounds
By default, the camera is set to beep whenever you take a picture, connect the camera to a computer, or
encounter an error condition.
To turn the beep sound off:
1 Set the Mode switch to PREF.
2 Turn the camera on.
3 Press the 6 button until the Sounds menu tab is
on top.
4 Press the Select button to open the menu.
5 Press the 6 button to highlight the Off menu
option.
6 Press the Select button to activate the setting and
exit the Sounds menu.
è If you wish to turn the camera beep back on at a
later time, follow the same procedure and select
the On menu option.
Setting Quick Review
By default, the camera displays the picture for a short period of time after you have taken it. This feature
allows you to instantly review and delete the picture, but it also increases the drain on your batteries.
To turn off Quick Review:
1 Set the Mode switch to PREF.
2 Turn the camera on.
3 Press the 6 button until the Quick Review menu
tab is on top.
4 Press the Select button to open the menu.
5 Press the 6 button to highlight the Off menu
option.
6 Press the Select button to activate the setting and
exit the Quick Review menu.
è If you wish to turn Quick Review back on at a
later time, follow the same procedure and select
the On menu option.
TIP
If your batteries have a low charge, or if you want to maximize the number of pictures you
can take using one set of batteries, turn Quick Review off.
23
V3200 Camera User’s Guide
Setting the Camera Date and Time
You are automatically prompted to set the date and time when you first use the camera or whenever you
replace the batteries. You can change these settings at any time through the Date & Time Preference menu
tab.
To set the date and time:
1 Set the Mode switch to PREF.
2 Turn the camera on.
3 Press the 6 button until the Date & Time
menu tab is on top.
4 Press the Select button to open the menu.
5 Press the 6 button until the numb er you want
to change is highlighted.
6 Press the buttons under the arrows at the
bottom of the LCD screen to decrement or
increment the number.
7 Repeat steps 5 and 6 until all the numbers are
correct.
8 Press the Select button to activate the settings and exit the Date & Time menu.
Adjusting the Brightness of the LCD screen
This setting allows you to darken or brighten the display in the LCD screen from –2.0 to +2.0 in increments
of 0.5. You may want to adjust this setting to make your LCD screen more visible when using the camera
in very dark or bright lighting conditions; for example, when taking pictures outdoors on a sunny day.
To change the LCD brightness:
1 Set the Mode switch to PREF.
2 Turn the camera on.
3 Press the 6 button until the LCD Brightness
menu tab is on top.
4 Press the Select button to open the menu.
5 Press the buttons below the arrows at the bottom
of the LCD screen to darken or brighten the
display.
6 Press the Select button to activate the setting and
exit the LCD Brightness menu.
TIP
24
The LCD brightness setting affects only the display on the LCD. It will not change the
brightness of the actual picture. To increase or decrease the actual brightness of the
pictures you take, see Changing the Exposure on page 25.
Viewing and Downloading Your Pictures Using a PC
Changing the Exposure
Your camera automatically adjusts the exposure of each picture to accommodate the current lighting
conditions. You may want to manually adjust the exposure setting when using your camera in unusual
lighting conditions; for example, when taking a picture of a person standing in front of a bright light source.
The camera’s Exposure preference setting lets you adjust the exposure from –2.0 to +2.0 in 0.5 increments.
To change the exposure level:
1 Set the Mode switch to PREF.
2 Turn the camera on.
3 Press the 6 button until the Exposure menu tab is
on top.
4 Press the Select button to open the menu.
5 Press the buttons below the arrows at the bottom of
the LCD screen to decrease or increase the
exposure setting.
6 Press the Select button to activate the setting and
exit the Exposure menu.
è The exposure setting is automatically reset to 0.0
when the camera is turned off. To manually reset the camera back to the default, set the Exposure
preference to 0.0.
Reformatting the Memory Card
Use the Reformat preference menu tab to erase all the data on your memory card and reformat it. This
action will erase all files on your card, including locked pictures.
To reformat your memory card:
1 Turn the camera on.
2 Set the Mode switch to PREF.
3 Press the 6 button until the Reformat menu tab
is on top.
4 Press the Select button to open the menu.
5 If you are sure that you want to delete all the
pictures (including locked pictures) from your
memory card and reformat it, press the 6 button
to highlight the Format Now menu option. If you
don't want to reformat your card, highlight the
Don't Format option.
6 Press the Select button to execute the option and
exit the Reformat menu.
!
Exercise caution when using this feature. Reformatting deletes everything on the memory card,
including locked images. No warning is given before the locked images are erased.
25
V3200 Camera User’s Guide
Setting the Video Mode
The video setting lets you adjust your camera to the same video signal standard used by your TV. Your
camera must be set correctly if you want to review or take pictures using your TV screen.
You are automatically prompted to set the correct video mode the first time you use the camera. You can
reset the mode at a later time through the Video Preference menu tab.
To change the video setting:
1 Set the Mode switch to PREF.
2 Turn the camera on.
3 Press the 6 button until the Video menu tab is
on top.
4 Press the Select button to open the menu.
5 Press the 6 button to highlight the setting you
want.
6 Press the Select button to activate the setting and
exit the Video menu.
Setting the Camera Language
Your camera supports six different languages (English, French, Italian, German, Spanish, and Dutch.) The
camera will automatically prompt you to set the language when you first use it. You can change the
language setting again at any time.
To change the language setting:
1
2
3
4
5
Set the Mode switch to PREF.
Turn the camera on.
Press the 6 button until the Language menu tab is on top.
Press the Select button to open the menu.
Press the 6 button to move the highlight to the setting you want. The highlight will automatically
move to the next screen when you reach the bottom.
6 Press the Select button to activate the setting and exit the Lnaguage menu.
26
Viewing and Downloading Your Pictures Using a PC
Viewing and Downloading Your Pictures Using a PC
You can view or download your pictures to a computer in two different ways:
♦
By connecting the camera to your computer and using Image Expert software to communicate with
the camera.
♦
By inserting the camera’s memory storage card into a PC card reader connected to your computer.
Connecting your camera to a PC
1 Turn the camera off.
2 Using the serial cable included in your camera kit, plug the mini jack end of the cable into the camera’s
serial port. (Behind the rubber door.)
3 Plug the other end of the cable directly into an available serial COM port on your computer.
è While the camera is connected to the computer, all camera functions are taken over by the PC with the
exception of the power and macro switches. You will not be able to display images on the camera’s
LCD or use any of the camera’s buttons.
Downloading pictures using a Compact Flash card reader
1 Slide the Card Eject switch on the bottom of your camera until the memory storage card is released
from the slot.
2 Remove the memory storage card from the camera.
3 Insert the card into a CF card reader connected to your computer.
Note: A Compact Flash card reader is a small device that allows you to download your images directly
from a CF card to your PC via parallel port, or USB port. This method is much faster and easier than using
a serial-data cable connection. This allows you to by-pass the serial data download process altogether. The
CF reader is much faster and circumvents serial communications conflicts. CF readers are available from
your local computer store or digital camera accessory supplier.
Likewise, a PCMCIA CF adapter that allows mobile computers (laptops and notebooks) to read CF
memory cards directly into a PCMCIA slot on your notebook computer. This allows notebook computer
users to by-pass the serial data download process altogether. The CF adapter is much faster and
circumvents serial communications conflicts.
Using Image Expert to view and download pictures
For information on installing and using Image Expert software to view and download pictures, see the
Image Expert User’s Guide.
27
V3200 Camera User’s Guide
Troubleshooting
Camera Problems
Problem
Possible causes
Solution
My camera has no power.
The camera is not turned on.
Press the Power button.
The batteries are low.
Replace the batteries with a fully
charged set or use an AC adapter.
The batteries are installed
incorrectly.
Check the battery installation
diagram.
The AC adapter isn't plugged in.
Confirm that the adapter is
plugged into the camera's power
port and is plugged into a
functioning electrical outlet.
Is the Ready light red and
blinking? If so, the flash may be
charging.
Wait until the light stops blinking,
then try again. You can decrease
the amount of time required to
charge the flash by turning off the
camera’s LCD display.
Does the camera beep 3 times
when you press the shutter
button? If so, the camera memory
card may be full and unable to
store another picture.
Check the picture count in the
Status LCD. If the count is "0", the
card is full. Download your images
to the computer and erase them
from the card.
Does the Status LCD display a
flashing symbol à [ ]? If so, the
memory card may be missing or
improperly inserted.
Check that the card is present and
fully inserted in the memory
compartment slot.
Is the camera connected to a
computer? If so, the camera
buttons aren't functional while the
camera is connected to a
computer.
Use the software controls to take a
picture, or disconnect the camera
from your computer.
The flash may be turned off.
Check the flash mode icon on the
Status LCD. Turn on the flash by
pressing the Flash button.
If the Ready light is red and
blinking, the flash may be
recharging.
Wait until the Ready light stops
blinking, then try again. You can
decrease the amount of time
required to charge the flash by
turning off the camera’s LCD
display.
The batteries may be too weak to
charge the flash.
Check the battery icon on the
Status LCD to determine the
charge of the batteries. If the
batteries are weak, replace them
with fully charged ones.
My camera won't take a
picture.
My flash does not work on my
camera.
28
Troubleshooting
Image Problems
Problem
Possible causes
Solution
My images look blurry.
Your subject or the camera may
have moved.
Hold the camera steady and take
another picture.
Your camera may not be set to the
correct distance setting.
Verify that the camera is set to
Macro mode if the distance
between the subject and the
camera is less than 2 feet (60 cm),
or normal mode if the subject is
more than 2 feet away.
You may need to use the flash for
this image.
To force the flash, toggle through
the flash settings until you see the
Forced Flash symbol.
You may need to manually adjust
the exposure setting.
Adjust the exposure setting to a
higher number using the
Preference menu, and then take
another picture.
You may be facing a bright light
when taking a picture.
Try varying the angle of your shot.
You may have accidentally
covered the light sensor.
Make sure it is not obstructed.
You may need to turn off the flash.
To set the flash to automatic,
toggle through the flash settings
until you see the Auto flash
symbol.
You may need to manually adjust
the exposure.
Adjust the exposure setting to a
lower number using the
Preferences menu, and then take
another picture.
You may not have set the date
and time on your camera.
To record this information on
future images, set the date and
time using the Preference menu.
My image looks too dark.
My image looks too light.
Some of my images do not
show the date and time.
29
V3200 Camera User’s Guide
Appendix
Regulatory information
FCC Compliance
This device complies with Part 15 of the FCC Rules. Operation is subject to the following two conditions:
♦
This device may not cause harmful interference, and
♦
This device must accept any interference received, including interference that may cause undesired
operation.
FCC Notice
This device has been tested and found to comply with the limits for a Class B digital device, pursuant to
Part 15 of the FCC Rules. These limits are designed to provide reasonable protection against harmful
interference in a residential installation. This device generates, uses, and can radiate radio frequency energy
and, if installed and used in accordance with the instruction, may cause harmful interference to radio
communications. However, there is no guarantee that interference will not occur in a particular installation.
If this device does cause harmful interference to radio or television reception, the user is encouraged to try
to correct the interference by one or more of the following measures:
♦
Reorient or relocate the receiving antenna.
♦
Increase the separation between the computer and receiver.
♦
Connect the computer into an outlet on a circuit different from that to which the receiver is connected.
♦
Consult the dealer or an experienced radio/TV technician for help.
Caution: Any changes or modifications not expressly approved by the grantee of this device could void
the user’s authority to operate the equipment.
Canadian Radio Interference Regulations Statement
This Class B digital device meets all the requirements of the Canadian Interference-Causing Equipment
Regulations.
Cet appareil numérique de la Classe B respecte toutes les exigences du Réglement sur le matériel brouilleur
du Canada.
30
Appendix
Limited Hardware Warranty
This camera is under warranty for a period of one year from the date of purchase, by the original purchaser.
In case of defects in materials or workmanship, Vivitar Corporation will repair or replace the camera free
of charge within the warranty period. This warranty applies to the camera only. This warranty does not
include batteries, or other accessories that have not been manufactured by Vivitar Corporation. This
warranty will not be honored if the camera has been mishandled or tampered with, or altered by anyone
other than the manufacturer. Other than for the warranty herein, Vivitar Corporation is not responsible for
loss, damage, or inconvenience of any kind.
Prior to returning a camera, you must first obtain an RMA number from Vivitar Technical Support or
Customer Service Operations. The RMA number, a brief description of the difficulties encountered, and
proof-of-purchase with the date of purchase clearly indicated, must accompany a defective camera being
returned under warranty. Prior to returning any product you must call Technical Support or Customer
Service to attempt to diagnose the problem and receive an RMA number. All related shipping and
transportation costs and insurances are at the owner's expense. Any alteration of this warranty cannot be
made without Vivitar Corporation’s written approval.
To contact us:
Vivitar Corporation
1280 Rancho Conejo Blvd.
Newbury Park, CA 91320
(805) 498-7008 Technical Support
Instructions for a return:
1. Call us for a RMA#
2. Put RMA# outside of packaging bo x
3. Enclose copy of proof of purchase
4. Enclose product description
5. Ship package prepaid and insured (We do not accept C.O.D. shipments)
Call Technical Support for any technical questions - If you wish to obtain an RMA# for product service,
Call customer service for warranty or non-warranty repairs, and spare or replacement parts.
31
V3200 Camera User’s Guide
Camera Specifications
Output Resolution
Megapixel resolution mode: 1152 x 864
Standard resolution mode: 640 x 480
CCD Sensor
1/3”, 1174 x 884, interlaced
Color
24-bit color
Output File Format
Standard JPEG, with embedded thumbnail (JFIF)
Compression
JPEG with 3 file sizes: Best, High, Medium
Processing Time
Approximately 5 seconds
Storage
External only, ATA compatible CompactFlash card
Serial Interface
RS232C, supporting transfer rates of 9,600 to 115,000 bits per second
LCD Display
1.8” active matrix TFT
Resolution: 280 x 220
Refresh rate: 15-18 frames/sec
Video Out
NTSC or PAL composite video output
Lens
All glass
Auto-focus, focus range:
Normal: 0.3 m to infinity
Macro: 15 cm to 60 cm
Aperture f/2.0 – f/11
Focal length: 6mm (equivalent ~42mm)
Shutter speed: 1/4 to 1/500 second
ISO Equivalent
140
Exposure Control
Auto Exposure
Manual exposure override, -2.0 to 2.0 in 0.5 increments
Self-Timer
10-second delay
Flash
1m – 3m flash range
Red-eye reduction mode
Power
4 AA cells – single-use alkaline or lithium, rechargeable NiCd or NiMH
Optional AC adapter
Weight (without batteries)
11 oz. (320 g)
Dimensions
H: 3.2 in. (82 mm) W: 2.2 in. (55 mm) L: 5.2 in. (132 mm)
32