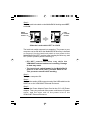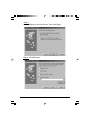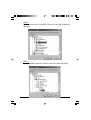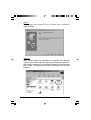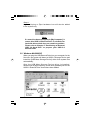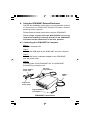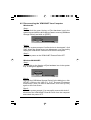
1
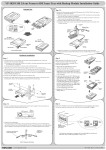
VPM-6248T
USB 2.0 5.25-inch
External Enclosure
with MobileRACK
User’s Manual
PROPRIETARY NOTICE
We make no warranty of any kind with regards to this material,
including, but not limited to, the implied warranties of merchantability
and fitness for a particular purpose. We shall not be liable for errors
contained herein or for incidental or consequential damages in connection with the furnishing, performance, or use of this material.
This document contains proprietary information which is
protected by copyright. All rights are reserved. No part of this document
may be photocopied, reproduced, or translated to another language
without our written consent. The information contained in this document
is subject to change without notice.
TRADEMARKS
MS-DOS, Windows, Windows 98SE/NT/2000/Me/XP are trademarks
of Microsoft Corporation.
PC is a trademark of International Business Machines Corporation.
Macintosh and Mac are trademarks of Apple Computer, Inc.
All of the third-party brands and names are the property of their
respective owners.
USB 2.0 5.25” External Enclosure with MobileRACK
VPM-6248T User’s Manual
Rev. 1.0
Date: August 6, 2004
Contents
1.
Introduction ..........................................................................
1-1 Features and Specifications ...........................................
VPM-6248T External Enclosure .....................................
MobileRACK ...................................................................
Operating Systems ........................................................
1-2 Package Checklist ..........................................................
4
4
4
5
5
6
2.
Hardware Installation .......................................................... 7
2-1 Temperature Control Jumper Settings ............................ 7
2-2 Configuration with the MobileRACK ................................ 9
2-3 LED Indicators .............................................................. 10
2-4 Mounting a 3.5-inch Drive in the MobileRACK ............... 10
2-5 Connecting the VPM-6248T to a Computer .................. 13
3. Drivers Installation ..............................................................
3-1 Windows 98SE .............................................................
3-2 Windows Me/2000/XP ..................................................
3-3 Mac OS .........................................................................
16
16
21
22
4. Using The VPM-6248T External Enclosure ......................
4-1 Connecting the VPM-6248T to Computer .....................
4-2 Disconnecting the VPM-6248T from Computer ............
Windows 98 .................................................................
Windows Me/2000/XP ..................................................
Mac OS.........................................................................
4-3 Using the MobileRACK Drive Tray ................................
23
23
24
24
24
25
25
5.
Partitioning the External USB 2.0 Hard Disk .................. 26
5-1 Partitioning Under Windows 98/Me ............................... 26
5-2 Partitioning under Windows 2000/XP ........................... 29
1. Introduction
Congratulations on your purchase of the VPM-6248T USB 2.0
5.25-inch External Enclosure with MobileRACK. Enabling
portability and high-speed USB 2.0 interface compatibility
with IDE and ATAPI devices, the VPM-6248T is the perfect
solution for data backup, transporting data, and adding more
storage space to USB-equipped computers.
Its hot-swapping and Plug-n-Play features give you a great
convenience on the road, where it can be connected and
disconnected without powering down your system. It is
USB 2.0/1.1 compatible and works with any USB-equipped PC,
notebook or Mac computer.
The VPM-6248T USB 2.0 5.25-inch External Enclosure is
factory configured with a MobileRACK. It enables
convenient, portable, hot-swapping of any 3.5-inch IDE or
ATAPI device (mounted in the MobileRACK drive tray) to
interface with any USB-equipped computer.
Note:
In order to reach USB 2.0 480 Mbps speed, your
computer must have a host adapter card with USB 2.
0 support. The VPM-6248T will auto detect the speed
of your USB port and adjust between USB 1.0 and
USB 2.0 speed.
1-1 Features and Specifications
VPM-6248T External Enclosure
• Provides a high-speed serial data connection between IDE
devices and USB 2.0 equipped computers
• Fully compatible with both USB 2.0 and USB 1.1 standard
specifications
• Compatible with 5.25-inch IDE devices and all ViPowER
VP-10 and VP-410 series MobileRACKs
4
VPM-6248T USER MANUAL
• Supports USB 2.0 transfer rates up to 480 Mbps. (Your
system must have USB 2.0 host port(s) and USB 2.0 driver
installed for the VPM-6248T to perform at USB high speed)
• USB 2.0/IDE compliant
• Integrated USB transceiver
• High-speed (480 Mbps) and full speed (12 Mbps) support
• USB suspend/resume, remote wake up support
• Supports ATA PIO modes 0-4: ATA interface operation mode
is automatically selected during device initialization or manually programmed with configuration data
• Supports Ultra DMA modes 0-4
• Supports 48-bit LBA (large HDD), when the VPM-6248T
connects with one 3.5” HDD installed in the mobileRACK
• Power and drive activity LEDs
• Drive enclosure made of metal to aide in heat dissipation
• Built-in cooling fan
• Adjustable temperature control sensor to reduce fan noise
• Works with USB-equipped PC, Notebook and Mac
computers
MobileRACK
• Enables portable use of 3.5-inch hard disk, MO, TR-4 tape,
zip and other IDE and ATAPI devices
• Convenient pull-out handle
• Safety latch-lock feature
• LED indicators for power and drive activity
• Includes MobileRACK docking case and drive tray
Operating Systems
• Windows Me/2000/XP – no drivers required
(software drivers for Windows 98SE included)
• Mac OS 9.0 or later (software drivers included)
VPM-6248T USER MANUAL
5
1-2 Package Checklist
The USB 2.0, 5.25” External Enclosure VPM-6248T package
contains the following items:
AC Power Cord
+5V/+12V
Power Adapter
VPM-6248T
Enclosure
MobileRACK
docking case
MobileRACK
drive case
USB 2.0 Cable
Drivers and Utility
Installation CD
Package Contents
1. VPM-6248T Enclosure assembled with one MobileRACK
docking case
2. One MobileRACK drive case
3. One USB 2.0 cable
4. One +5V/+12V power adapter
5. One power adapter power cord
6. Package of screws
7. One “Drivers and Utility Installation” CD
and User’s Manual
If any of these items are missing or damaged,
please contact your dealer or sales representative
for assistance.
6
VPM-6248T USER MANUAL
2. Hardware Installation
2-1 Temperature Control Jumper Settings
Jumpers JP7 and JP8, located on the rear PCB panel of the
VPM-6248T, are used to set the cooling fan for controlling the
operating temperature. The default setting is JP8 pins 1-2 ON,
JP7 OFF. This sets the cooling fan to always run continuously to
disperse heat when power to the VPM-6248T is ON.
The default setting means that when the power to only the
MobileRACK is switched OFF, the cooling fan will still continue to
run. There will always be the continual noise from the cooling fan
that is mounted in the VPM-6248T enclosure.
To provide a quieter working environment, the VPM-6248T is
designed with a built-in adjustable temperature control sensor
which can be set through jumpers. When the operating
temperature set by the jumper is reached, the fan will
automatically turn OFF.
To access the jumpers, remove three screws on the back of the
enclosure and slide the cover off.
Replace the cover after setting the jumpers.
OFF
ON
Three Mounting Screws
Remove Mounting Screws to Remove Cover
VPM-6248T USER MANUAL
7
JP8
Temperature
Control Jumper
Power
Switch
Power
Conn.
USB
Port
LED
Fan
Power
JP7
Temperature
Control Jumper
JP8
for
MobileRACK
40-Pin IDE Data
Connector
Temperature Control Jumper Locations
The following identifies the jumper options for setting the operating
temperature for the cooling fan.
Note: Only one jumper can be set at the same time.
JP7
(Clear)
1
JP8
1-2 :ON
(Default)
2
3
1-2 :ON
1
1
2
(Clear)
50°C
2
3
2-3 :ON
1
1
2
(Clear)
40°C
2
3
(Clear)
1
2
(Clear)
1
2
Temperature
60°C
1
2
3
8
VPM-6248T USER MANUAL
2-2 Configuration with the MobileRACK
The following information is for reference only. The VPM-6248T is
factory configured with the MobileRACK docking case installed
with these settings.
Jumper JP6, and CN6 with a 2-wire red-black cable connector,
are located on the rear PCB panel of the enclosure. These enable
operation of the MobileRACK with the VPM-6248T enclosure.
The default jumper setting for JP6: pins 2-3 ON.
JP8
Temperature
Control Jumper
Power
Switch
Power
Conn.
USB
Port
LED
Fan
Power
JP6
CN6
2-pin
Red-Black Cable
3
2
JP7
Temperature
Control
Jumper
40-Pin IDE Data
Connector
JP6 (2-3 ON) & CN6 : configuration with
MobileRACK (factory default setting)
1
Factory Configuration with MobileRACK
VPM-6248T USER MANUAL
9
2-3 LED Indicators
Red and green indicators are located on the front panel of the
VPM-6248T External Enclosure. The green LED is lit when the
power is ON. The red activity LED will flash when a HDD
installed in the MobileRACK is being accessed.
MobileRACK
LED Indicators
MobileRACK
Latch-Lock
VPM-6248T
LED Indicators
Green LED
(Power)
Red LED
(HDD Access)
VPM-6248T Front Panel with the MobileRACK
2-4 Mounting a 3.5-inch Drive in the MobileRACK
The VPM-6248T External Enclosure is factory configured with
the MobileRACK already installed.
Although these instructions specify a hard disk installation, the
steps are typical for mounting any device in the MobileRACK
drive case.
Step 1.
Separate the MobileRACK drive tray from the drive case installed
in the VPM-6248T External Enclosure by lifting the handle and
pulling the drive tray out.
Remove the
MobileRACK
Drive Tray
Remove the MobileRACK Drive Tray
10
VPM-6248T USER MANUAL
Step 2.
Remove the drive tray cover by sliding it towards the back
of the unit.
Slide Cover
Off
Remove the MobileRACK Drive Tray Cover
Step 3.
If you plan to install a drive that features removable media such
as a zip, TR-4 tape, MO, LS-120 drive, or ATA Flash memory
reader, remove the center part of the front panel.
Center Part
of Front Panel
Removed
Remove Front Panel for Removable Media Drives
VPM-6248T USER MANUAL
11
Step 4.
Connect the cables from the MobileRACK drive tray to the
appropriate pin connectors of the 3.5” HDD. Attach the power
and IDE cables from the MobileRACK tray to the 3.5” HDD.
The colored stripe on the IDE cable should be closest to the
power connector.
Power
Connector
IDE
Data Cable
MobileRACK Drive Tray with Cover Removed
Step 5.
Carefully position the 3.5” HDD inside the MobileRACK drive tray.
Secure the HDD in place using the supplied mounting screws.
Use the mounting holes on the sides or bottom, depending on the
design of the HDD.
Mounting
Screws
Power
Connector
Colored Stripe
IDE
Data Cable
Mounting
Screws
Mount the Drive in the MobileRACK Drive Tray
12
VPM-6248T USER MANUAL
Step 6.
Replace the drive tray cover by sliding it back on.
Replace the MobileRACK Drive Tray Cover
2-5 Connecting the VPM-6248T to a Computer
Computer Requirements
• USB or USB 2.0 equipped notebook or desktop computer
• Windows 98SE/Me/2000/XP, or Mac OS 9.0 or above
Proceed with the following steps to connect the
VPM-6248T to your computer.
Step 1.
Insert the MobileRACK drive tray (with the 3.5” drive installed)
into the MobileRACK docking case in the VPM-6248T
External Enclosure. Push firmly until the tray is seated.
Insert Drive Tray into VPM-6248T Enclosure
VPM-6248T USER MANUAL
13
Step 2.
Slide the latch-lock switch on the MobileRACK docking case LEFT,
to LOCK.
RIGHT
Unlock/OFF
Position
LEFT
Lock/ON
Position
Slide the Latch-switch LEFT to LOCK
The latch-lock switch supports hot-swapping. The power to your
computer can be ON when the MobileRACK drive tray is inserted
or removed. Use the latch-lock switch to turn power to the
MobileRACK ON (LEFT position) after inserting the drive tray, and
OFF (RIGHT position) before removing it.
Notes
• DO NOT remove the drive tray while the
VPM-6248T external enclosure is working. Damage
to data may result.
• The Latch-Lock switch located in the MobileRACK
must be in the Lock (LEFT) position when in use.
This prevents removal while working.
Step 3:
Turn your computer ON.
Step 4:
Connect the smaller USB connector end of the USB cable into the
USB Port on the VPM-6248T External Enclosure.
Step 5:
Connect the Power Adapter Power Cord to the +5V/+12V Power
Adapter. Then, plug one end of the power cord into an AC power
outlet, and the other end to the power inlet of the
VPM-6248T External Enclosure.
14
VPM-6248T USER MANUAL
+5V/+12V
Power Inlet
USB 2.0 Port
Connector
OFF
ON
Power
ON/OFF
Switch
VPM-6248T External Connector Locations
+5V/+12V
Power Adapter
Power Adapter
Power Cord
USB 2.0
Cable
Plug into AC
Power Outlet
Plug into USB Port
on Computer
VPM-6248T Connections
Step 6:
Power ON your VPM-6248T External Enclosure. The LED
indicators on the MobileRACK and external enclosure should light
after a slight delay.
Step 7:
Plug the second USB connector end of the USB cable into a USB
port on our computer. The VPM-6248T is ready to use.
Note:
This device will auto-detect the speed of your
USB port and adjust between USB 1.0 and USB
2.0 speed once the driver is installed.
VPM-6248T USER MANUAL
15
3. Driver Installation
After completing the hardware installation, refer to the following
driver installation instructions for the operating system you are
using.
3-1 Windows 98SE
If this is the first time using your VPM-6248T USB 2.0 External
Enclosure, you must first run the [SETUP.EXE] from the USB 2.
0 “Drivers and Utility Installation” CD after connecting it to your
computer. Then proceed with the following:
Step 1.
Connect your VPM-6248T External Enclosure to an available USB
port on your computer.
Step 2.
An “Add New Hardware Wizard” screen will appear.
Click [Next].
16
VPM-6248T USER MANUAL
Step 3.
Select “Display a list of all drivers” then click [Next].
Step 4. Click [Browse].
VPM-6248T USER MANUAL
17
Step 5.
Double click on the ViPowER CD icon of the [My Computer]
directory.
Step 6.
Select “Win98” under the “Drivers” directory, then click [OK].
18
VPM-6248T USER MANUAL
Step 7. Click [Next].
Step 8. Click [Next].
VPM-6248T USER MANUAL
19
Step 9.
The system will request you to restart your computer.
Click [FINISH].
Step 10.
After system restart, the installation is complete. You can now
connect your VPM-6248T Enclosure to the computer. D o u b l e click on [My Computer]. A new drive [Usbdisk] icon should have
been added. This identifies the USB 2.0 External Drive you just
installed.
20
VPM-6248T USER MANUAL
Step 11.
A green Unplug or Eject hardware icon will also be added
in the system tray.
Note:
If a new drive does not appear in [My Computer], it
means this USB 2.0 External Drive is a brand new
hard disk drive which does not contain a partition.
Please refer to Chapter 5 “Partitioning an External
USB 2.0 Hard Disk” to prepare your USB 2.0
External Disk.
3-2 Windows Me/2000/XP
When you plug the USB External Drive into your computer for the
first time, the system will detect a USB 2.0 Storage Device and
install the [USB Mass Storage Device] driver from system files
automatically.
After the USB Mass Storage Device driver is installed,
double-click on [MyComputer]. A new drive [Usbdisk] icon for the
USB 2.0 External Drive should have been added.
VPM-6248T USER MANUAL
21
Notes:
•
This USB 2.0 External Drive is supported by the Mass
Storage Device Driver in Windows Me/2000/XP operating
systems. You do not need to install any drivers.
•
If the new drive does not appear in [My Computer], it
means this USB 2.0 External Drive is a new hard disk
drive which does not contain a partition. Please refer to
Chapter 5 “Partitioning an External USB 2.0 Hard Disk” to
prepare your USB 2.0 External Disk.
3-3 Mac OS
The VPM-6248T USB 2.0 External Drive is supported by Mac
OS 9.X or above Mass Storage Support.
When you plug the VPM-6248T USB 2.0 external drive into a USB
port of your Mac computer, the mass storage volume should automatically appear on the desktop in a few seconds.
22
VPM-6248T USER MANUAL
4. Using the VPM-6248T External Enclosure
After the first installation of the driver, you can thereafter connect
or disconnect the VPM-6248T External Enclosure without
powering off the computer.
Please follow the steps below when using the VPM-6248T.
These steps assume that the MobileRACK drive tray
(with drive installed) is already inserted in the VPM-6248T
enclosure and the latch-lock is in the lock position.
4-1 Connecting the VPM-6248T to Computer
Step 1:
Turn your computer ON.
Step 2:
Connect the USB cable to the VPM-6248T and your computer.
Step 3:
Connect the power cord/power adapter to the VPM-6248T
and AC power outlet.
Step 4:
Turn the power of the VPM-6248T ON. The VPM-6248T
External Drive is ready to use.
+5V/+12V
Power Adapter
Power Adapter
Power Cord
USB 2.0
Cable
Plug into AC
Power Outlet
Plug into USB Port
on Computer
VPM-6248T Connections
VPM-6248T USER MANUAL
23
4-2 Disconnecting the VPM-6248T from Computer
Windows 98:
Step 1:
Double-click the green Unplug or Eject hardware icon in the
system tray and click the drive that you want to remove [USB Mass
Storage Device] and click on [STOP].
Step 2:
When the system prompts ‘Confirm device to be stopped’, click
[OK]. When the green arrow icon disappears, you may safely
unplug the VPM-6248T External Drive from the computer.
Step 3:
Switch the power on the VPM-6248T External Drive OFF.
Windows Me/2000/XP
Step 1:
Double-click on the Unplug or Eject hardware icon in the system
tray. A dialog box appears.
Step 2:
Highlight the [USB Mass Storage Device] in the dialog box, click
[STOP]. Choose the USB 2.0, 5.25” External Enclosure
VPM-6248(T) that you want to disconnect, then click [STOP]
again on the next screen.
Step 3:
When the system prompts “You may safely remove this device”,
disconnect the VPM-6248T External Drive from the computer
and switch the power OFF.
24
VPM-6248T USER MANUAL
Mac OS
When disconnecting your VPM-6248T USB 2.0 External Drive
from a Mac computer, first close all windows and quit all running
applications that are stored on the VPM-6248T External Drive.
Next, drag the USB 2.0 External Drive’s icon into the “Trash” to
dismount it from the Desktop. You can now safely disconnect the
USB 2.0 External Drive from the USB port.
CAUTION!!
Do not unplug the USB 2.0 External Drive from the USB port
of your computer or HUB while copying files to/from the
device or while files or applications stored on the USB 2.0
External Drive are in use.
DOING SO MAY RESULT IN LOSS OF DATA.
4-3 Using the MobileRACK Drive Tray
The VPM-6248T External Enclosure enables convenient
plug-n-play hot-swapping of 3.5-inch IDE or ATAPI devices
(mounted in MobileRACK drive trays) with any USB-equipped
computer. Multiple drive trays with different devices installed can
be used interchangeably as needed.
Refer to the following rules for inserting/removing drive trays:
• The power to your computer can be ON when any
MobileRACK drive tray is inserted or removed
• Slide the latch-lock switch LEFT to lock/ power-on the
MobileRACK after inserting the drive tray
• Slide the latch-lock switch RIGHT to unlock/power-off the
MobileRACK before removing the drive tray
RIGHT
Unlock/OFF
Position
LEFT
Lock/ON
Position
Latch-lock Switch Positions
VPM-6248T USER MANUAL
25
5. Partitioning the External USB 2.0 Hard Disk
5-1 Partitioning Under Windows 98/ME
Boot-up the computer into Windows 98/ME. Next, with the power
ON, connect your VPM-6248T External Hard Disk Drive to the
USB port.
There are two methods of partitioning and formatting your hard
drive.
Method 1
Step 1:
Click on [Start], select [Control Panel] in [Settings], double-click
[System] and open [Hard disk controllers].
Step 2:
You should see the VPM-6248T USB 2.0 Hard Disk you just
connected. Highlight the USB 2.0 Hard Disk and choose
[Properties], select [Settings]. Set the USB 2.0 Hard Disk to
[Removable] and reboot the system.
Step 3:
After restarting the system, a removable HDD is added to [My
Computer]. Choose the removable HDD and click the right mouse
button. Select [Format] to format the USB 2.0 Hard Disk Drive.
You can only set the USB 2.0 Hard Disk Drive to one partition
using this method.
26
VPM-6248T USER MANUAL
Method 2
Step 1:
Go into MS-DOS mode by clicking on [Start], then choose the
[MS-DOS Prompt] in [Programs].
Step 2:
At the DOS prompt, type [FDISK] and press [Enter].
Step 3:
If FDISK quits without any message, go back to the Windows 98
screen, disconnect the VPM-6248T USB 2.0 Hard Disk and
reboot the computer. Reconnect the USB 2.0 HDD and go back
to Step 1 to proceed.
Step 4:
For the first screen of FDISK, answer the question:
Do you want to enable large disk support?
[Y] if you want to build a partition larger than 2GB.
[N] if you want to build a partition small than 2GB.
Step 5:
The next screen is [FDISK OPTIONS]. Type [5] to select the disk.
VPM-6248T USER MANUAL
27
IMPORTANT:
You must type [5] in this screen to change the current fixed
disk drive to build a partition. The default fixed drive set by
FDISK is your internal hard disk drive.
WARNING!!
If you don’t change the fixed disk drive to the USB
2.0 Hard Disk, the data of your internal hard disk
will be destroyed!
Step 6:
In the [Change Current Fixed Disk Drive], type the disk drive
number that is assigned to the USB 2.0 Hard Disk.
Step 7:
Go back to the [FDISK OPTIONS] screen. Now you can create
or delete a partition of the USB 2.0 Hard Disk.
Step 8:
After you finish FDISK, go back to the Windows screen, disconnect and then reconnect the USB 2.0 Hard Disk again to activate
these changes. Double-click on [My Computer]. The USB 2.0
Hard Disk Drive icon that you have now partitioned should be
seen.
28
VPM-6248T USER MANUAL
5-2 Partitioning under Windows 2000/XP
Step 1:
To partition the VPM-6248T USB 2.0 Hard Disk Drive under
Windows 2000, connect the VPM-6248T drive to the USB port on
your computer. Next, click [Start], select [Control Panel],
[Settings], open [Administrative Tools] and double-click
[Computer Management].
VPM-6248T USER MANUAL
29
Step 2:
Click on [Disk Management]. All connected disk drives will be
listed. Find the USB 2.0 Hard Disk that you added and to the right
of the disk, view the status of the partitions of this disk drive. You
can create a new or delete an existing partition by right-clicking on
this area.
Step 3:
Right-click on the partition status area of the USB 2.0 Hard Disk
Drive. Click on [Create Partition….] and the “Create partition
wizard” will appear.
Step 4:
Follow the instructions of the wizard to partition and format your
USB 2.0 Hard Disk Drive.
After you have completed the partitioning and formatting of the
USB 2.0 Hard Disk Drive, you can write data to it.
Printed on recycled paper.