1
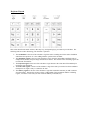
Preface
Congratulations on your choice of a Victor electronic calculator. Careful design, quality materials, painstaking
workmanship, and advanced research and production facilities have given you a calculator that, with proper care,
will provide many years of trouble-free service. To assure future protection, offered by Victor’s Extended
Guarantee Protection Program.
This operating manual describes the features and operation of the Victor 1460-4 electronic calculator. This
calculator features the four basic arithmetic operations, two independent tax keys, percentage and percentage-ofchange, change sign, sigma, item count, non-add/date functions, backspace, and cost, sell, margin keys.
Table of Contents
General Maintenance
Replacing the Ribbon
Paper Feed
Keyboard Diagrams
Key Features
Application Examples
Warranty
Extended Warranty
Preparation
BEFORE USING THE PRINTER FOR THE FIRST TIME:
Remove the tape holding the ink ribbon in place.
Before Beginning Calculation
1.
2.
3.
4.
Plug in AC power
Be sure that the paper roll and ribbon have bee installed properly.
Turn power switch on, and make sure that the display lights. A “C” will automatically be printed on
the paper tape.
Set decimal point selector switch at the desired position.
NOTE: Please remove the piece of tape holding the printer ribbon in place for transportation.
General Maintenance
1.
2.
3.
4.
5.
Do not place the calculator in hot, dusty, or damp locations.
To clean the housing, use a silicon-treated cloth. Do not use water or detergents.
Do not place anything on the housing, particularly on the head of the printer mechanism.
Turn off the power switch before removing the plug from AC wall outlet.
Turn the power switch off while not in use.
How to Feed the Paper Tape
1.
2.
3.
4.
5.
6.
Plug in the calculator and turn it on.
Cut or tear evenly the end of the paper roll to get a straight edge.
Place the paper holder into position. (Fig.
Install the paper roll on the paper holder.
Insert the paper end into the printer slot. (Fig.
Press the Paper Feed (↑) key to feed the paper to an adequate length.
Replacing the Ribbon
Your calculator is shipped with a 2-color ribbon already in place. You do not need to install or change it before you
begin using the calculator. When you have been using your calculator for some time, however, the print will
gradually become faint, indicating that you should change the ribbon. To change the ribbon, follow these steps.
1.
2.
3.
4.
Remove the paper roll, tearing the paper at the rear of the calculator. Use the Paper Advance (↑) key to
feed the remaining paper tape through the printer. Then remove the printer cover.
Remove the old ribbon by pulling it upward.
Install the ribbon spool with the black edge up. Roll from the outside of the full spool and place the
first spool on the spindle not engaged by the lever. Thread the new ribbon along the outside of the
guides and in front of the print wheels. Switch the lever to the other side and replace the second spool.
Rotate the spools to take up any slack. Replace the printer cover and the paper tape.
(Replace with the Victor #7010 Ink Ribbon)
Keyboard Layout
This section describes the mode switches, data entry keys, and operating keys provided on your calculator. The
following terms are used in discussing your calculator’s operation:
¾
¾
¾
¾
¾
The accumulator is the area of the calculator’s logic that stores a running total of the results of addition
and subtraction operations. It is the “adding machine” portion of the calculator.
The calculating register is the area of the calculator’s logic where the intermediate and final results of
multiplication, division, and percentage calculations are stored. The contents of the calculating register do
not affect the accumulator.
The keyboard register is the area of the calculator’s logic that stores the value that will immediately be
used in the next calculation.
The item count register is the area of the calculator’s logic that counts your entries into the accumulator.
Each positive or negative entry is counted as one item.
The memory register is the area of the calculator’s logic that accumulates amounts you add or subtract
from the memory. Because the memory register is independent of the accumulator and the calculating
register, it retains its value until you clear it with the Memory Total (MT) key.
KEY AND SLIDE SWITCH FEATURES
This section illustrates and describes the mode switches you can use to control your calculator’s operation.
OFF ON
· (OFF) The power is OFF.
· (ON) The power is ON.
P NP IP
· (P)
The printer is activated as long as the calculator is turned on.
· (NP)
The printer is activated only when the paper feed key or the non-add / date key is pressed. This is also
called display only mode.
· (IC)
Activates the Item Count so that when the Total key is pressed, the Item Count will automatically print on
the right hand side of the printed tape.
▲ 5/4 ▼
(▲) This setting causes an answer to a calculation to automatically round up.
(5/4) This setting causes automatic round off. If the last digit of the result that will be printed or printed /
displayed upon rounding is followed by a value of 0 to 4, the digit is unchanged. If the last digit
of the result that will be printed or printed / displayed is followed by a value of 5 to 9, the digit is
rounded up.
(▼) This causes an answer to be automatically rounded down. (Truncation)
∑ GT TAX SET
(∑)
When the slide switch is in the Sigma mode “∑” position, the results of the multiplication or
division calculations completed by the = or % keys are automatically added to the accumulator.
The accumulated answer can be recalled by pressing the * / ∑ key.
( GT )
Any total taken with the * / ∑ key is automatically accumulated to memory. The accumulated
Grand Total can be recalled by pressing the MT key.
(TAX SET)
Selects set mode for programming the Tax rate.
A 0 2 3 4 F DECIMAL SET
(A)
Monetary Add Mode: In this setting, amounts entered are assumed to be monetary. The
calculator automatically supplies a decimal point to the left of the last two digits entered.
(0,2,3,4)
Fixed digit mode: These settings specify the number of digits to the right of the decimal
point that are shown in the result.
(F)
Floating decimal point mode: This setting specifies that all digits of the result are shown,
up to a maximum of 12. If the result exceeds these capacities, excess digits to the right of
the decimal point are dropped. No rounding takes place.
(0) – (9) (00)(.) NUMERIC KEYS
The calculator uses the conventional 10 – key indexing keyboard, and includes the double zero
key and the decimal point key. Whole numbers are entered exactly as they are written.
(↑)
PAPER FEED KEY
Used to advance the paper
(→)
RIGHT SHIFT KEY
Used to delete the right most character of a live entry
(+-)
CHANGE SIGN KEY
Used to reverse the sign on the display
( IC )
ITEM COUNT KEY
Prints the Item Count when pressed
(%±)
PERCENT KEY
Completes percent calculation when the Multiplication or Division keys are used
(÷)
DIVISION KEY
The Division key performs division, automatic constant division, and Intermediate sequential
operations. It establishes the next amount as a constant divisor.
The ÷ key also causes the calculator to divide when you depress the =, %, M+, M-, or ÷ key. Each
divisor entry is retained as a constant (except M+ and M- entries) until you depress the X, ÷,
Clear.
( ∆% )
DELTA PERCENT KEY
Automatically compares any two amounts and then calculates and prints the difference and
percent of change.
(=)
EQUAL KEY
To get the result for a multiplication or division equation
( C/CE )
CLEAR / CLEAR ENTRY KEY
Clears a live entry by pressing this key once. Press twice to clear the accumulator or pending
calculation. Does not clear the Memory
(X)
MULTIPLICATION KEY
The multiplication key performs multiplication, automatic constant multiplication, and
intermediate sequential operations. It establishes the amount as a constant multiplicand.
The X key also causes the calculator to multiply when you depress the =, %, M+, M-, X, or ÷ key.
Each multiplicand entry is retained as a constant (except M+ and M- entries) until you depress the
X, ÷, or clear.
(-)
MINUS KEY
Subtracts an amount from the accumulator. To subtract the same amount more than one time
(repeat subtraction), enter that amount once and depress the Minus key as many times as necessary.
If this key is depressed immediately after the (%) key, it works as a percent minus key.
(+)
PLUS KEY
Adds an amount to the accumulator. To add the same amount more than onetime (repeat addition),
enter that amount once and depress the Plus key as many times as necessary. If this key is
depressed immediately after the (%) key, it works as a percent add key.
( TAX I )
TAX 1 KEY
Used to calculate an amount of tax using the preset tax. Use the “+” key for calculating an amount
including VAT, and the “-“ key for calculating an amount excluding VAT.
( TAX II )
TAX 2 KEY
Used to calculate an amount of tax using the preset tax. Use the “+” key for calculating an amount
including VAT, and the “-“ key for calculating an amount excluding VAT.
(D/#)
DATE / NON-ADD KEY
It will print a live entry as an identifier or as an invoice number without adding the number to the
accumulator. The number will appear on the left hand side of the tape with the “#” sign.
(◊)
SUBTOTAL KEY
Prints, but does not clear the accumulator.
(*/∑)
TOTAL KEY / SIGMA TOTAL KEY
Prints and clears the accumulator. This key will also print the total of multiplication and division
calculations when the slide switch is in Sigma mode ( ∑ ).
( M* )
MEMORY TOTAL KEY
Prints and clears the total in Memory.
( M◊ )
MEMORY SUB-TOTAL KEY
Prints, but does not clear the contents of Memory.
( M- )
MEMORY MINUS, EQUAL
Subtracts an amount from memory. If there is a live calculation pending, the Memory Minus key
will complete the calculation and subtract the amount from memory.
( M+ )
MEMORY PLUS, EQUAL
Adds an amount to Memory. If there is a live calculation pending, the Memory Plus key will
complete the calculation and accumulate the result to Memory.
NEW FEATURES
( GT )
GRAND TOTAL KEY
When the calculator is in Grand Total mode, any total taken with the “* / ∑” key is automatically
accumulated to Memory. The accumulated Grand Total can be recalled by pressing the GT
button.
(COST)
COST KEY
Used to enter the Cost factor in a Gross Profit Margin calculation.
(SELL)
SELL KEY
Used to enter the Selling Price in a Gross Profit Margin calculation.
(MARGIN)
MARGIN KEY
Used to enter the desired Margin in a Gross Profit Margin calculation.
E. DISPLAY SYMBOLS
M
: A NUMBER HAS BEEN STORED IN MEMORY.
E
: ERROR OR OVERFLOW OF CAPACITY.
-
: THE DISPLAYED VALUE IS NEGATIVE.
WARNING
• DO NOT PRESS ANY KEY WHEN THERE IS NO PAPER AND THE PRINTER IS ON. (OTHER
THAN THE PAPER FEED KEY ↑)
• FAILURE TO OBSERVE THIS WARNING WILL DAMAGE
▀ ELECTROMAGNETIC INTERFERENCE OR ELECTROSTATIC DISCHARGE MAY CAUSE THE
DISPLAY TO MALFUNCTION OR THE CONTENTS OF THE MEMORY TO BE LOST OR ALTERED.
SHOULD THIS OCCUR, USE THE TIP OF A BALL POINT PEN (OR SMALLER SHARP OBJECT) TO PRESS
THE [RESET] BUTTON AT THE BACK OF THE CALCULATOR. AFTER RESETTING, BE SURE TO SET
THE CALENDAR, CLOCK, AND TAX RATE AGAIN.
SPECIFICATIONS
*DISPLAY
*PRINTING SPEED
*PRINTING PAPER
*POWER SOURCES
*AMBIENT TEMPERATURE
*POWER CONSUMPTION
*DIMENSION
*INK RIBBON
*PRINTING COLOR
*WEIGHT
:12 DIGIT, FLUORESCENT
:4.5 LINES / SECOND
:WIDTH 57mm, DIAMETER 80mm MAX
:1) 120V / 60 Hz (USA, CANADA)
:2) 220 V / 50 Hz (ECD)
:0°C ~ 40°C (32°F ~ 104°F)
:120V / 0.16A / 19.2W
(220V / 0.08A / 18.4W)
:323 mm (L) X 220 mm (W) X 80 mm (H)
:VICTOR 7010
:2 – COLOR (MINUS AND NEGATIVE IN RED)
:1655 g