1
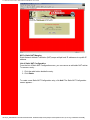
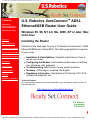
U.S. Robotics SureConnect ADSL Ethernet/USB Router User Guide
Contents:
US Robotics
SureConnect ADSL
Ethernet/USB Router
Configuration Utility
Summary
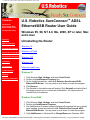
U.S. Robotics SureConnect™ ADSL
Ethernet/USB Router User Guide
Windows 95, 98, NT 4.0, Me, 2000, XP or later, Mac
and Linux
Installing the Router
Web User Interface
Terminal User Interface
Command Line Interface
Configuration Examples
Installation
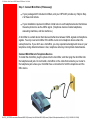
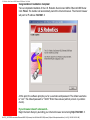
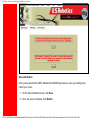
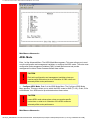
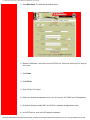
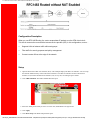
Welcome to the Web page for your U.S. Robotics SureConnect™ ADSL
Ethernet/USB Router, Model 9003. This Web page details five aspects
of your router...
●
●
Uninstallation
●
Troubleshooting
●
●
Glossary
Regulatory Information
Installation & Uninstallation: Complete instructions on how to
set up your router.
Configuring the Modem: Command-level discussion of all three
user interfaces, with examples.
Troubleshooting: Q&A format. Covers typical questions.
Glossary: ADSL jargon, rendered into English.
Regulatory Information:. Declaration of Conformity, FCC & CE
compliance statement, etc.
Technical Support
For current product support and contact information, go to the Support section of the U.S.
Robotics Web site:
http://www.usr.com/broadbandsupport
U.S. Robotics
part number
R46.0216.00
file:///P|/T_WRITER/Documentation/Released/9003...de/9003%20(Guiness)%20prac%20template/index.htm (1 of 2) [11/6/2002 8:52:17 AM]
U.S. Robotics SureConnect ADSL Ethernet/USB Router User Guide
file:///P|/T_WRITER/Documentation/Released/9003...de/9003%20(Guiness)%20prac%20template/index.htm (2 of 2) [11/6/2002 8:52:17 AM]
U.S. Robotics SureConnect ADSL Ethernet/USB Router User Guide
Contents:
US Robotics
SureConnect ADSL
Ethernet/USB Router
Configuration Utility
Summary
Web User Interface
Quick Setup
U.S. Robotics SureConnect™ ADSL
Ethernet/USB Router User Guide
Windows 95, 98, NT 4.0, Me, 2000, XP or later, Mac
and Linux
Web User Interface
Service Provider
Settings
Network
Firewall
Tools
Statistics
Terminal User Interface
Command Line
Interface
Overview
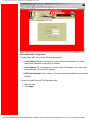
The Web User Interface (WUI) is one of three router user interfaces. The other interfaces
are the Terminal User Interface (TUI) and Command Line Interface (CLI). Each interface
allows you to set up, modify, and view router configuration variables and operational data.
The Web User Interface is a system of graphical menus. Menu pages control router
parameters and provide information about them. The WUI organizes these router
parameters into six topics. Here are the six topics, in the order that the WUI displays them...
• Quick Setup
• Firewall Settings
• Tools
Installation
• Service Provider
Settings
Uninstallation
• Network Settings
• Statistics
Configuration Examples
Troubleshooting
Glossary
Regulatory Information
This part of the manual discusses all but the Quick Setup topic. You’ll find information on
using the Quick Setup feature in the Quick Installation Guide.
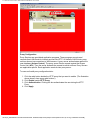
This manual begins topic discussions with a picture of the top-level menu screen. A
description of screen terms and procedures follows each screen shot. Either text or a table
defines screen variables. Afterward, summarized, step-by-step procedures often follow.
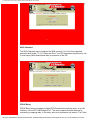
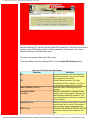
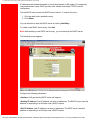
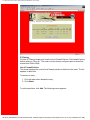
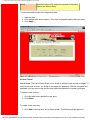
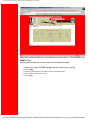
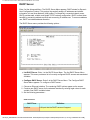
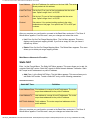
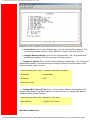
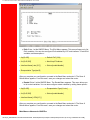
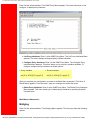
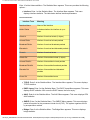
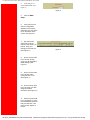
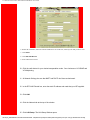
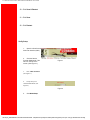
Selecting Topics. When you look at a menu page, notice the divider tabs at the very top of
the page. You can access any of the six router configuration and information topics by
clicking on its tab. The graphic below portrays the six divider tabs as they appear on a
menu.
Divider Tabs •
file:///P|/T_WRITER/Documentation/Released/900...ide/9003%20(Guiness)%20prac%20template/wui.htm (1 of 55) [11/6/2002 8:53:37 AM]
U.S. Robotics SureConnect ADSL Ethernet/USB Router User Guide
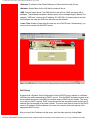
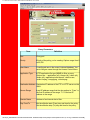
Configuration Options. Most menus present configuration options and prompt you for a
response. For example, the screen may help you to set up service provider, network or
firewall parameters. Some menus offer additional or more specific options by presenting
lower-level (secondary) screens. The bottom of many screens includes a set of graphical
buttons. Clicking one of the buttons with your mouse determines the disposition of options
on the page. For example…
• Add
• Delete
• Modify
• Disable
• Configure XXX
• Erase
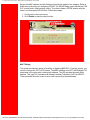
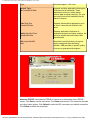
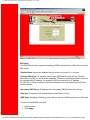
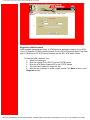
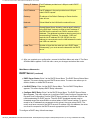
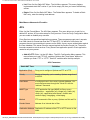
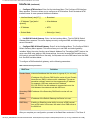
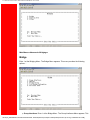
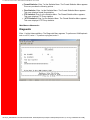
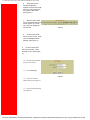
Selecting or Enabling Features. You can select menu options by clicking radio buttons or
checking boxes on the screen. In either case, use your mouse to make selections. Radio
buttons allow you to select only one of several options. Checkboxes allow you to enable
none, one or many features. The graphic below includes examples of both radio buttons
and checkboxes.
Radio Buttons •
Checkboxes •
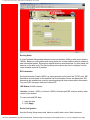
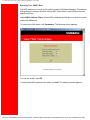
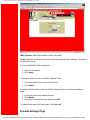
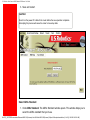
Accessing the Web User Interface
Your router includes the SureConnect ADSL Web Utility. This Web utility displays after you
complete installation.
To access the Web User Interface, follow these steps…
1. Install your router according to the Quick Installation Guide.
2. Connect the router to the Ethernet or USB port on your PC.
3. Open a Web browser and go to IP address http://192.168.1.1. (Otherwise, go to the
LAN IP designated for the router's management port.)
4. At the prompt, type in your user name and password. The default user name is "root."
The default password is "12345." (Don't type the quotation marks or period.)
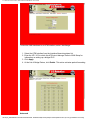
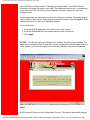
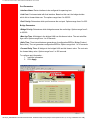
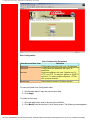
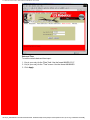
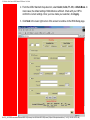
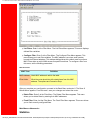
Service Provider Setting Page
file:///P|/T_WRITER/Documentation/Released/900...ide/9003%20(Guiness)%20prac%20template/wui.htm (2 of 55) [11/6/2002 8:53:37 AM]
U.S. Robotics SureConnect ADSL Ethernet/USB Router User Guide
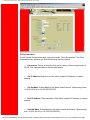
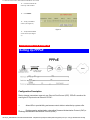
WAN Setup
Use this menu option to configure an ISP connection. ADSL employs Asynchronous
Transfer Mode (ATM) protocol to send data to the Internet Service Providers. An ATM
circuit uses Permanent Virtual Circuit (PVC) as pathway to identify and route modem data.
The U.S. Robotics Ethernet/USB Router supports multiple PVC connections for multiple
ISPs.
To configure a PVC…
1.
2.
3.
4.
•
Delete any connection that you don’t need.
Select the PVC in the Current ATM PVC List.
Click Delete.
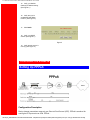
Click the connection type recommended by your ISP. Choose a mode: RFC1483
Bridged, RFC1483 Routed, PPPoE, PPPoA or MER.
If you chose RFC1483 Bridged mode, follow these steps…
1. Enter VPI / VCI values.
2. Click the radio button for the desired encapsulation mode: LLC/SNAP or VC
Multiplexing.
3. Network Settings: Be sure that options Enable NAPT and Enable DHCP are not
selected.
4. Click Add.
•
If you chose RFC1483 Routed mode, follow these steps…
1.
2.
Enter the WAN IP Address for your ISP.
Enter the WAN Subnet Mask for your ISP.
file:///P|/T_WRITER/Documentation/Released/900...ide/9003%20(Guiness)%20prac%20template/wui.htm (3 of 55) [11/6/2002 8:53:37 AM]
U.S. Robotics SureConnect ADSL Ethernet/USB Router User Guide
3. Enter VPI / VCI values.
4. Click the radio button for the desired encapsulation mode: LLC/SNAP or VC
Multiplexing.
5. Network Settings: Be sure that options Enable NAPT and Enable DHCP remain
selected.
6. Click Add.
•
If you chose PPPoE mode, follow these steps…
1. Enter Username and Password.
2. Select “Direct” Dialing mode. Only choose “Auto” if you prefer to start and stop
your connection while data is flowing.
3. Enter the IDLE Timeout: This function adjusts the number of minutes of no traffic
before the connection terminates. The idle timeout connection terminates when you
select “Auto” Dialing Mode.
4. Select the Authentication method: Chap or PAP or MS-CHAP.
5. Enter VPI / VCI values.
6. Click the radio button for the desired encapsulation mode: LLC/SNAP or VC
Multiplexing.
7. Network Settings: Be sure that options Enable NAPT and Enable DHCP remain
selected.
8. Click Add.
•
If you chose PPPoA mode, follow these steps…
1. Enter Username and Password.
2. Select the Authentication method: Chap or PAP or MS-CHAP.
3. Enter VPI / VCI values.
4. Click the radio button for the desired encapsulation mode: LLC/SNAP or VC
Multiplexing.
5. Network Settings: Be sure that options Enable NAPT and Enable DHCP remain
selected.
6. Click Add.
•
If you chose MER mode, follow these steps…
1. Enter the WAN IP Address for your ISP.
2. Enter WAN Subnet Mask for your ISP.
3. Enter VPI / VCI values.
4. Click the radio button for the desired encapsulation mode: LLC/SNAP or VC
Multiplexing.
5. Network Settings: Be sure that options Enable NAPT and Enable DHCP remain
selected.
6. Click Add.
Proceed to the Tools Menu to save your changes.
file:///P|/T_WRITER/Documentation/Released/900...ide/9003%20(Guiness)%20prac%20template/wui.htm (4 of 55) [11/6/2002 8:53:37 AM]
U.S. Robotics SureConnect ADSL Ethernet/USB Router User Guide
ADSL Standard
The ADSL Standard menu configures the ADSL protocol. You’ll find four supported
protocols: Multi-mode, T1.413, G.dmt and G.lite. Your ISP determines the protocol to use.
In most cases, Multi-mode should allow a connection to the ISP.
PPPoE Relay
PPPoE Relay protocol supports multiple PPPoE sessions through the router, on a LAN
interface, over an RFC1483 Bridged PVC. The router supports multiple sessions by
maintaining a mapping table. In this table, each entry represents one session. The Client /
file:///P|/T_WRITER/Documentation/Released/900...ide/9003%20(Guiness)%20prac%20template/wui.htm (5 of 55) [11/6/2002 8:53:37 AM]
U.S. Robotics SureConnect ADSL Ethernet/USB Router User Guide
Server side MAC address and the Session Id provide the basis for the mapping. Refer to
WAN setup instructions on configuring PPPoE. The PPPoE Relay option requires an ATM
PVC (server) and a LAN interface (client). The client initiates a PPPoE session with the
server via a third-party PPPoE client. Follow these steps…
1. Configure the client and server.
2. Click Enable to start the relay function.
NAPT Bridge
This screen provides the option of enabling or disabling MER PVC. From this screen, you
can also change this PVC’s ATM values. The MER Interface is an RFC1483 Bridged PVC,
terminated in the router with a static public address. The ISP provides the static public
address. This type PVC operates with Network Address Translation (NAT) and DHCP.
These protocols allow the router to serve LAN users with private addresses.
file:///P|/T_WRITER/Documentation/Released/900...ide/9003%20(Guiness)%20prac%20template/wui.htm (6 of 55) [11/6/2002 8:53:37 AM]
U.S. Robotics SureConnect ADSL Ethernet/USB Router User Guide
Bridging
You can group router LAN interfaces. Grouping allows forwarding of their Ethernet frames
to an ATM interface. The U.S. Robotics Ethernet/USB Router defaults to bridging on three
ports: ETH1, ETH2 and USB. The router bridges these ports to the atm0 interface or the
first PVC under WAN SETUP.
To change the grouping…
1. Click Erase All.
2. Click Interfaces.Choose the desired LAN Interfaces.
3. Click Apply.
file:///P|/T_WRITER/Documentation/Released/900...ide/9003%20(Guiness)%20prac%20template/wui.htm (7 of 55) [11/6/2002 8:53:37 AM]
U.S. Robotics SureConnect ADSL Ethernet/USB Router User Guide
To bind the LAN Interfaces to an ATM interface, select “Add Bridge.”
1. Select the ATM Interface from the Interface Name drop-down list.
2. Enter the VPI / VCI to which this ATM circuit belongs. Refer to WAN Setup for
information on setting up a bridged PVC.
3. Click Apply.
4. At the List of Bridge Entries, click Enable. This action activates packet forwarding.
Advanced
file:///P|/T_WRITER/Documentation/Released/900...ide/9003%20(Guiness)%20prac%20template/wui.htm (8 of 55) [11/6/2002 8:53:37 AM]
U.S. Robotics SureConnect ADSL Ethernet/USB Router User Guide
Use the Advanced Interface menu to configure LAN, PPP and ATM interfaces. Follow these
steps…
1. Select the Interface Name.
2. Set the IP and Subnet Mask by clicking Configure Interface. Some interfaces allow
the option of changing interface status.
Interfaces:
•
Interface mer0 usage is reserved. Its status is always Down.
•
Interface ADSL0 is the ADSL SNMP interface.
•
Interface lo0 is the loopback interface. When you perform an
OAM loopback, the status field displays UP.
•
Interfaces Atm0 to Atm 7 display the interfaces configured
for RFC1483 bridged mode or RFC 1483 routed mode.
•
Interfaces pppo to ppp7 display the interfaces configured for
PPPoE or PPPoA.
Parameters:
•
Dynamic IP address from DHCP: Selecting this option allows the DHCP Server to
assign the IP address.
•
Static IP address: Selects the IP address to be statically assigned.
•
Interface: The name of the selected interface.
•
IP address: The IP address of the selected interface.
•
Subnet Mask: The subnet mask of the selected interface.
•
MTU: Sets the maximum transmission unit of the interface. The MTU limits the size of
packets that transmit on an interface. Not all interfaces support the MTU parameter. Some
interfaces, like Ethernet, have range restrictions (80 - 1500).
•
Speed: Auto, 10 Mbps, or 100 Mbps.
•
State: Enable and Disable. When you set an interface to Disable, the system won’t
attempt to transmit messages through that interface. When you set an interface to Enable,
you can transmit messages through the interface.
file:///P|/T_WRITER/Documentation/Released/900...ide/9003%20(Guiness)%20prac%20template/wui.htm (9 of 55) [11/6/2002 8:53:37 AM]
U.S. Robotics SureConnect ADSL Ethernet/USB Router User Guide
Use the Advance–VCC menu to add and delete ISP connections. This menu also includes
options to enter ATM Quality of Service (Qos) parameters. The Advance–VCC menu
operates similarly to the WAN Setup menu.
The menu only supports Data type ATM circuits.
To list the Quality of Service setting per PVC, click the Show QOS Settings button.
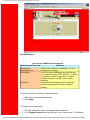
Advance–VCC Menu Add Parameters
Parameter
Definition
VPI
Virtual Path Identifier (VPI) that identifies
the ATM connection. The vpi is an integer
that ranges from 0 to 4,095.
VCI
Virtual Channel Identifier (VCI) that
identifies the ATM connection. The VCI is
an integer that ranges from 0 to 65,535.
Peak Cell Rate (Cells/sec)
Maximum rate for sending cells to the
network.
Average Cell Rate
Maximum sustainable or average rate for
sending cells to the network. Average Cell
(Cells/sec)
Rate specifies bandwidth utilization. This
value must always be less than or equal to
Peak Cell Rate.
Burst Size (cells)
Maximum number of cells that the user can
send at peak rate in a burst. We measure
burst size from within a sustainable rate.
CDVT (cells)
Constrains the number of cells the user can
send to the network at the maximum line
rate.
file:///P|/T_WRITER/Documentation/Released/900...ide/9003%20(Guiness)%20prac%20template/wui.htm (10 of 55) [11/6/2002 8:53:37 AM]
U.S. Robotics SureConnect ADSL Ethernet/USB Router User Guide
Type
Only data support – NO voice.
Service Type
cbr Constant Bit Rate
Supports real-time applications that require
a fixed amount of bandwidth. These
applications, such as a video stream,
produce data at regular intervals. The user
can specify how much bandwidth that he
wishes to reserve.
rtvbr Real Time
Variable Bit Rate
Supports time-sensitive applications such
as voice. Varies the rate at which cells
arrive.
Nrtvbr Non Real Time
Variable Bit Rate:
Ubr Unspecified Bit
Rate
Supports applications that have no
constraints on delay and delay variation, but
still have variable-rate and bursty traffic
characteristics.
Best effort service that does not require
tightly constrained delay and delay
variation. UBR provides no specific quality
of service or guaranteed throughput.
Advance–PPPOE. Use Advance–PPPoE to connect to, or disconnect from a PPPoE
server. Click Start to use the connection. Click Stop to disconnect. The menu also includes
two other button options. Click Default to make the ISP connection your default connection.
Click Delete to delete the connection.
file:///P|/T_WRITER/Documentation/Released/900...ide/9003%20(Guiness)%20prac%20template/wui.htm (11 of 55) [11/6/2002 8:53:37 AM]
U.S. Robotics SureConnect ADSL Ethernet/USB Router User Guide
Advance–PPPOA. Use Advance–PPPoA to connect to, or disconnect from a PPPoA
server. Click Start to use the connection. Click Stop to disconnect. The menu also includes
two other button options. Click Default to make the ISP connection your default connection.
Click Delete to delete the connection.
Network Setting Page
LAN Setup
file:///P|/T_WRITER/Documentation/Released/900...ide/9003%20(Guiness)%20prac%20template/wui.htm (12 of 55) [11/6/2002 8:53:37 AM]
U.S. Robotics SureConnect ADSL Ethernet/USB Router User Guide
Use LAN Setup to set the router’s IP Address and Subnet Mask. The LAN IP address
allows you to connect the router to your LAN. This address also allows you to manage the
router from your LAN. A LAN (Local Area Network) connects computers in the same
building or area.
Subnet masks split one network into a set of mini networks or subnets. Subnetting helps to
reduce traffic on each subnet. Subnetting also makes the network more manageable. Each
subnet functions as if it were an independent network.
To set up the LAN…
1. Enter the LAN IP Address for the router to use on the network.
2. Enter the Subnet Mask for the network that the router connects to.
3. Click Apply.
NOTICE. The LAN setup process changes the IP address of the Web User Interface. The
apply action causes the router to save your current configuration and then restart. After the
router restarts, you'll have to reapply to the Web User Interface using a new IP address.
DHCP
DHCP stands for Dynamic Host Configuration Protocol. This protocol dynamically assigns
file:///P|/T_WRITER/Documentation/Released/900...ide/9003%20(Guiness)%20prac%20template/wui.htm (13 of 55) [11/6/2002 8:53:37 AM]
U.S. Robotics SureConnect ADSL Ethernet/USB Router User Guide
IP addresses and related information to Local Area Network (LAN) nodes. For temporarily
connected network users, DHCP provides safe, reliable, and simple TCP/IP network
configuration.
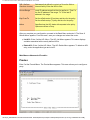
The top DHCP menu screen lists DHCP server entries. To remove the entry…
1. Click the radio button beside the entry.
2. Click Delete.
You can also start or stop the DHCP server by clicking Start/Stop.
To create a new DHCP server entry, click Add.
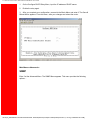
Note: Before adding a new DHCP server entry, you must first stop the DHCP server.
The following screen appears:
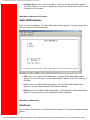
Configure the following parameters:
•Interface. LAN port that the DHCP server will support.
•Starting IP Address. First IP address in a block of addresses. The DHCP server uses this
address in responding to a LAN port node’s DHCP request.
•End IP Address. Last IP address in a block of addresses. The DHCP server uses this
address in responding to a LAN port node’s DHCP request.
file:///P|/T_WRITER/Documentation/Released/900...ide/9003%20(Guiness)%20prac%20template/wui.htm (14 of 55) [11/6/2002 8:53:37 AM]
U.S. Robotics SureConnect ADSL Ethernet/USB Router User Guide
•Gateway. IP address of the Default Gateway or Router that the node will use.
•Netmask. Subnet Mask for the LAN that the node will be on.
•DNS. Domain Name Server. The DNS that the node will use. DNS is a server with a
database. The database translates a domain name into a corresponding IP address. For
example, “USR.com” resolves into IP address 231.222.320.4. Communications over the
LAN between the node and USR.com web site use this address.
•Lease Time. Number of days that the node can use a DHCP lease. Subsequently, you
must renew the lease with the DHCP server.
DHCP Relay
Suppose that a Dynamic Host Configuration Protocol (DHCP) server resides on a different
LAN than the node broadcasting for DHCP service. Then the DHCP broadcast request must
be forwarded across the router/WAN to a subnet where a DHCP server resides. The router
must relay the DHCP request. DHCP relay assures that the requesting node receives an IP
address that corresponds to the node’s subnet. The router must have a record of the DHCP
server’s IP address. With this address, the router can correctly direct the request to the
appropriate DHCP server.
After you input the IP address into the menu, start the relay agent by clicking Start.
file:///P|/T_WRITER/Documentation/Released/900...ide/9003%20(Guiness)%20prac%20template/wui.htm (15 of 55) [11/6/2002 8:53:37 AM]
U.S. Robotics SureConnect ADSL Ethernet/USB Router User Guide
DNS Relay
The DNS Relay function supports forwarding of DNS requests from a LAN node to a known
DNS server.
•Domain Name. Internet site address that the router is a group of (i.e. usr.com).
•Primary DNS Server. IP address of the Primary DNS that the router will use. Domain
Name Server (DNS) is a server with a database. This server translates a domain name into
the corresponding IP address. For example, USR.com resolves into IP address
231.222.320.4. Communications over the LAN between the node and web site USR.com
use this address.
•Secondary DNS Server. IP address of the Secondary DNS that the router will use.
•Gateway. IP address of the Default Gateway the Router is to use.
•DNS Relay. Enabling or Disabling router ability to convey a DNS request from a LAN node.
To save and install DNS relay data…
1. Input the data.
2. Click Apply.
file:///P|/T_WRITER/Documentation/Released/900...ide/9003%20(Guiness)%20prac%20template/wui.htm (16 of 55) [11/6/2002 8:53:37 AM]
U.S. Robotics SureConnect ADSL Ethernet/USB Router User Guide
Routing Setup
A router forwards data packets between local area networks (LANs) or wide area networks
(WANs). Based on routing tables and routing protocols, routers read the network address in
each transmitted packet. Routers then decide where to send the packet. A router bases this
decision on the best route. The Routing Setup menu allows the user to configure how the
router forwards received IP packets.
RIP Information
Routing Information Protocol (RIP) is a routing protocol and is part of the TCP/IP suite. RIP
determines a route based on the smallest hop count between source and destination. RIP
determines the smallest hop count by communicating with other routers within the network.
Only use RIP if the target router also utilizes RIP.
•RIP Status=On/Off selection.
•Version= Version 1 (RIP1) or Version 2 (RIP2). Should match RIP versions used by other
routers in the network.
To save and install RIP data…
1. Input the data.
2. Click Apply.
Route Configuration
Use the Routing Setup area to add, delete or modify static routes. Static routes are
file:///P|/T_WRITER/Documentation/Released/900...ide/9003%20(Guiness)%20prac%20template/wui.htm (17 of 55) [11/6/2002 8:53:37 AM]
U.S. Robotics SureConnect ADSL Ethernet/USB Router User Guide
permanent routes that the router stores. The router uses these routes when determining
where to forward IP packets that it receives.
•Destination Network ID. IP address of the network that you’re defining in the table.
•Destination Subnet Mask. Network Subnet Mask of the defined entry in the table.
•Next Hop IP. IP address of the next router that will forward packets to the destination
network.
•Add. Add information to the routing table.
•Modify. Modifies an entry. To modify an entry…
1. From the List of Static Routes, select the route to modify. To do that, click Select next
to the route you’re modifying.
2. Then click Modify.
•Delete. Used to delete an existing entry. To delete…
1. Select the route to modify from the List of Static Routes. Do that by clicking Select
next to the route you’re deleting.
2. Click Delete.
•Erase All. Erases all routes in the List of Static Routes. This feature won’t erase networks
defined on interfaces of the router.
List of Static Routes
The list of networks known by the router. The list also includes the Next Hop to get to these
networks. Static routes may be networks added statically or learned from other networks.
file:///P|/T_WRITER/Documentation/Released/900...ide/9003%20(Guiness)%20prac%20template/wui.htm (18 of 55) [11/6/2002 8:53:37 AM]
U.S. Robotics SureConnect ADSL Ethernet/USB Router User Guide
Spanning Tree-Bridging
Transparent bridges use the spanning tree algorithm to dynamically determine the best
source-to- destination path. This algorithm avoids bridge loops (multiple paths linking one
segment to another) within a network. The algorithm determines all redundant paths and
makes only one of them active. The spanning tree protocol (STP) is part of the IEEE 802.1d
standard.
List of Spanning Tree Entries
List all known router bridging ports and their current state.
To view the current state of the spanning tree bridge click Parameters. The following
screen appears…
file:///P|/T_WRITER/Documentation/Released/900...ide/9003%20(Guiness)%20prac%20template/wui.htm (19 of 55) [11/6/2002 8:53:37 AM]
U.S. Robotics SureConnect ADSL Ethernet/USB Router User Guide
To close the screen, click Continue.
To configure a port, click Config Port. The following screen appears…
file:///P|/T_WRITER/Documentation/Released/900...ide/9003%20(Guiness)%20prac%20template/wui.htm (20 of 55) [11/6/2002 8:53:37 AM]
U.S. Robotics SureConnect ADSL Ethernet/USB Router User Guide
Port Parameters
•Interface Name. Router interface to be configured for spanning tree.
•Link Cost. Cost associated with that interface. Based on this cost, the bridge decides
which link to forward data over. The options range from 0 to 65,535.
•Port Priority. Determines which port becomes the root port. Options range from 0 to 255.
Bridge Parameters
•Bridge Priority. Determines which bridge becomes the root bridge. Options range from 0
to 65,000.
•Max Age Time. All bridges in the bridged LAN use this timeout value. The root sets Max
Age value. Options range from 1 to 60 seconds.
•Hello Time. Time interval between generations of configuration BPDUs (Bridge Protocol
Data Units). The root generates configuration BPDUs. Options range from 1 to 10 seconds.
•Forward Delay Time. All bridges in the bridged LAN use this timeout value. The root sets
the forward delay value. Options range from 1 to 200 seconds.
To configure port information…
1. Input the information.
2. Click Apply.
file:///P|/T_WRITER/Documentation/Released/900...ide/9003%20(Guiness)%20prac%20template/wui.htm (21 of 55) [11/6/2002 8:53:37 AM]
U.S. Robotics SureConnect ADSL Ethernet/USB Router User Guide
Spanning Tree - MAC Filters
The MAC address is a unique serial number burned into Ethernet adapters. This address
distinguishes the network card from others. MAC Filters allow or reject WAN access for
specific machines.
•List of MAC Address Filters. Known MAC addresses and the ports on which the router
learned the addresses.
To view current filter states, click Parameters. The following screen appears…
To close the screen, click OK.
To add a static MAC address to the table, click Add. The following screen appears…
file:///P|/T_WRITER/Documentation/Released/900...ide/9003%20(Guiness)%20prac%20template/wui.htm (22 of 55) [11/6/2002 8:53:37 AM]
U.S. Robotics SureConnect ADSL Ethernet/USB Router User Guide
•MAC Address. Static MAC address to add to the table.
•Frame. What the router should do with a data frame from this MAC address. The options
are Forward or Drop.
To set the Add/Modify Filter information…
1. Input the information.
2. Click Apply.
To delete an entry from the List of MAC Address Filters…
1. Check the radio button to the left of the entry.
2. Click Delete.
To modify a MAC address in the List of MAC Address Filters, or to make the address
static…
1. Check the radio button beside the entry.
2. Click Modify.
3. Proceed by following the same steps as in Add.
To erase all non-static MAC addresses, click Erase All.
Firewall Settings Page
file:///P|/T_WRITER/Documentation/Released/900...ide/9003%20(Guiness)%20prac%20template/wui.htm (23 of 55) [11/6/2002 8:53:37 AM]
U.S. Robotics SureConnect ADSL Ethernet/USB Router User Guide
IP Filtering
Click the IP Filtering header and view the List of Firewall Policies. The firewall’s factorydefault setting is “Deny All.” The router includes factory-configured policies that allow
access from LAN to WAN.
List of Firewall Policies
This screen displays the current list of firewall policies as defined in the router. The list
appears in table form.
To remove an entry…
1. Click the radio button beside the entry.
2. Click Delete.
To add new policies, click Add. The following screen appears:
file:///P|/T_WRITER/Documentation/Released/900...ide/9003%20(Guiness)%20prac%20template/wui.htm (24 of 55) [11/6/2002 8:53:37 AM]
U.S. Robotics SureConnect ADSL Ethernet/USB Router User Guide
Policy Parameters
On the Firewall Configuration page, notice the header “Policy Parameters.” The Policy
Parameters menu presents you with the following onscreen options …
•
Precedence. Priority of the policy that you’re creating. Options range from 0 to
65,535. The lower precedence number takes priority.
•
Src IP Address. Data source. Enter either a specific IP address or network
address.
•
Src Net Mask. Subnet Mask for the data’s network source. Options range from
/12 (255.240.0.0) to /32 (255.255.255.255).
•
Dest IP Address. Data destination. Enter either a specific IP address or network
address.
•
Dest Net Mask. Subnet Mask for the data’s network destination. Options range
from /12 (255.240.0.0) to /32 (255.255.255.255).
file:///P|/T_WRITER/Documentation/Released/900...ide/9003%20(Guiness)%20prac%20template/wui.htm (25 of 55) [11/6/2002 8:53:37 AM]
U.S. Robotics SureConnect ADSL Ethernet/USB Router User Guide
•
Source Port. Transport layer source port. Options range from 0 to 65,535.
•
Destination Port. Transport layer destination port. Options range from 0 to
65,535.
• Protocol. IP protocols to be filtered. Options are: Any (all), TCP, UDP, ICMP, AH,
ESP.
•
TCP Flags. Filtering of the TCP Flags that control session setup and termination.
Options are: None, urg (Urgent), ack (acknowledgement), psh (push), rst (reset), syn
(synchronize), fin (finished).
Firewall Parameters
To edit a firewall parameter…
1. Click the radio button beside “Existing ActionID.”
2. Enter the “FW Action ID” to modify.
To create a new firewall parameter, Click the radio button beside “New Action.” The screen
presents you with a number of options and sub-options…
●
●
●
●
Interface Name. Name of the Interface to apply the parameter to.
FW Action. How the system handles packets. Your sub-options include…
§
Allow. Permits packets to enter or leave the system.
§
Reset. Forces the TCP connection to reset.
§
Reject. Drops the packet and issues an “unreach host” ICMP error.
§
Deny. Drops the packet.
Direction. Specifies whether the action applies to incoming, outgoing, or both
incoming and outgoing traffic. Options are: Any, In, Out.
Time. The parameter applies during the time period that you specify. Click the start
(From) day, time and stop (To) day and time.
To save and install firewall configuration data…
1. Input the data.
2. Click Apply.
file:///P|/T_WRITER/Documentation/Released/900...ide/9003%20(Guiness)%20prac%20template/wui.htm (26 of 55) [11/6/2002 8:53:38 AM]
U.S. Robotics SureConnect ADSL Ethernet/USB Router User Guide
• NOTICE. Check your firewall configuration data. See View Actions at the top menu.
There, you’ll find a selection List of Firewall Policies. This selection summarizes the
action that you entered for each parameter. When you click View Actions, the following
screen appears.
file:///P|/T_WRITER/Documentation/Released/900...ide/9003%20(Guiness)%20prac%20template/wui.htm (27 of 55) [11/6/2002 8:53:38 AM]
U.S. Robotics SureConnect ADSL Ethernet/USB Router User Guide
IGMP Proxy
Click the IGMP Proxy radio button and view the List of IGMP Proxy Entries.
List of IGMP Proxy Entries
This screen displays a list of IGMP Proxy entries.
IGMP (Internet Group Membership Protocol) is a protocol. IP hosts use IGMP to report their
multicast group memberships to immediately nearest routers.
To remove an entry…
1. Click the radio button beside the entry.
2. Click Delete.
To create a new IGMP Proxy entry, click Add. The IGMP Proxy Configuration screen
appears…
IGMP Proxy Configuration
On the IGMP Proxy configuration Screen, follow these steps to set up your IGMP proxy…
1. Select Proxy interface, router interface, or both: Check the box next to the interface.
2. Use the pull-down menu to the right to select the eth, usb, atm, or ppp Interface.
To save and install IGMP Proxy Configuration data…
file:///P|/T_WRITER/Documentation/Released/900...ide/9003%20(Guiness)%20prac%20template/wui.htm (28 of 55) [11/6/2002 8:53:38 AM]
U.S. Robotics SureConnect ADSL Ethernet/USB Router User Guide
1. Input the data.
2. Click Apply.
NAT=>List of Static WAN Addresses
From the List of Static Wan Addresses menu, you can remove or add entries. To remove an
entry…
1. Click the radio button beside the entry.
2. Click Delete.
To create a new Static WAN Address entry, click Add. The Static WAN Address
Configuration screen appears…
file:///P|/T_WRITER/Documentation/Released/900...ide/9003%20(Guiness)%20prac%20template/wui.htm (29 of 55) [11/6/2002 8:53:38 AM]
U.S. Robotics SureConnect ADSL Ethernet/USB Router User Guide
NAT=>Static WAN Address Configuration
Public IP Address. Public IP address that the router uses when translating network
addresses.
To save and install Static WAN Address Configuration data…
1. Input the data.
2. Click Apply.
file:///P|/T_WRITER/Documentation/Released/900...ide/9003%20(Guiness)%20prac%20template/wui.htm (30 of 55) [11/6/2002 8:53:38 AM]
U.S. Robotics SureConnect ADSL Ethernet/USB Router User Guide
NAT=>Port Range Mapping
Click the NAT header and view the List of Port Range Entries. NAT port range mapping
allows the router to map public addresses and ports to private addresses and ports.
List of Port Range Entries
NAT stands for Network Address Translation. NAT enhances the power of Port Range
Mapping. Together, they can map a local IP address and port to a public IP address and
port.
To remove an entry…
1. Click the radio button beside the entry.
2. Click Delete.
To create a new Port Range entry: Click Add on the top screen. The Port Range
Configuration screen appears…
file:///P|/T_WRITER/Documentation/Released/900...ide/9003%20(Guiness)%20prac%20template/wui.htm (31 of 55) [11/6/2002 8:53:38 AM]
U.S. Robotics SureConnect ADSL Ethernet/USB Router User Guide
NAT=>Port Range Configuration
To add a Static NAT entry, set the following parameters…
●
●
●
●
●
●
●
Public Address. Set the public, destination IP address inside a packet header. The
router will map or redirect packets with the address that you specify.
Public Port From. Set the first (From) port of the public address that the router maps
or redirects. Options range from 1 to 65,535.
Public Port To. Set the last (To) port of the public address that the router maps or
redirects. Options range from 1 to 65,535.
Local Address. Set the IP address of a machine on the local LAN. The router directs
packets to this address.
Local Port From. Set the first (From) port of the local address that the router uses.
Options range from 1 to 65,535.
Local Port To. Set the last (To) port of the local address that the router uses. Options
range from 1 to 65,535.
Protocol. Set protocol. Your protocol setting applies to the other parameters on this
page. Your options are TCP or UDP port numbers.
To save and install Port Range Configuration data…
1. Input the data.
2. Click Apply.
file:///P|/T_WRITER/Documentation/Released/900...ide/9003%20(Guiness)%20prac%20template/wui.htm (32 of 55) [11/6/2002 8:53:38 AM]
U.S. Robotics SureConnect ADSL Ethernet/USB Router User Guide
NAT=>Static NAT Mapping
Static Network Address Translation (NAT) maps multiple local IP addresses to a public IP
address.
List of Static NAT Configuration
From the List of Static NAT Configuration menu, you can remove or add static NAT entries.
To remove a entry…
1. Click the radio button beside the entry.
2. Click Delete.
To create a new Static NAT Configuration entry, click Add. The Static NAT Configuration
screen appears…
file:///P|/T_WRITER/Documentation/Released/900...ide/9003%20(Guiness)%20prac%20template/wui.htm (33 of 55) [11/6/2002 8:53:38 AM]
U.S. Robotics SureConnect ADSL Ethernet/USB Router User Guide
NAT=>Static NAT Configuration
To add a Static NAT entry, set the following parameters…
●
●
●
Local Address From. First address in a range of local IP addresses. The router
maps these addresses to the public IP address.
Local Address To. Last address in a range of local IP addresses. The router maps
these addresses to the public IP address.
NAT Public Address. Public address. The router maps local addresses to this public
address.
To save and install Static NAT Configuration data…
1. Input the data.
2. Click Apply.
file:///P|/T_WRITER/Documentation/Released/900...ide/9003%20(Guiness)%20prac%20template/wui.htm (34 of 55) [11/6/2002 8:53:38 AM]
U.S. Robotics SureConnect ADSL Ethernet/USB Router User Guide
Proxy Configuration
Proxy Services are specialized application programs. These programs accept users’
requests from LAN clients for Internet services like HTTP. On behalf of LAN clients, proxy
services also set up connections to WAN servers. A proxy server authenticates against the
user database (Access Control). The proxy server filters a request against the Access
Control List (ACL). Then the server forwards the request to actual services. Proxy Servers
are application specific. Each application needs its own proxy server.
To save and install proxy configuration data…
1. Click the radio button beside the HTTP proxy that you want to enable. (The illustration
above doesn’t show proxy radio buttons.)
2. Click Enable beside HTTP Proxy.
3. Click Authentication. Clicking this box authenticates the user during the HTTP
Proxy.
4. Click Apply.
file:///P|/T_WRITER/Documentation/Released/900...ide/9003%20(Guiness)%20prac%20template/wui.htm (35 of 55) [11/6/2002 8:53:38 AM]
U.S. Robotics SureConnect ADSL Ethernet/USB Router User Guide
ACL (Access Control List)
The ACL List screen displays currently configured Access Control Lists (ACL).
To remove an ACL List entry…
1. Click the radio button beside the entry.
2. Click Delete.
To create a new ACL entry, click Add from the top screen. The following screen appears…
file:///P|/T_WRITER/Documentation/Released/900...ide/9003%20(Guiness)%20prac%20template/wui.htm (36 of 55) [11/6/2002 8:53:38 AM]
U.S. Robotics SureConnect ADSL Ethernet/USB Router User Guide
Proxy Parameters
Term
Definition
Port
Proxy port.
Priority
Priority of the policy you’re creating. Options range from 0
to 65,535.
User Name
A configured user in the router’s internal database. You
must configure users through the Access Control Menu.
Application Type
HTTP application file type (MIME) to filter or proxy.
Options are… •application (all), •image (all), •video (all),
•audio (all), •application/octet-stream, •audio/x-wav,
•audio/x-mpeg, •image/jpeg, •video/mpeg.
Destination Address Destination IP address of the FTP or HTTP server on the
WAN.
Source Range
Local IP address range that the rule applies to. “From” is
the first IP address in the range. “To” is the last IP
address in the range.
Domain Name
Address of an Internet site to filter.
Day From/To
Set the effective start (From) day and time for the policy.
Set the effective stop (To) day and time for the policy.
file:///P|/T_WRITER/Documentation/Released/900...ide/9003%20(Guiness)%20prac%20template/wui.htm (37 of 55) [11/6/2002 8:53:38 AM]
U.S. Robotics SureConnect ADSL Ethernet/USB Router User Guide
Action
Specifies how the ACL deals with requests to the policy.
Options are Allow or Deny.
To save and install Access List configuration data…
1. Input the data.
2. Click desired radio button options. The router only applies options that you select.
3. Click Apply.
Access Control
List of Users. The List of Users allows you to delete or authorize user access privileges. To
set up a new user account, you assign a username and password. With the username and
password, you can open a new account with either administrative or ordinary privileges.
To delete a user account…
1. Click the radio button beside the user entry.
2. Click Delete.
To create a new user entry…
1. Click Add on the top-level, List of Users screen. The following screen appears…
file:///P|/T_WRITER/Documentation/Released/900...ide/9003%20(Guiness)%20prac%20template/wui.htm (38 of 55) [11/6/2002 8:53:38 AM]
U.S. Robotics SureConnect ADSL Ethernet/USB Router User Guide
User Configuration
User Configuration Parameters
User Account Data Term
Definition
Username
Configurable username with up to 19 characters.
Password
Configurable user password with up to 19
characters.
Services
Services available to the user. Options are CLI,
HTTP, and FTP. To select all, perform a <SHIFT>
right click. To make multiple selections, <CTRL>
click on each selection.
Permissions
Administration access or Ordinary access.
To save and install User Configuration data…
1. See the table above. Input the user account data.
2. Click Apply.
To modify a User entry…
1. Click the radio button next to the user to be modified.
2. Click Modify from the top-level, List of Users screen. The following screen appears...
file:///P|/T_WRITER/Documentation/Released/900...ide/9003%20(Guiness)%20prac%20template/wui.htm (39 of 55) [11/6/2002 8:53:38 AM]
U.S. Robotics SureConnect ADSL Ethernet/USB Router User Guide
User Modification
User Account Modification Parameters
User Account Data Term
Definition
User Name &
User account that you’re modifying. You can’t
change these settings.
Authorization Old
Authorization
Select the new authorization level for this user.
Your options are CLI, HTTP, and FTP. To select
all, perform a <SHIFT> right click. To make
multiple selections, <CTRL> click on each
selection.
Permission
Select the new Permission level for this user.
Choose Administration access or Ordinary
access.
To save and install user account modification data…
1. Input user account modification data.
2. Click Apply.
To change a user’s password,,,
1. Click the radio button next to the appropriate user account.
2. Click Change Password from the top-level, List of Users screen. The following
file:///P|/T_WRITER/Documentation/Released/900...ide/9003%20(Guiness)%20prac%20template/wui.htm (40 of 55) [11/6/2002 8:53:38 AM]
U.S. Robotics SureConnect ADSL Ethernet/USB Router User Guide
screen appears…
Change Password
User Password Change Parameters
Password Data Term
Definition
Old Password
Enter the user’s old password.
New Password
Enter the user’s new password.
Confirm New Password
Confirm a correct entry by reentering the user’s
new password.
To save and install User Modification Configuration data…
1. Input the data.
2. Click Apply.
Tools Page
file:///P|/T_WRITER/Documentation/Released/900...ide/9003%20(Guiness)%20prac%20template/wui.htm (41 of 55) [11/6/2002 8:53:38 AM]
U.S. Robotics SureConnect ADSL Ethernet/USB Router User Guide
SNMP
Simple Network Management Protocol (SNMP) is a software component that resides in a
network device. SNMP responds to requests for information and action from a network
management station. Within the network device, an object-like format called a Management
Information Base (MIB) stores the information exchanged during SNMP.
SNMP=>System
The System function displays the SNMP parameter as assigned by the SNMP
Administrator. Modify the default settings by following these steps...
1. Click Modify.
2. Enter your changes.
3. Click Apply.
•NOTICE. To stop the SNMP agent, click Stop. The Stop button toggles to become the
Start button. After the process ends, you can start the agent by clicking Start.
Configure the SNMP listening port by following these steps...
1.
2.
3.
4.
5.
Click Stop to stop the agent.
Click Configure SMNP Agent.
Enter your changes.
Click Apply.
Restart the agent.
file:///P|/T_WRITER/Documentation/Released/900...ide/9003%20(Guiness)%20prac%20template/wui.htm (42 of 55) [11/6/2002 8:53:38 AM]
U.S. Robotics SureConnect ADSL Ethernet/USB Router User Guide
SNMP=>Trap
Set the agent to report up or down status by following these steps...
1.
2.
3.
4.
5.
Select the version of SNMP manager that the community is running.
Click Modify.
Enter the SNMP manager's IP address into its community name.
Select Enable for that status option.
Click Apply.
file:///P|/T_WRITER/Documentation/Released/900...ide/9003%20(Guiness)%20prac%20template/wui.htm (43 of 55) [11/6/2002 8:53:38 AM]
U.S. Robotics SureConnect ADSL Ethernet/USB Router User Guide
SNMP=>Community
Set the SNMP manager's IP address and community name for SNMP message exchange
by following these steps...
1. Click Configure Community.
2. Enter your changes.
3. Click Apply.
Diagnostic
The Diagnostic feature can generate ATM or IP traffic for troubleshooting or testing your
router’s configuration. Sometimes the request for a response fails. The failure may be due
to your ISP’s disabling its equipment from responding to these requests. The ISP may
disable responses for many reasons, including your security.
file:///P|/T_WRITER/Documentation/Released/900...ide/9003%20(Guiness)%20prac%20template/wui.htm (44 of 55) [11/6/2002 8:53:38 AM]
U.S. Robotics SureConnect ADSL Ethernet/USB Router User Guide
Diagnostic=>OAM Loopback
OAM Loopback generates two forms of ATM frames for testing the integrity of your ATM
circuit. F5 Segment (F5 SEG) frames transmit, but the ISP’s ATM switch doesn’t loop them
back. F5 End-to-End (F5 ETE) frames transmit and the ISP’s ATM switch replies.
To Start the OAM Loopback Test…
1. Select the frame type.
2. Enter an existing PVC (VPI/VCI) for the F5 ETE frames.
3. Enter the ATM switch loopback ID for the F5 ETE frames.
4. Click the Start Loopback to begin the test.
5. After the test completes, a screen reports results. Click Back to return to the
Diagnostic screen.
file:///P|/T_WRITER/Documentation/Released/900...ide/9003%20(Guiness)%20prac%20template/wui.htm (45 of 55) [11/6/2002 8:53:38 AM]
U.S. Robotics SureConnect ADSL Ethernet/USB Router User Guide
IP Address Ping Test
To Start the Address Ping Test…
1. Enter the IP of the network device that accepts ICMP packets.
2. Click Ping. If someone disabled ICMP packet forwarding on the device, the
Ping will fail.
Save and Restart
Whenever you make changes to the router’s configuration, the router saves the changes
in temporary memory storage. A power loss or power switch disconnection can cause the
router to lose changes. To make permanent changes, save changes and restart the
router.
file:///P|/T_WRITER/Documentation/Released/900...ide/9003%20(Guiness)%20prac%20template/wui.htm (46 of 55) [11/6/2002 8:53:38 AM]
U.S. Robotics SureConnect ADSL Ethernet/USB Router User Guide
After you click Save, the router returns to the Save and Restart screen. You may reboot
your router by clicking Restart. Another way to reboot is to turn the router off and on from
the router’s power switch.
• CAUTION. The Restart button doesn’t return you to the Save and Restart menu. You
can return by either of two methods: Click the browser’s Back Arrow key. Or reenter the
router management IP address on your browser’s address line.
Restore and Restart
The Restore and Restart option returns the router’s configuration to factory default
settings.
• CAUTION. During restoration to default settings, the router loses all your changes. After
the restoration process completes, you must reenter changes.
To erase the current router configuration…
1.
2.
3.
4.
Click Restore.
Click Restart.
Allow the router a few minutes to restore to factory settings.
Enter the router management IP address in the address line of your browser. The
router main menu appears.
file:///P|/T_WRITER/Documentation/Released/900...ide/9003%20(Guiness)%20prac%20template/wui.htm (47 of 55) [11/6/2002 8:53:38 AM]
U.S. Robotics SureConnect ADSL Ethernet/USB Router User Guide
Date and Time
To set the router's date and time input...
1. Key in your entry for the "Date" field. Use the format MM:DD:YYYY.
2. Key in your entry for the "Time" screen. Use the format HH:MM:SS.
3. Click Apply.
file:///P|/T_WRITER/Documentation/Released/900...ide/9003%20(Guiness)%20prac%20template/wui.htm (48 of 55) [11/6/2002 8:53:38 AM]
U.S. Robotics SureConnect ADSL Ethernet/USB Router User Guide
Version
Click the Version option to see the router firmware version.
Statistics Page
file:///P|/T_WRITER/Documentation/Released/900...ide/9003%20(Guiness)%20prac%20template/wui.htm (49 of 55) [11/6/2002 8:53:38 AM]
U.S. Robotics SureConnect ADSL Ethernet/USB Router User Guide
ADSL Link Status
Displays ADSL line settings and connection status
Status Term
ADSL Line Status
ADSL Standard
UpStream
DownStream
Attenuation
SNR Margin
HEC Count
Meaning
Displays the current ADSL line status
Displays the ADSL standard within the
current configuration. The standards are:
MULTI, T1.413, G.dmt, and G.Lite.
Displays the upstream data rate, as
negotiated by DSL link (Kb/s)
Displays the downstream data rate, as
negotiated by DSL link (Kb/s)
Displays the current attenuation in
decibels
Displays the current SNR margin in
decibels
Displays the number of ATM cells
received with errors since start of link.
Firmware
Displays the version number of the
firmware
15 min ES Counter
Displays the number of errors per second
for the current 15-minute period
CRC Errors
Displays the number of cyclical
redundancy check errors per second
since training
Displays the number of errors per second
for the current day
1 day ES Counter
file:///P|/T_WRITER/Documentation/Released/900...ide/9003%20(Guiness)%20prac%20template/wui.htm (50 of 55) [11/6/2002 8:53:38 AM]
U.S. Robotics SureConnect ADSL Ethernet/USB Router User Guide
System Statistics
Interface Statistics
Interface Statistics displays the statistics for all interfaces.
Screen Term
Interface Name
Admin Status
Octets In
Unicast PktsIn
Broadcast PktsIn
Discards In
Errors In
Octets Out
Unicast PktsOut
Broadcast PktsOut
Discards Out
Errors Out
Meaning
Name of the interface
Indicates whether the interface is up or
down
Number of received octets (in bytes)
Number of received unicast packets
Number of received broadcast packets
Number of received and discarded packets
Number of received errors
Number of transmitted octets (in bytes)
Number of transmitted unicast packets
Number of transmitted broadcast packets
Number of transmitted and discarded
packets
Number of transmitted errors
file:///P|/T_WRITER/Documentation/Released/900...ide/9003%20(Guiness)%20prac%20template/wui.htm (51 of 55) [11/6/2002 8:53:38 AM]
U.S. Robotics SureConnect ADSL Ethernet/USB Router User Guide
TCP-IP
The TCP-IP screen displays IP, UDP, TCP and ICMP statistics.
DHCP Lease
The DHCP-Lease displays names of devices on the network. These devices received an IP
address from the router’s DHCP server address pools. The screen also displays how long
you can use this IP.
file:///P|/T_WRITER/Documentation/Released/900...ide/9003%20(Guiness)%20prac%20template/wui.htm (52 of 55) [11/6/2002 8:53:38 AM]
U.S. Robotics SureConnect ADSL Ethernet/USB Router User Guide
ATM Statistics
The ATM Statistics Screen displays traffic statistics for Adaptation Layer 5 of the ATM
protocol and encapsulation.
AAL5 Statistics
The AAL5 Screen totals transmitted and received cells. The screen also reports total CRC
(Cyclical Redundancy Check) errors.
Subnetwork Dependent Convergence Protocol (SNDCP)
file:///P|/T_WRITER/Documentation/Released/900...ide/9003%20(Guiness)%20prac%20template/wui.htm (53 of 55) [11/6/2002 8:53:38 AM]
U.S. Robotics SureConnect ADSL Ethernet/USB Router User Guide
For the permanent virtual circuit (PVC), the SNDCP Screen organizes packet information by
Encapsulation Method.
Firewall Statistics
The Firewall Statistics Screen maintains flow-based statistics for incoming, outgoing and
dropped packets. Flow statistics describe the source address, source port, destination
address, destination port and protocol.
Traffic Statistics
The Traffic Statistics Screen displays data about inbound, outbound and dropped packets.
file:///P|/T_WRITER/Documentation/Released/900...ide/9003%20(Guiness)%20prac%20template/wui.htm (54 of 55) [11/6/2002 8:53:38 AM]
U.S. Robotics SureConnect ADSL Ethernet/USB Router User Guide
HTTP Proxy Statistics
The HTTP Proxy Statistics screen maintains data on the user. Software collects statistics
for incoming packets, outgoing packets, incoming bytes and outgoing bytes. If you disable
authentication, this screen displays statistics on the general user.
file:///P|/T_WRITER/Documentation/Released/900...ide/9003%20(Guiness)%20prac%20template/wui.htm (55 of 55) [11/6/2002 8:53:38 AM]
U.S. Robotics SureConnect ADSL Ethernet/USB Router User Guide
Contents:
US Robotics
SureConnect ADSL
Ethernet/USB Router
Configuration Utility
U.S. Robotics SureConnect™ ADSL Ethernet/USB
Router User Guide
Windows 95, 98, NT 4.0, Me, 2000, XP or later, Mac and Linux
Installing the Router
Summary
For current product support and contact information, go to the following Web site:
http://www.usr.com/broadbandsupport
Web User Interface
Terminal User Interface
Command Line
Interface
Configuration Examples
Installation
Uninstallation
Troubleshooting
Glossary
Thanks for purchasing the U.S. Robotics SureConnect™ ADSL Ethernet/USB Router, Model
9003. The following instructions walk you through installation of the router and the U.S.
Robotics SureConnect ADSL Ethernet/USB Router.
Please write down your serial number for future reference. If you need to call our Technical
Support department, you must have this number to receive assistance. You'll find your serial
number on a bar code sticker on the bottom of the router and also on the box. This number
has 12 characters. You will also need your model number, which is USR9003.
Installation Overview & System Requirements
What You Need Before You Begin
Regulatory Information
●
●
Active ADSL and Internet service from your local telephone company or Internet Service
Provider (ISP).
A microfilter may be required for each telephone device (telephones, answering
file:///P|/T_WRITER/Documentation/Released/9003%20(Guinness)/User%20Guide/9003%20(Guiness)%20prac%20template/installa.htm (1 of 25) [11/6/2002 8:55:05 AM]
U.S. Robotics SureConnect ADSL Ethernet/USB Router User Guide
machines, and fax machines) that shares the same phone line as the ADSL signal.
Make sure that no filter connects between the ADSL router and telephone wall jack.
(Some installations require a special type splitter between the router and wall jack. In
these installations, the splitter must include both telephone and router jacks. If the
splitter doesn't, don't install it between the phone jack and router.)
Your ISP should be able to provide the following:
●
●
●
●
Your user name and password if they were assigned.
ADSL Standard (Modulation)
❍ G.dmt
❍ G.lite
❍ Multi-Mode
❍ T1.413, Issue 2
VPI/VCI Settings
Encapsulation Mode
❍ RFC1483 Bridged
❍ RFC1483 Routed
❍ PPPoE
❍ PPPoA
❍ MER
Computer Requirements
Minimum System Requirements – Ethernet Port
●
●
●
●
●
●
Any computer with an Ethernet 10/100 Ethernet adapter (NIC)
32 MB RAM
10 MB hard disk space
Any operating system that supports an Ethernet connection with an IP stack
Internet Explorer or Netscape Navigator 4.0 or later Web browser
SureConnect Installation CD-ROM requires Windows 95, Windows 98, Windows Me,
Windows NT4.0, Windows 2000, or Windows XP
file:///P|/T_WRITER/Documentation/Released/9003%20(Guinness)/User%20Guide/9003%20(Guiness)%20prac%20template/installa.htm (2 of 25) [11/6/2002 8:55:05 AM]
U.S. Robotics SureConnect ADSL Ethernet/USB Router User Guide
Minimum System Requirements –USB Port
●
●
●
●
●
Pentium 200 MHz or faster compatible CPU
Host PC with Universal Serial Bus (USB)support
32 MB RAM
10 MB hard disk space
Internet Explorer or Netscape Navigator 4.0 or later Web browser
NOTICE
Make sure that your computer is on. You should have your operating system CD-ROM
readily available. The installation program requires use of the Windows Setup CD.
●
SureConnect Installation CD-ROM requires Windows 98, Windows Me, Windows 2000
or Windows XP
ADSL Network Requirements
ADSL and Internet service from your local telephone company or Internet Service Provider
(ISP).
Power Requirements
The U.S. Robotics SureConnect ADSL Ethernet/USB Router obtains power from the included
power supply. Be sure to only use the included power supply when operating this device.
This U.S. Robotics SureConnect ADSL Ethernet/USB Router package includes the following
items:
U.S. Robotics SureConnect ADSL
Ethernet/USB Router
Model 9003
Standard 7 ft RJ-11 telephone cable
(4 wire)
file:///P|/T_WRITER/Documentation/Released/9003%20(Guinness)/User%20Guide/9003%20(Guiness)%20prac%20template/installa.htm (3 of 25) [11/6/2002 8:55:05 AM]
U.S. Robotics SureConnect ADSL Ethernet/USB Router User Guide
Power Adapter
USB Cable
(3 ft/1 m)
Ethernet Straight Through Cable
(6 ft/1.8 m)
Quick Installation Guide
U.S. Robotics SureConnect Installation CD-ROM
with User Guide
Optional Components
Some models may include a microfilter in the box, or your ISP
may supply a microfilter. Check with your ISP to see if you
need a microfilter. The next section discusses microfilter
installation.
If you discover incorrect, missing, or damaged parts, inform your dealer.
Should You Connect via Ethernet or USB?
The U.S. Robotics ADSL Ethernet/USB Router gives you the option to connect through a
USB or an Ethernet port. Selecting how to connect your router is a matter of preference.
Connection also depends on your available computer ports and the operating system that you
use. For example, you must use an Ethernet connection with these operating systems:
Windows 95, Windows NT 4.0, Macintosh and Linux.
file:///P|/T_WRITER/Documentation/Released/9003%20(Guinness)/User%20Guide/9003%20(Guiness)%20prac%20template/installa.htm (4 of 25) [11/6/2002 8:55:05 AM]
U.S. Robotics SureConnect ADSL Ethernet/USB Router User Guide
Step 1. Connect Microfilters (If Necessary)
●
●
If your package didn't include microfilters, and your ISP didn't provide any: Skip to Step
2 of these instructions.
If your installation requires microfilters: Install one on each telephone device that shares
the same phone line as the ADSL signal. (Telephone devices include telephones,
answering machines, and fax machines.)
A microfilter is a small device that reduces interference between ADSL signals and telephone
signals. You only need a microfilter if the ADSL router and a telephone device share the
same phone line. If you don't use a microfilter, you may experience background noise on your
telephone during data transmission. Also, telephone calls may interrupt data transmissions.
Connect Microfilters to Telephone Devices
To install the microfilter, plug the phone into the microfilter, and then plug the microfilter into
the telephone wall jack. Do not install a microfilter on the cable that connects your router to
the telephone jack unless your microfilter has a connection for both the telephone and the
DSL device.
file:///P|/T_WRITER/Documentation/Released/9003%20(Guinness)/User%20Guide/9003%20(Guiness)%20prac%20template/installa.htm (5 of 25) [11/6/2002 8:55:05 AM]
U.S. Robotics SureConnect ADSL Ethernet/USB Router User Guide
Step 2. Install the ADSL Ethernet/USB Router
Windows 95 & NT 4.0, Macintosh and Linux Users
If you’re installing the U.S. Robotics SureConnect ADSL Ethernet/USB Router on a
system running Windows 95, NT 4.0, Macintosh or Linux, you must install the router
using the Ethernet option.
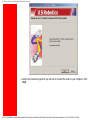
To install the U.S. Robotics SureConnect ADSL Ethernet/USB Router, insert the Installation
CD-ROM into the CD-ROM drive of your computer. If the installation does not start
automatically, go to your desktop and double-click My Computer, double-click the drive letter
associated with your CD-ROM drive, and then double-click Setup.
The U.S. Robotics SureConnect ADSL Ethernet/USB Router Installer Welcome window will
display. Click Next to continue installing the U.S. Robotics SureConnect ADSL Ethernet/USB
Router.
file:///P|/T_WRITER/Documentation/Released/9003%20(Guinness)/User%20Guide/9003%20(Guiness)%20prac%20template/installa.htm (6 of 25) [11/6/2002 8:55:05 AM]
U.S. Robotics SureConnect ADSL Ethernet/USB Router User Guide
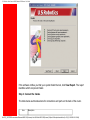
●
Select the connection type that you will use to connect the router to your computer. Click
Next.
file:///P|/T_WRITER/Documentation/Released/9003%20(Guinness)/User%20Guide/9003%20(Guiness)%20prac%20template/installa.htm (7 of 25) [11/6/2002 8:55:05 AM]
U.S. Robotics SureConnect ADSL Ethernet/USB Router User Guide
●
A qualification test will run to verify that your system meets the minimum installation
requirements. The Results screen will display those items in your configuration that
passed with a green flag and the ones that failed with a red flag. If your system passed
the qualification, click Next.
file:///P|/T_WRITER/Documentation/Released/9003%20(Guinness)/User%20Guide/9003%20(Guiness)%20prac%20template/installa.htm (8 of 25) [11/6/2002 8:55:05 AM]
U.S. Robotics SureConnect ADSL Ethernet/USB Router User Guide
If the software notifies you that your system failed the test, click View Report. The report
identifies which component failed.
Step 3. Connect the Cables
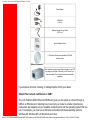
The table below summarizes data for connections and ports on the back of the router.
Item
Description
file:///P|/T_WRITER/Documentation/Released/9003%20(Guinness)/User%20Guide/9003%20(Guiness)%20prac%20template/installa.htm (9 of 25) [11/6/2002 8:55:05 AM]
U.S. Robotics SureConnect ADSL Ethernet/USB Router User Guide
O/I
Power
Console
USB
Pushbutton switch that turns the U.S. Robotics SureConnect ADSL
Ethernet/USB Router on and off.
Input jack that accepts cable from wall power supply.
Connects an RS-232 cable (not included) to the router. You can use the cable
to communicate to the router through the Terminal User Interface. The Terminal
User Interface (TUI) is another way to configure the router or get diagnostic
information. The TUI substitutes for the Web User Interface.
Universal serial bus port on the back of the router.
ENET1
Ethernet Port 1 on the back of the router.
ENET2
Ethernet Port 2 on the back of the router.
ADSL
Digital subscriber line RJ-11 service jack on the back of the router.
Connect the Power Adapter
Be sure to only use the included power supply. Connect the power adapter cord to the
“Power” jack at the rear of the router. Connect the power adapter to a standard wall outlet.
Turn on the router by pressing the power button labeled “O / I.” The “PWR” LED on the front
panel of the U.S. Robotics ADSL Ethernet/USB Router will be illuminated if power is being
supplied to the router. The router will initialize after the power is plugged in. This process
takes about a minute. Click Next to initialize the router.
file:///P|/T_WRITER/Documentation/Released/9003%20(Guinness)/User%20Guide/9003%20(Guiness)%20prac%20template/installa.htm (10 of 25) [11/6/2002 8:55:05 AM]
U.S. Robotics SureConnect ADSL Ethernet/USB Router User Guide
Connect the Telephone Cable
Connect one end of the included telephone cable to the “ADSL”telephone port on the back of
your router. Connect the other end of the cable into the telephone wall jack. Click Next.
file:///P|/T_WRITER/Documentation/Released/9003%20(Guinness)/User%20Guide/9003%20(Guiness)%20prac%20template/installa.htm (11 of 25) [11/6/2002 8:55:05 AM]
U.S. Robotics SureConnect ADSL Ethernet/USB Router User Guide
Connect the Ethernet or USB Cable
Ethernet
If you are connecting up to two devices, you can plug them directly into the back of the router.
Doing so eliminates the need for a separate hub. Insert one end of the Ethernet cable into
either the “ENET1” or “ENET2” port on the back of the U.S. Robotics SureConnect ADSL
Ethernet/USB Router. Connect the other end of the Ethernet cable to the Ethernet port on
your computer’s 10/100 Network Interface Card (NIC).
●
Click Finish.
file:///P|/T_WRITER/Documentation/Released/9003%20(Guinness)/User%20Guide/9003%20(Guiness)%20prac%20template/installa.htm (12 of 25) [11/6/2002 8:55:05 AM]
U.S. Robotics SureConnect ADSL Ethernet/USB Router User Guide
USB
●
●
●
If you have chosen to connect via the USB port, insert the rectangular end of the
included USB cable into the USB port of the computer. Insert the square end of the
cable into the port labeled “USB” on the U.S. Robotics SureConnect ADSL
Ethernet/USB Router.
After you plug in the USB cable, the router detects your PC. Then the router
automatically installs its software on your PC. (Your system may require a system
reboot.)
The Found New Hardware Wizard notifies you that the PC detects the router. Click
Finish.
file:///P|/T_WRITER/Documentation/Released/9003%20(Guinness)/User%20Guide/9003%20(Guiness)%20prac%20template/installa.htm (13 of 25) [11/6/2002 8:55:05 AM]
U.S. Robotics SureConnect ADSL Ethernet/USB Router User Guide
Congratulations! Installation Complete!
You've completed installation of the U.S. Robotics SureConnect ADSL Ethernet/USB Router.
Click Finish. The installer will automatically launch the Internet browser. The Internet browser
will point to IP address 192.168.1.1.
At this point, the software prompts you for a username and password. The default username
is "root." The default password is "12345." Enter these values (without periods or quotation
marks).
If your browser doesn't auto-launch...
Begin the Quick Setup by launching your Internet browser and entering http://192.168.1.1.
file:///P|/T_WRITER/Documentation/Released/9003%20(Guinness)/User%20Guide/9003%20(Guiness)%20prac%20template/installa.htm (14 of 25) [11/6/2002 8:55:05 AM]
U.S. Robotics SureConnect ADSL Ethernet/USB Router User Guide
The SureConnect ADSL Utility Quick Setup screen will display.
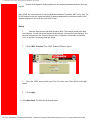
Step 4. Using the Quick Setup Menu
The U.S. Robotics SureConnect ADSL Ethernet/USB Router comes equipped with the
SureConnect ADSL Web Utility. This utility helps you to get the router set up in three easy
steps.
1. Select ADSL Standard.
2. Configure service provider settings.
file:///P|/T_WRITER/Documentation/Released/9003%20(Guinness)/User%20Guide/9003%20(Guiness)%20prac%20template/installa.htm (15 of 25) [11/6/2002 8:55:05 AM]
U.S. Robotics SureConnect ADSL Ethernet/USB Router User Guide
3. Save and restart.
CAUTION!
Do not turn the power off or disturb the router before the save operation completes.
Interrupting this process will cause the router to lose setup data.
Select ADSL Standard
1. Click ADSL Standard. The ADSL Standard window opens. This window helps you to
select the ADSL standard that you'll use.
file:///P|/T_WRITER/Documentation/Released/9003%20(Guinness)/User%20Guide/9003%20(Guiness)%20prac%20template/installa.htm (16 of 25) [11/6/2002 8:55:05 AM]
U.S. Robotics SureConnect ADSL Ethernet/USB Router User Guide
2. From the ADSL Standard drop-down list, select G.dmt, G.lite, T1.413, or Multi-Mode. In
most cases, the default setting of Multi-Mode is sufficient. Check with your ISP to
confirm the correct settings. Once you have made your selection, click Apply.
3. Click Next in the lower right corner of the screen to continue to the WAN Setup page.
file:///P|/T_WRITER/Documentation/Released/9003%20(Guinness)/User%20Guide/9003%20(Guiness)%20prac%20template/installa.htm (17 of 25) [11/6/2002 8:55:05 AM]
U.S. Robotics SureConnect ADSL Ethernet/USB Router User Guide
Configure Service Provider Settings
In the Service Provider Settings/WAN Setup screen, enter in the values obtained from your
ISP. See the ISP Settings Table at the end of this Web page for popular ISP settings.
(Settings may vary from the table listing. Check with your ISP.) If you don't find your ISP on
the table, call your ISP to obtain the correct settings.
1. See the Current ATM PVC List at the bottom of the screen. On this list, delete any
connection type that you don't need.
2. Select the connection type recommended by your ISP. Choose either RFC1483 bridged
mode, RFC 1483 routed mode, PPPoE mode, PPPoA mode, or MER mode. Some
connection types may require additional information, such as IP address or username
and password.
3. At the top of the WAN Screen, fill in the VPI and VCI values.
4. Select Encapsulation. Click either LLC/SNAP or VC Multiplexing.
5. If appropriate, select Enable NAPT.
6. If appropriate, select Enable DHCP.
7. Click Add.
8. To continue, click Next in the lower right corner of the screen.
file:///P|/T_WRITER/Documentation/Released/9003%20(Guinness)/User%20Guide/9003%20(Guiness)%20prac%20template/installa.htm (18 of 25) [11/6/2002 8:55:05 AM]
U.S. Robotics SureConnect ADSL Ethernet/USB Router User Guide
Save and Restart
Once you've selected the ADSL Standard and WAN Setup screens, save your settings and
restart your router.
1. On the Save & Restart screen, click Save.
2. Once the save is complete, click Restart.
file:///P|/T_WRITER/Documentation/Released/9003%20(Guinness)/User%20Guide/9003%20(Guiness)%20prac%20template/installa.htm (19 of 25) [11/6/2002 8:55:05 AM]
U.S. Robotics SureConnect ADSL Ethernet/USB Router User Guide
NOTICE
If your ISP gave you software to install, install the software now. Be sure to read and
follow the installation instructions.
3. You can test your connection by registering your router at...
http://www.usr.com/productreg
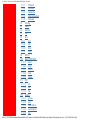
Service Provider Settings
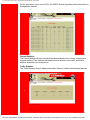
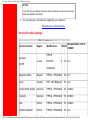
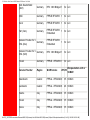
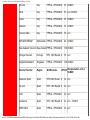
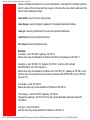
!++++++++++++++++++++Start of header row+++++++++++++++++>
Encapsulation -LLC or
Service Provider
Region
WAN Service
VPI VCI
VCMUX
PPPoE
Australia
Australia
RfC2516
8
35 LLC
All ISP
Embedded
Belgacom ADSL
Belgium
PPPoA - RFC2364 8
35 LLC
Telus
Canada
RFC 1483 Bridged 0
35 LLC
Tiscali (World Online)
Denmark
PPPoA - RFC2364 0
35 VCMUX
Cybercity
Denmark
PPPoA - RFC2364 0
35 VCMUX
AOL
France
PPPoA - RFC2364 8
35 VCMUX
Generic Netissimo
France
PPPoA - RFC2364 8
35 LLC
file:///P|/T_WRITER/Documentation/Released/9003%20(Guinness)/User%20Guide/9003%20(Guiness)%20prac%20template/installa.htm (20 of 25) [11/6/2002 8:55:05 AM]
U.S. Robotics SureConnect ADSL Ethernet/USB Router User Guide
9Online
France
PPPoA - RFC2364 8
35 VCMUX
Claranet
France
PPPoA - RFC2364 8
35 VCMUX
Club-Internet
France
PPPoA - RFC2364 8
35 VCMUX
EasyConnect
France
PPPoA - RFC2364 8
35 LLC
Freesurf
France
PPPoA - RFC2364 8
35 VCMUX
HRNet
France
PPPoA - RFC2364 8
35 VCMUX
Nerim
France
PPPoA - RFC2364 8
35 VCMUX
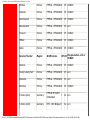
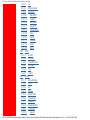
Service Provider
Region
WAN Service
Nordnet
France
PPPoA - RFC2364 8
35 VCMUX
Tiscaly Liberty Surf
France
PPPoA - RFC2364 8
35 LLC
Wanadoo
France
PPPoA - RFC2364 8
35 LLC
Worldnet
France
PPPoA - RFC2364 8
35 VCMUX
T-Online (Dun)
Germany
PPPoE RFC2516
1
Embedded
32 LLC
T-Online (Soft)
Germany
RFC 1483 Bridged 1
32 LLC
VPI VCI
Encapsulation -LLC or
VCMUX
file:///P|/T_WRITER/Documentation/Released/9003%20(Guinness)/User%20Guide/9003%20(Guiness)%20prac%20template/installa.htm (21 of 25) [11/6/2002 8:55:05 AM]
U.S. Robotics SureConnect ADSL Ethernet/USB Router User Guide
AOL Deutschland
(Soft)
Germany
RFC 1483 Bridged 1
32 LLC
QSC
Germany
PPPoE RFC2516 1
32 LLC
Arcor
Germany
PPPoE RFC2516 1
32 LLC
1&1 (Dun)
Germany
PPPoE RFC2516
1
Embedded
32 LLC
Anderer Provider für TGermany
DSL (Dun)
PPPoE RFC2516
1
Embedded
32 LLC
Anderer Provider für TGermany
DSL (Soft)
RFC 1483 Bridged 1
32 LLC
Tiscali
Germany
PPPoE - RFC2516 1
32 LLC
Service Provider
Region
WAN Service
Islandssimi
Iceland
PPPoA - RFC2364 0
35 VCMUX
Landssimi
Iceland
PPPoA - RFC2364 8
48 VCMUX
Nextra
Italy
PPPoA - RFC2364 8
35 VCMUX
Tiscali
Italy
PPPoA - RFC2364 8
35 VCMUX
Aruba
Italy
PPPoA - RFC2364 8
35 VCMUX
VPI VCI
Encapsulation -LLC or
VCMUX
file:///P|/T_WRITER/Documentation/Released/9003%20(Guinness)/User%20Guide/9003%20(Guiness)%20prac%20template/installa.htm (22 of 25) [11/6/2002 8:55:05 AM]
U.S. Robotics SureConnect ADSL Ethernet/USB Router User Guide
MC-link
Italy
PPPoA - RFC2364 8
35 VCMUX
Wind
Italy
PPPoA - RFC2364 8
35 LLC-VCMUX
Telvia
Italy
PPPoA - RFC2364 8
35 VCMUX
Albacom
Italy
PPPoA - RFC2364 8
35 VCMUX
Telecom Italia
Italy
PPPoA - RFC2364 8
35 LLC
KPN MXSTREAM
Netherlands PPPoA - RFC2364 8
48 VCMUX
New Zealand Telecom New Zealand PPPoA - RFC2364 0
100 VCMUX
Portugal Telecom
Portugal
RFC 1483 Routed 8
35 LLC
SingNet Broadband
Singapore
PPPoA - RFC2364 0
100 VCMUX
Service Provider
Region
WAN Service
Wanadoo Spain
Spain
RFC1483 Routed 8
32 LLC
Ya.com
Spain
RFC 1483 Routed 8
32 LLC
Uni2
Spain
PPPoA - RFC2364 1
33 LLC
Telefonica
Spain
RFC 1483 Routed 8
32 LLC - VCMUX
ERES MAS
Spain
PPPoA - RFC2364 8
35 LLC
VPI VCI
Encapsulation -LLC or
VCMUX
file:///P|/T_WRITER/Documentation/Released/9003%20(Guinness)/User%20Guide/9003%20(Guiness)%20prac%20template/installa.htm (23 of 25) [11/6/2002 8:55:05 AM]
U.S. Robotics SureConnect ADSL Ethernet/USB Router User Guide
Jazztel
Spain
PPPoA - RFC2364 8
35 LLC
Terra
Spain
RFC 1483 Routed 8
32 LLC
Retevision
Spain
PPPoA - RFC2364 8
35 VCMUX
Tiscali
Spain
PPPoA - RFC2364 1
32 VCMUX
Telepac
Spain
PPPoE RFC2516
0
Embedded
35 LLC
Skanova
Sweden
RFC 1483 Bridged 8
35 LLC
Etisalat Classical IP
Single User
UAE
RFC 1577 (1483)
0
Routed
100 LLC
Etisalat Classical IP for
UAE
Business
PPPoA - RFC2364 0
50 VcMux
UAE-Other
UAE
PPPoE RFC2516
0
Embedded
50 LLC
UAE-Other
UAE
RFC1483 Routed 0
100 LLC
Service Provider
Region
WAN Service
UK All ISP
UK
PPPoA - RFC2364 0
38 VCMUX
AOL
US
RFC 1483 Bridged 0
35 LLC
VPI VCI
Encapsulation -LLC or
VCMUX
file:///P|/T_WRITER/Documentation/Released/9003%20(Guinness)/User%20Guide/9003%20(Guiness)%20prac%20template/installa.htm (24 of 25) [11/6/2002 8:55:05 AM]
U.S. Robotics SureConnect ADSL Ethernet/USB Router User Guide
SBC
US
RFC 1483 Bridged 0
35 LLC
Sprint
US
RFC 1483 Bridged 0
35 LLC
BellSouth
US
RFC 1483 Bridged 8
35 LLC
Qwest
US
RFC 1483 Bridged 0
32 LLC
Verizon
US
RFC 1483 Bridged 0
35 LLC
Covad
US
RFC 1483 Bridged 0
35 LLC
EarthLink
US
RFC 1483 Bridged 0
35 LLC
file:///P|/T_WRITER/Documentation/Released/9003%20(Guinness)/User%20Guide/9003%20(Guiness)%20prac%20template/installa.htm (25 of 25) [11/6/2002 8:55:05 AM]
U.S. Robotics SureConnect ADSL Ethernet/USB Router User Guide
Contents:
US Robotics
SureConnect ADSL
Ethernet/USB Router
U.S. Robotics SureConnect ADSL
Ethernet/USB Router User Guide
Configuration Utility
Windows 95, 98, NT 4.0, Me, 2000, XP or later,
Mac and Linux
Summary
Terminal User Interface
Web User Interface
Overview
Terminal User Interface
Command Line
Interface
Configuration Examples
The Terminal User Interface (TUI) is one of three router user interfaces. The other interfaces are
the Web User Interface (WUI) and Command Line Interface (CLI). Each interface allows you to
set up, modify, and view router configuration variables and operational data.
The Terminal User Interface is a system of hierarchical, character-based menus. See the
nearby overview for a graphic map of the interface.
Installation
Uninstallation
Troubleshooting
Each menu presents options and prompts you for a response. Options occupy most of a menu
screen. The bottom of the screen provides information about expected responses…
●
●
Glossary
●
●
Regulatory Information
●
Mandatory vs. optional
Allowable formats
Operation success or failure
Error messages
Directions on what to do next
This document often refers to menu screens with path notation. For example, consider the
example in the following table…
The Desired Action
The Process
The Path Notation
Access PPPoA configuration Choose 2 for ‘ADVANCED’, 7 Main Menu=>Advanced=>
menu from Main Menu
for ‘SNDCP’, 3 for ‘PPPoA’,
screen.
and 2 for ‘CONFIGURE
SNDCP=>PPPoA=>
PPPoA’.
Configure PPPoA
Screen shots best describe some menu options. In this manual, a description precedes each
screen shot. Afterward, the manual provides definitions of screen variables. Pages without
screen shots include a menu path, followed by a description and necessary definitions.
file:///P|/T_WRITER/Documentation/Released/9003.../9003%20(Guiness)%20prac%20template/tquicks.htm (1 of 42) [11/6/2002 8:58:14 AM]
U.S. Robotics SureConnect ADSL Ethernet/USB Router User Guide
Accessing the Terminal User Interface
To access the Terminal User Interface, follow these steps…
1.
Connect a console cable between a computer and the router.
2.
Launch a terminal emulation program.
3.
Configure the terminal emulation program as follows…
• Terminal Type: VT-100
• Parity: None
• Bits Per Second: 9600
• Stop Bits: 1
• Data Bits: 8
• Flow Control: None
4.
Turn on the router. Configuration messages appear as the router boots up.
5.
Allow the default configuration to load.
6. When prompted, type in the User Name and Password. The default user name is Root. The
default password is 12345.
Terminal User Interface Map
Click for PDF
file:///P|/T_WRITER/Documentation/Released/9003.../9003%20(Guiness)%20prac%20template/tquicks.htm (2 of 42) [11/6/2002 8:58:14 AM]
U.S. Robotics SureConnect ADSL Ethernet/USB Router User Guide
version of TUI map:
TUI Map
Main Menu
The Main Menu is the first or top-level menu in the Terminal User Interface. The Main Menu
presents you with three options…
●
●
●
Enter 1 to open the to the Basic Menu.
Enter 2 to open the Advanced Menu.
Enter 0 to exit the Terminal User Interface.
Main Menu=>
Basic
Enter 1 at the Main Menu. The Basic Menu appears. This menu includes the following options…
file:///P|/T_WRITER/Documentation/Released/9003.../9003%20(Guiness)%20prac%20template/tquicks.htm (3 of 42) [11/6/2002 8:58:14 AM]
U.S. Robotics SureConnect ADSL Ethernet/USB Router User Guide
Main Menu=>Basic=>
Access Control
Enter 1 at the Basic Menu. The Access Control Menu appears. This menu provides the following
options…
•
List Users. Lists currently defined users by type, and provides associated services. The
user “root” is the default administrative login for the router.
•
Configure User. Opens the Configure User Menu, which allows you to add or delete users.
Add users to enforce ACL (Access Control List) and proxy services. Options include…
§ User Name
§ Password
§ Permissions (admin /
ordinary)
•
Delete User. Allows you to delete users by user name.
•
Change Password. Allows you to change a user’s password. Options include…
§ User Name
§ Old Password
§ New Password
§ Confirm Password
file:///P|/T_WRITER/Documentation/Released/9003.../9003%20(Guiness)%20prac%20template/tquicks.htm (4 of 42) [11/6/2002 8:58:14 AM]
U.S. Robotics SureConnect ADSL Ethernet/USB Router User Guide
Main Menu=>Basic=>
Link Status
Enter 2 at the Basic Menu. The Link Status Menu appears. This menu displays current link
status. Link status parameters include…
Link Status Parameters
Status Term
Meaning
ADSL Line Status
Displays the current ADSL line status
ADSL Standard
Displays the ADSL standard within the
current configuration. The standards are:
MULTI, T1.413, G.dmt, and G.Lite.
UpStream
Displays the upstream data rate, as
negotiated by DSL link (KB/s)
DownStream
Displays the downstream data rate, as
negotiated by DSL link (KB/s)
Attenuation
Displays the current attenuation in decibels
SNR Margin
Displays the current SNR margin in decibels
HEC Count
Displays the number of ATM cells received
with errors since start of link.
Firmware
Displays the version number of the firmware
15 min ES Counter
Displays the number of errors per second
for the current 15-minute period
CRC Errors
Displays the number of cyclical redundancy
check errors per second since training
1 day ES Counter
Displays the number of errors per second
for the current day
Main Menu=>Basic=>
WAN Setup
Enter 3 at the Basic Menu. The WAN Setup Menu appears. This menu allows you list, configure,
or delete ATM PVCs. Each option takes you to another screen.
file:///P|/T_WRITER/Documentation/Released/9003.../9003%20(Guiness)%20prac%20template/tquicks.htm (5 of 42) [11/6/2002 8:58:14 AM]
U.S. Robotics SureConnect ADSL Ethernet/USB Router User Guide
•
ATM PVC List. Enter 1 at the WAN Setup Menu. The ATM PVC List Menu appears. This
menu displays a list of currently defined PVCs.
•
ATM PVC Configuration. Enter 2 at the WAN Setup Menu. The ATM PVC Configuration
Menu appears. To configure an ATM PVC…
1. Enter a 2 on the WAN Setup Menu. The ATM PVC Configuration Menu appears.
2. Enter VPI and VCI data…
§ VPI [0-255]
§ Subnet Mask ( )
§ VCI [0-65,535]
§ User Name
§ SNDCP Component ( )
§ Password
§ [Bridge / Routed / PPPoE / § Mode [Auto / Direct]
PPPoA / MER]
§ Idle Timeout [min]
§ Encap [vc / 11c]
§ Authentication ( )
§ Nat [Enable / Disable]
§ [pap / chap / mschapv1 /
§ WAN IP Address ( )
mschapv2]
§ DHCP Server ( )
3. Five Subnetwork Dependent Convergence Protocol (SNDCP) options appear. (Bridge /
Routed / PPPoE / PPPoA / MER)
4. Choose the SNDCP option provided by your DSL service provider. Next, SNDCP
options for the SNDCP that you selected appear. Subsequent screens present several
options for each SNDCP.
file:///P|/T_WRITER/Documentation/Released/9003.../9003%20(Guiness)%20prac%20template/tquicks.htm (6 of 42) [11/6/2002 8:58:14 AM]
U.S. Robotics SureConnect ADSL Ethernet/USB Router User Guide
5. Enter the required information…
Main Menu=>Basic=>
WAN Setup (continued)
§
Bridge
A.
For a bridge PVC, enter a 1 at SNDCP Component.
B.
Enter the encapsulation type (vc or 11c).
§
Routed
A.
Enter SNDCP option 2 for routed.
B.
Choose the encapsulation method.
C.
Choose to enable or disable the NAT.
D.
Configure the WAN IP Address.
E.
Configure the subnet mask.
§
PPPoE
A.
Enter SNDCP option 3 for PPPoE.
B.
Enter remaining information as provided by your DSL service provider.
file:///P|/T_WRITER/Documentation/Released/9003.../9003%20(Guiness)%20prac%20template/tquicks.htm (7 of 42) [11/6/2002 8:58:14 AM]
U.S. Robotics SureConnect ADSL Ethernet/USB Router User Guide
§
PPPoA
A.
Enter SNDCP option 4 for PPPoA.
B.
Enter remaining information as provided by your DSL service provider.
§
MER
A.
Enter SNDCP option 5 for MER.
B.
Enter remaining information as provided by your DSL service provider.
6. After you complete your configuration, proceed to the Basic Menu and enter 8. The Save
& Reboot Menu appears. From this menu, save your changes and reboot the router.
Main Menu=>Basic=>
WAN Setup (continued)
•
ATM PVC Deletion. Enter 3 at the WAN Setup Menu. The ATM PVC Deletion Menu
appears. To delete an ATM PVC…
1. Enter valid VPI and VCI values.
2. After you complete your configuration, proceed to the Basic Menu and enter 8. The Save
& Reboot Menu appears. From this menu, save your changes and reboot the router.
Main Menu=>Basic=>
LAN Setup
Enter 4 at the Basic Menu. The IP LAN Menu appears. To configure a LAN IP address…
1.
2.
3.
4.
Accept default values or enter new IP address and subnet mask values.
Use LAN Setup to set the router’s IP Address and Subnet Mask.
Setup the LAN IP address to connect the router to.
Manage the router from your Local Area Network (LAN). A LAN connects computers in
the same building or area.
5. After you complete your configuration, proceed to the Basic Menu and enter 8. The Save
& Reboot Menu appears. From this menu, save your changes and reboot the router.
file:///P|/T_WRITER/Documentation/Released/9003.../9003%20(Guiness)%20prac%20template/tquicks.htm (8 of 42) [11/6/2002 8:58:14 AM]
U.S. Robotics SureConnect ADSL Ethernet/USB Router User Guide
IP addresses deliver packets of data across a network. These addresses differentiate the
source and destination IP address and keep them constant. When a router port detects a
packet, the router checks the routing table. The port attempts to match the network number of
the destination IP address with its routing table entry. If the port finds a match, it forwards the
packet to the destination network. With no match, the port forwards the packet to a router
defined as the default gateway.
Subnet masks split one network into a set of mini networks or subnets. Subnetting helps to
reduce traffic on each subnet. Subnetting also makes the network more manageable. Each
subnet functions as if it were an independent network.
Main Menu=>Basic=>
USB Configuration
Enter 5 at the Basic Menu. The Configure USB Interface Menu appears. To configure the USB
interface…
1. Enter a valid IP Address.
2. Enter a valid subnet mask.
3. After you complete your configuration, proceed to the Basic Menu and enter 8. The Save
& Reboot Menu appears. From this menu, save your changes and reboot the router.
file:///P|/T_WRITER/Documentation/Released/9003.../9003%20(Guiness)%20prac%20template/tquicks.htm (9 of 42) [11/6/2002 8:58:14 AM]
U.S. Robotics SureConnect ADSL Ethernet/USB Router User Guide
Main Menu=>Basic=>
MER Configuration
Enter 6 at the Basic Menu. The Configure MER Menu appears. To configure the MER
interface…
1. Enter a valid subnet mask.
2. After you complete your configuration, proceed to the Basic Menu and enter 8. The Save
& Reboot Menu appears. From this menu, save your changes and reboot the router.
file:///P|/T_WRITER/Documentation/Released/900...9003%20(Guiness)%20prac%20template/tquicks.htm (10 of 42) [11/6/2002 8:58:14 AM]
U.S. Robotics SureConnect ADSL Ethernet/USB Router User Guide
Main Menu=>Basic=>
Routing Setup
Enter 7 at the Basic Menu. The Routing Setup Menu appears. The Routing Setup menu
provides seven menu options. These options allow you to configure a route.
●
List Of Static Routes. Enter 1 at the Routing Setup Menu. The List of Static Routes
Menu appears. This menu lists defined static routes by Network ID address, subnet mask,
and next hop address.
file:///P|/T_WRITER/Documentation/Released/900...9003%20(Guiness)%20prac%20template/tquicks.htm (11 of 42) [11/6/2002 8:58:14 AM]
U.S. Robotics SureConnect ADSL Ethernet/USB Router User Guide
●
Configure Route. Enter 2 at the Routing Setup Menu. The Configure Route Menu
appears. From this menu, you can add new static routes. A router forwards data packets
between local area networks (LANs) or wide area networks (WANs). Based on routing
tables and routing protocols, routers read the network address in each transmitted frame.
Routers then decide how to send the frame. A router bases this decision on the best
route. The Configure Route Menu allows you to adjust how the router forwards received
IP packets.
To configure a route…
1. Enter a valid destination network ID. This is the network IP designation of the network
defined in the table.
2. Enter a valid destination subnet mask. This is the network subnet mask of the entry
defined in the table.
3. Enter a valid next hop ID. This is the IP address or gateway that the router uses to arrive
at the destination address.
4. After you complete your configuration, proceed to the Basic Menu and enter 8. The Save
& Reboot Menu appears. From this menu, save your changes and reboot the router.
Main Menu=>Basic=>
Routing Setup (continued)
•
Delete Route. Enter 3 at the Routing Setup Menu. The Delete Route Menu appears. From
this menu, you can delete a route. To delete a route…
1.
Enter the appropriate network ID.
2.
Enter subnet mask data.
3.
After you complete your configuration, proceed to the Basic Menu and enter 8. The Save
& Reboot Menu appears. From this menu, save your changes and reboot the router.
•
Flush Routing Table. Enter 4 at the Routing Setup Menu. The Flush Routing Table Menu
appears. To flush a routing table…
1.
Type Y.
2. After you complete your configuration, proceed to the Basic Menu and enter 8. The Save &
Reboot Menu appears. From this menu, save your changes and reboot the router.
•
RIP Information. Enter 5 at the Routing Setup Menu. The RIP Information Menu appears.
This menu lists currently configured RIP information.
•
Configure RIP. Enter 6 at the Routing Setup Menu. The Configure RIP Menu appears. Use
this menu to turn RIP on or off. Also use the menu to define which RIP version to use. Routing
Information Protocol (RIP) is a routing protocol and is part of the TCP/IP suite. RIP plots a route
based on the smallest hop count between source and destination. RIP determines the smallest
hop count by communicating with other routers in the network. Only use RIP if the target router
also utilizes RIP.
file:///P|/T_WRITER/Documentation/Released/900...9003%20(Guiness)%20prac%20template/tquicks.htm (12 of 42) [11/6/2002 8:58:14 AM]
U.S. Robotics SureConnect ADSL Ethernet/USB Router User Guide
To set up a route…
1.
Enter the RIP status. Set RIP Status to either “on” or “off.”
2.
Enter a number for the version. Either set RIP Version to 1 (for RIP1) or 2 (for RIP2). The
version number must match the RIP version that other routers in the network use.
3.
After you complete your configuration, proceed to the Basic Menu and enter 8. The Save
& Reboot Menu appears. From this menu, save your changes and reboot the router.
•
RIP List. Enter 7 at the Routing Setup Menu. The RIP List Menu appears. This menu
displays routes that the RIP has learned. You’ll see an empty list if RIP is off or if the router
hasn’t learned any routes.
Main Menu=>Basic=>
Save & Reboot
Enter 8 at the Basic Menu. The Save & Reboot Menu appears. This menu allows you to save
the current configuration and reboot the router.
Main Menu=>Basic=>
Erase & Reboot
Enter 9 at the Basic Menu. The Erase & Reboot Menu appears. This menu allows you to erase
the saved configuration and reboot the router.
Main Menu=>
Advanced
Enter 2 at the Main Menu. The Advanced Menu appears. This menu provides the following
options…
file:///P|/T_WRITER/Documentation/Released/900...9003%20(Guiness)%20prac%20template/tquicks.htm (13 of 42) [11/6/2002 8:58:14 AM]
U.S. Robotics SureConnect ADSL Ethernet/USB Router User Guide
Main Menu=>Advanced=>
ADSL Mode
Enter 1 at the Advanced Menu. The ADSL Mode Menu appears. This menu allows you to read
or write configuration and management variables, or configure the ADSL mode. The router uses
configuration and management variables (CMV) to tweak performance and provide
management functions. Router firmware defines these values.
!
CAUTION
Don’t write configuration and management variables unless you
receive explicit instructions to do so. Alteration of CMV values can
adversely affect router performance.
•
Configure ADSL Mode. Enter 3 at the ADSL Mode Menu. The Configure ADSL Mode
Menu appears. This menu allows you to switch the ADSL mode to ANSI (T1.413), G.dmt, G.lite
or Multimode. Your ADSL service provider determines these values.
!
CAUTION
Leave ADSL mode values alone unless you receive specific
instructions on what to do. Alteration of the ADSL mode can
adversely affect router performance.
Main Menu=>Advanced=>
file:///P|/T_WRITER/Documentation/Released/900...9003%20(Guiness)%20prac%20template/tquicks.htm (14 of 42) [11/6/2002 8:58:14 AM]
U.S. Robotics SureConnect ADSL Ethernet/USB Router User Guide
DHCP Server
Enter 2 at the Advanced Menu. The DHCP Server Menu appears. DHCP stands for Dynamic
Host Configuration Protocol. This protocol dynamically assigns IP addresses and related
information to Local Area Network (LAN) nodes. For temporarily connected network users,
DHCP provides safe, reliable, and simple TCP/IP network configuration. DHCP confers these
benefits by preventing address conflicts and conserving IP address use. To conserve address
use, DHCP centralizes address allocation.
The DHCP Server menu provides the following options…
●
●
List DHCP Server. Enter 1 at the DHCP Server Menu. The List DHCP Server Menu
appears. This menu provides a list of currently configured DHCP servers and associated
variables.
Configure DHCP Server. Enter 2 at the DHCP Server Menu. The Configure DHCP
Server Menu appears. To configure a DHCP server…
1. Choose an Ethernet interface. The remaining DHCP options appear on the screen.
2. Create a new DHCP server for the selected interface by entering legal values for each
variable. See DHCP variables below.
3. Set the following parameters…
DHCP Parameters
DHCP Term
Interface
Definition
LAN port that the DHCP server will support.
file:///P|/T_WRITER/Documentation/Released/900...9003%20(Guiness)%20prac%20template/tquicks.htm (15 of 42) [11/6/2002 8:58:14 AM]
U.S. Robotics SureConnect ADSL Ethernet/USB Router User Guide
Starting IP Address
First IP address provided on a LAN port node’s DHCP
request.
End IP Address
Last IP address in the pool provided on a LAN port
node’s DHCP request.
Gateway
IP address of the Default Gateway or Router that the
node will use.
Netmask
Subnet Mask for the LAN that the node will be on.
DNS
Domain Name Server. Actually, here we aren’t referring
to the DNS itself. Instead, we refer to the IP address of
the DNS that the node will use. DNS is a server with a
database. The database translates a domain name into a
corresponding IP address. For example, “USR.com”
resolves into IP address 231.222.320.04. Use this
address to communicate over the LAN between the node
and USR.com web site.
Lease Time
Number of days that the node can use a DHCP lease.
Subsequently, you must renew the lease with the DHCP
server.
4. After you complete your configuration, proceed to the Basic Menu and enter 8. The Save
& Reboot Menu appears. From this menu, save your changes and reboot the router.
Main Menu=>Advanced=>
DHCP Server (continued)
●
●
●
DHCP Server Status. Enter 3 at the DHCP Server Menu. The DHCP Server Status Menu
appears. This menu displays current DHCP server status. The menu also allows you to
enable, disable, or delete DHCP servers.
List DHCP Relay. Enter 4 at the DHCP Server Menu. The List DHCP Relay Menu
appears. This menu displays DHCP Relay information.
Configure DHCP Relay. Enter 5 at the DHCP Server Menu. The DHCP Server Status
Menu appears. This menu allows you to configure DHCP relay functions. Suppose that a
Dynamic Host Configuration Protocol (DHCP) server resides on a different LAN than the
node broadcasting for DHCP service. Then the DHCP broadcast request must be
forwarded across the router/WAN to a subnet where a DHCP server resides. To assure
receipt of an IP address that corresponds to this subnet, the router relays DHCP. The
router must have a record of the DHCP server’s IP address. With this address, the router
can direct the request to the DHCP server’s appropriate input IP address.
To configure a DHCP relay, follow these steps…
file:///P|/T_WRITER/Documentation/Released/900...9003%20(Guiness)%20prac%20template/tquicks.htm (16 of 42) [11/6/2002 8:58:14 AM]
U.S. Robotics SureConnect ADSL Ethernet/USB Router User Guide
1.
On the Configure DHCP Relay Menu, input the IP address of DHCP server.
2.
Enable the relay agent.
3. After you complete your configuration, proceed to the Basic Menu and enter 8. The Save &
Reboot Menu appears. From this menu, save your changes and reboot the router.
Main Menu=>Advanced=>
SNMP
Enter 3 at the Advanced Menu. The SNMP Menu appears. This menu provides the following
options…
file:///P|/T_WRITER/Documentation/Released/900...9003%20(Guiness)%20prac%20template/tquicks.htm (17 of 42) [11/6/2002 8:58:14 AM]
U.S. Robotics SureConnect ADSL Ethernet/USB Router User Guide
●
●
List of SNMP Entries. Enter 1 at the SNMP Menu. The SNMP Entries Menu appears.
This menu lists your SNMP variable settings.
Configure SNMP. Enter 2 at the SNMP Menu. The Configure SNMP Menu appears. This
menu allows you to configure SNMP variables.
1. Enter VPI and VCI data…
§ System Version description ( ) § System Location ( )
§ System Contact ( )
2. After you complete your configuration, proceed to the Basic Menu and enter 8. The
Save & Reboot Menu appears. From this menu, save your changes and reboot the
router.
●
Shutdown SNMP Agent. Enter 3 at the SNMP Menu. The Shutdown SNMP Agent Menu
appears. This menu allows you to shut down the SNMP agent.
Main Menu=>Advanced=>
Firewall
Enter 4 at the Advanced Menu. The Firewall Menu appears. This menu provides the following
options…
file:///P|/T_WRITER/Documentation/Released/900...9003%20(Guiness)%20prac%20template/tquicks.htm (18 of 42) [11/6/2002 8:58:14 AM]
U.S. Robotics SureConnect ADSL Ethernet/USB Router User Guide
●
Firewall Policies. Enter 1 at the Firewall Menu. The Firewall Policies Menu appears.
Select Policies or Action, or press <ESC> to exit to the previous menu.
Main Menu=>Advanced=>Firewall=>Firewall Policies=>
Policies
Enter 1 at the Firewall Policies Menu. The Policies Menu appears. This menu allows you to add,
list, or delete port firewall policies.
●
Add Firewall Policy. Enter 1 at the Policies Menu. The Firewall Add Policies Menu
appears. To add a firewall policy, set the following parameters…
Firewall Policy Parameters
Policy Term
Definition
Precedence
Priority of the policy that you’re creating. Options range from 0 to
65,535.
Src IP
Address
Data source. Either an IP address or network.
Src Net Mask Subnet Mask for the data’s network source. Options range from
/12 (255.240.0.0) to /32 (255.255.255.255).
Dest IP
Address
Data destination. Either an IP address or network.
file:///P|/T_WRITER/Documentation/Released/900...9003%20(Guiness)%20prac%20template/tquicks.htm (19 of 42) [11/6/2002 8:58:14 AM]
U.S. Robotics SureConnect ADSL Ethernet/USB Router User Guide
Dest Net
Mask
Subnet Mask for the data’s network destination. Options range
from /12 (255.240.0.0) to /32 (255.255.255.255).
Source Port
Transport layer source port. Options range from 0 to 65,535.
Protocol
IP protocols to be filtered. Options are: Any (all), TCP, UDP,
ICMP, AH, ESP.
TCP Flags
Filtering of the TCP Flags that control session setup and
termination. Options are: None, urg (Urgent), ack
(acknowledgment), psh (push), rst (reset), syn (synchronize), fin
(finished).
After you complete your configuration, proceed to the Basic Menu and enter 8. The Save &
Reboot Menu appears. From this menu, save your changes and reboot the router.
●
●
List Firewall Policies. Enter 2 at the Policies Menu. The List Firewall Policies Menu
appears. This menu displays implemented firewall policies. Press <ENTER> to see the
next page in the list.
Delete Firewall Policies. Enter 3 at the Policies Menu. The Delete Firewall Policies Menu
appears. This menu allows you to delete Firewall policies.
Main Menu=>Advanced=>Firewall=>Firewall Policies=>
Action
Enter 2 at the Firewall Policies Menu. The Action Menu appears. This menu allows you to add,
list, or delete firewall actions.
●
Add Firewall Action. Enter 1 at the Action Menu. The Firewall Action Add Menu appears.
To add a firewall action, set the following parameters…
Firewall Action Parameters
Policy Term
Definition
Interface Name
Name of the Interface to apply the parameter to.
Direction
Specifies whether the action applies to incoming, outgoing, or
both incoming and outgoing traffic. Options are Any, In, and
Out.
FW Action
How the system handles packets. Your sub-options include…
Allow
Permits packets to enter or leave the system.
Reset
Forces the TCP connection to reset
file:///P|/T_WRITER/Documentation/Released/900...9003%20(Guiness)%20prac%20template/tquicks.htm (20 of 42) [11/6/2002 8:58:14 AM]
U.S. Robotics SureConnect ADSL Ethernet/USB Router User Guide
Time
Reject
Drops the packet and issues an “unreach host”
ICMP error.
Deny
Drops the packet.
The parameter applies during the time period that you
specify. Select the start (From) day, time and stop (To) day
and time.
After you complete your configuration, proceed to the Basic Menu and enter 8. The Save &
Reboot Menu appears. From this menu, save your changes and reboot the router.
●
●
List Firewall Action. Enter 2 at the Action Menu. The Firewall Action List Menu appears.
This menu displays implemented firewall actions.
Delete Firewall Action. Enter 3 at the Action Menu. The Firewall Action Add Menu
appears. This menu allows you to delete Firewall actions.
Main Menu=>Advanced=>Firewall=>
Port Range Mapping
Enter 2 at the Firewall Menu. The Port Range Mapping Menu appears. This menu allows you to
add, list or delete port range mapping.
●
Add. Enter 1 at the Port Range Mapping Menu. The Add Menu appears. This menu
allows you to add port range mapping entries. NAT stands for Network Address
Translation. NAT enhances the power of Port Range Mapping. Together, they can map a
local IP address and port to a public IP address and port. To add a port range entry, enter
starting and ending addresses to map them to a single public address.
To add a port range entry, set the following parameters…
Port Range Mapping Parameters
Port Range
Term
Public Address
Definition
Set the public, destination IP address inside a packet header.
The router will map or redirect packets with the address that
you specify.
Public Port From Set the first (From) port of the public address that the router
maps or redirects. Options range from 1 to 65,535.
Public Port To
Set the last (To) port of the public address that the router
maps or redirects. Options range from 1 to 65,535.
file:///P|/T_WRITER/Documentation/Released/900...9003%20(Guiness)%20prac%20template/tquicks.htm (21 of 42) [11/6/2002 8:58:14 AM]
U.S. Robotics SureConnect ADSL Ethernet/USB Router User Guide
Local Address
Set the IP address of a machine on the local LAN. The router
directs packets to this address.
Local Port From Set the first (From) port of the local address that the router
uses. Options range from 1 to 65,535.
Local Port To
Set the last (To) port of the local address that the router
uses. Options range from 1 to 65,535.
Protocol
Set protocol. Your protocol setting applies to the other
parameters on this page. Your options are TCP or UDP port
numbers.
After you complete your configuration, proceed to the Basic Menu and enter 8. The Save &
Reboot Menu appears. From this menu, save your changes and reboot the router.
●
●
List. Enter 2 at the Port Range Mapping Menu. The List Menu appears. This menu
displays configured port mapping entries. If you find an empty list, then you haven’t
defined any entries.
Delete. Enter 3 at the Port Range Mapping Menu. The Delete Menu appears. This menu
allows you to delete port range mapping entries.
Main Menu=>Advanced=>Firewall=>
Static NAT
Enter 1 at the Firewall Menu. The Static NAT Menu appears. This menu allows you to add, list,
or delete Static NAT entries. Static NAT stands for Static Network Address Translation. Static
NAT maps local IP addresses to a public IP address.
●
Add. Enter 1 at the Static NAT Menu. The Add Menu appears. This menu allows you to
add Static NAT entries. To add a Static NAT entry, set the following parameters…
Static NAT Parameters
Static NAT Term
Definition
Local Address From First address in a range of local IP addresses. The router
maps these addresses to the public IP address.
Local Address To
Last address in a range of local IP addresses. The router
maps these addresses to the public IP address.
NAT Public Address Public address. The router maps local addresses to this
public address.
After you complete your configuration, proceed to the Basic Menu and enter 8. The Save &
Reboot Menu appears. From this menu, save your changes and reboot the router.
file:///P|/T_WRITER/Documentation/Released/900...9003%20(Guiness)%20prac%20template/tquicks.htm (22 of 42) [11/6/2002 8:58:14 AM]
U.S. Robotics SureConnect ADSL Ethernet/USB Router User Guide
●
●
List. Enter 2 at the Static NAT Menu. The List Menu appears. This menu displays
implemented static NAT entries. If you find an empty list, then you haven’t defined any
entries.
Delete. Enter 3 at the Static NAT Menu. The Delete Menu appears. To delete a Static
NAT entry, enter the starting local address.
Main Menu=>Advanced=>Firewall=>
ACL
Enter 4 at the Firewall Menu. The ACL Menu appears. This menu allows you to add, list, or
delete ACL entries. ACL provides setup for Proxy services. From the Proxy Configuration Menu,
you can enable or disable proxy services.
Proxy Services are specialized application programs. These programs accept users’ requests
from LAN clients for Internet services like FTP and HTTP. On behalf of LAN clients, the
programs then set up connections to servers on the WAN. A proxy server authenticates against
the user database. This server filters the request against the Access Control List. The server
forwards requests to actual services. Proxy Servers are application specific. Each application
needs its own proxy server.
●
Add ACL/FTP. Enter 1 at the ACL Menu. The ACL Configuration Menu appears. This
menu allows you to set FTP ACL variables. Options after “User Name” depend on
whether you enter “FTP” or “HTTP.” See ACL variables after the http example.
ACL Parameters
Static NAT Term
Definition
Application (Port)
Proxy port to configure. Options are FTP or HTTP.
Priority
Priority of the policy you’re creating. Options range from 0
to 65,535.
User Name
A configured user in the router’s internal database. You
must configure users through the Telnet CLI with the
“adduser” command.
MIME Type
HTTP application file type (MIME) to filter or proxy.
Options are… •application (all), •image (all), •video (all),
•audio (all), •application/octet-stream, •audio/x-wav,
•audio/x-mpeg, •image/jpeg, •video/mpeg.
Method
FTP command to filter or proxy. Options are Get and Put.
Domain Name
Address of an Internet site to filter.
Destination Address Destination IP address of the FTP or HTTP server on the
WAN.
file:///P|/T_WRITER/Documentation/Released/900...9003%20(Guiness)%20prac%20template/tquicks.htm (23 of 42) [11/6/2002 8:58:14 AM]
U.S. Robotics SureConnect ADSL Ethernet/USB Router User Guide
URL (Uniform
Resource Locator)
Addresses that define the route to a file on the Web or
Internet facility. Enter the URL to filter.
Source Range
Local IP address range that the rule applies to. “From” is
the first IP address in the range. “To” is the last IP
address in the range.
Day From/To
Set the effective start (From) day and time for the policy.
Set the effective stop (To) day and time for the policy.
Action
Specifies how the ACL deals with requests to the policy.
Options are Allow or Deny.
After you complete your configuration, proceed to the Basic Menu and enter 8. The Save &
Reboot Menu appears. From this menu, save your changes and reboot the router.
●
●
List ACL. Enter 2 at the ACL Menu. The ACL List Menu appears. This menu displays
variables associated with currently defined ACLs.
Delete ACL. Enter 3 at the ACL Menu. The ACL Delete Menu appears. To delete an ACL
entry, enter the application type and rule ID.
Main Menu=>Advanced=>Firewall=>
Proxies
Enter 5 at the Firewall Menu. The Proxies Menu appears. This menu allows you to configure a
proxy.
file:///P|/T_WRITER/Documentation/Released/900...9003%20(Guiness)%20prac%20template/tquicks.htm (24 of 42) [11/6/2002 8:58:14 AM]
U.S. Robotics SureConnect ADSL Ethernet/USB Router User Guide
●
Configure Proxy. Enter 1 at the Proxy Menu. The Proxy Configuration Menu appears.
This menu allows you to enable or disable ftp or http proxies. See the ACL menu for more
information on Proxy setup.
Main Menu=>Advanced=>Firewall=>
Static WAN Address
Enter 6 at the Firewall Menu. The Static WAN Address Menu appears. This menu allows you to
add, list or delete static WAN addresses.
●
●
●
Add. Enter 1 at the Static WAN Address Menu. The Add Static WAN Address Menu
appears. This menu allows you to use a static WAN IP address. Enter the IP address of
the WAN.
List. Enter 2 at the Static WAN Address Menu. The List Static WAN Address Menu
appears. This menu displays applied static WAN IP address.
Delete. Enter 3 at the Static WAN Address Menu. The Delete Static WAN Address Menu
appears. This menu allows you to delete static WAN IP addresses.
Main Menu=>Advanced=>
Interfaces
Enter 5 at the Advanced Menu. The Interfaces Menu appears. This menu provides the following
options…
file:///P|/T_WRITER/Documentation/Released/900...9003%20(Guiness)%20prac%20template/tquicks.htm (25 of 42) [11/6/2002 8:58:14 AM]
U.S. Robotics SureConnect ADSL Ethernet/USB Router User Guide
●
●
List Interfaces. Enter 1 at the Interfaces Menu. The List Interfaces Menu appears. This
menu displays defined interfaces. Press <ENTER> to view the next page of the list.
Configure Ethernet Interface. Enter 2 at the Interfaces Menu. The Configure Ethernet
Interface Menu appears. This menu provides the following options…
•
Configure IP Address. Enter 1 at the Configure Ethernet Interface Menu. The Configure IP
Address Menu appears. This menu allows you to assign IP data and interface status to either
Ethernet interface. Options include…
§ Interface Name [eth0 / eth1] § IP Address Type [static / dynamic]
§ IP Address
§ Subnet Mask
§ Broadcast
§ MTU
§ Status [up / down]
•
Configure MAC, Speed & Type. Enter 2 at the Configure Ethernet Interface Menu. The
Configure Mac Speed & Type Menu appears. This menu allows you to assign MAC address
variables to either Ethernet interface.
§ Interface Name [eth0 / eth1] § Speed [10 / 100 / auto]
§ MAC Address
§ Type [full / half / auto ]
Main Menu=>Advanced=>
file:///P|/T_WRITER/Documentation/Released/900...9003%20(Guiness)%20prac%20template/tquicks.htm (26 of 42) [11/6/2002 8:58:14 AM]
U.S. Robotics SureConnect ADSL Ethernet/USB Router User Guide
Interfaces (continued)
•
Configure ATM Interface. Enter 3 at the Interfaces Menu. The Configure ATM Interface
Menu appears. This menu allows you to configure an ATM interface. Enter the desired ATM
interface name. A menu presents additional variables…
§ Interface Name [ atm[0-7] ]
§ Broadcast
§ IP Address Type [static /
dynamic]
§ Alias Address
§ IP Address
§ MTU
§ Subnet Mask
§ Status [up / down]
•
List DNS & Default Gateway. Enter 4 at the Interfaces Menu. The List DNS & Default
Gateway Menu appears. This menu displays currently configured DNS and default gateway
server information.
•
Configure DNS & Default Gateway. Enter 5 at the Interfaces Menu. The Configure DNA &
Default Gateway Menu appears. This menu allows you to set DNS and default gateway
variables. When the router functions as a Network Address Port Translation (NAPT) device, the
router uses DNS relay settings. With these settings, the router forwards DNS requests from a
LAN node to a known DNS server. Normally, the requests arrive at a DNS server over the WAN
link. See DNS variables below.
To configure a DNS and default gateway, set the following parameters…
DNS & Default Gateway Parameters
DNS Term
Definition
Domain Name Internet site address that the router is a group of (i.e. usr.com).
IP address of the Primary DNS that the router will use. Domain
Name Server (DNS) is a server with a database. This server
translates a domain name into the corresponding IP address.
For example, USR.com resolves into IP address
231.222.320.04. Use this address to communicate over the
LAN between the node and web site USR.com.
Secondary DNS IP address of the Secondary DNS that the router will use.
Server
Gateway
IP address of the Default Gateway the Router is to use.
DNS Relay
Enabling or Disabling router ability to convey a DNS request
from a LAN node. In this case, the node is on a DNS server at
the WAN link.
After you complete your configuration, proceed to the Basic Menu and enter 8. The Save &
file:///P|/T_WRITER/Documentation/Released/900...9003%20(Guiness)%20prac%20template/tquicks.htm (27 of 42) [11/6/2002 8:58:14 AM]
U.S. Robotics SureConnect ADSL Ethernet/USB Router User Guide
Reboot Menu appears. From this menu, save your changes and reboot the router.
●
●
●
List ARP Table. Enter 6 at the Interfaces Menu. The List ARP Table Menu appears. This
menu displays ARP table values.
Delete ARP Entry. Enter 7 at the Interfaces Menu. The Delete ARP Entry Menu appears.
This menu allows you to delete ARP table values. Enter the IP address of the ARP table
value that you desire to delete.
Flush ARP Table. Enter 8 at the Interfaces Menu. The Configure DNA & Default Gateway
Menu appears. This menu allows you to flush ARP table values.
Main Menu=>Advanced=>
Interfaces (continued)
●
List Nat Information. Enter 9 at the Interfaces Menu. The List NAT Information Menu
appears. This menu displays currently configured NAT variables. If you see a ‘NAT Not
Configured’ message, it means that you haven’t defined any variables.
●
Configure Nat. Enter 10 at the Interfaces Menu. The Configure DNA & Default Gateway
Menu appears. This menu allows you to enable Nat on specific interfaces. Set “Enable
Nat” to yes or no. If you set it to yes, then select one of these interface options…
§ eth1
§ ppp [0-7]
§ atm
§ mer0
Main Menu=>Advanced=>
VCC
Enter 6 at the Advanced Menu. The VCC Menu appears. This menu allows you to list, add, list,
or delete VCC.
file:///P|/T_WRITER/Documentation/Released/900...9003%20(Guiness)%20prac%20template/tquicks.htm (28 of 42) [11/6/2002 8:58:14 AM]
U.S. Robotics SureConnect ADSL Ethernet/USB Router User Guide
●
●
List VCC. Enter 1 at the VCC Menu. The List VCC Menu appears. This menu displays
defined VCC variables.
Add VCC. Enter 2 at the VCC Menu. The Add VCC Menu appears. This menu allows you
to add VCC variables. Enter VPI, VCI, encapsulation, and service. Afterward, the system
presents additional options. Here is an example of settings for a UBR. Other service
options present similar variables. To add VCC variables, set these interface options...
§ Vpi [0-255]
§ Peak Cell Rate {cells/sec}
§ Vci [0-65,535]
§ Average Cell Rate {cells/sec}
§ Encapsulation Type [aa15]
§ Burst Size {in cells}
§ Service [cbr/rtvbr/nrtvbr/ubr]
§ CDVT {in micro sec}
After you complete your configuration, proceed to the Basic Menu and enter 8. The Save &
Reboot Menu appears. From this menu, save your changes and reboot the router.
•
Delete VCC. Enter 3 at the VCC Menu. The Delete VCC Menu appears. This menu Allows
you to delete VCC variables.
Main Menu=>Advanced=>
SNDCP
Enter 7 at the Advanced Menu. The SNDCAP Menu appears. This menu provides the following
options...
file:///P|/T_WRITER/Documentation/Released/900...9003%20(Guiness)%20prac%20template/tquicks.htm (29 of 42) [11/6/2002 8:58:14 AM]
U.S. Robotics SureConnect ADSL Ethernet/USB Router User Guide
●
IPoA. Enter 1 at the SNDCP Menu. The IPoA Menu appears. This menu allows you to list
IPoA variables. You can also configure IPoA variables by VCC and interface. To add IPoA
variables, set these options...
§ Vpi [0-255]
§ Default PVC [Y/N]
§ Vci [0-65,535]
§ Next Hop IP Address
§ Interface Name [ atm [0-7] ]
§ Status [enable/disable]
§ Encapsulation Type [aa15]
After you complete your configuration, proceed to the Basic Menu and enter 8. The Save &
Reboot Menu appears. From this menu, save your changes and reboot the router.
●
Routed. Enter 2 at the SNDCP Menu. The Routed Menu appears. This menu allows you
to list routed variables. You can also configure routed variables by setting these options...
§ Vpi [0-255]
§ Encapsulation Type [11c/vc]
§ Vci [0-65,535]
§ Status [enable/disable]
§ Interface Name [ ATM [0-7] ]
After you complete your configuration, proceed to the Basic Menu and enter 8. The Save &
Reboot Menu appears. From this menu, save your changes and reboot the router.
Main Menu=>Advanced=>SNDCP=>
file:///P|/T_WRITER/Documentation/Released/900...9003%20(Guiness)%20prac%20template/tquicks.htm (30 of 42) [11/6/2002 8:58:14 AM]
U.S. Robotics SureConnect ADSL Ethernet/USB Router User Guide
PPPoA
Enter 3 at the SNDCP Menu. The PPPoA Menu appears. This menu provides the following
options…
●
●
List PPPoA. Enter 1 at the PPPoA Menu. The List PPPoA Menu appears. This menu
displays configured PPPoA variables.
Configure PPPoA. Enter 2 at the PPPoA Menu. The PPPoA Menu appears. This is a twoscreen menu. Set these PPPoA variables...
Configure PPPoA, Screen 1
Configure PPPoA, Screen 2
§ Profile ID [0-7]
§ MTU [0-1,500]
§ Interface Name [ ppp [0-7] ]
§ Encapsulation Type [11c/vc]
§ Vpi [0-255]
§ Restart Time
§ Vci [0-65,535]
§ My IP Address
§ User Name
§ Peer IP Address
§ Password
§ Enable Nat [Y/N]
§ Authentication Protocol
[pap/chap]
§ NetMask
§ MRU [0-1,500]
After you complete your configuration, proceed to the Basic Menu and enter 8. The Save &
Reboot Menu appears. From this menu, save your changes and reboot the router.
•
Start PPPoA. Enter 3 at the PPPoA Menu. The Start PPPoA Menu appears. This menu
allows you to start a PPPoA session by entering the session’s profile ID.
•
Stop PPPoA. Enter 4 at the PPPoA Menu. The Stop PPPoA Menu appears. This menu
allows you to stop a PPPoA session by providing the session’s profile ID.
•
Delete PPPoA. Enter 5 at the PPPoA Menu. The Delete PPPoA Menu appears. This menu
allows you to delete a PPPoA session by entering the session’s profile ID.
•
Default PPPoA. Enter 6 at the PPPoA Menu. The Default PPPoA Menu appears. This
menu allows you to make a PPPoA session the default session by providing the session’s
profile ID.
Main Menu=>Advanced=>SNDCP=>
PPPoE
file:///P|/T_WRITER/Documentation/Released/900...9003%20(Guiness)%20prac%20template/tquicks.htm (31 of 42) [11/6/2002 8:58:14 AM]
U.S. Robotics SureConnect ADSL Ethernet/USB Router User Guide
Enter 4 at the SNDCP Menu. The PPPoE Menu appears. This menu provides the following
options…
●
●
List PPPoE. Enter 1 at the PPPoE Menu. The List PPPoE Menu appears. This menu
displays configured PPPoE variables.
Configure PPPoE. Enter 2 at the PPPoE Menu. The Configure PPPoE Menu appears.
This is a two-screen menu. Set these PPPoE variables...
Configure PPPoE, Screen 1
Configure PPPoE, Screen 2
§ Profile ID [0-7]
§ Restart Time
§ Interface Name [ ppp [0-7] ]
§ Mode [Auto/Direct]
§ Vpi [0-255]
§ Idle Timeout
§ Vci [0-65,535]
§ My IP Address
§ Encapsulation Type [11c/vc]
§ Peer IP Address
§ User Name
§ Service Name
§ Password
§ AC Name
§ Authentication Protocol
[pap/chap/mschapv1/mschapv2]
§ Host Unique Tag [Y/N]
§ MRU [0-1,492]
§ Ether Address
§ MTU [0-1,492]
§ Enable Nat [Y/N]
§
§ SubnetMask
After you complete your configuration, proceed to the Basic Menu and enter 8. The Save &
Reboot Menu appears. From this menu, save your changes and reboot the router.
•
Start PPPoE. Enter 3 at the PPPoE Menu. The Start PPPoE Menu appears. This menu
allows you to start a PPPoE session by entering the session’s profile ID.
•
Stop PPPoE. Enter 4 at the PPPoE Menu. The Stop PPPoE Menu appears. This menu
allows you to stop a PPPoE session by providing the session’s profile ID.
•
Delete PPPoE. Enter 5 at the PPPoE Menu. The Delete PPPoE Menu appears. This menu
allows you to delete a PPPoE session by entering the session’s profile ID.
•
Default PPPoE. Enter 6 at the PPPoE Menu. The Default PPPoE Menu appears. This
menu allows you to make a PPPoE session the default session by providing the session’s
profile ID.
file:///P|/T_WRITER/Documentation/Released/900...9003%20(Guiness)%20prac%20template/tquicks.htm (32 of 42) [11/6/2002 8:58:14 AM]
U.S. Robotics SureConnect ADSL Ethernet/USB Router User Guide
Main Menu=>Advanced=>SNDCP=>
MER
Enter 5 at the SNDCP Menu. The PPPoE Menu appears. This menu provides the following
options…
●
●
List MER. Enter 1 at the MER Menu. The List MER Menu appears. This menu displays
configured MER variables.
Configure MER. Enter 2 at the MER Menu. The Configure MER Menu appears. This
menu allows you to set MER variables. To configure MER variables, set these options...
§ Interface Name [mer0]
§ Vci [0-65,535]
§ Vpi [0-255]
§ Encapsulation Type [11c/vc]
After you complete your configuration, proceed to the Basic Menu and enter 8. The Save &
Reboot Menu appears. From this menu, save your changes and reboot the router.
•
MER Status. Enter 3 at the MER Menu. The MER Status Menu appears. This menu allows
you to change between enabled, disabled, or deleted status.
Main Menu=>Advanced=>SNDCP=>
PPPoE Relay
Enter 6 at the SNDCAP Menu. The PPPoE Relay Menu appears. This menu allows you to list,
file:///P|/T_WRITER/Documentation/Released/900...9003%20(Guiness)%20prac%20template/tquicks.htm (33 of 42) [11/6/2002 8:58:14 AM]
U.S. Robotics SureConnect ADSL Ethernet/USB Router User Guide
configure, or delete PPPoE relays. From this menu, you can also check the status of a PPPoE
relay.
●
●
List PPPoE Relay. Enter 1 at the PPPoE Relay Menu. The List PPPoE Relay Menu
appears. This menu displays variables for configured PPPoE relays.
Configure PPPoE Relay. Enter 2 at the PPPoE Relay Menu. The Configure PPPoE
Relay Menu appears. This menu allows you to set PPPoE relay variables. To configure
PPPoE relay variables, set these options...
§ Client Interface
[eth0/eth1/ATM/usb0]
§ Vpi [0-255]
§ Server Interface
[eth0/eth1/ATM/usb0]
§ Vci [0-65,535]
After you complete your configuration, proceed to the Basic Menu and enter 8. The Save &
Reboot Menu appears. From this menu, save your changes and reboot the router.
•
Delete PPPoE Relay Interface. Enter 3 at the PPPoE Relay Menu. The Delete PPPoE
Relay Menu appears. This menu allows you to delete PPPoE Relay interfaces by providing an
interface name.
•
PPPoE Relay Status. Enter 4 at the PPPoE Relay Menu. The PPPoE Relay Status Menu
appears. This menu allows you to change PPPoE Relay Status between enabled and disabled.
Main Menu=>Advanced=>
IGMP Proxy
file:///P|/T_WRITER/Documentation/Released/900...9003%20(Guiness)%20prac%20template/tquicks.htm (34 of 42) [11/6/2002 8:58:14 AM]
U.S. Robotics SureConnect ADSL Ethernet/USB Router User Guide
Enter 8 at the Advanced Menu. The IGMP Proxy Menu appears. This menu allows you to list,
configure, or delete proxy interfaces.
●
●
List Proxy Interfaces. Enter 1 at the IGMP Proxy Menu. The List Proxy Interfaces Menu
appears. This menu displays configured proxy interface variables.
Configure Proxy Interfaces. Enter 2 at the IGMP Proxy Menu. The Configure Proxy
Interfaces Menu appears. This menu allows you to set proxy Interface variables. To
configure configure proxy interfaces, set these options...
§ Proxy Interface
eth [0-1] / ATM [0-7] / ppp [0-7]
§ Router Interface
eth [0-1] / ATM [0-7] / ppp [0-7]
After you complete your configuration, proceed to the Basic Menu and enter 8. The Save &
Reboot Menu appears. From this menu, save your changes and reboot the router.
●
Delete Proxy Interfaces. Enter 3 at the IGMP Proxy Menu. The Delete Proxy Interfaces
Menu appears. This menu allows you to delete proxy interfaces by providing a specific
interface name.
Main Menu=>Advanced=>
Bridging
Enter 9 at the Advanced Menu. The Bridging Menu appears. This menu provides the following
options…
file:///P|/T_WRITER/Documentation/Released/900...9003%20(Guiness)%20prac%20template/tquicks.htm (35 of 42) [11/6/2002 8:58:14 AM]
U.S. Robotics SureConnect ADSL Ethernet/USB Router User Guide
Main Menu=>Advanced=>Bridging=>
Bridge
Enter 1 at the Bridging Menu. The Bridge Menu appears. This menu provides the following
options…
●
Group Interfaces. Enter 1 at the Bridge Menu. The Group Interfaces Menu appears. This
file:///P|/T_WRITER/Documentation/Released/900...9003%20(Guiness)%20prac%20template/tquicks.htm (36 of 42) [11/6/2002 8:58:14 AM]
U.S. Robotics SureConnect ADSL Ethernet/USB Router User Guide
menu allows you to enter interface names to group interfaces. For each interface, select
an interface type. Each menu line item refers to another group interface. A line item looks
like this…
Interface Name1
●
●
●
●
[ [eth [0-1] / ATM [0-7] / usb [0] ]
Add PVC. Enter 2 at the Bridge Menu. The Add PVC Menu appears. This menu allows
you to add a PVC by entering interface name, VCC, and encapsulation type variables.
Bridge Status. Enter 3 at the Bridge Menu. The Bridge Status Menu appears. This menu
allows you to change bridge status between enabled, disabled, and deleted.
List Bridge Information. Enter 4 at the Bridge Menu. The List Bridge Information Menu
appears. This menu displays configured bridge information. Press <ENTER> to view the
next list page.
Set Cache Timer. Enter 5 at the Bridge Menu. The Set Cache Timer Menu appears. This
menu allows you to configure cache timer variables.
Main Menu=>Advanced=>Bridging=>
Spanning Tree
Spanning Tree. Enter 2 at the Bridging Menu. The Spanning Tree Menu appears. This menu
allows you to Provides the following options.
●
Configure Bridge Port. Enter 1 at the Spanning Tree Menu. The Set Cache Timer Menu
appears. This menu allows you to set these Spanning Tree Bridge Port variables…
• Interface Name [ eth[0-1]/ATM[0-7] ] • Link Cost
• Priority
After you complete your configuration, proceed to the Basic Menu and enter 8. The Save &
Reboot Menu appears. From this menu, save your changes and reboot the router.
Transparent bridges use the spanning tree algorithm to dynamically determine the best sourceto-destination path. This algorithm avoids bridge loops (multiple paths linking one segment to
another) within a network. The algorithm determines all redundant paths and makes only one of
them active. The spanning tree protocol (STP) is part of the IEEE 802.1 standard.
●
Configure Bridge Parms. Enter 2 at the Spanning Tree Menu. The Configure Bridge
Parms Menu appears. To configure a spanning tree bridge from this menu, set the
following parameters…
Bridge Parameters
Bridge Term
Interface Name
Definition
Router interface to be configured for spanning tree.
file:///P|/T_WRITER/Documentation/Released/900...9003%20(Guiness)%20prac%20template/tquicks.htm (37 of 42) [11/6/2002 8:58:14 AM]
U.S. Robotics SureConnect ADSL Ethernet/USB Router User Guide
Link Cost
Cost associated with that interface. Based on this cost, the
bridge decides which link to forward data over. The options
range from 0 to 65,535.
Port Priority
Determines which port becomes the root port. Options range
from 0 to 255.
Bridge Priority
Determines which bridge becomes the root bridge. Options
range from 0 to 65,000.
Max Age Time
All bridges in the bridged LAN use this timeout value. The
root sets Max Age value. Options range from 1 to 60
seconds.
Hello Time
Time interval between generations of configuration BPDUs.
The root generates configuration BPDUs. Options range from
1 to 10 seconds.
Forward Delay
Time
All bridges in the bridged LAN use this timeout value. The
root sets the forward delay value. Options range from 1 to
200 seconds.
After you complete your configuration, proceed to the Basic Menu and enter 8. The Save &
Reboot Menu appears. From this menu, save your changes and reboot the router.
●
●
Spanning Tree Status. Enter 3 at the Spanning Tree Menu. The Spanning Tree Status
Menu appears. This menu allows you to enable or disable Spanning Tree status.
List Spanning Tree Info. Enter 4 at the Spanning Tree Menu. The List Spanning Tree
Info Menu appears. This menu displays configured Spanning Tree variables.
Main Menu=>Advanced=>Bridging=>
Filter
Enter 3 at the Bridging Menu. The Filter Menu appears. This menu allows you to list, configure,
delete, or flush filters.
file:///P|/T_WRITER/Documentation/Released/900...9003%20(Guiness)%20prac%20template/tquicks.htm (38 of 42) [11/6/2002 8:58:14 AM]
U.S. Robotics SureConnect ADSL Ethernet/USB Router User Guide
●
●
List Filters. Enter 1 at the Filter Menu. The List Filters Menu appears. This menu displays
defined filter variables.
Configure Filter. Enter 2 at the Filter Menu. The Configure Filter Menu appears. This
menu allows you to set filter variables. The MAC address is a unique serial number
burned into Ethernet adapters. This address distinguishes this network card from others.
MAC Filters allow or reject WAN access for specific machines. To configure a filter from
this menu, set the following parameters…
MAC Parameters
MAC Term
Definition
MAC Address
Static MAC address to add to the table.
Filter Action
What the router should do with a data frame from this MAC
address. The options are Forward or Drop.
After you complete your configuration, proceed to the Basic Menu and enter 8. The Save &
Reboot Menu appears. From this menu, save your changes and reboot the router.
●
●
Delete Filter. Enter 3 at the Filter Menu. The Delete Filter Menu appears. This menu
allows you to delete filters by entering their MAC addresses.
Flush Filter. Enter 4 at the Filter Menu. The Flush Filter Menu appears. This menu allows
you to flush currently configured filters.
Main Menu=>Advanced=>
Statistics
file:///P|/T_WRITER/Documentation/Released/900...9003%20(Guiness)%20prac%20template/tquicks.htm (39 of 42) [11/6/2002 8:58:14 AM]
U.S. Robotics SureConnect ADSL Ethernet/USB Router User Guide
Enter 10 at the Advanced Menu. The Statistics Menu appears. This menu provides the following
options…
●
Interface. Enter 1 at the Statistics Menu. The Interface Menu appears. This menu
displays interface statistics. The table below defines interface parameters.
Interface Parameters
Interface Term
Meaning
Interface Name
Name of the interface
Admin Status
Indicates whether the interface is up or
down
Octets In
Number of received octets (in bytes)
Unicast PktsIn
Number of received unicast packets
Broadcast PktsIn
Number of received broadcast packets
Discards In
Number of received and discarded packets
Errors In
Number of received errors
Octets Out
Number of transmitted octets (in bytes)
Unicast PktsOut
Number of transmitted unicast packets
Broadcast PktsOut
Number of transmitted broadcast packets
Discards Out
Number of transmitted and discarded
packets
Errors Out
Number of transmitted errors
●
●
●
●
●
TCP-IP. Enter 2 at the Statistics Menu. The Interface Menu appears. This menu displays
TCP/IP statistics.
DHCP-Lease. Enter 3 at the Statistics Menu. The DHCP Lease Menu appears. This menu
displays DHCP statistics. With no active DHCP leases, the list is empty.
AAL5. Enter 4 at the Statistics Menu. The AAL5 Menu appears. This menu displays ATM
AAL5 statistics.
SNDCP. Enter 5 at the Statistics Menu. The SNDCP Menu appears. This menu displays
packet information for the permanent virtual circuit (PVC). The system organizes the list
by encapsulation method.
Bridge. Enter 6 at the Statistics Menu. The Bridge Menu appears. This menu displays
bridge statistics.
file:///P|/T_WRITER/Documentation/Released/900...9003%20(Guiness)%20prac%20template/tquicks.htm (40 of 42) [11/6/2002 8:58:14 AM]
U.S. Robotics SureConnect ADSL Ethernet/USB Router User Guide
●
●
●
●
Firewall Statistics. Enter 7 at the Statistics Menu. The Firewall Statistics Menu appears.
This menu provides the following options…
Flow Statistics. Enter 1 at the Statistics Menu. The Firewall Statistics Menu appears.
This menu displays firewall flow statistics.
FTP Statistics. Enter 2 at the Statistics Menu. The Firewall Statistics Menu appears.
This menu displays FTP Proxy statistics.
HTTP Statistics. Enter 3 at the Statistics Menu. The Firewall Statistics Menu appears.
This menu displays HTTP Proxy statistics.
Main Menu=>Advanced=>
Diagnostic
Enter 11 at the Advanced Menu. The Diagnostic Menu appears. To perform an OAM loopback
test on a VCC, enter 1. To perform a ping test, enter 2.
file:///P|/T_WRITER/Documentation/Released/900...9003%20(Guiness)%20prac%20template/tquicks.htm (41 of 42) [11/6/2002 8:58:14 AM]
U.S. Robotics SureConnect ADSL Ethernet/USB Router User Guide
Main Menu=>Advanced=>
Version
Enter 12 at the Advanced Menu. The Version Menu appears. This menu provides software
version information for your router.
file:///P|/T_WRITER/Documentation/Released/900...9003%20(Guiness)%20prac%20template/tquicks.htm (42 of 42) [11/6/2002 8:58:14 AM]
U.S. Robotics SureConnect ADSL Ethernet/USB Router User Guide
Contents:
US Robotics
SureConnect ADSL
Ethernet/USB Router
Configuration Utility
Summary
U.S. Robotics SureConnect™ ADSL Ethernet/USB
Router User Guide
Windows 95, 98, NT 4.0, Me, 2000, XP or later, Mac and Linux
Command Line Interface
Index
Web User Interface
Terminal User Interface
Command Line
Interface
Configuration Examples
Installation
Uninstallation
Troubleshooting
Glossary
Regulatory Information
1
CLI Reference
1.1
Control Commands
1.1.1
help
1.1.2
home
1.1.3
exit
1.1.4
ls
1.2
Administration
1.2.1
reboot
1.2.2
save
1.2.3
version
1.2.4
date
1.2.5
erase
1.2.6
bitmap
1.3
user
file:///P|/T_WRITER/Documentation/Released/9003%20(Guinness)/User%20Guide/9003%20(Guiness)%20prac%20template/cli.htm (1 of 71) [11/6/2002 8:58:45 AM]
U.S. Robotics SureConnect ADSL Ethernet/USB Router User Guide
1.3.1
adduser
1.3.2
remuser
1.3.3
setperms
1.3.4
changepasswd
1.3.5
listusers
1.4
ifconfig
1.5
route
1.6
statistic
1.7
list
1.8
dns
1.8.1
set
1.8.2
list
1.8.3
dnsr
1.8.4
help
1.9
DHCP
1.10 DHCPSERVER
1.10.1
start
1.10.2
stop
1.10.3
subnet
1.10.4
host
1.10.5
lease
1.11 RIP
1.11.1
rip
1.11.2
ver
1.11.3
list
1.12 Bridge
1.12.1
group
1.12.2
pvc
1.12.3
cachetimer
1.12.4
setmultiport
1.12.5
list
file:///P|/T_WRITER/Documentation/Released/9003%20(Guinness)/User%20Guide/9003%20(Guiness)%20prac%20template/cli.htm (2 of 71) [11/6/2002 8:58:45 AM]
U.S. Robotics SureConnect ADSL Ethernet/USB Router User Guide
1.12.6
stats
1.12.7
bridge
1.12.8
filter
1.12.9
filterlist
1.12.10
filterflush
1.12.11
stp
1.13 ethernet
1.13.1
elink
1.13.2
setemac
1.13.3
rmon
1.13.4
pread
1.13.5
pwrite
1.14 rarpd
1.14.1
add
1.14.2
delete
1.14.3
list
1.14.4
rarpd
1.15 logger
1.15.1
log
1.15.2
logSeverity
1.15.3
logFtpServer
1.16 auth
1.16.1
adduser
1.16.2
deluser
1.16.3
modifyuser
1.16.4
changepasswd
1.16.5
listusers
1.16.6
resetuser
1.17 FTP/ HTTP Proxy
1.17.1
accountstats
1.17.2
ftpproxy
file:///P|/T_WRITER/Documentation/Released/9003%20(Guinness)/User%20Guide/9003%20(Guiness)%20prac%20template/cli.htm (3 of 71) [11/6/2002 8:58:45 AM]
U.S. Robotics SureConnect ADSL Ethernet/USB Router User Guide
1.17.3
httpproxy
1.18 ACL(s)
1.18.1
addacl
1.18.2
delacl
1.18.3
listacls
1.19 snmp
1.19.1
list
1.19.2
set
1.19.3
shutdown
1.19.4
help
1.20 adsl
1.20.1
setmode
1.20.2
readcmv
1.20.3
writecmv
1.20.4
mon
1.20.5
addusercmv
1.20.6
delusercmv
1.20.7
listusercmv
1.20.8
eread
1.20.9
ewrite
1.20.10
mwrite
1.20.11
mread
1.21 dhcpr
1.22 igmp
1.23
qosc
1.23.1
addrule
1.23.2
deleterule
1.23.3
listrule
1.23.4
listrules
1.23.5
listroutes
1.23.6
listarps
file:///P|/T_WRITER/Documentation/Released/9003%20(Guinness)/User%20Guide/9003%20(Guiness)%20prac%20template/cli.htm (4 of 71) [11/6/2002 8:58:45 AM]
U.S. Robotics SureConnect ADSL Ethernet/USB Router User Guide
1.23.7
nat
1.23.8
addressmap
1.23.9
portmap
1.23.10
delrdaddr
1.23.11
maplist
1.23.12
addpublic
1.23.13
delpublic
1.23.14
listpubaddrs
1.23.15
links
1.23.16
addfw
1.23.17
listallfw
1.23.18
listfw
1.23.19
delfw
1.24 ATM
1.24.1
vcadd
1.24.2
deletevc
1.24.3
showatmconn
1.24.4
atmstats
1.24.5
f5lb
1.24.6
vpadd
1.25 sndcp
1.25.1
routedbridge
1.25.2
Ipoa
1.25.3
list
1.25.4
pppoe
1.25.5
pppoestart
1.25.6
pppoestop
1.25.7
pppoelist
1.25.8
pppoedefault
1.25.9
pppoedel
1.25.10
pppoa
file:///P|/T_WRITER/Documentation/Released/9003%20(Guinness)/User%20Guide/9003%20(Guiness)%20prac%20template/cli.htm (5 of 71) [11/6/2002 8:58:45 AM]
U.S. Robotics SureConnect ADSL Ethernet/USB Router User Guide
1.25.11
1.25.12
1.25.13
1.25.14
1.25.15
1.25.16
1.25.17
1.25.18
1.25.19
1.25.20
pppoastart
pppoastop
pppoalist
pppoadel
pppoadefault
liststat
ppptrace
1483mer
mer
relay
CLI Menu System
Command Summary
1
CLI Reference
Command Line Interface (CLI) is used to configure the system via Telnet. To enter the CLI you
must Telnet into the modem at the modem’s Management IP address (default 192.168.1.1). The
default username is root. The default password is 12345.
All the system commands for various modules are organized in different directories. All these
directories are put under the directory called home. However, they can be listed by running help
command. All the administration commands are located under the home/users.
Upon logging into CLI the user enters into the default directory, home. The current working
directory includes the login name in the command prompt (ex. [root @ home]$ )
file:///P|/T_WRITER/Documentation/Released/9003%20(Guinness)/User%20Guide/9003%20(Guiness)%20prac%20template/cli.htm (6 of 71) [11/6/2002 8:58:45 AM]
U.S. Robotics SureConnect ADSL Ethernet/USB Router User Guide
1.1
Control Commands
The CLI provides commands for navigating between directories, listing the commands in a
directory, and providing help. Any of these commands may be executed from any directory.
1.1.1
help
help -o <command>
Displays help and usage text for the specified command. If nothing is specified, it displays help text
for all general commands.
1.1.2
home
home
This command changes the working directory to home directory.
1.1.3
exit
exit
If the user is working in the home directory, the session is closed. Otherwise exit changes the
working directory to its immediate parent directory.
1.1.4
ls
file:///P|/T_WRITER/Documentation/Released/9003%20(Guinness)/User%20Guide/9003%20(Guiness)%20prac%20template/cli.htm (7 of 71) [11/6/2002 8:58:45 AM]
U.S. Robotics SureConnect ADSL Ethernet/USB Router User Guide
ls
Lists all the commands available in the current working directory.
1.2
Administration
1.2.1
reboot
reboot
Reboots the modem (note: telnet session is lost).
1.2.2
save
save
Saves the current running configuration into memory. The current setting will remain saved when
the modem is rebooted.
1.2.3
version
version
Displays the version number of the modem’s firmware.
file:///P|/T_WRITER/Documentation/Released/9003%20(Guinness)/User%20Guide/9003%20(Guiness)%20prac%20template/cli.htm (8 of 71) [11/6/2002 8:58:45 AM]
U.S. Robotics SureConnect ADSL Ethernet/USB Router User Guide
1.2.4
date
date
Displays the current date and time settings.
date –o date MM:DD:YYYY time H:M:S
Sets the specified date and time.
1.2.5
erase
erase
Erases the current stored configuration. The currently used settings are not altered. The next time
the system is rebooted, the system will have its default (factory) settings.
Warning: Do not use the save command after the erase command unless the erase command
was performed in error.
1.2.6
bitmap
This will show the allocation status of bitmaps like sockets, mbuffs, and clusters.
1.3
user
To create, remove, list and change user settings, type users from the home directory
[root @ user ] $
file:///P|/T_WRITER/Documentation/Released/9003%20(Guinness)/User%20Guide/9003%20(Guiness)%20prac%20template/cli.htm (9 of 71) [11/6/2002 8:58:45 AM]
U.S. Robotics SureConnect ADSL Ethernet/USB Router User Guide
The ls command will list five options:
● adduser
● remuser
● setperms
● chpasswd
● listusers
1.3.1
adduser
adduser <username> -o -permissions <A= admin | O= ordinary>
Adds new access user to the system. This command requires that a password be provided. This
is an administrative command and you must be logged in with administrative rights.
<username>
The name of the user to be added.
-permissions <admin | ordinary>
Specifies the permissions granted to the user. By default the user is granted ordinary permissions.
1.3.2
remuser
deluser <username>
Deletes the specified access user. This is an administrative command and you must be logged in
with administrative rights.
1.3.3
setperms
file:///P|/T_WRITER/Documentation/Released/9003%20(Guinness)/User%20Guide/9003%20(Guiness)%20prac%20template/cli.htm (10 of 71) [11/6/2002 8:58:45 AM]
U.S. Robotics SureConnect ADSL Ethernet/USB Router User Guide
setperms {username} [-o permissions ( A )]
Modifies the properties of a user account.
<username>
The name of the user whose services or permissions are to be modified.
<permissions>
O – ordinary user, A – Administrator
Examples:
Change user xyz from ordinary user to Administrator.
setperms xyz -o A
1.3.4
changepasswd
changepasswd <username>
Changes password of the existing user. To use this command you must be logged as an
Administrator.
1.3.5
listusers
listusers
Lists all registered users to use CLI/http/ftp.
file:///P|/T_WRITER/Documentation/Released/9003%20(Guinness)/User%20Guide/9003%20(Guiness)%20prac%20template/cli.htm (11 of 71) [11/6/2002 8:58:45 AM]
U.S. Robotics SureConnect ADSL Ethernet/USB Router User Guide
1.4
ifconfig
The ifconfig command contains several forms to obtain information or configure an IP address for
an interface. The first form configures the IP address and other parameters for the specified
interface. The remaining forms display information about the interface(s).
ifconfig –o <interface_name> inet <address> [netmask <mask>] [broadcast <addr>]
[up|down] [mtu <n>]
ifconfig –o <interface_name>
ifconfig –o –a
ifconfig –o –l
<interface_name> The name of the interface. Possible values are “eth0”, “eth1”, “mer0”, “usb0”,
“lo0”, “atm0”, “atm1”, “atm2”, “atm3”, “atm4”, “atm5”, “atm6”, “atm7”, “ppp0”, “ppp1”, “ppp2,” “ppp3”,
“ppp4”, “ppp5”, “ppp6”, “ppp7”.
<address>
The IP address to be assigned to the interface. Dot-notation is used to enter the IP address (for
example 192.168.2.1).
netmask <mask>
The netmask is used to extract the network part from the IP address. It also specifies how much of
the address is to be reserved for subdividing the network into sub-networks that are taken from the
host field of the address. Netmask is ‘AND’ed with the interface IP address to get the network ID
file:///P|/T_WRITER/Documentation/Released/9003%20(Guinness)/User%20Guide/9003%20(Guiness)%20prac%20template/cli.htm (12 of 71) [11/6/2002 8:58:45 AM]
U.S. Robotics SureConnect ADSL Ethernet/USB Router User Guide
that is used in routing, indicating that this network is reachable through these interfaces. The mask
can be specified as a single hexadecimal number with a leading 0x, for example 0xffffff00, or with
a dot-notation Internet address of 255.255.255.00
broadcast <addr>
Broadcasting is used when it makes sense to send the same message to multiple recipients on the
LAN. This option is used to specify the broadcast address to be used in the network. The default
broadcast address is the address with a host part as all 1’s in the IP address. For example,
192.168.2.255 is a broadcast address for network 192.168.2.0
down
Mark an interface “down’’. When an interface is marked “down", the system will not attempt to
transmit messages through that interface.
up
Mark an interface “up’’. This may be used to enable an interface after an interface was
marked as “down’’. By enabling the interface, messages can be transmitted through that
interface.
mtu <n>
Sets the maximum transmission unit of the interface to n, the default is interface specific.
The MTU is used to limit the size of packets that are transmitted on an interface. Not all
interfaces support setting the MTU, and some interfaces, like ethernet, have range
restrictions (72 – 1500).
-a
Displays detailed information about all the interfaces.
-l
Lists the current interfaces.
Examples:
[root @ home] ifconfig –o -a
eth0: flags=ffff8843<UP,BROADCAST,RUNNING,SIMPLEX,MULTICAST>
mtu 1500 inet 192.168.2.185 netmask 0xffffff00 broadcast 192.168.2.255
file:///P|/T_WRITER/Documentation/Released/9003%20(Guinness)/User%20Guide/9003%20(Guiness)%20prac%20template/cli.htm (13 of 71) [11/6/2002 8:58:45 AM]
U.S. Robotics SureConnect ADSL Ethernet/USB Router User Guide
ether 08:00:20:c0:c9:74
lo0: flags=ffff8049<UP,LOOPBACK,RUNNING,MULTICAST> mtu 16384
inet 127.0.0.1 netmask 0xff000000
The above command lists all the interfaces.
ifconfig –o –l
Displays a list of interfaces. It will result in a listing such as "eth0 atm0."
ifconfig –o eth0
eth0: flags=ffff8843<UP,BROADCAST,RUNNING,SIMPLEX,MULTICAST>
mtu 1500 inet 192.168.2.185 netmask 0xffffff00 broadcast 192.168.2.255
ether 08:00:20:c0:c9:74
The configuration of eth0 is listed.
ifconfig –o eth0 inet 192.168.2.242
Set the IP address on eth0 to 192.168.2.242
ifconfig –o eth0 inet 192.168.2.185 mtu 900
Changes the MTU for the eth0 interface.
ifconfig –o eth0 inet 192.168.2.185 broadcast 192.168.255.255
Changes the broadcast address
ifconfig –o eth0 inet 192.168.2.185 netmask 255.255.00.00
Changes the netmask.
ifconfig –o eth0 inet 192.168.2.185 down
Marks the interface as down.
ifconfig –o eth0 inet 192.168.2.185 up
Marks the interface as up.
ifconfig –o eth0 inet 192.168.2.185 alias 192.168.2.242
file:///P|/T_WRITER/Documentation/Released/9003%20(Guinness)/User%20Guide/9003%20(Guiness)%20prac%20template/cli.htm (14 of 71) [11/6/2002 8:58:45 AM]
U.S. Robotics SureConnect ADSL Ethernet/USB Router User Guide
ifconfig -o eth0 inet 192.168.2.185 broadcast 192.168.255.255 netmask
255.255.00.00 mtu 900
Sets the broadcast address, netmask and mtu for the eth0 interface.
1.5
route
Allows the user to add, delete, and change a routing entry or allows the user to get
information about an entry.
route add –o -dest <dest_ip_addr> -gateway <gateway_ip_addr> [-netmask mask] [-mtu value] [hopcount value]
route add –o -dest <dest_ip_addr> -interface if_name [-netmask mask] [-mtu value] [-hopcount
value]
route delete –o -dest <dest_ip_addr>
route change –o -dest <dest_ip_addr> -gateway <new_ip_addr>
route get –o -dest <dest_ip_addr>
route flush
list routes
route add is used to add a routing entry. The destination address and the gateway to reach this
destination address must be specified. The netmask will be computed based upon the class of the
destination address if it is not specified. For example, a netmask of 255.255.255.0 will be taken for
a destination address of 192.168.3.0 since this is a class C address. If the destination is directly
reachable via an interface requiring no intermediary system to act as a gateway, the interface
modifier should be specified. The gateway given is the address of this host on the common
file:///P|/T_WRITER/Documentation/Released/9003%20(Guinness)/User%20Guide/9003%20(Guiness)%20prac%20template/cli.htm (15 of 71) [11/6/2002 8:58:45 AM]
U.S. Robotics SureConnect ADSL Ethernet/USB Router User Guide
network, indicating the interface to be used for transmission. Alternately if the interface is point-topoint, the name of the interface itself may be given. In this case the route remains valid even if the
local or remote addresses change.
route delete is used to remove routing entries.
route change is used to change the gateway for the specified destination address.
route get is used to get information for routes to the specified destination.
route flush will erase all routing table entries.
list routes will list all routing table entries.
Examples:
route add -o -dest 192.168.3.0 -gateway 192.168.2.1
Adds a route entry with destination IP address 192.168.3.0 and gateway as 192.168.2.1.
route add –o -dest 192.168.3.101 -gateway 192.168.2.1 -interface eth0 -netmask
255.255.255.255 -mtu 1500 -hopcount 2
Adds a route entry with destination ip address set to 192.168.3.101, gateway as 192.168.2.1 and
interface name to be used for this route as eth0, netmask as 255.255.255.255, mtu as 1500 and
hopcount to 2.
route delete -o -dest 192.168.3.0
Deletes the route entry whose destination IP address is 192.168.3.0.
route change –o -dest 192.168.3.0 -gateway 192.168.2.4
Changes the gateway to 192.168.2.4 for the entry whose destination addresses match with
192.168.3.0.
route get –o -dest 192.168.3.0
Lists the route entry whose destination IP address is 192.168.3.0.
file:///P|/T_WRITER/Documentation/Released/9003%20(Guinness)/User%20Guide/9003%20(Guiness)%20prac%20template/cli.htm (16 of 71) [11/6/2002 8:58:45 AM]
U.S. Robotics SureConnect ADSL Ethernet/USB Router User Guide
1.6
statistic
statistic <ip I tcp | udp | icmp>
Displays statistics for IP, ICMP, TCP and UDP protocols.
1.7
list
list <arp | udp | tcp | routes | interfaces>
Lists the Address Resolution Protocol (ARP) Table, Routing Table, and Protocol Control Blocks
(PCB) of UDP/TCP sockets in use and the network interfaces information.
1.8
dns
To set the Domain Name Server.
Commands for setting DNS parameters are in the .dns. directory. From the .home. directory, type
.dns. to enter the directory.
1.8.1
set
set -d <domain_name>
set [–n1 <name_server>] [–n2 <name_server>]
Sets DNS entries for the system. The domain_name specifies the name of this domain for the
file:///P|/T_WRITER/Documentation/Released/9003%20(Guinness)/User%20Guide/9003%20(Guiness)%20prac%20template/cli.htm (17 of 71) [11/6/2002 8:58:45 AM]
U.S. Robotics SureConnect ADSL Ethernet/USB Router User Guide
router. The name_server specifies the IP address of the server resolving DNS requests. To clear
a domain entry, specify double quotes (“”) for the domain name. To clear the name server entry,
specify 0 as the name server.
-n1 <name_server>
Used to specify the primary name server.
-n2 <name_server>
Used to specify the secondary name server.
Examples:
[cli @ dns]$ set -d analog.com
Sets the domain name to “analog.com”.
[cli @ dns]$ set -d “”
Removes the domain name.
[cli @ dns]$ set –n1 137.23.41.2
Sets the primary name server for DNS queries.
[cli @ dns]$ set –n1 0
Removes the primary name server.
1.8.2
list
list
Lists DNS domain name and name server.
1.8.3
dnsr
Enables/Disables the DNS relay function.
dnsr start -o [<server1>] [<server2>]
file:///P|/T_WRITER/Documentation/Released/9003%20(Guinness)/User%20Guide/9003%20(Guiness)%20prac%20template/cli.htm (18 of 71) [11/6/2002 8:58:45 AM]
U.S. Robotics SureConnect ADSL Ethernet/USB Router User Guide
dnsr stop -o [<server1>] [<server2>]
start
Starts the DNS relay function
stop
Stops the DNS relay function.
<server1>
IP address of the primary DNS server.
<server2>
IP address of the secondary DNS server.
1.8.4
help
Set and List domain/nameserver
list
set [-d] ( default domain ) value
set [-n1 / -n2] ( nameserver ) value
1.9
DHCP
dhcp <interface> start | stop | restart
Configures an interface to fetch its IP address from a DHCP server. The start option enables the
interface to get the IP address from the DHCP server. The stop option disables this feature.
The restart option will stop and then start again negotiation with the DHCP server for an IP
address. Restart is useful to reacquire an IP address.
Example:
dhcp eth0 start (note for the USR9003 etho is equal to port ETH1 and eht1 is equal to port ETH2)
file:///P|/T_WRITER/Documentation/Released/9003%20(Guinness)/User%20Guide/9003%20(Guiness)%20prac%20template/cli.htm (19 of 71) [11/6/2002 8:58:45 AM]
U.S. Robotics SureConnect ADSL Ethernet/USB Router User Guide
1.10 DHCPSERVER
The DHCP server commands are located in the “dhcpserver” directory.
1.10.1 start
Starts the DHCP server
1.10.2 stop
Stops the DHCP server.
The subnet and host commands are used to configure DHCP server. These commands are
available in the dhcpserver directory.
1.10.3 subnet
Configuration of DHCP to serve the specified IP addresses. The add option is used to
specify the IP addresses and other aspects of the configuration. The list option shows the
configured subnets. The delete command removes the serving of the specified subnet.
These commands take effect after the start command has been issued. These commands
are available in the dhcpserver directory.
subnet if add -o -subnet <subnet> [-netmask <mask>] -startip <startip> -endip
file:///P|/T_WRITER/Documentation/Released/9003%20(Guinness)/User%20Guide/9003%20(Guiness)%20prac%20template/cli.htm (20 of 71) [11/6/2002 8:58:45 AM]
U.S. Robotics SureConnect ADSL Ethernet/USB Router User Guide
<endip> [-leasetime <lease time in days>] [-broadcast <broadcast-address>] [-dns <nameserver>][-gateway <gateway-address>] [-server <serverip>] [-file <filename>]
-subnet <subnet> The subnet that the server will serve IP addresses on.
-netmask <mask> The subnet mask for the subnet that the server will serve IP addresses on.
-startip <startip> -endip <endip> The range of IP addresses that will be served. The startip and
endip define this range with the beginning and ending IP addresses to be served. These
addresses are specified in dot notation.
-gateway <gateway-address> The IP address of the gateway. This information is passed to the
DHCP clients that they use for a default route entry. By default the IP address of this router is
passed to the DHCP clients as the gateway.
-leasetime <leasetime> The amount of time the DHCP lease of the IP address will last. This is
specified in days. The default is 7 days.
-broadcast <broadcast-address> The IP broadcast address that the server will listen to for
DHCP requests. By default, a standard broadcast address for the subnet is used.
-dns <name-server> The IP address of the DNS server that should be passed to DHCP clients.
By default, the dns address configured on the WAN interface from the Internet Service Provider
(via DHCP server or PPPoA/PPPoE) is used.
-server <server> -file <filename> These options are used to support Bootp clients. The client will
go to the specified server to retrieve the specified file as the boot image. The 6489 based router
does not support storage of a file for a remote client to boot from, so the server specified will be
another machine on the network.
subnet if list
subnet if delete
Examples:
subnet add eth0 -o -subnet 192.168.5.0 -startip 192.168.5.200 -endip 192.168.5.210 \
-leasetime 3 -dns 192.168.5.7
IP addresses will be assigned to up to 11 DHCP clients. The IP addresses assigned will
begin with 192.168.5.200 and end with 192.168.5.210. The length of the IP address
assignment (the lease) is 3 days. The address of the DNS server (192.168.5.7) will also be
sent to the DHCP clients.
file:///P|/T_WRITER/Documentation/Released/9003%20(Guinness)/User%20Guide/9003%20(Guiness)%20prac%20template/cli.htm (21 of 71) [11/6/2002 8:58:45 AM]
U.S. Robotics SureConnect ADSL Ethernet/USB Router User Guide
subnet delete eth0 subnet 192.168.5.0
The DHCP server will no longer serve addresses for the 192.168.5.0 network.
1.10.4 host
These commands control the configuration of specific hosts and are useful when specific
machines need to have permanent IP addresses assigned. The host commands have precedence
over subnet commands. The add option is used to specify the IP address for a particular host.
The list option shows the configured hosts. The delete option will remove a host configuration.
These commands are available in the dhcpserver directory.
host add -o -macaddr <mac-address> -ipaddr <ipaddr> [-leasetime <lease time>]
[-broadcast <broadcast-address>] [-dns <name-server>] [-gateway <gateway-address>]
[-server <server-name>] [-file <filename>]
host delete -o -macaddr <mac_address>
host list
Examples:
host add -o -macaddr 00.00.00.d1.26.95 -ipaddr 192.168.5.34
Specifies that the machine with the MAC address of 00.00.00.d1.26.95 will be assigned the IP
address 192.168.5.34.
host delete -o -macaddr 00.00.00.d1.26.95
Removes this host configuration for the machine with the MAC address of
00.00.00.d1.26.95.
1.10.5 lease
file:///P|/T_WRITER/Documentation/Released/9003%20(Guinness)/User%20Guide/9003%20(Guiness)%20prac%20template/cli.htm (22 of 71) [11/6/2002 8:58:45 AM]
U.S. Robotics SureConnect ADSL Ethernet/USB Router User Guide
Leases represent which IP addresses are allocated to which machines and for how long. The list
option lists all outstanding leases.
lease list
lease delete -o -ipaddr <ipaddr>
1.11 RIP
RIP is a protocol that automatically updates the routing entries on the system. This is done by
cooperating with other nearby routers. The RIP commands are located in the “rip” directory. Two
commands are available: rip and ver. In order for any configuration changes to take effect, the
configuration must be saved (with “save” command) and the system rebooted.
1.11.1 rip
rip starts and stops automated updates of routing tables. When RIP is enabled, the system
communicates with other routers in the network to update and maintain the IP routing tables.
By default, RIP is not enabled. If RIP is enabled but no version is specified, RIP version 1 is used.
This command is available in the “rip” directory.
rip –o <on|off>
on
Enables RIP processing.
off
Disables RIP processing.
1.11.2 ver
file:///P|/T_WRITER/Documentation/Released/9003%20(Guinness)/User%20Guide/9003%20(Guiness)%20prac%20template/cli.htm (23 of 71) [11/6/2002 8:58:45 AM]
U.S. Robotics SureConnect ADSL Ethernet/USB Router User Guide
Specifies the version of the RIP protocol that will be used. The permissible values are 1 or 2. The
default is 1.
ver -o <1|2>
1.11.3 list
Lists the routes currently available.
list
Note: For these new values to take effect, the configuration must be saved. The next time the
system is booted, these values will be in effect.
1.12 Bridge
The bridge commands are located in the “bridge” directory.
1.12.1 group
group <interface_name> <interface_name> -o -if <interface_name> -if <interface_name>
Assigns or groups two or more interfaces to the bridge.
interface_name The name of an interface e.g. eth0, eth1 , atm0 ,atm1 etc.
Examples:
bridge group eth0 -o -if eth1 -if usb0 -if atm1
The interfaces eth0, eth1 and usb0 are assigned to the bridge atm1.
bridge group eth0 -o -if atm0
The interfaces eth0, and atm0 are assigned to the bridge.
1.12.2 pvc
file:///P|/T_WRITER/Documentation/Released/9003%20(Guinness)/User%20Guide/9003%20(Guiness)%20prac%20template/cli.htm (24 of 71) [11/6/2002 8:58:45 AM]
U.S. Robotics SureConnect ADSL Ethernet/USB Router User Guide
pvc add <port> <vpi> <vci> <encap> -o [-vpn <OUI> <vpnId>]
pvc delete <port> <vpi> <vci> <encap>
Attaches a PVC to the wan interface.
Add Adds the specified PVC to the bridge.
Delete Deletes the specified PVC to the bridge.
<port> A string identifying the wan interfaces e.g. atm0.
<vpi> <vci> Virtual Path Identifier and Virtual Circuit Identifier for the ATM connection.
<encap> Specifies the encapsulation type. The possible values are llc or vc which represent
Logical Link Control or VC multiplexing respectively.
-vpn <OUI> <vpnId> Specifies the VPN encapsulation. The OUI (Organizationally Unique
Identifier) and VPN identifier are specified as numbers.
1.12.3 cachetimer
cachetimer <timeout>
Specifies the idle timeout for bridge table entries. The timeout value is in seconds.
Whenever there is any traffic passing through the bridge, the bridge will maintain the lookup table
with the MAC addresses coming from configured interface (through LAN). If the traffic is destined
to any MAC address that is found in the lookup table, that packet is not sent to the ATM interface.
If there is no traffic from a particular machine for a certain time period, then that entry is deleted
from the lookup table. The time that the bridge will clear the bridge lookup entry is the cachetimer
timeout.
1.12.4 setmultiport
setmultiport enable | disable
Enables or disables flooding between ATM PVCs.
1.12.5 list
file:///P|/T_WRITER/Documentation/Released/9003%20(Guinness)/User%20Guide/9003%20(Guiness)%20prac%20template/cli.htm (25 of 71) [11/6/2002 8:58:45 AM]
U.S. Robotics SureConnect ADSL Ethernet/USB Router User Guide
list
Lists bridge parameters.
1.12.6 stats
stats
Displays bridge statistics.
1.12.7 bridge
bridge enable | disable | delete
Enables, disables, or deletes the configuration of the bridge.
1.12.8 filter
filter <action> <mac_address> -o [-fwd | -drop]
Configures the filtering capability of MAC addresses for the bridge. Up to 128 addresses may be
specified.
<action> Action may be add, delete, or modify.
<mac_address> The MAC address that is to be filtered. The address is specified by a hex code
for each byte separated by a colon (:). For example: 00:01:33:44:5F:2C.
-fwd When specified, the frame will be forwarded. This is the default.
-drop When specified, the frame will be dropped.
Examples:
filter add 1:2:3:4:5:6
Forward packets whose MAC destination address is 1:2:3:4:5:6.
filter add 2:3:4:4:5:2 -o -fwd
Forward packets whose MAC destination address is 2:3:4:4:5:2.
filter add 11:22:33:44:55:66 -o -drop
file:///P|/T_WRITER/Documentation/Released/9003%20(Guinness)/User%20Guide/9003%20(Guiness)%20prac%20template/cli.htm (26 of 71) [11/6/2002 8:58:45 AM]
U.S. Robotics SureConnect ADSL Ethernet/USB Router User Guide
Drop packets whose MAC destination address is 11:22:33:44:55:66
filter delete 1:2:3:4:5:6
Remove the filter action for MAC address 1:2:3:4:5:6
filter modify 2:3:4:4:5:2 -o -drop
Change the filter action for MAC address 2:3:4:4:5:2 to drop.
1.12.9 filterlist
filterlist
Lists the contents of the filter database.
1.12.10 filterflush
filterflush
Flush the dynamic entries of the filter database.
1.12.11 stp
The spanning tree commands are located in the “stp” directory (which is located in the
“bridge” directory).
1.13 ethernet
Ethernet commands are located in the “ethernet” directory.
1.13.1 elink
elink <interface> -o [[auto] | [10 | 100 | auto_speed ] | [half | full | auto_duplex]]
Configures the speed and/or duplex of the Ethernet interface. The default setting is auto for auto
file:///P|/T_WRITER/Documentation/Released/9003%20(Guinness)/User%20Guide/9003%20(Guiness)%20prac%20template/cli.htm (27 of 71) [11/6/2002 8:58:45 AM]
U.S. Robotics SureConnect ADSL Ethernet/USB Router User Guide
negotiation. With auto negotiation, both the speed and duplex are configured based upon what the
link is connected to. It is also possible to configure the duplex and specify auto_speed so that only
the speed is auto negotiated. Similarly for auto_duplex.
<interface> The name of the Ethernet interface. This is eth0.
Auto Specifies that both the speed and duplex are auto negotiated.
10 Specifies that the speed is set to 10M bits per second.
100 Specifies that the speed is set to 100M bits per second.
auto_speed Specifies that the speed is auto negotiated.
Half Specifies half duplex
Full Specifies full duplex
auto_duplex Specifies that the duplex is auto negotiated.
Examples:
[root @ ethernet]$ elink eth0 -o 10 half
Sets the Ethernet to a speed of 10Mbps half duplex.
[root @ ethernet]$ elink eth0 -o auto_speed full
The speed will be auto negotiated and the link will use full duplex.
1.13.2 setemac
setemac <mac address>
Sets the Ethernet addresses for the eth0 port. The Ethernet MAC address is specified in
standard colon-separated notation.
In order for the MAC changes to take effect, the configuration must be saved (using ‘save’
command in the home directory) and the system rebooted.
<mac address> The MAC address in colon separated notation. Two hex digits must be supplied
between the colons. Twelve hex digits comprise a MAC address. (i.e. “aa:bb:cc:01:22:05”).
Examples:
[root @ ethernet]$ setemac 11:22:33:44:55:66
[root @ ethernet]$home
[root @ home]$save
The above will assign 11:22:33:44:55:66 to eth0. This will take effect after the system is
rebooted.
file:///P|/T_WRITER/Documentation/Released/9003%20(Guinness)/User%20Guide/9003%20(Guiness)%20prac%20template/cli.htm (28 of 71) [11/6/2002 8:58:45 AM]
U.S. Robotics SureConnect ADSL Ethernet/USB Router User Guide
1.13.3 rmon
rmon <interface>
This command reads the EMAC RMON counters.
<interface> The name of the Ethernet interface. This is eth0.
Example:
[cli @ home]$ rmon eth0
Hardware link statistics
Rx frames : 276423
Rx octets : 53008763
Rx interrupts: 275055
Rx CRC errors: 4
Rx frame errors: 12
Rx internal errors: 0
Rx length errors: 268460
Rx resource events: 0
Tx frames: 4093
Tx octets: 456264
Tx interrupts: 4064
Tx SQE errors: 0
Tx carrier sense errors: 0
Tx deferred: 0
Tx excessively deferred: 0
Tx single collisions: 0
Tx multiple collisions: 0
Tx late collisions: 0
Tx internal errors: 0
Hardware interrupts: 548692
1.13.4 pread
pread <interface> <port(decimal)>
file:///P|/T_WRITER/Documentation/Released/9003%20(Guinness)/User%20Guide/9003%20(Guiness)%20prac%20template/cli.htm (29 of 71) [11/6/2002 8:58:45 AM]
U.S. Robotics SureConnect ADSL Ethernet/USB Router User Guide
Reads PHY register
Examples:
[root @ ethernet]$ pread eth0 1
Register 1 value 0xffff
Displays the register 1 value of eth0 interface.
1.13.5 pwrite
pwrite <interface> <port(decimal)> <value(hex)>
Writes PHY register
1.14 rarpd
This command list is used to get the IP address of diskless system.
1.14.1 add
add <0xH/Waddress > <IPAddress >
Used to add Hardware address and IP address into the DataBase.
<0xH/Waddress > Hardware address in hexadecimal format.
<IPAddress > IP address in dot notation.
Examples:
[root @ rarpd]$ add 0x112233445566 192.168.3.4
Adds the H/W address and IP Address mapping in the database.
1.14.2 delete
delete <0xH/Waddress >
Deletes an entry in the existing RARP DataBase.
file:///P|/T_WRITER/Documentation/Released/9003%20(Guinness)/User%20Guide/9003%20(Guiness)%20prac%20template/cli.htm (30 of 71) [11/6/2002 8:58:45 AM]
U.S. Robotics SureConnect ADSL Ethernet/USB Router User Guide
<0xH/Waddress > Hardware address in hexadecimal format.
Examples:
[root @ rarpd]$ delete 0x112233445566
Deletes mapping of H/W address 11:22:33:44:55:66 to IP Address, from the database.
1.14.3 list
list
Lists the RARP DataBase entries.
Examples:
[root @ rarpd]$ list
H/W ADDR IP ADDRESS
11:22:33:44:55:66 192.168.3.4
1.14.4 rarpd
rarpd <-a | interface>
Starts the RARPD on the specified interface or all the interfaces.
Examples:
[root @ rarpd]$ rarpd eth0
Starts the RARPD on eth0 interface.
[root @ rarpd]$ rarpd eth0
If RARPD is already running the above command, it displays : “Rarpd is already running on
the interface”
[root @ rarpd]$ rarpd -a
Starts the RARPD on all the interfaces.
file:///P|/T_WRITER/Documentation/Released/9003%20(Guinness)/User%20Guide/9003%20(Guiness)%20prac%20template/cli.htm (31 of 71) [11/6/2002 8:58:45 AM]
U.S. Robotics SureConnect ADSL Ethernet/USB Router User Guide
1.15 logger
This command list is used to display logging messages.
1.15.1 log
log -o [module name/ log level]
This command is used to display the log messages based on module name, severity level, or log
messages based on severity level and module name.
< loglevel > Loglevel can be given as exception, error or info.
< module name > Module name can be ll, ip, tcp, udp, sockets ,rawip, icmp, arp, igmp, app, cdcli,
if, telnet, dns, snmp, http, ping, ftp, ftpd, tftp, bootp, dhcpc, dhcps, qosbw, ipsec, ike, nat, firewall,
diffserv, logger, queuing, ipoa, pppoa, ethoa, httpproxy, ftpproxy
Examples:
[root @ logger]$ log –o all
“Exception” level log messages and the error or info level log messages ( if enabled) will be logged
from all modules.
[root @ logger]$ log –o tcp error
“error” level log messages from tcp module will be logged.
1.15.2 logSeverity
logSeverity -o [error/info] [on/off ]
This command is used to set the specified loglevel as ON or OFF. By default, error
and info log level messages are off. There is no on/off option for exception log level messages.
The exception log messages are always displayed (on).
Examples:
[root @ logger]$ logSeverity –o error on
Sets the loglevel error on so that error level log messages are displayed.
[root @ logger]$ log –o info off
file:///P|/T_WRITER/Documentation/Released/9003%20(Guinness)/User%20Guide/9003%20(Guiness)%20prac%20template/cli.htm (32 of 71) [11/6/2002 8:58:45 AM]
U.S. Robotics SureConnect ADSL Ethernet/USB Router User Guide
Sets the loglevel info off, so that info level log messages are not displayed.
1.15.3 logFtpServer
logFtpServer [server_address] [username] [password]
This command is used to configure the server address, user name, and password of the
external ftp server. The log messages are directed to the ftp server given and are logged into a file
by name “fwlogfile”.
Examples:
[root @ logger]$ logFtpServer 192.168.1.1 xyz xyz123
A file “fwlogfile” having the log message will be created in the ftp server 192.168.1.1
1.16 auth
These commands are located in the “auth” directory.
1.16.1 adduser
adduser <username> -o -services <cli | ftp | http> -permissions <admin | ordinary>
Adds a new user to the system. This command asks to set password for the user. This is an
administrators command, ordinary users cannot use this.
<username> The name of the user to be added.
-services <cli | ftp | http> Specifies the user privileges. The allowable privileges are: cli, ftp, or
http.
-permissions <admin | ordinary> Specifies the permissions granted to the user. By default, the
user is granted “ordinary” permissions.
1.16.2 deluser
file:///P|/T_WRITER/Documentation/Released/9003%20(Guinness)/User%20Guide/9003%20(Guiness)%20prac%20template/cli.htm (33 of 71) [11/6/2002 8:58:45 AM]
U.S. Robotics SureConnect ADSL Ethernet/USB Router User Guide
deluser <username>
Deletes the specified user. This is an administrators command, ordinary users cannot use this.
1.16.3 modifyuser
modifyuser <username> -o -addservices <cli | ftp | http> -delservices <cli | ftp | http> -permissions
<admin | ordinary>
Modifies the properties of a user account.
<username> The name of the user whose services or permissions are to be modified.
-addservices <cli | ftp | http> Adds cli, ftp, or http services to the user.
-delservices <cli | ftp | http> Removes cli, ftp, or http services from the user.
Examples:
modifyuser xyz –o –addservices ftp –permissions ordinary
Allows user “xyz” to access the system via ftp. In addition, gives the user “xyz” ordinary
permissions. In other words user “xyz” is not an administrator.
modifyuser abc -o -delservices http
Prohibits user “abc” from accessing the system via http.
modifyuser xyz –o –addservices ftp –delservices http –permissions ordinary
Allows user “xyz” to access the system via ftp and prohibits that user from accessing the system
via http. In addition, gives the user “xyz” ordinary permissions. In other words, user “xyz” is not an
administrator.
1.16.4 changepasswd
changepasswd <username>
Changes password of the existing user. This is an administrators command, ordinary users cannot
use this.
1.16.5 listusers
file:///P|/T_WRITER/Documentation/Released/9003%20(Guinness)/User%20Guide/9003%20(Guiness)%20prac%20template/cli.htm (34 of 71) [11/6/2002 8:58:45 AM]
U.S. Robotics SureConnect ADSL Ethernet/USB Router User Guide
listusers
Lists all current registered users and their allowed services and their permissions.
1.16.6 resetuser
resetuser <username>
To reset the password. This is an administrators command, ordinary users cannot use this.
1.17 FTP/ HTTP Proxy
These commands are available from the root menu..
1.17.1 accountstats
accountstats < httpproxy/ftpproxy>
This command is used to display accounting details of specified module.
1.17.2 ftpproxy
ftpProxy -o -auth {enable/disable}
This command is used to enable authentication for ftpproxy.
1.17.3 httpproxy
httpProxy -o [-auth {enable/disable}]
httpproxy -o -display
httpproxy -o –stat
This command is used to enable authentication for httpproxy. Use this command to display and
view statistics for the httpproxy.
file:///P|/T_WRITER/Documentation/Released/9003%20(Guinness)/User%20Guide/9003%20(Guiness)%20prac%20template/cli.htm (35 of 71) [11/6/2002 8:58:45 AM]
U.S. Robotics SureConnect ADSL Ethernet/USB Router User Guide
1.18 ACL(s)
This command are available for the root menu.
1.18.1 addacl
This command is used to create an access control list.
addacl module priority permissions -o -uid [UserId]
-range [Source Range]
-dest [Destination Address]
-domain [Domain Name]
-mime [Mime Type]
-method [Method]
-url [URL]
-timeofday [DAY1 TIME1 DAY2 TIME2]
module
: httpproxy/ftpproxy
permissions : allow/deny
Source Range : [192.168.2.1-192.168.2.6]
Mime Type : application,image,audio,video
Method
: get/put
DAY1,DAy2 : sun/mon/tue/wed/thu/fri/sat
TIME1,TIME2 : Hrs:Mins
1.18.2 delacl
This command is used to delete a access control list.
delacl module ruleid
module
: httpproxy/ftpproxy
1.18.3 listacls
This command is used to list access control list by a module.
file:///P|/T_WRITER/Documentation/Released/9003%20(Guinness)/User%20Guide/9003%20(Guiness)%20prac%20template/cli.htm (36 of 71) [11/6/2002 8:58:45 AM]
U.S. Robotics SureConnect ADSL Ethernet/USB Router User Guide
listacls module
module
: httpproxy/ftpproxy
1.19 snmp
Snmp commands allow listing and setting of current SNMP configuration.
1.19.1 list
list
This command lists the current SNMP configuration like system version, system contact, system
location, system id, etc.
Example:
List
Current SNMP Configuration
System Version Description : U.S.Robotics Corp,SureConnect ADSL Ethernet/USB Router
System Contact
: Phone: 1-800-874-2000
System Location
: Schuamburg,II,USA
System ID
: 1 3 6 1 4 1 4242 255
Default Trap Address : 192.168.1.1
Communites :
for reading MIB : public
for modifying MIB[1]: pub
for modifying MIB[2]: chip
1.19.2 set
set [-d] [-c] [-l] [-i] [-t] [-s1] [-s2] value
This command allows modification of any current SNMP configuration.
-d value System Version Description
file:///P|/T_WRITER/Documentation/Released/9003%20(Guinness)/User%20Guide/9003%20(Guiness)%20prac%20template/cli.htm (37 of 71) [11/6/2002 8:58:45 AM]
U.S. Robotics SureConnect ADSL Ethernet/USB Router User Guide
-c value System Contact.
-l value System Location
-I value Assigned Enterprise Number.
-t value Trap Server IP Address.
-r value Community for reading MIB.
-s1 value Community for modifying MIB.
-s2 value Community for modifying MIB.
1.19.3 shutdown
shutdown
This command shuts down the SNMP agent.
1.19.4 help
Option:
snmp list / set [-d] [-c] [-l] [-i] [-t] [-s1] [-s2] value
-d
: System Version Description
-c
: System Contact
-l
: System Loaction
-i
: Assigned Enterprise Number
-t
: Trap Server IP Address
-r
: Community for reading MIB
-s[1][2]: Community for modifying MIB
shutdown : To shutdown the agent
1.20 adsl
The ‘adsl’ directory contains commands to configure and gets the status information of the ADSL
link.
file:///P|/T_WRITER/Documentation/Released/9003%20(Guinness)/User%20Guide/9003%20(Guiness)%20prac%20template/cli.htm (38 of 71) [11/6/2002 8:58:45 AM]
U.S. Robotics SureConnect ADSL Ethernet/USB Router User Guide
1.20.1 setmode
setmode <mode>
Sets the mode of the ADSL link to ANSI (T1.413), G.DMT, G.Lite, or multi-mode. After
executing this command, the configuration can be saved and the next time the machine is
rebooted, the mode will take effect.
<mode> The mode may be ansi, gdmt, glite, or multi.
1.20.2 readcmv
readcmv <cmv_index> <offset>
The ADSL Configuration and Management Variables (CMV) can be read with the readcmv
command. The CMV variables are documented in “CMV Reference Manual”. This command will
only provide meaningful results when the link is operational.
<cmv_index> The cmv index may be one of the following values.
Note that they must be specified in uppercase: ADPT, CNTL, CODE, DIAG, DOPT, FLAG, INFO,
INTL, MASK, OPTN, PFCL, PFRX, PFTX, PSDM, RATE, RXDA, STAT, TEST, TONE, TXDA,
UOPT.
<offset>
This is a numeric value between 0 and 65535.
1.20.3 writecmv
writecmv <cmv_index> <offset> <value>
The ADSL Configuration and Management Variables (CMV) can be written with the writecmv
command. The CMV variables are documented in “CMV Reference Manual”. This command will
take effect only after the link is reconnected.
<cmv_index> The cmv index may be one of the following values.
Note they must be specified in uppercase: ADPT, CNTL, CODE, DIAG, DOPT, FLAG, INFO,
INTL, MASK, OPTN, PFCL, PFRX, PFTX, PSDM, RATE, RXDA, STAT, TEST, TONE, TXDA,
UOPT.
file:///P|/T_WRITER/Documentation/Released/9003%20(Guinness)/User%20Guide/9003%20(Guiness)%20prac%20template/cli.htm (39 of 71) [11/6/2002 8:58:45 AM]
U.S. Robotics SureConnect ADSL Ethernet/USB Router User Guide
<offset>
This is a numeric value between 0 and 258.
<value>
The value for the variable specified in hexadecimal format.
1.20.4
mon
mon
Displays the state of the ADSL connection. Only gives meaningful information when the link is
operational.
1.20.5 addusercmv
addusercmv <cmv_name> <offset> <value> <command> <msgid>
Allows the adding or setting of a CMV. The CMV values will be used the next time the system is
rebooted. Note that the configuration must be saved after using this command in order for them to
take effect on the next reboot.
<cmv_name> The following values are permitted for the cmv name: MASK, OPTN, PSDM,
RXDA, TEST, TXDA, or ADPT.
<offset>
The offset value which is a decimal in the range of 0 to 65535.
<value>
Value of the CMV. Value is expected in hexadecimal format.
<command>
Type of operation ( Read or Write ).
<msgid>
Message Id in decimal digits.
1.20.6 delusercmv
delusercmv <index>
Deletes the specified user CMV. The user cmv was added with the “addusercmv” command.
file:///P|/T_WRITER/Documentation/Released/9003%20(Guinness)/User%20Guide/9003%20(Guiness)%20prac%20template/cli.htm (40 of 71) [11/6/2002 8:58:45 AM]
U.S. Robotics SureConnect ADSL Ethernet/USB Router User Guide
<index>
Index of CMV as displayed by “listusercmv”.
1.20.7 listusercmv
listusercmv
Lists the User CMVs added by the ‘addusercmv’ command.
1.20.8 eread
eread <offset> <size>
Displays the Eagle 16 bit data memory
<offset >.
0 - 3ffff (hexadecimal)
< size >
1 - 256 (decimal)
1.20.9 ewrite
ewrite <offset> <value>
Writes 1 16-bit word into Eagle 16 bit data memory.
<offset >
0 - 3ffff (hexadecimal)
< value >
0 - ffff (hexadecimal)
1.20.10 mwrite
mwrite <offset> <value>
Writes 1 32-bit word into Eagle 16 bit data memory.
<offset >
file:///P|/T_WRITER/Documentation/Released/9003%20(Guinness)/User%20Guide/9003%20(Guiness)%20prac%20template/cli.htm (41 of 71) [11/6/2002 8:58:45 AM]
U.S. Robotics SureConnect ADSL Ethernet/USB Router User Guide
0xa0000000 - 0xbfffffff (hexadecimal)
< value >
0 - ffffffff (hexadecimal)
1.20.11 mread
mread <offset> < size >
Displays the Falcon 32 bit data memory.
<offset >
0xa0000000 - 0xbfffffff (hexadecimal)
< size >
1 - 100 (decimal)
1.21 dhcpr
dhcpr start -o <remote_server>
dhcpr stop
dhcpr status
Configures the DHCP Relay function. The system acts as a proxy for DHCP requests. When
enabling the DHCP Relay, the address of the DHCP server is specified and DHCP requests are
relayed to the specified server. On enabling DHCP relay functionality, the DHCP server
functionality gets disabled (if it is enabled) and vice versa.
start -o <remote_server> Starts DHCP relay. The remote_server is the IP address of the DHCP
server.
Stop Disables or stops the DHCP relay service.
Status Shows the status of the DHCP Relay.
1.22 igmp
igmp -o -proxyif <interface>
file:///P|/T_WRITER/Documentation/Released/9003%20(Guinness)/User%20Guide/9003%20(Guiness)%20prac%20template/cli.htm (42 of 71) [11/6/2002 8:58:45 AM]
U.S. Robotics SureConnect ADSL Ethernet/USB Router User Guide
igmp -o -routerif <interface>
igmp -o -deleteif <interface>
igmp -o -display
Used for configuring igmp proxy and router interfaces.
-proxyif <interface> Sets the proxy interface. Typically a LAN interface (eth0) is specified.
-routerif <interface> Sets the router interface. Typically a WAN interface (ATM0, PPP0) is
specified.
-deleteif <interface> Deletes either the proxy or router interface.
-display Displays the group in all interfaces.
1.23 qosc
The following commands are available in the “qosc” directory
1.23.1 addrule
addrule prority -o [-da address] [-sa address] [-p protocol] [-dp portNum] [-sp portNum]
[-tos serviceType] [-type icmp-types] [-flg tcp-flags] [-tc actionID] [-fw actionID]
The addrule command provides a mechanism to specify an action (Firewall or Traffic Conditioning)
to packets matching a user specified criteria. One or more of the following packet header fields can
be used in the specification criteria: destination IP address, source IP address, destination port,
source port, and protocol (TCP, UDP, or ICMP). Every rule must be associated with at least one
action. Before adding a rule, the specified action must already be available in the system.
<priority>
The priority for this rule. Since there can be many rules configured and it is possible for a packet to
match several different rules, the priority is used to break ties. The priority values range from the
highest priority 0 to the lowest priority 65531. By default the minimum priority value (65535) is
assigned if the priority is not specified.
file:///P|/T_WRITER/Documentation/Released/9003%20(Guinness)/User%20Guide/9003%20(Guiness)%20prac%20template/cli.htm (43 of 71) [11/6/2002 8:58:45 AM]
U.S. Robotics SureConnect ADSL Ethernet/USB Router User Guide
-da <ip_address>
Specifies that one of the criteria for a match is the destination address of the IP packet
header. The ip_address must be specified in dot-notation. The prefix_length is used to specify
the size of the netmask. The value for prefix_length from 12 to 32.
-sa <ip_address>[/<prefix_length>]
Specifies that one of the criteria for a match is the ource address of the IP packet header. The
ip_address must be specified in dot-notation. The prefix_length is used to specify the size of the
netmask. The value for prefix_length from 12 to 32.
-dp [operator]<port>
Specifies that one of the criteria for a match is the destination port of the IP packet header. The
port is a numeric value from 0 to 65,531. Optionally an operator may be specified so that many
ports can be matched. The operators supported are: <, >, =.
-sp [operator]<port>
Specifies that one of the criteria for a match is the source port of the IP packet header. The port is
a numeric value from 0 to 65,531. Optionally, an operator may be specified so that many ports
can be matched. The operators supported are: <, >, =.
-tos [operator] <class>
The Type Of Service flag causes the type of service field in the packet header to be marked with
the specified value. Based upon this marking, the packet will be given the applicable priority if the
transmitting interface has a Queuing mechanism enabled. The class may be any one of the
following:
Priority Alternative
Priority
Comment
rt Ef real time traffic
ct af1 critical traffic
hi af2 high priority traffic
md af3 medium priority traffic
file:///P|/T_WRITER/Documentation/Released/9003%20(Guinness)/User%20Guide/9003%20(Guiness)%20prac%20template/cli.htm (44 of 71) [11/6/2002 8:58:45 AM]
U.S. Robotics SureConnect ADSL Ethernet/USB Router User Guide
lo af4 low priority traffic
df default
Optionally an operator may be specified so that many ports can be matched. The operators
supported are: <, >, =.
-flgs <tcp_flags>
This field represents the TCP flags SYN, URG, RST, FIN, ACK
-typ <icmp_types>
ICMP packet types such as ECHO REQ, ECHO REPLY, DEST UNREACH etc
Note: To assign an Action ID to a rule, you must create or use an existing Action ID before using
AddRule command.
-tc <action_id> <not support in the USR9003>
Packets matching the criteria specified in this rule will be processed with the specified Traffic
Conditioning action. The Traffic Conditioning action is identified by the action_id. The action_id
was returned by an addtc <not support in the USR9003> command.
-fw <action_id>
Packets matching the criteria specified in this rule will be processed with the specified Firewall
action. The Firewall action is identified by the action_id. The action_id was returned by addfw
command.
Examples:
addrule 5 -o -sa 192.168.2.1/24 -da 192.168.3.4 -p tcp -dp <2334 -sp 4546 -tos ef -fw 3
Packets with a source IP address of 192.168.2.1, a destination address of 192.168.3.4, and using
a TCP destination port less than 2334 will have its TOS field marked with high priority and will be
processed by Firewall action #3.
file:///P|/T_WRITER/Documentation/Released/9003%20(Guinness)/User%20Guide/9003%20(Guiness)%20prac%20template/cli.htm (45 of 71) [11/6/2002 8:58:45 AM]
U.S. Robotics SureConnect ADSL Ethernet/USB Router User Guide
addrule 6 -o -sa 192.168.2.1 -da 192.168.3.4 -p icmp -dp >2334 -sp 4546 -tc 1 -fw 2
Packets with a source IP address of 192.168.2.1, a destination address of 192.168.3.4, a source
port of 4546, and using an ICMP destination port greater than 2334 will have a source
portprocessed by Traffic Conditioning action #1 and Firewall action #2.
1.23.2 deleterule
deleterule <rule_id> -[<action_type>]
Deletes a configured rule. The rule_id is a Rule Identifier that is returned by addrule. Rule
Identifiers are also listed in the listrules command. If action_type is specified (as tc or fw), then
only the action part is deleted and not the rule. If the action type is not specified or if the specified
action type is the only action present in the rule, then the rule is also deleted.
<rule_id>
The rule identifier returned by addrule. Rule identifiers are also listed by listrules.
-<action_type>
The action_type option can be tc for Traffic Conditioning or fw for Firewall action. This deletes the
action part of the rule.
Note: If the rule has only one action specified with it, the entire rule is deleted as well.
Examples:
deleterule 1
Deletes the rule whose identifier is 1.
deleterule 2 -tc
file:///P|/T_WRITER/Documentation/Released/9003%20(Guinness)/User%20Guide/9003%20(Guiness)%20prac%20template/cli.htm (46 of 71) [11/6/2002 8:58:45 AM]
U.S. Robotics SureConnect ADSL Ethernet/USB Router User Guide
Deletes rule number 2’s traffic conditioning action. If rule 2 does not have any other actions, the
rule is also deleted.
1.23.3 listrule
listrule <rule_id>
Displays details about a configured rule whose identifier is rule_id.
Example:
listrule 1
ID: 1 PRI: 30000 [SRC: 192.168.1.0/24] [FW: 1]
1.23.4 listrules
listrules
Displays details of all configured Rules.
Example:
Listrules
ID: 1 PRI: 30000 [SRC: 192.168.1.0/24] [FW: 1]
ID: 2 PRI: 29000 [DP: =67] [FW: 2]
1.23.5 listroutes
file:///P|/T_WRITER/Documentation/Released/9003%20(Guinness)/User%20Guide/9003%20(Guiness)%20prac%20template/cli.htm (47 of 71) [11/6/2002 8:58:45 AM]
U.S. Robotics SureConnect ADSL Ethernet/USB Router User Guide
listroutes
Displays the router’s routing table.
Example:
listroutes
Internet Routing Table
Destination
Gateway
----------------------------------------------127.0.0.1
127.0.0.1
192.168.1.0
0: 0: 0: 0: 0: 0
224.0.0.0
0: 0: 0: 0: 0: 0
Netmask
-----255.255.255.0
255.0.0.0
1.23.6 listarps
listarps
Displays the router’s arp table.
Example
listarps
ARP Table
destination addr
Link Address
---------------------------------------192.168.1.3
0: 4:76:3f:6e:9c
224.0.0.1
1: 0:5e: 0: 0: 1
1.23.7 nat
file:///P|/T_WRITER/Documentation/Released/9003%20(Guinness)/User%20Guide/9003%20(Guiness)%20prac%20template/cli.htm (48 of 71) [11/6/2002 8:58:45 AM]
U.S. Robotics SureConnect ADSL Ethernet/USB Router User Guide
Network Address Translation (NAT) hides internal IP addresses of a network from the outside
world and provides access to the Internet for multiple machines using a single or fixed number of
public IP addresses. The NAT framework supports both dynamic and static NAT. The nat
command enables dynamic NAT processing
With the nat command, all private addresses are mapped to the IP address of the specified WAN
interface.
nat -o [-interface <interface>]
yes|no] [-disable] [-status]
[-alias_address <addr>] [-unregistered_only yes|no] [-same_ports
- interface <interface>
Configures the specified WAN interface to use dynamic Network Address Translation. For all
packets transmitted from the WAN interface, the source address is modified to use IP address of
the WAN interface. The source port of the packet may be modified, as required. Packets received
on the WAN interface will have their destination address modified appropriately to reach the
appropriate machine on the LAN network.
-alias_address <ip_address>
The source address field of the outbound packets from the WAN interface will be overwritten with
the specified ip_address.
-unregistered_only [yes | no]
If yes, only the outbound packets with unregistered source IP addresses are translated. All the
outbound packets with the registered source IP addresses are forwarded on the WAN interface
without translation. This is useful if you have one more subnet having registered IP addresses that
share the common WAN link with the subnet having unregistered IP addresses.
Registered addresses are addresses reachable and advertised in the Internet, whereas
unregistered addresses are private addresses which are not reachable through the Internet.
Currently there is no command to display registered addresses.
file:///P|/T_WRITER/Documentation/Released/9003%20(Guinness)/User%20Guide/9003%20(Guiness)%20prac%20template/cli.htm (49 of 71) [11/6/2002 8:58:45 AM]
U.S. Robotics SureConnect ADSL Ethernet/USB Router User Guide
-same_ports [yes | no]
If yes, nat will try to retain the source port without modification for outgoing packets. This can only
be done if the port is not already in use by another connection.
The default is yes.
-disable
The Option is used to disable the nat interface.
-status
This will display all the configured options on nat interface.
Examples:
nat -o -interface atm0
Configures the WAN interface atm0 to use network address translation.
nat -o -alias_address 202.54.30.50
Configures alias address as 202.54.30.50 and maps this IP address to an interface and takes that
as NAT interface.
nat .o -unregistered_only yes
Tells the NAT module to translate only those outgoing packets that bear an unregistered IP
address in the source address field of the packet header.
nat .o -same_ports yes
Tells the NAT to try retaining the same source port while translating outbound packets. However, if
this causes conflict with existing entries in the NAT table, then source port will be modified.
file:///P|/T_WRITER/Documentation/Released/9003%20(Guinness)/User%20Guide/9003%20(Guiness)%20prac%20template/cli.htm (50 of 71) [11/6/2002 8:58:45 AM]
U.S. Robotics SureConnect ADSL Ethernet/USB Router User Guide
nat -o -disable
Disables the nat interface.
nat -o -status
Displays all the options on nat interface.
1.23.8 addressmap
(This command is not supported for the USR9003 router. Use the Menu system or the Web
Interface to create or delete Static NAT routes or Range Port maps)
1.23.9 portmap
(This command is not supported for the USR9003 router. Use the Menu system or the Web
Interface to create or delete Static NAT routes or Range Port maps)
1.23.10 delrdaddr
(This command is not supported for the USR9003 router. Use the Menu system or the Web
Interface to create or delete Static NAT routes or Range Port maps)
1.23.11 maplist
maplist
Display the current mappings for NAT configurations.
Example:
maplist
Local address range
Alias address
file:///P|/T_WRITER/Documentation/Released/9003%20(Guinness)/User%20Guide/9003%20(Guiness)%20prac%20template/cli.htm (51 of 71) [11/6/2002 8:58:45 AM]
U.S. Robotics SureConnect ADSL Ethernet/USB Router User Guide
-----------------------------------------192.168.1.1 192.168.1.10 210.134.100.0
-----------------------------------------Port range mappings [WAN to LAN]...
Alias address Port range
Local address Port range
Protocol
-----------------------------------------------------------------------210.168.0.1 60 - 78 192.168.1.10 70 - 88 TCP
-----------------------------------------------------------------------1.23.12 addpublic
addpublic <public_addr >
<public_addr>
The public IP address to be entered. Dot notation should be used.
Examples:
addpublic 217.11.52.34
Enters the public IP address 217.11.52.34.
1.23.13 delpublic
delPublic <index>
Removes the entered IP addresses specified by addpublic. The index specifies a particular IP
address. The indexes are specified with the listpubaddrs command.
file:///P|/T_WRITER/Documentation/Released/9003%20(Guinness)/User%20Guide/9003%20(Guiness)%20prac%20template/cli.htm (52 of 71) [11/6/2002 8:58:45 AM]
U.S. Robotics SureConnect ADSL Ethernet/USB Router User Guide
1.23.14 listpubaddrs
listpubaddr
Lists the public IP addresses that were entered with addpublic.
1.23.15 links
links
Display all logic links in NAT table.
Example:
links
LOCAL-ADDR/PORT ALIAS-ADDR/PORT REMOT-ADDR/PORT LINK/EX.TIME IN/OUT-PKTS
~~~~~~~~~~~~~~~ ~~~~~~~~~~~~~~~ ~~~~~~~~~~~~~~~ ~~~~~~~~~~~~ ~~~~~~~~~~~
192.168.1.3
0.0.0.0
192.168.1.1
TCP
657
2217
0
23
172800
1105
1.23.16 addfw
addfw action -o [-ifa interface] [-dir direction] [-code icmp code]
action : allow, deny, reject, reset, unreach,
interface : any vaild interface of the system
direction : in or out, default all direction
icmp code : any for the follwing code mentioned
file:///P|/T_WRITER/Documentation/Released/9003%20(Guinness)/User%20Guide/9003%20(Guiness)%20prac%20template/cli.htm (53 of 71) [11/6/2002 8:58:45 AM]
U.S. Robotics SureConnect ADSL Ethernet/USB Router User Guide
unreach net(default)
-0
unreach host
-1
unreach port
-3
unreach srcfail
-5
unreach net-unknown
-6
unreach host-unknown
-7
unreach isolated
-8
unreach net-prohibited - 9
unreach host-prohibited - 10
unreach filter-prohibited - 13
Adds a firewall action. An action identifier is returned which can be used with the addrule
command. The addrule command is used to specify the types of packets that will be given this
action.
<action>
Specifies what happens when the packet enters. The following actions are possible:
Action Comment
Allow - Permits the packet to enter or leave the system.
Deny - Drops the packet.
Reset - Forces the TCP connection to be reset.
Reject - Drops the packet and issues an .unreach host. ICMP error.
Unreach - Drops the packet and sends the ICMP error specified with the -error_code option.
Divert - Changes the destination port of the packet. See the -port option.
-ifa <interface>
The name of the interface that this firewall action applies to. Typically this is the WAN interface
(atm0, ppp0).
-dir <direction>
Specifies whether the action applies to incoming, outgoing, or both incoming and outgoing
traffic. The allowable values for direction are in or out. If not specified, the action applies to both
incoming and outgoing traffic.
file:///P|/T_WRITER/Documentation/Released/9003%20(Guinness)/User%20Guide/9003%20(Guiness)%20prac%20template/cli.htm (54 of 71) [11/6/2002 8:58:46 AM]
U.S. Robotics SureConnect ADSL Ethernet/USB Router User Guide
-code <icmp_code>
This ICMP error code is issued when the unreach action is used.
Code Meaning
0 unreach net (default)
1 unreach host
3 unreach port
5 unreach srcfail
6 unreach net-unknown
7 unreach host-unknown
8 unreach isolated
9 unreach net-prohibited
10 unreach host-prohibited
13 unreach filter-prohibited
Examples:
addfw reset –o -ifa atm0
addrule 6 -da 216.11.52.34 -dp 23 -p tcp -fw 1
The rules above, results in all attempts via telnet from any host to 216.11.52.34 being reset. First,
the addfw command defines the firewall action of reset for the traffic coming from the atm0
interface. The addfw command returns an identifier, suppose for this example that 1 is
returned. Next, the addrule command defines telnet from any host to 216.11.52.34 and using the fw option it
links the reset action as specified with the addfw command.
addfw unreach –o -code 1
addrule 6 -da 192.168.7.25 -p icmp -fw 3
The two rules above specify that all ICMP packets destined to 192.168.7.25 will result in the
file:///P|/T_WRITER/Documentation/Released/9003%20(Guinness)/User%20Guide/9003%20(Guiness)%20prac%20template/cli.htm (55 of 71) [11/6/2002 8:58:46 AM]
U.S. Robotics SureConnect ADSL Ethernet/USB Router User Guide
message "ICMP Host Unreachable" being sent back to the sender. First, the addfw command
defines a Host Unreachable action. Next, the addrule command defines ICMP flow to
192.168.7.25, and using the -fw option, it links the unreach action to this flow.
1.23.17 listallfw
listallfw
Displays all firewall actions.
Example:
listallfw
Id
Interface Direction Day-Time To Day-Time Action
1
2
3
4
eth0
any
atm0
any
in
sun 0:00 sat 23:59 allow
any
sun 0:00 sat 23:59 allow
any
sun 0:00 sat 23:59 reset
any
sun 0:00 sat 23:59 unreach host
1.23.18 listfw
listfw <id>
Displays all configured parameters of the specified action identfier.
Example:
listfw 4
file:///P|/T_WRITER/Documentation/Released/9003%20(Guinness)/User%20Guide/9003%20(Guiness)%20prac%20template/cli.htm (56 of 71) [11/6/2002 8:58:46 AM]
U.S. Robotics SureConnect ADSL Ethernet/USB Router User Guide
Id
FIREWALL ACTIONS
----------------Interface Direction Day-Time To Day-Time Action
4
any
any
sun 0:00
sat 23:59 unreach host
1.23.19 delfw
delfw <id>
Deletes the specified firewall action. The id is returned from the addfw command and is also listed
in the listallfw command.
1.24 ATM
1.24.1 vcadd
vcadd <vpi> <vci> <service> <encaps> -o [-peak <val>] [-avg <val>] [-mbs <val>]
[-cdvt <val>]
Establishes a Permanent Virtual Circuit (PVC) with the specified traffic descriptors. The service
specifies the traffic type of the PVC. Permissible values are: cbr, rtvbr, nrtvbr, or ubr. The
adaptation parameter is used to specify the type of ATM adaptation layer for which permissible
values are aal5 for data connections and aal2 for voice connections.
<vpi> <vci> Virtual Path Identifier (VPI) and Virtual Channel Identifier (VCI) that identifies this ATM
connection. The vpi is an integer number which can range from 0 to 255. The vci is an integer
number which can range from 0 to 65,535.
<service> The service specifies the kind of traffic shaping. The possible values are cbr, rtvbr,
nrtvbr, or ubr.
file:///P|/T_WRITER/Documentation/Released/9003%20(Guinness)/User%20Guide/9003%20(Guiness)%20prac%20template/cli.htm (57 of 71) [11/6/2002 8:58:46 AM]
U.S. Robotics SureConnect ADSL Ethernet/USB Router User Guide
The following table briefly describes these options.
Service
Name
cbr
Constant Bit Rate Supports real-time applications requiring a
fixed amount of bandwidth. The applications
produce data at regular rates.
Real Time
Supports time-sensitive applications such as
Variable Bit Rate voice. In these applications the rate at which
cells arrive are varied. But these cells need
to be delivered in a timely manner with
minimal delay.
rtvbr
Description
nrtvbr
Non Real Time Supports applications that have no
Variable Bit Rate constraints on delay and delay variation, but
still have variable-rate and bursty traffic
characteristics. Applications include packet
data transfers, terminal sessions, and file
transfers.
ubr
Unspecified Bit
Rate
Best effort service that does not require
tightly
constrained delay and delay variation. UBR
provides
no specific quality of service or guaranteed
throughput. The traffic is “at risk” because
the network provides no performance
guarantees for UBR traffic. The traffic
descriptor is similar to IP’s “best effort”
approach to traffic management.
<encaps> Specifies whether ATM Adaptation Layer is aal2 or aal5. For voice (not support by
USR9003) connections, AAL2 must be specified. For data connections, AAL5 must be specified.
-peak <value> Defines the fastest rate a user can send cells to the network. It is expressed in
file:///P|/T_WRITER/Documentation/Released/9003%20(Guinness)/User%20Guide/9003%20(Guiness)%20prac%20template/cli.htm (58 of 71) [11/6/2002 8:58:46 AM]
U.S. Robotics SureConnect ADSL Ethernet/USB Router User Guide
units of cells per second.
-avg <value> Defines the maximum sustainable/average rate a user can send cells to the network.
It is expressed in cells per second. This specifies the bandwidth utilization. This value must always
be less than or equal to the Peak Cell Rate (see -pcr option).
-mbs <value> Maximum number of cells the user can send at the peak rate in a burst, within the
sustainable rate.
-cdvt <value> Constrains the number of cells the user can send to the network at the maximum
line rate. It is expressed in microseconds.
Examples:
vcadd 0 38 cbr aal2 -o -peak 1600 -mbs 25 -cdvt 50000
The following creates a PVC (vpi - 0,vci - 38). Service class is cbr (Constant Bit Rate) and
encapsulation as aal2 (for voice). The traffic descriptors are set for peak cell rate of 1600kbps,
burst size of 25 cells, and cell delay variation of 50000 microseconds.
vcadd 0 39 ubr aal5
The following creates a PVC (vpi=0, vci=39). Service class is ubr (Unspecified Bit Rate) and
encapsulation is aal5 (for data).
1.24.2 deletevc
deletevc <vpi> <vci>
Deletes the specified PVC. The PVC is identified by the vpi / vci values.
Example:
deletevc 0 39
Deletes a PVC with vpi=0 and vci=39.
1.24.3 showatmconn
showatmconn
Lists the existing PVCs.
Example:
showatmconn
file:///P|/T_WRITER/Documentation/Released/9003%20(Guinness)/User%20Guide/9003%20(Guiness)%20prac%20template/cli.htm (59 of 71) [11/6/2002 8:58:46 AM]
U.S. Robotics SureConnect ADSL Ethernet/USB Router User Guide
ATM INTERFACE CONFIGURATION INFORMATION
MAX INTERFACE VPC’s : 10
MAX INTERFACE VCI’s : 255
ILMI VPI VALUE AT THIS INTERFACE : 0
ILMI VCI VALUE AT THIS INTERFACE : 16
INTERFACE ADMINISTRATIVE ADDRESS : 137.71.139.250
ACTIVE VCC CONNECTIONS AT THIS INTERFACE : 2
1.24.4 atmstats
atmstats
Lists the AAL5 and ATM statistics.
1.24.5 f5lb
f5lb <vpi> <vci> <flow_type> -o <LLID>
This command initiates an F5 loopback.
<vpi> Virtual Path Identifier for the ATM connection.
<vci> Virtual Circuit Identifier for the ATM connection.
<flow_type> Specifies segment (seg) or end-to-end (ete).
<LLID> The loopback identifer. This is specified as 32 hex digits. The default is:
FFFFFFFFFFFFFFFFFFFFFFFFFFFFFFFF
1.24.6 vpadd
vpadd <id> <vpi> <service> -o [-peak <val>][-avg <val>] [-mbs <val>] [-cdvt <val>]
This command allows the adding and configuring of an atm connection.
<id> Connection identification
file:///P|/T_WRITER/Documentation/Released/9003%20(Guinness)/User%20Guide/9003%20(Guiness)%20prac%20template/cli.htm (60 of 71) [11/6/2002 8:58:46 AM]
U.S. Robotics SureConnect ADSL Ethernet/USB Router User Guide
< vpi > vpi number
< service > cbr / rtvbr / nrtvbr / ubr
<peak val>
Peak cell rate (in cells/s)
<avg val >
Average/minimum (SCR) cell rate (in cells/s)
<mbs val >
Burst size in cells
<cdvt val >
Cell delay variation tolerance (in micro secs)
1.25 sndcp
The following commands are available under the “sndcp” directory.
1.25.1 routedbridge
routedbridge <interface> disable <vpi><vci>
routedbridge <interface> enable <vpi><vci> -o <-enc encapsulation> <-vpn OUI
vpnId>
Configures the specified WAN interface to use Routed Bridge which is RFC 2684 routing.
Note: The Maximum Transfer Unit (MTU) for the Routed Bridge is 9182.
Interface The name of the WAN interface. Typically this is ‘atm0’.
Enable Enables this Routed Bridge interface.
Disable Disables this Routed Bridge interface.
<vpi> <vci > These are the vpi, vci values on which the Routed Bridge has to be enabled/disabled.
vpi,vci are assigned with the vcadd command. The showatmconn command can also be used to
list the current ATM connections with their respective vpi and vci values. (Note the vcadd and
showatmconn commands are located in the “atm” directory).
file:///P|/T_WRITER/Documentation/Released/9003%20(Guinness)/User%20Guide/9003%20(Guiness)%20prac%20template/cli.htm (61 of 71) [11/6/2002 8:58:46 AM]
U.S. Robotics SureConnect ADSL Ethernet/USB Router User Guide
-enc LLC | VC Specifies the encapsulation type. The possible values are ‘llc’ or ‘vc’, which
represent Logical Link Control or VC multiplexing respectively.
-vpn OUI vpnId Enables VPN encapsulation. OUI is organizationally unique identifier. VpnId is
VPN index.
Example:
routedbridge atm0 enable 0 100 –o -enc LLC
Establishes a Routed Bridge connection on the WAN interface atm0. VPI, VCI values 0, 100 is
used for the ATM connection. LLC encapsulation will be used.
routedbridge atm0 disable 0 100
Disables the Routed Bridge connection.
1.25.2
Ipoa
ipoa <interface> disable <vpi><vci> -o [default] [-nhp <ip_address>]
ipoa <interface> enable <vpi><vci> -o [-enc LLC|VC] [default] [-nhp <ip_address>]
[-vpn <OUI> <vpnId>]
Configures the specified WAN interface to use IPoA, which is Classical IP over ATM including
Inverse ATM Arp. IPoA uses Inverse ATM Arp to get the peer IP address. The Maximum Transfer
Unit (MTU) for IPoA is 9182.
Note: In this case, if the peer does not support Inverse ATM Arp, then there will not be any traffic
flow. If the nexthop (-nhp option) or default PVC is configured per IPoA, then it does not use
Inverse ATM Arp to get the peer IP address.
Interface The name of the WAN interface. Typically this is ‘atm0’.
Enable Enables this IPoA interface.
Disable Disables this IPoA interface.
<vpi> <vci > These are the vpi, vci values on which ipoa has to be enabled/disabled. vpi,vci are
assigned with the vcadd command. The showatmconn command can also be used to list the
current ATM connections with their respective vpi and vci values. (Note the vcadd and
showatmconn commands are located in the “atm” directory).
-enc LLC | VC Specifies the encapsulation type. The possible values are ‘llc’ or ‘vc’ which
file:///P|/T_WRITER/Documentation/Released/9003%20(Guinness)/User%20Guide/9003%20(Guiness)%20prac%20template/cli.htm (62 of 71) [11/6/2002 8:58:46 AM]
U.S. Robotics SureConnect ADSL Ethernet/USB Router User Guide
represent Logical Link Control or VC multiplexing respectively.
Default If an entry does not exist for the destination in the inverse ATM Arp table, then the packet
is forwarded on the PVC specified.
-nhp <ip_address> Specifies the next hop IP address of the peer-end.
-vpn <OUI> <vpnId> Specifies the VPN encapsulation. The OUI (Organizationally Unique
Identifier) and VPN identifier are specified as numbers.
Example:
ipoa atm0 enable 0 100 –o -enc LLC
Establishes an IPoA connection on the WAN interface atm0. VPI, VCI values 0, 100 is used for the
ATM connection. LLC encapsulation will be used.
ipoa atm0 disable 0 100
Disables the IPoA connection.
1.25.3 list
list <param>
Displays the configurations of IPOA/BRIDGE/ROUTEDBRIDGE.
<param>
param can be bridge / routedbridge / ipoa.
Example:
list bridge
Diplays Bridge parameters.
list routedbridge
Diplays Routed Bridge parameters.
list ipoa
Diplays IPoA parameters.
1.25.4 pppoe
file:///P|/T_WRITER/Documentation/Released/9003%20(Guinness)/User%20Guide/9003%20(Guiness)%20prac%20template/cli.htm (63 of 71) [11/6/2002 8:58:46 AM]
U.S. Robotics SureConnect ADSL Ethernet/USB Router User Guide
pppoe <profile> -o <-if Interface> <-encap Encapsulation> <-restarttime Timeout >
<-auth Auth> <-myaddr IPAddr> <-peer PeerIPAddr> <-mtu MTU> <-mru MRU>
<-hwaddr Ethaddr> <-service ServiceName> <-acname ACName> <-tag HostTag>
<-user Username> <-pass Password> <-vpi Vpi> <-vci Vci> <-mode Mode>
<-idletime idleTimeout> <-nat [enable/disable]> <-netmask mask> <-vpn OUI vpnId>
Sets up a PPPoE profile.
Profile Profile number to configure. Specify an integer number from 0 through 7.
-if <interface> Interface name with unit number. Four PPP interfaces are available: ppp0, ppp1,
ppp2, ppp3, ppp4, ppp5, ppp6, ppp7
-encap <encapsulation> Encapsulation type. Possible values are LLC (Logical Link Control) or
VC (VC Multiplexing).
-restarttime <timeout> Timeout in milliseconds. The default is 3 seconds (3000 milli seconds).
-auth <authentication> Authentication type (pap, chap, mschapv1, mschapv2).
-myaddr <ip_addr> Desired self IP Address (eg 192.168.26.7). Expressed in dot notation.
-peer <peer_addr> Peer IP Address to optionally specify the address of the Internet Service
Provider. Expressed in dot notation.
-mtu <mtu> Maximum Transmission Unit expressed in bytes. The default is 1492.
-mru <mru> Maximum Receive Unit, negotiated in LCP. The default is 1492.
-hwaddr <addr> Hardware address of the router for this connection. Typically, one of the Ethernet
hardware addresses of the router are used for this. The address is specified with ‘:’ used as a
delimiter between byte values (eg 10:11:12:13:14:15).
-service <service_name> Service Name.
-acname <ac_name> Access Concentrator name.
-tag <host_tag> Use host unique tag.
-user <user> Username. This string can be up to 30 characters.
-pass <password> Password. This string can be up to 30 characters.
-vpi <vpi> The ATM vpi value which was assigned in a vcadd command or listed in a
atmshowconn command.
-vci <vci> The ATM vci value which was assigned in a vcadd command or listed in a
atmshowconn command.
-mode <mode> Mode can be AUTO or DIRECT. In case the mode is set to AUTO, the PPPoE
file:///P|/T_WRITER/Documentation/Released/9003%20(Guinness)/User%20Guide/9003%20(Guiness)%20prac%20template/cli.htm (64 of 71) [11/6/2002 8:58:46 AM]
U.S. Robotics SureConnect ADSL Ethernet/USB Router User Guide
negotiation starts only when the system identifies any traffic required to be transferred on the link.
In case the mode is set to DIRECT, the PPPoE negotiation is started manually using the
“pppoestart” command. The default mode is DIRECT.
-idletime <idletime> The value of idletime is given in minutes and this value indicates how long
the link remains up when there is no data transfer over the link. The idle time works only when
used in combination with mode AUTO. The default is 60 seconds.
-nat enable|disable Enables or disables NAT (Network Address Translation) for this PPP
interface. The default is for NAT to be disabled.
-netmask <mask> Specifies the netmask for the PPP interface. The mask is specified in dot
notation (i.e. 255.255.255.0).
-vpn <OUI> <vpnId> Specifies the VPN encapsulation. The OUI (Organizationally Unique
Identifier) and VPN identifier are specified as numbers.
Example:
pppoe 1 –o -if ppp0 -vpi 0 -vci 100 -user jones -pass Indiana
Defines a PPPoE profile. The ppp0 interface is used with the ATM connection vpi 0 and vci 100.
The user name is “jones” and the password is “Indiana”.
1.25.5 pppoestart
pppoestart <Profile>
Starts PPPoE given the specified profile. The profile is specified with an integer (0, 1, 2). The
profile was previously specified with the pppoe command.
pppoestop <Profile>
1.25.6 pppoestop
pppoestop <Profile>
Stops PPPoE given the specified profile. The profile is specified with an integer (0, 1, 2). The
profile was previously specified with the pppoe command.
pppoestop <Profile>
file:///P|/T_WRITER/Documentation/Released/9003%20(Guinness)/User%20Guide/9003%20(Guiness)%20prac%20template/cli.htm (65 of 71) [11/6/2002 8:58:46 AM]
U.S. Robotics SureConnect ADSL Ethernet/USB Router User Guide
1.25.7 pppoelist
pppoelist [-profile Profile]
Displays the listing of all available free profiles. If -profile is not specified, this command will
display all the valid configured profiles.
1.25.8 pppoedefault
pppoedefault <profile>
Configures the specified profile as the default PPPoE connection. This profile must be using “auto”
mode. Out of all the profiles that are using the “auto” option, only one can be run at a time. This
command is used to specify that profile. If the “pppoedefault” command is not used, the first profile
that used the “auto” option is used as the default.
1.25.9 pppoedel
pppoedel <profile> | all
Deletes the specified profile. Profile is specified as a number (see pppoe command). If all is
specified, then all profiles are deleted. This command only deletes inactive profiles. If a profile is in
use, it must be stopped before it can be deleted.
1.25.10 pppoa
pppoa <profile> -o <-if Interface> <-encap Encapsulation> <-restarttime Timeout
> <-auth Auth> <-myaddr IPAddr> <-peer PeerIPAddr> <-mtu MTU> <-mru MRU>
<-user Username> <-pass Password> <-vpi Vpi> <-vci Vci> <-nat [enable/disable]> <-netmask
mask> <-vpn OUI vpnId>
file:///P|/T_WRITER/Documentation/Released/9003%20(Guinness)/User%20Guide/9003%20(Guiness)%20prac%20template/cli.htm (66 of 71) [11/6/2002 8:58:46 AM]
U.S. Robotics SureConnect ADSL Ethernet/USB Router User Guide
Sets up a PPPoA profile.
Profile Profile number to configure. Specify an integer number from 0 through 7.
-if <interface> Interface name with unit number. Eight PPP interfaces are available: ppp0, ppp1,
ppp2, ppp3, ppp4, ppp5, ppp6, and ppp7.
-encap <encapsulation> Encapsulation type. Possible values are LLC or VC.
-restarttime <timeout> Timeout in milliseconds. The default is 3 seconds (3000 milli seconds).
-auth <authentication> Authentication type (PAP or CHAP).
-myaddr <ip_addr> Desired self IP Address (eg 192.168.26.7). Expressed in dot notation.
-peer <peer_addr> Peer IP Address to optionally specify the IP address of the Internet Service
Provider. Expressed in dot notation.
-mtu <mtu> Maximum Transmission Unit expressed in bytes. The default is 1500.
-mru <mru> Maximum Receive Unit, negotiated in LCP. The default is 1500.
-user <user> Username.
-pass <password> Password.
-vpi <vpi> The ATM vpi value which was assigned in a vcadd command or listed in a
atmshowconn command.
-vci <vci> The ATM vci value which was assigned in a vcadd command or listed in a
atmshowconn command.
-nat enable|disable
Enables or disables NAT (Network Address Translation) for this PPP interface. The default is for
NAT to be disabled.
-netmask <mask> Specifies the netmask for the PPP interface. The mask is specified in dot
notation (i.e. 255.255.255.0).
-vpn <OUI> <vpnId> Specifies the VPN encapsulation. The OUI (Organizationally Unique
Identifier) and VPN identifier are specified as numbers.
Example:
pppoa 1 –o -if ppp0 -vpi 0 -vci 100 -user jones -pass Indiana
Defines a PPPoA profile. The ppp0 interface is used with the ATM connection with vpi 0
and vci 100. The user name is “jones” and the password is “Indiana”.
file:///P|/T_WRITER/Documentation/Released/9003%20(Guinness)/User%20Guide/9003%20(Guiness)%20prac%20template/cli.htm (67 of 71) [11/6/2002 8:58:46 AM]
U.S. Robotics SureConnect ADSL Ethernet/USB Router User Guide
1.25.11 pppoastart
pppoastart <Profile>
Starts PPPoA given the specified profile. The profile is specified with an integer (0, 1, 2). The
profile was previously specified with the pppoa command pppoastop <Profile>
1.25.12 pppoastop
pppoastop <Profile> Stops PPPoA given the specified profile. The profile is specified with an
integer (0, 1, 2). The profile was previously specified with the pppoa command.
pppoastop <Profile>
1.25.13 pppoalist
pppoalist [-profile Profile]
Displays the listing of all available free profiles. If -profile is not specified, this command will
display all the valid configured profiles.
1.25.14 pppoadel
pppoadel <profile> | all
Deletes the specified profile. Profile is specified as a number (see pppoa command). If all is
specified, then all profiles are deleted. This command only deletes inactive profiles. If a profile is in
use, it must be stopped before it can be deleted.
1.25.15 pppoadefault
pppoadefault <profile>
file:///P|/T_WRITER/Documentation/Released/9003%20(Guinness)/User%20Guide/9003%20(Guiness)%20prac%20template/cli.htm (68 of 71) [11/6/2002 8:58:46 AM]
U.S. Robotics SureConnect ADSL Ethernet/USB Router User Guide
Configures the specified profile as the default PPPoA connection. This profile must be using “auto”
mode. Out of all the profiles which are using the “auto” option, only one can be run at a time. This
command is used to specify that profile.
1.25.16 liststat
liststat <param>
Displays the status of IPOA/BRIDGE/ROUTEDBRIDGE/PPPOE/PPPOA.
<param> param can be bridge / routedbridge / ipoa / pppoa / pppoe.
Example:
liststat bridge
Diplays Bridge status
liststat routedbridge
Diplays Routed Bridge status
liststat ipoa
Diplays IPoA status
liststat pppoa
Diplays PPPoA status
liststat pppoe
Diplays PPPoE status
1.25.17 ppptrace
ppptrace [on | off ]
Enables or Disables PPP console messages. Requires an RS-232 cable connection and a running
terminal emulation program to view messages (refer to the Menu User Interface for further
instructions).
1.25.18 1483mer
1483mer add port vpi vci encapsulation
file:///P|/T_WRITER/Documentation/Released/9003%20(Guinness)/User%20Guide/9003%20(Guiness)%20prac%20template/cli.htm (69 of 71) [11/6/2002 8:58:46 AM]
U.S. Robotics SureConnect ADSL Ethernet/USB Router User Guide
Configures the specified WAN interface to use 1483MER (MAC Encapsulation Routing). The “mer”
command is used to enable the configuration.
Port The MER interface name (mer0).
<vpi> <vci > These are the vpi, vci values on which the 1483 is configured. vpi,vci are assigned
with the vcadd command. The showatmconn command can also be used to list the current ATM
connections with their respective vpi and vci values. (Note the vcadd and showatmconn
commands are located in the “atm” directory). The vpi value is between 0 - 255. The vci value is
between 0 - 65535.
-encapsulation llc | vc Specifies the encapsulation type. The possible values are ‘llc’ or ‘vc’ which
represent Logical Link Control or VC multiplexing respectively.
1.25.19 mer
mer enable | disable | Delete | Status
Enables, disables, deletes or gives status of the 1483MER configurations.
1.25.20 relay
relay
relay -o -client <-if interface> <-pvc vpi vci>
relay -o -server <-if interface> <-pvc vpi vci>
relay -o enable | disable
relay -o -display
Configures and enables PPPoE relay.
-client <-if interface> <-pvc vpi vci>
Specifies the server interface for the PPPoE Relay. The PPPoE server is connected to this
interface. The interface may be ppp0, ppp1, ppp2, ppp3, ppp4, ppp5, ppp6, or ppp7.
-server <-if interface> <-pvc vpi vci>
Specifies the client interface for the PPPoE Relay. The PPPoE clients are connected to this
interface. Typically eth0 is specified.
enable
file:///P|/T_WRITER/Documentation/Released/9003%20(Guinness)/User%20Guide/9003%20(Guiness)%20prac%20template/cli.htm (70 of 71) [11/6/2002 8:58:46 AM]
U.S. Robotics SureConnect ADSL Ethernet/USB Router User Guide
Enables the PPPoE Relay feature.
disable
Disables the PPPoE Relay feature.
-display
Displays the PPPoE Relay configuration.
===============================================================
file:///P|/T_WRITER/Documentation/Released/9003%20(Guinness)/User%20Guide/9003%20(Guiness)%20prac%20template/cli.htm (71 of 71) [11/6/2002 8:58:46 AM]
U.S. Robotics SureConnect ADSL Ethernet/USB Router User Guide
Contents:
US Robotics
SureConnect ADSL
Ethernet/USB Router
U.S. Robotics SureConnect™ ADSL
Ethernet/USB Router User Guide
Configuration Utility
Summary
Web User Interface
Terminal User Interface
Command Line
Interface
Windows 95, 98, NT 4.0, Me, 2000, XP or later, Mac and
Linux
• CONFIGURATION EXAMPLE
Setting Up RFC1483 Bridging
Configuration Examples
Installation
Uninstallation
Troubleshooting
Glossary
Regulatory Information
Configuration Description
When you use RFC1483 bridging, Ethernet frames bridge over the ATM virtual circuit. This circuit
connects the router to the Internet Service Provider (ISP). The router operates in Bridge Mode, and
only passes Ethernet packets between the ISP and local network. The ISP may choose to statically or
dynamically assign IP addresses to local network nodes. If the ISP employs dynamic assignment, a
DHCP server in the ISP’s network assigns addresses.
Setup
1. Open the SureConnect Web User Interface (WUI). This example employs the Web User
Interface. You can set up the Network Model with any of the router's three interfaces. The other
two interfaces are the Terminal User Interface (TUI) and the Command-Line Interface (CLI). In
any case, succeeding steps are similar.
file:///P|/T_WRITER/Documentation/Released/900...%20(Guiness)%20prac%20template/configexamp.htm (1 of 33) [11/6/2002 9:00:34 AM]
U.S. Robotics SureConnect ADSL Ethernet/USB Router User Guide
2. Click the Service Provider Settings tab. This tab is on the top of the screen. The Service
Provider Settings Window opens.
3. Click ADSL Standard. The ADSL Standard Window opens.
4. Select the ADSL protocol that you’ll use. For most users, Multi Mode is the right choice.
5. Click Apply.
6. Click WAN Setup. The WAN Setup Window opens.
7.
Below the Add button, notice the Current ATM PVC List. On this list, select any PVC that you
don’t need.
8.
Click Delete.
9.
Click RFC1483 Bridged.
file:///P|/T_WRITER/Documentation/Released/900...%20(Guiness)%20prac%20template/configexamp.htm (2 of 33) [11/6/2002 9:00:35 AM]
U.S. Robotics SureConnect ADSL Ethernet/USB Router User Guide
10.
Enter VPI and VCI values.
11. Select your desired encapsulation mode. Your choices are: LLC/SNAP and VC Multiplexing.
12. At Network Settings, be sure that Enable NAPT and Enable DHCP remain unselected.
13. Click Add.
14. Click the Tools tab at the top of the window.
15. Click Save & Restart.
16. Click Save.
17. Click Restart.
Verify Setup
1.
Open the SureConnect
Web User Interface (WUI).
2.
Click the Service Provider
Settings tab. This tab is on the
top of the screen. (See Figure 1.)
Figure 1
3.
Click ADSL Standard.
(See Figure 1.)
4.
Verify that you’ve selected
Multi Mode. (See Figure 2.)
Figure 2
5.
Click WAN Setup.
6.
See the Current ATM
PVC List at the bottom of the
screen (Figure 3). On this list,
verify your VPI and VCI
settings.
file:///P|/T_WRITER/Documentation/Released/900...%20(Guiness)%20prac%20template/configexamp.htm (3 of 33) [11/6/2002 9:00:35 AM]
U.S. Robotics SureConnect ADSL Ethernet/USB Router User Guide
7.
On the Current ATM
PVC List, see “Encap.” Verify
your Encapsulation Mode
settings. (See Figure 3.)
Figure 3
8.
See the Current ATM
PVC List. Verify that only the
RFC Bridged configuration
appears there. (See Figure 3.)
9.
Click Bridging.
10. Verify your bridging
entries. (See Figure 4.)
Figure 4
• CONFIGURATION EXAMPLE
Setting Up MER
Configuration Description
file:///P|/T_WRITER/Documentation/Released/900...%20(Guiness)%20prac%20template/configexamp.htm (4 of 33) [11/6/2002 9:00:35 AM]
U.S. Robotics SureConnect ADSL Ethernet/USB Router User Guide
When you use MAC Encapsulated Routing (MER), Ethernet frames bridge over the ATM Virtual
Circuit. The router can still perform IP routing with Network Address Translation (NAT) for the LAN. To
perform this NAT function, the router requires a static IP address for its MER interface. Your ISP must
supply the address. The router also supports dynamic assignment of IP addresses to local network
nodes. When using dynamic assignment, the router acts as a DHCP server.
Setup
1. Open the SureConnect Web User Interface (WUI). This example employs the Web User
Interface. You can set up the Network Model with any of the router's three interfaces. The other
two interfaces are the Terminal User Interface (TUI) and the Command-Line Interface (CLI). In
any case, succeeding steps are similar.
2. Click the Service Provider Settings tab. This tab is on the top of the screen. The Service
Provider Settings Window opens.
3. Click ADSL Standard. The ADSL Standard Window opens.
4. Select the ADSL protocol that you’ll use. For most users, Multi Mode is the right
choice.
5.
Click Apply.
6. Click WAN Setup. The WAN Setup Window opens.
file:///P|/T_WRITER/Documentation/Released/900...%20(Guiness)%20prac%20template/configexamp.htm (5 of 33) [11/6/2002 9:00:35 AM]
U.S. Robotics SureConnect ADSL Ethernet/USB Router User Guide
7. Below the Add button, notice the Current ATM PVC List. On this list, select any PVC that you
don’t need.
8. Click Delete.
9. Click MER.
10. Enter VPI and VCI values.
11. Select your desired encapsulation mode. Your choices are: LLC/SNAP and VC Multiplexing.
12. At Network Settings, enable NAPT and DHCP by selecting the appropriate boxes.
13. In the MER box, enter the static IP address and mask that your ISP supplied.
file:///P|/T_WRITER/Documentation/Released/900...%20(Guiness)%20prac%20template/configexamp.htm (6 of 33) [11/6/2002 9:00:35 AM]
U.S. Robotics SureConnect ADSL Ethernet/USB Router User Guide
14. Click Add.
15. Click the Network tab.
16. Click DNS Relay. The DNS & Default Gateway Configuration Window opens. (See the screen
shot below.)
17. At the DNS Relay line, select Disable from the dropdown menu..
18. Click Apply.
19. If your ISP provided a Domain Name, enter the name here. (Domain Name isn’t a required field.
The ISP might not provide a domain name.)
20. Enter the Primary DNS Server IP address that your ISP provided.
21. Enter the Secondary DNS Server IP address that your ISP provided. (Secondary DNS Server
isn’t a required field. The ISP might not provide an IP address for a secondary DNS server.)
22. Enter the Default Gateway IP address that your ISP provided.
file:///P|/T_WRITER/Documentation/Released/900...%20(Guiness)%20prac%20template/configexamp.htm (7 of 33) [11/6/2002 9:00:35 AM]
U.S. Robotics SureConnect ADSL Ethernet/USB Router User Guide
23. On the DNS Relay line, select Enable from the dropdown menu.
24. Click Apply.
25. Click the Tools tab at the top of the window.
26. Click Save & Restart.
27. Click Save.
28. Click Restart.
Verify Setup
1.
Open the SureConnect
Web User Interface (WUI).
2.
Click the Service Provider
Settings tab. This tab is on the
top of the screen. (See Figure 1.)
Figure 1
3.
Click ADSL Standard.
(See Figure 1.)
4.
Verify that you’ve selected
Multi Mode. (See Figure 2.)
Figure 2
5.
Click WAN Setup.
file:///P|/T_WRITER/Documentation/Released/900...%20(Guiness)%20prac%20template/configexamp.htm (8 of 33) [11/6/2002 9:00:35 AM]
U.S. Robotics SureConnect ADSL Ethernet/USB Router User Guide
6.
See the Current ATM
PVC List at the bottom of the
screen (Figure 3). On this list,
verify your settings for VPI
and VCI.
7.
On the Current ATM
PVC List, see “Encap.” Verify
your Encapsulation Mode
settings. (See Figure 3.)
8.
On the Current ATM
PVC List, see “NAT.” Verify
that NAT is “On.” (See Figure
3.)
Figure 3
9.
Verify the IP address for
your ATM PVC. (See Figure
3.)
10. Verify the mask for your
ATM PVC. (See Figure 3.)
11. Click DNS Relay.
12. Verify your Domain
Name Setting. (See Figure 4.)
13. Verify your Primary DNS
Server IP address setting.
(See Figure 4.)
14. Verify your Secondary
DNS Server IP address
setting. (See Figure 4.)
Figure 4
file:///P|/T_WRITER/Documentation/Released/900...%20(Guiness)%20prac%20template/configexamp.htm (9 of 33) [11/6/2002 9:00:35 AM]
U.S. Robotics SureConnect ADSL Ethernet/USB Router User Guide
15. Verify your Default
Gateway IP address setting.
(See Figure 4.)
16. Verify that you’ve
enabled the DNS Relay
function. (See Figure 4.)
17. Click DHCP.
18. Verify your DHCP
entries. (See Figure 5.)
Figure 5
19. Verify that the server is
running. (See Figure 5.)
• CONFIGURATION EXAMPLE
Setting Up PPPoA
Configuration Description
Dial-up Internet connections commonly use Point-to-Point Protocol (PPP). PPPoA is a method for
running the PPP protocol over ATM. PPPoA…
file:///P|/T_WRITER/Documentation/Released/900...%20(Guiness)%20prac%20template/configexamp.htm (10 of 33) [11/6/2002 9:00:35 AM]
U.S. Robotics SureConnect ADSL Ethernet/USB Router User Guide
•
Allows ISPs to provide billing and access control similar to what dial up systems offer.
•
Provides session authentication using either Password Authentication Protocol (PAP) or
Challenge Handshake Authentication Protocol (CHAP).
•
Permits router signals to easily negotiate link and network parameters between the router
and ISP.
With PPPoA, the router achieves IP routing with Network Address Translation (NAT) for the LAN. The
PPPoA-enabled router also supports dynamic IP address assignment to local network nodes. With
dynamic assignment, the router acts as a DHCP server.
Setup
1.
Open the SureConnect Web User Interface (WUI). This example employs the
Web User Interface. You can set up the Network Model with any of the router's three
interfaces. The other two interfaces are the Terminal User Interface (TUI) and the
Command-Line Interface (CLI). In any case, succeeding steps are similar.
2.
Click ADSL Standard. The ADSL Standard Window opens.
3. Select the ADSL protocol that you’ll use. For most users, Multi Mode is the right
choice.
4.
Click Apply.
file:///P|/T_WRITER/Documentation/Released/900...%20(Guiness)%20prac%20template/configexamp.htm (11 of 33) [11/6/2002 9:00:35 AM]
U.S. Robotics SureConnect ADSL Ethernet/USB Router User Guide
5. Click WAN Setup. The WAN Setup Window opens.
6. Below the Add button, notice the Current ATM PVC List. On this list, select any PVC that you
don’t need.
7. Click Delete.
8. Click PPPoA.
9. Enter VPI and VCI values.
10. Select your desired encapsulation mode. Your choices are: LLC/SNAP and VC Multiplexing.
11. At Network Settings, enable NAPT and DHCP by selecting the appropriate boxes.
12. In the PPPoA box, enter your ISP-assigned username.
file:///P|/T_WRITER/Documentation/Released/900...%20(Guiness)%20prac%20template/configexamp.htm (12 of 33) [11/6/2002 9:00:35 AM]
U.S. Robotics SureConnect ADSL Ethernet/USB Router User Guide
13. In the PPPoA box, enter your ISP-assigned password.
14. In the PPPoA box, enter the authentication protocol that your ISP uses.
15. Click Add.
16. Click the Tools tab at the top of the window.
17. Click Save & Restart.
18. Click Save.
19. Click Restart.
Verify Setup
1.
Open the
SureConnect Web User
Interface (WUI).
2.
Click the Service
Provider Settings tab. This
tab is on the top of the
screen. (See Figure 1.)
Figure 1
3.
Click ADSL
Standard.
file:///P|/T_WRITER/Documentation/Released/900...%20(Guiness)%20prac%20template/configexamp.htm (13 of 33) [11/6/2002 9:00:35 AM]
U.S. Robotics SureConnect ADSL Ethernet/USB Router User Guide
4.
Verify that you’ve
selected Multi Mode. (See
Figure 2.)
Figure 2
5.
Click the WAN
Setup.
6.
Verify that only the
PPPoA configuration
appears on the Current
ATM PVC List. (This is the
list on the bottom of the
screen. See Figure 3.)
7.
See the Current
ATM PVC List at the
bottom of the screen. On
this list, verify your
settings for VPI and VCI.
(See Figure 3.)
Figure 3
8.
On the Current ATM
PVC List, see “Encap.”
Verify your Encapsulation
Mode settings. (See
Figure 3.)
9.
On the Current ATM
PVC List, see “NAT.”
Verify that NAT is “On.”
(See Figure 3.)
10. On the Current ATM
PVC List, verify your ISPassigned, PPPoA
username. (See Figure 3.)
11. See the Current ATM
PVC List (Figure 3). Verify
the authentication protocol
that your ISP uses. This
protocol must appear on
the list.
file:///P|/T_WRITER/Documentation/Released/900...%20(Guiness)%20prac%20template/configexamp.htm (14 of 33) [11/6/2002 9:00:35 AM]
U.S. Robotics SureConnect ADSL Ethernet/USB Router User Guide
12. Click the Network tab
at the top of the window.
13. Click DHCP.
14. Verify your DHCP
entries. (See Figure 4.)
Figure 4
15. Verify that the DHCP
server started. (See Figure
4.)
• CONFIGURATION EXAMPLE
Setting Up PPPoE
Configuration Description
Dial-up Internet connections commonly use Point-to-Point Protocol (PPP). PPPoE is a method for
running the PPP protocol over Ethernet. PPPoE…
•
Allows ISPs to provide billing and access control similar to what dial up systems offer.
•
Provides session authentication using either Password Authentication Protocol (PAP) or
Challenge Handshake Authentication Protocol (CHAP).
file:///P|/T_WRITER/Documentation/Released/900...%20(Guiness)%20prac%20template/configexamp.htm (15 of 33) [11/6/2002 9:00:35 AM]
U.S. Robotics SureConnect ADSL Ethernet/USB Router User Guide
•
Permits router signals to easily negotiate link and network parameters between the router
and ISP.
With PPPoE, the router achieves IP routing with Network Address Translation (NAT) for the LAN. The
PPPoE-enabled router also supports dynamic IP address assignment to local network nodes. With
dynamic assignment, the router acts as a DHCP server.
Setup
1.
Open the SureConnect Web User Interface (WUI). This example employs the Web
User Interface. You can set up the Network Model with any of the router's three interfaces. The
other two interfaces are the Terminal User Interface (TUI) and the Command-Line Interface
(CLI). In any case, succeeding steps are similar.
2.
Click ADSL Standard. The ADSL Standard Window opens.
3. Select the ADSL protocol that you’ll use. For most users, Multi Mode is the right
choice.
4.
Click Apply.
5. Click WAN Setup. The WAN Setup Window opens.
file:///P|/T_WRITER/Documentation/Released/900...%20(Guiness)%20prac%20template/configexamp.htm (16 of 33) [11/6/2002 9:00:35 AM]
U.S. Robotics SureConnect ADSL Ethernet/USB Router User Guide
6. Below the Add button, notice the Current ATM PVC List. On this list, select any PVC that you
don’t need.
7. Click Delete.
8. Click PPPoE.
9. Enter VPI and VCI values.
10. Click the radio button for your desired encapsulation mode. Your choices are: LLC/SNAP and
VC Multiplexing.
11. At Network Settings, enable NAPT and DHCP by checking appropriate boxes.
12. In the PPPoE box, enter your ISP-assigned username.
file:///P|/T_WRITER/Documentation/Released/900...%20(Guiness)%20prac%20template/configexamp.htm (17 of 33) [11/6/2002 9:00:35 AM]
U.S. Robotics SureConnect ADSL Ethernet/USB Router User Guide
13. In the PPPoE box, enter your ISP-assigned password.
14. In the PPPoE box, use the arrow to select the dialing mode. For most users, Direct is the right
choice.
15. In the PPPoE box, enter the Idle Timeout value. Idle Timeout determines how long the link
remains active during a period without data transfer. Idle Timeout only affects Auto Dialing
Mode. The router doesn’t use Idle Timeout for direct dialing mode.
16. In the PPPoE box, use the arrow to select the authentication protocol that your ISP uses.
17. Click Add.
18. Click the Tools tab at the top of the window.
19. Click Save & Restart.
20. Click Save.
21. Click Restart.
Verify Setup
1.
Open the SureConnect
Web User Interface (WUI).
Figure 1
file:///P|/T_WRITER/Documentation/Released/900...%20(Guiness)%20prac%20template/configexamp.htm (18 of 33) [11/6/2002 9:00:35 AM]
U.S. Robotics SureConnect ADSL Ethernet/USB Router User Guide
2.
Click the Service
Provider Settings tab. This tab
is on the top of the screen.
(See Figure 1.)
3.
Click ADSL Standard.
(See Figure 1.)
4.
Verify that you’ve
selected Multi Mode. (See
Figure 2.)
Figure 2
5.
Click WAN Setup.
6.
Verify that only the
PPPoE configuration appears
on the Current ATM PVC List.
(See Figure 3.)
7.
See the Current ATM
PVC List at the bottom of the
screen (Figure 3). On this list,
verify your settings for VPI
and VCI.
8.
On the Current ATM
PVC List, see “Encap.” Verify
your Encapsulation Mode
settings. (See Figure 3.)
Figure 3
9.
On the Current ATM
PVC List, see “NAT.” Verify
that NAT is “On.” (See Figure
3.)
10. On the Current ATM
PVC List, verify your ISPassigned, PPPoE username.
(See Figure 3.)
file:///P|/T_WRITER/Documentation/Released/900...%20(Guiness)%20prac%20template/configexamp.htm (19 of 33) [11/6/2002 9:00:35 AM]
U.S. Robotics SureConnect ADSL Ethernet/USB Router User Guide
11. In the PPPoE box, verify
for your dialing mode
selection. For most users,
direct is the right choice. (See
Figure 3.)
12. In the PPPoE box, verify
your desired Idle Timeout
value. (See Figure 3.)
13. In the PPPoE box, find
the authentication protocol.
Verify that your ISP uses this
protocol. (See Figure 3.)
14. Click the Network tab at the
top of the window.
15. Click DHCP.
Figure 4
16. Verify your DHCP setting.
(See Figure 4.)
17. Verify that the DHCP
server started. (See Figure 4.)
• CONFIGURATION EXAMPLE
Setting Up RFC1483 Routing without NAT
file:///P|/T_WRITER/Documentation/Released/900...%20(Guiness)%20prac%20template/configexamp.htm (20 of 33) [11/6/2002 9:00:35 AM]
U.S. Robotics SureConnect ADSL Ethernet/USB Router User Guide
Configuration Description
When you use RFC1483 Routing, the router encapsulates IP packets over the ATM virtual circuit.
This circuit connects the router and the Internet service provider (ISP). In this configuration, routers …
•
Segment LANs to balance traffic within workgroups
•
Filter traffic for security purposes and policy management
•
Connect remote offices at the edge of the network
Setup
1. Open the SureConnect Web User Interface (WUI). This example employs the Web User Interface. You can set up
the Network Model with any of the router's three interfaces. The other two interfaces are the Terminal User
Interface (TUI) and the Command-Line Interface (CLI). In any case, succeeding steps are similar.
2. Click ADSL Standard. The ADSL Standard Window opens.
3. Select the ADSL protocol that you’ll use. For most users, Multi Mode is the right choice.
4. Click Apply.
5. Click WAN Setup. The WAN Setup Window opens.
file:///P|/T_WRITER/Documentation/Released/900...%20(Guiness)%20prac%20template/configexamp.htm (21 of 33) [11/6/2002 9:00:35 AM]
U.S. Robotics SureConnect ADSL Ethernet/USB Router User Guide
6. Below the Add button, notice the Current ATM PVC List. On this list, select any PVC that you don’t need.
7. Click Delete.
8. Click RFC1483 Routed.
9. Enter VPI and VCI values.
10. Click the radio button for your desired encapsulation mode. Your choices are: LLC/SNAP and
VC Multiplexing.
11. At Network Settings, be sure that NAPT and DHCP don’t have a checkmark.
12. In the RFC1483 Routed box, enter the static IP address and mask that your ISP supplied.
13. Click Add.
14. Click the Network tab at the top of the window.
15. Click LAN Setup. The LAN Setup Window opens.
file:///P|/T_WRITER/Documentation/Released/900...%20(Guiness)%20prac%20template/configexamp.htm (22 of 33) [11/6/2002 9:00:35 AM]
U.S. Robotics SureConnect ADSL Ethernet/USB Router User Guide
16. This step changes the LAN IP address that connects to the router’s Web user interface. In the
LAN IP Address box, enter the new Ethernet 1 local LAN IP address.
17. This step changes the network subnet that connects to the router’s Web user interface. In the
Subnet box, enter the new Ethernet 1 local Subnet mask.
18. This step locks in your LAN IP address and network subnet changes from the previous steps.
Click Apply. This action saves your current configuration and restarts the router.
19. Change these items on your PC’s to match the new network that the router is on…
• IP address
• Subnet mask
• Default gateway
• DNS IP Address
If you don’t know how to complete this step, refer to your PC’s manual. Most Windows PCs
allow access to network settings though the Start Menu at Settings. Look for a listing such as
“Network and Dial-Up Connections.” Also refer to the Quick Installation Guide.
20. Open the SureConnect Web User Interface (WUI).
21. Click the Network tab at the top of the window.
file:///P|/T_WRITER/Documentation/Released/900...%20(Guiness)%20prac%20template/configexamp.htm (23 of 33) [11/6/2002 9:00:35 AM]
U.S. Robotics SureConnect ADSL Ethernet/USB Router User Guide
22. Click Routing Setup. The Routing Setup Window opens.
23. The next few steps add the WAN Default Gateway supplied by your ISP. Select the entry with
these specifications…
•
Destination Network ID: 0.0.0.0
•
Destination Subnet Mask: 0.0.0.0.
24. Click Delete.
25. Enter 0.0.0.0 into the Destination Network ID box.
26. Enter 0.0.0.0 into the Destination Subnet Mask box.
27. At the Next Hop IP box, enter the WAN Default Gateway supplied by your ISP.
28. Click Add.
29. Click the Tools tab at the top of the window.
file:///P|/T_WRITER/Documentation/Released/900...%20(Guiness)%20prac%20template/configexamp.htm (24 of 33) [11/6/2002 9:00:35 AM]
U.S. Robotics SureConnect ADSL Ethernet/USB Router User Guide
30. Click Save & Restart.
31. Click Save.
32. Click Restart.
Verify Setup
1.
Open the SureConnect
Web User Interface (WUI).
2.
Click the Service
Provider Settings tab. This
tab is on the top of the
screen. (See Figure 1.)
Figure 1
3.
Click ADSL Standard.
(See Figure 1.)
4.
Verify that you’ve
selected Multi Mode. (See
Figure 2.)
Figure 2
5.
Click WAN Setup.
file:///P|/T_WRITER/Documentation/Released/900...%20(Guiness)%20prac%20template/configexamp.htm (25 of 33) [11/6/2002 9:00:35 AM]
U.S. Robotics SureConnect ADSL Ethernet/USB Router User Guide
6.
Verify that only the
Routed configuration
appears on the Current ATM
PVC List. (This is the list on
the bottom of the screen.
See Figure 3.)
7.
See the Current ATM
PVC List at the bottom of the
screen (Figure 3). On this
list, verify your settings for
VPI and VCI.
Figure 3
8.
On the Current ATM
PVC List, see “Encap.” Verify
your Encapsulation Mode
settings. (See Figure 3.)
9.
On the Current ATM
PVC List, see “NAT.” Verify
that NAT is “Off.” (See Figure
3.)
10. Click the Network tab at
the top of the window.
11. Click LAN Setup.
Figure 4
12. Verify your LAN IP
address setting. (See Figure 4.)
13. Verify your subnet setting.
(See Figure 4.)
file:///P|/T_WRITER/Documentation/Released/900...%20(Guiness)%20prac%20template/configexamp.htm (26 of 33) [11/6/2002 9:00:35 AM]
U.S. Robotics SureConnect ADSL Ethernet/USB Router User Guide
14. Click the Routing Setup
tab at the top of the window.
15. Verify your Destination
Network ID setting. (See Figure
5.)
16. Verify your Destination
Subnet Mask setting. (See
Figure 5.)
Figure 5
17. Verify your Next Hop ID
setting. (See Figure 5.)
• CONFIGURATION EXAMPLE
Setting Up RFC1483 Routing with NAT & DHCP
Configuration Description
When you use RFC1483 Routing, the router encapsulates IP packets over the ATM virtual circuit.
This circuit connects the router and the Internet service provider (ISP). In this configuration, routers …
•
Segment LANs to balance traffic within workgroups
•
Filter traffic for security purposes and policy management
•
Connect remote offices at the edge of the network
file:///P|/T_WRITER/Documentation/Released/900...%20(Guiness)%20prac%20template/configexamp.htm (27 of 33) [11/6/2002 9:00:35 AM]
U.S. Robotics SureConnect ADSL Ethernet/USB Router User Guide
•
Can route IP with network address translation (NAT) for the LAN
Setup
1.
Open the SureConnect Web User Interface (WUI). This example employs the
Web User Interface. You can set up the Network Model with any of the router's three
interfaces. The other two interfaces are the Terminal User Interface (TUI) and the
Command-Line Interface (CLI). In any case, succeeding steps are similar.
2.
3.
4.
Click ADSL Standard. The ADSL Standard Window opens.
Select the ADSL protocol that you’ll use. For most users, Multi Mode is the right choice.
Click Apply.
5. Click WAN Setup. The WAN Setup Window opens.
file:///P|/T_WRITER/Documentation/Released/900...%20(Guiness)%20prac%20template/configexamp.htm (28 of 33) [11/6/2002 9:00:35 AM]
U.S. Robotics SureConnect ADSL Ethernet/USB Router User Guide
6. Below the Add button, notice the Current ATM PVC List. On this list, select any PVC that you
don’t need.
7. Click Delete.
8. Click RFC1483 Routed.
9. Enter VPI and VCI values.
10. Click the radio button for your desired encapsulation mode. Your choices are: LLC/SNAP and
VC Multiplexing.
11. At Network Settings, check NAPT.
12. At Network Settings, check DHCP.
13. In the RFC1483 Routed box, enter the static IP address and mask that your ISP supplied.
file:///P|/T_WRITER/Documentation/Released/900...%20(Guiness)%20prac%20template/configexamp.htm (29 of 33) [11/6/2002 9:00:35 AM]
U.S. Robotics SureConnect ADSL Ethernet/USB Router User Guide
14. Click Add.
15. Click the Network tab at the top of the window.
16. Click DNS Relay. The DNS & Default Gateway Configuration Window opens.
17. At the DNS Relay box, select Disable from the dropdown menu.
18. Click Apply.
19. If your ISP provided a Domain Name, enter the name here. (Domain Name isn’t a required field.
The ISP might not provide a domain name.)
20. Enter the Primary DNS Server IP address that your ISP provided.
21. Enter the Secondary DNS Server IP address that your ISP provided. (Secondary DNS Server
isn’t a required field. The ISP might not provide an IP address for a secondary DNS server.)
file:///P|/T_WRITER/Documentation/Released/900...%20(Guiness)%20prac%20template/configexamp.htm (30 of 33) [11/6/2002 9:00:35 AM]
U.S. Robotics SureConnect ADSL Ethernet/USB Router User Guide
22. Enter the Default Gateway IP address that your ISP provided.
23. At the DNS Relay box, select Enable from the dropdown menu.
24. Click Apply.
25. Click the Tools tab at the top of the window.
26. Click Save & Restart.
27. Click Save.
28. Click Restart.
Verify Setup
1.
Open the SureConnect
Web User Interface (WUI).
2.
Click the Service Provider
Settings tab. This tab is on the top of
the screen. (See Figure 1.)
Figure 1
3.
Click ADSL Standard. (See
Figure 1.)
file:///P|/T_WRITER/Documentation/Released/900...%20(Guiness)%20prac%20template/configexamp.htm (31 of 33) [11/6/2002 9:00:35 AM]
U.S. Robotics SureConnect ADSL Ethernet/USB Router User Guide
4.
Verify that you’ve selected
Multi Mode. (See Figure 2.)
Figure 2
5.
Click WAN Setup.
6.
Verify that only the Routed
configuration appears on the
Current ATM PVC List. (This is
the list on the bottom of the
screen. See Figure 3.)
7.
See the Current ATM PVC
List at the bottom of the screen
(Figure 3). On this list, verify your
VPI and VCI settings.
Figure 3
8.
On the Current ATM PVC
List, see “Encap.” Verify your
Encapsulation Mode settings.
(See Figure 3.)
9.
On the Current ATM PVC
List, see “NAT.” Verify that NAT
is “On.” (See Figure 3.)
10. Click the Network tab at
the top of the window.
11.
Click DNS Relay.
12.
Verify your Domain Name
setting. (See Figure 4.)
file:///P|/T_WRITER/Documentation/Released/900...%20(Guiness)%20prac%20template/configexamp.htm (32 of 33) [11/6/2002 9:00:35 AM]
U.S. Robotics SureConnect ADSL Ethernet/USB Router User Guide
13. Verify your Primary DNS
Server setting. (See Figure 4.)
14. Verify your setting
Secondary DNS Server setting.
(See Figure 4.)
15. Verify your Default
Gateway setting. (See Figure 4.)
Figure 4
16. In the DNS Relay Box,
verify that you’ve selected
“Enable.” (See Figure 4.)
17. Click the Network tab at the
top of the window.
18. Click DHCP.
19. Verify your DHCP setting.
(See Figure 5.)
Figure 5
20. Verify that the DHCP server
started. (See Figure 5.)
file:///P|/T_WRITER/Documentation/Released/900...%20(Guiness)%20prac%20template/configexamp.htm (33 of 33) [11/6/2002 9:00:35 AM]
U.S. Robotics SureConnect ADSL Ethernet/USB Router User Guide
Contents:
US Robotics
SureConnect ADSL
Ethernet/USB Router
Configuration Utility
Summary
U.S. Robotics SureConnect™ ADSL
Ethernet/USB Router User Guide
Windows 95, 98, NT 4.0, Me, 2000, XP or later, Mac
and Linux
Uninstalling the Router
Web User Interface
Terminal User Interface
Windows 95
Command Line Interface
Windows 98/2000
Configuration Examples
Windows XP
Installation
Windows NT
Uninstallation
Macintosh and Linux
Troubleshooting
Windows 95
Glossary
Regulatory Information
1. Click Windows Start, Settings, and then Control Panel.
2. Double-click Add/Remove Programs icon.
3. On the Install/Uninstall tab, select U.S. Robotics SureConnect ADSL
Ethernet/USB Router. You may have to scroll down to locate this program.
4. Click Remove.
5. The Reinstall or Uninstall screen will display. Click Uninstall and select Yes if
the display prompts you to confirm the uninstallation. All components will
uninstall from the computer.
Windows 98 and 2000
1. Click Windows Start, Settings, and then Control Panel.
2. Double-click Add/Remove Programs.
3. The Add/Remove Programs screen will display all programs that you currently
have installed. Locate and select the U.S. Robotics SureConnect ADSL
Ethernet/USB Router. You may have to scroll down to locate this program.
4. Click Add/Remove in Windows 98 or Change/Remove in Windows 2000.
file:///P|/T_WRITER/Documentation/Released/9003...9003%20(Guiness)%20prac%20template/uninstal.htm (1 of 2) [11/6/2002 9:01:48 AM]
U.S. Robotics SureConnect ADSL Ethernet/USB Router User Guide
5. The Reinstall or Uninstall screen will display. Click Uninstall and then click
Next. All components will uninstall from the computer.
Windows XP
1. Click Windows Start and then Control Panel.
2. Double-click Add/Remove Programs.
3. The Install/Uninstall tab will display all programs that you currently have
installed. Locate and select the U.S. Robotics SureConnect ADSL
Ethernet/USB Router. You may have to scroll down to locate this program.
4. Click Add/Remove. The Reinstall or Uninstall screen will display. Click
Uninstall and then click Next. All components will uninstall from the computer.
Windows NT
1. Click Windows Start, Settings, then Control Panel.
2. Double-click Add/Remove Program.
3. The Add/Remove Programs screen will display all programs that you currently
have installed. Locate and select the U.S. Robotics SureConnect ADSL
Ethernet/USB Router. You may have to scroll down to locate this program.
4. Click Add/Remove.
5. The Reinstall or Uninstall screen will display. Click Uninstall and then click
Next. All components will uninstall from the computer.
Macintosh and Linux
Unplug all cables from the computer and the router.
file:///P|/T_WRITER/Documentation/Released/9003...9003%20(Guiness)%20prac%20template/uninstal.htm (2 of 2) [11/6/2002 9:01:48 AM]
U.S. Robotics SureConnect ADSL Ethernet/USB Router User Guide
Contents:
US Robotics
SureConnect ADSL
Ethernet/USB
Router
Configuration Utility
Summary
U.S. Robotics SureConnect™ ADSL
Ethernet/USB Router User Guide
Windows 95, 98, NT 4.0, Me, 2000, XP or later, Mac and Linux
Troubleshooting
Web User Interface
Troubleshooting Checklist
Terminal User
Interface
To help diagnose the problem, use the checklist below.
●
Command Line
Interface
Configuration
Examples
●
●
●
Confirm that you have secured the power adapter to the router and to an active wall outlet. The "PWR" LED should
illuminate.
Confirm that you have secured the telephone cable to the telephone wall jack and to the router. The "ADSL"LED
should illuminate.
Confirm that you have secured the Ethernet cable to the "ENET1"and/or "ENET2" port on the router and to the
computer's network interface card. The "ENET1" or the "ENET2" LED, or both should illuminate.
If you're using the USB cable: Confirm that you've secured the USB cable to the "USB" port on the router and
computer. The "USB" LED should illuminate.
Installation
Status LEDs
Uninstallation
Troubleshooting
Glossary
Regulatory
Information
The front of the U.S. Robotics SureConnect ADSL Ethernet/USB Router has five LEDs. The first from the left is the "PWR"
LED. The second and third are the data transfer "ENET1" and "ENET2" LEDs. The fourth is the "USB" LED. The fifth is the
"ADSL" LED. LED conditions below indicate the router's operational status.
PWR
On Green
Off
Receiving power from the wall jack power supply.
Detected no power.
On Green/10 Mbps Established and detected a physical connection through the Ethernet cable
On Orange/100Mbps between router and computer.
file:///P|/T_WRITER/Documentation/Released/9003%20(Guinness)/User%20Guide/9003%20(Guiness)%20prac%20template/troubles.htm (1 of 7) [11/6/2002 9:02:16 AM]
U.S. Robotics SureConnect ADSL Ethernet/USB Router User Guide
ENET1 or
ENET 2
Flashing Green or
Orange
Off
On Green
USB
Flashing Green
Off
ADSL
Flowing data traffic.
Did not establish a physical connection between router and computer.
Established and detected a physical connection through the USB cable between
router and computer.
Flowing data traffic.
Did not establish a physical connection between router and computer.
On Green
Established a DSL link.
Flashing Green
Negotiating a DSL link.
Off
The DSL link failed.
Troubleshooting Tips
None of the LEDs illuminates when I turn on the router.
•
Check the connection between the power adapter, router, and wall outlet.
•
Confirm that you're using the power adapter that came with your U.S. Robotics SureConnect ADSL Ethernet/USB
Router package.
The ADSL light is flashing or is not illuminated.
●
Make sure that the telephone cable connects properly at the "ADSL" port on the rear of the router and at the phone
wall jack.
I can't connect to the router's configuration utility.
Possible Solution 1:
●
●
Make sure that your Ethernet or USB cables connect properly and securely.
Make sure that you've plugged in the power cord.
Possible Solution 2:
●
●
Make sure that your PC is using an IP address within the range of 192.168.1.2 to 192.168.1.254.
Make sure that the address of the subnet mask is 255.255.255.0.
file:///P|/T_WRITER/Documentation/Released/9003%20(Guinness)/User%20Guide/9003%20(Guiness)%20prac%20template/troubles.htm (2 of 7) [11/6/2002 9:02:16 AM]
U.S. Robotics SureConnect ADSL Ethernet/USB Router User Guide
●
●
If necessary, the Default Gateway data should be at 192.168.1.1.
To verify these settings, perform the following steps:
Windows 95, 98, or Me Users:
1.
Click Windows Start.
2.
Click Run.
3.
Type winipcfg.
4.
Click OK.
5.
Check the IP Address, Subnet Mask, Default Gateway data. Is this data correct?
6.
If the data isn't correct, click Release All. Then click Renew All.
Windows NT, 2000, or XP Users:
1.
Click Windows Start.
2.
Click Run.
3.
Type cmd.
4.
Click OK.
5.
At the DOS prompt, type ipconfig/all.
6.
Check the IP Address, Subnet Mask, Default Gateway data. Is this data correct?
•
7.
If the data isn't correct...
Type ipconfig/release.
•
Press Enter.
•
Type ipconfig/renew.
•
Press Enter.
file:///P|/T_WRITER/Documentation/Released/9003%20(Guinness)/User%20Guide/9003%20(Guiness)%20prac%20template/troubles.htm (3 of 7) [11/6/2002 9:02:16 AM]
U.S. Robotics SureConnect ADSL Ethernet/USB Router User Guide
Possible Solution 3:
•
Verify the connection setting of your Web browser.
●
●
Verify that the HTTP Proxy feature of your Web browser is disabled. Make these verifications so that your Web
browser can read configuration pages inside your router.
Launch your Web browser.
Internet Explorer Users:
1.
Click Tools, Internet Options, and then click the Connections tab.
2.
Select Never dial a connection, click Apply, and then click OK.
3.
Click Tools and then click Internet Options.
4.
Click Connections and then click LAN Settings.
5.
Make sure none of the check boxes are selected and click OK.
6.
Click OK.
Netscape Navigator Users:
1.
Click Edit, Preferences, and then double-click Advanced in the Category window.
2.
Click Proxies, select Direct connection to the Internet, and then click OK.
3.
Click Edit again and then click Preferences.
4.
Under Category, double-click Advanced and then click Proxies.
5.
Select Direct connection to the Internet and click OK.
6. Click OK.
●
If you can't connect to the router, see the Troubleshooting Ping procedure below in these Troubleshooting Tips.
I can't access the Internet.
file:///P|/T_WRITER/Documentation/Released/9003%20(Guinness)/User%20Guide/9003%20(Guiness)%20prac%20template/troubles.htm (4 of 7) [11/6/2002 9:02:16 AM]
U.S. Robotics SureConnect ADSL Ethernet/USB Router User Guide
Possible Solution:
●
●
●
●
●
●
●
Make sure that you've connected the power cord.
Make sure that you've correctly connected Ethernet or USB cables between the router and PCs.
Make sure that you have a DSL link.
Make sure that you have an active ISP account.
See the router's Service Provider Setting Page under WAN Setup. Check your settings for VCI and VPI.
See the router's Service Provider Setting Page under WAN Setup. Check your settings for username and password.
If you can't access the Internet, refer to the Troubleshooting Ping Procedure on this Web page.
I don't know if my assigned IP Address is Static or Dynamic.
Possible Solution:
●
●
●
If you have active DSL service, you probably have a Dynamic IP address.
Check with your service provider to verify this information. Some providers assign Static IP addresses.
If your service provider uses dynamic host configuration protocol, verify that you've enabled DHCP.
While trying to check my network configuration settings in Windows Me or XP, I can't find the
Network icon.
Possible Solution:
●
●
The default setting in Windows Me and XP is to not show all of the icons within the Control Panel. Windows ME
Users: Click Windows Start, Settings, and then Control Panel. Windows XP Users: Click Windows Start, and then
Control Panel.
Within Control Panel, click View all Control Panel options on the left side of the screen. All Control Panel icons
should now be visible.
I don't know how to configure the TCP/IP protocol to work with the router.
Possible Solution:
1. The router must access a network interface card inside your PC. Your PC may not recognize this internal network
interface card. You may be able to resolve this problem by installing or adding the correct hardware.
2. Open the help menu system in your operating system.
3. Check the help messages for TCP/IP.
Troubleshooting Ping Procedure
file:///P|/T_WRITER/Documentation/Released/9003%20(Guinness)/User%20Guide/9003%20(Guiness)%20prac%20template/troubles.htm (5 of 7) [11/6/2002 9:02:16 AM]
U.S. Robotics SureConnect ADSL Ethernet/USB Router User Guide
1. Click Windows Start and then click Run. In the Run dialog box, Windows 95, 98, and Me users: Type
command and click OK. Windows NT, 2000, and XP users: Type cmd and click OK. The command line screen
opens.
2. Type Ping 127.0.0.1. This is your local host address. The address assures that TCP/IP is installed and
functions properly. If you can't complete this ping, disconnect the router and then repeat the installation procedure.
3. Type Ping followed by your IP address. This assures that your PC responds to requests. If you can't
complete this ping, make sure all the cables connect properly and that all the correct drivers are installed.
4. Type Ping followed by your gateway address to check the communication with your gateway. (The default
gateway address is 192.168.1.1.) This assures that you can connect to other machines and the router. If you can
establish communication with the router, you can access the Administration page and configure settings. If you
can't complete this ping, make sure that the router power cord is plugged in. Also make sure that the router is
properly connected to your PC.
5. Type Ping followed by the outside Internet address of your router. This is the address that is provided either
by your ISP or by the outside LAN. This procedure will assure that your router functions properly and allows traffic
to pass through.
6. Type Ping followed by your known DNS server address. This will allow you to resolve valid Internet host
names to IP addresses and to verify that you can access the Internet.
What If I don't receive a return message from a successful ping?
•
No return message indicates that the PC can't communicate to the router through IP address assignment.
Check the address in the configuration utility.
•
If necessary, correct the address in the Console Mode.
•
After making corrections, continue with the ping procedure.
Technical Support
Go to the Support section of the U.S. Robotics Web site:
http://www.usr.com/support
file:///P|/T_WRITER/Documentation/Released/9003%20(Guinness)/User%20Guide/9003%20(Guiness)%20prac%20template/troubles.htm (6 of 7) [11/6/2002 9:02:16 AM]
U.S. Robotics SureConnect ADSL Ethernet/USB Router User Guide
•
See the FAQ and Troubleshooting Web pages for your specific product. These pages address the most
common difficulties that users experience.
•
If you can't connect to the Internet, contact your ISP for assistance.
•
For current support contact information, go to the following Web site:
http://www.usr.com/broadbandsupport
file:///P|/T_WRITER/Documentation/Released/9003%20(Guinness)/User%20Guide/9003%20(Guiness)%20prac%20template/troubles.htm (7 of 7) [11/6/2002 9:02:16 AM]
U.S. Robotics SureConnect ADSL Ethernet/USB Router User Guide
Contents:
US Robotics
SureConnect ADSL
Ethernet/USB Router
Configuration Utility
Summary
U.S. Robotics SureConnect™ ADSL
Ethernet/USB Router User Guide
Windows 95, 98, NT 4.0, Me, 2000, XP or later, Mac
and Linux
Glossary
Web User Interface
A | B | C | D | E | F | GH | IJKL | M | N | OP | QR | S | TU | V | WXYZ
Terminal User Interface
A
Command Line Interface
Configuration Examples
Installation
Uninstallation
Troubleshooting
Glossary
ADSL (Asymmetric Digital Subscriber Line) - Transports information to and from
customers and networks. ADSL employs different upstream and downstream data
rates. The “asymmetric” name refers to these differing rates.
AH (Authentication Header) – RFC2402 defines AH. AH provides integrity and
authentication through the shared key hashing algorithms (HMAC-MD5, HMACSHA1). AH provides authentication for as much of the IP header as possible. AH also
authenticates upper level protocol data.
Regulatory Information
AM (Amplitude Modulation) Modulation method used by modems, radio, and DSL
equipment. The signal modulates or alters the amplitude or intensity of the carrier. In
regular AM, the carrier is a sinewave. The amplitude of the modulated carrier changes
in proportion to signal amplitude. AM creates two identical sidebands on either side of
the carrier. These sidebands contain the signal data. Either sideband can be
attenuated or suppressed without harming the signal data. With an equivalent signal,
AM tends to require less bandwidth than FM does. AM's disadvantage is that it’s more
subject to impulse noise and static than FM is.
ATM (Asynchronous Transfer Mode) - Protocol that packs digital information into 53byte cells. The cells switch throughout a network over virtual circuits.
Average Cell Rate - Maximum sustainable or average rate (Cells/second) for sending
cells to the network. Average Cell Rate specifies bandwidth utilization. This value
must always be less than or equal to Peak Cell Rate.
file:///P|/T_WRITER/Documentation/Released/900...003%20(Guiness)%20prac%20template/glossary.htm (1 of 11) [11/6/2002 9:02:38 AM]
U.S. Robotics SureConnect ADSL Ethernet/USB Router User Guide
B
Bandwidth - Amount of data that can be transmitted over a given time period.
BPDU (Bridge Protocol Data Unit) - Data messages exchanged across switches in
an extended LAN with a spanning tree protocol topology. BPDU packets assure that
data arrives at the intended destination. These packets contain information on
addresses, costs, ports, and priorities. Network loop detection involves exchanging
BPDU messages across bridges. Loop deletion entails placing redundant switch ports
in a backup (blocked) state and shutting down selected bridge interfaces.
Bridge – A device that connects two LAN segments together. These LAN segments
may be of similar or dissimilar types, such as Ethernet and Token Ring. Inserting a
bridge into a network segments the network. The bridge improves performance by
keeping traffic contained within bridge segments.
Bridge Loop - Path that links one network segment to another. The spanning tree
protocol avoids bridge loops.
Bridge Priority - Determines which bridge becomes the root bridge.
Burst Size (Cells) - Maximum number of cells that the user can send at peak rate in
a burst. We measure burst size from within a sustainable rate.
C
CAP (Carrierless Amplitude and Phase Modulation) Modulation method used by
modems and DSL equipment. Based on QAM. Signals modulate two wideband
signals using passband modulation. CAP permits two to nine bits per frequency cycle.
Carrier wave - Periodic waveform. A carrier may be modulated or unmodulated. It
may also be continuous or switched. Typically, modems modulate the carrier wave
with a data signal. Modulation represents the data signal by impressing a variation on
some characteristic of the carrier wave. For instance, a circuit may represent the
signal as a proportional shift in carrier amplitude, frequency, or phase. Demodulation
(detection) eliminates the carrier wave and reproduces the signal. The carrier
frequency must be significantly greater than the signal frequency. A modem may
simultaneously apply more than one signal and more than one modulation method to
the same carrier. The modulation method may suppress the carrier before
transmission. In that case, the receiver must reinsert the carrier before demodulation
can occur.
CBR (Constant Bit Rate) - Service type that supports real-time applications with a
fixed bandwidth. These applications, such as a video stream, produce data at regular
file:///P|/T_WRITER/Documentation/Released/900...003%20(Guiness)%20prac%20template/glossary.htm (2 of 11) [11/6/2002 9:02:38 AM]
U.S. Robotics SureConnect ADSL Ethernet/USB Router User Guide
intervals. The user can specify how much bandwidth that he wishes to reserve.
CDVT (Cells) - Parameter that constrains the number of cells that the user can send
to the network at the maximum line rate.
Cycle - One half of a periodic wave. For instance, a sinewave includes one positive
and one negative cycle.
D
DHCP (Dynamic Host Configuration Protocol) - Protocol for automatic TCP/IP
configurations. DHCP provides static and dynamic address allocation and
management.
DHCP Relay - Suppose that a Dynamic Host Configuration Protocol (DHCP) server
resides on a different LAN than the node broadcasting for DHCP service. Then the
DHCP broadcast request must be forwarded across the router/WAN to a subnet
where a DHCP server resides. To assure receipt of an IP address that corresponds to
this subnet, the router must use a DHCP relay. The router needs to know the IP
address of the DHCP server. With this address, the router can direct the request to
the appropriate DHCP server.
DMT (Discrete Multitone) - Most common DSL modulation method. DMT creates
256 channels across the usable frequency spectrum. Each channel measures
4.3125KHz wide. Dividing the spectrum into channels allows DMT to function well in
spite of nearby AM radio transmitters. The DMT modulator and demodulator is the
FFT (Fast Fourier Transform) algorithm. Inside each channel, the modulation
technique is QAM. Within each channel, the number of bits per symbol may be
independently selected. Independent selection allows a DMT modem to be rate
adaptive. Both G.DMT and G.Lite use DMT.
DNS (Domain Naming System) - Mechanism used in the Internet for translating
names of host computers into IP addresses.
DNS Relay - DNS requests that the router forwards from a LAN node to a known
DNS server. The router uses a DNS relay when the router functions as a NAPT
(Network Address Port Translation) device. The requests arrive at a DNS server over
the WAN link. To function as a NAPT, the router requires DNS relay settings.
DSLAM (Digital Subscriber Line Access Multiplexer) - Network device that
receives signals from multiple customer Digital Subscriber Line connections. DSLAM
places signals on high speed lines with multiplexing techniques for the fastest phone
line technology available.
E
file:///P|/T_WRITER/Documentation/Released/900...003%20(Guiness)%20prac%20template/glossary.htm (3 of 11) [11/6/2002 9:02:38 AM]
U.S. Robotics SureConnect ADSL Ethernet/USB Router User Guide
ESP (Encapsulating Security Payload) – ESP provides confidentiality. Optionally,
ESP also provides integrity, authentication, anti-replay service, and limited traffic flow
confidentiality. Options selected at the time of Security Association establishment
determine provided services. For confidentiality, shared ESP supports shared key
encryption algorithms, such as DES and Triple DES.
F
Filter - Operating parameter used in LAN bridges and routers. When set, the filter
causes bridges and routers to block transfer of packets between LANs. The term
"filter" also applies to a hardware device, such as a microfilter. When installed, this
device reduces interference between DSL signals and telephone signals.
Forward Delay Time - Timeout value employed by all bridges in the bridged LAN.
The root sets the forward delay value.
FM (Frequency Modulation) Modulation method used by modems, radio, and DSL
equipment. The signal modulates or alters the frequency or pitch of the carrier. In
regular FM, the carrier is a sinewave. The frequency of the modulated carrier changes
in proportion to signal amplitude. FM creates an infinite number of sidebands. These
sidebands contain the signal data. With an equivalent signal, FM tends to require
more bandwidth than AM does. FM's advantage is that it’s less subject to impulse
noise and static than AM is.
Frame - Variable length information unit that contains packets. Also refers to a
transmission frame, a fixed-length unit that carries bits across a physical link. A
transmission frame is a framed transport component. DSL technologies use frames.
Also refers to a frame of video, one image in a video sequence
G
Gateway - Entrance to and exit from a communications network.
G.DMT - The ADSL standard approved by the International Telecommunications
Union (ITU). G.DMT indicates full-rate ADSL, which provides standards for higher
speed ADSL than G.Lite. G.DMT provides maximum data rates of 8 Mbps
downstream from the subscriber and 1.5 Mbps upstream from the subscriber.
G.lite - Standard way to install Asymmetric Digital Subscriber Line service. Over
regular phone lines, G.Lite makes possible Internet connections to home and
business computers at up to 1.5 Mbps. Officially known as G.992.2.
H
file:///P|/T_WRITER/Documentation/Released/900...003%20(Guiness)%20prac%20template/glossary.htm (4 of 11) [11/6/2002 9:02:38 AM]
U.S. Robotics SureConnect ADSL Ethernet/USB Router User Guide
Hello Time - Time interval between generations of configuration BPDUs. The root
bridge generates configuration BPDUs.
I
ICMP - (Internet Control Message Protocol) - A TCP/IP protocol for sending error
and control messages. For example, a router uses ICMP to notify the sender that the
router’s destination node is unavailable. A ping utility sends ICMP echo requests to
verify the existence of an IP address.
Interface Name - Router interface that will be configured.
IP (Internet Protocol) - Protocol that allows a packet of information to travel through
many networks and LANs.
IP Address - IP addresses deliver packets of data across a network. These
addresses differentiate the source and destination IP address and keep them
constant. When a router port detects a packet, the router checks the routing table.
The port attempts to match the network number of the destination IP address with its
routing table entry. If the port finds a match, it forwards the packet to the destination
network. With no match, the port forwards the packet to a router defined as the
default gateway.
J
K
L
LAN (Local Area Network) - Network base covering a local geographic area. A LAN
connects computers in the same building or area.
Link Cost - Cost associated with the interface. Based on this cost, the bridge decides
which link to forward data over.
file:///P|/T_WRITER/Documentation/Released/900...003%20(Guiness)%20prac%20template/glossary.htm (5 of 11) [11/6/2002 9:02:38 AM]
U.S. Robotics SureConnect ADSL Ethernet/USB Router User Guide
M
MAC Address (Local Area Network) - Unique serial number burned into Ethernet
adapters. Distinguishes the network card from others.
Max Age Time Timeout value that all bridged LAN bridges use. The root bridge sets
the Max Age value.
MAC Filter (Local Area Network) - Method of allowing or rejecting WAN access for
specific machines.
Microfilter - Device that separates the ADSL data signal from the telephone signal so
that the ADSL data signal does not interfere with the telephone device.
Modulation - Varying elements of electrical carrier waves in a manner that represents
signal data. Demodulation restores the signal data. A modulated signal requires more
bandwidth and an unmodulated signal does. The bandwidth increase results from the
creation of sidebands during modulation. The sidebands contain the signal. AM
creates two, identical sidebands on either side of the carrier. FM creates an infinite
number of sidebands.
MTU (Maximum Transmission Unit) - Parameter that limits the size of packets that
transmit on an interface. Not all interfaces support the MTU parameter. Some
interfaces, like Ethernet, have range restrictions (80 - 1500).
N
NAP (Network Access Point) - Public network exchange facility where ISPs connect
while peering. NAP connections determine how the Internet routes traffic.
Next Hop IP - IP address or Gateway used to arrive at the destination address.
NRT-VBR (Non Real Time-Variable Bit Rate) - Service type that supports
applications that have no constraints on delay and delay variation, but still have
variable-rate and burst traffic characteristics.
O
P
file:///P|/T_WRITER/Documentation/Released/900...003%20(Guiness)%20prac%20template/glossary.htm (6 of 11) [11/6/2002 9:02:38 AM]
U.S. Robotics SureConnect ADSL Ethernet/USB Router User Guide
PAM (Pulse Amplitude Modulation) Modulation method used by modems and DSL
equipment. The signal modulates or alters the amplitude or intensity of the carrier. In
regular AM, the carrier is a sinewave. In PAM, the carrier is a periodic series of DC
pulses.
PCM (Pulse Code Modulation) - Digital modulation method for transmitting analog
data. PCM signals are binary. These signals can represent any analog data with only
two states, logic 0 and logic 1.
PDM (Pulse Duration Modulation) Modulation method. Signal modulates or alters
the duty cycle of the pulse. In PDM, the carrier is a pulse stream. Also called PWM
(Pulse Width Modulation).
Peak Cell Rate - Maximum rate (Cells/second) for sending cells to the network.
Phase - Position of a periodic waveform.
PM (Phase Modulation) Modulation method used by modems, radio, and DSL
equipment. The signal modulates or alters the phase or position of carrier waves. In
regular PM, the carrier is a sinewave. The phase of the modulated carrier changes in
proportion to signal amplitude.
Port Priority - Parameter that determines which port becomes the root bridge port.
POTS (Plain Old Telephone Service) - Basic voice service available in residences
throughout the United States.
PP (Point-to-Point Protocol) – Communication protocol for dialing up the Internet
over a serial link. Such serial links include a POTS and an ISDN line. PPP establishes
the session between the user’s computer and the ISP. PPP uses the Link Control
Protocol (LCP), which also handles authentication (PAP, CHAP, etc.), compression,
and encryption.
PPM (Pulse Position Modulation) Modulation method used by modems and DSL
equipment. The signal modulates or alters the location of a pulse in the carrier. The
carrier is a stream of pulses.
PPPoA (Point-to-Point Over ATM) – Dial-up Internet connections typically use PPP
protocol. PPPoA is a method for running PPP protocol over ATM. PPPoA… ·
• offers service providers similar billing and access control with a presence in dial-up
services.
• provides session authentication using Password Authentication Protocol (PAP).
• provides session authentication using Challenge Handshake Authentication
Protocol (CHAP).
• achieves session accounting and conservation of bandwidth by closing down
unused sessions.
• allows the IAD/Router and ISP link to easily negotiate network parameters.
file:///P|/T_WRITER/Documentation/Released/900...003%20(Guiness)%20prac%20template/glossary.htm (7 of 11) [11/6/2002 9:02:38 AM]
U.S. Robotics SureConnect ADSL Ethernet/USB Router User Guide
PPPoE (Point-to-Point Over Ethernet) – Dial-up Internet connections typically use
PPP protocol. PPPoE is a method for running PPP protocol over Ethernet. PPPoE… ·
• offers service providers similar billing and access control with a presence in dial-up
services.
• provides a low-cost solution to multiple host maintenance at the customer
premises.
• provides session authentication using Password Authentication Protocol (PAP).
• provides session authentication using Challenge Handshake Authentication
Protocol (CHAP).
• achieves session accounting and conservation of bandwidth by closing down
unused sessions.
• allows the IAD/Router and ISP link to easily negotiate network parameters.
PVC (Permanent Virtual Circuit) - Virtual connection between two fixed endpoints
on the network. Frame relay and ATM networking term.
PWM (Pulse Width Modulation) Modulation method. Signal modulates or alters the
duty cycle of the pulse. In PWM, the carrier is a pulse stream. Also called PDM (Pulse
Duration Modulation).
Q
QAM (Quadrature Amplitude Modulation) Modulation method used by modems and
DSL equipment. Combines two amplitude-modulated (AM) signals into a single
channel. The modem inserts the signals 90 degrees (one-quarter cycle) out of phase
with each other. Engineers call this 90-degree phase shift "quadrature." QAM
modulates both carrier phase and amplitude. Doubles effective bandwidth.
R
RAM (Random Access Memory) - Primary memory in a computer. The computer
can overwrite this type of memory with new data. The "random access" part of RAM
derives from the way RAM stores data: The computer can locate any bit of information
in RAM in an equal amount of time. This fact applies regardless of where the bit
resides.
RIP (Routing Information Protocol) - Routing protocol and part of the TCP/IP suite.
RIP determines a route based on the smallest hop count between source and
destination. RIP determines the smallest hop count by communicating with other
routers within the network. Only use RIP if the target router also utilizes RIP.
RJ-11 - Six-conductor modular telephone jack wired for up to four wires. The most
common telephone jack in the world is the RJ-11. This connects telephone
file:///P|/T_WRITER/Documentation/Released/900...003%20(Guiness)%20prac%20template/glossary.htm (8 of 11) [11/6/2002 9:02:38 AM]
U.S. Robotics SureConnect ADSL Ethernet/USB Router User Guide
instruments, modems, and fax machines to a female RJ-11 jack. The female jack
often mounts to the wall or floor.
RJ-45 - Eight-conductor modular telephone jack. Used for 10BaseT, ISDN and other
data connections.
Router - Device that forwards data packets between local area networks (LANs) or
wide area networks (WANs). Referring to routing tables and routing protocols, routers
read the network address in each transmitted packet. Routers then decide where to
send the packet. A router bases this decision on the best route. When a router port
detects a packet, the router checks the routing table. The port attempts to match the
network number of the destination IP address with its routing table entry. If the port
finds a match, it forwards the packet to the destination network. With no match, the
port forwards the packet to a router defined as the default gateway.
RT-VBR (Real Time-Variable Bit Rate) - Service type that supports time-sensitive
applications such as voice. Varies the rate at which cells arrive.
S
Sideband - Band of frequencies adjacent to the carrier. Modulation of the carrier
creates sidebands. The sidebands contain the signal data, but consume bandwidth
beyond what the carrier needs. In some cases, circuitry may suppress duplicate
sidebands without harming the signal data. For instance, AM becomes single
sideband when circuits delete one of two identical AM sidebands. Some single
sideband equipment also suppresses the carrier frequency. The carrier must then be
restored at the receiver before the signal can be demodulated, that is, recovered.
Spanning Tree-Bridging - Particular algorithm or formula. Transparent bridges use
the spanning tree algorithm to dynamically determine the best source-to-destination
path. This algorithm avoids bridge loops (multiple paths that link one segment to
another) within a network. The algorithm determines all redundant paths and makes
only one of them active. The spanning tree protocol (STP) is part of IEEE standard
802.1.
Splitter - DSL device that accommodates analog telephones, plus digital data access
over the Internet. With a splitter, analog voice signals transmit at baseband
frequencies. These combine with passband data transmission through a low-pass
filter.
Static routes - Permanent routes that the router stores. The router uses these routes
when determining where to forward IP packets that it receives.
Subnet Mask - Portion of a network. Distinguished from other portions by the use of a
mask or subnet number. Subnet masks split one network into a set of mini networks
or subnets. Subnetting helps to reduce traffic on each subnet. Subnetting also makes
the network more manageable. Each subnet functions as if it were an independent
file:///P|/T_WRITER/Documentation/Released/900...003%20(Guiness)%20prac%20template/glossary.htm (9 of 11) [11/6/2002 9:02:38 AM]
U.S. Robotics SureConnect ADSL Ethernet/USB Router User Guide
network.
SVC (Switched Virtual Circuit) - Virtual connection between two variable endpoints
on the network. The switch makes at the beginning of the call, and breaks at the end
of the call. A frame relay and ATM networking term.
T
TCP/IP (Transmission Control Protocol/Internet Protocol) - Set of protocols
designed to link dissimilar computers that use various networks and LANs.
Topology - Geometric physical or electrical configuration that describes a local
communication network. The most common distribution system topologies are the
bus, ring, and star.
U
UDP (User Datagram Protocol) - A protocol within the TCP/IP protocol suite. When
reliable delivery is unnecessary, communications may use UDP instead of TCP.
UBR (Unspecified Bit Rate) - Best effort service that does not require tightly
constrained delay and delay variation. UBR provides no specific quality of service or
guaranteed throughput.
USB (Universal Serial Bus) - External bus standard that supports data transfer rates
of 12 Mbps.
V
VCI (Virtual Channel Identifier) - Address of a virtual circuit. An integer that ranges
from 0 to 65,535. The integer identifies a virtual channel that cells may traverse.
VPI (Virtual Path Identifier) - Address of a virtual path to a connection on an ATM
network. An integer that ranges from 0 to 4,095.
W-X-Y-Z
WAN (Wide Area Network) - Network base that covers a large geographic area.
file:///P|/T_WRITER/Documentation/Released/900...003%20(Guiness)%20prac%20template/glossary.htm (10 of 11) [11/6/2002 9:02:38 AM]
U.S. Robotics SureConnect ADSL Ethernet/USB Router User Guide
WINS (Windows Internet Name Service) - Service that transposes Windows
networking names into addresses usable for routing purposes.
file:///P|/T_WRITER/Documentation/Released/900...003%20(Guiness)%20prac%20template/glossary.htm (11 of 11) [11/6/2002 9:02:38 AM]
U.S. Robotics SureConnect ADSL Ethernet/USB Router User Guide
Contents:
Regulatory Information
US Robotics
SureConnect ADSL
Ethernet/USB Router
Manufacturer’s Declarations of Conformity
Configuration Utility
FCC Declaration of Conformity
We declare under our sole responsibility that the U.S. Robotics SureConnect
ADSL Ethernet/USB Router to which this declaration relates, is in conformity
with the following standards or other normative documents:
ANSI C63.4-1992 Methods of measurement
Federal Communications Commission 47 CFR Part 15, subpart B
1) 15.107 (e) Class B Conducted Limits
2) 15.109 (g) Class B Radiated Emissions Limits
Summary
Web User Interface
Terminal User Interface
Command Line Interface
Configuration Examples
Installation
Uninstallation
Troubleshooting
Glossary
Regulatory Information
FCC Class B Statement
This device complies with Part 15 of the FCC Rules. Operation is subject to
the following two conditions:
1) this device may not cause harmful electromagnetic interference, and
2) this device must accept any interference received including interference that
may cause undesired operations.
Radio and Television Interference
Note: This equipment has been tested and found to comply with the limits for
a Class B digital device, pursuant to Part 15 of the FCC Rules. These limits are
designed to provide reasonable protection against harmful interference in a
residential installation. This equipment generates and uses radio frequency
energy and, if not installed and used in accordance with the instructions, may
cause interference to radio communications. However, there is no guarantee
that interference will not occur in a particular installation. If this equipment
does cause interference to radio or television reception, which can be
determined by turning the equipment off and on, the user is encouraged to try
to correct the interference by one or more of the following measures:
●
●
●
●
Reorient or relocate the receiving antenna or cable input device.
Increase the separation between the equipment and receiver.
Connect the equipment into an outlet on a circuit different from that to which the receiver is
connected.
Consult the dealer or an experienced radio/TV technician for help.
file:///P|/T_WRITER/Documentation/Released/9003...9003%20(Guiness)%20prac%20template/regulato.htm (1 of 8) [11/6/2002 9:02:47 AM]
U.S. Robotics SureConnect ADSL Ethernet/USB Router User Guide
The user may find the following information prepared by the Federal
Communications Commission helpful:
Consult the dealer or an experienced radio/TV technician for help.
Telephone Interference Bulletin
This document is available on the Internet through the FCC Consumer and
Government Affairs Home Page at http://www.fcc.gov/cgb. Under Consumer
alerts and factsheets=>Telephone>Miscellaneous Telephone Information,
select Interference to Telephones.
Caution: Changes or modifications not expressly approved by the party
responsible for compliance could void the user’s authority to operate this
equipment.
In order to maintain compliance with the limits of a Class B digital device,
U.S. Robotics requires that you use a quality interface cable when connecting
to this device. Suggested cable type is 90-ohm USB cable for the USB port,
and standard telephone cable for the RJ-11 port. The telco cable needs to be
connected with a minimum 26AWG telephone cable.
UL Listing/C-UL Listing
This information technology equipment is UL Listed and C-UL Listed for both
the US and Canadian markets respectively, for uses described in the User
Guide.
FCC Part 68 Registration
Customer Information
This equipment complies with Part 68 of the FCC rules and the requirements
adopted by the ACTA. On the bottom of this equipment is a label that
contains, among other information, a product identifier in the format US:
AAAEQ##TXXXX. If requested, this number must be provided to the
telephone company.
This equipment uses the following Universal Service Order Code (USOC)
jacks: RJ-11.
A plug and jack used to connect this equipment to the premises wiring and
telephone network must comply with the applicable FCC Part 68 rules and
requirements adopted by the ACTA. A compliant telephone cord modular plug
is provided with this product. It is designed to be connected to a compatible
modular jack that is also compliant. See this document for details.
file:///P|/T_WRITER/Documentation/Released/9003...9003%20(Guiness)%20prac%20template/regulato.htm (2 of 8) [11/6/2002 9:02:47 AM]
U.S. Robotics SureConnect ADSL Ethernet/USB Router User Guide
The REN is used to determine the number of devices that may be connected to
a telephone line. Excessive RENs on a telephone line may result in the devices
not ringing in response to an incoming call. In most but not all areas, the sum
of RENs should not exceed five (5.0). To be certain of the number of devices
that may be connected to a line, as determined by the total RENs, contact the
local telephone company. For products approved after July 23, 2001, the REN
for this product is part of the product identifier that has the format US:
AAAEQ##TXXXX. The digits represented by ## are the REN without a
decimal point (e.g., 03 is a REN of 0.3).
If this equipment, U.S. Robotics SureConnect ADSL Ethernet/USB Router,
causes harm to the telephone network, the telephone company will notify you
in advance that temporary discontinuance of service may be required. But if
advance notice is not practical, the telephone company will notify the customer
as soon as possible. Also, you will be advised of your right to file a complaint
with the FCC if you believe it is necessary.
The telephone company may make changes in its facilities, equipment,
operations or procedures that could affect the operation of the equipment. If
this happens the telephone company will provide advance notice in order for
you to make necessary modifications to maintain uninterrupted service.
If trouble is experienced with this equipment, for repair or warranty
information, please contact:
USR-Walnut
528 Spanish Lane
Walnut, CA 91789
If the equipment is causing harm to the telephone network, the telephone
company may request that you disconnect the equipment until the problem is
resolved.
There are no serviceable parts in this equipment.
If your home has specially wired alarm equipment connected to the telephone
line, ensure the installation of this equipment does not disable your alarm
equipment. If you have questions about what will disable alarm equipment,
consult your telephone company or a qualified installer.
For Canadian router Users:
file:///P|/T_WRITER/Documentation/Released/9003...9003%20(Guiness)%20prac%20template/regulato.htm (3 of 8) [11/6/2002 9:02:47 AM]
U.S. Robotics SureConnect ADSL Ethernet/USB Router User Guide
Utilisateurs de routers au Canada:
Industry Canada (IC)
This digital apparatus does not exceed the Class B limits for radio noise
emissions from digital apparatus set out in the interference-causing equipment
standard entitled Digital Apparatus, ICES-003 of Industry Canada.
Le présent appareil numérique n’émet pas de bruits radio-électriques dépassant
les limites applicables aux appareils numériques de la classe B prescrites dens
le Règlement sur le brouillage radioélectrique édicté par l’Industrie. NMB-003
Customer Information
Notice: This equipment meets the applicable Industry Canada Terminal
Equipment Technical Specifications. This is confirmed by the registration
number. The abbreviation, IC, before the registration number signifies that
registration was performed based on a Declaration of Conformity indicating
that Industry Canada technical specifications were met. It does not imply that
Industry Canada approved the equipment.
Notice: The Ringer Equivalence Number (REN) for this terminal equipment is
0.1B. The REN assigned to each terminal equipment provides an indication of
the maximum number of terminals allowed to be connected to a telephone
interface. The termination on a interface may consist of any combination of
devices subject only to the requirement that the sum of the Ringer Equivalence
Numbers of all the devices does not exceed five.
AVIS: Le nombre équivalent de sonneries (REN) affecté à chaque terminal
indique le nombre maximal de terminaux qui peuvent être branchés à une
interface téléphonique. L’équipement terminal d’une interface peut comporter
toute combinaison d’appareils, à la condition unique que le nombre équivalent
total des sonneries de tous les appareils ne dépasse pas 5. Le nombre
équivalent des sonneries se trouve sur la base du router.
AVIS: L’étiquette d’Industrie Canada (IC) permet d’identifier le matériel
homologué. Cette homologation signifie que le matériel est conforme à
certaines normes de protection, d’exploitation et de sécurité des réseaux de
télécommunications, comme le prescrivent les documents qui portent sur les
exigences techniques relatives à l’équipement terminal. Cependant, le
Ministère ne garantit pas que l’appareil fonctionnera à la satisfaction de
l’utilisateur.
Avant d’installer ce matériel, l’utilisateur doit s’assurer qu’il est permis de le
raccorder aux installations de l’entreprise locale de télécommunication. Le
file:///P|/T_WRITER/Documentation/Released/9003...9003%20(Guiness)%20prac%20template/regulato.htm (4 of 8) [11/6/2002 9:02:47 AM]
U.S. Robotics SureConnect ADSL Ethernet/USB Router User Guide
matériel doit également être installé selon une méthode de raccordement
autorisée. Dans certains cas, le câblage intérieur de la compagnie étant associé
à une ligne individuelle, le service individuel peut être étendu au moyen d’un
connecteur certifié (rallonge téléphonique). L’abonné ne doit pas oublier que
la conformité aux conditions susmentionnées n’empêchera peut-être pas la
dégradation du service dans certains cas. À l’heure actuelle, les compagnies de
téléphone n’autorisent pas les utilisateurs à raccorder leur appareil au jack sauf
dans des circonstances précises énoncées dans les contrats et tarifs de ces
compagnies.
Les réparations de matériel homologué doivent être coordonnées par un
représentant désigné par le fournisseur. L’entreprise de télécommunications
peut demander à l’utilisateur de débrancher un appareil à la suite de
réparations ou de modifications effectuées par l’utilisateur ou à cause d’un
mauvais fonctionnement de l’appareil.
AVIS: L’étiquette d’Industrie Canada identifie le matériel homologué. Cette
étiquette certifie que le matériel est conforme aux normes de protection,
d’exploitation et de sécurité des réseaux de télécommunications, comme le
prescrivent les documents concernant les exigences techniques relatives au
matériel terminal. Le Ministère n’assure toutefois pas que le matériel
fonctionnera à la satisfaction de l’utilisateur.Avant d’installer ce matériel,
l’utilisateur doit s’assurer qu’il est permis de le raccorder aux installations de
l’entreprise locale de télécommunication. Le matériel doit également être
installé en suivant une méthode acceptée de raccordement. L’abonné ne doit
pas oublier qu’il est possible que la conformité aux conditions énoncées cidessus n’empêche pas la dégradation du service dans certaines situations.Les
réparations de matériel homologué doivent être coordonnées par un
représentant désigné par le fournisseur. L’entreprise de télécommunications
peut demander à l’utilisateur de débrancher un appareil à la suite de
réparations ou de modifications effectuées par l’utilisateur ou à cause de
mauvais fonctionnement.Canadian router Users, your warranty and repair
centre is:
U.S. Robotics
Unit - 100
13751 Mayfield Place
Richmond, B.C. Canada V6V 2G9
CE Compliance
CE Declaration of Conformity
file:///P|/T_WRITER/Documentation/Released/9003...9003%20(Guiness)%20prac%20template/regulato.htm (5 of 8) [11/6/2002 9:02:47 AM]
U.S. Robotics SureConnect ADSL Ethernet/USB Router User Guide
We, U.S. Robotics Corporation of 935 National Parkway, Schaumburg,
Illinois, 60173-5157,USA, declare under our sole responsibility that the U.S.
Robotics SureConnect ADSL Ethernet/USB Router to which this declaration
relates is in conformity with the following standards and/or other normative
documents:
EN60950
EN55022
EN55024
EN61000-3-2
EN61000-3-3
We hereby declare that this product is in compliance with all the essential
requirements of Directive 1999/5/EC. The conformity assessment procedure
referred to in Article 10(3) and detailed in Annex II of Directive 1999/5/EC
has been followed.
Product Specifications for ADSL Ethernet Router
Standard Conformance
Basic ADSL
Standards and Specifications
Analog Devices 6480/6482 Eagle ADSL Chipset and 6489 Network Processor
Supports full-rate G.DMT (ITU-T G.992.1)and T1.413Issue 2 ADSL: up to 8
Mbps downstream and up to 1 Mbps upstream
Supports G.lite (ITU-T G.992.2)ADSL:up to 1.5 Mbps downstream and up to
512 Kbps upstream
Supports DSL handshaking (ITU-T G.994.1)
Multi-DSLAM interoperability including Alcatel, Globespan, Texas
Instruments, and Analog Devices-based DSLAMs (results available upon
request)
Transport Protocols:
RFC 2516 PPP over Ethernet (Client and Relay)
RFC 2364 PPP over ATM
RFC 2225 (formerly 1577)Classical IP and ARP over ATM
RFC 2684 (formerly 1483)Multi-protocol over ATM (Bridged and Routed)
ATM Attributes:
file:///P|/T_WRITER/Documentation/Released/9003...9003%20(Guiness)%20prac%20template/regulato.htm (6 of 8) [11/6/2002 9:02:47 AM]
U.S. Robotics SureConnect ADSL Ethernet/USB Router User Guide
AAL Type: AAL 5
ATM Service Class: UBR, CBR, nrt-VBR, rt-VBR
Virtual Circuit Support:16 PVCs
TR37 Auto-provisioning with ILMI v4.0
End-to-end loopback: OAM
ATM pacing, policing (QOS)
Traffic Management 4.1
Data Rate:
G.dmt: 8Mbps (downstream), 1Mbps (upstream)
G.lite: 1.5Mbps (downstream), 512Kbps (upstream)
Media Type:
Simultaneous data/voice (can coexist with HPNA)
Service Provider:
Digital Subscriber Line Access Multiplexer (DSLAM)
Media Connection:
(2)RJ-45 10/100 Ethernet ports
(1)USB 1.1 compliant port
ADSL port (RJ-11)
Console port (RS-232)
AC into power supply
Ethernet cable connection to computer, RJ-11 connection to ADSL provider
System Requirements:
●
●
●
●
●
A host computer running Windows 95, Windows 98, 2000, Me, NT 4.0, XP, Linux, or
Macintosh.
A host computer running Internet Explorer 4.0 or later.
32 MB of RAM and 10 MB of hard disk space (memory intensive applications may require
more RAM).
200 MHz Pentium or faster compatible CPU.
For Ethernet port, any computer with an Ethernet 10/100 RJ-45 interface.
For USB port, host PC with Universal Serial Bus (USB) support.
Physical Characteristics:
LEDs/Indicators:
Power
DSL
USB
Ethernet 1
file:///P|/T_WRITER/Documentation/Released/9003...9003%20(Guiness)%20prac%20template/regulato.htm (7 of 8) [11/6/2002 9:02:47 AM]
U.S. Robotics SureConnect ADSL Ethernet/USB Router User Guide
Ethernet 2
Dimensions:
Length 5.5 in.(13.97 cm)
Width 9.2 in.(23.36 cm)
Height 1.6 in.(23.36 cm)
Weight:14.4 oz. (0.448 kg)
Power: Consumption: 10V DC at 680mA
Environmental:
Operating temperature conditions: 32 -122 °F (0 -50 °C)
Operating humidity: 5%to 95% RH non-condensing
file:///P|/T_WRITER/Documentation/Released/9003...9003%20(Guiness)%20prac%20template/regulato.htm (8 of 8) [11/6/2002 9:02:47 AM]