1
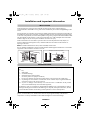
20VL64-en.book
Page 1
Thursday, February 1, 2007
5:06 PM
20VL64
15VL64
Series
Owner’s manual
20VL64-en.book
Page 2
Thursday, February 1, 2007
5:06 PM
20VL64-en.book
Page 3
Thursday, February 1, 2007
5:06 PM
Contents
Safety precautions ......................................................... 4
Installation and important information............................... 5
Getting started ........................................................... 7
Controls ..................................................................... 8
Remote control .............................................................. 8
TV................................................................................ 9
Connecting external equipment .................................. 10
Connecting a media recorder and/or a decoder ............... 10
Connecting audio and video equipment with
standard AV or S-Video terminals ................................... 11
Connecting a personal computer (PC) .............................. 12
Connecting an audio system ........................................... 12
Using the TV............................................................... 13
Quick Setup .................................................................. 13
Programming ................................................................ 14
Editing programs, Setting up the sound ............................ 15
Setting up the sound (continued) ...................................... 16
Setting up the picture ..................................................... 17
Features: Picture Size, Sleep Timer,
Panel Lock, Backlight..................................................... 18
Features: PC Settings, Input Selection ............................... 19
Features: Blue Screen, Channel Return, Mute, Headphones. 20
Using Teletext ............................................................ 21
To view Teletext in Auto or List mode................................ 22
Questions and Answers ............................................. 23
Specifications ............................................................. 25
ENGLISH-3-
20VL64-en.book
Page 4
Thursday, February 1, 2007
5:06 PM
Safety precautions
This equipment has been designed and manufactured to meet international safety standards but, like
any electrical equipment, care must be taken to obtain the best results and for safety to be assured.
Please read the points below for your own safety. They are of a general nature, intended to help with
all electronic consumer products and some points may not apply to the goods you have just purchased.
Air Circulation
Do not
Leave more than 10 cm clearance around the TV DON’T remove any fixed covers, as this will
to allow adequate ventilation. This will prevent
expose dangerous and ‘live’ parts.
overheating and possible damage to the TV.
DON'T obstruct the ventilation openings of the
Dusty places should also be avoided.
equipment with items such as newspapers,
tablecloths, curtains, etc. Overheating will cause
Heat Damage
damage and shorten the life of the equipment.
Damage may occur if the TV is left in direct
sunlight or near a heater. Avoid places subject to DON’T allow electrical equipment to be
exposed to dripping or splashing or objects filled
extremely high temperatures or humidity, or
with liquids, such as vases, to be placed on the
locations where the temperature is likely to fall
equipment.
below 5°C (41°F).
DON'T place hot objects or naked flame
Mains Supply
sources, such as lighted candles or nightlights
on, or close to equipment. High temperatures
The mains supply required for this equipment is
can melt plastic and lead to fires.
110 - 240 V AC 50 Hz. Never connect to a DC
supply or any other power source. DO ensure
DON'T use makeshift stands and NEVER fix legs
that the TV is not standing on the mains lead. DO with wood screws. To ensure complete safety,
NOT cut off the mains plug from this equipment, always fit the manufacturers’ approved stand,
this incorporates a special Radio Interference
brackets or legs with the fixings provided
Filter, the removal of which will impair its
according to the instructions.
performance. In the UK, the fuse fitted in this plug
is approved by ASTA or BSI to BS1362. It should DON'T listen to headphones at high volume, as
such use can permanently damage your hearing.
only be replaced by a correctly rated and
approved type and the fuse cover must be
DON'T leave equipment switched on when it is
refitted. IF IN DOUBT PLEASE CONSULT A
unattended, unless it is specifically stated that it is
COMPETENT ELECTRICIAN.
designed for unattended operation or has a
Do
DO read the operating instructions before you
attempt to use the equipment.
DO ensure that all electrical connections
(including the mains plug, extension leads and
inter-connections between pieces of equipment)
are properly made and in accordance with the
manufacturers’ instructions. Switch off and
withdraw the mains plug before making or
changing connections.
standby mode. Switch off by withdrawing the
plug, make sure your family know how to do this.
Special arrangements may need to be made for
people with disabilities.
DON'T continue to operate the equipment if you
are in any doubt about it working normally, or it
is damaged in any way - switch off, withdraw the
mains plug and consult your dealer.
ABOVE ALL - NEVER let anyone, especially
children, push or hit the screen, push
anything into holes, slots or any other
openings in the case.
DO consult your dealer if you are ever in doubt NEVER guess or take chances with
about the installation, operation or safety of your electrical equipment of any kind - it is
better to be safe than sorry.
equipment.
DO be careful with glass panels or doors on
equipment.
THE MAINS PLUG IS USED AS A
DISCONNECTING DEVICE AND THEREFORE
SHOULD BE READILY OPERABLE.
ENGLISH-4-
20VL64-en.book
Page 5
Thursday, February 1, 2007
5:06 PM
Installation and important information
Where to install
Locate the television away from direct sunlight and strong lights. Soft or indirect lighting is
recommended for comfortable viewing. Use curtains or blinds to prevent direct sunlight falling on the
screen.
Always place the TV on the floor or a sturdy level, stable surface that can support the weight of the unit.
It must then be secured to a wall, pillar, or other immovable structure with a sturdy tie using the hooks
on the rear of TV pedestal, or secured to the platform using a fixing strap located underneath the table
top stand. Make sure the surface is wide enough so that the TV’s width and depth don’t exceed the
surface’s edges. If not, the TV may lean or fall over and cause an injury.
Make sure the television is located in a position where it cannot be pushed or hit by objects, as
pressure will break or damage the screen, and that small items cannot be inserted into slots or
openings in the case.
Note: A Toshiba wall bracket or stand, where available, must be used.
If a non Toshiba wall bracket or stand is used the products' BEAB approval will become void and the
equipment is then used at the consumers own risk.
Sturdy tie (as short as possible)
Clip
Hooks
TV top
TV side
Screw
(Not
supplied)
Fixing strap
EXCLUSION CLAUSE
Toshiba shall under no circumstances be liable for loss and/or damage to the product caused
by:
i
fire;
ii earthquake;
iii accidental damage;
iv intentional misuse of the product;
v use of the product in improper conditions;
vi loss and/or damage caused to the product whilst in the possession of a third party;
vii any damage or loss caused as a result of the owner’s failure and/or neglect to follow the
instructions set out in the owner’s manual;
viii any loss or damage caused directly as a result of misuse or malfunction of the product
when used simultaneously with associated equipment;
Furthermore, under no circumstances shall Toshiba be liable for any consequential loss and/or
damage including but not limited to the following, loss of profit, interruption of business, the loss
of recorded data whether caused during normal operation or misuse of the product.
If stationary images generated by text services, channel identification logos, computer displays, video
games, on screen menus, etc. are left on the screen for any length of time they could become
conspicuous. It is always advisable to reduce both the brightness and contrast settings.
ENGLISH-5-
20VL64-en.book
Page 6
Thursday, February 1, 2007
5:06 PM
Important notes about your LCD TV
The following symptoms are technical limitations of LCD Display technology and are not an indication
of malfunction. Therefore, Toshiba is not responsible for perceived defects resulting from these
symptoms.
1. An afterimage (ghost) may appear on the screen if a fixed non-moving image is displayed for a
long period of time. The afterimage is not permanent and will disappear in a short period of
time.
2. The LCD panel contained in this TV is manufactured using an extremely high level of precision
technology; however, there may be an occasional pixel (dot of light) that does not operate
properly (that does not light, that remains constantly lit, etc.). This is a structural property of LCD
technology, is not a sign of malfunction, and is not covered under your warranty. Such pixels
are not visible when the picture is viewed from a normal viewing distance.
Note: Interactive video games that involve shooting a "gun" type of joystick at an on-screen target
may not work on this TV.
Cleaning the screen and the cabinet
After turning off the power, clean the screen and the cabinet with a soft, dry cloth. We recommend that
you do not use any proprietary polishes or solvents on the screen or cabinet as this may cause
damage.
Disposal
The cold cathode fluorescent lamp in the LCD panel contains a small amount of mercury, when the set
reaches the end of its useful life please dispose of it in accordance with Local Government Regulations
or at a recycling centre.
Following information is only for EU-member states:
The use of the symbol indicates that this product may not be treated as household
waste. By ensuring this product is disposed of correctly, you will help prevent
potential negative consequences for the environment and human health, which
could otherwise be caused by inappropriate waste handling of this product. For
more detailed information about recycling of this product, please contact your
local city office, your household waste disposal service or the shop where you
purchased the product.
ENGLISH-6-
20VL64-en.book
Page 7
Thursday, February 1, 2007
5:06 PM
Getting started
Thank you for purchasing this Toshiba LCD TV. The goal of this manual is to guide you through setting
up and operating your Toshiba TV as quickly as possible. Instructions in this manual are based on
using the remote control. You can also use the controls on the TV if they have the same name as those
referred to on the remote control. Please read all the safety and operating instructions carefully, and
keep this manual for future reference.
Supplied accessories
Back of TV
Check that you have accessories and items as
listed below.
• Accessory box
•
Power cord
•
Remote control
•
Batteries
(EU)
(UK)
Power cord
Note: SCART, VGA, RCA leads and
3.5mm stereo jack for PC audio are not
supplied.
Note: If you are not going to use your television
for a long period of time, make sure to remove the
mains plug from the wall socket.
Precautions for moving the TV
Aerial connection
•
When moving the TV, be sure to remove the
plug from the wall outlet and disconnect the
antenna cable and audio/video cables, any
steady ties. Fire or electric shock may result if
the power cord is damaged.
•
When carrying the TV, be sure to carry it
upright.
•
Never carry the TV with the screen facing up
or down.
This connection allows you to watch TV programs
or basic cable channels.
To connect an aerial, plug the aerial lead into the
aerial socket on the rear of the TV.
Back of TV
From Aerial
or Cable
Power cord connection
1. Plug the power cord into the AC inlet on the
back of the TV.
2. Plug the other end of the power cord to a
wall socket. The power indicator turns blue
when power is supplied. Now your TV is in
stand-by mode.
Press
on the remote control to select TV.
You can use an outdoor or indoor aerial.
However, if you use an indoor aerial the quality
of the reception may be reduced and adjustment
of the aerial may be required when changing
programs.
Note: If you live in a poor reception area or use
an indoor aerial you may experience loss or
corruption of teletext transmissions.
ENGLISH-7-
20VL64-en.book
Page 8
Thursday, February 1, 2007
5:06 PM
Controls
Remote control
10
1
11
12
13
2
3
4
MENU
P
EXIT
5
6
14
15
16
OK
6. Volume up and down buttons (@/6)
Menu adjustment buttons ( / )*
7. Sound Type/Language selection button
8. Text Question/Answer button (Reveal)
9. Text stop button (Hold)
10. Text/Mix/TV selection button
11. Standby button*
12. Numeric buttons
13. External input selection button*
14. Sound mode selection button
15. EXIT button
16. Program up and down buttons (P /P )
Menu adjustment buttons ( / )*
17. (From left to right) Red, green, yellow and blue text
control buttons
18. Picture size selection button
19. Mute button
20. Backlight button
21. Teletext time/update button
22. Teletext enlarge button (Double size)
*The function has a duplicate location on the TV.
Battery installation and effective range of
the remote
P
17
18
19
7
Backlight
20
8
21
9
22
Remove the back cover of your
remote control to reveal the
battery compartment and
make sure you insert the
batteries the right way round.
+
-
+
Suitable battery types for this
remote are IEC R03 and AAA 1.5V.
The performance of the remote control will deteriorate
beyond a distance of 8 metres or outside an angle of
30 degrees from the remote sensor of the TV.
If the operating range becomes reduced, the batteries
may need replacing.
Caution
1. Teletext index/initial button
Info button (CALL)
2. Channel return button
3. Picture mode button
4. MENU button*
5. OK button
•
Remove dead batteries immediately to prevent acid
leaking into the battery compartment. Dispose of
them in a designated disposal area.
•
Do not combine a used, old battery with a new one
or mix battery types.
Warning: Batteries must not be exposed to
excessive heat, such as sunshine, fire and the like.
ENGLISH-8-
Getting started.fm
Page 9
Monday, February 26, 2007
10:16 AM
TV
TV front
Right side panel
Standby
Program /
Menu adjustment
/
VOLUME @/6
Menu adjustment /
Input signal selection
MENU
Speaker
Indicator;
Blue=Standby
and On,
Yellow=Timer
Headphone
jack
Remote sensor
Back
AV IN (S-Video/
Video/Audio input)
Adjusting the
TV viewing
angle
Tilt angle
Audio output
3° 12°
SCART 1 (VIDEO/RGB),
Power cord
Cable holder
Bundles the connection
cables.
SCART 2 (VIDEO/S-VIDEO)
ANT IN
PC AUDIO IN
RGB/PC IN
Please note
•
Do not use Video RCA and S-Video connections at the same time, otherwise they will effect the
picture.
•
An RGB input from SCART 1 will give you better picture quality.
ENGLISH-9-
20VL64-en.book
Page 10
Thursday, February 1, 2007
5:06 PM
Connecting external equipment
You can connect a wide range of audio and video equipment to your TV. Before connecting any
external equipment, turn off all main power switches. If there is no switch, remove the mains plug from
the wall socket.
Please refer to the owner's manual of the equipment to be connected.
Connecting a media recorder and/or a decoder
This connection allows you to watch and record basic and premium cable channels, as well as watch
or record videotapes/DVDs. Tune the VCR to an appropriate channel (the same channel as the
decoder output switch), and use the decoder to change channels.
Connect the aerial to the socket on the rear of the TV. If you are using a decoder* and/or media
recorder**, it is essential that the aerial cable is connected through the decoder and/or through the
media recorder to the TV.
Switch on the decoder/media recorder and the TV. Press
on the remote control to select EXT1 to
watch TV and record the TV. Press
on the remote control to select EXT2 to watch videotapes/DVDs
and record the TV. See "Selecting an input signal" on page 19 for more information.
decoder*
media recorder**
*A decoder could be Digital Satellite, Free to Air or any other compatible decoder.
** A media recorder could be VCR (video recorder) or DVD recorder.
ENGLISH-10-
20VL64-en.book
Page 11
Thursday, February 1, 2007
5:06 PM
Connecting audio and video equipment with
standard AV or S-Video terminals
You can connect video equipment such as a VCR, DVD player, camcorder or video game, etc. to this
TV and enjoy the high quality picture.
If your video equipment has an S-VIDEO output terminal, connect it to the S-VIDEO input terminal of the
TV and select EXT3-S as the input signal. If not, connect it to the standard AV terminal and select EXT3
as the input signal. An S-Video signal provides a better image quality than a video signal.
Switch on the devices and the TV. If you want to record the video or TV image, see "Selecting an input
signal" on page 19 for more information.
Back side
Another A/V equipment can be connect
to
(1) similarly
Video Games
Camcorder
L VIDEO S-VIDEO
R
AUDIO OUT OUT OUT
DVD player
ANT ANT
IN
OUT
For VCR only
VCR
•
If you connect mono sound equipment to
, connect the audio output of the equipment to the
L or R terminal on the TV. To select the L or R mono channel to be output on both speakers, please
refer to "Selecting a sound type" on page 16.
•
You can enjoy video games with this TV. A shooting game, however, which shoots the target on
the TV screen with a ray gun may not work because of the LCD colour TV properties.
ENGLISH-11-
20VL64-en.book
Page 12
Thursday, February 1, 2007
5:06 PM
Connecting a personal computer (PC)
This connection allows you to view the image of a personal computer (PC) on the TV screen. When
connecting a PC to the TV, use an analog RGB (15-pin) computer cable and a PC audio cable. Press
on the remote control to select PC to view the PC image. If a PC is not connected, or no signal is
received, a “No Signal” message will move around the screen at random.
Computer
Back of TV
Audio
output
RGB/PC
output
Audio cable
Conversion adapter (if necessary)
•
To use a PC, set the monitor output resolution on the PC before connecting it to the TV. The
following signals can be displayed.
• SVGA: VESA 800 X 600 @ 60Hz (for 20VL64 series)
XGA: VESA 1024 X 768 @ 75Hz (for 15VL64 series)
• Other formats or non-standard signals may not be displayed correctly.
•
To display the optimum picture, use the PC setting feature. See "Using the PC settings" on page 19
for details.
•
If you want to record a TV program while viewing the PC image, connect your recorder to
or
, and tune your TV to the channel that you want to record. See "Selecting an input signal"
on page 19 for more information.
Note: Some PC models cannot be connected to this television
Connecting an audio system
This connection allows you to hear the TV sound through external speakers connected to an audio
amplifier. The audio signal level (fixed) is not affected by pressing the volume buttons on the TV or the
TV's remote control. To control the audio through the amplifier, use the audio system's volume control.
Back of TV
Amplifier
ENGLISH-12-
20VL64-en.book
Page 13
Thursday, February 1, 2007
5:06 PM
Using the TV
Quick Setup
Tuning the TV using Quick Setup for the Learning about the On-Screen Display
first time turn-on
(OSD) menu system
Before switching on your TV, ensure an aerial is
connected and put your decoder and video
recorder to standby modes if they are connected.
1. Press
(Standby) on the right side panel
of the TV, or
on the remote control to
switch the TV on. The Quick Setup menu
will display after a few seconds.
Quick Setup
Language
Country
Sound System
English
U.K.
I
0
Search >
MENU OK EXIT
2. Press /
to select your language.
3. Press
to highlight Country, and then
press / to select the country you are
located.
4. Press
to highlight Search >, and then
press
or OK to start auto-tuning. The
slide bar will move along the line as the
search progresses. This can take several
minutes.
Note: The progress bar may start for a
second time if more than one sound system
is searched.
When the search is complete, the TV will
automatically select programme position 1.
This may not be a clean picture or the
single may be weak. You can manually
programme or edit the channels using the
Channel menu. See "Adding channels
manually" on page 14 for details.
After you have turned on the TV, you will need to
set some preferences for the TV by using the OSD
menu system. You can access the system using the
buttons on the TV or remote control.
1. Press MENU to display the OSD menu.
2. Press /
to select a main menu.
3. Press / to select an function item.
4. Press /
to adjust a setting, or press
or OK to display the next page of menu
and repeat step 3-4.
5. To return to the previous menu, or leave and
save your menu settings, repeatedly press
EXIT or MENU until the menu disappears.
Main menu highlighted
Main menu name
Picture
Picture Mode
Function item
1
Contrast
63
Brightness
32
Colour
32
Sharpness
0
Tint
0
Picture Advanced Setting >
Function buttons
MENU OK EXIT
Options
Changing the on-screen display
language
1. Press MENU and then press /
Special menu appears.
2. Highlight Language by pressing
until the
/
.
Special
Language
Colour System
English
Auto
Picture Size
Auto
Sleep Timer
0 Minutes
Panel Lock
Backlight
Off
Bright
Teletext Setting >
MENU OK EXIT
3. Press /
to select the language you
wish to use. All the on-screen display text of
your TV will be displayed in the language
that you have selected.
ENGLISH-13-
20VL64-en.book
Page 14
Thursday, February 1, 2007
5:06 PM
Programming
When you press P /P , your TV will stop only on the channels you program into the TV's channel
memory. Follow the steps below to program all active channels into the TV's memory.
Programming channels automatically
Note: All previously stored programmes will be
lost when Auto Programme is started.
Your TV can automatically detect all active
channels in your area and store them in the
channel memory.
To program channels automatically:
1. Press MENU, and then press /
until
the Channel menu appears.
2. Press
to highlight Auto Programme and
press or OK to display the Auto
Programme page.
Channel
Auto Programme >
Manual Programme >
Programme Edit >
Blue Screen
On
MENU OK EXIT
3. For the rest steps, please refer to steps 3
and 4, "Tuning the TV using Quick Setup
for the first time turn-on" on page 13.
Note: If you want to stop searching, press
, , EXIT, or MENU.
4. Check the stored channels by pressing
P /P .
Adding channels manually
3. Press
to highlight Position and press
or the numeric buttons to select a
channel you want to set up.
/
Manual Programme
BG
Sound System
Position
01
Frequency
___.__ Mhz
Manual Fine Tuning
-
+
AFT
Off
Store
01
MENU OK EXIT
4. Press
to highlight Frequency and
press /
to start the tuning system in
descending or ascending order. If a
channel is found, the picture is displayed.
5. If the picture is not clear or the signal is
poor, you can fine tune the frequency.
Press to highlight Manual Fine Tuning
and press /
to adjust the setting until
the picture quality is acceptable.
Note: Under normal circumstances, you don’t
need to use the Manual Fine Tuning or AFT
function.
The Auto Fine Tuning function (AFT) if set to On
will automatically search and lock a suitable
frequency for the channel.
6. To save the current channel settings to the
TV’s memory, highlight Store and press OK.
The channel number will stop flashing.
After you have automatically programmed the
active channels into the TV's channel memory,
you can manually add some channels or erase
some channels that you don’t want to view.
To add channels:
1. In the Channel menu, press /
to
highlight Manual Programme. Press
or
OK to display the Manual Programme
page.
2. Highlight Sound System and press /
to
select a TV standard according to your
local TV system.
ENGLISH-14-
20VL64-en.book
Page 15
Thursday, February 1, 2007
5:06 PM
Editing programs, Setting up the sound
Editing programs
To set the TV to your personal needs, you can
name the programs, swap channel numbers
(change channels sequence), skip the programs
that you don’t need by using the functions
provided in the Programme Edit menu.
To assign an up to 5-character label to channels:
1. Press MENU, and then press /
until
the Channel menu appears.
2. Highlight Programme Edit and press or
OK to display the Programme Edit page.
11. Press
to highlight Skip and press /
to select On. The selected channel will be
skipped when you press P /P .
If you want to restore the skipped channel, repeat
step 10-11 and select Off in step 11.
Setting up the sound
You can adjust the sound volume of your TV by
using @/6 on your remote control or TV. You
can control the other sound settings by entering
the Audio menu.
Selecting a sound mode
Programme Edit
Position
Name
Position Swap
Skip
There are five sound modes available. To select a
preset sound mode, press
on the remote
control repeatedly until the preferred mode is
selected.
01
------Off
MENU OK EXIT
3. Highlight Position and press /
or the
numeric button to select the channel you
want to edit.
4. Press
to highlight Name and press
or
OK. An asterisk will display in the first
place.
5. Press /
to select a desired character
from among A-Z, 0-9, and symbols like . + , etc. for each. You can move between
characters by pressing / .
6. When complete, press OK or to the far
left hand side until the * disappears.
To swap channels:
You can sort out the similar types of channels
from others or re-arrange the channel sequence
to a preferred order by swapping channels.
Mode
Flat
Hall
Theatre
News
Memory
Sound Quality
flat sound (factory setting)
a concert hall filled with a rich warm
sound (factory setting)
a movie theatre filled with a
dynamic sound (factory setting)
news/dialogue (factory setting)
your personal preference
Adjusting the sound quality
You can change the quality of your TV’s sound by
adjusting the balance, treble, and bass.
To adjust the sound balance:
1. Press
to highlight Balance and press /
to change the setting.
7.
Highlight Position and press / or the
numeric button to select the channel you
want to swap.
8. Press
to highlight Position Swap and
enter another channel number that you
would like to swap.
9. Press OK. The channel number will change
immediately.
To skip unwanted channels:
10. Highlight Position and press /
or the
numeric button to select the channel you
want to skip.
ENGLISH-15-
Audio
Sound Mode
Flat
Balance
0
Sound Type
L+R
AVL
Off
On
Speaker Out
Audio Advanced Setting >
Audio Reset
MENU OK EXIT
20VL64-en.book
Page 16
Thursday, February 1, 2007
5:06 PM
Setting up the sound (continued)
To adjust the sound treble and bass:
2. Press
to highlight Audio Advanced
Setting > and press to display the Audio
Advanced Setting page.
3. Press /
to highlight one of the items
(Treble, Mid Treble, Middle,Mid Bass, and
Bass) you want to adjust.
4. Press /
to adjust the level.
Flat
Balance
0
L+R
Sound Type
AVL
Off
On
Speaker Out
Audio Advanced Setting >
Audio Reset
Flat
Balance
0
Sound Type
L+R
AVL
Off
Speaker Out
On
Audio Advanced Setting >
Audio Reset
MENU OK EXIT
Using AVL
Audio
Sound Mode
Audio
Sound Mode
Audio Advanced Setting
0
0
Treble
Mid Treble
MENU OK EXIT
Middle
0
Mid Bass
0
Bass
0
With the AVL (Automatic Volume Leveler) on, the
TV will keep the sound level constant among
different TV stations when viewing TV programs.
To active the AVL function, go to the Audio menu,
press
to highlight AVL, and press /
to
select On.
Audio
MENU OK EXIT
The sound qualities you adjusted in the Audio
Advanced Setting page will be saved in the
Memory mode.
To reset the audio settings:
Press
to highlight Audio Reset and press
or
OK to return all of the audio settings to the default
values of Flat.
Selecting a sound type
The program you watch might be stereo or in two
different languages. The available options
depend on the programme you are watching.
When EXT1, EXT2, EXT3, EXT3-S, or PC input is
selected, the options for sound type are L+R, L+L,
R+R. Your selection decides from which speaker
the audio is output.
To listen to different sound types:
• Using the remote control
Sound Mode
Flat
Balance
0
Sound Type
L+R
AVL
Off
Speaker Out
On
Audio Advanced Setting >
Audio Reset
MENU OK EXIT
Using the Speaker Out feature
Be sure you have correctly connected your TV to
an external audio system, if you want to activate
the Speaker Out function. For connection
method, refer to "Connecting an audio system"
on page 12.
To use the Speaker Out function:
In the Audio menu, press
to highlight Speaker
Out and press /
to select Off to switch off
the main TV speakers.
Press 8 on the remote control repeatedly
until the preferred type is selected.
• Using the on-screen display menu
In the Audio menu, press
to highlight Sound
Type and press /
to select a preferred type.
If you experience noise or poor reception of any
stereo/bilingual program, set the Sound Type to
Mono. Noise will be reduced and reception may
improve.
ENGLISH-16-
Audio
Sound Mode
Flat
Balance
0
Sound Type
L+R
AVL
Off
Speaker Out
On
Audio Advanced Setting >
Audio Reset
MENU OK EXIT
20VL64-en.book
Page 17
Thursday, February 1, 2007
5:06 PM
Setting up the picture
TINT: When an NTSC video signal is connected
to EXT1, EXT2, EXT3 or EXT3-S, you can adjust
You can select your desired picture type from four the colour tint setting. If you do not connect this
type of video, then the TINT option will not be
picture modes: 1, 2, 3, or M.
available on the OSD menu.
To select the picture mode:
There are more advanced settings open for
• Using the remote control
adjustment: Black Stretch, Noise Reduction,
Press
on the remote control repeatedly until
Colour Temperature. To adjust the advanced
a preferred mode is selected.
settings:
Selecting the picture mode
Picture
Mode
4. In the Picture menu, press /
until
Picture
Advanced
Setting
is
highlighted.
EXIT
MENU
P
5. Press or OK to display the Picture
• Using the on-screen display menu
Advanced Setting page.
1. Press MENU, and then press /
until the 6. Press /
until the item you want to
Picture menu appears.
adjust is highlighted and press / to
2. Press
to highlight Picture Mode and press
adjust the level.
/ to select a preferred mode.
Picture
Picture Mode
Picture
Picture Mode
Contrast
Brightness
53
Colour
32
Sharpness
+0
Tint
+0
1
53
Contrast
Brightness
Colour
1
32
32
Picture Advanced Setting
32
Off
Black Stretch
Sharpness
+0
Noise Reduction
+0
Tint
Picture Advanced Setting
Off
Colour Temperature
Cool
Picture Reset
MENU OK EXIT
Picture Advanced Setting >
MENU OK EXIT
MENU/ENTER EXIT
Adjusting the picture quality
If you are not satisfied with the preset picture
quality, you can additionally adjust the picture
contrast, brightness, colour, and sharpness levels
based on a selected picture mode.
To adjust the settings:
1. In the Picture menu, press /
until the
item you want to adjust is highlighted.
2. Press / to adjust the level.
3. To continue adjusting the other items, repeat
step 1-2.
Selection
Pressing
7.
To continue adjusting the other items, repeat
step 6.
Item
Black Stretch (increases the
strength of dark areas of the
picture)
Noise Reduction (adjusts the
noise reduction strength)
Colour Temperature (selects a
preferred color temp.)
Options
Low, Middle,
High, Off
Low, Middle,
High, Off
Normal,
Warm, Cool
Note:
When the selected input signal is PC, the
following functions will not be available: Colour,
Sharpness, Tint, Black Stretch, and Noise
Reduction.
Contrast
lower
higher
Brightness
darker
lighter
Colour
paler
deeper
Sharpness
softer
sharper
Tint
reddish
greenish
To reset the picture settings:
In the Picture > Picture Advanced Setting menu,
The changes you make in the picture settings will press
to highlight Picture Reset and press
or
be stored to the M mode.
OK to return all of the picture settings to the
default values of 1 mode.
ENGLISH-17-
20VL64-en.book
Page 18
Thursday, February 1, 2007
5:06 PM
Features: Picture Size, Sleep Timer,
Panel Lock, Backlight
2.
Press
to highlight Sleep Timer and press
/ to set the length of time before the TV
You can select a desired picture size (Auto, 4:3 or
turns off.
16:9) either directly on the remote control or in
The time length ranges from 0 minutes to
the on-screen display menu.
120 minutes.
• Using the remote control
0 J 15 J 30 J 45 J 60 J 120
Repeatedly press
on the remote control to
The timer starts at the time the timer is set, and the
select a desired picture size.
TV indicator will turn from blue to yellow.
Picture
To cancel the sleep timer:
Size
Select 0 minutes for the timer.
Note: When an instant power failure occurs or
• Using the OSD menu
the TV is switched manually into standby, the
1. Press MENU, and then press /
until the sleep timer settings may be cleared.
Special menu appears.
2. Press
to highlight Picture Size and press Locking the control buttons on the TV’s
side panel (Panel Lock)
/ to select a desired picture size.
Selecting the picture size
Special
Language
Colour System
English
Auto
Picture Size
Auto
Sleep Timer
0 Minutes
Panel Lock
Backlight
Off
Bright
Teletext Setting >
MENU OK EXIT
Item
Auto
4:3
Pressing
or
Automatically adjusts the image to fit
the TV screen.
This is most suitable for 4:3 images like
computer monitors, standard definition
TV and 4:3 aspect DVD movies, as it
displays them without aspect alteration.
You can lock the control buttons on the TV to
prevent your settings from being changed
accidentally (by children, for example). When
the Panel Lock is On, no control buttons on the TV
panel will operate except pressing
to turn
into standby.
To active the panel lock function:
1. Press MENU, and then press / until the
Special menu appears.
2. Press
to highlight Panel Lock and press
/ to select On.
Note: Remove the remote control for Parental
control.
Setting the Backlight
Your LCD TV set has a light behind its LCD panel.
This light source, which is called a backlight,
16:9
This is most suitable for images which
affects the brightness of the entire screen. In a
are already in a 16:9 aspect, like high
darkened room with proper lighting, we
definition TV, as it displays them
recommend you lower this setting before you
without aspect alteration.
begin adjusting the brightness and contrast. You
can always raise it later if it proves too dim.
To set the Backlight:
Turning off the TV automatically (Sleep
• Using the remote control
Timer)
Press Backlight repeatedly to select.
If the Sleep Timer is set, the TV can automatically
• Using the on-screen display
switch to stand-by mode at the preset time.
1. Press MENU, and then press /
until the
To set the Sleep Timer:
Special
menu
appears.
1. Press MENU, and then press /
until the
2. Press
to highlight Backlight and press
Special menu appears.
/ to select Bright, Normal, or Power
Save.
ENGLISH-18-
20VL64-en.book
Page 19
Thursday, February 1, 2007
5:06 PM
Features: PC Settings, Input Selection
Using the PC settings
Selecting an input signal
You can adjust the horizontal/vertical picture
position, frequency (to minimize vertical stripes
on the screen), and phase (to remove horizontal
noise and sharpen the picture) manually or autoconfigure these settings all at once.
1. Confirm a PC is connected (see
"Connecting a personal computer (PC)" on
page 12).
2. Repeatedly press
on the remote control
or on the TV side panel to select PC input
mode.
3. Press MENU, and then press / until the
PC menu appears.
4. To automatically adjust the settings, press
to highlight Auto and then press OK. The
TV will automatically adjust the screen
position, frequency, and phase. Allow a
few seconds while auto-configuration is in
progress.
If you would like to view image coming from
another device connecting to your TV, repeatedly
press
to select your desired input signal on
the remote control or the right side panel of the
TV.
PC
Auto
Frequency
32
Phase
32
H. Position
V. Position
MENU OK EXIT
5. To manually make the appropriate
adjustments to other items, press
to
highlight the item to be set and then press
/
to make adjustment.
• Frequency
Minimizes any vertical bars or stripes
appearing on the screen background. The
adjustable range may vary depending on
the input mode.
• Phase
Reduces (or minimizes) any horizontal noise
and clears up or sharpens the character
images. The adjustable range may vary
depending on the input mode.
• H. Position/V. Position
Adjusts picture left/right and up/down. The
adjustable range may vary depending on
the input mode.
Input
selection
A selection menu displays on screen after the first
button press.
TV
EXT1
EXT2
EXT3
EXT3-S
PC
Note: When an S-Video signal is input to EXT2,
EXT2-S will be automatically sensed. EXT2-S will
be displayed on the input menu instead of EXT2.
Make sure the equipment you want to view is
correctly connecting to the TV. See "Connecting
external equipment" on page 10 for details.
In addition to accepting signals from external
devices, the TV can meanwhile output signal to
(SCART 1) or
other external devices via
(SCART 2).
Selected input
mode
Using input
connector
TV
Available output
connector(s):
Output signal
: Tuner,
: Tuner
EXT1
: CVBS
EXT2/EXT2-S
: Tuner
EXT3
EXT3-S
(Video)
: Tuner,
: Video
(S-Video)
: Tuner,
: Tuner
or
PC
PC
: Tuner,
: Tuner
e.g. When you want to view an image coming
from
, make sure the connector is correctly
connected to an external device and select EXT1
as the input mode. You can connect another
equipment to
for recording or displaying
the image in CVBS format via a SCART lead.
To exit this menu, press EXIT or OK, or just wait for
a few seconds to let the menu disappear.
ENGLISH-19-
20VL64-en.book
Page 20
Thursday, February 1, 2007
5:06 PM
Features: Blue Screen, Channel Return, Mute,
Headphones
Using the blue screen feature
Muting the sound
With the blue screen function on, the screen will
automatically turn blue and the sound will be
muted when no signal is received.
To turn on the blue screen feature:
1. Press MENU, and then press / until the
Channel menu appears.
2. Press
to highlight Blue Screen and press
/ to On.
If the blue screen appears repeatedly because of
poor signal strength, select Off in step 2.
To temporarily mute the sound of your television,
press B and the icon “ “ will appear on
screen. To return the sound, press B again.
During mute, pressing 6 will disable the mute
function and decrease the volume; pressing @
will also disable the mute function and increase
the volume.
MENU
Channel
Auto Programme >
Volume
up/down
Manual Programme >
Programme Edit >
Blue Screen
On
P
EXIT
OK
P
MENU OK EXIT
Switching between two channels (2)
The feature allows you to switch between two
channels without entering an actual channel
number each time. To switch between two
channels:
1. Select the first channel you want to view.
2. Select a second channel using the numeric
buttons (0-9).
Mute
Using the headphones
When you plug in headphones, sound is
transferred into the headphones. The audio
2. The previous channel will be
setting of the headphone can be adjusted using
displayed. Each time you press 2, the TV
6/@ on the remote control or TV.
3. Press
will switch back and forth between the last
two channels that were selected.
E.G. 3¨2112 3
Numeric
buttons
Channel
return
ENGLISH-20-
20VL64-en.book
Page 21
Thursday, February 1, 2007
5:06 PM
Using Teletext
Teletext is an information system that displays text on your TV screen. Using the teletext control buttons
you can view pages of information that are listed in the teletext index.
Note: No on-screen display is available in Teletext mode. The Contrast, Brightness and Colour cannot
be changed, but the volume control is still available.
To select a language for Teletext
Setting:
To display the index/initial page
The language options enable the display of
different languages when using Teletext Setting.
1. Press MENU, and then press /
until the
Special menu appears.
2. Press
to highlight Teletext Setting > and
press or OK to display the Teletext
Setting page.
3. Press
to highlight Language and press
press /
to select a language from
among: Western, Eastern, Cyrillic 1, Cyrillic
2, Arabic, and Other.
Colour System
Picture Size
Sleep Timer
Panel Lock
Backlight
To select a page of text
Find the number of the page in the index and
enter it using the Numeric buttons. The number of
the page will appear in the top left hand corner
of the screen.
The page counter will search for your page.
When it finds it, the page will be displayed.
To move to the next page of text press
To move to the previous page press
To return to the index page, press
Special
Language
Press
to access the index/initial page. The
one displayed is dependant on the broadcaster.
.
.
.
English
Page search while watching TV
Auto
Auto Setting
Teletext
0 Minutes
Teletext
Off
Language
Bright
Press
in Text mode. The TV will return to
TV mode with the text page number in the top left
hand corner of the screen.
Enter the page number you want using the
numeric buttons.
The top line of the text page will appear whilst the
text searches for your page. When the page is
found the number will remain in the top left hand
corner of the screen.
Press
to view your selected page of text.
Auto
Western
Teletext Setting >
MENU OK EXIT
MENU OK EXIT
To enter Text mode
Press
. The text page will appear,
normally the index page.
Double height text
To mix the TV picture and text page
To view a TV programme whilst in text mode,
press
. The text will be superimposed
over the TV programme.
To exit Text mode
Press
again. The screen will return to
the channel you were watching.
If you have difficulty reading the text on the TV,
you can double the height of the text.
Press
. The top half of the page will be
displayed in double height text.
Press
again. The bottom half of the page will
be displayed in double height text.
Press
text.
again to return to the full page in normal
ENGLISH-21-
20VL64-en.book
Page 22
Thursday, February 1, 2007
Page Stop
5:06 PM
To select a text mode:
If the page of text you have selected contains sub 1. Press MENU, and then press /
until the
pages, these sub pages will automatically be
Special menu appears.
displayed in order with a delay to allow you to
2. Press
to highlight Teletext Setting > and
read the page.
press or OK to display the Teletext
To stop the move to the next sub page press
.
Setting page.
The symbol
will display in the top left hand
3. Highlight Teletext and press /
to select
corner.
a language from among: Auto or List.
To continue moving through the sub pages, press
again.
Special
Language
To reveal information
Colour System
Press
to reveal concealed information (quiz
answers etc.).
Press
again to conceal the information
again.
Sleep Timer
Panel Lock
Picture Size
Backlight
English
Auto
Auto Setting
Teletext
0 Minutes
Teletext
Off
Language
Bright
Auto
Western
Teletext Setting >
To select a sub-page
MENU OK EXIT
MENU OK EXIT
If the page of text you are viewing contains subpages, press
. The teletext will search for the
sub page. This may take some time. To view the
next sub-page, press a 4-digit number using the
numeric number buttons, e.g. 0002.
Navigating pages using Auto
If Fastext is available, four coloured titles will
appear at the base of the screen.
To access one of the four given subjects, press the
relevant coloured button on the remote control.
To enter cancel mode
For further information on your particular text
If you want to return to the TV whilst the teletext is system(s), see the broadcast text index page, or
searching, press
.
consult your Toshiba dealer.
When the page number is found, it will appear in Navigating pages using List
the top left hand corner of the screen.
The four coloured choices at the bottom of the
screen are numbers – 100, 200, 300, and 400,
which have been programmed into the TV’s
memory. To view these pages, press the relevant
Clock
coloured buttons.
Press
to display the time whilst watching To change these stored pages:
a TV program. When you press
again, 1. Enter the 3-digit number to display the page
the clock will disappear.
you want to set
2. Press and hold the relevant colour button
until “L” on the bottom left side changes to
To view Teletext in Auto
“S”. The page number is stored.
or List mode
3. To set the rest three desired pages, repeat
steps 1 and 2.
The TV is capable of showing Fast and Top text in
Note: If you exit text and change the TV
Auto mode, and List information on the screen,
channel, the preset pages in List mode will be
dependent on transmission.
lost.
The Teletext buttons on the remote control have
the same function for both.
Press
again to view the text page.
ENGLISH-22-
20VL64-en.book
Page 23
Thursday, February 1, 2007
5:06 PM
Questions and Answers
Below are the answers to some of the most common queries.
For more information, go to www.toshiba.co.uk.
Q
Q
Why is there no sound or picture?
Why is the VCR/DVD picture is black and
white?
Check the mains switch is on and check all mains Check the correct input has been chosen, EXT2,
connections.
EXT3, or EXT3-S. See "Connecting a media
Check the TV is not in standby mode.
recorder and/or a decoder" on page 10.
Q
There is a picture, but why is there little or no
colour?
When using an external source, if there is little or
no colour, improvements may sometimes be
achieved by changing the colour system. The
colour is factory set to Auto to display the best
colour system. If not, change the colour system.
To do so:
1. Press MENU, and then press /
until the
Special menu appears.
2. Press
to highlight Colour System and
press /
to select between Auto, PAL,
SECAM, NTSC4.43, and NTSC3.58.
Auto
Picture Size
Auto
Sleep Timer
Panel Lock
0 Minutes
Off
Bright
MENU OK EXIT
Why doesn’t the video/DVD being played show
on screen?
Make sure the VCR or DVD player is connected to
the TV as shown on page 10, then select the
correct input by pressing
.
Q
Q
Why don’t the controls on the right side panel
of the TV work?
Check the Panel Lock is On.
Q
Why doesn’t the remote control work?
Why are there vertical stripes on the screen
when in PC mode?
The Frequency may need adjustment. See "Using
the PC settings" on page 19 for details.
Teletext Setting >
Q
Interference or a weak signal. Try a different TV
station. Manual Fine Tuning may help. See
"Adding channels manually" on page 14 for
details.
Q
English
Colour System
Backlight
What else can cause a poor quality?
Check the batteries aren’t dead or inserted
incorrectly.
Special
Language
Q
Q
Why are there horizontal stripes and/or
blurred on the screen when in PC mode?
The Phase may need adjustment. See "Using the
PC settings" on page 19 for details.
Q
Why is there no sound from my connected
sound equipment?
Check the Speaker Out in the Audio menu is set
to On.
Why is there a picture but no sound?
Check all lead connections.
Check the volume has not been turned down or
that sound mute has not been selected.
Q
Why are there no text sub-pages?
There are none broadcast or they have not yet
loaded. Press
to access. See "To select a
sub-page" on page 22 for details.
ENGLISH-23-
20VL64-en.book
Q
Page 24
Thursday, February 1, 2007
Q
Why are there problems with text?
Good performance of text depends on a good
strong broadcast signal. This normally requires a
roof or loft aerial. If the text is unreadable or
garbled, check the aerial. Go to the main index
page of the text service and look for the User’s
Guide. This will explain the basic operation of
text in some detail. If further information is
needed on how to use text, see the "Using
Teletext" on page 21 for details.
Q
The picture from my VCR is poor, how can I
improve?
You can turn the VCR mode on in the OSD menu
to minimize or solve this problem.
1. Go to the Picture menu and press
to
highlight Picture Advanced Setting.
2. Press or OK to display the Picture
Advanced Setting page and press
to
highlight VCR Mode.
3. Press /
to select On.
Why are there no text sub-pages?
Picture
There are none broadcast or they have not yet
loaded. Press
to access. See "To select a
sub-page" on page 22 for details.
Q
5:06 PM
Why are the four coloured text numbers visible
but no text?
Picture Mode
1
53
Contrast
Brightness
Colour
Sharpness
Tint
32
32
Picture Advanced Setting
+0
Black Stretch
+0
Noise Reduction
Picture Advanced Setting > Colour Temperature
MENU OKVCR
EXITMode
Picture Reset
Off
Off
Cool
On
Text has been selected whilst viewing an external
source i.e. DVD or VCR. No text will appear on
MENU OK EXIT
screen or a box may appear stating no
Note:
The
VCR
Mode
is
available
in TV position
information is available. Select a broadcasting
0 and EXT modes selected only.
channel and press
to access.
Q
Why are the colours wrong when a NTSC
source is played?
1. Connect the source via a SCART lead and
play.
2. Set Colour System in the Special menu as
Auto, NTSC3.58, or NTSC4.43.
3. Go to the Picture menu and adjust Tint. See
"Adjusting the picture quality" on page 17
for details.
ENGLISH-24-
20VL64-en.book
Page 25
Thursday, February 1, 2007
5:06 PM
Specifications
Note: Specification is subject to change without notice.
Broadcast systems/channels
PAL-I
UHF UK21-UK69
VHF E2-E12, S1-S41
SECAM-L
UHF F21-F69
VHF F1-F10, B-Q
PAL-B/G
UHF E21-E69
VHF E2-E12, S1-S41
SECAM-D/K
UHF R21-R69
VHF R1-R12
Video input
PAL, SECAM, NTSC3.58/4.43
External connections
EXT1
Input/Output
21-pin SCART
Input: RGB, A/V
Output: TV
EXT2
Input/Output
21-pin SCART
Input: A/V, S-Video
Output: TV, EXT1, EXT3
EXT3
Input
4 pin
S-Video
Phono jack
Video
Phono jacks
Audio L+R
PC
Input
Input
Mini D-Sub 15-pin Analog RGB signal
3.5 mm stereo jack Audio
Audio output fixed
Phono jacks
Audio L+R
Programme position
100
Stereo
Nicam
2 carrier system
Visible screen size
(approx.)
(20VL64) 20” diagonal /(15VL64) 15” diagonal
Display
4:3
Sound output
(at 10% distortion)
(20VL64) Main 3W+3W / (15VL64) Main 2W+2W
Power consumption
(20VL64) 70W / (15VL64) 53W
Standby (approx.)
<1W
Dimensions (approx.)
(20VL64) 474 mm (W) x 465 mm (H) x 236 mm (D) /
(15VL64) 372 mm (W) x 382 mm (H) x 206 mm (D)
Weight
(approx.)
(20VL64) 8.5 kg (Net)
(15VL64) 4.4 kg (Net)
Headphone socket
3.5 mm stereo
11.3 (Gross; EU)
7.2 (Gross; EU)
Operating temperature 0°C—40°C (at sea level)
Storage temperature
-20°C—50°C (at sea level)
ENGLISH-25-
10.8 (Gross; UK) /
6.7 (Gross; UK)
20VL64-en.book
Page 26
Thursday, February 1, 2007
5:06 PM
Printed on recycled paper. 100% Chlorine free.
© Toshiba Information Systems (U.K.) Limited
All rights reserved.
Reproduction in whole or part without written permission is strictly prohibited.
Toshiba Information Systems (U.K.) Limited
Consumer Products Division,
European Service Centre,
Admiralty Way, Camberley,
Surrey, GU15 3DT, UK
P/N: 4J.00403.003
Specification is subject to change without notice.