1
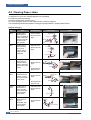
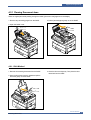
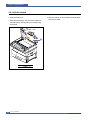
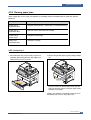
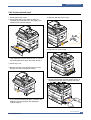
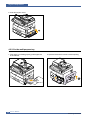
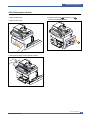
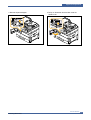
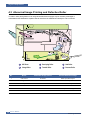
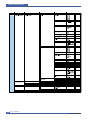
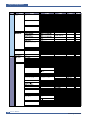
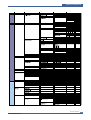
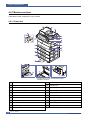
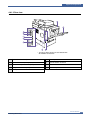
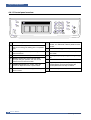
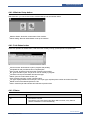
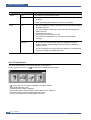
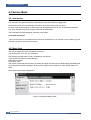
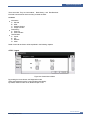
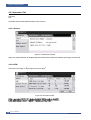
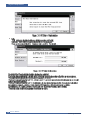
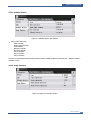
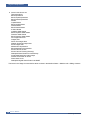
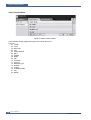
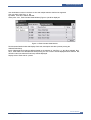
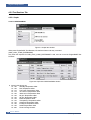
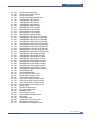
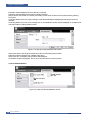
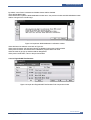
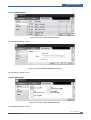
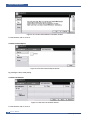
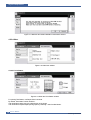
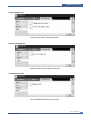
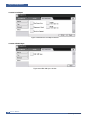
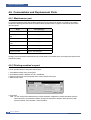
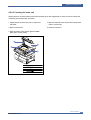
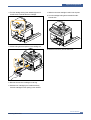
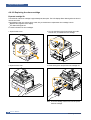
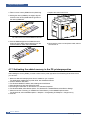
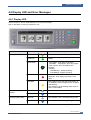
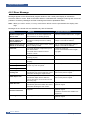
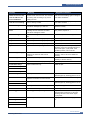
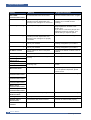
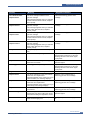
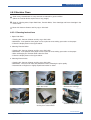
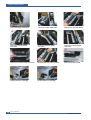
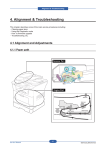
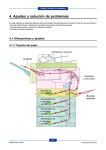
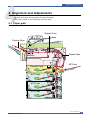
Alignment & Adjustments
4
4. Alignment and Adjustments
This chapter describes some of the main service procedures including:
Using the Tech Mode; Clearing paper jam and test patterns.
Much of this chapter is also included in the user's guide.
4.1 Paper path
Simplex Pass
Finisher Pass
Duplex Pass
MP Feed
Cassette Feed
SCF Feed
SCF Feed
SCF Feed
Service Manual
Samsung Electronics
4-1
Alignment & Adjustments
4.2 Clearing Paper Jams
If a paper jam occurs an error message appears in the LCD display.
Find and remove the jammed paper.
If you don't see the paper, open the covers.
Do not use a tweezers, pincers or other metal tools when clearing a paper jam.
This could damage the internal mechanism causing print quality problems or possibly electrical shock.
[ Engine Jam Type ]
Type
Case
Jam 0
Jam 1
Jam Removal
Jam Layout
Leading edge of
media does not
arrive at registration
within a certain time
after pick-Up(If fails
at a time, it tries
pick-up again)
1. Pull out cassette
Registration
Leading edge of
media does not
arrive at Exit
Sensor within a
certain time after
registration
1. Open side cover
2. Remove jammed
paper
Regi Sensor
Pick-Up
Exit Sensor
2. Remove jammed
paper
Fuser
OPC
Registration
Jam 2
Duplex
Jam 1
Photo
Trailing edge of
media does not
leave Exit Sensor
within a certain time
after touching Regi
Sensor
1. Open side cover
Trailing edge of
media leaves Exit
Sensor, and does
not arrive at Duplex
Jam1 Sensor
1. Open side cover
Regi Sensor
2. Remove jammed
paper
Exit Sensor
Fuser
Or
1. Remove jammed
paper from exit
Duplex Jam1
Sensor
2. Remove jammed
paper
Or
Fuser
1. Remove jammed
paper from exit
Duplex
Jam 2
Duplex
Jam 0
4-2
Leading edge of
media does not
arrive at Duplex
Jam2 Sensor after
touching Duplex
Jam1 Sensor
1. Open Side Cover
Leading edge of
media does not
arrive at
Registration after
touching Duplex
Jam2 Sensor
1. Open Side Cover
Duplex Jam1 Sensor
2. Remove jammed
paper
Duplex Jam2 Sensor
Registration
2. Remove jammed
paper
Duplex Jam2 Sensor
Service Manual
Samsung Electronics
Alignment & Adjustments
4.2.1 Clearing Document Jams
When an original jams while passing through the DADF, [Document Jam] appears on the display.
1. Remove any remaining pages from the DADF.
3. Pull the jammed paper gently out of the DADF.
2. Open the DADF cover.
4.2.1.1 Exit Misfeed
1. Remove the remaining documents from the DADF.
3. Close the document input tray. Then place the documents back into the DADF.
2. Open the document input tray upward and pull the
document gently out of the DADF.
Service Manual
Samsung Electronics
4-3
Alignment & Adjustments
4.2.1.2 Roller misfeed
1. Open the scanner lid.
3. Close the scanner lid. Then load the removed pages
back into the DADF.
2. Seize the misfed paper, and remove the paper from
the feed area by carefully pulling it to the right using
both hands.
4-4
Service Manual
Samsung Electronics
Alignment & Adjustments
4.2.2 Clearing paper jams
When a paper jam occurs, Paper Jam appears on the display. Refer to the table below to locate and clear the
paper jam.
Message
Location of jam
[Paper Jam 0]
Open/Close Door
In the paper feed area (tray 1, optional tray 2, or multi-purpose tray)
[Paper Jam 1]
Open/Close Door
In the fuser area or around the toner cartridge
[Paper Jam 2]
Check Inside
In the paper exit area page
Duplex Jam
Open/Close Door
In the duplex unit page
4.2.2.1 In the tray 1
1. Pull out the paper Tray to open. After you pull it out
completely, lift the front part of the Tray slightly up to
release the Tray from the machine.
2. Remove the jammed paper by gently pulling it straight
out.
Once you remove the jammed paper here, open the
side cover and then close it to clear the "Paper Jam0"
message on the display.
If there is any resistance, and the paper does not move
immediately when you pull, stop pulling. Then:
Service Manual
Samsung Electronics
4-5
Alignment & Adjustments
3. Open the side cover.
5. Close the cover and insert the paper Tray. Lower the
rear part of the Tray to align the rear edge with the
corresponding slot of the machine, then insert it completely.
4. Carefully remove the misfed paper in the direction
shown.
4-6
Service Manual
Samsung Electronics
Alignment & Adjustments
4.2.2.2 In the optional tray 2
1. Pull the optional tray 2 open.
2. Pull the paper Tray to open. After you pull it out
completely, lift the front part of the Tray slightly up to
release the Tray from the machine.
5. Open the outer jam cover in tray2.
6. Open the inner cover of tray2.
If the paper does not move when you pull, or if you do
not see the paper in this area, stop and go to step 3.
3. Pull the tray 1 half.
4. Remove the paper in the direction shown. To avoid
the paper torn, pull it out gently and slowly.
7. Pull the jammed paper out in the direction shown. To
avoid tearing the paper, pull it out gently and slowly.
If you cannot find the jammed paper, or if there is any
resistance removing the paper, stop pulling and
continue to step 5.
Service Manual
Samsung Electronics
4-7
Alignment & Adjustments
8. Close the two jam covers.
4.2.2.3 In the multi-purpose tray
1. If the paper is not feeding properly, pull the paper out
of the machine.
4-8
2. Open and close the front cover to resume printing.
Service Manual
Samsung Electronics
Alignment & Adjustments
4.2.2.4 In the paper exit area
1. Open the side cover.
4. Close the front cover and the side cover
Printing automatically resumes.
.
2. Open the front cover.
3. Gently pull the paper out through the exit area.
Service Manual
Samsung Electronics
4-9
Alignment & Adjustments
4.2.2.5 In the duplex unit area
If the duplex unit is not inserted correctly, paper jam may occur. Make sure that the duplex unit is inserted correctly.
1. Open the side cover.
3. Remove the jammed paper.
2. Pull the guide exit.
4. Close the side cover.
4.2.2.6 In the stacker
1. Open the stacker cover.
4-10
2. Push the stacker lever down.
Service Manual
Samsung Electronics
Alignment & Adjustments
3. Remove the jammed paper.
4. Pull up on the stacker lever and then close the
stacker cover.
Service Manual
Samsung Electronics
4-11
Alignment & Adjustments
4.3 Abnormal Image Printing and Defective Roller
If a mark or other printing defect occurs at regular intervals down the page it may be caused by a damaged or
contaminated roller. Measure the repetition interval and refer to the table below to identify the roller concerned.
5
6
2
1
3
4
Pick_UP
Roller
MP Feed
Roller
1
2
4-12
OPC Drum
Charge Roller
3
4
Developing Roller
Transfer Roller
5
6
Heat Roller
Pressure Roller
No
Roller
Abnormal image period
Kind of abnormal image
1
OPC Drum
94.30mm
White spot, Block spot
2
Charge Roller
43.96mm
Black spot
3
Develop Roller
39.25mm
Horizontal density band
4
Transfer Roller
57.14mm
Black side contamination/transfer fault
5
Heat Roller
125.6mm
Black spot and fuser ghost
6
Pressure Roller
157mm
Black side contamination
Service Manual
Samsung Electronics
Alignment & Adjustments
4.4 User Mode
The conrol panel provides access to various menus to seup the machine or use the machine's funcions. These menus
can be accessed by pressing Menu. Refer to the following diagram. Menus available in Fax, Copy, or Scan mode vary.
Default Value
Service Manual
Samsung Electronics
4-13
Alignment & Adjustments
4-14
Service Manual
Samsung Electronics
Alignment & Adjustments
Service Manual
Samsung Electronics
4-15
Alignment & Adjustments
4-16
Service Manual
Samsung Electronics
Alignment & Adjustments
Service Manual
Samsung Electronics
4-17
Alignment & Adjustments
4.4.1 Machine overview
These are the main components of your machine:
4.4.1.1 Front view
* The figure above shows an SCX-6345N with all
available accessories.
4-18
1
DADF (Duplex Automatic Document Feeder)
12
optional tray 2
2
document width guides
13
optional tray 3
3
document input tray
14
optional tray 4
4
document output tray
15
optional tray stand
5
scanner lid
16
output support
6
control panel
17
multi-purpose tray extension
7
side cover
18
multi-purpose tray paper width guides
8
multi-purpose tray
19
scanner glass
9
front cover
20 toner cartridge
10
optional tray jam cover
21
11
tray 1
drum cartridge
Service Manual
Samsung Electronics
Alignment & Adjustments
4.4.1.2 Rear view
* The figure above shows an SCX-6345N with
all available accessories.
1
optional stacker & stapler
6
network port
2
optional stacker output tray
7
optional stacker connection
3
extension telephone socket (EXT)
8
power switch
4
telephone line socket (LINE)
9
power receptacle
5
USB port
Service Manual
Samsung Electronics
4-19
Alignment & Adjustments
4.4.1.3 Control panel overview
4-20
1
Machine Setup: Sets the value of machine setup.
8
2
Job Status: Enters job status menu which shows
the current running jobs, waiting jobs or completed
jobs.
Redial/Pause: In Standby mode, redials the last
number, or in Edit mode, inserts a pause into a fax
number.
9
On Hook Dial: Engages the telephone line.
3
Screen brightness dial: adjusts the brightness of
the touch screen.
10
Power Saver: Enters the machine into the power
save mode.
4
Status: Shows the status of your machine.
11
5
Screen: Displays the current machine status,
prompts during an operation, and user can set
manus since it is the touch screen.
Interrupt: Stops a progressing job for urgent copy
job.
12
Clear All: Sets the machine with default values.
13
Stop: Stops an operation at any time. The pop up
window appears on the screen showing the
current job that user can stop or resume.
14
Start: Starts a job.
6
number keypad: dials fax number, enters the
number of copied document or option values.
7
Clear: Deletes character of string in the editing
area of screen.
Service Manual
Samsung Electronics
Alignment & Adjustments
4.4.1.4 Machine Setup button
With this button, you can browse current machine settings and set machine values.
Machine Status: shows the current status of the machine.
Admin Setting: allows an administrator to set up the machine.
4.4.1.5 Job Status button
When user presses Job Status button, LCD shows the currently running, queued jobs and completed jobs.
Current Job tab: shows the list of jobs in progress and pending.
Completed Job tab: provides the list of completed jobs.
Error List tab: shows the list of errors that occurred in the machine.
No.: gives the order of jobs. The job in No. 001 is currently in progress.
Job Name: shows job information like name and type.
Status: gives the current status of each job.
User: provides user name, mainly computer name.
Job Type: displays details of the active job, such as job type, recipient phone number and other information.
Delete: removes the selected job from the list.
Close: closes the job status window and switches to previous view.
4.4.1.6 Status
Status
Off
Description
The machine is off-line.
The machine is in Power Save mode. When data is received, or any button is
pressed, it switches to on-line automatically.
Service Manual
Samsung Electronics
4-21
Alignment & Adjustments
Status” LED
Green
Description
On
Blinking
The machine is on-line and can be used.
When the backlight slowly blinks, the machine is receiving data from the
computer.
When the backlight blinks rapidly, the machine is printing data.
Red
On
The toner cartridge is totally Out of lifespan. Remove the old toner cartridge
and install a new one.
The drum cartridge is totally empty. Remove the old drum cartridge and
install a new one.
A paper jam has occurred.
The front cover is open. Close the cover.
The machine has stopped due to a major error. Check the display
message.
Blinking
A minor error has occured and the machine is waiting the error to be
cleared. Check the display message. When the problem is cleared, the
machine resumes.
The toner cartridge is low. Order a new toner cartridge. You can temporarily
improve print quality by redistributing the toner.
4.4.1.7 Touch Screen
The touch screen allows for user-friendly operation of the machine.
Once you press the home icon (
) on the screen, it shows the Main screen.
: Shows Help. You can find the explanation by feature contents.
Copy: Enters the Copy menu.
Fax: Enters the Fax menu. (Optional)
Scan: Enters Scan to Email, NetScan, Scan to Server menu. (Optional)
Stored Documents: Enters the Stored Documents menu.
Logout: Logs out from the currently logged in account.
4-22
Service Manual
Samsung Electronics
Alignment & Adjustments
4.4.1.8 Power Saver button
When the machine is not in use, save electricity with the provided power save mode. Puts the machine into power
save mode.
4.4.1.9 Interrupt button
When you press this button, the machine goes into interrupt mode which means it stops a printing job for urgent
machine use.
Note: Interrupt mode is resumed at default value (Off) after the machine is shut down or reset.
Service Manual
Samsung Electronics
4-23
Alignment & Adjustments
4.4.2 Machine's basic settings
After setting up the machine, you may need to set the machine's basic features. Check the next explanation if you
would like to set or change values.
4.4.2.1 Setting log in password
To set your machine up or change the settings, you have to login. To change passwords, follow the next steps.
1. Press Machine Setup on the control panel.
2. Press Admin Setting.
3. Login message appears, enter password (Factory setting: 1111) with number keypad and press OK.
4. Press Setup tab > Authentication.
5. Press Change Admin Setting Password.
6. Enter old password and new password.
7. Press OK.
4.4.2.2 Setting the date and time
The current date and time are shown on the display when your machine is on and ready to work.
1. Press Machine Setup on the control panel.
2. Press Admin Setting.
3. Login message appears, enter password with number keypad and press OK.
4. Press General tab > Data/Time > Set Date/Time.
5. Select date and time using left/right arrows.
Note: To change the format of date and time, press Date Format and Time Format.
6. Press OK.
4.4.2.3 Changing the display language
To change the language that appears on the touch screen, follow these steps.
1. Press Machine Setup button in the control panel.
2. Press Admin Setting.
3. Login message appears, enter password with number keypad and press OK.
4. Press General tab.
5. Press down arrow to switch the screen, press Language.
6. Select language.
7. Press OK.
4-24
Service Manual
Samsung Electronics
Alignment & Adjustments
4.4.2.4 Setting job timeout
When there is no input, the machine waits for a specific time. You can set the amount of time the machine will
wait.
1. Press Machine Setup on the control panel.
2. Press Admin Setting.
3. Login message appears, enter password with number keypad and press OK.
4. Press General tab.
5. Press Timers.
6. Select System Timeout.
7. Select On.
8. Select time using left/right arrows.
9. Press OK.
4.4.2.5 Setting the tray and paper
You can select the tray and paper you use for printing job.
1. Press Machine Setup on the control panel.
2. Press Admin Setting.
3. Login message appears, enter password with number keypad and press OK.
4. Press General tab.
5. Press down arrow to switch the screen, press Tray Management.
6. Select tray and its options such as paper size, type, and Tray Confirmation Message.
7. Press OK.
4.4.2.6 Using energy saving feature
The machine provides energy saving features.
Scan Power Save: reduces machine's power consumption when it is not in actual use.
Power Save: saves power by turning off the scan lamp. The scan lamp under the scanner glass automatically
turns off when it is not in use to reduce power consumption and extend the life of the lamp.
1. Press Machine Setup on the control panel.
2. Press Admin Setting.
3. Login message appears, enter password with number keypad and press OK.
4. Press General tab.
5. Press down arrow to switch the screen, press Energy Saver.
6. Select appropriate option and time.
7. Press OK.
Service Manual
Samsung Electronics
4-25
Alignment & Adjustments
4.4.2.7 Changing the default settings
You can set the default values for copy, fax, email, scan and paper all at once.
1. Press Machine Setup on the control panel.
2. Press Admin Setting.
3. Login message appears, enter password with number keypad and press OK.
4. Press General tab > Default Settings > Default Option.
5. Press the function you want to change, and change its settings.
For example, if you want to change the default setting of the brightness & darkness for a copy job, press Copy >
Darkness and adjust the brightness & darkness.
6. Press OK.
4-26
Service Manual
Samsung Electronics
Alignment & Adjustments
4.4.2.8 Understanding the keyboard
You can enter alphabet characters, numbers, or special symbols using the keyboard on the touch screen. This
keyboard is specially arranged like a normal keyboard for better usability for the user.
Touch the input area where you need to enter characters and the keyboard pops up on the screen. The keyboard
below is the default showing the lowercase letters.
1
2
3
4
5
6
7
Left/Right: moves the cursor between characters
in the input area.
Backspace: deletes the character on the right side
of the cursor.
Delete: deletes the character on the left side of the
cursor.
Clear: deletes all characters in the input area.
Input area: enter letters within this line.
Shift: converts lowercase keys to uppercase keys.
Symbol: switches from the alphanumeric keyboard
to the symbol keyboard.
8
9
10
11
Space: enters a blank between characters.
Top domai n: chooses top level domains
like .com, .net, .org, etc. By pressing arrow key,
you can select different domains.
You can set the 5 different top level domains in
Admin settings.
OK: saves and closes input result.
Cancel: cancels and closes input result.
Note: If you enter the email address, then the keyboard for email pops up. After you enter the address, press OK
to activate entered address. Press the arrow key on the side for rotating between From, To, CC, Bcc,
Subject, Message in order.
Service Manual
Samsung Electronics
4-27
Alignment & Adjustments
4.5 Service Mode
4.5.1 Introduction
This document will capture the behavior specifications for the GUI Windows for Diagnostics
Each section of this document describes one feature with a step window image and script.
However, used window image is not fixed image from the specification point of view. Acquire detail information
from script. Window image is just example image will be implemented.
This is intended to aid GUI designers, reviewers & also testers.
Associated Documents:
<The documents that are associated with this should be mentioned here. For example in case of Basic Copy, the
following could be the associated documents>
4.5.2 Entry Point
The entry for Diagnostics is the combination of hard key.
User should press xxx and yyy altogether.
After pressing the hard button for entry, OP displays Login window.
Login window has editbox for Passcode input.
Passcode has 4 digits.
Passcode is 1934
After input the passcode and OK button, OP shall wait until get the response from MCB notifying that MCB is idle.
Once Diagnostics window is displayed, all hard buttons except numeric button and clear button shall be disabled.
Below is the main window of Diagnostics.
Figure 2-1 Diagnostics Main window
4-28
Service Manual
Samsung Electronics
Alignment & Adjustments
There are 3 tabs. They are Information , Fault History , and Test Routines .
Each tab has several sub items and they re listed as below.
Contents
Information
A. General
B. HFSI
C. Software Version
D. Usage Counters
Fault History
A. Fault Log
B. Fault Counters
Test Routines
A. Copier
B. Fax
C. Network
D. Other
Detail of each tab and items will be explained in the following chapters.
4.5.2.1 Logout
Figure 2-2 General item window
By pressing the Home button, exit Diagnostics mode.
When exit Diagnostics mode, a popup window shall display.
By default, Reset Counters is No, Reboot Copier is Yes.
Service Manual
Samsung Electronics
4-29
Alignment & Adjustments
4.5.3 Information Tab
Flowchart
N/A
Information Tab provides detail information of the machine.
4.5.3.1 General
Figure 3-1 General item window
When user selects General, OP displays Machine Serial Number, Network IP Address and Images since last call.
4.5.3.2 HFSI
HFSI shows the usage of High Frequency Service Items .
Figure 3-2 HFSI item window
4-30
Service Manual
Samsung Electronics
Alignment & Adjustments
Service Manual
Samsung Electronics
4-31
Alignment & Adjustments
4-32
Service Manual
Samsung Electronics
Alignment & Adjustments
4.5.3.3 Software Version
Figure 3-4 Software Version item window
Items in this column are:
Main Controller
Image Output Terminal
User Interface
Network Controller
Document Feeder
Tray 2 Firmware
Tray 3 Firmware
Tray 4 Firmware
The items in the Software Version shall be same as those of Machine Status > Machine Infor > Machine Details >
Software Version.
4.5.3.4 Usage Counters
Figure 3-5 Usage Counter item window
Service Manual
Samsung Electronics
4-33
Alignment & Adjustments
Items in this column are:
Total Impressions
Black Impressions
Black Copied Impressions
Black Printed Impressions
Sheets
Copied Sheets
Black Copied Sheets
Printed Sheets
Black Printed Sheets
2 Sided Sheets
Copied 2 Sided Sheets
Black Copied 2 Sided Sheets
Printed 2 Sided Sheets
Black Printed 2 Sided Sheets
Fax Images Received
Images Sent
Server Fax Images Sent
Network Scanning Images Sent
Email Images Sent
Maintenance Impressions
Black Maintenance Impressions
Known Jams in the IOT
Known Jams in Finishing Device(s)
Attempted Sheet Feeds from Internal trays
Actual sheet feeds from Internal trays
Normal Level Power On Hours
Power Save Hours
Attempted Original Sheet Feeds in the DADF
The items in the Usage Counter shall be same as those in the Machine Status > Machine Infor > Billing Counters.
4-34
Service Manual
Samsung Electronics
Alignment & Adjustments
4.5.4 Fault History Tab
4.5.4.1 Fault Log
Figure 4-1 Fault Log item window
Fault log window shall display errors last error first.
Figure 4-2 Fault Log item Clear All window
Once user confirms to clear Fault Log, the list shall be empty.
Service Manual
Samsung Electronics
4-35
Alignment & Adjustments
4.5.4.2 Fault Counters
Figure 4-3 Fault Counters window
Fault Counters window displays Fault group with number and name.
They are
01 Feeder
02 Fuser
03 Motor Fan
04 LSU
05 Option Interface
06 CRU
07 Finisher
08 DADF
09 FDI
10 Controller
11 Scanner
12 Mismatch Type
13 Network
14 Cloning
18 ax Memory State
21 Tray
24 MSOK
4-36
Service Manual
Samsung Electronics
Alignment & Adjustments
User shall select one item in the list at a time and multiple selection shall not be supported.
User can select Non Zero or All
By default, Non Zero shall be selected..
When press OK , Fault Counters Detail Window (Figure 4-4) shall be displayed.
Figure 4-4 Fault Counters Detail window
Fault Counters Detail window shall display Fault code, description and value (counter) among the
selected Fault Group.
Items of displayed Fault codes are different based on the selection of Non Zero or All When selected Non
Zero , Fault codes in the selected Fault Group having non zero counter shall be displayed When selected All ,
all Fault codes in the selected Fault Group shall be displayed.
Display order of Fault code is upward.
Service Manual
Samsung Electronics
4-37
Alignment & Adjustments
4.5.5 Test Routines Tab
4.5.5.1 Copier
4.5.5.1.1 NVM Read/Write
Figure 5-1 Copier item window
When press Engine/DADF Test Routines, OP shall send test mode entry command.
(CMD_COPY_COMP_ENTERMODE)
Only when the response for CMD_COPY_COMP_ENTERMODE is OK, user can move into Engine/DADF Test
Routines.
Figure 5-2 Copier item NVM Read/Write window
Items in this column are:
10 - 100
StandBy Temperature offset
10 - 105
Run Temperature offset
10 - 110
Low Power Temperature offset
10 - 115
101-185 mm Temperature offset
10 - 120
186-216 mm Temperature offset
10 - 125
60 gms Temperature offset
10 - 130
90 gms Temperature offset
10 - 135
Bond Temperature offset
10 - 140
Transparency Temperature offset
10 - 145
Cardstock Temperature offset
10 - 150
Envelopes Temperature offset
10 - 155
Labels Temperature offset
10 - 200
Fuser Life Page Counter
4-38
Service Manual
Samsung Electronics
Alignment & Adjustments
10 - 210
10 - 220
10 - 300
10 - 310
07 - 100
07 - 200
07 - 300
07 - 400
07 - 500
07 - 110
07 - 210
07 - 310
07 - 410
07 - 510
07 - 120
07 - 220
07 - 320
07 - 420
07 - 520
07 - 130
07 - 230
07 - 330
07 - 430
07 - 530
07 - 140
07 - 240
07 - 340
07 - 440
07 - 540
07 - 150
07 - 250
07 - 350
07 - 450
07 - 550
06 - 100
06 - 110
08 - 100
08 - 110
08 - 120
08 - 130
08 - 140
08 - 150
08 - 160
09 - 100
09 - 110
09 - 120
09 - 130
09 - 200
09 - 210
09 - 240
09 - 140
09 - 230
05 - 700
05 - 710
Heat Roll Life Page Counter
Pressure Roll Life Page Counter
Pick-up interval delay
Pick-up interval delay [Special paper]
Top Registration Tray1 Simplex
Top Registration Tray2 Simplex
Top Registration Tray3 Simplex
Top Registration Tray4 Simplex
Top Registration Bypass Simplex
Side Registration Tray1 Simplex
Side Registration Tray2 Simplex
Side Registration Tray3 Simplex
Side Registration Tray4 Simplex
Side Registration Bypass Simplex
Top Registration Tray1 Dup_long (2nd side)
Top Registration Tray2 Dup_long (2nd side)
Top Registration Tray3 Dup_long (2nd side)
Top Registration Tray4 Dup_long (2nd side)
Top Registration Bypass Dup_long (2nd side)
Side Registration Tray1 Dup_long (2nd side)
Side Registration Tray2 Dup_long (2nd side)
Side Registration Tray3 Dup_long (2nd side)
Side Registration Tray4 Dup_long (2nd side)
Side Registration Bypass Dup_long (2nd side)
Top Registration Tray1 Duplex (1st side)
Top Registration Tray2 Duplex (1st side)
Top Registration Tray3 Duplex (1st side)
Top Registration Tray4 Duplex (1st side)
Top Registration Bypass Duplex (1st side)
Side Registration Tray1 Duplex (1st side)
Side Registration Tray2 Duplex (1st side)
Side Registration Tray3 Duplex (1st side)
Side Registration Tray4 Duplex (1st side)
Side Registration Bypass Duplex (1st side)
Vertical Magnification
Horizontal Magnification
Pick up roller Life Page Counter
Forward roller Life Page Counter
Retard roller Life Page Counter
Tray2 Pick-up Roller Life Page Counter
Tray3 Pick-up Roller Life Page Counter
Tray4 Pick-up Roller Life Page Counter
Bypass Rubber Pad Life Page Counter
LD Light Level
MHV Control Bias Control
THV Control Bias Control
Deve Bias Control
Drum Life Page Counter
Toner Cartridge Life Page Counter
Drum PWM
Detack Bias Control
Transfer Roller Life Page Counter
ADF Roller Life Page Counter
ADF Rubber Pad Life Page Counter
Service Manual
Samsung Electronics
4-39
Alignment & Adjustments
Edit button shall be disabled until any NVM item is selected.
Edit button shall be disabled when read only NVM is selected.
Search edit box has 00-000 as a default. User shall input the whole number to find a specific NVM by pressing
Find button.
If matching NVM is found, the page including the specified NVM shall be displayed and the NVM is shown as
selected.
If matching NVM is not found, error message such as Invalid NVM number shall be displayed on the status area
and search edit box displays default number.
Figure 5-3 Copier item NVM Read/Write Edit window
When press Reset, value shall be Default value without confirmation popup window.
NVM name shall be displayed top of Default value string.
When press OK, confirmation popup window shall displayed.
Confirmation window shall display Touch OK to save the value or Cancel to return
4.5.5.1.2 NVM Initialization
Figure 5-4 Copier item NVM Initialization window
4-40
Service Manual
Samsung Electronics
Alignment & Adjustments
By default, none of items is selected and Initialize button shall be disabled.
There shall be Back button.
When Back button is pressed, NVM Initialization window return the previous window and NVM Initialization button
shall be changed to the normal image
Figure 5-5 Copier item NVM Initialization Confirmation window
When OK/Cancel is selected, move back to Figure 5-4.
When press OK button, OK and Cancel button are disabled until get the result from MCB.
When press OK button, SR shall show the initialization progress status and result.
When the result is get, pop up window shall be disappeared.
When press Cancel button, return to the previous window
4.5.5.1.3 Engine/DADF Test Routines
Figure 5-6 Copier item Engine/DADF Test Routines Find Component window
Service Manual
Samsung Electronics
4-41
Alignment & Adjustments
When exit this window, OP shall send exit command.
(CMD_COPY_COMP_EXITMODE)
By default, all Test routines will be displayed.
By default, search edit box has 00 .
OK/Reset button shall be disabled until any test routine is selected.
Maximum number of selection is 3.
Reset will deselect all selected test routines.
User select test routine by touching the row and deselect touching it again.
User input chain number in search edit box and only all test routines in the chain shall be displayed.
Figure 5-7 Copier item Engine/DADF Test Routines window
By default, Start/Stop/Stop All shall be disabled.
Start button shall be enabled when selected item is not running.
Multiple selection shall not be supported.
Stop shall be enabled only when the selected item is running.
Stop All shall be enabled when there is any running test item.
Back button shall be disabled when there is any running test item.
4.5.5.2 Fax
Figure 5-8 Fax item window
4-42
Service Manual
Samsung Electronics
Alignment & Adjustments
4.5.5.2.1 NVM Read/Write
Figure 5-9 Fax item NVM Read/Write window
For the behavior, refer to 4.5.5.1.1
Figure 5-10 Fax item NVM Read/Write Edit window
For the behavior, refer to 4.5.5.1.1
4.5.5.2.2 NVM Initialize
Figure 5-11 Fax item NVM Initialize Edit window
For the behavior, refer to 4.5.5.1.2.
Service Manual
Samsung Electronics
4-43
Alignment & Adjustments
Figure 5-12 Fax item NVM Initialize Confirmation window
For the behavior, refer to 4.5.5.1.2.
4.5.5.2.3 Protocol Report
Figure 5-13 Fax item Protocol Report window
By pressing the Print, starts printing.
4.5.5.2.4 Fax Routines
Figure 5-14 Fax item Fax Routines window
For the behavior, refer to 4.5.5.1.3
4-44
Service Manual
Samsung Electronics
Alignment & Adjustments
Figure 5-15 Fax item Fax Routines Find window
For the behavior, refer to 4.5.5.1.3
4.5.5.3 Network
Figure 5-16 Network item window
4.5.5.3.1 NVM Initialization
Figure 5-16 Network item NVM Initialization window
For behavior, refer to 4.5.5.1.2
Service Manual
Samsung Electronics
4-45
Alignment & Adjustments
Figure 5-17 Network item NVM Initialization Confirmation window
4.5.5.4 Other
Figure 5-18 Other item window
4.5.5.4.1 Print Pattern
Figure 5-19 Other item Print Pattern window
For printing Test Pattern, use Report Print Command.
By default, Test Pattern number shall be 1.
User shall select paper source by selecting tray of the image.
User shall select simplex/duplex printing option by selecting 1 sided /2 sided button.
4-46
Service Manual
Samsung Electronics
Alignment & Adjustments
4.5.5.4.2 Shading Test
Figure 5-20 Other item Shading Test window
4.5.5.4.3 Scan Edge Test
Figure 5-21Other item Scan Edge Test window
4.5.5.4.4 Memory Clear
Figure 5-22Other item Memory Clear window
Service Manual
Samsung Electronics
4-47
Alignment & Adjustments
4.5.5.4.5 Print Report
Figure 5-23Other item Print Report window
4.5.5.4.6 OEK S/N Sync.
Figure 5-24 OEK S/N Sync. window
4-48
Service Manual
Samsung Electronics
Alignment & Adjustments
Service Manual
Samsung Electronics
4-49
Alignment & Adjustments
4.6 Consumables and Replacement Parts
4.6.1 Maintenance part
To avoid print quality and paper feed problems resulting from worn parts and to maintain your printer in top working
condition the following item swill need to be replaced at the specified number of pages or when the life span of each
item has expired.
Items
Yield (Average)
DADF rubber pad
Approx. 50,000 pages
Multi-purpose tray rubber
pad
Approx. 200,000 pages
DADF feed roller
Approx. 50,000 pages
Multi-purpose tray feed
roller
Approx. 200,000 pages
Transfer roller
Approx. 100,000 pages
Fuser unit
Approx. 200,000 pages
Paper Feed roller
Approx. 200,000 pages
We highly recommend that an authorized service provider, dealer or the retailer where you bought printer performs this
maintenance activity.
4.6.2 Printing machine's report
You can print the machine's information and job report.
1. Press Machine Setup on the control panel.
2. Press Machine Status > Machine Info. tab > Print/Report.
3. Select the report type, then the right side of the screen shows the list to print.
4. Select the list to print.
5. Press Print.
Note : You can use SynchThru Web Service to print the machine's configuration or browse the status. Open the
internet browser in the networked computer, and type the machine's IP address. When SynchThru Web
Service is opened, click Information > Print information.
4-50
Service Manual
Samsung Electronics
Alignment & Adjustments
4.6.3 Clearing memory
When you want to delete all the data, including data from mail box, received fax, or user settings, in the flash memory of
the machine, use the memory clearing function.
This function(Clearing memory) of the SCX-6345N is not supported
4.6.4 Calibrating the touch screen
When pointing positions of the touch screen is incorrect, you can correct the pointing position using the calibration feature.
1. Press and hold the numeric key 0. While you are pressing the key 0, turn on the machine to enter the calibration
mode.
2. When the machine enters to the calibration mode, press + mark in numerical order.
3. When the screen shows the job done, press any number key on the control panel to validate the touch screen.
4. When the calibration screen shows up again, press + mark in numerical order.
5. When the machine completes the calibration, turn off and on the machine again.
4.6.5 Checking the supplies life
If you want to know the supplies' life within the machine, follow the next step.
1. Press Machine Setup on the control panel.
2. Press Machine Status.
3. Press down arrow to browse all the supply list, measurement, and remains.
Service Manual
Samsung Electronics
4-51
Alignment & Adjustments
4.6.6 Checking the machine's serial number
If you want to check your machine's serial number from the screen, follow the next step.
1. Press Machine Setup on the control panel.
2. Press Machine Status > Machine Info. tab > Machine Details.
4.6.7 Clearing the toner empty message
When you want to set the machine not to show the toner empty and replace the toner message, follow the next steps.
1. Press Machine Setup on the control panel.
2. Press Admin Setting. When the login message pops up, then enter password and press OK.
3. Press General > Ignore Toner Empty Status.
4. Press On.
5. Press OK.
4.6.8 Cleaning your machine
To maintain print and scan quality, follow the cleaning procedures below each time the toner cartridge is replaced or if
print and scan quality problems occur.
Caution : Cleaning the machine cabinet with cleaning materials that contain large amounts of alcohol, solvent, or other
strong substances can discolor or damage the cabinet.
4.6.8.1 Cleaning the outside
Clean the machine cabinet with a soft lint-free cloth. You can dampen the cloth slightly with water, but be careful not to
let any water drip onto or into the machine.
4.6.8.2 Cleaning the inside
Contact a service representative to clean the inside of the machine.
4-52
Service Manual
Samsung Electronics
Alignment & Adjustments
4.6.8.3 Cleaning the scan unit
Keeping the scan unit clean helps ensure the best possible copies. We suggest that you clean the scan unit at the start
of each day and during the day, as needed.
1. Slightly dampen a soft lint-free cloth or paper towel
with water.
4. Wipe the underside of the scanner lid and white sheet
until it is clean and dry
2. Open the scanner lid.
5. Close the scanner lid
3. Wipe the surface of the scanner glass and DADF
glass until it is clean and dry.
Service Manual
Samsung Electronics
4-53
Alignment & Adjustments
4.6.9 Maintaining the toner cartridge
Toner cartridge storage
To get the most from the toner cartridge, keep the following guidelines in mind:
Do not remove the toner cartridge from its package until ready for use.
Do not refill the toner cartridge. The machine warranty does not cover damage caused by using a refilled cartridge.
Store toner cartridges in the same environment as your machine.
Expected cartridge life
The toner cartridge yield depends on the amount of toner that print jobs require. Average yield for a new toner cartridge
is 20,000 standard pages in accordance with ISO/IEC 19752 standard. (Average yield for the original toner cartridge
supplied with the machine is 20,000 standard pages.) The actual number may also be different depending on the print
density of the pages you print on, and the number of pages may be affected by operating environment, printing interval,
media type, and media size. If you print a lot of graphics, you may need to change the cartridge more often.
4.6.9.1 Replacing the toner cartridge
When the toner cartridge is completely empty:
Toner Empty appears on the display.
The Status LED lights red.
The machine stops printing. The incoming faxes are saved in memory.
At this stage, the toner cartridge needs to be replaced. For order information for toner cartridges.
Note : You can set the machine to disregard the Toner Empty message and to continue printing.
1. Open the side cover.
4-54
2. Open the front cover.
Service Manual
Samsung Electronics
Alignment & Adjustments
3. Turn the cartridge locking lever towards right until it
sounds 'click', to release the toner cartridge.
7. Slide the new toner cartridge in until it locks in place.
8. Turn the cartridge locking lever towards left until it
sounds 'click'.
4. Lift the locking lever and pull the toner cartridge out.
9. Close the front cover, then the side cover.
5. Remove the new toner cartridge from its bag.
6. Hold the toner cartridge by the handle and slowly
insert the cartridge into the opening in the machine.
Service Manual
Samsung Electronics
4-55
Alignment & Adjustments
4.6.9.2 Replacing the drum cartridge
Expected cartridge life
The useful life of the drum cartridge is approximately 60,000 copies. The LCD displays Drum Warning when the drum is
near the end of life.
Approximately 6,000 more copies can be made, but you should have a replacement drum cartridge in stock.
Replace Drum appears on the display.
The Status LED lights red.
For order information for drum cartridges.
1. Open the side cover.
3. Turn the cartridge locking lever towards right until it
sounds 'click', to release the toner cartridge.
2. Open the front cover.
4. Lift the locking lever and pull the toner cartridge out.
Note : The toner cartridge must be removed to replace
the drum cartridge.
4-56
Service Manual
Samsung Electronics
Alignment & Adjustments
5. Pull the used drum cartridge out.
Note : Help the environment by recycling your used
drum cartridge. Refer to the recycling brochure
packed with the drum cartridge for details.
7. Unpack the new drum cartridge and slide it into place,
making sure not to touch the surface of the drum.
8. Turn the cartridge locking lever towards left until it
sounds 'click'.
6. Thoroughly shake the drum cartridge side to side for
five or six times.
9. Close the front cover, then the side cover.
Note : If you do not reset the counter, Drum Warning
may appear before the current drum cartridge's
time is up.
Service Manual
Samsung Electronics
4-57
Alignment & Adjustments
4.6.10 Managing your machine from the website
If you have connected your machine to a network and set up TCP/IP network parameters correctly, you can manage the
machine via Samsung's SynchThru Web Service, an embedded web server. Use SynchThru Web Service to:
View the machine's device information and check its current status.
Change TCP/IP parameters and set up other network parameters.
Change the printer properties.
Set the machine to send email notifications to let you know the machine's status.
Get support for using the machine.
To access SynchThru Web Service:
1. Start a web browser, such as Internet Explorer, from Windows.
2. Enter the machine IP address (http://xxx.xxx.xxx.xxx) in the address field and press the Enter key or click Go.
Your machine's embedded website opens.
4-58
Service Manual
Samsung Electronics
Alignment & Adjustments
4.7 Option Installing
Your machine is a full-featured one that has been optimized to meet most of your printing needs. Recognizing that each
user may have different requirements, however, Samsung makes several accessories available to enhance your
machine's capabilities.
This chapter includes:
Precautions when installing accessories
Installing a memory DIMM
4.7.1 Precautions when installing accessories
Disconnect the power cord
Never remove the control board cover while the power is being supplied.
To avoid the possibility of an electrical shock, always disconnect the power cord when installing or removing ANY internal or external accessories.
Discharge static electricity
The control board and internal accessories (network interface card or memory DIMM) are sensitive to static electricity.
Before installing or removing an internal accessories, discharge static electricity from your body by touching something
metal, such as the metal back plate on any device plugged into a grounded power source. If you walk round before
finishing installation, discharge any static electricity once again.
4.7.2 Installing a memory DIMM
Your machine has a dual in-line memory module (DIMM) slot. Use this DIMM slot to install additional memory.
Your machine has 256 MB of memory which can be expanded to 384 MB.
This machine comes with 128 MB of on-board memory and a 128 MB DIMM. To expand the memory of your machine,
you must remove the existing DIMM and purchase a larger one.
The order information is provided for optional memory DIMM.
1. Turn the machine off and unplug all cables from the
machine.
3. Completely open the latch on each side of the DIMM
slot. Remove the preinstalled memory DIMM.
2. Open the control board cover by grasping it and slide
toward you.
Service Manual
Samsung Electronics
4-59
Alignment & Adjustments
4. Take out a new memory DIMM from the plastic bag.
7. Replace the control board cover.
5. Holding the memory DIMM by the edges, align the
notches on the memory DIMM with the grooves on
the memory DIMM slot.
Note: The notches and grooves illustrated above may
not match those on an actual DIMM and the slot.
6. Push the DIMM straight into the DIMM slot until it
snaps into place. Make sure the latches fit over the
notches located on either side of the DIMM.
8. Reconnect the power cord and printer cable, and turn
the machine on.
4.7.3 Activating the added memory in the PS printerproperties
After installing the memory DIMM, you need to select it in the printer properties of the PostScript printer driver so that
you can use it.
1. Make sure that the PostScript printer driver is installed on your computer.
For details about installing the PS printer driver, see theSoftware Section.
2. Click the Windows Start menu.
3. For Windows 98/Me/NT 4.0/2000, select Settings and thenPrinters.
4 Select the Samsung SCX-6x45 Series PS printer.
5 Click the right mouse button on the machine icon and select Properties.
6. For Windows 98/Me, select Device Options. For Windows NT 4.0/2000/XP/2003, select Device Settings.
7. Select the amount of memory you installed from Printer Memory in the Installable Options section
For Windows 98, select Installable Options > VMOption > changesetting for:VMOption > change memory.
8. Click OK.
4-60
Service Manual
Samsung Electronics
Alignment & Adjustments
4.8 Display LED and Error Messages
4.8.1 Display LED
The S a us LED on he con rol panel shows he s a us of your machine.
See he able below o know your machine's s a us.
ED or LED button
Status (LED)
Power Saver (LED
button)
Interrupt (LED button)
LED status
Description
Off
Power Off
Green On
Ready
Green Blink
. Copy Mode : Copy job is in progress
. Fax Mode : Fax job (RX, TX) is in progress
. Scan / Email : Scan or Email job is in
progress
. Printing:
- Slow Blinking : Data processing
- Fast Blinking : Engine is printing
Red On
Errors that need userís intervention such as
paper jam, toner empty, tray empty, cover
open
Red Blink
Recoverable errors that userís intervention is
not needed to recover happens such as paper
mismatching.
The machine is in the warning status such as
end of consumables.
Blue Off
The machine is not in power saver mode
Blue On
The machine is in power saver mode
Blue Off
The machine is not in interrupt printing mode
Blue On
Then machine is in interrupt printing mode
Service Manual
Samsung Electronics
4-61
Alignment & Adjustments
4.8.2 Error Message
Messages appear on the Smart Panel program window or the control panel display to indicate the
machine’s status or errors. Refer to the tables below to understand the messages’ meaning and correct the
problem if necessary. Messages and their meanings are listed in alphabetical order.
Note : When you call for service, it is very convenient to tell the service representative the display message.
Messages in the colored cells are available only with SCX-6345N.
Display
Meaning
Suggested solutions
Ambient Temperature
Sensor Fault
The sensor for the inner temperature of
the machine is not working properly.
Turn the machine off and turn it on again.
BOOTP server error. An
Auto IP address has
been established.
BOOTP server does not work. The
machine is working with auto IP setting
function.
Set the network parameters again or
assign a new static IP address.
BOOTP server error. An
Auto IP is not working
The BOOTP server does not work, and the
auto IP setting is failed.
Set the network parameters again or
assign a new static IP address.
CCD Lock
The CCD (Charged Couple Device) lock
has been locked.
Unlock the CCD lock.
Or turn off the machine and on again.
Try again.
The CCD does not detect its home
location or move.
Check Fax Kit
The fax kit is not installed, or the fax is not
working properly.
Reinstall the fax kit.
Check Hard Drive
The hard disk drive does not work
properly.
Turn the machine off and turn it on again.
Check Tray 2 Feed Area
Paper has jammed in the tray feed area.
Or the tray cover is opened.
Clear the jam.
DADF Duplex
Feeding Jam
The lead edge of the document failed to
actuate the scan sensor within the correct
time after actuating the duplex sensor.
Lift up the document input tray and
remove the jammed original.
DADF Duplex Jam
The lead edge of the document failed to
actuate the duplex sensor within the
correct time when the document was fed
the wrong way.
Lift up the document input tray and
remove the jammed original.
DADF Exit Jam
The lead edge of the document failed to
actuate the gate sensor within the correct
time after actuating the scan sensor.
Open the DADF cover and remove the
jammed original.
DADF Oversize
Document Detected
Oversizeddocument or double-feeding of
originals.
Open the DADF cover and remove the
jammed original.
Check the document size whether it is
supported.
DADFRegistration Jam
The originals are jammed in DADF.
Open the DADF cover and remove the
jammed original.
Check Tray 3 Feed Area
Check Tray 4 Feed Area
4-62
Service Manual
Samsung Electronics
Alignment & Adjustments
Display
Meaning
Suggested solutions
DHCP server error. An
Auto IP address has
been established.
DHCP server does not work. The machine
is working with the setting IP by auto IP
setting function.
Set the network setting again or assign a
new static IP address.
DHCP server error. An
Auto IP is not working.
The DHCP server does not work, and the
auto IP setting is failed.
Set the network setting again or input the
new static IP addre.
Drum Cartridge Initializi
It is the mixing time when installing the
new drum cartridge up to 180 sec.
Wait about 180 seconds until the
machine is ready.
Drum Communication
Error
Communication between the drum
cartridge and the machine has failed
The drum cartridge is invalid.
Reinstall the drum cartridge. If the problem persists, replace it.
Drum Warning
The drum cartridge is near the end of its
life.
Ensure a replacement cartridge in stock.
Duplex Jam 0
Paper has jammed during duplex printing.
Clear the jam.
Duplex Jam 1
Paper has jammed during duplex printing.
Clear the jam.
Duplex Jam 2
Paper has jammed during duplex printing.
Clear the jam.
Ejector Fault
Ejector unit is not operating.
Remove paper from the output tray
(finisher). If this error message shows on
the screen again, cycle power. If the
problem persists, call for service.
Fax Memory is empty.
There is no more available fax
memory. No more fax data can be
received.
Delete the received fax data in the
memory. Call for service to delete fax
memory.
Fax Memory is low.
Available fax memory is now 1MB.
Delete the received fax data in the
memory to secure memory.
Feed Jam at MP Tray
Paper Misfed from multi-purpose tray
Clear the jam.
Feed Jam at Tray 1
Paper misfed from tray
Clear the jam.
Finisher Duplex Jam
Paper jammed in the stacker.
Open the stacker door and remove
jammed paper by lowering guide 1a or 1b.
Finisher Interface Error
Communication error has occurred
between the stacker and the machine.
Turn the machine off and turn it on again.
Finisher Jam 0
Paper jammed in the stacker.
Open the stacker door and remove
jammed paper by lowering guide 1a or 1b.
Finisher Jam 2
Paper jammed in the stacker exit part.
Pull jammed paper from the stacker exit.
Finisher Stacker Full
The stacker is full of printouts.
Remove printouts from the stacker.
Front Jogger Fault
Front Jogger is not operating.
Open the finisher door and clear any
jammed paper (if there is). If this error
message shows on the screen again,
cycle power.
Fuser error
There is a problem in the fuser unit.
Unplug the power cord and plug it back
in.
Feed Jam at Tray 2
Feed Jam at Tray 3
Feed Jam at Tray 4
Finisher Jam 1
Fuser High Error
Fuser Low Error
Fuser unit error
Service Manual
Samsung Electronics
4-63
Alignment & Adjustments
Display
Meaning
Suggested solutions
GUI to MCB
Communications Fault
A communication error has occurred.
Turn the machine off and turn it on again.
Install Drum Cartridge.
The drum cartridge is not installed, or the
CRUM (Consumer Replaceable Unit
Monitor) in the cartridge is not connected.
Install the drum cartridge. If it is already
installed, try to reinstall the drum
cartridge.
Install Staple Cartridge.
The staple cartridge is not installed.
Install the staple cartridge following the
steps explained on the back of the
finisher door.
If you want to continue the print job and
disregard of this error message, go to
Admin Setting to adjust the option.
Install Toner Cartridge.
The toner cartridge is not installed or the
CRUM (Consumer Replaceable Unit
Monitor) in the cartridge is not properly
connected.
Try to reinstall the toner cartridge.
Invalid Drum cartridge.
The drum cartridge you have installed is
not for your machine.
Install a Samsung-genuine drum
cartridge, designed for your machine.
Invalid Toner Cartridge
The toner cartridge you have installed is
not for your machine.
Install a Samsung-genuine toner
cartridge, designed for your machine.
IP address conflict
The IP address is used in other place
elsewhere.
Check the IP address or obtain a new IP
address.
Jam at Fuser
Paper has jammed in the fuser area.
Clear the jam.
Jam in Tray 2
Paper has jammed in the feeding area of
the tray.
Clear the jam.
A problem has occurred in the LSU (Laser
Scanning Unit).
Unplug the power cord and plug it back
inches.
Main motor failure
There is a problem in the motor unit.
Unplug the power cord and plug it back
in. If the problem still persists, please
call for service.
MCB to DADF
Communications Fault
The communication error has occurred.
Turn the machine off and turn it on again.
MCB Watchdog Detects
Software Failure
MCB software is not responding.
Turn the machine off and turn it on again.
Memory Failure
Memory access failed.
Turn the machine off and turn it on again.
Network cable is
disconnected
The network cable is disconnected.
Connect the network cable properly.
Network card is not
installed
The network card is not installed.
Install the network card.
Jam in Tray 3
Jam in Tray 4
LSU Hsync Error
LSU Motor Error
MCB to NIC
Communications Fault
MCB to Tray 2
Communications Fault
MCB to Tray 3
Communications Fault
MCB to Tray 4
Communications Fault
4-64
Service Manual
Samsung Electronics
Alignment & Adjustments
Display
Meaning
Suggested solutions
Non Genuine Drum,
Replace Drum
The drum cartridge installed is not a
genuine cartridge.
This message appears when you selected
Continue at Non Genuine Drum, Replace
Drum prompt.
Install the Samsung-genuine drum
cartridge.
Non Genuine Drum,
Replace Drum1
The drum cartridge installed is not a
genuine cartridge.
This message appears when you selected
Stop at Non Genuine Drum, Replace
Drum1 prompt.
Install the Samsung-genuine drum
cartridge.
Non Genuine Toner,
Replace Toner
The toner cartridge installed is not a
genuine cartridge.
This message appears when you selected
Continue at Non Genuine Toner, Replace
Toner prompt.
Install the Samsung-genuine drum
cartridge.
Non Genuine Toner,
Replace Toner1
The toner cartridge installed is not a
genuine cartridge.
This message appears when you selected
Stop at Non Genuine Toner, Replace
Toner1 prompt.
Install the Samsung-genuine drum
cartridge.
Output Bin full
The printed papers are full on the output
tray.
Remove printed outs from the output tray.
Paddle Fault
Paddle unit is not operating.
Open the finisher door and clear any
jammed paper (if there is). If this error
message shows on the screen again,
cycle power.
Paper Sensed in DADF.
When the machine is on, jammed paper is
detected in the DADF.
Open the DADF cover and remove the
jammed original.
Rear Jogger Fault
Rear Jogger is not operating.
Open the finisher door and clear any
jammed paper (if there is). If this error
message shows on the screen again,
cycle power.
Registration Jam
Paper has jammed in the registration area.
Clear the jam.
Replace Drum
The drum cartridge is at the end of its life.
When the drum replacement.
message appears on the screen and if you
select Continue, this message displays.
Replace a drum cartridge with a
Samsung-genuine drum cartridge.
Replace Drum1
The drum cartridge is at the end of its life.
When the drum replacement.
message appears on the screen and if you
select Stop, this message displays.
Replace a drum cartridge with a
Samsung-genuine drum cartridge.
Replace toner
The toner cartridge had run out at least
once before.
Replace a drum cartridge with a
Samsung-genuine drum cartridge.
Scan Feeding Jam
The lead edge of the document failed to
actuate the scan sensor within the correct
time after actuating the registration sensor.
Open the DADF cover and remove
jammed original.
SMPS Fan failure
There is a problem with the SMPS (Switch
Mode Power Supply) Fan.
Unplug the power cord and plug it back
in.
Service Manual
Samsung Electronics
4-65
Alignment & Adjustments
Display
Meaning
Stacker Fault
Stacker unit is not operating.
Remove paper from the output tray
(finisher).
If this error message shows on the
screen again, cycle power.
Stapler Empty
Stapler is run out.
Order Staple Cartridge.
And replace it.
Stapler Fault
Stapler is not operating.
Remove paper from the output tray
(finisher) and open the finisher door to
clear the jammed paper. If this error
message shows on the screen again,
cycle power.
Support Finger Fault
Support Finger unit is not operating.
Remove paper from the output tray
(finisher). If this error message shows on
the screen again, cycle power.
Toner Cartridge
Communication Error
Communication between the toner
cartridge and the machine has failed.
Reinstall the toner cartridge. If the
problem persists, replace it.
Toner Empty, Replace
Toner1
The toner in the cartridge has run out.
The machine stops print job.
Replace the toner cartridge with a
Samsung-genuine toner cartridge.
Toner Low
The toner cartridge is almost empty.
Ensure a replacement cartridge is in stock.
Toner Page Count
Reached, Replace Toner
The toner page count is expired.
When the printed page related message
appears on the screen, if you select
Continue, this message displays.
When the toner pagecount reached
message appears on the screen, press
Continue to continue the printing job. Or
replace a toner cartridge with a
Samsung-genuine toner cartridge.
Toner Page Count
Reached, Replace
Toner1
The toner page count has expired.
When the printed page related message
appears on the screen, if you press Stop,
this message displays.
Replace a toner cartridge with a
Samsung-genuine toner cartridge.
The drum cartridge has some mechanical
problem.
Turn the machine off and turn it on again.
If the problem persists, replace the drum
cartridge.
Not supplied toner to the drum cartridge.
Remove the sealing tape from the drum
cartridge, and check the lever for the
shutter on the toner cartridge.
The credit is not enough to access the job
according to Foreign Device.
Insert credit into the Foreign Device.
Toner Sensor Error
Toner Supply error
Use Auxiliary Access
4-66
Suggested solutions
Service Manual
Samsung Electronics
Alignment & Adjustments
4.8.3 Machine Clean
Clean every 10,000sheets or every 6months to maintain in good condition.
(When the Transfer Roller expires due to long usage.)
Clean in following order; Paper Path Parts, Transfer Roller, Toner Cartridge and Drum Cartridge in the
Inner Frame.
Clean with Vacuum Cleaner and Dry rag or Soft cloth.
4.8.3.1 Cleaning Instructions
1. Paper Path Parts
- Cleaning Kit : Vacuum Cleaner and Dry rag or Soft cloth.
- Mal Affects : Dust particles from paper can be copied at worst making spot stains on the paper.
- Follow the display listed on the figure below.
2. Cleaning-Transfer Roller
-
Cleaning Kit : Vacuum Cleaner and Dry rag or Soft cloth.
Mal Affects : Dust particles from paper can be copied at worst making spot stains on the paper.
When exchanging the Transfer Roller clean the area.
Follow the display listed on the figure below.
4. Cleaning-Frame Inside
- Cleaning Kit : Vacuum Cleaner and Dry rag or Soft cloth.
- Mal Affects : The toner can leak and pollute the interior, affecting the print quality.
- Recommend an Engineer or highly experienced worker to clean.
1
2
Open the Cover.
4
Remove the Cartridge.
5
Cover with a piece of paper
and lay it on a flat surface.
3
Remove the Cartridge.
6
Clean the Paper Path Parts.
Service Manual
Samsung Electronics
4-67
Alignment & Adjustments
7
Clean the Paper Path Parts.
10
Clean the Transfer Roller
Unit Parts.
13
Clean the Transfer Roller Unit Parts.
16
Reassemble the Cartridge.
4-68
8
9
Clean the Paper Path Parts.
Release the Transfer Roller.
11
12
Clean the Transfer Roller
Unit Parts.
14
Reassemble the Transfer Roller.
Clean the Transfer Roller
Unit Parts.
15
Clean the Frame Inside.
17
Reassemble the Cartridge.
Service Manual
Samsung Electronics
Alignment & Adjustments
4.8.3.2 Cleaning advisories of the parts.
1. Make sure the main cord is unplugged before the cleaning.
2. Do not use flammable liquid cleaner or spray products for cleaning.
3. Avoid making scratches while cleaning the parts.
4. Avoid direct contact by hand on the Transfer Roller.
5. Avoid exposing inner parts for a long duration of time.
The surface of OPC Drum can be affected by direct light if exposed for a long time.
(1~2 minutes is enough time for cleaning)
6. OPC surface must not be scratched.
Service Manual
Samsung Electronics
4-69