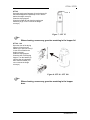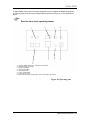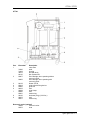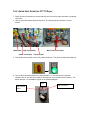
1
Operation Instructions Dehumidified air dryer STT40 STT70 Sterling Material Processing STT40 / STT70 Sterling Material Processing 5200 West Clinton Ave. Milwaukee, WI 53223 Telephone: (414) 354-0970 Fax: (414) 354-6421 www.sterlco.com Technical service: Service department Telephone: (800) 423-3183 Edition: 07/03 These operation instructions are for*: (* please fill in personally) Serial number: Year of manufacture: Date of Delivery: Number of delivery: Date commissioned: Location: Group of machines: 2 STT40 / STT70 Sterling Material Processing retains all rights to change the information in these operation instructions at any time without notice. We assume no liability for any errors from direct or indirect damage resulting in context with these operation instructions. Copying, translation or publication in any form except for personal use by the purchaser requires approval from Sterling Material Processing. All rights reserved. 3 STT40 / STT70 Table of contents 1. General Information................................................................................................. 1-1 1.1. Warnings and symbols.......................................................................................... 1-1 1.2. Explanations and information ............................................................................... 1-3 1.3. Legal basis ............................................................................................................ 1-3 1.4. Field of application ............................................................................................... 1-3 1.5. Notes on Usage ..................................................................................................... 1-3 2. Safety instructions.................................................................................................... 2-1 2.1.1. Assembly...................................................................................................... 2-3 2.1.2. Operation ..................................................................................................... 2-3 2.1.3. Maintenance................................................................................................. 2-4 2.2. For the safety of the device................................................................................... 2-5 3. Start up ..................................................................................................................... 3-1 3.1. Initial Operation .................................................................................................... 3-2 3.1.1. Switching on the Dryer ................................................................................ 3-2 3.2. Continuous Operation ........................................................................................... 3-4 3.2.1. Switching the Dryer on ................................................................................ 3-4 3.2.2. Setting the Drying Temperature................................................................... 3-5 3.3. Switching the Dryer off ........................................................................................ 3-7 4. Error and error correction ........................................................................................ 4-1 5. Maintenance............................................................................................................. 5-1 5.1. Maintenance schedule........................................................................................... 5-3 5.2. Preventative Maintenance..................................................................................... 5-4 5.2.1. Servicing Process Air Filters ....................................................................... 5-4 Cleaning or Replacing the Return Air Filter............................................................ 5-5 5.2.3. Servicing the Dew Point Monitor ................................................................ 5-6 5.3. Corrective Maintenance ........................................................................................ 5-7 5.3.1. Symptoms of Worn Desiccant ..................................................................... 5-7 5.3.2. Replacing Worn Desiccant .......................................................................... 5-8 5.4. Disposing of Drying Agents ................................................................................. 5-9 5.5. Replacing the Process Heater.............................................................................. 5-10 5.5.1. Replacing/Cleaning the Cooling Coils ...................................................... 5-11 5.5.2. Replacing the regeneration heating coil..................................................... 5-12 5.6. Cleaning the Drying Hopper............................................................................... 5-13 6. Functional description............................................................................................ 6-15 6.1. General Information............................................................................................ 6-16 6.2. Drying Hopper (Optional)................................................................................... 6-19 6.2.1. Hopper Heater............................................................................................ 6-20 6.3. Connection to a Pneumatic Conveying System (Optional) ................................ 6-22 6.4. Return Air Cooler (Optional).............................................................................. 6-22 7. Transporting, Assembly and Storage....................................................................... 7-1 7.1. Transporting and Packing ..................................................................................... 7-2 7.2. Assembly............................................................................................................... 7-3 7.3. Storage .................................................................................................................. 7-3 8. Assembly instructions.............................................................................................. 8-1 8.1. Installation of the exhaust fan for regeneration of exhaust air.............................. 8-2 4 STT40 / STT70 8.2. Grounding the equipment against electrostatic charging...................................... 8-2 8.3. Electrical Connection............................................................................................ 8-3 8.4. Connection of Return Air Cooler (Optional) ........................................................ 8-4 9. Troubleshooting ....................................................................................................... 9-1 9.1. Introduction........................................................................................................... 9-1 9.2. Determining Temperature Controller Errors or Sensor Errors ............................. 9-4 Using a Thermocouple............................................................................................. 9-4 Using a Platinum Resistance Thermometer............................................................. 9-4 10. Technical data ........................................................................................................ 10-5 10.1. STT40 ............................................................................................................... 10-5 10.2. STT70 ............................................................................................................... 10-5 10.3. Dimension Sheet ............................................................................................... 10-6 11. Spare parts list........................................................................................................ 11-1 12. Electrical manual ................................................................................................... 12-1 13. Accessories ............................................................................................................ 13-1 5 STT40 / STT70 1. General Information These operation instructions are addressed to all users of this device. These operation instructions must be followed by every person working on or with the unit. 1.1. Warnings and symbols The following warnings and symbols are used in these operating instructions: This symbol indicates danger to life! Fatal or serious injury is possible if the corresponding instructions, regulations or warnings are not observed. / ) This symbol indicates that serious injury is possible if the corresponding instructions, regulations or warnings are not observed. This symbol indicates that extensive damage to equipment is possible if the corresponding instructions, regulations or warnings are not observed. This symbol indicates that information is important for becoming familiar with the equipment, i.e. technical specifications. This symbol indicates that a technical term is explained at this point. General Information 1-1 STT40 / STT70 When disposing of drying agents / batteries / oil, observe all official rules. Caution: High noise pollution ! For anyone working on the equipment, hearing protection should be worn. Avoid impairment of hearing! Caution: Danger of being crushed ! Disconnect the equipment from the main power supply before starting maintenance procedures. All compressed air pipes on the equipment should be depressurized before starting maintenance work. Caution: Danger, surface is hot ! Before starting any work, wait until all parts have cooled down sufficiently. Avoid touching any of these parts! Caution: Danger, surface is slippery ! Remove any granules remaining on the ground. Caution: Danger, electrical shock hazard ! Observe that the control system is still under voltage even when the main power switch is switched off. General Information 1-2 STT40 / STT70 1.2. Explanations and information Various terms and designations are used in these operating instructions to ensure clarity. Therefore please note that the terms used in the text stand for the corresponding explanations listed below. • Equipment: ”Equipment” can mean an individual unit, a machine or an installation. • Operating personnel: The ”operating personnel” are persons operating the equipment under their own responsibility or according to instructions. • Operator: The ”operator” of the equipment (production manager, foreman, etc.) is the person responsible for all production sequences. The operator instructs the operating personnel what is to be done. • Operating instructions: The ”operating instructions” describe the interaction of the equipment, production sequences or methods. The operating instructions must be compiled by the operator of the equipment. • Equipment foreman: When several operating personnel work on one machine, the ”equipment foreman” coordinates the operating sequences. The equipment foreman must be appointed by the operator. • Trained personnel: ”Trained personnel” are persons whom, due to their training, are authorized to carry out the required work. 1.3. Legal basis See “Manufacturer’s Certificate” resp. “Certificate of Conformity”. 1.4. Field of application This dryer has been manufactured to dry thermoplastic granules and regrind before processing. This machine removes all remaining moisture from the granules both inside and out, regardless of climate or ambient air conditions. 1.5. Notes on Usage • Experienced operators can begin directly with the chapter on “Start-up” if the unit has been properly installed. • If the unit has not been installed yet, observe the instructions in the chapter on “Assembly Instructions” and “Transport, Assembly and Storage”. General Information 1-3 STT40 / STT70 2. Safety instructions These safety instructions apply to all persons around the operating equipment. Please inform all persons around the operating equipment of the direct and indirect hazards connected with it. These operation instructions are to be used by all persons assigned activities connected with the equipment. Knowledge of the English language is a prerequisite. For your safety, ensure that the operating personnel are familiar with the operating instructions and the function of the equipment. Safety instructions 2-1 STT40 / STT70 2.1 General The operating personnel of this equipment must be at least 16 years old. Please read these operation instructions carefully before operating the equipment for the first time. Contact us should questions arise. This avoids injury and damage to equipment! These operation instructions must be kept available at all times at the place where the equipment is operating. Improper operation results in danger of accidents! Please note that not all conceivable cases regarding operation or maintenance of the equipment can be covered in these operating instructions. Please observe all safety instructions and warnings on the equipment. This avoids injury and damage to equipment! All work on the equipment must be carried out by persons whose qualifications are specified in the pertaining chapters of the operation instructions. Improper operation results in danger of accidents! The proper work clothes must be worn during any work on the equipment is performed. This avoids injury! The local regulations and requirements pertaining to this equipment must be observed. Disconnect electrical components from the main power supply before working on them. Caution: Danger, electrical shock hazard! Compile a detailed sequence of operating procedures to be carried out on this equipment based on this Operation Instruction Manual. Improper operation results in danger of accidents! Observe that the control system is still under voltage even when the main power switch is turned off. Caution: Danger, electrical shock hazard! Safety instructions 2-2 STT40 / STT70 2.1.1. Assembly Compare the connected loads with those of the main power supply. Danger, electrical shock hazard! When using lifting gear, please observe the pertaining regulations. Caution: Danger of accidents! Do not modify, add other equipment or change the design of the equipment without the approval of the manufacturer. Caution: Danger of accidents! Attachments not supplied by Sterling must be manufactured in accordance with safety regulation EN 294. Danger of accidents! The equipment may only be operated when all the associated components are properly connected in accordance with the relevant regulations. This avoids injury and damage to equipment! Operate the device only if all its components are grounded. Danger, electrical shock hazard! Please note for installation that the equipment is top-heavy. Danger exists that it may topple over! Take care that the device is not standing on the main power cable. This will prevent danger to people and material! 2.1.2. Operation Appoint a foreman to be responsible for the equipment. Ensure that the operating personnel are provided detailed instruction in the operation of the equipment. Improper operation results in danger of accidents! When the main power switch is turned off for reasons pertaining to safety, it must be secured against unauthorized activation. Caution: Danger of accidents! Repair work must be carried out by trained personnel only. Caution: Danger of accidents! Never operate the equipment when partially dismantled! Danger! Limbs may be caught in machinery! Electric shock! In case of malfunction, shut down the equipment immediately. Have malfunctions corrected immediately. Danger of accidents! This machine is intended only for the drying of granulated plastics. Any other use is contrary to specifications. This equipment is not suitable for food processing. The safety instructions of any connected machines must be followed. Please note that sound levels exceeding 85 db(A) may cause long term damage to your health. Use the appropriate ear muffs. This avoids impairment of hearing! Please note that the drying cells, drying hoppers and piping grow hot during use. Avoid touching any of these parts! Danger: Injury through burns! Never operate the dryer without side panels. Danger: Limbs may be caught in machinery! Injury through burns! When drying plastics which emit gases dangerous to human health, take care that the regeneration exhaust air is disposed of without polluting the environment. This will prevent danger to people and material! Safety instructions 2-3 STT40 / STT70 2.1.3. Maintenance Before starting maintenance work, appoint a supervisor. Inform personnel responsible for the system before beginning maintenance work. Caution: Danger of accidents! Disconnect the equipment from main power supply before starting maintenance procedures to ensure that it cannot be switched on unintentionally. Caution: Danger of accidents! All pipes, hoses and connections should be checked regularly for leaks and damage. Any faults which arise should be corrected immediately. Danger of accidents! Depressurize all compressed air piping before starting maintenance work. Danger of accidents! Air filters should only be cleaned/replaced when the the main power switch is off and the blower has stopped. This avoids injury and damage to equipment! Any maintenance work on the equipment should only be started when the main power switch is off and the blower has stopped. This avoids injury and damage to equipment! Check the v-belts of the blower only when the main power switch is turned off and the blowers have stopped. Caution: Danger of accidents! Open drying hoppers only if they are completely empty. Danger of accidents! Never open drying hoppers while the device is in operation. Danger: Injury through burns! Open drying hoppers only if they have been sufficiently cooled down. Danger: Injury through burns! Before beginning maintenance work, wait until the drying cells, drying hoppers and air piping have cooled down sufficiently. Avoid touching any of these parts! Danger: Injury through burns! Remove any granules remaining on the ground. Danger of accidents! Lock the wheels in place after installation if the dryer is mounted on a movable frame. This will prevent danger to people and material! Safety instructions 2-4 STT40 / STT70 2.2. For the safety of the device Never change settings without carefully assessing the consequences. Use only original Sterling spare parts. Observe the maintenance instructions. Keep a record of all maintenance work and repairs. Please note that electronic components can be damaged by static discharge. Before initial operation and at regular intervals, make sure that no electrical connections are loose. Never readjust sensors without exactly knowing their functions. Please ensure that the storage temperature is between 32 to +131 °F (0 and +55 °C). Please ensure that the operation temperature is between 32 to +113 °F (0 and +45 °C). Check the rotation direction of the blowers after the electrical connections have been made (see rotational direction arrow). Clean the drying hoppers before filling them for the first time. Follow the material manufacturers’ instructions for maximum drying temperature. Follow the material manufacturers’ drying instructions. Ensure that the drying hoppers are always completely filled and that the retention period is respected if material is continually being removed. Note that if too much material is taken from the drying hopper, it will lead to insufficient drying of the material. Close the air stop valves of the drying hoppers which are empty or have not been used. Write down all data which you have entered into the control system. The password is to be given to authorized personnel only. Please note that the temperature of the dryer heating system must always be set lower than that of the supplementary heaters. When you dispose of drying agents, observe all official rules and guidelines. Note that drying cells should be replaced or refilled only by Sterling if they are empty. When no material is continuously fed into the drying hopper (batch drying) and is continuously removed, the material level must not fall below 40% in the drying hopper. Close the throttle valves. Read the operating manuals of any machines connected to this dryer. Safety instructions 2-5 STT40 / STT70 3. Start up This chapter is addressed to the operators of the machine. It assumes the operator has general skills with drying equipment and that the functional description has been read and understood. Ensure that the operators have the required experience. ) Make sure that the main switch is set to the “0" position. Check the drying hopper for cleanliness. Check to see whether the adhesive film on the drying hopper has been removed. If there is a return air cooler, switch on the coolant circuit. If there is a timer clock (optional), adjust it. Read the timer clock operating manual. Check whether the release switches for the “Timer” and the “Hopper” (ST1, ST2) are set to the ”0" position. The “trouble” signal lamp may flash shortly while the valve block is being changed. Start up 3-1 STT40 / STT70 3.1. Initial Operation Check whether the inlet of the drying hopper is closed by a lid or whether a conveyor unit (optional) is installed. If not, manufacture a suitable lid and install it on the inlet of the drying hopper or install the optional conveyor unit. ) Attachments which are not supplied by Sterling must be manufactured according to the European Standard 294 safety regulation. Check whether the coolant circuit of the return air cooler (if a return air cooler is installed) is turned on. 3.1.1. Switching on the Dryer 1. Turn on the dryers’ main power switch. The “run” signal lamp lights up. 2. For operation with timer clock (optional): Turn the “Timer” switch to the ON position: For operation without timer clock: Turn the “Timer” switch to the ON position: ) The blower is running. If the dryer has not been used for several months it must be run for 2 hours without material. Start up 3-2 STT40 / STT70 Turn the “Hopper” release switches (ST1, ST2) to the “I” position. To set the drying temperature, turn the temperature controller to 176° F (+80 °C). Press the “PGM” key one time. Set the drying temperature to 176° F using the arrow keys. After 2 seconds, the display will flash and the value will be stored. Press the “EXIT” key (the setpoint value and the actual value of the drying temperature are displayed). After 2 hours, turn the “Hopper” release switches (ST1, ST2) to the “0” position. Turn the “Timer” switch to the OFF position: / Wait until the blower has stopped. The blower will continue running for 10 minutes once it is turned off. If there is a return air cooler installed, turn off the coolant circuit. Turn off the dryers’ main power switch. The “power” signal lamp turns off. Note: The previous steps only need to be taken if this is the initial startup of the dryer, or if the dryer has been sitting for several months. Start up 3-3 STT40 / STT70 3.2. Continuous Operation Note: To see a quick start guide for operation of this dryer see chapter 14. ) Fill at least half of the drying hopper with material. 3.2.1. Switching the Dryer on Turn on the dryers’ main power switch to the on position. The “run” signal lamp turns on. For operation with the optional timer clock: Turn the “Timer” switch to the position. For operation without timer clock: Turn the “Timer” switch to the position. The blower is running at this point. Start up 3-4 STT40 / STT70 3.2.2. Setting the Drying Temperature Turn the “Hopper” (ST1, ST2) release switches to the “I” position. For each drying hopper, set the required process drying temperature by using the corresponding temperature controller. Check whether the set process drying temperature is appropriate for the materials which have been placed in the drying hopper. Observe the instructions of the material manufacturer. After filling the drying hopper you must wait for the resonance time of the material to pass before using the material for making product. Observe the instructions of the material manufacturer. Use the following steps to set the temperature controller. Press the “PGM” key. By using the arrow keys, select the desired value for the drying temperature. After 2 seconds, the display will flash and the value is stored. Press the “EXIT” key (the setpoint value and the actual value of the drying temperature are displayed). ) After changing materials, immediately check and reset the drying temperature. Start up 3-5 STT40 / STT70 Autotuning the temperature controller Press the “EXIT” key for at least 2 seconds. “tunE” flashes. Autotuning can take several minutes. If “tunE” stops flashing, Autotuning is finished. Press the “EXIT” key. Start up 3-6 STT40 / STT70 3.3. Switching the Dryer off Turn the “Timer” switch to the / position: Wait until the blower has stopped. The blower will continue running for 10 minutes once the dryer is turned off. If there is a return air cooler installed, switch off its coolant circuit. Turn off the dryer’s main power switch. The “power” signal lamp turns off. Note: For more detailed instructions on the shutting down of this dryer, see the quick start guide in Chapter 14. Start up 3-7 STT40 / STT70 4. Error and error correction This chapter is directed at the operators of the equipment. It assumes the operator has general skills in dealing with drying systems and that the “start-up” description has been read and understood. Ensure in each and every case that the operators have the relevant skills in operating this equipment. ) Faults must be eliminated before the control system can start operating again. An alarm is indicated by the steady light of the “trouble” signal lamp. When the fault has been eliminated, the “trouble” signal lamp turns off. Error and error correction 4-1 STT40 / STT70 The following errors can cause an alarm: Blower The blower pressure is too low. Check the blower. Vacuum sensor is defective. Regeneration heater 1 The safety temperature limiter on regeneration heater 1 has been activated. Check the safety temperature limiter. Call the Sterling Service Department. Regeneration heater 2 The safety temperature limiter on regeneration heater 2 has been activated. Check the safety temperature limiter. Call the Sterling Service Department. Hopper heater The safety temperature limiter on the hopper heater has been activated. Check the safety temperature limiter. Call the Sterling Service Department. Error and error correction 4-2 STT40 / STT70 5. Maintenance This chapter is intended for persons having skills in electrical and mechanical areas due to their training, experience and supporting documentation. Personnel using the instructions in this chapter must be familiar with accident prevention regulations, operating conditions, safety regulations and their implementation. Ensure in each case that the personnel are informed. For maintenance work taking place at heights of over 6ft. (1829mm), use only ladders and working platforms or similar equipment intended for this purpose. At greater heights, the proper protective equipment against falling must be worn. Use only suitable lifting gear in proper working order and load suspension devices within the sufficient carrying capacity. Do not stand or work under suspended loads! Ensure that electric motors and controller cabinets are sufficiently protected against moisture. Use suitable workshop equipment. Before starting maintenance work, appoint a supervisor. Before beginning maintenance work on the system, inform the responsible personnel. Never operate the equipment when it is partially dismantled. Any maintenance and repair work NOT described in this manual may only be carried out by Sterling service personnel or by specialized staff authorized by Sterling. / To ensure that it cannot be switched on unintentionally, disconnect the equipment from the main power supply before starting maintenance procedures. Before starting maintenance work, all compressed air pipes on the equipment should be depressurized. Maintenance 5-1 STT40 / STT70 ) Please observe the maintenance schedule. Before starting maintenance work, clean the equipment of oil, fuel or lubricant. Ensure that materials and incidentals as well as spare parts required for operation are disposed of properly and in an environmentally sound manner. Use only original Sterling spare parts. Keep records of all maintenance and repair procedures. Maintenance 5-2 STT40 / STT70 5.1. Maintenance schedule The checklist below contains a list of items which should be inspected and/or replaced to keep your Dehumidifying Dryer operating at peak efficiency. Perform each inspection at the regular intervals listed below. System model # Every week Date/ By Serial # Date/ By Date/ By Date/ By Date/ By Date/ By Date/ By Date/ By Date/ By Date/ By Date/ By Date/ By Date/ By Inspect all filters for wear, replace/ clean if dirty or worn. Check to make sure that all hose conections are air tight. Every month Jan Feb Mar Apr May Jun Jul Aug Sep Oct Nov Dec Lock out electrical power and inspect electrical wiring for integrity. Check main power switch and ensure that signal lamps are functioning properly. Check dew point and temperature tracking with an external dew point monitor and pyrometer. Visually inspect the shifting of the airflow valve during one cycle. Every year Next scheduled inspection Actual inspection Date/By Next scheduled inspection Actual inspection Date/By Scheduled replacement date Actual replacement Date/Work done by Scheduled replacement date Actual replacement Date/Work done by Inspect desiccant. Replace if brown or broken. Every two years Replace desiccant. Whenever the material is changed: The drying hopper and suction box must be cleaned. The service intervals provided above are based on a 3-shift operation. -Photocopy this page for your maintenance records – Maintenance 5-3 STT40 / STT70 5.2. Preventative Maintenance This section describes maintenance procedures which will increase the longevity and efficiency of your dehumidifying dryer. Perform them at the regular intervals listed on the dryer checklist on the previous page. 5.2.1. Servicing Process Air Filters Caution! Operating the dryer without the process air filter installed voids your warranty! Dehumidifying dryers have a single cartridge canister-type filter in the process air loop. The filter protects blowers from plastic fines drawn in from the drying hopper and prevents the desiccant from being contaminated. Regular filter cleaning is essential to keep your dryer operating at peak efficiency. You can blow or vacuum the dirt out of the filter with compressed air, but remember, it could become damaged from high-pressure blowing. Set the “Timer” release switch to the position. Recommendations for Cleaning and Replacing Filters • Remove the threaded fastener securing the filter access cover, then remove the cover. • Remove the nut on the center retaining rod to remove the filter cartridge. / Wait until the blower has stopped. The blower will continue running for 10 minutes once the dryer is turned off. If there is a return air cooler installed, switch off the coolant circuit. / Switch off the dryer’s main power switch (the “power” signal lamp turns off). Interrupt the main power supply so that the device cannot be turned on unintentionally. Clogged filters substantially reduce the amount of circulating air and lead to a production lag of your dryer. Clogged filters may also damage the heating elements. Maintenance 5-4 STT40 / STT70 5.2.2. Cleaning or Replacing the Return Air Filter STT40 / STT70 • Detach the screw on the housing of the return air filter and remove the housing cover. • Remove the nut of the filter cartridge. • Remove the filter cartridge. • Clean the inside of the return air filter housing. Use non-fibrous cleaning cloths or an industrial type vacuum cleaner. • Vacuuming - Try vacuum-cleaning a soiled filter first. Vacuuming removes most large particles and surface contaminants, and may suffice for the first time you clean a filter. Use a commercial-duty (recommended) or household vacuum cleaner. Vacuum the filter from the air intake (dirty) side only. • Cleaning with Compressed Air - Blow clean, dry compressed air up and down the pleats, blowing from the inside out. Remove loose dirt from the filter with compressed air or vaccum from the outside. ) • Figure 1: Air Filter Location & Disassembly Return Air Filter DO NOT clean/wash filter with water! After each cleaning: • Inspect the filter element. Briefly hold a light bulb behind the element and look for any fatigued paper or residual dirt. Inspect for holes and tears by looking though the filter toward a bright light. Check for damaged gaskets or dented metal parts. Do not re-use a damaged filter! • Check the gasket for damage. A damaged gasket allows contaminants into the process. Replace as needed. • Re-install the cleaned/new filter cartridge. • Rethread the nut that holds the filter in place. • Install the lid of the return air filter housing. ) Never operate the dryer without a return air filter. Purchase order numbers for a return air filter on the STT40/70 dryer are: when operating without return air cooler: ID 83957 when operating with return air cooler: ID 83956 Maintenance 5-5 STT40 / STT70 5.2.3. Servicing the Dew Point Monitor The accuracy of the dew point monitor on mini dryer systems depends on proper operation of the dew point sensor and the control board. The dew point sensor is in the process air stream and is therefore susceptible to contamination. Dew point sensor life depends on: • Air temperature and flow passing over the sensor. • The amount of fines (dust) in the process air. • The amount of plasticizer vapor in the process air. Once every six months, the dryer operator should monitor the initial dew point sensor readings and establish a periodic replacement schedule as needed. • Do not attempt to check the continuity or resistance of the dew point sensor. The sensor will be destroyed! Maintenance 5-6 STT40 / STT70 5.3. Corrective Maintenance This section provides you with the information necessary to correct or repair any issues which might appear during the normal operation of your dehumidifying dryer. Although we have listed how to perform these procedures, it is recommended that you call the Service Department to have any in-depth maintenance performed. 5.3.1. Symptoms of Worn Desiccant The moisture absorption capacity of the desiccant used in your dehumidifying dryer degrades after an indefinite period of time. Useful life depends on variables such as material moisture content, plasticizer vapors in the return air, and number of regeneration cycles. Your dryer may need new desiccant if it exhibits any of the following symptoms: • • The process air dew point measured with a portable dew point monitor is higher than -10°F (-23ºC) throughout the process drying cycle. Noticeable amounts of desiccant in the beds is a medium-brown color or darker. If you notice any of these signs, replace the desiccant in the desiccant beds. Desiccant replacement kits are available from the Parts Department. If you want, a technician can repack desiccant beds at your site. • Handling desiccant material is HAZARDOUS. Wear an N-100 type safety filter mask or equivalent to avoid prolonged breathing of desiccant dust. Wear safety goggles and gloves to avoid contact with eyes and skin. • Handle with adequate ventilation. • Wash hands thoroughly after handling. ✚ FIRST AID ✚ In case of eye contact, immediately flush eyes with plenty of water for at least 15 minutes. SEE A PHYSICIAN IMMEDIATELY IF IRRITATION PERSISTS. Maintenance 5-7 STT40 / STT70 5.3.2. Replacing Worn Desiccant • DESICCANT BEDS ARE HOT DURING OPERATION. To avoid burn hazard, make sure desiccant beds are sufficiently cool before replacing worn desiccant. To access the Desiccant Bed: 1. Disconnect electrical power to the dryer. 2. Remove dryer side panels. 3. Remove any internal hoses that may be in the way. 4. Use nut driver to remove clamps at top and bottom of the desiccant tank. 5. Remove the Desiccant Cell leaving valve and Y-pipe attached to the dryer. 6. With a shop vacuum or by dumping, carefully remove all desiccant from each tower. Figure 2: Desiccant Bed Location and Disassembly Remove Hose Clamps Remove Clamp 7. Inspect each lower desiccant screen for tears or holes where desiccant burned-through. Replace as needed. 8. After cleaning each chamber, add a level layer of half the 8 x 12 bead desiccant on top of the screen. Next, carefully add the full amount of bead desiccant specified per bed. Smooth the top level, and finally add another layer of the remaining bead desiccant to the top. Make sure this layer is level and smooth. (See following table for correct amount of desiccant required.) 9. Repeat the previous step for the other bed. 10. Inspect the gaskets on the valve assembly. Replace if necessary. 11. Place the desiccant cell assembly back into the dryer and replace clamps. Maintenance 5-8 STT40 / STT70 12. Replace any internal hoses that were removed to change desiccant. Figure 3: Required Desiccant Amounts Dryer model STT 40 STT 70 8 x 12 bead Total Part no. lbs. 13.23 W00018051 28.76 Kg 6 13 5.4. Disposing of Drying Agents Please note that drying cells are replaced or refilled by Sterling only if they are empty. When disposing of drying agents, observe all official rules. Since used drying agents may contain impurities from the dried materials, treat them as special waste. It is not possible for Sterling to take back the used drying agent or drying cells with used drying agents. Maintenance 5-9 STT40 / STT70 5.5. Replacing the Process Heater The dehumidifying dryers utilize a thru-phase Calrod-type heater element. This heater element is mounted to the inlet of the drying hopper. Although the replacement procedure is the same for each heater, the wattage varies by model, voltage, temperature range, etc. • Hazardous electrical current present. Disconnect and lock out power before you replace heater elements! Figure 4: Process Heater Location and Disassembly Remove Clamp Process Heater Procedures 1. Remove access cover from the junction box located on the bottom of the heater. 2. Remove the wiring from all terminals that are inside the junction box. (Note: Sketch all wiring locations so that you can properly re-install later.) 3. Remove the clamp that is attaches the process heater to the hopper. Also, remove the hose from the heater. 4. Place the process heater assembly on a workbench to begin disassembly. 5. Carefully unscrew heater/junction box subassembly from the process heater housing. (You must replace both the process heater element and the junction box.) 6. Replace with new heater element/junction box subassembly. • Heater loops should not touch each other. “Hot spots” lead to premature heater failure! Maintenance 5-10 STT40 / STT70 7. Re-clamp process heater assembly onto the drying hopper. 8. Reattach wiring according to the sketch that was made previously. 9. Replace the air hose to the process heater. 10. Replace access cover on junction box of process heater assembly. 5.5.1. Replacing/Cleaning the Cooling Coils • Hazardous electrical current present. Disconnect and lock out power before you replace cooling coil! Figure 5: Cooling Coil Location and Disassembly Cooling Coil Location 1. In order to gain access to the cooling coil, the cover plate on the side of the dryer must be removed. 2. Remove cooler from the cooler housing. 3. To clean the cooling coil, use compressed air or a steam cleaner to blow the dust off or clean any oily residue on the coil. 4. Re-install the cooler in reverse order. Install new gaskets and securely tighten all fasteners. 5. Secure the access cover on the side of the dryer. Maintenance 5-11 STT40 / STT70 5.5.2. Replacing the regeneration heating coil • Hazardous electrical current present. Disconnect and lock out power before you replace heating element! Figure 6: Heating Coil Location and Disassembly Heating Coil 1. In order to gain access to the heating element, the cover plate on the side of the dryer must be removed. 2. Remove the desiccant tank which has the faulty heater element from the dryer. 3. Place desiccant tank onto a workbench and remove desiccant as stated earlier in the changing desiccant section of this manual. If the desiccant is old or damaged, you may discard it at this time. If it is undamaged, place it in a bag and save it for later. 4. Unwire the heater that is located inside the bottom of the desiccant tank. Remove and replace the heater with a new heater. Rewire the heater and reassemble the desiccant tank. 5. Pour desiccant back into the tank. Use either the saved desiccant in the bag or new desiccant if it is needed. 6. Put the desiccant tank back into the dryer cabinet. 7. Inspect the gaskets on the valve assembly. Replace if necessary. 8. Place the desiccant cell assembly back into the dryer and replace clamps. 9. Replace any internal hoses that were removed to change desiccant. Maintenance 5-12 STT40 / STT70 5.6. Cleaning the Drying Hopper Set the “Timer” release switch to the / position. Wait until the blower has stopped. The blower will continue running for 10 minutes once the dryer is turned off. If there is a return air cooler installed, switch off the coolant circuit. / Switch off the dryer’s main power switch (the “power” signal lamp turns off). Interrupt the main power supply so that the device cannot be turned on unintentionally. ) Clean the drying hopper each time you change the materials to be dried. Make sure that the drying hopper is completely empty and has cooled down sufficiently. Remove any granules remaining on the ground. Maintenance 5-13 STT40 / STT70 STT 25 Open the toggle-type fasteners (A) at the hopper lid and fold the hopper lid upwards (if in use: remove before the single conveyor). Clean the drying hopper. Close the hopper lid and close the toggle-type fasteners (A) (if in use: re-mount the single conveyor). ) A Figure 7: STT 25 When cleaning, remove any granules remaining in the hopper lid. STT 60 - 100 Open the door of the drying hopper: Lift and turn the handle (A) to open the lock (if in use: remove before the single conveyor). Clean the drying hopper. Close the door of the drying hopper: Turn the handle (A) until the door is locked and then close the handle (if in use: re-mount the single conveyor). Figure 8: STT 60 - STT 100 ) When cleaning, remove any granules remaining in the hopper door. Maintenance 5-14 STT40 / STT70 6. Functional description This functional description is addressed to the operators of the equipment. This functional description assumes the operator has a general familiarity with drying equipment. Verify that the operators have the appropriate skills. Functional description 6-15 STT40 / STT70 6.1. General Information The dehumidified air dryers were developed for drying plastic granules. Due to their compact construction, they can be utilized for drying next to the processing machine (drying hopper on the processing machine) or with one or more drying hoppers as a movable facility (compact facility). The dryers work according to the dehumidified air principle, i.e., the air is not only heated but also dehumidified before it flows through the drying hopper. In this manner, plastic granules can be dried down to a very small residual moisture content. The drying temperature can be adjusted, if necessary, up to a maximum of 356°F (+180 °C) (upper limit) (When drying above 250°F process temperature, a return air cooler is required.). Due to the heat that is released during water absorption in the drying cells, the lower limit of the dehumidified air temperature is approx. 140°F (+60 °C). Drying takes place continuously, i.e., there are no rest periods due to regeneration of the drying agent. ) The dryer is rated for continuous operation. The dryer may only be put into operation if the drying hopper is filled. Functional description 6-16 STT40 / STT70 Figure 9: Functional diagram of STT40 / STT70 All functions are fully automatic. The dryer is equipped with two drying cells. One drying cell is part of the drying cycle; the other drying cell is regenerated simultaneously. Part of the dehumidified air is used for regenerating the moist drying cell. At the beginning of regeneration, it is heated by the regeneration heater. After the end of the heating period, the drying cell is cooled off by using dehumidified air. After the switch-over time is reached, the regenerated drying cell is included in the drying cycle, and the cycle starts again. ➅ ➃ ➄ ➃ ➆ ➀ ➂ ➀ ➁ 1 Drying cell 2 Regenerating heater 3 Drying hopper 4 Diaphragm 5 Return air filter 6 Blower 7 Valve 8 Drying heater ➈ 9 Suction box ➇ Functional description 6-17 STT40 / STT70 A digital display of the current dew point temperature can be supplied as additional equipment. An optional timer clock can also be supplied which switches the dryer on or off at preselected times. ) Read the timer clock operating manual. 2 1 7 3 4 6 5 8 1 = “hopper” release switch STT1, STT2 (STT2 only STT70) 2 = dew point display (op tional) 3 = “power” signal lamp 4 = “trouble” signal lamp 5 = main power switch 6 = “Timer” release switch 7 = timer clock (op tional) 8 = temperature controller “drying hopper” STT1, STT2 (STT2 only STT70) Figure 10: Operating unit Functional description 6-18 STT40 / STT70 6.2. Drying Hopper (Optional) The material is dried in the drying hopper. The dehumidified air is heated and then conducted through the material in the drying hopper and removes moisture. Drying hoppers must have the appropriate dimensions for their specific use so that the desired final moisture content is reached. When refilling a drying hopper, the material must be dried completely before material can be taken out for the first time. Time needed to do this is equivalent to the resonance time (of that material). If material is taken out continuously, there must also be a continual addition of material into the drying hopper (continuous drying process). New (moist) material is conveyed into the upper opening of the drying hopper and slowly reaches the material outlet at the lower end. On its way from the upper to the lower end, the material is dried down to the final moisture content. In order to guarantee a continuous drying process, we recommend that you always keep the drying hopper filled completely. Figure 11: Drying Hopper Functional description 6-19 STT40 / STT70 6.2.1. Hopper Heater Each drying hopper has its own heater. The temperature of the dehumidified air is adjusted by means of the temperature controller. The setting range is from +140°- +356°F (+60 - +180 °C). The current temperature can be read off the digital display (= actual value). If you are drying at a process temperature above 250°F you must use a return air cooler. ) The temperature controller is factory-programmed. Nevertheless, you have to set specific values which are dependent on the processed material. Process display drying temperature Setpoint display drying temperature “PGM” key. Selecting operating level or parameter selection Reducing setpoint value “EXIT” key. Aborting the input Increasing setpoint value Figure 12: Temperature controller Functional description 6-20 STT40 / STT70 DEFAULT SETTINGS FOR JUMO TEMP. CONTROLLER Model number: dTRON 16.1 B 70.3011 Contact information: Germany MoltkestraBe 13-31 36035 Fulda, Germany Ph: +49 661 60 03-7 27 Fax: +49 661 60 03-5 08 E-mail: [email protected] Internet: www.jumo.net USA 885 Fox Chase, Suite 103 Coatesville, PA 19320, USA Ph: 610-380-8002 or 1-800-554-JUMO Fax: 610-380-8009 Email: [email protected] Internet: www.JumoUSA.com PARAMETERS THAT ARE CHANGED IN TESTING AREA CELSIUS FAHRENHEIT FACTORY DEF. ACS VALUE ACS VALUE C112 2000 C 2000=C 2030= F SPL -200 40 Deg. C 104 Deg. F SPH 850 140 Deg. C 284 Deg. F SPH 850 180 Deg. C 356 Deg. F AL1 0 20 Deg. C 68 Deg. F rASd 0 5 19 DESCRIPTION NOTE: DEG. C TO DEG. F CONVERSION LOW TEMP LIMIT HIGH TEMP LIMIT (STANDARD) HIGH TEMP LIMIT (REQUIRES AFTER COOLER) HIGH TEMP ALARM BAND RAMP GRADIENT PARAMETERS THAT ARE NOT CHANGED (FACTORY DEFAULTS) SCL 0 0 START VALUE RANGE FOR STD. SIGNALS SCH 100 100 END VALUE RANGE FOR STD. SIGNALS OFFS -200 -200 PROCESS VALUE CORRECTION (OFFSET) AL2 0 0 LIMIT FOR LIMIT COMPARATOR 2 Pb1 0 7 PROPORTIONAL BAND 1(CONTROLLER OUT 1) Pb2 0 0 PROPORTIONAL BAND 2(CONTROLLER OUT 2) dt 80 s 9s DERIVATIVE TIME rt 350 s 36 s RESET TIME Cy 1 20.0 s 7.4 s SWITCHING CYCLE TIME(CONTROLLER OUT 1) Cy 2 20.0 s 20 s SWITCHING CYCLE TIME(CONTROLLER OUT 2) db 0 0 CONTACT SPACING HYS 1 1 1 SWITCHING DIFFERENTIAL1(CONTROLLER OUT 1) HYS 2 1 1 SWITCHING DIFFERENTIAL2(CONTROLLER OUT 2) y.0 0% 0% WORKING POINT y.1 100% 100% OUTPUT LIMITATION: MAX OUTPUT y.2 -100% -100% OUTPUT LIMITATION: MIN OUTPUT Df 0.6 s 1.2 s FILTER TIME CONSTANT FOR ADAPTATION raSD 0 9 RAMP GRADIENT SP1 Process Temp Process Temp SET POINT FOR PROCESS TEMPERATURE SP2 Process Temp Process Temp USED FOR SECOND HEATER C111 0000 0000 PARAMETER SETTINGS C113 0534 0534 PARAMETER SETTINGS C114 1001 1001 PARAMETER SETTINGS Note: 1) Please consult the JUMO dTRON temperature controller O&I manual for further explanation of the above parameter settings. 2) Some factory default settings may change as the unit is run continuously. Functional description 6-21 STT40 / STT70 6.3. Connection to a Pneumatic Conveying System (Optional) Your dryer works best in combination with a pneumatic conveying system. When assembled this way, your drying hopper will always be supplied with sufficient material. The dryer will only take as much material as is required by the processing machines. Therefore, the drying result will remain consistent. Sterling drying hoppers are equipped with a suitable flange for adding a Sterling pneumatic conveyor. Suction boxes with one or three suction tubes can be supplied as well (optional). These suction boxes are developed specifically for this type of hopper. The loading of material into the conveying line is adjusted by closing or opening the control cover (A). A Figure 13: Suction Box 6.4. Return Air Cooler (Optional) ) A RETURN AIR COOLER MUST BE EMPLOYED IF THE RETURN AIR TEMPERATURE IS HIGHER THAN +65 °C (149°F). A return air cooler improves the efficiency of the drying cells. The lower the return air temperature, the better the efficiency of the drying cells. The return air cooler can be connected to a coolant circuit or to the water main network. Functional description 6-22 STT40 / STT70 7. Transporting, Assembly and Storage This chapter is intended for all operating personnel of the equipment. Personnel using these instructions must be knowledgable in the regulations for the prevention of accidents, the operating conditions, safety regulations and their implementation. Ensure that the operating personnel are sufficiently informed. Please inform all persons around the operating equipment of the direct and indirect hazards connected with it. Please observe all safety regulations for the operation of lifting equipment. Transporting, Assembly and Storage 7-1 STT40 / STT70 7.1. Transporting and Packing Please ensure that the lifting equipment has an adequate carrying capacity. Note that the dryer system is top-heavy. Risk of toppling! ) The machine must not be tilted or laid on its side. The equipment has undergone a rigorous operating test in the factory and is packed carefully to avoid transport damage. Please check packing materials upon delivery for transport damage. The inlet and discharge flanges are sealed with plugs so that no dirt can enter during transport. Remove the plugs before assembly. Packing materials should be disposed of according to environmental laws or reused. The dryer or the compact unit is delivered on a pallet. The dryer should only be moved by means of the appropriate lifting equipment (e. g. a fork lift truck or a workshop crane). Fasten the transport cables to the eyelets of the control cabinets. When transporting the dryer to another location, it must be shock-proofed and free from vibrations. Transporting, Assembly and Storage 7-2 STT40 / STT70 7.2. Assembly Please ensure the lifting equipment has an adequate carrying capacity. Check the load capacity where the dryer is to be installed, particularly if it is to be installed on a platform. The place selected for installation should be as vibration-free as possible. The main power switch must be accessible. Ground the equipment against electrostatic charging. ) The machine must not be tilted or laid on its side. Because of its compact construction, the dryer can be installed directly beside the processing machine (drying hopper on the processing machine) or with one or more drying hoppers as a movable facility (compact facility). Special foundations are not necessary for installation. The dryer must be installed on a level surface and must not be exposed to excessive humidity. The maximum permissible ambient temperature is 45 °C (113°F). To facilitate servicing, the dryer should be installed in such a way that it is accessible from 3 sides. Make sure that the air filters can be changed without problems. To conserve energy, keep the distance between dryer, hopper and processing machine as small as possible. The wheels of the compact unit should be locked to ensure stable operation. The foil skin should be removed from the drying hopper before operation. 7.3. Storage The control system may only be stored at temperatures from 0 to +55°C (32 to +131 °F). Between delivery and machine commissioning, the equipment should be stored in a dry, dust and vibration-free room. Transporting, Assembly and Storage 7-3 STT40 / STT70 8. Assembly instructions These installation instructions are intended for persons with skills in electrical and mechanical areas due to their training, experience and supporting documentation. Personnel using these installation instructions must be knowledgeable in the regulations for the prevention of accidents, operating conditions, safety regulations and their implementation. Ensure in each case that the personnel are informed. The installation and operation instructions apply to all connected equipment. Observe safety regulations with regard to handling lifting gear. All installation work must be carried out with the equipment disconnected from electrical power and compressed air supply. / For installation work taking place at heights of over approx. 6 feet (1829mm), use only ladders or similar equipment and working platforms intended for this purpose. At greater heights, the proper equipment for protection against falling must be worn. Use only suitable lifting gear which is in proper working order and suspension devices within the sufficient load carrying capacity. Do not stand or work under suspended loads! Use suitable workshop equipment. ) Install the equipment such that all parts are easily accessible; this facilitates maintenance and repair work. Assembly instructions 8-1 STT40 / STT70 8.1. Installation of the exhaust fan for regeneration of exhaust air When plastics are being dried that release harmful gases during the drying process, care must be taken that the regeneration exhaust air is disposed of in an environmentally sound way. At the same time the throughput of the regeneration blower must not be altered. It should be noted when assembling a disposal system (e.g. an exhaust system) that the regeneration exhaust air is very humid. Thus condensation may form, which must not under any circumstances return to the dryer. 8.2. Grounding the equipment against electrostatic charging Considerable electrostatic charging may occur in the equipment during processing of the various materials. For this reason, all components must be sufficiently grounded, see grounding bolt dryer (A) and drying hopper (B). Ensure that all state and local electrical regulations are observed. Figure 14: Grounding the equipment Assembly instructions 8-2 STT40 / STT70 8.3. Electrical Connection The electrical connection of the dryer and the hopper heaters may only be done by Sterling service staff or by qualified staff authorized by Sterling. Other persons are not permitted to perform any electrical connection. Observe the rules of the state and local electricity board. The main power switch must be freely accessible. Ground the equipment against electrostatic charging. The serial tag lists voltage, phase, and amp draw information: Line voltage must be within plus or minus ten percent (±10%) of the voltage listed on the serial tag, or damage may occur. Phase imbalance must be less than two percent (2%). Connect main power to the dryer at the disconnect or terminals in the lower position of the control enclosure. Install a fused disconnect with a lockout feature in the power main leading to the dryer. ) On a regular basis, make sure that none of the electrical or screw connections become loose. Ensure that the main power switch is at the “0" position before carrying out any electrical connection. The operating voltage is STT40: 230/1/60 STT70: 480/3/60. Special voltages can be supplied on request. The connected loads* are STT40 max. 1.1 kW, STT70 max. 2.0 kW. *If hopper heaters are installed, the value of each hopper heater must be added to these connected loads (STT40: max. 1.5 kW, STT70: max. 3.0 kW). The fuse protection must have STT40 16 A, STT70 16 A. Assembly instructions 8-3 STT40 / STT70 8.4. Connection of Return Air Cooler (Optional) ) A return air cooler must be used if the return air temperature is higher than 149°F (+65 °C). You can connect the return air cooler to a coolant circuit or to the water main network. The water flow rate in the water main network* is for: STT40 approx. 7.16 ft3 (0.2 m3/h), STT70 approx. 14.13 ft3 (0.4 m3/h) (*water temperature:42.8°F) (+6 °C) Rate your coolant circuit accordingly. Connect the coolant in- and outlets to the return air cooler. Observe the flowing direction of the coolant. Check the tightness of the connections. Connections are made with ½” NPT. Figure 15: Connection of Return Air Cooler STT40 (A) / STT70 (B) Assembly instructions 8-4 STT40 / STT70 9. Troubleshooting 9.1. Introduction The utmost in safety precautions should be observed at all times when working on or around the machine and the electrical components. All normal trouble-shooting must be accomplished with the power off, line fuses removed, and with the machine tagged as out of service. The use of good quality test equipment cannot be over-emphasized when troubleshooting is indicated. Use a good ammeter that can measure at least twice the AC and DC current that can be encountered for the machine. Be sure that the voltmeter has at least minimum impedance of 5,000 OHMS-per-volt on AC and 20,000 OHMS-per-volt on DC scales. Popular combination meters, VOM and VTVM can be selected to provide the necessary functions. Before making haphazard substitutions and repairs when defective electrical components are malfunctioning, we recommend that you check the associated circuitry and assemblies for other defective devices. It is common to replace the obviously damaged component without actually locating the real cause of the trouble. Such hasty substitutions will only destroy the new component. Refer to wiring diagrams and schematics. Locating mechanical problems, should they occur, is relatively straightforward. When necessary, refer to the parts catalog section. Problem Little or no air coming from the process delivery tube. Possible cause Corrective action Dirty filter. Desiccant beds are contaminated by material or plasticizer leaking into the system. Clean or replace filter. Blower overload has tripped. Blower fins filled with dust or contaminants. Suction in delivery tube, pressure from the return tube. Phase is reversed on power drop coming into the dryer. (Note: on STT 70 only) Replace desiccant. See Page 42 for more information. Fix the problem and reset the overload. Remove blower side plate, clean baffles, replace. Stop the dryer. If the dryer was connected to the drying hopper, check to see if the desiccant and process air heater has been contaminated with resin. If so, replace the desiccant and remove any resin carry-over. Otherwise, change the phase of two legs of the three-phase power drop. Troubleshooting 9-1 STT40 / STT70 Problem Loss or reduction of process air temperature. Possible cause Corrective action Process heaters are faulty. Check for open heaters. Replace if required. Solid-state temperature controller faulty. Replace. Process temperature was adjusted in error by plant personnel. Process heaters are faulty. Desiccant beds are contaminated. Material being dried differs from material specified at the time of purchase. Loss or reduction in drying capacity. Break in flex hose to/from drying hopper. Airflow valve sticking or failing to shift. Blower fins filled with dust or contaminants. PLC Regeneration Bed LED indicators both off. Insufficient power to PLC (Power LED is off). Faulty PLC (PLC Power light is on, Run light is off, and/or Error light is on). Regenerating bed cooldown. Blower Input indicator is off. Process air in high-temperature PLC Regeneration Heater condition. Left/Right output indicators both Insufficient power to PLC off. (Power light is off). Faulty PLC (PLC Power light is on, Run light is off, and/or Error light is on). Make sure that plant personnel are aware of the proper temperature set point. Post an appropriate sign next to the controller. Replace. Replace desiccant. Drying systems are designed for the material which was originally specified. Different materials may need a longer residence time or a different drying temperature. Inspect for air leaks; replace as needed. Check for proper operation of valve actuators. Repair or replace if necessary. Remove blower side plate, clean baffles, replace. Replace filter elements. Check power supply and power wiring to PLC. Replace PLC. None. Verify that blower contactor is on. Check input wiring to PLC. None. Check power supply and power wiring to PLC. Replace PLC. Troubleshooting 9-2 STT40 / STT70 Problem Material in drying hopper cakes, or meltdown occurs. Possible cause Corrective action Process temperature set too high due to operator error. Check resin manufacturer’s data sheet for proper drying temperature. Make sure plant personnel are aware of the correct process temperature set point. High temperature alarm not set properly. Process set point is out of acceptable range. Function set for degrees Celsius (ºC), set point at degrees Fahrenheit (ºF). Process thermocouple not in airflow. Poor dew point performance. Nothing displays when the controller is turned on. Burned out regeneration heater. Contaminated or worn out desiccant. Leaking process air hoses. Dryer operates beyond its capacity. Bad dew point sensor. Fouled dew point sensor manifold. Dirty filter. The internal mechanism is not inserted properly into the housing. The power supply is not connected to its terminals properly. No power is supplied, or the supplied power is not within the specified range. Disconnect switch or Control Power switch not set to ON. Control Power fuse blown. Hopper release switch is not in the “I” position. Reset high temperature alarm. Restore temperature controller to factory pre-sets. Verify correct Celsius or Fahrenheit settings. Verify that the thermocouple is properly installed in the inlet tube. Repair or replace. Replace. Repair or replace. Check dryer and drying hopper sizing. Replace. Clear obstruction. Air should flow freely through sensor. Clean or replace filter element. Properly insert the internal mechanism into the housing. Properly connect the power supply to the power supply terminals. Supply a voltage of 85 to 125 VAC to the power supply terminals of the controller. Check control power fuse for continuity. Turn disconnect switch and control power switch ON. Turn the hopper release switch to the “I” position. Troubleshooting 9-3 STT40 / STT70 Problem Possible cause Corrective action No setting change possible on temperature controller. The key protection switch is set to ON. Input polarity on thermo-couple is wrong or connection is wrong. Set the key protection switch to OFF. Process value is abnormal or not obtained. Properly wire the terminals. Input-type setting is incorrect. Properly set the input with the input-type selector rotary switch. No compensating lead wires used for extension of the thermocouple. Use proper compensating lead wires and terminals. Thermocouple and controller are connected by wires other than proper lead wires. Process thermocouple not in airflow. Sensor is broken or shortcircuited. The controller is influenced by noise or other induction. Celsius temperatures used instead of Fahrenheit or vice versa. Use a dedicated thermocouple connector. If a connector is a metal different from the thermocouple and controller, a temperature error may result. Verify that the thermocouple is properly installed in the inlet tube. Replace with a good sensor. Separate input wires as far as possible from the origin of the noise. Check to see that proper temperature setting is in the temperature controller. 9.2. Determining Temperature Controller Errors or Sensor Errors Using a Thermocouple If the controller displays a temperature that is close to room temperature (70ºF/21ºC) when you short-circuit controller input terminals, the controller is normal and the sensor is probably broken, short-circuited, or incorrectly wired. Using a Platinum Resistance Thermometer If the controller displays a temperature of about 0.0°C (32ºF) when you insert a 100ohm resistor between terminals A and –B of the controller, and you short-circuit controller terminals +B and –B, the controller is normal and the sensor is probably broken, short-circuited, or incorrectly wired. Other service problems or questions can be answered by contacting the Service Department. Troubleshooting 9-4 STT40 / STT70 10. Technical data 10.1. STT40 amount of dehumidified air: max. 1,412.69 ft3/h, (40 m3/h) operating voltage: 230 V/AC/50 Hz special voltages can be supplied upon request connected load: 2.6 kW calorific output (drying)*: max. 1.5 kW *depending on the equipment with hopper heaters calorific output (regenerating): 0.7 kW driving power (drying, regenerating): 0.37 kW drying temperature: max. 356°F (+180 °C) width: 11.8 in. (300 mm) depth: 27.5 in. (700 mm) height: 35.5 in. (900 mm) weight: approx. 149.9 lbs (68 kg) noise: approx. 61 dB (A) options:timer clock dew point display return air cooler Return Air Cooler (optional) water flow rate in the water main network*: approx. 7.16 ft3/h (0.2 m3/h) (*water temperature: 42.8°F) (+6 °C) Ø pipe connection: 0.5 in. (12 mm) 10.2. STT70 amount of dehumidified air: max. 2,472.03 ft.3/h (70 m3/h) operating voltage: 400 V/3 AC/50 Hz special voltages can be supplied upon request connected load: 5.0 kW calorific output (drying)*: max. 3.0 kW *depending on the equipment with hopper heaters calorific output (regenerating): 1.2 kW driving power (drying, regenerating): 0.75 kW drying temperature: max. 356°F (+180 °C) width: 15.7 in. (400 mm) depth: 35.5 in. (900 mm) height: 35.5 in. (900 mm) weight: approx. 227.17 lbs. (103 kg) noise: approx. 66 dB (A) options:timer clock dew point display return air cooler Return Air Cooler (optional) water flow rate in the water mains network*: (*water temperature: 42.8°F (+6 °C) Ø pipe connection: 0.5 in. (12 mm) approx. 14.13ft.3/h (0.4 m3/h) Technical data 10-5 STT40 / STT70 10.3. Dimension Sheet A B C D STT 40 27.5” (700 mm) 3.2” (80 mm) 35.5” (900 mm) 11.8” (300 mm) STT 70 35.5” (900 mm) 3.2” (80 mm) 35.5” (900 mm) 15.7” (400 mm) Dimensions in inches (mm). Specifications may be subject to change without notice. Technical data 10-6 STT40 / STT70 11. Spare parts list This spare parts list must be used only by trained personnel. Other persons are not permitted to modify or repair the equipment. Spare parts list 11-1 STT40 / STT70 STT40 Pos. 1 2 ID-number 31940 31938 36212 84130 83957 83956 3 4 5 6 7 8 9 84129 85819 85820 94233 93298 85690 85691 96196 96353 92361 Description valve stem shaft housing disc with bush disc flywheel DU filter cartridge, when operating without return air cooler filter cartridge, when operating with return air cooler blower STT40 guide roll with fixing device guide roll seal hose clamp seal tension ring desiccant (6 kg) (13.23 lbs.) seal tension ring Return air cooler (optional) 33848 return air cooler 83972 hose Spare parts list 11-2 STT40 / STT70 STT70 Pos. 1 2 ID-number 31940 31938 36212 84130 83957 83956 3 4 5 6 7 8 9 85677 85819 85820 94233 97677 23917 97677 23533 96196 96353 92361 Description valve stem shaft housing disc with bush disc flywheel DU filter cartridge, when operating without return air cooler filter cartridge, when operating with return air cooler blower STT70 guide roll with fixing device guide roll sealing ring tension ring sealing ring tension ring sieve desiccant (13 kg)(28.76 lbs.) seal tension ring Return air cooler (optional) 29786 return air cooler 83972 hose Spare parts list 11-3 STT40 / STT70 Operating unit Pos. 1 2 3 4 5 6 7 ID-number 82368 82394 82393 82495 82494 82392 82495 26207 82395 82490 87454 85241 83646 Description main switch LED element, green cap fixing adapter LED element, white cap fixing adapter dew point display (optional) selector switch actuator contact element temperature controller TT1, TT2 timer clock (optional) seal Spare parts list 11-4 STT40 / STT70 Control unit STT40 85280 motor 84131 radiator 0.7 kW 83339 pull-button 87440 contact element 83411 controller 82516 temperature limiter 88440 contactor 85941 terminal 85940 fuse 99102 fuse 88806 relay holder 88816 relay 84510 thermal breaker Hopper heater 85688 radiator 1,5 kW 85652 safety temperature limiter Control unit STT70 85279 motor 85676 radiator 1.2 kW 95816 pull-button 87440 contact element 83329 controller 85275 temperature limiter 88914 contactor 85254 power supply 88907 terminal 99815 fuse 88806 relay holder 88849 relay 83624 terminal 84512 thermal breaker 84159 control switch Hopper heater 85343 radiator 1,5 kW 84512 thermal breaker 85652 safety temperature limiter (= STB) 85338 radiator 3 kW 84510 thermal breaker 85652 STB Spare parts list 11-5 STT40 / STT70 12. Electrical manual This electrical manual is intended to be used by Sterling service personnel and trained personnel authorized by Sterling only. Other persons are not permitted to modify or repair the equipment. Connection diagram no.: _ _ _ _ _ _ _ _ _ _ _ _ _ _ _ _ _ _ _ _ _ _ _ Currently not available; will be delivered at a later date ! Electrical manual 12-1 STT40 / STT70 13. Accessories Basic setting on temperature controller Digital timer Spare parts list Drying Hoppers ST 25 - ST 6400 ___________________________ ___________________________ Accessories 13-1 STT40 / STT70 Basic temperature controller settings STT40 This information is intended to be used by Sterling service personnel and trained personnel authorized by Sterling only. Other persons are not permitted to modify or repair the equipment. Settings, if temperature is displayed in F° Code C111 0 0 0 0 C112 2 0 3 0 C113 0 5 3 4 C114 1 0 0 1 SPL 0 1 0 4 SPH* 0 2 8 4 * with return air cooler in use: 0 3 5 6 Parameter AL1 HYS1 rASd Parameter set 1 68.0 1 19.0 Settings, if temperature is displayed in C° Code C111 0 0 0 0 C112 2 0 0 0 C113 0 5 3 4 C114 1 0 0 1 SPL 0 0 4 0 SPH* 0 1 4 0 * with return air cooler in use: 0 1 8 0 Parameter AL1 HYS1 rASd Parameter set 1 20.0 1 5.0 Accessories 13-2 STT40 / STT70 Basic temperature controller settings STT70 This information is intended to be used by Sterling service personnel and trained personnel authorized by Sterling only. Other persons are not permitted to modify or repair the equipment. Settings, if temperature is displayed in F° Code C111 0 0 0 0 C112 2 0 3 0 C113 0 5 3 4 C114 1 0 0 1 SPL 0 1 0 4 SPH 0 2 8 4 * with return air cooler in use: 0 3 5 6 Parameter AL1 HYS1 rASd Parameter set 1 68.0 1 19.0 Settings, if temperature is displayed in C° Code C111 0 0 0 0 C112 2 0 0 0 C113 0 5 3 4 C114 1 0 0 1 SPL 0 0 4 0 SPH 0 1 4 0 * with return air cooler in use: 0 1 8 0 Parameter AL1 HYS1 rASd Parameter set 1 20.0 1 5.0 Accessories 13-3 14. Quick Start Guides 14.1. for STT 40 Dryer 1. Check all wiring connections to ensure that they are in the correct place and have a good tight connection. 2. Hook up main single-phase power and ground. The following picture shows the correct location. Main power High Temp Safety Heater Connection Main Power Connection Thermocouple 3. Turn the disconnect switch to the “ON” position as shown. The green run light should light up. 4. Turn the dryer operation switch to the desired position. If you have a seven day timer installed, set it to “On with timer” position, otherwise set it to “On without timer” position. The blower will start. An explanation is given in the following diagram. OFF On with timer On without timer 5. Turn the hopper heater switch to position “I” Position “O” Position “I” 6. Once in position “I”, temperature controller will display as shown below. Blower must be running for temperature controller to be on. Temperature setting will vary as the processed desired temperature is changed. Also, a description of the buttons are listed below. Note: For initial start-up or if the dryer has not run for an extended period of time, turn the hopper heater switch to position “O”. Wait 2 hours for both beds to regenerate (without material in the hopper). If there are two hoppers, switch both to position “0”. If this is not an initial start-up, use position “I” and continue. Process Display Set Point LED “Status” LED Ramp/Program PGM EXIT Arrow down Arrow up Use the following steps to adjust the process temperature set point. a.) Press “PGM” key one time. b.) Use arrow up or down to set the preferred process temperature. c.) The set point will flash after 2 seconds, and then it will be accepted and stored. d.) Press “EXIT” key one time to return to the original screen. e.) Observe actual and set point temperatures, both will ramp up or down momentarily to the desired set point temperature. Note: Due to the following circumstances: - initial dryer start-up - dryer not running for long period of time - dryer has been unplugged and moved to a different location It is recommended that the dryer be Self-Optimized. The following steps should be taken to self optimize the dryer: a.) Press and hold the “EXIT” button for at least 2 seconds. b.) “tunE” will flash while self-optimization is in progress (can take several minutes) c.) When “tunE” stops flashing; self-optimization is completed. d.) When self-optimization is complete press “EXIT” key once. e.) At this point the dryer is ready to run continuously. Note: If for any reason the “FAULT” orange light goes on, please go to Chapter-4 in this operation manual for troubleshooting instructions. (CAUTION: DO NOT TURN MAIN POWER DISCONNECT TO THE OFF POSITION WITHOUT FIRST TURNING THE BLOWER SWITCH TO THE OFF “0” POSITION. WAIT UNTIL THE BLOWER HAS TIMED OUT PRIOR TO DISCONNECTING MAIN POWER.) 14.2. Proper Shut-down Guide for STT 40 Dryer 1. Turn the hopper heater switch to position “0” Position “O” Position “I” OFF 2. With the main disconnect power in the “ON” position, turn the dryer operation switch to the “OFF” position, this will automatically enable the system to go into cool down mode. That means the blower will run for 10 minutes. Note: This time is utilized to cool down the regeneration heater/cell. 3. After 10 minutes of run time, the blower will turn off but the green light remains lit. That means the system is off but the power is still on. 4. Turn the disconnect switch to the “OFF” position as shown. The green run light should turn off. (CAUTION: DISCONNECT POWER BEFORE SERVICING DRYER UNIT). 14.3. Quick Start Guide for STT 70 Dryer 1. Check all wiring connections to ensure that they are in the correct place and have a good tight connection. 2. Hook up main three-phase power and ground. The following picture shows the correct location. Main power High Temp Safety Heater Connection Main Power Connection Thermocouple 3. Turn the disconnect switch to the “ON” position as shown. The green run light should light up. 4. Turn the dryer operation switch to the desired position. If you have a seven day timer installed, set it to “On with timer” position, otherwise set it to “On without timer” position. The blower will start. An explanation is given in the following diagram. OFF On without timer On with timer 5. Turn the hopper heater switch to position “I” Position “O” Position “I” 6. Once in position “I”, the temperature controller will display as shown below. Blower must be running for temperature controller to be on. Temperature setting will vary as the processed desired temperature is changed. Also, a description of the buttons is listed below. Note: For initial start-up or if the dryer has not run for an extended period of time, turn the hopper heater switch to position “O”. Wait 2 hours for both beds to regenerate (without material in the hopper). If there are two hoppers, switch both to position “0”. If this is not initial start-up, use position “I” and continue. Process Display Set Point LED “Status” LED Ramp/Program PGM EXIT Arrow down Arrow up Use the following steps to adjust the process temperature set point. a.) Press “PGM” key one time. b.) Use arrow up or down to set the preferred process temperature. c.) The set point will flash after 2 seconds, and then it will be accepted and stored. d.) Press “EXIT” key one time to return to original screen. e.) Observe actual and set point temperatures, both will ramp up or down momentarily to the desired set point temperature. Note: Due to the following circumstances: - initial dryer start-up - dryer not running for long period of time - dryer has been unplugged and moved to a different location It is recommended that the dryer be Self-Optimized. The following steps should be taken to self optimize the dryer: a.) Press and hold the “EXIT” button for at least 2 seconds. b.) “tunE” will flash while self-optimization is in progress (can take several minutes) c.) When “tunE” stops flashing; self-optimization is completed. d.) When self-optimization is complete press “EXIT” key once. e.) At this point the dryer is ready to run continuously. Note: If for any reason the “FAULT” orange light goes on, please go to Chapter-4 in this operation manual for troubleshooting instructions. (CAUTION: DO NOT TURN MAIN POWER DISCONNECT TO THE OFF POSITION WITHOUT FIRST TURNING THE BLOWER SWITCH TO THE OFF “0” POSITION. WAIT UNTIL THE BLOWER HAS TIMED OUT PRIOR TO DISCONNECTING MAIN POWER.) 14.4. Proper Shut-down Guide for STT 40 Dryer 1. Turn the hopper heater switch to position “0” Position “O” Position “I” OFF 2. With the main disconnect power in the “ON” position, turn the dryer operation switch to the “OFF” position, this will automatically enable the system to go into cool down mode. That means the blower will run for 10 minutes. Note: This time is utilized to cool down the regeneration heater/cell. 3. After 10 minutes of run time, the blower will turn off but the green light remains lit. That means the system is off but the power is still on. 4. Turn the disconnect switch to the “OFF” position as shown. The green run light should turn off. (CAUTION: DISCONNECT POWER BEFORE SERVICING DRYER UNIT). Parts Department Call toll-free 7am–5pm CST [800] 423-3183 or call [414] 354-0970, Fax [414] 354-6421 The ACS Customer Service Group will provide your company with genuine OEM quality parts manufactured to Sterling engineering design specifications, which will maximize your equipment’s performance and efficiency. To assist in expediting your phone or fax order, please have the model and serial number of your unit when you contact us. A customer replacement parts list is included in this manual for your convenience. ACS welcomes inquiries on all your Sterling parts needs and is dedicated to providing excellent customer service. Service Department Call toll-free 8am–5pm CST [800] 657-4679 or call [414] 354-0970 Emergencies after 5pm CST, call [847] 439-5655 Sterling has a qualified service department ready to help. Service contracts are available for most Sterling products. Sales Department Call [414] 354-0970 Monday–Friday, 8am–5pm CST Sterling products are sold by a world-wide network of independent sales representatives. Contact our Sales Department for the name of the sales representative nearest you. Contract Department Call [414] 354-0970 Monday–Friday, 8am–5pm CST Let Sterling install your system. The Contract Department offers any or all of these services: project planning; system packages including drawings; equipment, labor, and construction materials; and union or non-union installations. Sterling 5200 W. Clinton Ave Milwaukee, WI 53223 [414] 354-0970 • Fax [414] 354-6421