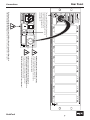
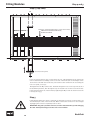
1
Manual 3BDL 1BDL 8 10 &3 "% / : . &*/ &3." ( RackPack Model 2710 19"/3 U mounting frame for SPL RackPack modules Manual RackPack, Model 2710 Version 1.0 – 8 /2007 Designer: Wolfgang Neumann This user’s guide contains a description of the product. It in no way represents a guarantee of particular characteristics or results of use. The information in this document has been carefully compiled and verified and, unless otherwise stated or agreed upon, correctly describes the product at the time of packaging with this document. Sound Performance Lab (SPL) continuously strives to improve its products and reserves the right to modify the product described in this manual at any time without prior notice. This document is the property of SPL and may not be copied or reproduced in any manner, in part or fully, without prior authorization by SPL. SPL electronics GmbH Sohlweg 55 41372 Niederkruechten Germany Tel. +49 (0)2163 983 40 Fax +49 (0)2163 983 420 Email: [email protected] www.soundperformancelab.com CE Declaration of Conformity Manufacturer: SPL electronics GmbH Type of Equipment: Audio Signal Processor Product: RackPack, Model 2710 Compliance Engineer: Wolfgang Neumann Test Basis: EN50081-1:1992, EN50082-1:1992, EN60065:1993, EN61000-3-3:1995, EN60065:2002, EN55013:2001, EN55020:2002, EN61000-3-2:2000, 73/23 EWG; 93/68 EWG. We herewith declare, that the construction of the RackPack, Model 2710, is in compliance with the standards and regulations mentioned above. Notes on environmental protection At the end of its operating life, this product must not be disposed of with regular household waste but must be returned to a collection point for the recycling of electrical and electronic equipment. The “wheelie bin“ symbol on the product, user’s manual and packaging indicates that. The materials can be re-used in accordance with their markings. Through re-use, recycling of raw materials, or other forms of recycling of old products, you are making an important contribution to the protection of our environment. Your local administrative office can advise you of the responsible waste disposal point. WEEE Registration: 973 349 88 © 2007 SPL electronics GmbH. All rights reserved. Names of other companies and their products are trademarks of their respective owners. 2 RackPack Contents Important Safety Information ................................................................ 4 Introduction . . . . . . . . . . . . . . . . . . . . . . . . . . . . . . . . . . . . . . . . . . . . . . . . . . . . . . . . . . . . . . . . . . . . . . . . . . . . . . . . . . . . 6 Hook Up . . . . . . . . . . . . . . . . . . . . . . . . . . . . . . . . . . . . . . . . . . . . . . . . . . . . . . . . . . . . . . . . . . . . . . . . . . . . . . . . . . . . . . . . 7 Scope Of Delivery, Placement, Rack Mounting, Placement Of The External Power Supply . . . . . . . . . . . . . . . . . . . . . . . . . . . . . . . . . . . . . . . . . . . . . . . 7 Air Circulation, Power Connection, Signal Connections, On And Off . . . . . . . . . . . . . . . . . . . 8 Rear Panel/Connections ...................................................................... 9 Fitting Modules . . . . . . . . . . . . . . . . . . . . . . . . . . . . . . . . . . . . . . . . . . . . . . . . . . . . . . . . . . . . . . . . . . . . . . . . . . . . . . . . 1 0 Please Note, Step 1 . . . . . . . . . . . . . . . . . . . . . . . . . . . . . . . . . . . . . . . . . . . . . . . . . . . . . . . . . . . . . . . . . . . . . . . . . 1 0 Step 2 and 3 . . . . . . . . . . . . . . . . . . . . . . . . . . . . . . . . . . . . . . . . . . . . . . . . . . . . . . . . . . . . . . . . . . . . . . . . . . . . . . 11 Step 4 and 5 . . . . . . . . . . . . . . . . . . . . . . . . . . . . . . . . . . . . . . . . . . . . . . . . . . . . . . . . . . . . . . . . . . . . . . . . . . . . . . 12 Link Cable Installation . . . . . . . . . . . . . . . . . . . . . . . . . . . . . . . . . . . . . . . . . . . . . . . . . . . . . . . . . . . . . . . . . . . . . 13 External Power Supply . . . . . . . . . . . . . . . . . . . . . . . . . . . . . . . . . . . . . . . . . . . . . . . . . . . . . . . . . . . . . . . . . . . . . . . 1 4 Description, Placement Of The External Power Supply, On And Off . . . . . . . . . . . . . . . . . . . 1 4 Dimensions and Weight . . . . . . . . . . . . . . . . . . . . . . . . . . . . . . . . . . . . . . . . . . . . . . . . . . . . . . . . . . . . . . . . . . . . . . . 15 Guarantee and Product Registration . . . . . . . . . . . . . . . . . . . . . . . . . . . . . . . . . . . . . . . . . . . . . . . . . . . . . . . . . 15 RackPack 3 Important Safety Information Please note and retain this information. Carefully read and follow all of the safety and operating instructions before you use the machine. Be doubly careful to follow all warnings and special safety instructions noted in this manual and on the unit. This manual provides all information needed to fit or exchange RackPack modules. Module manuals do not contain information on fitting and exchanging modules. You need this manual everytime a module is to be fitted or exchanged. If the manual is not at hand, you can download it like any other SPL product manual at www.soundperformancelab.com. Connections: Only use the connections as described. Other connections can lead to health risks and equipment damage. Water And Humidity: Do NOT use this machine anywhere near water (for example near a wash basin or bath, in a damp cellar, near swimming pools, or the like). In such cases there is an extremely high risk of fatal electrical shocks! Insertion Of Foreign Objects Or Fluids: NEVER allow a foreign object through any of the machine’s chassis openings. You can easily come into contact with dangerous voltage or cause a damaging short circuit. NEVER allow any fluids to be spilled or sprayed on the machine. Such actions can lead to dangerous electrical shocks or fire! OPENING THE DEVICE: Open the device only to fit or exchange modules. The fitting and/or exchange of modules should only be carried out by qualified persons. In the light of possible physical damage or injuries any manipulation is at your own risk. In order to avoid exposure to any residual voltage, the device should be disconnected from any power source at least 5 minutes before opening it. If you handle the device improperly or ignore the manual (part of the delivery of the RackPack frame) you risk to damage the device or expose yourself to an electric shock. In these cases SPL electronics GmbH denies any responsibility. Electrical Power: Run this machine ONLY from sources which can provide proper power at the prescribed rating. When in doubt about a source, contact your dealer or a professional electrician. To be sure you have isolated the machine, do so by disconnecting the power cord from your wall connection. Be sure that the power cord plug is always accessible. When not using the machine for a longer period, make sure to unplug it from your wall power socket. Power Cord Protection: Make sure that your power cord is arranged to avoid being stepped on or any kind of crimping and damage related to such event. Do not allow any equipment or furniture to crimp this power cord. Power Connection Overloads: Avoid any kind of overload in connections to wall sockets, extension or splitter power cords. Always keep manufacturer warnings and instructions in mind. Overloads create fire hazards and risk of dangerous shocks! Lightning: Before thunderstorms or other severe weather, disconnect the machine from wall power (but to avoid life threatening lightning strikes, not during a storm). Similarly, before any severe weather, disconnect ALL the power connections of other machines and antenna and phone/internet cables which may be interconnected so that no lightning damage or overload results from such secondary connections. Air Circulation: Chassis openings offer ventilation and serve to protect the machine from overheating. NEVER cover or otherwise close off these openings. NEVER place the machine on a soft surface (carpet, sofa, etc.). Make sure to provide for a mounting space of 4-5 cm/2 inches when mounting the machine in racks or cabinets. Controls and Switches: Operate the controls and switches only as described in the manual. Incorrect adjustments outside safe parameters can lead to damage and unnecessary repair costs. Never use the switches or level controls to effect excessive or extreme changes. 4 RackPack Important Safety Information Repairs: Unplug the machine and immediately contact a qualified technician when you think repairs are needed – or when moisture or foreign objects may accidentally have gotten in to the housing, or in cases when the machine may have fallen and shows any sign of having been damaged. This also applies to any situation in which the machine has not been subjected to any of these unusual circumstances but still is not functioning normally or its performance is substantially altered. In cases of damage to the power cord or its plug, first consider turning off the main circuit breaker before unplugging the power cord. Spare Parts: Be sure that any service technician uses original spare parts or those with identical specifications as the originals. Incorrectly substituted parts can lead to fire, electrical shock, or other dangers, including further equipment damage. Safety Inspection: Be sure always to ask a service technician to conduct a thorough safety check and ensure that the state of the repaired machine is in all respects up to factory standards. Cleaning: In cleaning, do NOT use any solvents, as these can damage the chassis finish. Use a clean, dry cloth (if necessary, with an acid-free cleaning oil). Disconnect the machine from your power source before cleaning. Warnings DO NOT PLACE THE MACHINE IN SUCH A WAY THAT IT MIGHT COME INTO CONTACT WITH OR SIT ON ANY FLUIDS. AVOIDING SUCH CONTACT WILL AVOID HAZARDS FROM FIRE, DANGEROUS ELECTRICAL SHOCK OR MACHINE DAMAGE. DO NOT OPEN THE MACHINE. THE LIGHTNING SYMBOL WITHIN A TRIANGLE WARNS YOU ABOUT UNINSULATED HIGH VOLTAGE INSIDE THE TRANSDUCER AND THE POTENTIAL FOR DANGEROUS ELECTRICAL SHOCKS – WHICH CAN ALSO OCCUR EVEN AFTER THE MACHINE HAS BEEN DISCONNECTED FROM A POWER SOURCE. Symbols And Notes ALSO IN THIS MANUAL A LIGHTNING SYMBOL WITHIN A TRIANGLE WARNS YOU ABOUT THE POTENTIAL FOR DANGEROUS ELECTRICAL SHOCKS – WHICH CAN ALSO OCCUR EVEN AFTER THE MACHINE HAS BEEN DISCONNECTED FROM A POWER SOURCE. AN EXCLAMATION MARK (!) WITHIN A TRIANGLE IS INTENDED TO MAKE YOU AWARE OF IMPORTANT OPERATIONAL ADVICE AND/OR WARNINGS THAT MUST BE FOLLOWED. BE ESPECIALLY ATTENTIVE TO THESE AND ALWAYS FOLLOW THE ADVICE THEY GIVE. The symbol of a lamp directs your attention to explanations of important functions or applications. Attention Do not attempt any alterations to this machine without the approval or supervision of SPL electronics GmbH. Doing so could nullify completely any and all of your warranty/guarantee rights and claims to user support. RackPack 5 Introduction RackPack The RackPack system allows you to set up a very compact, customized analog rack on only 3 U rack space – equipped with both approved and new SPL specialties providing you one-ofa-kind processing, highly effective handling and superior audio quality. RackPack Modules The Transient Designer opens a new dimension in dynamic processing with its unique level-independent signal processing. Imitated especially by several software applications, the original Transient Designer remains the state-of-the-art transient modeler. The DynaMaxx compressor is incomparably musical and easy to handle. Thanks to its signaldependent automation it is the perfect “set’n’forget” compressor for demanding studio and live applications. Just as efficient and advanced in quality is SPL’s DeEsser. It has been the first device of its kind to use phase cancellation as a means to reduce sibilants. Much more unobtrusive than the common frequency-based compression, the SPL DeEsser has proven it’s technological prominence all over the world. Further highlights are the two preamp modules Preference Mic Pre and Premium Mic Pre. As an alternative to our tube preamps they are based upon the proven design of our Atmos® multi-channel recording system. The Premium Mic Pre provides the same triple stage design with transformer in- and outputs like the Atmos® system, thus ensures the same referenceclass results. The Preference Mic Pre offers a superior price/performance ratio to meet the highest demands in all areas of miking, and while a continuous preamp quality is of immeasurable value especially with multichannel recordings, it is impressively economical as well now with the Preference Mic Pre module. Further modules complete the RackPack system that includes the whole range of analogue peripheral equipment and allows for perfect integration into any live and studio environment: From the passive equalizers Bass Ranger and Vox Ranger, which are specialized to certain instrument groups, through tube effects to monitoring solutions, the RackPack system builds a frame to cover the whole set of SPL’s expertise in analog signal processing technology. Freedom As A Matter Of Principle Whether you need an eight channel preamp, an effects rack or individual channel strips: The RackPack-System offers the maximum freedom to compose customized setups for varying challenges in any live or studio environment. Internally we have purposely dispensed with a bus system for connections to and between modules. Instead each module provides balanced XLR in- and outputs, so free routing between modules is ensured. Furthermore each module can also be integrated into any studio- or live- environment just like a stand-alone device. And since two outputs are available simultaneously on each module, you can route from any module additionally while it is connected already to another module (or elsewhere). If you have for example built a RackPack as a channel strip, you can still pick up a signal from any stage. Another advantage from the designer’s view is that each module can be equipped with I/O sockets that perfectly meet the individual module’s requirements, i.e. special sockets for monitor modules in stereo or multichannel applications. 6 RackPack Hook Up Scope Of Delivery • The RackPack frame including all blind panels and the front panel (if modules are not fitted already). Please note that all modules are shipped without the aluminum front panel. You need it when you fit a module into the frame. Therefore make sure that you handle the aluminum front panels with the same care and prudence as any other unit surface. All screws holding front and rear blind and front panels are needed for the fitting of modules. Two additional screws are shipped with every module. • The external power supply including the cable for connection to RackPack • The AC power cord to feed the IEC-spec, 3-prong connector • This manual • 4-mm-Allen key required for the fitting of the module Please save the original packaging. In service cases the original packaging ensures a safe shipping and handling. It is also useful for your own transports if you don’t use a special housing or rack. Placement Place the unit on a level and stable surface. The unit’s enclosure is EMC-safe and effectively shielded against HF interference. Nonetheless, you should carefully consider where you place the unit to avoid electrical disturbances. It should be positioned so that you can easily reach it, but there are other considerations. Try not to place it near heat sources or in direct sunlight, and avoid exposure to vibrations, dust, heat, cold or moisture. It should also be kept away from transformers, motors, power amplifiers and digital processors. Always ensure sufficient air circulation by keeping a distance of 4-5 cm/2 inches to other units and to the sides of the unit. Rack Mounting Be sure that both above and below the machine you maintain a distance of 4-5 cm/2 inches in order to eliminate electromagnetic or high frequency interference from other equipment. Moreover, this will ensure adequate air circulation to prevent overheating. Do NOT locate other machines that produce excessive heat below the unit. The rear side of the machine should be properly supported – especially when transport is involved. Placement Of The External Power Supply Do not place the external power supply on top of the RackPack. Place the external power supply on a level and stable surface only. We recommend a distance of at least 50 cm/20 inches to avoid any interferences between the external power supply and the RackPack frame or other devices. Choose a place that is easily accessible so that you can switch off the external power supply quickly in case of an emergency. Please mind the notes under “Power Connection” and “On And Off” on the next page. RackPack 7 Hook Up Air Circulation Always ensure sufficient air circulation in any installation or setup: always keep a distance of about 4-5 cm (1 U rack space or about 2 inches) to the next device. This concerns especially the space above and below the device because louvers are cut into top and bottom panels for optimal heat removal. For free placement outside of a rack please always use a level and stable surface. Never place it on a soft surface such as a blanket or a cushion etc. If the RackPack is mounted into a rack, do not place units below the RackPack that produce excessive heat. Power Connection The RackPack is fed through the external power supply. Before connecting the power supply always make sure that the position of the voltage selector on the back of the RackPack corresponds to the voltage of your local power supply (115V position: 110-120V, 230 V position: 220-240V). In case of doubt please ask your dealer, a professional electrician or your local power supplier. Before you connect the external power supply to the wall socket please switch its POWER button to OFF. Also turn off all devices that you may have already connected to the RackPack. If signal or power connections are changed in the future, always switch off power before. Before you connect the external power supply to the wall socket you should connect it to the RackPack (see illustration on page 9). The cable fixed to the external power supply with the multi-pin connector on the other end is made to connect to the RackPack. It is not possible to connect it incorrectly; place the groove at the end of the plug on the spring at the socket on the RackPack and tighten the screw. After connecting the external power supply to the RackPack and selecting the correct voltage on the external power supply, connect the power supply to the wall socket and then turn on the RackPack with the POWER switch. IMPORTANT: Never disconnect the external power supply from the RackPack while the power is switched on. Always turn the external power supply off first and then wait approximately one minute to allow for any residual current to discharge. Now you may disconnect the multi-pin connector. Mind that residual current can damage the unit if you do not follow this procedure! Please read and follow all security advices on pages 4 and 5. Signal Connections Before first connecting any other equipment – and in all other cases where you are connecting cables with or from other sources – you should be sure to shut the unit and all machines to be connected off (external power supply). Otherwise you risk to damage the unit, connected gear or your ears. On And Off In switching on and off, you do not need to follow any particular sequence with connected devices in the periphery of the RackPack. There is, however, the general rule for a chain of devices in the audio processing to always turn on power amplifiers last and to turn them off first. If specified sufficiently you can also switch the external power supply on and off through a multiway connector or other main switches. 8 RackPack 'PS*OTUBMMBOE3FNPWBMPG3BDL1BDL.PEVMFT1MFBTFSFGFSUP.BOVBMGPSEFUBJMT $0//&$5038*3*/(9-31JO(/%1JO )PU1JO° $PME'PSPUIFSDPOOFDUPSTQMFBTFSFGFSUP.BOVBMGPSEFUBJMT #&'03&TXJUDIJOHPOUIFFYUFSOBMQPXFSTVQQMZ DPOOFDUUIFFYUFSOBMQPXFSTVQQMZBOEUIF 3BDL1BDLXJUIUIFNVMUJQJOQPXFSDPSEGJYFE UPUIFFYUFSOBMQPXFSTVQQMZ /&7&3EJTDPOOFDUUIFFYUFSOBMQPXFSTVQQMZGSPN UIF3BDL1BDLXIJMFUIFQPXFSTVQQMZJTTUJMMTXJUDIFEPO 'JSTUTXJUDIPGGUIFFYUFSOBMQPXFSTVQQMZBOEXBJU BUMFBTUPOFNJOVUFCFGPSFEJTDPOOFDUJOH 0UIFSXJTFSFTJEVBMDVSSFOUTDBODBVTFTFSJPVTEBNBHFT *.1035"/5$0//&$5108&3$03%50 "6%*06/*5#&'03&48*5$)*/(0/108&3 108&306516550"6%*06/*5 4&3*"-/6.#&3 .BEFJO(FSNBOZ 4PVOE 1FSGPSNBODF -BCPSBUPSZ 3BDL1BDL .PEFM $ "6 5 * 0 / XXXTPVOEQFSGPSNBODFMBCDPN 3*4,0'&-&$53*$4)0$, %0/0501&/ 8"3/*/( "7*43*426&%&$)0$c-&$53*26&/&1"40673*3 4&3*"-/6.#&3 503&%6$&3*4,0''*3&03&-&$53*$4)0$,%0/05 &9104&5)*46/*5503"*/03.0*4563& %*4$0//&$5."*/4#&'03&3&.07*/($07&3 5)*4&26*1.&/5.645#&&"35)&% 50 146 (/%-*'5 (/%-*'5 ."%&*/(&3."/: 4PVOE1FSGPSNBODF-BC 1PXFS4VQQMZ6OJU .PEFM146 5IFSFBSQBOFM(/%MJGUTXJUDIFMJNJOBUFTIVN CZTFQBSBUJOHUIFJOUFSOBMHSPVOEGSPNUIF VOJUµTIPVTJOHHSPVOE*GIVN PDDVSTQSFTTUIFTXJUDIFTUP BDUJWBUF(/%MJGU /05&9104&5)*46/*5503"*/03.0*4563&%*4$0//&$5."*/4 #&'03&3&.07*/($07&35)*4&26*1.&/5.645#&&"35)&% 70-5"(&]'64& 7_)[]"TMPX 7_)[]"TMPX 108&3 8 " 3 / * / ( 503&%6$&3*4,0''*3&03&-&$53*$4)0$,%0 ."*/4*/165 $ "6 5 * 0 / %0/0501&/ 3*4,0'&-&$53*$4)0$, "7*43*426&%&$)0$c-&$53*26&/&1"40673*3 #FGPSFZPVVTFUIF3BDL1BDLNBLFTVSFUIBUUIJTWPMUBHFTFMFDUPSTXJUDITFUUJOHSFGMFDUT UIFDPSSFDUMPDBMQPXFSMJOFWPMUBHF7QPTJUJPO77QPTJUJPO7 9 RackPack Rear Panel Connections Fitting Modules Step 1 Please Note Fitting and/or exchanging modules should only be done by qualified persons. In the light of possible physical damage or injuries any manipulation is at your own risk. SPL is not liable for any physical damage or injury. Before opening the device please read all security advices (pages 4 and 5) and the “Hook Up” information (pages 7 and 8). If the device is already in use and you want to expand it with further modules: Turn off the external power supply before you open the device and wait at least one minute before you disconnect the device from the external power supply. Also disconnect any signal connections to other units and wait another five minutes to make sure no residual current is left before opening the RackPack. This instruction explains how to fit a module into the third slot. In this example, modules have already been fitted into slot #1 and #2. You will need the following tools: a Phillips screwdriver and a 4 mm Allen key (the Allen key is part of the scope of delivery of the RackPack frame). Step 1 (Top View) Unscrew all 14 Phillips screws which fix the top panel with the Phillips screwdriver and remove the top panel. 10 RackPack Fitting Modules Step 2 and 3 Step 2 (Rear View) 'PS*OTUBMMBOE3FNPWBMPG3BDL1BDL.PEVMFT1MFBTFSFGFSUP.BOVBMGPSEFUBJMT .BEFJO(FSNBOZ 16 65 5 06 5 16 16 / * / 65 65 5 (/%-*'5 5 * 5 5 06 16 16 */ 5 5 16 5 06 5 5 06 50 146 16 16 5 06 5 65 5 06 8"3/*/( 503&%6$&3*4,0''*3&03&-&$53*$4)0$,%0/05 &9104&5)*46/*5503"*/03.0*4563& %*4$0//&$5."*/4#&'03&3&.07*/($07&3 5)*4&26*1.&/5.645#&&"35)&% 0 "7*43*426&%&$)0$c-&$53*26&/&1"40673*3 3BDL1BDL 5 5 $ "6 5 * 0 / 3*4,0'&-&$53*$4)0$, %0/0501&/ 16 16 XXXTPVOEQFSGPSNBODFMBCDPN 0 3BDL1BDL .PEFM 3BDL1BDL 4PVOE 1FSGPSNBODF -BCPSBUPSZ 1 */ 1 $0//&$5038*3*/(9-31JO(/%1JO )PU1JO° $PME'PSPUIFSDPOOFDUPSTQMFBTFSFGFSUP.BOVBMGPSEFUBJMT 4&3*"-/6.#&3 Unscrew the two Phillips screws holding the cover panel of slot #3 on the rear. Remove the cover panel. As long as slot #3 is fitted with a module, the cover will not be needed anymore. You may want to store it for future use. Step 3 (Front View) 3 1 0 3 5 7 5 10 20 VU 3 1 0 3 OVL 7 11. ° SIG OVL 7 11. ° 76 1"% 3BDL 1BDL 76 1"% .*$("*/ .*$("*/ 8 10 &3 . &. * 6 . E# & .*$13 13 13 &. 5 VU SIG * 6 . E# & .*$13 Unscrew the two Allen screws (socket screws) of slot #3 on the front of the RackPack frame with the Allen key and remove the silver decoration panel as well as the blank black panel. Keep the decoration panel and handle it with care, it is needed for the new module. You will not need the black cover anymore as long as slot #3 is fitted with a module. You may want to store it for future use. RackPack 11 "% / : 7 5 10 20 &*/ &3." ( Fitting Modules Step 4 and 5 Step 4 (Top View) Y .0%6-& 'MBUSJCCPODBCMFXJUIFJHIUQMVHTUPQPXFSUIFNPEVMFT "8":416--0313&445)&1-6(4 /&7&35)&$"#-& .0%6-& TJMWFSEFDPSBUJPOQBOFM Y Insert the new module into the slot from the front side of the RackPack. Fix the back of the new module with the four Phillips screws to the rear of the frame (two of the Phillips screws needed here came with the new module, two further screws remained from unscrewing the rear cover panel, see step 2). Now tighten the two M4 socket screws. Put them through the holes on the top and bottom of the aluminum panel first, then through the top and bottom holes of the front of the module. Fix the panel and the front of the module by tightening the M4 screws into the threads of the housing (see step 3). Step 5 Finally plug the multi-pin connector of the ribbon cable that corresponds to the module’s slot into the multi-pin socket of the new module. Make sure that the connection is safe and tight by plugging the connector completely into the socket. IMPORTANT: Only pull or push the connector, never the cable! Otherwise you risk damaging the cable. Subsequent damages can affect one or more modules! 12 RackPack Fitting Modules Link Cable Installation Link Cable Installation (Top View) 'MBUSJCCPODBCMFXJUIUXPQMVHTUPDPOOFDU UXPNPEVMFTGPS-*/,NPEF .0%6-& .0%6-& .0%6-& .0%6-& 'MBUSJCCPODBCMFXJUIFJHIUQMVHT UPQPXFSUIFNPEVMFT Two modules supporting the LINK feature (i. e. Transient Designer & DynaMaxx) can be run as stereo pairs. In LINK mode, the master module controls the slave module and allows a coherent processing of stereo programs over both channels. Besides coherent stereo operations the LINK mode offers further interesting applications, please refer to the individual manuals of the modules for further details. IMPORTANT: You have to specify the master or slave configuration of a module before you fit a module into the RackPack frame. The module manuals explain how to configure a module for master or slave mode. All modules supporting LINK mode have a 10-pin-socket on the top of their circuit board. A flat ribbon cable with two 10-pin-connectors is part of the module’s scope of delivery. Plug one of the two multi pin connectors of the ribbon cable into either one of the multi-pin sockets of the modules to be connected. Make sure that the connections are safe by plugging the connector completely into the socket. IMPORTANT: Only pull or push the connector, never the cable! Otherwise you risk to damage the cable. Subsequent damages can affect one or more modules! RackPack 13 External Power Supply The external power supply offers fundamental advantages over internal power supplies: Properly installed, transformer hum and interference should never be an issue and the unit should deliver clean, clear audio. In addition to that, internal circuitry is free from AC power which could negatively influence especially sensitive modules such as preamps. The 100 VA transformer is generously proportioned to ensure plenty of power in any situation and proper current for the various circuits. Entirely new circuit designs were developed to process the various direct currents. The +/18 V current, for example, utilizes a discrete voltage regulator with barely measurable noise. High-speed rectifier diodes and large capacities ensure sufficient current to process even the most powerful impulses. In addition, most currents are stabilized using 400 V/100 nF MKP foil condensers to ensure plenty of current for fast transients. 48 V phantom power is also processed using discrete, low-noise voltage regulators and fed directly to the microphone conductors through two resistors. Placement Of The External Power Supply Do not place the RackPack on top of the external power supply or the power supply on top of the RackPack. Place the external power supply on a level and stable surface only. We recommend a distance of at least 50 cm/20 inches to avoid any interferences between the transformer of the external power supply and the RackPack or other devices. Choose a place that is easily accessible so that you can switch off the external power supply quickly in case of an emergency. Please mind the notes under “Power Connection” on page 8. On And Off In switching on and off, you do not need to follow any particular sequence with connected devices in the periphery of the RackPack. There is, however, the general rule for a chain of devices in the audio processing to always turn on power amplifiers last and to turn them off first. If specified sufficiently you can also switch the external power supply through a multiway connector or other main switches. 14 RackPack Dimensions & Weight Width x Height x Depth Weight (without modules) 482 x 132 x 296 mm/19 x 5.19 x 11.65 in 5,65 kg/12.46 lbs External Power Supply – Dimensions External Power Supply – Weight 154 x 67 x 236 mm/6.06 x 2.63 x 9.29 in 4,25 kg /9.37 lbs Guarantee All SPL products come with a two-year manufacturer’s guarantee against defects in material or assembly from the date of purchase. End users are supported in the two-year guarantee through their distributor or dealer. In such cases, please contact your dealer for full guarantee conditions and service. Direct SPL product support requires product registration. Please fill out the guarantee card enclosed in the package legibly in printed letters and send it directly to SPL. Or use the online registration form that may be reached at www.soundperformancelab.com (international clients) or www.spl-usa.com (US clients). RackPack 15 < Manual RackPack Model 2710 RackPack