1
Manual
%
7 5
10
20
0
30
50
3
1 0
70
100
100
3
5
VU
SIG
OVL
7
11.
°
76
1"%
.*$("*/
&'
&3
13
&
& / $ E# $ 1 3
&.*
Preference Mic Pre
RackPack Module, Model 2711
Single-channel microphone preamplifier module
Manual Preference Mic Pre
Model 2711
Version 1.0 – 8/2007
Designer: Wolfgang Neumann
This user‘s guide contains a description of the product. It in no way represents
a guarantee of particular characteristics or results of use. The information in
this document has been carefully compiled and verified and, unless otherwise
stated or agreed upon, correctly describes the product at the time of packaging
with this document.
Sound Performance Lab (SPL) continuously strives to improve its products and
reserves the right to modify the product described in this manual at any time
without prior notice. This document is the property of SPL and may not be copied or reproduced in any manner, in part or fully, without prior authorization by
SPL.
SPL electronics GmbH, Sohlweg 55, 41372 Niederkruechten, Germany
Phone. +49 (0)2163 983 40
Fax +49 (0)2163 983 420
E-Mail: [email protected]
Internet: www.soundperformancelab.com
CE Declaration of Conformity
Manufacturer: SPL electronics GmbH, Type of Equipment: Audio
Signal Processor, Product: RackPack/Preference Mic Pre, Model 2711,
Compliance Engineer: Wolfgang Neumann
Test Basis: EN50081-1:1992, EN50082-1:1992, EN60065:1993, EN61000-33:1995, EN60065:2002, EN55013:2001, EN55020:2002, EN61000-3-2:2000,
73/23 EWG; 93/68 EWG. We herewith declare, that the construction of the
Preference Mic Pre, Model 2711, is in compliance with the standards and regulations mentioned above.
Notes on environmental protection
At the end of its operating life, this product must not be disposed of
with regular household waste but must be returned to a collection
point for the recycling of electrical and electronic equipment. The
“wheelie bin“ symbol on the product, user‘s manual and packaging indicates that. The materials can be re-used in accordance with their markings. Through re-use, recycling of raw materials, or other forms of recycling of
old products, you are making an important contribution to the protection of our
environment. Your local administrative office can advise you of the responsible
waste disposal point.
WEEE Registration: 973 349 88
© 2007 SPL electronics GmbH. All rights reserved. Names of other companies
and their products are trademarks of their respective owners.
2
RackPack: Preference Mic Pre
Contents
Important Security Information . . . . . . . . . . . . . . . . . . . . . . . . . . . . . . . . . . . .
4
Hook Up . . . . . . . . . . . . . . . . . . . . . . . . . . . . . . . . . . . . . . . . . . . . . . . . . . . . . . . . . . . . . .
6
Scope Of Delivery . . . . . . . . . . . . . . . . . . . . . . . . . . . . . . . . . . . . . . . . . . . . . . . . . . .
6
Introduction . . . . . . . . . . . . . . . . . . . . . . . . . . . . . . . . . . . . . . . . . . . . . . . . . . . . . . . . .
Main Features . . . . . . . . . . . . . . . . . . . . . . . . . . . . . . . . . . . . . . . . . . . . . . . . . . . . . 7
8
Rear Panel/Connections . . . . . . . . . . . . . . . . . . . . . . . . . . . . . . . . . . . . . . . . . . . .
Wiring . . . . . . . . . . . . . . . . . . . . . . . . . . . . . . . . . . . . . . . . . . . . . . . . . . . . . . . . . . . . . .
XLR Sockets, Channel Split . . . . . . . . . . . . . . . . . . . . . . . . . . . . . . . . . . . . . . 8
8
9
Control Elements . . . . . . . . . . . . . . . . . . . . . . . . . . . . . . . . . . . . . . . . . . . . . . . . . . . .
Mic Gain, About Leveling . . . . . . . . . . . . . . . . . . . . . . . . . . . . . . . . . . . . . . . . . VU Meter, PPM, -10 dB . . . . . . . . . . . . . . . . . . . . . . . . . . . . . . . . . . . . . . . . . . . . 48 V Phantom Power Supply, Pad . . . . . . . . . . . . . . . . . . . . . . . . . . . . . . . . Phase Reverse, High-Pass Filter, Signal LED, Overload LED . . . . 10
10
11
12
13
Technology . . . . . . . . . . . . . . . . . . . . . . . . . . . . . . . . . . . . . . . . . . . . . . . . . . . . . . . . . . 14
SSM 2019, Servo Drive Design . . . . . . . . . . . . . . . . . . . . . . . . . . . . . . . . . . . 14
Foil And Styroflex Capacitors, Outputs, Channel Split . . . . . . . . . . 15
Copy Master: Recall Settings. . . . . . . . . . . . . . . . . . . . . . . . . . . . . . . . . . . . . . . . 16
Block Diagram . . . . . . . . . . . . . . . . . . . . . . . . . . . . . . . . . . . . . . . . . . . . . . . . . . . . . . 17
Specifications . . . . . . . . . . . . . . . . . . . . . . . . . . . . . . . . . . . . . . . . . . . . . . . . . . . . . . . 18
Measurements . . . . . . . . . . . . . . . . . . . . . . . . . . . . . . . . . . . . . . . . . . . . . . . . . . . . . . 19
CMRR, Frequency Range . . . . . . . . . . . . . . . . . . . . . . . . . . . . . . . . . . . . . . . . . 19
Guarantee . . . . . . . . . . . . . . . . . . . . . . . . . . . . . . . . . . . . . . . . . . . . . . . . . . . . . . . . . . . 20
RackPack: Preference Mic Pre
3
Important Security Information
Please note and retain this information. Carefully read and follow all
of the safety and operating instructions before you use the machine.
Be doubly careful to follow all warnings and special safety instructions
noted in this manual and on the unit. The following information refers
to modules built into the RackPack frame.
Connections: Only use the connections as described. Other connections can lead to health risks and equipment damage.
Water And Humidity: Do NOT use this machine anywhere near water
(for example near a wash basin or bath, in a damp cellar, near swimming pools, or the like). In such cases there is an extremely high risk of
fatal electrical shocks!
Insertion Of Foreign Objects Or Fluids: NEVER allow a foreign object
through any of the machine‘s chassis openings. You can easily come
into contact with dangerous voltage or cause a damaging short circuit.
NEVER allow any fluids to be spilled or sprayed on the machine. Such
actions can lead to dangerous electrical shocks or fire!
OPENING THE DEVICE: Open the device only to fit or exchange
modules. The fitting and/or exchange of modules should only be
carried out by qualified persons. In the light of possible physical
damage or injuries any manipulation is at your own risk. In order to
avoid any residual voltage, the device should be disconnected from
any power source at least 5 minutes prior to opening it. If you handle
the device improperly or ignore the manual (part of the delivery of the
RackPack frame) you risk to damage the device or expose yourself to
an electric shock. In these cases SPL electronics GmbH denies any
responsibility.
Electrical Power: Run this machine ONLY from sources which can
provide proper power at the prescribed rating. When in doubt about
a source, contact your dealer or a professional electrician. To be sure
you have isolated the machine, do so by disconnecting the power cord
from your wall connection. Be sure that the power cord plug is always
accessible. When not using the machine for a longer period, make sure
to unplug it from your wall power socket.
Power Cord Protection: Make sure that your power cord is arranged to
avoid being stepped on or any kind of crimping and damage related
to such event. Do not allow any equipment or furniture to crimp this
power cord.
Power Connection Overloads: Avoid any kind of overload in connections to wall sockets, extension or splitter power cords. Always keep
manufacturer warnings and instructions in mind. Overloads create fire
hazards and risk of dangerous shocks!
4
RackPack: Preference Mic Pre
Important Security Information
Lightning: Before thunderstorms or other severe weather, disconnect
the machine from wall power (but to avoid life threatening lightning
strikes, not during a storm). Similarly, before any severe weather, disconnect ALL the power connections of other machines and antenna and
phone/internet cables which may be interconnected so that no lightning damage or overload results from such secondary connections.
Air Circulation: Chassis openings offer ventilation and serve to protect the machine from overheating. NEVER cover or otherwise close
off these openings. NEVER place the machine on a soft surface (carpet, sofa, etc.). Make sure to provide for a mounting space of 4-5 cm/2
inches when mounting the machine in racks or cabinets.
Controls And Switches: Operate the controls and switches only as
described in the manual. Incorrect adjustments outside safe para-meters can lead to damage and unnecessary repair costs. Never use the
switches or level controls to effect excessive or extreme changes.
Repairs: Unplug the machine and immediately contact a qualified
technician when you think repairs are needed – or when moisture or
foreign objects may accidentally have gotten in to the housing, or in
cases when the machine may have fallen and shows any sign of having
been damaged. This also applies to any situation in which the machine
has not been subjected to any of these unusual circumstances but still
is not functioning normally or its performance is substantially altered.
In cases of damage to the power cord or its plug, first consider turning
off the main circuit breaker before unplugging the power cord. Replacement/Substitute Parts: Be sure that any service technician
uses original replacement parts or those with identical specifications
as the originals. Incorrectly substituted parts can lead to fire, electrical shock, or other dangers, including further equipment damage.
Safety Inspection: Be sure always to ask a service technician to conduct a thorough safety check and ensure that the state of the repaired
machine is in all respects up to factory standards.
Cleaning: In cleaning, do NOT use any solvents, as these can damage
the chassis finish. Use a clean, dry cloth (if necessary, with an acidfree cleaning oil). Disconnect the machine from your power source
before cleaning.
RackPack: Preference Mic Pre
5
Hook Up
Fitting A Module
The fitting and/or exchange of modules should only be carried out by
qualified persons. Please read the manual of the RackPack frame. It
contains all information needed to fit a module as well as all safety
and notes and warnings. If you don‘t have the manual at hand, you
can download it like all SPL product manuals from our web site http://
www.soundperformancelab.com.
Symbols And Notes
IN THIS MANUAL A LIGHTNING SYMBOL WITHIN A TRIANGLE WARNS
YOU ABOUT THE POTENTIAL FOR DANGEROUS ELECTRICAL SHOCKS
– WHICH CAN ALSO OCCUR EVEN AFTER THE MACHINE HAS BEEN
DISCONNECTED FROM A POWER SOURCE.
AN EXCLAMATION MARK (!) WITHIN A TRIANGLE IS INTENDED TO MAKE
YOU AWARE OF IMPORTANT OPERATIONAL ADVICE AND/OR WARNINGS
THAT MUST BE FOLLOWED. BE ESPECIALLY ATTENTIVE TO THESE AND
ALWAYS FOLLOW THE ADVICE THEY GIVE.
The symbol of a lamp directs your attention to explanations of important functions or applications.
Attention
Do not attempt any alterations to this machine without the approval
or supervision of SPL electronics GmbH. Doing so could nullify completely any and all of your warranty/guarantee rights and claims to
user support.
Scope Of Delivery
The scope of delivery comprises:
• The module
• This manual
• Four Philips screws to mount the module to the back panel (if module is delivered separately from the frame). Further screws needed
for mounting the module remain when you remove front and rear
covers from the RackPack frame.
6
RackPack: Preference Mic Pre
Introduction
When recording acoustic instruments or vocals, using a microphone
is inevitable. The actual output level of a microphone is very low and
therefore has to be boosted to studio or line level (0 dB) with a preamplifier. Sometimes signals have to be boosted by a factor of 2000 or
more. As a consequence, the resulting sound quality provided by the
preamp is of paramount importance, so a good microphone preamp
that does not overdrive is the definitive requirement in order to record
acoustic instruments or vocals with sufficient dynamics and untainted
sound.
The section “Technology” from page 14 explains how the Preference
Mic Pre meets these requirements.
Main Features
The Preference Mic Pre offers preamplification values of up to +72 dB
with lowest noise operation and a high common mode rejection.
A VU meter with two modes for average levels (VU) and peak levels
(PPM) displays the output levels.
A very stable phantom power supply (48 V) is provided to power condenser microphones.
The polarity of the microphone can be switched with the phase reverse
switch.
A high-pass filter protects against low frequency interferences.
Two LEDs are placed into the VU window to concentrate all displays in
one area.
The signal LED (SIG.) indicates that an input signal is present, the
overdrive LED (OVL) warns against potential overdrives.
RackPack: Preference Mic Pre
7
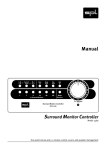
Rear Panel/Connections
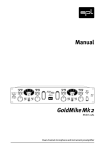
Wiring
456%*0
-*7&
*/
1
65
5
.JDSPQIPOF
16
.JDSPQIPOF
*
/
06
5
16
06
5
06
$VF.JY
.POJUPSJOH
5
16
5 5 PS
16
.POJUPSJOH
"%%"8
16
5 5 '0)
0
65
'VSUIFS
.PEVMF
3BDL1BDL
8
RackPack: Preference Mic Pre
Rear Panel/Connections
XLR Sockets, Channel Split
XLR Sockets
Connect your microphone to the electronically balanced XLR input. The
outputs of the Preference Mic Pre are electronically balanced, too. You
can use both XLR output sockets simultaneously.
XLR pin wiring: Pin 1 = ground
Pin 2 = hot (+)
Pin 3 = cold (-)
The illustration shows the correct pin
wiring of the balanced XLR sockets if
an unbalanced wiring is required.
0VUQVU
CBMBODFE
VOCBMBODFE
(/%
IPU
DPME
Channel Split
Since the Preference Mic Pre provides two independent outputs, it
always offers you two routes for one input channel.
If, for example, a RackPack is configured as a channel strip, one preamp output can feed the next module while the second output is used
to record the direct preamp signal.
Another exemplary studio application is to send one signal directly
into the A/D converter to be recorded in your DAW while the second
signal is used for latency-free monitoring (e.g. cue mix for the singer).
In live applications Output 1 can be routed to Front Of House (FOH)
while Output 2 feeds the monitoring mixer.
RackPack: Preference Mic Pre
9
Control Elements
Mic Gain
.*$("*/
E#
Mic Gain, About Leveling
With the Mic Gain control you can regulate the preamplification of the
microphone signal. It ranges from +14 dB to +72 dB. The input stage can
handle input levels of up to 18 dB. The value set with the Mic Gain control defines the output level equally for both Output 1 and Output 2.
When you set the Mic Gain you have to consider the type of microphone that you are using (dynamic or condenser microphone) as well
as its sensitivity. The sensitivity of a dynamic microphone is at around
2 mV/Pa whereas the sensitivity of a condenser microphone can be up
to 20 mV/Pa. The result is a difference in output of 20 dB.
You should also consider the sound pressure level of the sound source,
the distance of the microphone to it and the acoustics of the room
when you set the preamplification.
About Leveling
Initially you should always ensure to have deactivated the -10 dB button so that the VU meter displays correct values (see “-10 dB” on page
11). Now turn up the Mic Gain control until the VU meter displays maximum levels between 0 dB and +3 dB. At this level you don’t risk any
overdrive when you experience sudden and unexpected peaks in the
level of the source. Always remember that the VU meter only shows
average values and that a peak level can be much higher (up to +10 dB).
If necessary, turn on the PPM mode to see the actual peak levels.
Usually levels of around 0 dB and +3 dB are safe. If, however, you experience very high peaks already at minimum Mic Gain values (i.e. drums,
brass instruments), you can activate the PAD function (see “PAD”
on page 12). The input level is now reduced so that you can regulate
Mic Gain again in a useful range.
If you know in advance that the level will be very consistent you can
always turn up Mic Gain. In this case you can activate the -10dB button
to have more headroom in the display.
IMPORTANT: To exclude any audible distortion the OVL LED should only
light up shortly. It starts illuminating 3 dB before a potential overload,
so first illumination does not indicate an overload, but that the limit of
leveling is reached. Avoid permanent illumination of the OVL LED to
exclude overloads (also refer to “Overload LED” on page 13).
10
RackPack: Preference Mic Pre
VU Meter, PPM, -10 dB
Control Elements
VU Meter
10
20
The VU meter displays the output level of the preamp. The gauge indicates levels from -20 dB to +5 dB. If necessary you can lower the sensitivity by 10 dB so that the gauge goes up to +15 dB output level (see
“-10 dB” below and “About Leveling” on the previous page).
%
0
7 5
30
50
3
1 0
70
100
100
SIG
An especially interesting feature is the option to switch between two
display modes: VU mode and PPM mode. The VU mode (VU=Volume
Unit) displays average levels, thus provides information on the overall loudness. The PPM mode (PPM=Peak Program Meter) displays the
peak levels.
The integration time of the display complies with the BBC requirements. In VU mode the rise time up to 0 dB is approx. 300 ms. In PPM
mode the rise time up to 0 dB is about 2 ms and the release time down
to -20 dB is at a “slow” 1,5 seconds. This calibration ensures to display
even short peaks up to about +6 dB since the needle does not have to
travel the entire distance of the gauge every time.
11.
The PPM button allows to switch the VU metering characteristics from
VU display mode (button is deactivated and not illuminated) to PPM
display mode (button is active and illuminated). A/D converter display also make use of the PPM mode. Monitoring peak levels is most
important to avoid overloading the converter and to prevent audible
distortion. Peak levels are always above the average levels. It may
make sense in most cases to also press the -10 dB button to prevent
the needle from getting stuck on the right side of the gauge. -10dB
°
With this button you can change the sensitivity of the VU display. If
you press the -10 dB button (button is illuminated), the sensitivity of
the display is lowered by 10 dB. With the needle for example at 0dB,
a value of +10 dB is displayed. Now you can read values of up to +15 dB.
You always have to add these 10 dB to the displayed values, for
example if you compare these values with those of an A/D converter.
Remember that A/D converters show peak levels, not average levels.
For comparison press the PPM button to activate the PPM mode.
RackPack: Preference Mic Pre
11
5
OVL
The VU meter is custom made to meet SPL specifications and assures
a balanced optical perception thanks to it’s optimized ballistics.
PPM
3
VU
Control Elements
48 V Phantom Power Supply, Pad
48 V Phantom Power Supply
7
The Preference Mic Pre provides 48 volt phantom power for microphones requiring external current (generally condenser microphones).
Such microphones are dependent upon a clean, consistent and
noise-free power supply for optimal operation and audio quality. The
Preference Mic Pre continuously delivers precisely 48 V and a maximum current of 14 mA, which will power all microphones.
IMPORTANT: All microphones with balanced, ground-free outputs can
be used with the phantom power activated. Unbalanced microphones
may only be used with phantom power deactivated.
Phantom power should only be activated when using microphones that
require it. Please be sure to deactivate phantom power with all other
microphones (including tube microphones which are supplied from
their own power supply, thus need no extra phantom power supply).
ALWAYS FOLLOW THESE RULES WHEN WORKING WITH PHANTOM
POWER – THE INPUT STAGES OF THE PREMIUM MIC PRE CAN BE
DAMAGED IF YOU DO NOT ACT ACCORDINGLY:
1)First connect the microphone to the Preference Mic Pre.
2)Then activate phantom power – you can start working now.
3)When you have finished recording, turn the phantom power off first.
4)DO NOT disconnect the microphone from the Preference Mic Pre
UNTIL phantom power has been switched off for a minute and all
residual current is discharged.
Pad
1"%
The Pad function allows you to attenuate the input signal by 20 dB so
that you can process even very high levels, i.e. from drums or brass
instruments.
If the VU meter shows levels above +3 dB even while Mic Gain is set
very low (and the -10 dB button deactivated), the time has come to
press the Pad button. It illuminates when it is activated.
12
RackPack: Preference Mic Pre
Phase Reverse, High Pass Filter
Control Elements
Phase Reverse
With the phase reverse button you invert the polarity of the microphone signal. When not pressed (button is not illuminated) the polarity is in phase. After pushing the button (button is illuminated) the
polarity is inverted.
The phase reverse feature comes in very handy if you have to switch
the polarity of the XLR input according to the polarity of the microphone or the microphone cable. The pin wiring of the XLR sockets are
as follows: Pin 1 = ground, Pin 2 = hot (+), Pin 3 = cold (-).
Sometimes it is useful to switch the polarity of a microphone, for example in the case of M/S miking. A second classic application is the miking of a snare drum with two microphones that are placed above and
below the snare: Since both drum heads move in the same direction
when the drum is played, the microphones are out of phase. Switch
the polarity of the bottom mic and you avoid any cancellations when
you join both signals in the mix.
High-Pass Filter
The high-pass filter, also known as rumble filter, helps to eliminate
any interferences within the lowest frequencies. The first order filter
operates smoothly with 6 dB per octave, starting from 75 Hz with -3 dB.
This characteristic usually helps in most cases and has the least sonic
disadvantages. If you need to filter on a more extreme scale, even
second order filters (12 dB/octave) are overstrained frequently and
sonic disadvantages become more and more apparent. In those cases
a variable filter is the means of choice.
Signal LED
10
20
%
The signal LED (SIG) indicates immediately whether an input signal
is existent or not. The LED starts responding at a minimum level of
-25 dB.
0
7 5
30
50
3
1 0
70
100
1
00
3
5
VU
SIG
OVL
Overload LED
The overload LED (OVL) warns 3 dB before a potential internal overload, thus indicates that a headroom of 3 dB is left. Avoid overloads
as they may result in unwanted distortions. As soon as the OVL LED
illuminates permanently you have to reduce the amplification with the
Mic Gain control until the LED turns off or only lights up shortly (also
refer to “About Leveling” on page 10).
RackPack: Preference Mic Pre
10
20
%
0
SIG
13
7 5
30
50
3
1 0
70
100
3
5
VU
OVL
Technology
SSM 2019, Servo Drive
SSM 2019
The Preference Mic Pre is suitable for all common dynamic and condenser microphones. It works along the principles of an instrumentation amplifier which is a technology that is also used in measurement
and medical equipment due to its high common mode rejection of stray
pick-ups. It is based on the semiconductor SSM 2019 which sounds
more balanced than available alternatives. Low noise and distortion
values as well as a broad bandwidth and a fast slew rate are its forte.
Servo Drive Design
The main focus during the development of the Preference Mic Pre was
its acoustic transparency and its natural representation of the source
signal. Reducing DC offsets in the audio signal paths is a decisive part
of this design job.
DC offsets are produced in relatively large amounts especially when
amplifying a microphone signal because the signal is amplified by
extreme factors from the pico volt range to 0dB nominal level. DC offsets impair the signal quality as they induce noise and distortion that
lead to a diffuse sound.
The Preference Mic Pre‘s servo drive design minimizes these problems
much more effectively than the common solution based on capacitors
by setting the DC offset to almost 0 mV. In addition to that, the active
servo drive circuitry tends to produce less distortions than passive
capacitors.
The servo drive design incorporates three operational amplifiers. The
SSM 2019 is the first op-amp. The second op-amp acts as a sensor to
detect voltage differences. These differences are then compensated
for in a third op-amp working as summing stage.
Of course an elaborate active servo drive circuitry is a more expensive solution than simply using passive capacitors, but especially in
a microphone preamplifier this effort pays off with improved sound
quality.
14
RackPack: Preference Mic Pre
Capacitors,Outputs, Channel Split
Technology
Foil And Styroflex Capacitors
Only the best MKP and styroflex capacitors are used in the various circuits. They sound more open and dynamic in contrast to the conventional ceramic capacitors.
Outputs
Both output stages are electronically balanced and can be used independently. They are capable of driving very long cables (up to a few
hundred yards, depending on the capacity of the cables and the input
stages on the other end). The maximum output level is +22 dBu.
Channel Split
Since the Preference Mic Pre has two independent outputs, it always
offers you two routes for one input channel.
If, for example, a RackPack is configured as a channel strip, one output
can feed the next module while the second output is used to record
the direct preamp signal.
Another exemplary studio application would be to send one signal
directly into the A/D converter to be recorded in your DAW while the
second signal is used for latency-free monitoring (e.g. cue mix for the
singer).
RackPack: Preference Mic Pre
15
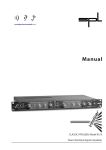
Copy Master: Recall Settings
Artist:
...........................................
%
Album:
7 5
10
20
0
30
50
3
1 0
70
100
3
5
VU
SIG
OVL
...........................................
7
11.
Title:
76
°
...........................................
1"%
.*$("*/
&'
&3
13
Track(s)/Group:
...........................................
Engineer:
&
& / $ E# $ 1 3
&.*
...........................................
Date:
...........................................
16
RackPack: Preference Mic Pre
Block Diagram
RackPack: Preference Mic Pre
17
Specifications
Audio
Frequency Range
10 Hz bis › 200 kHz
CMRR
-84 dBu
(at 1kHz with -30 dBu input level and 30 dB Gain)
THD & N @ 1 kHz
Input Level
-30 dBu
-60 dBu
Gain
30 dB
60 dB
THD & N
0,0035%
0,047%
Noise
Gain
72 dB
60 dB
30 dB
Noise Level A-weighted
-57,0 dBu
-69,0 dBu
-91,7 dBu
E.I.N. (Equivalent Input Noise) -129,0 dBu
Dynamic Range
114,0 dB
Input
XLR connector, electronically balanced
Impedance unbalanced
ca. 1,6 kOhm
Impedance balanced ca. 3,2 kOhm
Max. Input Level
+18 dBu, +38 dBu with Pad activated
Outputs
Output 1: XLR connector, electronically balanced
Impedance unbalanced
ca. 75 Ohm
Impedance balanced
ca. 150 Ohm
Max. Outpul Level
+22 dBu
Output 2: XLR connector, electronically balanced
Impedance unbalanced
ca. 75 Ohm
Impedance balanced ca. 150 Ohm
Max. Outpul Level
+22 dBu
Control Elements
Mic Gain Range
Pad
High-Pass Phantom Power Supply
18 dB to 72 dB
-20 dB
fg = 75 Hz (-3 dB)
48 V
Dimensions & Weight
Height x Width x Depth
Weight
132 mm x 46,9 mm x 315 mm/
5.2 x 1.84 x 12.4 inches
0,3 kg/0,66 lbs
Note: 0 dBu = 0.775 V. Specifications are subject to change without notice.
18
RackPack: Preference Mic Pre
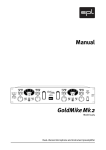
Measurements
Sound Performance Lab
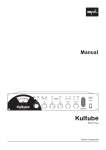
CMRR
08/20/07 13:48:31
-50
-60
d
B
u
-70
-80
-90
-100
10
20
50
100
200
500
1k
2k
5k
10k
20k
Hz
CMRR with -30dBu input level and vu = 30dB
black = input -> output 1
grey = input -> output 2
CMRR -30dB.at27
Sound Performance Lab
Frequency Response / THD+N
ratio
08/20/07 12:13:27
+3
0.2
0.175
+2
0.15
+1
d
B
u
0.125
+0
0.1
0.075
-1
0.05
-2
0.025
-3
10
20
50
100
200
500
1k
2k
5k
10k
20k
50k
Hz
Frequency Response and THD + N ratio with -30dBu input level and vu = 30dB
black = frequency response
grey = THD + N ratio
Freq Resp + THD.at27
RackPack: Preference Mic Pre
19
200k
%
Guarantee
Guarantee, Product Registration
All SPL products come with a two-year manufacturer’s guarantee
against defects in material or assembly from the date of purchase. End
users are supported in the two-year guarantee through their distributor or dealer. In such cases, please contact your dealer for full guarantee conditions and service.
Direct SPL product support requires product registration. Please fill
out the guarantee card enclosed in the package legibly in printed letters and send it directly to SPL. Or use the online registration form
that may be reached at www.soundperformancelab.com (international
clients) or www.spl-usa.com (US clients).
20
RackPack: Preference Mic Pre