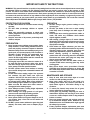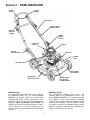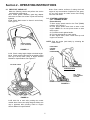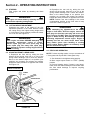
1
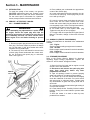
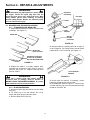
Safety Instructions & Operator’s Manual for
20” STEEL DECK
WALK MOWERS
SERIES 12
MODELS
R205012
NR205012
MODEL NUMBER EXPLANATION
PREFIX
N
SERIES
DESIGNATION
BODY
R
20
50
SUFFIX
12
CUTTING
WIDTH
PREFIX EXPLANATION
R - Recycling Mower
N - California Model
BODY EXPLANATION
20 - 20” Cutting Width
50 - 5.0 HP Engine
SUFFIX EXPLANATION
ENGINE
HP
SERIES
DESIGNATION
12 - Series Designation
Thank you for buying a SNAPPER Product! Before operating your Walk Behind, read this manual carefully and pay
particular attention to the “IMPORTANT SAFETY INSTRUCTIONS” on Page 2. Remember that all power equipment can be
dangerous if used improperly. Also keep in mind that SAFETY requires careful use in accordance with the operating
instructions and common sense.
COPYRIGHT © 1996
SNAPPER INC.
ALL RIGHTS RESERVED
MANUAL No. 3-5806 (I.R. 8/96)
IMPORTANT SAFETY INSTRUCTIONS
WARNING: This powerful machine is capable of amputating hands and feet and can throw objects that can cause injury
and damage! Failure to comply with the following instructions may result in serious injury to the operator or other
persons. The owner of the mower must understand these instructions and, furthermore, must allow only persons who
understand these instructions to operate mower. Each person operating the mower must be of sound mind and body
and must not be under the influence of any substance which might impair vision, dexterity, or judgment. If you have any
questions pertaining to your mower which your dealer cannot answer to your satisfaction, call or write the Customer
Service Department at SNAPPER, McDonough, Georgia, 30253. Phone: (770) 954-2500.
PROTECTION FOR CHILDREN
OPERATION
1.
1.
2.
3.
4.
DO NOT allow children in area when mower is being
operated.
DO NOT allow pre-teenage children to operate
mower.
Allow only responsible teenagers or adults with
mature judgment to operate mower and only under
close supervision.
Keep the area clear of all persons, particularly small
children, and pets.
2.
3.
4.
PREPARATION
1.
Never operate mower without proper guards, plates,
safety switches, or other safety protective devices in
place and properly connected. Inspect to determine
that these safety devices are installed properly, are in
good repair, and operate properly. If the condition or
operation of these devices are questionable, they
must be repaired or replaced before using the
mower. Be thoroughly familiar with the controls and
proper use of the equipment.
2. Thoroughly inspect the area where the mower is to
be used and remove all stones, sticks, wire, bones
and other foreign objects. Also note the location of
holes, stumps, and other possible hazards.
3. DO NOT operate mower when barefoot or wearing
open sandals. Always wear substantial footwear and
long pants.
4. Fill fuel tank before starting engine. Use approved
fuel container. DO NOT smoke near open fuel
container. DO NOT fill fuel tank indoors or when
engine is running. Allow engine to cool for at least
ten minutes before refilling. Wipe off any spilled fuel
before starting engine. DO NOT run engine indoors.
5. Make sure that the wheel drive clutch control is
disengaged before starting engine.
6. Never attempt to make a cutting height adjustment
while the engine is running.
7. When mowing over rough ground or in tall grass,
mower must be set at highest cutting position.
8. Mow only in daylight or in good artificial light.
9. Never operate mower in wet grass. Always be sure of
your footing; keep a firm hold on the handle and
walk; never run!
10. DO NOT operate mower without the grass bag (and
adapter), side chute, mulch cover or adapter plug in
place.
5.
6.
7.
8.
DO NOT change engine governor settings or over
speed engine.
DO NOT put hands or feet near or under rotating
parts. Keep clear of discharge area while engine is
running.
STOP engine when crossing gravel drives, walks, or
roads, and under any conditions where thrown
objects might be a hazard.
After striking a foreign object or if mower vibrates
abnormally, STOP the engine, disconnect and secure
spark plug wire. Inspect the mower for any damage
and repair the damage.
STOP blade and engine whenever you leave the
operating position behind the handle for any reason,
including clearing grass, emptying grass bag and
making any adjustments, repairs, or inspections.
Before cleaning, repairing or inspecting, make
certain blade and all moving parts have STOPPED.
Disconnect and secure spark plug wire away from
plug to prevent accidental starting.
STOP engine and wait until the blade comes to
complete STOP before removing grass bag and/or
clearing grass.
Mow across slopes, never up-and-down. Exercise
CAUTION when changing directions on slopes. DO
NOT mow steep slopes or other areas where stability
or traction is in doubt.
MAINTENANCE AND STORAGE
1.
2.
3.
4.
5.
6.
2
Keep all nuts, bolts, and screws tight to be sure
mower is in safe operating condition.
Never store mower with fuel in tank inside of a
building where fumes may reach an open flame or
spark. Allow engine to cool before storing in any
enclosure.
To reduce fire hazard, keep mower free of grass,
leaves, spilled fuel or excessive grease.
Check grass bag assembly frequently for wear or
deterioration. Replace with new bag if loose seams
or tears are evident. Replace slider or bag adapter if
broken or cracked.
Have your mower inspected and serviced each year
by an authorized Snapper dealer. Determine if any
additional devices are available which might upgrade
the safety of your mower.
Factory specified Snapper replacement parts must
be used to assure adequate protection against injury.
TABLE OF CONTENTS
IMPORTANT SAFETY INSTRUCTIONS................................................... 2
TABLE OF CONTENTS ............................................................................ 3
FAMILIARIZATION.................................................................................... 4
OPERATING INSTRUCTIONS............................................................... 5-6
Pre-start Checklist ............................................................................................... 5
Starting & Operation Engine & Blades .............................................................. 5
Stopping Engine & Blades .................................................................................. 6
Adjusting Cutting Height.................................................................................... .6
Adjusting Front & Rear Axles ............................................................................. 6
Recycling Operation ............................................................................................ 6
MAINTENANCE INSTRUCTIONS............................................................. 7
Changing Engine Oil............................................................................................ 7
Annually (End of Each Season) .......................................................................... 7
Engine................................................................................................................ 7
Air Filter ............................................................................................................. 7
Engine Oil .......................................................................................................... 7
Fuel Filter........................................................................................................... 7
Storage Procedure............................................................................................... 7
ADJUSTMENTS AND REPAIR ................................................................. 8
Mower Blade Repair/Replacement ..................................................................... 8
TROUBLESHOOTING .............................................................................. 9
SERVICE SCHEDULE ............................................................................ 10
WARRANTY ............................................................................................ 11
3
Section 1 - FAMILIARIZATION
BLADE
CONTROL
UPPER
HANDLE
MID-HANDLE
BLADE CONTROL
CABLE CLAMP
ENGINE
THROTTLE
CONTROL
LOWER
HANDLE
(Bracket)
ROPE START
HANDLE
ENGINE
FOLDING
HANDLE KNOBS
MUFFLER
MOWER
DECK
FUEL TANK
DECK HEIGHT
ADJUSTMENT
MOWER DECK
RECYCLING COVER
ENGINE PRIMER
BUTTON (SEE
ENGINE MANUAL)
INTRODUCTION
This manual has been prepared for the operators of
the SNAPPER Series 12, 20” WALK BEHIND
MOWERS. Its purpose, aside from recommending
operating and routine service requirements, is to
promote safety through the use of accepted operating
practices. Read, Understand and Follow the
“IMPORTANT SAFETY INSTRUCTIONS” on Page 2
of this manual and all safety messages on the
mower, engine and attachments before operating the
machine.
NOMENCLATURE
The nomenclature drawing above, shows the
essential parts of the SNAPPER Series 12, 20”
WALK BEHIND MOWERS. It is recommended that
all operators of the mower become thoroughly
familiar with the controls, parts and operation of the
mower before operating. Specific details involving
the engine are found in the separate Engine Owner’s
Manual. Study these manuals before operating and
keep both handy for future reference.
4
Section 2 - OPERATING INSTRUCTIONS
2.1 PRE-START CHECK LIST
Make the following checks and perform the service
required before each start-up.
2.1.1. Check guards, deflectors, grass bag, adapter
and covers to make sure all are in place and securely
tightened.
2.1.2. Check blade control to insure it works freely.
See Figure 2.1.
2.1.6. Clean exterior surfaces of cutting deck and
engine of any accumulation of spilled fuel, dirt, grass,
oil, etc. Keep engine air intake screen and cooling
fins clear at all times.
2.2 STARTING & OPERATION
2.2.1. ENGINE & BLADE
(Primer Models)
1. Move engine speed control to the “Fast” (Rabbit)
position. See Figure 2.3.
2. Push primer button three times to start a cold
engine. NOTE: Do not use primer button to start
warm engine.
3. Pull blade control against handle.
4. Pull rope start handle to crank engine.
5. After engine starts, allow a brief warm-up until
engine runs smooth.
NOTE: Stop the engine (and blade) by releasing the
blade control.
BLADE CONTROL
(“OFF” POSITION)
HOLD BLADE
CONTROL
AGAINST
UPPER HANDLE
FIGURE 2.1
2.1.3. Check cutting height. Adjust to desired height.
2.1.4. Check engine oil and add oil as needed to bring
level up to the full mark. Refer to Engine Owner’s
Manual for oil specifications. See Figure 2.2.
OIL LEVEL CHECK
STARTING STANCE
PULL ROPE
START HANDLE
TO START
FIGURE 2.3
FIGURE 2.2
2.1.5. Add fuel to tank after pushing the mower
outside where fumes can safely dissipate. Make sure
cap is tightened after refueling. Refer to Engine
Owners Manual for specifications.
5
Section 2 - OPERATING INSTRUCTIONS
2. Reposition the rear axle by raising the rear
wheels off the ground, then pull in on one of the
spring loaded bushings until it clears the bracket.
Move to the desired height of cut position (four
positions are provided) and release the bushing.
Repeat the same procedure on opposite end of axle.
NOTE: Position rear axle bushings in the same
corresponding position as the front axle to keep
deck level. Refer to Figure 2.4.
2.3 STOPPING
Stop engine and blade by releasing the blade
control.
WARNING
Stop engine and mower blade by releasing the blade
control before adjusting cutting height.
2.4 CUTTING HEIGHT ADJUSTMENT
Positioning the axles in the lowest of the four
adjustment positions in the wheel brackets raises
the cutting deck to the highest cutting height which
is 2-1/2 inches. The top position provides the lowest
cut of 1/2 inch. See Figure 2.4.
WARNING
Before attempting any adjustments to the cutting
height or front baffle, STOP the engine, remove the
spark plug wire from the spark plug and secure wire
away from plug. DO NOT make any adjustments with
engine or blade running. Be extremely careful when
performing adjustments around engine. Engine is
extremely hot and can cause severe burns. Wear
heavy leather gloves when handling or working
around cutting blades. Blades are extremely sharp
and can cause severe injury.
WARNING
STOP engine and blade BEFORE attempting any
adjustments, maintenance, service or repairs.
Remove spark plug wire from spark plug and
secure spark plug wire away from spark plug.
Never attempt to adjust the cutting height while the
engine is running.
2.6 RECYCLING OPERATION
2.5 ADJUSTING FRONT & REAR AXLES
1. Reposition the front axle by raising the front
wheels off the ground, then pull in on one of the
spring loaded bushings until it clears the bracket.
Move to the desired height of cut position (four
positions are provided) and release the bushing.
Repeat the same procedure on opposite end of axle.
See Figure 2.4.
NOTE: For best recycling results, cut up to a maximum of
1” from grass and recycle ONLY when grass is dry.
1. Set all wheels in the highest cutting position.
2. Move engine speed control to “FAST” (Rabbit)
position.
3. Proceed mowing slowly. If grass is very dense,
lower each rear wheel bushing one notch lower than
the front wheel bushings to improve recycling
performance.
FRONT AXLE SHOWN
LOWEST
CUT
AXLE BUSHING
HIGHEST
CUT
CUTTING HEIGHT ADJUSTMENTS
FIGURE 2.4
6
Section 3 - MAINTENANCE
3.1 INTRODUCTION
To retain the quality of the mower, use genuine
SNAPPER replacement parts only. Contact a local
SNAPPER dealer for parts and service assistance.
For the correct part or information for a particular
mower, always mention model and serial number.
3. Place shallow pan underneath the approximate
center of the oil drain plug.
4. Loosen with ratchet and short extension, but do
not remove oil drain plug. Loosen plug until you can
turn it with your fingers.
5. Lower the mower down and place the piece of
wood under left rear wheel. Reach back under
mower and remove drain plug and allow oil to drain
out completely in pan. Some oil will spill onto hands,
immediately wipe hands clean with cloth rags.
6. Tilt mower back up and replace drain plug.
Tighten securely but do not over tighten.
7. Fill engine with oil as specified in Engine Owner’s
Manual. Thereafter, change oil after each 25 hours
of use.
3.2 SERVICE - AFTER FIRST 5 HOURS
3.2.1. CHANGE ENGINE OIL
WARNING
Before attempting any adjustments or repairs, STOP
the engine, remove the spark plug wire from the
spark plug and secure wire away from plug. Engine
oil is extremely hot and can cause severe burns.
Allow engine oil to cool before draining to prevent
injury.
3.3 ANNUALLY (END OF EACH SEASON)
Perform all maintenance as described in the maintenance
schedule.
3.3.1. Engine
Service engine according to engine owner’s manual.
3.3.2. Air Filter
Refer to engine owner’s manual for service instructions.
3.3.3. Engine Oil
Refer to engine owner’s manual for service instructions.
1. Disconnect spark plug wire and secure end away
from plug. The items needed to perform oil change
are: (2) cloth rags, (1) 3/8” drive ratchet with a short
extension and (1) shallow pan.
2. Tilt mower up on its rear wheels for access to the
oil drain plug located underneath the mower deck.
Do not tilt mower with spark plug or carburetor
down. See Figure 3.1.
3.4 STORAGE PROCEDURE
Refer to the Engine Owner’s Manual for directions
regarding engine storage preparations. Prepare the
mower for “end of season” storage as follows:
1. Drain fuel from fuel tank and let engine run until
all fuel is out of the carburetor.
2. Disconnect and remove the spark plug wire
away from spark plug before any other
preparations are made!
3. Tape all openings closed to prevent spraying
water into exhaust or air intakes during washing.
4. Tilt mower up on its rear wheels and thoroughly
clean the underside of the deck. Do not tilt mower
with spark plug or carburetor down. Scrape away
any accumulation of grass with a putty knife and or
wire brush.
5. Lubricate all exposed metal with a light coating of
oil to prevent corrosion.
6. Loosen handle knobs. Carefully fold the handles
forward, “flexing” the control cables to prevent cable
damage.
7. Store the mower in a shed or other dry area,
protected from weather.
REMOVE
OIL PLUG
FIGURE 3.1
7
Section 4 - REPAIR & ADJUSTMENTS
WARNING
BLADE HUB
(ON ENGINE)
Before attempting any adjustments or repairs, STOP
the engine, remove the spark plug wire from the
spark plug and secure wire away from plug. Wear
heavy leather gloves when handling or working
around cutting blades. Blades are extremely sharp
and can cause severe injury.
END VIEW
BLADE
4.1 MOWER BLADE REPAIR/REPLACEMENT
4.1.1. STANDARD BLADE WEAR LIMIT
1. Inspect blade frequently for signs of excessive wear
or damage. See Figure 4.1.
FLANGE
CONE
WASHER
NEW BLADE
SPECIAL
RETAING
CAPSCREW
FIGURE 4.2
4. Sharpen blade on a grinding wheel at an angle of
22 to 28 degrees. The cutting surface should extend
inward about 3-1/2” from the tip. See Figure 4.3.
WEAR LIMIT
(NOTCH STARTS)
DANGEROUS CONDITION !
DO NOT USE ON MOWER !
REPLACE WITH NEW BLADE.
BLADE
TIP
FIGURE 4.1
2. Replace the blade if it is badly chipped, bent,
noticeably out of balance or has cracks or notch in
either tip. See Figure 4.1. Replace with new blade
Part No. 2-6407.
4 1/4”
*PLUS OR MINUS 3
DEGREES
WARNING
FIGURE 4.3
Never use a cutting blade that shows signs of
excessive wear or damage. Refer to Section on
MOWER BLADE REPAIR/REPLACEMENT for proper
blade inspection and service procedures.
5. Check blade for balance. If necessary, correct
balance by grinding heavy end of blade.
6. Reinstall blade. Refer to Figure 4.1. Check torque
of blade retaining cap screw. Recommended torque
should be 30 to 40 ft. lbs.
4.1.2. BLADE SHARPENING
1. Disconnect spark plug wire and secure end away
from plug.
2. Tilt mower up on its rear wheels. Do not tilt
mower with spark plug or carburetor down.
3. Remove blade. See Figure 4.2.
8
TROUBLESHOOTING
PROBLEM
Engine Will Not Start
Using Recoil Starter
PROBABLE CAUSE
1. Fuel tank empty.
2. Engine needs priming.
3. Spark plug wire disconnected.
1. Fill fuel tank with fresh fuel.
2. Push primer bulb three times.
3. Place spark plug wire onto spark plug.
Engine Stalls or Stops 1. Blade control is released or is not being held securely
After Running
against handle.
2. Fuel tank empty.
3. Engine air pre-cleaner and or air cleaner dirty.
4. Spark plug defective or gap set improperly.
5. Water, debris or stale fuel in fuel system.
Engine Loses Power
1. Engine air pre-cleaner or air cleaner dirty
2. Spark plug faulty.
3. Water, debris or stale fuel in fuel system.
Engine Backfires When 1. Throttle control set too “FAST”.
Turned To “STOP”
Excessive Vibration 1. Damaged, out of balance or bent mower blade.
2. Loose blade components.
Cutting Grass
Improperly
1. Cutting height too low or high.
2. Engine speed too slow.
4. Terraced cut, side to side.
5. Excessive deck pitch, front to rear.
6. Cutting blade dull or damaged.
1. Blade control should be held securely against
handle at all times during operation of mower.
2. Fill with fuel to proper level.
3. Clean free of all debris.
4. Service spark plug.
5. Drain and clean fuel system.
1. Clean or replace filters.
2. Service spark plug.
3. Drain and clean fuel system.
1. Set throttle control to “SLOW” and allow engine to
idle.
1. Service mower blade.
2. Service and tighten loose parts.
1. Adjust cutting height.
2. Move engine speed control to “FAST” position.
4. Adjust height of cut.
5. Adjust height of cut.
6. Sharpen cutting edges or replace blade.
Poor Grass Discharge 1. Engine speed too slow.
2. Forward speed too fast.
3. Grass is wet.
4. Excessively worn or damaged blade.
5. Build up of grass clippings and debris under deck.
6. Improper blade installed on deck.
7. Blade installed improperly on deck.
Oil Leaking
CORRECTIVE ACTION
1. Leaking engine case.
1. Move engine speed control to “FAST” position.
2. Move ground speed control to a slower speed.
3. Mow when grass is dry.
4. Service mower blade.
5. Clean deck.
6. Install proper SNAPPER blade.
7. Install blades properly.
1. Contact authorized SNAPPER dealer.
2. Check and tighten drain plug.
3. Make sure dip stick or oil filler cap is securely
in place.
9
SERVICE SCHEDULE
ITEM
Engine Oil
SERVICE PERFORMED
REF.
EACH
USE
X
5
HRS
25
HRS
Check Oil Level
Page 8
Initial Oil Change
Page 8
Periodic Oil Change
Page 8
X*
Clean Sponge Element
X**
50
HRS
100
HRS
X
Air Cleaner
Clean or Replace
Engine Manual
& Page 9.
Engine Manual.
Spark Plug
Replace
Engine Manual.
X
Clean Shroud & Fins
Engine Manual
& Page 9
Page 10
X**
Air Pre-Cleaner
Engine Cooling
System
Mower Blade
Check For Wear, Damage
X
& Replacement
Clean Debris
Page 9
Mower Deck
X
Accumulation
* Change oil every 25 hours when operating under heavy load or high temperatures.
**Clean more often under dusty conditions or when air debris is present
10
X**
EACH
SEASON
10 - 5 - 2 YEAR LIMITED WARRANTY
TRANSMISSION GEAR BOX and MOWER DECK - 10 YEARS
For ten (10) years from purchase date for the original purchaser’s residential non-commercial* use,
SNAPPER, through any Snapper dealer, will replace or repair free of charge, the mower deck or transmission
gear box if found upon examination by the factory to be defective in material or workmanship or both.
COMPONENTS PARTS - 5 YEARS
For five (5) years from purchase date for original purchaser’s residential non-commercial* use, Snapper,
through any Snapper dealer will replace free of charge any part or parts found upon examination by the factory
to be defective in material or workmanship or both.
ENGINE - 2 YEARS
The engine on this product is warranted by the engine manufacturer for two (2) years for the original
purchaser’s non-commercial* use. (See engine manufacturer’s warranty statement for details.)
BATTERIES
Batteries are warranted separately and have one (1) year prorated warranty with a ninety (90) day free
replacement period.
DISCLAIMER OF WARRANTIES
Implied warranties including those of merchantability and fitness for a particular purpose, are limited to five (5)
years from purchase date for the original purchaser’s residential, non-commercial use, for ninety (90) days from
purchase date for the original purchaser’s commercial, rental, or other non-residential use, and to the extent
permitted by law, any and all implied warranties are excluded. This is the exclusive remedy. Liabilities for
consequential damages, under any and all warranties are excluded.
Some states do not allow limitations on how long an implied warranty lasts, or do not allow the exclusion or
limitation of incidental or consequential damages, so the above limitation or exclusion may not apply to you.
All transportation cost incurred by the purchaser in submitting material to a SNAPPER dealer for replacement
under this warranty must be paid by the purchaser.
This warranty does no apply to parts that have been damaged by accident, alteration, abuse, improper
lubrication, normal wear (things such as belts, blades, driven disc or any other normal wear item). This warranty
does not cover tune-ups or other adjustments required in the normal use of the product.
There is no other express warranty.
This warranty gives you specific legal rights, and you may also have other rights which vary from state to state.
*Any use other than on the purchaser’s residential lawn constitutes commercial use.
WARNING: THE USE OF REPLACEMENT PARTS OTHER THAN GENUINE SNAPPER PARTS MAY
IMPAIR THE SAFETY OF SNAPPER PRODUCTS AND WILL VOID ANY LIABILITY AND WARRANTY BY
SNAPPER ASSOCIATED WITH THE USE OF SUCH PARTS.
IMPORTANT: Please fill out the attached SNAPPER Product Registration Card immediately and mail to:
SNAPPER, 535 Macon Rd., McDonough, Ga. 30253
11
Safety Instructions & Operator’s Manual for
20” STEEL DECK WALK MOWERS SERIES 12
Models: R205012 & NR205012
COPYRIGHT © 1996
SNAPPER INC.
ALL RIGHTS RESERVED
MANUAL No. 3-5806 (I.R. 8/96)
PRINTED IN U.S.A.
12