1
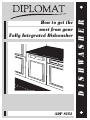
ADP 8252
D I S H WA S H E R
How to get the
most from your
Fully Integrated Dishwasher
A Helping Hand on the Home Front
From now on washing dishes, glassware, cutlery and saucepans should be as simple
as loading your dishwasher and switching on.
We strongly recommend you take the
time to read this leaflet fully from cover
to cover. It may seem like a chore,
but it'll pay off in the long run.
Contents
Page No.
1,2 & 3
Installation
4&5
Loading
6
Your Dishwasher
7
Detergent and Rinse Aid Dispenser
8
Water Softener
9 & 10
The First Wash
11
Table of Programs
12
Cleaning and Maintenance
13
How to Deal with Small Problems
14
General and Technical Details
15 & 16
Not Working Properly?
17
Electrical Connections
18
12 Month Guarantee
Installation
1
Your brand new dishwasher complies with stringent EEC specifications and is fully compatible
with any 600mm deep kitchen units. If you are reasonably handy at DIY, installing your
dishwasher should be relatively straight forward as long as you stick to the following guidelines.
If you have any doubts about installing this product we suggest you seek professional advice.
IMPORTANT
The electrical supply, water supply and drain should NOT be positioned directly
behind the appliance. When the appliance is located and fixed in position it must be
possible to switch off and disconnect both electrical and water supplies.
Connection to a Water Supply
Your dishwasher has been specially designed to heat its own water. This means that you'll only
have to pay to heat water actually consumed by the appliance. What's more, the dishwashing
process itself is designed with economy in mind. Within each cycle, hot water is filtered and recirculated many times before being expelled as waste.
We recommend that your dishwasher is permanently plumbed in to the cold water supply. To do
so, connect the pipe with its 3/4" BSP female connector to a suitably threaded tap. Always run
water through the pipe before connection to remove any debris. Ensure that there are no kinks
in the tube and always fit the black rubber filter supplied with the dishwasher at the appliance
inlet connection.
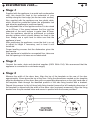
Connection to Waste Pipe
The discharge hose is at the back of your dishwasher. On no account shorten this pipe and
always ensure it hangs vertically.
Plumb the pipe into a waste outlet between 320 and 800mm above floor level. This outlet
should be at least 40mm in diameter, providing an air break, and ensuring an efficient flow of
water.
On no account seal the waste pipe as this can create a suction effect in the wrong direction.
Plumb in your dishwasher as illustrated below.
Capacity
Your dishwasher has a capacity of 12 full place settings. That's 12 of everything-dinner, soup,
side and dessert plates plus the accompanying cutlery and selection of saucepans, so you
shouldn't be short of space.
Before you start
Check the salt rinse-aid levels and make sure that you've added sufficient detergent.
Installation cont...
2
Stage 1
Supplied with the appliance is a metal anti-condensation
strip, this should be fixed to the underside of your
worktop along the front edge (via the two outer screws).
Also supplied with the appliance are two plastic skids,
which should be positioned below the adjustable feet
and allow the appliance to positioned easily.
The adjustable feet of the appliance allow it to be raised
up to 870mm, if the space between the floor and the
underside of the work surface is grater than 870mm,
then the appliance should be positioned on suitable
wooden spacers which should always be fixed to the
floor. Always use a spirit level to make sure that the
appliance is level.
After positioning the appliance, screw the feet in or out
to adjust its height if necessary, and to level it until
horizontal.
Proper levelling ensures that the dishwasher gives the
best service.
If the appliance is installed on a carpeted floor, take care
that the openings in its base are not obstructed.
Stage 2
Connect the water, drain and electrical supplies (230V 50Hz 13A). We recommend that the
appliance is connected to a cold water supply.
Stage 3
Measure the width of the decor door. Align the top of the template on the rear of the door
approximately 10mm above the top of the door. Using the dimensions marked on the template
align the dimensions of the decor door with corresponding dimensions on the right hand side of
the template. Mark through the identified position of the side fixing bracket with a bradawl.
Repeat this process for the left hand side fixing bracket (ensure the left handside dimension of
the template is aligned with the width of the decor door previously measured). Align the fixing
bracket over the pre-marked holes and secure in position with the screws provided.
Installation cont...
3
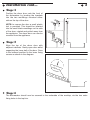
Stage 4
Position the decor door onto the front of
the dishwasher by locating the brackets
into the two mouldings mounted either
side on the top of the door.
NOTE: to remove the door a small plastic
tool is provided. This should be inserted
into the small black mouldings on the side
of the door, rotated and pulled away from
the appliance. The decor door can now be
removed from the appliance.
Stage 5
Align the top of the decor door with
adjacent cabinets. Gently open door whilst
supporting the lower half of the door. Once
in the lowered position fix the lower fixing
screws as shown in the diagram.
Stage 6
The dishwasher should now be screwed to the underside of the worktop, via the two outer
fixing holes in the top trim.
Loading
4
The dishwasher has a capacity of 12 place-settings including serving dishes.
Before loading the dishes, remove the largest scraps of food to avoid blocking the filter.
Very dirty pans of frying-pans must be soaked in water before they are placed in the
dishwasher, to allow food waste to be removed more easily.
Put pans in the bottom basket.
Loading the bottom basket
Thanks to the particular vigorous washing action of the bottom spray arm, the bottom basket is
the right place for the dishes with the toughest dirt. It has supports for plates and a basket for
cutlery of all kinds (if you have to wash only a little cutlery, just one basket can be used). The
bottom basket can be filled with plates, soup dishes, dessert and serving dishes, pans and lids.
Place the main course and dessert plates on the racks provided, taking care that there is
always a gap between one plate and the next. They must always be vertical to allow the water
to pass freely. Pans must always be upside down. All loading combinations and variations are
possible, provided dishes and pans are placed so that all dirty surfaces are exposed to the jets
of water from below, and the water is able to flow freely.
Loading the Top Basket
The top basket is intended to take only small and medium items such as glasses, small plates,
coffee and tea cups, shallow bowls and light heat resistant plastic objects. When the top basket
is used in the lower position, plates with light dirt can also be placed in it. Load plates with the
top, and other recipients with the opening facing down. A few washes will give you experience
of the best way to arrange cups and glasses in two layers. Large and small plates can be
placed in the centre, in the supports provided.
Loading cont...
5
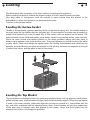
Adjusting the Top Basket
The top basket can be in two different
positions depending on the height of the
dishes.
- Pull out the right-hand basket guide;
- remove the stop, first releasing it as
shown in the diagram;
- push the guide to free the wheels;
- fit the upper or lower pair of wheels into
the guide depending on the setting
required;
- return the stop to its original position.
This will allow large diameter plates to be
loaded into the bottom basket.
What not to Load
Some objects are best washed by hand. These include large silverware items, hand painted
crockery, very sot plastics, antique porcelain and utensils with polished wood handles.
Since dishwasher detergents tend to be abrasive, "soft" glassware, cut glass, and lead-crystal
ware should not be washed in the dishwasher.
These days, manufacturers often display the "Dishwasher Safe" stamp on items that are robust
enough to cope with regular dishwashing.
If you ever hear knocking or a breaking noises during a cycle, stop the machine at once.
NEVER OPEN THE DOOR WHILST A CYCLE IS IN PROGRESS
Having stopped the machine, wait 15 minutes to allow the crockery to cool down before
opening the door to attend to any problem.
IMPORTANT NOTE
In the interest of general safety do not place long bladed knives in the cutlery basket.
These items should be laid flat, so as not to cause potential accidental injury when
unloading your dishwasher.
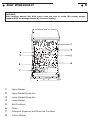
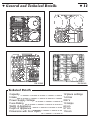
Your Dishwasher
6
WARNING
After loading, ensure that both spray arms are free to rotate. We cannot accept
responsibility for damage caused by incorrect loading.
1
2
3
4
5
6
7
8
Upper Basket
Upper Basket Spray Arm
Lower Basket Spray Arm
Lower Basket
Salt Container
Filters
Detergent Dispenser and Rinse Aid Container
Cutlery Basket
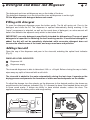
Detergent and Rinse Aid Dispenser
7
The detergent and rinse aid dispenser are on the inside of the door.
The detergent dispenser is on the left and the rinse aid dispenser is on the right.
Fill the dispenser with detergent before each wash.
Filling with detergent
To open the detergent dispenser press the button gently. The lid will spring out. Pour in the
detergent and close the lid. The dispenser is opened automatically during washing. If the
"super" programme is selected, as well as the usual dose of detergent, an extra amount will
have to be added to the adjacent cavity which is also below the lid.
IMPORTANT: use only detergents specifically intended for dishwashers. The use of good
detergents is important in obtaining the best washing results. If insufficient detergent is
added, the dirt will not be completely eliminated, while excessive detergent does not
increase the effectiveness of the wash, and may cause foam and pollution.
Adding rinse-aid
Open the cap of the dispenser and pour in the rinse-aid, watching the optical level indicator
(Fig. 2).
RINSE-AID LEVEL INDICATOR
Dispenser full
Dispenser empty
The rinse-aid dispenser is able to take about 140 c.c. of liquid. Before closing the cap or hatch,
wipe away any spills of rinse-aid with a soft cloth.
The rinse-aid is added to the water automatically during the last rinse; it speeds up the
drying process and prevents the formation of stains and scale deposits on the dishes.
To adjust the dosage, turn the selector on the dispenser to the desired position, the doses are
proportioned to the numbers indicated (Fig. 2). Increase the dose if the washed dishes are dull
or show round marks. If dishes are sticky or have whitish streaks, reduce the dose. The
appliance leaves the factory with a mid-range setting.
1.
2.
Water Softener
8
The dishwasher is equipped with an automatic softener which uses regenerating salts specially
developed for dishwashers to remove hardening substances from the water.
Hard water leaves whitish marks on the dry dishes, and dishes gradually lose their shine over
time. The appliance is preset to dispense the right amount of salt on the basis of the hardness
of the mains water.
N.B. The appliance leaves the factory with a medium setting (2).
IMPORTANT NOTE: users are asked to take great care to close the salt container
carefully after filling. It is important that detergent, or water containing it, should not
enter the salt container, since this would impair operation of the regeneration system. In
this case, the warranty would no longer apply.
Filling with salt
Use only regenerating salt for household dishwashers. If salt pastilles are used, do not fill
container completely.
There is a container on the bottom of the dishwasher into which the regeneration salt has to be
poured. After taking out the bottom basket, unscrew the cap off by turning it anti-clockwise and
pour in the salt using the funnel supplied with the dishwasher. Before unscrewing the cap back
into place, remove salt residue from the opening of the container. The water softener contains
about 1,7 kg of salt.
N.B. when the appliance is used for the first time, one litre of water has to be poured into
the tank as well as the salt.
The salt container must always be topped up before a wash, so that any overflowing salt
solution will be removed immediately by the water. If this solution is left inside the tank, it might
cause corrosion.
Adjusting the water softener
The dishwasher is fitted with a device which allows adjustements to the level of hardness of the
mains water. It is inside the plastic ring-nut on the right-hand side inside the dishwasher and
allows setting 5 levels. Set the water softener after checking the hardness of your water in
accordance with the table below.
WATER HARDNESS
French
degrees (°dF)
SETTING
0÷4
0÷7
N. 1 NO SALT
5÷9
8 ÷ 15
N. 1
10 ÷ 22
16 ÷ 37
N. 2
23 ÷ 29
38 ÷ 50
N. 3
30 ÷ 35
51 ÷ 60
N. 4
36 ÷ 41
61 ÷ 70
N. 5
German
degrees (°dH)
The First Wash
9
Switching on
The dishwasher must not be turned on until the dishes have been loaded, the dispenser has
been filled with detergent, a check has been made that the spray arms turn freely, and the door
has been shut. The water tap must also be turned on and salt placed in the container.
To simplify programming and communication, the dishwasher is equipped with an "Information
Display" (see diagram page 10).
6
7
8
9
10
Indicates the programme selected/delayed start/alarms.
Indicates that a delay has been set before the start of the programme.
No rinse aid warning light.
No regenerating salt warning light.
Indicates that an economy programme has been selected.
Setting the programme "P"
All programming operations are accompanied by a short beep to indicate reception; if you do
not hear anything when a button is pressed, the programme selected does not provide this
function. To select the most suitable programme for the dishes to be washed, comply carefully
with the table in the manual which follows, especially in the beginning. This table lists the
programmes available in relation to the type of dishes, their strength and resistance to
temperature, and how dirty they are. With this fully integrated dishwasher, the washing
programmes are selected with the door partly open. Once the most suitable programme has
been identified, it is set by pressing the "programme selection" ("P") button until the
corresponding number appears on the information display.
N.B.: "P0" on the display means that no washing programme has been selected. This
indication remains on the display until the programme selection button is pressed, at this point
the display will show the last programme carried out. Each time the button is pressed, the
system will scroll through the programme numbers from that number onward.
Start-up
At this point, to start the dishwasher simply close the door. A double beep will inform you that
the programme is starting.
Switch-off
The end of the washing programme is signalled by an on/off beeper and the appearance of
"P0" on the display.
The First Wash cont...
10
Deleting/Changing the Programme
To abort a programme in progress simply open the door and select programme "P0". When the
door is closed, the dishwasher will force an early end to the programme.
To change a programme already in progress simply set the new number corresponding to the
programme desired. When the door is closed, the dishwasher will automatically start the new
programme.
Removing the dishes
It is better to wait at least 20 minutes after the end of the program before removing the dishes,
so that they will be dry and not too hot.
Empty the bottom basket first, so that any drops of water left in the top basket will not fall onto
dishes still in the bottom one.
Programme Delay
Allows the start of washing programmes to be delayed by a minimum of 1 hour to a
maximum of 9. This allows you to operate the dishwasher during the hours you prefer. When
the "programme delay" button is pressed, the number of hours (9, 8,...1) will appear on the
display, together with the "clock" symbol which remains there until the programme starts. The
number of hours disappears automatically if the keyboard is not used for five seconds of if any
button other than "programme delay" is pressed. To see how many hours are left before the
programme starts, simply press the corresponding button once.
Economy programme selection "ECO"
This button can be pressed to reduce the temperatures in programmes 4-8, allowing electricity
saving and reducing the duration of the washing cycle.
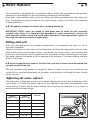
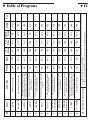
1
P
6
7
8
9
10
ECO
(****) RINSE
8
NO
70°C
70°C
70°C
55°C
55°C
65°C
65°C
45°C
45°C
45°C
NO
Wash
NO
YES
YES
YES
YES
YES
YES
YES
YES
YES
YES
NO
1 st
Rinse
YES
YES
YES
YES
NO
NO
NO
NO
YES
NO
NO
NO
2 st
Rinse
65°C
70°C
70°C
70°C
65°C
65°C
65°C
65°C
NO
55°C
65°C
NO
YES
YES
YES
YES
YES
YES
YES
YES
NO
YES
YES
NO
Rinse Aid
Drying
Rinse
-
-
*
-
*
-
*
-
-
*
-
-
Eco
* = Press "ECO" button.
** = Programme recommended with a "new generation" detergents containing enzymes.
*** = Reference cycle according to EN 50242.
**** = Before starting programme No. 8, check that the hatch of the detergent dispenser.
NO
45°C
Very dirty oans and dishes with a lot of dried on
food, containing also starch (ex. pasta, rice,
semolina, potatoes, eggs, sauces, roasts).
Dishes requiring "refreshing".
NO
N.B. Only SOAK with partial load.
SUPER
7
(without prewash)
Dishes with normal dirt and pans, with dried
residues containing starches.
YES
Very dirty pans and dishes with dried residues
containing starches.
STRONG
6
STRONG
NO
Dishes with light dirt with dried residues
of foods containing starches.
ECO BIO
(***) EN 50242
5
6
YES
Dishes with light dirt with dried residues
of foods containing starches.
BIO (**)
5
NO
Dishes with normal dirt without dried residues
or starches.
DAILY
4
YES
Dishes with normal dirt with dried residues of
foods containing starches.
NORMAL
4
NO
Dishes with light or medium dirt with no dried
residues or starches.
RAPID
3
NO
CRYSTAL
2
YES
Delicate china or glassware which cannot
withstand high washing temperatures. Small non
dried food remains which do not contain starch.
DELICATE
2
Preliminary rinsing of dishes.
Prewash
NO
SOAK
1
Load Type
Dishes with light dirt (glasses, cups).
Cycle
No.
Table of Programs
11
Cleaning and Maintenance
12
Cleaning the Appliance
Make sure that the appliance is disconnected from the electrical mains.
The outside surfaces and the inside of the door of the dishwasher must be cleaned regularly
with a soft, damp cloth.
Never use abrasive or acid detergents.
The door seals must be cleaned with a damp sponge. The outside of the appliance may be
cleaned with a normal detergent for painted surfaces.
Cleaning the Water Intake Filter
Clean the filter at the appliance water inlet connection periodically. Turn off the tap, unscrew the
end of the water filler hose, remove the black filter and clean it gently under a jet of running
water, then replace the filter and screw the hose back in place.
Cleaning the Spray Arms
The spray arms can easily be removed to allow periodic cleaning of the nozzles and prevent
any clogging. To remove the top arm, unscrew the retainer ring-nut; the bottom arm will simply
pull off after releasing the two catches. Wash them thoroughly under a jet of water.
Cleaning the Filter Unit
The central filter should be removed for inspection periodically and cleaned if necessary. To
remove it, press the tangs lightly, turn anticlockwise and lift out. Remove the central filter by
pushing from below and separate it from the microfilter; then extract the central plastic filter
from its seat. The rectangular filter can now be just lifted out.
Clean filters in running water using a stiff brush.
It is essential to clean filters carefully as instructed above, as the dishwasher cannot operate
with a fouled filter.
Users must also take care to replace the cleaned filters correctly, to avoid damage to the
washing pump.
How to Deal with Small Problems
If the dishwasher is to be out of use for a long period
The following precautions must be taken:
- perform two consecutive pre-rinses;
- disconnect the plug from the mains;
- leave the door slightly open so that no unpleasant smells can form;
- turn off the water tap.
Before re-using the dishwasher after a lay-off
- Re-connect the plug to the power socket;
- check that no sludge or rust has been deposited in the water supply pipeline;
- allows water to flow freely from the supply tap for a few minutes;
- re-connect the filter hose and turn the water tap back on.
13
General and Technical Details
EN 50242
14
EN 50242
Technical Details
Capacity
Intake
Power Supply Voltage
Fuse Rating
Width of Appliance
Depth of Appliance
Dimension with Door Open
12 place settings
1÷9 bar
230 V
13 Amps
60 cm
57 cm
116 cm
Not Working Properly?
15
Check These Points First
The electronic control system is capable of detecting 6 possible dishwasher malfunctions.
Therefore before calling the After-Sales Service, users are advised to consult the list below, and
in all cases to make a note of the error messages.
Alarm E1
NOT USED ON THIS APPLIANCE.
Alarm E2
The system which limits the water level inside the dishwasher (Safety Level) has been tripped.
Since this might be a temporary fault, try reprogramming the machine. If the malfunction
persists, call the After-Sales Service.
Alarm E3
The dishwasher is not able to heat the washing water correctly. To establish the cause of the
fault call the After-Sales Service.
Alarm E4
The temperature monitoring system has failed. Switch off the dishwasher, switch it back on and
restart a washing programme. If the alarm appears again, call the After-Sales Service,
specifying the number of the error.
Alarm E5
The dishwasher is not able to take in water. Check that:
A) the water cock is open;
B) the filter in the pipe is not blocked;
C) there are no restrictions in the filter pipe.
After making these checks, close the door. The washing programme will restart from the point
where it was interrupted. If the alarm persists call the After-Sales Service.
Alarm E6
The dishwasher is unable to discharge the water. Check that:
A) the drain hose is not crushed;
B) the drain line is not blocked.
After making these checks, close the door. The washing programme will restart from the point
where it was interrupted. If the alarm persists call the After-Sales Service.
Not Working Properly cont...
If the dishes are not clean at the end of the program
Check whether:
- the right washing program has been used;
- the detergent dispenser has opened correctly;
- the right amount of detergent has been placed in the dispenser;
- the dishes have been arranged correctly;
- the spray-arms turn freely;
- the water tap has been turned on;
- the spray arm nozzles are blocked;
- the filler hose filter is fouled;
- the main water pressure is correct;
- there is salt in the water softener.
If the dishwasher does not work
Check that:
- the connection to the power supply socket and the fuse;
- there is not a power supply blackout;
- the water tap is turned on;
- the door is closed correctly;
- the filler hose filter is not fouled;
- the filler and drain hoses are not creased.
16
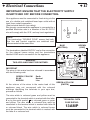
Electrical Connections
17
IMPORTANT: ENSURE THAT THE ELECTRICITY SUPPLY
IS SWITCHED OFF BEFORE CONNECTING.
Your appliance must be connected to fixed wiring via the
use of a double pole switched fused spur outlet with at
least 3mm contact separation.
(See technical data for fuse rating).
We strongly recommend the appliance is connected by a
qualified electrician who is a member of the N.I.C.E.I.C
who will comply with the I.E.E. and any local regulations.
NOTE
The terminology "DOUBLE POLE" means that both
the live and neutral supplies are switched and
disconnected at the same time.
BLUE
(NEUTRAL)
BROWN
(LIVE)
The terminations labelled SUPPLY are for the connection
for the internal house wiring and the terminations
labelled LOAD are for connection for the appliance.
- WARNING THIS APPLIANCE MUST BE EARTHED.
IMPORTANT
The wires in this mains lead are coloured in accordance
with the following code:
GREEN / YELLOW
BLUE
BROWN
Earth
Neutral
Live
At the colours of the wires in the mains lead of this
appliance may not correspond with the coloured
markings identifying the terminals in your spur box,
proceed as follows.
The wire which is coloured green and yellow must be
connected to the terminal which is marked with the letter
E or by the earth symbol
or coloured green or green
and yellow. The wire which is coloured blue must be
connected to the terminal which is marked with letter N
or coloured black. The wire which is coloured brown
must be connected to the terminal which is marked with
the letter L or coloured red.
GREEN & YELLOW
(EARTH)
TECHNICAL DATA
FUSE RATING:
13AMP
12 Months Guarantee
18
GUARANTEE CONDITIONS
(a) Any claim during the period of the guarantee MUST
BE ACCOMPANIED WITH THE RECEIPT relating to the
original purchase.
(b) The unit must be correctly installed and operated in
accordance with the manufacturer's instructions and
used for normal domestic purposes.
(c) The guarantee does not cover accidental damage,
misuse or alterations which are likely to affect the units.
(d) The guarantee is invalid if the unit is tampered with,
or repaired by any unauthorised person.
(e) The guarantee in no way affects your statutory rights.
(f) Mainland U.K. only.
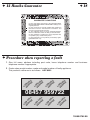
Procedure when reporting a fault
1. Give full name, address including post code, home telephone number and business
telephone number if appropriate.
2. Quote sales receipt number, make and model number of faulty appliance.
LO
SE W
RV CA
IC LL
E
LO
SE W
RV CA
IC LL
E
LO
SE W
RV CA
IC LL
E
LO
SE W
RV CA
IC LL
E
This product's reference is as follows: ADP 8252
LO
SE W
RV CA
IC LL
E
LO
SE W
RV CA
IC LL
E
LO
SE W
RV CA
IC LL
E
LO
SE W
RV CA
IC LL
E
08457 959722
19590 0765 00