1
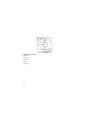
Slim 3-CD Stereo
Instructions/ Warranty
SA248
Instructions
Slim 3-CD Stereo
FCC Information
For CD player section. This device complies with Part 15 of the FCC Rules. Operation is subject to
the following two conditions: (1) This device may not cause harmful interference and (2) this device
must accept any interference received, including interference that may cause undesired operation.
Changes or modifications not expressly approved by manufacturer may void the user’s authority to
operate this equipment.
Note:
This equipment has been tested and found to comply with the limits for a Class B digital device,
pursuant to part 15 of the FCC Rules. These limits are designed to provide reasonable protection
against harmful interference in a residential installation. This equipment generates, uses and can
radiate radio frequency energy and, if not installed and used in accordance with these instructions,
may cause harmful interference to radio communications. However, there is no guarantee that interference will not occur in a particular installation. If this equipment does cause harmful interference
to radio or television reception, which can be determined by turning the equipment off and on, the
user is encouraged to try to correct the interference by one or more of the following measures:
• Reorient or relocate the receiving antenna.
• Increase the separation between the equipment and receiver.
• Connect the equipment to an outlet on a circuit different from that to which the receiver is connected.
• Consult an experienced radio/TV technician for help.
For Safe and Efficient Operation
Do not damage power cord.
When not in use, disconnect the power cord from the outlet. Grasp the plug, not the cord, when
disconnecting the unit.
If water should enter the unit, electrical shock or a malfunction may result. Use in an area where
there is low humidity and dust.
Do not disassemble or alter the unit in any way.
SA248
Do not use in areas where extremes in temperature occur (below 40°F/5°C or exceeding 95°F/35°C),
or where unit may be exposed to direct sunlight.
Because of the CD player’s extremely low noise and wide dynamic range, there is a tendency to turn
the volume on the amplifier higher than necessary. Doing so may produce an excessively high output
from the amplifier, which can cause damage to the speakers.
Sudden changes in the surrounding temperature can cause dew to form on the optical pickup lens
inside the unit. Under these conditions, the unit may be unable to operate properly. If this should
occur, remove all discs and allow the player to adjust to the surrounding temperature.
Power Supply
AC Power Cord
Plug small end of power cord into power jack marked AC on back of stereo. Insert plug in standard
polarized AC outlet.
Batteries
1. Remove battery panel on back of stereo by pushing down on tab while pulling tab away from
stereo.
2. Insert two AA batteries, being sure to align +/- ends with illustrations inside battery compartment.
(Remote also uses two AA batteries.)
Note:
• Do not mix new batteries with old or used batteries.
* Only use batteries of the same type and brand.
• Remove batteries and store them in a cool place if unit will not be used for an extended period of time.
• Carefully follow the battery manufacturer’s instructions for proper use and disposal.
• Do not allow young children to handle batteries.
• Spent or discharged batteries must be recycled or disposed of properly in compliance with all
applicable laws. For detailed information, contact your local solid waste authority.
SA248
Location of Stereo Controls
1. Moodlight
2. CD player 1
3. CD player 2
4. CD door
5. CD player 3
SA248
6. MEMORY/PROGRAM — programs AM/FM stations and CD tracks
7. STEREO/MONO — selects mono or stereo for FM stations
8. PRESET — accesses preset radio stations
9. CLOCK SET — sets clock
10. DYNAMIC BASS — turns BassXpander on and off
11. SURROUND — turns surround sound on and off
12. TREBLE — adjusts treble sound level
13. BASS — adjusts bass sound level
14. MOODLIGHT — turns moodlight on and off
15. CD SELECTOR — selects which CD plays
16. LINE IN/OUT — selects line-in or line-out while in line select mode
17. LINE SELECT — selects line select mode
18. LEFT AND RIGHT IN/OUT JACKS — connects with external equipment to perform in AUX
in or AUX out mode
SA248
19. REPEAT — repeats one CD track, one CD or all CDs
20. TUNER BAND — selects AM or FM
21. BACKLIGHT — turns LCD backlight on and off
22. SUREWAKE — turns SureWake on and off
23. STOP — stops CD play
24. PLAY/PAUSE — begins or pauses CD play
25. VOLUME KNOB — adjusts volume
26. CD-TUNER-SKIP forward — skips/searches CD track forward, scans radio stations upward,
advances time while setting clock or timer
27. CD-TUNER-SKIP backward — skips/searches CD track backward, scans radio stations downward, decreases time while setting clock or timer
28. POWER/STANDBY — turns power on or off or to standby mode
29. MUTE — turns off sound
30. TIMER — sets wake-up and shutoff time
31. SLEEP — selects auto shutoff sleep mode (120 min., 90 min., 60 min., 30 min.)
32. PHONES — headphone jack
33. SNOOZE — stops play for about 10 minutes
34. CD DOOR OPEN/CLOSE — opens and closes CD door
35. MODE — changes display from elapsed CD track time to remaining track time or entire CD
time (in CD mode), clock, or AM/FM station (in Tuner mode)
36. INFRARED SENSOR — receives infrared signals from remote control
37. LCD display
SA248
38. Carrying recess
39. Slot for wall-mounting bracket — connects to mounting bracket to mount unit on wall
40. FM antenna terminal — terminals for connecting single antenna (75Ω) or dipole antenna (300Ω)
41. Stand — opens to support main unit for desktop use
42. Left and right channel speaker terminals — inputs for speaker cables
43. Battery compartment — holds batteries for clock backup
44. Subwoofer jack — connects to optional external subwoofer (model SA249)
45. AC socket — connects to AC power cord
46. DC jack — connects to car/boat adapter
47. RESET — press to reset unit if experiencing abnormal operation
48. AM antenna terminal — connects single AM loop antenna
SA248
Remote Control Functions
1. POWER/STANDBY —- turns power on or off (standby mode)
2. NUMBERS — selects AM/FM preset stations or CD tracks
3. INTRO — plays first 10 seconds of each track
4. REPEAT — repeats one CD track, one CD or all CDs
5. PRESET — retrieves preset radio stations
6. STOP — stops CD play
7. 3 CD selection — chooses CD
8. MEMORY — programs CD tracks
9. TUNER — selects AM/FM tuner mode
10. STEREO/MONO — selects mono or stereo for FM stations
11. BASS — adjusts bass sound level
12. DYNAMIC BASS — turns BassXpander on and off
13. VOLUME — controls volume
14. MUTE — turns sound on and off
15. CD DOOR — opens and closes CD player doors
16. MOODLIGHT — turns moodlight on and off
17. TIMER — turns timer function on or off
18. LINE — selects line-in or line-out function
19. RANDOM — selects random CD play
20. CD-TUNER-SKIP forward — skips/searches CD track forward, scans radio stations upward,
advances time while setting clock or timer
21. CD-TUNER-SKIP backward — skips/searches CD track backward, scans radio stations downward, decreases time while setting clock or timer
22. PLAY/PAUSE — begins or pauses CD play
SA248
23. REMAIN/MODE — changes display from elapsed CD track time to remaining track time or
entire CD time (in CD mode), clock, or AM/FM station (in Tuner mode)
24. SLEEP — selects auto shutoff sleep mode (120 min., 90 min., 60 min., 30 min.)
25. SNOOZE — stops play for about 10 minutes
26. TREBLE — adjusts treble sound level
27. SURROUND — turns surround sound on and off
Connecting Speakers
Attach left and right speakers to center section by inserting speaker pegs into holes on both sides of
center unit. Slide speakers down to lock in place.
Connect left/right speaker lead wires to speaker terminals on back of center unit. Wires with black
stripe connect to red speaker terminals.
Wall Mounting
1. Position bracket on wall where you want to hang center unit. Drill two slightly undersized holes
for a firm fit.
2. Secure bracket to wall using dowels and two screws (included). Mounting screws should be
anchored to a solid wall support, such as a wood frame or concrete wall.
3. Mount center unit onto wall bracket. Make sure mounting tab on center unit fits securely into
mounting slot on wall bracket.
4. Use screws and plastic dowels to mount speakers if they are mounted away from center unit.
Wall mounting the speakers will yield the smoothest and most extended bass response. Next best
location would be in a bookcase or on a wall shelf 8-12" deep.
Getting Started
Power
STANDBY LED illuminates when stereo has been properly plugged in. Press POWER on stereo or
remote to turn stereo on. STANDBY LED will turn off and stereo will default to previously chosen
function.
SA248
Setting Clock
1. Open CD doors by pressing CD DOOR OPEN/CLOSE.
2. Press CLOCK SET once. Hour number will flash.
3. Use CD-TUNER-SKIP buttons to select the desired hour.
4. Press CLOCK SET again. Minutes number will flash.
5. Use CD-TUNER-SKIP buttons to select the desired minutes.
6. Press CLOCK SET again to set time. Numbers will stop flashing.
Playing CDs
Normal Play
1. Open CD doors by pressing CD DOOR OPEN/CLOSE.
2. Load up to 3 CDs on spindles with information side facing stereo. Discs can be removed by placing
a finger under cutout section next to disc and pulling disc up.
3. Close CD door. Wait a few seconds while unit reads all 3 CDs.
4. Use CD SELECT buttons to choose a CD and press PLAY/PAUSE to play. LCD will show number
of tracks and total recorded time on disc before play begins.
Use CD-TUNER-SKIP buttons to skip to desired track. PLAY/PAUSE temporarily pauses play.
STOP stops CD play.
Programmed Play
1. Load up to 3 discs in stereo.
2. Press CD SELECT buttons or PLAY/PAUSE to read all discs, then press STOP button.
3. Press MEMORY on remote control or Memory Program on stereo. Flashing “MEMORY”
appears on LCD over “00 P-01.”
4. Choose CD with first track to be programmed.
5. Use CD-TUNER-SKIP buttons to select desired track, or press CD SELECT to select another
CD, then choose a track (or tracks) from that CD.
6. Press MEMORY to store selection.
SA248
7. Repeat steps 3-6 to program additional tracks (up to 63 tracks).
8. Press MEMORY again until track for P-01 is displayed on LCD. Press MEMORY again to review
programmed tracks.
9. Press PLAY/PAUSE to play programmed tracks.
Press CD-TUNER-SKIP buttons to skip forward or backward through programmed tracks. Press
STOP twice, open CD door or turn off power to erase programmed tracks.
If stereo is switched to tuner during programmed CD play, stereo will resume programmed play
when PLAY/PAUSE is pressed.
Random Play
1. Press CD SELECT buttons or PLAY/PAUSE to read all discs, then press STOP button.
2. Press RANDOM on remote control. “RANDOM” indicator appears on LCD and selected disc
will begin random play. Press RANDOM again for random play for all discs.
To cancel random play, press RANDOM repeatedly until RANDOM indicator disappears on LCD.
Repeat Play
1. Press CD SELECT buttons or PLAY/PAUSE to read all discs, then press STOP button.
2. When track to be repeated is played, press REPEAT once. “REPEAT” indicator will appear on
LCD and the current track will be played repeatedly. Press REPEAT twice and the disc playing will
play repeatedly. Press REPEAT three times and all discs will play repeatedly.
To cancel repeat play, press REPEAT until “REPEAT” indicator disappears on LCD.
Tuner Operation
Basic Operation
1. Press TUNER/BAND to select AM or FM.
2. Use CD-TUNER-SKIP buttons to manually select the desired radio station. Press and hold either
CD-TUNER-SKIP button to search up or down for the next receivable station.
SA248
Storing Stations in Memory
Stereo can store up to 20 FM and 20 AM stations.
1. Select desired radio station.
2. Press MEMORY. “MEMORY” indicator flashes on LCD.
3. Press PRESET to assign preset number. For example, to store a radio station on preset #9, press
PRESET nine times until LCD displays #9 as preset number.
4. Press MEMORY to store selection. “MEMORY” indicator will stop flashing.
5. Repeat steps 1-4 to store additional radio stations in memory.
Selecting a Preset Station
In tuner mode, press PRESET to recall radio stations in memory.
Timer Operation
Timer automatically turns stereo on and off during times you choose.
1. Choose radio station or disc and track number. If no track is selected, the first track of the selected
disc will play.
2. Press and hold TIMER for about 5 seconds until “TIMER ON” indicator flashes on LCD. Hour
segment will flash.
3. Press CD-TUNER-SKIP buttons to select wake-up hour.
4. Press TIMER again. Hour number stops flashing and minute number begins flashing.
5. Press CD-TUNER-SKIP buttons to select wake-up minute.
6. Press TIMER again. “TIMER OFF” indicator appears and flashes. Hour segment flashes.
7. Press CD-TUNER-SKIP buttons to select time-off hour.
8. Press TIMER again. Hour number stops flashing and minute number begins flashing.
9. Press CD-TUNER-SKIP buttons to select time-off minute.
10. Press TIMER again to end setting process. LCD shows on and off times for timer. At this point,
timer has been activated. “TIMER” indicator appears on LCD.
SA248
Stereo can be left on or in standby. When timer goes off, stereo will play the previously selected
radio station or selected CD track.
To disable timer, press TIMER again. Timer on and off setting will be stored in memory for future
use. Press TIMER again to activate.
SureWake
SureWake allows you to adjust the volume to any level without affecting the wake-up volume.
SureWake plays music quietly during wake-up, then slowly increases the volume to ensure that you
are awake.
1. Activate the timer as described in the previous section.
2. Press SureWake button to turn SureWake on. Indicator light will illuminate. To turn off
SureWake, press SureWake button again.
Sleep Function
Sleep Function plays stereo for the amount of time you designate, then turns off automatically.
Press SLEEP. “2:00” appears on LCD. Sleep timer is now set to play for 2 hours. To decrease the
time in 30-minute increments, press SLEEP until desired time appears. Length of sleep timer
remains on LCD for several seconds, then returns to the original display.
Snooze Function
Press SNOOZE to turn stereo off for 10 minutes. Stereo will automatically turn on after 10 minutes.
Snooze can be activated during normal, preset or timed play. To turn snooze off, turn stereo power
off, then on.
Troubleshooting
No operation
• Make sure AC plug is properly connected and AC outlet is functional.
• Make sure desired function has been selected.
• Check that disc has been inserted correctly and CD door is completely closed.
• Clean CD lens if necessary.
SA248
CD door does not completely open
• Make sure speaker grills are pressed flush to speakers.
No display
• Check power plug.
No sound
• Check speaker connections.
• Sound will not play from speakers if headphones are plugged in. If no sound comes out of headphones, make sure they have been plugged in correctly.
• Make sure snooze function is not activated.
Static or weak radio reception
• Make sure antennas have been connected correctly.
SA248
WARRANTY
What Is Covered
This warranty covers any defects in materials or workmanship, with the exceptions stated below.
How Long Coverage Lasts
This warranty runs for 90 days from the date of original purchase.
What Is Not Covered
This warranty does not cover damage caused by misuse or use other than as intended and described in the
product instruction manual, or loss or damage to batteries or removable parts.
What The Sharper Image Will Do
The Sharper Image will repair any defects in materials or workmanship. In the event repair is not possible,
The Sharper Image will either replace this product with one of similar features and price, or refund the full
purchase price of the product, whichever you prefer.
How to Obtain Service
Return the product and receipt, along with a brief explanation of the problem, to:
T.S.I. - Returns Department
2901-A West 60th Street
Little Rock, AR 72209
If you have questions please feel free to contact our customer service representatives at 1-800-344-5555 or
by email at [email protected].
This warranty gives you specific legal rights, and you may have other legal rights that vary from state to
state.
Sharper Image Corporation
650 Davis St., San Francisco, CA 94111
(415) 445-6000
Shop online: www.sharperimage.com
V1 0402