1
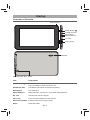
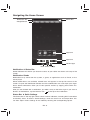
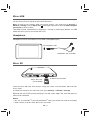
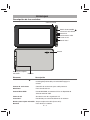
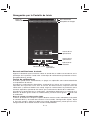
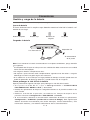
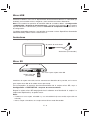
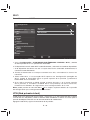
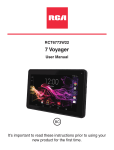
User Manual
Manual del usuario
RCT6378W2
7” Tablet Computer
Tableta de 7”
Scan for more user manual details or visit www.RCAtablets.com
Escanear para más detalles del manual de usuarios o vistita
www.RCAtablets.com
It's important to read these instructions prior to using your new product for
the first time.
Es importante que lea este libro de instrucciones antes de usar su nuevo
producto por primera vez.
Safety Precautions
Equipment tested for
compliance as a
RCT6378W2 complete unit
This device complies with Part 15 of the FCC Rules. Operation is subject to the following
two conditions: (1) This device may not cause harmful interference, and (2) this device must
accept any interference received, including interference that may cause undesired operation.
This equipment has been tested and found to comply with the limits for a Class B digital
device, pursuant to Part 15 of FCC Rules. These limits are designed to provide reasonable
protection against harmful interference in a residential installation. This equipment
generates, uses, and can radiate radio frequency energy and, if not installed and used in
accordance with the instructions, may cause harmful interference to radio communications.
However, there is no guarantee that interference will not occur in a particular installation. If
this equipment does cause harmful interference to radio or television reception, which can
be determined by turning the equipment off and on, the user is encouraged to try to
correct the interference by one or more of the following measures:
• Reorient or relocate the receiving antenna.
• Increase the separation between the equipment and receiver.
• Connect the equipment into an outlet on a circuit different from that to which the receiver
is connected.
• Consult the dealer or an experienced radio/TV technician for help.
Warning: Changes or modifications not expressly approved by the party responsible for
compliance could void the user’s authority to operate the equipment.
Caution: Use of controls or adjustments or performance of procedures other than those
specified may result in hazardous radiation exposure.
Warning: the AC adapter is used as disconnect device and it should remain readily
operable during intended use.
In order to disconnect the mains plug from mains completely, the ac adaptor should be
disconnected from the mains socket outlet completely.
For Your Safety
The AC power plug is polarized and only fits into AC power outlets one way. If the plug won’t
go into the outlet completely, turn the plug over and try to insert it the other way. If it still won’t
fit, contact a qualified electrician to change the outlet, or use a different one. Do not attempt
to bypass this safety feature.
Service Information
This product should be serviced only by those specially trained in appropriate servicing
techniques. For instructions on how to obtain service, refer to the warranty included in this
guide.
EN - 1
IMPORTANT SAFETY INSTRUCTIONS
PLEASE READ AND SAVE THIS FOR FUTURE REFERENCE
Some of the following information may not apply to your particular product; however, as with
any electronic product, precautions should be observed during handling and use.
•
•
•
•
•
•
•
•
•
•
•
•
•
Read these instructions.
Keep these instructions.
Heed all warnings.
Follow all instructions.
Do not use this apparatus near water.
Clean only with dry cloth.
Do not block any ventilation openings. Install in accordance with the manufacturer’s
instructions.
Do not install near any heat sources such as radiators, heat registers, stoves, or other
apparatus (including amplifiers) that produce heat.
The AC power plug is polarized and only fits into AC power outlets one way. If the plug
won’t go into the outlet completely, turn the plug over and try to insert it the other way.
If it still won’t fit, contact a qualified electrician to change the outlet, or use a different
one. Do not attempt to bypass this safety feature.
Protect the power cord from being walked on or pinched par ticularly at plugs,
convenience receptacles, and the point where they exit from the apparatus.
Only use attachments / accessories specified by the manufacturer.
Unplug this apparatus during lightning storms or when unused for long periods of time.
Refer all servicing to qualified service personnel. Servicing is required when the
apparatus has been damaged in any way, such as power-supply cord or plug is
damaged, liquid has been spilled or objects have fallen into the apparatus, the
apparatus has been exposed to rain or moisture, does not operate normally, or has
been dropped.
ADDITIONAL SAFETY INFORMATION
• The AC adapter and apparatus shall not be exposed to dripping or splashing and no
objects filled with liquids, such as vases, shall be placed on the apparatus.
• Always leave sufficient space around the product for ventilation. Do not place product
in or on a bed, rug, in a bookcase or cabinet that may prevent air flow through vent
openings.
• Do not place lighted candles, cigarettes, cigars, etc. on the product.
• Connect power cord only to AC power source as marked on the product.
• Care should be taken so that objects do not fall into the product.
• Do not attempt to disassemble the cabinet. This product does not contain customer
serviceable components.
• To prevent the risk of fire or electric shock, do not expose this apparatus to rain or
moisture.
• Do not play your headset at high volume. Hearing experts warn against extended highvolume play.
EN - 2
Contents
Safety Precautions .............................................................................................1
Important Safety Instructions .........................................................................2
Startup ...................................................................................................................4
Overview of Controls .................................................................................................4
Buttons ...................................................................................................................5
Accessory ..............................................................................................................5
Navigating the Home Screen ......................................................................................6
Connections ..............................................................................................................8
Battery Management and Charging .......................................................................... 8
Micro-USB ............................................................................................................... ..9
Headphone ................................................................................................................. 9
Micro SD .....................................................................................................................9
Wi-Fi...........................................................................................................................10
VPN...........................................................................................................................10
Basic Operation .............................................................................................................11
First Time Operation ....................................................................................................... 11
Basic Operation ..................................................................................................................11
Google Now .......................................................................................................................12
Voice Search & Voice Actions .............................................................................................12
Download Apps on Google PlayTM .....................................................................................13
Settings ..............................................................................................................................13
Google Account .................................................................................................................14
Preinstalled Apps ..........................................................................................................14
Additional Information ..................................................................................................15
Trouble Shooting ............................................................................................................... 15
Specifications .....................................................................................................................15
Copyright and Trademark Notices ..................................................................................... 15
Limited Warranty ............................................................................................................16
EN - 3
Startup
Overview of Controls
Front Camera
Power Button
Headphone Port
Microphone
Micro-USB Port
DC Jack
Vol+/- Button
Speaker
Micro SD Card Slot
Reset
Item
Description
Power Button
Press to enter standby/wake up mode,
press and hold to switch On/Off the unit.
Headphone Port
Headphone connection for personal listening.
Microphone
For voice input.
Micro-USB Port
MINI USB Port, connect to a PC or USB storage device.
DC Jack
Connect with 5V DC charger.
Vol+/- Key
Press to increase/decrease the volume.
Micro SD Card Slot Accepts micro SD card (up to 32G).
Reset
Reset the tablet.
EN - 4
Buttons
Power Button
Power the Tablet On
Press & hold the Power
button until the RCA logo appears.
Power the Tablet Off
Press & hold the Power
button until a message box displays. Tap "OK" and the tablet
will be powered off.
Sleep Mode
Briefly press the Power button to put the tablet in sleep mode.
If you don’t operate for some time, the tablet will enter sleep mode automatically.
Tip: You can go to Settings > DEVICE > Display > Sleep to set the screen timeout.
Wake the Tablet from Sleep Mode
Press the Power button to wake the tablet from sleep mode.
Vol +/- Button
Press the Vol +/- button to increase or decrease the volume.
Tip: You can go to Settings > DEVICE > Sound > Volumes to adjust volume settings for
Notifications and Alarms.
Accessory
The following accessory is included.
AC Adapter ...................................................................... x 1
EN - 5
Navigating the Home Screen
Notification Bar
2:35
Status Bar
Google Search
App Icons
App Icons
Recent Apps
Back Home All App
Notification & Status Bar
Some indicators that inform you about the status of your tablet are shown at the top of the
screen.
Notification Shade
Notifications may come from the system, a game, an application such as E-mail, or the
music player.
When Notifications are available, related icons will appear in the top left corner of the
screen. To open the Notification Shade, touch the Notification icon and swipe your finger
down. Some notifications allow you to take specific actions by tapping icons within the
notification.
After you are finished with a notification, just slide it away to the left or right. If you want to
dismiss all notifications, tap the Dismiss icon
at the top of the notification.
Status Bar & Quick Settings
The Status Bar in the top right corner shows various indicators, including Wi-Fi connection
and battery status. To access "Quick Settings", touch the status bar and swipe down. You
can then adjust various settings on the tablet by touching the corresponding square.
EN - 6
Notification & Status Icons
The below table lists some of the frequently used icons in the Notification & Status bar:
Item
Description
Message
Received new message.
Music
Play Music application is running.
Screenshots
Screenshot captured.
USB tethering
Has connected to a PC and the USB tethering is turned on.
Wi-Fi
Has a Wi-Fi Internet connection.
Play Store
An update for an app is available.
Home Screen Icons
All Apps
Tap the All Apps icon
to enter the All Apps screen.
In All Apps screen, you can:
•
Move between screens: Slide left or right.
•
Open an App: Tap its icon.
•
Copy an App icon to the Home screen: Press & hold the icon or widget icon and
slowly to drag it to the Home screen.
•
View widgets: Tap the widgets tab at the top of a All Apps screen. Widgets are app
information displays that can be placed on your Home screen.
•
Get more apps: Tap the Google Play Store icon
upper right corner.
•
View info about an App: Press & hold it, and drag it to the top of the screen, then drop
the app over the App Info icon i .
Tip: Most apps include a Menu icon
control the app’s settings.
, or the Shop icon
at the
near the top or bottom of the screen that lets you
Back
Tap Back icon
to return to the previous screen.
• The Back icon remains on the bottom of the screen at all times, allowing you to
navigate back to the previous screen.
• Once you go back to the Home screen, you can’t go back any further in your history.
Home
Tap Home icon
from anywhere on your tablet to return to the Home screen.
Recent Apps
Tap Recent Apps icon
to view recently used apps. Tap an app to use it again.
You can slide down to see more apps. You can also slide it away to the left or right.
EN -7
Connections
Battery Management and Charging
The tablet has a built-in rechargeable battery.
Battery Icon
The battery icon in the upper-right corner shows the battery level or charging status.
Low battery
Full battery
Need to be
charged
Charging
Charging the Battery
AC Adapter
To DC Jack
To Wall Outlet
Note: In order to keep the battery working in best condition, please pay attention to the
following:
• The included AC adapter is for use with this unit only. Do not use it with other equipment.
• Please do not charge the battery in high temperatures.
• Do not wait for the battery to be fully depleted before charging again. Keep the battery
charged as needed.
• If tablet has not been used for a long period of time, the battery might be in over
discharge protection mode and may take longer to charge.
Prolong the Battery Life
Here are some tips for how to prolong the life of the battery:
• If you aren’t using Wi-Fi, go to Settings > WIRELESS & NETWORKS > Wi-Fi, turn it
off.
• Don’t leave the Maps or Navigation apps open on the screen when you’re not using
them.
• Turn down screen brightness and set a shorter screen timeout: Settings > DEVICE
>Display.
• If you don’t need it, turn off automatic syncing for all apps: Settings > ACCOUNTS
>[Google account-name]. This means you need to sync manually to collect messages,
email, and other recent information, and won’t receive notifications when updates occur.
EN - 8
Micro-USB
Connect your tablet to a PC or a USB storage device with a USB cable (not included), to
transfer music, pictures and other files in both directions.
Note: To change your tablet’s USB connection options, you should go to Settings >
DEVICE > Storage, and tap Menu icon at the upper right corner. Then tap USB computer
connection to enter to setup.
The tablet can be connected to a keyboard, a mouse or other input devices via USB
cable and use it just as you would with a PC.
Headphone
Headphone can be connected to the tablet’s Headphone port.
To headphone Port
Headphone (not included)
Micro SD
To Micro SD Card Slot
Micro SD Card
(not included)
Insert the micro SD card, with contacts facing the screen, into the tablet’s Micro SD slot
until it clicks.
To check the storage of the micro SD card, go to Settings > DEVICE > Storage.
Remove the micro SD card by pushing in on the card's edge. The card will pop out
and can be removed.
Notes:
• You can use microSD
TM
card and microSDHCTMcard (up to 32GB, SD card not included).
• Never remove or insert micro SD card in On mode.
EN - 9
Wi-Fi
Connect to a Wi-Fi Network
1:35
Settings
MyHomeWF
WIRELESS & NETWORKS
Wi-Fi
Connected
ON
CoffeeShopWF
WPS available
More...
DEVICE
Sound
Display
ScreenshotSetting
Storage
Battery
Apps
PERSONAL
1. Go to Settings > WIRELESS & NETWORKS > Wi-Fi, and slide the Wi-Fi switch to the
ON position.
2. The device will scan Wi-Fi networks automatically and display the available names.
• If the device finds a network that you connected to previously, it will connect to it
automatically.
3. Tap a network name to connect to it, and enter a password if necessary.
4. Alternatively, if your Wi-Fi router supports Wi-Fi Protected Setup, tap the WPS icon
at the top of the screen, and then press the WPS button on your router.
5. If your network does not broadcast its SSID, tap the Plus icon + at the top of
the screen, and enter the Network SSID (name) of the network. If necessary, enter
security or other network configuration details.
Note: you can tap Menu icon
at the upper right corner in the Settings screen for
advanced settings.
VPN (Virtual Private Network)
You can create virtual private network (VPN) and connect to your private network securely
through a public network, such as the internet. You must set a lock screen PIN or password
before you can use credential storage.
Add VPN network and follow the instructions on the screen.
EN - 10
Basic Operation
First Time Operation
Turning Your Tablet On for the First Time
When using the tablet for the first time, you will be required to setup the following:
1. Select the language, then tap Start .
2. If you have a Google Account, select "Yes". Then tap a network name to see more
details or connect to it, and enter a password if necessary.
When prompted, sign in using the email address and password for your Google
Account. If you don’t have one yet, go ahead and create one.
3. Follow the onscreen instructions to setup the tablet.
Basic Operation
Using the Touchscreen
Here are some basic procedures for interacting with the touchscreen.
Tap
To select an item on the touchscreen, lightly tap it.
Press & Hold
In some instances, touching the item and holdingyour finger
on it will present other options or menus.
Drag or Swipe
While holding an item such as an icon, it can sometimes be
moved by dragging it to another area or screen. You may also be
able to swipe your finger across a screen or item to navigate or
move it.
Zoom
By placing two fingers on the screen, you can slide them apart to
"Zoom In", or pinch them together to "Zoom Out".
EN - 11
Customizing the Home Screen
• From All Apps screen to Home screen: Tap All Apps icon
to open All Apps screen,
press & hold an icon or widget and slowly to drag it to the location of your choice. This
makes it much easier to change your Home screen layout.
• Move apps or widgets: Press & hold an icon or widget, slowly to drag it to the screen
edge, the screen will switch.
• Delete apps or widgets: Press & hold an icon or widget, when the "X" icon appears at
the left of the screen, drag the icon or widget into it.
• Press & hold the wallpaper on your Home screen, and choose your wallpaper from
Gallery, Live Wallpapers or Wallpapers.
Google Now
To create a truly personalized experience, using your location and personal Google
account information, use Google Now. Touch and Hold the Home icon, and slide up to
the Google Now icon. Follow the instructions to setup your Google Now experience.
Voice Search & Voice Actions
Turn Voice Search or Voice Action On
You can initiate a Voice Search or Voice Action by tapping the Microphone icon in the top
left corner of the Home screen.
When you’re viewing the Google Now screen, you don’t have to touch anything. Just say
“Google.”
Note: To detect when you say “Google” to launch Voice Search or Voice Actions, Google
analyzes sound picked up by your tablet’s microphone in intervals of a few seconds or
less. The sound is immediately discarded after analysis and is not stored on the device or
sent to Google servers.
Using Voice Search
After tapping the microphone icon, just say whatever it is you want Google to search for.
Using Voice Actions
There are many actions that the tablet can perform using "Voice Actions". For example,
you can send emails, set alarms, play a song, or navigate to a website. Just tap the
Microphone icon, and say what you want the tablet to do. As you speak, Voice Search
analyzes your speech and initiates the action.
If Voice Search doesn’t understand you, it lists a set of possible meanings. Just tap the
one you want.
EN - 12
Download apps on Google PlayTM
In addition to the apps that came preinstalled on your tablet, the Play Store provides many
apps that you can download and install in your tablet.
1. On the App menu, touch the Play Store icon.
2. To search for an app, touch the search icon in the upper right corner, and then type
a keyword to search.
3. Touch an available app to select it and then touch Install to download and install
the app.
Settings
Settings lets you configure the tablet, set app options, add accounts, and change other
preferences.
WIRELESS & NETWORKS
Wi-Fi—Enable or disable Wi-Fi, and connect to a wireless network so that you can check
email, search the Web, or access social media websites.
More... —Enable or disable Airplane mode or VPN.
DEVICE
Sound—Set Volumes, Default notification sound, and enable or disable Touch sounds
and Screen lock sound.
Display—Set Brightness, Wallpaper, Sleep, Daydream, Font size and Wireless display.
ScreenshotSetting—Set Select delay time to capture the screen, Set the location of
screenshot storage and enable or disable Show the screenshot button in the statusbar.
Storage—View available space in FLASH, INTERNAL STORAGE, SD CARD and USB
STORAGE /set the related items.
Battery—View battery status.
Apps—View downloaded apps and running apps. To view information or uninstall an
app, tap the relevant app.
PERSONAL
Location access—Enable or disable Access to my location and LOCATION SOURCES.
S e c u r i t y — S e t p r e fe r e n c e s fo r S C R E E N S E C U R I T Y , PA S S WO R D S , D E V I C E
ADMINISTRATION, and CREDENTIAL STORAGE.
Language & input—Set preferences for Language, KEYBOARD & INPUT METHODS,
SPEECH and MOUSE/TRACKPAD.
Backup & reset—Set preferences for BACKUP & RESTORE, and PERSONAL DATA.
ACCOUNTS
You can add an email account or another type of account.
EN - 13
SYSTEM
Date & time—Enable or disable Automatic date & time, and select preferences for date,
time, time zone, time format, and date format etc..
Accessibility—Select preferences for SERVICES and SYSTEM.
Developer options—Enable or disable various Developer options.
WARNING: It is highly recommended that the Developer options remain turned OFF.
Adjusting these settings can cause the device and applications on it to break or misbehave.
About tablet
Check System updates, Status, Legal information etc.
Google Account
A Google Account lets you organize and access your personal information from any
computer or mobile device.
Add an Account
You can use multiple Google Accounts and Microsoft Exchange ActiveSync accounts on
your tablet.
You may also be able to add other kinds of accounts, depending on your apps. To add some
accounts, you may need to obtain details from your system administrator about the service
to which the account connects. For example, you may need to know the account’s domain or
server address.
1. Go to Settings > ACCOUNTS > Add account.
2. Tap the kind of account to add. And then follow the on-screen instructions.
3. To remove a Google account, go to Settings > ACCOUNTS > Google > [accountname] Menu icon > Remove account.
Preinstalled Apps
Your tablet comes with many apps preinstalled to allow you to browse the web, send
and receive email, and access entertainment. Spend some time exploring these
apps to learn how your tablet can be most useful for you.
EN - 14
本页已使用福昕阅读器进行编辑。
福昕软件(C)2005-2010,版权所有,
仅供试用。
Additional Information
Trouble Shooting
Tablet displays network or service error message
• When you are located in places with poor signals, your tablet may lose its Wi-Fi
connection. Try moving closer to the Wi-Fi router.
Touch screen response is slow or incorrect
If the tablet’s touch screen response is incorrect, please try the following:
• Remove any protective film of the touch screen. The protective film may prevent the
device recognition input.
• Make sure that your fingers dry and clean before you tap the touch screen.
• Restart the tablet to clear any temporary software bugs.
• Make sure that the tablet’s software has been upgraded to the latest version.
Tablet is frozen or a serious error appears
• If the tablet is frozen or suspended, you may need to close the app program or reset
the tablet.
• If the tablet is frozen or slow to respond, press & hold the power button for 8 seconds to
reset the tablet.
• If that doesn't work, insert a paper clip into the RESET hole on the back of the tablet.
Tablet gets warm
• When using for a long time, the tablet may be warm. This is normal and will not affect
the life or performance of the unit.
Specifications
Power: DC IN 5V (operate with AC adapter)
Front Camera: 0.3 Megapixel
Copyright and Trademark Notices
Google, Google Play, YouTube and other marks are trademarks of Google Inc.
The Android robot is reproduced or modified from work created and shared by Google and
used according to terms described in the Creative Commons 3.0 Attribution License.
The Wi-Fi CERTIFIED Logo is a certification mark of the Wi-Fi Alliance. The Wi-Fi Protected
Setup Mark is a mark of the Wi-Fi Alliance.
Specifications subject to change without notice.
EN - 15
Limited Warranty
AVC MULTIMEDIA (“AVC”) makes the following limited warranty. This limited warranty extend
to the original consumer purchaser and is limited to non-commercial use of the product.
One Year Parts & Labor Warranty
AVC products purchased in the United States or Canada are warranted to be free from defects in
materials or workmanship for a period of one year from the date of their original retail purchase.
If the unit fails to conform to this warranty, we will service the product using new or refurbished
parts and products, at AVC’s sole discretion.
During a period of one year from the effective warranty date, AVC will provide, when needed,
service labor to repair a manufacturing defect at its designated Service Center. To obtain
warranty service in the United States or Canada, you must first call our Customer Support
Center at 1-877-252-6873 or 1-855-475-9646, during the hours listed in the box below.
The determination of service will be made by AVC Customer Support. PLEASE DO NOT
RETURN YOUR UNIT TO AVC WITHOUT PRIOR AUTHORIZATION. New or remanufactured
replacements for defective parts or products will be used for repairs by AVC at its designated
Service Center for one year from the effective warranty date. Such replacement parts or products
are warranted for an additional one year from the date of repair or replacement. The Customer
will be required to ship the unit to the Service Center indicated at the time Customer Support
is contacted to make the necessary repairs. The customer is responsible for all transportation
charges to the service facility.
Packaging and Shipping Instruction
When you send the product to the AVC service facility you must use the original carton box
and packing material or an equivalent as designated by AVC.
Your Responsibility
(1) You must retain the original sale receipt to provide proof of purchase.
(2) These warranties are effective only if the product is purchased and operated in the
United States or Canada.
(3) Warranties extend only to defects in material or workmanship, and do not extend to
any product or parts which have been lost or discarded, or damage to product or parts
caused by misuse, accident, improper operation or maintenance, or use in violation of
instructions provided with the product, or to product which has been altered or modified
without authorization of AVC, or to products or parts thereof which have had the serial
number removed or changed.
Out of Warranty
In the event your product requires repair after the limited warranty period has expired,
please contact our Customer Support Center at 1-877-252-6873 or 1-855-475-9646 or
www.RCAtablets.com
Hours: Monday–Thursday: 9am–7pm, Friday: 9am–5pm, Saturday: 9am–NOON
Eastern time.
Important: You are responsible for any transportation, shipping or insurance relative to
the return of product to our Product Returns Center.
EN - 16
All warranties implied by state law, including the implied warranties of merchantability and
fitness for a particular purpose, are expressly limited to the duration of the limited warranties
set forth above. With the exception of any warranties implied by state law as hereby
limited, the foregoing warranty is exclusive and in lieu of all other warranties, guarantees,
agreements and similar obligations of manufacturer or seller with respect to the repair or
replacement of any parts. In no event shall AVC be liable for consequential or incidental
damages.
No person, agent, distributor, dealer or company is authorized to change, modify or extend
the terms of these warranties in any manner whatsoever. The time within action must be
commenced to enforce any obligation of AVC arising under the warranty or under any
statute, or law of the United States or Canada or any state thereof, is hereby limited to one
year from the date of purchase. This limitation does not apply to implied warranties arising
under state law.
This warranty gives you specific legal rights and you may also have other rights, which
may vary, from state to state. Some states do not allow limitation on how long an implied
warranty lasts, when an action may be brought, or the exclusion or limitation of incidental or
consequential damages, so the above provisions may not apply to you.
For more information on other products and services, please visit our web site at :
www.RCAtablets.com
Important: Also keep your “Bill of Sale” as proof of purchase.
Model no....................................................................................................................
Product name............................................................................................................
Type of set.................................................................................................................
Serial no....................................................................................................................
Invoice no..................................................................................................................
Date purchased.........................................................................................................
Dealer name..............................................................................................................
FOR SUPPORT, SERVICE AND REPAIR, PLEASE VISIT www.RCAtablets.com
Specifications and external appearance are subject to change without notice.
© 2013 AVC MULTIMEDIA
EN - 17
Precauciones de seguridad
Equipo probado para
cumplimiento como una
RCT6378W2 unidad completa
Este aparato cumple con la Parte 15 del Reglamento de la FCC. El funcionamiento de este
equipo queda sujeto a las dos condiciones siguientes: (1) este aparato no puede causar
interferencia negativa, y (2) este aparato debe aceptar cualquier interferencia recibida,
incluyendo interferencias que pudieran ocasionar que el equipo funcione de una forma que
no sea la deseada.
Este equipo ha sido evaluado y se ha determinado que cumple con los límites establecidos
para aparatos digitales de clase B, de acuerdo a lo estipulado en la Parte 15 del Reglamento
de la FCC. Estos límites se han diseñado para proporcionar una protección razonable contra
una interferencia negativa en instalaciones residenciales. Este equipo genera, usa y puede
irradiar energía de radiofrecuencias y, si no se instala o usa según indican las instrucciones,
podría provocar interferencia negativa en las comunicaciones radiales.
No obstante, no existe garantía de que no se produzca interferencia en una instalación dada.
Si este equipo efectivamente provoca interferencia negativa en la recepción de las señales de
radio o de televisión, lo que se puede determinar encendiendo y apagando el equipo, instamos
al usuario a tratar de corregir dicha interferencia sigueindo una o más de las recomendaciones
siguientes:
• Reoriente la antena receptora o póngala en un lugar diferente.
• Aumente la distancia entre el equipo y el aparato receptor.
• Enchufe el equipo en una toma de corriente conectada a un circuito diferente al circuito al
que esté conectado el receptor.
• Pida ayuda al vendedor o a personal técnico experimentado en reparación de radios y
televisores.
ADVERTENCIA: los cambios o modificaciones que se hagan a esta unidad, que no estén
expresamente aprobados por la par te responsable de hacer cumplir las reglas de
funcionamiento de este aparato, pueden anular la autoridad del usuario para operar este
equipo.
Advertencia: El tomacorriente se usa como dispositivo de desconexión y debe estar
siempre disponible para su funcionamiento durante su uso.
Para desconectar completamente el tomacorriente de la red eléctrica, el tomacorriente
debe estar desconectado totalmente del enchufe de la pared conectado a la red
eléctrica.
Para su seguridad
El adaptador de corriente CA está polarizado (una de sus patas es más grande que la
otra) y sólo encajará en salidas de potencia CA de una manera. Si tiene Usted dificultad
en introducir el adaptador en la caja del tomacorriente en su totalidad, intente cambiar la
posición del adaptador. Si aún así no consigue encajarlo, contacte a un electricista calificado
para que sustituya la caja del tomacorriente, o utilice una diferente. No intente pasar
desapercibido estas normas de seguridad.
Información técnica
Este producto sólo debería ser atendido por personal especializado y entrenado con las
técnicas de man-tenimiento apropiadas. En la garantía, incluida en esta guía, encontrará
instrucciones sobre la forma de obtener servicio técnico.
E-1
IMPORTANTE INSTRUCCIONES DE
SEGURIDAD
FAVOR DE GUARDAR ESTO PARA UNA REFERENCIA FUTURA
Alguna de la siguiente información quizá no se aplique a su producto en particular. Sin
embargo, como con cualquier producto electrónico, se deben tomar precauciones durante
su manejo y uso.
• Lea estas instrucciones.
• Conserve estas instrucciones.
• Tome en cuenta todas las advertencias.
• Siga todas las instrucciones.
• No use este aparato cerca del agua.
• Limpie solamente con un paño seco.
• No bloquee ninguna de las aperturas de ventilación. Instale de acuerdo con las instrucciones del fabricante.
• No instale cerca de fuentes de calor tales como radiadores, registros de calor, estufas,
u otros aparatos (incluyendo amplificadores) que produzcan calor.
• Use solamente accesorios / aditamentos especificados por el fabricante.
• Desconecte este aparato durante tormentas eléctricas o cuando no sea utilizado por
largos períodos de tiempo.
• Refiera todo el servicio a personal de servicio califi cado. El servicio es requerido
cuando el aparato ha sido dañado de alguna forma, tal como daño a la clavija o al
cable de corriente, cuando se ha derramado líquido o han caído objetos dentro del
aparato, el aparato ha sido expuesto a lluvia o humedad, no funciona normalmente, o
ha sido tirado.
INFORMACION ADICIONAL DE SEGURIDAD
• El aparato no debe quedar expuesto a goteos o salpicaduras de líquidos, y, por lo tanto,
no se deben colocar sobre el aparato objetos que contengan líquidos, como por ejemplo vasos.
• Siempre deje suficiente espacio para ventilación alreadedor del producto. 0No ponga el
producto en la cama, alfombra, librero o gabinete que pueda obstruir la corriente de aire
a través de apeturas de ventilación.
• No pongan velas, cigarillos o cigarros encendidos encima de producto.
• Conecte sólo en receptáculos de corriente alterna como esta indicado en el producto.
• Tome precauciones para evitar que caigan objetos dentro del producto.
• Carros y Estantes–El artefacto deberá ser usado sólo con carros y estantes que hayan
sido recomendados por el fabricante.
• Para prevenir fuego o shock eléctrico, no exponga el producto a lluvia o humedad.
• No ponga los auriculares a un volumen alto. Los especialistas de oído previenen contra
la exposición a altos volúmenes de forma continuada.
E- 2
Contenidos
Precauciones de seguridad ..............................................................................1
Importante instrucciones de seguridad ...........................................................2
Arranque ................................................................................................................4
Descripción de los controles ......................................................................................4
Botones ...................................................................................................................5
Accesorio ................................................................................................................5
Navegación por la Pantalla de Inicio ............................................................................6
Conexiones.................................................................................................................8
Gestión y carga de la batería ....................................................................................... 8
Micro-USB ..................................................................................................................9
Auriculares ................................................................................................................... 9
Micro SD .....................................................................................................................9
Wi-Fi ..........................................................................................................................10
VPN ...........................................................................................................................10
Funcionamiento básico ...............................................................................................11
Puesta en marcha ............................................................................................................. 11
Funcionamiento básico ......................................................................................................11
Google Now .......................................................................................................................12
Búsqueda de voz & Acciones por voz ................................................................................12
Descargue aplicaciones en Google PlayTM ........................................................................13
Configuración .....................................................................................................................13
Cuenta de Google ..............................................................................................................14
Aplicaciones preinstaladas ........................................................................................14
Información adicional ...................................................................................................15
Resolución de problemas ................................................................................................. 15
Especificaciones ................................................................................................................15
Avisos de derechos de autor y marcas registradas .......................................................... 15
Garantía limitada ............................................................................................................16
E-3
Arranque
Descripción de los controles
Cámara frontal
Botón de encendido
Puerto de auriculares
Micrófono
Puerto Micro-USB
Toma de CC
Botón Vol+/-
Altavoz
Ranura para tarjeta
micro SD
Reinicio
Elemento
Descripción
Botón de encendido
Presiónelo para ir al modo de suspensión/
manténgale presionado para encender/apagar la
unidad.
Puerto de auriculares
Conexión de auriculares para audio personal.
Micrófono
Para entrada de voz.
Puerto Micro-USB
Puerto MINI USB, se conecta al PC o un dispositivo de
almacenamiento USB.
Toma de CC
Se conecta con el cargador 5V CC.
Tecla Vol+/-
Presiónelo para aumentar/disminuir el volumen.
Ranura para tarjeta micro SD Acepta tarjeta micro SD (hasta 32G).
Reinicio
Para reiniciar la tableta.
E-4
Botones
Botón de encendido
Para encender la tableta
Mantenga presionado el Botón de encendido
hasta que aparezca el logotipo de RCA.
Para apagar la tableta
Mantenga presionado el Botón de encendido
hasta que aparezca un cuadro de
mensaje. Puntee “Aceptar” y la tableta se apagará.
Modo de suspensión
Presione brevemente el Botón de encendido para poner la tableta en modo de suspensión.
Si no utiliza la tableta por un tiempo, entrará en el modo de suspensión automáticamente.
Consejo: Puede ir a Configuración > DISPOSITIVO > Pantalla > Suspender para
establecer el tiempo de espera de la pantalla.
Reactivar la pantalla del Modo de suspensión
Presione el Botón de encendido para reactivar la tableta del modo de suspensión.
Botón Vol+/Presione el Botón Vol +/- para aumentar o disminuir el volumen.
Consejo: Puede ir a Configuración > DISPOSITIVO > Sonido > Volumen para ajustar
la configuración del volumen para Notificaciones y Alarmas.
Accesorio
El siguiente accesorio está incluido.
Adaptador CA ...................................................................... x 1
E-5
Navegación por la Pantalla de Inicio
Barra de
notificaciones
2:35
Barra de estado
Búsqueda en Google
Iconos de las
aplicaciones
Iconos de las
aplicaciones
Aplicaciones
recientes
Retroceso Inicio Todas las
aplicaciones
Barra de notificaciones & estado
Algunos indicadores que le informan sobre el estado de su tableta se encuentran en la
partecopa de la pantalla. Puede abrir la Bandeja de notificaciones punteando la Barra
de notificaciones o estado.
Cortina de notificaciones
El sistema puede enviar notificaciones, un juego, una aplicación como correo electrónico
o el reproductor de música.
Cuando hay notificaciones disponibles, aparecerán los iconos en la esquina superior
izquierda de la pantalla. Para abrir la cor tina de notificaciones, toque el icono de
notificación y deslice el dedo hacia abajo. Algunas notificaciones le permitirán tomar
acciones específicas punteando los iconos que se encuentran dentro de la notificación.
Cuando haya terminado con la notificación, simplemente deslícela a la izquierda o la
derecha. Si desea ignorar todas las notificaciones, puntee el icono Ignorar
encima de
la notificación.
Barra de estado & Configuración rápida
La Barra de estado en la esquina superior derecha muestra varios indicadores, incluyendo
la conexión Wi-Fi y el estado de la batería. Para acceder “Configuración rápida”, toque
la barra de estado y deslice el dedo hacia abajo. Seguidamente, puede ajustar varias
configuraciones de la tableta tocando cuadro correspondiente.
E-6
Iconos de notificaciones & estado
La siguiente tabla muestra algunos de los iconos más usados en la Barra de notificaciones
/estado:
Elemento
Descripción
Mensaje
Nuevo mensaje recibido.
Música
La aplicación de Reproducción de música está activa.
Capturas de pantalla Pantallas capturadas.
Anclaje a red USB
Cuando se conecta a un PC y el anclaje a red USB está
encendido.
Wi-Fi
Tiene una conexión a Internet Wi-Fi.
Play Store
Está disponible alguna actualización para una aplicación.
Iconos de la Pantalla de Inicio
Todas las aplicaciones
Puntee el icono Todas las aplicaciones
para entrar a la pantalla de Todas las
aplicaciones.
En la pantalla de Todas las aplicaciones puede:
• Moverse entre las pantallas: Deslizarse de izquierda a derecha.
• Abrir una aplicación: Puntear su icono.
• Copiar icono de aplicación a la pantalla de Inicio: Mantenga presionado el icono o el
icono del widget y arrástrelo lentamente a la pantalla de Inicio.
• Ver widges: Puntee la ficha widgets en la parte superior de la pantalla de Todas las
aplicaciones. Los widgets son pantallas de información de la aplicación que se pueden
colocar en la pantalla de Inicio.
• Obtén más aplicaciones: Puntee el icono Google Play Store
, o el icono de la
Tienda
en la esquina superior derecha.
• Ver información de una aplicación: Manténgala presionada, y arrástrela a la parte
superior de la pantalla, a continuación, suéltela sobre el icono de Información i de la
aplicación.
Consejo: La mayoría de las aplicaciones incluyen un icono de Menú cerca de la parte
superior o inferior de la pantalla que permite controlar la configuración de la aplicación.
Retroceso
Puntee el icono de Retroceso
para retroceder a la pantalla anterior.
• El icono retroceso permanece siempre en la parte inferior de la pantalla, permitiéndole
retroceder a la pantalla anterior.
• Cuando regresa a la pantalla de Inicio, no podrá seguir retrocediendo en su historial.
Inicio
Puntee el icono de Inicio
de Inicio.
desde cualquier lugar de su tableta para regresar a la pantalla
Aplicaciones recientes
Puntee el icono de Aplicaciones recientes
para ver las aplicaciones usadas recientemente.
Puntee una aplicación para volver a usarla.
Puede deslizar hacia abajo para ver más aplicaciones. También puede deslizarla hacia la
izquierda o la derecha.
E -7
Conexiones
Gestión y carga de la batería
La tableta incluye una batería incorporada recargable.
Icono de batería
El icono de batería en la esquina copa derecha muestra el nivel de la batería o el
estado de su carga.
Batería completa
Batería baja
Necesita ser
cargada
Cargando
Cargando la batería
Adaptador CA
A la Toma de CC
Al tomacorriente
de la pared
Nota: Para mantener la batería funcionando en las mejores condiciones, ponga atención
a lo siguiente:
• El adaptador de CA que se incluye con esta unidad sólo debe usarse con esta unidad
No lo use con otros equipos.
• No cargue la batería a temperaturas altas.
• No espere a que la batería esté completamente agotada antes de volver a cargarla
Mantenga la batería cargada según sea necesario.
• Si la tableta no se ha usado por un largo período de tiempo, la batería puede estar en
modo de protección de descarga excesiva y puede tardar más en cargarse.
Cómo prolongar la vida útil de la batería
Aquí le presentamos algunos consejos para prolongar la vida útil de la batería:
• Si no está usando Wi-Fi, vaya a Configuración > CONEXIONES
INALÁMBRICAS Y REDES > Wi-Fi, y desactívelo.
• No deje las aplicaciones de mapas o navegación abiertas en la pantalla cuando no las
esté usando.
• Reduzca el br illo de la pantalla y establezca un tiempo de espera de la
pantalla máscorto: Configuración > DISPOSITIVO > Pantalla.
• Si no lo necesita, desactive la sincronización automática de todas las aplicaciones:
Configuración > CUENTAS >[nombre de la cuenta de Google]. Esto significa que
deberá sincronizar manualmente para recibir mensajes, correos electrónicos y otra
información reciente, y no recibirá notificaciones de las actualizaciones.
E-8
Micro-USB
Conecte su tableta a una PC o un dispositivo de almacenamiento USB con un cable USB (no
incluido), para transferir música, imágenes y otros archivos en ambas direcciones.
Nota: Para cambiar las opciones de conexión USB de su tableta, debe ir a Configuración
> DISPOSITIVO > Espacio de almacenamiento, y puntee el icono de Menú en la esquina
superior derecha. A continuación, puntee la Conexión de computadora USB para entrar a
la configuración.
La tableta se puede conectar a un teclado, un mouse u otros dispositivos de entrada
mediante USB y úselos como si fuera una PC.
Auriculares
Los auriculares se pueden conectar al puerto de auriculares de la tableta.
Al puerto de auriculares
Auriculares (no incluidos)
Micro SD
A la ranura para tarjeta micro SD
Tarjeta micro SD
(no incluida)
Introduzca la tarjeta micro SD, con los contactos en dirección de la pantalla, en la ranura
para tarjeta micro SD de la tableta hasta que encaje.
Para comprobar el espacio de almacenamiento de la tarjeta micro SD, vaya a
Configuración > DISPOSITIVO > Espacio de almacenamiento.
Saque la tarjeta micro SD empujando hacia adentro en el borde de la tarjeta. La
tarjeta será expulsada y se podrá sacar.
Nota:
• Puede usar una tarjeta microSD TM y una microSDHC TM(hasta 32GB, tarjeta SD no
incluida).
• Nunca saque o introduzca una tarjeta micro SD en modo Encendido.
E-9
Wi-Fi
Conexión a una red Wi-Fi
1:35
Configuración
MyHomeWF
CONEXIONES INALÁMBRICAS Y REDES
Wi-Fi
Si
Más...
Conectado
CoffeeShopWF
WPS disponible
DISPOSITIVO
Sonido
Pantalla
ScreenshotSetting
Espacio de almacenamiento
Batería
Aplicaciones
PERSONAL
1. Vaya a Configuración > CONEXIONES INALÁMBRICAS Y REDES > Wi-Fi, y deslice
el interruptor de Wi-Fi a la posición de Encendido.
2. El dispositivo buscará redes Wi-Fi automáticamente y mostrará los nombres disponibles.
• Si el dispositivo encuentra una red a la que usted se ha conectado anteriormente, la
conectará automáticamente.
3. Puntee el nombre de una red para conectarse a ella, e introduzca la clave si es
necesario.
4. Como alternativa, si su enrutador Wi-Fi soporta una Configuración protegida de
en la parte superior de la pantalla y presione el
Wi-Fi, puntee el icono WPS
botón WPS de su enrutador.
5. Si su red no transmite su SSID, puntee el icono de suma + en la parte superior
de la pantalla, e introduzca el SSID de la red (nombre). Si fuera necesar io,
introduzca los detalles de seguridad u otras configuraciones de la red.
Note: puede puntear el icono de Menú en la esquina superior derecha en la pantalla
de Configuración para configuraciones avanzadas.
VPN (Red privada virtual)
Puede crear una red privada virtual (VPN) y conectarla a su red privada de forma segura
a través de una red pública, como la internet. Debe establecer un PIN o una clave para la
pantalla de bloqueo antes de usar el almacenamiento de credenciales.
Agregue la red VPN y siga las instrucciones de la pantalla.
E - 10
Funcionamiento básico
Puesta en marcha
Encender su tableta por primera vez
Cuando use la tableta por primera vez, se le pedirá que haga las siguiente configuraciones:
1. Seleccione el idioma, a continuación, puntee Inicio .
2. Si tiene una cuenta de Google, seleccione "Si". A continuación, puntee un nombre
de una red para ver más detalles o conectarse a ella, e introduzca la clave si es
necesario.
Cuando se le solicite, ingrese usando la dirección de email y la clave de su cuenta de
Google. Si todavía no la tiene, cree una.
3. A continuación, siga las instrucciones de la pantalla para configurar la tableta.
Funcionamiento básico
Uso de la Pantalla táctil
A continuación se presentan algunos procedimientos básicos para interactuar con la
pantalla táctil.
Puntear
Para seleccionar un ítem en la pantalla táctil, puntéelo suavemente.
Mantenga presionado
En algunos casos, cuando se mantiene el ítem presionado con el
dedo aparecerán otras opciones y menús.
Arrastrar o deslizar
Cuando presione un ítem, como por ejemplo un icono, algunas
veces se puede mover arrastrándolo a otra área o pantalla
También debe poder deslizar su dedo a través de una pantalla o
ítem para moverlo o navegar.
Zoom
Al colocar dos dedos en la pantalla, podrá separarlos para
"acercar" o acercarlos para "alejar".
E - 11
Personalización de la pantalla de Inicio
• Desde la pantalla de Todas las aplicaciones hacia la pantalla de Inicio: Puntee
e l i c o n o d e To d a s l a s a p l i c a c i o n e s
p a r a a b r i r l a p a n t a l l a d e To d a s l a s
aplicaciones, mantenga presionado un icono o widget y arrástrelo lentamente hacia
la posición que desee. Esto facilita cambiar el diseño de su pantalla de Inicio.
• Mover aplicaciones o widgets: Mantenga presionado un icono o widget, arrástrelo
lentamente hacia el borde de la pantalla, la pantalla se cambiará.
• Borrar aplicaciones o widgets: Mantenga presionado un icono o widget, cuando el icono
"X" aparezca en la parte izquierdo de la pantalla, arrastre el icono o widget hacia él.
• Mantenga presionado el fondo de pantalla en su pantalla de Inicio, y seleccione su
fondo de pantalla de la Fondos de pantalla animados, Galería o Papeles tapiz.
Google Now
Para crear una experiencia realmente personalizada, usando su ubicación y la información
de la cuenta de Google personal, use Google Now. Mantenga presionado el icono de
Inicio, y deslícelo hacia el icono de Google Now. Siga las instrucciones para configurar
su experiencia de Google Now.
Búsqueda de voz & Acciones por voz
Encienda Búsqueda de voz o Acciones por voz
Puede iniciar una Búsqueda de voz o una Acción por voz punteando el icono del micrófono
en la esquina superior izquierda de la pantalla de Inicio.
Cuando esté viendo una pantalla de Google Now, no es necesario que toque nada.
Simplemente diga “Google”.
Nota: Para detectar cuando diga “Google” al iniciar la Búsqueda de Voz o las Acciones
por Voz, Google analiza el sonido recogido por el micrófono de la tableta en intervalos de
unos segundos o menos. El sonido se desecha inmediatamente después de analizarlo y
no se almacena en el dispositivo ni se envía a los servidores de Google.
Uso de la Búsqueda de Voz
Después de puntear el icono del micrófono, simplemente diga lo que quiera que Google
busque.
Uso de las Acciones por Voz
Hay muchas acciones que la tableta puede realizar usando las "Acciones por Voz".
Por ejemplo, puede enviar correos electrónicos, configurar alarmas, reproducir una
canción, o navegar hacia un sitio web. Simplemente puntee el icono del micrófono, y
diga lo que quiere que la tableta haga. Mientras habla, la Búsqueda de Voz analiza lo
que dice e inicia la acción.
Si la Búsqueda de Voz no entiendo lo que dice, elabora una lista de los posibles
significados. Simplemente puntee el que desee.
E - 12
Descargue aplicaciones en Google PlayTM
Además de las aplicaciones que vienen instaladas en su tableta, la Play Store proporciona
muchas aplicaciones que puede descargar e instalar en su tableta.
1. En el menú de Aplicaciones, toque el icono de Play Store.
2. Para buscar una aplicación, toque el icono de búsqueda en la esquina superior
derecha, y escriba una palabra clave para iniciar la búsqueda.
3. Toque una aplicación disponible para seleccionarla y, a continuación, toque
instalar para descargar e instalar la aplicación.
Configuración
Configuración le permite configurar la tableta, establecer opciones de aplicaciones, agregar
cuentas, y cambiar otras preferencias.
CONEXIONES INALÁMBRICAS Y REDES
Wi-Fi—Activar o desactivar Wi-Fi, y conectar a una red inalámbrica para que pueda revisar
el correo, buscar en la red o descargar aplicaciones.
Más...—Activar o desactivar Modo de avión o VPN.
DISPOSITIVO
Sonido—Configurar el Volumen, Sonido de notificación predeterminado, y activar o
desactivar Tonos táctiles y Sonido de bloqueo de pantalla.
Pantalla—Configurar el Brillo, Fondo de pantalla, Suspender, Activar protector de
pantalla, Tamaño de fuente y Pantalla inalámbrica.
Configuración de Capturas de pantalla—Configurar el tiempo que se demora en
capturar la pantalla, Configurar la ubicación del almacenamiento de las capturas de
pantalla y activar o desactivar el botón de Mostrar las capturas de pantallas en la barra
de estado.
Espacio de almacenamiento—Ver el espacio disponible en FLASH, ALMACENAMIENTO
INTERNO, TARJETA SD y ALMACENAMIENTO USB /configurar los ítems relacionados.
Batería—Ver estado de la batería.
Aplicaciones—Ver las aplicaciones descargadas y las que están activas. Para ver la
información o desinstalar una aplicación, puntee la aplicación relevante.
PERSONAL
Acceso a la ubicación—Activar o desactivar el Acceso a mi ubicación, Ubicación de red
Wi-Fi y móvil.
Seguridad—Configurar preferencias para PANTALLA DE SEGURIDAD, CONTRASEÑAS,
ADMINISTRACIÓN DEL DISPOSITIVO, y ALMACENAMIENTO DE CREDENCIALES.
Teclado e idioma —Configurar las preferencias para Idioma, TECLADO Y MÉTODOS DE
ENTRADA, VOZ, y MOUSE/TRACKPAD.
Copia de seguridad y restablecer—Establecer las preferencias para CREAR COPIA DE
SEGURIDAD Y RESABLECER, y DATOS PERSONALES.
E - 13
CUENTAS
Puede agregar una cuenta de correo electrónico u otro tipo de cuenta.
SISTEMA
Fecha & hora—Activar o desactivar la Fecha y hora automáticas, y seleccionar
preferencias para la fecha, hora, huso horario, formato de hora, y formato de fecha.
Accesibilidad—Seleccionar las preferencias para SERVICIOS y SISTEMA.
Opciones del desarrollador—Activar o desactivar varias opciones para desarrolladores.
ADVERTENCIA: Es sumamente recomendable que las opciones para desarrolladores
se mantengan Si. Ajustar estas configuraciones puede provocar que el dispositivo y sus
aplicaciones se rompan o se dañen.
Acerca del tablet
Compruebe las actualizaciones del sistema, estado, información legal, etc.
Cuenta de Google
Una cuenta de Google le permite organizar y acceder a su información personal desde
cualquier computadora o dispositivo móvil.
Agregue una cuenta
Puede usar múltiples cuentas de Google y Microsoft Exchange ActiveSync en su tableta.
También puede agregar otros tipos de cuentas, en dependencia de sus aplicaciones. Para
agregar algunas cuentas, es posible que necesite obtener detalles de su administrador de
sistema sobre el servicio al que se conecta la cuenta. Por ejemplo, es posible que necesite
conocer el dominio de la cuenta o la dirección del servidor.
1. Vaya a Configuración > CUENTAS > Agregar cuenta.
2. Puntee el tipo de cuenta que va a agregar. Y, a continuación, siga las instrucciones de la
pantalla.
3. Para quitar una cuenta de Google, vaya a Configuración > CUENTAS > Google
> [nombre de la cuenta] icono de Menú > Eliminar cuenta.
Aplicaciones preinstaladas
Su tableta viene con muchas aplicaciones preinstaladas para permitirle navegar por la
web, enviar y recibir correos electrónicos, y acceder al entretenimiento. Dedique un tiempo
a explorar estas aplicaciones para aprender cómo puede serle más útil su tableta.
E - 14
Información adicional
Resolución de problemas
La tableta muestra un mensaje de error en la red o de servicio
• Cuando está ubicado en lugares con señales muy débiles, su tableta puede perder su
conexión Wi-Fi. Intente moverse a un lugar más cerca del enrutador Wi-Fi.
La respuesta de la pantalla táctil es lenta o incorrecta
Si la respuesta de la pantalla táctil de la tableta es incorrecta, intente lo siguiente:
• Quite cualquier película protectora de la pantalla táctil. La película protectora puede
impedir el reconocimiento de entradas en el dispositivo.
• Asegúrese de que sus dedos estén secos y limpios antes de puntear la pantalla táctil.
• Reinicie la tableta para limpiar cualquier defecto temporal de software.
• Asegúrese de que el software de la tableta ha sido actualizado con la última versión.
La tableta esta bloqueada o aparece algún error serio
• Si la tableta está bloqueada o suspendida, es posible que necesite cerrar la aplicación o
reiniciar la tableta.
• Si la tableta está bloqueada o lenta, mantenga presionado el botón de encendido
durante 8 segundos para reiniciar la tableta.
• Si esto no funciona, introduzca un clip para papeles en el orificio de REINICIO en parte
trasera de la tableta.
La tableta se calienta
• Cuando la utiliza durante mucho tiempo, la tableta se puede sentir caliente al tacto.
Esto es normal y no afectará la vida útil o el rendimiento de la unidad.
Especificaciones
Alimentación: CC IN 5V (funciona con adaptador CA)
Cámara frontal: 0.3 Megapíxeles
Avisos de derechos de autor y marcas registradas
Google, Google Play, YouTube y otras marcas son marcas registradas de Google Inc.
El robot Android es reproducido o modificado a partir del trabajo creado y compartido por
Google y se usa según los términos descritos en la licencia de Creative Commons 3.0
Attribution.
El logotipo CERTIFICADO Wi-Fi es una marca de certificación de Wi-Fi Alliance. La marca
Wi-Fi Protected Setup es una marca de Wi-Fi Alliance.
Les spécii cations et l’apparence extérieure sont sous réserve de changement
sans préavis.
E - 15
Garantía limitada
AVC MULTIMEDIA (“AVC”) ofrece la siguiente garantía limitada, la cual se extiende al
comprador-consumidor original y está limitada al uso no comercial del producto.
Garantía de repuestos y reparaciones por Uno Año
Los productos AVC que se hayan comprado en los Estados Unidos o Canadá tienen una
garantía de uno año a partir de la fecha original de compra en caso de presentar defectos
en los materiales o en su fabricación. Si la unidad no se encuentra en conformidad a esta
garantía, nosotros repararemos el producto usando piezas y productos nuevos y reparados,
según lo estime AVC únicamente.
Durante un período de uno año a partir de la fecha efectiva de la garantía, AVC proporcionará,
cuando sea necesario, mano de obra de reparación para reparar defectos de fabricación en
su centro de reparaciones designado. Para obtener los servicios de la garantía en los Estados
Unidos o Canadá, usted deberá llamar primero a nuestro Centro de Servicio para el Cliente al
1-877-252-6873 o 1-855-475-9646 durante las horas que se indican en el recuadro más abajo.
La decisión de si bien usted está facultado para recibir estos servicios la tomará la oficina de
Respaldo al Cliente de AVC. POR FAVOR NO DEVUELVA ESTA UNIDAD A AVC SIN CONTAR CON AUTORIZACIÓN PREVIA. En los centros designados para reparaciones y por un
período de uno año a contar de la fecha de efectividad de la garantía, AVC utilizará piezas o
productos de recambio nuevos o refabricados al efectuar reparaciones de productos o piezas
defectuosas. Dichos productos o piezas de recambio cuentan con una garantía adicional de
uno año a contar de la fecha del cambio o de la reparación. Para poder hacer las reparaciones
que sean necesarias, el cliente deberá enviar la unidad al centro de reparaciones que se le
indique al contactarse con la oficina de respaldo al cliente. El cliente es responsable por todos
los gastos de envío al centro de reparaciones.
Instrucciones para envolver la unidad y para su envío
Cuando usted envíe el producto al centro de reparaciones de AVC, usted debe utilizar
la caja de cartón y el material de embalaje original o un tipo de embalaje equivalente,
según lo establezca AVC.
Su responsabilidad
(1) Usted debe guardar la boleta de venta original como prueba de su compra.
(2) Estas garantías sólo son efectivas si el producto ha sido comprado y puesto a funcionar
en Estados Unidos o Canadá.
(3) Las garantías sólo se extienden en caso de materiales o de fabricación defectuosa y no
se extiende a productos o piezas que se hayan perdido o tirado a la basura, ni a productos o piezas dañadas a causa del mal uso de la unidad, de accidentes, del funcionamiento o mantenimiento inapropiados del equipo, así como tampoco en caso de no
haber seguido las instrucciones que acompañan este producto, o de haber modificado
o alterado el producto sin la autorización de AVC, o de haber quitado o cambiado el
número de serie de las piezas o del producto.
Fuera de la Garantía
En caso que su producto necesite ser reparado y que el período de garantía ya
haya expirado, sírvase contactarse con el Centro de Ayuda al Cliente en el fono
1-877-252-6873 o 1-855-475-9646, o www.RCAtablets.com
Hora: Lunes–Jueves: 9am–7pm, Viernes: 9am–5pm, Sábado: 9am–MEDIODÍA
Tiempo del Este.
Importante:
Usted se hace responsable de cualesquier gastos por razones de transporte, envío
o seguro relacionados con la devolución del producto al Centro de Devoluciones de
Productos.
E - 16
Todas las garantías implícitas según la ley de un estado, incluidas las garantías implícitas
de comercialización y de aptitud para un propósito específico, están limitadas expresamente
a la duración de la garantía limitada expuesta más arriba. Con la excepción de cualesquiera
garantías implícitas según la ley de un estado, que por la presente quedan limitadas, la garantía
precedente tiene carácter de exclusiva y predomina sobre las demás garantías, cauciones,
acuerdos y obligaciones similares del vendedor o del fabricante con respecto a la reparación
o al reemplazo de cualesquier partes del aparato. AVC en ningún caso se hará responsable
de daños fortuitos ni de daños resultantes de cualquier otra situación que no sea la indicada
en la garantía limitada de este aparato.
Ninguna persona, agente, distribuidor, comerciante ni empresa está autorizada para cambiar,
modificar o extender los términos de estas garantías en ninguna manera, cualquiera que
ésta fuese. El tiempo dentro del cual se debe iniciar una acción para hacer cumplir cualquier
obligación de AVC que surja en virtud de la garantía o de cualquier estatuto o ley de Estados
Unidos o Canadá o de cualesquier de sus estados, queda aquí limitado a uno año a contar
de la fecha de adquisición del producto. Esta restricción no se aplica a las garantías implícitas
planteadas en virtud de la ley de un estado.
Esta garantía le brinda derechos legales específicos y puede que usted también tenga otros
derechos que pueden variar, dependiendo del estado. Algunos estados no ponen límite
en cuanto a la duración de una garantía implícita, a cuándo se puede tomar acción, o a la
exclusión o limitación de los daños fortuitos o consiguientes, de modo que es posible que las
disposiciones anteriores no sean aplicables en su caso.
Para mayor información acerca de otros productos y servicios, sírvase contactar nuestra página
de internet en la siguiente dirección: www.RCAtablets.com
Importante: Guarde su “Boleta de venta” como prueba de su compra.
N° de modelo..................................................................................................
Nombre del producto......................................................................................
Tipo de aparato...............................................................................................
N° de serie......................................................................................................
N° de recibo....................................................................................................
Fecha de compra............................................................................................
Nombre del comerciante.................................................................................
PARA RESPALDO TÉCNICO, SERVICIO Y REPARACIÓN, POR FAVOR VISTITA
www.RCAtablets.com
Les spécifications et l’apparence extérieure sont sous réserve de changement sans préavis.
© 2013 AVC MULTIMEDIA
E - 17
Printed in China
Impreso en China
811-937891W010